contentscd1.edb.hkedcity.net/cd/science/laboratory/safety/saf… · · 2004-09-13remind students...
TRANSCRIPT
Contents
Page
Preface
Lessons on Laboratory Safety 1
Exemplars of Learning Activities
1 Laboratory Safety Rules 4
2 Eye Protection 7
3 Safety Information on Chemicals 10
4 Risk Assessment 12
5 What if a Laboratory Accident Happens? 16
Preface Safety is always the prime concern in conducting practical work and investigations in science. In order to maintain a high standard of laboratory safety, students should bear in mind that knowing and following safe practices is a part of learning in science. To promote students' awareness of laboratory safety, schools should deliver lessons on laboratory safety, particularly at the beginning of each school year, to remind students the importance of laboratory safety, and the general safety practice and precautions in the laboratory. Well-entrenched safety awareness and practice will keep the number of laboratory accidents to a minimum. In this booklet, possible strategies in conducting safety lessons and exemplars of learning activities on laboratory safety are included as a reference for science teachers to plan and design lessons on laboratory safety. The activities aim at involving students as active learners in reflecting and discussing safety issues in real-life context, rather than just being told what to do, thereby developing a stronger sense of personal responsibility in respect of laboratory safety among students. The activities can be readily carried out and completed in 1-2 teaching periods. In addition to the learning activities suggested in this booklet, teachers can make use of the enclosed interactive learning package entitled "Safety in Exploring Science" when conducting lessons on laboratory safety. We would like to acknowledge the following persons for their valuable comments and support in designing and trying out the activities in this booklet. Dr Albert C Cheung (City University of Hong Kong) Ms Chu Suk Ching (True Light Middle School of Hong Kong) Dr Joseph K Kwan (Hong Kong University of Science & Technology) Mr Lee Charn Kau (HKTA Ching Chung Secondary School) Mr Leung Kar Yau (retired) Mr Lo Kam Cheong (CCC Kei Heep Secondary School) Mr Mok Ming Wai (United Christian College) Mr Pun Kwong Cheung (SKH Tsang Shiu Tim Secondary School) Science Education Section Education and Manpower Bureau June 2004
1
Lessons on Laboratory Safety For the purpose of arousing students’ awareness of the importance of laboratory safety and to equip them with the knowledge thereon, each science class should at least dedicate one lesson to laboratory safety at the beginning of each school year. The general objectives of lessons on laboratory safety are:
(i) to be aware of the danger of performing science experiments without proper knowledge or teachers ' supervision;
(ii) to be aware of the need to take proper precautions when working in a laboratory;
(iii) to have knowledge on the proper use of various laboratory safety facilities and personal protective equipment;
(iv) to be aware of mistakes commonly made in a laboratory ;
(v) to be aware of the need to formulate and observe laboratory rules, through which the concept of legislation, law and order is developed;
(vi) to know the proper actions to be taken in case of a laboratory accident;
(vii) to have basic knowledge on first aid in a laboratory;
(viii) to be aware of the need to develop a sense of responsibility to oneself and others;
(ix) to show consideration for the safety of others when working in a laboratory;
(x) to be aware of the necessity of cooperating with fellow students, sharing responsibility and contributing to group work;
(xi) to know how to evacuate a laboratory in a safe and orderly manner;
(xii) to recognise the safety facilities and equipment available in a laboratory;
(xiii) to understand the meaning of various hazard warning symbols and the precautions to be taken in handling hazardous chemicals; and
(xiv) to understand and apply the concept of risk assessment on science experiments.
Various teaching strategies and activities can be applied to achieve the above objectives. The table on the next page gives some suggestions and teachers may tailor the strategies according to the needs and levels of their students.
2
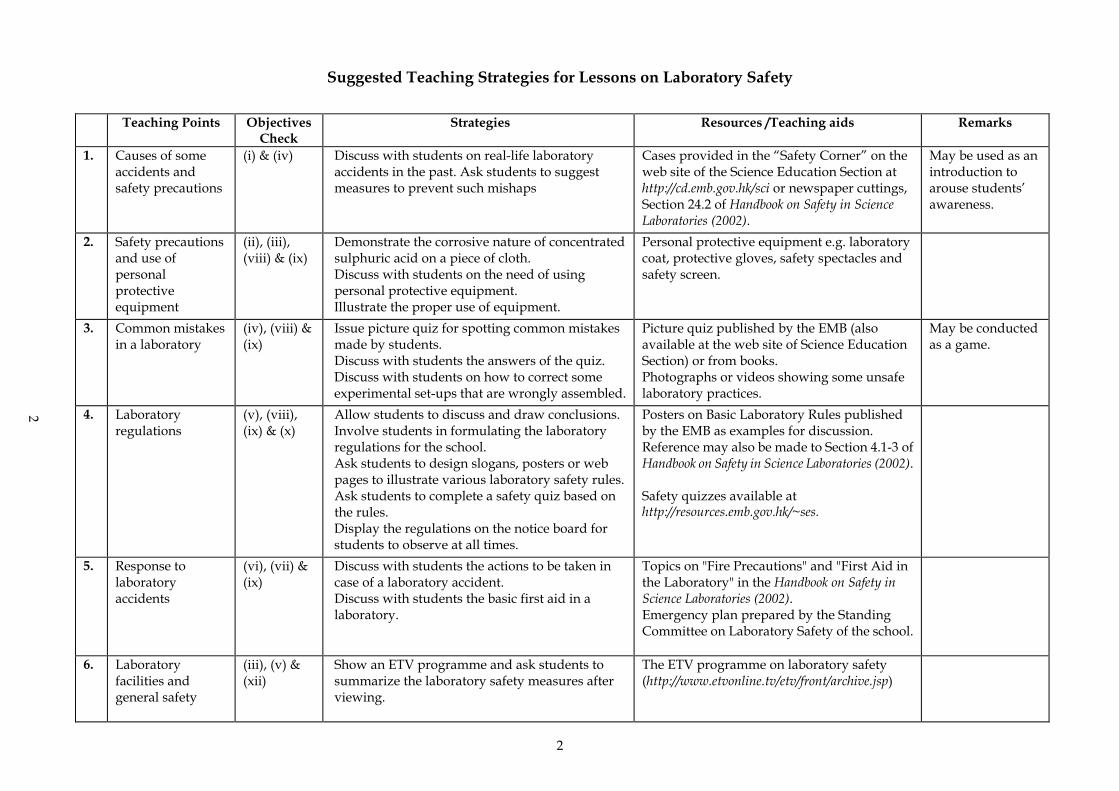
Suggested Teaching Strategies for Lessons on Laboratory Safety
Teaching Points Objectives
Check Strategies Resources /Teaching aids Remarks
1. Causes of some accidents and safety precautions
(i) & (iv)
Discuss with students on real-life laboratory accidents in the past. Ask students to suggest measures to prevent such mishaps
Cases provided in the “Safety Corner” on the web site of the Science Education Section at http://cd.emb.gov.hk/sci or newspaper cuttings, Section 24.2 of Handbook on Safety in Science Laboratories (2002).
May be used as an introduction to arouse students’ awareness.
2. Safety precautions and use of personal protective equipment
(ii), (iii), (viii) & (ix)
Demonstrate the corrosive nature of concentrated sulphuric acid on a piece of cloth. Discuss with students on the need of using personal protective equipment. Illustrate the proper use of equipment.
Personal protective equipment e.g. laboratory coat, protective gloves, safety spectacles and safety screen.
3. Common mistakes in a laboratory
(iv), (viii) & (ix)
Issue picture quiz for spotting common mistakes made by students. Discuss with students the answers of the quiz. Discuss with students on how to correct some experimental set-ups that are wrongly assembled.
Picture quiz published by the EMB (also available at the web site of Science Education Section) or from books. Photographs or videos showing some unsafe laboratory practices.
May be conducted as a game.
4. Laboratory regulations
(v), (viii), (ix) & (x)
Allow students to discuss and draw conclusions. Involve students in formulating the laboratory regulations for the school. Ask students to design slogans, posters or web pages to illustrate various laboratory safety rules. Ask students to complete a safety quiz based on the rules. Display the regulations on the notice board for students to observe at all times.
Posters on Basic Laboratory Rules published by the EMB as examples for discussion. Reference may also be made to Section 4.1-3 of Handbook on Safety in Science Laboratories (2002). Safety quizzes available at http://resources.emb.gov.hk/~ses.
5. Response to laboratory accidents
(vi), (vii) & (ix)
Discuss with students the actions to be taken in case of a laboratory accident. Discuss with students the basic first aid in a laboratory.
Topics on "Fire Precautions" and "First Aid in the Laboratory" in the Handbook on Safety in Science Laboratories (2002). Emergency plan prepared by the Standing Committee on Laboratory Safety of the school.
6. Laboratory facilities and general safety
(iii), (v) & (xii)
Show an ETV programme and ask students to summarize the laboratory safety measures after viewing.
The ETV programme on laboratory safety (http://www.etvonline.tv/etv/front/archive.jsp)
2
3
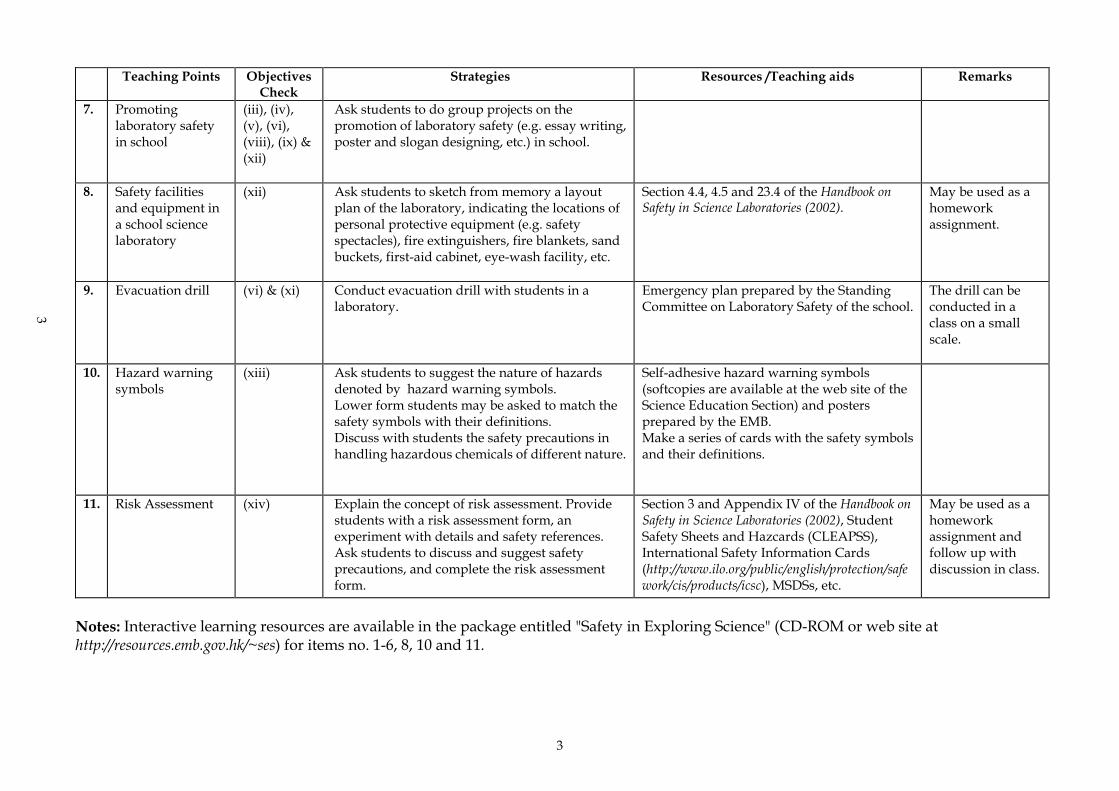
Teaching Points Objectives Check
Strategies Resources /Teaching aids Remarks
7. Promoting laboratory safety in school
(iii), (iv), (v), (vi), (viii), (ix) & (xii)
Ask students to do group projects on the promotion of laboratory safety (e.g. essay writing, poster and slogan designing, etc.) in school.
8. Safety facilities and equipment in a school science laboratory
(xii) Ask students to sketch from memory a layout plan of the laboratory, indicating the locations of personal protective equipment (e.g. safety spectacles), fire extinguishers, fire blankets, sand buckets, first-aid cabinet, eye-wash facility, etc.
Section 4.4, 4.5 and 23.4 of the Handbook on Safety in Science Laboratories (2002).
May be used as a homework assignment.
9. Evacuation drill
(vi) & (xi) Conduct evacuation drill with students in a laboratory.
Emergency plan prepared by the Standing Committee on Laboratory Safety of the school.
The drill can be conducted in a class on a small scale.
10. Hazard warning symbols
(xiii) Ask students to suggest the nature of hazards denoted by hazard warning symbols. Lower form students may be asked to match the safety symbols with their definitions. Discuss with students the safety precautions in handling hazardous chemicals of different nature.
Self-adhesive hazard warning symbols (softcopies are available at the web site of the Science Education Section) and posters prepared by the EMB. Make a series of cards with the safety symbols and their definitions.
11. Risk Assessment (xiv) Explain the concept of risk assessment. Provide students with a risk assessment form, an experiment with details and safety references. Ask students to discuss and suggest safety precautions, and complete the risk assessment form.
Section 3 and Appendix IV of the Handbook on Safety in Science Laboratories (2002), Student Safety Sheets and Hazcards (CLEAPSS), International Safety Information Cards (http://www.ilo.org/public/english/protection/safework/cis/products/icsc), MSDSs, etc.
May be used as a homework assignment and follow up with discussion in class.
Notes: Interactive learning resources are available in the package entitled "Safety in Exploring Science" (CD-ROM or web site at http://resources.emb.gov.hk/~ses) for items no. 1-6, 8, 10 and 11.
3
4
Laboratory Safety Rules Teachers’ Guide
Objectives Upon completion of this activity, students should be aware of the need to • formulate and observe laboratory rules • develop a sense of responsibility to oneself and others • take proper precautions when working in a laboratory Introduction Teaching students to observe laboratory safety rules at the beginning of each school year is conducive to the establishment of personal responsibility and helps students realize the importance of behaving properly in a laboratory. Procedures 1. Discuss with students why safety rules should be followed when working in a
laboratory.
2. Ask students to discuss in groups of 4-5 and write down the rules that they think should be observed in a laboratory.
3. Invite students to report the results of their discussion (with the help of a projector or visualizer if available).
4. Summarize the safety rules that should be observed in a laboratory and explain the consequence of unsafe behaviour.
5. Ask students to sign a “safety contract” to make them realize their responsibility in respect of laboratory safety. Rules suggested by students that are not covered in the contract can be added.
6. Display the safety rules on a notice board to remind students to observe the rules at all times.
Remarks • Instead of providing a long list of safety rules, the contract may include only a
number of important points that are relevant to your students. Teachers may refer to the safety rules available on reference web sites in customizing the safety contract.
• The safety contract is to be kept in the students’ practical workbook or exercise book as a reminder of the safety rules. Alternatively, students may sign a large safety contract which can be displayed on the notice boards in the laboratory. Copies of laboratory safety rules can be distributed to students.
• To further encourage students to communicate their understanding of various safety rules, each student can create a simple web page on a given safety rule. The web pages can be uploaded to a class web site for sharing. A sample of the web site is available at http://www.mindspring.com/~mfallonsp/safety_rules/index.html.
• Senior form students may have already been familiar with the safety rules, thus procedures 2-5 may be replaced by a safety quiz or a group discussion about
5
laboratory accidents.
References 1. Anne B. Davidson (1999), Contracting for Safety, The Science Teachers, Sept, pp
36-39 2. http://www.tenet.edu/teks/science/stacks/safety/safety_manual.html 3. http://teachers.sduhsd.k12.ca.us/esmith/laboratory.htm 4. http://www.flinnsci.com/homepage/safe/contract.html 5. http://www.mindspring.com/~mfallonsp/safety_rules/index.html 6. http://www.chem.vt.edu/RVGS/ACT/lab/safety_rules.html 7. http://www.education-world.com/a_tsl/archives/02-1/lesson028.shtml
6
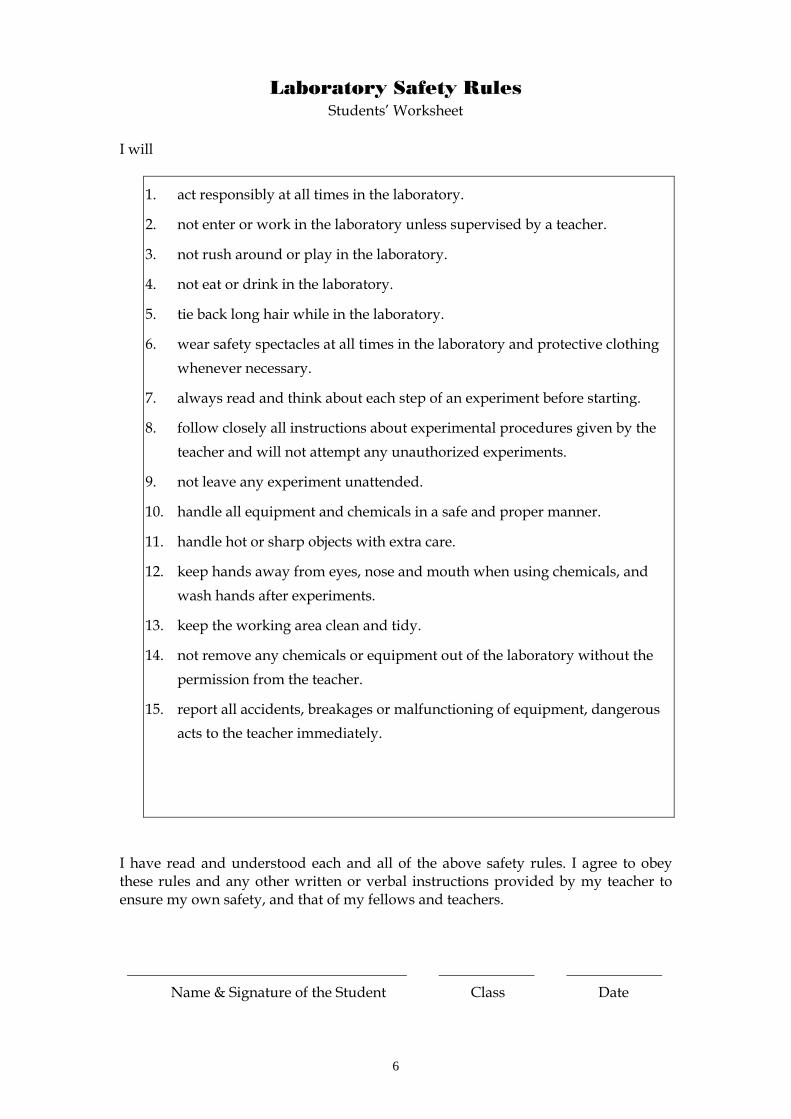
Laboratory Safety Rules Students’ Worksheet
I will
1. act responsibly at all times in the laboratory.
2. not enter or work in the laboratory unless supervised by a teacher.
3. not rush around or play in the laboratory.
4. not eat or drink in the laboratory.
5. tie back long hair while in the laboratory.
6. wear safety spectacles at all times in the laboratory and protective clothing
whenever necessary.
7. always read and think about each step of an experiment before starting.
8. follow closely all instructions about experimental procedures given by the
teacher and will not attempt any unauthorized experiments.
9. not leave any experiment unattended.
10. handle all equipment and chemicals in a safe and proper manner.
11. handle hot or sharp objects with extra care.
12. keep hands away from eyes, nose and mouth when using chemicals, and
wash hands after experiments.
13. keep the working area clean and tidy.
14. not remove any chemicals or equipment out of the laboratory without the
permission from the teacher.
15. report all accidents, breakages or malfunctioning of equipment, dangerous
acts to the teacher immediately.
I have read and understood each and all of the above safety rules. I agree to obey these rules and any other written or verbal instructions provided by my teacher to ensure my own safety, and that of my fellows and teachers.
Name & Signature of the Student Class Date
7
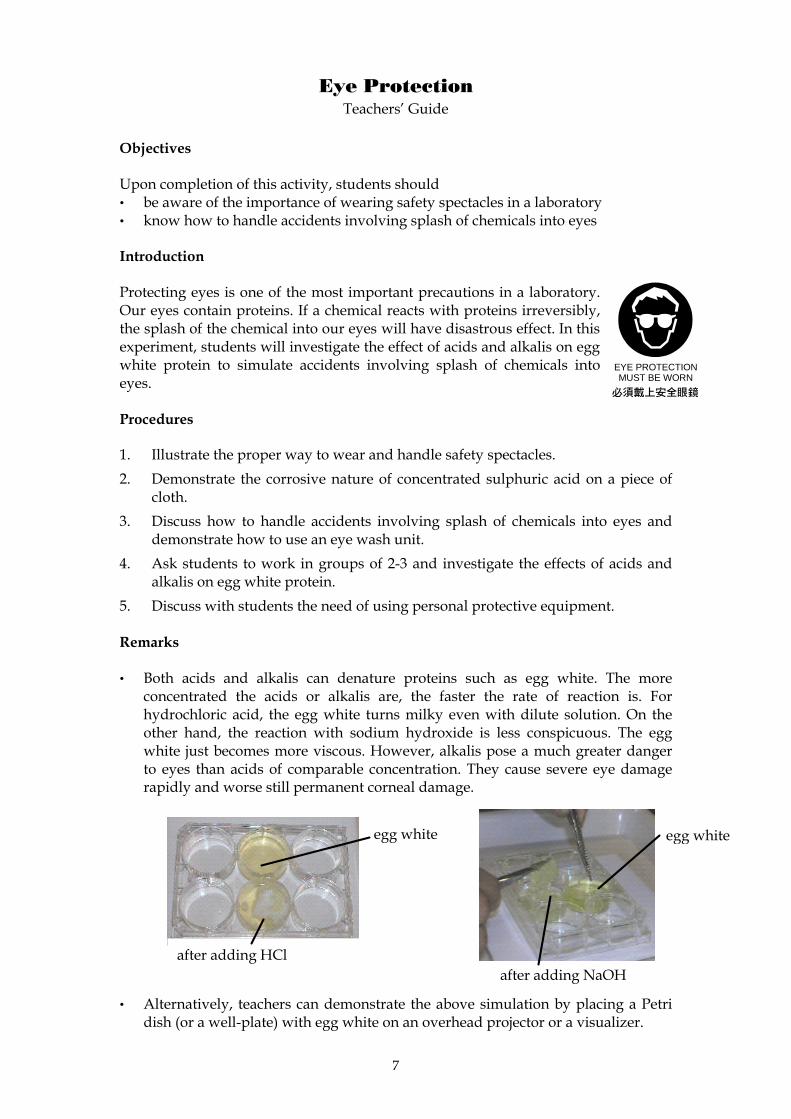
Eye Protection Teachers’ Guide
Objectives Upon completion of this activity, students should • be aware of the importance of wearing safety spectacles in a laboratory • know how to handle accidents involving splash of chemicals into eyes Introduction Protecting eyes is one of the most important precautions in a laboratory. Our eyes contain proteins. If a chemical reacts with proteins irreversibly, the splash of the chemical into our eyes will have disastrous effect. In this experiment, students will investigate the effect of acids and alkalis on egg white protein to simulate accidents involving splash of chemicals into eyes. Procedures 1. Illustrate the proper way to wear and handle safety spectacles.
2. Demonstrate the corrosive nature of concentrated sulphuric acid on a piece of cloth.
3. Discuss how to handle accidents involving splash of chemicals into eyes and demonstrate how to use an eye wash unit.
4. Ask students to work in groups of 2-3 and investigate the effects of acids and alkalis on egg white protein.
5. Discuss with students the need of using personal protective equipment. Remarks • Both acids and alkalis can denature proteins such as egg white. The more
concentrated the acids or alkalis are, the faster the rate of reaction is. For hydrochloric acid, the egg white turns milky even with dilute solution. On the other hand, the reaction with sodium hydroxide is less conspicuous. The egg white just becomes more viscous. However, alkalis pose a much greater danger to eyes than acids of comparable concentration. They cause severe eye damage rapidly and worse still permanent corneal damage.
• Alternatively, teachers can demonstrate the above simulation by placing a Petri
dish (or a well-plate) with egg white on an overhead projector or a visualizer.
egg white
after adding HCl after adding NaOH
egg white
EYE PROTECTIONMUST BE WORN
8
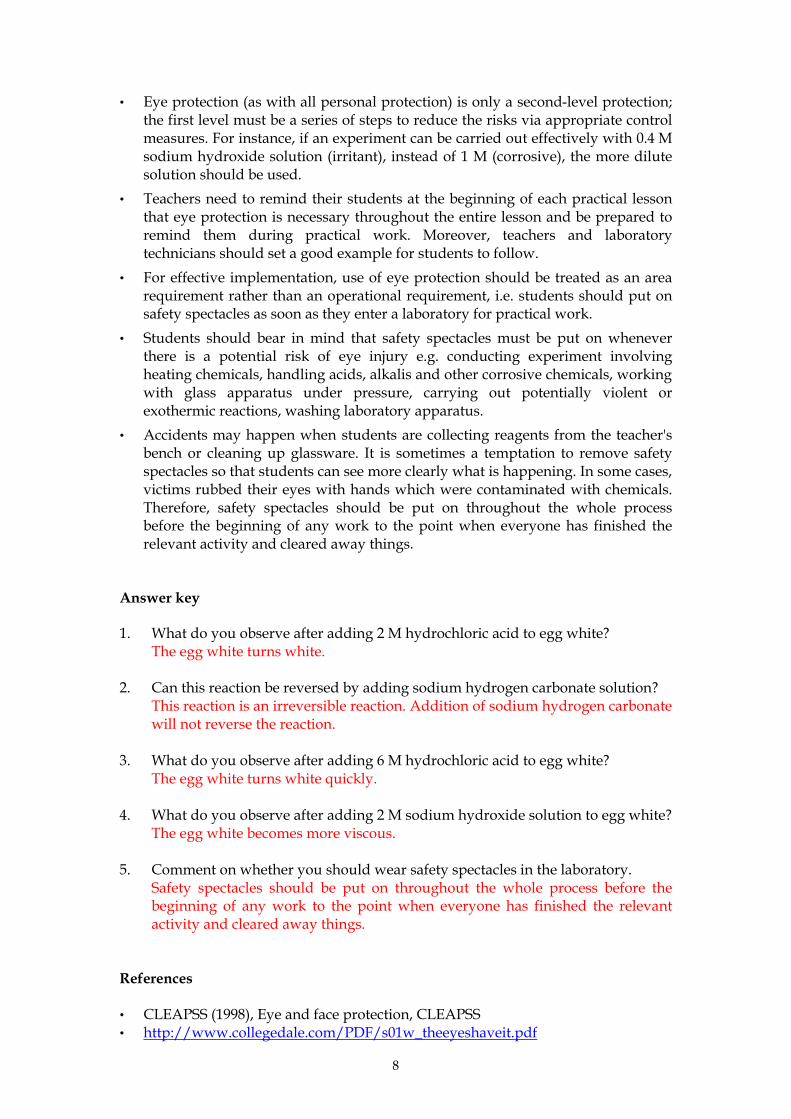
• Eye protection (as with all personal protection) is only a second-level protection;
the first level must be a series of steps to reduce the risks via appropriate control measures. For instance, if an experiment can be carried out effectively with 0.4 M sodium hydroxide solution (irritant), instead of 1 M (corrosive), the more dilute solution should be used.
• Teachers need to remind their students at the beginning of each practical lesson that eye protection is necessary throughout the entire lesson and be prepared to remind them during practical work. Moreover, teachers and laboratory technicians should set a good example for students to follow.
• For effective implementation, use of eye protection should be treated as an area requirement rather than an operational requirement, i.e. students should put on safety spectacles as soon as they enter a laboratory for practical work.
• Students should bear in mind that safety spectacles must be put on whenever there is a potential risk of eye injury e.g. conducting experiment involving heating chemicals, handling acids, alkalis and other corrosive chemicals, working with glass apparatus under pressure, carrying out potentially violent or exothermic reactions, washing laboratory apparatus.
• Accidents may happen when students are collecting reagents from the teacher's bench or cleaning up glassware. It is sometimes a temptation to remove safety spectacles so that students can see more clearly what is happening. In some cases, victims rubbed their eyes with hands which were contaminated with chemicals. Therefore, safety spectacles should be put on throughout the whole process before the beginning of any work to the point when everyone has finished the relevant activity and cleared away things.
Answer key 1. What do you observe after adding 2 M hydrochloric acid to egg white?
The egg white turns white.
2. Can this reaction be reversed by adding sodium hydrogen carbonate solution? This reaction is an irreversible reaction. Addition of sodium hydrogen carbonate will not reverse the reaction.
3. What do you observe after adding 6 M hydrochloric acid to egg white? The egg white turns white quickly.
4. What do you observe after adding 2 M sodium hydroxide solution to egg white? The egg white becomes more viscous.
5. Comment on whether you should wear safety spectacles in the laboratory. Safety spectacles should be put on throughout the whole process before the beginning of any work to the point when everyone has finished the relevant activity and cleared away things.
References • CLEAPSS (1998), Eye and face protection, CLEAPSS • http://www.collegedale.com/PDF/s01w_theeyeshaveit.pdf
9
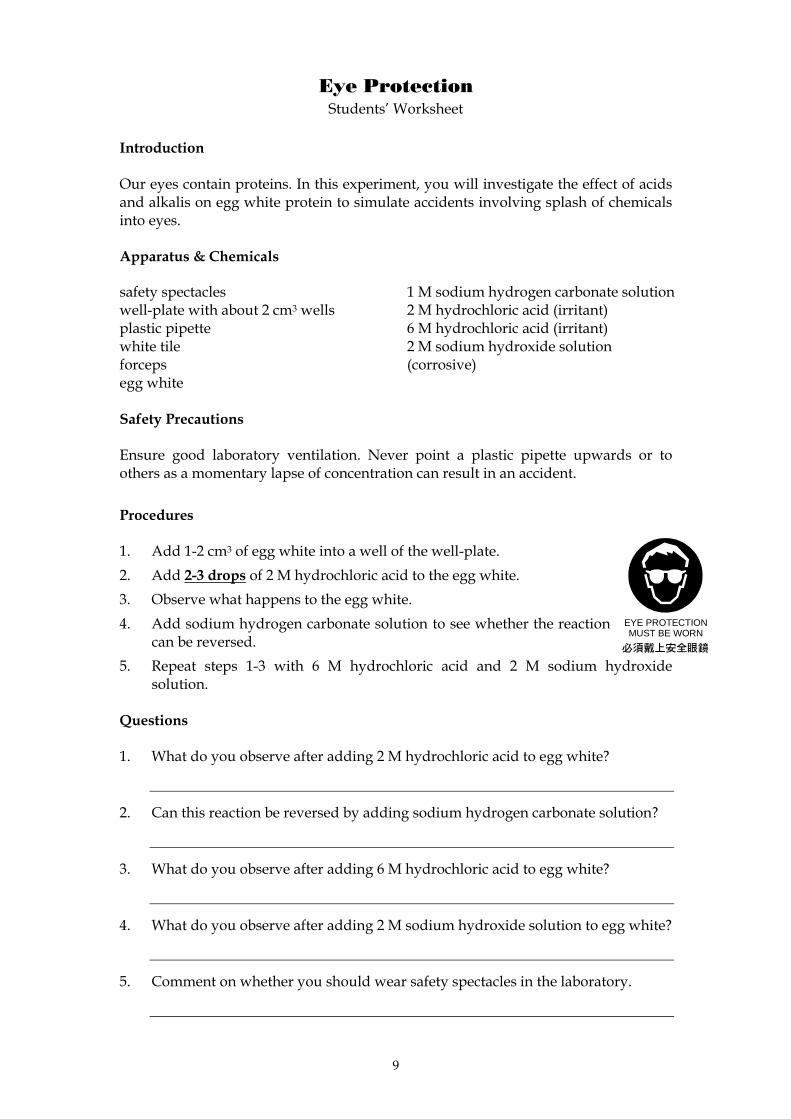
Eye Protection Students’ Worksheet
Introduction Our eyes contain proteins. In this experiment, you will investigate the effect of acids and alkalis on egg white protein to simulate accidents involving splash of chemicals into eyes. Apparatus & Chemicals safety spectacles well-plate with about 2 cm3 wells plastic pipette white tile forceps egg white
1 M sodium hydrogen carbonate solution 2 M hydrochloric acid (irritant) 6 M hydrochloric acid (irritant) 2 M sodium hydroxide solution (corrosive)
Safety Precautions Ensure good laboratory ventilation. Never point a plastic pipette upwards or to others as a momentary lapse of concentration can result in an accident. Procedures 1. Add 1-2 cm3 of egg white into a well of the well-plate.
2. Add 2-3 drops of 2 M hydrochloric acid to the egg white.
3. Observe what happens to the egg white.
4. Add sodium hydrogen carbonate solution to see whether the reaction can be reversed.
5. Repeat steps 1-3 with 6 M hydrochloric acid and 2 M sodium hydroxide solution.
Questions 1. What do you observe after adding 2 M hydrochloric acid to egg white?
2. Can this reaction be reversed by adding sodium hydrogen carbonate solution?
3. What do you observe after adding 6 M hydrochloric acid to egg white?
4. What do you observe after adding 2 M sodium hydroxide solution to egg white?
5. Comment on whether you should wear safety spectacles in the laboratory.
EYE PROTECTIONMUST BE WORN
10
Safety Information of Chemicals Teachers’ Guide
Objectives Upon completion of this activity, students should be able to locate and interpret the safety information of hazardous chemicals available on the Internet. Introduction Knowing how to locate and understand safety information of a chemical is critical to working safely in a laboratory. This activity helps students locate and interpret essential safety information of chemicals. Procedures 1. Provide students with a copy of the safety information (e.g. Material safety data
sheet (MSDS)) of a chemical. Brief students on how the information is organised.
2. Tell students where to find safety information available on the Internet from reliable sources. To save time in retyping the URLs of useful web sites, links can be put together in a shared document file on the intranet.
3. Ask students to search for the chemical formulae, safety symbol(s), risks, safety precautions and disposal methods of certain chemicals (e.g. NaOH, H2SO4, HCl) which are commonly used in their practical work.
4. Ask students to write down their results and the source of information in the worksheet provided.
5. Discuss their findings with the class. Remarks • The activity can be carried out in a Multimedia Learning Centre or a computer
room where 2 students may share one computer. The activity can also be assigned as homework.
• MSDSs provide important information about chemicals, including their hazardous nature, handling procedures, first-aid measures and emergency procedures, for the reference of laboratory users. They are usually available from suppliers of chemicals or on the Internet.
• MSDSs were originally designed for health and safety professions and students may not be able to understand all the information provided. Alternatively, teachers may use simplified references such as Student Safety Sheets (CLEAPSS), International Safety Information Cards (International Labour Organization) and Laboratory Chemical Safety Summaries (Howard Hughes Medical Institute).
• Several students may search for information about same chemicals so that they can compare their results. The chemicals covered should be limited in number so that class discussion would not be too time-consuming.
References • http://bluebonnet.bio.swt.edu/Safety/MSDS%20SG.html • CLEAPSS (2003), Hazcards 1995 Edition (updated 2003), CLEAPSS
11
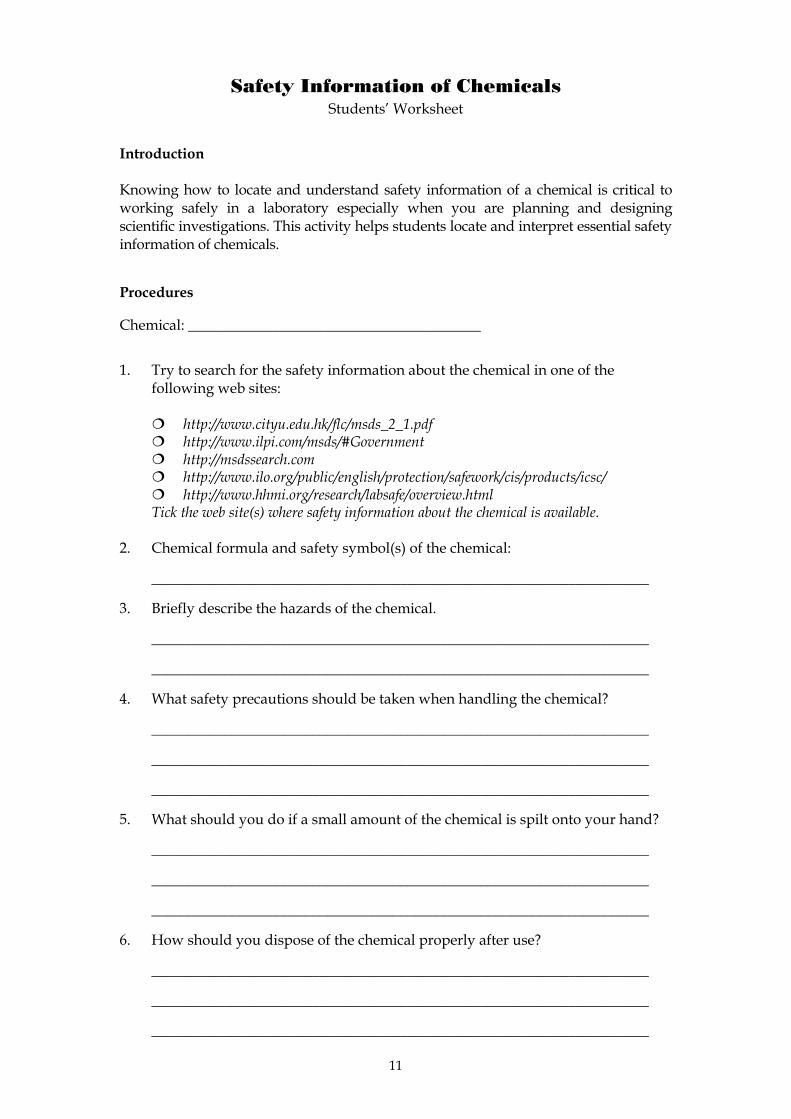
Safety Information of Chemicals Students’ Worksheet
Introduction Knowing how to locate and understand safety information of a chemical is critical to working safely in a laboratory especially when you are planning and designing scientific investigations. This activity helps students locate and interpret essential safety information of chemicals.
Procedures
Chemical: ________________________________________
1. Try to search for the safety information about the chemical in one of the
following web sites:
¦ http://www.cityu.edu.hk/flc/msds_2_1.pdf ¦ http://www.ilpi.com/msds/#Government ¦ http://msdssearch.com ¦ http://www.ilo.org/public/english/protection/safework/cis/products/icsc/ ¦ http://www.hhmi.org/research/labsafe/overview.html Tick the web site(s) where safety information about the chemical is available.
2. Chemical formula and safety symbol(s) of the chemical:
____________________________________________________________________
3. Briefly describe the hazards of the chemical.
____________________________________________________________________
____________________________________________________________________
4. What safety precautions should be taken when handling the chemical?
____________________________________________________________________
____________________________________________________________________
____________________________________________________________________
5. What should you do if a small amount of the chemical is spilt onto your hand?
____________________________________________________________________
____________________________________________________________________
____________________________________________________________________
6. How should you dispose of the chemical properly after use?
____________________________________________________________________
____________________________________________________________________
____________________________________________________________________
12
Risk Assessment - think thrice before you act
Teachers’ Guide Objectives Upon completion of this activity, students should be • aware of the importance of safety in planning scientific investigations • able to understand and apply the concept of risk assessment • able to identify hazards and take precautions to minimise the risks Introduction All practical work must be carried out keeping safety in mind to minimise the risk of harming oneself and others. Risk assessment is a systematic way of identifying hazards involved in an activity, assessing how likely the hazards will actually cause harm and deciding the preventive measures to be taken to control these risks. This activity will involve students as active learners to think about hazards and risks associated with practical work in a systematic manner. Procedures 1. Explain why risk assessment is important, especially when planning scientific
investigations.
2. Provide students with a copy of the procedures of an experiment.
3. Ask students to think about the risks involved in the experiment (by considering the chemicals and equipment used, and the experiment procedures involved) and how to reduce the risks to an acceptable level. Remind students that there are a number of ways to minimise risks in science experiments and wearing personal protective equipment is only the last resort to be considered.
4. Ask students to complete the risk assessment form provided. The hazardous nature of uncommon chemicals can be provided to students.
5. Discuss with students their risk assessments before conducting the experiment.
Remarks • The part on risk assessment can be assigned as homework and to be followed up
with discussion in class. Students may search for relevant safety information on the Internet or consult appropriate references.
• Risk assessment is applicable to all kinds of science experiments. Teachers should select an experiment that is not too complicated for the students to understand the concept of risk assessment. After students become familiar with the basic steps in carrying out a risk assessment, they can apply the concept in planning their own experiments. However, teachers must check students’ risk assessments before they start any practical work.
13
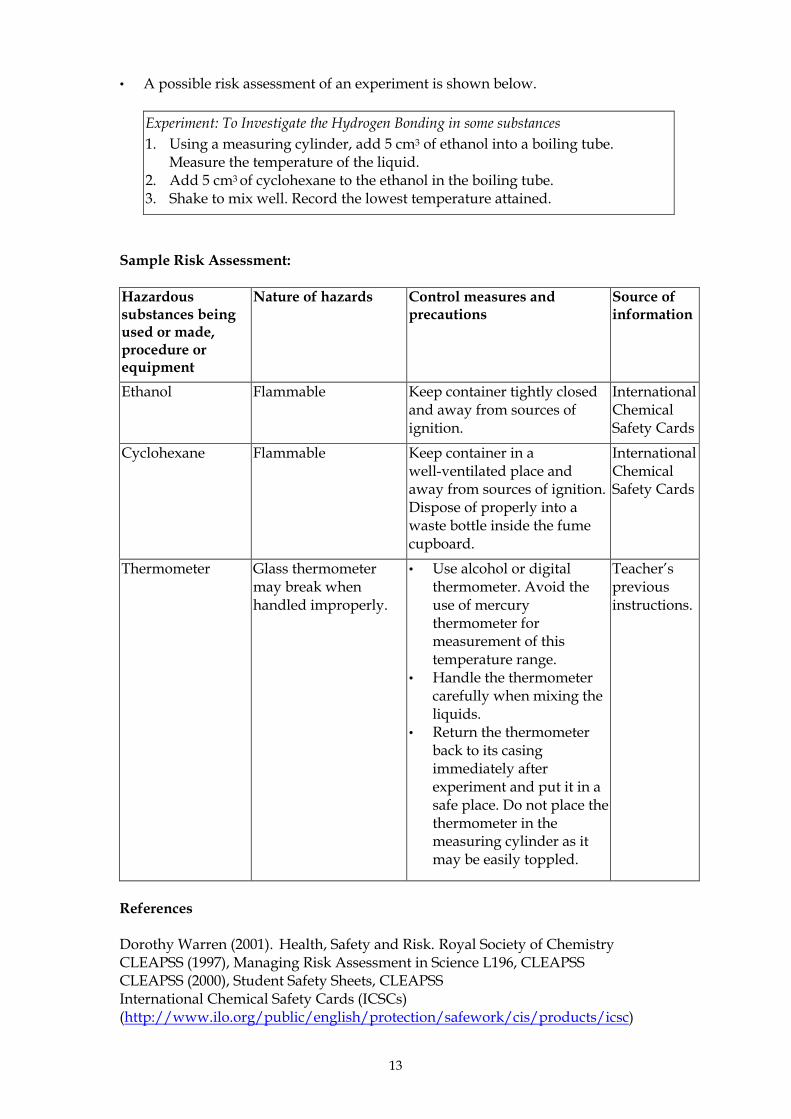
• A possible risk assessment of an experiment is shown below.
Experiment: To Investigate the Hydrogen Bonding in some substances 1. Using a measuring cylinder, add 5 cm3 of ethanol into a boiling tube.
Measure the temperature of the liquid. 2. Add 5 cm3 of cyclohexane to the ethanol in the boiling tube. 3. Shake to mix well. Record the lowest temperature attained.
Sample Risk Assessment: Hazardous substances being used or made, procedure or equipment
Nature of hazards Control measures and precautions
Source of information
Ethanol Flammable Keep container tightly closed and away from sources of ignition.
International Chemical Safety Cards
Cyclohexane Flammable Keep container in a well-ventilated place and away from sources of ignition. Dispose of properly into a waste bottle inside the fume cupboard.
International Chemical Safety Cards
Thermometer Glass thermometer may break when handled improperly.
• Use alcohol or digital thermometer. Avoid the use of mercury thermometer for measurement of this temperature range.
• Handle the thermometer carefully when mixing the liquids.
• Return the thermometer back to its casing immediately after experiment and put it in a safe place. Do not place the thermometer in the measuring cylinder as it may be easily toppled.
Teacher’s previous instructions.
References Dorothy Warren (2001). Health, Safety and Risk. Royal Society of Chemistry CLEAPSS (1997), Managing Risk Assessment in Science L196, CLEAPSS CLEAPSS (2000), Student Safety Sheets, CLEAPSS International Chemical Safety Cards (ICSCs) (http://www.ilo.org/public/english/protection/safework/cis/products/icsc)
14
Risk Assessment - think thrice before you act
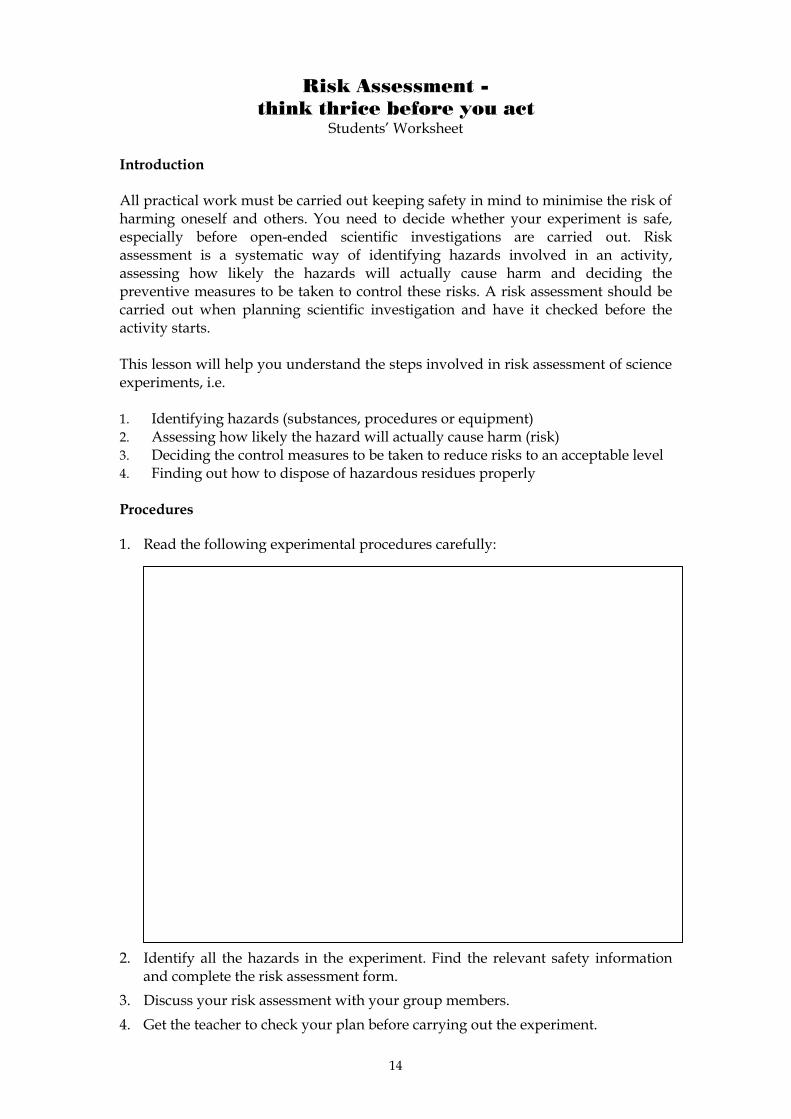
Students’ Worksheet Introduction All practical work must be carried out keeping safety in mind to minimise the risk of harming oneself and others. You need to decide whether your experiment is safe, especially before open-ended scientific investigations are carried out. Risk assessment is a systematic way of identifying hazards involved in an activity, assessing how likely the hazards will actually cause harm and deciding the preventive measures to be taken to control these risks. A risk assessment should be carried out when planning scientific investigation and have it checked before the activity starts. This lesson will help you understand the steps involved in risk assessment of science experiments, i.e. 1. Identifying hazards (substances, procedures or equipment) 2. Assessing how likely the hazard will actually cause harm (risk) 3. Deciding the control measures to be taken to reduce risks to an acceptable level 4. Finding out how to dispose of hazardous residues properly Procedures 1. Read the following experimental procedures carefully:
2. Identify all the hazards in the experiment. Find the relevant safety information
and complete the risk assessment form.
3. Discuss your risk assessment with your group members.
4. Get the teacher to check your plan before carrying out the experiment.
15
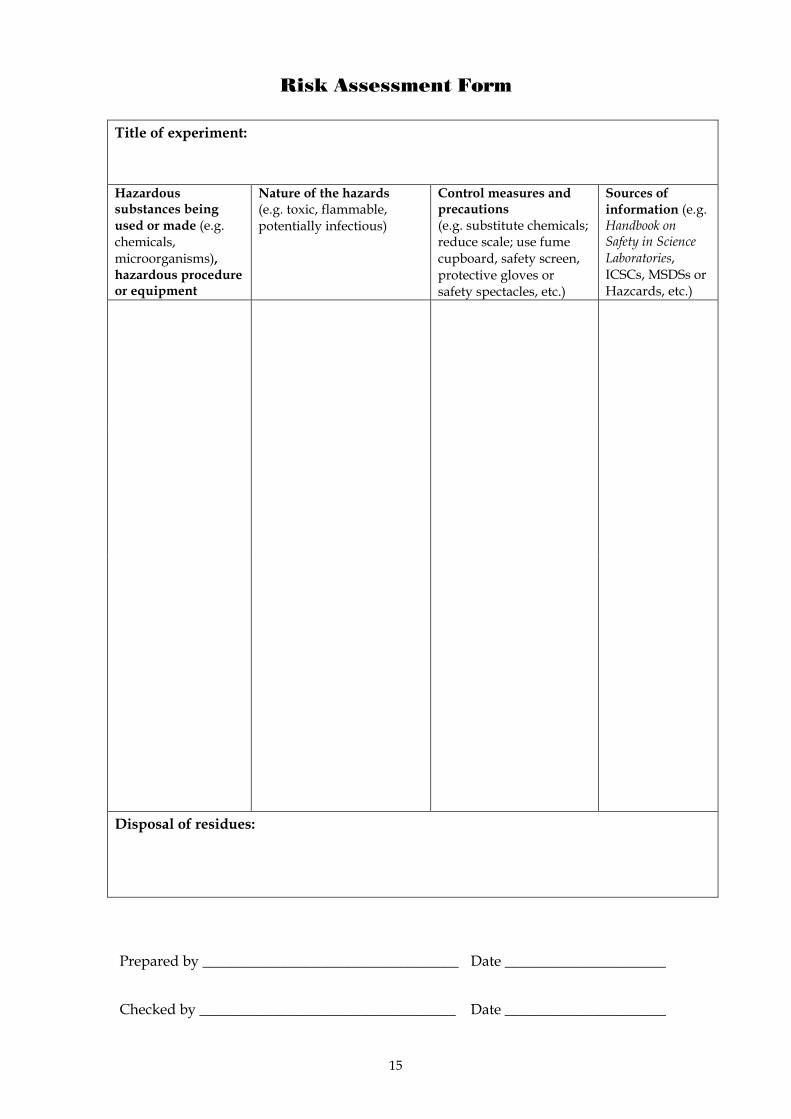
Risk Assessment Form
Title of experiment: Hazardous substances being used or made (e.g. chemicals, microorganisms), hazardous procedure or equipment
Nature of the hazards (e.g. toxic, flammable, potentially infectious)
Control measures and precautions (e.g. substitute chemicals; reduce scale; use fume cupboard, safety screen, protective gloves or safety spectacles, etc.)
Sources of information (e.g. Handbook on Safety in Science Laboratories, ICSCs, MSDSs or Hazcards, etc.)
Disposal of residues: Prepared by ___________________________________ Date ______________________
Checked by ___________________________________ Date ______________________
16
What if a Laboratory Accident Happens? Teachers’ Guide
Objectives Upon completion of this activity, students should • know the proper actions to be taken in case of accidents in a laboratory • be aware of the nature and causes of laboratory accidents, and the basic safety
precautions for prevention Introduction Accidents do occur in practical work. Fortunately, most of the accidents occurred in school science laboratories were minor ones and did not result in serious injury. Most of the accidents were due to the carelessness of students and could have been prevented with simple safety measures. Therefore when doing practical work, students should be alert at all times, aware of the hazards and safety precautions relating to the substances/operations at hand and be well prepared in handling accidents properly to minimize injuries. The accident cases included in this activity are different in nature. Teachers can select cases relevant to their subjects and discuss with students what lessons can be learnt from the accidents to promote awareness on laboratory safety. Procedures 1. Prepare two sets of accident cases. Divide the class into groups of 4 to 6 . Give
each group one case for discussion.
2. Allow approximately five minutes for students to study the cases and then start the group discussion.
3. To start the class discussion on individual case, ask one group to describe their case briefly. Ask two or three of the groups to respond to the first question and the other groups to the second one.
4. Summarize the measures necessary to prevent accidents.
5. Discuss the causes and nature of accidents common in school science laboratories (Table 1).
Remarks • Students should understand that it is necessary to keep clam in case of accidents.
All laboratory accidents must be reported immediately to the teacher or the laboratory technician. If it is an emergency, move the victim to safety immediately or deal with the cause of accident properly.
• If time is allowed, more accident cases (including those from newspapers) can be discussed if there is still time to spare.
• Safety precautions to accidents common in science laboratories can be found at http://cd.emb.gov.hk/sci/laboratory/cla/cla.html.
17
Possible points for the discussion of each accident case are given below:
Splash in Eyes 1. If a chemical has been splashed into an eye, flush the eye with running cold
water or an eye wash unit immediately for at least 10 minutes. Ensure that water drains away from the patient’s face but not into the unaffected eye. Do not attempt to neutralise the chemical in the injured eye by acid or alkali. All eye injuries should be regarded as serious cases and medical treatment should be sought without delay.
2. Eye protection should be worn when there is any potential risk of eye injuries. For effective implementation, use of eye protection should be treated as an area requirement rather than an operational requirement, i.e. students should put on safety spectacles as soon as they enter a laboratory for practical work.
3. Students should be reminded of the correct way to hold reagent bottles i.e. hold the body of the bottle firmly instead of holding the stopper or the dropper. The dropper of the bottle should be carefully pulled out with a twist (excessive force should not be applied).
Neutralisation 1. Flush the eyes with running cold water or an eye wash unit immediately for at
least 10 minutes (refer to the case above).
2. Student should never attempt unauthorized experiments or play around with laboratory equipment and chemicals. Materials for conducting experiments should be returned immediately to appropriate places after use.
3. Materials provided to students for experiments should be carefully controlled. Sodium hydroxide is corrosive, and can cause serious harm to eyes and skin. Dilute solution of sodium hydroxide, instead of pellets, should be provided to students for the experiment.
Dynamic Trolleys 1. Do not attempt to remove foreign objects such as glass pieces from the eyes.
Keep the patient still and send for medical aid immediately.
2. It is unwise to make observation at a distance close to your eyes. Besides, the trolley should be checked to make sure that the spring-loaded plunger impulse rod is secured inside the tube before it is distributed to the students. During the experiment, if the rod springs out accidentally, the teacher should guide the students to push the rod back in position correctly.
3. Not all experiments using the dynamic trolleys involve the spring-loaded impulse rod. Hence, the rod may be removed from the trolley before the students carry out experiments on trolleys. The rod should be re-fixed onto the trolley afterwards.
A Gas Tap without Burner 1. Smother flames on clothing, hair or skin with a fire blanket or textile fabric such
as a piece of damp cloth. Place the burnt area under slowly running cold water until the pain fades. To prevent the flames from travelling up to the face, lie

18
down immediately and then roll across the floor i.e. "Drop and Roll". It would be better if the victim could wrap himself in a fire blanket or any textile fabric while rolling on the floor.
2. Teachers should warn their students of the potential danger in careless handling of Bunsen burners and gas taps. Long hair must be properly tied back. Arms or any parts of the body should never be stretched over burners set alight.
3. All unused gas taps should be properly secured to prevent them from being mistakenly turned on by students. Appropriate labels may also help students identify the correct gas taps.
Heat Burn 1. Place the burnt area under slowly running cold water until pain fades. Do not
apply ointments or any other chemicals to the injured area of heat burn. For severe burns, medical aid should be sought without delay.
2. Heated objects remain hot for some time. They should always be handled with care. Never touch or hold hot objects with bare hands.
3. The sequence in conducting an experiment may be rearranged to avoid requiring students to dry up test tubes by heating. In fact only 6 test tubes are needed to carry out this experiment, i.e. 2 test tubes for the solubility test and action of dilute hydrochloric acid and 4 dry test tubes for dry heating of chemicals.
Cut by Broken Glass 1. Avoid touching the wounds with bare hands or having direct contact with
blood. Always use a pair of disposable plastic/vinyl gloves. Apply direct pressure to the wound over a clean dressing. If bleeding continues, do not remove the dressing, but apply further pads on top of the original one. Then bandage the wound firmly. Excessive blood loss may lead to shock. Medical assistance should be sought immediately.
2. Whenever possible, the insertion of glass tubes through holes of rubber stoppers should be done by the laboratory technician. If the task is to be conducted by students, the teacher should demonstrate the techniques involved.
3. A cork borer could be used to assist in threading the glass tube through the hole of a rubber stopper and a towel to hold the glass tube. In setting up the apparatus for an experiment, students sometimes have to adjust the position of the glass tubing, teachers should remind students to lubricate the glass tubing and rubber stopper with water/glycerine and hold the tubing with a towel/leather glove at the end near the stopper when applying pressure.
Hydrogen Explosion 1. The teacher, laboratory technician and students should keep clam. The teacher
should assess the situation and ask for help if necessary.
2. Newly conducted or potentially dangerous experiments should be tried out before they are performed to avoid unpredictable mishaps.
3. A safety screen should also be used. Both teachers and students should wear safety spectacles.
19
4. The hydrogen-generating set-up should be completely removed from the laboratory bench and placed in the fume cupboard before the hydrogen soap bubbles are ignited.
5. The experiment can be replaced by a safer microscale experiment.
Rat Bite 1. Avoid touching the wound with bare hands or have any direct contact with
blood. Wear a pair of disposable plastic or vinyl gloves. In addition, squeeze the wound to let out some blood immediately after the bite. It should then be followed by washing with soap and water. Apply antiseptic as necessary. Stop the bleeding if it persists and apply light dressing. The patient should then be sent to the nearest hospital for medical treatment. All the rats in the cage should be retained, as they may be required for subsequent diagnosis.
2. Whenever possible, rats should be kept in places that students could not get access to before they were killed for experimental purpose. Teachers should inform students to abide by the warning sign in the laboratory under any circumstances.
A Vigorous Reaction 1. The student should be treated with first aid procedures for cuts.
2. Experiments involving sodium are potentially hazardous and should only be demonstrated by the teacher with all the necessary safety precautions. The following points should be noted in demonstrating the reaction safely:
• Use pieces of sodium with sides no larger than 4 mm. Remove the paraffin oil on the sodium by a filter paper.
• Do not attempt to collect any gas over a reacting piece of sodium by any means.
• Use a trough made of transparent plastics to contain the water. Do not cover up the trough to allow for the escape of liberated gas and prevent it from accumulating to a critical level.
• Use a safety screen to surround the trough so that students are properly protected from any splattering that may occur.
• Keep students at a safe distance from the apparatus set-up, instead of letting them crowd around the demonstration site. Both teachers and students should wear safety spectacles.
Concentrated Sulphuric Acid 1. Unless the quantity of water used is large enough, treating the affected area
with water inappropriately may worsen the chemical burn due to the highly exothermic reaction between concentrated sulphuric acid and water. In this case, to minimize the chemical burn and to prevent the corrosive concentrated sulphuric acid from spreading over the student’s hand, liquid should be quickly wiped off from the student’s hand as much as possible with a piece of dry cloth before flooding the area with a large excess of water. If a large area is affected or blistering occurs, seek medical attention immediately.
2. Students need to take extreme care for the safety of others and not to rush when working in the laboratory.
3. The extent of injury could have been much reduced if students handle only
20
small amount of the hazardous chemical during each part of an experiment. If only a small amount of concentrated sulphuric acid is needed for an experiment, the acid should be dispensed using small dropping bottles.
Iron/Sulphur Reaction
1. Stop the experiment and evacuate the class from the laboratory area in a safe and orderly manner. Remove the victim to fresh air to rest and keep him or her warm. If breathing is affected however slightly, seek medical attention immediately.
2. Sulphur dioxide is toxic by inhalation. When performing experiments involving harmful gases/vapour, good ventilation should always be maintained by opening windows, switching on ceiling fans and exhaust fans as appropriate or conduct this kind of experiments inside a fume cupboard. Perform this kind of experiments only on a small scale i.e. use about 2 g of mixture containing iron powder and sulphur powder in the ratio of 7:4 by mass.
3. Reaction between sulphur and iron filings may be vigorous. Use a borosilicate glass test tube (more heat resistant). Insert a mineral fibre plug in the mouth of the tube before heating. Heat the mixture strongly but stop as soon as the reaction starts (indicate by a glow). The mineral fibre prevents sulphur vapour leaving the test tube and possibly catching a fire.
An Accident Involving Phenol 1. If phenol is spilt on skin or clothes, remove all contaminated clothing as quickly
as possible. Flood the area with water for at least 15 minutes. Seek medical attention as soon as possible.
2. Phenol is toxic in contact with skin and if swallowed. Protective gloves should be worn when handling phenol as it can cause burns if it comes into contact with skin. Neoprene gloves provide the best protection against phenol. The use of appropriate personal protective equipment must be strictly enforced when toxic or corrosive chemicals are to be handled by students in a laboratory. However, less hazardous aromatic phenols e.g. methyl 4-hydroxybenzoate could be used to illustrate the reactions of phenol.
3. Never apply heat to a stoppered test tube or any other closed systems, as this may be hazardous with the building up of gas/vapour pressure inside the system.
References • Education and Manpower Bureau (2002), Handbook on Safety in Science Laboratories • Department for Education and Employment (1996), Safety in Science Education,
London: The Stationary Office • http://www.tenet.edu/teks/science/safety/facilitators_handbook.html • http://www2.umdnj.edu/eohssweb/aiha/accidents/topic.htm • CLEAPSS (2003), Safer Chemical, Safer Reactions (L195), CLEAPSS • CLEAPSS (2003), Hazcards 1995 Edition (updated 2003), CLEAPSS
21
Table 1. Accidents Common in School Science Laboratories
Type of Accidents Nature/Cause
Cuts Small cuts caused by broken glass apparatus (e.g. test tubes, or glass tubing), tools (e.g. dissecting instruments, cork borer or cutter) or sharp edges.
Heat burns or scalds Carelessness in handling hot objects (e.g. tripods, glassware, metal rods/plates, crucibles or combustion spoons), hot liquids, Bunsen flame or lighted matches.
Chemicals on skin Spillage of chemicals during transfer or heating of chemical liquids, washing up of apparatus containing chemical mixtures, opening the container of chemical or breakage of glass containers. Concentrated sulphuric acid, phenol and sodium hydroxide were the most common harmful chemicals involved. Students’ mischievous behaviour of pouring chemicals onto others.
Chemical spillage Small-scale spillage of chemicals during transfer. Spillage of mercury from broken mercury thermometers or from its container. Incorrect techniques exercised by students in using apparatus such as separating funnel.
Eye accidents Chemical liquids or solids which splashed onto the eyes, giving rise to slight irritation or discomfort. The chemicals commonly involved were copper(II) sulphate, dilute acids and alkalis. Students unintentionally rubbed their eyes with hands contaminated with chemicals. Students looked at bright light through a magnifying glass.
Substances catching fire
Accidental ignition of flammable liquids (e.g. ethanol or ethyl ethanoate). Ignition of gas coming out from defective burner tubings or from opened gas tap not connected to Bunsen burner. Ignition of blackout curtain by focused sunlight from an optical instrument.
Discomfort arising from inhalation of gases
Discomfort after inhaling a small amount of chemical vapour (e.g. sulphur dioxide, bromine or ammonia) from reaction mixtures or town gas from leaking gas taps.
Bites by animals Rats biting students and laboratory staff during experiments or when preparing for dissection experiments.
Others Accidents of various natures were reported. Over 90% of the cases under this category were mere accidental breakage of glassware or damage of equipment. Students were hurt when they knocked on floor, stools, benches, or cupboards. Tasting of chemicals (e.g. copper(II) sulphate) by students.
22
Accident Cases Students’ Worksheet
Splash in Eyes
A class of students was conducting a food test using a dilute iodine solution. The teacher had not requested the class to wear safety spectacles because he thought that the hazard associated with the use of dilute iodine solution was very low. A student was trying to take the iodine solution contained in a dropping bottle. Instead of holding the body of the bottle firmly, he wrongly grasped the stopper and due to gravity, the bottle detached from the stopper and fell onto the bench. As a result, some of the solution inside the bottle splashed out and spilt into the student’s eyes. Questions
1. What emergency actions would you take to deal with this accident?
2. What safety precautions should the teachers and students have taken to prevent the accident?
Neutralisation
The accident occurred when a class of students was performing an experiment on neutralization using dilute solutions of sodium hydroxide and hydrochloric acid. After completing all the practical work assigned by the teacher, a student injected some water from a syringe into a beaker containing a few pieces of sodium hydroxide pellets. Unfortunately, some solution spilt out from the beaker onto the face and eyes of another student who was not wearing any eye protection. Questions
1. What emergency actions would you take to deal with this accident?
2. What safety precautions should the teachers and students have taken to prevent the accident?
23
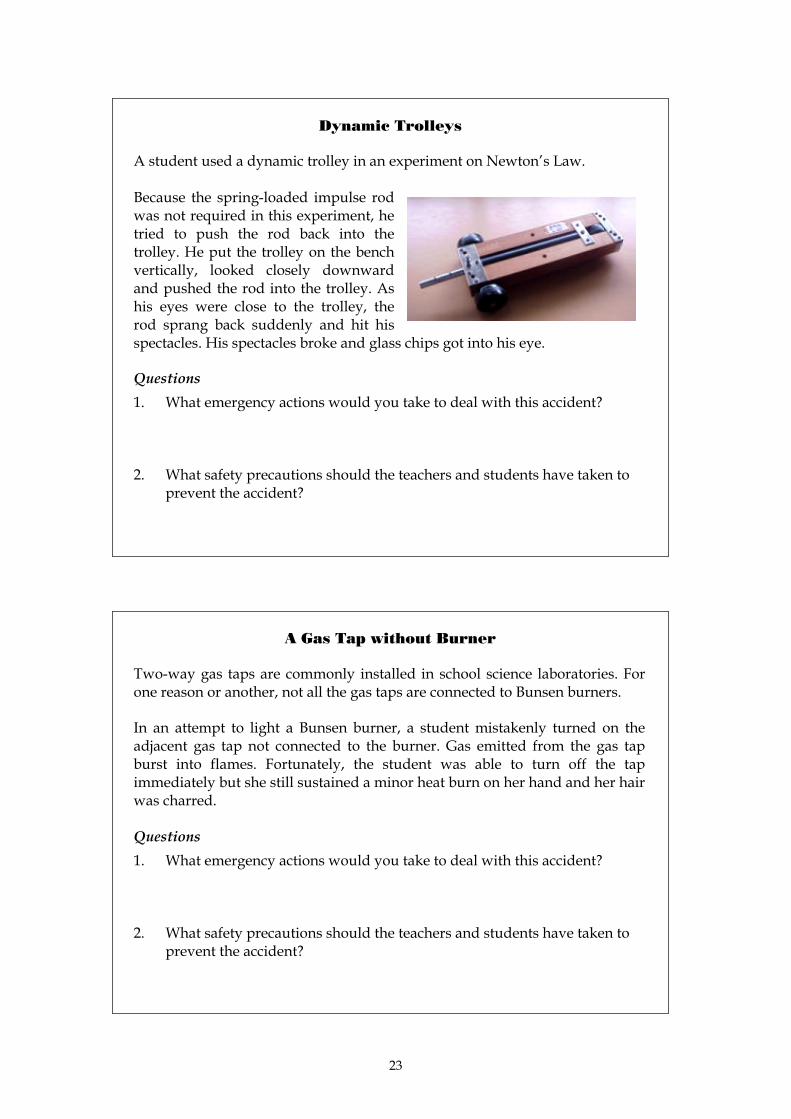
Dynamic Trolleys
A student used a dynamic trolley in an experiment on Newton’s Law. Because the spring-loaded impulse rod was not required in this experiment, he tried to push the rod back into the trolley. He put the trolley on the bench vertically, looked closely downward and pushed the rod into the trolley. As his eyes were close to the trolley, the rod sprang back suddenly and hit his spectacles. His spectacles broke and glass chips got into his eye. Questions
1. What emergency actions would you take to deal with this accident?
2. What safety precautions should the teachers and students have taken to prevent the accident?
A Gas Tap without Burner
Two-way gas taps are commonly installed in school science laboratories. For one reason or another, not all the gas taps are connected to Bunsen burners. In an attempt to light a Bunsen burner, a student mistakenly turned on the adjacent gas tap not connected to the burner. Gas emitted from the gas tap burst into flames. Fortunately, the student was able to turn off the tap immediately but she still sustained a minor heat burn on her hand and her hair was charred. Questions
1. What emergency actions would you take to deal with this accident?
2. What safety precautions should the teachers and students have taken to prevent the accident?
24
Heat Burn
A class of students was performing an experiment to investigate the solubility, action of dilute hydrochloric acid and heat on four chemicals. Dry test tubes were required for the third part which involved dry heating of the chemicals. The teacher instructed the class to dry up the required test tubes by heating and demonstrated the relevant techniques. A student tried to dry up a test tube for use in the experiment by heating the test tube on a Bunsen flame. The heated test tube was placed in a test tube rack for cooling. After a while, she forgot that the test tube was still hot and held it with her right hand. The test tube was so hot that it stuck onto her hand. She immediately swung her hand to remove the test tube and then placed her hand under running water. She asked her classmates to report the accident to the teacher. The teacher applied some burn cream on the injured area of the student. The student was not sent to hospital for medical treatment. After the lesson, she was so painful that she burst into tears. Questions
1. What emergency actions would you take to deal with this accident?
2. What safety precautions should the teachers and students have taken to prevent the accident?
Cut by Broken Glass A student was performing an experiment by following the instructions on the laboratory manual given by his teacher. In setting up the apparatus, he had to insert a glass tubes through the hole of a rubber stopper. When he pressed a glass tube through one of the holes, the glass tube broke and cut the student’s palm. First-aid treatment was given by the laboratory technician and the student was then sent to hospital for further treatment. Questions
1. What emergency actions would you take to deal with this accident?
2. What safety precautions should the teachers and students have taken to prevent the accident?
25
Hydrogen Explosion A teacher was demonstrating an experiment on testing hydrogen gas. The purpose of the experiment was to ignite the hydrogen gas trapped in the soap bubbles to produce a “pop” sound, a typical property of hydrogen gas. The experiment was included in the teaching plan for the first time.
The teacher tried to prepare some soap bubbles on the bench mat from hydrogen gas generated from a reaction flask containing some zinc granules and dilute hydrochloric acid. The teacher failed to make the soap bubbles after a few attempts. Aiming at producing the desired outcome, she then decided to light up a splint first and tried to ignite the soap bubbles once they were formed. Unfortunately, the burning splint was placed too close to the set-up. The flammable hydrogen gas inside the set-up was ignited and gave rise to an explosion. During the demonstration, the students were either sitting or standing in front of the teacher's bench. The teacher, the laboratory technician and a number of students were injured by broken glass. Questions
1. What emergency actions would you take to deal with this accident?
2. What safety precautions should the teachers and students have taken to prevent the accident?
Rat bite A school had purchased about 20 rats for use in dissection experiments. The rats were temporarily reared inside a metal cage at a corner of the Biology laboratory. A warning sign “Please Don’t Touch” was displayed beside the cage. The teacher was discussing with a group of students at the teacher’s bench in the biology laboratory after a lesson. A student was curious about the rats and tried to touch one of them. In doing so, her finger was bitten by a rat and injured with a little bleeding. Questions
1. What emergency actions would you take to deal with this accident?
2. What safety precautions should the teachers and students have taken to prevent the accident?

26
A Vigorous Reaction In a demonstration experiment, a teacher allowed a piece of sodium to react with water in an inverted beaker as shown:
When some hydrogen gas was collected, the piece of sodium stuck onto the inner bottom of the beaker and the reaction stopped. The teacher attempted to start the reaction afresh by shaking the beaker so as to dislodge the sodium. In doing so, some air accidentally got into the beaker of hydrogen. Somehow, an explosion occurred and the beaker shattered into pieces. A student standing opposite to the teacher was hurt by glass fragments. Questions
1. What emergency actions would you take to deal with this accident?
2. What safety precautions should the teachers and students have taken to prevent the accident?
Concentrated Sulphuric Acid
A class of students started to conduct an experiment on investigating the properties of concentrated sulphuric acid. The experiment consisted of several parts which required the use of concentrated sulphuric acid. The amount of concentrated sulphuric acid taken by a student at one time using a test tube to her bench was enough for all parts of the experiment. When she was holding the test tube filled with one-third of concentrated sulphuric acid in her left hand, a student walking behind carelessly struck her left elbow. The concentrated sulphuric acid in the test tube was spilt out onto her left forearm and upper arm. The student immediately washed her left hand with plenty of tap water and the accident was reported to the teacher. A considerable large area of the student’s left forearm and upper arm sustained chemical burn. Questions
1. What emergency actions would you take to deal with this accident?
2. What safety precautions should the teachers and students have taken to prevent the accident?
glass trough
water
hydrogen gas sodium
inverted beaker
27
Iron/Sulphur Reaction
A class of students was performing an experiment on investigation of elements and compounds. A small amount of sulphur/iron mixture was heated strongly in the experiment and a certain amount of sulphur dioxide was produced. The teacher had instructed the class to use minimum amount of chemicals and to heat the mixture for about five minutes only. He had turned on the ceiling fans and opened the windows of the laboratory, but forgotten to turn on the exhaust fans. Apparently, some students used more than enough sulphur and heated the mixture for too long. A number of students felt discomfort and reported the mishap to the teacher. Questions
1. What emergency actions would you take to deal with this accident?
2. What safety precautions should the teachers and students have taken to prevent the accident?
An Accident Involving Phenol
A class of students was studying the properties of phenol. Prior to the experiment, the teacher had warned the class about the toxic nature of phenol. Appropriate hazard warning labels were placed on the bottles of phenol to alert the students. They were also advised to put on personal protective equipment, such as laboratory coat, rubber gloves and safety spectacles when handling phenol. To test the solubility of phenol in hot water, a student heated a mixture of phenol and water in a stoppered test tube over a hot water bath. As the pressure inside the test tube built up, the stopper suddenly spurted out, and some of the phenol-water mixture splashed onto the unprotected forearm of the student. His skin was burnt. Questions
1. What emergency actions would you take to deal with this accident?
2. What safety precautions should the teachers and students have taken to prevent the accident?