18.03.27 - ar15 instructions d02
TRANSCRIPT

AR-15Disclaimer
Limited WarrantySatisfaction Guarantee Installation Instructions
DC2G
WARNING: Failure to properly install trigger snug-down screws and ensure proper �t with safety could result in an unsafe �rearm. Read and follow all instructions. Contact TriggerTech or a licensed gunsmith for assistance.
TTRIBBERTECH
TriggerTech DisclaimerImproper handling, installation, storage and/or use of Trigger Tech products and/or the firearm in which they are installed, can cause death, serious injury and/or property damage.TriggerTech products are designed solely for installation and use in the specific firearm for which they are advertised. It is the purchaser’s responsibility to determine compatibility.
Aftermarket trigger handling and installation can involve complicated procedures and presuppose knowledge of firearms handling. If a purchaser or user is not familiar, or not sufficiently familiar, with firearms handling and exchanging out trigger components, the purchaser or user (collectively, “Purchaser”) must seek further information and assistance from a gunsmith or other qualified professional.
By installing or using any purchased TriggerTech trigger product (“TT Product”) the Purchaser agrees to the following terms and conditions: 1.The Purchaser will abide by all applicable firearm safety laws, protocols, and regulations in force in the jurisdiction
where the TT Product is handled, installed, stored and/or used; 2. The Purchaser certifies that he/she is legally entitled to purchase and use the TT Product and the firearm in which it is to be installed, in the jurisdiction where the TT Product is purchased and used; 3. The Purchaser assumes responsibility for ensuring that any users of the TT Product comply with these terms and conditions and with all applicable firearms safety protocols and regulations when handling, installing, storing and/or operating the TT Product; 4. The Purchaser agrees to conduct a test for proper trigger fit and function, before each use of the TT Product, with the firearm in which it is installed in an unloaded condition. Never assume the TT Product works without testing it; 5. The Purchaser agrees to consistently use a trigger lock on the installed TT Product, together with any related safety mechanism on the firearm in which the TT Product is installed; 6. The Purchaser agrees to contact TriggerTech immediately in the event of any change or loss of trigger function; 7. Following installation, the Purchaser will not conduct any maintenance of the TT Product which requires disassembly of the TT Product, in whole or part; 8. In no event shall TriggerTech be
liable for any direct, indirect, incidental, special, consequential or punitive damages arising from loss of life, personal injury and/or property damage, in connection with the use or misuse of the TT product, or the firearm in which the TT Product is installed; 9. TriggerTech is not responsible for the acts or omissions of the Purchaser resulting from a lack of training or knowledge of firearms handling, or failure to properly implement such training and knowledge; 10. The Purchaser assumes the risk and all liability for death, injury, and loss and damage to persons or property caused by use or installation inconsistent with TriggerTech’s instructions, negligent or intentional use or misuse of the TT Product, or the firearm in which the TT Product is installed.
TriggerTech Limited WarrantyTriggerTech warrants to the original retail purchaser that this TriggerTech product will be free from manufacturing and handling defects for thirty days after the original sale of the product, and from manufacturing defects for the life of the product. This warranty only applies if this product was manufactured and sold by TriggerTech. This warranty excludes conditions caused by excessive wear and tear, aggressive handling, unreasonable use, modifications, alternation, tampering, misuse, improper installation, or other factors outside TriggerTech’s control. Modifying the product in any way VOIDS this warranty. This limited warranty does not extend to future performance.
No TriggerTech representative, distributor or reseller is authorized to assume any other obligation or liability in connection with the product, or to alter the terms of this warranty.
ALL WARRANTIES OTHER THAN STATED HEREIN ARE DISCLAIMED, INCLUDING IMPLIED WARRANTIES OF MERCHANTABILITY AND FITNESS FOR A PARTICULAR PURPOSE,
TO THE EXTENT ALLOWABLE BY APPLICABLE LAW. ALL LIABILITY FOR INCIDENTAL, PUNITIVE, SPECIAL, OR CONSEQUENTIAL DAMAGES ARE EXPRESSLY DISCLAIMED, TO THE EXTENT ALLOWABLE BY APPLICABLE LAW.
Trigger Tech does not assume any liability arising from loss of life, personal injury and/or property damage in connection with the use, misuse or modification of the TT product, or the firearm in which the TT Product is installed.
Warranties are handled directly by TriggerTech, not through our dealer network. To obtain warranty coverage, please contact us directly at the number/website below for a return authorization. Product alleged to be defective must be returned to Trigger Tech for inspection. The cost of shipping to us is the customer’s responsibility. Any products determined by TriggerTech to require warranty coverage, will be replaced or repaired, at TriggerTech’s sole option.
TriggerTech Satisfaction GuaranteeTriggerTech Triggers have distinctively less creep than competitors’ products. While most shooters view this as a benefit, some may not enjoy the distinct, crisp feeling of a TriggerTech Trigger. If you are the original purchaser and are not satisfied with the zero-creep break of your TriggerTech Trigger, you may return it to TriggerTech within thirty (30) days of purchase, in the original packaging and with proof of purchase. Provided the Trigger is undamaged, Trigger Tech will refund the purchase price.
Note: Installation of your TriggerTech trigger may void all or part of your firearm manufacturer’s warranty, so please check with the firearm manufacturer to find out if installation will affect your firearm warranty prior to installation of the trigger.
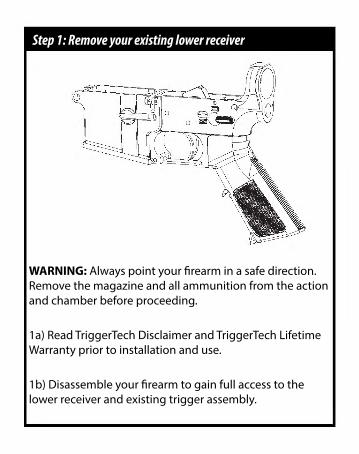
Step 1: Remove your existing lower receiver
WARNING: Always point your �rearm in a safe direction. Remove the magazine and all ammunition from the action and chamber before proceeding.
1a) Read TriggerTech Disclaimer and TriggerTech Lifetime Warranty prior to installation and use.
1b) Disassemble your �rearm to gain full access to the lower receiver and existing trigger assembly.
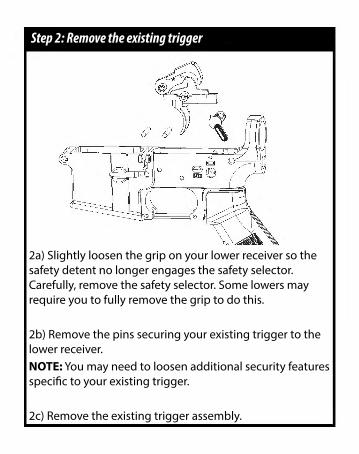
2a) Slightly loosen the grip on your lower receiver so the safety detent no longer engages the safety selector. Carefully, remove the safety selector. Some lowers may require you to fully remove the grip to do this.
2b) Remove the pins securing your existing trigger to the lower receiver. NOTE: You may need to loosen additional security features speci�c to your existing trigger.
2c) Remove the existing trigger assembly.
Step 2: Remove the existing trigger
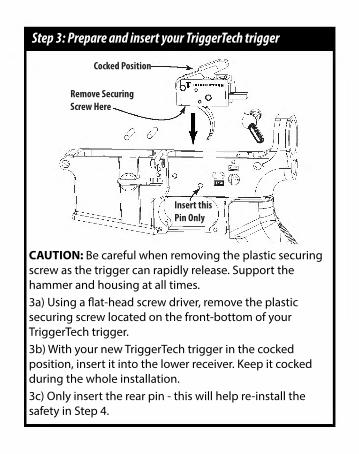
CAUTION: Be careful when removing the plastic securing screw as the trigger can rapidly release. Support the hammer and housing at all times. 3a) Using a �at-head screw driver, remove the plastic securing screw located on the front-bottom of your TriggerTech trigger.3b) With your new TriggerTech trigger in the cocked position, insert it into the lower receiver. Keep it cocked during the whole installation.3c) Only insert the rear pin - this will help re-install the safety in Step 4.
Step 3: Prepare and insert your TriggerTech trigger
Insert thisPin Only
Remove SecuringScrew Here
Cocked Position
(l (l
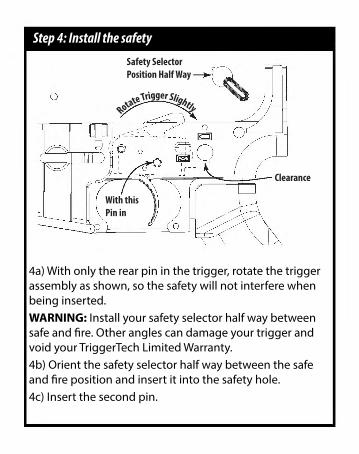
4a) With only the rear pin in the trigger, rotate the trigger assembly as shown, so the safety will not interfere when being inserted.WARNING: Install your safety selector half way between safe and �re. Other angles can damage your trigger and void your TriggerTech Limited Warranty. 4b) Orient the safety selector half way between the safe and �re position and insert it into the safety hole. 4c) Insert the second pin.
Step 4: Install the safety
With thisPin in
Rotate Trigger Slightly
Clearance
Safety SelectorPosition Half Way
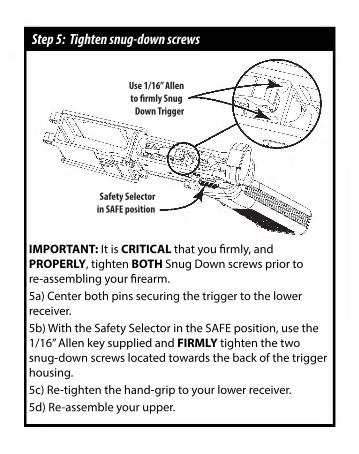
IMPORTANT: It is CRITICAL that you �rmly, and PROPERLY, tighten BOTH Snug Down screws prior to re-assembling your �rearm.5a) Center both pins securing the trigger to the lower receiver.5b) With the Safety Selector in the SAFE position, use the 1/16” Allen key supplied and FIRMLY tighten the two snug-down screws located towards the back of the trigger housing.5c) Re-tighten the hand-grip to your lower receiver.5d) Re-assemble your upper.
Step 5: Tighten snug-down screws
Use 1/16” Allento �rmly Snug
Down Trigger
Safety Selectorin SAFE position
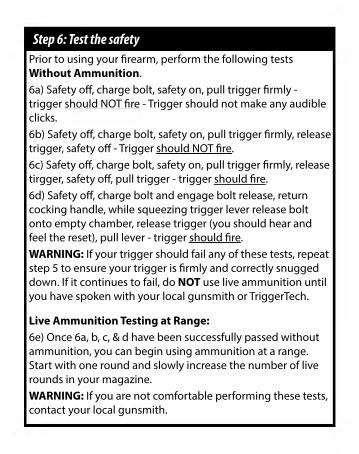
Prior to using your �rearm, perform the following tests Without Ammunition.6a) Safety o�, charge bolt, safety on, pull trigger �rmly - trigger should NOT �re - Trigger should not make any audible clicks.6b) Safety o�, charge bolt, safety on, pull trigger �rmly, release trigger, safety o� - Trigger should NOT �re.6c) Safety o�, charge bolt, safety on, pull trigger �rmly, release tirgger, safety o�, pull trigger - trigger should �re.6d) Safety o�, charge bolt and engage bolt release, return cocking handle, while squeezing trigger lever release bolt onto empty chamber, release trigger (you should hear and feel the reset), pull lever - trigger should �re.WARNING: If your trigger should fail any of these tests, repeat step 5 to ensure your trigger is �rmly and correctly snugged down. If it continues to fail, do NOT use live ammunition until you have spoken with your local gunsmith or TriggerTech.
Live Ammunition Testing at Range:6e) Once 6a, b, c, & d have been successfully passed without ammunition, you can begin using ammunition at a range. Start with one round and slowly increase the number of live rounds in your magazine.WARNING: If you are not comfortable performing these tests, contact your local gunsmith.
Step 6: Test the safety
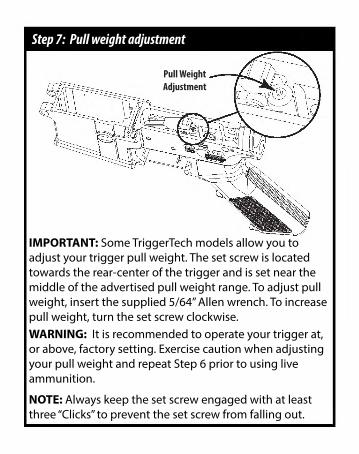
IMPORTANT: Some TriggerTech models allow you to adjust your trigger pull weight. The set screw is located towards the rear-center of the trigger and is set near the middle of the advertised pull weight range. To adjust pull weight, insert the supplied 5/64” Allen wrench. To increase pull weight, turn the set screw clockwise.WARNING: It is recommended to operate your trigger at, or above, factory setting. Exercise caution when adjusting your pull weight and repeat Step 6 prior to using live ammunition.
NOTE: Always keep the set screw engaged with at least three “Clicks” to prevent the set screw from falling out.
Step 7: Pull weight adjustment
Pull WeightAdjustment
Lubrication: TriggerTech’s Triggers can operate dry because of our patented technology. Any oil can be used, but it is recommended to be cleaned regularly.
Cleaning: The best way to clean a TriggerTech trigger is with compressed air or a grease cutting agent that does not leave residue. We recommend lighter �uid, letting it dry, and blowing with compressed air.
Maintenance
