17 bowel elimination define the following term: defecation the act of passing feces from the large...
TRANSCRIPT

17Bowel Elimination
Define the following term:
Defecationthe act of passing feces from the large intestine out of the body through the anus.
17Bowel Elimination1. List qualities of stools and identify signs and symptoms to report about stool
Remember these signs and symptoms to report about stool: • Whitish, black, or red stools • Diarrhea• Constipation • Flatulence• Pain when having a bowel movement • Blood, pus, mucus, or discharge in stool • Fecal incontinence

17Bowel Elimination
Define the following term:
Peristalsisinvoluntary contractions that move food through the gastrointestinal system.

17Bowel Elimination
2. List factors affecting bowel elimination
REMEMBER:Normal changes of aging, psychological factors, food and fluid intake, activity level, personal habits, and medications can all affect bowel elimination.

17 Bowel Elimination
Transparency 17-1: Factors Affecting Bowel Elimination
• Normal changes of aging • Peristalsis slows. • There is less muscle tone. • Possible tooth loss and less saliva affect digestion.
• Psychological factors • Stress, anger, and fear increase peristalsis. • Depression decreases peristalsis. • A lack of privacy can greatly affect elimination.
• Food and fluids • Fiber improves elimination. • Animal fats and low-fiber foods can cause constipation. • Some foods cause gas, which can help with elimination. • Proper fluid intake helps elimination.

17 Bowel Elimination
Transparency 17-1: Factors Affecting Bowel Elimination (cont’d.)
• Physical activity • Regular activity helps elimination. • Immobility weakens muscles and may slow elimination.
• Personal habits • Time of day varies but it usually occurs after meals. • Supine position causes most trouble for bowel
elimination. • Best position for elimination is squatting and leaning
forward.• Medications
• Laxatives help elimination. • Pain relievers can slow elimination. • Antibiotics may cause diarrhea.

17Bowel Elimination
Define the following terms:
Constipationthe inability to eliminate stool, or the difficult and painful elimination of a hard, dry stool.
Enemaa specific amount of water, with or without an additive, that is introduced into the colon to eliminate stool.
Suppositorya medication given rectally to cause a bowel movement.
Fecal impactiona hard stool that is stuck in the rectum and cannot be expelled; results from unrelieved constipation.

17Bowel Elimination
Define the following terms:
Hemorrhoidsenlarged veins in the rectum or outside the anus that can cause rectal itching, burning, pain, and bleeding.
Diarrheafrequent elimination of liquid or semi-liquid feces.
Anal/fecal incontinencethe inability to control the bowels, leading to involuntary passage of stool.
Flatulenceair in the intestine that is passed through the rectum, which can result in cramping or abdominal pain; also called flatus or gas.

17Bowel Elimination
Define the following terms:
Lactose intolerancethe inability to digest lactose, a type of sugar found in milk and some other dairy products.
Colitisinflammation of the large intestine that causes diarrhea and abdominal pain; also called irritable bowel syndrome.
Malabsorptioninability to absorb or digest a particular nutrient properly.
Heartburna condition that results from a weakening of the sphincter muscle which joins the esophagus and the stomach; causes a burning sensation in the esophagus.

17Bowel Elimination
Define the following terms:
Ulcerationscarring.
Gastroesophageal reflux disease (GERD)a chronic condition in which the liquid contents of the stomach back up into the esophagus.
Peptic ulcersraw sores in the stomach or the small intestine that cause pain, belching, and vomiting.
Ulcerative colitisa chronic inflammatory disease of the large intestine; causes cramping, diarrhea, pain, rectal bleeding, and loss of appetite.

17Bowel Elimination
Define the following terms:Colostomy
surgically-created diversion of stool or feces to an artificial opening through the abdomen; stool will generally be semi-solid.
Stomaan artificial opening in the body.
Colorectal cancercancer of the gastrointestinal tract; also known as colon cancer.
17Bowel Elimination3. Describe common diseases and disorders of the gastrointestinal system
In some states, NAs are required to learn the procedure for giving a resident an anal suppository. Because it is not a required procedure in all states, the procedure is provided as Handout 17-1.

17Bowel Elimination
4. Discuss how enemas are given
There are several different types of enemas: • Tap water enema • Soapsuds enema • Saline enema • Commercial enema
17Bowel Elimination
4. Discuss how enemas are given
Remember these guidelines for enemas:• Keep bedpan nearby or make sure bathroom is vacant before
assisting with enema.• Resident will be placed in Sims’ position.• Enema solution should be warm.• Enema bag should not be raised above the height listed in the
care plan.• Tip of tubing should be lubricated if not pre-lubricated.• Unclamp tube and allow a small amount of solution to run
through, then reclamp. This removes air that could cause cramping.

17Bowel Elimination
4. Discuss how enemas are given
Guidelines for enemas (cont’d.):• Solution should flow in slowly.• Hold tubing in place while giving the enema. Stop immediately
if the resident has pain or you feel resistance. Report to the nurse.
• Resident should take slow, deep breaths.• Report any of the following to the nurse:
• Resident could not tolerate enema due to cramping.• Enema had no results.• Amount of stool was very small.• Stool was hard, streaked with red, very dark, or black.

Giving a cleansing enema
Equipment: 2 pair of gloves, bath blanket, IV pole, enema solution, tubing and clamp, bed protector, bedpan, lubricating jelly, bath thermometer, tape measure, toilet paper, 2 washcloths, robe, non-skid footwear
1. Wash your hands.
2. Identify yourself by name. Identify the resident by name.
Giving a cleansing enema (cont’d.)
3. Explain procedure to the resident. Speak clearly, slowly, and directly. Maintain face-to-face contact whenever possible.
4. Provide for resident’s privacy with curtain, screen, or door.
5. Adjust bed to a safe level, usually waist high. Lock bed wheels.

Giving a cleansing enema (cont’d.)
6. If the bed has side rails, raise side rail on far side of bed. Lower side rail nearest you.
7. Help resident into left-sided Sims’ position. Cover with a bath blanket.
8. Place the IV pole beside the bed. Raise the side rail.
Giving a cleansing enema (cont’d.)
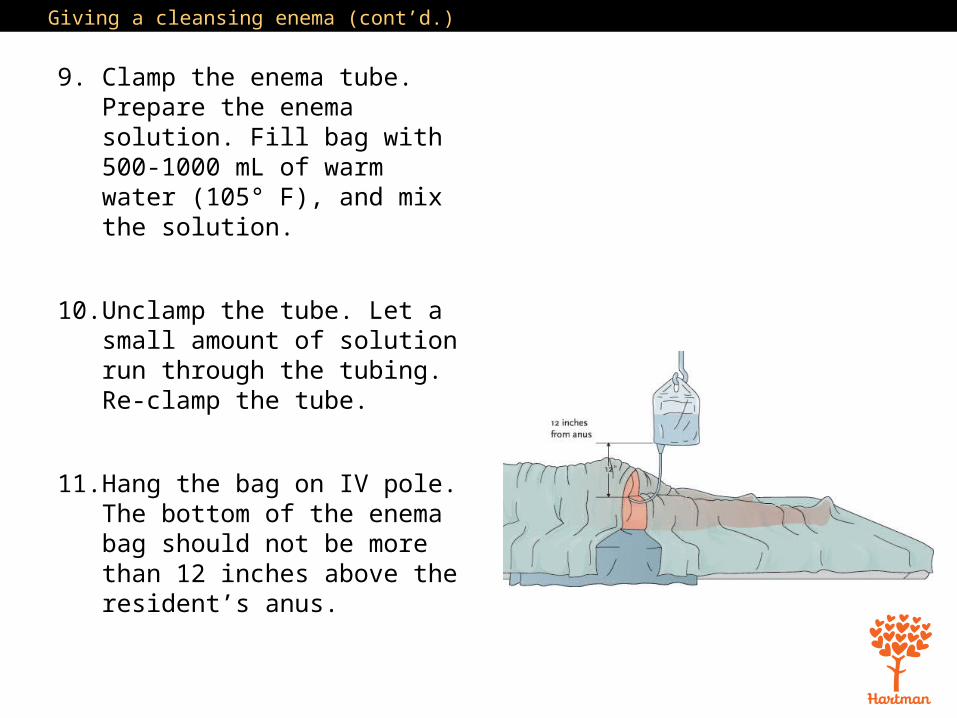
9. Clamp the enema tube. Prepare the enema solution. Fill bag with 500-1000 mL of warm water (105° F), and mix the solution.
10. Unclamp the tube. Let a small amount of solution run through the tubing. Re-clamp the tube.
11. Hang the bag on IV pole. The bottom of the enema bag should not be more than 12 inches above the resident’s anus.

Giving a cleansing enema (cont’d.)
12. Put on gloves.
13. Lower the side rail. Uncover resident enough to expose anus only.
14. Place bed protector under resident. Place bedpan close to resident’s body.
15. Lubricate tip of tubing with lubricating jelly.
Giving a cleansing enema (cont’d.)
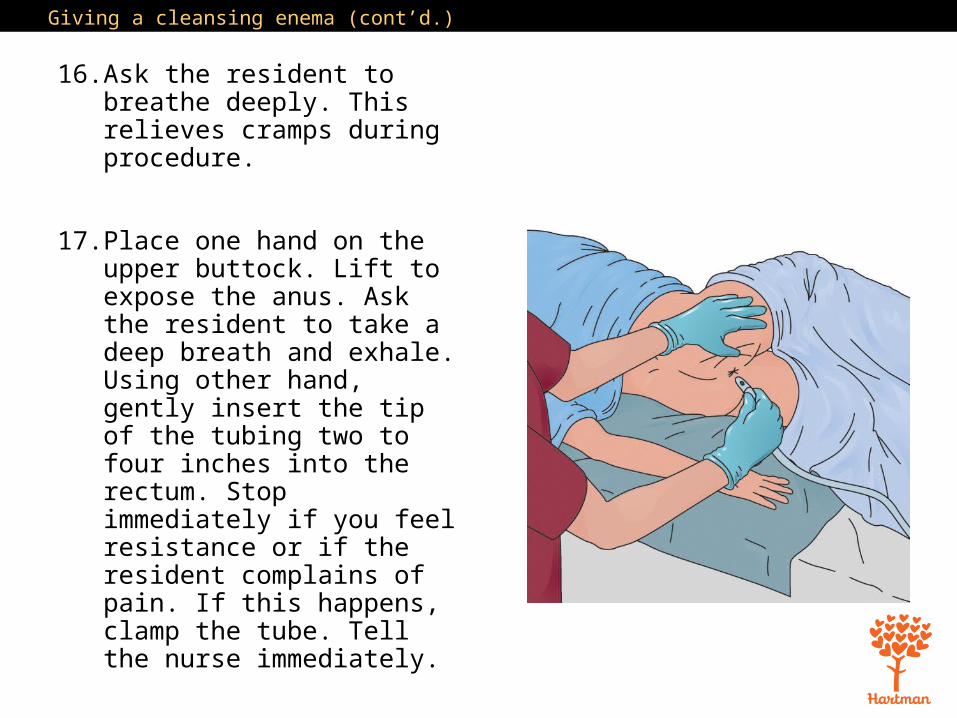
16. Ask the resident to breathe deeply. This relieves cramps during procedure.
17. Place one hand on the upper buttock. Lift to expose the anus. Ask the resident to take a deep breath and exhale. Using other hand, gently insert the tip of the tubing two to four inches into the rectum. Stop immediately if you feel resistance or if the resident complains of pain. If this happens, clamp the tube. Tell the nurse immediately.

Giving a cleansing enema (cont’d.)
18. Unclamp the tubing. Allow the solution to flow slowly into the rectum. Ask resident to take slow, deep breaths. If resident complains of cramping, clamp the tubing and stop for a couple of minutes. Encourage him or her to take as much of the solution as possible.
Giving a cleansing enema (cont’d.)
19. Clamp the tubing when the solution is almost gone. Remove the tip from the rectum. Place the tip into the enema bag. Do not contaminate yourself, resident, or bed linens.
20. Ask the resident to hold the solution inside as long as possible.
Giving a cleansing enema (cont’d.)
21. Help resident to use bedpan, commode, or get to the bathroom. If the resident uses a commode or bathroom, apply robe and non-skid footwear. Lower the bed to its lowest position before the resident gets up.

Giving a cleansing enema (cont’d.)
22. Place toilet tissue and washcloths or wipes within resident’s reach. Ask the resident to clean his hands with the hand wipe when finished, if he is able. If the resident is using the bathroom, ask him not to flush the toilet when finished.
23. Place the call light within resident’s reach. Ask resident to signal when done. Leave the room.
Giving a cleansing enema (cont’d.)
24. Discard disposable equipment. Clean area.
25. Remove gloves. Wash your hands.
26. When called by the resident, return and put on clean gloves. Assist with perineal care as needed.
27. Take bedpan to the bathroom. Empty the bedpan carefully into the toilet. Note color, odor, and consistency of contents before flushing. If resident used toilet, check toilet contents.

Giving a cleansing enema (cont’d.)
28. Turn the faucet on with a paper towel. Rinse the bedpan with cold water first and empty it into the toilet. Place bedpan in proper area for cleaning or clean it according to facility policy.
29. Remove and discard gloves.
30. Wash your hands.
31. Make resident comfortable. Remove bath blanket and cover resident.

Giving a cleansing enema (cont’d.)
32. Return bed to lowest position. Remove privacy measures.
33. Place call light within resident’s reach.
34. Report any changes in resident to the nurse.
35. Document procedure using facility guidelines.

Giving a commercial enema
Equipment: 2 pairs of gloves, bath blanket, standard or oil retention commercial enema kit, bed protector, bedpan, lubricating jelly, washcloths or wipes, toilet tissue, robe, non-skid footwear
1. Wash your hands.
2. Identify yourself by name. Identify the resident by name.

Giving a commercial enema (cont’d.)
3. Explain procedure to the resident. Speak clearly, slowly, and directly. Maintain face-to-face contact whenever possible.
4. Provide for resident’s privacy with curtain, screen, or door.
5. Adjust bed to a safe level, usually waist high. Lock bed wheels.

Giving a commercial enema (cont’d.)
6. If the bed has side rails, raise side rail on far side of bed. Lower side rail nearest you.
7. Help resident into left-sided Sims’ position. Cover with a bath blanket.
8. Put on gloves.
9. Lower the side rail. Uncover resident enough to expose anus only.

Giving a commercial enema (cont’d.)
10. Place bed protector under resident. Place bedpan close to resident’s body.
11. Lubricate tip of bottle with lubricating jelly.
12. Ask resident to breathe deeply to relieve cramps during procedure.

Giving a commercial enema (cont’d.)
13. Place one hand on the upper buttock. Lift to expose the anus. Ask the resident to take a deep breath and exhale. Using other hand, gently insert the tip of the tubing about one and a half inches into the rectum. Stop if you feel resistance or if the resident complains of pain. Tell the nurse immediately.

Giving a commercial enema (cont’d.)
14. Slowly squeeze and roll the enema container so that the solution runs inside the resident. Only release pressure after removing tip from the rectum.
15. When tip is removed, place bottle inside the box upside-down.
16. Ask the resident to hold the solution inside as long as possible.

Giving a commercial enema (cont’d.)
17. Help resident to use bedpan, commode, or get to the bathroom. If the resident uses a commode or bathroom, apply robe and non-skid footwear. Lower the bed to its lowest position before the resident gets up.
18. Place toilet tissue and washcloths or wipes within resident’s reach. Ask the resident to clean his hands with the hand wipe when finished, if he is able. If the resident is using the bathroom, ask him not to flush the toilet when finished.

Giving a commercial enema (cont’d.)
19. Place the call light within resident’s reach. Ask resident to signal when done. Leave the room.
20. Discard disposable equipment. Clean area.
21. Remove gloves. Wash your hands.
22. When called by the resident, return and put on clean gloves. Assist with perineal care as needed.

Giving a commercial enema (cont’d.)
23. Take bedpan to the bathroom. Empty the bedpan carefully into the toilet. Note color, odor, and consistency of contents before flushing. If resident used toilet, check toilet contents.
24. Turn the faucet on with a paper towel. Rinse the bedpan with cold water first and empty it into the toilet. Place bedpan in proper area for cleaning or clean it according to facility policy.
Giving a commercial enema (cont’d.)
25. Remove and discard gloves.
26. Wash your hands.
27. Make resident comfortable. Remove bath blanket and cover resident.
28. Return bed to lowest position. Remove privacy measures.

Giving a commercial enema (cont’d.)
29. Place call light within resident’s reach.
30. Report any changes in resident to the nurse.
31. Document procedure using facility guidelines.

17Bowel Elimination
5. Demonstrate how to collect a stool specimen
Remember these points about stool specimens: • Stool is tested for blood, pathogens, and other things. • Stool must be warm if being tested for ova and parasites. • Urine or tissue in a stool sample can ruin the sample.

Collecting a stool specimen
Equipment: specimen container and lid, label (labeled with resident’s name, room number, date, and time), 2 tongue blades, 2 pairs of gloves, bedpan (if resident cannot use portable commode or toilet), “hat” for toilet (if resident uses toilet or commode), 2 plastic bags, toilet tissue, washcloth or towel, supplies for perineal care, lab slip, if required
Ask the resident to let you know when he can have a bowel movement. Be ready to collect the specimen.
1. Wash your hands.
Collecting a stool specimen (cont’d.)
2. Identify yourself by name. Identify the resident by name.
3. Explain procedure to the resident. Speak clearly, slowly, and directly. Maintain face-to-face contact whenever possible.
4. Provide for resident’s privacy with curtain, screen, or door.
5. Put on gloves.

Collecting a stool specimen (cont’d.)
6. When the resident is ready to move bowels, ask him not to urinate at the same time and not to put toilet paper in with the sample. Provide a plastic bag for toilet paper.
7. Fit hat to toilet or commode, or provide resident with bedpan. Ask the resident to signal when he is finished with the bowel movement. Make sure call light is within reach and leave the room.

Collecting a stool specimen (cont’d.)
8. When called by resident, return and help with perineal care, if needed. Help resident wash his hands.
9. Remove and dispose of gloves.
10. Wash your hands.
11. Put on clean gloves.

Collecting a stool specimen (cont’d.)
12. Using the two tongue blades, take about two tablespoons of stool, and put it in the container. Cover it tightly.
13. Place the container in a plastic bag.
14. Wrap the tongue blades in toilet paper and throw them away. Empty the bedpan or container into the toilet. Rinse and clean equipment. Store.
Collecting a stool specimen (cont’d.)
15. Remove and dispose of gloves.
16. Wash your hands.
17. Return bed to lowest position if adjusted. Remove privacy measures.
18. Place call light within resident’s reach.

Collecting a stool specimen (cont’d.)
19. Report any changes in resident to the nurse.
20. Take specimen and lab slip to proper area. Document procedure using facility guidelines. Note amount and characteristics of stool.

17Bowel Elimination
Define the following term:Occult
hidden; difficult to see or observe.

17Bowel Elimination
6. Explain occult blood testing
REMEMBER:Blood in the stool may be a sign of a serious problem, such as cancer. The Hemoccult test is one test that checks for occult blood.

Testing a stool specimen for occult blood
Equipment: labeled stool specimen, Hemoccult® test kit or other ordered test kit, 1 or 2 tongue blades, paper towel, plastic bag, gloves
1. Wash your hands.
2. Put on gloves.
3. Open the test card.
4. Pick up a tongue blade. Get small amount of stool from specimen container.
Testing a stool specimen for occult blood (cont’d.)
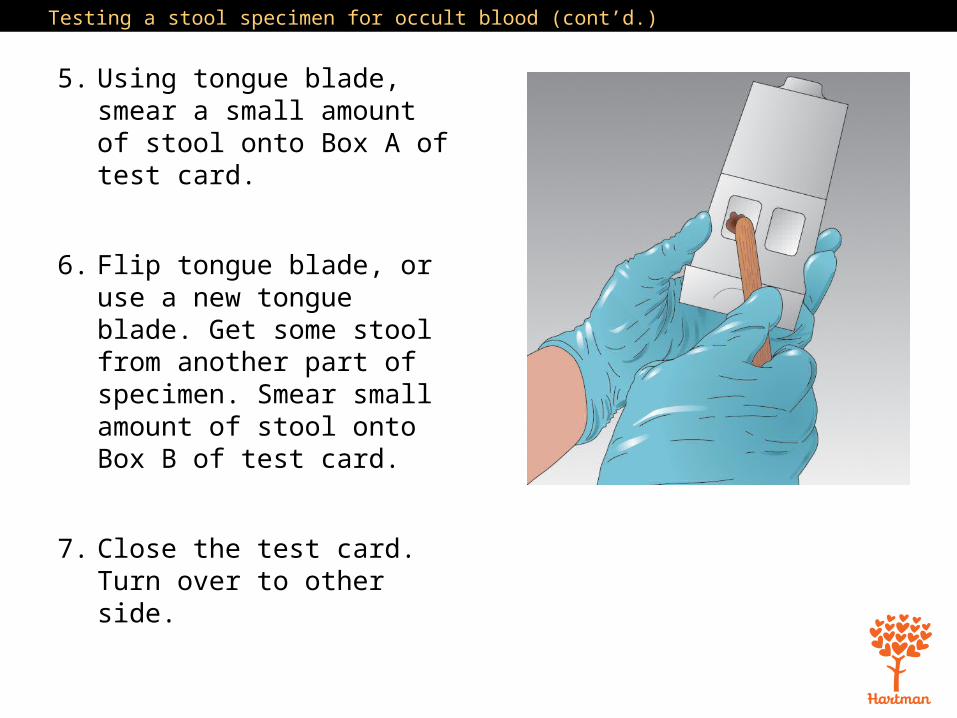
5. Using tongue blade, smear a small amount of stool onto Box A of test card.
6. Flip tongue blade, or use a new tongue blade. Get some stool from another part of specimen. Smear small amount of stool onto Box B of test card.
7. Close the test card. Turn over to other side.

Testing a stool specimen for occult blood (cont’d.)
8. Open the flap, and open the developer. Apply developer to each box. Follow manufacturer’s instructions.
9. Wait the amount of time listed in instructions, usually between 10 and 60 seconds.
10. Watch the squares for any color changes. Record color changes. Follow instructions.

Testing a stool specimen for occult blood (cont’d.)
11. Place tongue blade and test packet in plastic bag, and dispose of plastic bag properly.
12. Remove and dispose of gloves.
13. Wash your hands.
14. Document procedure using facility guidelines.

17Bowel Elimination
Define the following terms:
Ostomya surgically-created opening from an area inside the body to the outside.
Ureterostomysurgically created opening from an ureter to the abdomen for urine to be eliminated.
Ileostomy surgically-created opening into the end of the small intestine to allow feces to be expelled; causes stool to be liquid.

17Bowel Elimination
7. Define the term “ostomy” and list care guidelines
Remember these guidelines for ostomy care: • Make sure resident receives good skin care and hygiene.
Ostomy bag should be emptied and cleaned or replaced whenever stool is eliminated.
• Always wear gloves and wash hands carefully. Follow standard precautions.
• Teach proper handwashing techniques to residents with ostomies.
17Bowel Elimination
7. Define the term “ostomy” and list care guidelines
Guidelines for ostomy care (cont’d.): • Skin barriers protect skin around stoma from irritation.• Residents with an ileostomy may experience food blockage, in
which a large amount of undigested food collects in the small intestine and blocks passage of stool. Follow diet instructions in the care plan and the nurse’s instructions for assisting with feeding.
• Be sensitive and supportive when working with residents with ostomies. Always provide privacy for ostomy care.

Caring for an ostomy
Equipment: bedpan, disposable bed protector, bath blanket, clean ostomy bag and belt/appliance, toilet paper or gauze squares, basin of warm water, soap or cleanser, washcloth, skin cream as ordered, 2 towels, plastic disposable bag, gloves
1. Wash your hands.
2. Identify yourself by name. Identify the resident by name.

Caring for an ostomy (cont’d.)
3. Explain procedure to the resident. Speak clearly, slowly, and directly. Maintain face-to-face contact whenever possible.
4. Provide for resident’s privacy with curtain, screen, or door.
5. Adjust bed to a safe level, usually waist high. Lock bed wheels.

Caring for an ostomy (cont’d.)
6. Place bed protector under resident. Cover resident with a bath blanket. Pull down the top sheet and blankets. Only expose ostomy site. Offer resident a towel to keep clothing dry.
7. Put on gloves.
8. Remove ostomy bag carefully. Place it in plastic bag. Note the color, odor, consistency, and amount of stool in the bag.

Caring for an ostomy (cont’d.)
9. Wipe the area around the stoma with toilet paper or gauze squares. Discard paper/gauze in plastic bag.
10. Using a washcloth and warm soapy water, wash the area in one direction, away from the stoma. Pat dry with another towel. Apply cream as ordered.
Caring for an ostomy (cont’d.)
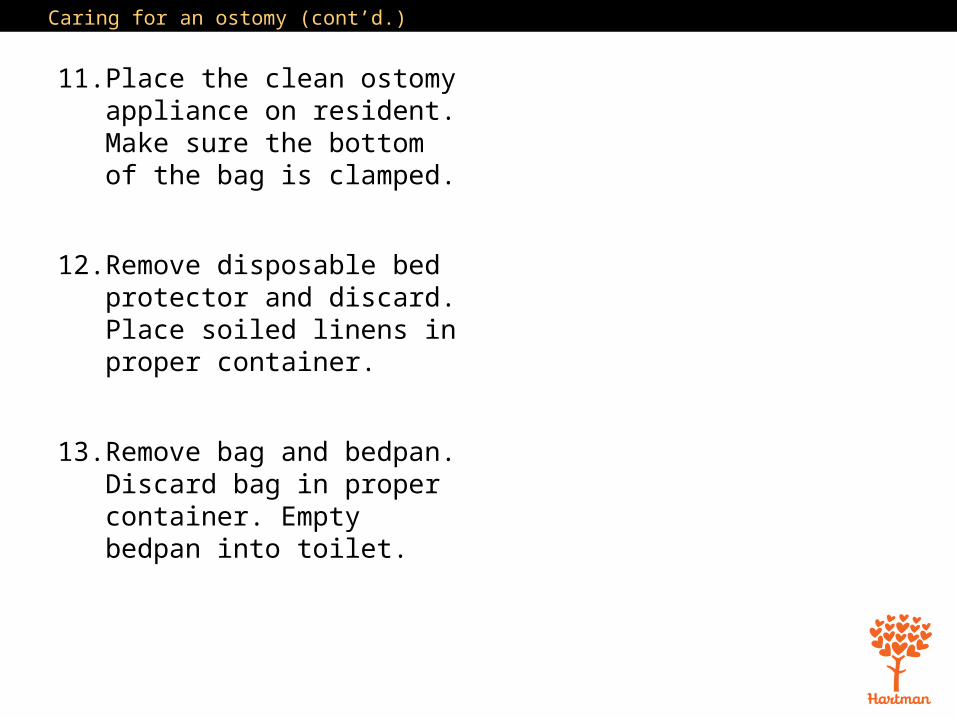
11. Place the clean ostomy appliance on resident. Make sure the bottom of the bag is clamped.
12. Remove disposable bed protector and discard. Place soiled linens in proper container.
13. Remove bag and bedpan. Discard bag in proper container. Empty bedpan into toilet.

Caring for an ostomy (cont’d.)
14. Rinse bedpan and pour rinse water into toilet. Place container in proper area for cleaning or clean it according to facility policy.
15. Remove and dispose of gloves.
16. Wash your hands.
17. Make resident comfortable. Make sure sheets are free from wrinkles and the bed free from crumbs.
Caring for an ostomy (cont’d.)
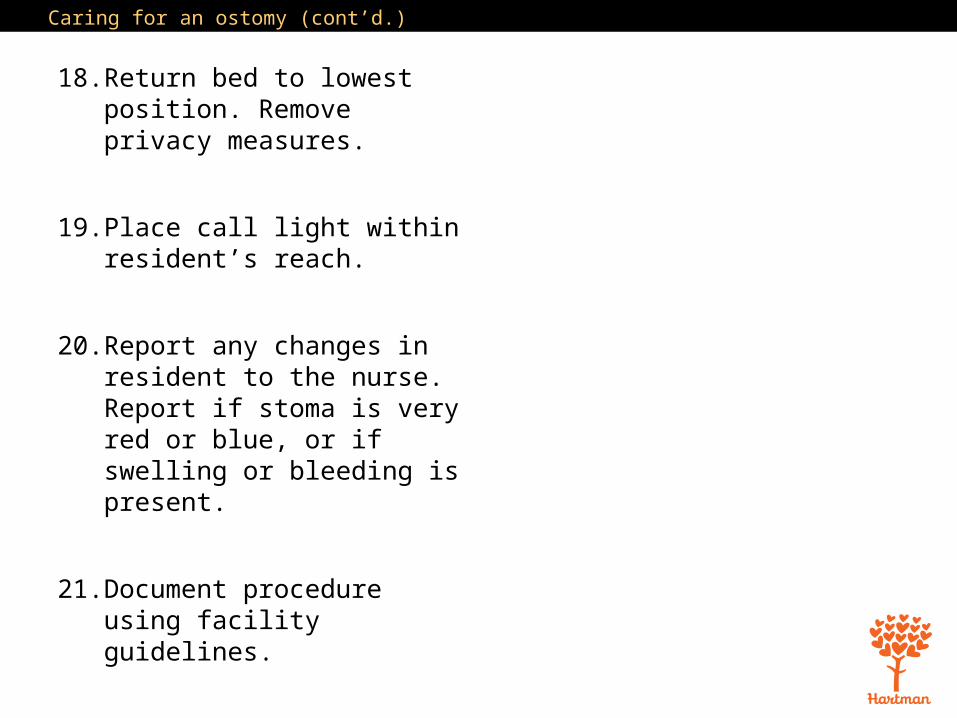
18. Return bed to lowest position. Remove privacy measures.
19. Place call light within resident’s reach.
20. Report any changes in resident to the nurse. Report if stoma is very red or blue, or if swelling or bleeding is present.
21. Document procedure using facility guidelines.

17Bowel Elimination
8. Explain guidelines for assisting with bowel retraining
NAs may assist in bowel retraining, following these guidelines: • Follow standard precautions. Wear gloves. • Explain the schedule to the resident. Follow the schedule. • Keep a record of bowel habits. • Encourage plenty of fluids.• Encourage foods high in fiber. • Answer call lights promptly. • Provide privacy.
17Bowel Elimination
8. Explain guidelines for assisting with bowel retraining
Guidelines for bowel retraining (cont’d.): • Never rush resident. • Assist with good perineal care. • Discard wastes properly.• Discard clothing protectors and incontinence briefs properly. • Some facilities use washable bed pads or briefs. Follow
standard precautions when placing these items in the laundry.• Keep an accurate record of elimination. • Offer positive reinforcement but do not talk to residents as if
they are children.• Never show frustration or anger.

17Bowel Elimination
8. Explain guidelines for assisting with bowel retraining
REMEMBER:Always keep a positive attitude when assisting residents who are going through bowel retraining. Think about how you would feel if you were unable to control elimination.