15-31584 encompass user guide.pdf (10/11/16) - mgic estimate and closing disclosure, ... access...
TRANSCRIPT

1
GET CONNECTEDwith MGIC through Encompass®
User GuideVersion 4.0
mgic.com

2
Table of Contents
Encompass® and Ellie Mae® are registered trademarks of Ellie Mae, Inc. DU Express is a service accessing Desktop Underwriter®, a registered trademark of Fannie Mae. Loan Product AdvisorSM is a Freddie Mac service mark.
Quick Guide .................................................................................................................3
Order Rate Quotes ...................................................................................................3
Quick Guide .................................................................................................................5
Order Delegated MI..................................................................................................5
Quick Guide ................................................................................................................. 7
Order Non-Delegated MI ........................................................................................7
Quick Guide .................................................................................................................9
Order Contract Underwriting ...............................................................................9
I. Admin Guide ............................................................................................................11
A. Password Manager .............................................................................................11
B. Rate Quote - Only User Persona ................................................................... 12
C. Trigger for PMI LTV Cut-off.............................................................................. 13
II. Access MGIC – Direct ......................................................................................... 16
III. Order Rate Quotes ............................................................................................. 18
IV. Order MI ................................................................................................................ 21
A. Delegated ............................................................................................................. 21
B. Non-Delegated ................................................................................................... 26
C. Contract Underwriting .....................................................................................31
D. Submit Post-Close Documents ................................................................... 33

3
Quick GuideOrder Rate Quotes
1. Select Rate Quote
To get a rate quote, select Rate Quote as the Request Type and enter the appropriate information.
Click Rate Quote.
2. View Rate Quote
Rate quotes appear under the Check Status/View Result tab. Highlight the rate quote and click View to view the rate quote PDF.
✂

4
Quick Guide Order Rate Quotes (continued)3. Import MI Rates
To import the MI premium information into the MIP/PMI/Guarantee Fee Calculation screen, Loan Estimate and Closing Disclosure, select the Rate Quote and click Import MI Rates.
✂

5
✂
Quick GuideOrder Delegated MI
1. Select Order Delegated MI
To order delegated MI, select Order Delegated MI as the Request Type and enter the appropriate MI information.
Click Order.
2. View Commitment Certificate
Under the Check Status/View Results tab, highlight the complete delegated MI order and click View to view the PDF of the most recent Commitment Certificate.

6
Quick GuideOrder Delegated MI (continued)3. Import MI Rates
To import the MI premium information into the MIP/PMI/Guarantee Fee Calculation screen, Loan Estimate and Closing Disclosure, select the delegated MI order response and click Import MI Rates.
4. Resubmit Delegated MI Order (Optional)
As changes occur to the loan, you may resubmit the loan data by selecting Resubmit Delegated MI Order in the Request Type drop-down menu.
Upload any documents if needed.
Click Resubmit.
✂

7
Quick GuideOrder Non-Delegated MI
1. Select Order Non-Delegated MI
Select Order Non-Delegated MI from the Request Type drop-down to activate the Upload Attachments section and enter the appropriate MI information.
2. Add Attachments
a. Click Upload Attachments to open the Attachment List
b. Click the plus icon to add an attachment
c. Enter any comments
d. Browse for the document
e. Click Continue
f. Click Attach to attach the documents to the loan file
✂

8
Quick GuideOrder Non-Delegated MI (continued)3. Order Non-Delegated MI
Click Order to submit the loan file with the attached loan documents.
4. Resubmit Non-Delegated MI Order (Optional)
As changes occur to the loan, you may resubmit the loan data and any new documents or conditions on an existing loan by selecting Resubmit Non-Delegated MI Order in the Request Type drop-down menu. Upload any documents if needed.
Click Resubmit.
✂

9
Quick GuideOrder Contract Underwriting
1. Order Contract UW
Select Order Contract UW from the Request Type drop-down.
Check Contract UW with MI if you’d like to have MI coverage on the loan.
Note: To set up Contract Underwriting, please contact your MGIC Account Manager: mgic.com/directory
2. Attach Documents
a. Click Upload Attachments to open the Attachment List
b. Click the plus icon to add an attachment
c. Enter any comments
d. Browse for the document
e. Click Continue
f. Click Attach to attach the documents to the loan file
✂

10
Quick GuideOrder Contract Underwriting (continued)3. Resubmit Contract UW (Optional)
As changes occur to the loan, you may resubmit the loan data and any new documents or conditions on an existing Contract Underwriting loan by selecting Resubmit Contract UW Order in the Request Type drop-down menu.
Upload any documents if needed.
Click Resubmit.
✂

11
I. Admin GuideA. Password Manager1. Access Settings
From within Encompass, go to Encompass > Settings.
2. Access Password Management
Go to Company/User Setup > Services Password Management.
3. Create Password Setting
Click the New Password Setting icon to open the Account Details screen.
4. Activate MGIC
For the Service Category, select Mortgage Insurance. For the Provider Name, select MGIC – Direct.
The Description field is free-form and can contain whatever is meaningful to you.
MGIC provides the User ID and Password.
Finally, select the users that should have access to the MGIC – Direct interface.
Click Save.

12
I. Admin Guide (continued)
B. Rate Quote - Only User Persona1. Access Personas
Go to Encompass Settings > Company/User Setup > Personas. Click the plus icon to create a new persona or copy an existing one and rename it to MGICRateQuoteOnly.
2. Access User
Under Organization/Users, open the user profile by either double-clicking the row or by highlighting the row and clicking Edit User.
3. Edit User
Click the Add Persona icon, check MGICRateQuoteOnly and click OK.

13
I. Admin Guide (continued)
C. Trigger for PMI LTV Cut-off1. Access Triggers
Go to Encompass Settings > Business Rules > Field Triggers.
2. Create Trigger
Click on the New icon to open the Add/Edit Trigger screen and name the Trigger.
3. Create Event
Staying on the Add/Edit Trigger screen, in the Add and apply field events section, click Add.

14
I. Admin Guide (continued)
C. Trigger for PMI LTV Cut-off (continued)4. Enter Activation Section
On the Add/Edit Field Event screen, in the Activation section, enter the following values shown on the right.
5. Enter Action Section
Click Add to open the Add/Edit Assignment screen. Enter the following values shown on the right.
Click OK.
6. Add Field Event
When you’ve finished, click OK.

15
I. Admin Guide (continued)
C. Trigger for PMI LTV Cut-off (continued)7. Save Field Event
On the Add/Edit Trigger screen, click Save.
8. Activate Trigger
To activate the trigger, highlight the new trigger and click Activate. The MIP/PMI/Guarantee Fee Calculation screen will automatically update with the Cancel At LTV.
Note: The changes won’t take effect until the admin and user(s) log out and back in.

16
II. Access MGIC – Direct
1. Access MI
There are two ways to access the Mortgage Insurance section. Within a loan file, either:
a. Go to Services > Mortgage Insurance on the top menu, or
b. Go to Services > Order Mortgage Insurance on the side tab
2. Add MGIC
Under the All Providers tab, select MGIC – Direct and click Add to My List.

17
II. Access MGIC – Direct (continued)
3. Access MGIC
MGIC – Direct now appears on the My Providers tab as a default MI company. Select MGIC – Direct and click Submit, or double-click MGIC – Direct.
4. Enter Login Information
Enter your assigned User ID, Password and MGIC Branch ID (optional). This is NOT your Loan Center login. If you don’t have this login information, contact your company’s Encompass system administrator or MGIC’s Customer Service at [email protected] or 1-800-424-6442.
If your login information is already pre-populated, your company’s system administrator may have already automatically set up your login information.
Check Save Login Information.
Note: If you entered any login information, you must order a rate quote or MI once in order for Encompass to remember the login information.

18
III. Order Rate Quotes
1. Select Rate Quote
To get a rate quote, select Rate Quote as the Request Type and enter the appropriate information.
If needed, click MI Coverage % to see the GSE MI coverage percentage requirements.
If you’ve submitted the loan to both DU® and Loan Product AdvisorSM, we’ll prompt you to choose the AU result represented for underwriting purposes.
Click Rate Quote.
Note: The Request Type field will always default to Rate Quote until you order MI.
2. View Rate Quote
You may order as many rate quotes as you like; the most recent appears under the Check Status/View Result tab. Highlight the rate quote and click View to view the rate quote PDF.
The rate quote PDF is automatically placed in your eFolder.

19
III. Order Rate Quotes (continued)
3. Uncheck Lock Box
Go to Forms > 1003 Page 1 > MIP/FF icon. Make sure the Lock box in the MIP/PMI/ Guarantee Fee Calculation screen is unchecked in order to import the MI premium information into the MIP/PMI/Guarantee Fee Calculation screen, Loan Estimate and Closing Disclosure.
4. Import MI Rates
To import the MI premium information into the MIP/PMI/Guarantee Fee Calculation screen, Loan Estimate and Closing Disclosure, select the Rate Quote and click Import MI Rates.

20
III. Order Rate Quotes (continued)
5. Select MI Rates to Import
Select the fees to import and click Import Fees.
6. View MI Rates
To view the imported MI premiums, go to Forms >1003 Page 1 > MIP/FF icon. The Monthly Mortgage Insurance section automatically displays the imported rates.

21
IV. Order MIA. Delegated1. Order Delegated MI
To order delegated MI, select Order Delegated MI as the Request Type and enter the appropriate information. Enter an MGIC Program ID code if applicable. If you’ve submitted the loan to both DU® and Loan Product Advisor, we’ll prompt you to choose the AU result represented for underwriting purposes.
Click Order.
2. Check Status
If a loan is pending MGIC underwriting review, click Check Status to get the updated status.

22
IV. Order MI (continued)
A. Delegated (continued)3. View Commitment Certificate
Under the Check Status/View Result tab, select the Commitment Certificate you wish to view and click View. Import the MI and ULDD fields the same way as on the initial rate quote submission.
23
IV. Order MI (continued)
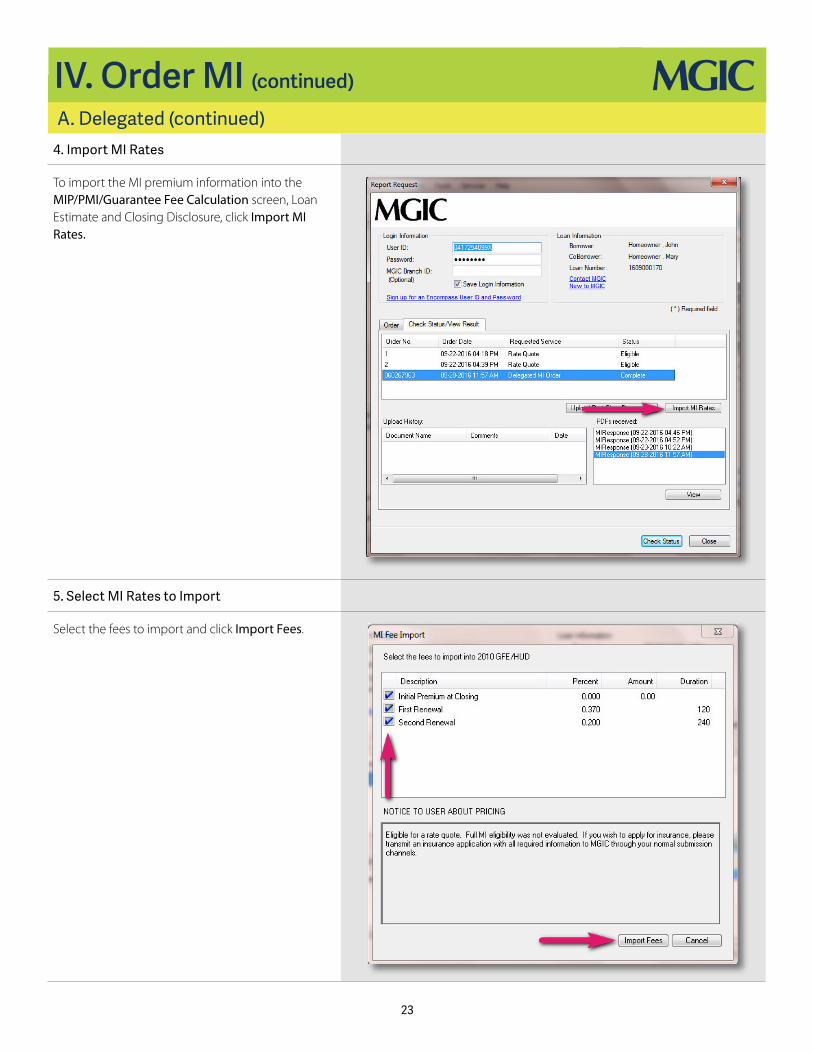
A. Delegated (continued)4. Import MI Rates
To import the MI premium information into the MIP/PMI/Guarantee Fee Calculation screen, Loan Estimate and Closing Disclosure, click Import MI Rates.
5. Select MI Rates to Import
Select the fees to import and click Import Fees.

24
IV. Order MI (continued)
A. Delegated (continued)6. View Imported Rates
To view the imported MI premiums, go to Forms > 1003 Page 1 > MIP/FF icon. The Monthly Mortgage Insurance section automatically displays the imported rates.
7. View Imported ULDD Fields
To view the imported File # (MGIC Commitment Certificate Number), PMI Coverage and MI Company Name Type fields, go to Forms > ULDD/PDD > Mortgage Insurance.

25
IV. Order MI (continued)
A. Delegated (continued)8. View Imported Certificate Number
To view the imported Commitment Certificate number, go to page 1 of the Closing Disclosure.
9. Resubmit Delegated MI Order (Optional)
As changes occur to the loan, you may resubmit the loan data by selecting Resubmit Delegated MI Order in the Request Type drop-down menu.
Upload any documents if needed.
Click Resubmit.

26
IV. Order MI (continued)
B. Non-Delegated1. Select Order Non-Delegated MI
Select Order Non-Delegated MI from the Request Type drop-down to activate the Upload Attachments section and enter the appropriate MI information. Enter an MGIC Program ID if applicable.
2. Open Attachment List
Click Upload Attachments to open the Attachment List.

27
IV. Order MI (continued)
B. Non-Delegated (continued)3. Add Attachment
Click the plus icon to add an attachment.
Enter any comments about the loan for the Underwriter. Comments can contain up to 100 characters.
4. Browse Documents
There are two ways to select documents: by uploading a document from the computer or by selecting a document from the eFolder.
a. To upload documents from your PC, select Browse from Computer, click Continue to browse for the document, locate the document and click Open
b. To add documents from the eFolder, select Browse from Encompass eFolder and click Continue. Select the document(s) you wish to add and click Continue.

28
IV. Order MI (continued)
B. Non-Delegated (continued)5. Attach Documents
Once all the necessary documents are listed, click Attach to attach them to the loan file.
6. Order Non-Delegated MI
The attachments now appear in the Upload Attachments field under the Order tab. After entering the appropriate MI data, click Order to submit the loan file with the attached loan documents.
29
IV. Order MI (continued)
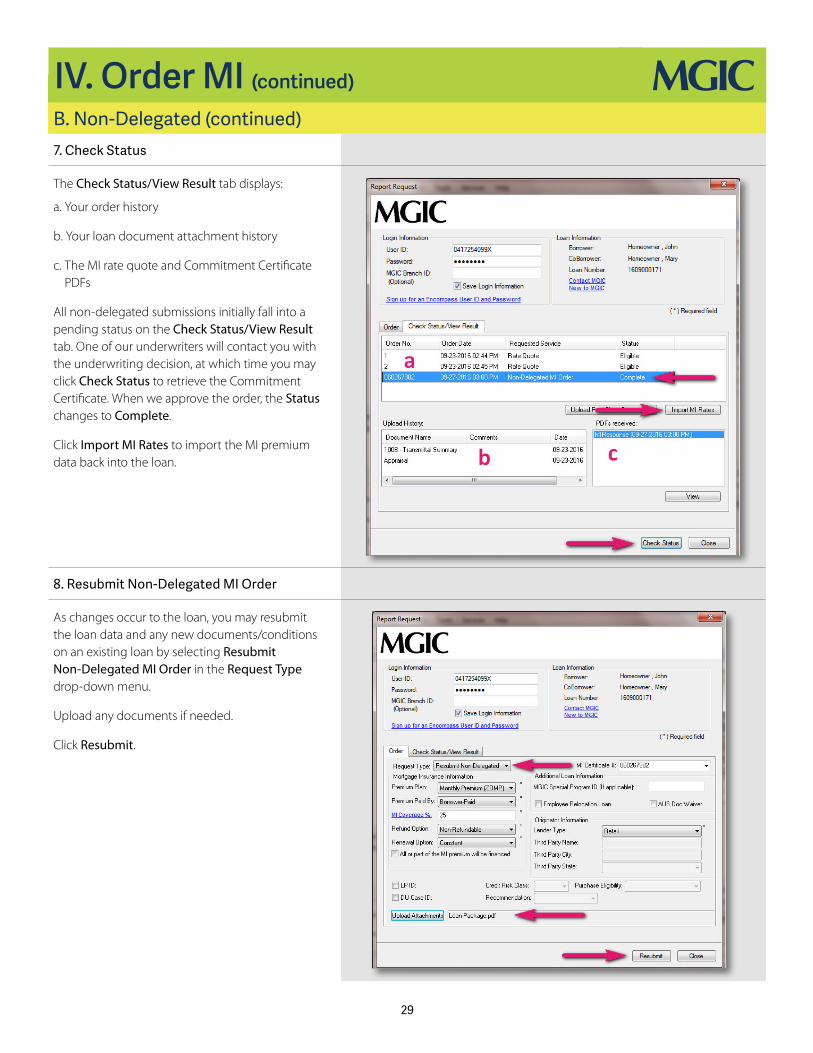
B. Non-Delegated (continued)7. Check Status
The Check Status/View Result tab displays:
a. Your order history
b. Your loan document attachment history
c. The MI rate quote and Commitment Certificate PDFs
All non-delegated submissions initially fall into a pending status on the Check Status/View Result tab. One of our underwriters will contact you with the underwriting decision, at which time you may click Check Status to retrieve the Commitment Certificate. When we approve the order, the Status changes to Complete.
Click Import MI Rates to import the MI premium data back into the loan.
8. Resubmit Non-Delegated MI Order
As changes occur to the loan, you may resubmit the loan data and any new documents/conditions on an existing loan by selecting Resubmit Non-Delegated MI Order in the Request Type drop-down menu.
Upload any documents if needed.
Click Resubmit.

30
IV. Order MI (continued)
B. Non-Delegated (continued)9. View Commitment Certificate
Under the Check Status/View Result tab, click View to view the PDF of the most recent Commitment Certificate.
Import the MI and ULDD fields the same way as on the initial rate quote submission.

31
IV. Order MI (continued)
C. Contract Underwriting1. Select Order Contract UW
Select Order Contract UW from the Request Type drop-down menu.
Check Contract UW with MI if you’d like to have MI coverage on the loan.
Note: To set up Contract Underwriting, please contact your MGIC Account Manager: mgic.com/directory
2. Attach Documents
a. Click Upload Attachments to open the Attachment List
b. Click the plus icon to add an attachment
c. Enter any comments
d. Browse for the document
e. Click Continue
f. Click Attach to attach the documents to the loan file
3. Order Contract UW
Click Order.

32
IV. Order MI (continued)
C. Contract Underwriting (continued)4. View Status
The Check Status/View Result tab displays:
a. Your order history
b. Your loan document attachment history
c. The MI rate quote and Commitment Certificate PDFs
All Contract UW submissions initially fall into a pending status on the Check Status/View Result tab.
5. Resubmit Contract UW
As changes occur to the loan, you may resubmit the loan data and any new documents or conditions on an existing Contract UW loan by selecting Resubmit Contract UW in the Request Type drop-down menu. Upload any documents.
Click Resubmit.

33
IV. Order MI (continued)
D. Submit Post-Close Documents1. Open Attachment List
Once the MI order is complete and you’ve already closed, you may submit post-closing documents from the Check Status/View Result tab. Click Upload Post-Close Documents to open the Attachment List.
2. Add Attachment
Click the plus icon to open the Attachment List screen.
Enter any comments about the loan for the underwriter. Comments can contain up to 100 characters.
34
IV. Order MI (continued)
D. Submit Post-Close Documents (continued)3. Upload Post-Closing Docs
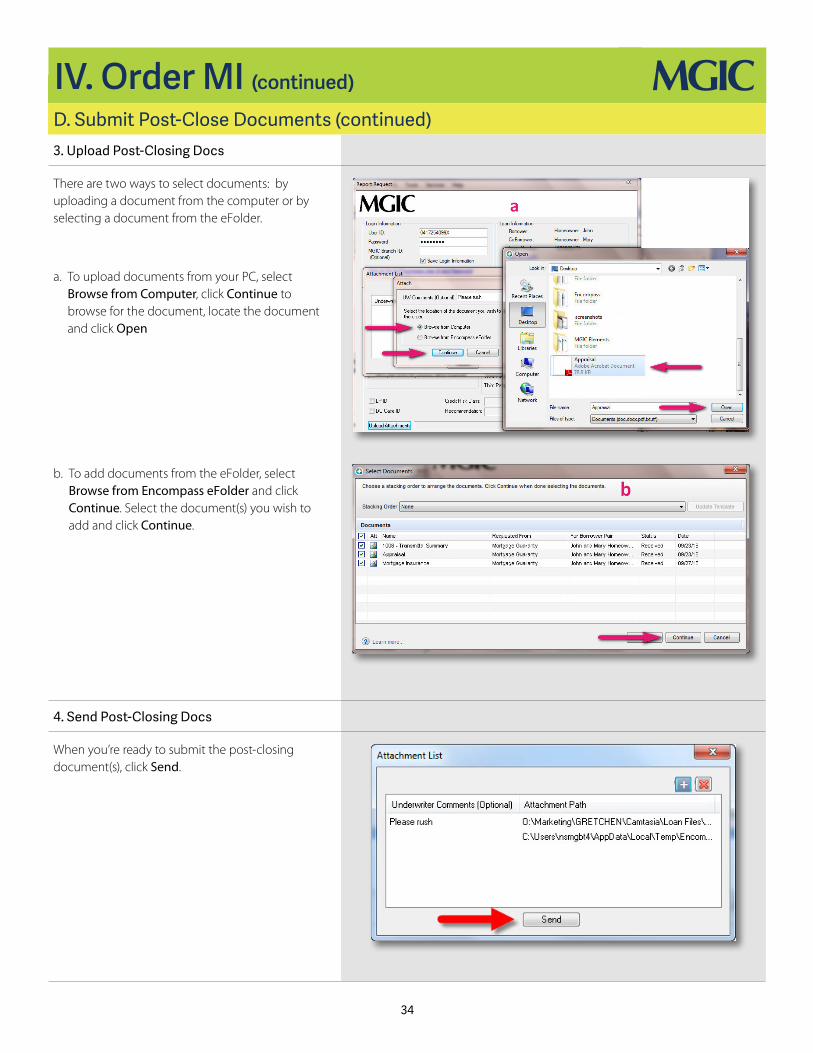
There are two ways to select documents: by uploading a document from the computer or by selecting a document from the eFolder.
a. To upload documents from your PC, select Browse from Computer, click Continue to browse for the document, locate the document and click Open
b. To add documents from the eFolder, select Browse from Encompass eFolder and click Continue. Select the document(s) you wish to add and click Continue.
4. Send Post-Closing Docs
When you’re ready to submit the post-closing document(s), click Send.

35
ResourcesDocument List
Loan Document ListIt’s NOT required to place your documents in this order. This list is for informational purposes.
Appraisal
Assets
Borrower Authorization Signed
Closing Disclosure
Condo Questionnaire
Cover sheet for Return Doc Delivery
Credit
Disclosure
Divorce Decree
DU Findings
Flood Certification
Home Inspection Report
Income
Lease Agreement
Lender Decision Document
Lender Notes
Loan Application (1003)
Loan Application (1003) Signed
Loan Estimate
LP Feedback
Miscellaneous
Mortgage/DOT
Note
Other AU Results
Pay History/Collection Notes
Program Guidelines
Purchase Agreement
Registration/Rate Lock Confirmation
Returned NOLA
Tax Returns
Title
Transmittal Summary (1008)
Vendor Report

36
Notes
User ID:Password:Branch ID:

37
Notes

15-31584 10/16
Contacts:MGICIntegration [email protected]
Your MGIC Account Managermgic.com/directory