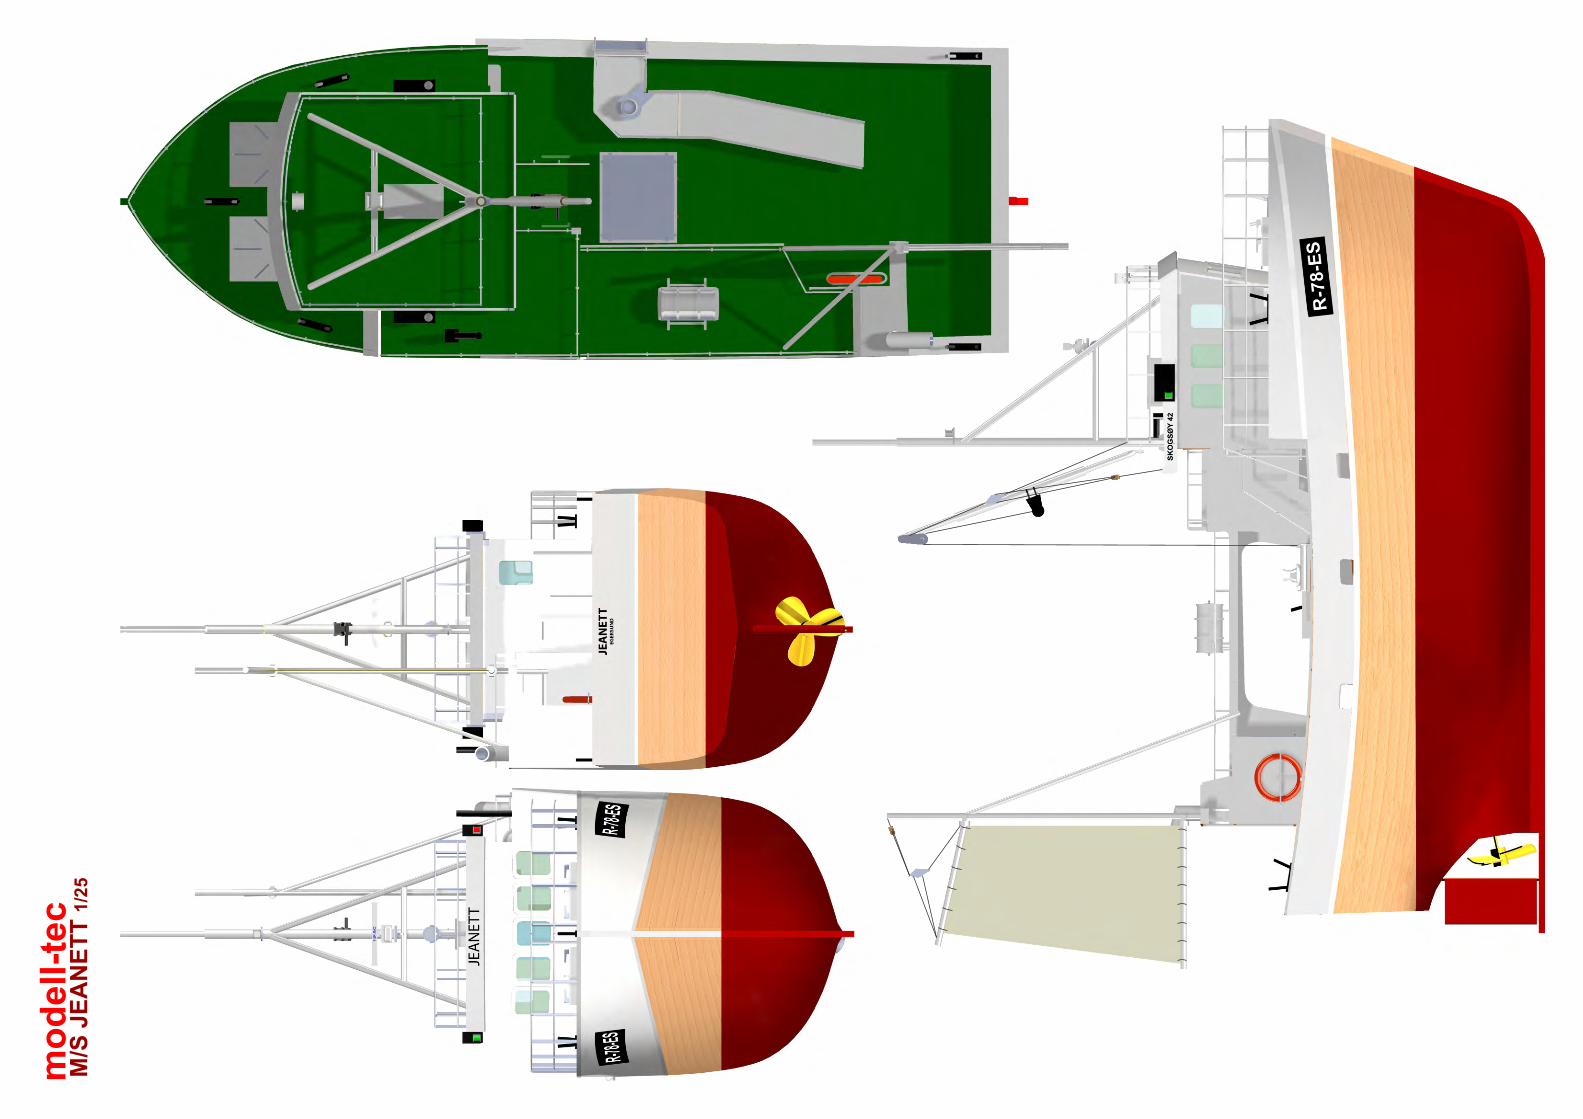
1/25 modell-tec m/s jeanett
TRANSCRIPT
M/S
JE
AN
ET
T 1
/25
mo
de
ll-t
ec
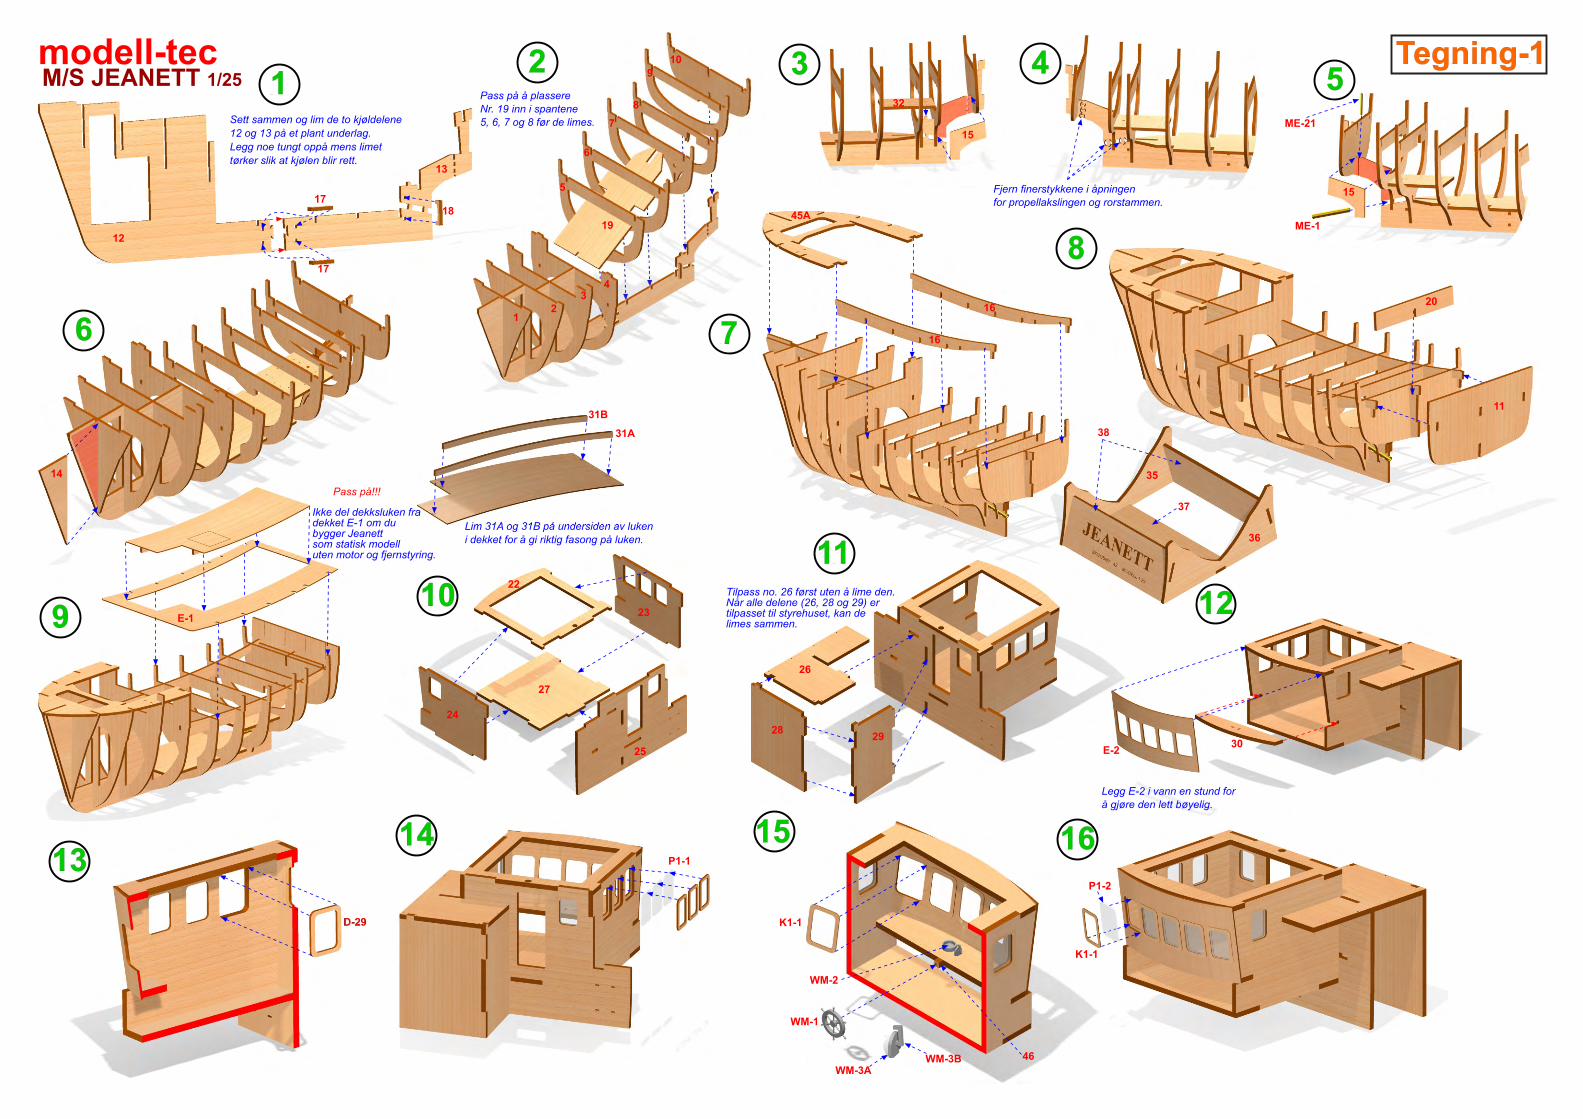
L�m 31A og 31B på unders�den av luken� dekket for å g� r�kt�g fasong på luken.
Fjern finerstykkene � åpn�ngenfor propellaksl�ngen og rorstammen.
Legg E-2 � vann en stund forå gjøre den lett bøyel�g.
M/S JEANETT 1/25modell-tec
Pass på!!!
Ikke del dekksluken fradekket E-1 om dubygger Jeanettsom stat�sk modelluten motor og fjernstyr�ng.
T�lpass no. 26 først uten å l�me den.Når alle delene (26, 28 og 29) ert�lpasset t�l styrehuset, kan del�mes sammen.
Sett sammen og l�m de to kjøldelene
12 og 13 på et plant underlag.
Legg noe tungt oppå mens l�met
tørker sl�k at kjølen bl�r rett.
12
13
17
17
18
12
34
5
6
7
8
9
10
15
14
16
16
45A
E-1
31B
31A
19
32
23
24
27
22
25
26
2829
E-230
D-29
15
ME-1
P1-1
K1-1
P1-2
K1-1
WM-1
WM-2
WM-3BWM-3A
46
11
20
36
35
37
38
ME-21
12 3 4
5
6 7
8
910
11
12
1314 15 16
Tegn�ng-1Pass på å plassereNr. 19 �nn � spantene5, 6, 7 og 8 før de l�mes.
M/S JEANETT 1/25modell-tec
Ta bort
D-9
D-10
D-12
D-13
D-4
E-11
D-34
E-19
21
33
E-21
E-22
E-22
E-20
P2-2
P2-9
S-1
P2-8
P2-7 P2-14
P2-13
P2-11
P2-12
ME-4
ME-3
WM-4
WM-5
WM-6
P3-7
WM-7
ME-5
ME-2
P2-4
ME-6
ME-8
ME-9
ME-7
WM-8
P3-5
WM-11
WM-12
D-48
D-49
D-49
D-50
D-50
D-51
D-30
D-31
D-32
WM-7
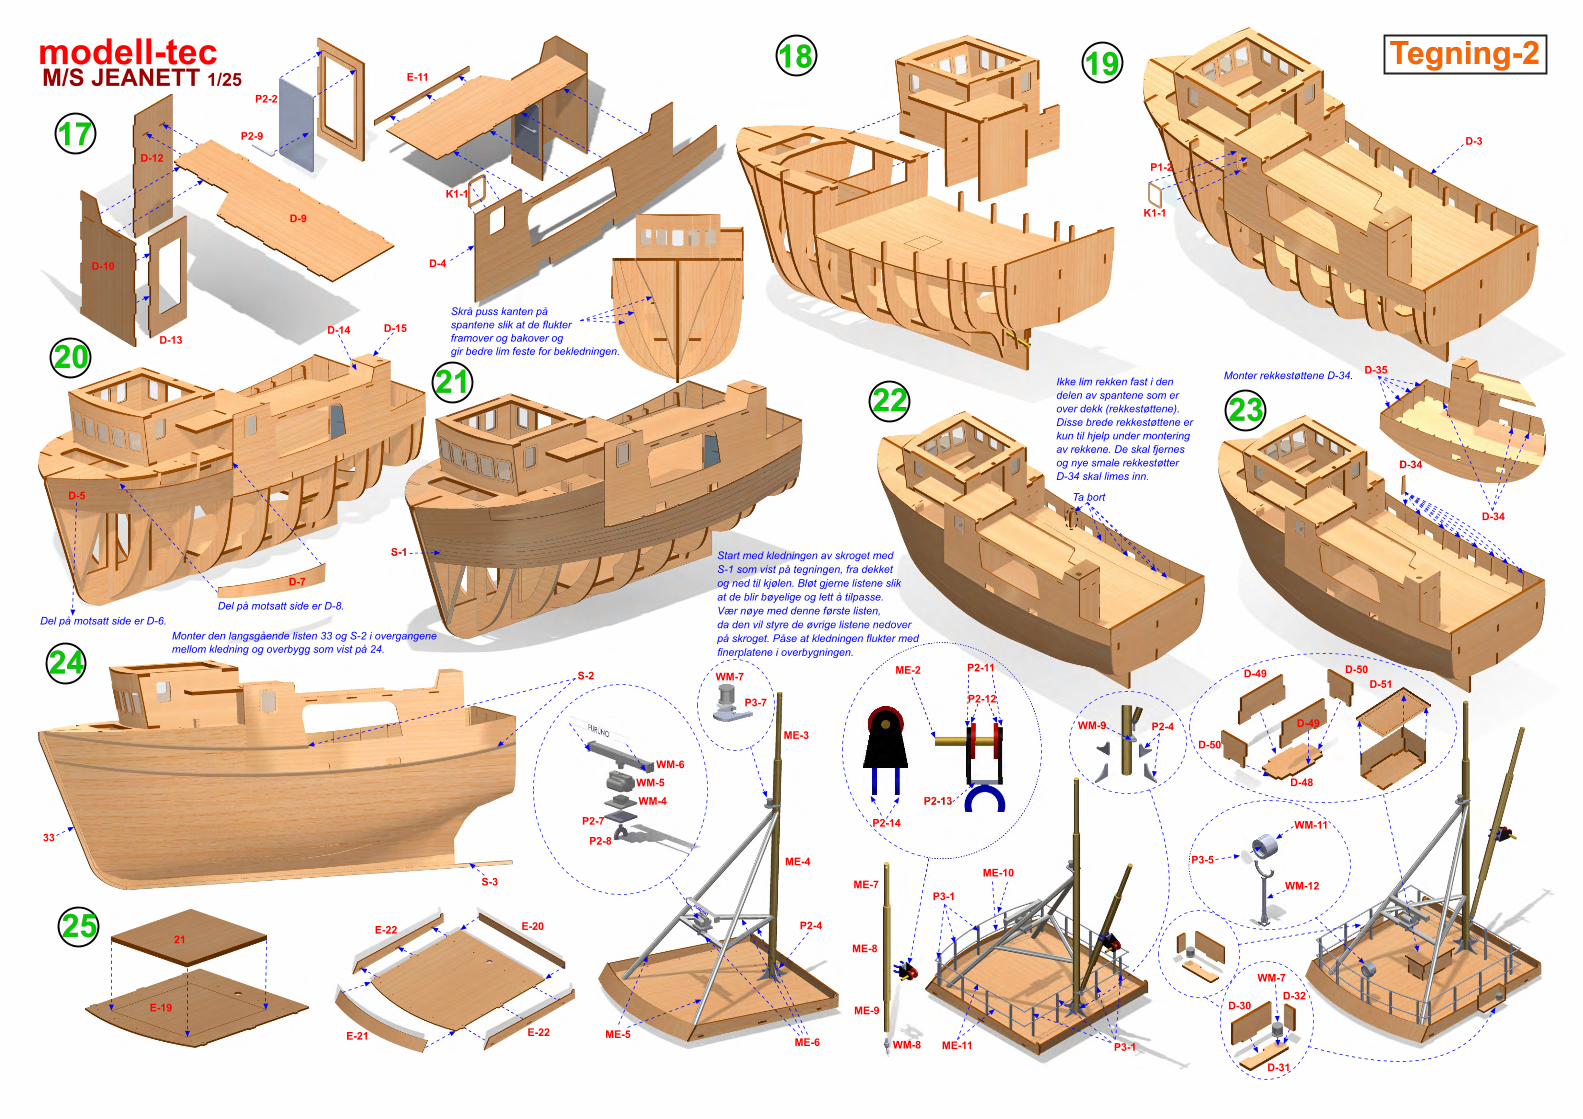
Del på motsatt s�de er D-6.
D-5
D-7
D-15D-14
Start med kledn�ngen av skroget med
S-1 som v�st på tegn�ngen, fra dekket
og ned t�l kjølen. Bløt gjerne l�stene sl�k
at de bl�r bøyel�ge og lett å t�lpasse.
Vær nøye med denne første l�sten,
da den v�l styre de øvr�ge l�stene nedover
på skroget. Påse at kledn�ngen flukter med
finerplatene � overbygn�ngen.
D-35
D-34
ME-10
P3-1
ME-11
WM-9 P2-4
P3-1
S-2
S-3
P1-2
K1-1
K1-1
Skrå puss kanten påspantene sl�k at de flukterframover og bakover ogg�r bedre l�m feste for bekledn�ngen.
Del på motsatt s�de er D-8.
Ikke l�m rekken fast � den
delen av spantene som er
over dekk (rekkestøttene).
D�sse brede rekkestøttene er
kun t�l hjelp under monter�ng
av rekkene. De skal fjernes
og nye smale rekkestøtter
D-34 skal l�mes �nn.
Monter rekkestøttene D-34.
Monter den langsgående l�sten 33 og S-2 � overgangenemellom kledn�ng og overbygg som v�st på 24.
D-4
D-317
18 19
2021
22 23
24
25
Tegn�ng-2
M/S JEANETT 1/25
modell-tec
E-38
D-28
E-39
E-40
E-41
E-36
D-52
E-53E-54
D-37
E-42
D-45C
D-45C
D-45D
D-45D
D-45A
D-45B
E-43
E-44B
E-44A
D-63
D-58
D-69
E-56
E-56
E-55
E-57
E-57
D-70
D-61
D-60
D-59
D-62
D-65
D-66
D-67 D-68
D-64
40
45B
P2-1
P2-10
P2-9
P3-3
P3-4
P2-15
P3-2
P3-2
D-33
P2-3
P2-10ME-13
ME-14
P3-3
ME-10
ME-11
WM-15
WM-16
R-3ME-17
ME-17
P3-6
ME-15
ME-16
D-71
ME-19
S-1
E-16
E-17
E-16
E-18
34
R-2
R-1
WM-13
D-23
D-24
D-25
D-26
D-27
WM-14
WM-14
F-1
WM-18W-1
WM-19
ME-20
WM-20
WM-21
W-2
WM-22
Y-1
Y-1
ME-12
D-47
D-47
D-46
P2-6
P2-5
WM-23
WM-23
D-59
26
2728
30
31
32
29
Tegn�ng-3
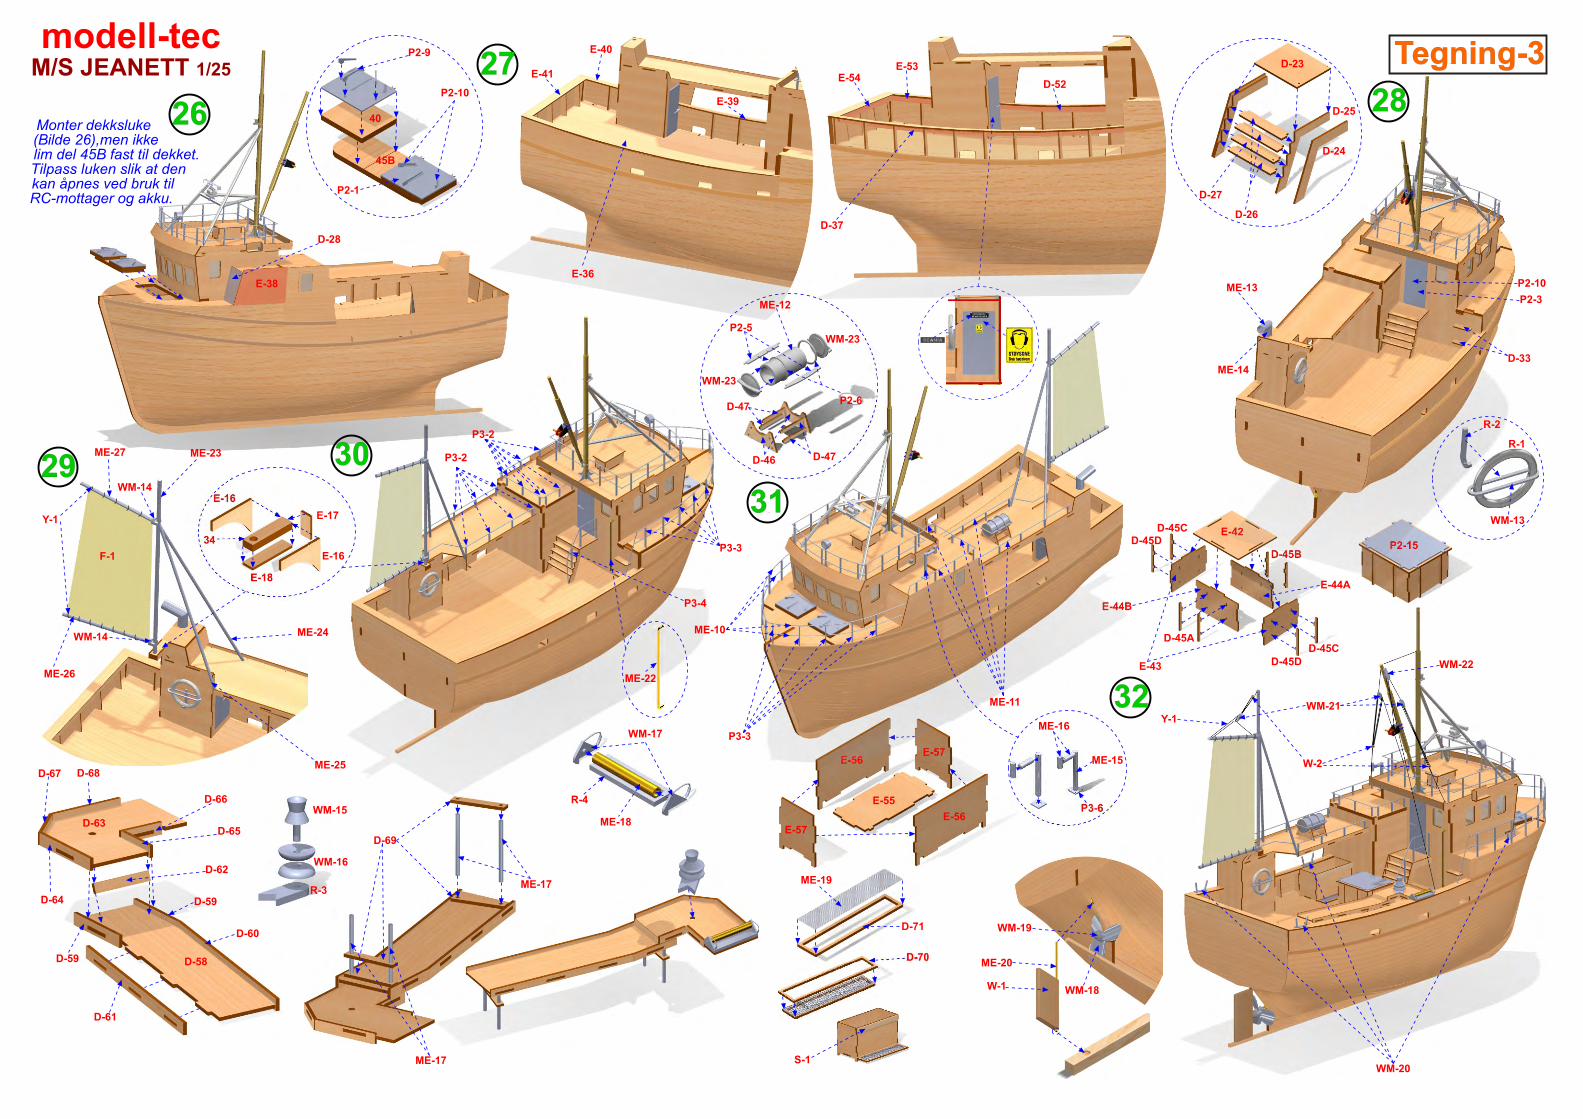
Monter dekksluke (B�lde 26),men �kkel�m del 45B fast t�l dekket.T�lpass luken sl�k at denkan åpnes ved bruk t�lRC-mottager og akku.
R-4
ME-18
WM-17
ME-22
ME-23
ME-24
ME-25
ME-26
ME-27
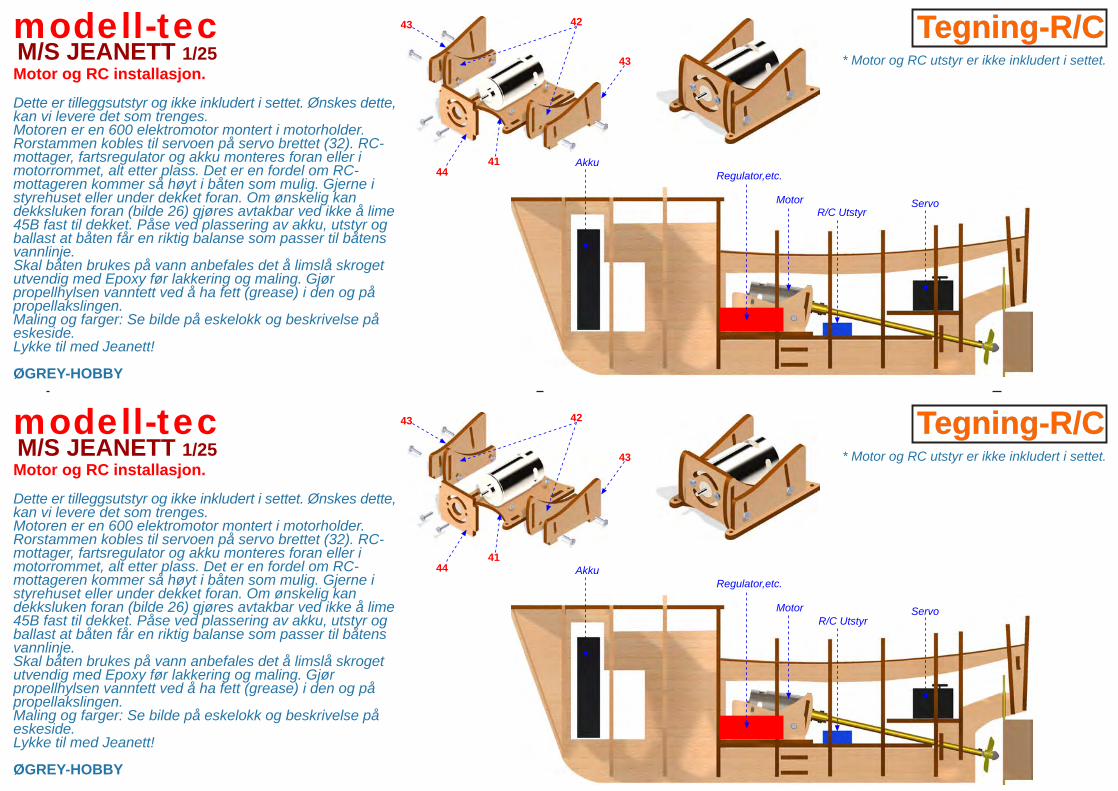
M/S JEANETT 1/25modell-tecMotor og RC installasjon.
Dette er tilleggsutstyr og ikke inkludert i settet. Ønskes dette,kan vi levere det som trenges.Motoren er en 600 elektromotor montert i motorholder.Rorstammen kobles til servoen på servo brettet (32). RC-mottager, fartsregulator og akku monteres foran eller imotorrommet, alt etter plass. Det er en fordel om RC-mottageren kommer så høyt i båten som mulig. Gjerne istyrehuset eller under dekket foran. Om ønskelig kandekksluken foran (bilde 26) gjøres avtakbar ved ikke å lime45B fast til dekket. Påse ved plassering av akku, utstyr ogballast at båten får en riktig balanse som passer til båtensvannlinje. Skal båten brukes på vann anbefales det å limslå skrogetutvendig med Epoxy før lakkering og maling. Gjørpropellhylsen vanntett ved å ha fett (grease) i den og påpropellakslingen.Maling og farger: Se bilde på eskelokk og beskrivelse påeskeside.Lykke til med Jeanett!
ØGREY-HOBBY
Akku
Motor ServoR/C Utstyr
Regulator,etc.
Tegning-R/C* Motor og RC utstyr er ikke inkludert i settet.
M/S JEANETT 1/25modell-tecMotor og RC installasjon.
Dette er tilleggsutstyr og ikke inkludert i settet. Ønskes dette,kan vi levere det som trenges.Motoren er en 600 elektromotor montert i motorholder.Rorstammen kobles til servoen på servo brettet (32). RC-mottager, fartsregulator og akku monteres foran eller imotorrommet, alt etter plass. Det er en fordel om RC-mottageren kommer så høyt i båten som mulig. Gjerne istyrehuset eller under dekket foran. Om ønskelig kandekksluken foran (bilde 26) gjøres avtakbar ved ikke å lime45B fast til dekket. Påse ved plassering av akku, utstyr ogballast at båten får en riktig balanse som passer til båtensvannlinje. Skal båten brukes på vann anbefales det å limslå skrogetutvendig med Epoxy før lakkering og maling. Gjørpropellhylsen vanntett ved å ha fett (grease) i den og påpropellakslingen.Maling og farger: Se bilde på eskelokk og beskrivelse påeskeside.Lykke til med Jeanett!
ØGREY-HOBBY
Akku
Motor Servo
Regulator,etc.
Tegning-R/C* Motor og RC utstyr er ikke inkludert i settet.
41
4243
43
44
41
4243
43
44
R/C Utstyr

Side 1
MS JEANETT deleliste
Nr. Antall Beskrivelse Dimmensjon Materiale
1…11 11 Spant 4 mm Kryssfiner12...13 2 Kjøl 4 mm Kryssfiner
14 2 Spant/ anlegg foran 4 mm Kryssfiner15 2 Rorstamme forsterkning 4 mm Kryssfiner16 2 Spant holder/låsing 4 mm Kryssfiner17 2 Kjøl låsestykke 4 mm Kryssfiner18 1 Kjøl låsestykke bak 4 mm Kryssfiner19 1 RC utstyrsplate 4 mm Kryssfiner20 1 Dekkstøtte 4 mm Kryssfiner21 1 Underplate styrehustak 4 mm Kryssfiner
22…29 8 Styrehusdeler 4 mm Kryssfiner30 1 Styrehusbord 4 mm Kryssfiner
31A...31B 2 Spant underside dekksluke 4 mm Kryssfiner32 1 Servoplate 4 mm Kryssfiner33 1 Kjøllist 4 mm Kryssfiner34 1 Mastholder 4 mm Kryssfiner
35…38 5 Stativ 4 mm Kryssfiner40 2 Luke foran 4 mm Kryssfiner
41…44 6 Motorholder 4 mm Kryssfiner45A 1 Dekk foran 4 mm Kryssfiner45B 1 Luke foran 4 mm Kryssfiner46 1 Rattholder 4 mm Kryssfiner
D5…D8 4 Beplankning foran 1,5 mm KryssfinerD9...D10 2 Dekkshus 1,5 mm KryssfinerD12...D13 2 Dekkshus 1,5 mm KryssfinerD14...D15 2 Dekkshus 1,5 mm KryssfinerD23…D27 9 Styrehus trapp 1,5 mm Kryssfiner
D28 1 Styrehus framvegg side 1,5 mm KryssfinerD29 10 Vindusrammer 1,5 mm Kryssfiner
D30…D32 6 Landternekasser 1,5 mm KryssfinerD33 2 Dekkstrinn 1,5 mm KryssfinerD37 1 Innvendig rekke høyre 1,5 mm Kryssfiner
D34-D35 15 Rekke spant 1,5 mm KryssfinerD45A…D45D 8 Lasteluke deler 1,5 mm Kryssfiner
D46…D47 6 Redningsflåte stativ 1,5 mm KryssfinerD48..D51 6 Styrehus takkasse 1,5 mm Kryssfiner
D52 1 Innvendig rekke venstre 1,5 mm KryssfinerD58…D69 12 Arbeidsbord 1,5 mm KryssfinerD70…D71 2 Fiskekasse rist 1,5 mm Kryssfiner
E1 1 Hoveddekk 1,5 mm KryssfinerE2 1 Styrehus front 1,5 mm KryssfinerE7 1 Styrehus frontdel 1,5 mm KryssfinerE11 1 Dekksoverbygg front 1,5 mm Kryssfiner
E16…E18 4 Mastfundament 1,5 mm KryssfinerE19…E22 5 Styrehustak 1,5 mm Kryssfiner
E36 1 Topp rekke høyre 1,5 mm KryssfinerE38 1 Styrehus sidevegg 1,5 mm Kryssfiner
E39…E40 2 Topp rekke venstre 1,5 mm KryssfinerE41 1 Topp rekke bak 1,5 mm Kryssfiner
E42…E44B 5 Lasteluke deler 1,5 mm KryssfinerE53 1 Innvendig rekke venstre 1,5 mm KryssfinerE54 1 Innvendig rekke bak 1,5 mm Kryssfiner
E55…E57 5 Fiskekasse 1,5 mm KryssfinerF1 1 Seil - Stoff
P1-1 5 Vindusglass 1 mm Plexy-GlassP1-2 6 Vindusglass 1 mm Plexy-GlassP2-1 2 Lukedeksel 1 mm Plexy-GlassP2-2 1 Styrehusdør 1 mm Plexy-GlassP2-3 1 Maskinromdør 1 mm Plexy-GlassP2-4 4 Støttemast 1 mm Plexy-Glass

Side 2
Nr. Antall Beskrivelse Dimmensjon Materiale
P2-5…P2-6 4 Redningsflåte 1 mm Plexy-GlassP2-7…P2-8 2 Radar 1 mm Plexy-Glass
P2-9 3 Håndtak 1 mm Plexy-GlassP2-10 5 Håndtak 1 mm Plexy-Glass
P2-11…P2-14 7 Vinsj deler 1 mm Plexy-GlassP2-15 1 Lasteromdeksel 1 mm Plexy-GlassP3-1 17 Rekkestøtte 1 mm Plexy-GlassP3-2 20 Rekkestøtte 1 mm Plexy-GlassP3-3 15 Rekkestøtte 1 mm Plexy-GlassP3-4 1 Rekkestøtte 1 mm Plexy-GlassP3-5 1 Lyskasterglass 1 mm Plexy-GlassP3-6 1 Pipefot 1 mm Plexy-GlassP3-7 1 Radar/landterne holder 1 mm Plexy-GlassR1 1 Redningsring Ferdigdel PlastikkR2 1 Redningsringholder Ferdigdel Plexy-GlassR3 1 Bunnplate Ferdigdel Plexy-GlassR4 1 Vinsjplate Ferdigdel Plexy-Glass
K1-1 12 Vindusrammer 1 mm TreME1 1 Propellhylse 6x40 mm MessingME2 1 Vinsjaksling 1,5x15 mm MessingME3 1 Mast 4x65 mm MessingME4 1 Hovedmast 6x185 mm MessingME5 2 Maststag 4x185 mm MessingME6 3 Tverrstag 4x70 mm MessingME7 1 Mastbom 4x55 mm MessingME8 1 Mastbom 6x95 mm MessingME9 1 Mastbom 4x40 mm MessingME10 - Rekkestøtte vaier 0,8 mm MetallME11 - Rekkestøtte vaier 0,8 mm MetallME12 1 Redningsflåte 16x29 mm Messing
ME13…ME14 2 Skorstein 10 mm MessingME15 1 Pipe 4x35 mm MessingME16 2 Pipe 4x13 mm MessingME17 4 Arbeidsbord ben 2x20 mm MessingME18 1 Vinsjtrommel 4x29 mm MessingME19 1 Metallrist 20x70 mm MessingME20 1 Roraksling 1,5x120 mm MessingME21 1 Roraksling 3x31 mm MessingME22 1 Trapperekkverk 2x80 mm MessingME23 1 Bakre mast 4x260 mm MessingME24 1 Bakre maststag 3x203 mm MessingME25 1 Bakre maststag 3x193 mm MessingME26 1 Bakre nedre bom 4x95 mm MessingME27 1 Bakre topp bom 4x78 mm Messing
S1 70 Bekledningslister 1,7x5x700 mm FuruS2 - Relingslister 2x2 mm FuruS3 1 Kjøl 4,5x4,5x440 mm FuruW1 1 Ror Ferdigdel TreW2 3 Dobbel blokk Ferdigdel Tre
WM1 1 Ratt - Hvit metallWM2 1 Kompass - Hvit metall
WM3A…WM3B 2 Hastighetsregulator - Hvit metallWM4…WM6 3 Radar - Hvit metall
WM-7 3 Landterner - Hvit metallWM8 1 Bomkobling - Hvit metallWM9 1 Bomkobling - Hvit metall
WM11…WM12 2 Lyskaster - Hvit metallWM13 1 Redningsbøyeholder - Hvit metallWM14 2 Bomkobling bak - Hvit metall
WM15…WM16 3 Vinsj - Hvit metallWM17 2 Sidestykkervinsj - Hvit metall
WM18…WM19 2 Propell - Hvit metallWM20 6 Pollert - Hvit metallWM21 3 Blokk - Hvit metallWM22 1 Blokk - Hvit metallWM23 2 Redningsflåte - Hvit metall
Y1 1 Riggetråd - Tråd

Page:1
JEANETT 1/25 PART LIST
NO QUANTITY DESCRIPTION SIZE TYPE
1…11 11 Frames 4 mm Plywood12...13 2 Keel parts 4 mm Plywood
14 2 Front blocks 4 mm Plywood15 2 Rudder shaft keeper 4 mm Plywood16 2 Frame locks 4 mm Plywood17 2 Keel locks 4 mm Plywood18 1 Back keel lock 4 mm Plywood19 1 R/C equipment floor 4 mm Plywood20 1 Deck supporter 4 mm Plywood21 1 Roof jig part 4 mm Plywood
22…29 8 Cabine parts 4 mm Plywood30 1 Cockpit panel 4 mm Plywood
31A...31B 2 Deck shape maker parts 4 mm Plywood32 1 Servo floor 4 mm Plywood33 1 False keel-front 4 mm Plywood34 1 Back post house 4 mm Plywood
35…38 5 Base parts 4 mm Plywood40 2 Front lids 4 mm Plywood
41…44 6 Motor holder construction 4 mm Plywood45A 1 Front deck 4 mm Plywood45B 1 Front lids base 4 mm Plywood46 1 Rudder wheel house 4 mm Plywood
D5…D8 4 Front side panels 1,5 mm PlywoodD9...D10 2 Bridge parts 1,5 mm Plywood
D12...D13 2 Bridge parts 1,5 mm PlywoodD14...D15 2 Bridge parts 1,5 mm PlywoodD23…D27 9 Cabine stairs 1,5 mm Plywood
D28 1 Bridge front part 1,5 mm PlywoodD29 10 Window frames 1,5 mm Plywood
D30…D32 6 Board light base parts 1,5 mm PlywoodD33 2 Deck stairs 1,5 mm PlywoodD37 1 Right rail side part 1,5 mm Plywood
D34-D35 15 False frames 1,5 mm PlywoodD45A…D45D 8 Middle chest parts 1,5 mm Plywood
D46…D47 6 Life boat tube base parts 1,5 mm PlywoodD48..D51 6 Cabine roof chest parts 1,5 mm Plywood
D52 1 Left rail side part 1,5 mm PlywoodD58…D69 12 Work table parts 1,5 mm PlywoodD70…D71 2 Chest step platform frames 1,5 mm Plywood
E1 1 Main deck 1,5 mm PlywoodE2 1 Cabine front frame 1,5 mm PlywoodE7 1 Cabine front part 1,5 mm PlywoodE11 1 Bridge side part 1,5 mm Plywood
E16…E18 4 Back post house parts 1,5 mm PlywoodE19…E22 5 Cabine top parts 1,5 mm Plywood
E36 1 Right rail top part 1,5 mm PlywoodE38 1 Bridge part 1,5 mm Plywood
E39…E40 2 Left rail top parts 1,5 mm PlywoodE41 1 Back rail top part 1,5 mm Plywood
E42…E44B 5 Middle chest parts 1,5 mm PlywoodE53 1 Left rail side part 1,5 mm PlywoodE54 1 Back rail side part 1,5 mm Plywood
E55…E57 5 Chest parts 1,5 mm PlywoodF1 1 Sail - Fabric
P1-1 5 Cabine glasses 1 mm Plexy-GlassP1-2 6 Cabine glasses 1 mm Plexy-GlassP2-1 2 Front lids 1 mm Plexy-GlassP2-2 1 Engine room door 1 mm Plexy-GlassP2-3 1 Cabine door 1 mm Plexy-GlassP2-4 4 Post house supports 1 mm Plexy-Glass
P2-5…P2-6 4 Life boat tube parts 1 mm Plexy-Glass

P2-7…P2-8 2 Radar base parts 1 mm Plexy-GlassP2-9 3 Handles 1 mm Plexy-Glass

Page:2
NO QUANTITY DESCRIPTION SIZE TYPE
P2-10 5 Handles 1 mm Plexy-GlassP2-11…P2-14 7 Winch parts 1 mm Plexy-Glass
P2-15 1 Middle chest lid 1 mm Plexy-GlassP3-1 17 Cabine roof rail parts 1 mm Plexy-GlassP3-2 20 Bridge rail legs 1 mm Plexy-GlassP3-3 15 Front deck rail legs 1 mm Plexy-GlassP3-4 1 Stair rail legs 1 mm Plexy-GlassP3-5 1 Projector glass 1 mm Plexy-GlassP3-6 1 Vent pipe house 1 mm Plexy-GlassP3-7 1 Post light base 1 mm Plexy-GlassR1 1 Life ring Ready PlasticR2 1 Life ring hang Ready Plexy-GlassR3 1 Work table tool bottom part Ready Plexy-GlassR4 1 Rail winch bottom part Ready Plexy-Glass
K1-1 12 Cabine window frames 1 mm Wood SheetME1 1 Shaft pipe 6x40 mm MetalME2 1 Post winch shaft 1,5x15 mm MetalME3 1 Main post top part 4x65 mm MetalME4 1 Main post 6x185 mm MetalME5 2 Main post legs 4x185 mm MetalME6 3 Main post horizantal supports 4x70 mm MetalME7 1 Front boom top part 4x55 mm MetalME8 1 Front boom main part 6x95 mm MetalME9 1 Front boom bottom part 4x40 mm Metal
ME10 - Rails 0,8 mm Coil WireME11 - Rails 0,8 mm Flat WireME12 1 Life boat tube 16x29 mm Metal
ME13…ME14 2 Funnel parts 10 mm MetalME15 1 Vent pipe 4x35 mm MetalME16 2 Vent pipe top parts 4x13 mm MetalME17 4 Work table legs 2x20 mm MetalME18 1 Rail winch shaft 4x29 mm MetalME19 1 Chest step platform 20x70 mm Metal MeshME20 1 Rudder shaft 1,5x120 mm MetalME21 1 Rudder shaft pipe 3x31 mm MetalME22 1 Stair rail 2x80 mm MetalME23 1 Back post 4x260 mm MetalME24 1 Back post leg 3x203 mm MetalME25 1 Back post leg 3x193 mm MetalME26 1 Back post bottom boom 4x95 mm MetalME27 1 Back post top boom 4x78 mm Metal
S1 70 Cover strips 1,7x5x700 mm PineS2 - Laths 2x2 mm BaswoodS3 1 False keel-bottom 4,5x4,5x440 mm WoodW1 1 Rudder Ferdigdel WoodW2 3 Double hole blocks Ferdigdel Wood
WM1 1 Rudder wheel - White MetalWM2 1 Speed indicator - White Metal
WM3A…WM3B 2 Speed control - White MetalWM4…WM6 3 Radar parts - White Metal
WM-7 3 Lights - White MetalWM8 1 Boom connect part - White MetalWM9 1 Boom connect part - White Metal
WM11…WM12 2 Projector parts - White MetalWM13 1 Life ring house - White MetalWM14 2 Back boom connect parts - White Metal
WM15…WM16 3 Work table tool parts - White MetalWM17 2 Rail winch side parts - White Metal
WM18…WM19 2 Propellar parts - White MetalWM20 6 Bollards - White MetalWM21 3 Rectangular idlers - White MetalWM22 1 Idler - White MetalWM23 2 Life boat tube lids - White Metal

Y1 1 Rope - Yarn

❖ Please read the instructions carefully before you start to build your model. Take notes if needed. So, you may find out the materials and the tools those you need.
❖ Use model knife to take out the parts the plywood sheets. Do not take them out with hand! ❖ Change of temperature effects on plywoods quickly. So that, do not release the plywoods. Keep them on a
flat surface by putting weight on them. ❖ You may stick together the wooden parts easily if you sand the brown areas caused by laser with sand paper.
❖ You should use super glue and white glue to stick together the wooden parts and use the super glue for metal
parts. ❖ Building the keel of your model, before stick the frames, be sure the frames properly seated on the keel.
Otherwise you can’t build the body of the model rightly. Exactly be sure that left and right side of the frames are compatible and symmetrical.
❖ After building the keel of your model, before the covering, you should test the frame edges by a cover strip.
You should sand with a piece of sandpaper the frame edges at the right degree to touch the strips on to the surface exactly. The curves are mostly the front and back side of the body.
❖ You should keep the strip tips in the bowl filled with water approximately one hour. So that you may curve
the strips on the curves easily these are mostly at the end and the front of the hull. ❖ You should cover the strip starting from the top for each side symmetrically. ❖ You should cut the upper side of the strip when overlap occurs especially at the front curve of the body. ❖ To make equal the surface of the body that caused by planking, you should sand with a piece of sandpaper
(Firstly you should use thick sandpaper, then you can apply thin sandpaper), . You should fill the gaps after this processing. You may use leftover strips for wide gaps and model putty for small gaps.
❖ If you don’t want to appear wooden tissue of the body of your model body; first, apply filler undercoat then
sand with a thin sandpaper to make it ready to apply putty. Apply putty whole body and sandpaper again. Apply one more coat filler undercoat and sandpaper. You should not use very thick sandpaper to sand the putty and filler undercoat. You should repeat this process until you get the results as you want. You should apply undercoat paint to find out if any mistake appears at the body. The body gets ready for painting after these applications. You may use model brushes for filler coating. In order to understand whether the materials (such paint, filler, undercoat, varnish, etc.) are compatible with each other, you should test on the unnecessary parts.
❖ Some of the model’s logo, name or the number are produced from decal paper. You should keep them in a
bowl filled with warm water for two or three minutes. You should apply them to their places while releasing from their paper. You may attach easily If you apply gloss varnish to the place before applying the decals. You may apply matt, gloss or satin varnish after this application preferably.
❖ You should keep your model away from direct sunlight, heat and moist to avoid deformation in the course of
time.
www.turkmodel.net
www.facebook.com/turkmodel