10/18/2018 colony pcr · benchling colony...
TRANSCRIPT

10/18/2018 Colony PCR · Benchling
file:///tmp/tmpu2fjho.html 1/2
Colony PCRIntroductionQuickly test a transformation with confirmation primers.
Materials
›
Procedure
PCR
Label at least 8 colonies on a plate with a marker (circle them and assign a number)Pick and dissolve each of the colony in 20 ul of mQH2OHeat at 80°C for 10' then set the following PCR reactionThis protocol is for Taq polymerase, which is cheaper than high fidelity polymerase like Phusion. No fidelity in sequence is required here, just an active enzyme that can polymerize a linear PCR product in presence of the proper primers. In case you use another polymerase, then follow its specific protocol. Here it's used the HF buffer for Phusion which was proven to be functional also for Taq polymerase.
25
mQH2O 15.4 385
5X HF buffer 5 125
10 mM dNTPs 0.5 12.5
10 uM F 0.5 12.5
10 uM R 0.5 12.5
Colony (in 20 ul H2O)
3
Taq DNA pol 0.1 2.5
25
A B C
1
2
3
4
5
6
7
8
9
Table1
Set the following protocol on a thermocycler
1. 95°C 2'
2. 95 °C 30''
3. Tm 30''
4. 68 °C 1'/kb

10/18/2018 Colony PCR · Benchling
file:///tmp/tmpu2fjho.html 2/2
5. Go to step 2 for 24 additional times
6. 68 °C 5'
7. 16°C ∞
Run the PCR product on an agarose gel and check the resultPick the good colony from the plate and let them grow for minipreps

10/18/2018 Electroporation · Benchling
file:///tmp/tmpJgFQE9.html 1/2
ElectroporationIntroductionProtocol used for fast transformation of a strain with a desired plasmid. No echmical competent cells needed.
Materials
› o/n culture of desired strain
› 10% glycerol
› ice
› ddH2O
› Benchtop centrifuge
› Electroporation cuvette
› Electroporator
› desired Plasmid
› Plates with appropriate antibiotics
› LB medium (no AB)
Procedure
Day 1
1. 1. Set up an overnight culture. Pick one or two colonies and inoculate them in microfuge tubes containing 1 mL LB medium and punctured a hole in the lid for air. Incubate at 37°C overnight with shaking.
Day 2
Before starting: Chill 10% glycerol (ddH2O) on ice for an hour Chill electroporation cuvettes (1 mm/2mm gap). Cool benchtop centrifuge to 2°C. 1. Set up microfuge tubes (with punctured hole in the lid for air) and add 1.4mL fresh LB medium, add 30 µl of overnight culture. 2. Culture for 1-3h at 37°C, shaking at 1000 rpm.

10/18/2018 Electroporation · Benchling
file:///tmp/tmpJgFQE9.html 2/2
3. Prepare the cells for electroporation - Centrifuge for 30 sec at 11,000 rpm in a cooled microfuge benchtop centrifuge (at 2°C). Discard the supernatant by quickly tipping it out , and place the pellet on ice. Resuspend the pellet with 1 ml chilled 10% Glycerol, pipetting up and down a few times to mix the suspension. Repeat the centrifugation and resuspenion of the cells again. Centrifuge and tip out the supernatant once more leaving 100-150 µl left in the tube wit h the pellet. 4. Take DNA of your choice, add 40ng Plasmid / 400-800ng Linear DNA to your cell pellet. Mix briefly pelleted cells with added DNA. Transfer the cell suspension from the tube to the chilled electroporation cuvette. If volume does not reach the top of the electrode add remaining with 10% glycerol 5. Electroporate at 1800V for 1mM and 2500 for 2mM, (outputted 4-5 ms pulses are the norm). 6. Resuspend the electroporated cells in 1 ml LB medium without antibiotics and return them to the microfuge tube. 7. Incubate at 37C 1h, shaking at 1000 rpm. 8. Plate on LB plates with proper Antibiotics + supplementations needed. Electroporator Instructions Turn on - hit "on-Standby" Click ^ v same time to get 1800 or 2500 Volt Load cuvette in (dry its exterior) X2 fast clicks on "pulse" will start the shock, wait until machine beeps to know its finished.

10/18/2018 Error Prone PCR (Derr et al. 2005) · Benchling
file:///tmp/tmp_kf3Qm.html 1/2
Error Prone PCR (Derr et al. 2005)IntroductionGet started by giving your protocol a name and editing this introduction.
Materials
›
Procedure
Error-prone dNTPs mix
dNTPs mix mM in 50 uL 10x stock
dATP 0.2 2
dGTP 0.2 2
dCTP 1 10
dTTP 1 10
A B C
1
2
3
4
5
Table2
PCR mix
50 Final concentration (mM)
MgCl2 (100 mM)** 1.65 3.5 2.5
MnCl2 (10 mM) 1.25 0.25 25 uM
dNTPs error mix (10x stock)
5 0.2 uM add only 1 ul
Primer FW (10 mM) 10 2 1 ul
Primer RW (10 mM) 10 1 ul
Template (10 ng/ul) 5 50 ng
Taq (5000 U/mL) 0.5 2.5 units 1 ul
Taq buffer 5
H2O 11.6
A B C D E F
1
2
3
4
5
6
7
8
9
10
Table1
**Note, the Taq buffer already contains 1.5 mM MgCl2. So this calculation is already accounting for that amount. See below:

10/18/2018 Error Prone PCR (Derr et al. 2005) · Benchling
file:///tmp/tmp_kf3Qm.html 2/2
Ca*Va + Cb*Vb =Cf*Vf
Ca= mM 100 Va= 1.675
Cb= mM 1.5 Vb= 5
Cf= mM 3.5 Vf= 50
A B C D E
1
2
3
4
Table3
PCR program
1. 94 °C for 45 s
2. 94°C for 45s
3. 65°C for 45s
4. 72°C for 2min
5. repeat step 2-4 29 times
6. 72 °C for 10 min

10/18/2018 Error Prone PCR (Luzi protocols) · Benchling
file:///tmp/tmpyhvREJ.html 1/2
Error Prone PCR (Luzi protocols)IntroductionIn this protocol there is a summary of the conditions to play around with and how to do so to get the most mutations.
Materials
›
Procedure
1.
50 Final concentration (mM)
MgCl2 (100 mM)** 1.175 2.5
MnCl2 (10 mM) 0.125 0.025
dNTPs error mix (10x stock)
1 0.2 uM
Primer FW (10 mM) 1
Primer RW (10 mM) 1
Template (10 ng/ul) 5 50 ng
Taq (5000 U/mL) 1
Taq buffer 5
H2O 34.7
A B C D E F
1
2
3
4
5
6
7
8
9
10
Table1
2. **Note, the Taq buffer already contains 1.5 mM MgCl2. So this calculation is already accounting for that amount. See below:
3.
MgCl2
Ca*Va + Cb*Vb =Cf*Vf
Ca= mM 100 Va= 1.175
Cb= mM 1.5 Vb= 5
Cf= mM 2.5 Vf= 50
A B C D E
1
2
3
4
5
Table3
10/18/2018 Error Prone PCR (Luzi protocols) · Benchling
file:///tmp/tmpyhvREJ.html 2/2
MnCl2
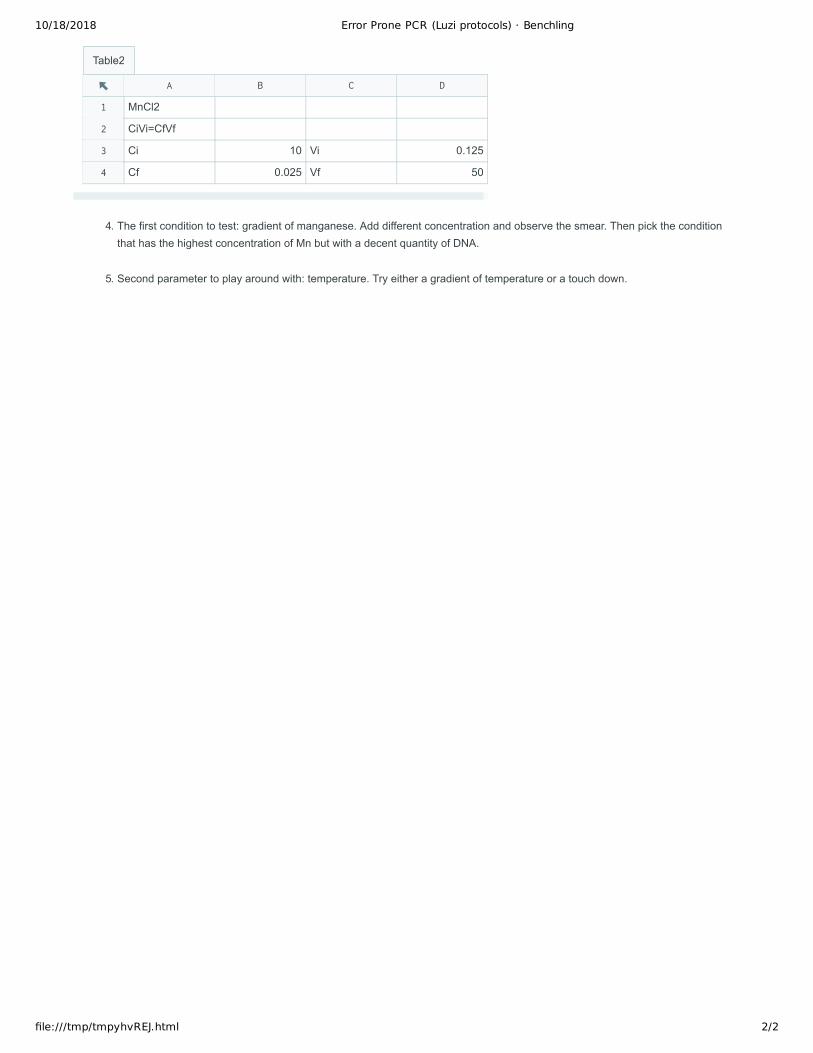
CiVi=CfVf
Ci 10 Vi 0.125
Cf 0.025 Vf 50
A B C D
1
2
3
4
Table2
4. The first condition to test: gradient of manganese. Add different concentration and observe the smear. Then pick the condition that has the highest concentration of Mn but with a decent quantity of DNA.
5. Second parameter to play around with: temperature. Try either a gradient of temperature or a touch down.
10/18/2018 Error Prone PCR (Tobias) · Benchling
file:///tmp/tmpintceI.html 1/2
Error Prone PCR (Tobias)IntroductionGet started by giving your protocol a name and editing this introduction.
Materials
›
›
Procedure
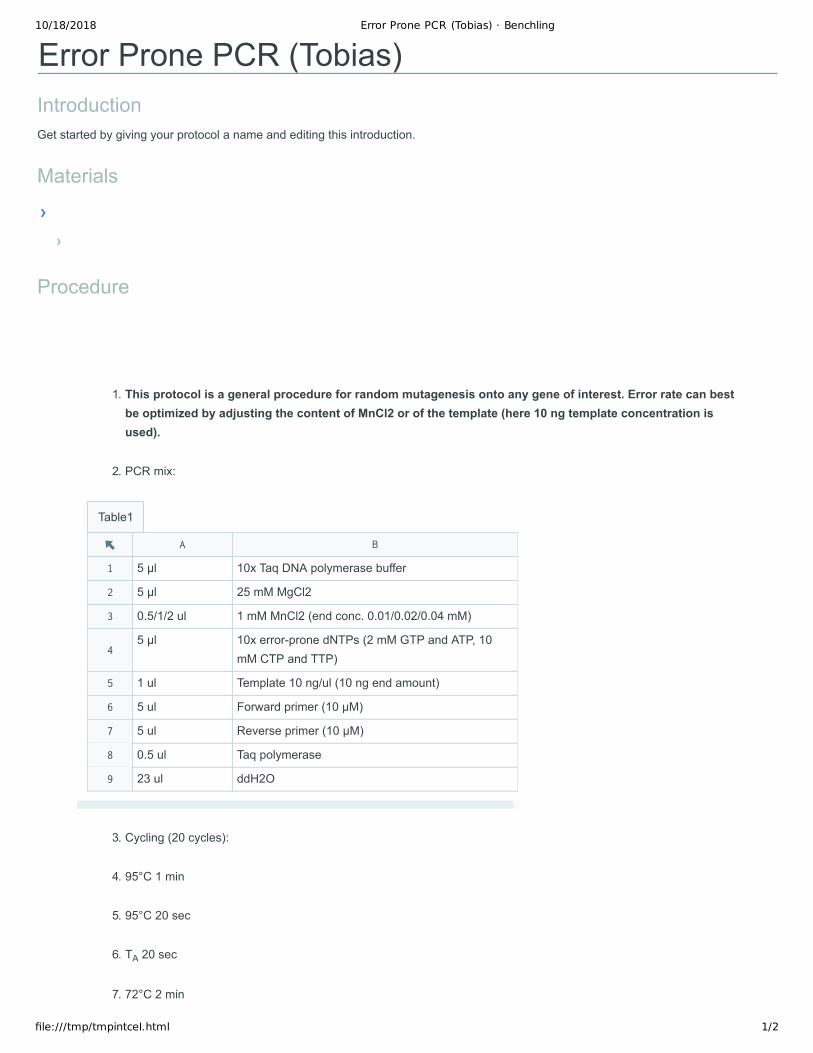
1. This protocol is a general procedure for random mutagenesis onto any gene of interest. Error rate can best be optimized by adjusting the content of MnCl2 or of the template (here 10 ng template concentration is used).
2. PCR mix:
5 µl 10x Taq DNA polymerase buffer
5 µl 25 mM MgCl2
0.5/1/2 ul 1 mM MnCl2 (end conc. 0.01/0.02/0.04 mM)
5 µl 10x error-prone dNTPs (2 mM GTP and ATP, 10 mM CTP and TTP)
1 ul Template 10 ng/ul (10 ng end amount)
5 ul Forward primer (10 µM)
5 ul Reverse primer (10 µM)
0.5 ul Taq polymerase
23 ul ddH2O
A B
1
2
3
4
5
6
7
8
9
Table1
3. Cycling (20 cycles):
4. 95°C 1 min
5. 95°C 20 sec
6. TA 20 sec
7. 72°C 2 min

10/18/2018 Error Prone PCR (Tobias) · Benchling
file:///tmp/tmpintceI.html 2/2
8. 72°C 10 min
9.

10/18/2018 GeneRuler 1 kb band sizes · Benchling
file:///tmp/tmpAVGdLD.html 1/1
GeneRuler 1 kb band sizesIntroduction
Materials
›
Procedure

10/18/2018 Gibson Assembly® Protocol (E5510) · Benchling
file:///tmp/tmpjmaca1.html 1/2
Gibson Assembly® Protocol (E5510)IntroductionThis is the protocol for Gibson Assembly using the Gibson Assembly® Cloning Kit (E5510). More information from NEB can be found here.
Materials
› Gibson Assembly Cloning Kit
› Gibson Assembly® Master Mix
› NEBuilder® Positive Control
› NEB® 5-alpha Competent E. coli (High Efficiency)
› SOC Outgrowth Medium
› pUC19 Transformation Control Plasmid
› DNA Polymerases (for generating PCR products)
› Recommended: Q5® High-Fidelity DNA Polymerase, Q5 Hot Start High-Fidelity DNA Polymerase, or Q5 Hot Start High-Fidelity 2X Master Mix
› LB (Luria-Bertani) plates with appropriate antibiotic
Procedure
Set up the following reaction on ice:
1. Reaction volumes: Use this table to calculate reaction volumes and set up the reaction. Remember to input your total DNA fragment volume in cells B3 and C3 for assemblies with 2-3 fragments and 4-6 fragments, respectively.
2. Optimized cloning efficiency is 50–100 ng of vectors with 2–3 fold of excess insert
3.
Insert ng/ul Insert Backbone ng/ul Backbone
EG102C 15 15 ul 20 5 ul
EG103C 15 15 ul 18 5 ul
EG104C 14 15 ul 11 5 ul
A B C D E
1
2
3
4
Table2

10/18/2018 Gibson Assembly® Protocol (E5510) · Benchling
file:///tmp/tmpjmaca1.html 2/2
00:15:00
2-3 Fragments Assembly
Concentration Range of DNA fragments 02 - .5 pmols*
Total Volume of Fragments (μl) 20
Gibson Assembly Master Mix (2x) (μl) 30
Deionized Water (μl) 10
Total Volume (μl) *** 60
A B
1
2
3
4
5
6
Table1
4. Incubate samples in a thermocycler at 50°C for 15 minutes when 2 or 3 fragments are being assembled or 60 minutes when 4-6 fragments are being assembled.
Note: Extended incubation up to 60 minutes may help to improve assembly efficiency in some cases (for further details see FAQ section). *Select the pencil icon and change the timer to 60 minutes if working with 4-6 fragments
5. Store samples on ice or at –20°C for subsequent transformation.
6. Transform NEB 5-alpha Competent E. coli cells (provided with the kit) with 2 μl of the assembly reaction, following the chemcial transformation protocol or electro competent cells transformation protocol
7.
10/18/2018 Gibson assembly: One-step isothermal DNA assembly protocol · Benchling
file:///tmp/tmpZp3KVA.html 1/2
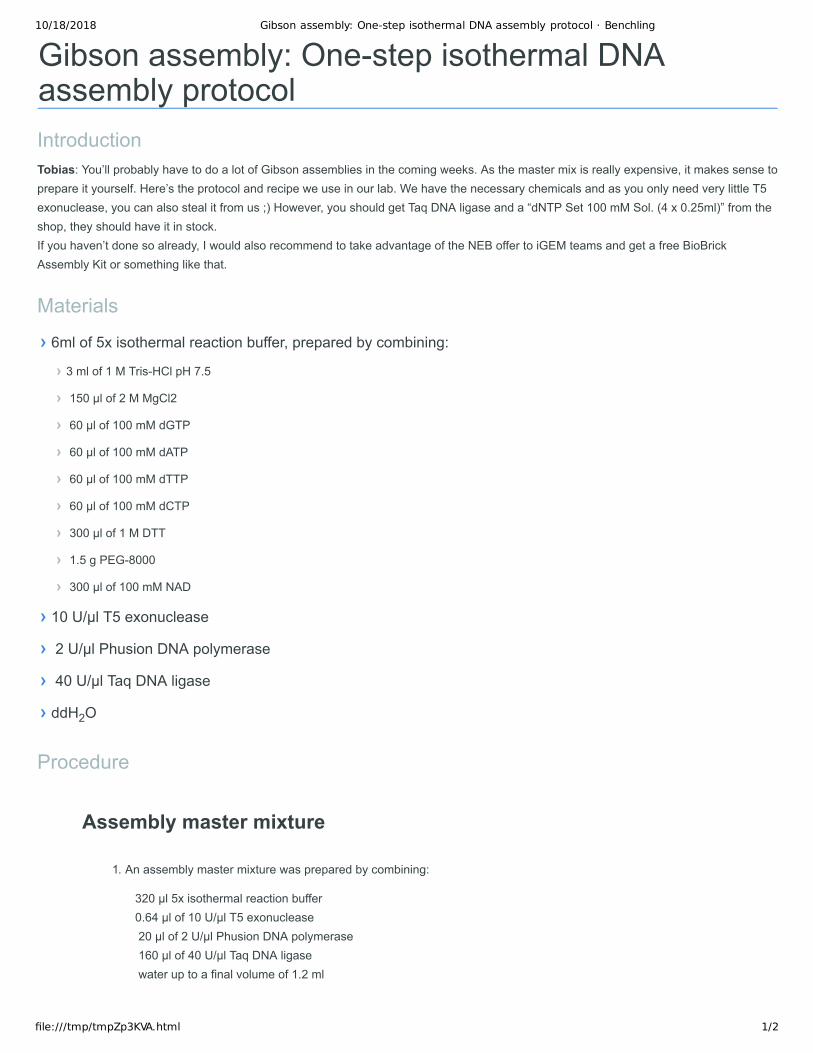
Gibson assembly: One-step isothermal DNA assembly protocolIntroductionTobias: You’ll probably have to do a lot of Gibson assemblies in the coming weeks. As the master mix is really expensive, it makes sense to prepare it yourself. Here’s the protocol and recipe we use in our lab. We have the necessary chemicals and as you only need very little T5 exonuclease, you can also steal it from us ;) However, you should get Taq DNA ligase and a “dNTP Set 100 mM Sol. (4 x 0.25ml)” from the shop, they should have it in stock. If you haven’t done so already, I would also recommend to take advantage of the NEB offer to iGEM teams and get a free BioBrick Assembly Kit or something like that.
Materials
› 6ml of 5x isothermal reaction buffer, prepared by combining:
› 3 ml of 1 M Tris-HCl pH 7.5
› 150 µl of 2 M MgCl2
› 60 µl of 100 mM dGTP
› 60 µl of 100 mM dATP
› 60 µl of 100 mM dTTP
› 60 µl of 100 mM dCTP
› 300 µl of 1 M DTT
› 1.5 g PEG-8000
› 300 µl of 100 mM NAD
› 10 U/µl T5 exonuclease
› 2 U/µl Phusion DNA polymerase
› 40 U/µl Taq DNA ligase
› ddH2O
Procedure
Assembly master mixture
1. An assembly master mixture was prepared by combining:
320 µl 5x isothermal reaction buffer 0.64 µl of 10 U/µl T5 exonuclease 20 µl of 2 U/µl Phusion DNA polymerase 160 µl of 40 U/µl Taq DNA ligase water up to a final volume of 1.2 ml

10/18/2018 Gibson assembly: One-step isothermal DNA assembly protocol · Benchling
file:///tmp/tmpZp3KVA.html 2/2
2. This reagent-enzyme mix is aliquoted (15 µL aliquots) and stored at -20 °C.
This mixture can tolerate numerous freeze-thaw cycles and remains stable even after one year. The exonuclease amount is ideal for the assembly of DNA molecules with 20–150 bp overlaps. For DNA molecules overlapping by greater than 150 bp, 3.2 µl of 10 U/µl T5 exonuclease was used to prepare the assembly master mixture above. Frozen 15 µl assembly mixture aliquots were thawed and then kept on ice until ready to be used. Five microliters of the DNA to be assembled were added to the master mixture in equimolar amounts. Between 10 and 100 ng of each 6 kb DNA fragment was added. For larger DNA segments, proportional amounts of DNA were added (for example, 250 ng of each 150 kb DNA segment). Incubations were performed at 50 °C for 15 to 60 min (60 min was optimal).
One-step isothermal DNA assembly protocol
3. PCR up the DNA fragments to be cloned (each primer overhang is min 20 nt).
4. Cut open the backbone.
5. Heat inactivate the enzymes if cut open an empty vector OR Gel purify the cut backbone if cut open a full vector.
6. Gel purify the PCR fragments.
7. Mix the backbone and PCR fragments in max 5µl total volume, in molar ratio 1:1.
8. Thaw reaction mixture on ice.
9. Add DNA mixture (5µl) to the reaction mixture (15µl).
10. Heat the PCR machine at 50°C.
11. Run the reaction for 1 hour at 50°C.
12. Transform into bacteria (1-5ul or more if necessary).

10/18/2018 M9 Protocol · Benchling
file:///tmp/tmp5A9aea.html 1/2
M9 ProtocolIntroductionobtained from: https://www.protocolsonline.com/recipes/media/m9-medium-5x/ M9 is a minimal, low osmolarity media for E. Coli, resulting in slower growth rate of these cells (~60 min doubling time)
Materials
› 5X Stock
› Na2HPO4
› KH2PO4
› NH4Cl
› NaCl
› CaCl2 (optional)
› Additional Components for 1X Working Solution
› MgSO4.7H2O
› Carbon source (sugar or glycerol) --> glucose
› 0.5% vitamin B1 (thiamine)
› 20% for L amino acids to 40 ug/ml or DL amino acids to 80 ug/ml
› Antibiotic
Procedure
Preparing the 5X stock
1. Add the following reagents to a 2-liter flask:
30 g Na2HPO415 g KH2PO45 g NH4Cl2.5 g NaCl15 mg CaCl2 (optional) --> take 1.351 mL from the 0.1 mM CaCl solution1 liter of high quality distilled water
2. Once the ingredients are added, heat with stirring until the components are completely dissolved. Pour the solution into smaller bottles
split up into 5 x 200mL into 5 1L flasks

10/18/2018 M9 Protocol · Benchling
file:///tmp/tmp5A9aea.html 2/2
3. loosen caps and then autoclave at 15 lb/in2 for 15 min. If you wish to add add antibiotics or nutritional supplements, do this only after the autoclave cycle is complete, as the high temperature may destroy these components. Wait until the the bottle is less than 50°C (it should be warm to touch), and then add the components. After the bottles cool to below 40°C, the caps can be tightened and the concentrated medium stored indefinitely at room temperature.
Preparing the 1X Working Solution
4. To make 1X working solution, the 5X media should be diluted to 1× with high quality sterile distilled water. Hence, add the following sterile solutions to 200mL of M9 salts
1 ml 1 M MgSO4.7H2O --> 0.246 g in 1ml10 ml 20% carbon source (sugar or glycerol) --> glucose789 ml distilled water
5. Typically, several additional components are also added to make a complete medium.
0.1 ml 0.5% vitamin B1 (thiamine)5 ml 20% Casamino Acids or L amino acids to 40 ug/ml or DL amino acids to 80 ug/mlAntibiotic: add kanamycin to a final concentration of 50 μg/mL

10/18/2018 M9 Swimming agar · Benchling
file:///tmp/tmp4DPGee.html 1/1
M9 Swimming agarIntroductionThis protocol is describes the swimming agar, where colonies are given around a source of molecules (Asp) to see their reaction. Protocol taken from iGEM Göttingen 2012.
Materials
› 1.25 % (v/v) glycerol
› 20 % (v/v) 5x M9 salt stock solution
› 0.1 % (v/v) of CaCl2 x 2 H2O stock solution (20 mg/mL)
› 0.1 % (v/v) MgSO4 stock solution (0.12 g/mL)
› 0.3 % (w/v) of agar
›
Procedure
M9 Swimming Agar
1. Preparation of 500 ml of M9 swimming agar
Material Percentage Volume/weight volume from already existing stocks
Glycerol 0.0125 6.25
M9 Salts 0.2 100
CaCl2 * 2 H2O 0.001 0.5 0.9
MgSO4 0.001 0.5
Agar 0.003 1.5
Leucine 0.0042 0.21
Total volume 500
A B C D
1
2
3
4
5
6
7
8
9
10
Table1

10/18/2018 M9 swimming medium v2 · Benchling
file:///tmp/tmpOJOiBX.html 1/1
M9 swimming medium v2IntroductionGet started by giving your protocol a name and editing this introduction.
Materials
›
›
Procedure
1.
M9 500 ml
Glycerol 1 ml
thiamine HCl 500 ug
methionine 10 mg
leucine 10 mg
histindine 10 mg
agar 1.25 g
A B C
1
2
3
4
5
6
7
8
Table1

10/18/2018 Miniprep with GenElute Plasmid Miniprep kit · Benchling
file:///tmp/tmpN7ElfS.html 1/1
Miniprep with GenElute Plasmid Miniprep kitIntroductionProtocol from the GenElute Plasmkid Miniprep kit.
Materials
›
›
Procedure
1.
10/18/2018 Motility Bu er · Benchling
le:///tmp/tmprKfEHk.html 1/1
Motility BufferIntroductionGet started by giving your protocol a name and editing this introduction.
Materials
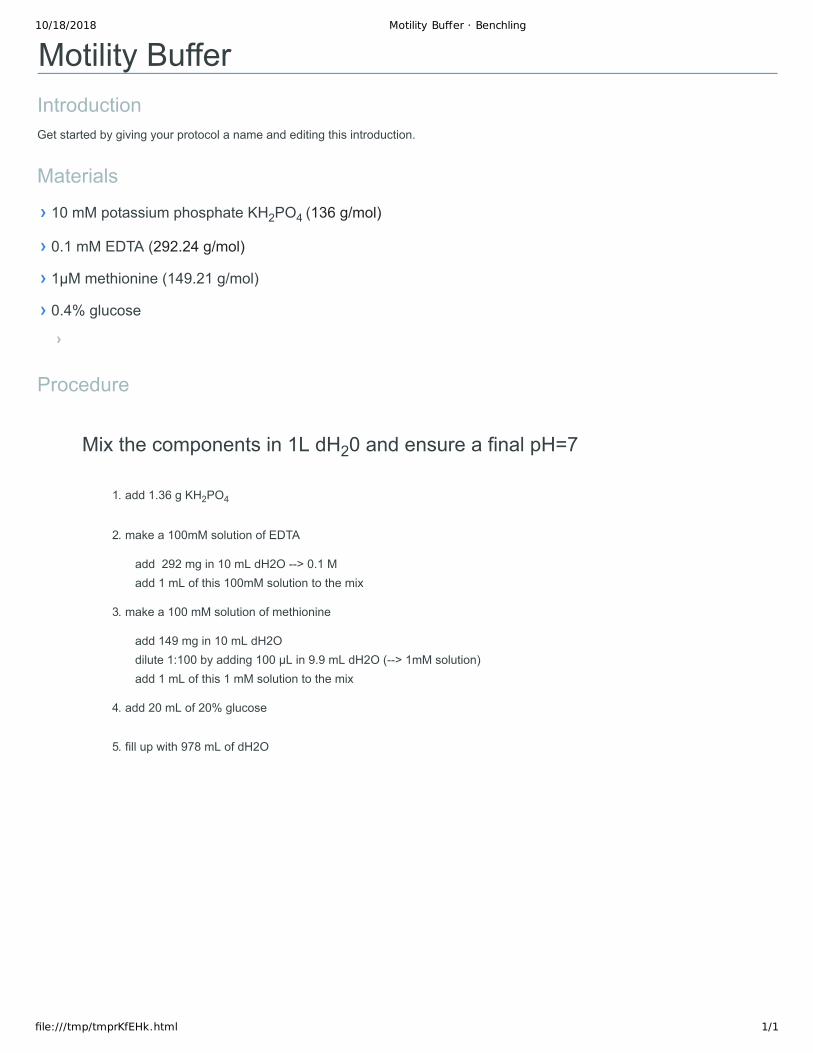
› 10 mM potassium phosphate KH2PO4 (136 g/mol)
› 0.1 mM EDTA (292.24 g/mol)
› 1μM methionine (149.21 g/mol)
› 0.4% glucose
›
Procedure
Mix the components in 1L dH20 and ensure a final pH=7
1. add 1.36 g KH2PO4
2. make a 100mM solution of EDTA
add 292 mg in 10 mL dH2O --> 0.1 Madd 1 mL of this 100mM solution to the mix
3. make a 100 mM solution of methionine
add 149 mg in 10 mL dH2Odilute 1:100 by adding 100 μL in 9.9 mL dH2O (--> 1mM solution)add 1 mL of this 1 mM solution to the mix
4. add 20 mL of 20% glucose
5. fill up with 978 mL of dH2O

10/18/2018 PCR Amplification (Phusion) · Benchling
file:///tmp/tmpmrKH_G.html 1/2
PCR Amplification (Phusion)IntroductionPCR amplification of fragments or backbones
Materials
›
›
Procedure
Mix
mQH2O 32.5 48.75
5X HF buffer 10 15
10 mM dNTPs 1 1.5
10 uM F 2.5 3.75
10 uM R 2.5 3.75
(~10 ng/ul) DNA 1 1.5
Phusion 0.5 0.75
50 75
A B C D E F
1
2
3
4
5
6
7
8
9
Table1
Set the following protocol on a thermocycler:
1. 98°C 30''
2. 98 °C 10''
3. Tm 10''
4. 72 °C 15-30'' /Kb
5. Go to step 2 for 29 additional times
6. 72 °C 10'
7. 10°C ∞

10/18/2018 PCR Amplification (Phusion) · Benchling
file:///tmp/tmpmrKH_G.html 2/2
8.

10/18/2018 Preparation Chemically Competent Cells · Benchling
file:///tmp/tmpAnklAV.html 1/1
Preparation Chemically Competent CellsProject: iGEM ETHZ 2018Authors: Jan KrüsemannDate: 2018-07-26
Preparation of CaCl2 Chemically Competent CellsGrow strain of choice in 50mL Erlenmeyer until it reaches 0.3-0.5 O.D.●Transfer to 50mL centrifuge tube and place on ice for 15 min●Pellet cells in 4C pre-cooled centrifuge (4,000 rpm for 10 min)●Resuspend in 25mL (half volume) ice-cold 0.1M CaCl2●Incubate on ice for 1h●Pellet at 4K,000 rpm for 10 min●Remove supernatant●Resuspend with 4mL of ice cold 0.1M CaCl2 +15% Glycerol●Aliquot 50/100uL in sterile 1.5mL tubes●Store in -80˚●
___________________________________________________________________________________________________To Prepare:
0.1M CaCl2 – 250mL●25mL 1M cacl2 and 225 ddH2O
Send to autoclave●0.1M CaCl2 15% Glycerol 50mL●
5mL 1M cacl2, 7.5mL glycerol in 37.5 ddH20Filter Sterilize●
THURSDAY, 26/7/18

10/18/2018 Split Luciferase Complementation Assay · Benchling
file:///tmp/tmp7C2enj.html 1/1
Split Luciferase Complementation AssayIntroductionTesting for split luciferase complementation via sucrose induction
Materials
› o/n cultures
› 20% sucrose in M9
› Luciferin Substrate Buffer: 500 µM Luciferin in 0.1 M citrate-phosphate buffer
›
›
Procedure
Dilution of o/n cultures
1. 40 µL in 4 mL
Growth in incubator at 37 °C until ~ O.D. 1
Spin down cells (if culture not dense enough, spin down several times to increase pellet size)
2. 3000 rpm for 3 min
Resuspend in 1 mL M9 + 20% sucrose
Dilute to equal amounts
Transfer 100 µL of resuspended culture to 96 luminescence well plate and mix with 100 µL Luciferin Substrate Buffer or control
Read out luminescence

10/18/2018 Tethering Medium · Benchling
file:///tmp/tmpUex4U7.html 1/1
Tethering MediumIntroductionAs described in Transient response to chemotactic stimuli in Escherichia coli (Berg, Tedesco, 1975; sourijk, 2002)
Materials
› 0.067 M Sodium Chloride NaCl (58.44 g/mol)
› 0.01 M Potassium Phosphate KH2PO4 (136.084 g/mol)
› 0.1 mM EDTA (292.24 g/mol)
› 1 μM Methionine
› 10 mM lactic acid
›
Procedure
Add these to 1L of ddH2O
1. 3.915 g of NaCl
2. 1.36 g of KH2PO4
3. make a 100mM solution of EDTA
add 292 mg in 10 mL dH2O --> 0.1 Madd 1 mL of this 100mM solution to the mix

10/18/2018 Transformation · Benchling
file:///tmp/tmprST_6h.html 1/1
TransformationIntroductionThis protocol is a variant of the Hanahan protocol Hanahan91using CCMB80 buffer for DH10B, TOP10 and MachI strains. It builds on Example 2 of the Bloom05 patent as well. This protocol has been tested on NEB10, TOP10, MachI and BL21(DE3) cells. See OWW Bacterial Transformation page for a more general discussion of other techniques. The Jesse '464 patent describes using this buffer for DH5α cells. The Bloom04 patent describes the use of essentially the same protocol for the Invitrogen Mach 1 cells. This is the chemical transformation protocol used by Tom Knight and the Registry of Standard Biological Parts.
Before you start: Estimated bench time: 30 min Estimated total time: 2 hours (plus 2x 14-16 hour incubations) You can prepare stocks of your bacteria of interest and store at -80°C to seed future batches of competent cells. Detergent is a major inhibitor of competent cell growth and transformation. Glass and plastic must be detergent free for these protocols. The easiest way to do this is to avoid washing glassware, and simply rinse it out. Autoclaving glassware filled 3/4 with DI water is an effective way to remove most detergent residue. Media and buffers should be prepared in detergent free glassware and cultures grown up in detergent free glassware.
Materials
› Petri plates with SOB agar
› Sterile loop
› Glycerol
› Cryotubes
›
Procedure
1.

10/18/2018 Transformation Chemically Comp. Cells · Benchling
file:///tmp/tmpNmZcZU.html 1/2
Transformation Chemically Comp. CellsIntroductionJan's protocol for transformation of chemically competent cells
Materials
› Chemically competent cells
› Ice
› Heat bath
› LB
› Agar plates with resistance
› Incubator
›
Procedure
00:30:00
00:00:45
00:02:00
Transformation procedure
1. Thaw Bacteria from -80˚ on ice (10 min)
2. Add X µl Plasmid (up to 10% of total volume) and mix gently with pipette, let it sit on ice for 30min
3. Heat-shock tube in 42˚ for 45sec
4. Put tube on ice for 2min
5. Add 900µl LB
6. Shake in incubator at 37˚ for 1 hour

10/18/2018 Transformation Chemically Comp. Cells · Benchling
file:///tmp/tmpNmZcZU.html 2/2
01:00:00
7. Meanwhile: Prepare appropriate agar plates with antibiotics and pre-heat in 37˚ (dry) incubator
8. After an Hour - Take 50-200µl of the culture and spread on agar plate.
9. (If all bacteria are needed, spin down bacteria to pellet in 4000g for 3 min, and discard of most of media, leaving only a-bit of liquid (~100ul), re-suspend pellet with the remained liquid and spread on plate)
10. Incubate plates in 37˚ over-night

10/18/2018 Transformation Chemically Comp. Cells · Benchling
file:///tmp/tmpcJTeu4.html 1/1
Transformation Chemically Comp. CellsProject: iGEM ETHZ 2018Authors: Elisa GarulliDate: 2018-07-26
Thaw Bacteria from -80˚ on ice (10 min)Add X µl Plasmid (up to 10% of total volume) and mix gently with pipette, let it sit on ice for 30min●Heat-shock tube in 42˚ for 45sec●Put tube on ice for 2min●Add 900µl LB●Shake in incubator at 37˚ for 1 hour●Meanwhile: Prepare appropriate agar plates with antibiotics and pre-heat in 37˚ (dry) incubator●After an Hour - Take 50-200µl of the culture and spread on agar plate.●
(If all bacteria are needed, spin down bacteria to pellet in 4000g for 3 min, and discard of most of media, leaving only a-bit of liquid (~100ul), re-suspend pellet with the remained liquid and spread on plate)
Incubate plates in 37˚ over-night●
THURSDAY, 26/7/18

10/18/2018 Tryptone Swimming Plate · Benchling
file:///tmp/tmpsaRYaB.html 1/1
Tryptone Swimming PlateIntroductionPlates for swimming assay
Materials
› Tryptone swimming agar
› 1 % (w/v) bacto tryptone
› 0.5 % (w/v) NaCl
› 0.3 % (w/v) agar
Procedure
Recipe
ddH2O 500 mL
Bacto tryptone 5 g
NaCl 2.5 g
Agar 1.5 g
A B C D
1
2
3
4
Table1

10/18/2018 Untitled · Benchling
file:///tmp/tmp8fbQDC.html 1/1
UntitledIntroductionGet started by giving your protocol a name and editing this introduction.
Materials
›
›
Procedure
1.

10/18/2018 Untitled · Benchling
file:///tmp/tmpeTbGIr.html 1/1
UntitledProject: iGEM ETHZ 2018Authors: Elisa GarulliDate: 2018-07-27
FRIDAY, 27/7/18

10/18/2018 Untitled · Benchling
file:///tmp/tmp1OMKtl.html 1/1
UntitledProject: iGEM ETHZ 2018Authors: Eline BijmanDate: 2018-08-05
SUNDAY, 5/8/18

10/18/2018 Agarose Plug Assay · Benchling
file:///tmp/tmpoO9YUq.html 1/2
Agarose Plug AssayIntroductionThis assay is used to test whether the bacteria respond to the ligand (aspartate) at all. The bacteria are given into the middle of an agarose covered slide containing Asp. They will usse up the Asp and move outwards (if they respond), forming a halo visible by the naked eye.
Materials
› 1X TAE buffer
› Agarose
› Motility Buffer
› Microscopy slide
› Cover slip
Procedure
Make the 2% Agarose gel
1. Add 0.2 g of agarose into 10 mL of TAE buffer (use heat-proof container)
2. Microwave in pulses (total of 1-3 min) until agarose is completely disolved.
3. Keep the agarose at 60°C
Prepare Bacteria
4. From an overnight culture in LB (or M9) dilute to an OD600 of 0.05
5. Incubate them at 30°C until an OD600 of 0.6 - 0.8 is reached (mid exponential phase)
6. Harvest 10 mL of the culture and centrifuge at 800x g for 5 min
7. Wash the bacteria with 10 mL motility buffer
8. Spin them down again and resuspend in 10 mL motility buffer
Plug Assay
9. Add Aspartate to reach a final concentration of 1mM
take 100 μL of 10mM Asp and mix with 0.9 mL of 2% agarose

10/18/2018 Agarose Plug Assay · Benchling
file:///tmp/tmpoO9YUq.html 2/2
10. Prepare a microscopy slide by puting 2 tapes next to each other with a distance of 1 cm between them
the tape is there to get an appropriate plug thickness
11. Place a drop of 5 μL onto a microscopy slide and immediately cover if with a cover slip
12. Remove the cover slip, once the plug is hard
13. Pipette bacteria around the plug and wait for 30 - 60 min

10/18/2018 Blunt end ligation · Benchling
file:///tmp/tmpDZ623Y.html 1/2
Blunt end ligationIntroductionFor introducing a deletion (fragment of multiple bp) into a plasmid. Adapted from ThermoFisher (https://assets.thermofisher.com/TFS-Assets/LSG/manuals/MAN0013192_Selof_Linear_DNA_UG.pdf)
Materials
› Linear DNA
› 10x T4 DNA Ligase Buffer
› T4 DNA Ligase
› nuclease free Water
› Polyethylene glycol (PEG) greatly increases the ligation efficiency of blunt-end DNA ligation. The recommended concentration of PEG 4000 in the ligation reaction mixture is 5% (w/v). --> need 0.05mg/uL --> prepare 0.5mg/uL = 0.5g/mL and dilute 1:10 in nuclease free water
›
Procedure
Mixing of components
Component Concentration Mass Volume
DNA 40
Buffer 5
Ligase 5
PEG 4000 0.5mg/uL 2.5mg 5
Water
A B C D
1
2 #VALUE!
3
4
5
6 #VALUE!
Table1
Incubation
1. Mix thoroughly, spin down shortly
2. Incubate for 1h at 22°C
3. Heat inactivate ligase at 65°C for 10 minutes

10/18/2018 Blunt end ligation · Benchling
file:///tmp/tmpDZ623Y.html 2/2
4. . Use up to 5 µl of the mixture for transformation of 50 µl chemically competent cells and 1-2 µl per 50 µl of electrocompetent cells

10/18/2018 Bubbling Experiment · Benchling
file:///tmp/tmpPbgQNn.html 1/2
Bubbling ExperimentIntroduction
Materials
› Vanillin: Sigma-Aldrich, V1104-100G, Lot. BCBV5242
› O-toluidine
› N, N-dimethylformamide
› Acetic acid buffer 0.1 M, 4,5 pH
Procedure
Dilutions
1. Stock solutions
1 mg/mL vanillin- Weight 0.0100 g of Vanillin add 10 mL of distilled water1 µg/mL vanilin- Add 9990µL of ddH20- Add 10 µL of 1 mg/mL vanillin stock solution1ng/mL vanillin- Add 9990µL of ddH20- Add 10 µL of 1 µg/mL vanillin stock solution1pg/mL vanillin- Add 9990µL of ddH20- Add 10 µL of 1 ng/mL vanillin stock solution
2. Arithmetic serial dilutions:
Read the table as: how much to add from each stock and how much of water, each column is a sample.
0 1 2 3 4 5 6 7 8
Vanillin µg/mL 1000 500 400 300 200 100 75 50 25
1 mg/mL stock solution [mL]
1 0.5 0.4 0.3 0.2 0.1 0.075 0.05 0.025
1 µg/mL stock solution [mL]
0 0 0 0 0 0 0 0 0
1 ng/mL stock solution [mL]
0 0 0 0 0 0 0 0 0
1 pg/mL stock solution [mL]
0 0 0 0 0 0 0 0 0
ddH2O [mL] 0 0.5 0.6 0.7 0.8 0.9 0.925 0.95 0.975
A B C D E F G H I J
1
2
3
4
5
6
7
Table1
3. Prepare solutions for the reaction:
- Mix o-toluidine with N, N-dimethylformamide at 1:3 (v/v) [toxic-substances cupbord third floor]- Acetic acid buffer 0.1 mM at 4.5 pH
4. Prepare bubbled samples:
- Add three spoons of vanillin in a 1L flask.- Close the cap and incubate for some time (tbd) so the air gets saturated.- Change the cap to the one with the tubing, connected to the pump- Bubble for the desired time in 7.5 mL in a 50 mL Falcon tube (not more or the water will be sprayed in the flask containing vanillin). *- Immediately transfer 1 mL from each sample to a 1.5 eppendorf tube and close the cap to minimize the evaporation of the vanillin. *Previously tested times were 3s, 10s, 1m, 5m, 10m and 30m. However, we noticed that the concentration in the water seems to decrease as we increase the bubbling time. This might be because the air gets less and less saturated as we pump it out. We should try to reverse the order and do the longer times before (or the central ones, so to get the maximum of vanillin in).
5. Reaction
Add 1 mL of vanillin solution and 200 μL of o-toluidine solution to a 1.5 mL Eppendorf tube, and shake the mixture was for 5 min at room temperature, take care of preparing also a blank sample with water and the o-toluidine solution. Add acetic acid solution (200 μL) to the mixture, and place the tube in a boiling water bath for 15 min at 100 ̊C. (or thermoblock at 99°C). Be careful as the pressure that builds in the eppendorf tend to make them pop open. Try to keep the caps sealed.

10/18/2018 Bubbling Experiment · Benchling
file:///tmp/tmpPbgQNn.html 2/2
6. Measurement
Depends on the experiment performed. Either plate reader, UV-Vis spectrometer or MS.
10/18/2018 Cell Tethering Assay · Benchling
file:///tmp/tmpuKyvbp.html 1/2
Cell Tethering AssayIntroductionWith this method one can observe the CCW and CW rotation of bacteria, which are coated to the surface using anti-flagellin Abs. Protocol from Bacterial Tethering Analysis Reveals a “Run-Reverse-Turn” Mechanism for Pseudomonas Species Motility
When we coat proteins to a glass coverslip, we use Cromic-sulphuric acid overnight to degrease. After that we dry the glasses at 60 degrees celsius. Then you can place a drop of protein solution on parafilm. Slide the glass on the protein solution and incubate at RT (1-2 hours). Block in 1% BSA or HSA overnight at 4°C. Store at 4°C, max 2-3 days. You can also freeze the glasses in the blocking solution at -20°C for longer storage
Materials
› bBSA (0.05 mg/mL (probably less)) in PBS (pH7.4) (from practical course script)
› BSA (40mg/mL) in PBS (pH7.4)
› Avidin (0.01 mg/mL) in PBS
› Anti-Flagellin (Anti-FliC) Antibody for E. coli conjugated to biotin (AB193301), Abcam
› PBS
Procedure
Surface Functionalization (Kuhn & Dittrich 2012)
1. Fill channels with PBS by centrifugation: 10 mins at 800g
2. Do everything with 5μL/min
3. Prepare the 40 mg/mL BSA and bBSA, vortex it, let it settle for 5 mins and filter through a 0.45 μm filter
4. !! Do this directly after plasma treatment/bonding: Fill the bonded chip with bBSA and incubate for 2h at RT
5. Wash with PBS by flushing for 5 min with 5μL/min
6. Fill the chip with BSA for 2-3 h at RT (blocking)
7. Wash
8. Fill the chip with avidin and incubate for 2h
9. Wash

10/18/2018 Cell Tethering Assay · Benchling
file:///tmp/tmpuKyvbp.html 2/2
Antibody Coating
10. Dilute some of the Ab to 0.025 mg/mL in PBS? (Huang 2002)
11. Fill the chip with the Ab solution and incubate at RT for 1h
12. Wash
Bacteria Immobilization (Berg 1975, Qian 2013)
13. Spin down at 3000 rpm for 3 mins (6?) and resuspend cells in tethering medium at a concentration of ~3*108 cells/mL
14. Pass the cells through a 34-gauge blunt-end needle 4 times to shear off flagella
or 60 times through 29-gauge needle (26-gauge (Block 1982))
15. Fill the chip with bacterial solution and incubate at RT for 1 h
16. Flush out unbound bacteria with tethering medium at 50μL/min

10/18/2018 Chip fabrication · Benchling
file:///tmp/tmpkuruSb.html 1/2
Chip fabricationIntroductionMicrofluidic chip fabrication protocol
Materials
› PDMS
› Curing agent
› Puncher
› Blades
› Cutter
› Holder
› Paper towel
› Glass slides
Procedure
Chip fabrication
1. Pour 40 g of PDMS + 4 g of curing agent in a weighting boat (note the weight needs to be calibrated, the 0 need to be in the middle)
2. Mix really really well, also from bottom up
3. Degas (open and close the inlet to make the bubbles pop)
4. Pour on the wafer in the holder
5. put in the oven for 2-3 hours
6. take out and separate from the white holder with the back part of a cutter
7. separate the chips with the blade, looking at the lines with the light, use the paper towel as a surface
8. punch the holes with a new puncher
9. clean with tape
10. close the chips with tape

10/18/2018 Chip fabrication · Benchling
file:///tmp/tmpkuruSb.html 2/2
11. clean the glasses with distilled water
12. Seal the glass on the chip:
put on the plastic slid both the glass and the chipput in the plasma lamp, turn the pump on for 45 s with the inlet closedopen the inlet on the small opening until the pressure is between 7 and 8 mBarturn on the plasma for 45sturn off, open the inlet on the big opening and turn off the pumpseal the chip on the glass pressing delicatelyput on the heater plate