1. create webform page · mhc drupal user manual: webforms these instructions are not inclusive of...
TRANSCRIPT

MHC Drupal User Manual: Webforms
These instructions are not inclusive of all webform features that may be available. If you
need assistance in creating webforms, or if you want to provide options on your forms
that may be available, but are not included in this documentation, email the College
Web Team at: [email protected].
There are four main steps to create a Webform:
1. Create the webform page.
2. Add webform components (questions).
3. Add receipt page content.
4. Add form submission recipients.
1. Create Webform Page A. Click on the Add Content link at the top of the personal menu.
B. Select Webform from the list of content types.
C. Complete the Webform fields as follows: 1) Add a Title (this title will appear above the content on the form page).
2) Select the Section (the top level of your section of the web).
3) Add content to the Body if appropriate.

2 MHC Drupal User Manual: Webforms 02/22/13
4) Scroll down to the bottom of the page; select the Parent Item pull-down menu, and then click on the section you want the new page to appear.
5) Click on Save.
6) After you save the page, you should get to this page, where you will add the field name and type components, and indicate if the field is mandatory.

3 MHC Drupal User Manual: Webforms 02/22/13
2. Webform Components You may add any number of fields to a node for the end-user can fill out:
NAME DESCRIPTION
Date Presents month, day, and year fields
E-mail A special textfield that accepts email addresses
Fieldset Fieldsets allow you to organize multiple fields into groups
File Allow users to upload files of configurable types
Grid Allows creation of grid questions, denoted by radio buttons
Hidden A field which is not visible to the user, but is recorded with the
submission
Markup Displays text as HTML in the form; does not render a field
Number A numeric input field (either as textfield or select list)
Page break Organize forms into multiple pages
Select options Allows creation of checkboxes, radio buttons, or select menus
Textarea A large text area that allows for multiple lines of input
Textfield Basic textfield type
Time Presents the user with hour and minute fields.
Optional am/pm fields

4 MHC Drupal User Manual: Webforms 02/22/13
Creating a Textfield A text field is a large text area that allows for multiple lines of input.
1. Enter the question to be asked under Label, i.e.; First Name
2. Select Textfield in type. 3. Check the Mandatory box if the question is mandatory.
4. Click on Add
5. Scroll down to the bottom of the page to DISPLAY.
6. The width of the textfield box can be changed by entering a number. The size of the
box can be edited by entering a number under Width.
7. Select Save Component. 8. Add the second textfield component Last Name with a width of 35
Creating an Email Field An email field is a special textfield that accepts email addresses.
1. Enter the question to be asked under Label, i.e.; Email. 2. Select E-mail in type. 3. Check the Mandatory box if the question is mandatory.
4. Click Add.

5 MHC Drupal User Manual: Webforms 02/22/13
5. Under Default value, you can type in @mtholyoke.edu if the form is to be filled by a Mount Holyoke College affiliated member. This extension will be automatically entered into the field and the user can just put in their Mount Holyoke College username. This is not necessary,

6 MHC Drupal User Manual: Webforms 02/22/13
Add Field Containing Numbers A field containing numbers is a numeric input field (either as textfield or select list).
1. Enter the question under Label; i.e., Current Age
2. Select Number 3. Click on Add
4. Check the box on the left of Integer
5. To enter a description for an example for the user, write this under Description
And the field in the webform will look like this:
7 MHC Drupal User Manual: Webforms 02/22/13
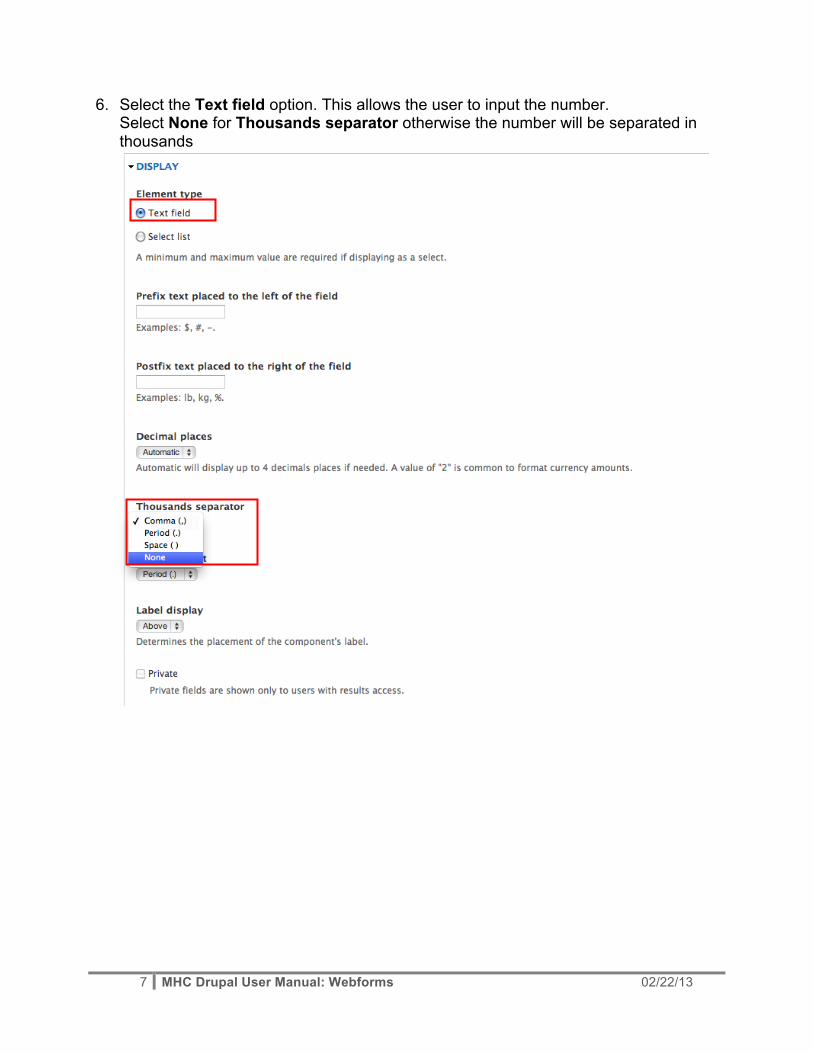
6. Select the Text field option. This allows the user to input the number. Select None for Thousands separator otherwise the number will be separated in thousands

8 MHC Drupal User Manual: Webforms 02/22/13
Markup
A markup displays text as HTML in the form; does not render a field.
1. Add the label type in the question.
2. Select the type of label it is from the pull-down menu; i.e., markup.
3. Click on Add; you will be redirected to the Edit component.

9 MHC Drupal User Manual: Webforms 02/22/13
4. In the Edit component, the label details and the field key are auto-filled from the
information that you added to the label.
5. Add appropriate content to the Value section of the form. If appropriate, change the
format from paragraph to Heading 2, etc.
6. Click on Save.
Select Options
The select options field type allows you to create checkboxes, radio buttons, or menus:
Select list (single selection) – choose the "Select options" type, enter the values and
label, and make sure "List box" option is checked (on).
Select list (multiple selection) - choose the "Select options" type, enter the values and
label, then choose the "Multiple" advanced setting, and make sure "Listbox" option is
checked (on).
Checkbox - choose the "Select options" type, enter the value and label, then choose
the "Multiple" advanced setting (even if you just want one checkbox to appear), and
make sure "Listbox" option is not on.
Checkboxes (multiple) - choose the "Select options" type, enter the values and label,
then choose the "Multiple" advanced setting, and make sure "Listbox" option is not on.
Radio buttons - choose the "Select options" type, enter the values and label. Make
sure both the 'Multiple' advanced setting and "Listbox" option settings are not on.
10 MHC Drupal User Manual: Webforms 02/22/13
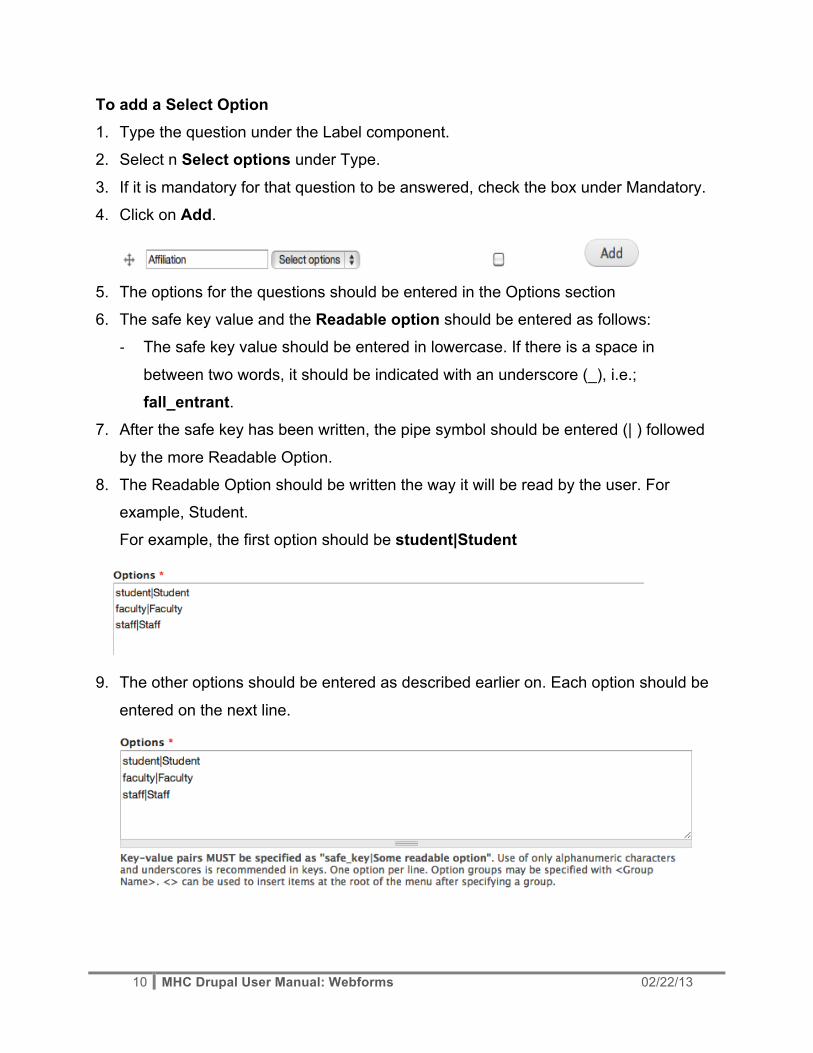
To add a Select Option 1. Type the question under the Label component.
2. Select n Select options under Type.
3. If it is mandatory for that question to be answered, check the box under Mandatory.
4. Click on Add.
5. The options for the questions should be entered in the Options section
6. The safe key value and the Readable option should be entered as follows:
-‐ The safe key value should be entered in lowercase. If there is a space in
between two words, it should be indicated with an underscore (_), i.e.;
fall_entrant. 7. After the safe key has been written, the pipe symbol should be entered (| ) followed
by the more Readable Option.
8. The Readable Option should be written the way it will be read by the user. For
example, Student.
For example, the first option should be student|Student
9. The other options should be entered as described earlier on. Each option should be
entered on the next line.

11 MHC Drupal User Manual: Webforms 02/22/13
10. Click on the Label display pull-down menu and select Inline. This allows options,
which are just a few to be arranged neatly in one line. For example, a question,
which has two options, can be arranged inline.
11. Click on Save component at the bottom of the screen.
12 MHC Drupal User Manual: Webforms 02/22/13
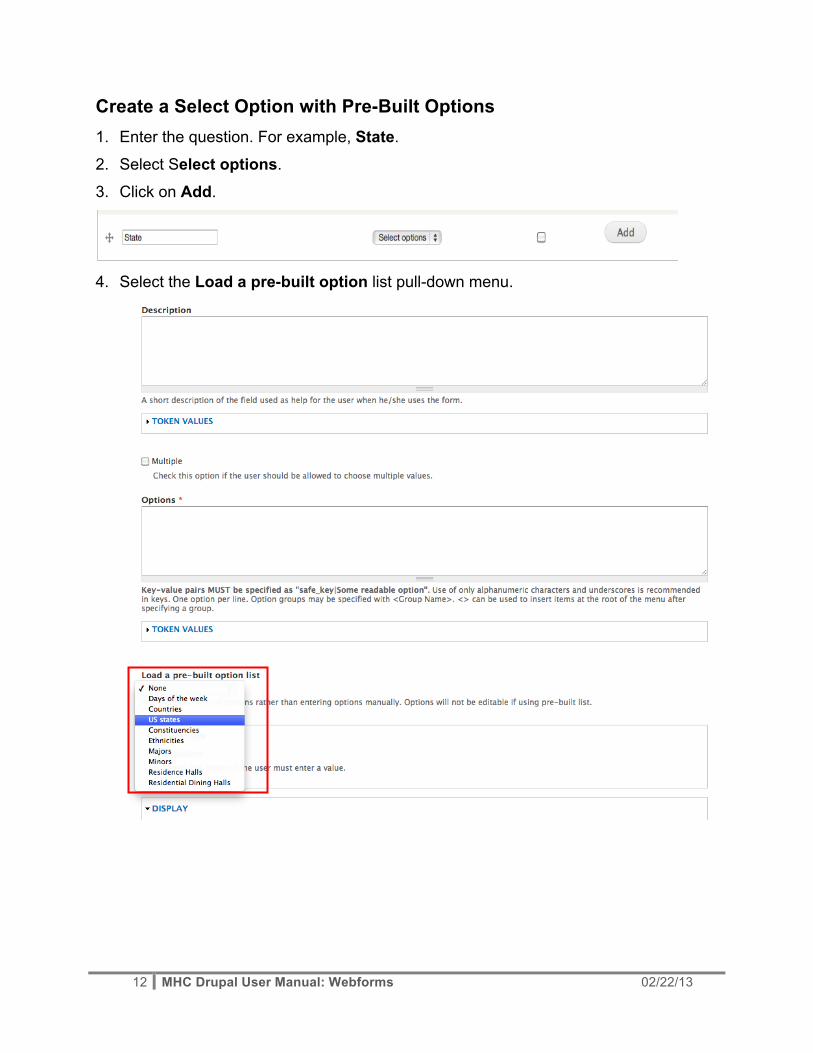
Create a Select Option with Pre-Built Options 1. Enter the question. For example, State.
2. Select Select options.
3. Click on Add.
4. Select the Load a pre-built option list pull-down menu.

13 MHC Drupal User Manual: Webforms 02/22/13
5. Select the pre-built list; for example, US states (the options area will pre-fill from the
pre-built list).
6. Check box on the left of Listbox. This is under the Display section.
7. Click on Save component. 8. Save the changes made on the webform.

14 MHC Drupal User Manual: Webforms 02/22/13
Add Text Area. 1. Enter the question under Label; i.e., Hobbies
2. Select Text area
3. Click on Add
4. Check the box on the left Resizable. This makes sure that the size of the box can be
edited.
15 MHC Drupal User Manual: Webforms 02/22/13
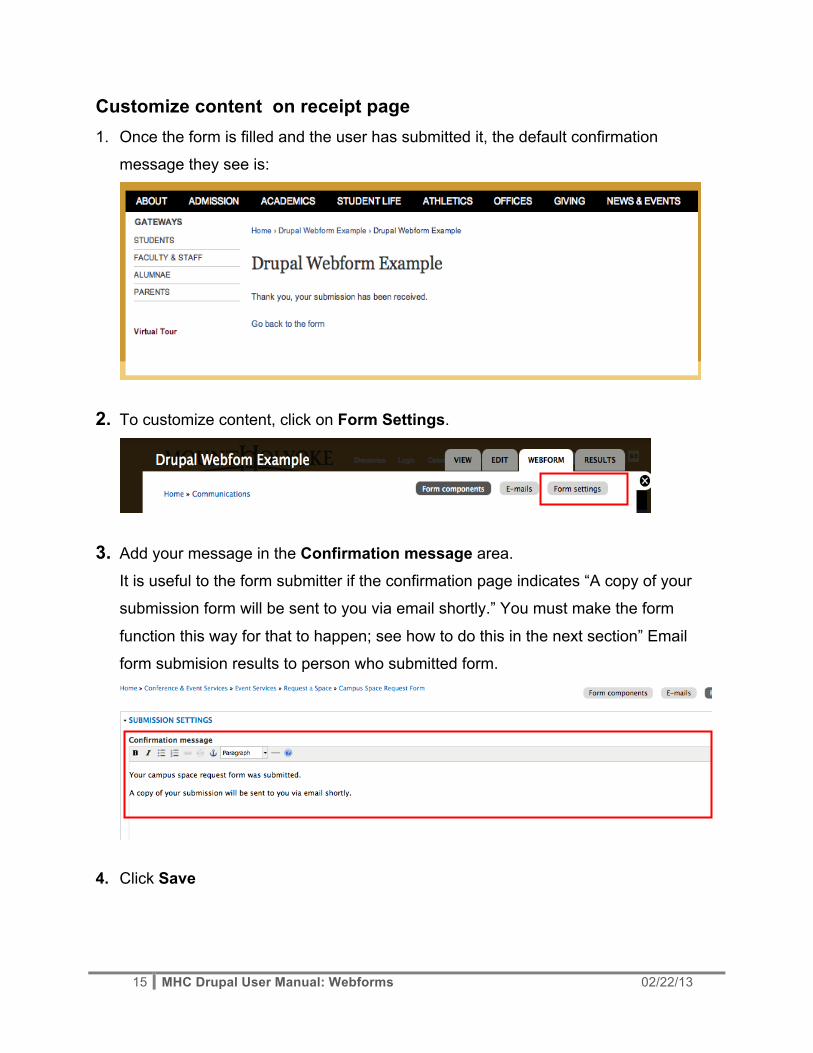
Customize content on receipt page 1. Once the form is filled and the user has submitted it, the default confirmation
message they see is:
2. To customize content, click on Form Settings.
3. Add your message in the Confirmation message area.
It is useful to the form submitter if the confirmation page indicates “A copy of your
submission form will be sent to you via email shortly.” You must make the form
function this way for that to happen; see how to do this in the next section” Email
form submision results to person who submitted form.
4. Click Save

16 MHC Drupal User Manual: Webforms 02/22/13
Assign Email Recipients You may recieve the data from form submission via email and/or by downloading the
data from the webform in Drupal via the Results tab. Note: only one person per form
has access to view the webform database.
You may setup webforms to do any or all of the following:
• Email form submissions to a mail list, i.e., [email protected].
• Email a summary of the form submission to the person who submitted the form,
i.e. Value of “Email.”
• Email form submissions to one or more indiviuals in your department, i.e.,
Set form so you or someone in your department receives results via email: 1. Go to the Webform tab and then click on Emails, which can be found on the top of
the Edit Component page.
2. Select Address, and your MHC email address (i.e., [email protected]), and
then select Add.

17 MHC Drupal User Manual: Webforms 02/22/13
3. Comple the Email Header Details as follows:
a. Email subject
You may leave the default or add a custom subject. This is the text you will
see as the subject in your email.
b. Email from address
Select Component and use the pull-down menu to select the email field of the
person who will complete the form.

18 MHC Drupal User Manual: Webforms 02/22/13
c. Email from name
Custom - enter the key values for the first and last name of the person who
will complete the form; i.e., %value[first_name] %value[last_name].
Note: match the form components EXACTLY to the key field label.
4. Save email settings. The next screen should look similar to this:

19 MHC Drupal User Manual: Webforms 02/22/13
Set form to email submision results to person who submitted form: 1. Go to the Webform tab and then click on Emails, which can be found on the top of
the Edit Component page.
2. Select Email Address (or whatever field name was assigned for the person filling in
the form to add) from the pull-down menu, then select Add. Note: the form submitter
must include their email on the form to receive the email, so you may want to make
email a required field or indicate it is optional, but required if they want a copy of
their form sent.
3. Complete the Email Header Details as follows (see screen shots on previous page):
a. Email subject – you may leave the default or add a custom subject. This is
the text you will see as the subject in your email.
b. Email from address – select Component and use the pull-down menu to
select the email field of the person who will complete the form.
c. Email from name – select Custom and enter the key values for the first and
last name of the person who will complete the form; i.e.,
%value[first_name] %value[last_name]
d. Save email settings.