1. create bip report - cloudcustomerconnect.oracle.com · upload provided reports in following...
TRANSCRIPT
Alexey Shtrakhov Sunday, August 20, 2017 Page 1 of 9
1. CREATE BIP REPORT
Login to your BIP Server: https://yourbiserver.com/xmlpserver/servlet/catalog
Upload provided reports in following custom folders.
NOTE! If these folders do not exists you can create them. If you need to locate these files in some other folders,
it is possible, but later provided code will need to be modified.
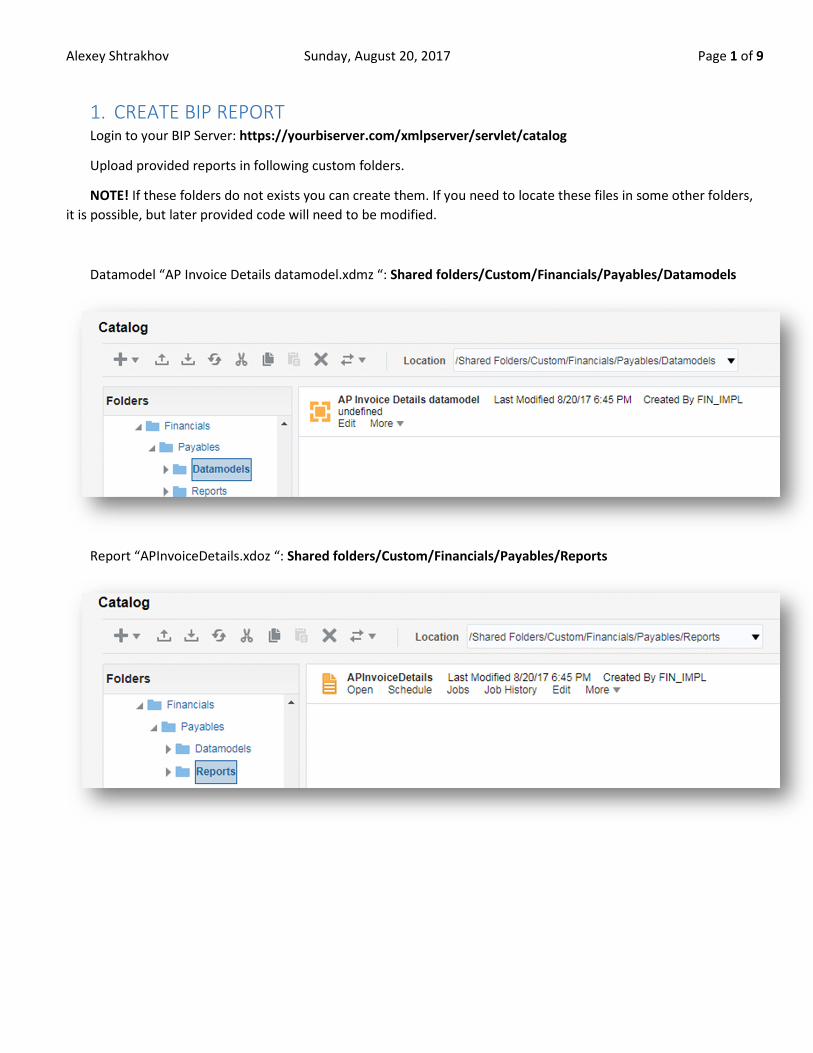
Datamodel “AP Invoice Details datamodel.xdmz “: Shared folders/Custom/Financials/Payables/Datamodels
Report “APInvoiceDetails.xdoz “: Shared folders/Custom/Financials/Payables/Reports
Alexey Shtrakhov Sunday, August 20, 2017 Page 2 of 9
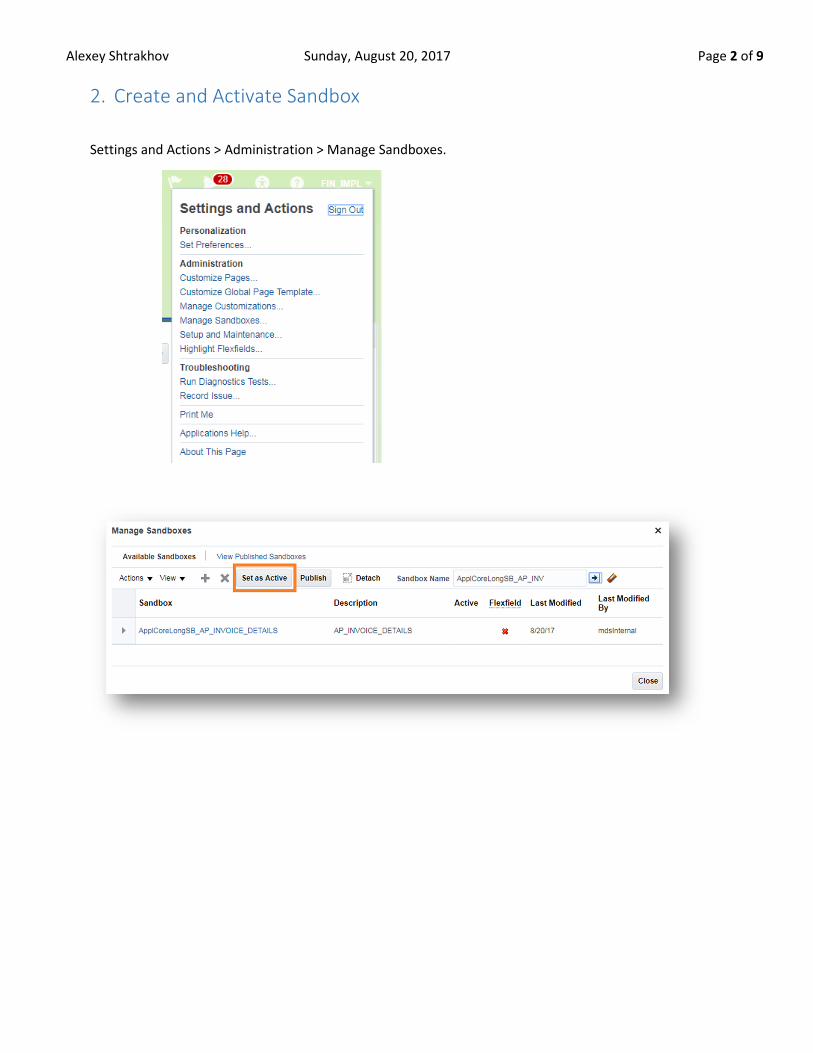
2. Create and Activate Sandbox
Settings and Actions > Administration > Manage Sandboxes.
Alexey Shtrakhov Sunday, August 20, 2017 Page 3 of 9
3. AP Invoice Form Customization
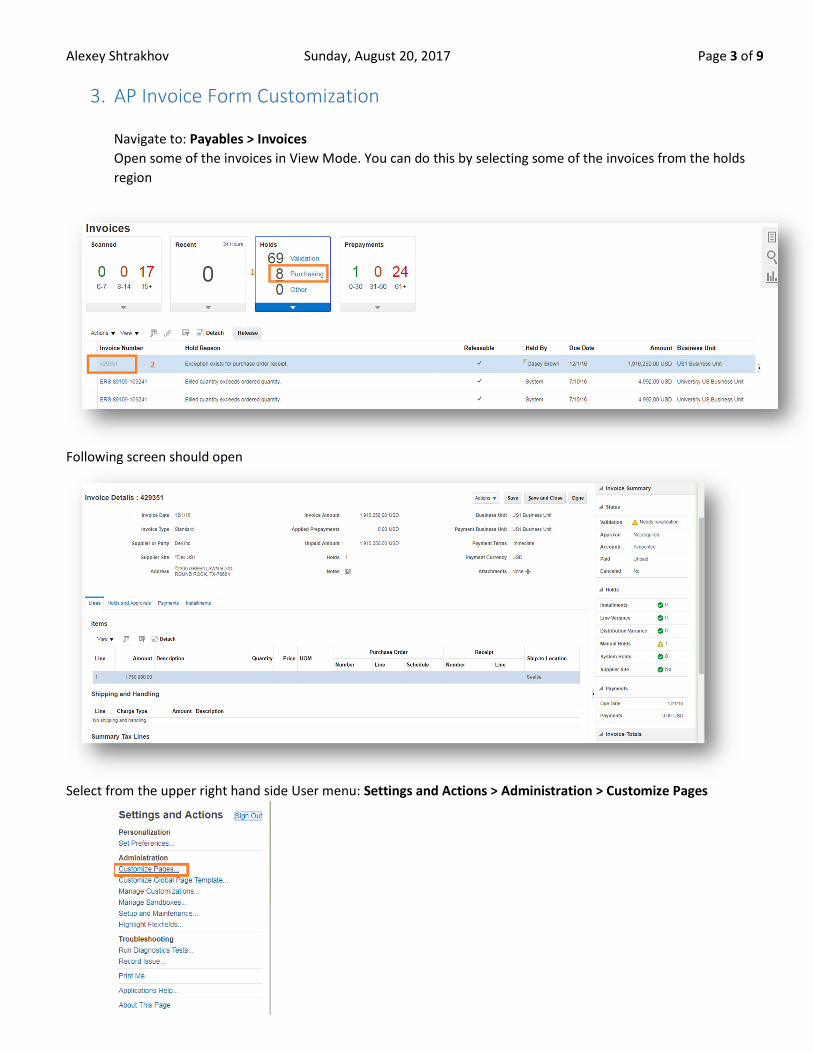
Navigate to: Payables > Invoices
Open some of the invoices in View Mode. You can do this by selecting some of the invoices from the holds
region
Following screen should open
Select from the upper right hand side User menu: Settings and Actions > Administration > Customize Pages
Alexey Shtrakhov Sunday, August 20, 2017 Page 4 of 9
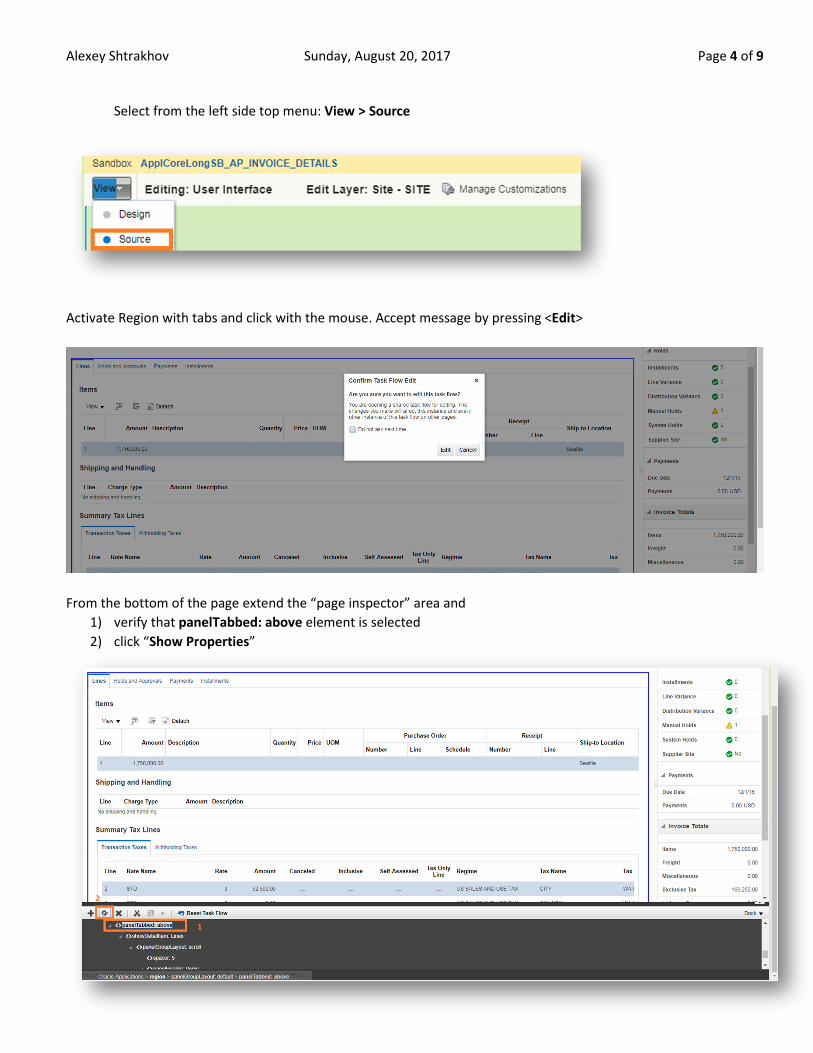
Select from the left side top menu: View > Source
Activate Region with tabs and click with the mouse. Accept message by pressing <Edit>
From the bottom of the page extend the “page inspector” area and
1) verify that panelTabbed: above element is selected
2) click “Show Properties”
Alexey Shtrakhov Sunday, August 20, 2017 Page 5 of 9
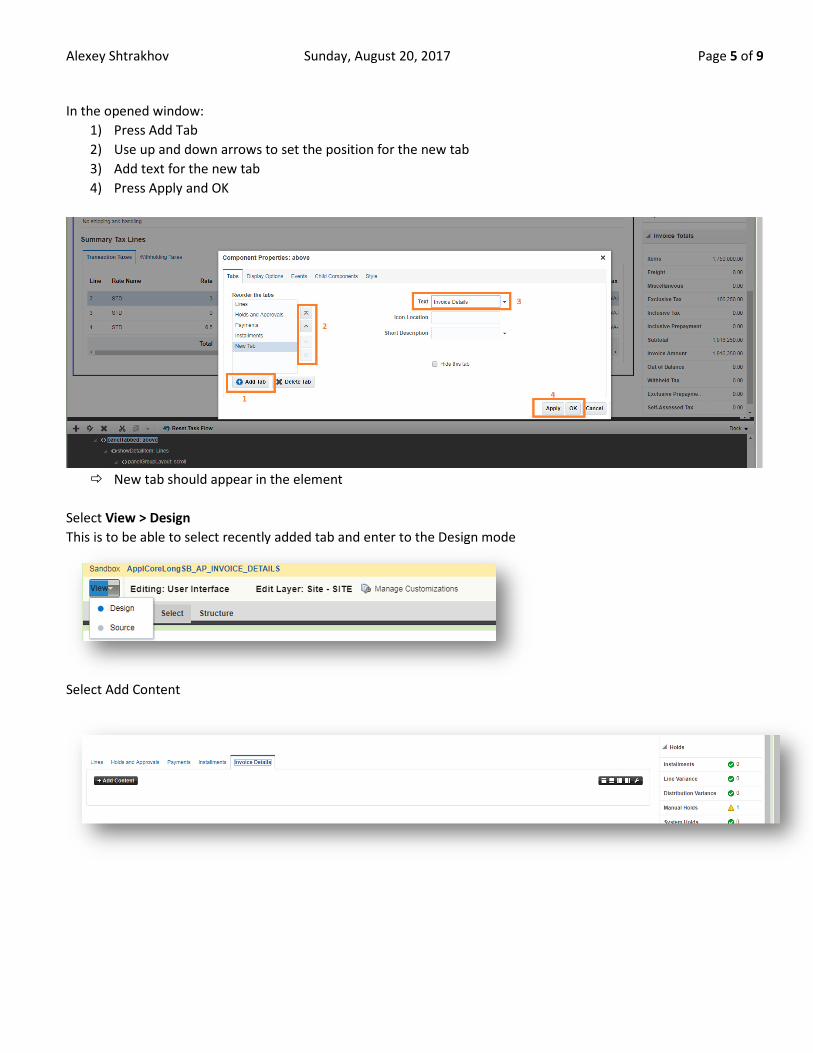
In the opened window:
1) Press Add Tab
2) Use up and down arrows to set the position for the new tab
3) Add text for the new tab
4) Press Apply and OK
� New tab should appear in the element
Select View > Design
This is to be able to select recently added tab and enter to the Design mode
Select Add Content
Alexey Shtrakhov Sunday, August 20, 2017 Page 6 of 9
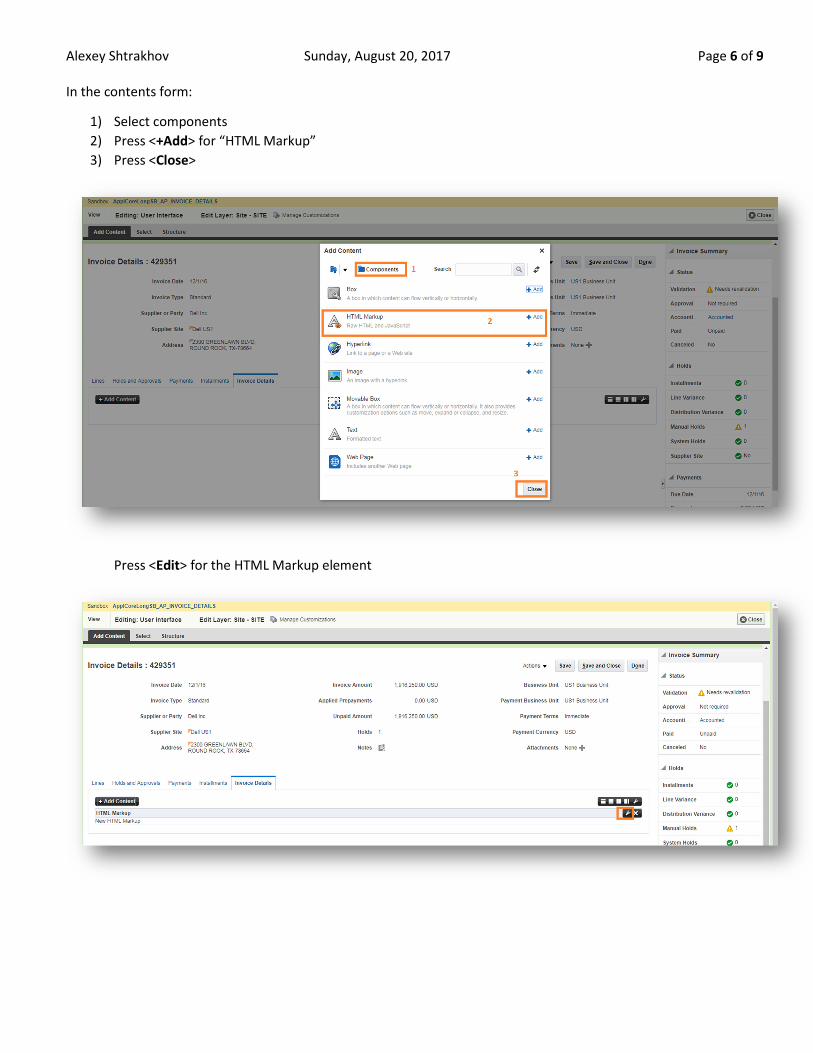
In the contents form:
1) Select components
2) Press <+Add> for “HTML Markup”
3) Press <Close>
Press <Edit> for the HTML Markup element
Alexey Shtrakhov Sunday, August 20, 2017 Page 7 of 9
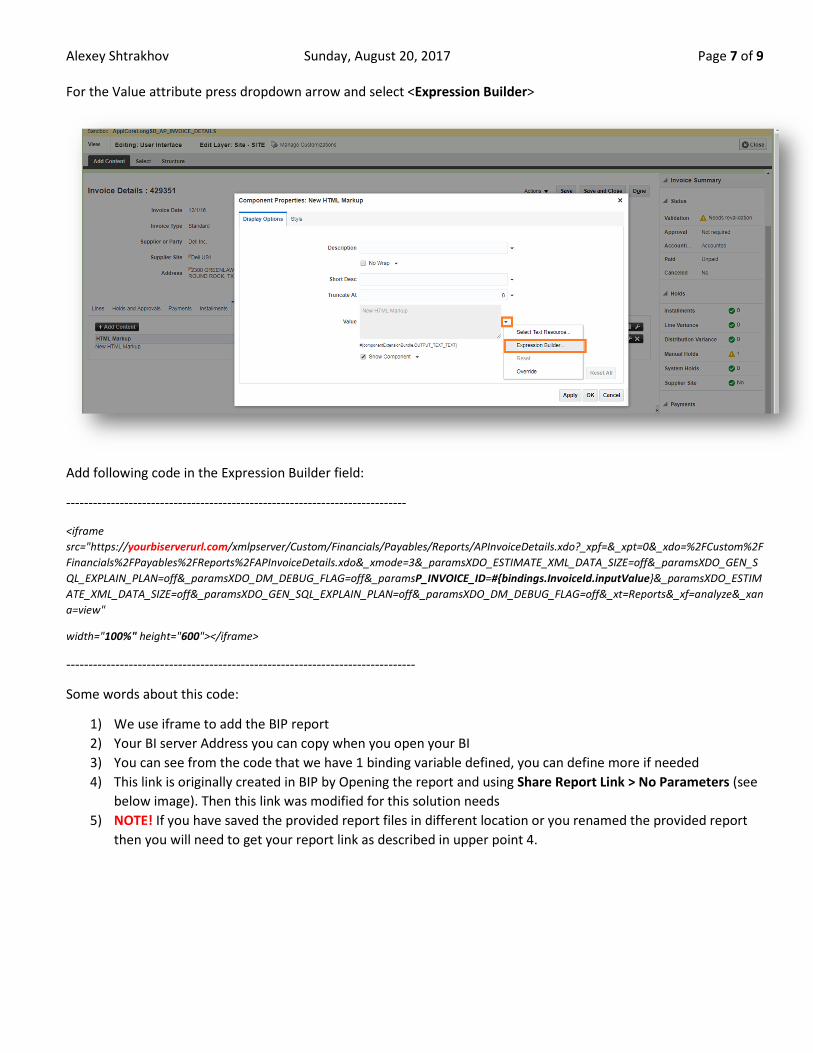
For the Value attribute press dropdown arrow and select <Expression Builder>
Add following code in the Expression Builder field:
----------------------------------------------------------------------------
<iframe
src="https://yourbiserverurl.com/xmlpserver/Custom/Financials/Payables/Reports/APInvoiceDetails.xdo?_xpf=&_xpt=0&_xdo=%2FCustom%2F
Financials%2FPayables%2FReports%2FAPInvoiceDetails.xdo&_xmode=3&_paramsXDO_ESTIMATE_XML_DATA_SIZE=off&_paramsXDO_GEN_S
QL_EXPLAIN_PLAN=off&_paramsXDO_DM_DEBUG_FLAG=off&_paramsP_INVOICE_ID=#{bindings.InvoiceId.inputValue}&_paramsXDO_ESTIM
ATE_XML_DATA_SIZE=off&_paramsXDO_GEN_SQL_EXPLAIN_PLAN=off&_paramsXDO_DM_DEBUG_FLAG=off&_xt=Reports&_xf=analyze&_xan
a=view"
width="100%" height="600"></iframe>
------------------------------------------------------------------------------
Some words about this code:
1) We use iframe to add the BIP report
2) Your BI server Address you can copy when you open your BI
3) You can see from the code that we have 1 binding variable defined, you can define more if needed
4) This link is originally created in BIP by Opening the report and using Share Report Link > No Parameters (see
below image). Then this link was modified for this solution needs
5) NOTE! If you have saved the provided report files in different location or you renamed the provided report
then you will need to get your report link as described in upper point 4.
Alexey Shtrakhov Sunday, August 20, 2017 Page 8 of 9
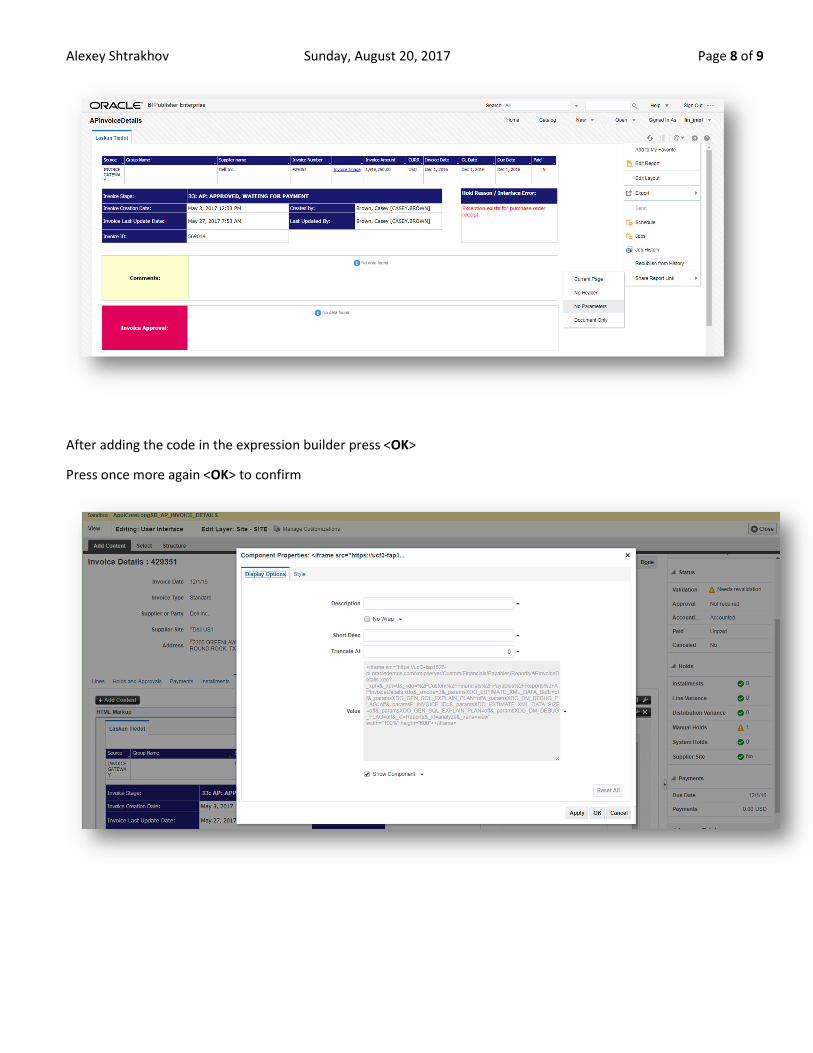
After adding the code in the expression builder press <OK>
Press once more again <OK> to confirm
Alexey Shtrakhov Sunday, August 20, 2017 Page 9 of 9
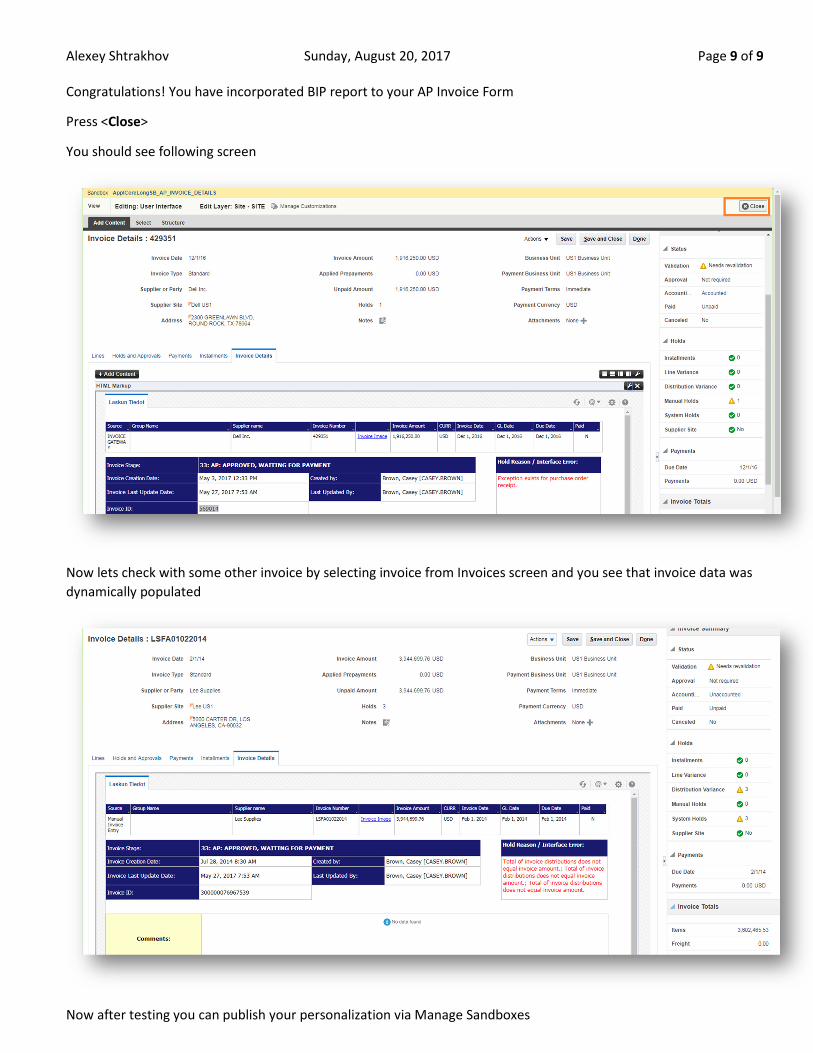
Congratulations! You have incorporated BIP report to your AP Invoice Form
Press <Close>
You should see following screen
Now lets check with some other invoice by selecting invoice from Invoices screen and you see that invoice data was
dynamically populated
Now after testing you can publish your personalization via Manage Sandboxes