rotowash · what it is this instruction manual is for following cleaning machines: y x y x is an...
TRANSCRIPT
rotowash
CAUTION Do not operate this appliance before reading the
instructions.
INSTRUCTION MANUAL
Floor Cleaning Machine
Version 29.01.13 (# 77458)
DEAR ROTOWASH USER!
Your ROTOWASH is a valuable help in dealing with many cleaning problems. Please read this manual through carefully to enable you obtain the best results from your ROTOWASH.
The following points must be observed before the ROTOWASH is used, also during use or by service work:
The machine may only be used by persons who have been trained in its use and who have been specially appointed as ROTOWASH trained operatives.
This device may not be used or stored outside or in a damp room. This appliance is suitable for commercial use for example in hotels, schools,
hospitals, factories, shops, offices and rental businesses. This appliance is not suitable for picking up hazardous dust. The specified voltage on the rating plate must match the voltage of the
power source. The electrical connection must be made with a three contacts socket (with
earth ground). It is not allowed to use this machine without an earth ground. All connections of the mains supply cable must be protected at least against
water splashing. The electrical plug must be disconnected from the main electricity supply
before cleaning and servicing the machine, before changing parts and before changing over to another machine function.
Running over the mains cable can be dangerous. Avoid damage to the mains supply cable by not running over it and by not
squashing or pulling it etc. The mains supply cable must be examined regularly for possible damage or
wear. The machine must not be used if such damage is evident. This substitute cable must be of an equivalent type (H05VV-F 3G1.5mm²) to
the cable fitted by the manufacturer or an original ROTOWASH spare part must be fitted.
Use only specified brushes with the machine supplied. The use of other brushes can compromise safety and performance.
When transporting the ROTOWASH in a lift ensure that the handle is placed in such a position to avoid a possible jamming against the lift walls.
The water level on the floor must not exceed 3 mm. (approx. 2/16”). The use of cleaning fluids which foam excessively or contain Hydrochloride
based substances invalidates the guarantee. Check before use, whether the brushes are suitable for the intended
application This appliance is not intend for use by persons (including children) with
reduced physical, sensory or mental capabilities or lack of experience and knowledge unless they have been given initial supervision to instruction concerning use of the appliance by a person responsible for their safety.
Children should be supervised to ensure that they do not play with the appliance.
Attention: If the loop handle is separated from the machine, the IPX4 standard may not
be existent, depending on the handle’s individual position. Check the stripper blade and have it replaced by a professional service
technician before it gets too sharp. Never attempt to replace the stripper blade with your bare hands - Risk of Injury!
KEEP THIS INSTRUCTION MANUAL!!!
WHAT IT IS
This instruction manual is for following cleaning machines:
Y X Y
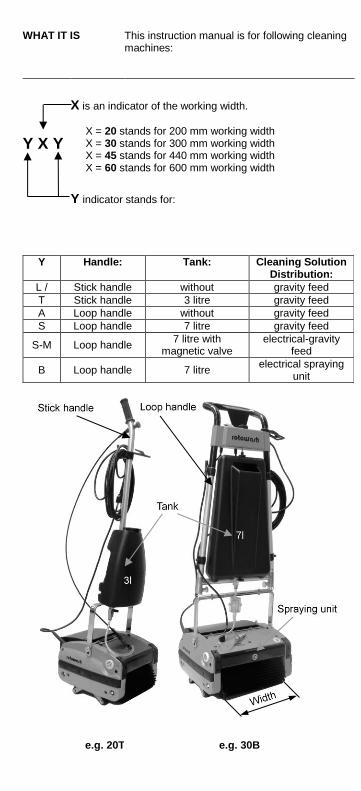
X is an indicator of the working width.
X = 20 stands for 200 mm working width X = 30 stands for 300 mm working width X = 45 stands for 440 mm working width X = 60 stands for 600 mm working width
Y indicator stands for:
Y Handle: Tank: Cleaning Solution Distribution:
L / Stick handle without gravity feed
T Stick handle 3 litre gravity feed
A Loop handle without gravity feed
S Loop handle 7 litre gravity feed
S-M Loop handle 7 litre with
magnetic valve electrical-gravity
feed
B Loop handle 7 litre electrical spraying
unit
e.g. 20T e.g. 30B
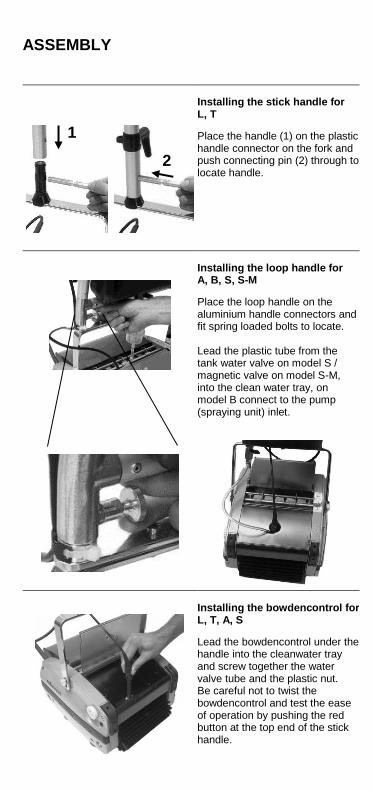
ASSEMBLY
Installing the stick handle for L, T Place the handle (1) on the plastic handle connector on the fork and push connecting pin (2) through to locate handle.
Installing the loop handle for A, B, S, S-M Place the loop handle on the aluminium handle connectors and fit spring loaded bolts to locate. Lead the plastic tube from the tank water valve on model S / magnetic valve on model S-M, into the clean water tray, on model B connect to the pump (spraying unit) inlet.
Installing the bowdencontrol for L, T, A, S Lead the bowdencontrol under the handle into the cleanwater tray and screw together the water valve tube and the plastic nut. Be careful not to twist the bowdencontrol and test the ease of operation by pushing the red button at the top end of the stick handle.
1
2
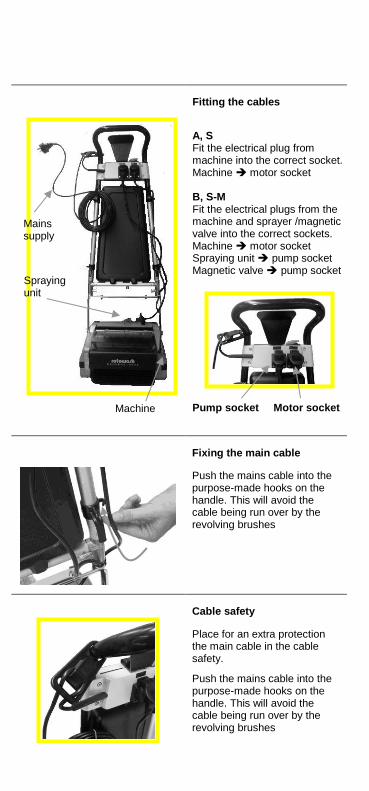
Fitting the cables
A, S Fit the electrical plug from machine into the correct socket. Machine motor socket B, S-M Fit the electrical plugs from the machine and sprayer /magnetic valve into the correct sockets. Machine motor socket Spraying unit pump socket Magnetic valve pump socket
Pump socket Motor socket
Fixing the main cable Push the mains cable into the purpose-made hooks on the handle. This will avoid the cable being run over by the revolving brushes
Cable safety Place for an extra protection the main cable in the cable safety.
Push the mains cable into the purpose-made hooks on the handle. This will avoid the cable being run over by the revolving brushes
Mains supply
Spraying unit
Machine
WORKING WITH ROTOWASH
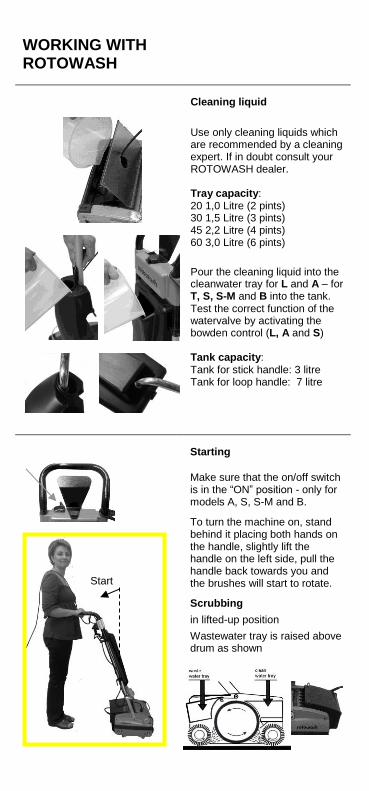
Cleaning liquid
Use only cleaning liquids which are recommended by a cleaning expert. If in doubt consult your ROTOWASH dealer. Tray capacity: 20 1,0 Litre (2 pints) 30 1,5 Litre (3 pints) 45 2,2 Litre (4 pints) 60 3,0 Litre (6 pints)
Pour the cleaning liquid into the cleanwater tray for L and A – for T, S, S-M and B into the tank. Test the correct function of the watervalve by activating the bowden control (L, A and S) Tank capacity: Tank for stick handle: 3 litre Tank for loop handle: 7 litre
Starting
Make sure that the on/off switch is in the “ON” position - only for models A, S, S-M and B.
To turn the machine on, stand behind it placing both hands on the handle, slightly lift the handle on the left side, pull the handle back towards you and the brushes will start to rotate.
Scrubbing
in lifted-up position
Wastewater tray is raised above drum as shown
Start
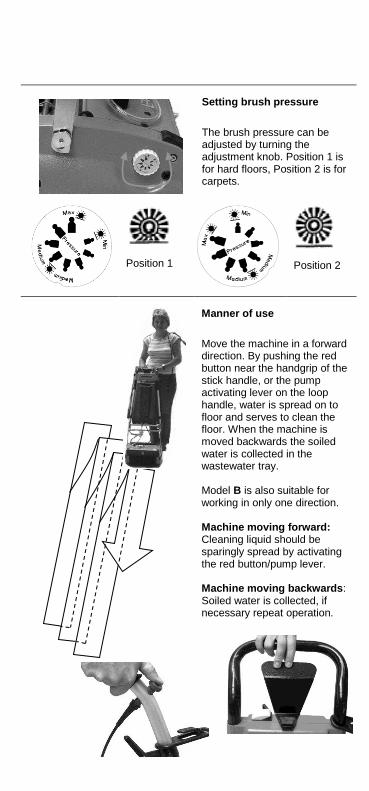
Setting brush pressure
The brush pressure can be adjusted by turning the adjustment knob. Position 1 is for hard floors, Position 2 is for carpets.
Position 1
Position 2
Manner of use
Move the machine in a forward direction. By pushing the red button near the handgrip of the stick handle, or the pump activating lever on the loop handle, water is spread on to floor and serves to clean the floor. When the machine is moved backwards the soiled water is collected in the wastewater tray. Model B is also suitable for working in only one direction. Machine moving forward: Cleaning liquid should be sparingly spread by activating the red button/pump lever. Machine moving backwards: Soiled water is collected, if necessary repeat operation.
WORKING WITH ROTOWASH
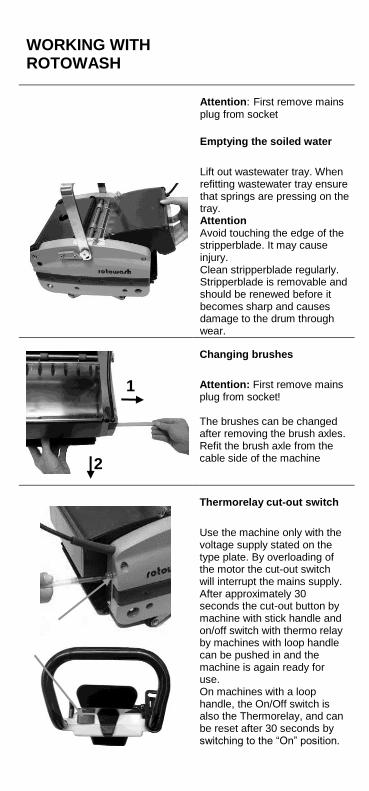
Attention: First remove mains
plug from socket
Emptying the soiled water
Lift out wastewater tray. When refitting wastewater tray ensure that springs are pressing on the tray. Attention Avoid touching the edge of the stripperblade. It may cause injury. Clean stripperblade regularly. Stripperblade is removable and should be renewed before it becomes sharp and causes damage to the drum through wear.
Changing brushes
Attention: First remove mains plug from socket! The brushes can be changed after removing the brush axles. Refit the brush axle from the cable side of the machine
Thermorelay cut-out switch
Use the machine only with the voltage supply stated on the type plate. By overloading of the motor the cut-out switch will interrupt the mains supply. After approximately 30 seconds the cut-out button by machine with stick handle and on/off switch with thermo relay by machines with loop handle can be pushed in and the machine is again ready for use. On machines with a loop handle, the On/Off switch is also the Thermorelay, and can be reset after 30 seconds by switching to the “On” position.
1
2
TRANSPORT, CLEANING AND CARE OF YOUR ROTOWASH
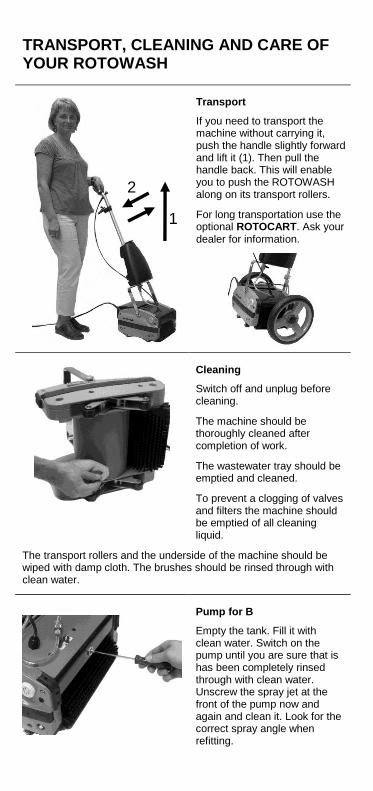
Transport
If you need to transport the machine without carrying it, push the handle slightly forward and lift it (1). Then pull the handle back. This will enable you to push the ROTOWASH along on its transport rollers.
For long transportation use the optional ROTOCART. Ask your dealer for information.
Cleaning
Switch off and unplug before cleaning.
The machine should be thoroughly cleaned after completion of work.
The wastewater tray should be emptied and cleaned.
To prevent a clogging of valves and filters the machine should be emptied of all cleaning liquid.
The transport rollers and the underside of the machine should be wiped with damp cloth. The brushes should be rinsed through with clean water.
Pump for B
Empty the tank. Fill it with clean water. Switch on the pump until you are sure that is has been completely rinsed through with clean water. Unscrew the spray jet at the front of the pump now and again and clean it. Look for the correct spray angle when refitting.
1
2

1. Stick handle
2. Bowdencontrol
3. Cable safety
4. Cable holder
5. Tank 3l
6. Connecting pin
7. Fork
8. Clean water tray
9. Adjustment knob
10. Thermo relay
11. Brushaxle
12. Brushes
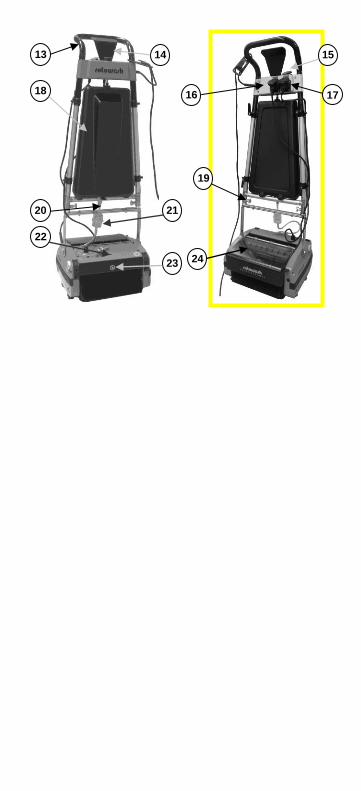
13. Loop handle
14. Pump activating lever
15. Combined On/Off switch
and Thermo relay
16. Socket „Pump”
17. Socket „Motor”
18. Tank 7l
19. Spring loaded bolt
20. Manual water valve /
Magnetic valve
21. Water tube with filter
22. Spraying unit
23. Spray jet
24. Waste water tray
4
9
1
11
3
2
8 7
6
5
12 10
21
18
14 13
20
15
16
19
22
23 24
17
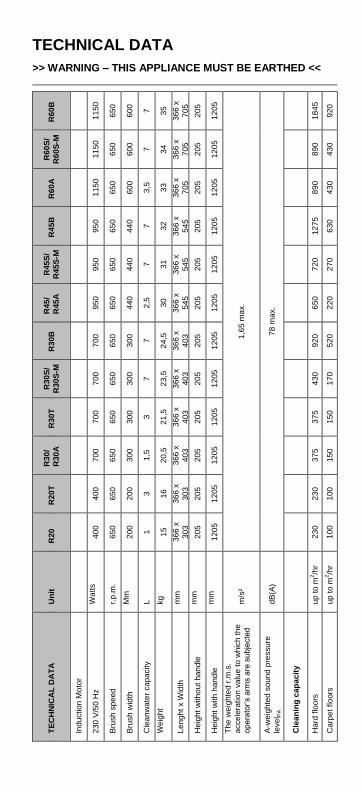
TECHNICAL DATA
>> WARNING – THIS APPLIANCE MUST BE EARTHED <<
R60
B
11
50
65
0
60
0
7
35
36
6 x
70
5
20
5
12
05
1,6
5 m
ax.
78
ma
x.
18
45
92
0
R60
S/
R60
S-M
11
50
65
0
60
0
7
34
36
6 x
70
5
20
5
12
05
89
0
43
0
R60
A
11
50
65
0
60
0
3,5
33
36
6 x
70
5
20
5
12
05
89
0
43
0
R45
B
95
0
65
0
44
0
7
32
36
6 x
54
5
20
5
12
05
12
75
63
0
R45
S/
R45
S-M
95
0
65
0
44
0
7
31
36
6 x
54
5
20
5
12
05
72
0
27
0
R45
/
R45
A
95
0
65
0
44
0
2,5
30
36
6 x
54
5
20
5
12
05
65
0
22
0
R30
B
70
0
65
0
30
0
7
24
,5
36
6 x
40
3
20
5
12
05
92
0
52
0
R30
S/
R30
S-M
70
0
65
0
30
0
7
23
,5
36
6 x
40
3
20
5
12
05
43
0
17
0
R30
T
70
0
65
0
30
0
3
21
,5
36
6 x
40
3
20
5
12
05
37
5
15
0
R30
/
R30
A
70
0
65
0
30
0
1,5
20
,5
36
6 x
40
3
20
5
12
05
37
5
15
0
R20
T
40
0
65
0
20
0
3
16
36
6 x
30
3
20
5
12
05
23
0
10
0
R20
40
0
65
0
20
0
1
15
36
6 x
30
3
20
5
12
05
23
0
10
0
Un
it
Wa
tts
r.p
.m.
Mm
L
kg
mm
mm
mm
m/s
²
dB
(A)
up
to
m2/h
r
up
to
m2/h
r
TE
CH
NIC
AL
DA
TA
Ind
uctio
n M
oto
r
23
0 V
/50
Hz
Bru
sh
sp
ee
d
Bru
sh
wid
th
Cle
an
wate
r cap
acity
We
igh
t
Le
ng
ht
x W
idth
Heig
ht
with
ou
t ha
nd
le
Heig
ht
with
ha
nd
le
Th
e w
eig
hte
d r
.m.s
.
acce
lera
tio
n v
alu
e t
o w
hic
h t
he
op
era
tor’
s a
rms a
re s
ub
jecte
d
A-w
eig
hte
d s
oun
d p
ressu
re
leve
l PA
Cle
an
ing
cap
ac
ity
Hard
flo
ors
Carp
et
flo
ors

FUNCTION & USE
Two counter-rotating brushes (1 and 2) throw the soiled water on to the revolving drum (3), from there it is fed into the waste water tray (5) by means of a stripper blade (4).
This machine is suitable for use with NON-FOAMING detergents having a pH value ranging from 6.5 to 9.5.
The floor cleaning machine from Rotowash is intended for wet and dry cleaning of hard floors, structural floors and textile floors. Prerequisite for the success is the right choose of the brushes.
APPLICATION GUIDE
ROTOWASH used as:
Maintenance cleaning machine
Primary cleaning machine*
Polishing machine
Carpet shampooing machine **
Type of brush
Standard Standard Hard Abrasive
Soft Soft
Brush pressure
Depending on the type of floor; contact Rotowash
Cleaning and Care liquids
According to the recommendation of the floor manufacturer
* Wastewater tray in lifted-up position
** Can also be used for applying impregnation, disinfection and antistatic agents.
>> WARNING – THIS APPLIANCE HAS BEEN DESIGNED FOR USE WITH BRUSHES SUPPLIED BY THE MANUFACTURER. THE FITTING OF OTHER BRUSHES MAY AFFECT ITS SAFETY <<
Before use, check the brush compatibility on the respective floor in an unsuspicious corner.
Attention: Limited suitability for wool and high-pile carpets (brush recommendation: Soft)
rotowash
This document including photographs and illustrations are not contractual. Rotowash reserves the right to change at any time the characteristics of its products without notice.
Rotowash Reinigungsmaschinenfabrik GmbH Karl-Fink-Park 1 , 8435 Wagna, Austria Tel.: +43 3452 / 76611 – 0 Fax: +43 3452 / 76611 – 22 E-Mail: [email protected] Web: www.rotowash.at