cookbook · gluten free • lactose free • sugar free ... this book contains recipes for meals to...
TRANSCRIPT

BrainFoodAutism/ADHD Recovery Using the
SCD/GAPS/PALEO Diet
Cookbook
the
Gluten Free • Lactose Free • Sugar Free
Angela Taylor

For James
Love, Mom
This is NOT a free e-book!The list price of this eBook is $18.99.
You have been sold one copy to keep on yourcomputer or other eReader.
You may also print out one copy for your personal use.
Printing out more than one copy, or distributing it electronically, is prohibited by international and USA copyright laws and treaties, and
would subject the purchaser topenalties of up to $100,000 PER COPY distributed.
Copyright ©2016 by Angela Taylor
The BrainFood Cookbook - Autism & ADD Recovery Using the SCD/GAPS/PALEO Diet
ISBN-13: 978-1942668008
PO Box 26151Baltimore, MD 21210 USAwww.brainfoodcookbook.com
First published in the United States, January 2012 as an eBookFirst printing, October 2014Revised Second Edition to be printed, Spring 2016
Library of Congress Registration TX 7-481-805
BrainFood TV Show concept material is registered with the WGAE Online Script Registration Service
Reference Number: VPEA4DBC9A42
All rights reserved. No part of this publication may be reproduced ortransmitted in any form or by any means, electronic, or mechanical, including pho-tocopying, recording, or by any information storage and retrieval system.
Layout/Design by Angela TaylorPhotographs by Angela Taylor and by royalty-free stock photographers (photo credits available upon request)
This book contains recipes for meals to help manage Autism, ADD/ADHD, and common digestive disorders. It is not intended as a substitute for the advice and care of your physician, and you should use proper discretion, in consultation with your physician, in utilizing the information presented. The author/publisher ex-pressly disclaim responsibility for any adverse effects that may result from the use or application of the information contained in this book.
GAPSTM and Gut and Psychology SyndromeTM are the trademark and copy-right of Dr. Natasha Campbell-McBride. The right of Dr. Natasha Campbell-McBride to be identified as the author of this work has been asserted by her in accordance with the Copyright, Patent and Designs Act 1988.
con
ten
ts
intr
od
uct
ion Foreword, by Natasha Campbell-McBride, M.D.
AcknowledgmentsOur StoryAdditional ReadingSummary of GAPS Legal/Illegal Foods (Full GAPS)GAPS Intro and StagesGAPS FAQPasteurized vs. Raw DairySoaking/Sprouting/Dehydrating Nuts (and Seeds)CookwareOxalates GoitrogensHow do I get my kid to eat this stuff?Menu PlanningSaving Time and Saving MoneyStrictness ChartMuscle TestingOther Therapies in Conjunction with GAPS
Abbreviations . . . . . . . . . . . . . . . . . . . . . . . . . . . . . . 26
Juicing . . . . . . . . . . . . . . . . . . . . . . . . . . . . . . . . . . . 27 Fruit and Vegetable Juicing - Overview Dreamsicle Green Lemonade
Ferments . . . . . . . . . . . . . . . . . . . . . . . . . . . . . . . . . 31 Kefir (raw dairy) 24-hour Yogurt (raw dairy) Lacto-Fermented Veggies
Appetizers . . . . . . . . . . . . . . . . . . . . . . . . . . . . . . . . 35 Lima Bean Hummus Guacamole Salsa Fresca Zucchini Fritters Pumpkin Seed Falafel Sun-Dried Tomato Spears Ants on a Log (Stuffed Celery) Deviled Eggs
Salads and Dressings . . . . . . . . . . . . . . . . . . . . . . . . 44 Chicken Salad with Grapes Apple Fennel Salad Radish Mango Salad Asian Tomato Salad Bookmaker Salad Fennel Orange Currant Salad Cobb Salad Broccoli-Cranberry Salad Red Wine Vinaigrette Dressing Thousand Island Dressing Spicy Tropical Dressing French Dressing Quick Zucchini Salad
©2016 The BrainFood Cookbook by Angela Taylor

con
ten
ts
Soups and Stews . . . . . . . . . . . . . . . . . . . . . . . . . . . 58 Chicken Stock Lentil Soup with Bacon Chicken Noodle Soup Beef Stew Beef Chili Sausage Pizza Soup Tomato Cabbage Soup Butternut Squash SoupMain Dishes . . . . . . . . . . . . . . . . . . . . . . . . . . . . . . . 67 Chicken Nuggets Apple Meatloaf Honey-Mustard Curry Roasted Chicken Pecan Encrusted Salmon Pan-Seared Filet Mignon with Steakhouse Seasoning Rub BBQ Chicken Breasts Cuban Beef and Peppers Stuffed Bell Peppers Zucchini Noodles with Roasted Tomatoes Chicken Kebabs Beef Tacos Taco Seasoning Mix Turkey Sandwiches Roasted Turkey Breast Slow Roasted Beef Tenderloin Hamburgers Herb Roasted Chicken and Carrots BLT SandwichesSide Dishes . . . . . . . . . . . . . . . . . . . . . . . . . . . . . . . . 86 Carrot French Fries Steamed “Veggie Magic” Broccoli with Lemon-Infused Olive Oil Roasted Brussels Sprouts Roasted Beets Quick Sautéed Greens Cranberry Orange Relish Cauliflower Couscous Cauliflower “Mashed Potatoes” Roasted Cauliflower Roasted Asparagus Roasted Spring Onions Black Beans Winter Squash Purée Candied “Sweet Potato” CasseroleDesserts . . . . . . . . . . . . . . . . . . . . . . . . . . . . . . . . . . 102 Cinnamon Cookies Little James’ Snack Cakes Pecan Pie Bites Nut Butter Brownies Apple Pecan Cake with Cream Cheese Icing Orange Cake Applesauce (or Pearsauce) Grilled Peaches Lemon Lime Bars Jam Thumbprint Cookies Coconut Raisin Truffles Marshmallows Fruit Leather Snack Bars Madeleines Strawberry Frozen Yogurt Fruit Kabobs
©2016 The BrainFood Cookbook by Angela Taylor
con
ten
ts
Breakfast and Brunch . . . . . . . . . . . . . . . . . . . . . . . 119 Kefir Smoothie Asparagus Omelet Pecan Waffles Wild Blueberry Muffins Goji Berry Granola Almond Milk Brazil Nut Vanilla Milk Coconut Milk Banana Silver Dollar Pancakes Orange Almond Muffins Cashew Bread Carrot Pulp Bread Yogurt Cream Cheese Banana Apple Muffins Sunflower Spice Muffins Apple Cake Cranberry-Orange Walnut Bread Cashew Crepes Pumpkin Harvest Muffins Banana Walnut Muffins
Snacks . . . . . . . . . . . . . . . . . . . . . . . . . . . . . . . . . . . 139 Garlic and Herb Flatbread Crackers Olive Tapenade Onion Dip Kale Chips Spiced Pecans Roasted Pumpkin Seeds Crispy Onion Straws
Condiments . . . . . . . . . . . . . . . . . . . . . . . . . . . . . . . 147 Ghee Mayonnaise Ketchup Barbeque Sauce Worcestershire Sauce Hot Sauce Almond Butter / Almond Flour (Soaked & Sprouted)
Beverages . . . . . . . . . . . . . . . . . . . . . . . . . . . . . . . . 155 Ginger Tea Hard Cider
Appendix A - Daily Record Sheets . . . . . . . . . . . . . . . 158Appendix B - 11 Characteristics of Healthy Traditional Diets . . 159Appendix C - Supplements . . . . . . . . . . . . . . . . . . . . 161
©2016 The BrainFood Cookbook by Angela Taylor

FOREWORD
When following any diet the real help comes from those who show you new ways of cooking and preparing food - the recipes. They bring the excitement and joy into the whole nutritional programme and make it easier to follow. The BrainFood Cookbook by Angela Taylor is full of excellent recipes for all the GAPS people of the world – recipes, created by a GAPS person who accomplished her own healing journey.
Thank you, Angela, for this wonderful work!
Dr. Natasha Campbell-McBride, M.D.

ACKNOWLEDGEMENTS
My Husband, Dan Taylor, as without his support none of this would be possible. Thank you for proofreading, eating your way through countless recipe tests, and enjoying cold dinners after they had been photographed. I promise you many evenings of great food now that the book is intact.
My Mom, Susan Piatt, for helping with recipe testing, compiling email addresses, and editing the index.
Krista Bieniek, for assisting me in the kitchen, and also for braving several failed recipe experiments.
Lavina Velasco, for recipe testing, and giving several tips to improve recipe instructions.
My Literary Agent, Jackie Meyer, for believing in me.
Dr. Natasha Campbell-McBride, for creating GAPS, writing about GAPS, and getting the word out to the world.

OUR STORYMy heart was broken when my son James was diagnosed with autism at the age of 2. He would often exhibit autis-tic behaviors such as flapping his hands, toe walking, and banging his head on the ground when frustrated. James would run around aimlessly in circles. He did not point at objects. Potty training was not even a consideration. James would obsessively play with trains for hours. He had no interest in opening Christmas presents, literally dropping them on the ground and walking away. James would play by himself, even in a roomful of children. He rarely looked people in the eye.
A standardized speech test put James down in the 6th per-centile. When he did speak, he used one word utterances like “cracker” or “train”. When my husband and I spoke to James, he literally couldn’t understand what we were saying to him. He also exhibited echolalia, where he would repeat things that he heard without understanding a word of it. James never asked any questions.
And as for me... I was in a deep depression because of James’ autism.
I was fortunate to get an appointment with a Defeat Autism Now (DAN) doctor who insisted that we start the Gluten Free / Casein Free (GFCF) diet immediately. We drove di-rectly from his office to the health food store and purchased an entirely new inventory for our kitchen. I put our whole family on the diet to ensure no cheating would occur. I was very pleased that “gluten-free” worked great to eliminate James’ stimming/flapping behaviors, but his general lack of comprehension persisted.
I had read some testimonials from other moms about how the Paleo Diet, and Specific Carbohydrate Diet (SCD) had helped their children. With further reading I learned of a newer version of the SCD: the GAPS diet. (Gut and Psychology Syndrome by Dr. Natasha Campbell-Mc-Bride) I discovered that the Paleo, SCD, and GAPS diets shared most of the same basic dietary restrictions, but that GAPS was a comprehensive gut-healing program. In fact, SCD/GAPS was listed as the #1 most effectivenon-drug intervention at the Defeat Autism Now (DAN) conference.
We started GAPS, and I cooked absolutely everything from scratch. Again, our whole family did the diet to ensure compliance. I noticed that James’ eye contact, speech, comprehension, and behavior were improv-ing! My greatest joy was in finding something that worked to recover my son from autism, but my great-est frustration was that my son wasn’t a fan of my then-repertoire of GAPS recipes. Mealtimes were a long, drawn-out challenge. If we were to continue, I had to find a better way.
Growing up I spent a great deal of time in the kitchens of my mother and grandmother, so I was inspired to adapt our delicious family recipes into “legal” food. I’ve reinvented everything from cakes and breads, to salad dressings and dinners, while keeping them quick and easy to prepare.
Within a year of starting GAPS James was enrolled in regular preschool, speaking in complete sentences, using pronouns correctly, potty trained, playing with friends, and asking questions! Having made it to the other side of autism, with my child recovered, I felt compelled to share what I have learned with the world. And so I give you... The BrainFood Cookbook.
©2016 The BrainFood Cookbook by Angela Taylor
ADDITIONAL READING
It is beyond the scope of this cookbook to completely cover all the scientific reasons why the Paleo/SCD/GAPS diet works for the treatment of gut dysbiosis for Autism, Asperger’s Syndrome, Attention Deficit Disorder (ADD/ADHD), Dyslexia, and Depression. For more detailed information I highly rec-ommend reading the following books for a comprehensive explanation of why and how it works:
©2016 The BrainFood Cookbook by Angela Taylor
SCD/GAPS diet books:
Breaking the Vicious Cycle by Elaine Gottchall
Gut and Psychology Syndrome by Dr. Natasha Campbell-McBride
The GAPS Guide Bookby Baden Lashkov
SCD/GAPS diet websites:
www.gaps.mewww.gapsdiet.com
www.gapsguide.comgroups.yahoo.com/group/GAPShelp/
Great companion books:
Healing and Preventing Autism: A Complete Guide by Jenny McCarthy and Dr. Jerry Kartzinel
Healing ADD Revised Edition: The Breakthrough Program that Allows You to See
and Heal the 7 Types of ADDby Daniel Amen
Additional BrainFood Guidebooks (coming in 2016)
by Angela TaylorTopics to include: Muscle Testing, Homeopathy, etc.
For a preview of the topics to be covered, please visit http://www.brainfoodcookbook.com/other_useful_therapies.htm

SUMMARY OF GAPS LEGAL/ILLEGAL FOODS
(Full GAPS)
The Paleo, SCD, and GAPS diets share most of the same basic dietary restrictions. Listed here is a general overview (with many of my opinions noted) of legal/illegal foods on the GAPS diet. However GAPS is slightly stricter than the
SCD and Paleo diets.
For even more information, please visit these 2 very comprehensive allowed/prohibited food lists:
www.gapsdiet.com/The_Diet.html
www.breakingtheviciouscycle.info/legal/listing
Allowed Foods: (organic foods whenever possible)Honey (raw honey is best)
FruitVegetables (fresh or frozen - not canned)
Glass-Jarred Tomatoes / tomato saucesNuts / Nut Butter (preferably Soaked/Sprouted/Dehydrated)
CoconutEggs (free-range & soy-free is best)
Poultry & Meat (grass-fed is best)
Fish (not farmed)
Ghee (clarified butter)
Fermented Raw Dairy (such as Yogurt and Kefir)
Gluten-Free Soy Sauce (in moderation)
Very Dry Wine/Hard Cider (for adults, obviously)
Prohibited:WheatAll Grains (even “gluten-free” are prohibited)
RiceCorn/Corn Syrup/CornstarchTapiocaPotatoesOatsMost Dairy* (but clarified butter (ghee) IS allowed)
Most Beans*ChocolatePeanuts (due to aphlotoxic mold)
Canned Foods (but canned tuna allowed in moderation)
Sugar/Brown Sugar/Molasses/Evaporated Cane JuiceMaple SyrupArtificial SweetenersArtificial Food Dyes and PreservativesAnnatto (natural yellow food dye - triggers ADHD)
BeerSoybeans/Soy Milk/Tempeh* continue reading for more info
©2016 The BrainFood Cookbook by Angela Taylor

Who came up with these lists? Elaine Gottschall (author of Breaking the Vicious Cycle) originally created the legal/illegal lists.Dr. Natasha Campbell-McBride later elaborated.And I have added a few notations of my own.
Basically, we are avoiding foods that are:- known allergens- have opiate qualities- difficult to digest
What happens when food is incompletely digested?It increases microbial fermentation in the intestines, which “intoxicates” the patient, resulting in irritability and/or brain fog.
What makes a food difficult to digest?
1) Sugars/Starches:
2) Vegetables/Beans:
Vegetables that contain more amylose than amylopectin starch are simpler to digest.
monosaccharide(legal)
easier to digesthoney
fruits (fructose)
disaccharide(illegal)
difficult to digestcane sugar
maple sugarlactose
amylose(legal)
easier to digestasparagus
black beans* (soaked)broccoli
brussels sproutscabbagecarrots
cauliflowercelery
cucumbereggplant
kidney beans* (soaked)lentils* (soaked)
lettucenavy beans* (soaked)
onionspeas
peppersspinachsquash
*only if tolerated
amylopectin(illegal)
difficult to digestblack eyed peas
chickpeas/garbanzoscorn
jicamamung beans
okrapotatoesseaweed
sweet potatoestaro
turnipsunsoaked beans
polysaccharide(illegal)
difficult to digeststarchesgrains
©2016 The BrainFood Cookbook by Angela Taylor

WHAT ARE THE GAPS INTRO AND STAGES?
Dr. Natasha Campbell-McBride specifies strict limitations of foods on the GAPS “Intro” and Stages. (The recipes in this cookbook are based upon Full GAPS, but I have listed an overview of the Intro here for those unfamiliar with it.) This is a very brief overview of the Intro — I suggest learning more about the stages in the Additional Reading.
How long should you do each stage ?Until diarrhea clears. Then proceed to the next stage, intro-ducing one new food at a time (to isolate food sensitivities).
We were fortunate to complete the intro with minimal problems in about 2 weeks. Your individual timing may be shorter or longer.
Intro/Stage 1Homemade meat or fish stockCooked vegetablesHomemade vegetable soup with your homemade meat or fish stock.Probiotic foods (kefir/yogurt; juice from sauerkraut/fermented vegetables)Ginger tea with a little honey between meals
Stage 2 (in addition to previous foods)Organic egg yolksStews and casseroles made with meats and vegetablesIncrease daily amount of homemade yogurt and kefir, if introduced. Increase the amount of juice from sauerkraut or fermented vegetablesFermented fishHomemade ghee
Stage 3 (in addition to previous foods)Ripe avocadoNut butter/egg/squash pancakesEgg scrambled with plenty of ghee, goose fat or duck fatIntroduce the sauerkraut and your fermented vegetables
Stage 4 (in addition to previous foods)Gradually add meats cooked by roasting and grillingCold pressed olive oilFreshly pressed carrot, lettuce, mint juicesBread made with ground almonds or any other nuts
Stage 5 (in addition to previous foods)Cooked apple pureéLettucePeeled cucumberFreshly pressed apple, pineapple, mango juice (avoid citrus)
Stage 6 (in addition to previous foods)Peeled raw appleOther raw fruitHoneyGAPS legal “cakes”Dried fruit
Full GAPS
©2016 The BrainFood Cookbook by Angela Taylor

GAPS FAQ How did this diet come about?
Drs. Sidney V. and Merrill P. Haas initially created the Specific Carbohydrate Diet (SCD) in 1951 for the treatment of Celiac Disease.
Elaine Gottschall utilized the SCD to cure her daughter’s Ulcerative Colitis, and was a great SCD pioneer. She authored the SCD book Breaking the Vicious Cycle, and devoted her life’s work to SCD research.
Later, Dr. Natasha Campbell-McBride took the SCD a step further by researching and creating the Gut and Psychology Syndrome diet (GAPS) for her child’s Autism. GAPS is slightly stricter than the SCD.
Why does GAPS work for Autism / Asperger’s / ADHD / ADD?
It has been found that these disorders share “Leaky Gut Syndrome” where food gets released into the bloodstream before it has been properly digested. The GFCF (Gluten-Free Casein-Free) diet is based upon the theory that Gluten or Dairy, when leaked through the gut, will have opiate-like qualities in the brain. GAPS and SCD diets further theorize that if wheat/dairy is a problem, aren’t all starches/sugars similarly problematic? And so we arrive at the GAPS diet, which deprives the brain of opiate-like substances while simultaneously healing the gut, body, and mind.
What other related disorders can be helped by the GAPS diet?
Dr. Campbell-McBride asserts that “Leaky Gut Syndrome” may be at the root of many diseases. Dyslexia, Depression, Bipo-lar Disorder, Irritable Bowel Syndrome, Celiac Disease, Colitis, Crohn’s Disease, Cystic Fibrosis, Autoimmune Disorders (MS, Diabetes Type 1, Rheumatoid Arthritis, etc.), Arthritis, Chron-ic Cystitis, Hormonal Abnormalities, Chronic Fatigue and all Digestive Disorders can be helped with the GAPS diet.
What causes leaky gut?
Various theories include candida (yeast) overgrowth, vaccine damage, and a genetic predisposition to allergies or poor methylation (ability for the body to detox itself).
©2016 The BrainFood Cookbook by Angela Taylor
For those unfamiliar with the basic concepts of SCD/GAPS, I’ve included a Frequently Asked Questions section.
For more info, I highly recommend reading the books listed in the Additional Reading section.

My kid only eats macaroni and cheese? Why?
The opiate-like affects of the gluten and dairy are actually addictive. The “addict” craves the very foods to which he is allergic, and the vicious cycle continues.
Is there withdrawal when you change the diet?
Yes... and the withdrawal can be severe if you change the diet too suddenly, resulting in agitated behavior!
I’ve heard of “die-off” when you change the diet?
Die-off is when candida and other bad bugs die, leaving behind toxic waste products. Die-off is induced by consuming probiotics (or anti-fungal prescriptions), and by switching to the GAPS diet (which deprives candida of their favorite food source: starches and sugars). These die-off waste products affect brain function, making us irritable.
Strategies to reduce withdrawal and die-off symptoms:
I suggest the following implementation, over a series of weeks. Take it slow, or suffer the crazy consequences!
• Go dye free• Eliminate sugar and “sugar substitutes” (honey & fruit still allowed)
• Go gluten free• Go pasteurized dairy free (GAPS raw dairy allowed: Yogurt & Kefir)
• Start making most of your meals GAPS-compliant• Full GAPS• Do the GAPS Intro / Stages• Full GAPSPersonally, when my family made the transition from Gluten-Free to GAPS Intro/Stages, I was grumpy for about 2 weeks straight due to withdrawal and die-off. If your child is in school, I would suggest making the transition during Winter, Spring, or Summer break.
Do I have to do the Intro?
Yes, but let me explain. Many people start on Full GAPS, then go back and do the Intro and the Stages after they feel they are ready. For fullest healing, yes, you must do the Intro and all the Stages at some point. (the sooner, the better)
How do I decide whether to go dairy-free?
We tried giving up our daily raw kefir smoothies (see p. 62) and we got colds within 2 days. (We really need that daily dose of fermented food, and my son refuses to eat fermented veggies.) For us, I decided that pasteurized dairy was actually the culprit to be avoided. So, we did choose to consume homemade raw yogurt/kefir throughout the Intro and beyond. I would urge you to muscle test to determine if dairy is OK for you.
What’s the difference between Paleo / SCD / GAPS?
These diets are very similar - all disallow grains and most starches. However, Paleo allows sweet potato and other roots, and disallows beans (legumes). SCD allows dry curd cottage cheese, and disallows Bifidus bacteria.
How will I know if it’s working?
One easy way is to take video before and after. But the best way is to keep a daily log of diet and behavior. (See Appendix A) We saw continued daily improvements in speech, cognition, and behavior as the months on GAPS progressed.
Our ongoing affirmation that GAPS is the right choice for us: When James accidentally eats something illegal, we see the resultant bad behavior afterward.
But we can’t possibly give up bread!
Good news - you don’t have to! For starters, see the Cashew Bread recipe on p. 128. And there are several more recipes for baked goods in the “Breakfast and Brunch” chapter.
Do I have to stay on this diet for the rest of my life?
Not necessarily. Some people are able to heal the gut and allow additional foods. Once you have been on GAPS for 1½ - 2 years, and subsequently symptom free for 6 months, you can do challenges of one illegal food at a time and watch for ill affects. (For example try well-cooked sweet potatoes, or sprouted buckwheat.) Some find they must stay strictly on GAPS, some move to Paleo (which allows grain-free starches), some are able to go to 95% GAPS 5% Gluten-Free Grains, some people go to GFCF, some people go to Nourishing Traditions.* Bioindividuality means that each person is unique. * For more information read Appendix B
©2016 The BrainFood Cookbook by Angela Taylor

PASTEURIZED VS. RAW DAIRY
Many nutrition experts do not recommend drinking pasteur-ized milk of any kind – ever.1 Once milk has been pasteur-ized it’s pretty much “dead,” and offers little in terms of real nutritional value to anyone. (Whether you show signs of intolerance to milk or not.)
Valuable enzymes are destroyed, vitamins (such as A, C, B6 and B12) are diminished, fragile milk proteins are radically transformed from health nurturing to unnatural amino acid configurations that can actually worsen your health. Finally the eradication of beneficial bacteria through the pasteuriza-tion process actually ends up promoting pathogens.
The healthy alternative to pasteurized milk is unpasteurized milk, also known as “raw milk”. It is an outstanding source of nutrients including beneficial bacteria such as lactobacil-lus acidophilus, vitamins and enzymes, and is one of the finest sources of calcium available.
However, many moms I’ve spoken to are “freaked out” about drinking unpasteurized milk, thinking it’s dirty or unsafe. I can personally attest that I’ve consumed exclu-sively raw milk products for over 6 years, with zero prob-lems. HOWEVER, it is important to get your raw milk from a trusted source. Ask your friends for referrals, and go visit the farm. Is it clean? Are the cows fed exclusively grass, out in a big pasture? Or are they fed grain, confined to small pens or barns, and standing around in their own poop? After what I’ve learned about Big Ag, I wouldn’t dream of drinking pasteurized milk purchased “sight unseen” from the grocery store.
1 http://articles.mercola.com/sites/articles/archive/2003/03/29/pasteurized-milk-part-two.aspx
It is important to also note that different breeds of cows yield different milk. “A1” cows are “newer” breeds that experienced a mutation of a particular amino acid (his-tadine) some 5,000 years ago. Unfortunately, A1 cows include the black and white breeds like Holsteins (and Friesians) that are the most popular breeds in North America. A1 milk contains BCM7 - a powerful opiate that can have a detrimental impact on your body. Histi-dine only weakly holds on to BCM 7, so it is liberated in the GI tract of animals and humans who drink A1 cow milk.
“A2” cows are the older breeds that do not have this mutation. The amino acid proline in A2 milk has a strong bond to the opiate BCM7, which helps keep it from being released. The older cow breeds, such as Jersey, Guernsey, Asian and African are primarily A2. (However, take note that the milk from A2 cows has been tested and shown to still contain some liberated BCM7.) Goats and sheep also produce the healthier A2 type milk.
You will likely need to find a small local farmer to pro-vide your family with a source of raw A2 milk. Where I live the Amish community is a great resource. You may also find info through www.realmilk.com or local Weston A. Price chapters www.westonaprice.org. Some families have so much difficulty in finding raw milk, they opt to keep their own goat (or Jersey cow) in their backyard.
On GAPS we are only allowed “milk” if it has been fer-mented into yogurt or kefir. The fermentation process consumes the lactose (milk sugar) which is problematic to GAPS patients. We cannot cook with yogurt because this essentially pasteurizes it.
The one exception to “don’t heat your dairy” is ghee (clarified butter). Since butter contains no milk sugar, and we remove the milk solids while making it, we are allowed to cook with ghee. It has a high smoking point, so ghee is a perfect oil to cook with.
Technically the SCD and GAPS both “allow” hard aged cheeses (because the lactose is consumed during the aging process). However I would advise against them unless they are made with raw milk, and therefore I do not cook with them.
©2016 The BrainFood Cookbook by Angela Taylor
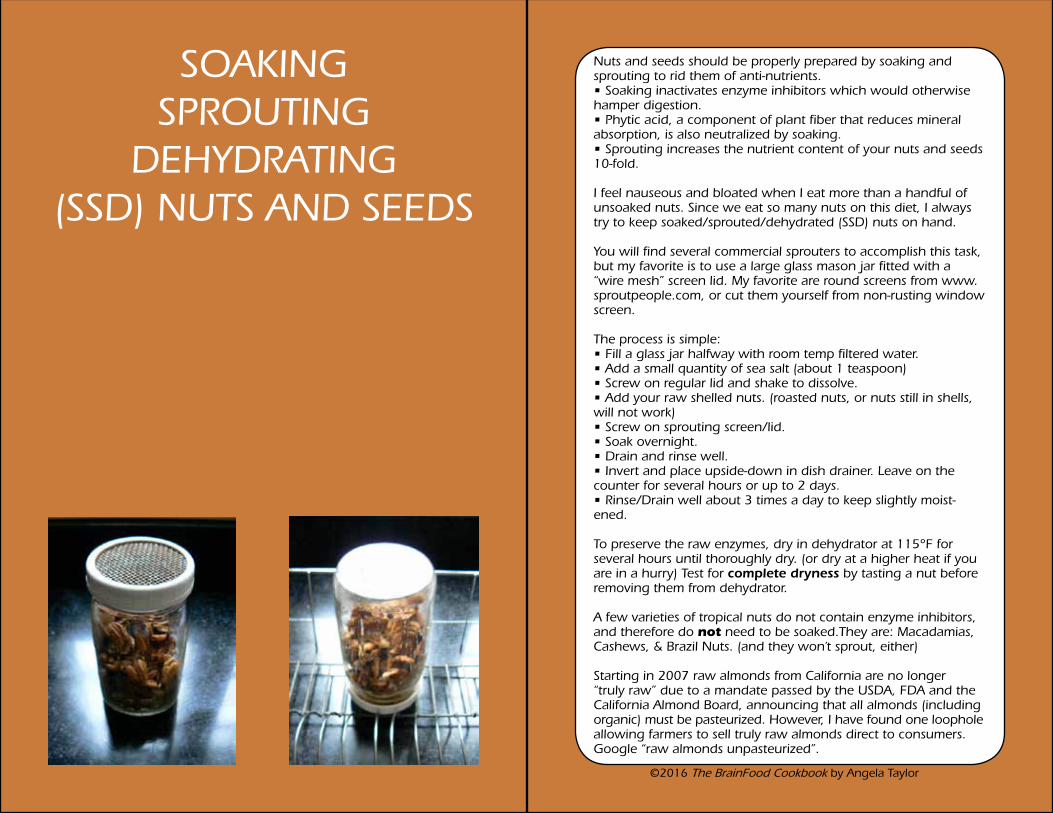
SOAKING SPROUTING
DEHYDRATING(SSD) NUTS AND SEEDS
Nuts and seeds should be properly prepared by soaking and sprouting to rid them of anti-nutrients. • Soaking inactivates enzyme inhibitors which would otherwise hamper digestion. • Phytic acid, a component of plant fiber that reduces mineral absorption, is also neutralized by soaking.• Sprouting increases the nutrient content of your nuts and seeds 10-fold.
I feel nauseous and bloated when I eat more than a handful of unsoaked nuts. Since we eat so many nuts on this diet, I always try to keep soaked/sprouted/dehydrated (SSD) nuts on hand.
You will find several commercial sprouters to accomplish this task, but my favorite is to use a large glass mason jar fitted with a “wire mesh” screen lid. My favorite are round screens from www.sproutpeople.com, or cut them yourself from non-rusting window screen.
The process is simple: • Fill a glass jar halfway with room temp filtered water.• Add a small quantity of sea salt (about 1 teaspoon)• Screw on regular lid and shake to dissolve.• Add your raw shelled nuts. (roasted nuts, or nuts still in shells, will not work)• Screw on sprouting screen/lid. • Soak overnight. • Drain and rinse well. • Invert and place upside-down in dish drainer. Leave on the counter for several hours or up to 2 days. • Rinse/Drain well about 3 times a day to keep slightly moist-ened.
To preserve the raw enzymes, dry in dehydrator at 115°F for several hours until thoroughly dry. (or dry at a higher heat if you are in a hurry) Test for complete dryness by tasting a nut before removing them from dehydrator.
A few varieties of tropical nuts do not contain enzyme inhibitors, and therefore do not need to be soaked.They are: Macadamias, Cashews, & Brazil Nuts. (and they won’t sprout, either)
Starting in 2007 raw almonds from California are no longer “truly raw” due to a mandate passed by the USDA, FDA and the California Almond Board, announcing that all almonds (including organic) must be pasteurized. However, I have found one loophole allowing farmers to sell truly raw almonds direct to consumers. Google “raw almonds unpasteurized”.
©2016 The BrainFood Cookbook by Angela Taylor
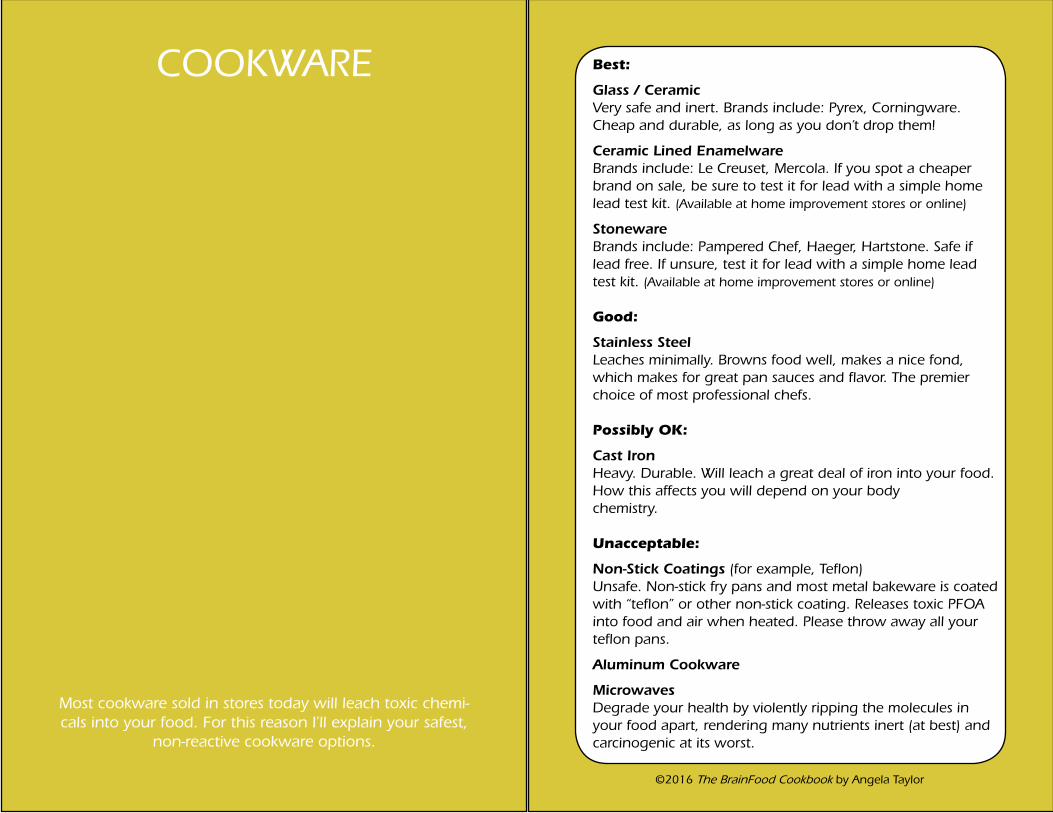
COOKWARE
Most cookware sold in stores today will leach toxic chemi-cals into your food. For this reason I’ll explain your safest,
non-reactive cookware options.
Best:
Glass / CeramicVery safe and inert. Brands include: Pyrex, Corningware. Cheap and durable, as long as you don’t drop them!
Ceramic Lined EnamelwareBrands include: Le Creuset, Mercola. If you spot a cheaper brand on sale, be sure to test it for lead with a simple home lead test kit. (Available at home improvement stores or online)
StonewareBrands include: Pampered Chef, Haeger, Hartstone. Safe if lead free. If unsure, test it for lead with a simple home lead test kit. (Available at home improvement stores or online)
Good:
Stainless SteelLeaches minimally. Browns food well, makes a nice fond, which makes for great pan sauces and flavor. The premier choice of most professional chefs.
Possibly OK:
Cast IronHeavy. Durable. Will leach a great deal of iron into your food. How this affects you will depend on your body chemistry.
Unacceptable:
Non-Stick Coatings (for example, Teflon)Unsafe. Non-stick fry pans and most metal bakeware is coated with “teflon” or other non-stick coating. Releases toxic PFOA into food and air when heated. Please throw away all your teflon pans.
Aluminum Cookware
MicrowavesDegrade your health by violently ripping the molecules in your food apart, rendering many nutrients inert (at best) and carcinogenic at its worst.
©2016 The BrainFood Cookbook by Angela Taylor
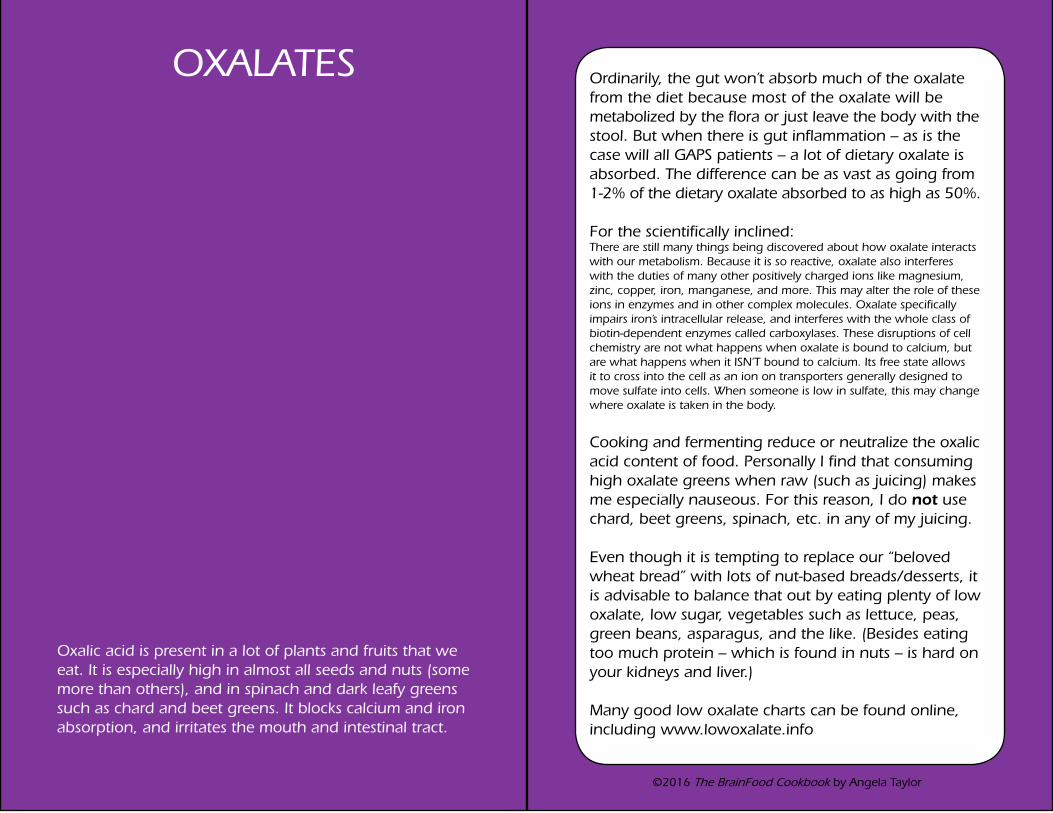
OXALATES Ordinarily, the gut won’t absorb much of the oxalate from the diet because most of the oxalate will be metabolized by the flora or just leave the body with the stool. But when there is gut inflammation – as is the case will all GAPS patients – a lot of dietary oxalate is absorbed. The difference can be as vast as going from 1-2% of the dietary oxalate absorbed to as high as 50%.
For the scientifically inclined:There are still many things being discovered about how oxalate interacts with our metabolism. Because it is so reactive, oxalate also interferes with the duties of many other positively charged ions like magnesium, zinc, copper, iron, manganese, and more. This may alter the role of these ions in enzymes and in other complex molecules. Oxalate specifically impairs iron’s intracellular release, and interferes with the whole class of biotin-dependent enzymes called carboxylases. These disruptions of cell chemistry are not what happens when oxalate is bound to calcium, but are what happens when it ISN’T bound to calcium. Its free state allows it to cross into the cell as an ion on transporters generally designed to move sulfate into cells. When someone is low in sulfate, this may change where oxalate is taken in the body.
Cooking and fermenting reduce or neutralize the oxalic acid content of food. Personally I find that consuming high oxalate greens when raw (such as juicing) makes me especially nauseous. For this reason, I do not use chard, beet greens, spinach, etc. in any of my juicing.
Even though it is tempting to replace our “beloved wheat bread” with lots of nut-based breads/desserts, it is advisable to balance that out by eating plenty of low oxalate, low sugar, vegetables such as lettuce, peas, green beans, asparagus, and the like. (Besides eating too much protein – which is found in nuts – is hard on your kidneys and liver.)
Many good low oxalate charts can be found online, including www.lowoxalate.info
©2016 The BrainFood Cookbook by Angela Taylor
Oxalic acid is present in a lot of plants and fruits that we eat. It is especially high in almost all seeds and nuts (some more than others), and in spinach and dark leafy greens such as chard and beet greens. It blocks calcium and iron absorption, and irritates the mouth and intestinal tract.

GOITROGENSGoitrogens are naturally-occurring substances that can interfere with function of the thyroid gland in making its hormone.
Examples of foods that contain goitrogens
Cruciferous vegetables including: Broccoli, Brussels Sprouts, Cabbage, Cauliflower, Kale PeachesSpinachRadishesStrawberries(and these illegals:
Peanuts, Millet, Soy products, including tofu)
As cooking and fermenting seems to reduce the goitrogens found in food, avoid raw cruciferous veggies. For example, try instead:
Steamed Broccoli and CauliflowerRoasted Brussels SproutsFermented CabbageSautéed Kale and Spinach
Although for many people goitrogens do not seem to pose a health concern, those who have thyroid problems may be advised to take it easy on these foods. For example, don’t eat spinach salad, or an entire carton of strawberries, every single day.
©2016 The BrainFood Cookbook by Angela Taylor

HOW DO I GET MY KID TO EAT THIS STUFF?
How do I keep my kid from cheating?
• Put everyone in your house on the diet. Give away all your illegal food.• Pack a “lunch bag” for your child whenever he leaves the house: for school, playdates, sports, outings with Grandma, you name it.• And the obvious: serve delicious food, that he likes.
I advise seating your child in a high chair, or booster seat with a clip-on tray, at mealtimes. It’s hard enough to change your child’s diet, without him constantly wandering away from the table.
Since we can’t eat typical “starches”, we need to eat a LOT of vegetables to get enough carbohydrate calories for a balanced diet. (Eating a diet too high in protein is hard on your kidneys.) Our strategy was to control the plate, and insist on “First peas, then steak” for example. So we would alternate bites, for the entire meal.
As a further incentive to eat the whole dinner, dessert can be set in the middle of the table, out of reach, until the dinner plate is empty. (I found even a simple apple could be a great dessert motivator.)
But my child hates vegetables...
Our child only liked 5 vegetables, so we would serve them often: carrots, cucumbers, lettuce, peas, and green beans. Researchers have found that it takes 18 exposures to a new food for a child to accept it, so we would always insist that James try one small bite of “new” vegetables when they were served. (And, we would generously coat new veg-etables with ghee and sea salt.) We even kept a chart, and eventually, we added some new veggies to our repertoire.
Raw Steamed Other
Artichokes
Asparagus ~
Broccoli √
Butternut Squash Chips
Carrots √ √ Roasted
Cauliflower √ Roasted
Celery √
Chard
Cucumbers √
Eggplant
Fennel
Green Beans (fresh, not frozen) √
Iceberg Lettuce √
Kale ~ Chips
Mushrooms
Onions
Parsnips
Pumpkin
Romaine Lettuce √
Petite Green Peas √
Spinach √
Sugar Snap Peas ~
Yellow Squash
Yellow/Orange Peppers Grilled
Zucchini Fritters
©2016 The BrainFood Cookbook by Angela Taylor

MENU PLANNINGOne secret to doing GAPS (without losing your mind) is just doing some simple planning so you’re never “stuck” with nothing legal to eat. I always keep snacks in my purse and in the trunk of my car. Snack boxes of organ-ic raisins and bags of nuts are good choices.
Just to give you an idea of how we do GAPS, pretty much every day we eat: (those on “rotation diets” may cringe, but this works for us)
• Breakfast - kefir smoothie (see p. 119)
• Snacktime - raisins or a baked good
• Lunch - cucumber, turkey sandwich on cashew bread (see p. 80), fresh fruit
• Snacktime - fruit, baked good, or crunchy snack
• Dinner - planned for all 7 days on Sunday. Typically we have only 3 items per meal: raw veggie, then a main course and one cooked veggie. I like to write on a weekly calendar what we’re having for dinner that week, then make one big grocery store trip on the weekend. Dinner is not always a fancy affair - for busy nights I’ll plan to have “Scrambled Eggs and Petite Peas”, or “Hamburgers and Green Beans” for example.
• Dessert - whatever we have on hand
• Beverages - exclusively spring water, except 1/2 cup of fresh squeezed (unpasteurized) juice per day
©2016 The BrainFood Cookbook by Angela Taylor

SAVING TIME AND SAVING MONEY
• Cheapest food staples are bananas, eggs, carrots, frozen petite peas, ground beef, homemade pumpkin purée. Also beans if they are tolerated.• Obtain a stand-alone freezer.• Buy a quarter-cow and freeze. We choose to have the butcher turn the toughest cuts into ground beef rather than keep them as roasts.• Buy nuts directly from the grower in bulk and freeze.• Soak/Sprout/Dehydrate a great quantity of nuts at one time, so you always have some nuts at the ready.• Soak and slow-cook a quantity of beans/lentils at one time, and freeze them in recipe-sized portions.• Form a neighborhood buying group with Frontier Wholesale to buy various organic spices/staples in bulk.• Unfortunately most warehouse clubs sell woefully few organic products / produce. There is a brand new mail-order “warehouse club” called greenpolkadotbox.com that may be of some usefulness once they get up to speed.• Bake double batches of recipes, and freeze.• Buy bananas 2-3 times per week so you always have ripe bananas on hand. When bananas get overripe, peel and freeze until you have enough for a recipe.• Buy organic produce in season, and “can” in glass jars, dehydrate, or freeze.• Save leftover carrot pulp/apple pulp from juicing, and freeze. (Use later for baking).• Try to grow whatever is easiest/most expensive (i.e. toma-toes, cucumbers, zucchini, pumpkins, butternut squash).• Pumpkin has twice the fiber of oatmeal, so it will help you feel full. Many of my baked good recipes contain pumpkin.• Buy honey directly from the beekeeper.• Buy raw dairy directly from the farmer.• Join an organic CSA for fresh veggies in season.• If at all possible, obtain the following appliances to save time in the kitchen: KitchenAid Food Processor Omega Juicer Excalibur Dehydrator KitchenAid Stand Mixer Strong Blender (If you don’t have a Vitamix, a Blendtec or Braun may be sufficient for your needs.)• Ask friends/family/church members to help out with cooking. Hire a personal chef or culinary student to come help out once a week if your budget allows.
Some parents question the value of the time consuming/expensive GAPS diet as many doctors dismiss GAPS as being “unproven”. Until then, be assured that every parent I have spoken to – who has properly implemented GAPS without cheating – has seen huge improvements in their child’s cognition and behavior. (And, please know that I am trying every day to launch a scientific research study to “prove” the effectiveness of GAPS in a clinical research setting. I will continue to post updates on my efforts at www.brainfoodcookbook.com.)
When the going gets tough, just remember that untreated Autism/ADHD is also expensive and time-consuming – and heartbreaking.
Here are some assorted tips to help you:
©2016 The BrainFood Cookbook by Angela Taylor

HOW STRICT SHOULD WE BE?
How strict to be on GAPS is each family’s personal decision. I would rather see a family do “good-enough” GAPS rather than give up because they can’t do “perfect” GAPS. So you may want to cut yourself some slack the first month when initially changing your family’s diet. When you are making your initial transition, if your child will only eat GAPS chicken nuggets and carrot fries for a week, well then so be it.
Then once you are established with GAPS (say the first 2-3 months) and your child is most in need of healing you might decide to place your family into the “Strictest” catego-ry. FYI - at this point, after 2 years on GAPS, our son has lost his autism diagnosis and is pretty much healed. So now I’d currently put us in the merely “Strict” category.
Strict Diet Stricter StrictestBuy organic farmer-direct pastured eggs, which eat feed of unknown origin (likely eating a soy-containing feed)
Buy organic farmer-direct pastured eggs, which eat soy-free feed
Keep your own pastured laying hens and feed them soy-free feed
Occasionally allow raw light agave nectar - Natural Zing brand (I recommend you do not cook your agave nectar)
Allow cooked and raw honey
Only allow raw honey
Allow occasional eating out in restaurants, attempting to order something GAPS legal
Allow some store bought condiments if legal
Only allow strictly homemade GAPS foods 100% of the time
Occasionally allow produce of unknown origin when at school or a friend's house
Allow organic produce, and carefully washed non-organic produce
Only allow organic, carefully washed (i.e. Lotus Sanitizer) produce
Allow plenty of GAPS treats
Allow a few GAPS treats here and there
Do not allow any sweet food
Allow baking soda Allow baking soda if pH neutralized in recipe with vinegar or lemon juice
Never use baking soda
Occasionally allow store bought coconut milk ice cream that is sweetened with agave nectar, and contains a small amount of Guar Gum
Allow homemade frozen yogurt "ice cream" (sweetened with honey)
Only allow homemade coconut milk or almond milk "ice cream"
Allow slight exceptions for special occasions (but never gluten !!)
Follow general GAPS guidelines
Follow general GAPS guidelines, and also Muscle Test everything to see if it "Makes weak"
Allow (non-organic) olive oil spray that contains a trace amount of soy lecithin
Allow organic olive oil spray that contains a trace amount of soy lecithin
Only allow spraying of pure cooking oils in the glass pump sprayer
Allow occasional canned tomatoes
Allow occasional canned tuna
Allow no canned food
Allow store-bought sausage if the ingredients are legal (no sugar)
Allow farmer-purchased sausage if the ingredients are legal (no sugar)
Only allow homemade sausage
Fermented raw dairy allowed (yogurt, kefir)
Ghee allowed No dairy allowed
Occasionally allow small amounts of wheat-free soy sauce (tamari)
Allow very trace amounts of soy
Allow no soy
Allow the occasional pure juice box for special occasions
Allow farm fresh unpasteurized cider
Allow fresh pressed juices only
Occasionally allow store-bought organic bacon, nitrate-free, sugar-free
Allow farmer-purchased bacon if it is "cured in the natural way" (with smoke and salt) and nitrate-free, sugar-free
Allow home-cured bacon made from fresh free-range forest-fed pork belly
©2016 The BrainFood Cookbook by Angela Taylor

MUSCLE TESTING(APPLIED KINESIOLOGY)
Muscle testing (applied kinesiology) is a very effective way to assess if a food (or other substance) is “good for you”? Or, does it “make you weak”? It is beyond the scope of this book to teach you how to muscle test, or to prove its effectiveness. For further reading I recommend:Your Body Can Talk by Susan L Levy, D.C. and Carol Lehr, M.A.
Personally, I muscle test absolutely everything my child puts in his mouth – every food, drink, or vitamin supplement. Once I establish that a particular food (and brand of that food) is OK for him, sure, I don’t test for it every day. But I won’t introduce even a bite of something new without muscle testing it first.
Note that we do muscle test often (at least once a week) to determine his vitamin dosing.
It is best if a highly trained practitioner teaches you how to do muscle testing. Learn first to test what is “good for you” personally. Next, learn to test what is “good for” your child.
I learned to do muscle testing with my chiropractor. I hold my arm out, and she presses down while asking the questions. We set the intention that down = YES. She asks these 2 questions at the start of the session:• Are you testable?• Are you switched?
For each food tested (while holding the food):• Does this make you weak?
For each vitamin supplement (while holding the item):• Does this make you weak?• Do you need this?• How many per day?
There are many mysteries about the human body (and the universe) we don’t fully understand, which does not diminish their value and effectiveness in any way. I will cover the topic of muscle testing (and many other useful therapies) in my next books due out in 2016. For a preview of the topics to be covered, including a detailed muscle testing script, please visit www.brainfoodcookbook.com/other_useful_therapies.htm
©2016 The BrainFood Cookbook by Angela Taylor

OTHER THERAPIESIN CONJUNCTION
WITH GAPS
We achieved remarkable results using the GAPS diet to recover our son from Autism. After about a year on the diet James’ speech, eye contact, and stimming remarkably improved.
©2016 The BrainFood Cookbook by Angela Taylor
https://www.youtube.com/watch?v=bAse3Apfjo8
Before GAPS:Speech 6th Percentile
Lack of ComprehensionPoor Eye ContactLots of Stimming
Autistic
https://www.youtube.com/watch?v=DfzQx2ZAnow
After GAPS:Neurotypical Speech
Excellent ComprehensionGood Eye ContactMinimal Stimming
IEP eliminated
After having great success with the GAPS diet, James’ behavior was no longer “Autistic”, but I would still characterize him as having some remaining “ADD” ten-dencies. We did additional natural therapies for even greater healing, including:
Applied Behavioral Analysis (ABA)Speech TherapyOccupational TherapyVaccination WaiverFish Oil / Probiotics / Vitamin SupplementsHerbs for Parasites / “Hulda Clark” style Parasite ZapperEarthing/Grounding SheetsEMF reductionHomeopathyChiropratic AdjustmentsNeuro Emotional Technique (NET)Ionic Detox Footbath / FIR SaunaCraniosacral Therapy / ReikiBerard AITA/SERT Allergy TherapyGraceLight SessionsEyelights
Read more details about these therapies on my website at
www.brainfoodcook.com/other_useful_therapies.htm
To claim that absolutely all of James’ healing is a result of the GAPS diet would be incorrect. However, I feel strongly that none of the other therapies would have been useful without GAPS. In other words:• You must first setup the brain for success (by eliminating foods your child cannot tolerate = GAPS diet) in order to get results from your other efforts.• It is crucial to make diet your #1 intervention before you attempt anything else. • Until you change the diet, you are wasting your time and money on other therapies.

t. = teaspoon
T. = Tablespoon
C. = Cup
lb. = pound
oz. = ounce
abbre
viat
ion
s

juic
ing
Fruit and Vegetable juicing - Overview
Dreamsicle
Green Lemonade

Fruit and Vegetable JuicingWhen first starting with juicing, it’s a good idea to use lots of items from the sweet category, and slowly increase the proportion of neutral and strong tasting items.
The oil from citrus peel is very bitter, so I usually do citrus in a designat-ed rotary citrus juicer, then juice the veggies in my omega juicer, and stir them together.
Sweet - Easy to Drink:AppleOrangeCarrot
Neutral:LettuceCucumber
Strong tasting:CeleryGingerLemonLime
Not Recommended:High oxalate veggies such as spinach, kale, chard, beet greens. Personally, these items make me nauseous when I juice them.
©2016 The BrainFood Cookbook by Angela Taylor
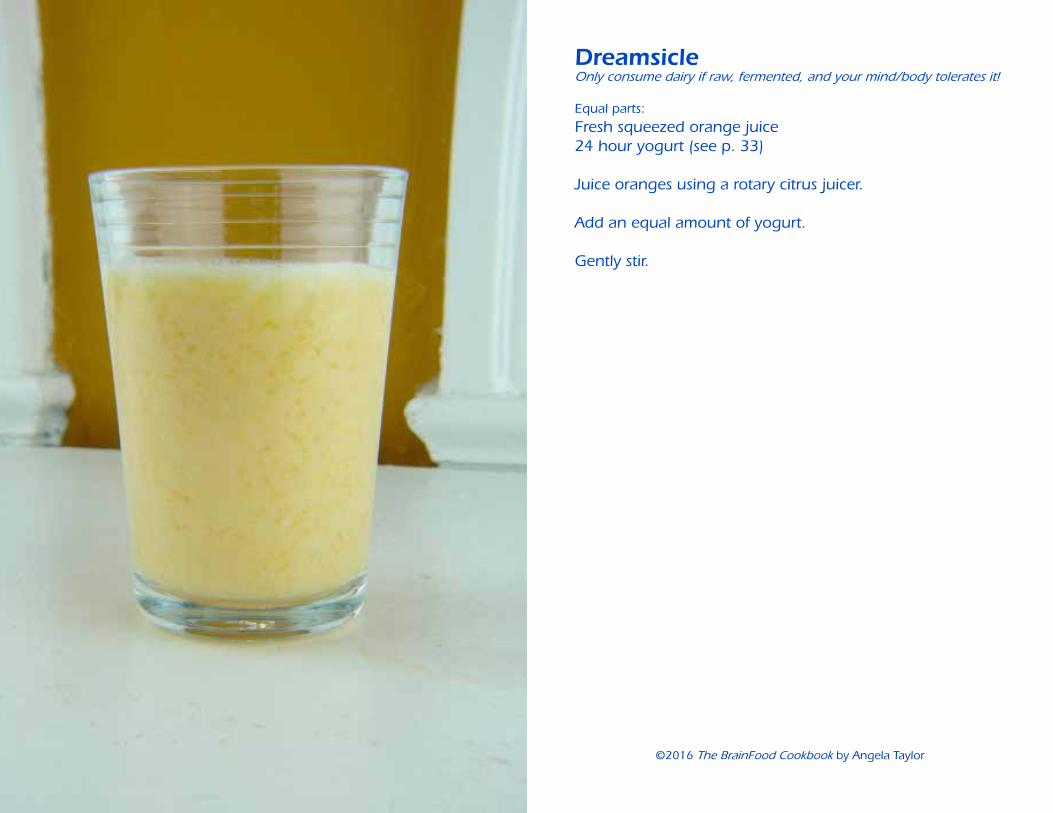
DreamsicleOnly consume dairy if raw, fermented, and your mind/body tolerates it!
Equal parts:
Fresh squeezed orange juice24 hour yogurt (see p. 33)
Juice oranges using a rotary citrus juicer.
Add an equal amount of yogurt.
Gently stir.
©2016 The BrainFood Cookbook by Angela Taylor

Green Lemonade
1 lemon2 apples1 head of romaine lettuce(optional: 1 stalk celery)
Juice lemon using a rotary citrus juicer.
Juice apples and lettuce (and optional celery) using Omega juicer.
Combine and gently stir.
©2016 The BrainFood Cookbook by Angela Taylor

ferm
ents
Homemade Kefir (raw dairy)
Homemade Yogurt (raw dairy)
Lacto-Fermented Veggies

KefirOnly consume dairy if raw, fermented, and your mind/body tolerates it!
Raw milk (cow, goat, sheep)Kefir Grains
Place a big spoonful of kefir grains in a clean glass jar. Pour raw milk into jar, leaving about an inch of room at the top for fermentation/expansion. Stir/shake well, and screw lid onto jar.
Ferment at room temp (65-75°F) for 24 hours. Shake peri-odically (2-3 times during the 24 hours) to redistribute fresh milk to the grains.
Sometimes the grains will finish consuming the milk sugars before 24 hours. If it separates into layers of clear whey and solid kefir, it’s done.
Place a large strainer in a bowl. Pour the contents of your kefir jar into the strainer, then use a rubber spatula to scrape the grains back and forth until all the kefir has passed through into the bowl. Transfer the grains to a small jar and refrigerate for next time. Transfer the kefir to a large jar (I use the jar from fermentation) and refrigerate.
©2016 The BrainFood Cookbook by Angela Taylor
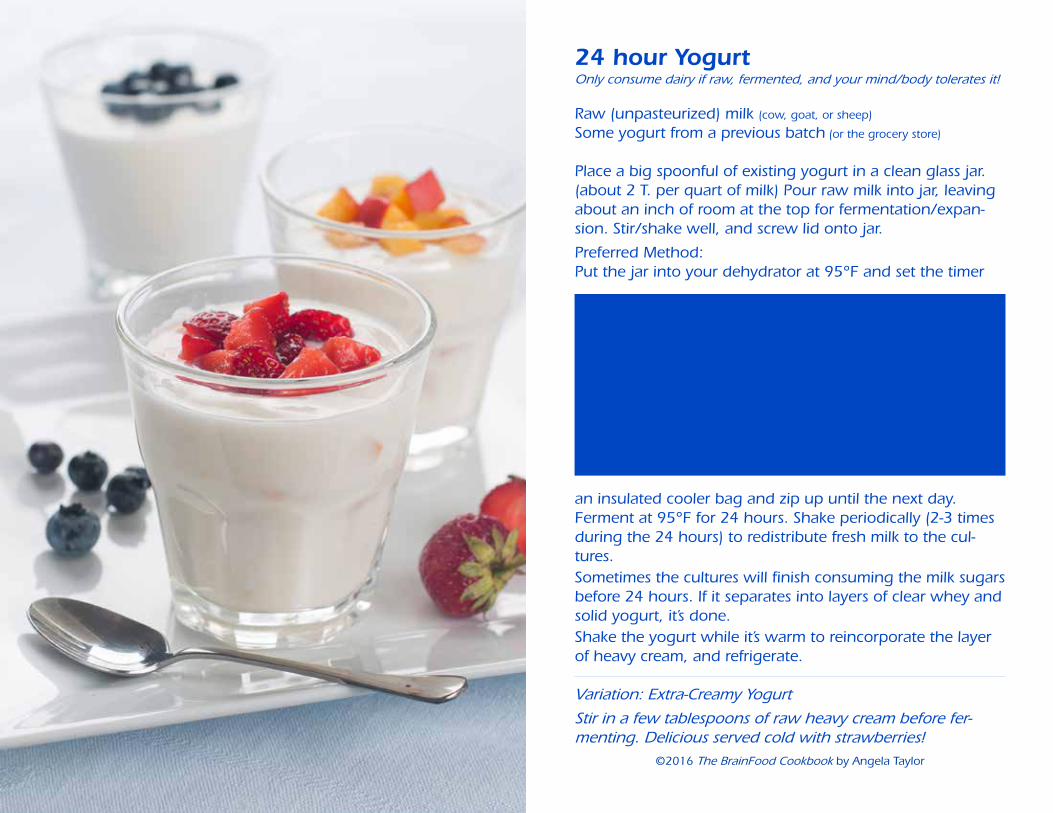
24 hour YogurtOnly consume dairy if raw, fermented, and your mind/body tolerates it!
Raw (unpasteurized) milk (cow, goat, or sheep)
Some yogurt from a previous batch (or the grocery store)
Place a big spoonful of existing yogurt in a clean glass jar. (about 2 T. per quart of milk) Pour raw milk into jar, leaving about an inch of room at the top for fermentation/expan-sion. Stir/shake well, and screw lid onto jar.
Preferred Method:Put the jar into your dehydrator at 95°F and set the timer
for 24 hours.
Alternate Method:Use these methods when travelling (or if you don’t own a dehydrator):1) Fill a small cooler with 115°F water. Insert yogurt jar. Check the water periodically to see if it has cooled be-low 90°F. Reheat the water as needed.2) Gently warm the milk on the stove to around 100°F. Pour into jar, and wrap the jar in kitchen towels. Put into
an insulated cooler bag and zip up until the next day.Ferment at 95°F for 24 hours. Shake periodically (2-3 times during the 24 hours) to redistribute fresh milk to the cul-tures.Sometimes the cultures will finish consuming the milk sugars before 24 hours. If it separates into layers of clear whey and solid yogurt, it’s done.Shake the yogurt while it’s warm to reincorporate the layer of heavy cream, and refrigerate.
Variation: Extra-Creamy Yogurt
Stir in a few tablespoons of raw heavy cream before fer-menting. Delicious served cold with strawberries!
©2016 The BrainFood Cookbook by Angela Taylor
©2016 The BrainFood Cookbook by Angela Taylor
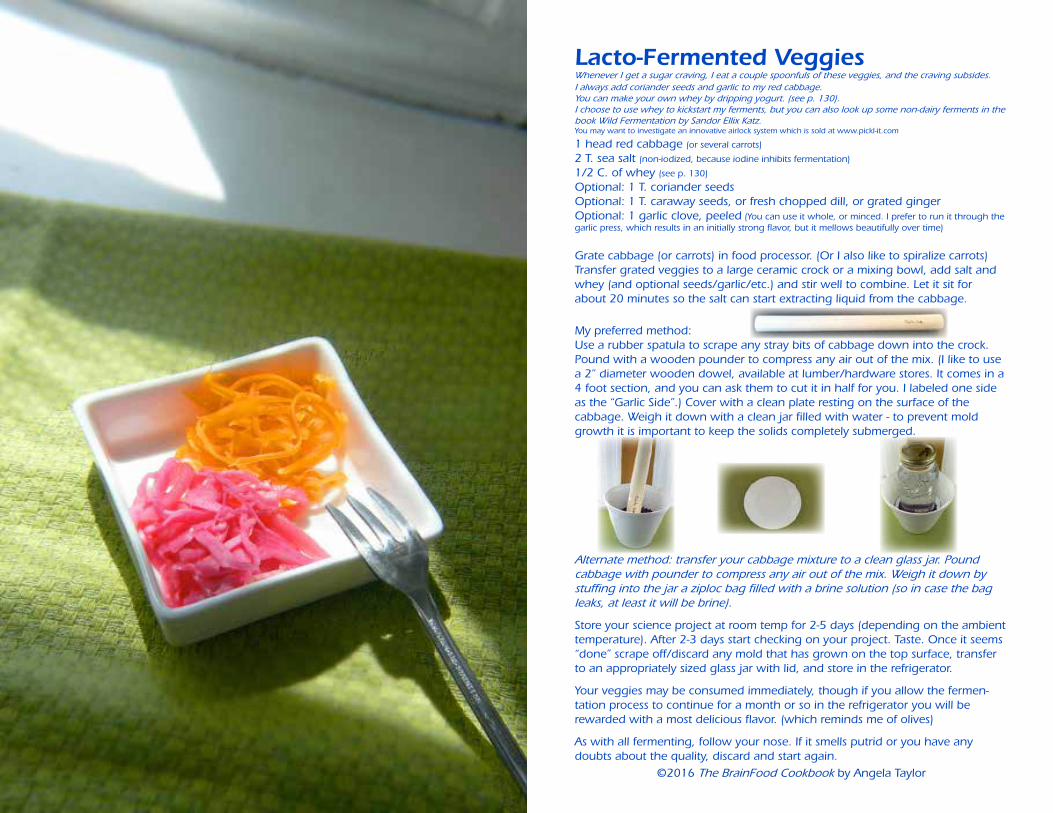
Lacto-Fermented VeggiesWhenever I get a sugar craving, I eat a couple spoonfuls of these veggies, and the craving subsides.I always add coriander seeds and garlic to my red cabbage.You can make your own whey by dripping yogurt. (see p. 130). I choose to use whey to kickstart my ferments, but you can also look up some non-dairy ferments in the book Wild Fermentation by Sandor Ellix Katz.You may want to investigate an innovative airlock system which is sold at www.pickl-it.com
1 head red cabbage (or several carrots)
2 T. sea salt (non-iodized, because iodine inhibits fermentation)
1/2 C. of whey (see p. 130)
Optional: 1 T. coriander seedsOptional: 1 T. caraway seeds, or fresh chopped dill, or grated gingerOptional: 1 garlic clove, peeled (You can use it whole, or minced. I prefer to run it through the garlic press, which results in an initially strong flavor, but it mellows beautifully over time)
Grate cabbage (or carrots) in food processor. (Or I also like to spiralize carrots) Transfer grated veggies to a large ceramic crock or a mixing bowl, add salt and whey (and optional seeds/garlic/etc.) and stir well to combine. Let it sit for about 20 minutes so the salt can start extracting liquid from the cabbage.
My preferred method:Use a rubber spatula to scrape any stray bits of cabbage down into the crock. Pound with a wooden pounder to compress any air out of the mix. (I like to use a 2” diameter wooden dowel, available at lumber/hardware stores. It comes in a 4 foot section, and you can ask them to cut it in half for you. I labeled one side as the “Garlic Side”.) Cover with a clean plate resting on the surface of the cabbage. Weigh it down with a clean jar filled with water - to prevent mold growth it is important to keep the solids completely submerged.
Alternate method: transfer your cabbage mixture to a clean glass jar. Pound cabbage with pounder to compress any air out of the mix. Weigh it down by stuffing into the jar a ziploc bag filled with a brine solution (so in case the bag leaks, at least it will be brine).
Store your science project at room temp for 2-5 days (depending on the ambient temperature). After 2-3 days start checking on your project. Taste. Once it seems “done” scrape off/discard any mold that has grown on the top surface, transfer to an appropriately sized glass jar with lid, and store in the refrigerator.
Your veggies may be consumed immediately, though if you allow the fermen-tation process to continue for a month or so in the refrigerator you will be rewarded with a most delicious flavor. (which reminds me of olives)
As with all fermenting, follow your nose. If it smells putrid or you have any doubts about the quality, discard and start again.

appet
izer
s
Lima Bean Hummus
Guacamole
Salsa Fresca
Zucchini Fritters
Pumpkin Seed Falafel
Sun-Dried Tomato Spears
Ants on a Log (Stuffed Celery)
Deviled Eggs

Lima Bean HummusLima beans are actually baby butter beans. They are properly called baby lima beans. Baby lima beans are allowed because in the smaller/younger state, they contain less starch. At maturity as butter beans, they contain a great deal of starch, too much for GAPS. They are green as babies, white as adults. So eat the green ones, not the white ones.
16 oz. bag frozen baby lima beans(Optional: Filtered water and about 1 t. sea salt) (Optional: Soak lima beans overnight in salted water.)- - - - - - - - - - - - - - - - - - 1 head of garlic1 t. sea salt3-4 T. lemon juice3-4 T. olive oil1/4 t. pepper
Preheat oven to 375°F. Cut off the very top of the garlic clove so that the tops of most of the cloves are exposed slightly. Coat with a little olive oil and wrap securely in tin foil. Roast garlic in oven for 1 hour. Remove and allow to cool.
Bring a pot of water to a boil. If soaked, drain and rinse lima beans. Add lima beans to boiling water, return to a boil, then turn down to a simmer. Cook for 15 minutes. Drain in colander, rinse, and cool. Put beans into food processor.
Using your fingers, squeeze the soft, roasted garlic out of each clove into food processor. Add salt, lemon juice, and olive oil the food processor and blend until completely smooth.
Scrape ingredients off sides of food processor to make sure it blends evenly. If you find that the hummus is too thick, you can add additional olive oil.
Serve at room temperature with crudités or almond crackers.
Optional: Sprinkle with chopped parsley or paprika before serving.
©2016 The BrainFood Cookbook by Angela Taylor

Fastest Ever GuacamoleThe trick to great guacamole is using nice, ripe avocados. When you buy avocados at the store, they are typically hard/unripe. Set them in a warm dark spot to ripen. When ripe the skins will be fully black and the avocado will yield slightly when you press on it. Alternately you can try to flick off the small stem on the end - if it easily flicks off it’s ripe.
I like to make this in small batches because I enjoy eating it every day, and guacamole turns brown so readily.
If you don’t have a Whole Foods near you, you can make your own Salsa Fresca using the recipe on the following page.
1 ripe avocado (Hass avocados are frequently found in stores)
1 heaping spoon of fresh “Salsa Fresca” (for example, from Whole Foods)
several generous shakes of sea saltgenerous shake of ground cuminsqueeze of lime juice
Cut avocado in half. Remove seed. Scoop out avocado from the peel, put in bowl.
Mash avocado with fork. Add remaining ingredients. Stir to combine.
©2016 The BrainFood Cookbook by Angela Taylor

Salsa FrescaI enjoy the milder taste of shallots. If you prefer a bolder flavor, onions could be used instead.
To save time, I’ll often chop/combine all ingredients in the food proces-sor small bowl, rather than chop by hand.
1 jalapeno, minced2 shallots, diced small (1/2 C.)2 medium tomatoes, diced small (1 1/2 C.)1 T. fresh lime juice1/2 t. sea salt1/2 C. loosely packed fresh cilantro leaves, roughly chopped
In a medium bowl, stir together tomatoes, shallot, jalapeno, fresh lime juice and salt. Let sit at least 15 minutes (covered in refrigera-tor). Stir in cilantro leaves just before serving.
©2016 The BrainFood Cookbook by Angela Taylor

Zucchini Fritters
1 lb. zucchini3 T. dried minced onion flakes½ C. almond flour1 t. dried Italian seasoning½ t. sea salt¼ t. ground black pepper2 large egg yolks2 large egg whites- - - - - - - - - - - - - - - - - - - -Ghee for frying- - - - - - - - - - - - - - - - - - - -For Dipping:store-bought marinara saucehomemade yogurt
Directions
Preheat oven to 200°F.
Juice zucchini in Omega. (Drink or discard the juice, save the pulp for this recipe)
Beat egg whites with mixer just until stiff peaks form.
In a medium bowl, combine zucchini pulp, onion, almond flour, Italian seasoning, salt, pepper, and egg yolks. Fold in egg white. Batter will be the consistency of thick pancake batter.
In a metal skillet (NOT nonstick) melt ghee over medium heat. Drop spoonfuls of batter and smooth out with back of spoon. Cook fritters until lightly browned, about 2 minutes per side. Drain on paper towels. Keep warm on serving platter in oven as you make additional batches.
Serve with sauces for dipping.
Note: leftover batter can be stored in the refrigerator for a day. It actu-ally thickens as the onion flakes absorb the liquid.
©2016 The BrainFood Cookbook by Angela Taylor

Pumpkin Seed Falafel
1½ C. pumpkin seeds½ t. sea salt
1 egg1 small onion, chopped1 clove of garlic, minced in garlic press2 T. of fresh parsley, chopped½ t. ground coriander½ t. ground cumin½ t. sea salt¼ t. pepperghee for frying
Soak pumpkin seeds in salted water 8-12 hours. Rinse and drain well. Sprout for a while if you have time.Rinse and drain well again.
Grind seeds through Omega juicer with the “blank” plate. They will retain a bit of texture, which is good.
Mix ground seeds with remaining ingredients in stand mixer.
Pre-heat a skillet over medium heat and add ghee. Heat ghee until melted and shimmering. Drop blobs of thick batter (approx ping pong ball sized) into hot pan — I like to use a metal cookie scoop. Mash with spoon to form patties. Heat until bottom is slightly browned, then flip with metal spatula.
Drain on paper towels. Eat as-is, or with ripe avocado on the top, or dip into yogurt.
These hold together, so they will pack well if needed.
- - - - - - - - - - - - - - - - - - - - - - - - - - - - - - - - - - - - - - - - - - - - - - - - - - - - - -
If desired, serve lettuce wraps filled with falafel, sliced tomatoes and cucumbers. Drizzle with yogurt.
©2016 The BrainFood Cookbook by Angela Taylor

Sun-Dried Tomato SpearsMakes 36 spears
6 cloves garlic, peeled and pressed in garlic press1 t. olive oil1 pound bag frozen petite peas, thawed8 ounces sun-dried tomatoes (packed in olive oil)1 t. sea salt1 t. freshly ground black pepper6 heads endive, ends trimmed and leaves separated
Preheat small skillet on medium. Add 1 t. olive oil, then add gar-lic. Stir for about 1 minute. Immediately transfer garlic from hot pan into food processor bowl.
Drain sun-dried tomatoes in a colander set over a bowl. Reserve the drained olive oil.
Add peas, sun-dried tomatoes, salt, and pepper to the food pro-cessor. Pulse the machine until the peas and tomatoes are finely chopped.
Add 1/4 C. of the drained olive oil. Pulse until the olive oil is in-corporated and the mixture is minced but not yet puréed.
Fill the endive spears with the filling. Serve.
©2016 The BrainFood Cookbook by Angela Taylor
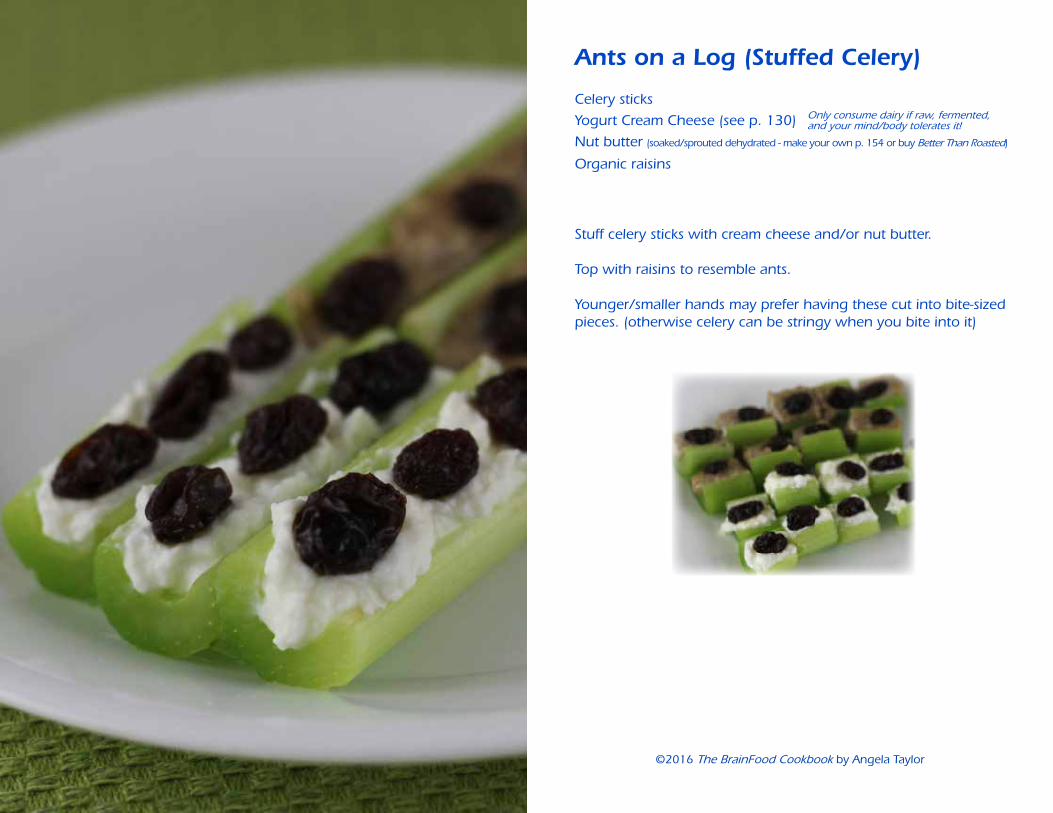
Ants on a Log (Stuffed Celery)
Celery sticks
Yogurt Cream Cheese (see p. 130)
Nut butter (soaked/sprouted dehydrated - make your own p. 154 or buy Better Than Roasted)
©2016 The BrainFood Cookbook by Angela Taylor
Organic raisins
Stuff celery sticks with cream cheese and/or nut butter.
Top with raisins to resemble ants.
Younger/smaller hands may prefer having these cut into bite-sized pieces. (otherwise celery can be stringy when you bite into it)
Only consume dairy if raw, fermented, and your mind/body tolerates it!
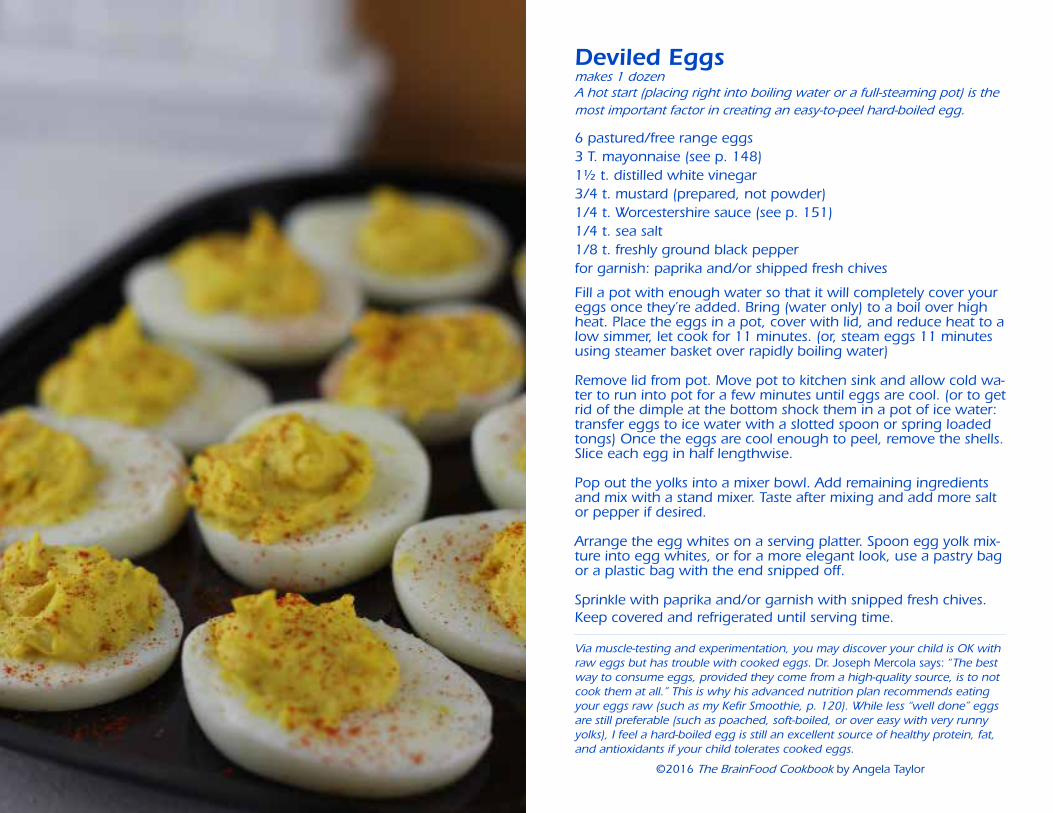
Deviled Eggsmakes 1 dozen A hot start (placing right into boiling water or a full-steaming pot) is the most important factor in creating an easy-to-peel hard-boiled egg.
6 pastured/free range eggs3 T. mayonnaise (see p. 148)1½ t. distilled white vinegar3/4 t. mustard (prepared, not powder)1/4 t. Worcestershire sauce (see p. 151)1/4 t. sea salt1/8 t. freshly ground black pepperfor garnish: paprika and/or shipped fresh chives
Fill a pot with enough water so that it will completely cover your eggs once they’re added. Bring (water only) to a boil over high heat. Place the eggs in a pot, cover with lid, and reduce heat to a low simmer, let cook for 11 minutes. (or, steam eggs 11 minutes using steamer basket over rapidly boiling water)
Remove lid from pot. Move pot to kitchen sink and allow cold wa-ter to run into pot for a few minutes until eggs are cool. (or to get rid of the dimple at the bottom shock them in a pot of ice water: transfer eggs to ice water with a slotted spoon or spring loaded tongs) Once the eggs are cool enough to peel, remove the shells. Slice each egg in half lengthwise.
Pop out the yolks into a mixer bowl. Add remaining ingredients and mix with a stand mixer. Taste after mixing and add more salt or pepper if desired.
Arrange the egg whites on a serving platter. Spoon egg yolk mix-ture into egg whites, or for a more elegant look, use a pastry bag or a plastic bag with the end snipped off.
Sprinkle with paprika and/or garnish with snipped fresh chives. Keep covered and refrigerated until serving time.
Via muscle-testing and experimentation, you may discover your child is OK with raw eggs but has trouble with cooked eggs. Dr. Joseph Mercola says: “The best way to consume eggs, provided they come from a high-quality source, is to not cook them at all.” This is why his advanced nutrition plan recommends eating your eggs raw (such as my Kefir Smoothie, p. 120). While less “well done” eggs are still preferable (such as poached, soft-boiled, or over easy with very runny yolks), I feel a hard-boiled egg is still an excellent source of healthy protein, fat, and antioxidants if your child tolerates cooked eggs.
©2016 The BrainFood Cookbook by Angela Taylor

sala
ds
and
dre
ssin
gs
Chicken Salad with Grapes
Apple Fennel Salad
Radish Mango Salad
Asian Tomato Salad
Bookmaker Salad
Fennel Orange Currant Salad
Cobb Salad
Broccoli-Cranberry Salad
Red Wine Vinaigrette Dressing
Thousand Island Dressing
Spicy Tropical Dressing
French Dressing
Quick Zucchini Salad
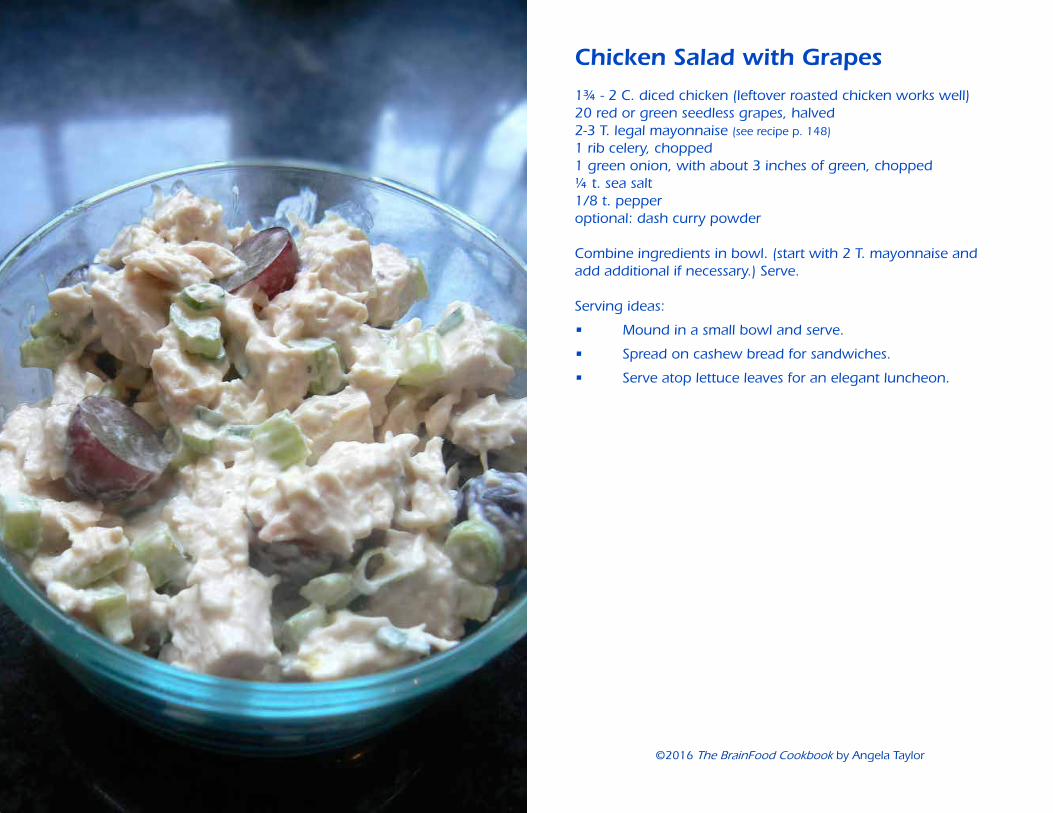
Chicken Salad with Grapes
1¾ - 2 C. diced chicken (leftover roasted chicken works well)20 red or green seedless grapes, halved2-3 T. legal mayonnaise (see recipe p. 148)
1 rib celery, chopped1 green onion, with about 3 inches of green, chopped¼ t. sea salt1/8 t. pepperoptional: dash curry powder
Combine ingredients in bowl. (start with 2 T. mayonnaise and add additional if necessary.) Serve.
Serving ideas:
• Mound in a small bowl and serve.
• Spread on cashew bread for sandwiches.
• Serve atop lettuce leaves for an elegant luncheon.
©2016 The BrainFood Cookbook by Angela Taylor

Apple Fennel Saladserves 2 as a side dish
1 t. dijon mustard1 t. apple cider vinegar1 t. olive oil1/4 t. sea salt1/8 t. fresh ground black pepper1 chopped apple1 chopped fennel bulb1 T. fresh flat leaf parsley, chopped
Combine mustard, vinegar, olive oil, sea salt and pepper in bowl.
Add apple and fennel blub and toss to coat.
Add parsley, stir, and serve.
©2016 The BrainFood Cookbook by Angela Taylor
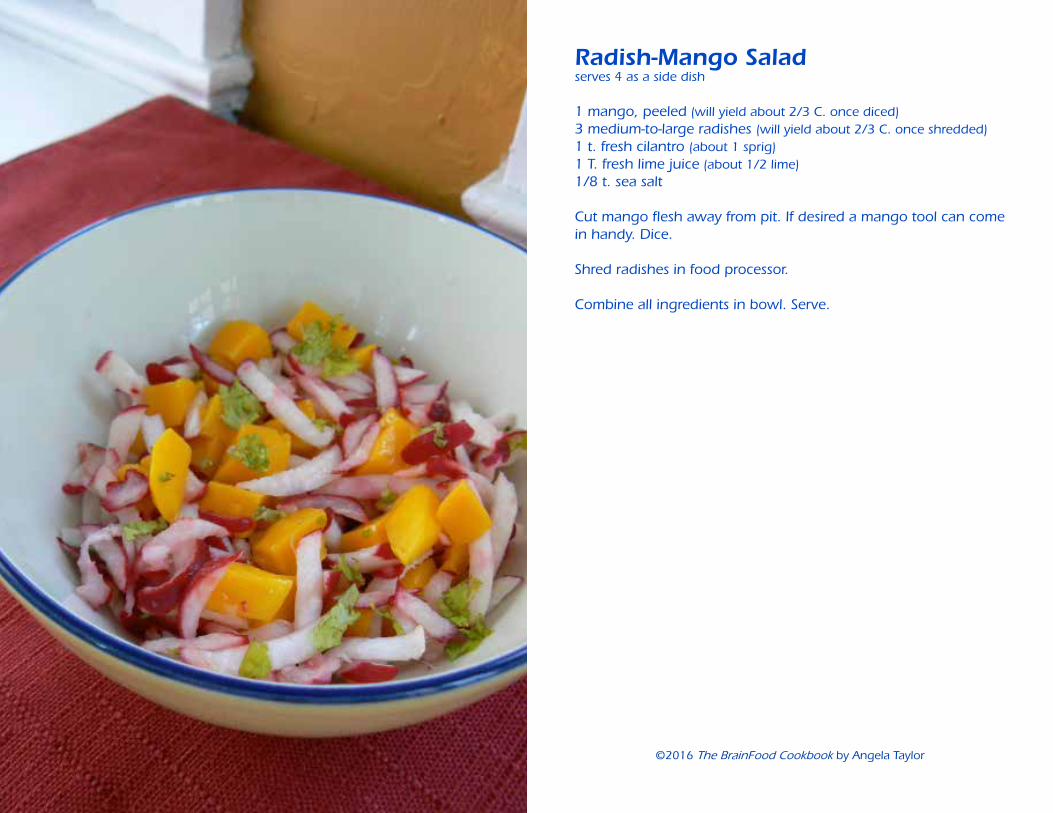
Radish-Mango Saladserves 4 as a side dish
1 mango, peeled (will yield about 2/3 C. once diced)3 medium-to-large radishes (will yield about 2/3 C. once shredded)1 t. fresh cilantro (about 1 sprig)1 T. fresh lime juice (about 1/2 lime)1/8 t. sea salt
Cut mango flesh away from pit. If desired a mango tool can come in handy. Dice.
Shred radishes in food processor.
Combine all ingredients in bowl. Serve.
©2016 The BrainFood Cookbook by Angela Taylor

Asian Tomato Salad
2 C. grape tomatoes, halved2 t. fresh cilantro leaves, chopped½ t. toasted sesame oil1 t. wheat-free tamari soy sauce
Place all ingredients in a bowl and stir to combine.
©2016 The BrainFood Cookbook by Angela Taylor
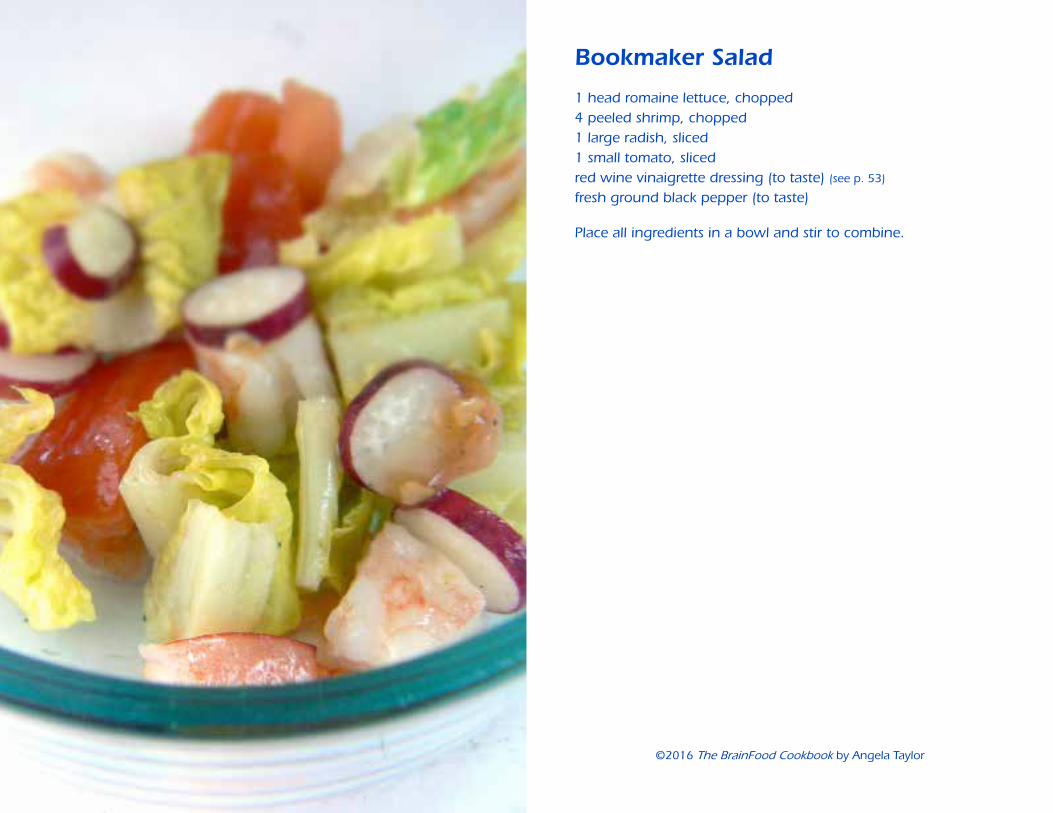
Bookmaker Salad
1 head romaine lettuce, chopped4 peeled shrimp, chopped1 large radish, sliced1 small tomato, slicedred wine vinaigrette dressing (to taste) (see p. 53)
fresh ground black pepper (to taste)
Place all ingredients in a bowl and stir to combine.
©2016 The BrainFood Cookbook by Angela Taylor

Fennel Orange Currant Saladserves 4 as a side dish
Because we’re eating the peel I recommend organic oranges. Wash well before grating. The Zyliss grater/zester is the best tool ever for zesting citrus.
I highly recommend organic currants, as conventional grapes are a heavily sprayed crop.
1 5-oz. box baby spinach1/4 C. extra-virgin olive oil2 T. honey2 t. white wine vinegar1/2 t. sea salt1/4 t. fresh ground black pepper1/16 t. red cayenne pepper2 T. minced shallots2 navel oranges (organic)1 bulb fennel (core and stems removed)1-2 T. dried currants (organic)
Empty box of spinach into a large salad mixing bowl.
Put olive oil, honey, vinegar, salt, peppers, and shallots in blender.
Grate about 1 T. zest from the oranges. Add zest to blender. Pull off peels and discard peels. Pull peeled oranges into segments. Throw 2 segments into the blender. Cut remaining segments into 4 bite-sized pieces, and add to salad bowl.
Halve the fennel and slice thinly. Add to salad bowl.
Whizz dressing in the blender. Pour over salad. Toss to coat.
Divide the salad onto serving plates. Sprinkle currants evenly on top. Serve.
©2016 The BrainFood Cookbook by Angela Taylor
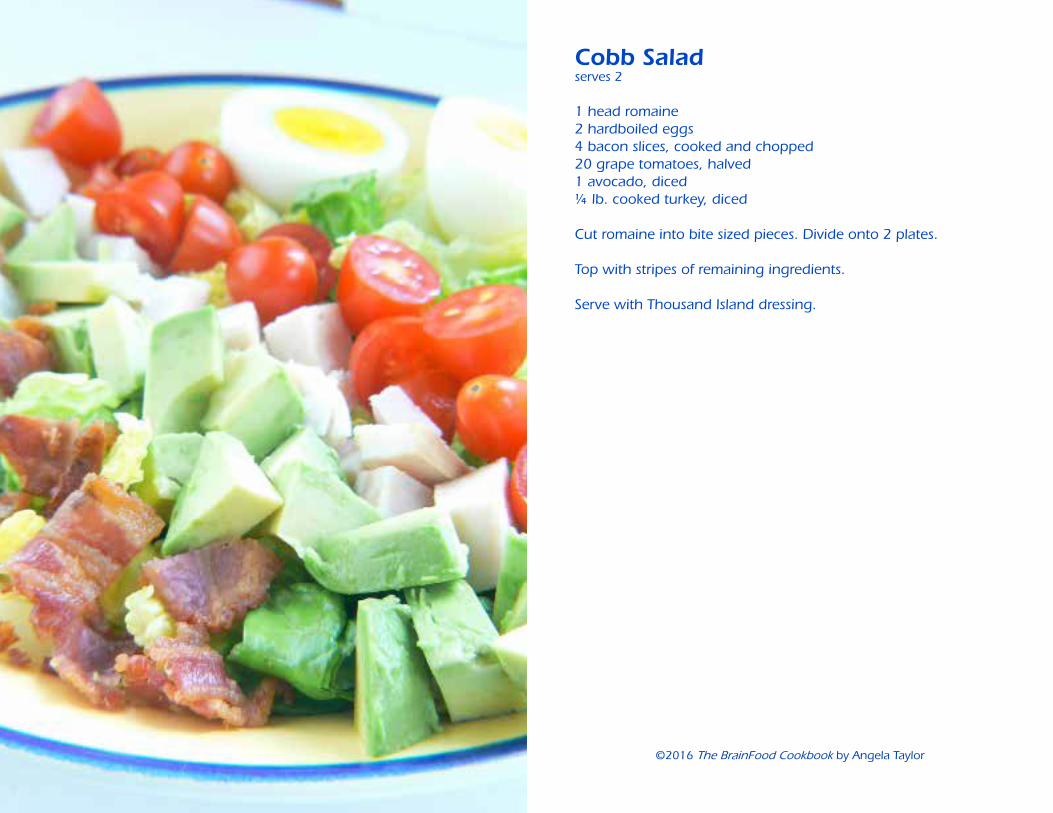
Cobb Saladserves 2
1 head romaine2 hardboiled eggs4 bacon slices, cooked and chopped20 grape tomatoes, halved1 avocado, diced¼ lb. cooked turkey, diced
Cut romaine into bite sized pieces. Divide onto 2 plates.
Top with stripes of remaining ingredients.
Serve with Thousand Island dressing.
©2016 The BrainFood Cookbook by Angela Taylor

Broccoli Cranberry SaladThis makes a large salad, perfect for parties and family gatherings. It is best served the same day, as the broccoli discolors the next day. (So if you are making this to serve at home, you may wish to cut the recipe in half.)
2 lbs. broccoli crowns, cut into ½-inch florets (or 3 lbs if big stalks)1 C. sliced (or slivered) almonds¾ C. fruit-juice sweetened dried cranberries(optional: 1 C. cooked GAPS-legal bacon, crumbled)
DRESSING:1 C. red onion, chopped1 C. mayonnaise (see p. 148)¼ C. honey2 T. red wine vinegar½ t. sea salt¼ t. fresh ground black pepper
If using optional bacon, heat oven to 400°F and cook bacon until crisp, 12-15 minutes. Move bacon to paper towels. Reserve bacon grease (strain into a jar) for future use.
Rinse broccoli well, and cut florets into bite-sized ½-inch pieces. Discard stalks. Lightly steam broccoli florets for about 4 minutes, and drain well. Cool.
Mix together steamed broccoli, almonds, cranberries. Place in frig.
Cook red onion in small amount of bacon fat (or other oil), cook-ing/stirring until lightly caramelized.
Combine all dressing ingredients (except onion) in a large mixing bowl. Mix until thoroughly combined using a wire whisk. Add onions and gently combine. Put salad, dressing, and bacon into the refrigerator until serving time.
At serving time:Add most of the dressing to salad and mix well. (We want to avoid “over-dressing” the salad. Add the rest of the dressing if needed, or store leftover dressing in the frig.) Add bacon and mix well. Serve.
©2016 The BrainFood Cookbook by Angela Taylor
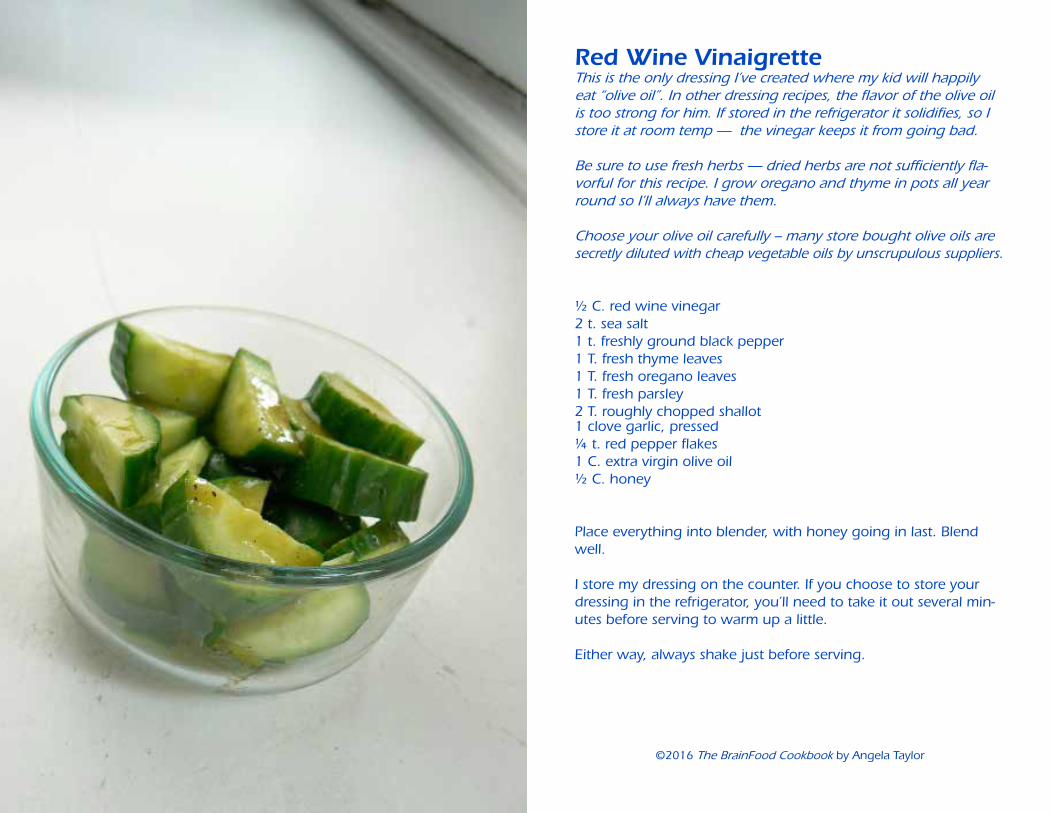
Red Wine VinaigretteThis is the only dressing I’ve created where my kid will happily eat “olive oil”. In other dressing recipes, the flavor of the olive oil is too strong for him. If stored in the refrigerator it solidifies, so I store it at room temp — the vinegar keeps it from going bad.
Be sure to use fresh herbs — dried herbs are not sufficiently fla-vorful for this recipe. I grow oregano and thyme in pots all year round so I’ll always have them.
Choose your olive oil carefully – many store bought olive oils are secretly diluted with cheap vegetable oils by unscrupulous suppliers.
½ C. red wine vinegar2 t. sea salt1 t. freshly ground black pepper1 T. fresh thyme leaves1 T. fresh oregano leaves 1 T. fresh parsley2 T. roughly chopped shallot1 clove garlic, pressed¼ t. red pepper flakes1 C. extra virgin olive oil½ C. honey
Place everything into blender, with honey going in last. Blend well.
I store my dressing on the counter. If you choose to store your dressing in the refrigerator, you’ll need to take it out several min-utes before serving to warm up a little.
Either way, always shake just before serving.
©2016 The BrainFood Cookbook by Angela Taylor
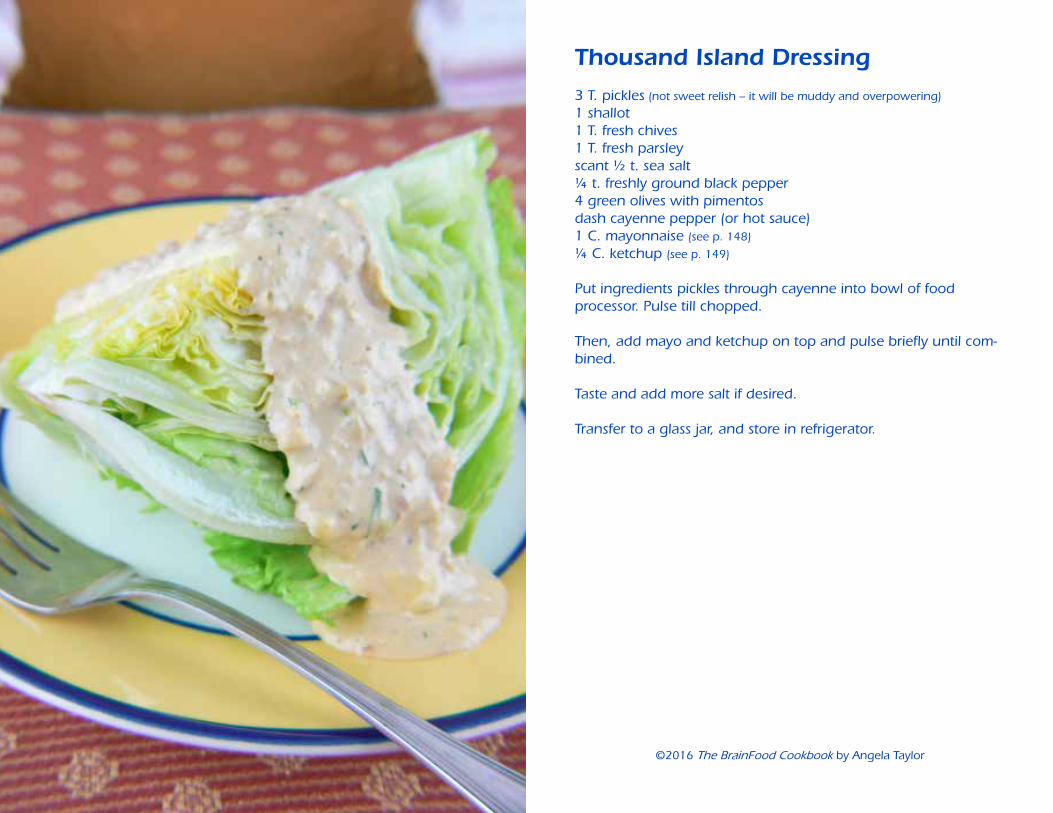
Thousand Island Dressing
3 T. pickles (not sweet relish – it will be muddy and overpowering)
1 shallot1 T. fresh chives1 T. fresh parsleyscant ½ t. sea salt¼ t. freshly ground black pepper4 green olives with pimentosdash cayenne pepper (or hot sauce)1 C. mayonnaise (see p. 148)
¼ C. ketchup (see p. 149)
Put ingredients pickles through cayenne into bowl of food processor. Pulse till chopped.
Then, add mayo and ketchup on top and pulse briefly until com-bined.
Taste and add more salt if desired.
Transfer to a glass jar, and store in refrigerator.
©2016 The BrainFood Cookbook by Angela Taylor

Spicy Tropical Dressing• The Microplane Zester is the best tool ever for zesting citrus• Don’t touch your eyes after handling the habañero pepper!• Be sure to buy: - an organic orange, and wash well before grating - expeller-pressed organic oil, as conventional oils contain a lot of chemicals.
8 oz. fresh pineapple chunks3 T. fresh cilantro, coarsely chopped½ t. orange zest4 t. apple cider vinegar½ t. minced habañero pepper1 garlic clove, peeled¼ t. sea salt¼ C. canola or sunflower oil
Place all ingredients in blender except oil. Turn on blender.
With blender on, gradually add oil until blended.
Salad is shown here with romaine, cucumbers, and additional pineapple chunks.
©2016 The BrainFood Cookbook by Angela Taylor

French DressingBe sure to buy:• expeller-pressed organic oil, as conventional oils contain a lot of chemicals• organic white wine vinegar, as conventional grapes are a heavily sprayed crop.
1/4 C. ketchup (see p. 149)1/4 C. raw honey1/4 C. organic white wine vinegar1 T. chopped shallot (or red onion)1/2 t. Worcestershire sauce (see p. 151)1/4 t. sea salt1/8 t. hot pepper sauce (see p. 152)2/3 C. canola or sunflower oil
Place all ingredients in blender except oil. Turn on blender.
If you want a creamy texture: With blender on, gradually add oil until blended.
If you want a more clear texture/color:Pour blender contents into a large bottle. Add oil. Shake to com-bine.
©2016 The BrainFood Cookbook by Angela Taylor

Quick Zucchini SaladThis salad comes together fast for a speedy side dish.
Macadamia nut oil is unique for its low Omega 6 content compared to most other oils, and it also has a lovely flavor. But if you don’t have any on hand, you could substitute a different oil.
1 lb. zucchini2 t. macadamia nut oiljuice of half a lime¾ t. sea saltpinch of ground corianderseveral shakes of seasoned salt (such as Redmond RealSalt Seasoned Salt)
Cut zucchini in half lengthwise. With spoon, scoop out and discard any large seeds from the zucchini. Grate zucchini in food processor fitted with grating disc.
Place all ingredients in a large bowl and stir to combine.
Spoon onto serving dishes and garnish with a little coarse sea salt if desired.
©2016 The BrainFood Cookbook by Angela Taylor

soups
and
ste
ws
Chicken Stock
Lentil Soup with Bacon
Chicken Noodle Soup
Beef Stew
Beef Chili
Sausage Pizza Soup
Tomato Cabbage Soup
Butternut Squash Soup
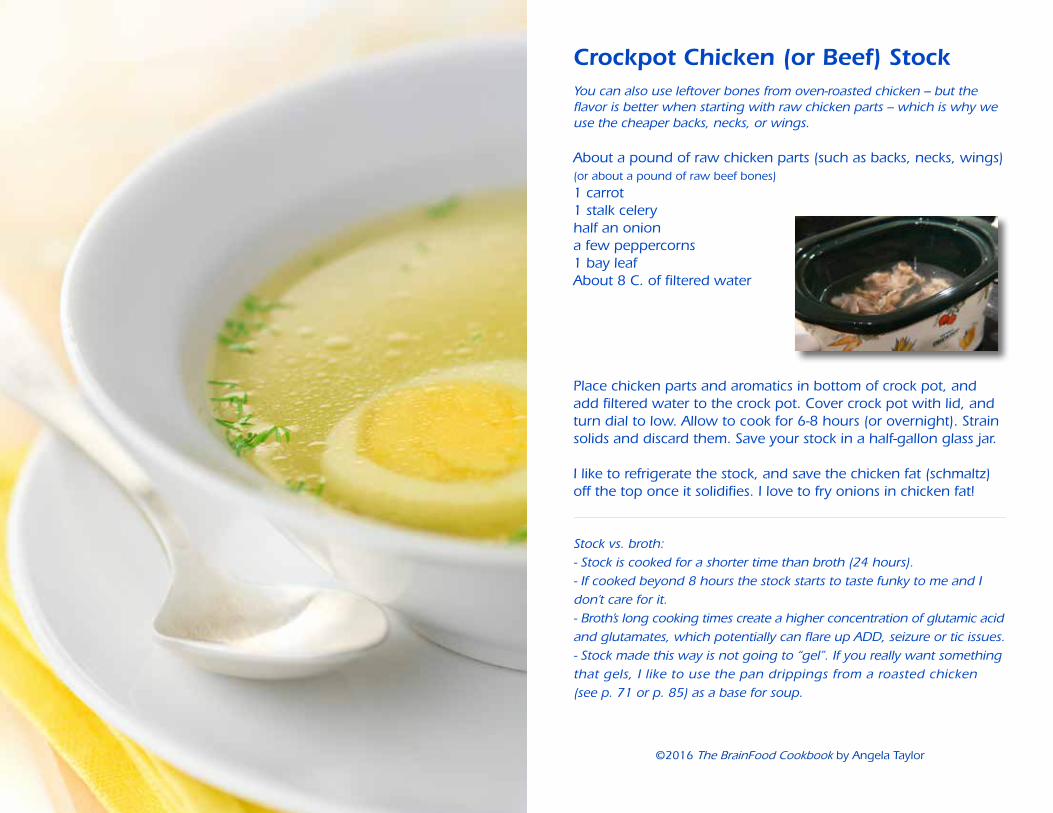
Crockpot Chicken (or Beef) StockYou can also use leftover bones from oven-roasted chicken – but the flavor is better when starting with raw chicken parts – which is why we use the cheaper backs, necks, or wings.
About a pound of raw chicken parts (such as backs, necks, wings)(or about a pound of raw beef bones)
1 carrot1 stalk celeryhalf an oniona few peppercorns1 bay leafAbout 8 C. of filtered water
Place chicken parts and aromatics in bottom of crock pot, and add filtered water to the crock pot. Cover crock pot with lid, and turn dial to low. Allow to cook for 6-8 hours (or overnight). Strain solids and discard them. Save your stock in a half-gallon glass jar.
I like to refrigerate the stock, and save the chicken fat (schmaltz) off the top once it solidifies. I love to fry onions in chicken fat!
Stock vs. broth: - Stock is cooked for a shorter time than broth (24 hours).- If cooked beyond 8 hours the stock starts to taste funky to me and I don’t care for it. - Broth’s long cooking times create a higher concentration of glutamic acid and glutamates, which potentially can flare up ADD, seizure or tic issues. - Stock made this way is not going to “gel”. If you really want something that gels, I like to use the pan drippings from a roasted chicken (see p. 71 or p. 85) as a base for soup.
©2016 The BrainFood Cookbook by Angela Taylor
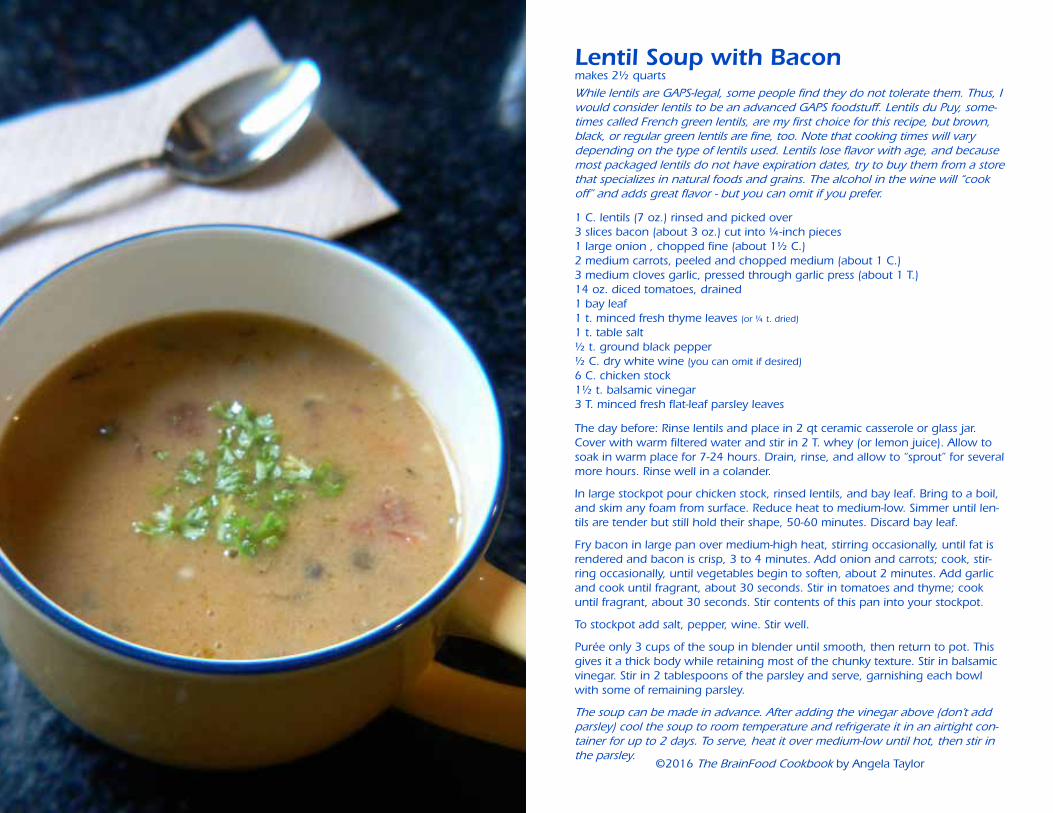
Lentil Soup with Baconmakes 2½ quarts
While lentils are GAPS-legal, some people find they do not tolerate them. Thus, I would consider lentils to be an advanced GAPS foodstuff. Lentils du Puy, some-times called French green lentils, are my first choice for this recipe, but brown, black, or regular green lentils are fine, too. Note that cooking times will vary depending on the type of lentils used. Lentils lose flavor with age, and because most packaged lentils do not have expiration dates, try to buy them from a store that specializes in natural foods and grains. The alcohol in the wine will “cook off” and adds great flavor - but you can omit if you prefer.
1 C. lentils (7 oz.) rinsed and picked over3 slices bacon (about 3 oz.) cut into ¼-inch pieces1 large onion , chopped fine (about 1½ C.)2 medium carrots, peeled and chopped medium (about 1 C.)3 medium cloves garlic, pressed through garlic press (about 1 T.)14 oz. diced tomatoes, drained1 bay leaf1 t. minced fresh thyme leaves (or ¼ t. dried)
1 t. table salt½ t. ground black pepper½ C. dry white wine (you can omit if desired)6 C. chicken stock1½ t. balsamic vinegar3 T. minced fresh flat-leaf parsley leaves
The day before: Rinse lentils and place in 2 qt ceramic casserole or glass jar. Cover with warm filtered water and stir in 2 T. whey (or lemon juice). Allow to soak in warm place for 7-24 hours. Drain, rinse, and allow to “sprout” for several more hours. Rinse well in a colander.
In large stockpot pour chicken stock, rinsed lentils, and bay leaf. Bring to a boil, and skim any foam from surface. Reduce heat to medium-low. Simmer until len-tils are tender but still hold their shape, 50-60 minutes. Discard bay leaf.
Fry bacon in large pan over medium-high heat, stirring occasionally, until fat is rendered and bacon is crisp, 3 to 4 minutes. Add onion and carrots; cook, stir-ring occasionally, until vegetables begin to soften, about 2 minutes. Add garlic and cook until fragrant, about 30 seconds. Stir in tomatoes and thyme; cook until fragrant, about 30 seconds. Stir contents of this pan into your stockpot.
To stockpot add salt, pepper, wine. Stir well.
Purée only 3 cups of the soup in blender until smooth, then return to pot. This gives it a thick body while retaining most of the chunky texture. Stir in balsamic vinegar. Stir in 2 tablespoons of the parsley and serve, garnishing each bowl with some of remaining parsley.
The soup can be made in advance. After adding the vinegar above (don’t add parsley) cool the soup to room temperature and refrigerate it in an airtight con-tainer for up to 2 days. To serve, heat it over medium-low until hot, then stir in the parsley.
©2016 The BrainFood Cookbook by Angela Taylor

Chicken “Noodle” Soupmakes 2 quarts
The night before, make a recipe of the Honey-Mustard-Curry Roasted Chicken (p. 70) so you will have your soup starter basics. For the Best Ever Chicken Soup:1) Save the drippings from the bottom of the roasting pan and set aside in refrigerator.2) Next, place the bones (leftover after your family eats the chicken) into crockpot and add about 7 cups filtered water. Cover and cook on low overnight. In the morning, remove large bones with tongs, and pour stock through strainer to remove remaining small bones. Discard all bones.
Saved roasting pan drippings from Honey Mustard Curry Chicken2 large yellow onions, sliced lengthwise into long “noodles”1 stalk celery, chopped2 medium carrots, chopped into coins14 oz. diced tomatoes1 bay leaf1 t. table salt½ t. ground black pepper6-7 C. chicken stock2 fresh thyme sprigs (or ¼ t. dried)1 sprig minced fresh parsley leaves
Heat only the schmaltz (the layer of fat that solidified on top) from the saved pan drippings in a large stockpot on medium-low. Add onions and sweat for about 20-30 minutes.
Add to stockpot: remainder of pan drippings, celery, carrots, tomatoes, bay leaf, salt, pepper, chicken stock and thyme sprigs. Simmer until car-rots are tender but still hold their shape, 50-60 minutes. Discard bay leaf and thyme sprigs.
Serve, garnishing each bowl with a little sprinkle of parsley.
©2016 The BrainFood Cookbook by Angela Taylor
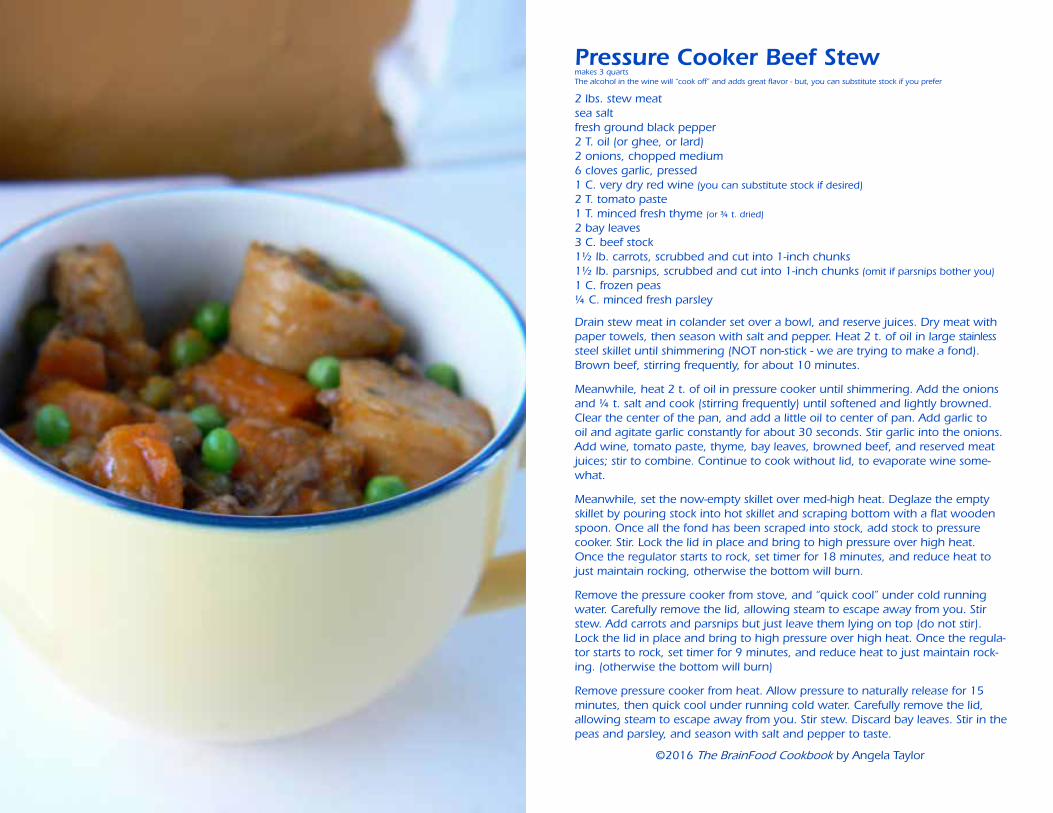
Pressure Cooker Beef Stewmakes 3 quartsThe alcohol in the wine will “cook off” and adds great flavor - but, you can substitute stock if you prefer
2 lbs. stew meatsea saltfresh ground black pepper2 T. oil (or ghee, or lard)2 onions, chopped medium6 cloves garlic, pressed1 C. very dry red wine (you can substitute stock if desired)2 T. tomato paste1 T. minced fresh thyme (or ¾ t. dried)
2 bay leaves3 C. beef stock1½ lb. carrots, scrubbed and cut into 1-inch chunks 1½ lb. parsnips, scrubbed and cut into 1-inch chunks (omit if parsnips bother you)1 C. frozen peas¼ C. minced fresh parsley
Drain stew meat in colander set over a bowl, and reserve juices. Dry meat with paper towels, then season with salt and pepper. Heat 2 t. of oil in large stainless steel skillet until shimmering (NOT non-stick - we are trying to make a fond). Brown beef, stirring frequently, for about 10 minutes.
Meanwhile, heat 2 t. of oil in pressure cooker until shimmering. Add the onions and ¼ t. salt and cook (stirring frequently) until softened and lightly browned. Clear the center of the pan, and add a little oil to center of pan. Add garlic to oil and agitate garlic constantly for about 30 seconds. Stir garlic into the onions. Add wine, tomato paste, thyme, bay leaves, browned beef, and reserved meat juices; stir to combine. Continue to cook without lid, to evaporate wine some-what.
Meanwhile, set the now-empty skillet over med-high heat. Deglaze the empty skillet by pouring stock into hot skillet and scraping bottom with a flat wooden spoon. Once all the fond has been scraped into stock, add stock to pressure cooker. Stir. Lock the lid in place and bring to high pressure over high heat. Once the regulator starts to rock, set timer for 18 minutes, and reduce heat to just maintain rocking, otherwise the bottom will burn.
Remove the pressure cooker from stove, and “quick cool” under cold running water. Carefully remove the lid, allowing steam to escape away from you. Stir stew. Add carrots and parsnips but just leave them lying on top (do not stir). Lock the lid in place and bring to high pressure over high heat. Once the regula-tor starts to rock, set timer for 9 minutes, and reduce heat to just maintain rock-ing. (otherwise the bottom will burn)
Remove pressure cooker from heat. Allow pressure to naturally release for 15 minutes, then quick cool under running cold water. Carefully remove the lid, allowing steam to escape away from you. Stir stew. Discard bay leaves. Stir in the peas and parsley, and season with salt and pepper to taste.
©2016 The BrainFood Cookbook by Angela Taylor

Beef ChiliFor best digestibility, beans need soaking/sprouting/extended cooking, and I find that freezing also helps break them down. Prepare beans at your leisure, freeze them, and just pop them out of the freezer when you’re ready to make chili.
Elaine Gottschall felt that kidney beans were “legal”, while Natasha Campbell-McBride does not specifically mention either way. My son muscle tests “OK” for kidney beans. If you find that kidney beans are problematic for you, try navy beans instead, or omit beans altogether!
Bean prep: Several days before (if freezing) or 1-2 days before if just soaking:
Rinse 1 C. (or more, to save time next time you make chili) dried beans. Place in 2 qt. ceramic casserole or glass jar. Cover with warm filtered water and stir in 2 T. whey (or lemon juice). Allow to soak in warm place for 7-24 hours. Rinse well in a colander, and “sprout” for several hours. (If using a jar, screw on sprout-ing screen, then set jar upside down in your dish drainer.) Rinse well, then add to slow cooker and cover with plenty of filtered water. Cook on low overnight. In the morning, dump beans in colander and rinse well. Transfer 2 C. portions to freezer-safe containers. Freeze.
2 C. thawed, rinsed kidney beans2 T. ghee, lard or other oil2 onions, diced1 red bell pepper, diced2 T. chili powder1 T. cumin½ t. cayenne pepper½ t. sea salt6 garlic cloves, pressed2 lb. ground beef28 oz. diced tomatoes28 oz. tomato puréeadditional ½ t. sea salt
Heat ghee in a large Dutch oven over medium until shimmering. Add the onions, bell pepper, chili powder, cumin, cayenne, and ½ t. salt. Cook until the onions are caramelized, about 10 minutes. Make a well in the center. Add a little additional oil, then add the garlic to the well. Agitate garlic constantly for about 30 seconds, then stir the whole pot together.
Add the beef and increase the heat to medium-high. Cook, breaking up the beef with your spoon, until no longer pink (about 10 minutes).
Stir in the beans, diced tomatoes (with their juice), tomato purée, and ½ t. salt. Bring to a simmer, cover, and cook for 45 minutes.Remove the lid and continue to simmer until beef is tender, about 45 more min-utes. Season with additional salt and pepper if desired.
Serve and garnish with chives, cilantro, and/or avocado. If you wish: serve with dollop of 24-hour yogurt after allowing your mug of chili to cool to about 120°F.
©2016 The BrainFood Cookbook by Angela Taylor
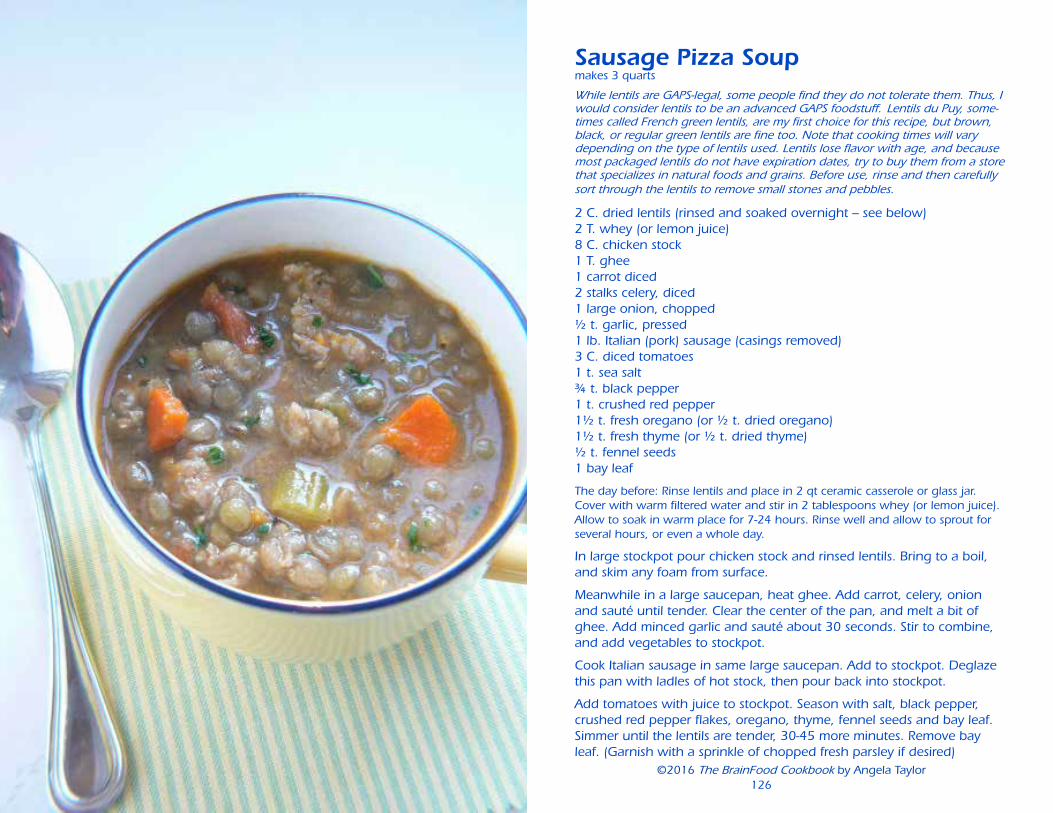
Sausage Pizza Soupmakes 3 quarts
While lentils are GAPS-legal, some people find they do not tolerate them. Thus, I would consider lentils to be an advanced GAPS foodstuff. Lentils du Puy, some-times called French green lentils, are my first choice for this recipe, but brown, black, or regular green lentils are fine too. Note that cooking times will vary depending on the type of lentils used. Lentils lose flavor with age, and because most packaged lentils do not have expiration dates, try to buy them from a store that specializes in natural foods and grains. Before use, rinse and then carefully sort through the lentils to remove small stones and pebbles.
2 C. dried lentils (rinsed and soaked overnight – see below)2 T. whey (or lemon juice)8 C. chicken stock 1 T. ghee1 carrot diced 2 stalks celery, diced 1 large onion, chopped½ t. garlic, pressed1 lb. Italian (pork) sausage (casings removed)3 C. diced tomatoes1 t. sea salt¾ t. black pepper1 t. crushed red pepper1½ t. fresh oregano (or ½ t. dried oregano)1½ t. fresh thyme (or ½ t. dried thyme)½ t. fennel seeds1 bay leaf
The day before: Rinse lentils and place in 2 qt ceramic casserole or glass jar. Cover with warm filtered water and stir in 2 tablespoons whey (or lemon juice). Allow to soak in warm place for 7-24 hours. Rinse well and allow to sprout for several hours, or even a whole day.
In large stockpot pour chicken stock and rinsed lentils. Bring to a boil, and skim any foam from surface.
Meanwhile in a large saucepan, heat ghee. Add carrot, celery, onion and sauté until tender. Clear the center of the pan, and melt a bit of ghee. Add minced garlic and sauté about 30 seconds. Stir to combine, and add vegetables to stockpot.
Cook Italian sausage in same large saucepan. Add to stockpot. Deglaze this pan with ladles of hot stock, then pour back into stockpot.
Add tomatoes with juice to stockpot. Season with salt, black pepper, crushed red pepper flakes, oregano, thyme, fennel seeds and bay leaf. Simmer until the lentils are tender, 30-45 more minutes. Remove bay leaf. (Garnish with a sprinkle of chopped fresh parsley if desired)
©2016 The BrainFood Cookbook by Angela Taylor126

Tomato Cabbage SoupThe alcohol in the wine will “cook off” and adds great flavor - but, you can omit if you prefer
8 C. stock (from chicken bones, beef bones, etc.)1 32 oz. jar tomato-vegetable juice (similar to V8 juice)1 bay leafGhee, lard, or refined sunflower oil (suitable for high heat cooking)6 large green onions (also called “spring” onions)3 carrots, sliced into coins3 stalks celery, sliced2 green peppers, chopped1 container (10 oz. or so) white mushrooms, cleaned and slicedhalf a head of red cabbage, cut into bite sized pieces14 oz. diced tomatoes1/4 C. dried minced onion1 t. very dry wine (omit if desired)1/16 t. celery seed1/4 t. freshly ground black pepper1 t. sea salt3/4 t. onion powder1/2 t. garlic powder1/4 t. smoked paprika
Put stock in slow cooker and heat on Low. Add tomato-vegetable juice and bay leaf.
Important: at no point during the following sauté of vegetables should you allow the bottom of the pan to burn. We want to end up with a medium brown fond when we are done sautéing.
Heat a large skillet on medium and add small amount of oil. Slice white parts of green onions, Sauté about 4-6 minutes. Save green parts for garnish.
Add carrots and celery to skillet and sauté for several more minutes. Remove veggies from pan and add to soup.
Add small amount more oil to empty skillet. Sauté green pepper pieces for 4-5 minutes. Add to soup.
Add small amount more oil to empty skillet. Sauté mushroom slices for 4-5 minutes. Add to soup.
Use a ladle to remove 3 ladlefuls of stock into hot skillet. Scrape bottom of skillet to remove all brown bits (this is called the fond). Pour back into soup.
Add cabbage, tomatoes, dried minced onion, wine, celery seed, black pepper, and sea salt to soup.
Put dry spices (onion powder, garlic powder, smoked paprika) in a very small bowl. Add about a tablespoon of stock and stir to combine into a paste. Add a ladleful of stock - stir to combine, then pour back into soup.
Cook for 2 hours, or until cabbage is softened. Ladle into serving bowls and garnish with sliced green onion tops. Remove & discard bay leaf when you encounter it.
©2016 The BrainFood Cookbook by Angela Taylor

Butternut Squash Soup2½ pounds butternut squash, peeled, seeded, and cut into 2-inch chunks (about 7 cups)
2 T. ghee1 leek, white and light green parts only, quartered lengthwise, sliced thin, and washed thoroughly (about 1½ cups)
1 t. sea salt4 C. chicken stock2 sprigs fresh thyme1 bay leafpinch cayenne pepperSalt and pepper(optional yogurt for garnish)
Preheat oven to 400°F.
Place squash chunks in a glass dish and cover with foil. Roast for 45 minutes.
Melt ghee in Dutch oven over medium-high heat. Add leek, and 1 t. sea salt. Cook, stirring occasionally, until leek is nicely cara-melized, about 10 to 13 minutes.
Add 2 C. stock and scrape bottom of pot to loosen and dissolve fond. Add remaining 2 C. stock, cooked squash (and any squash liquid), thyme sprigs, bay leaf, and cayenne. Increase heat to high and bring to simmer. Reduce heat to medium and simmer until leeks are fully tender, about 6 to 7 minutes.
Remove and discard bay leaf and thyme sprigs. Working in batch-es, process soup in blender until smooth. Season with salt and pepper to taste. If you wish: serve with dollop of 24-hour yogurt after allowing your mug of soup to cool to about 120°F.
©2016 The BrainFood Cookbook by Angela Taylor

mai
n d
ish
es
Chicken Nuggets
Apple Meatloaf
Honey-Mustard Curry Roasted Chicken
Pecan Encrusted Salmon
Pan-Seared Filet Mignon with Steakhouse Seasoning Rub
BBQ Chicken Breasts
Cuban Beef and Peppers
Stuffed Bell Peppers
Zucchini Noodles with Roasted Tomatoes
Chicken Kebabs
Beef Tacos
Taco Seasoning Mix
Turkey Sandwiches
Roasted Turkey Breast
Slow Roasted Beef Tenderloin
Hamburgers
Herb Roasted Chicken and Carrots
BLT Sandwiches
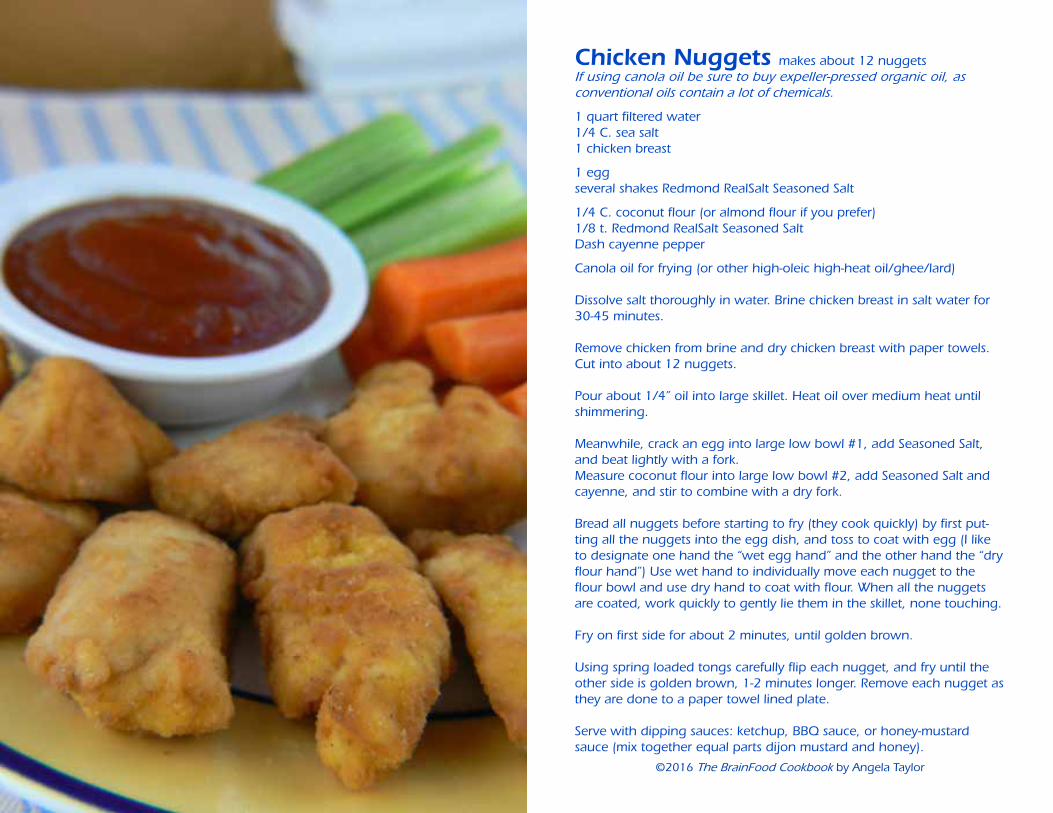
Chicken Nuggets makes about 12 nuggetsIf using canola oil be sure to buy expeller-pressed organic oil, as conventional oils contain a lot of chemicals.
1 quart filtered water1/4 C. sea salt1 chicken breast
1 eggseveral shakes Redmond RealSalt Seasoned Salt
1/4 C. coconut flour (or almond flour if you prefer)1/8 t. Redmond RealSalt Seasoned Salt Dash cayenne pepper
Canola oil for frying (or other high-oleic high-heat oil/ghee/lard)
Dissolve salt thoroughly in water. Brine chicken breast in salt water for 30-45 minutes.
Remove chicken from brine and dry chicken breast with paper towels. Cut into about 12 nuggets.
Pour about 1/4” oil into large skillet. Heat oil over medium heat until shimmering.
Meanwhile, crack an egg into large low bowl #1, add Seasoned Salt, and beat lightly with a fork.Measure coconut flour into large low bowl #2, add Seasoned Salt and cayenne, and stir to combine with a dry fork.
Bread all nuggets before starting to fry (they cook quickly) by first put-ting all the nuggets into the egg dish, and toss to coat with egg (I like to designate one hand the “wet egg hand” and the other hand the “dry flour hand”) Use wet hand to individually move each nugget to the flour bowl and use dry hand to coat with flour. When all the nuggets are coated, work quickly to gently lie them in the skillet, none touching.
Fry on first side for about 2 minutes, until golden brown.
Using spring loaded tongs carefully flip each nugget, and fry until the other side is golden brown, 1-2 minutes longer. Remove each nugget as they are done to a paper towel lined plate.
Serve with dipping sauces: ketchup, BBQ sauce, or honey-mustard sauce (mix together equal parts dijon mustard and honey).
©2016 The BrainFood Cookbook by Angela Taylor
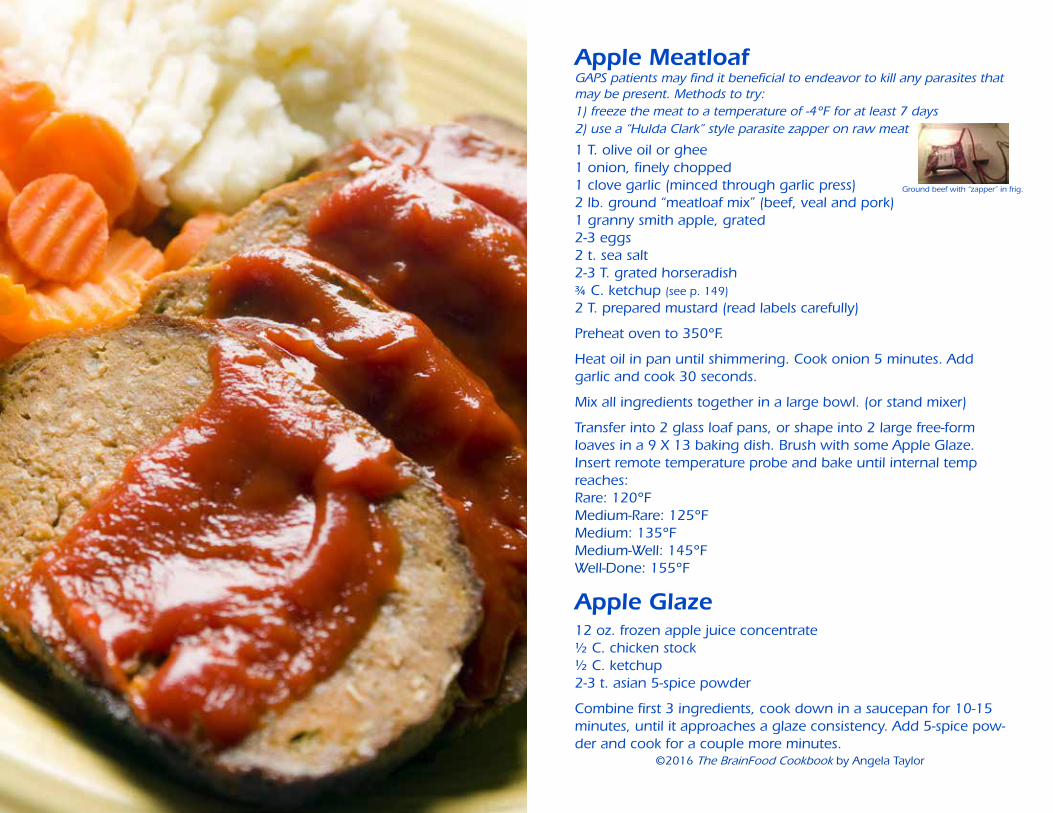
Apple MeatloafGAPS patients may find it beneficial to endeavor to kill any parasites that may be present. Methods to try:1) freeze the meat to a temperature of -4°F for at least 7 days2) use a “Hulda Clark” style parasite zapper on raw meat
1 T. olive oil or ghee1 onion, finely chopped1 clove garlic (minced through garlic press)2 lb. ground “meatloaf mix” (beef, veal and pork)1 granny smith apple, grated2-3 eggs2 t. sea salt2-3 T. grated horseradish¾ C. ketchup (see p. 149)
2 T. prepared mustard (read labels carefully)
Preheat oven to 350°F.
Heat oil in pan until shimmering. Cook onion 5 minutes. Add garlic and cook 30 seconds.
Mix all ingredients together in a large bowl. (or stand mixer)
Transfer into 2 glass loaf pans, or shape into 2 large free-form loaves in a 9 X 13 baking dish. Brush with some Apple Glaze. Insert remote temperature probe and bake until internal temp reaches:Rare: 120°FMedium-Rare: 125°FMedium: 135°FMedium-Well: 145°FWell-Done: 155°F
Apple Glaze12 oz. frozen apple juice concentrate½ C. chicken stock½ C. ketchup2-3 t. asian 5-spice powder
Combine first 3 ingredients, cook down in a saucepan for 10-15 minutes, until it approaches a glaze consistency. Add 5-spice pow-der and cook for a couple more minutes.
©2016 The BrainFood Cookbook by Angela Taylor
Ground beef with “zapper” in frig.

Honey Mustard Curry Roast ChickenServes 4
4 chicken breasts3 T. honey3 T. grainy mustard1 T. ghee1½ t. curry powder (preferably Madras)½ t. sea salt¼ t. freshly ground black pepper
Brine the Chicken:
For best results (with moist chicken and crispy skin) brine the chicken the day before, and allow the skin to air-dry in the refrig-erator. Here’s how:
Soak chicken in salted water (¼ C. sea salt per 4 cups water) for one hour. Remove chicken pieces from salt water, dry with paper towels, and place on a grid rack set inside a baking sheet.
Put the whole array (uncovered) in the refrigerator overnight, to allow the skin to dehydrate.
Preheat oven to 400°F.
Combine honey, mustard, ghee, curry powder, salt and pepper in a small bowl. Set the chicken pieces on a cooking rack set inside a roasting pan. Brush chicken pieces all over with the mustard glaze. Add filtered water to the bottom of the roasting pan so the drippings won’t burn.
Bake until the chicken is golden on the outside and no longer pink in the center, to an internal temp of 160°F (about 35 to 40 minutes) Remove from oven and tent with foil for 5 minutes. Serve.
Save the drippings to make Chicken “Noodle” Soup, p. 61.
©2016 The BrainFood Cookbook by Angela Taylor

Pecan Encrusted SalmonServes 4
GAPS patients may find it beneficial to endeavor to kill any parasites that may be present. Methods to try:1) freeze the fish to a temperature of -4°F for at least 7 days2) use a “Hulda Clark” style parasite zapper on the raw fish (photo p. 69)
Avoid farmed salmon - it contains red food dye, is fed an un-natural unhealthy feed, and breeds sea lice which is decimating the wild salmon population. Unless the fish case specifically says “Wild Salmon” it is farmed - so don’t buy it!
4 (6-oz.) wild salmon fillets sea saltfreshly ground black pepper 2 T. ghee 2 T. dijon mustard sauce - mix together at least an hour before1½ T. honey2 C. coarsely chopped soaked/sprouted/dehydrated pecans1 T. fresh parsley, snipped fine
At least one hour before: Melt ghee in a pan or in oven. Stir in mustard and honey. Put sauce in refrigerator to thicken. (otherwise it will run right off your fish when you apply it)
(But if you are pressed for time, and not as concerned about presentation tonight, just stir all together: melted ghee, mustard, honey and pecans. Then immediately spread atop your fish.)
Preheat oven to 400°F. Move oven rack to lower-middle position. Place salmon skin-side down on lightly greased baking sheet. Sprinkle salmon with salt and pepper. Coat top of salmon with ghee/mustard/honey sauce.
In small bowl, mix together chopped pecans and chopped parsley. Sprinkle on top of sauce and press in to make it stick. Mound any nuts that fall off around edges of fish. Bake on lower-middle oven rack (so pecans don’t burn) for 10-12 minutes, or until internal temp reaches 135°F. Sprinkle with pars-ley and serve immediately.
©2016 The BrainFood Cookbook by Angela Taylor
]

Pan Seared Filet Mignonwith Steakhouse Seasoning Rub
4 Filet Mignons
Steakhouse Seasoning Rub:5 t. salt4 t. paprika2 t. black pepper1 t. onion powder1 t. garlic powder1 t. cayenne pepper½ t. coriander½ t. turmeric
Remove filets from refrigerator and allow the temperature to rise naturally. If they are tied, leave twine intact during cooking.
Preheat oven to 450°F.
Heat large cast iron skillet on medium-high heat. Melt some ghee in the pan.
Combine ingredients for steakhouse rub, and place in an old spice bottle with shaker top. Shake rub on each side of steak and press in with your fingers. Sear one side of steak in hot pan for 2-3 minutes. Flip steaks over, insert oven safe temperature probe, and place hot pan in oven. Continue to cook steaks in oven until internal temperature reaches:
Rare: 120°FMedium-Rare: 125°FMedium: 135°FMedium-Well: 145°FWell-Done: 155°F
Transfer tenderloin to cutting board and tent with foil for 5-10 minutes - the internal temperature will continue to rise.
Untent filets, remove twine with scissors, and serve.
©2016 The BrainFood Cookbook by Angela Taylor

BBQ Chicken Breasts4 chicken breasts¼ C. sea saltgheeBBQ sauce (see p. 150)
Brine the chicken by soaking chicken in salted water (¼ C. sea salt per 4 C. filtered water) for one hour. Preheat grill on high.
Remove chicken pieces from salt water, dry with paper towels.
Use your fingers on the surface of chicken breasts to apply a thin coat of ghee.
Scrape grill clean with a grill brush.
Grill on medium (for about 5 minutes per side) until the internal temp reads 160°F.
Remove chicken from grill and put on a clean plate. Tent (cover plate tightly) with foil for 5-10 minutes to allow the juices to evenly distribute through the meat. Now is a great time to steam any accompanying vegetables.
Brush with BBQ sauce and serve.
©2016 The BrainFood Cookbook by Angela Taylor
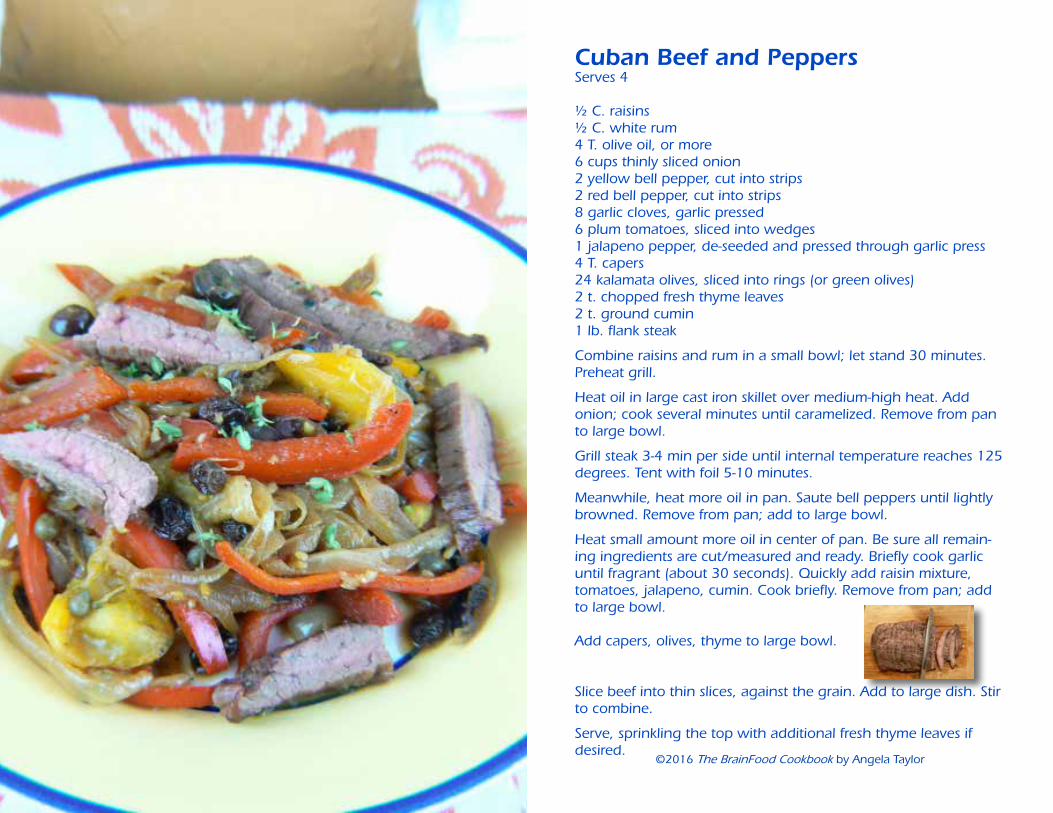
Cuban Beef and PeppersServes 4
½ C. raisins½ C. white rum4 T. olive oil, or more6 cups thinly sliced onion2 yellow bell pepper, cut into strips2 red bell pepper, cut into strips8 garlic cloves, garlic pressed6 plum tomatoes, sliced into wedges1 jalapeno pepper, de-seeded and pressed through garlic press4 T. capers24 kalamata olives, sliced into rings (or green olives)2 t. chopped fresh thyme leaves2 t. ground cumin1 lb. flank steak
Combine raisins and rum in a small bowl; let stand 30 minutes.Preheat grill.
Heat oil in large cast iron skillet over medium-high heat. Add onion; cook several minutes until caramelized. Remove from pan to large bowl.
Grill steak 3-4 min per side until internal temperature reaches 125 degrees. Tent with foil 5-10 minutes.
Meanwhile, heat more oil in pan. Saute bell peppers until lightly browned. Remove from pan; add to large bowl.
Heat small amount more oil in center of pan. Be sure all remain-ing ingredients are cut/measured and ready. Briefly cook garlic until fragrant (about 30 seconds). Quickly add raisin mixture, tomatoes, jalapeno, cumin. Cook briefly. Remove from pan; add to large bowl.
Add capers, olives, thyme to large bowl.
Slice beef into thin slices, against the grain. Add to large dish. Stir to combine.
Serve, sprinkling the top with additional fresh thyme leaves if desired.
©2016 The BrainFood Cookbook by Angela Taylor

Stuffed Bell PeppersServes 4 as a light main dish
1 T. sea salt4 medium bell peppers (about 6 oz each) halved and de-seeded2 medium carrots, grated1½ T. olive oil1 medium onion, chopped (about 1 C.)12 oz. ground beef3 medium cloves garlic, pressed14 oz. diced tomatoes, drained2 T. chopped fresh flat-leaf parsley leaves freshly ground black pepperabout ¼ C. ketchup
Bring 4 quarts water to boil in large stockpot or Dutch oven over high heat. Add 1 T. salt and bell peppers. Cook until peppers just begin to soften, about 3 minutes. Using slotted spoon, remove peppers from pot, drain on a rack.
Adjust oven rack to middle position and heat oven to 350° F.
Meanwhile, heat 12-inch heavy-bottomed skillet over medium-high heat until hot, about 1½ minutes; add oil and swirl to coat. Cook onion and carrot, stirring occasionally, until softened and beginning to brown, about 5 minutes. Add ground beef and cook, breaking beef into small pieces with spoon, until no longer pink, about 4 minutes. Clear the center of the pan and add a small amount of olive oil. Add garlic and cook until fragrant, about 30 seconds. Stir to combine.
Transfer mixture to bowl; stir in tomatoes, parsley, and salt and pepper to taste.
Place peppers cut-side up in 13X9-inch glass baking dish. Use a large spoon to divide filling evenly among peppers. Spoon ketchup over each filled pepper. Bake until filling is heated through, perhaps 25 to 30 minutes. After cooking, top with additional chopped parsley if desired.
©2016 The BrainFood Cookbook by Angela Taylor

Zucchini Noodles with Roasted TomatoesServes 2
Any type of tomatoes will work, but cherry tomatoes are my favorite.If your garlic has started to sprout (has green shoots) discard it and get some new garlic. Sprouted garlic is very bitter.
2 lb. cherry tomatoes3-4 cloves garlic, minced through garlic press2 T. olive oil1 t. Sea salt ½ t. freshly ground black pepper2 lb. zucchiniFresh herbs for topping pasta, such as basil or oregano
Preheat oven to 425°F.
Add garlic, olive oil, sea salt and pepper to bowl and mix well. Cut cherry tomatoes in half and add to bowl. Stir to coat with oil mixture. Place on baking sheet in a single layer and roast for 20 minutes.
Meanwhile, peel zucchini. Cut into spaghetti noodles with a spiralizer slicer. Avoid using the seeds.
To warm zucchini noodles:Option 1: Warm covered in dehydrator at 115° to preserve raw enzymes.orOption 2: Heat a large skillet with a bit of olive oil. Saute for about 2 minutes.
Place noodles on plates. Top with roasted tomatoes and chopped fresh herbs.
©2016 The BrainFood Cookbook by Angela Taylor
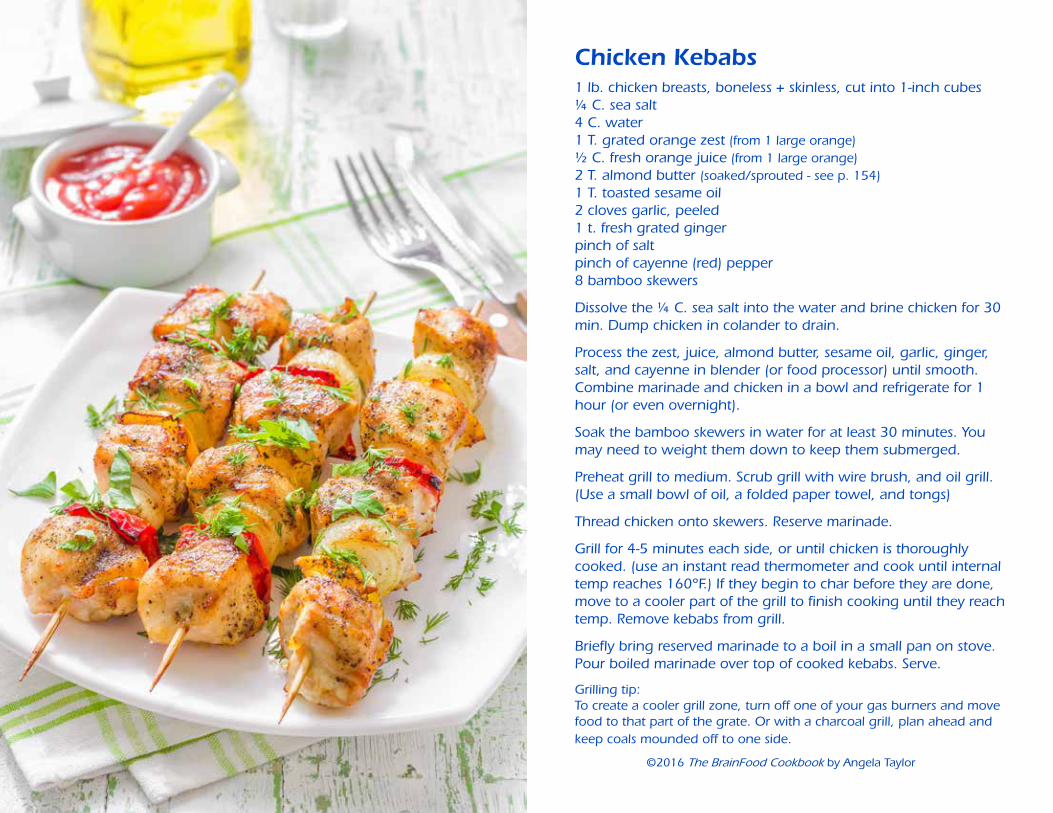
Chicken Kebabs1 lb. chicken breasts, boneless + skinless, cut into 1-inch cubes¼ C. sea salt4 C. water1 T. grated orange zest (from 1 large orange)½ C. fresh orange juice (from 1 large orange)2 T. almond butter (soaked/sprouted - see p. 154)1 T. toasted sesame oil2 cloves garlic, peeled1 t. fresh grated gingerpinch of saltpinch of cayenne (red) pepper8 bamboo skewers
Dissolve the ¼ C. sea salt into the water and brine chicken for 30 min. Dump chicken in colander to drain.
Process the zest, juice, almond butter, sesame oil, garlic, ginger, salt, and cayenne in blender (or food processor) until smooth.Combine marinade and chicken in a bowl and refrigerate for 1 hour (or even overnight).
Soak the bamboo skewers in water for at least 30 minutes. You may need to weight them down to keep them submerged.
Preheat grill to medium. Scrub grill with wire brush, and oil grill. (Use a small bowl of oil, a folded paper towel, and tongs)
Thread chicken onto skewers. Reserve marinade.
Grill for 4-5 minutes each side, or until chicken is thoroughly cooked. (use an instant read thermometer and cook until internal temp reaches 160°F.) If they begin to char before they are done, move to a cooler part of the grill to finish cooking until they reach temp. Remove kebabs from grill.
Briefly bring reserved marinade to a boil in a small pan on stove. Pour boiled marinade over top of cooked kebabs. Serve.
Grilling tip:To create a cooler grill zone, turn off one of your gas burners and move food to that part of the grate. Or with a charcoal grill, plan ahead and keep coals mounded off to one side.
©2016 The BrainFood Cookbook by Angela Taylor
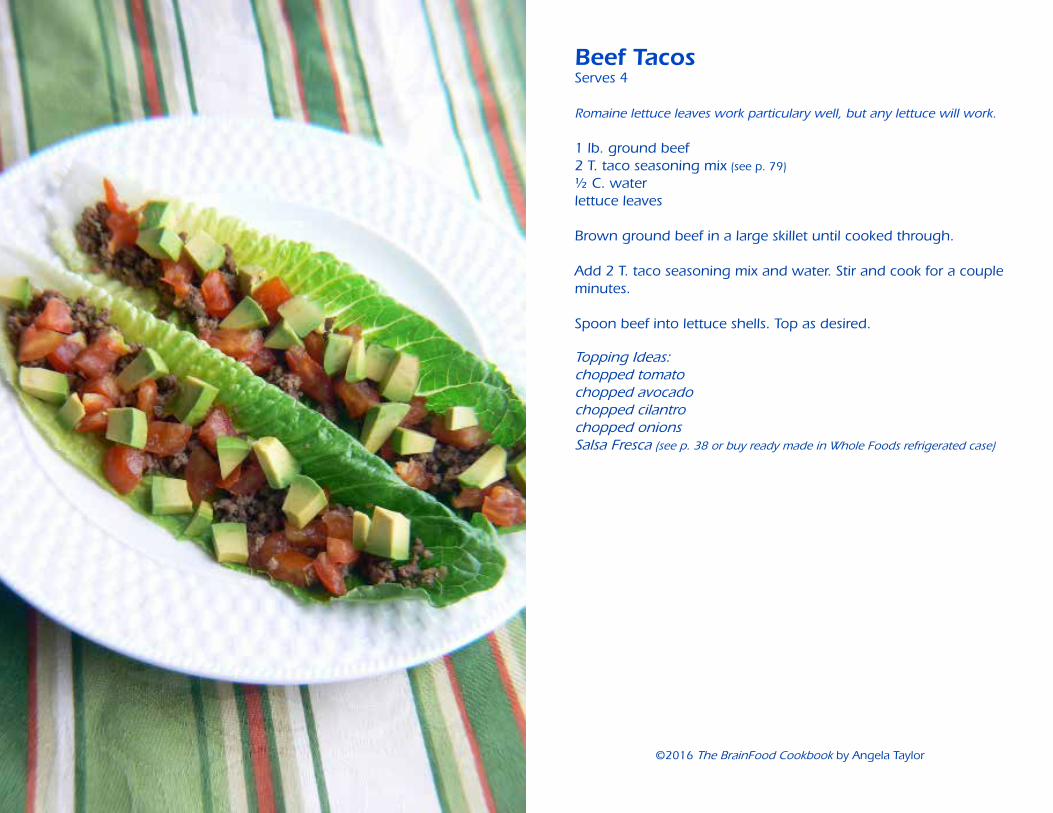
Beef TacosServes 4
Romaine lettuce leaves work particulary well, but any lettuce will work.
1 lb. ground beef 2 T. taco seasoning mix (see p. 79)
½ C. waterlettuce leaves
Brown ground beef in a large skillet until cooked through.
Add 2 T. taco seasoning mix and water. Stir and cook for a couple minutes. Spoon beef into lettuce shells. Top as desired.
Topping Ideas: chopped tomatochopped avocadochopped cilantrochopped onionsSalsa Fresca (see p. 38 or buy ready made in Whole Foods refrigerated case)
©2016 The BrainFood Cookbook by Angela Taylor

Taco Seasoning Mixmakes 6 “packages” (about 2 T. each) of mix ¼ C. dried minced onion2 T. chili powder2 t. paprika2 t. dried red pepper flakes1½ t. dried oregano½ t. dried marjoram1 T. salt¼ t. ground black pepper1 T. dried minced garlic1 t. ground cumin
Combine all ingredients in a small bowl and blend thoroughly with wire whisk.
Spoon mixture into a tightly closed container and label as “Taco Seasoning Mix”. Store in a cool, dry place.
©2016 The BrainFood Cookbook by Angela Taylor

Turkey SandwichesPhoto #1:Our favorite turkey sandwich is made on cashew bread (p.128)
Photo #2:I invented the lettuce wrap version one day when we ran out of cashew bread. It’s also a good sandwich to take if your school prohibits tree nuts.
Ingredients:
sliced turkey deli meat (read labels carefully, or bake your own - see p. 81)
ripe red tomatoeslettuce leaves (a romaine leaf - folded in half - works best for #2)
spicy mustard (read labels carefully)
Spread bread (or lettuce leaf) lightly with mustard. Assemble sandwich and enjoy.
©2016 The BrainFood Cookbook by Angela Taylor
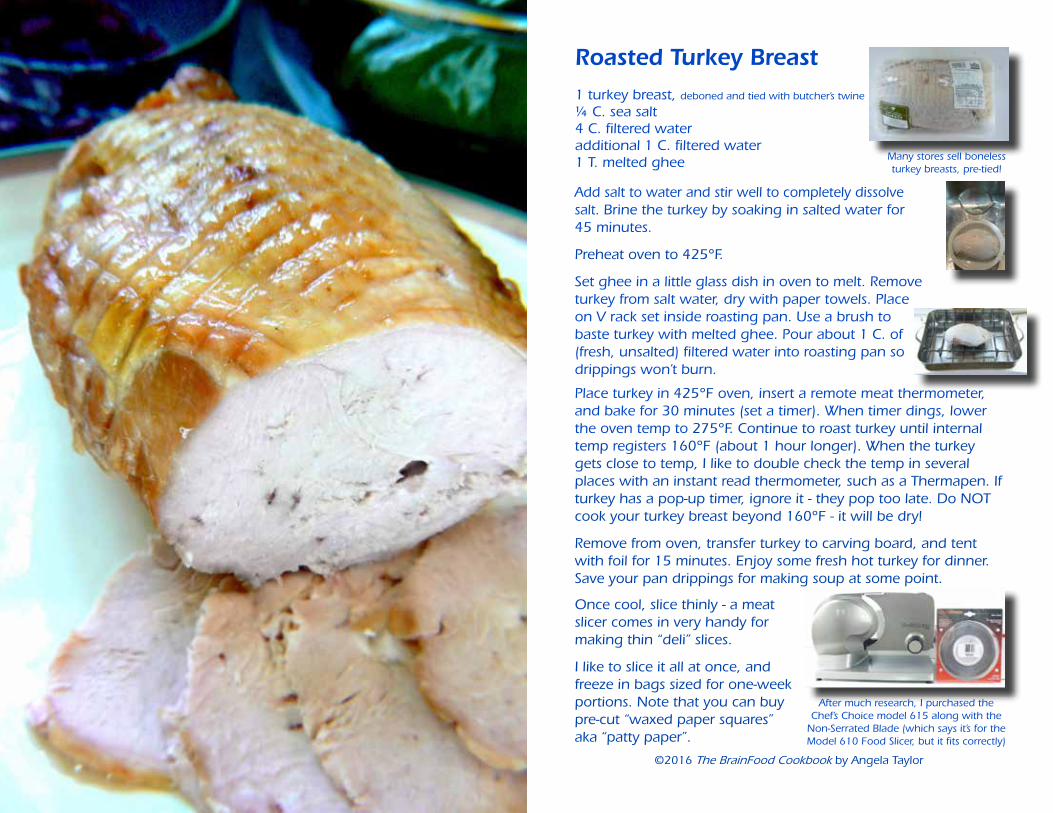
Roasted Turkey Breast1 turkey breast, deboned and tied with butcher’s twine
¼ C. sea salt4 C. filtered wateradditional 1 C. filtered water1 T. melted ghee Many stores sell boneless
turkey breasts, pre-tied!
Add salt to water and stir well to completely dissolve salt. Brine the turkey by soaking in salted water for 45 minutes.
Preheat oven to 425°F.
Set ghee in a little glass dish in oven to melt. Remove turkey from salt water, dry with paper towels. Place on V rack set inside roasting pan. Use a brush to baste turkey with melted ghee. Pour about 1 C. of (fresh, unsalted) filtered water into roasting pan so drippings won’t burn.
Place turkey in 425°F oven, insert a remote meat thermometer, and bake for 30 minutes (set a timer). When timer dings, lower the oven temp to 275°F. Continue to roast turkey until internal temp registers 160°F (about 1 hour longer). When the turkey gets close to temp, I like to double check the temp in several places with an instant read thermometer, such as a Thermapen. If turkey has a pop-up timer, ignore it - they pop too late. Do NOT cook your turkey breast beyond 160°F - it will be dry!
Remove from oven, transfer turkey to carving board, and tent with foil for 15 minutes. Enjoy some fresh hot turkey for dinner. Save your pan drippings for making soup at some point.
Once cool, slice thinly - a meat slicer comes in very handy for making thin “deli” slices.
I like to slice it all at once, and freeze in bags sized for one-week portions. Note that you can buy pre-cut “waxed paper squares” aka “patty paper”.
After much research, I purchased the Chef’s Choice model 615 along with the
Non-Serrated Blade (which says it’s for the Model 610 Food Slicer, but it fits correctly)
©2016 The BrainFood Cookbook by Angela Taylor
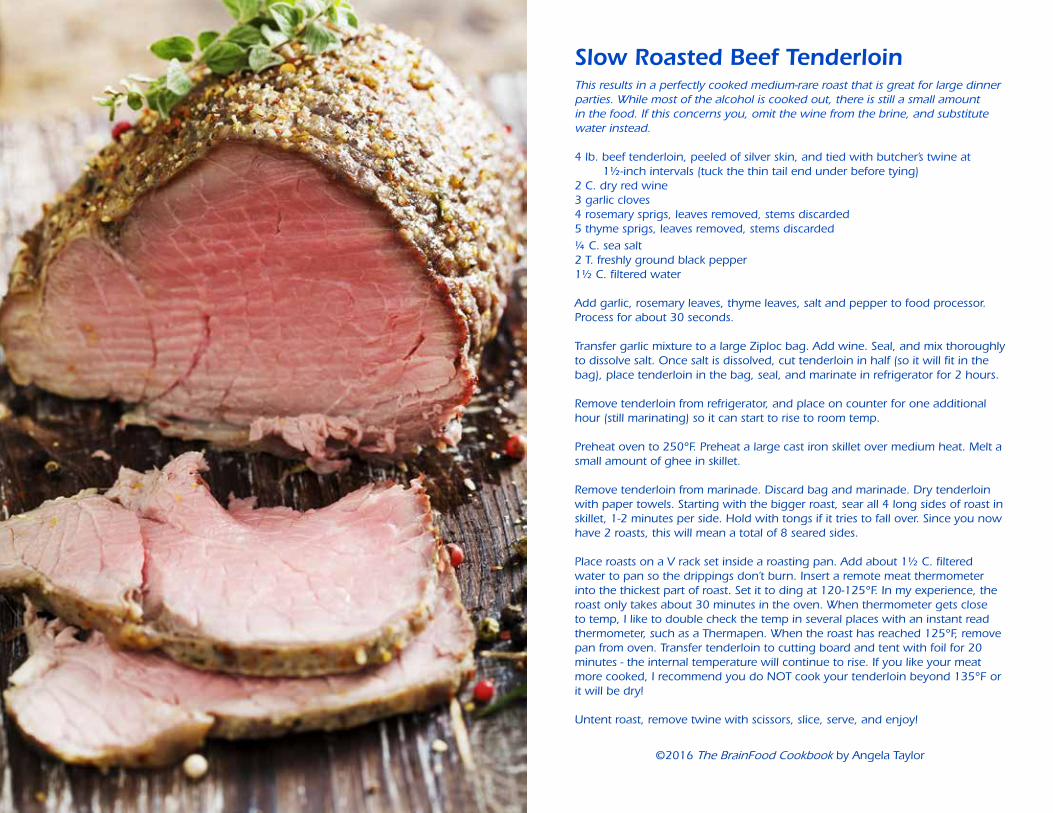
Slow Roasted Beef TenderloinThis results in a perfectly cooked medium-rare roast that is great for large dinner parties. While most of the alcohol is cooked out, there is still a small amount in the food. If this concerns you, omit the wine from the brine, and substitute water instead.
4 lb. beef tenderloin, peeled of silver skin, and tied with butcher’s twine at 1½-inch intervals (tuck the thin tail end under before tying)2 C. dry red wine3 garlic cloves4 rosemary sprigs, leaves removed, stems discarded5 thyme sprigs, leaves removed, stems discarded¼ C. sea salt2 T. freshly ground black pepper1½ C. filtered water
Add garlic, rosemary leaves, thyme leaves, salt and pepper to food processor. Process for about 30 seconds.
Transfer garlic mixture to a large Ziploc bag. Add wine. Seal, and mix thoroughly to dissolve salt. Once salt is dissolved, cut tenderloin in half (so it will fit in the bag), place tenderloin in the bag, seal, and marinate in refrigerator for 2 hours.
Remove tenderloin from refrigerator, and place on counter for one additional hour (still marinating) so it can start to rise to room temp.
Preheat oven to 250°F. Preheat a large cast iron skillet over medium heat. Melt a small amount of ghee in skillet.
Remove tenderloin from marinade. Discard bag and marinade. Dry tenderloin with paper towels. Starting with the bigger roast, sear all 4 long sides of roast in skillet, 1-2 minutes per side. Hold with tongs if it tries to fall over. Since you now have 2 roasts, this will mean a total of 8 seared sides.
Place roasts on a V rack set inside a roasting pan. Add about 1½ C. filtered water to pan so the drippings don’t burn. Insert a remote meat thermometer into the thickest part of roast. Set it to ding at 120-125°F. In my experience, the roast only takes about 30 minutes in the oven. When thermometer gets close to temp, I like to double check the temp in several places with an instant read thermometer, such as a Thermapen. When the roast has reached 125°F, remove pan from oven. Transfer tenderloin to cutting board and tent with foil for 20 minutes - the internal temperature will continue to rise. If you like your meat more cooked, I recommend you do NOT cook your tenderloin beyond 135°F or it will be dry! Untent roast, remove twine with scissors, slice, serve, and enjoy!
©2016 The BrainFood Cookbook by Angela Taylor
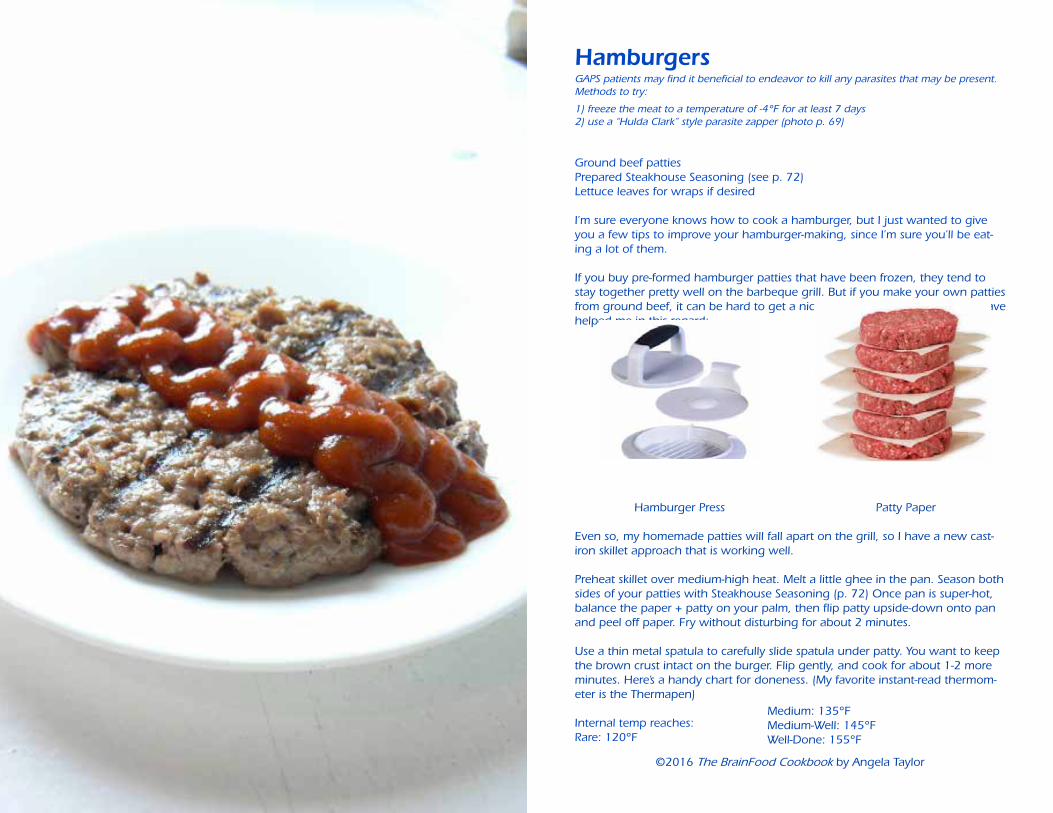
HamburgersGAPS patients may find it beneficial to endeavor to kill any parasites that may be present. Methods to try:
1) freeze the meat to a temperature of -4°F for at least 7 days2) use a “Hulda Clark” style parasite zapper (photo p. 69)
Ground beef pattiesPrepared Steakhouse Seasoning (see p. 72)Lettuce leaves for wraps if desired
I’m sure everyone knows how to cook a hamburger, but I just wanted to give you a few tips to improve your hamburger-making, since I’m sure you’ll be eat-ing a lot of them.
If you buy pre-formed hamburger patties that have been frozen, they tend to stay together pretty well on the barbeque grill. But if you make your own patties from ground beef, it can be hard to get a nice looking patty. Two tools that have helped me in this regard:
Hamburger Press Patty Paper
Even so, my homemade patties will fall apart on the grill, so I have a new cast-iron skillet approach that is working well.
Preheat skillet over medium-high heat. Melt a little ghee in the pan. Season both sides of your patties with Steakhouse Seasoning (p. 72) Once pan is super-hot, balance the paper + patty on your palm, then flip patty upside-down onto pan and peel off paper. Fry without disturbing for about 2 minutes.
Use a thin metal spatula to carefully slide spatula under patty. You want to keep the brown crust intact on the burger. Flip gently, and cook for about 1-2 more minutes. Here’s a handy chart for doneness. (My favorite instant-read thermom-eter is the Thermapen)
Internal temp reaches:Rare: 120°F
©2016 The BrainFood Cookbook by Angela Taylor
Medium: 135°FMedium-Well: 145°FWell-Done: 155°F
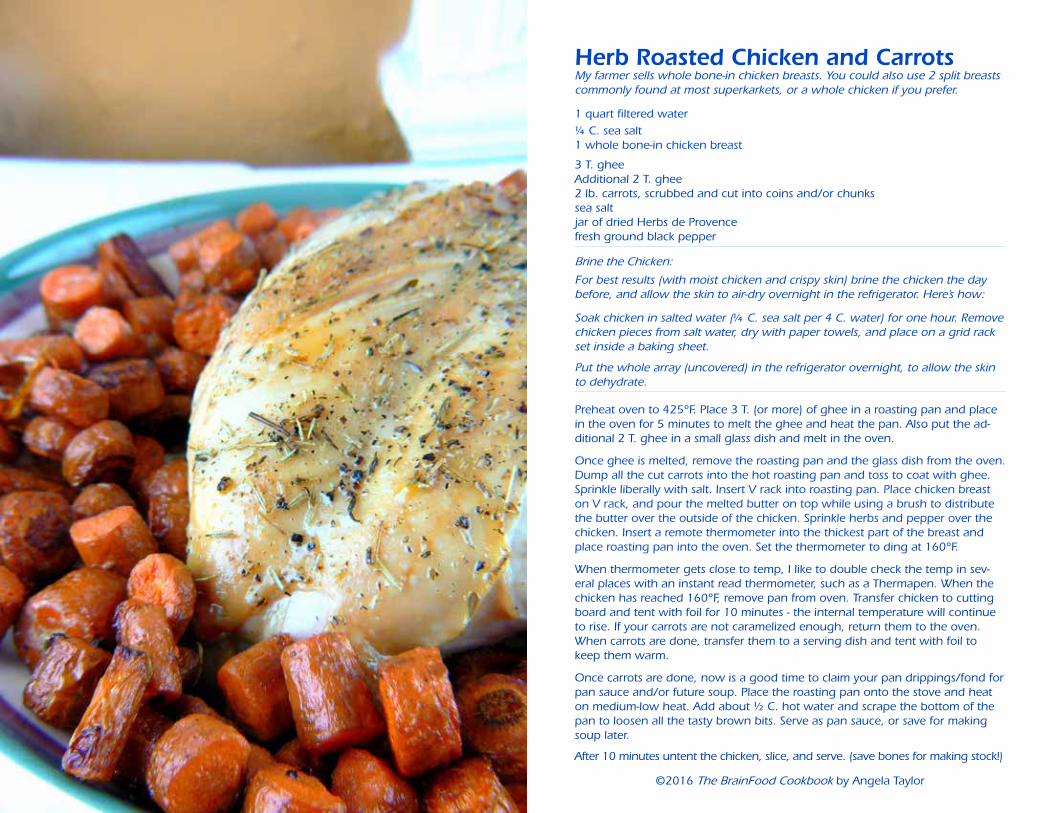
Herb Roasted Chicken and CarrotsMy farmer sells whole bone-in chicken breasts. You could also use 2 split breasts commonly found at most superkarkets, or a whole chicken if you prefer.
1 quart filtered water¼ C. sea salt1 whole bone-in chicken breast
3 T. gheeAdditional 2 T. ghee2 lb. carrots, scrubbed and cut into coins and/or chunkssea saltjar of dried Herbs de Provencefresh ground black pepper
Brine the Chicken:
For best results (with moist chicken and crispy skin) brine the chicken the day before, and allow the skin to air-dry overnight in the refrigerator. Here’s how:
Soak chicken in salted water (¼ C. sea salt per 4 C. water) for one hour. Remove chicken pieces from salt water, dry with paper towels, and place on a grid rack set inside a baking sheet.
Put the whole array (uncovered) in the refrigerator overnight, to allow the skin to dehydrate.
Preheat oven to 425°F. Place 3 T. (or more) of ghee in a roasting pan and place in the oven for 5 minutes to melt the ghee and heat the pan. Also put the ad-ditional 2 T. ghee in a small glass dish and melt in the oven.
Once ghee is melted, remove the roasting pan and the glass dish from the oven. Dump all the cut carrots into the hot roasting pan and toss to coat with ghee. Sprinkle liberally with salt. Insert V rack into roasting pan. Place chicken breast on V rack, and pour the melted butter on top while using a brush to distribute the butter over the outside of the chicken. Sprinkle herbs and pepper over the chicken. Insert a remote thermometer into the thickest part of the breast and place roasting pan into the oven. Set the thermometer to ding at 160°F.
When thermometer gets close to temp, I like to double check the temp in sev-eral places with an instant read thermometer, such as a Thermapen. When the chicken has reached 160°F, remove pan from oven. Transfer chicken to cutting board and tent with foil for 10 minutes - the internal temperature will continue to rise. If your carrots are not caramelized enough, return them to the oven. When carrots are done, transfer them to a serving dish and tent with foil to keep them warm.
Once carrots are done, now is a good time to claim your pan drippings/fond for pan sauce and/or future soup. Place the roasting pan onto the stove and heat on medium-low heat. Add about ½ C. hot water and scrape the bottom of the pan to loosen all the tasty brown bits. Serve as pan sauce, or save for making soup later.
After 10 minutes untent the chicken, slice, and serve. (save bones for making stock!)
©2016 The BrainFood Cookbook by Angela Taylor

BLT Sandwich
2 slices bacon (GAPS legal)2 slices cashew bread (see p. 128)
mayonnaise (see p. 148)1 lettuce leaf2 slices plum tomato
Preheat oven to 400°F. Adjust oven rack to middle-top position.
Place bacon on a baking sheet and bake in oven for 10-15 minutes, checking frequently. Remove slices as they are done and drain on paper towels.
Spread mayonnaise on bread. Top with bacon, lettuce and tomato slices. Cut in half and serve.
I use an electric knife to cut the sandwich in half, as the cashew bread is fragile.
©2016 The BrainFood Cookbook by Angela Taylor

sid
e d
ish
es
Carrot French Fries
Steamed “Veggie Magic”
Broccoli with Lemon-Infused Olive Oil
Roasted Brussels Sprouts
Roasted Beets
Quick Sautéed Greens
Cranberry Orange Relish
Cauliflower Couscous
Cauliflower “Mashed Potatoes”
Roasted Cauliflower
Roasted Asparagus
Roasted Spring Onions
Black Beans
Winter Squash Purée
Candied “Sweet Potato” Casserole
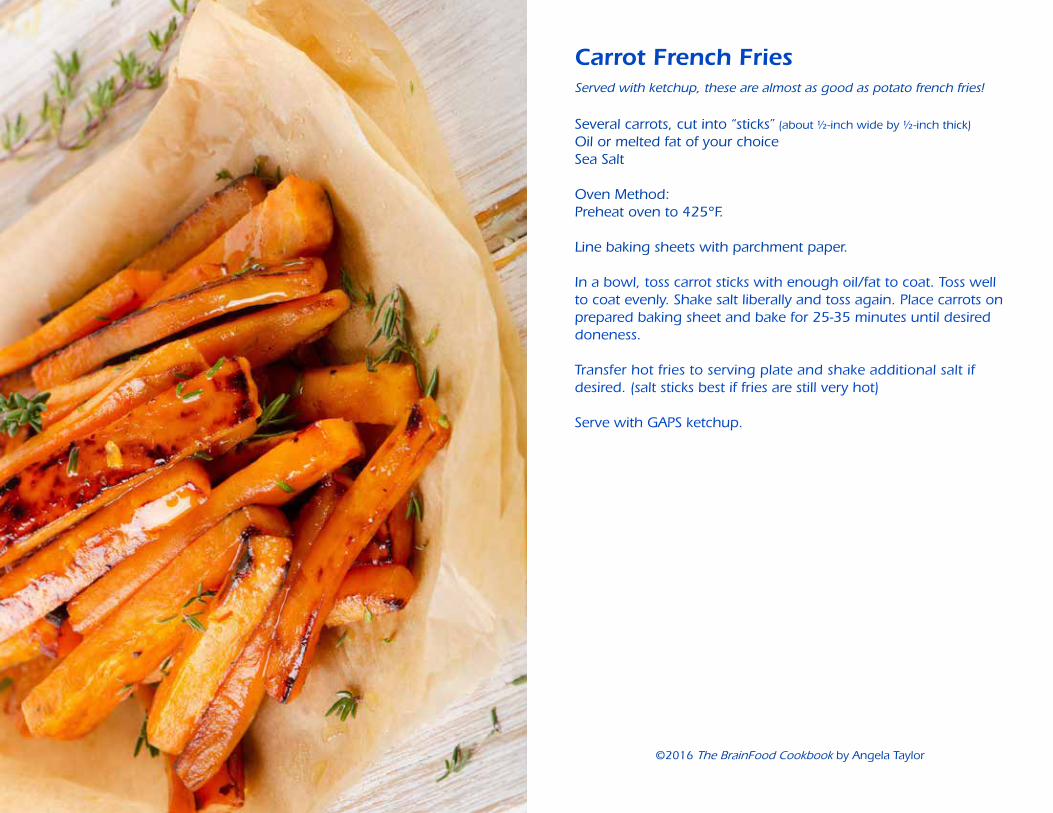
Carrot French FriesServed with ketchup, these are almost as good as potato french fries!
Several carrots, cut into “sticks” (about ½-inch wide by ½-inch thick)
Oil or melted fat of your choiceSea Salt
Oven Method:Preheat oven to 425°F.
Line baking sheets with parchment paper.
In a bowl, toss carrot sticks with enough oil/fat to coat. Toss well to coat evenly. Shake salt liberally and toss again. Place carrots on prepared baking sheet and bake for 25-35 minutes until desired doneness.
Transfer hot fries to serving plate and shake additional salt if desired. (salt sticks best if fries are still very hot)
Serve with GAPS ketchup.
©2016 The BrainFood Cookbook by Angela Taylor
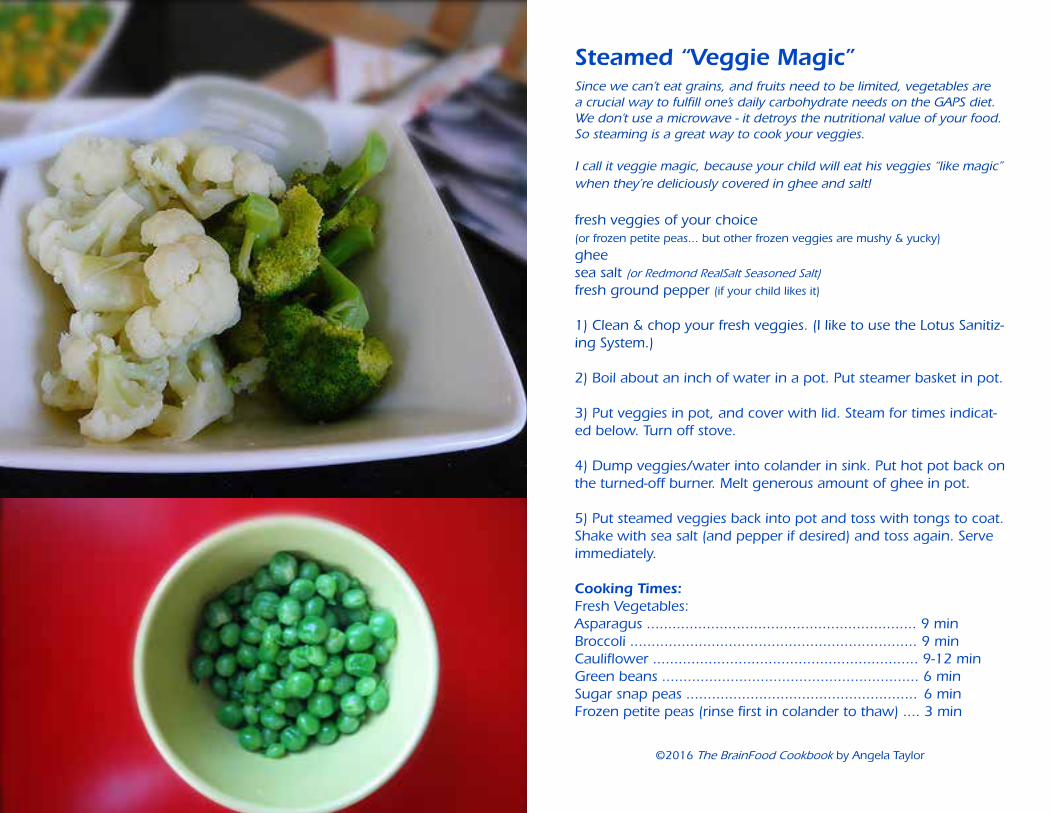
Steamed “Veggie Magic”Since we can’t eat grains, and fruits need to be limited, vegetables are a crucial way to fulfill one’s daily carbohydrate needs on the GAPS diet. We don’t use a microwave - it detroys the nutritional value of your food. So steaming is a great way to cook your veggies.
I call it veggie magic, because your child will eat his veggies “like magic” when they’re deliciously covered in ghee and salt!
fresh veggies of your choice (or frozen petite peas... but other frozen veggies are mushy & yucky)
gheesea salt (or Redmond RealSalt Seasoned Salt)fresh ground pepper (if your child likes it)
1) Clean & chop your fresh veggies. (I like to use the Lotus Sanitiz-ing System.)
2) Boil about an inch of water in a pot. Put steamer basket in pot.
3) Put veggies in pot, and cover with lid. Steam for times indicat-ed below. Turn off stove.
4) Dump veggies/water into colander in sink. Put hot pot back on the turned-off burner. Melt generous amount of ghee in pot.
5) Put steamed veggies back into pot and toss with tongs to coat. Shake with sea salt (and pepper if desired) and toss again. Serve immediately.
Cooking Times:Fresh Vegetables:Asparagus ............................................................... 9 minBroccoli ................................................................... 9 minCauliflower .............................................................. 9-12 minGreen beans ............................................................ 6 minSugar snap peas ...................................................... 6 minFrozen petite peas (rinse first in colander to thaw) .... 3 min
©2016 The BrainFood Cookbook by Angela Taylor

Broccoli with Lemon-Infused Olive OilIf you can’t tolerate ghee, this is a great way to get your kids to eat their veggies.
Figone’s was the first manufacturer in the USA to extract citrus olive oils using fresh zest. (Unlike many of the oils on the market that use citrus powders and citrus flavors.) Figone’s citrus olive oils are made by using fresh olives and then fresh zest of the citrus, milled together and then the natural oils of both the citrus and the olives are extracted at the exact same moment to obtain the best flavors.
You can try to make your own lemon-infused olive oil at home, but unless you have a commercial olive press (to press the citrus peel for oil), sadly, you will not get the same excellent taste.
fresh broccoliFigone’s Meyer Lemon-Infused Olive Oil (www.figoneoliveoil.com)
sea saltfresh ground pepper (if your child likes it)
1) Clean & chop your fresh broccoli.
2) Boil about an inch of water in a pot. Put steamer basket in pot.
3) Put veggies in pot, and cover with lid. Steam for about 9 min-utes. Turn off stove.
4) Dump veggies/water into colander in sink.
5) Put steamed veggies into serving dish and drizzle with Lemon-infused oil, shake with sea salt (and pepper if desired). Serve im-mediately.
The lemon-infused olive oil also goes very well with steamed peas.
©2016 The BrainFood Cookbook by Angela Taylor
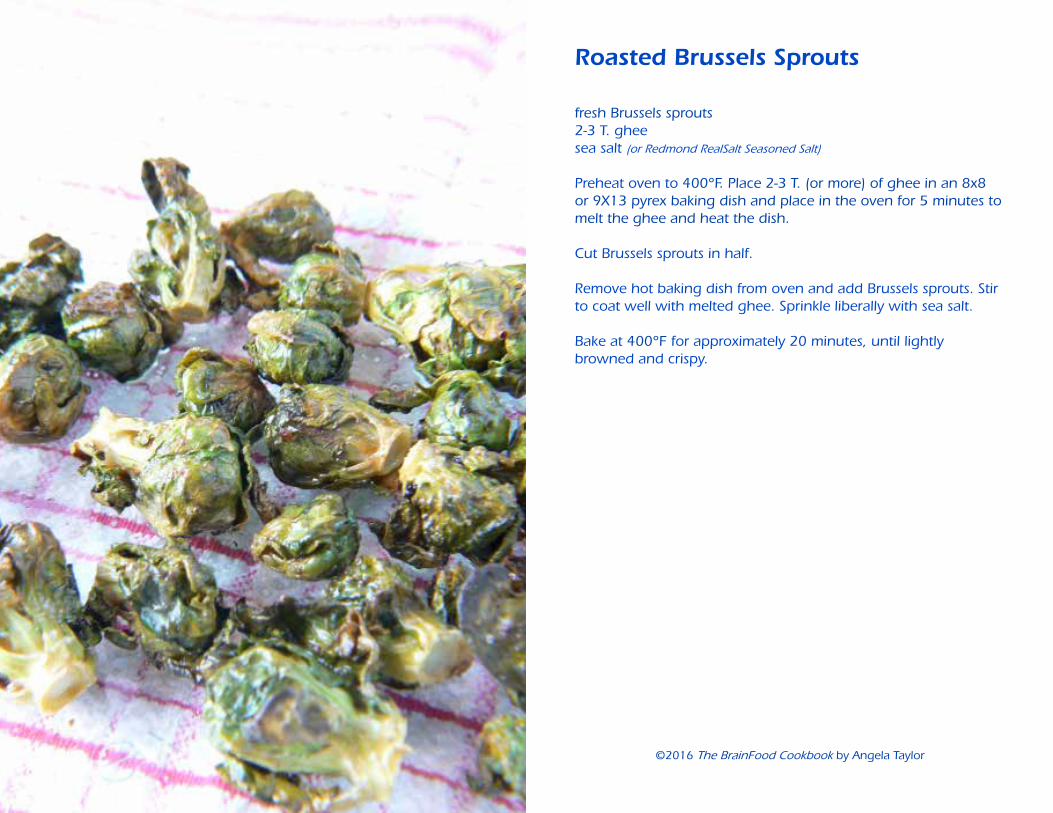
Roasted Brussels Sprouts
fresh Brussels sprouts2-3 T. gheesea salt (or Redmond RealSalt Seasoned Salt)
Preheat oven to 400°F. Place 2-3 T. (or more) of ghee in an 8x8 or 9X13 pyrex baking dish and place in the oven for 5 minutes to melt the ghee and heat the dish.
Cut Brussels sprouts in half.
Remove hot baking dish from oven and add Brussels sprouts. Stir to coat well with melted ghee. Sprinkle liberally with sea salt.
Bake at 400°F for approximately 20 minutes, until lightly browned and crispy.
©2016 The BrainFood Cookbook by Angela Taylor
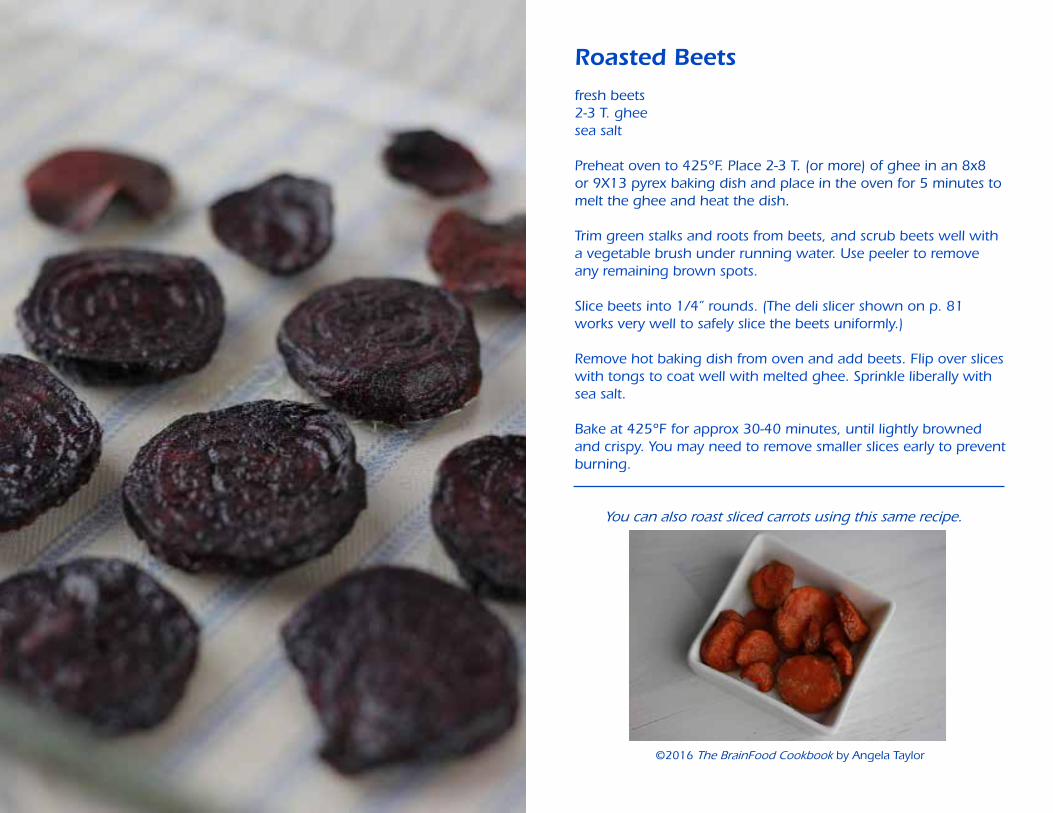
Roasted Beets
fresh beets2-3 T. gheesea salt
Preheat oven to 425°F. Place 2-3 T. (or more) of ghee in an 8x8 or 9X13 pyrex baking dish and place in the oven for 5 minutes to melt the ghee and heat the dish.
Trim green stalks and roots from beets, and scrub beets well with a vegetable brush under running water. Use peeler to remove any remaining brown spots.
Slice beets into 1/4” rounds. (The deli slicer shown on p. 81 works very well to safely slice the beets uniformly.)
Remove hot baking dish from oven and add beets. Flip over slices with tongs to coat well with melted ghee. Sprinkle liberally with sea salt.
Bake at 425°F for approx 30-40 minutes, until lightly browned and crispy. You may need to remove smaller slices early to prevent burning.
You can also roast sliced carrots using this same recipe.
©2016 The BrainFood Cookbook by Angela Taylor
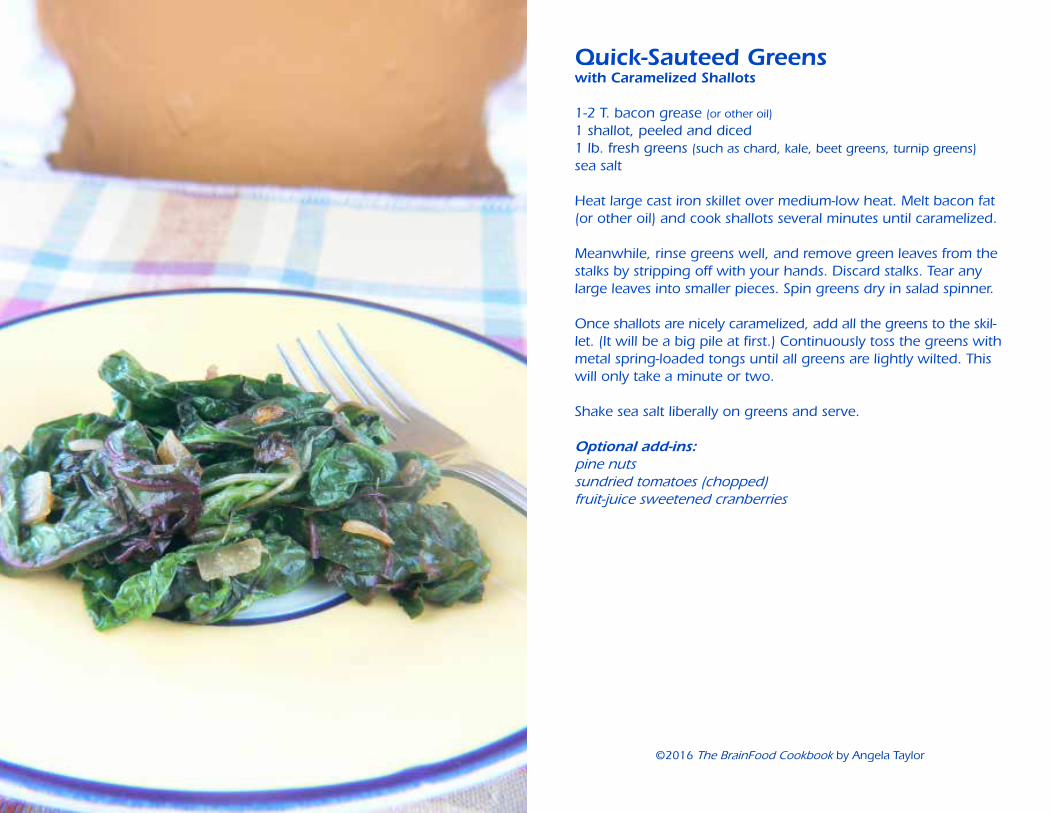
Quick-Sauteed Greens with Caramelized Shallots
1-2 T. bacon grease (or other oil)
1 shallot, peeled and diced1 lb. fresh greens (such as chard, kale, beet greens, turnip greens)sea salt
Heat large cast iron skillet over medium-low heat. Melt bacon fat (or other oil) and cook shallots several minutes until caramelized.
Meanwhile, rinse greens well, and remove green leaves from the stalks by stripping off with your hands. Discard stalks. Tear any large leaves into smaller pieces. Spin greens dry in salad spinner.
Once shallots are nicely caramelized, add all the greens to the skil-let. (It will be a big pile at first.) Continuously toss the greens with metal spring-loaded tongs until all greens are lightly wilted. This will only take a minute or two.
Shake sea salt liberally on greens and serve.
Optional add-ins:pine nutssundried tomatoes (chopped)fruit-juice sweetened cranberries
©2016 The BrainFood Cookbook by Angela Taylor

Cranberry-Orange RelishBe sure to buy an organic orange, and wash well before grating.The Microplane Zester is the best tool ever for zesting citrus.
¾ C. filtered waterScant 1 C. honey (I suggest a light/neutral honey, such as Tupelo)¼ t. sea saltGrated orange zest from 1 orange12 oz. bag cranberries (fresh or frozen)Orange juice from one orange
In small non-reactive saucepan (I use a glass Visions pot) combine water, honey, salt and orange zest. Heat to boiling.
Add cranberries, stir, and return to boil. Immediately reduce heat to medium, and cook for about 5 minutes, until most (or all) of the cranberries have popped. Remove from heat.
Once the relish reaches room temperature, stir in the orange juice.
Transfer to serving bowl, and refrigerate until serving time.
©2016 The BrainFood Cookbook by Angela Taylor
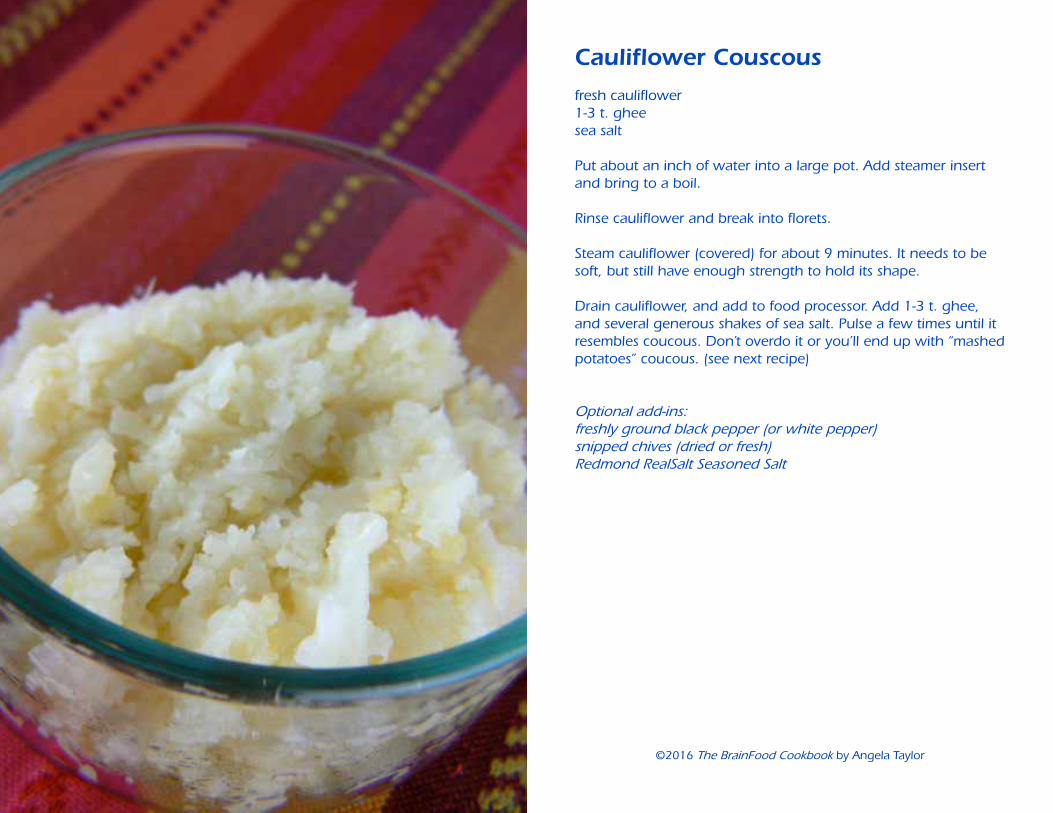
Cauliflower Couscous
fresh cauliflower1-3 t. gheesea salt
Put about an inch of water into a large pot. Add steamer insert and bring to a boil.
Rinse cauliflower and break into florets.
Steam cauliflower (covered) for about 9 minutes. It needs to be soft, but still have enough strength to hold its shape.
Drain cauliflower, and add to food processor. Add 1-3 t. ghee, and several generous shakes of sea salt. Pulse a few times until it resembles coucous. Don’t overdo it or you’ll end up with “mashed potatoes” coucous. (see next recipe)
Optional add-ins:freshly ground black pepper (or white pepper)snipped chives (dried or fresh)Redmond RealSalt Seasoned Salt
©2016 The BrainFood Cookbook by Angela Taylor
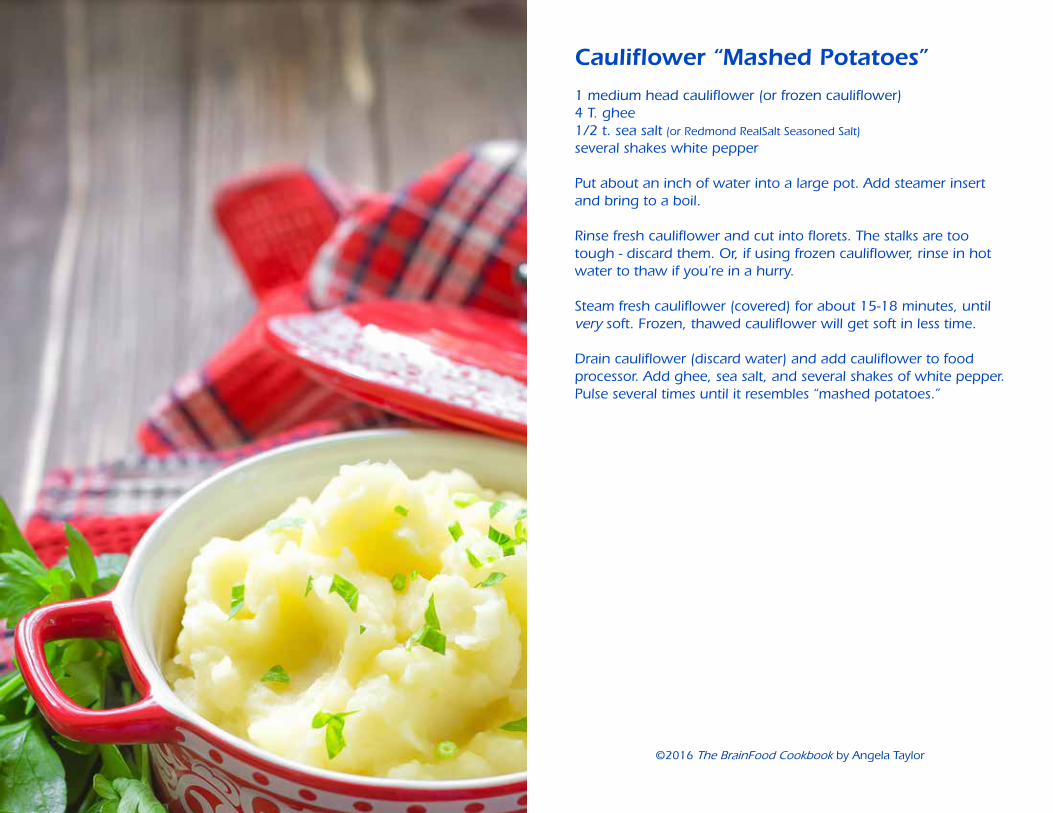
Cauliflower “Mashed Potatoes”
1 medium head cauliflower (or frozen cauliflower)4 T. ghee1/2 t. sea salt (or Redmond RealSalt Seasoned Salt)
several shakes white pepper
Put about an inch of water into a large pot. Add steamer insert and bring to a boil.
Rinse fresh cauliflower and cut into florets. The stalks are too tough - discard them. Or, if using frozen cauliflower, rinse in hot water to thaw if you’re in a hurry.
Steam fresh cauliflower (covered) for about 15-18 minutes, until very soft. Frozen, thawed cauliflower will get soft in less time.
Drain cauliflower (discard water) and add cauliflower to food processor. Add ghee, sea salt, and several shakes of white pepper. Pulse several times until it resembles “mashed potatoes.”
©2016 The BrainFood Cookbook by Angela Taylor

Roasted Cauliflower
fresh cauliflower1-3 T. gheesea salt
Preheat oven to 400°F. Place 1-3 T. (or more) of ghee in an 8x8 or 9X13 pyrex baking dish and place in the oven for 5 minutes to melt the ghee and heat the dish.
Trim cauliflower into golf ball-sized pieces.
Remove hot baking dish from oven and add cauliflower. Toss with tongs to coat well with melted ghee. Sprinkle liberally with sea salt.
Bake at 400°F for approx 30-40 minutes, stirring occasionally, until lightly browned and crispy. You may need to remove smaller pieces early to prevent burning.
©2016 The BrainFood Cookbook by Angela Taylor
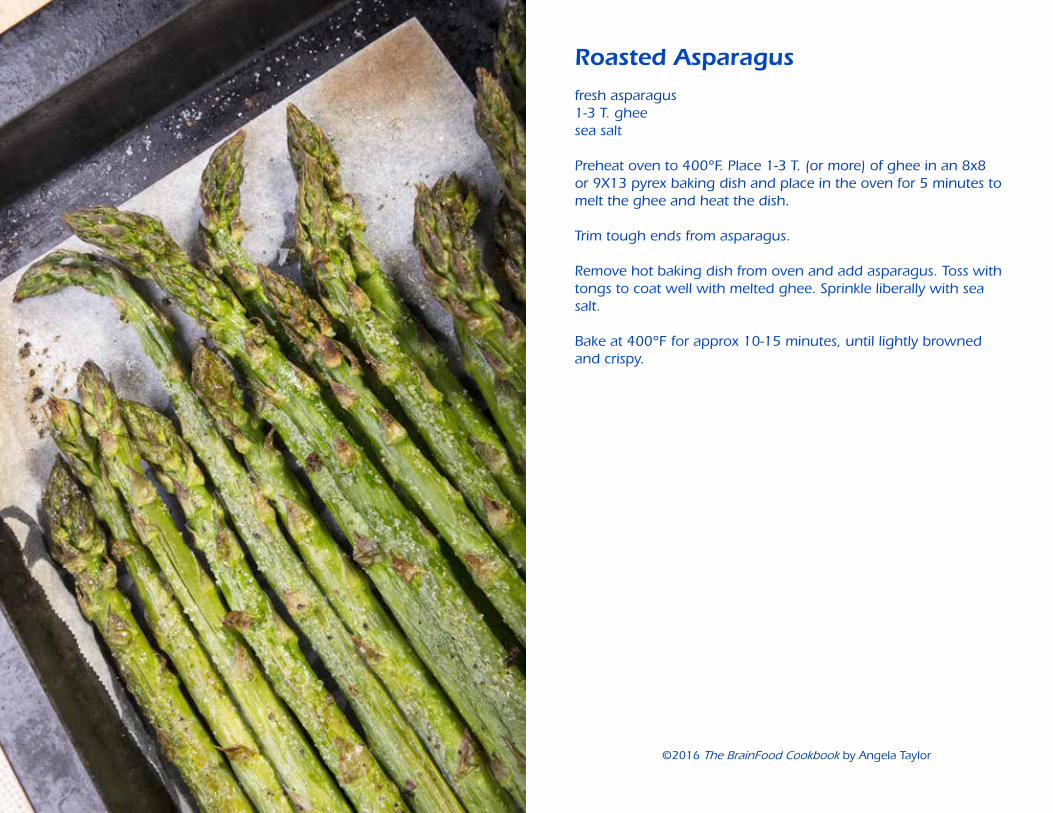
Roasted Asparagus
fresh asparagus1-3 T. gheesea salt
Preheat oven to 400°F. Place 1-3 T. (or more) of ghee in an 8x8 or 9X13 pyrex baking dish and place in the oven for 5 minutes to melt the ghee and heat the dish.
Trim tough ends from asparagus.
Remove hot baking dish from oven and add asparagus. Toss with tongs to coat well with melted ghee. Sprinkle liberally with sea salt.
Bake at 400°F for approx 10-15 minutes, until lightly browned and crispy.
©2016 The BrainFood Cookbook by Angela Taylor
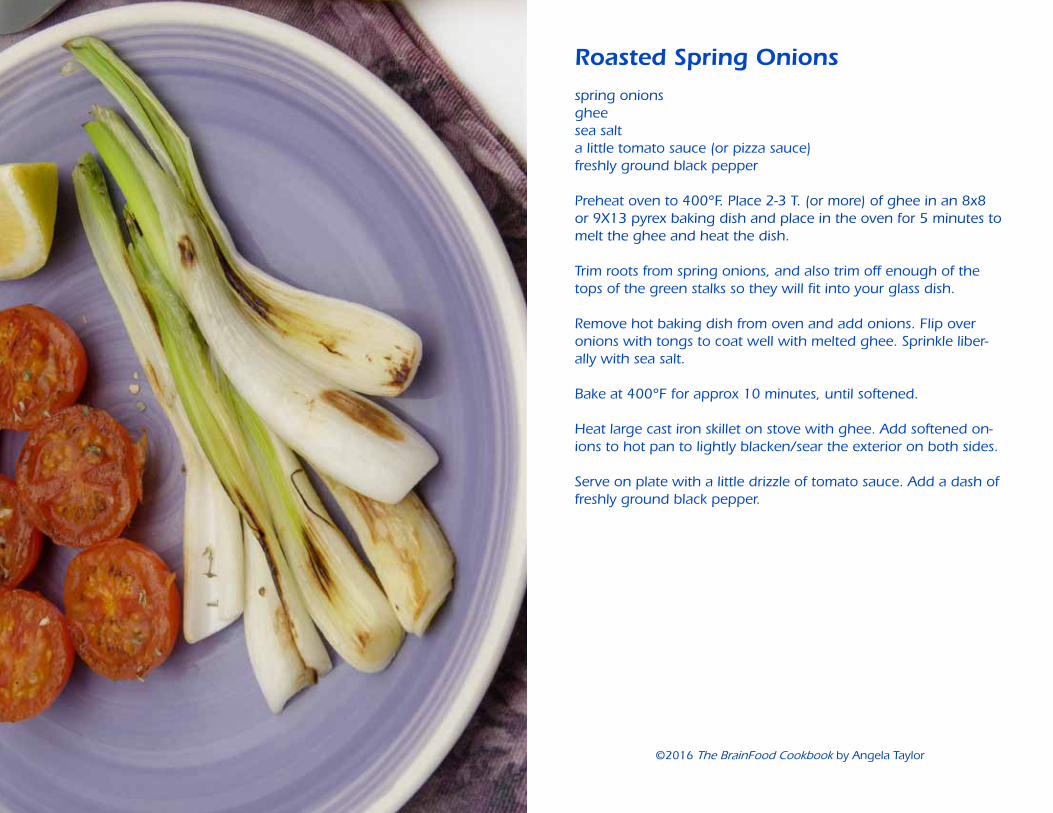
Roasted Spring Onions
spring onionsgheesea salta little tomato sauce (or pizza sauce)freshly ground black pepper
Preheat oven to 400°F. Place 2-3 T. (or more) of ghee in an 8x8 or 9X13 pyrex baking dish and place in the oven for 5 minutes to melt the ghee and heat the dish.
Trim roots from spring onions, and also trim off enough of the tops of the green stalks so they will fit into your glass dish.
Remove hot baking dish from oven and add onions. Flip over onions with tongs to coat well with melted ghee. Sprinkle liber-ally with sea salt.
Bake at 400°F for approx 10 minutes, until softened.
Heat large cast iron skillet on stove with ghee. Add softened on-ions to hot pan to lightly blacken/sear the exterior on both sides.
Serve on plate with a little drizzle of tomato sauce. Add a dash of freshly ground black pepper.
©2016 The BrainFood Cookbook by Angela Taylor

Digestible Black BeansI have always found beans difficult to digest. This freezer method helps make the beans more digestible, as it additionally breaks down the bean starch. Use your own judgement, and do not consume if they cause you digestive distress.
Black Bean preparation:• Soak 2 C. black beans in 2 qt. ceramic casserole or glass jar containing filtered water with about 1t. sea salt (and optional: a bit of whey.) Soak 8-24 hours. • Drain and rinse well in a colander.• Sprout for several hours (screw on sprouting lid, then set up-side-down jar in dish drainer).• Rinse well.• Add beans to crock pot; cover with plenty of filtered water.• Cook overnight.• Rinse well in colander.• Freeze beans.• Thaw when ready to continue.
1 onion, chopped2 cloves garlic, pressed1 t. cumin¼ t. dried red pepper flakes¼ C. tomato paste1 T. gluten free tamari soy sauce1 T. rice vinegarFrozen black beans, thawed1 chopped red or yellow bell pepper Heat large pot over medium heat. Add a little bacon grease or ghee, and sauté onion until nicely browned, about 10-14 minutes.
Add garlic, cumin, and red pepper flakes and stir for 30 seconds, until fragrant.
Add tomato paste, soy sauce and vinegar. Stir. Add beans, Stir. Cook until heated through.
Heat small fry pan over medium heat. Add a little bacon grease or ghee, and sauté bell pepper until lightly browned. Stir into beans and serve.
©2016 The BrainFood Cookbook by Angela Taylor
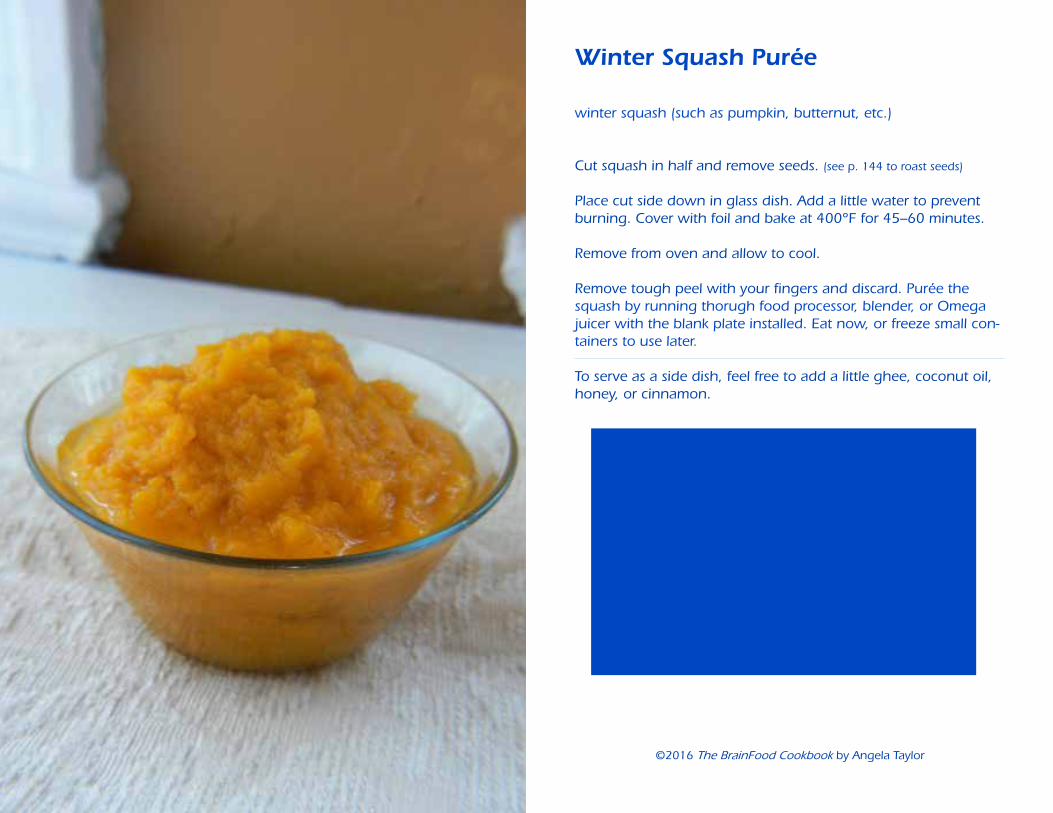
Winter Squash Purée
winter squash (such as pumpkin, butternut, etc.)
Cut squash in half and remove seeds. (see p. 144 to roast seeds)
Place cut side down in glass dish. Add a little water to prevent burning. Cover with foil and bake at 400°F for 45–60 minutes.
Remove from oven and allow to cool.
Remove tough peel with your fingers and discard. Purée the squash by running thorugh food processor, blender, or Omega juicer with the blank plate installed. Eat now, or freeze small con-tainers to use later.
To serve as a side dish, feel free to add a little ghee, coconut oil, honey, or cinnamon.
For use in recipes:
Fresh cooked pumpkin can be more watery than but-ternut squash. (so if you use butternut squash you won’t need to strain)But if using a watery pumpkin, I like to remove excess water by:
• holding a pot lid over the bowl and draining out excess water, or
• straining briefly in my Donvier yogurt cheese strainer
and then measure for the recipe.
©2016 The BrainFood Cookbook by Angela Taylor
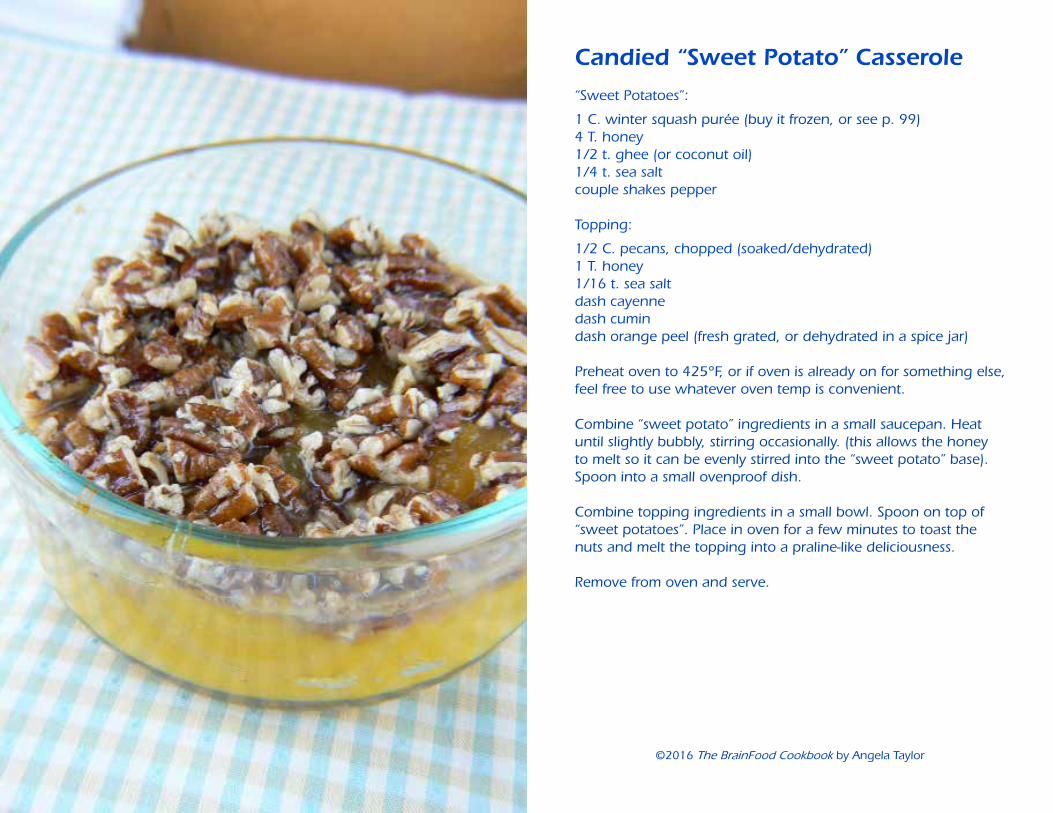
Candied “Sweet Potato” Casserole
“Sweet Potatoes”:
1 C. winter squash purée (buy it frozen, or see p. 99)4 T. honey1/2 t. ghee (or coconut oil)1/4 t. sea saltcouple shakes pepper
Topping:
1/2 C. pecans, chopped (soaked/dehydrated)1 T. honey1/16 t. sea saltdash cayennedash cumindash orange peel (fresh grated, or dehydrated in a spice jar)
Preheat oven to 425°F, or if oven is already on for something else, feel free to use whatever oven temp is convenient.
Combine “sweet potato” ingredients in a small saucepan. Heat until slightly bubbly, stirring occasionally. (this allows the honey to melt so it can be evenly stirred into the “sweet potato” base). Spoon into a small ovenproof dish.
Combine topping ingredients in a small bowl. Spoon on top of “sweet potatoes”. Place in oven for a few minutes to toast the nuts and melt the topping into a praline-like deliciousness.
Remove from oven and serve.
©2016 The BrainFood Cookbook by Angela Taylor

des
sert
s
Cinnamon Cookies
Little James’ Snack Cakes
Pecan Pie Bites
Nut Butter Brownies
Apple Pecan Cake with Cream Cheese Icing
Orange Cake
Applesauce (or Pearsauce)
Grilled Peaches
Lemon Lime Bars
Jam Thumbprint Cookies
Coconut Raisin Balls
Marshmallows
Fruit Leather Snack Bars
Madeleines
Strawberry Frozen Yogurt
Fruit Kabobs
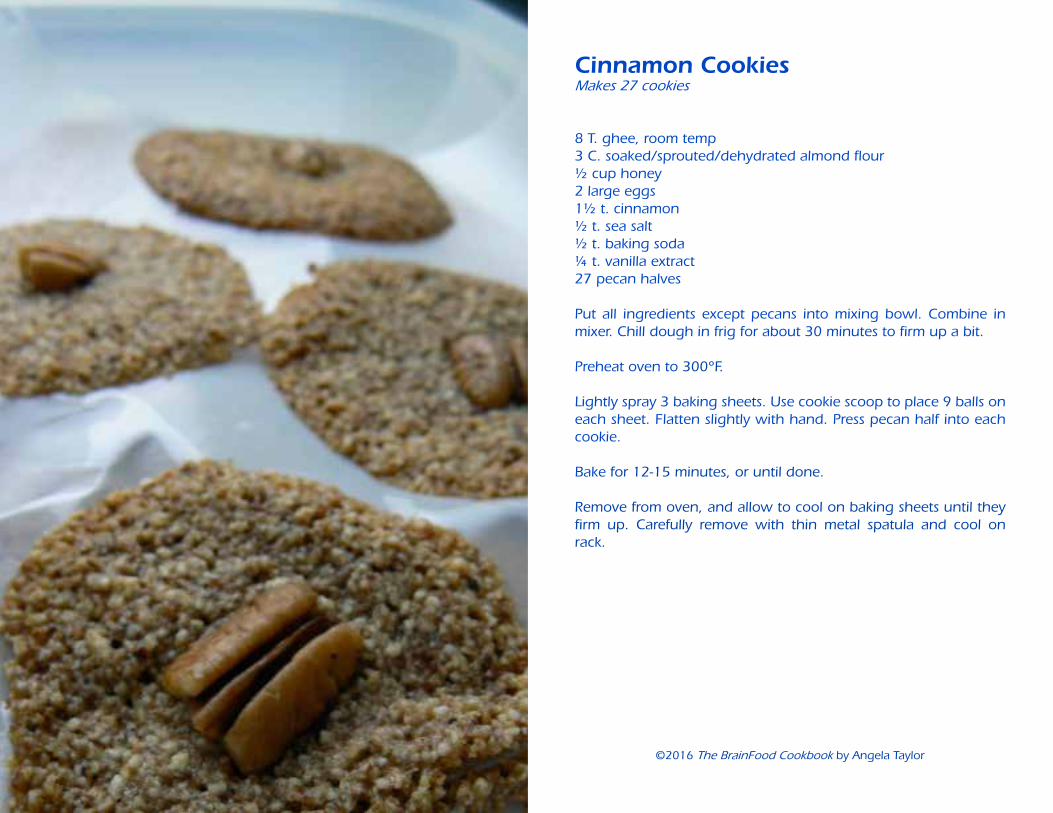
Cinnamon CookiesMakes 27 cookies
8 T. ghee, room temp3 C. soaked/sprouted/dehydrated almond flour½ cup honey2 large eggs1½ t. cinnamon½ t. sea salt½ t. baking soda¼ t. vanilla extract27 pecan halves
Put all ingredients except pecans into mixing bowl. Combine in mixer. Chill dough in frig for about 30 minutes to firm up a bit.
Preheat oven to 300°F.
Lightly spray 3 baking sheets. Use cookie scoop to place 9 balls on each sheet. Flatten slightly with hand. Press pecan half into each cookie.
Bake for 12-15 minutes, or until done.
Remove from oven, and allow to cool on baking sheets until they firm up. Carefully remove with thin metal spatula and cool on rack.
©2016 The BrainFood Cookbook by Angela Taylor
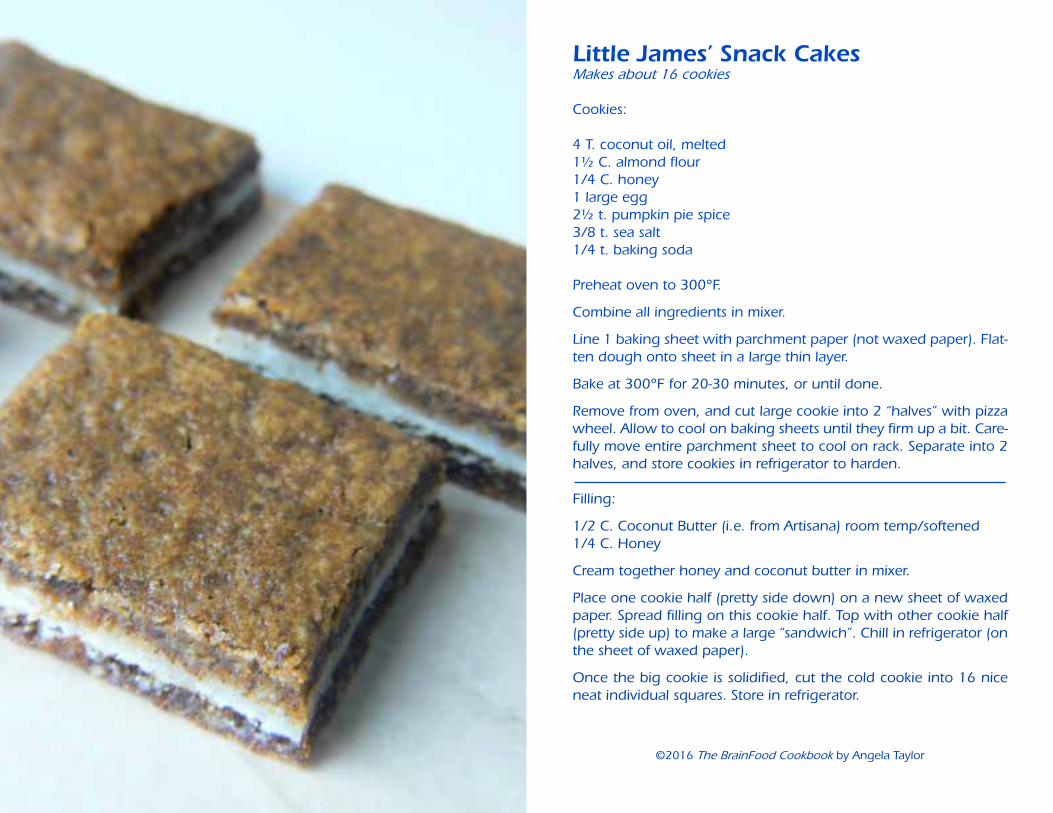
Little James’ Snack CakesMakes about 16 cookies
Cookies:
4 T. coconut oil, melted1½ C. almond flour1/4 C. honey1 large egg2½ t. pumpkin pie spice3/8 t. sea salt1/4 t. baking soda
Preheat oven to 300°F.
Combine all ingredients in mixer.
Line 1 baking sheet with parchment paper (not waxed paper). Flat-ten dough onto sheet in a large thin layer.
Bake at 300°F for 20-30 minutes, or until done.
Remove from oven, and cut large cookie into 2 “halves” with pizza wheel. Allow to cool on baking sheets until they firm up a bit. Care-fully move entire parchment sheet to cool on rack. Separate into 2 halves, and store cookies in refrigerator to harden.
Filling:
1/2 C. Coconut Butter (i.e. from Artisana) room temp/softened1/4 C. Honey
Cream together honey and coconut butter in mixer.
Place one cookie half (pretty side down) on a new sheet of waxed paper. Spread filling on this cookie half. Top with other cookie half (pretty side up) to make a large “sandwich”. Chill in refrigerator (on the sheet of waxed paper).
Once the big cookie is solidified, cut the cold cookie into 16 nice neat individual squares. Store in refrigerator.
©2016 The BrainFood Cookbook by Angela Taylor

Pecan Pie BitesMakes 25 squares
1 C. almond flour (or 1 1/3 C. soaked/sprouted/dehydrated almonds)2½ C. soaked/dehydrated pecans4 T. ghee1/3 C. honey2 eggs1 T. vanilla extract1/4 t. sea salt
Preheat oven to 300°F.
In bowl of a stand mixer, beat together ghee, honey, eggs, vanilla, and salt.
If using whole almonds, place in food processor and process until ground into a fine flour. Add almond flour to mixer bowl.
Place pecans in food processor and briefly pulse into medium-sized pieces. Add to mixer bowl. Mix until combined.
Spray an 8X8 glass baking dish. Pour in batter and spread evenly.
Bake at 300°F for 25-35 minutes.
Cool and cut into squares.
©2016 The BrainFood Cookbook by Angela Taylor

Nut Butter BrowniesMakes 25 1-inch squares
Originally I used to make these with almond butter — but soaked & sprouted almond butter is expensive and hard to find. I’ve now modified the recipe so that any kind of nut can be used.
These brownies are fairly thin. If you want thicker brownies, dou-ble the recipe and increase the baking time.
If you haven’t got squash purée on hand, you can substitute frozen butternut squash chunks (thawed), bananas, or applesauce.
½ C. ripe winter squash purée (buy it frozen, or see p. 99)1 egg1 T. coconut oil, melted in oven¼ t. salt½ t. baking soda¼ C. honey1 heaping C. soaked/sprouted/dehydrated nuts
Preheat oven to 350ºF.
Put everything in blender or food processor. Blend well, periodi-cally stopping and scraping sides.
Pour into sprayed 8 X 8 glass pan.
Bake at 350ºF for 28-35 minutes.
©2016 The BrainFood Cookbook by Angela Taylor

Apple Pecan Autumn CakeThe most delicious cake I have EVER eaten - Makes one 9 X 13 cake
3 C. soaked/sprouted/dehydrated ground pecan flour1/2 t. salt1 t. baking soda2 t. cinnamon1 t. nutmeg1/2 t. cloves4 jumbo eggs (or equivalent in smaller ones)1/3 C. coconut oil (melted in oven)2/3 C. honey3 C. grated apples (pears work as well)
Preheat oven to 300ºF.
Set a strainer over a bowl and put grated apples in strainer. Use spoon/spatula to press on apples until you have extracted 1/2 cup juice. Enjoy drinking that juice, then proceed.
Mix dry ingredients in a bowl with whisk.In mixer, beat together wet ingredients. Beat in apples.Add dry ingredients to mixer bowl and blend together.
Bake in a sprayed 9” X 13” glass pan for about 55 minutes or until firm.
Muffins: Alternately, this recipe will make 24 muffins. Bake for 25-35 minutes.
Round Layer Cake: Bake in 2 well-sprayed round cake pans for 40-45 minutes. For a nice neat icing job, freeze layers before spread-ing the icing.
Cream Cheese Icing1 C. raw yogurt cream cheese (see p. 130)6 T. ghee at room temp2 T. honey1 t. vanilla extract
Beat all ingredients together. Will frost a 9” X 13” cake thinly.(Double or triple the recipe for a round layer cake.)
©2016 The BrainFood Cookbook by Angela Taylor

Orange CakeMakes one round cake
Use organic oranges since you will be eating the entire peel.
2 organic oranges4 eggs½ C. honey1 T. ghee½ t. sea salt1 t. baking soda2 C. almond flour (or 2½ C. whole almonds)
Wash the oranges, rinse thoroughly, and boil them whole (peel and all) for 1½ hours, or until soft. Remove from water and cool for a few minutes until you can handle them.
Preheat oven to 325° F.
Cut oranges in half and discard seeds and stems. Place whole or-anges (peel and all) in a blender, and blend until smooth.
Process in eggs, honey, ghee, salt and baking soda until well blended. Add almond flour (or almonds) and blend well. You may need to scrape several times with spatula.
Pour batter into a well sprayed round cake pan.
Bake for 50-60 minutes, until a toothpick stuck in the center comes out clean. Cool pan on a cake rack.
Serve plain, or top with sliced strawberries and drizzle with yo-gurt.
©2016 The BrainFood Cookbook by Angela Taylor
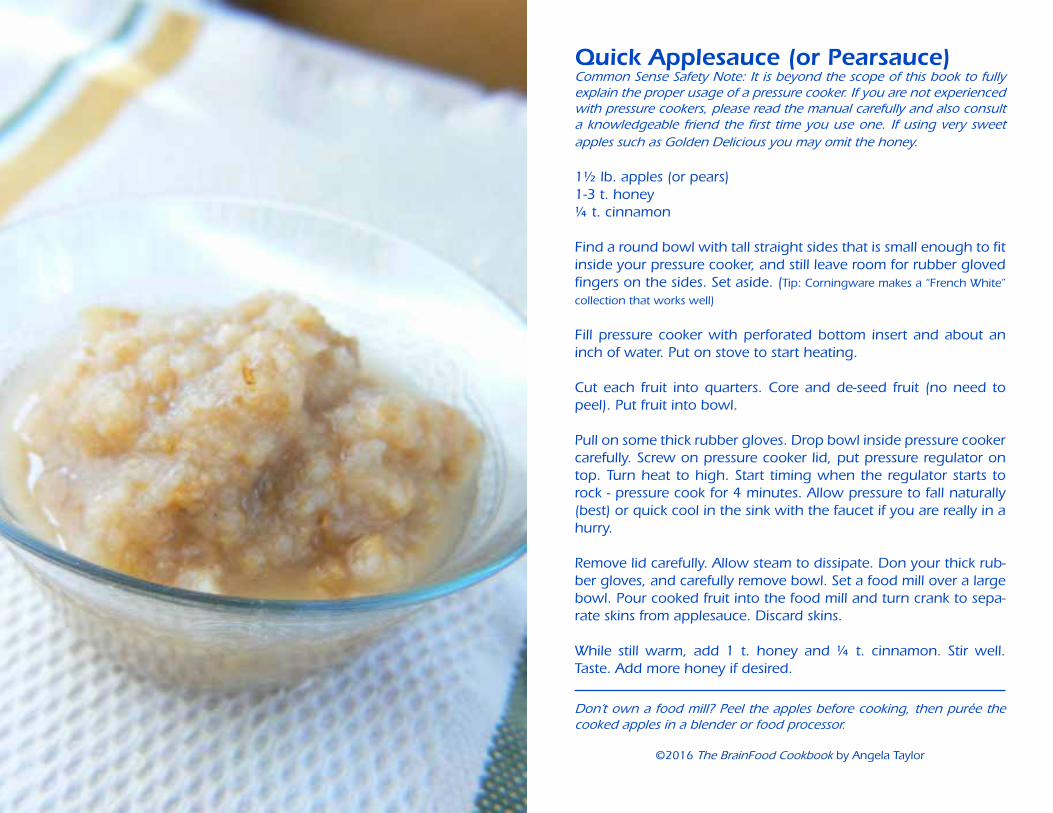
Quick Applesauce (or Pearsauce)Common Sense Safety Note: It is beyond the scope of this book to fully explain the proper usage of a pressure cooker. If you are not experienced with pressure cookers, please read the manual carefully and also consult a knowledgeable friend the first time you use one. If using very sweet apples such as Golden Delicious you may omit the honey.
1½ lb. apples (or pears)1-3 t. honey¼ t. cinnamon
Find a round bowl with tall straight sides that is small enough to fit inside your pressure cooker, and still leave room for rubber gloved fingers on the sides. Set aside. (Tip: Corningware makes a “French White”
collection that works well)
Fill pressure cooker with perforated bottom insert and about an inch of water. Put on stove to start heating.
Cut each fruit into quarters. Core and de-seed fruit (no need to peel). Put fruit into bowl.
Pull on some thick rubber gloves. Drop bowl inside pressure cooker carefully. Screw on pressure cooker lid, put pressure regulator on top. Turn heat to high. Start timing when the regulator starts to rock - pressure cook for 4 minutes. Allow pressure to fall naturally (best) or quick cool in the sink with the faucet if you are really in a hurry.
Remove lid carefully. Allow steam to dissipate. Don your thick rub-ber gloves, and carefully remove bowl. Set a food mill over a large bowl. Pour cooked fruit into the food mill and turn crank to sepa-rate skins from applesauce. Discard skins.
While still warm, add 1 t. honey and ¼ t. cinnamon. Stir well. Taste. Add more honey if desired.
Don’t own a food mill? Peel the apples before cooking, then purée the cooked apples in a blender or food processor.
©2016 The BrainFood Cookbook by Angela Taylor
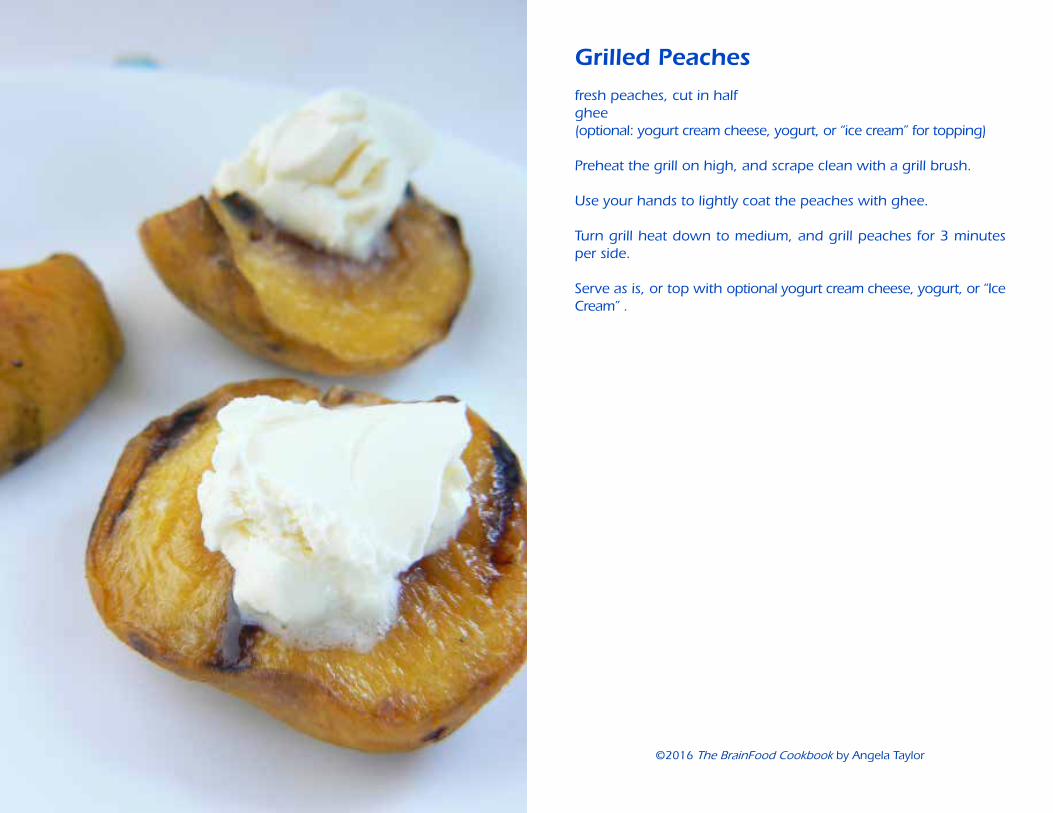
Grilled Peaches
fresh peaches, cut in halfghee(optional: yogurt cream cheese, yogurt, or “ice cream” for topping)
Preheat the grill on high, and scrape clean with a grill brush.
Use your hands to lightly coat the peaches with ghee.
Turn grill heat down to medium, and grill peaches for 3 minutes per side.
Serve as is, or top with optional yogurt cream cheese, yogurt, or “Ice Cream” .
©2016 The BrainFood Cookbook by Angela Taylor

Lemon Lime Bars (raw food enthusiasts take note - these are raw)
Makes 25 squares
Crust:6 dates (pitted)1 C. macadamia nuts1 C. soaked/sprouted/dehydrated pecans½ t. vanilla extract¼ t. sea salt
Filling:¼ C. lime juice (from about 2 limes)½ C. lemon juice (from 2 lemons)½ C. honey¼ C. coconut milk1 C. avocado (about 2 avocados)2 t. vanilla extract¼ t. sea salt½ C. coconut oil
Double check all dates for pits (discard if found). Grind dates in food processor until they become a paste. Add macadamias, pecans, vanilla, and sea salt.Pulse until crumbly.Press the mixture into the bottom of a glass 8 X 8 dish.
Combine all filling ingredients in blender until smooth. Pour on top of crust. Cover and place in freezer until ready to serve (at least 3 hours).
Keeps for a long time (at least a month) in the freezer.Can be served directly from the freezer as a frozen treat (my prefer-ence), or thawed for several minutes if you prefer.
©2016 The BrainFood Cookbook by Angela Taylor

Jam Thumbprint CookiesMakes 36 cookiesI like to soak/sprout/dehydrate some almonds, then grind thealmonds in my Omega (or food processor) to make almond flour.
2½ C. almond flour¼ C. dates½ C. ghee1 egg2 T. honey1 t. vanilla extract1 t. sea saltraspberry jam (fruit-juice sweetened)
Double check all dates for pits (discard if found). Grind dates in Omega (or food processor) to make date paste. In stand mixer bowl, combine date paste, almond flour, ghee, egg, honey, vanilla, and sea salt. Mix well.
Refrigerate dough for about one hour.
Preheat oven to 350°F.
Use a teaspoon to fill craters with jam.
Bake until light brown, about 20 minutes. Rotate cookie sheets halfway through to ensure even cooking. Remove carefully from cookie sheets with stiff metal spatula, and cool completely on cool-ing rack.
Use small cookie scoop to drop balls onto cookie sheets. Press flat with heel of hand, then make a large well in the center:a) with a Pampered Chef mini tart shaper. (faster and more uniform)
b) your thumb and forefinger. (it will look like a volcano crater)
©2016 The BrainFood Cookbook by Angela Taylor
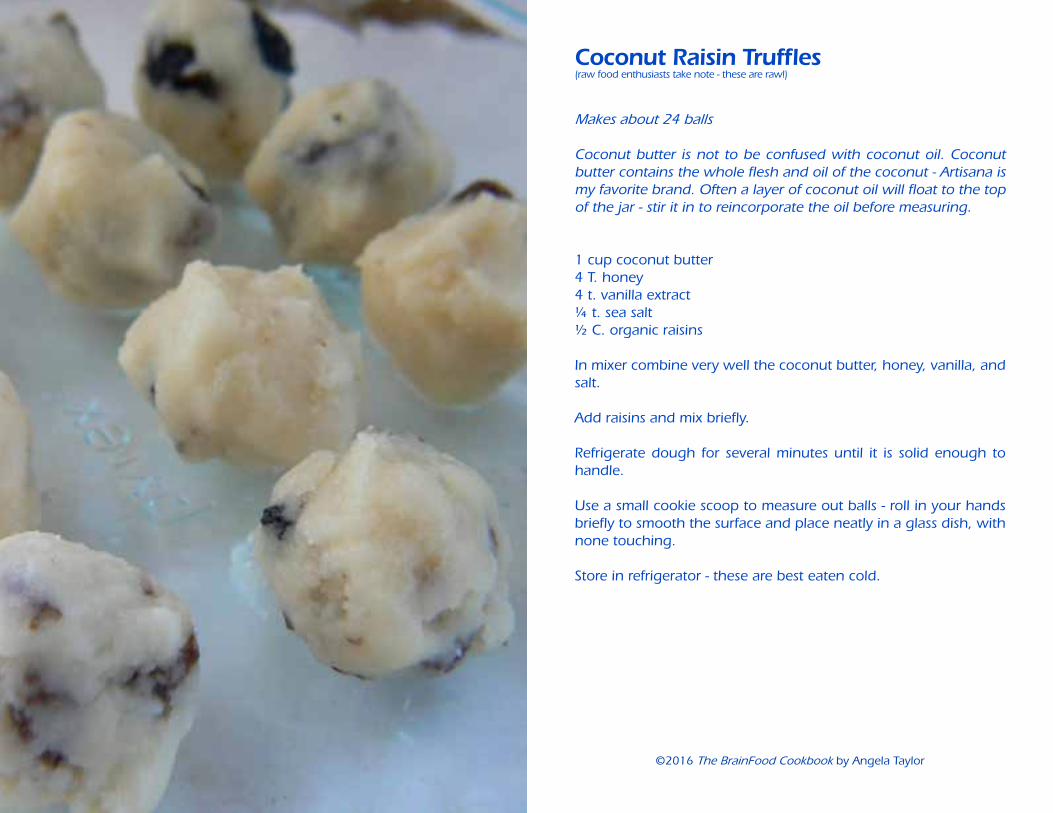
Coconut Raisin Truffles (raw food enthusiasts take note - these are raw!)
Makes about 24 balls
Coconut butter is not to be confused with coconut oil. Coconut butter contains the whole flesh and oil of the coconut - Artisana is my favorite brand. Often a layer of coconut oil will float to the top of the jar - stir it in to reincorporate the oil before measuring.
1 cup coconut butter4 T. honey4 t. vanilla extract¼ t. sea salt½ C. organic raisins
In mixer combine very well the coconut butter, honey, vanilla, and salt.
Add raisins and mix briefly.
Refrigerate dough for several minutes until it is solid enough to handle.
Use a small cookie scoop to measure out balls - roll in your hands briefly to smooth the surface and place neatly in a glass dish, with none touching.
Store in refrigerator - these are best eaten cold.
©2016 The BrainFood Cookbook by Angela Taylor

MarshmallowsNow your child won’t feel “left out” at campfires!Makes about 4 dozen jumbo marshmallows
3 packages unflavored gelatin1 C. cold filtered wateradditional ½ C. filtered water2 C. honey¼ t. sea salt2 t. vanilla extract
In stand mixer, combine gelatin with ½ C. cold water. Mix with whisk attachment. Scrape bottom of bowl if needed.
In large glass saucepan, combine the other ½ C. water, honey, and salt. Insert (or clip on) a thermometer. Cook over medium-high heat until temperature reaches 240°F. Immediately remove from heat.
Turn mixer on low speed and (while running) slowly pour hot hon-ey into gelatin bowl.
Once all the honey is added, increase mixer speed to high. Whip until the mixture is very thick and lukewarm, about 12-15 minutes. Add vanilla about a minute before turning off mixer.
Spray a glass 9 X 13 glass pan. Pour marshmallow batter into pan and spread evenly. (a greased spatula will help)
Allow marshmallows to sit uncovered for 4-8 hours.
Overturn pan, and use kitchen shears to cut into 1-inch squares.
Place in airtight container (preferably not allowing the marshmal-lows to touch each other) and store in freezer.
©2016 The BrainFood Cookbook by Angela Taylor

Fruit Leather Snack Bars(raw food enthusiasts take note - these are raw)
Makes 5 bars
1 pound ripe fruit (such as plums or pears)
Prepare a 7 X 5 inch glass dish by lining the bottom with a Teflex sheet, cut to fit.
Wash and roughly chop fruit. Remove seeds, pits and stems. Place raw fruit (peel and all) into blender and purée.
Pour fruit purée into glass dish. Dehydrate for several hours at 115°F.
You will find the top to be hard and dry, while underneath it is still wet. Flip dish over to remove fruit bars. Peel off Teflex to reveal the still-wet side.
Dehydrate (dry side down) for several more hours until desired chewiness is achieved.
Cut into bars and store in refrigerator or freezer.
©2016 The BrainFood Cookbook by Angela Taylor

MadeleinesMakes about 50 mini-madeleines
Be sure to buy mini-Madeleine tins for this recipe. I got stainless steel pans (tinned) from Williams Sonoma.
These will puff considerably in the oven, but will deflate as they cool.
8 T. melted ghee2 large eggs3/4 C. almond flour5 T. honey1/8 t. sea salt1/2 t. almond extractthe grated zest of one medium orange
Preheat oven to 350°F. Position an oven rack to the lower-middle rack. Set ghee in oven to melt. (Optional: Place a baking stone on this rack. I use an overturned stoneware cookie sheet as a large baking stone.)
Spray a madeleine pan with oil.
Place all ingredients in blender and turn on. Periodically scrape sides as needed.
Pour 1 t. batter into each madeleine mold.
Place pans in oven, sitting on surface of baking stone. (I can fit 2 madeleine pans in the oven atop one baking stone)
Bake 13-15 minutes until tester inserted into center of cookie comes out clean and sides have begun to brown. (Swap and rotate mad-eleine pans halfway through cooking time.)
Remove cookies from pan and cool on rack.
©2016 The BrainFood Cookbook by Angela Taylor

Strawberry Frozen YogurtOnly consume dairy if raw, fermented, and your mind/body tolerates it!
Plan ahead: most ice cream machines have a removable canister that must be frozen at least 12 hours before churning ice cream. To save time, I just store mine in the freezer so I’m ready whenever the mood strikes me to make ice cream.
2 cups extra creamy yogurt (see p. 33) or coconut milk3/4 C. honey (tupelo, or other light-bodied honey)10 oz. bag frozen organic strawberries (still frozen)1 t. fresh lemon juice1 t. vanilla extract1/8 t. sea salt
Put all ingredients in blender. Purée until well mixed, scraping sides of blender jar occasionally.
Pour contents of blender jar into prepared ice cream maker. Churn about 20 minutes. (It will resemble soft-serve ice cream)
Enjoy some soft-serve now, and transfer the rest to a freezer-safe container. Freeze.
This recipe is best enjoyed within a week after making it.
©2016 The BrainFood Cookbook by Angela Taylor
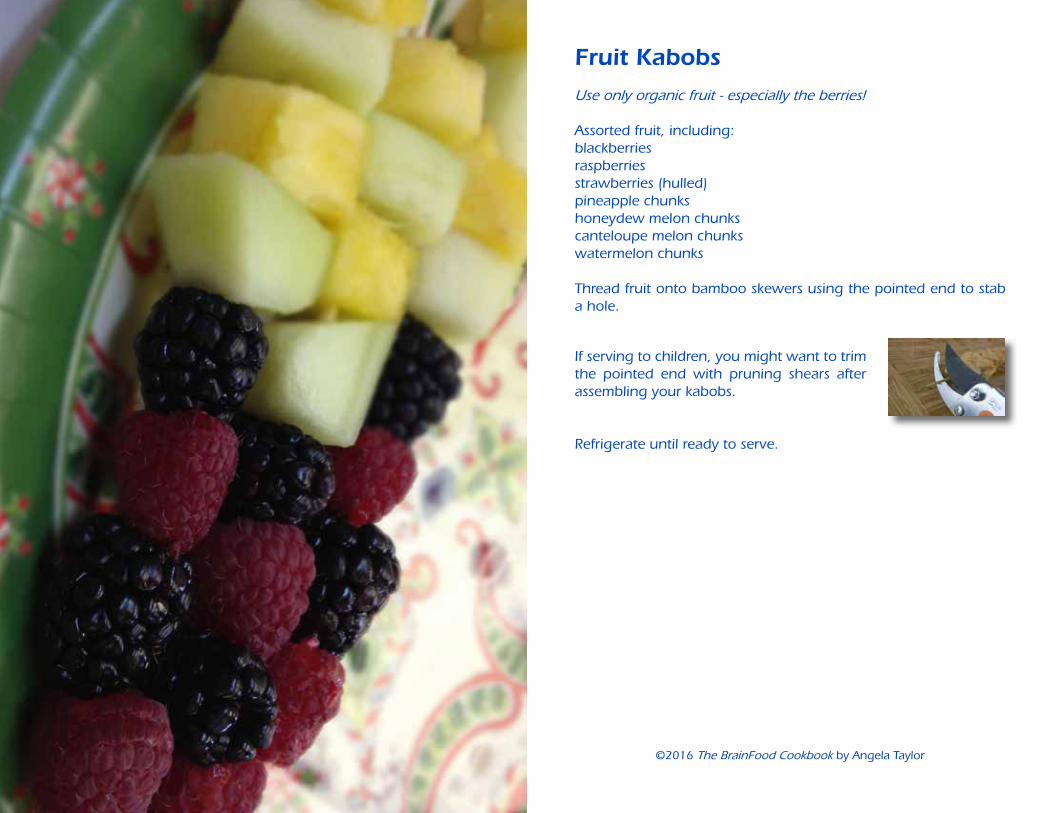
Fruit Kabobs
Use only organic fruit - especially the berries!
Assorted fruit, including:blackberriesraspberriesstrawberries (hulled)pineapple chunkshoneydew melon chunkscanteloupe melon chunks watermelon chunks
Thread fruit onto bamboo skewers using the pointed end to stab a hole.
If serving to children, you might want to trim the pointed end with pruning shears after assembling your kabobs.
Refrigerate until ready to serve.
©2016 The BrainFood Cookbook by Angela Taylor

bre
akfa
st a
nd
bru
nch
Kefir Smoothie
Asparagus Omelet
Pecan Waffles
Wild Blueberry Muffins
(Raw) Cranberry Granola
Almond Milk
Brazil Nut Vanilla Milk
Coconut Milk
Banana Silver Dollar Pancakes
Orange Almond Muffins
Cashew Bread
Carrot Pulp Bread
Yogurt Cream Cheese
Banana Apple Muffins
Sunflower Spice Muffins
Apple Cake
Cranberry-Orange Walnut Bread
Cashew Crepes
Pumpkin Harvest Muffins
Banana Walnut Muffins

Kefir Smoothieserves 1-2 people
Only consume dairy if raw, fermented, and your mind/body tolerates it!
We have safely consumed raw eggs for several years this way with no problems. I suggest using fresh local eggs from a trusted farmer (or your own backyard). To minimize salmonella risk we want truly free range chickens raised in spacious conditions. For maximum nutrition, the chicken’s diet should include lots of bugs and grass, and no soy feed. (FYI - Cocofeed is a great coconut-based, soy-free feed)
Raw eggs, if purchased unrefrigerated, will stay fresh on your counter for several weeks.
1 C. raw milk kefir (see p. 32)1 nicely spotted ripe banana, peeled, and pre-frozen1-2 t. raw honeyoptional: 1 probiotic capsule (you may want to omit if going to school and you notice it causes behavior problems)
2 raw eggs (from a trusted local farmer)
Put kefir in blender.Add frozen banana and honey. (optional: Twist open probiotic capsule and
add powder to blender.)
Cover with lid.Start blender and leave running.
Meanwhile, crack 2 eggs into 2 glasses. Smell for freshness and discard any eggs which smell “bad.” Remove any bits of shell. Now combine the 2 eggs into one glass. Through hole in lid, dump into running blender and immediately turn off (allowing eggs to blend for a mere second or two). Serve.
Why turn off the blender immediately after adding the eggs?Raw eggs are very good for you, especially if their fragile proteins are intact (so, not blended/beaten hard). But to me, goopy strings of raw eggs are “gross” to drink, so this ever-so-brief blending is my best com-promise.
©2016 The BrainFood Cookbook by Angela Taylor
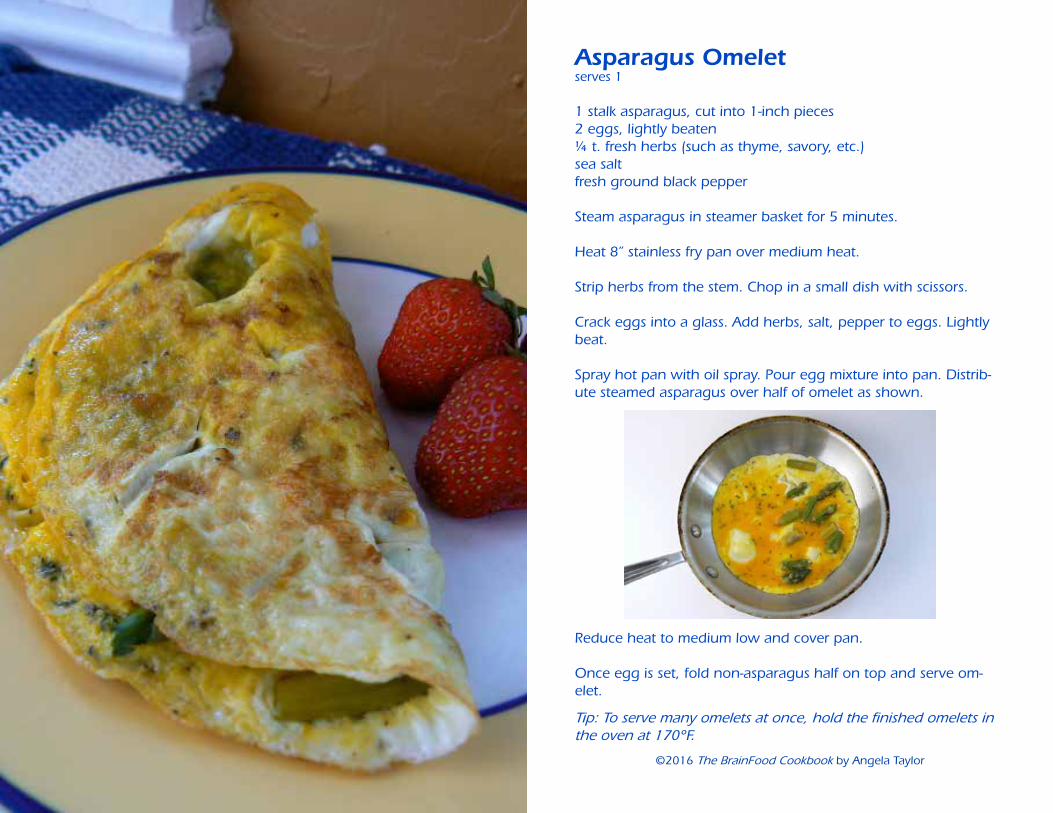
Asparagus Omeletserves 1
1 stalk asparagus, cut into 1-inch pieces2 eggs, lightly beaten¼ t. fresh herbs (such as thyme, savory, etc.)sea saltfresh ground black pepper
Steam asparagus in steamer basket for 5 minutes.
Heat 8” stainless fry pan over medium heat.
Strip herbs from the stem. Chop in a small dish with scissors.
Crack eggs into a glass. Add herbs, salt, pepper to eggs. Lightly beat.
Spray hot pan with oil spray. Pour egg mixture into pan. Distrib-ute steamed asparagus over half of omelet as shown.
Reduce heat to medium low and cover pan.
Once egg is set, fold non-asparagus half on top and serve om-elet.
Tip: To serve many omelets at once, hold the finished omelets in the oven at 170°F.
©2016 The BrainFood Cookbook by Angela Taylor

Pecan WafflesMakes 8 waffles
2 C. raw pecans (soaked/sprouted/dehydrated)4 eggs5 T. melted ghee3 T. honey1½ t. vanilla½ t. baking soda¼ t. sea salt
Preheat waffle iron.Preheat oven to 200° F.
In blender combine all ingredients.
Spray waffle iron with cooking spray. Pour batter into iron and spread quickly to distribute. Waffle iron settings may vary, but I cook waffles on setting 5 for about 2:15 (2 minutes 15 seconds), or until desired doneness.
Keep first batch warm in oven while you make the second batch.
Serve with ghee and honey (Or if you allow it, raw light agave nectar. FYI - Natural Zing is the only brand we muscle test “OK” for.)
©2016 The BrainFood Cookbook by Angela Taylor
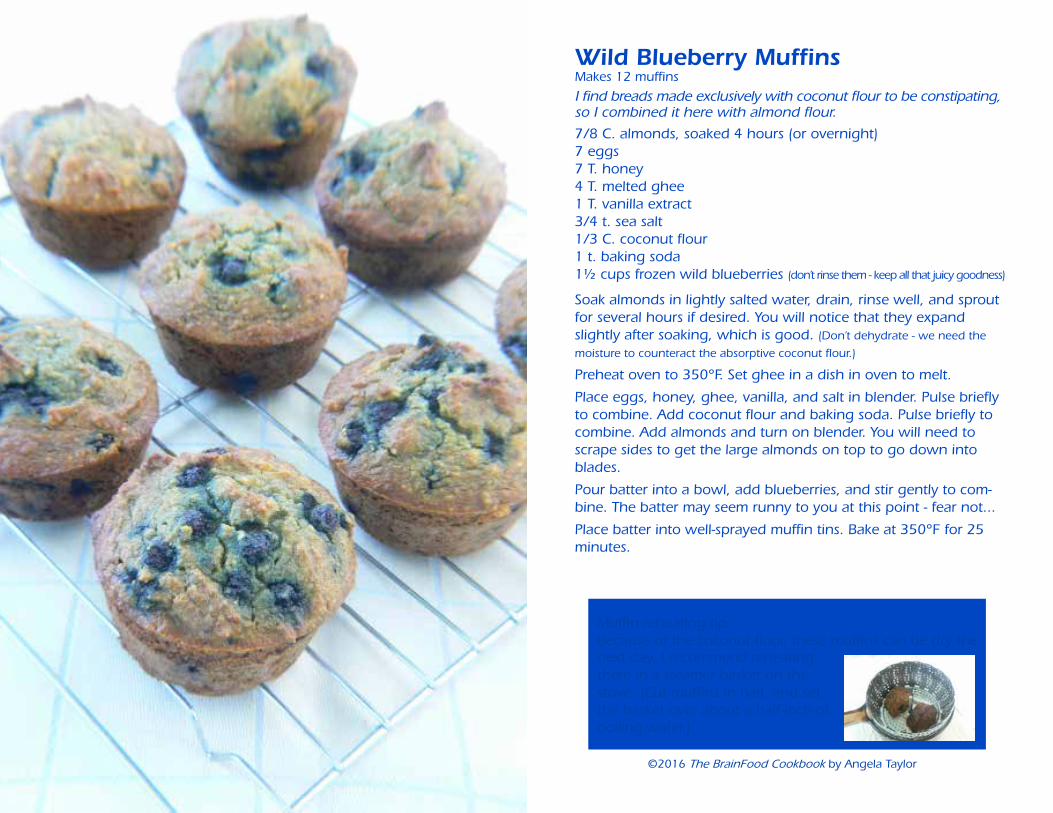
Wild Blueberry MuffinsMakes 12 muffins
I find breads made exclusively with coconut flour to be constipating, so I combined it here with almond flour.
7/8 C. almonds, soaked 4 hours (or overnight)7 eggs7 T. honey4 T. melted ghee1 T. vanilla extract3/4 t. sea salt1/3 C. coconut flour1 t. baking soda1½ cups frozen wild blueberries (don’t rinse them - keep all that juicy goodness)
Soak almonds in lightly salted water, drain, rinse well, and sprout for several hours if desired. You will notice that they expand slightly after soaking, which is good. (Don’t dehydrate - we need the
moisture to counteract the absorptive coconut flour.)
Preheat oven to 350°F. Set ghee in a dish in oven to melt.
Place eggs, honey, ghee, vanilla, and salt in blender. Pulse briefly to combine. Add coconut flour and baking soda. Pulse briefly to combine. Add almonds and turn on blender. You will need to scrape sides to get the large almonds on top to go down into blades.
Pour batter into a bowl, add blueberries, and stir gently to com-bine. The batter may seem runny to you at this point - fear not...
Place batter into well-sprayed muffin tins. Bake at 350°F for 25 minutes.
©2016 The BrainFood Cookbook by Angela Taylor
next day. I recommend reheating them in a steamer basket on the stove. (Cut muffins in half, and set the basket over about a half-inch of boiling water.)
Muffin reheating tip:Because of the coconut flour, these muffins can be dry the
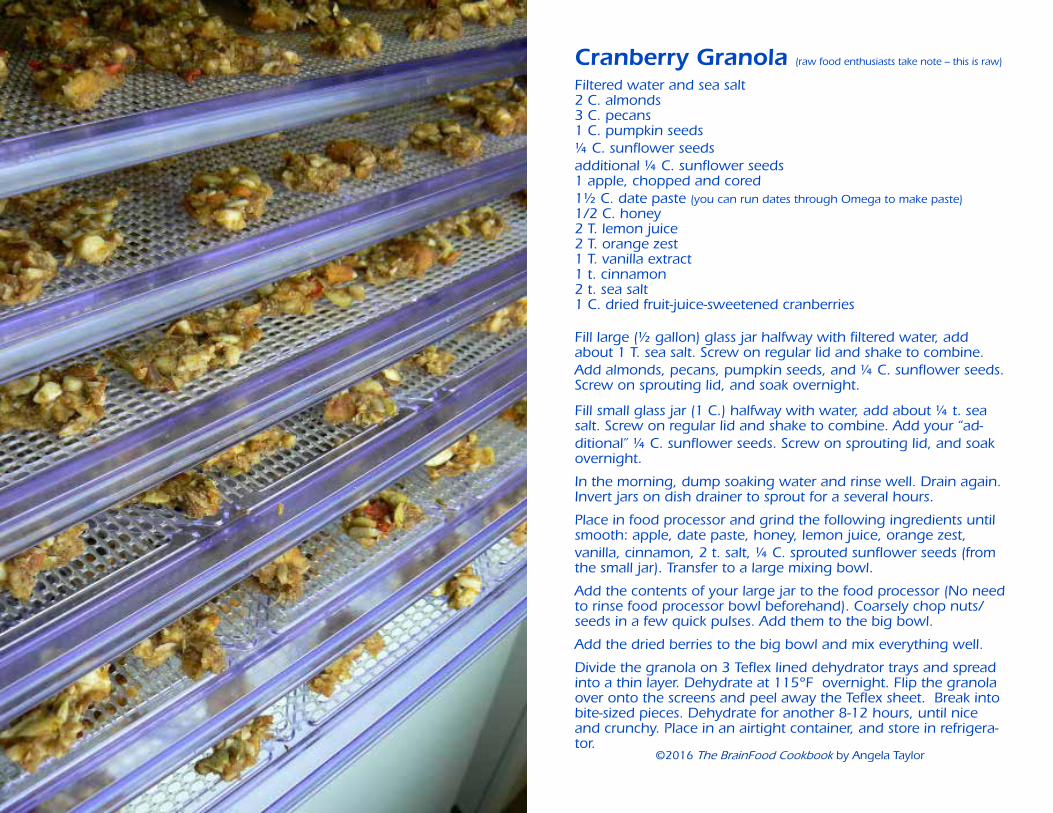
Cranberry Granola (raw food enthusiasts take note – this is raw)
Filtered water and sea salt2 C. almonds3 C. pecans1 C. pumpkin seeds¼ C. sunflower seedsadditional ¼ C. sunflower seeds1 apple, chopped and cored1½ C. date paste (you can run dates through Omega to make paste)1/2 C. honey2 T. lemon juice2 T. orange zest1 T. vanilla extract1 t. cinnamon2 t. sea salt1 C. dried fruit-juice-sweetened cranberries
Fill large (½ gallon) glass jar halfway with filtered water, add about 1 T. sea salt. Screw on regular lid and shake to combine. Add almonds, pecans, pumpkin seeds, and ¼ C. sunflower seeds. Screw on sprouting lid, and soak overnight.
Fill small glass jar (1 C.) halfway with water, add about ¼ t. sea salt. Screw on regular lid and shake to combine. Add your “ad-ditional” ¼ C. sunflower seeds. Screw on sprouting lid, and soak overnight.
In the morning, dump soaking water and rinse well. Drain again. Invert jars on dish drainer to sprout for a several hours.
Place in food processor and grind the following ingredients until smooth: apple, date paste, honey, lemon juice, orange zest, vanilla, cinnamon, 2 t. salt, ¼ C. sprouted sunflower seeds (from the small jar). Transfer to a large mixing bowl.
Add the contents of your large jar to the food processor (No need to rinse food processor bowl beforehand). Coarsely chop nuts/seeds in a few quick pulses. Add them to the big bowl.
Add the dried berries to the big bowl and mix everything well.
Divide the granola on 3 Teflex lined dehydrator trays and spread into a thin layer. Dehydrate at 115°F overnight. Flip the granola over onto the screens and peel away the Teflex sheet. Break into bite-sized pieces. Dehydrate for another 8-12 hours, until nice and crunchy. Place in an airtight container, and store in refrigera-tor.
©2016 The BrainFood Cookbook by Angela Taylor

This is the traditional way to make nut milks. However, see 30-Second Nut Milk (below) for an even faster recipe.For a more viscous texture, you may optionally add 1 Tablespoon sunflower lecithin.
Almond Milk1 C. raw almonds, soaked 4 (or more) hours4 C. filtered water¼ C. raw honey(optional - tiny bit of stevia)
pinch sea salt
©2016 The BrainFood Cookbook by Angela Taylor
Drain and rinse nuts. Put nuts in blender. Add filtered water and all other ingredients. Blend for about a minute.
Line a glass bowl (or large mea-suring cup) with a nut milk bag. Pour contents of blender into nut milk bag. Squeeze bag to extract nut milk.
Discard leftover nut solids, or dry and use as nut flour.
Brazil Nut Vanilla Milk1 C. raw Brazil nuts, soaked 2 or more hours4 C. filtered water¼ C. raw honey1 T. vanilla extract(optional - tiny bit of stevia)pinch sea salt2 T. coconut oil, gently melted (dehydrator is good for this)
30-Second Nut Milk2 T. nut butter (soaked/sprouted: homemade p. 154 or Better Than Roasted)2 C. filtered waterpinch sea salt2 T. raw honey½ t. vanilla extract1 T. coconut butter, gently melted (dehydrator is good for this)
Place all ingredients in blender. Blend until smooth.
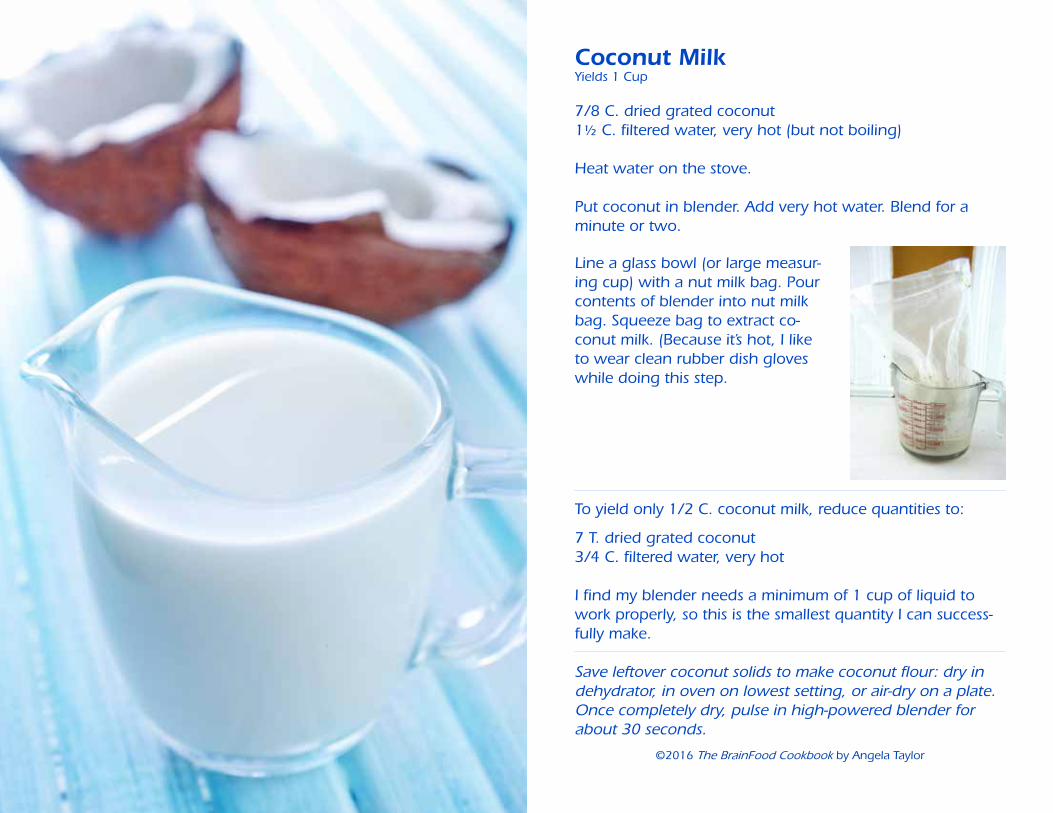
Coconut MilkYields 1 Cup
7/8 C. dried grated coconut1½ C. filtered water, very hot (but not boiling)
Heat water on the stove.
Put coconut in blender. Add very hot water. Blend for a minute or two.
©2016 The BrainFood Cookbook by Angela Taylor
Line a glass bowl (or large measur-ing cup) with a nut milk bag. Pour contents of blender into nut milk bag. Squeeze bag to extract co-conut milk. (Because it’s hot, I like to wear clean rubber dish gloves while doing this step.
To yield only 1/2 C. coconut milk, reduce quantities to:
7 T. dried grated coconut3/4 C. filtered water, very hot
I find my blender needs a minimum of 1 cup of liquid to work properly, so this is the smallest quantity I can success-fully make.
Save leftover coconut solids to make coconut flour: dry in dehydrator, in oven on lowest setting, or air-dry on a plate. Once completely dry, pulse in high-powered blender for about 30 seconds.
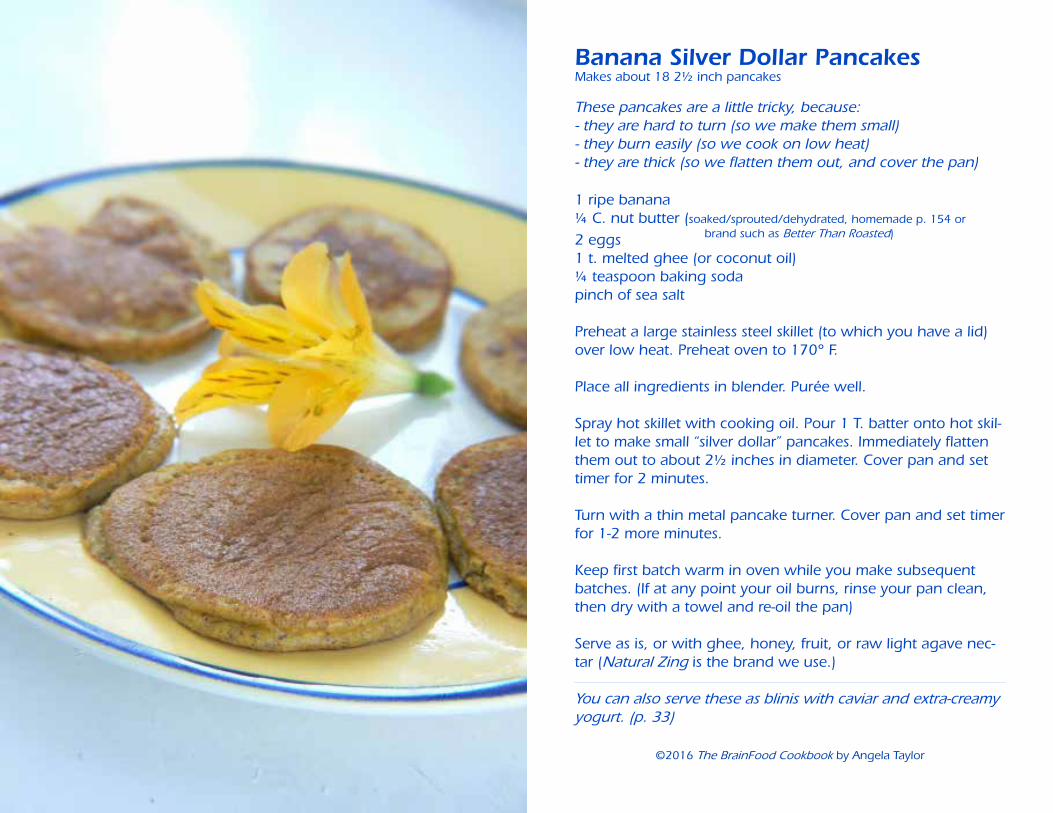
Banana Silver Dollar PancakesMakes about 18 2½ inch pancakes
These pancakes are a little tricky, because:- they are hard to turn (so we make them small)- they burn easily (so we cook on low heat)- they are thick (so we flatten them out, and cover the pan)
1 ripe banana¼ C. nut butter (soaked/sprouted/dehydrated, homemade p. 154 or brand such as Better Than Roasted)
©2016 The BrainFood Cookbook by Angela Taylor
2 eggs1 t. melted ghee (or coconut oil)¼ teaspoon baking sodapinch of sea salt
Preheat a large stainless steel skillet (to which you have a lid) over low heat. Preheat oven to 170° F.
Place all ingredients in blender. Purée well.
Spray hot skillet with cooking oil. Pour 1 T. batter onto hot skil-let to make small “silver dollar” pancakes. Immediately flatten them out to about 2½ inches in diameter. Cover pan and set timer for 2 minutes.
Turn with a thin metal pancake turner. Cover pan and set timer for 1-2 more minutes.
Keep first batch warm in oven while you make subsequent batches. (If at any point your oil burns, rinse your pan clean, then dry with a towel and re-oil the pan)
Serve as is, or with ghee, honey, fruit, or raw light agave nec-tar (Natural Zing is the brand we use.)
You can also serve these as blinis with caviar and extra-creamy yogurt. (p. 33)

Orange Almond Muffins/CupcakesMakes 12 muffins
2 organic oranges4 eggs1/3 C. honey1 T. ghee1/2 t. sea salt1 t. baking soda2 C. almond flour (or 2½ C. whole almonds)
Wash the oranges, rinse thoroughly, and boil them whole (peel and all) for 1½ hours, or until soft. Remove from water and cool for a few minutes until you can handle them.
Preheat oven to 375° F.
Cut oranges in half and discard seeds and stems. Place whole or-anges (peel and all) in a blender, and blend until smooth.
Process in eggs, honey, ghee, salt and baking soda until well blend-ed. Add almond flour (or almonds) and blend well. You may need to scrape several times with spatula.
Pour batter into well sprayed muffin pans.
Bake at 375° F for 25-30 minutes, until a toothpick stuck in the center comes out clean.
©2016 The BrainFood Cookbook by Angela Taylor
Muffin removal tip:After cooling for the initial 10 minutes, don clean, dry rubber gloves. Run a knife around the perimeter of each of the 12 muffins. Invert a baking sheet over the top of the muffin pan. Holding the baking sheet and muffin pan together tightly as a unit, flip the whole thing over and the muffins will “fall” from their pan onto the baking sheet. Gently shake the upside-down muffin pan to remove any stuck muffins.
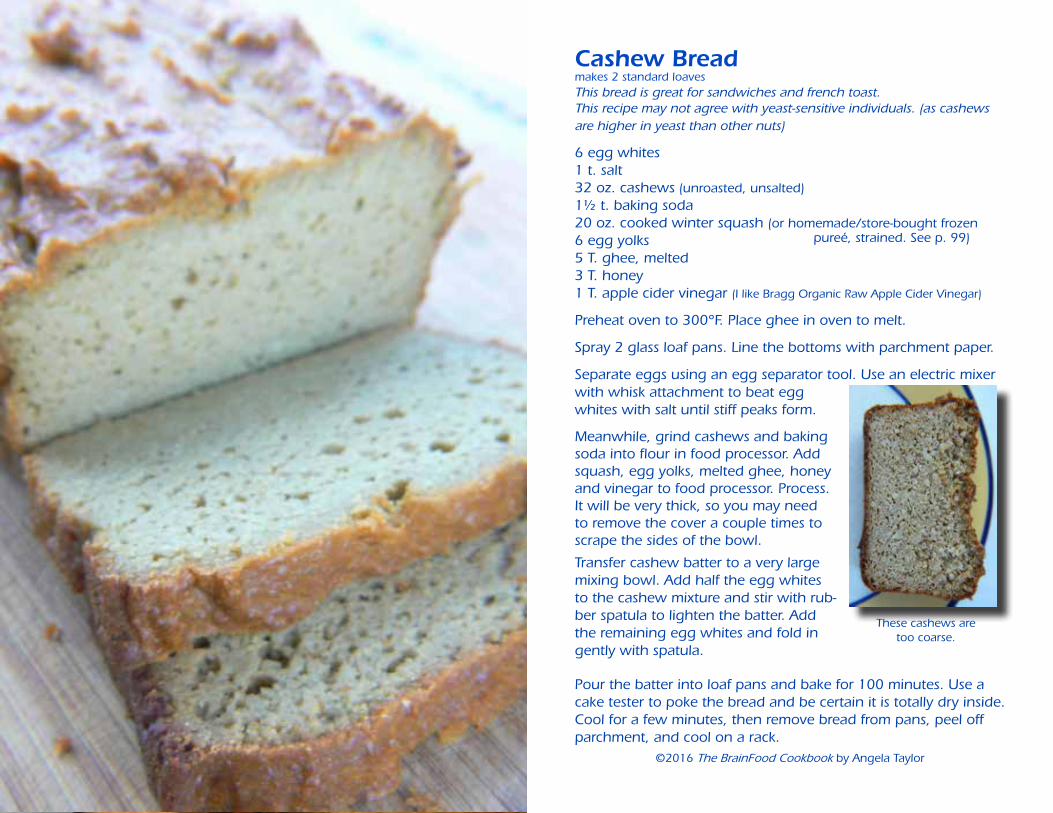
Cashew Breadmakes 2 standard loavesThis bread is great for sandwiches and french toast.This recipe may not agree with yeast-sensitive individuals. (as cashews are higher in yeast than other nuts)
6 egg whites1 t. salt32 oz. cashews (unroasted, unsalted)1½ t. baking soda20 oz. cooked winter squash (or homemade/store-bought frozen6 egg yolks5 T. ghee, melted3 T. honey1 T. apple cider vinegar (I like Bragg Organic Raw Apple Cider Vinegar)
Preheat oven to 300°F. Place ghee in oven to melt.
Spray 2 glass loaf pans. Line the bottoms with parchment paper.
Separate eggs using an egg separator tool. Use an electric mixer
©2016 The BrainFood Cookbook by Angela Taylor
with whisk attachment to beat egg whites with salt until stiff peaks form.
Meanwhile, grind cashews and baking soda into flour in food processor. Add squash, egg yolks, melted ghee, honey and vinegar to food processor. Process. It will be very thick, so you may need to remove the cover a couple times to scrape the sides of the bowl.
Transfer cashew batter to a very large mixing bowl. Add half the egg whites to the cashew mixture and stir with rub-ber spatula to lighten the batter. Add the remaining egg whites and fold in gently with spatula.
Pour the batter into loaf pans and bake for 100 minutes. Use a cake tester to poke the bread and be certain it is totally dry inside. Cool for a few minutes, then remove bread from pans, peel off parchment, and cool on a rack.
These cashews are too coarse.
pureé, strained. See p. 99)

Carrot Pulp BreadMakes 2 loavesThis bread is great when spread with yogurt cream cheese.You can store carrot pulp (left over from juicing) in the freezer until you accumu-late 3 cups.
5 egg whites1 t. salt2 C. macadamia nuts2 C. soaked/sprouted/dehydrated almonds1½ t. baking soda1 t. cinnamon½ t. nutmeg3 C. carrot pulp (left over from juicing)3 T. melted coconut oil5 egg yolks3 T. lemon juice (from ½ of a lemon)2 t. cider vinegar½ C. honey
Preheat the oven to 300°F. Set a little dish with 3 T. coconut oil in oven to melt.
Spray loaf pans with cooking spray. Line the bottoms only with parchment paper (trace bottom of pan on parchment, then cut).
If you have a Vitamix, simply blend all ingredients, then proceed to final step. Otherwise:
Separate eggs using an egg separator tool. Use an electric mixer with whisk attachment to beat egg whites with salt until stiff peaks form.
Meanwhile, add macadamias, baking soda, cinnamon and nut-meg to food processor. Grind into flour. Add in carrot pulp and give it a couple pulses.
Add in the rest of the ingredients. (oil through honey) Pulse to combine.
Transfer contents of food processor to a large bowl. Add half of egg whites to bowl and stir well to lighten the batter. Add the remaining egg whites and fold them in.
Fill loaf pans with batter. Bake for 65-75 minutes. Allow to cool in the pan for about 10 minutes and then gently loosen sides with a knife. Remove from pan and peel paper off bottom. Cool on racks.
©2016 The BrainFood Cookbook by Angela Taylor

Yogurt Cream CheeseOnly consume dairy if raw, fermented, and your mind/body tolerates it!
Ingredients:
raw milk yogurtsea salt
I find that yogurt cheese stays fresh longer with the addition of a small amount of sea salt. I typically add ¼ t. of sea salt per cup of yogurt, stir well to combine, then strain.
My preferred method:Pour yogurt into a Donvier yogurt cheese maker. Allow to strain in the refrigerator overnight. Store cheese directly in the screen/box, or transfer to a jar.
Alternate method:Strain yogurt by lining a large strainer with cheesecloth/muslin. Cover the whole assembly with a lid (or some plastic wrap) to prevent off-flavors from the refrigerator. Allow it to strain in the refrigerator overnight, then squeeze the cloth to remove any remaining liquid. Use a rubber spatula to scrape cream cheese off cheesecloth, and store in a jar.
When your cheese is done dripping, save the dripped whey in the refrigerator for fermenting veggies, adding to bean soaking water, adding to smoothies, fertilizing plants, etc.
©2016 The BrainFood Cookbook by Angela Taylor

Banana Apple MuffinsMakes 12 Muffins
The ground dehydrated pumpkin seeds do a nice job of soaking up some of the moisture from the bananas. Don’t be tempted to skip the grinding step. I once skipped the “grinding into flour” of the pumpkin seeds – and ended up with weird chunks of pumpkin seeds that had an unpleasant chaw to them. These make great cupcakes when spread with creamy vanilla frosting. (p. 106)
Muffin removal tip:After cooling for the initial 10 minutes, don clean, dry rubber gloves. Run a knife around the perimeter of each of the 12 muffins. Invert a baking sheet over the top of the muffin pan. Holding the baking sheet and muffin pan together tightly as a unit, flip the whole thing over and the muffins will “fall” from their pan onto the baking sheet. Gently shake the upside-down muffin pan to remove any stuck muffins.
©2016 The BrainFood Cookbook by Angela Taylor
½ lemon, squeezed into juice2 T. ghee1 t. cinnamon1 t. vanilla1 t. baking soda2 ripe bananasPulp of 4 apples (Run apples through Omega juicer to obtain pulp; save
juice for another purpose, or just drink it :)
Preheat oven to 350°F.
Mix all ingredients well in a blender.
Spray muffin cups well.
Bake in oven at 350°F for about 35 minutes.
1 C. almond flour3 eggs1/3 C. honey¼ C. soaked/sprouted/dehydrated pumpkin seeds, finely ground into flour in coffee grinder

Sunflower Spice MuffinsMakes 12 Muffins
1½ C. sunflower seeds, soaked overnight, drained and rinsed, to yield approx. 2 cups½ C. honey1 t. vanilla extract3 eggs½ lemon, squeezed into juice2 T. ghee1 t. cinnamon¼ t. cloves¼ t. sea salt1 t. baking soda
Preheat oven to 300°F.
Mix all ingredients well in a blender, until completely smooth. You may need to stop the blender and scrape the sides periodically.
Spray muffin cups very well.
Bake in oven at 300°F for 35-40 minutes.
Cool in pan 10 minutes on counter, then carefully remove muffins from muffin pan and cool completely on a cooling rack.
Muffin removal tip:After cooling for the initial 10 minutes, don clean, dry rubber gloves. Run a knife around the perimeter of each of the 12 muffins. Invert a baking sheet over the top of the muffin pan. Holding the baking sheet and muffin pan together tightly as a unit, flip the whole thing over and the muffins will “fall” from their pan onto the baking sheet. Gently shake the upside-down muffin pan to remove any stuck muffins.
©2016 The BrainFood Cookbook by Angela Taylor

Apple CakeMakes 3 mini-loaf pans
1 C. sunflower seeds, soaked overnight, drained and rinsed, to yield approx. 1 1/3 cups¾ C. almond flour½ C. honey1 t. vanilla extract3 eggs½ lemon, squeezed into juice3 T. ghee1 t. cinnamon½ t. nutmeg¼ t. sea salt1 t. baking soda
1½ C. peeled and grated apple (a firm apple is best)½ C. walnuts, coarsely chopped
Preheat oven to 325°F. After the oven is preheated, toast walnuts on a baking sheet for about 5 minutes.
Mix the batter ingredients (sunflower seeds through baking soda) well in a blender, until completely smooth. You may need to stop the blender and scrape the sides periodically.
In a bowl, stir together batter, shredded apples, and walnuts.
Spray mini loaf pans very well. Distribute between the 3 pans.
Bake in oven at 325°F for 65-70 minutes. Centers should be com-pletely set.
Cool in pans 10 minutes on counter, then carefully remove from mini loaf pans and cool completely on a cooling rack.
Glaze:1 T. ghee3 T. honey1/8 t. vanilla extract
Combine in a small saucepan and heat until bubbly. Pour over cooled cakes.
©2016 The BrainFood Cookbook by Angela Taylor
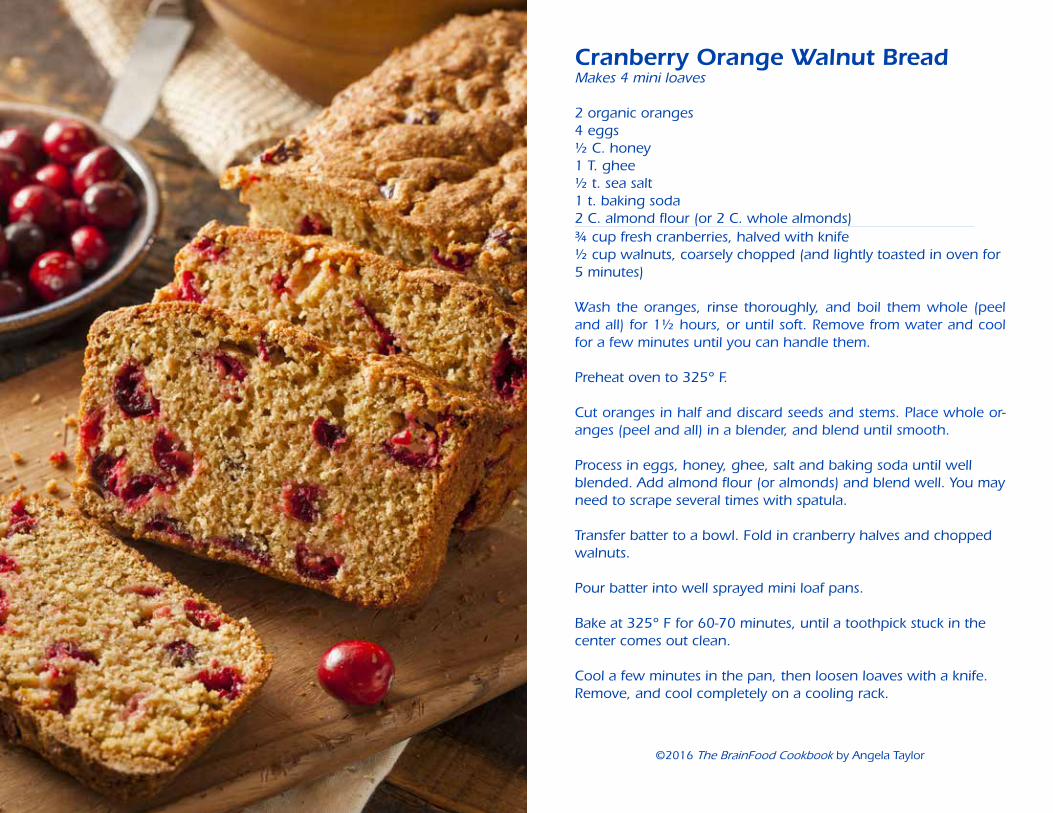
Cranberry Orange Walnut BreadMakes 4 mini loaves
2 organic oranges4 eggs½ C. honey1 T. ghee½ t. sea salt1 t. baking soda2 C. almond flour (or 2 C. whole almonds)¾ cup fresh cranberries, halved with knife½ cup walnuts, coarsely chopped (and lightly toasted in oven for 5 minutes)
Wash the oranges, rinse thoroughly, and boil them whole (peel and all) for 1½ hours, or until soft. Remove from water and cool for a few minutes until you can handle them.
Preheat oven to 325° F.
Cut oranges in half and discard seeds and stems. Place whole or-anges (peel and all) in a blender, and blend until smooth.
Process in eggs, honey, ghee, salt and baking soda until well blended. Add almond flour (or almonds) and blend well. You may need to scrape several times with spatula.
Transfer batter to a bowl. Fold in cranberry halves and chopped walnuts.
Pour batter into well sprayed mini loaf pans.
Bake at 325° F for 60-70 minutes, until a toothpick stuck in the center comes out clean.
Cool a few minutes in the pan, then loosen loaves with a knife. Remove, and cool completely on a cooling rack.
©2016 The BrainFood Cookbook by Angela Taylor

Cashew CrêpesMakes about 3 large crêpes
1 C. cashews (unroasted, unsalted)½ C. coconut milk (or water)2 eggs1/8 t. sea salt1½ t. ghee, melted
Combine in blender. (Ideally, several hours before use.)Refrigerate until ready to cook.
I find that cooking crêpes only really works properly on special crêpe irons, so I take my crêpe batter to the crêpe restaurant, and have them cook it there.
If you who want to buy a crêpe iron and cook them yourself:Preheat griddle.Pour a small amount of oil (or ghee) onto griddle and spread with round metal heavy object, or natural hair pastry brush.Place a thin ladle of batter onto griddle.Spread batter with a wooden T tool (crêpe batter spreader).Allow to setup for a minute.Loosen edges with metal bench scraper.Loosen under entire crêpe with long metal icing spreader / crêpe spatula. (use 3 long strokes)Flip.Use a paintbrush to apply melted ghee to the cooked side.Set for a minute, then flip.
Fill as desired. (i.e. fresh fruit, GAPS-legal preserves, sliced turkey, yogurt cream cheese, etc.)
©2016 The BrainFood Cookbook by Angela Taylor

Pumpkin Harvest MuffinsMakes 12 Muffins
10 oz. winter squash purée (buy it frozen, or see p. 99)2 eggs3 T. coconut oil½ t. sea salt2 heaping C. soaked/sprouted/dehydrated nuts1 t. Pumpkin Pie Spice1 t. vanilla extract1 t. lemon juice (or vinegar)1/3 C. honey3/4 t. baking soda
If frozen, thaw winter squash purée until it is room temp.
Preheat oven to 350°F.
Place coconut oil in a little dish, and put in oven briefly until melted.
Spray muffin tins very well.
Put everything into blender in list order. Turn on blender. Stop periodically to scrape sides if needed. Pour into well-sprayed muf-fin tins.
Bake for 30-35 minutes.
Cool in pan 10 minutes on counter, then carefully remove muffins from muffin pan and cool completely on a cooling rack.
©2016 The BrainFood Cookbook by Angela Taylor
Muffin removal tip:After cooling for the initial 10 minutes, don clean, dry rubber gloves. Run a knife around the perimeter of each of the 12 muffins. Invert a baking sheet over the top of the muffin pan. Holding the baking sheet and muffin pan together tightly as a unit, flip the whole thing over and the muffins will “fall” from their pan onto the baking sheet. Gently shake the upside-down muffin pan to remove any stuck muffins.
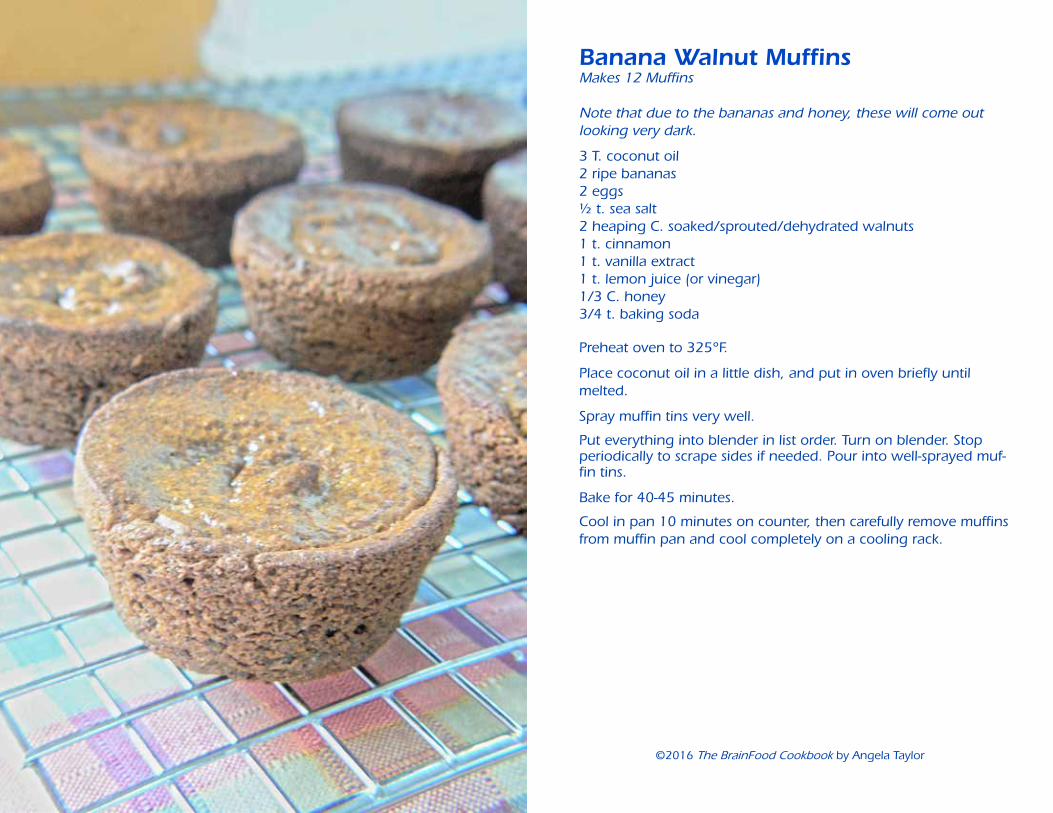
Banana Walnut MuffinsMakes 12 Muffins
Note that due to the bananas and honey, these will come out looking very dark.
3 T. coconut oil2 ripe bananas2 eggs½ t. sea salt2 heaping C. soaked/sprouted/dehydrated walnuts1 t. cinnamon1 t. vanilla extract1 t. lemon juice (or vinegar)1/3 C. honey3/4 t. baking soda
Preheat oven to 325°F.
Place coconut oil in a little dish, and put in oven briefly until melted.
Spray muffin tins very well.
Put everything into blender in list order. Turn on blender. Stop periodically to scrape sides if needed. Pour into well-sprayed muf-fin tins.
Bake for 40-45 minutes.
Cool in pan 10 minutes on counter, then carefully remove muffins from muffin pan and cool completely on a cooling rack.
©2016 The BrainFood Cookbook by Angela Taylor

snac
ks
Garlic and Herb Flatbread Crackers
Olive Tapenade
Onion Dip
Kale Chips
Spiced Pecans
Roasted Pumpkin Seeds
Crispy Onion Straws
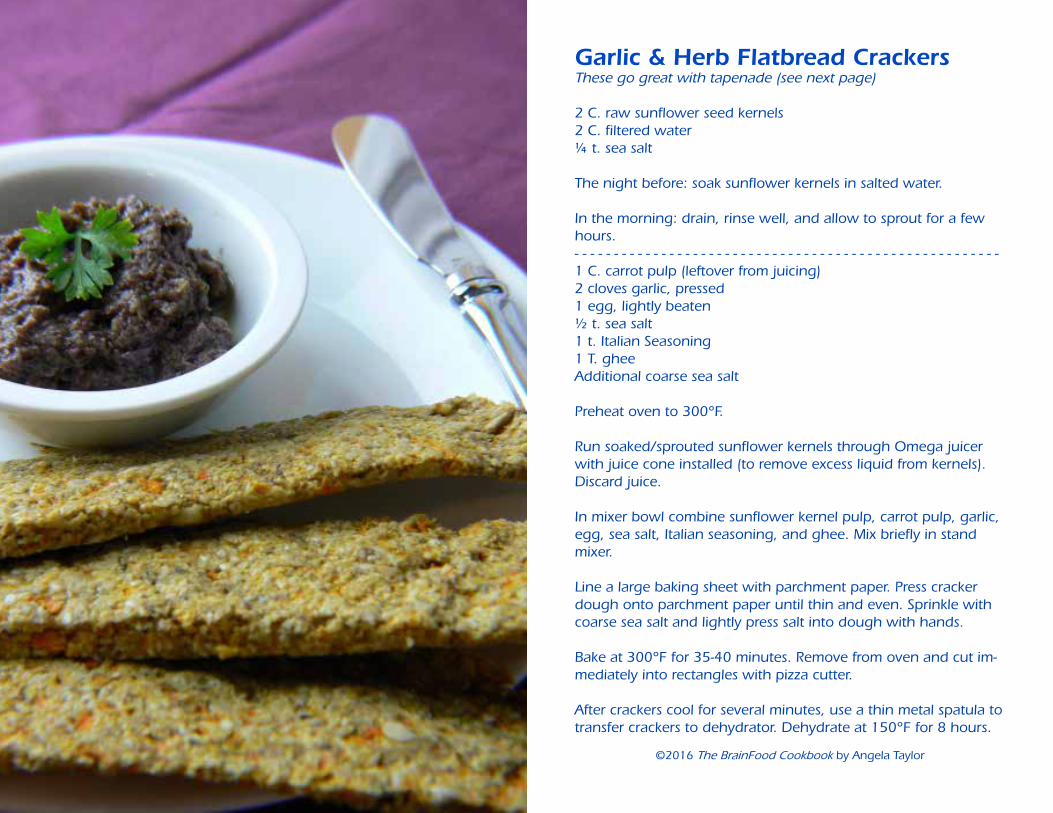
Garlic & Herb Flatbread CrackersThese go great with tapenade (see next page)
2 C. raw sunflower seed kernels2 C. filtered water¼ t. sea salt
The night before: soak sunflower kernels in salted water.
In the morning: drain, rinse well, and allow to sprout for a few hours.- - - - - - - - - - - - - - - - - - - - - - - - - - - - - - - - - - - - - - - - - - - - - - - - - - - - - - 1 C. carrot pulp (leftover from juicing)2 cloves garlic, pressed1 egg, lightly beaten½ t. sea salt1 t. Italian Seasoning1 T. gheeAdditional coarse sea salt
Preheat oven to 300°F.
Run soaked/sprouted sunflower kernels through Omega juicer with juice cone installed (to remove excess liquid from kernels). Discard juice.
In mixer bowl combine sunflower kernel pulp, carrot pulp, garlic, egg, sea salt, Italian seasoning, and ghee. Mix briefly in stand mixer.
Line a large baking sheet with parchment paper. Press cracker dough onto parchment paper until thin and even. Sprinkle with coarse sea salt and lightly press salt into dough with hands.
Bake at 300°F for 35-40 minutes. Remove from oven and cut im-mediately into rectangles with pizza cutter.
After crackers cool for several minutes, use a thin metal spatula to transfer crackers to dehydrator. Dehydrate at 150°F for 8 hours.
©2016 The BrainFood Cookbook by Angela Taylor

Olive TapenadeThe olives sold on “olive bars” are often treated with sodium propionate, a chemical preservative. Therefore, I suggest buying organic olives in glass jars.
If buying Kalamata olives, be sure to buy organic, true Greek Kalamata olives. “Kalamata-style” olives from other countries are often dyed purple/black.
1 clove garlic, peeled and garlic pressed1 C. pitted olives, drained (double check for pits!)2 T. capers, drained3 T. fresh parsley, chopped1½ T. fresh lemon juice1 T. extra virgin olive oil¼ t. fresh ground black pepper1/8 t. anchovy paste, optional
Place all ingredients in food processor.
Pulse until desired consistency is reached.
©2016 The BrainFood Cookbook by Angela Taylor
Sun-dried tomato variation:Add a few sun-dried tomatoes (from a jar) to food processor be-fore pulsing.
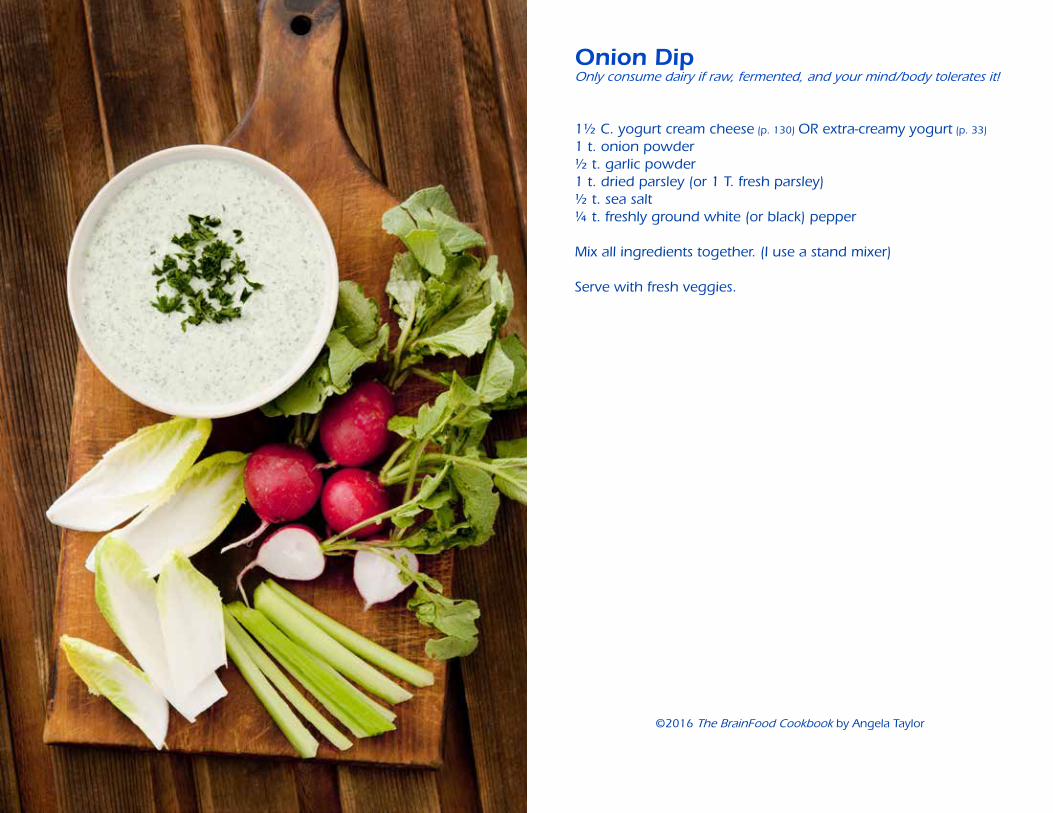
Onion DipOnly consume dairy if raw, fermented, and your mind/body tolerates it!
1½ C. yogurt cream cheese (p. 130) OR extra-creamy yogurt (p. 33)
1 t. onion powder½ t. garlic powder1 t. dried parsley (or 1 T. fresh parsley)½ t. sea salt¼ t. freshly ground white (or black) pepper
Mix all ingredients together. (I use a stand mixer)
Serve with fresh veggies.
©2016 The BrainFood Cookbook by Angela Taylor

Kale Chips
1 head kale2-3 T. extra virgin olive oilsea salt
Preheat oven to 300°F.
Wash and spin kale dry in salad spinner.
Rip leaves and discard stems.
Put leaves in bowl and add about 2 T. olive oil. Massage the oil into leaves with your fingers. Add more oil if needed to lightly coat all leaves.
Spread kale in single layer on cookie sheets. Sprinkle liberally with sea salt.
Bake at 300°F for 10-15 minutes. Remove from oven just before they start to brown.
After kale chips cool for several minutes, transfer to dehydrator. Dehydrate at 150°F for 8 hours. Store in airtight container.
©2016 The BrainFood Cookbook by Angela Taylor

Spiced Pecans
1 lb. pecan halves4 T. ghee½ t. sea salt½ t. cayenne pepper½ t. cumin½ t. dried orange peel (jars found in spice section)
½ t. cinnamon¼ C. honey
The day (or night) before, soak pecans 4-8 hours in 4 C. filtered water.
Drain, rinse, and dehydrate at 150°F until completely dry. (taste to confirm interior dryness)
Heat large skillet over medium heat for a few minutes.
Pre-measure all other ingredients while pan heats. Line a baking sheet with parchment paper (NOT waxed paper - the wax will melt).
Add pecans and toss for 4-5 minutes until they start to brown. Remove pecans from pan.
Put pan back on burner. Add remaining ingredients and stir until ghee and honey are melted.
Quickly add pecans to pan and stir. Dump pecans onto prepared parchment paper-lined pan and cool completely. Pack into jars or bags.
©2016 The BrainFood Cookbook by Angela Taylor
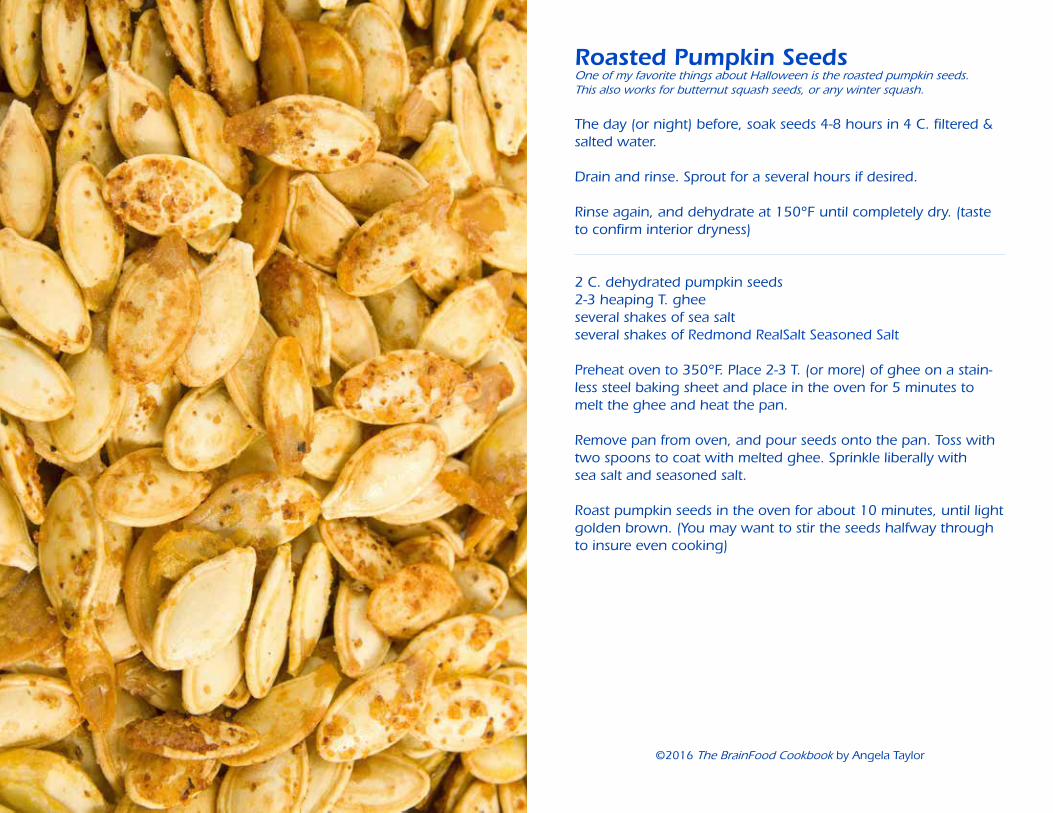
Roasted Pumpkin SeedsOne of my favorite things about Halloween is the roasted pumpkin seeds.This also works for butternut squash seeds, or any winter squash.
The day (or night) before, soak seeds 4-8 hours in 4 C. filtered & salted water.
Drain and rinse. Sprout for a several hours if desired.
Rinse again, and dehydrate at 150°F until completely dry. (taste to confirm interior dryness)
2 C. dehydrated pumpkin seeds2-3 heaping T. gheeseveral shakes of sea saltseveral shakes of Redmond RealSalt Seasoned Salt
Preheat oven to 350°F. Place 2-3 T. (or more) of ghee on a stain-less steel baking sheet and place in the oven for 5 minutes to melt the ghee and heat the pan.
Remove pan from oven, and pour seeds onto the pan. Toss with two spoons to coat with melted ghee. Sprinkle liberally with sea salt and seasoned salt.
Roast pumpkin seeds in the oven for about 10 minutes, until light golden brown. (You may want to stir the seeds halfway through to insure even cooking)
©2016 The BrainFood Cookbook by Angela Taylor

Crispy Onion StrawsGreat to snack on as-is, and also nice to sprinkle on salads and steamed green beans. Personally I find these to be very detoxing, so I have to eat small quantities.
1 vidalia onion¼ C. wheat-free tamari soy sauce2 T. olive oil
Peel onions and cut in half from pole-to-pole.
Remove core by cutting a little “V” notch as shown.
Cut onion into strips as shown.
Toss all ingredients in a bowl. Marinate for 1-8 hours.
Drain/discard excess liquid in a colander.Spread onions out on dehydrator sheets. Dehydrate at:115°F (to preserve raw enzymes) or 150°F (for maximum crispness)
Dehydrate until completely dry (taste to confirm dryness). Store in an airtight container.
©2016 The BrainFood Cookbook by Angela Taylor

con
dim
ents
Ghee
Mayonnaise
Ketchup
Barbeque Sauce
Worcestershire Sauce
Hot Sauce
Almond Butter / Almond Flour (Soaked & Sprouted)
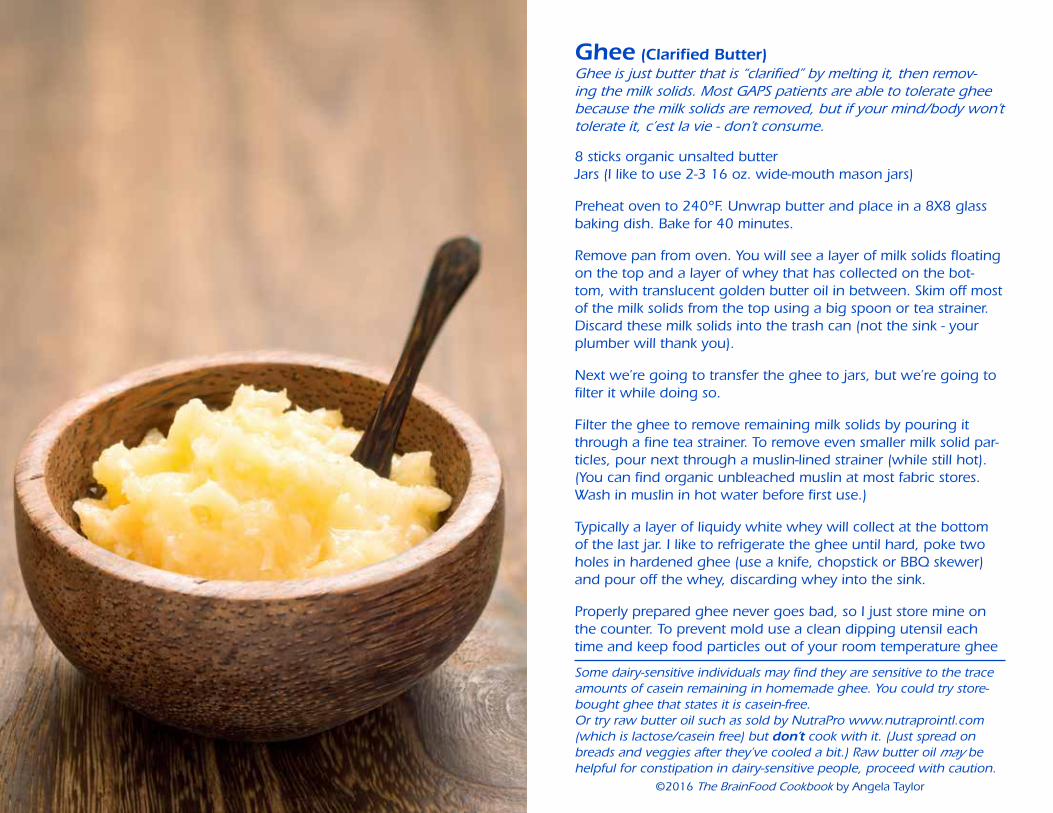
Ghee (Clarified Butter)Ghee is just butter that is “clarified” by melting it, then remov-ing the milk solids. Most GAPS patients are able to tolerate ghee because the milk solids are removed, but if your mind/body won’t tolerate it, c’est la vie - don’t consume.
8 sticks organic unsalted butterJars (I like to use 2-3 16 oz. wide-mouth mason jars)
Preheat oven to 240°F. Unwrap butter and place in a 8X8 glass baking dish. Bake for 40 minutes.
Remove pan from oven. You will see a layer of milk solids floating on the top and a layer of whey that has collected on the bot-tom, with translucent golden butter oil in between. Skim off most of the milk solids from the top using a big spoon or tea strainer. Discard these milk solids into the trash can (not the sink - your plumber will thank you).
Next we’re going to transfer the ghee to jars, but we’re going to filter it while doing so.
Filter the ghee to remove remaining milk solids by pouring it through a fine tea strainer. To remove even smaller milk solid par-ticles, pour next through a muslin-lined strainer (while still hot). (You can find organic unbleached muslin at most fabric stores. Wash in muslin in hot water before first use.)
Typically a layer of liquidy white whey will collect at the bottom of the last jar. I like to refrigerate the ghee until hard, poke two holes in hardened ghee (use a knife, chopstick or BBQ skewer) and pour off the whey, discarding whey into the sink.
Properly prepared ghee never goes bad, so I just store mine on the counter. To prevent mold use a clean dipping utensil each time and keep food particles out of your room temperature ghee
Some dairy-sensitive individuals may find they are sensitive to the trace amounts of casein remaining in homemade ghee. You could try store-bought ghee that states it is casein-free. Or try raw butter oil such as sold by NutraPro www.nutraprointl.com (which is lactose/casein free) but don’t cook with it. (Just spread on breads and veggies after they’ve cooled a bit.) Raw butter oil may be helpful for constipation in dairy-sensitive people, proceed with caution.
©2016 The BrainFood Cookbook by Angela Taylor

MayonnaiseThis was the most vexing recipe in the entire cookbook to master. I spent countless late-nights turning eggs and oil into broken emulsions. The secrets that finally worked for me were:• allow 5-10 minutes for Step 1• allow 4 minutes for Step 2• To accomplish Step 1, I found it was necessary to use the special “small” bowl of my KitchenAid food processor. In my (failed) experiments I’ve discovered the too-small amount of liquid in Step 1 will not work in a blender, nor a large food processor, nor my immersion blender.• Possibly you could use a mini-prep if it is robust enough to run for 15 minutes without overheating.
It is possible that these long processing times are more than what is needed, but it’s what finally worked for me with my equipment.
Many folks like to make their mayo with some amount of olive oil. Admittedly this is healthy, but I don’t care for the taste. You could also substitute expeller-pressed safflower oil or any other oil if you like.
3 egg yolks (from pastured free range hens)3/4 t. sea salt3/8 t. prepared mustard1/8 t. honeypinch cayenne pepper2 T. distilled white vinegar1 t. lemon juice1 T. canola oil (expeller-pressed organic)additional 1½ C. canola oil (expeller-pressed organic)
Step 1:Place yolks, salt, mustard, honey, pepper, vinegar, lemon juice, and 1 T. canola oil in special “small” bowl of KitchenAid food processor. Turn machine on and allow it to run for 5-10 minutes, until the egg yolk mixture has gotten very thick. (You can stop the motor periodically to scrape the bowl and check on progress)
Step 2:Now, with motor running, slowly and constantly drizzle in oil in a very fine stream. I allowed myself 4 minutes to drizzle in the 1½ C. of oil.
This will keep for at least a week, or possibly even longer, in the refrigerator.
©2016 The BrainFood Cookbook by Angela Taylor

Ketchup
6 oz. tomato paste1/2 C. white vinegar1/4 C. water1/3 C. honey (a light bodied honey such as tupelo is best)1 t. sea salt1/4 t. onion powder1/8 t. garlic powderone shake of ground cloves
Combine all ingredients in a non-reactive saucepan over medium heat. Whisk until all ingredients are well combined.
Pour into glass jar and store in refrigerator.
©2016 The BrainFood Cookbook by Angela Taylor

BBQ Sauce1 T. ghee, bacon fat, or other oil1 small onion , chopped1 C. ketchup3 T. honey1 date, pitted and chopped2 T. red wine vinegar2 T. Worcestershire sauce2 T. Dijon mustard1½ teaspoons liquid smoke (optional)1 t. hot pepper sauce1/4 t. ground black pepperadditional 1 t. ghee, bacon fat, or other oil1 clove garlic pressed through a garlic press (about 1 t.)1 t. chili powder1/4 t. cayenne pepper
Heat 1 T. fat in large skillet. Cook onion on medium-low until caramelized, about 10-12 minutes.
Add the ketchup, honey, vinegar, Worcestershire, mustard, liquid smoke (if using), hot pepper sauce, and black pepper together in a medium bowl.
Heat 1 t. oil in a large nonreactive saucepan over medium heat until shimmering but not smoking. Add the garlic, chili powder, and cayenne and cook until fragrant, about 30 seconds.
Whisk in the ketchup mixture and bring to a boil; reduce the heat to medium-low and simmer gently, uncovered, about 25 minutes.Cool sauce slightly, then purée in blender until smooth.
If it’s too thick for your liking, try thinning it with some fresh or-ange juice.
©2016 The BrainFood Cookbook by Angela Taylor

Worcestershire Sauce
1/2 t. tamarind paste (or reconstituted/sieved tamarinds)
1/2 C. filtered water1/2 C. apple cider vinegar1/4 t. anchovy paste2 T. tamari soy sauce (wheat-free)1 T. honey3/8 t. onion powder1/4 t. garlic powder1/8 t. cloves1/8 t. red pepper flakes
If tamarind paste has solidified, reconstitute by combining with the water in a small pot over low heat. Stir. Add to blender.
Place all remaining ingredients in a blender. Blend until all ingre-dients are liquefied.
©2016 The BrainFood Cookbook by Angela Taylor

Hot SauceMakes 1½ Cups
1 1/3 lb ripe red hot peppers1 T. sea salt
Later: Approximately 1 1/3. t. organic white wine vinegar
Prepare a one pint mason jar, and a lid, by running through a hot dishwasher or dunking in boiling water.
If you own onion goggles, you might want to put them on. You also might want to make this recipe outdoors, as the fumes are strong.
Chop off the stems, then place peppers into food processor. Grind into a fine mash. Add salt and pulse to combine. Transfer pep-per mixture to jar. Try not to touch the inside of the jar with your fingers.
Pack the mash down into your container - I like to use a clean wooden dowel (you may want to label one end as being the “hot side”). Continue to pound the mash until you have extracted a layer of liquid covering the mash. This liquid layer is important for proper fermentation. If you are unsuccessful in extracting enough liquid, add some salted water (brine) to cover the mash. Weigh down with a clean paperweight that is small enough to fit inside the jar, to keep solids submerged. (or a zip top plastic bag filled with brine)
Screw on the lid, and label with today’s date. Sit inside a larger dish to catch any spillover that may occur. Allow your mash to ferment at room temp for 3-4 weeks to develop a good flavor. Check it periodically and pound/add more brine to keep the mash submerged.
After 3-4 weeks, scrape off any mold that has formed on the top surface, and discard mold. Add white wine vinegar to taste and stir. Allow to ferment for an additional week at room temp.
You may now store in refrigerator as is (thick). Or if you desire a thinner “Tabasco” style sauce, strain it with a food mill, cheese-cloth, or nut milk bag, and transfer to an old hot sauce bottle.
©2016 The BrainFood Cookbook by Angela Taylor

Almond Butter / Almond Flour (Soaked & Sprouted)Tastes great spread on apple slices!
truly raw organic almonds (google “raw almonds unpasteurized”)filtered watersea salt
Fill a large mason jar halfway with filtered water. Add a small amount of sea salt (about a ½ teaspoon), screw on lid, and shake to combine.
Add almonds to jar about ¾ full. Screw on a sprouting screen. Let soak over-night.
The next day, drain the water. Rinse several times (in the jar). Drain jar, and turn upside down in a dish drainer. Allow nuts to “sprout” for several hours. (Note, they will only get a little white dot on the end, NOT big green sprouts)
Spread nuts on dehydrator screens. For Almond Flour:You are probably going to bake with the flour, so go ahead and set dehydrator to max setting, which is probably 155°F. Your nuts should be dry in about a day.For Almond Butter:You want to keep it “raw”, so we will set dehydrator at 115°F. Dehydrate for 2-3 days until completely dry. (test by chewing a nut and see if it still tastes damp inside)
Once dry: Method 1 using Omega juicer:Grind the nuts in Omega juicer with the blank plate. For the first pass, you can only drop in about 4 nuts at a time or it will jam.Almond Flour: After one pass through the Omega, you are done. Store in a jar in refrigerator.Almond Butter:You will need to run your almonds through about 7 times to get a nice creamy almond butter. When done, pack jars with about an inch of almond butter, shake on some sea salt, and continue until jar is full. Store in refrigerator.
Method 2 using Spectra 11 Melanger (stone grinder):
©2016 The BrainFood Cookbook by Angela Taylor
This really is the best way! It produces a creamy, store bought consistency, and requires a mini-mum of my labor. (Only drawback is the machine costs about $500 US.)
Finely chop 1½ cups dehydrated nuts in food processor. Transfer to stone grinder. Allow to run for about 15 minutes. When done, pack jars with about an inch of almond butter, shake on some sea salt, and continue until jar is full. Store in refrigerator.

bev
erag
es
Ginger Tea
Hard Cider
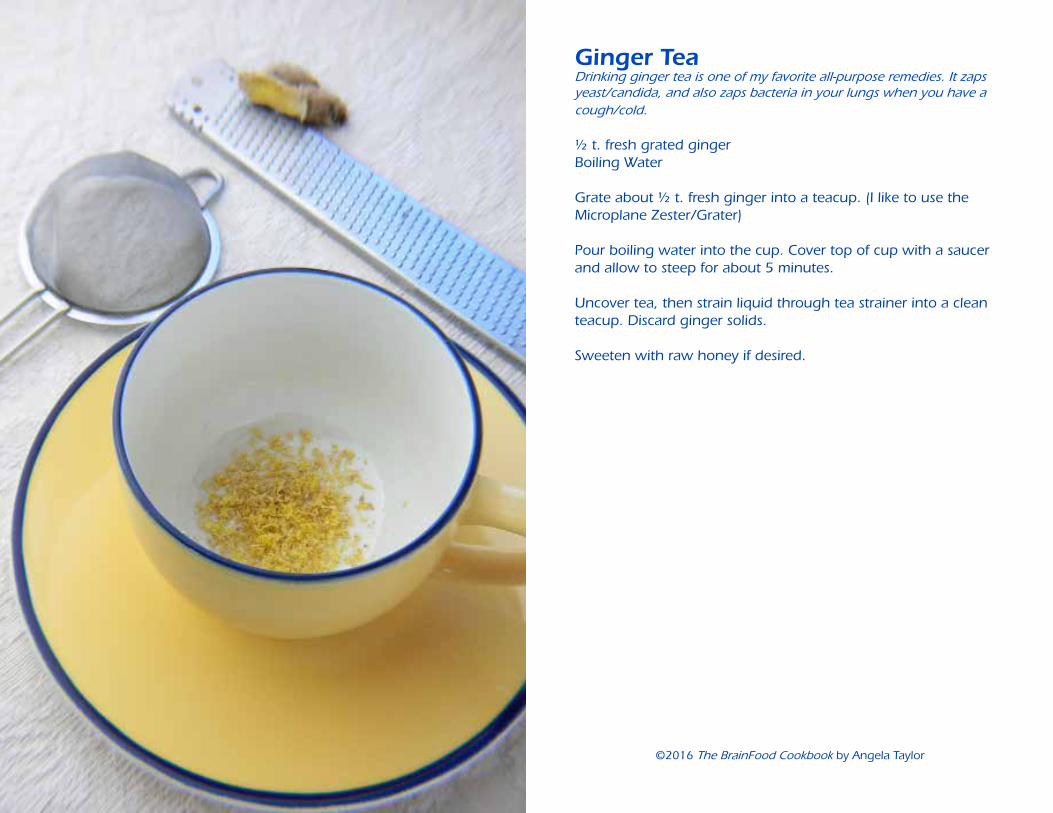
Ginger TeaDrinking ginger tea is one of my favorite all-purpose remedies. It zaps yeast/candida, and also zaps bacteria in your lungs when you have a cough/cold.
½ t. fresh grated gingerBoiling Water
Grate about ½ t. fresh ginger into a teacup. (I like to use the Microplane Zester/Grater)
Pour boiling water into the cup. Cover top of cup with a saucer and allow to steep for about 5 minutes.
Uncover tea, then strain liquid through tea strainer into a clean teacup. Discard ginger solids.
Sweeten with raw honey if desired.
©2016 The BrainFood Cookbook by Angela Taylor

Hard CiderFor adults only, obviously
I have included this recipe as a “reward” for all the parents who are doing the GAPS diet along with their children. Enjoy it in good health!
Ingredients:Fresh pressed (unpasteurized) apple juice or apple cider
Pour fresh apple juice/cider into a mason jar.
We are going to allow the juice to ferment at room temperature for a few days, so we need to keep out any insects:• Screw on a fine mesh sprouter screen/lid, or • Secure a piece of cheesecloth with a rubber band.
Allow the juice to sit at room temp undisturbed for 3-5 days. If you want to keep it away from the kids, feel free to stash in a high cupboard. (Just don’t forget about it.)
Taste it on days 3, 4, 5. When it has reached the desired level of fermentation, remove the screen and replace with a regular lid. (The longer it ferments, the less sweet, and higher in alcohol, it will be.)
Store in refrigerator. Will keep for several days.
©2016 The BrainFood Cookbook by Angela Taylor

Appendix A
DAILY RECORD SHEETS
To track your child’s progress, I suggest you keep a daily log of his food and behavior. Here is a sample spreadsheet I
used for James.
It is also helpful to shoot video along the way, so keep your camcorder/phone handy!
Date: 2/11/2010 James Taylor Daily Autism Tracking
Bowel Movement (frequency) once in morning
Bowel Movement (size) lots
Bowel Consistency
diarrhea pooped in pants in morning
(took new "Rosemary Detox" bath last night…?)
(or, Mixed Berry shake yesterday?)
Nap? yes.
Nap (times) 5:45pm-8:00pm
Nap (# of hours) 2.25
Rashes
behavior
weather
Social Skills played very well with Josie and brother
Running in circles
hands in mouth
Good Mood
OCD still some looking at left arm
Staring off into space
Humming / Raspberries nope
Congestion nope
Comprehension really great!
Flexibility (# good transitions I saw)
Rigidity (# bad transitions I saw)
Potty issues
Protest when time to go potty
Switch Flipping On/Off
Supplements
Probiotic (Mercola) yes
Krill Oil yes
Allergy Homeopathic yes
B12 shot
Preschool no
Activities / Other playdate at Josie Russo's House
Good talking/cognition examples
Detox Bath yes - the new Detox MD Dead Sea Salt bath
Food Diary Shake
Cucumbers w vinaigrette
egg
Cashew Bread Turkey Sandwich w Mustard
Strawberries and Pineapple
Hot Dog
Sugar Snap Peas lightly coated w asian garlic sauce
one bite of shrimp
Macadamia Banana Bread
Sleep (times) 11:00 pm - 9:00 am
Sleep (# of hours) 10 hours
Slept through night? yes, but came into our bed at 7:15am
Dry diaper upon waking? yes
©2016 The BrainFood Cookbook by Angela Taylor

Appendix B
11 CHARACTERISTICS OF HEALTHY TRADITIONAL
DIETS
©2016 The BrainFood Cookbook by Angela Taylor
Based upon information compiled byDr. Weston A. Price, Sally Fallon, and Mary Enig, PhD
When it comes to choosing the optimal diet and supplements for our health, there is a lot of conflicting information out there. It makes sense to look at what traditional cultures, untouched by Western civilization, have eaten for thousands of years. Today there are few cultures that have not had contact with civilization. Fortunately, there was a researcher who investigated the diets of many traditional cultures in the 1920’s to 1930’s, when travel to them became easier but before these cultures started eating West-ern foods. This researcher was Dr. Weston A. Price, a dentist from Cleveland. Being a dentist, he studied the teeth of these people and discovered that people on traditional diets had healthy, almost cavity-free, beautiful, straight teeth in uncrowded, broad jaws. When the children of these people changed to a Western diet, they had crowded, crooked teeth in narrow jaws with lots of cavities. The cause was clearly not genetic (unlike what we have been told), as children in the same family would either have beautiful, well-spaced teeth or crooked, unhealthy teeth depend-ing on what their diet was.
Dr. Price studied the diets of traditional cultures all over the world, from remote villages in Switzerland, to Eskimos, to the South Pacific. His work is now being carried on by the Weston A. Price Foundation and the Price-Pottenger Nutrition Foundation.
Sally Fallon has summarized Dr. Price’s research by identifying the 11 underlying characteristics of healthy traditional diets.
#1 - Contained no refined or denatured foods. Just re-fined sugar, white flour, vegetable oils, canned foods and condensed milk were enough to cause havoc to traditional people’s health in the 1920’s. Today we have many more refined foods including high fructose corn syrup, pasteurized milk, skim and low fat milk, hydrogenated fats, isolated pro-tein powders and many food additives and preservatives.
#2 - Contained animal foods. The people Dr. Price found with the broadest faces and thickest skulls (indicating the best diet) ate fish and shellfish. Also, he found that traditional cul-tures went to great trouble, energy, and risk to obtain animal foods. For instance, people living in the Andes at 12,000 feet would hike down to the sea to get fish roe (eggs). There are critical nutrients that only occur in animal foods, such as the fat soluble vitamins A and D, as well as cholesterol. Choles-terol has been demonized by the media but it is an essential nutrient for optimal development of the nervous system, brain and digestive tract. So it is especially critical for children. B12 is another nutrient found only in animal foods.
#3 – Always ate some animal foods raw, such as raw milk, butter, cheese, [chicken] eggs, marinated fish, fish eggs, or even raw meat. One important nutrient destroyed by heat is vitamin B6, which is found in raw dairy and meat.
The pictures below are of Aborigine girls, taken in Australia in the early 1900’s.
ate native “primitive” dietwhole foods
(including raw animal products)straight, strong teeth
fully formed sinus passages
ate “modernized” dietprocessed foods
(including sugar, white flour)crooked, crowded, decayed teeth
frequent sinus problems
All photos © Price-Pottenger Nutrition Foundation www.ppnf.org

©2016 The BrainFood Cookbook by Angela Taylor
#4 - Extremely nutrient dense. The diets of traditional cul-tures had much higher levels of vitamins and minerals than we get in our diets today. Everything they did maximized nu-trients: they grew food on fertile soil, ate organ meats prefer-entially to muscle meats, ate animal fats rather than vegetable oils, raised animals on pasture rather than in factories, ate dairy products raw or fermented, and would travel far to get foods that were super nutritious (such as fish eggs). With our faith in modern medicine, we have forgotten the importance of nutrition. For instance, we used to feed cod liver oil to our children but now we vaccinate them instead. This started with the publication of Baby and Child Care by Dr. Spock, who advocated vaccinations instead of cod liver oil.
#5 - Very high food enzyme content. Enzymes are de-stroyed by heat—118 degrees wet heat or 150 degrees dry heat. We know from animal studies that if you only feed ani-mals cooked foods, so the diet has no enzymes, the pancreas and salivary glands expand. That’s because they have to work harder to make enzymes to digest the food. Some of the best sources of enzymes are cultured/fermented raw dairy prod-ucts, raw meat and fish, raw honey, tropical fruits, and foods or drinks that have been fermented (such as raw sauerkraut or kombucha tea). Traditional cultures typically ate some fer-mented foods with every meal as a condiment, to help with digestion.
#6 - Took great care in preparing seed foods. By seed foods, we mean any nut, grain or legume (bean). Unlike modern diets where we eat seeds whole with no preparation, or just grind them up (as in flour), traditional cultures would soak, sprout and/or ferment their seed foods before eating. The reason for this special care is that these foods contain enzyme inhibitors that block digestion, as well as phytic acid which blocks mineral absorption.
#7 - Total fat content of traditional diets ranged from 30% to 80% (in the case of Eskimos). Saturated fats are actu-ally needed for good health and they comprise at least 50% of our cell membranes. They protect the liver from toxins, en-hance the immune system, are necessary for proper function of the kidneys and lungs and help us utilize essential fatty acids. The short chain saturated fatty acids (found in butter and coconut oil) are antimicrobial — fighting against bacteria, yeast and parasites and supporting the immune system.
#8 – Consumed equal amounts of Omega 3 and Omega 6 fatty acids. Our diets today are composed of almost all Omega 6. This is caused by our high consumption of vegetable oils as well as how we raise our animals. Typical supermarket eggs (from factory chickens) contain 20 times more Omega 6 than 3. Chickens raised outside on a natu-ral diet contain high levels of Omega 3. Wild salmon are high in Omega 3, while farm-raised salmon contains much more Omega 6. The Omega 3 oils are high in fish liver oil, fish eggs, egg yolk, organ meats, and seaweed – the sacred foods of traditional cultures. These foods contain the Omega 3 fatty acids in the form needed by the body, EPA and DHA. Some foods, such as flax oil, contain precursors to these fatty acids which the body then has to convert to EPA. Not all people can make this conversion, so relying on flax oil alone for Omega 3 fatty acids can lead to a deficiency.
#9 - Consumed high-quality salt. Salt is an essential nutri-ent for protein digestion, the function of the adrenal glands and the development of the brain. The problem with salt in our diet today is that it’s a processed food, with all the trace minerals removed and aluminum added to make it free flowing. Whole salts like Celtic Sea Salt® (from the sea) or RealSalt® (from Utah) are healthy additions to the diet. Your salt should not be bright white but should be gray, beige or pink, indicating the presence of minerals in it.
#10 - Made use of bones. Traditional cultures commonly made bone stocks/broths, which are very high in minerals such as calcium, phosphorus, and magnesium in a form that is easy to absorb. Also, broths are rich in gelatin, which promotes digestion and helps support liver function. Tradi-tional cultures also ground bones up and made a paste.
#11 - Fed special foods to parents-to-be, nursing wom-en, and growing children, so the next generation would grow up healthy. These special foods were the sacred foods of the culture, such as raw butter and cream, fish liver oil, fish eggs, egg yolk, organ meats, seaweed, algae, etc.
For more information, I encourage you to read:Nourishing Traditions by Sally Fallon and Mary EnigCure Tooth Decay: Heal & Prevent Cavities with Nutrition by Ramiel NagelWeston A. Price Foundation - www.westonaprice.orgPrice-Pottenger Nutrition Foundation - www.ppnf.org
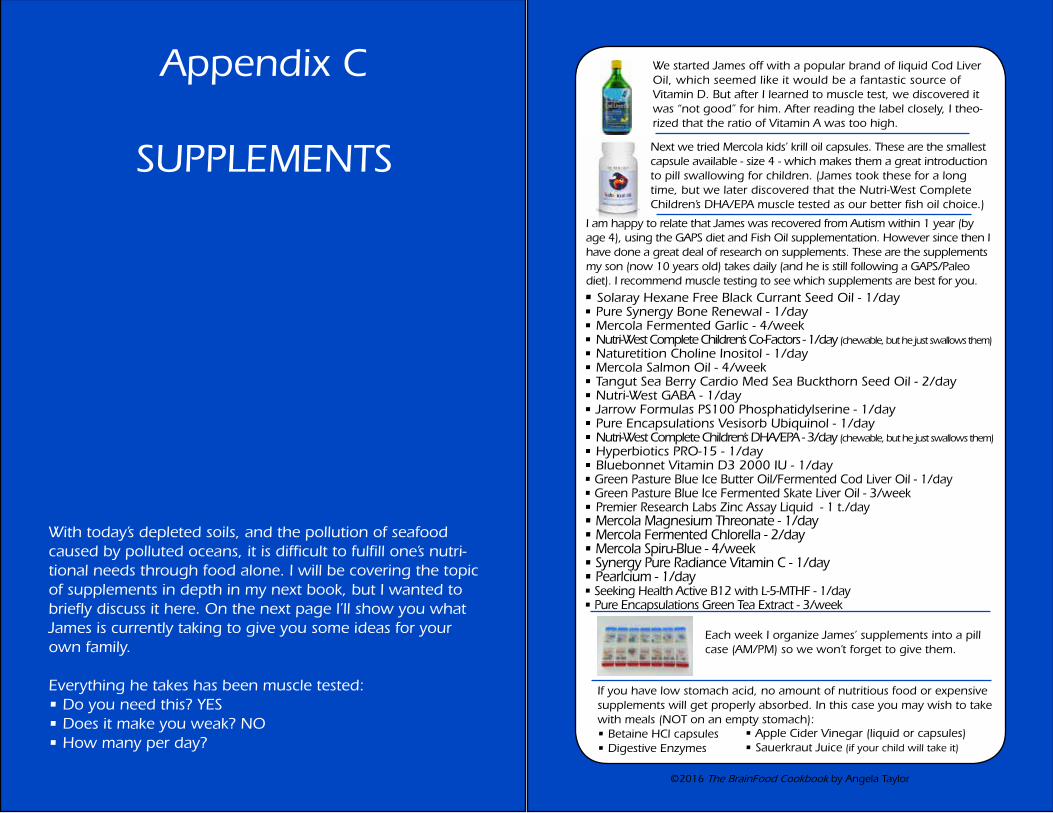
Appendix C
SUPPLEMENTS
With today’s depleted soils, and the pollution of seafood caused by polluted oceans, it is difficult to fulfill one’s nutri-tional needs through food alone. I will be covering the topic of supplements in depth in my next book, but I wanted to briefly discuss it here. On the next page I’ll show you what James is currently taking to give you some ideas for your own family.
Everything he takes has been muscle tested:• Do you need this? YES• Does it make you weak? NO• How many per day?
©2016 The BrainFood Cookbook by Angela Taylor
We started James off with a popular brand of liquid Cod Liver Oil, which seemed like it would be a fantastic source of Vitamin D. But after I learned to muscle test, we discovered it was “not good” for him. After reading the label closely, I theo-rized that the ratio of Vitamin A was too high.
Next we tried Mercola kids’ krill oil capsules. These are the smallest capsule available - size 4 - which makes them a great introduction to pill swallowing for children. (James took these for a long time, but we later discovered that the Nutri-West Complete Children’s DHA/EPA muscle tested as our better fish oil choice.)
• Solaray Hexane Free Black Currant Seed Oil - 1/day• Pure Synergy Bone Renewal - 1/day• Mercola Fermented Garlic - 4/week• Nutri-West Complete Children’s Co-Factors - 1/day (chewable, but he just swallows them) • Naturetition Choline Inositol - 1/day• Mercola Salmon Oil - 4/week• Tangut Sea Berry Cardio Med Sea Buckthorn Seed Oil - 2/day• Nutri-West GABA - 1/day• Jarrow Formulas PS100 Phosphatidylserine - 1/day• Pure Encapsulations Vesisorb Ubiquinol - 1/day• Nutri-West Complete Children’s DHA/EPA - 3/day (chewable, but he just swallows them)• Hyperbiotics PRO-15 - 1/day• Bluebonnet Vitamin D3 2000 IU - 1/day• Green Pasture Blue Ice Butter Oil/Fermented Cod Liver Oil - 1/day• Green Pasture Blue Ice Fermented Skate Liver Oil - 3/week• Premier Research Labs Zinc Assay Liquid - 1 t./day• Mercola Magnesium Threonate - 1/day• Mercola Fermented Chlorella - 2/day• Mercola Spiru-Blue - 4/week• Synergy Pure Radiance Vitamin C - 1/day• Pearlcium - 1/day• Seeking Health Active B12 with L-5-MTHF - 1/day• Pure Encapsulations Green Tea Extract - 3/week
Each week I organize James’ supplements into a pill case (AM/PM) so we won’t forget to give them.
If you have low stomach acid, no amount of nutritious food or expensive supplements will get properly absorbed. In this case you may wish to take with meals (NOT on an empty stomach):• Betaine HCl capsules• Digestive Enzymes
• Apple Cider Vinegar (liquid or capsules)• Sauerkraut Juice (if your child will take it)
I am happy to relate that James was recovered from Autism within 1 year (by age 4), using the GAPS diet and Fish Oil supplementation. However since then I have done a great deal of research on supplements. These are the supplements my son (now 10 years old) takes daily (and he is still following a GAPS/Paleo diet). I recommend muscle testing to see which supplements are best for you.

Angela Taylor is the mother of James, a boy who successfully recovered from Autism through the healing power of food. When he was diagnosed with Autism at the age of 2, conventional doctors and educators offered little hope for James beyond suggesting enrollment in a special school so he could learn to cope with everyday life. Not willing to give in and a strong believer in the impact of foods on the mind, Angela began her own research and experimentation in the kitchen by putting James on a strict diet based upon the Gut & Psychology Syndrome (GAPS) diet. Within days, James’ behavior improved dramatically. Over the next 12 months he went — from his initial developmental diagnosis in the 6th percentile — to being nearly asymptomatic. James is now a happy, bright eyed, and well-mannered child with many friends in his mainstream school and bright prospects for the future. James has literally been healed by the power of food and Angela is spreading the word to other parents and adults afflicted with disorders including Autism, Asperger’s Syndrome, ADD/ADHD, Dyslexia and Depression. Angela holds 3 degrees from John Hopkins University.
BrainFoodAutism/ADD Recovery Using the
SCD/GAPS/PALEO Diet
Cookbook
the
The BrainFood Cookbook contains recipes used by author Angela Taylor to successfully recover her child from Autism. The recipes are gluten-free, lactose-free, and based upon the Specific Carbohydrate Diet (SCD) and Gut and Psychology Syndrome Diet (GAPS) which are becoming ever more popular in the Autism community. The BrainFood Cookbook aims to inspire busy moms who are desperate to heal their children, but may be daunted by learning a whole new way of cooking. With clearly explained, del icious recipes, i t wil l appeal to both gourmet and inexperienced cooks alike. This book aims to demonstrate the power of food in changing lives like none other before it.