* free design supplement
TRANSCRIPT

THE ORIGINAL 2nd DECEMB 195 CL 129 NUMBER 3338 'DO- IT- YOURSELF'
OB MAGAZINE
FOR AL
HOME CRAFTSMEN
Also in tillfue:
A PHOTOGRAPHIC
CHRISTMAS CARD
COLLECTORS' CLUB
HOW TO MAKE A
PUPPET THEATRE
DESIGNING BY
SPATEERVVORK
SHIP MODELLING
PROJECTS FOR THE
FESTIVE SEASON
ETC. ETC.
* FREE Design
Supplement • It& aMM.R. .... ......... . .
e*:-> • ‘e l
liIjjiilili
IDEAL AS
GIFTS FOR
ALL YOUR
FRIENDS
SHIP'S WHEEL CALENDAR
Up-to-the-minute ideas
Practical designs
Pleasing and profitable things to make
5°

The making of a doll's house is a job well with n tse capabilities of any
handyman. With a fretsaw, a few simple tools and one of Hobbies kits, he can
make a lasting model of which he can be really proud, and one which is
certain to please its small owner. For those who have suitable wood of their own, design sheets can be purchased separately. Metal windows, doors and
fittings can also be obtained separately, and are listed in Hobbies Annual.
2 ft. wide
2 ft. high
16 in. deep
TUDOR DOLL'S HOUSE No. 237 Special
A large and attractive model of a typical half-timbered Tudor house.
Double-hinged front. Metal windows, doors and fireplaces, and all necessary
wood and fittings.
DOLL'S HOUSE. No. 2910
Another low-priced house. 17 in.
wide. The front is hinged to reveal
four rooms, a hall and landing.
New low-priced DOLL'S
HOUSE. No. 254 Special
Sturdy hardboard ensures rigid
construction. Back opens to
facilitate furnishing.
20 in. high Price 45/I I
Price 92/6
Price 59/11
DOLL'S HOUSE FURNITURE
Sets of designs for complete houses full of furniture are obtainable. For the
smaller house (No. 2910) the set costs 2/.. The set for the larger houses
(Nos. 237 Special and 254 Special) is 2/6. (Postage on each set 2d.) Com-
plete kits containing a set of designs and all necessary wood are available
price 8/11 (post 1/6) for the smaller house, and 19/3 (post 2/-) for the larger
ones.
LIG HTI NG SET. Electrify your doll's house with a
lighting set. Six bulb-holders, two switches, 6 yards flex and
full wiring instructions.
(post 9d.) Set 7/1 I
All supplies from branches, stockists, etc., or by post.
DEPT. 993
HOBBIES LTD DEREHAN NORFOLK
DON'T LET SOLDERING
LEAD YOU A DANCE
use
FLUXITE Soldering ceases to be a knotty problem the moment you use FLUXITE. Solder flows on easily and smoothly—and stays on. For over half a century FLUXITE has been the choice of craftsman and engineer alike and, in this age, its reliability and speed has made FLUXITE even more in demand than ever.
IT
SIMPLIFIES
ALL
SOLDERING
FLUXITE LTD., Bermondsey St., GM.83
London, S.E.I
146

LI K E its three predecessors, Decem-ber takes its name from its former position in the calendar. It was at
one time the tenth month of the year, as its name denotes. The Saxons called it Heilig-Monath, or holy month, and Giulerra. or first Giul.
DECEMBER Giul was the feast of Thor, which took
place at the winter solstice, so-called from lol or 01, a feast, and also the beverage of the time, from which probably we have our ale. Some trace our word Yule or Christ-
mas to this root. But there has been much controversy as to the real origin of the word. Some say it is derived from a
Greek source, and others from the Latin word Jubilum, a time of rejoicing, and the festival held in honour of Julius Caesar. But the more generally adopted view is that it is from the Gothic word Giul or Hiul, a wheel.
According to this latter theory the Yule festival took its name from its being the turning-point of the year, the season at which the sun makes a revo-lution in his annual circuit, and enters on his northern journey. December anniversaries, etc, which
may be depicted in stamps. 3rd, 1894, Robert Louis Stevenson
died — Samoa 1935, 6d. magenta — R. L. Stevenson's home 'Vailima' — I/-mint; 1/- violet and brown — Stevenson's Tomb — 1/9 mint.
5th, 1791, Mozart died — Austria
1922, 5 Krone blue — Mozart — 10d.
6th, Feast of St Nicholas — France 1951, 15 francs blue — St Nicholas — 9d. mint.
8th, 1856, Father Theobald Mathew, Irish advocate of temperance reform, died — Ireland 1938, 2d. black — Father Mathew — Id. used.
21st, 1879, Stalin born — Russia 1946, 30 kopecks sepia — Stalin — 9d. used.
25th, Christmas Day — Austria 1953, 1 schilling green — Child and Christmas Tree — 5d. used.
Indoor sports flourish with figure skating, table tennis, and badminton championships. Tobogganing and out-door skating takes place in the severer winters. Germany 1935, Winter Games, set of
3, 3/- mint. 'If it rain much during the twelve days
after Christmas Day it will be a wet year.'
nOfIS of the belt
IN the da» ut the Highland clans, the chieftain was a great man. As often as not he was a learned scholar, and
his word was law within the glens and moors where his followers li‘ed
fine eblenbeb
Scotch aueshe
70*PROOF ..59k era* autane.e4#41 . hate a édaeatalmele oroatterailp.to
NARDYS' CROWN BREWERY LIMITED
Mooches tor 15
«à•e; PRODUCE OF SCOTLAND
Wi hen a chieftain paid a formal sisit he v..as attended by a number of personal servants, who were called familiarly, 'the boys of his belt'. Highland pride was such that it soon passed into proverb. His bodyguard in peace was composed of his henchman (or right-hand man), poet (or bard), orator, armour-bearer, horse-leader, knapsack-carrier, piper, and piper's man, gillie to carry him pick-a-back over streams, and a dozen other strapping young fellows without especial duty save to do his bidding.
147

Make it truly personal
A Photographic Christmas Card
TH E first Christmas cards ever pro-duced were, undoubtedly, intended to convey seasonal greetings to
friends, and it is clear they were of a truly personal nature. With the advent of improved colour printing and cheap postage rates the greeting card soon be-came a commercial project, and the intimate touch has almost vanished from the millions which are printed each year. The majority of cards are beauti-fully printed, and one can have private cards specially made, but it is still doubtful whether these bear the same personal touch of the earlier cards.
By S. H. Longbottom
The only way to restore the true personal greeting card is by making it yourself of yourself, and photography provides the ideal medium. This is not such a task as it may appear, and once you have conceived the basic idea, you may make as many as you like, either in the traditional form of a small folding card with a stick-on picture, or one of the long narrow types now so popular. Many cards bear a familiar Christmas
scene of some kind, and if this type of design meets with your approval, and if you are reasonably good with a pen, you can quickly make a sketch whereby you can introduce yourself and, perhaps, the members of the family. Among such we may quote an old-fashioned stage coach, skating scenes and the like, but what could be more personal than your own initial ?
If you look at the ' Merry Christmas' card you will appreciate that the letter
— which is the initial letter of the writer's surname — formed the basis for the picture. True, it has been slightly elaborated to symbolize the 'home-stead', having a roof, chimney, garden and a door bearing the number. The family can be seen through three win-dows. Such a card can be quite topical, introduce the family, be amusing yet so personal that no one else could despatch a similar one. You may now be in-terested to learn how it was made. There was no other choice for the
initial than the letter L, and it was only a matter of making it rather more in-teresting and ornamental than the rigid Roman letter. You will see how it has been given a curved spine, a ridged top, the chimney and umbrella being added as afterthoughts. The same remarks apply to the cat and bird, while the tiny
This is an example of the initial type of card for making on whole-plate paper, ultimately folded in half longways of the paper.
border of flowers represented the garden, but also provided a base. The letter was sketched out on a large
sheet of paper approximately 10 in. by 8 in. and finally finished in Indian ink. Curved lines can be drawn with the aid
of spring curtain wire, pliable tubing or flexible curves. The message was also drawn in Indian ink. Three suitable photographs were
taken to portray the various members of the family engaged in a task connected with their hobbies, printed to about quarter plate size and then stuck on to the prepared sketch. Finally, the win-dow frames were added by means of white ink. With this original prepared it only remained for the whole to be photo-graphed to produce a single negative. There are two ways of making a copy
negative from such material, and both are suggested for your approval. You may pin the design to a wall, taking a direct photograph, but the disadvant-ages of this are that you must be able to approach very close to the design, or the negative will be too small to manipulate. If you possess, and are conversant with, supplementary lenses you will be able to take a copy with your camera in this fashion, but you must ensure that the original is evenly illuminated. The other method involves the use of
the enlarger, and is simplicity itself. The design is laid on the enlarger baseboard and the lens focused as though making an enlargement, that is by first making a test focusing with a negative, so as to include all the design. It is now a matter of enlarging in reverse. In place of the normal negative in the carrier sub-stitute, a piece of unexposed material, directing a light on to the design — but note the following points.
It is best to use special copying
This is a picture made for a stick-on card. The drawing was first sketched out, the figures specially posed for the ultimate positions and the photograph attached to the drawing.
1 48

material such as commercial ortho cut film for this process, and which is specially prepared for copying. You must also ensure that no stray light penetrates the chamber holding the film. The writer takes the precaution of 'bandaging' the slot in the enlarger where the carrier fits, using black material, and this successfully prevents the entry of the light.
Finally, the original should be evenly illuminated from both sides of the enlarger baseboard. The balance of the light can be examined by placing a ruler on edge centrally on the design and observing whether there is any shadow. The lights are then adjusted until any shadow disappears, and obviously the two lamps must be of the same wattage. The exposure with two 40 watt lamps may be about 4 seconds when using the material mentioned, but a test is recommended.
Since an enlarger lens is specially de-signed to deal with a flat plane, this method of copying is possibly superior to the normal direct camera method. The master negative should be fully developed to produce good contrast, and when this has been prepared, you can commence the production of the cards. The greeting card itself can take
many forms. You may buy blank, single-fold cards with a message printed on the inside and, perhaps, the word 'Greetings' on the front cover where there is a space for a stick-on picture. This type varies in size and can be quite expensive. You must appreciate that such cards involve the printing of the picture to a requisite size, trimming and mounting, but for some time now I have found it both cheaper and quicker to make my cards
from whole-plate double weight printing paper, exposing one half only of the sensitive side to give a long narrow picture. For this work you should only use papers with a dull matt surface. The cards are quite easily made to
this pattern if a suitable mask is pre-pared as shown in the diagram, not
r -
MASK
PAPER
CARDBOARD BASE
unlike a wallet, allowing one half of the paper to be masked and protected while the other half is exposed. This mask is made from a manilla folder which is quite opaque. The picture is focused as usual, but to fit the one half of the card, the procedure then being as usual. On completion of the processing the prints are immersed in a glycerine bath to make them flexible. This avoids
any possibility of cracking when folding, and a suitable bath can be made by adding two parts of glycerine to every hundred parts of water. After soaking for five minutes in such a, solution, the prints are allowed to drain, and when almost dry, are left under pressure until flat. The next step involves scoring down
the centre on the inside for easy folding, after which they are stacked together and left under pressure for some time. Another handy gadget which speeds the process of scoring is a cardboard tem-plate made exactly half the width of the print, and which eliminates the necessity for measuring each time.
If you wish to improve the final appearance of the card, we can suggest one or two other treatments which may be of interest. For example, the card may be tinted or toned, or you may deckle the edges of the front cover. The latter is done by stacking the cards on edge and tapping them at irregular distances with the edge of a ruler. If only a few cards are to be so treated, they should be placed between two thin pieces of card-board. Each edge is similarly treated in turn, the cards being held between the fingers and thumb, but note that the taps must not be blows, or the deckling will be too severe, and that it is customary to treat only the front edges in this fashion.
It is reasonable to ask how other initials could be used. With all those letters having an aperture like B, D, 0, etc., we already have a frame, but where we are confronted with straight line letters such as L we have little alternative but to adapt them as illustrated. A little 'doodling' with a pencil can solve this problem very quickly.
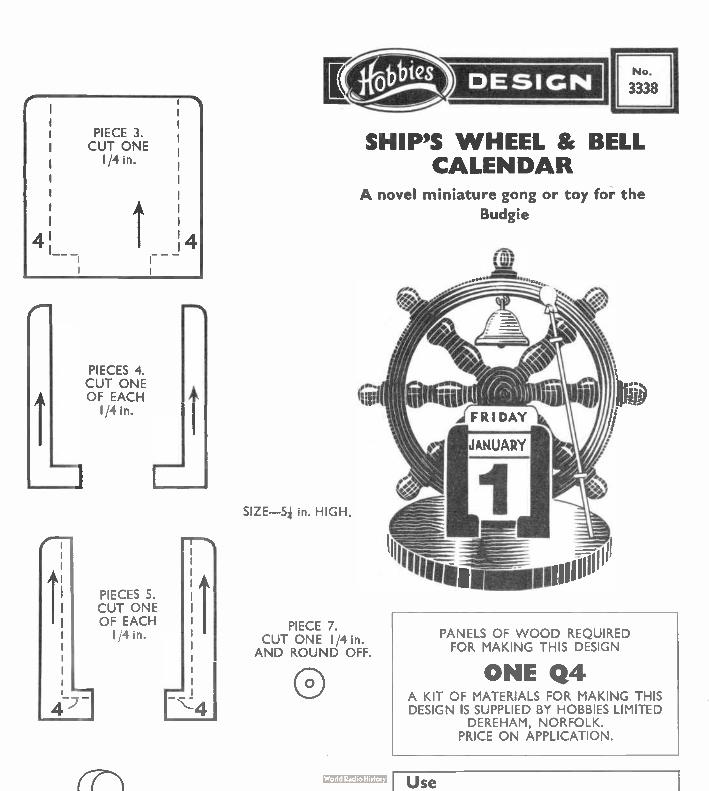
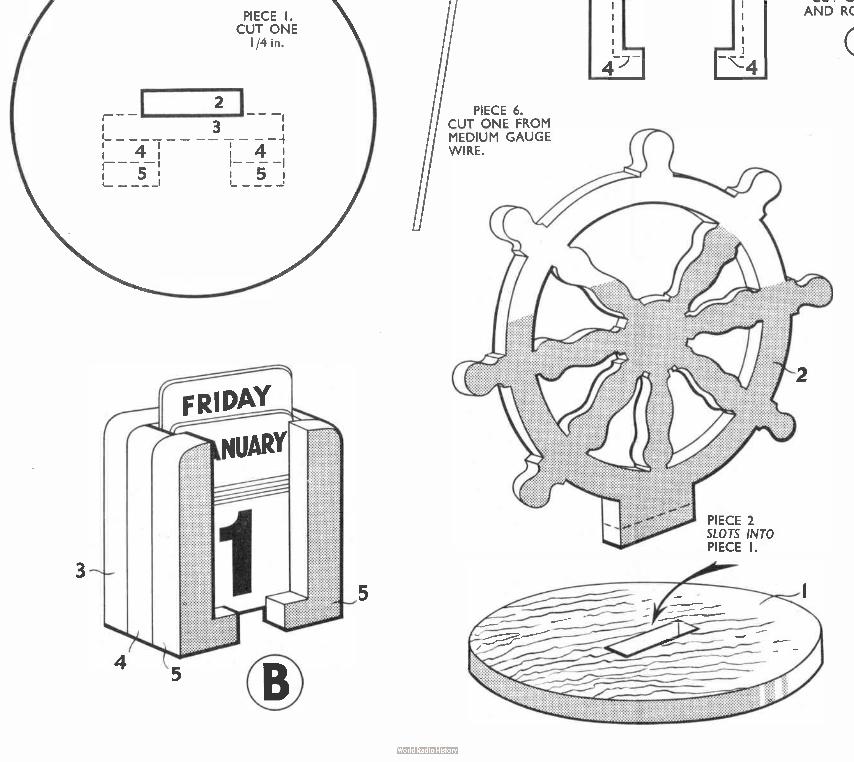
Our Design subject
A. PERPETUAL calendar is always a welcome gift for friends, and this design, which has as its motif
a ship's wheel, should fill the bill admirably.
It has provision for calendar pads to change the date each day, and as an added feature there is a miniature ship's bell together with hammer for striking, which is of a decorative rather than utilitarian use but, nevertheless, en-hances this pleasing novelty. Owners of budgerigars will possibly find that when they let their pet loose to fly around the room, it will make for the bell and peck at it with its beak.
Just over 5 in. high, the model stands firmly on a circular base. White plastic calendar date pads are included in the Hobbies kit, and the design is an ideal suggestion for making up as New Year's gifts. The calendar holder when made up is glued to the wheel, which then slots
Making up the into the base. If it is desired to send the article through the post, for easier pack-ing and less risk of damage, the base should not be fixed in position but should be packed flat behind the wheel. The model can then easily be assembled by the recipient.
All the parts which make up the model are shown full-size on the design sheet. These should be traced and transferred to their appropriate thick-nesses of wood by means of carbon
Hobbies Kit No. 3338 for making the Ship's Wheel Perpetual Calen-dar contains all wood and materials including calendar pads. Kits from branches, etc., price 5/- or by post (9d. extra) from Hobbies Ltd, Dereham, Norfolk.
Ship's Calendar paper. Next cut them out with a fretsaw and clean up well with glasspaper. Round off as desired, in particular the spokes on the ship's wheel. The assembly of the parts which make
up the holder for the calendar date pads is shown at A and B on the design sheet. These parts are glued together, and the whole is then glued in position on the wheel as indicated by dotted lines. The hammer is made from a piece of
wire (piece 6), on the end of which is pushed piece 7. Cover this head with a small piece of cloth or thin leather, and secure with thread.
Before adding the finish, clean up all parts thoroughly and fill the grain if necessary. The usual finish will be by painting or staining and polishing etc. Insert the screweyes for hanging the bell and securing the hammer. The bell screw-eye should, of course, be opened, as shown on the finished illustration.
149

Electrical Guide- 5
A.
REVERSING MOTORS
W IT H many models it is useful to be able to reverse the direc-tion in which the motor runs.
This saves the need for any separate, mechanical reverse gear in cranes, vehicles and similar models, because the load can be raised or lowered, or the vehicle made to travel backwards, by reversing the motor. With a train, rever-sing is particularly useful for realistic working.
By 'Modeller'
There are two ways of reversing an electric motor, the simplest being suitable for permanent magnet motors only. Such motors have a horseshoe-shaped permanent magnet for the 'field magnet', in which the armature runs, and can only work from direct current (battery or rectifier circuit). Very many model motors are of this kind. The permanent magnet is often visible. If not, the motor is shown to be a permanent magnet type if it runs in the reverse direction when leads to the battery are changed over. Other model motors, especially of
larger type, have a wound field magnet. These will run from direct current, or alternating current (mains transformer). Simply reversing connections to them does not reverse the direction in which they run. They can be reversed, however, though the circuit is rather less con-venient than with the permanent magnet motors.
Reversing a per-mag motor The direction of running is reversed
when the polarity of the direct current supply is reversed, as mentioned. Any switch which will reverse polarity in this way will thus act as a reversing switch.
TO BATTERY
Fig. 14 shows how a switch of this kind works. At 'A' the switch arms, shown by arrows, make contact with the switch studs as indicated. If connections are followed, it will be seen that the motor receives a supply with positive and negative polarity as shown. But when the switch is set in the position shown at 'B', the polarity of the supply to the motor is reversed. All such reversing switches operate in this way, though the actual construction of the switch may be different. The switch should be of a kind where
contact with one set of studs is broken before contact with the second set is made. If this is not so, the battery will be short circuited when the switch is in its intermediate position.
TO BATTERY
TO MOTOR
CONTACTS
ir
SWITCH BLADES
Fig. 15—A double-pole reversing switch
Such switches are called 'double-pole double-throw' to indicate that two circuits are switched to two positions. The switch positions can be marked 'Forward' and 'Reverse' with 'Off' in the central position where no contact is made.
+ — B. .1. TO MOTOR TO MOTOR
Fig. 14—Reversing a permanent magnet motor
A double-pole double-throw knife switch, with connections, is shown in Fig. 15. Two switch blades are joined by an insulated handle. Two leads are taken from the blade pivots. The other leads are taken from two contacts, which are wired with crossed leads to the re-maining contacts, as indicated. A switch of this kind is fairly
easy to construct. If the model is run from a rectifier, no bat-tery is required, of course. Another type of switch is
shown in Fig. 16. Three bolts, screws or contact studs are sufficient, because the centre
150
one may be under either of the switch blades. The blades are connected by an insulated link of wood, ebonite, etc., so that they move together. In Fig. 16, the switch is off. When both blades are moved one way, the model runs forward; when moved the other way, the model will reverse. The blades should bear upon the studs to obtain good contact, and such a switch is easily made with a little care. A speed control, of any type dealt with
in the last article in this series, may be included in circuit. With a train, the engine can then be run at any desired speed in either direction, and this gives very realistic working. If more conven-ient, the speed control can be placed be-
TRACK
TO DC SUPPLY
Fig. I6—Speed control and reverse for railway
tween reversing switch and supply (battery or rectifier). The items can be combined on a small control panel. The great advantage of permanent
magnet motors lies in the fact that the reversing switch can be placed anywhere in circuit — near the motor, or near the battery or rectifier.
For A.C. type motors Larger motors often have wound field
magnets, and these have the advantage that they can run from D.C. or directly from the low-voltage A.C. provided by a mains transformer. Against them is the disadvantage that reversing the supply does not reverse the direction of running. To reverse such a motor, it is neces-
sary to reverse connections to the field winding, or to the armature, but not to both. When this is done, the motor will run in the opposite direction, it making no difference whether current is drawn from a battery or transformer.

Several connections are needed from the motor to the switch, so the switch usually needs to be near the motor. It is, indeed, often mounted on the motor itself. This is not much disadvantage with a crane, lift hoist, and some vehicles. But with a train it would mean that the switch had to be in the engine, so this kind of motor is not very suitable for trains.
Connections for an A.C. type motor are shown in Fig. 17, current being drawn from a transformer instead of a battery, if this is more convenient. The field consists of a fairly large
winding, with two leads coming from it. With a non-reversing motor, these leads often go directly to the brushes, or to the terminals on the motor. The brushes shown are springy metal
strips, but some motors will have brushes inside small tubes, and fitted with springs to press them against the armature com-mutator.
In Fig. 17, moving the switch from one position to the other reverses the supply to the brushes, but not to the field, which is connected straight to the battery. If more convenient, the brushes may go to the battery, and the field to the reversing contacts. When the field and armature are wired
in parallel, as shown in Fig. 17, the double pole reversing switch cannot be used for off switching as well, so the usual on/off switch should be kept in circuit. A very compact switch, with no off position, will thus be suitable. A small double-pole toggle switch, as used in mains electrical equipment, would be satisfactory, and would take up very little space indeed.
In some motors of this kind, field and armature are wired in series. With this type of motor, one motor terminal will go to one end of the field winding. The second field connection will be taken to one brush, and the remaining brush will go to the second motor terminal. A re-versing switch, to change over the field, can be added in just the same way. The reversing switch may also have an off position, when field and armature are in series.
It is worth noting that the working voltage of the motor can be changed by altering from parallel to series wiring. For example, suppose a 6 volt motor has field and brushes connected in parallel. The field winding then receives 6 volts, and the armature also receives 6 volts, through the brushes. But if the field and brushes were wired in series, as explained, the motor would then be suitable for running from a 12 volt supply.
It is best to let the model come to rest, before reversing it, especially if it has much momentum. Switching off for a few seconds, or pausing with the switch in the off position, will allow this.
FIELD AR ATURE BRUSHES
• TO \je.....--"r BATTERY
DOUBLE POLE SWITCH
Fig. I7—Reversing a wound field magnet motor
It should always be remembered that if a model electric motor is to run properly, it should be allowed to reach quite a high speed. With many models a reduction drive of fairly large ratio will thus be needed. A worm drive is often used,
because it has a high ratio. Witn cranes, elevators, and similar models, the worm also acts as an automatic brake, because though the worm, fitted to the motor, can drive the gear with which it engages, the gear cannot turn the worm. Light belts, and gearing, are also used for reduction drives. The whole should turn freely, so that power is not wasted. With some models, a very high ratio
will be necessary. For example, consider a model roundabout, which is to turn at a maximum speed of 25 revolutions per minute (RPM). If the motor runs at 2,000 RPM, the reduction ratio will need to be 2,000 divided by 25, or 80:1. A 20:1 worm drive and 4:1 gear drive would do this (20 x 4 = 80). Final ad-justment of speed can, of course, be arranged with a speed control resistance, as explained. But some model motors run at very high speeds, 4,000 to 6,000 RPM not being unusual, and it is then very important indeed that sufficient re-duction gearing is present, especially with a heavy model.
NEXT WEEK: Transformers for motors
and lamps
Model Greenhouse in S. Africa
AN example of the delightful show-piece which can be made from Hobbies Design No. 3300 is seen in
this picture from sunny South Africa. Mrs V. Barry of Green Point, Cape
Town, who lives in a flat, writes express-151
ing great delight with the design and the finished model greenhouse, in which various kinds of plants are growing well. We particularly like the additional pro-vision of three hanging baskets, which can easily be modelled to size from wire by any handyman.
This miniature greenhouse is much en-joyed by people who unfortunately have no garden and yet love to tend plants and watch them grow. This they can do all the year round without having to go out of doors, and they can move their show-piece from room to room, as it is entirely self-contained. There is no glazing' as the windows are of tough transparent plastic sheeting, nailed in place.
The model is an exact replica of the real thing and will easily take eighteen pots and saucers, for which staging is pro-vided. In Hobbies editorial office we have brought along seedling cacti quite success-ally in the prototype model. The door and roof light are hinged for ventilation, and one side of the roof is hinged to facilitate watering. This, we have found, is quite easily done with a squeeze-type polythene bottle — without removing the plants.
Hobbies Kit No. 3300 contains all the materials for making this model, and also included are twelve pots and saucers — to give you a start. Kits are obtainable from all branches, stockists, etc, or post free from Hobbies Ltd, Dept 99, Dereham, Norfolk, price 39/6.
Full instructions for making
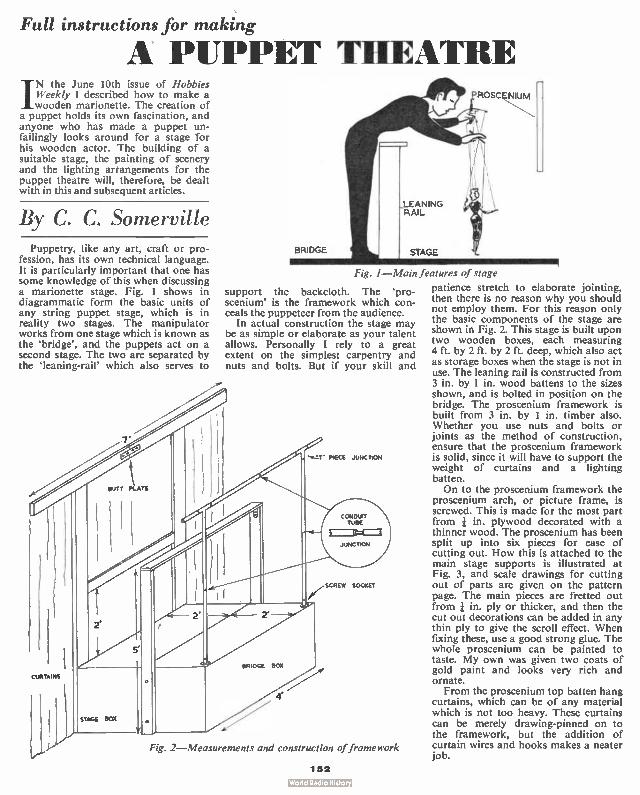
A PUPPET THEATRE
. IN the June 10th issue of Hobbies Weekly I described how to make a wooden marionette. The creation of
a puppet holds its own fascination, and anyone who has made a puppet un-failingly looks around for a stage for his wooden actor. The building of a suitable stage, the painting of scenery and the lighting arrangements for the puppet theatre will, therefore, be dealt with in this and subsequent articles.
By C. C. Somerville Puppetry, like any art, craft or pro-
fession, has its own technical language. It is particularly important that one has some knowledge of this when discussing a marionette stage. Fig. I shows in diagrammatic form the basic units of any string puppet stage, which is in reality two stages. The manipulator works from one stage which is known as the 'bridge', and the puppets act on a second stage. The two are separated by the leaning-rail' which also serves to
CURTAINS
STAGE BOX
LEANING RAIL
BRIDGE
Fig. 1—Main features of stage
support the backcloth. The 'pro-scenium' is the framework which con-ceals the puppeteer from the audience.
In actual construction the stage may be as simple or elaborate as your talent allows. Personally I rely to a great extent on the simplest carpentry and nuts and bolts. But if your skill and
PIECE JUNCTION
SCREW SOCKET
41'
Fg. 2—Measurements and construction of framework
152
PROSCENIUM
patience stretch to elaborate jointing, then there is no reason why you should not employ them. For this reason only the basic components of the stage are shown in Fig. 2. This stage is built upon two wooden boxes, each measuring 4 ft. by 2 ft. by 2 ft. deep, which also act as storage boxes when the stage is not in use. The leaning rail is constructed from 3 in. by 1 in. wood battens to the sizes shown, and is bolted in position on the bridge. The proscenium framework is built from 3 in. by 1 in. timber also. Whether you use nuts and bolts or joints as the method of construction, ensure that the proscenium framework is solid, since it will have to support the weight of curtains and a lighting batten. On to the proscenium framework the
proscenium arch, or picture frame, is screwed. This is made for the most part from in. plywood decorated with a thinner wood. The proscenium has been split up into six pieces for ease of cutting out. How this is attached to the main stage supports is illustrated at Fig. 3, and scale drawings for cutting out of parts are given on the pattern page. The main pieces are fretted out from in. ply or thicker, and then the cut out decorations can be added in any thin ply to give the scroll effect. When fixing these, use a good strong glue. The whole proscenium can be painted to taste. My own was given two coats of gold paint and looks very rich and ornate. From the proscenium top batten hang
curtains, which can be of any material which is not too heavy. These curtains can be merely drawing-pinned on to the framework, but the addition of curtain wires and hooks makes a neater job.

BAT TEN
CURTAIN
LEAD SHOT
Fig. 6— Wing pieces
The main curtain or 'act drop' is worked by means of a lead counter-weight, as shown in Fig. 4. This curtain should be made of some rich looking material, deep blue velvet being ideal if used with a gilt proscenium arch. Wood strip is tacked into a hem at the top of the act drop and lead shot inserted into the bottom hem to ensure that the curtain hangs well. The simple mecha-nism for raising and lowering the cur-tain can clearly be seen in Fig. 4. A very important addition to your
stage is the hanging rail for the puppets when they are off stage. This rail can be seen in Fig. 2, and is constructed from conduit pipe (a metal tube used by electricians). Alternatively this could be made in aluminium tube, which has the advantage of lightness, but is more expensive. The 'backcloth' can be a perfectly
LEAD COUNTERWEIGHT
STAGE
11
/".
SASHCORD
Fig. 4—Curtain raising mechanism
plain sheet of light blue linen, or ply-wood painted blue, to act as a 'sky cloth'. In contrast to this you can have backcloth painted to depict any scene you care to name. The actual painting of the backcloth will be dealt with later.
PLYWOOD PROFILE WING
FOLDING SCREEN
Fig. 3—The proscenium arch
SEE
PATTERNS
ON
PAGE
155
Fig. 5 shows how hooks are screwed at either end of the leaning rail. From these the backcloth of unbleached calico is suspended by means of a wooden dowel running through a hem at the top of the cloth. The 'wings', or
side scenes, have a special purpose to fulfil, apart from their scenic value. They prevent the audience seeing off stage. They may be made in a variety of forms, such as folding screens.They can stand on the
LEANING RAIL
HOOK
DOWEL ROD
Fig. 5—Hanging the backcloth
floor where needed, or be suspended as curtains on swinging rods affixed to the back of the proscenium. Some details of wings can be seen in Fig. 6. As folding screens they can be made of plywood with either a linen hinge or small brass hinges. Wings with an irregular profile to suggest trees or buildings can be tackled by anyone with a fretsaw. The main structure of the theatre is
now complete. It remains to paint the scenery, wire the lighting and, of course, put on a show. These points will be dealt with in another article.
In the present article I have attempted to outline the basic principles of puppet stage construction without laying down too many rules. A bigger stage may be built along similar lines, and many innovations can be added. If any reader finds difficulty on any point I will do my best to be of assistance if he will drop me a line care of the Editor.
153

SPATTER WORK DESIGNING
IT may be difficult to fully appreciate the many advantages of spatterwork designing from the few examples we
give in black and white, but when we say that blendings of various colours on either white or coloured papers is possi-ble you will realize there are limitless combinations. Moreover, only a mini-mum of equipment is required and the method can be applied for decorating such as wall panels, woodware, paper bookbindings and greetings cards.
Briefly, the method consists of spray-ing colour on to paper or objects in conjunction with masks or stencils, using an old toothbrush or nailbrush as equipment. Some poster writers use a spattergun — something like a garden spray — but there is no need to go to this expense since the ultimate effect is no different.
eceakeie".."Weee Iel.iegrn:»614
Fig. 2
Trim the bristles of an old toothbrush so that they are about + in. long, and even in height. A nailbrush, being a little larger, would obviously cover larger areas in a shorter period and should be similarly trimmed.
Designs are made from masks and stencils, Fig. 1 being a good example of a Dutch scene, and similar stencils can be bought from most artists' materials shops. The stencil is laid on the paper and the spatter applied but we must emphasize that more than one colour
ete;
-feefferet - •
ffle;je.rjke..,'_e*Ekrete Fig. I
can be used. To produce this picture further protective masking was placed all round the edges of the stencil to prevent the colour from spreading. As you will see, Fig. 2 is surrounded
by a border, involving a double spraying. First a piece of lightweight cardboard is prepared to the same size as the paper with an aperture cut out a little smaller than the stencil. In operation the stencil and border mask are laid together on the paper and the spatter applied. The stencil
By H. Mann
is then removed with the border and the oblong cut-out replaced over the figure of the boy, the border being spattered as shown.
Fig. 3 is different in that it shows what can be done by the use of simple semi-circular and line masks combined with graded spattering. This type of design is most effective when applied in colours on cork table mats, bookcovers and other small objects. We must repeat that it is essential to consider your designs in terms of colour rather than black and white specimens.
Poster paints are most suitable for this type of work if mixed to a reasonable consistency, although you may use water colours, dyes, inks and the like, while metallic powders mixed in varnish and thinned with turpentine give inter-esting results. Any tough paper can be used for preparing your own stencils although you can buy specially prepared oiled paper for this purpose. When a stencil is made from something like drawing paper and likely to be used many times it is an advantage to apply a thin coating of a solution made from half linseed oil and half turpentine, followed by an application of varnish when dry. You can easily make your own stencils from original designs and
154
perhaps the observation of some pic-tures will give you an idea.
Violent clashes of colour should be avoided and you must remember the combinations which arise through the mixing of the three primary colours. A heavier application of one of these will modify the resulting hue and you are advised to make several tests on spare pieces of paper to see the various com-binations. Red and yellow will blend together with good effect, producing orange tones where they mingle, but retaining their own colours where alone. And it is partly in this blending of col-ours that the work becomes most fascinating.
Returning to the actual process of spattering, you are warned to cover the
Fig. 3
table with a sheet of newspaper or you will certainly spatter the table top! Lay the paper on the newspaper with the stencil on top, the latter being held firmly in position by pins, weights or anything convenient. The colours are mixed in saucers and ready to hand so charge the brush by gently dippi,ng into the liquid. It is essential that surplus colour is expelled immediately, other-wise you will produce ugly splashes instead of the fine spray required. It may be advisable to work off excessive

colour on to an old piece of newspaper before starting on the work in hand. When the brush is ready direct it to-wards the paper, drawing a nail — or piece of thin stick — across the bristles towards the user. This causes the springy bristles to discharge a light spray of colour where directed. If the brush is held about one foot above the paper the spray will be finer and cover a larger area. When a graded pattern is the ob-jective, as in Fig. 3, work a little nearer but be careful not to overload the brush or the effect will be spoiled. The fine spatter does not take long to
dry but do not be in too big a hurry to remove the mask or stencil. Bear in mind the danger of smearing the edges of the design by too hasty removal, but there is no reason why you should not have several stencils and pictures in process at the same time, all ready for the same colour. After applying the spatter, wash out the brush, dry with a cloth and no doubt the first application will be dry and you are ready for the next. Further reference to Fig. 3 will reveal that the masks have been super-imposed and in such instances it is always necessary to cover the as yet
untreated areas at the base of the paper with a mask. As already indicated, the method has
numerous applications and the produc-tion of small things like greetings cards is very quick once you have prepared your own original design for an appro-priate picture. Use the traditional form of card folded down the centre, with the picture on the front. Here we have an-other example of the need for protection during processing. Do not forget to cover that half which is to be the back. Scoring and folding is best done after the picture has been made since it is difficult to make a folded card lie flat. Anyone can be an inventor of spatter
designs, and experiments with stencil cutting or applying colour will reveal new methods of working. You can use the edges of line stencils or odds and ends like string, buttons and pins; or by using both the negative and positive stencils separately, or even by reversing a mask from right to left, while coins, plates and saucers will produce circular effects without making masks. The latter are also heavy enough to keep paper quite flat. Normally you will find it convenient
Next Wednesday's issue will con-tain patterns for making a model 1906 Ford car and a picture in marquetry. Also Christmas pro-jects and other modelling and handyman features.
MAKE SURE OF YOUR COPY
by placing a firm order with your newsagent.
to work on a table, especially where small items are concerned, but large pieces can be more easily spattered if hung vertically on a wall or board and much depends on the particular project. Do not overlook the fact that spat-
terwork can be extended to a whole range of craft products such as white woodware, cork mats, linen handker-chiefs, and even wall panels if the appro-priate colours are used. Inks and dyes may be necessary for some of the latter suggestions but before attempting them you are advised to gain some experience by practice on smaller objects.
Scale Patterns for Puppet Theatre Proscenium CUT TWO I IN.
CUT TWO 114 IN.
0 G >%
4. o .... 13,
l'
CUT TWO 8 11 IN.
CUT TWIN. O 118
CUT TWO 118 IN. CUT TWO 114 IN.
I SQUARE: i
3 INS
155

Gummed strip modelling
Masks for the Festive Season
M OULD I NG and modelling with moistened gummed strip is now an established handicraft
and one which may be carried out by young and old at a very reasonable cost. The work is simple after some initial practice and the results obtained are most rewarding.
First, let us say a few words relative to the material. Gummed sealing tape is obtainable in shops and handicraft stores in small, medium and large sized coils, brown being a popular colour. In addi-tion colours are available, so that one may make a selection in a colour to suit the work in hand. The coils are made in ¡ in. up to 4 in. widths, one inch being a popular width for making up many types of models. While the tongue is the most natural
moistener, a sponge or damper should be used where there is a lot of fixing to be done. The adhesives used in these tapes are based upon animal glue, and this can give a ' taste' after a little licking.
The mould or former All forms of moulding or modelling
from wet strips of tape are produced from a previously made up wooden former or master mould. Either carved wood, clay or Plasticine may be used as a basis upon which to make up a mask or head. This initial work should be care-fully carried out, the work of hand modelling the clay or carving the wood into a shape being accurate. Once a master mould has been produced, dozens and dozens of masks may be made for the group or the party, and with some slight variation in finish and decoration, they may be made to look individual, produced for various oc-casions and folks. Masks of various kinds are as popular
as ever for the carnival or the stage, for the party or the concert and other festive occasions. There are life-size masks or they may be made up in miniature form for the purpose of puppetry and the miniature stage. Added decoration gives the finished appearance of the comic mask, while well defined features may be added for serious party and theatrical work. Having made up the master former or
mould from clay or Plasticine, the mould should be painted in order to give it a really smooth surface which will also be non-porous. This smooth surface is most essential to good work. The mould should then be covered neatly with sodden tissue paper, pressed home into and around the shape. This is only
a temporary measure used in each individual piece of work and it serves to prevent the first layers of moistened gummed tape, when applied, from stick-ing to the mould or former. Lengths of wet tape should be applied to the tissue base in small pieces of approximately
By F. T. Day
half an inch in length. Small pieces in such sizes knit well and may be super-imposed, giving added strength. The small pieces may be initially placed in any order, but the second lot of wet
Fig. 1.—Lady's mask for the party. First the mould, then the simple applica-tion of wet tape, followed by the facial decoration and curly hair.
Fig. 2.— Boys' mask. A mask with added fea-tures - for the party.
strips should be laid out as shown in our illustration, so that they form an attrac-
tive built up finish or design. Each piece is slightly overlapped to give strength. Each section of the face or mould must be worked as a separate unit, i.e. the nose, ears, forehead and side face must be treated individually, the tape being affixed in suitable directions.
After the initial applications of small pieces of wet tape are practically dry, trim off the edges of the mask and care-fully ease off the face mask from the former or mould. If a small part of the shape thus formed has stuck to the former, ease a piece of thin stiff card between the former and the mask and thus separate the two. Dust the mask former with french chalk to prevent any subsequent tendency for the mask to stick to the former and then replace the mask on to its mould for further and finishing treatment.
This is carried out by building up layers of longer strips of tape in neater form overlapped, and the final layers of wet tape should be laid with a definite neat pattern or style to be represented in the finished mask. The finished mask may now be slipped
off its mould. Holes are neatly made for the eyes and the mouth and the eyes added as cut out additional pieces. In the final make up, at least three layers of tape should be used for strength and flexibility.
Facial decoration
In the case of masks for the ladies, the hair may be added by fixing a number of long thin cut strips of paper with ad-hesive, and curled to represent wavy hair. Paper rolling or waving may be carried out by pulling up strips of paper under a ruler. The pull and the pressure give the curl to the strip. Eyebrows may be added by tinting and the face generally painted, coloured or decorated in any style to suit the use and application of the mask. Elastic cords are added for the purpose of fixing. Frills and fancies cut from sculptured paper may be added for collar and tie. Before any tinting or facial treatment takes place, sanding down the mask with a fine glasspaper will give a smooth, skin-like effect. The face treatment on the mask may be comic for the farce, jovial for the party or fancy dress dance, or serious for the play. Treatment with suitable hard finish
copal varnish will render the masks very durable and waterproof should they be required for use in the open air.
(F.T.D.)
156

BRITAIN'S NEW NAVY offers boys
of 15-171
one of the finest
Engineering
Apprenticeship
Schemes
in the world
As an Artificer in Britain's New Navy you
will receive a fine training in engineering and
will enjoy all the travel and variety that a
sPafaring life has to offer—plus special high
rates of pay.
Altogether there are five highly specialised
Artificer Branches :—Electrical, Engine Room,
Ordnance, Aircraft, and Shipwright and at
least forty per cent of all Technical Officers
Apprentices now have the opportunity to qualify for the Ordinary National Certi-ficate during their training. Basic pay, marriage allowances and living-out allow-ances have been increased—in fact, the Royal Navy has a great deal to offer you.
You're better off
in the Navy .
in the Navy will be promoted from the
Lower Deck.
The age for entry is between 15 and l7lt and
if you do not possess the G.C.E. (or S.L.C. or
equivalent) with passes in Mathematics and
Science or technical subjects you will be asked
to take an entry examination.
The closing date for applications for the
next entry is 15th January, 1960.
To: The Admiralty, Director of Naval Recruiting (Dept. HS 14) Queen Anne's Mansions, London, S.W.1 Please send me a copy of the illustrated booklet
'ARTIFICER APPRENTICES IN THE ROYAL NAVY'
NAME
ADDRESS
AGE
AA7
157

THE GARDEN
6, POOL
IF the bog garden is defined as an area of permanently waterlogged soil, most of the plants described as
Marginals qualify for inclusion. In addition, the following plants, all in-habitants of acid, moorland bogs, can be grown.
Drosera. The Sundews are interesting little insectivorous plants that should be set in sphagnum moss or bog peat with ample moisture at the roots. Their leaves are covered with glistening, viscid hairs to which insects are attracted under the impression, presumably, that they are refreshing drops of dew. Thereupon, they adhere to the leaves, become en-folded, dissolved by the digestive juices, and finally absorbed by the leaves.
Other members of the Drosera family are the Longfolia and the Rotundifolia, both of which are also covered with tiny white flowers on short 3 in. stems.
Narthecium ossifragum. Looking re-markably like a very tiny Gladiolus, the Bog Asphodel has stiff little sword-shaped leaves and a 6 in. spike of dainty yellow flowers. They flower around July-August and grow to a height of 8 in. They are followed by tiny orange fruits.
Eriophorum angusifolium. On moor-land bogs the white drifts made by the Cotton Grass are a striking spectacle. The silvery, silky tufts are borne on slender stalks, 12-15 in. high. Bog plants are normally sufficiently
advanced in growth to be ready to move sometime in May, and the plant-ing season continues until mid- or late July. Bog plants require an open, un-shaded position.
Waterside plants The banks of streams or natural
pools provide the ideal conditions for plants which enjoy a rich soil but are never really saturated. These conditions
WATERSIDE PLANTS can be simulated around a concrete garden pool by adding liberal quantities of leaf mould to the existing soil and the use of the hose during dry spells. Their striking foliage is perfectly in keeping with the oasis-like character of the pool. Whilst they will all flourish in the sun, provided the soil remains moist, they will grow with equal freedom in semi-shade.
Astilbe. This plant, commonly known as Goat's Beard, is closely related to the Spiraeas previously described, and has attractive palmate foliage and massed plumes of flower.
Varieties of the family are Etna, Fanal, Red Sentinel, Salland, Venus, William Reeves and White Gloria. All have flowers of red or pink except the last named, which bears creamy, white blooms. They grow from 4-3 ft. in height.
Cypripedium. The hardy Ladies Slip-per Orchid is an unusual plant that grows easily in moist, partly shaded positions. Varieties are the Calceolus with yellow blooms and growing to 12 in. high and the Spectabile, a stronger grower with large pink and white showy flowers. They flower in May—June and grow to 2 ft. high.
Hemerocallis. The Day Lilies are the exception to the rule that waterside plants need a moist soil. They thrive equally well in a dry sunny border, con-tinuously from June until August, to a height of 3 ft. Other varieties are the Flava and the Aurantiaca. Flowers are orange to yellow.
Hosta funkia. Excellent plants for moist soil in sun or shade. Striking leaves are their feature although the tiny mauve and pale lilac flowers are very pleasing. Other varieties are the Ovata Aurea and the Sieboldiana. They all grow to 2 ft. in height and flower from May until August.
Iris. This is the plant with the largest family. They will not tolerate a saturated soil but thrive where moisture is com-bined with good drainage. The Iris Kaemferi, the Japanese
clematis-flowered iris, is without doubt the most beautiful of waterside plants. Their exquisite colours range from white and all shades and mixtures of blue, pink, violet, purple, bronze and purple-red. They flower from July until the end of August and grow to 3 ft. in height.
Other members of the family are the Ochaurea, Sibirica and the Snow Queen, the last named having pure, white blooms.
Lysichitum. Striking plants of exotic appearance not unlike the wild Cuckoo Pint or Lords and Ladies plant. Ideal
for moist and very wet positions, they have enormous deep green leaves up to 4 ft. long, and bear yellow, arum-like flowers in April and May. Other varieties are the Americanum and the Camts-chatcense, the latter a scarce, Siberian plant.
Primulas. Given the right conditions these are among the most colourful of waterside plants. A dressing of well-rotted manure or leaf mould is advised. They prefer a semi-shaded position un-less the soil is kept moist artificially.
Varieties vary in height from 9 in. to 3 ft., and their colours are — Auran-tiaca (orange-red); Bulleyana (orange); Denticulata (lavender blue); Alba (white); Violet Queen (violet); Florin-da (yellow); Helodoxa (yellow); Ja-ponica Hybrids (all shades); Etna (red); Postford White (white); Pulverulenta (crimson); Bartley Strain (all shades); Sikkemensis (yellow, scented).
Trollius. The handsome yellow or orange balls of the Globe Flower are among the most beautiful features of pond or streamside. The blooms are carried well clear of the foliage. They flower from May until July, growing from 2 ft.-3 ft. in height. Members of the family are the Euro-
paeus Superbus, Golden Queen, Orange Princess, Prichards Giant and the Yellow Prince. The above is only a small selection of
suitable plants. Should you require further details, Messrs Stewarts Water-side Nurseries of Ferndown, Dorset, will gladly supply details.
A Christmas
!Buy'
Ae UCT1ONEER', a game with a big appeal to the whole family, is an ideal choice for those seeking
such a Christmas gift. In it the players, numbering two to six, take the place of dealers and collectors at an auction, and the object is to buy and sell in order to build up a collection of antiques. The winner of the game is the player who by shrewd dealing has collected all the valu-able property and money, thus eliminat-ing his opponents. Costing 26/6 from leading stores, it would appear to be an ideal choice for maximum fun and interest at a family Christmas gathering.
158

MAKE THESE GRAND NOVELTIES AS XMAS PRESENTS FROM KITS
By
WEATHERHO USE No.3320 A 'wet or fine' fore-caster in Swiss chalet setting.
5/ ( post I6)
'OWL' PERPETUAL CALENDAR
No.3228 5/3 (post11 -)
GALLEON CANDLESTICKS No. 3306. Decorative & practical.
5/4 ( post 1/6)
'OLD WELL' PLANT HOLDER
Send for a kit now to: Dept 993, No.3248 10/3 (post 1/6) HOBBIES LTD DEREHAM, NORFOLK
Leann Dte? Direct from Paris
UNDER
FAMOUS
FRENCH
ARTISTS
DON'T you wish you could draw and paint—Haven't you envied the pleasure of your friends who can — and the money some make? Now you can learn to be a real artist in a few months, in your own home
through the world-famous Paris A.B.C. School of Art. The secret is you reap all the benefit of studying under famous French
artists by post. Your lessons come (in English, of course) direct from Paris, your drawings go to Paris and your particular teacher in Paris sends his criticisms and suggestions direct to you.
You will be astonished how quickly you progress: how soon your amateur efforts take on the real professional touch.
You owe it to your-self to learn more about the wonderful training. Send this coupon with a 3d. stamp to the London Office or write for a free copy of its in-tensely interesting, profusely illustrated 32-page Brochure to-day!
Send this form today
—FREE COUPON- — The Paris A.B.C. School of Art
I ( Dept. 123), 211 Piccadilly, London, W.1
IPlease send free copy of your new illustrated Brochure. Mr., Mrs. or Miss
IAddress
113
II I I J'S
e Ile's right,you know!
One plus one does equa one—when it's CASCAMITE "One Shot". Each tin of this outstanding wood glue contains both the resin glue powder and the hardener, blended together in exactly the right proportions. For use, all you do is mix with cold water. Only CASC.AMITE "One Shot" has this unique advantage of combining simplicity of use with the excellent per-
formance of a resin glue. For gluing wood, it provides a joint which is as strong as the wood itself, stain-free, heat resistant and waterproof. With "One Shot" you can also glue joints even though they have gaps of up to ,16 ". For woodworking (furniture making, joinery, boat building, etc.), there is certainly no better choice. Try a tin for your next job.
Packed in 4, 7 & 18 oz. tins (2/6d., 4/0d. & 8/6d. respectively). Also in larger sizes.
But for a good general-purpose glue, be
sure to get CASCO Grade 'A' (Powdered)
Casein glue. It glues almost everything, is
easy to use and is most economical (21 oz.
of powder make 71 oz. liquid glue). Packed
in 21, 71 and 16 oz. tins (2/0d., 4/6d. &
7/6d. respectively). Also in larger sizes.
Stocked by Ironmongers, Builders' Merchants Handicraft Shops, etc.
SYNTHETIC RESIN & CASEIN GLUES Manufactured by
LEICESTER, LOVELL & CO. LTD NORTH BADDESLEY SOUTHAMPTON
159

THE first stage in shipbuilding is the laying of the keel, as this is the foundation upon which the whole
structure of the ship's frame is built. It must, of course, be absolutely true and straight, and this applies equally when making a built-up model. The piece of timber you use must be well seasoned and planed and finished absolutely true and straight if you are to get the frames (ribs) correctly positioned and the whole structure true.
In actual wooden shipbuilding the keel consisted of one or more pieces of timber, according to the size of the ship. If more than one piece had to be used, they were joined together by being scarfed— a term used in shipbuilding to
WOODEN SHIP
BUILDING — 4 By ̀ Whipstaff'
denote the type of joint used. There are several ways of scarfing as will be seen by reference to Fig. I. Usually the timber was elm and the scarfed joints were bolted through for added strength. The floor timbers were fastened across
the keel, a similar timber to the keel was laid above the keel and the floor timber and bolted through the floor timbers to the keel for added strength. The stern post was a straight piece of
timber mortised into the after end of the keel, inclined to the angle of rake shown in the design or draught. Into this was framed the transom and fashion pieces to form the framework of the stern. The stem was one or more pieces of
compass timber (curved timber) bolted together and formed to the forward rake as designed on the draught. It was fastened to the keel at the forward end with a strong scarf joint and rabbeted on both sides to take the butt ends of the planks. On each side of the stern were fitted
the hawse pieces. These are two pieces of compass timber with circular holes bored in the top for the passages of cables. They were strengthened both above and below with breast hooks. The step for the foremast also helped to strengthen them. On this foundation was built the
framework of the ribs, called timbers, starting with the floor timbers, followed by the futtocks and top timbers, which were sometimes squared, sometimes circular and reached to the gunwale. The transoms were pieces framed to
the inside of the sternpost and fashion timbers and formed the stern framework. They were made from compass timber.
MainhiforModellers Li
The fashion pieces, so called because they gave the shape of the stern,were the two large pieces of compass timber. In some kinds of ships they had rabbets to take the butt end of the planks aft as did the stern at the forward end. Counter pieces were fitted between the transom and gallery, to support, with the addition of brackets, the overhang of the stern.
Footwales were fitted inside and con-sisted of long pieces of compass timber secured to the floor timbers and lower ends of the futtocks, forming a planking and binding together the floor timbers and futtocks for added strength. The difference in this practice between
naval and merchant ships lies in the planking-in above these footwales to enclose the space to form the hold for stowing cargo, as in the case of the merchant vessel. In naval vessels strakes of timber were used to plank it up, leaving open spaces between to enable leaks to be found and repaired.
Riders were made of compass timber similar to floor timbers, but larger, and secured across the keelson and fastened to the timbers for added strength. The clamps, now added, were long
pieces of timber shaped to fit the side of the ships and fastened to the sides for the beams of the decks to be fastened on. The deck beams were shaped to the
camber designed for the deck of the par-ticular ship, each end resting on the clamp and being bolted to the side of the ship with knees and standards to hold all firmly together. Upon these, the planks of the decks were laid and tree-nailed securely. Waterways were added to the decks,
shaped to the sides of the ship and were treenailed to the timbers and deck beams. The planks of the deck were 'rayed' into the waterways. To 'fay' the planks is to fit them, by letting them into the edges of the waterways.
.. I. I
,1 41 g1
SCARFED JOINTS
STEM
SCARFED PIECES OF CURVED COMPASS TIMBER
STEM
SHEL CLAMP
PLANKING
WING
LOWER TRANSOM
1 ."'
STERN Pen
MORTISED INTO KEEL
-.1 ;
FASHION STERN UI PIECE POS
cHock DEADWOOp
DECK BEAM
KNEE
160

from these Books bulging with BRIGHT IDEAS Any volume in this most interesting range co books, each dealing with a different aspect oi gummed paper-
craft, will show you a wealth oi ideas, the way to carry them out, and give hours of intense enjoyment. Each is the key to an economical hobby that is rich in variety, ranging from the making of a charming picture p
to framing it delightfully — from three dimensional ; s models to wall decorations, from paper sculpture to
FOit soloot New(
All books obtainable from: Newnes & Pearson Ltd. Tower House, Southampton St., Strand, W.C.I. Ask your stationer to show you the Butterfly range of handicraft materials.
charming flower studies.
Other books by FREDERICK T. DAY
Coloured Paper Decoration .. 7/6 Coloured Papercraft for Schools .. 7/6
Coloured Papercraft for Infants' Schools.. 6/- Lampshade and Parchment Craft .. 8/6 Decorative Flower and Leafmaking .. 8/6 Gummed Strip and Paper Modelling .. 7/6 Paper Sculpture for Schools 7/6
sE p4
BUTTERFLY BRAND
SAMUEL JON ES EsCOITD. STATIONERY MILL,CAMBERWELL, LONDON, S.E.5. RODNEY:5064
pe,ovEE•E•E•E•E•E., CERTOFIX
RecLeey FIXES
7/ 7CERTOFIX
CERTOFIX liquid glue
can cope with all gen-eral repairs. It unites
wood, glass, metal and almost all substances. It is clean in use; its joints
are stronger than the materials it unites.
Sold at all Woolworth Stores
Employing special NEW SUPER SENSITIVE circuit and incorporating built-in Ferrite Aerial. For use with deaf-aid type earpiece. Attractive ivory and black plastic case only 44m. X 24m. x I tin. Very simple to construct. Runs for months on pen torch battery. Completely safe. No exte nul Aerial or Earth required. Excellent quality reception on Medium Wave-band. Easy to follow instructions provided. Special Price for all required components (incl. battery) only 27/6 plus 2/- p. & p. Deaf-aid earpiece with lead extra at 12/6. Full details and assembly instructions separately if required I /- post free.
ALL POST ORDERS AND CORRESPONDENCE TO
162 HOLLOWAY ROAD, LONDON, N.7. NOR. 6295/6/7
18 TOTTEN HAM COURT RD., LONDON, W.I. MUS. 5929,0095 Callers welcome at both branches
CLYNE RADIO LTD.
Everything for the Radio Hobbyist! Send stamp for complete list of equipment
for Home Construction.
e COSSOR KITS! • A unique opportunity to obtain a first class amplifier and/or thc latest
type VHF/FM receiver at the most reasonable price ever.
COSSOR AUDIO AMPLIFIER KIT 562K. This excellent amplifier supplied in kit form in manufacturers original presentation carton com-prising: Pre-assembled printed-circuit board, valves: 6V4, 6805, EF86, output transformer, two loudspeakers, 4in. circular and 10 x 6m, elliptical wiring wire, nuts, bolts, attractive escutcheon and control knobs, mounting brackets and fully illustrated assembly instructions. With negative feedback incorporated, and the high performance loudspeakers provided, a really high quality output is assured. Suitable for use with radio tuners, micro-phone, or gramophone units. For AC 200/250v. operation. BRAND NEW AND COMPLETE AT ONLY L5. 19. 6 plus 3/6 p. & p. ( List price 0.15.0.) COSSOR VHF FM RECEIVER KIT 70IK ONLY a. 19. 6 plus 3/6 p. & p. (List price E15.15.0). Full details on request
OUR NEW SUPER TRANSISTOR CRYSTAL RECEIVER
161

* LEARN * RADIO & T/V SERVICING for your OWN BUSINESS/HOBBY
• by a new exciting no-maths. system, using practical equipment, recently intro-
duced to this country.
FREE Brochure from :—
RADIOSTRUCTOR
DEPT. G8I, 46, MARKET PLACE, READING, BERKS. 2 12
XX ODELS. You can make lasting stone-hard n.1.models with Sankey's Pyruma Plastic Cement. Supplied in tins by Ironmongers, Hardwaremen and Builders' Merchants. Ask for instruction leaflet. ovst is.te
FREE stamp album and 20 stamps. Request approvals, enclosing 6d. Additional gifts
given. — Beeze, 8 Langland Villas, Mumbles, Swansea.
BUILD YOUR OWN HI-FI at home! At last, for reasonable cost — the chance to make your
own quality HI-FI audio equipment and to gain the knowledge to service and maintain it. FREE brochure from — Dept. HW 20, Radio-tructor, 46 Market Place, Reading, Berks.
REFUND IF NOT WORTH 50ZMORE • Amazing Portable
TRANSISTOR RADIO
ADVANCE 1960 ,avc SENSATION! £6.W.
, Mt=
Your personal set °AarNr FOR wherever you are. Genuine Transistor, only 6' x 4"x Ir. weight 15 ces. Fits pocket yet has wonderful qualities reproduction & volume. Built-in Aerial & Speaker. Additional booster Aerial FREE! As pleasing as its big brothers. Fin-ger tip control & selection of stations. Runs on 2 batteries obtainable everywhere 7d. each giving months normal use. Ultra modern case — de-lightful pastel shades. Guaranteed. E6.19.6 — 3/9 p & p, or 40/. dep. bal. 14 ftn ly.pyts. 8/8 + p & p. Carrying case & Slings sent on appro. 12/6 ex. & Batteries 1/6 inc. post. LISTS GUITARS, RINGS, WATCHES, etc. Easy terms on most lines. STATE REQUIREMENTS.
H EED(WARTEll & GENERAL StIMIES till
(HOBW/ENG/91) 196-200 Coldharbour Lane, Loughboro Junc., London, S.E.5. Open Sat.
'T'RANSISTORS, Germanium Crystals, Head-" phones, etc. Lists and diagrams free. Ger-manium Diodes with three crystal set circuits 1/-. Postagt 3d. — P.R.S. (H), 33 Bourne Gardens, London, E.4. AK AKE A MUSICAL BOX for as little as 1V121/-. New kits and tunes available. Move-ments 13/- post free. Please send 3d. stamp for free illustrated catalogue. — The Swisscross Co., Dept. B, 202 Tulse Hill, London. S.W.2.
T EARN RADIO and ELECTRONICS the practical way! Very latest system of
experimenting with and building radio apparatus — 'as you learn'. FREE brochure from — Dept. HW.10, Radiostructor, 46 Market Place, Reading, Berks.
'WHEELS (Hardwood and Rubber Tyred WV Metal). Cot, Pram and Doll's house Fittings and Papers, Beads, Transfers, Prints and other accessories. Stamp for new lists. (Trade supplied.) New address — JOYDEN CO., 91 Peplins Way, Brookmans Park, Herts.
CTAMPS FREE — Empire Packet including °Pictorials and Victorians with approvals. — Robert J. Peck, 7A Kemp Road, Bournemouth.
EEXTRA CHEQUES from writing. Send for 'Ideas for Writers' (free). Scores of sug-gestions for beginners and others. Typewriter unnecessary. — Writers' Ring (H.W.), 5 Edmund Street, Birmingham 3.
KUKLOS ANNUAL. Indispensable cyclists' handbook. Tours, resthouses, money-saving
hints, 31- post free. — Burrow, Publishers, 2 Imperial House, Cheltenham.
100 DIFFERENT stamps free! Request Id. upwards discount approvals. — Bush,
53 Newlyn Way, Parkstone, Dorset.
BUILD AN EFFICIENT Crystal Receiver with our quality complete kit. Easy instruc-
tions. Soldering unnecessary. Good reception anywhere. Reduced price for short period 14/6 post free. Send P.O. NOW. — Radio Compo-nents, Accessories, wonderful new Transistor Receiver Kits supplied. Send 3d. stamp for Bargain List. — RADIOMATIC, 26 Blackburne Drive, Hunts Cross, Liverpool.
LOOK! 100 Free including loads of Pictorials, plus further gifts each time you request my
cheap approvals. 3d. postage. — Salter, 42 North Road, Rotherham.
VENEERED BOTH SIDES
TABLE LEGS
1166,""ge
TABLE TOPS 17/6 each
(post 2/-) Two
useful sizes:
20 20 in. and
30 15 in.
Each size available in Oak, Sapele Mahogany or Walnut.
State which required
PLAIN BEECH
No. 580 9 i n. 2/- each No. 581 15 in. 2/6 each No. 582 20 in. 3/- each
FERRULED BEECH
No. 590 6 in. 2/9 each No. 593 15 in. 3/6 No. 591 9 in. 3/- each No. 594 18 in. 3/9 No. 592 12 in. 3/3 each No. 595 20 in. 4/-Ferrules are of Brass securely fitted
EBONISED FERRULED BEECH No. 600
With metal block and brass ferrule. One size only. 18 in. 5/3 each (Postage: 3 or 4 Legs 1/6 extra)
From branches or by post
HOBBIES LTD
HEAR A LL CONTINENTS With H.A.C. Short-Wave Receivers
Suppliers for over 18 years of radio S-W Receivers of quality. One-Valve Kit, Price 25/- Two-Valve Kit, Price 50/-Improved designs with Denco coils. All kits complete with all components, accessories and full instructions. Before orderine, call and inspect ademan' stration receiver, or send stamped addressed envelope for descriptive catalogue. H.A.C. Short-Wave Products (Dept. 22), II Old Bond Street, London, W.I.
KITS for OLD TIME SHIPS Hobbies range of Ship Models includes Elizabeth Jonas, Gutty Sark, Victory, Mayflower, etc. Complete kits of wood, sail material, guns, pulleys, cord, etc., with full-size patterns of parts and planed wood ready to cut out, shape and construct. A fascinating pastime.
Ask for free illustrated list at Hobbies Branches or from Hobbies Limited, Dept. 99, Dereham, Norfolk.
DEREHAM NORFOLK
162
The HALTRAC MIDGET HOIST
Weighs 1 lb. Breaking strain 1,000 lbs.
PRICE 57/6 will pull or lift anything. Self-lubricating solid nylon pulleys — 72ft. nylon rope — rustless aluminium construction throughout. Standard equipment for the Motorist, Cara-vanner, Gardener, Workshop, etc. etc.
Available from all good Stores, Ironmongers, Halford Bronches, Yacht Chandlers, etc., or from:
HALTRAC LTD. (Dept. HW.I0) BOURNE WORKS, WEIMAR STREET,
LONDON, S.W.I5
Trade enquiries also invited

CHRISTMAS 'CARDS' IN W0011
CUT OUT THESE
FULL-SIZE PATTERNS
WITH A FRETSAW
THE backing pieces A are cut from k in. wood — as many as are needed for the cards it is intended
to make. The overlays B are cut from * in. inlay wood or marquetry veneers, and it is possible to pin or tape eight pieces together, and cut eight at a time. Use a fine grade fretsaw for cutting, and remember to keep the saw upright all the time. The backing pieces should be stained
dark and the overlays left white. There is no need to polish, the wood will look quite attractive if left in its natural state. If you wish the card to stand, it will be a simple matter to hinge a small strut at the back. To send your personal greetings, paste
a small square of art paper or card on the back. (M.P.)
—
7...z.-z-4 c,- --, __.,. ,
i::.-: ....- r- ---4 — —. s.1 i__.> L -. --... 1 I r-I s. __-. . -,.... /,_ _ _ ..--- __ J«.. #:*17_ j
- —
r: s.; ;;: r";
_
A
163
Printed by BALDING & M ANSELL, LTD., London and Wisbech, and Published for the Proprietors, HOBBIES LTD., by HORACE M ARSHALL & SON, Lw., Temple House, Tallis Street, E.C.4. Sole Agents for Australia and New Zealand: Gordon & Gotch
(A'sia) Ltd. For South Africa: Central News Agency Ltd. Registered for transmission by Canadian Magazine Post.
READER'S REPLY
HNIV '?e4
NOW BRING IT TO LIFE
WITH THE HUIVIBROL TOUCH I
Humbrol Plastic Enamel—in 34 matching shades—gives an added touch
of realism to all flying models. But that's not the only advantage! Precise
Laboratory tests have proved that Humbrol Gloss Enamel is 29°10 lighter than ordinary
colour dope. And Gloss Humbrol (excepting metallic colours) is proof against
diesel fuels—no need for an additional coat of fuel proofer.
Humbrol is dry in i hour, and flows on easily without brushmarks.
It is now being accepted more and more by discriminating modellers as
today's replacement for colour dope, the professional finish that makes so
much difference. Handy 4 oz. tins 8d. Sizes up to 4 pint.
USE BRITFIX BALSA CEMENT TOO!
The established favourite with modellers. Transparent, quick drying, waterproof. Tubes from 6d.
HUMBROL The Art Enamel that turns Models into Masterpieces
THE HUMBER OIL CO. LTD. (PAINTS DIVISION) MARFLEET HULL
164

/
4 L_
PIECE 3. CUT ONE
1/4 in.
t
I I
I
I
I I
I I
r - -
I
; 4 1
e-
I
PIECE 6. CUT ONE FROM MEDIUM GAUGE WIRE.
IBM%
PIECES 4. CUT ONE OF EACH
1/4 in.
- I 1-
t PIECES 5. CUT ONE OF EACH
1/4 in.
I
PIECE 3. CUT ONE
1/4 in.
t i
14
f-
1 PIECES 4. CUT ONE OF EACH
1/4 in.
-1 f-
f—r-
1
41
PIECES 5. CUT ONE OF EACH
1/4 in.
I
No.
3338
SHIP'S WHEEL & BELL CALENDAR
A novel miniature gong or toy for the
Budgie
SIZE-54 in. HIGH.
PIECE 7. CUT ONE 1/4 in. AND ROUND OFF.
PANELS OF WOOD REQUIRED FOR MAKING THIS DESIGN
ONE Q4 A KIT OF MATERIALS FOR MAKING THIS DESIGN IS SUPPLIED BY HOBBIES LIMITED
DEREHAM, NORFOLK. PRICE ON APPLICATION.
Use
(
3
PIECE I. CUT ONE
1/4 in.
2
5
PIECE 6. CUT ONE FROM MEDIUM GAUGE WIRE.
1 , 1 , , 417 r-I:4
PIECE 2 SLOTS INTO PIECE I.
— . — AND RC
(

PIECE 6. ONE FROM IUM GAUGE E.
PIECES 5. CUT ONE OF EACH
1/4 in. 1
1 rr- i
4-51 1--- =.4
PIECE 2 SLOTS INTO PIECE I.
PIECE 7. CUT ONE 1/4 in. AND ROUND OFF.
PANELS OF WOOD REQUIRED FOR MAKING THIS DESIGN
ONE Q4 A KIT OF MATERIALS FOR MAKING THIS DESIGN IS SUPPLIED BY HOBBIES LIMITED
DEREHAM, NORFOLK. PRICE ON APPLICATION.
Use
Wad UNIVERSAL
IT'S DESIGNED FOR THE JOB The popular general purpose liquid glue, used cold for all making and mending with wood, leather, card, etc. The best glue for sticking laminated plastics. Large tube 1/2, 8 oz. tin 2/10, 16 oz. tin 4/6
AVAILABLE FROM ALL BRANCHES OF HOBBIES LTD
THE ARROWS INDICATE DIRECTION OF GRAIN OF WOOD
PRINTED IN ENGLAND