zoom/grenadine training for boskone attendees
TRANSCRIPT

Zoom/Grenadine Training for Boskone Attendees The schedule for Boskone, provided by Grenadine, is available here: https://sites.grenadine.co/sites/boskone/en/boskone-58/schedule You need to be a Boskone member to be able to log into the Grenadine schedule for Boskone.
■ Be sure you know the email address you used to buy your Boskone membership with. If you're not sure, write to [email protected].
■ Be sure everyone in your household with an adult attending membership has a unique email address. Registration can help you fix that if that is not the case.
If you have checked these things and are still having trouble logging in, write to [email protected]
Table of Contents Code of Conduct
Hardware & Software Requirements
Remembering Time Zones
Different Kinds of Chat and Messaging
Logging in to Grenadine, the Boskone Schedule App Setting Grenadine Profile Features
Setting My Account Options Setting Privacy, Public Name and Home Time Zone Exporting your Grenadine Schedule to Your Local Calendar
Viewing the Boskone Schedule Attending an Item Signing Up for an Item Marking an Item as a Favorite Grenadine Messaging and Chat
Session Chat
Logging into Zoom, the Video Conferencing App Attending a Zoom Session
Audience Features Webinars
Q&A (Questions and Answers) Meetings
Breakout Rooms Speaker View vs. Gallery View Zoom on Smartphones

Code of Conduct The Boskone Code of Conduct is in force during the convention. The Code of Conduct applies to all attendees, including panelists and hosts. Anyone who breaks the Code of Conduct may be removed from an item by a host and spoken to about what they did. The person may be allowed back into the item. Any Zoombombing will result in an attendee’s instant expulsion from the item. They may also lose their Boskone membership rights and be reported to Zoom.
Hardware & Software Requirements In addition to a Boskone membership, you will need at a minimum to attend the virtual Boskone:
■ Windows 7 (or a more recent release) ■ Mac Sierra (or a more recent release) ■ Linux (recent releases) ■ Tablet ■ Smart Phone
Grenadine and Zoom will work on any of these devices on any recent browser
If you are going to be a panelist, a moderator, or Zoom host, you need:
■ A desktop or laptop ■ A microphone ■ A video camera
To ensure your device is up to using Zoom, display the Zoom test meeting (https://zoom.us/test) Check your camera on the page, and your speaker and microphone on the page.
Remembering Time Zones All times in the daily schedule are in Eastern Standard Time (EST). If you need quick time zone conversions, go to: https://www.timeanddate.com/worldclock/converter.html While the convention will start on Friday, February 12 at 3pm EST, noon PST, and 10pm in London, Boskone will start on Saturday, February 13 at 7am in eastern Australia and 4am in Beijing, China. See "Setting Privacy, Public Name and Home Time Zone" for information on how to set your local or home time zone for the item detail pages of the Grenadine schedule.
Different Kinds of Chat and Messaging We’re using two kinds of chat/messaging systems, a new one through Grenadine (the schedule app) and an older one through Zoom (the video app): Grenadine messaging is new and operates across the Boskone schedule Website. It allows private person-to-person messaging and video chats that can include small groups. The Grenadine video chat will not replace Zoom for displaying Program items, but will provide more opportunities for Boskone members to communicate. The Grenadine person-to-person chat shows up at the bottom right of many Grenadine pages:

Grenadine session chat is also new. Session chat is connected to the Program item’s VIrtual Session page and is used for post-item chat. You will also find Grenadine session chat attached to artist, dealer and fan table pages. Grenadine messaging and chat is documented in the Grenadine Messaging and Chat later in this document. Zoom Chat is used for chat within a Zoom session only. When you enter any Zoom session and want to chat with other audience members, click on the Chat icon on the bottom of your Zoom screen. The Chat window appears to the right of your Zoom screen.

Logging in to Grenadine, the Boskone Schedule App To log into the Boskone Schedule:
1. Open https://sites.grenadine.co/sites/boskone/en/boskone-58/ in a browser.
2. If you have not bought a membership, select one of the “Register” buttons to register for Boskone. While you can see the schedule for Boskone without registering, you cannot attend any events without registering as you will never see the big blue “Join virtual session” button on an item detail page or be able to access the Virtual Session page.
Once you have bought a membership, click the “Log in” button at the top right of the screen. Grenadine displays a small Log in screen:
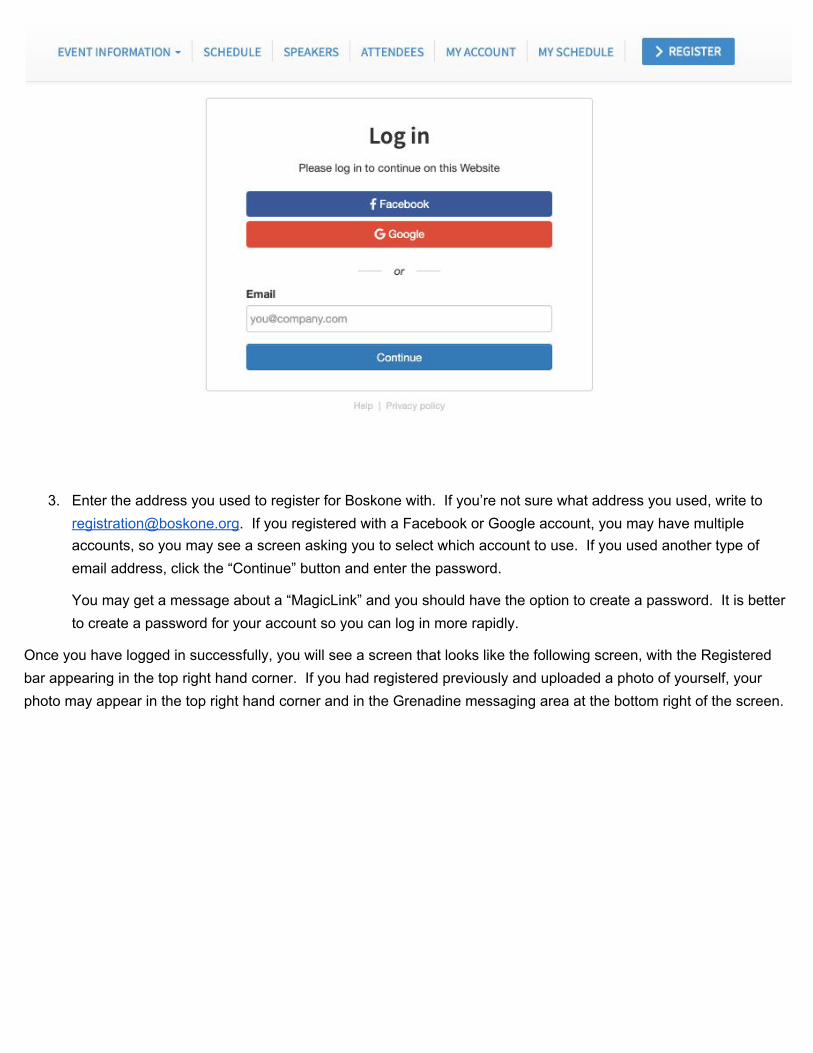
3. Enter the address you used to register for Boskone with. If you’re not sure what address you used, write to [email protected]. If you registered with a Facebook or Google account, you may have multiple accounts, so you may see a screen asking you to select which account to use. If you used another type of email address, click the “Continue” button and enter the password.
You may get a message about a “MagicLink” and you should have the option to create a password. It is better to create a password for your account so you can log in more rapidly.
Once you have logged in successfully, you will see a screen that looks like the following screen, with the Registered bar appearing in the top right hand corner. If you had registered previously and uploaded a photo of yourself, your photo may appear in the top right hand corner and in the Grenadine messaging area at the bottom right of the screen.

If you just want to see the schedule, go to “Viewing the Boskone Schedule.” If you are interested in changing your profile information, continue with the next section, “Setting Grenadine Profile Features.” If you want to make your profile and schedule private, change your public name or set your home time zone, go to “Setting Privacy, Public Name and Home Time Zone”
Setting Grenadine Profile Features
Setting My Account Options Remember, adding any data on the My Account page is optional. The My Account page lets you customize the information people can see about you. Once you have logged in, click on the “My Account” option at the top of the page to display a very long Welcome screen. The top portion of the screen will be discussed here and the bottom portion will be discussed in the next section:

The name you registered with will appear following Welcome at the top left. Your registration name will also appear in the name fields under the Name. You are not able to change your registered name on this form. If there is an error with your registered name on the Welcome screen, write to [email protected] with the correction so they can fix it. If you want to use a fannish name, you can set your public name in the “Setting Privacy, Public Name and Home Time Zone” section; do not write to Registration about fannish name changes for Grenadine. If you are an attendee, the information in your profile settings will appear in the Attendees area. If you are also a participant, this information will appear in both the Attendees and the Speakers areas. You will be able to configure what information Grenadine displays in the “Setting Privacy, Public Name and Home Time Zone” section later; you can also leave any of these fields blank. You can upload a square photo of yourself to use as a profile photo. Click on the “Select Image” button to the right of the Photo heading to select a photo to use for your profile photo. The rest of the Welcome screen has the following fields:

You can add any of your social media URLs here that you would like to share with other Boskone members. Be sure to enter the full URL to your account. To link your Twitter account to your profile, enter your Twitter URL as https://www.twitter.com/<accountname>. If you want to share a document with other Boskone members, you can upload a short story, a piece of art or a fanzine. To upload a document file here, click the “Select File” button under and to the right of the My Documents heading. You can store up to 50mb of files here--graphics, PDFs or text files. Note: The My Documents area has its own “Save” button right below the Upload a New File text. Be sure to click that “Save” button when you add or delete files. When you have completed filling out the Welcome screen, click the “Save” button just above the My Documents area. You can then click on Attendees at the top of the page to see a list of attendees with public profiles:
The list displays your name, occupation, company, photo, and icons indicating where you have a public social media account. Click your name in the list to see what Grenadine displays about your public profile:


If your schedule is public, Grenadine displays any item you are a panelist on, or if you have marked it in your schedule as a “Favorite,” which means you’re thinking about attending it. You can click a social media icon on the right under the Share This heading to share your schedule in email, on Facebook, Twitter or Instagram.
Setting Privacy, Public Name and Home Time Zone
You can decide what information you share with other Boskone members. You can return to the Welcome page form and delete the fields with your personal information, or you can change your privacy settings.
To display your privacy settings, click the “My Account” option at the top of the page, then the “My Settings” option on the left of the page. Grenadine displays the My Settings page.
When the sliders on the My Settings page are all green, your profile, schedule and messaging information are all public. To hide your profile from the Attendees list, slide the “Public profile” slider to the right. To hide your schedule, slide the “Show My Schedule” slider to the right. To hide your account from the new Grenadine messaging/chat system, slide the “Allow Messages” slider to the right. All the sliders are now gray. Click the “Save” button to change your privacy settings. .
Note: These settings will also hide your schedule and profile from the Speakers list if you are a Program participant. We do not recommend that you hide your profile or schedule, but you have the option to if you want. If you make your settings private as shown above, your record disappears from the Attendees list, as well as the Speakers list if you are a Program participant.

To restore your settings to public, click the “My Settings” link to return the My Settings Window. Shift the sliders left to make your settings public (green) any time you want. Grenadine Messaging may work in some unexpected ways, particularly how the “Block Message” option works. Check Grenadine Messaging and Chat later in this document for more information. You can change your local home time zone so the program item detail page will display both EST & your home time zone for the item if you live in another time zone. Your home time zone will not appear on the day list of items. To display your local time zone on a program item detail page, click on the "Home time zone" field to list the time zones. Click on your time zone. If you live in Tokyo, scroll down the time zone list until you reach “(GMT+9:00) Tokyo” and select it. To change your public name, click the checkbox under “Public Name” and update your name information as desired.
After you click the “Save” button, this profile is updated to display the profile & schedule on Grenadine, to set the home time zone to Tokyo time and to update the Public Name to “Cordwainer Bird.” Your new Public name appears on the My Settings page.

It can take a few minutes for your profile/schedule to appear online under your new public name on the Attendees page:
Your public name will sort according to the last name, so your name may appear in a different part of the list. Your public name will also appear in any schedule items:
As for your home time zone, remember the home time zone will not appear on the day schedules, unless you live in Eastern Standard Time. Keep the Time Zone Converter handy. The scroll list of time zones shows GMT +/- hours and a major city/country in that zone. If you live in the UK, and select "(GMT +00.00) London" as your local time zone, on the next detail Program item page you display, your local time appears as BST.

But, when you select an item on the day schedule to display the item detail page, you will see the time for that item displayed in both EST and the time you set for Home Time Zone. If you live in Tokyo, set your home time zone to JST so that your item detail pages will include it under the EST time for the item.
Exporting your Grenadine Schedule to Your Local Calendar
You can import your schedule, and any items you favorited, to many kinds of online calendars including Apple, Outlook and Google. Some calendar programs may accept your set home time zone, but others may not. Be sure to set your local or home time zone, and that time matches the time zone you set in Grenadine for your home time zone. To import calendar information after you have set your local time zone in My Settings page:
1. Click on the "My Schedule" option at the top of the page:

2. In the upper right hand corner, you will see the "Download These Events to Your Calendar" blue button. Click that button. Grenadine creates the my_schedule.ics file in your Downloads directory.
3. Open your online calendar app and import the my_schedule.ics file from the Downloads directory (check the
online help for your calendar software if you do not know how to import a file into your calendar). After import, you will see the Boskone items in your calendar in your local zone (if you have already set your home time zone). The times displayed in this online calendar are for Tokyo - Japan Standard Time:.

Viewing the Boskone Schedule
Once you log in to the Grenadine website, you will see the following links at the top of every Boskone page:
● "Event Information:" Displays files to help you attend the Virtual Boskone. ● “Schedule:” Displays the Boskone schedule day by day. ● “Speakers:” Displays a page of Program participants with public schedules and profiles. ● “Attendees:” Displays a page of attendees with public profiles. ● “My Account:” Displays your profile information. ● “My Schedule:” Displays your schedule.
In addition to the Program schedule, Art Show, Dealers, and Fan Tables will also be online. There is currently an Exhibitors link at the bottom of the main Boskone schedule page. It takes you to an area that looks something like this:
To visit an artist page, a dealers page or a fan tables page, select the graphic for the page you want to visit. Each page will have information and an area where you can use Grenadine chat to chat with the artist, dealer or fan table:
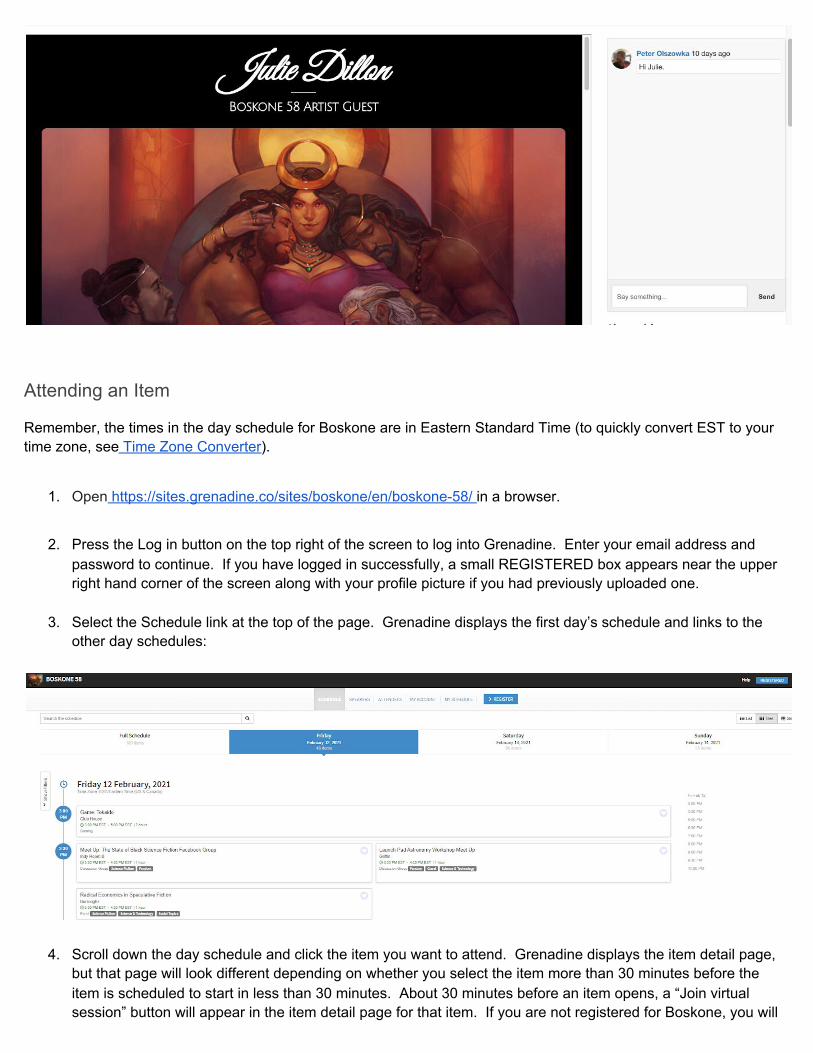
Attending an Item
Remember, the times in the day schedule for Boskone are in Eastern Standard Time (to quickly convert EST to your time zone, see Time Zone Converter).
1. Open https://sites.grenadine.co/sites/boskone/en/boskone-58/ in a browser.
2. Press the Log in button on the top right of the screen to log into Grenadine. Enter your email address and
password to continue. If you have logged in successfully, a small REGISTERED box appears near the upper right hand corner of the screen along with your profile picture if you had previously uploaded one.
3. Select the Schedule link at the top of the page. Grenadine displays the first day’s schedule and links to the
other day schedules:
4. Scroll down the day schedule and click the item you want to attend. Grenadine displays the item detail page, but that page will look different depending on whether you select the item more than 30 minutes before the item is scheduled to start in less than 30 minutes. About 30 minutes before an item opens, a “Join virtual session” button will appear in the item detail page for that item. If you are not registered for Boskone, you will

never see a “Join virtual session” button. Since most of our items are webinars, there will be plenty of audience space so you don’t need to “wait” for an item to open unless you really want to.
Remember, when you reach the item detail page for a Program item and do not see a “Join virtual session” button, that means the item will not start for over a half hour.
5. Click on the “Join virtual session” button to launch the Virtual Session window:
The Virtual Session window is the last Grenadine window you will see before you join the Zoom session. The Virtual Session page will also be the place where you can later chat with people who attended the item (see
Item Detail Page Longer than 30 Minutes Before the Item Starts
Item Detail Page Less than 30 Minutes Before the Item Starts

the Session chat window on the right) or view the recording of this item. There will be more description of Viewing Recordings later in this document. Here’s a brief description of the buttons/links on this page:
● Join Virtual Session - Joins the Zoom session for this item ● Leave this session - Leaves the Virtual Session window & returns to the Item Detail page for this item. ● Info for hosts and presenters - Will display a new window if you are a host or presenter ● Fullscreen - Extends the Virtual Session window to the size of the screen window ● Having trouble connecting? - Displays some additional information which may be useful ● Presenter links - Displays the profile and full schedule of the presenter, if they are public.
6. Click the “Join virtual session” button in the gray window. Various Zoom-related windows appear, depending
on if you have Zoom already installed on your system or not.
7. Zoom prompts you to click the “Open zoom.us.app” button, click that to join the meeting. Before the session, you will be in a “waiting room” for that session. The Zoom host will let you in the Zoom session when the session is scheduled to start.
Signing Up for an Item
You do not need to sign up for most items. You can attend most Program items by clicking on the “Join virtual session” button for that Program item in its Virtual Session page. Some items, such as kaffeeklatsches (small sessions with a writer & up to 25 attendees talk informally), require sign up as they have limited capacity. These items are labeled “Signup Required.” If you have already signed up for an item, the schedule includes the word “Registered” under the item title. To sign up for a kaffeeklatsche:
1. Select the item requiring signup on the schedule. It will take you to the item detail page for that item. The “Sign up and add to My Schedule” button is on the right hand side of the page:
Click the “Sign up and add to My Schedule” button. A small window appears appears if there are still places available in the item:

2. Click the checkbox beside “Please also send me a confirmation email.”
3. Click the “Sign Up” button on the lower right of the window. If your sign up was successful, Grenadine displays a “Success” window and sends you a confirmation email.
If you try to attend an item that requires signup that you have not signed up for, the “Join on Zoom” button does not appear in the Grenadine item detail page for that item. It is good practice to use the name you registered for Boskone with as your Zoom name. However, it is very important to define your Zoom name to be your registration name before you try to sign up or attend a kaffeeklatsch. The host has to move people from a waiting room into a meeting room. If you define your Zoom name as something other than the name you registered for Boskone with, the host might not be able to move you into the item you signed up for.
Marking an Item as a Favorite As you look at the schedule, you may find items that you’re interested in attending. You can mark those items as a favorite by clicking the heart in the daily schedule:

If you plan to attend the Sharon Lee and Steven Miller reading, click the heart to save it to your schedule:
Your schedule will now include that item as a favorite; select the My Schedule link at the top of the page to display your updated schedule:

Important: Favoriting an item is not the same thing as signing up for an item. See the previous section “Signing Up for an Item” for more information.
Grenadine Messaging and Chat
After you log in to the Boskone Grenadine schedule, you will see a new Messaging box on the lower right side of most Grenadine Web pages, such as your My Schedule and My Account pages. When you click the small Messaging box, the Messaging window appears. It’s a narrow window with two panes:
● People icon - List of Boskone Members who are open to receiving messages ● Chat - Person-to-person chat between you and another Boskone member
When you receive a message, you will not receive a sound notification, but you will see a red dot on at the top of the Messaging window.

To select a Boskone member to chat with, click the People icon to display a list of Boskone members who have not blocked messages or enter the name of a Boskone member in the Search field.
If you want to send a message to Guy Consolmagno, click on his icon on the list. The following Messaging window appears:
“Send a message” -- Sends a message to the selected person “Invite to a video call” -- Invites the selected person to a video call with you. “View profile” -- Displays the person’s Grenadine profile if it is public.. “Cancel” -- Returns you to the full list of Boskone members willing to receive messages.

Important: We strongly suggest that you not click the “Invite to a video call” button for people whom you do not know. See Making Video Calls below for more information on video calls. If you select a person under the Person icon, then click on the Chat label on the right, you will see a record of messages you have exchanged with that person:
Important: The Allow Messages/Block Messages feature documented in “Setting Privacy, Public Names and Home Time Zone” does not work as many block features do. It is all or nothing - Allow Messages permits all messaging and Block Messages blocks all messages except: if you have already exchanged Grenadine messages with a person, that person will not be blocked in the future if you set Block Messages. The Block Messages feature will block everyone if you set it before you accept messages from anyone. Block Messages does not block messages in Session Chat.
Session Chat In addition to your personal messaging, Grenadine also supports messaging attached to each Program item in the Virtual Session window (the last Grenadine window you see before going to a Zoom session). Session chat is also associated with artists in the virtual Art Show, dealers in the virtual Dealers Room and fans running fant tables in the Virtual Fan Table area. This feature is to encourage more discussion among fans at the convention. If you want to continue the discussion after the item ends, take a look at your browser tabs and click the tab with the title of the Program item that just ended. That tab will return you to the Virtual Session page for that item. The Zoom host will also put the link back to the session in the Zoom chat just before the end of the session. The Session chat is to the right of the gray virtual session window. Just type something in the “Say something” field and press the “Send” button to send it.

If you have blocked messages, you can still chat in Session chat.

Logging into Zoom, the Video Conferencing App While you are not required to download Zoom for attending a panel, it is very helpful if you do. Even if you have never used Zoom before, you will access Zoom as soon as you click on a blue Zoom button on a Virtual Session page. When you are attending an event or Program item in a webinar as an audience member, your microphone or camera will be turned off by default; the audience is mostly invisible in a webinar. However, when you’re attending a small interactive group such as a kaffeeklatsch or discussion group, be sure the microphone and video at the bottom left of the Zoom screen are active (do not have the red line through them). If you are new to Zoom, you may want to check these Zoom resources:
● https://zoom.us/download ● https://support.zoom.us/hc/en-us/articles/201362023-System-Requirements-for-PC-Mac-and-Linux ● https://support.zoom.us/hc/en-us/articles/206175806-Frequently-Asked-Question
Attending a Zoom Session
From the Grenadine schedule (see “Attending an Item” previously for detailed information on accessing items in Grenadine):
1. Find an item you want to attend in the daily schedule that starts within 30 minutes. Click on that item to display its Item Detail page.
2. Click on the “Join virtual session” button in the Item Detail Page. Grenadine displays the Virtual Session page. 3. Click on the “Join virtual session” button in the Virtual Session page. Depending on whether you have
downloaded Zoom. you may be prompted to "Open zoom.com.us" or you may be brought straight to the waiting room. When the panel is about to start, the next screen you see is the Zoom space for the Program item.
Remember, unless you are a registered Boskone member, you will never see a “Join virtual session” button at any time.
Audience Features Zoom has two types of meeting spaces, webinars and meetings. Most of our panels and all the events will be webinars. The only videos you see at a webinar are the videos of the panelists. Attendees can chat with the entire audience through the Chat window; they cannot chat with specific attendees. A webinar has a separate Q&A icon; click on it to display the Q&A window. If you have a relevant question for the panel, enter it in the Q&A window. If you are used to various emoji-like icons for Zoom meetings, you will only see the Raise Hand icon at the bottom of the screen in a webinar. Meetings are typically used for small Program items such as kaffeeklatches and discussion groups. You see small videos of up to 49 other attendees at a time. Zoom meetings are good for interactive items. Zoom meetings let the individual attendees send chat messages to each other during the item. During meetings, attendees can display their profile picture rather than turning on their video.

Webinars When you are admitted into a webinar, you will only see the panelists on the screen.
Most Zoom user controls are across the bottom of the screen:
● Audio Settings Icon: (far left-hand side) Your microphone is turned off during a webinar item by default. ● “Chat:” Displays a chat window for webinar participants in a window to the right of the Zoom window. In a
webinar, you will not be able to chat with individual attendees, you can chat to the audience or the panel as a whole.
● “Raise Hand:” Indicates you would like to be acknowledged by the moderator, but due to the size of the audience, this may not be seen by the panelists. Reserve questions/comments for the time designated by the moderator. Note that the other emojis beyond “Raise Hand” are only available in meetings
● “Q&A:” Displays a Q&A window so you can submit questions to the panelists. If you want to submit a question to the panelists, do so about a half hour into the panel. Q&A time will usually be during the last few minutes of the panel. Not all questions will be used.
● “End:” click to leave the webinar.
If you click the Chat icon, the Chat window appears to the right of the Zoom screen. The Chat icon is at the bottom of the window, and you can Chat to the audience as a whole or to the panel as a whole (but not to any individuals). If you click the Q&A icon, the Q&A window “floats” on the screen. Enter a question for the panelists, and it may be selected to be answered before the end of the panel.
If you are used to Zoom meetings, you will not see a list of audience participants. You will see a note at the top of the participants windows with the number of participants in the webinar.

Q&A (Questions and Answers)
The Q&A feature is somewhat complicated. The audience, the panelists and the hosts each see somewhat different versions of the same information. When an audience member selects the Q&A icon at the bottom of the webinar screen, they see this screen:
The only people who can ask questions are members of the audience. The only people who can answer questions are panelists, occasionally aided by the Zoom hosts.

When you ask some questions, your screen will look like this:
Note: Boskone has not enabled anonymous questions. If you try to click in the “Send anonymously” check\box, nothing will happen. Your name will always appear with any question you send. We do not guarantee all that panelists will answer all questions. Sometimes, it’s a matter of timing. Sometimes, several questions are extremely similar. However, some people will ask questions that are on the rude side, like “The character Arifft sucked! Why are your characters so terrible?” Panelists can delete those kinds of questions or can decide to answer them. As panelists answer questions, the questions will disappear from the “All questions” window. But every question you submit, whether it is answered or not, will persist in your “My questions” window.
Meetings
When you join a meeting, and the host lets you into the meeting, your screen will contain videos of the panelists as well as the audience. Up to 49 videos can appear on the screen at a time. At Boskone, we are using Zoom meetings for kaffeeklatches, discussion groups, and parties.
Most Zoom user controls are across the bottom of the screen:

● Microphone Icon: (far left side) If it has a red slash through it, you are muted. Keep your microphone muted while you or listening and unmuted for discussion groups and kaffeeklatsches when you are talking. You can adjust your microphone and speakers by selecting the caret to the right of the microphone icon to display various features you can test.
● Video Icon: If it has a red slash through it, your video is suppressed. Your profile graphic will appear when the video is suppressed if you have defined a profile graphic for yourself. You can adjust your video camera or select a virtual background (if your computer supports this feature) by selecting the caret (^) to the right of the video icon. If you click on the caret beside the Video icon, you will see many other features you can use to customize your Zoom experience. Remember to check yourself on the video to ensure there is enough lighting near your computer so people can see you. We urge you to experiment with the Videos settings features before Boskone.
● “Participants:” Displays the names and number of participants (panelists and attendees) at the meeting in a window to the right of the Zoom window.
● “Chat:” Displays a chat window for participants in a window to the right of the Zoom window. In a Meeting, you may chat with anyone in the meeting but we recommend that you not chat with the panelists as it may interrupt them.
● “Record:” Gives you the option to record the Webinar to your hard drive. This option is usually suppressed. ● “Reactions:” Displays the emoji you select on the left side of your video pane and beside your name in the
Participants window for 10 seconds:
Except for the Raise Hand icon, this feature is not available for webinars.
The top line of icons are for clapping, give a thumb up, love, laugh, surprise, celebrate.
The next line of icons are for yes, no, go slower and go faster.
The bottom line of reactions contains only the Raise Hand icon. If a discussion group or kaffeeklatch is too full, the person running the item may request that audience members use the Raise Hand icon to be acknowledged rather than just speak out.
After you select them, Zoom displays these emojis in the left corner of your video pane and beside your name on the Participants window for about five seconds and then they disappear. The Raise Hand icon will persist until you click on it to hide it.
● “End:” click to leave the panel.
At the bottom of the screen, you will see “Share Screen:” The capability to share a screen is generally reserved for panelists. If you are going to share anything during a meeting, be sure the item is open and on your desktop, and your desktop is clear of other files and applications (other than Grenadine and Zoom) before you click "Share Screen."
Breakout Rooms
Breakout rooms can only be created by room hosts "under" a meeting room. At Boskone, they will only be used for parties, not for Program items.
Speaker View vs. Gallery View When you attend a meeting, you can view the attendees in two ways, "Speaker View" or "Gallery View." This can be set at the top right of your screen. "Speaker View" displays the person talking prominently on the screen, with a yellow-green line around the video box. The other people attending the meeting appear in small boxes at the top of the screen: "Gallery View" shows everyone attending the discussion group/small panel in equal-sized video boxes, with the speaker’s video box highlighted by a yellow-green box. In webinars, the panelists are the only people who appear on the screen. The current speaker is highlighted by a yellow-green line around their video box.
Zoom on Smartphones
You can run Zoom on smartphones, but it can be problematic, at least on iPhones. The Zoom controls are at the bottom of the screen and they can be tricky to display. You can only mute Zoom with the “Join Audio” icon that sometimes appears on the left; if you turn off the audio from the phone (and not the Zoom app) the Zoom audio does not turn off.