zippered patchwork bag - wordpress.com · zippered patchwork bag this is a great project for scraps...
TRANSCRIPT

Zippered Patchwork Bag
This is a great project for scraps and to practice working with zippers. Sadly, there’s no magic trick to installing zippers well, you just have to practice!
To make, first decide on your finished size. I wanted my finished pouch to house some cords for the projector I bring to the meetings. I decided on a final size of 16 x 10 inches. It helps to sketch this out to decide on dimensions. Be sure you add in your seam allowances if you’re creating a custom sized bag!
A note on Interfacing - I used a lightweight interfacing. This is sturdy enough for my bag to stand up on it’s own. Feel free to skip the interfacing if you don’t want your bag to be that sturdy.
We’ll be posting the sideshow demonstration on our website at www.ipscork.com and on our YouTube Channel.
If you have any questions, please email us at [email protected]
Cutting DirectionsPatchwork Fabric• Thirty-two 2.5 inch squares• Two 2 inch square for zipper
Exterior Fabric:• Two 2.5 x 16.5 inch rectangles• Two 4.5 x 16.5 inch rectangles
Interior Fabric• Two 16.5 x 10.5 inches rectangles
Interfacing• Two 16.5 x 10.5 inch rectangles

Directions for Assembly
Arrange your 32 squares in two patchwork panels. These panels will be two rows, with 8 squares in each row.
Sew these patchwork panels together, paying attention in the way you press your seams. You may find alternating the way you press the seams in the rows makes it easier to line up the intersections.
To finish exterior panels, sew the narrow exterior fabric rectangle to the top of the patchwork panel, and the wider exterior fabric to the bottom. Make a total of two.
Iron on interfacing on the wrong side of the exterior panel.

On top edge of exterior panels, measure in 1/4 inch in and mark. This will help you with placement of zipper in later steps.
To make zipper tabs, take the two 2 inch square pieces, fold in half and press. ON ONE HALF ONLY, fold in half and press. This piece basically becomes binding on the ends of the zipper.
On open end of zipper, make a mark slightly below any metal zipper stops. Line up the unfolded side of zipper tab and sew a 1/2 inch seam. (If desired, before making the 1/2 inch seam, you can create a new zipper stop out of thread by sewing a zigzag back and forth across the zipper teeth 1/4 inch away from mark, but I found that this step was not really necessary.)
Trim zipper at just inside mark and fold zipper tab over and sew close to the folded edge. Trim edges of zipper tab.
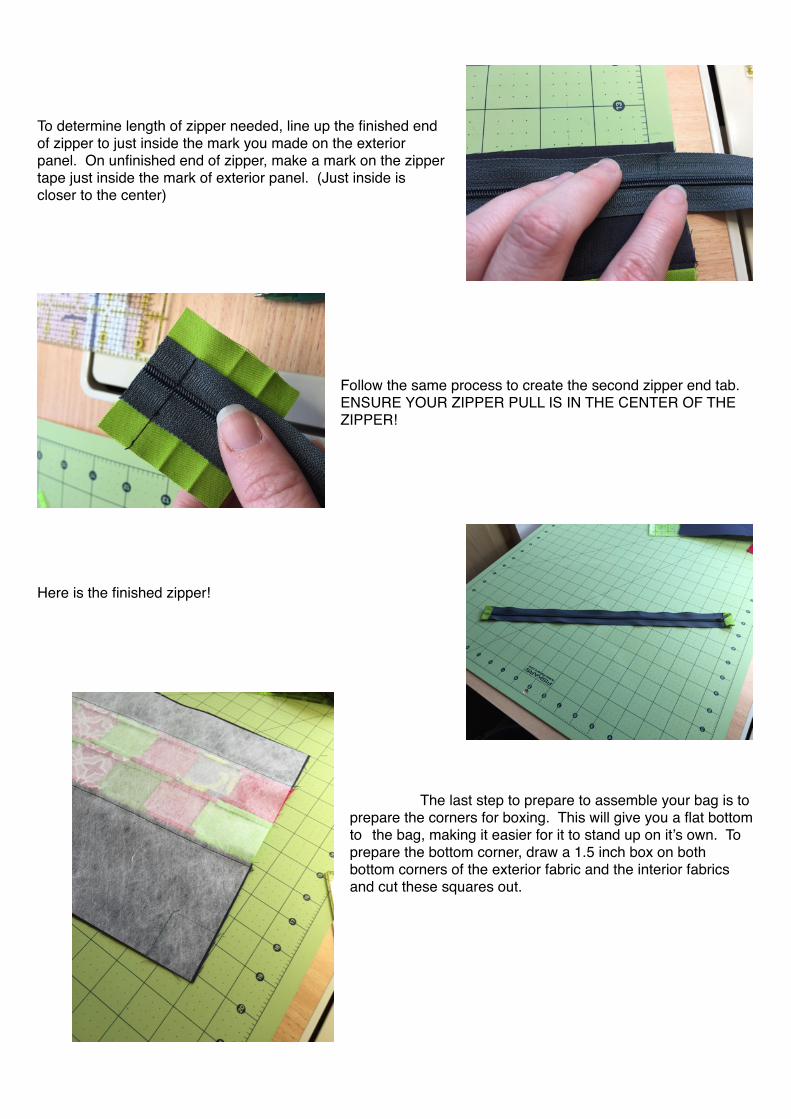
To determine length of zipper needed, line up the finished end of zipper to just inside the mark you made on the exterior panel. On unfinished end of zipper, make a mark on the zipper tape just inside the mark of exterior panel. (Just inside is closer to the center)
Follow the same process to create the second zipper end tab. ENSURE YOUR ZIPPER PULL IS IN THE CENTER OF THE ZIPPER!
Here is the finished zipper!
The last step to prepare to assemble your bag is to prepare the corners for boxing. This will give you a flat bottom to the bag, making it easier for it to stand up on it’s own. To prepare the bottom corner, draw a 1.5 inch box on both bottom corners of the exterior fabric and the interior fabrics and cut these squares out.

To assemble your bag, start by placing one exterior bag panel right side up, and place your zipper right side down on the top edge. Be sure to place the zipper just inside the marked lines!
Then place your interior fabric right side down, lining up the top edges. Sew across the top edge. You may find using a zipper foot makes this step easier. Use the zipper teeth as a guide.
After sewing this seam, press interior and exterior fabrics away from the zipper. Topstitch if desired.
To sew the rest of the bag, place bag with external fabric right side up, with zipper on top edge. Zipper should be face up. Place your other external fabric panel on top and pin, ensuring the zipper is just inside the marked lines.

Next, place your second lining fabric right side up, and place the bag on top, lining up edges and pin. Before sewing, ensure that your lining fabric has right sides touching and the external panels have right sides touching. You are now ready to sew the top edge to the zipper.
Sew the zipper seam, using the zipper as a guide and a zipper foot. Press both the zipper and lining fabric away from the zipper and topstitch if desired.
NEXT, UNZIP THE ZIPPER HALF WAY. Doing so in this step will make this easier to turn later. Then, put your lining pieces right sides together and your external fabrics right sides together. Sew the bottom external fabric seam.
Sew the lining fabric seam EXCEPT be sure to leave a gap for turning, at least 2-3 inches large.
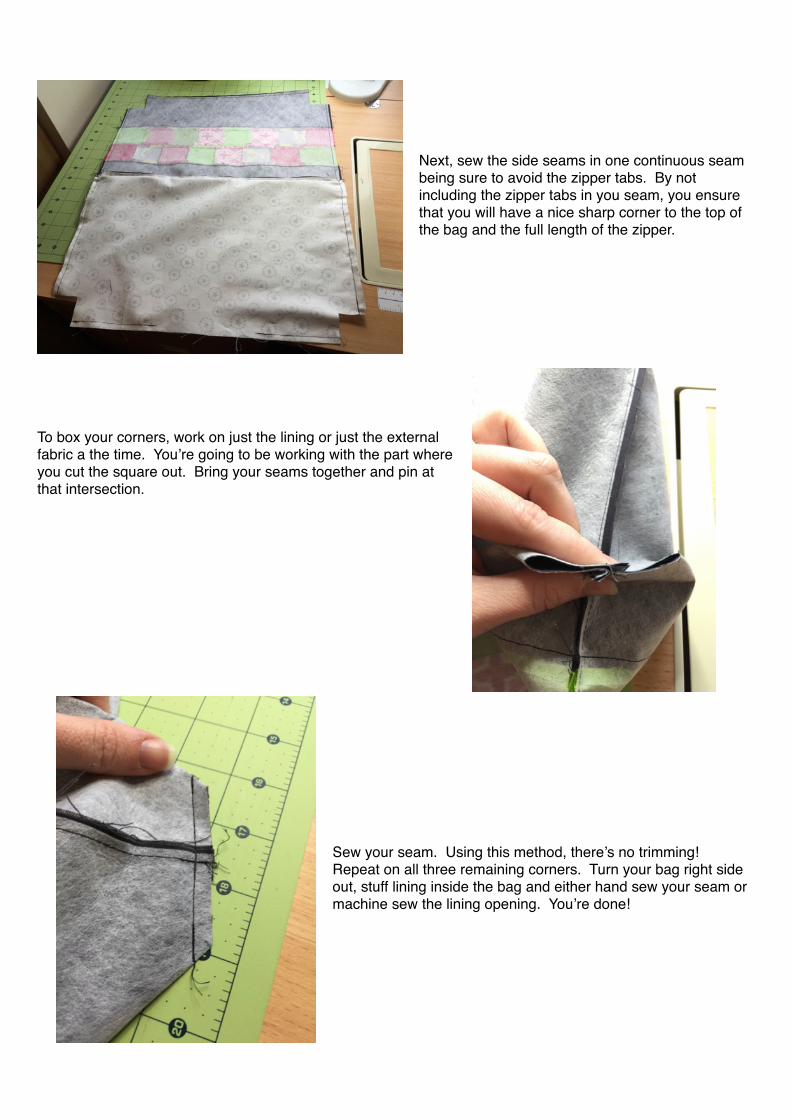
Next, sew the side seams in one continuous seam being sure to avoid the zipper tabs. By not including the zipper tabs in you seam, you ensure that you will have a nice sharp corner to the top of the bag and the full length of the zipper.
To box your corners, work on just the lining or just the external fabric a the time. You’re going to be working with the part where you cut the square out. Bring your seams together and pin at that intersection.
Sew your seam. Using this method, there’s no trimming! Repeat on all three remaining corners. Turn your bag right side out, stuff lining inside the bag and either hand sew your seam or machine sew the lining opening. You’re done!