zenworks 2017 update 2 · upgrading the primary servers to zenworks 2017 9 2. upgrade zenworks:...
TRANSCRIPT
ZENworks 2017 Update 2Upgrade Guide
February 2018

Legal Notice
For information about legal notices, trademarks, disclaimers, warranties, export and other use restrictions, U.S. Government rights, patent policy, and FIPS compliance, see https://www.novell.com/company/legal/.
Copyright © 2018 Micro Focus Software Inc. All rights reserved.
About This Guide
This guide includes information about new enhancements in ZENworks 2017 and information to help you successfully upgrade to this release.
The information in this guide is organized as follows:
Chapter 1, “Upgrading the Primary Servers to ZENworks 2017,” on page 7
Chapter 2, “Updating Satellites and Managed Devices to ZENworks 2017,” on page 27
Chapter 3, “Appliance Migration,” on page 29
Audience
This guide is intended for ZENworks administrators.
Feedback
We want to hear your comments and suggestions about this manual and the other documentation included with this product. Please use the comment on this topic link at the bottom of each page of the online documentation.
Additional Documentation
ZENworks is supported by other documentation (in both PDF and HTML formats) that you can use to learn about and implement the product. For additional documentation, see the ZENworks documentation website.
About This Guide 3

4 About This Guide
Contents
About This Guide 3
1 Upgrading the Primary Servers to ZENworks 2017 7
1.1 Understanding the Upgrade Installer . . . . . . . . . . . . . . . . . . . . . . . . . . . . . . . . . . . . . . . . . . . . . . . . . . 71.2 Database Considerations. . . . . . . . . . . . . . . . . . . . . . . . . . . . . . . . . . . . . . . . . . . . . . . . . . . . . . . . . . . 81.3 Understanding the Upgrade Order . . . . . . . . . . . . . . . . . . . . . . . . . . . . . . . . . . . . . . . . . . . . . . . . . . . . 81.4 Prerequisites . . . . . . . . . . . . . . . . . . . . . . . . . . . . . . . . . . . . . . . . . . . . . . . . . . . . . . . . . . . . . . . . . . . . 9
1.4.1 Using Windows to Create a ZENworks Installation DVD from an ISO Image . . . . . . . . . . . 101.4.2 Using Linux to Create a ZENworks Installation DVD from an ISO Image . . . . . . . . . . . . . . 10
1.5 Upgrading the Remote OEM Sybase SQL Anywhere Database . . . . . . . . . . . . . . . . . . . . . . . . . . . . 111.6 Upgrading the Primary Servers . . . . . . . . . . . . . . . . . . . . . . . . . . . . . . . . . . . . . . . . . . . . . . . . . . . . . 12
1.6.1 Appliance Migration . . . . . . . . . . . . . . . . . . . . . . . . . . . . . . . . . . . . . . . . . . . . . . . . . . . . . . . 121.6.2 Using the GUI to Upgrade Linux and Windows Servers . . . . . . . . . . . . . . . . . . . . . . . . . . . 131.6.3 Using a Command Line to Upgrade a Linux Server . . . . . . . . . . . . . . . . . . . . . . . . . . . . . . 191.6.4 Running ZENworks Diagnostic Center to Verify the Database Schema . . . . . . . . . . . . . . . 21
1.7 Troubleshooting . . . . . . . . . . . . . . . . . . . . . . . . . . . . . . . . . . . . . . . . . . . . . . . . . . . . . . . . . . . . . . . . . 22
2 Updating Satellites and Managed Devices to ZENworks 2017 27
2.1 Prerequisites for Updating Satellite Servers or Managed Devices. . . . . . . . . . . . . . . . . . . . . . . . . . . 272.2 Updating Satellite Servers and Managed Devices. . . . . . . . . . . . . . . . . . . . . . . . . . . . . . . . . . . . . . . 272.3 Known Limitations . . . . . . . . . . . . . . . . . . . . . . . . . . . . . . . . . . . . . . . . . . . . . . . . . . . . . . . . . . . . . . . 28
3 Appliance Migration 29
3.1 Preparing the ZENworks 11 SP4 Appliance for Migration . . . . . . . . . . . . . . . . . . . . . . . . . . . . . . . . . 303.2 Deploying and Configuring the ZENworks 2017 Appliance . . . . . . . . . . . . . . . . . . . . . . . . . . . . . . . . 303.3 Migrating ZENworks 11 SP4 Data to ZENworks 2017 Appliance. . . . . . . . . . . . . . . . . . . . . . . . . . . . 323.4 Post migration . . . . . . . . . . . . . . . . . . . . . . . . . . . . . . . . . . . . . . . . . . . . . . . . . . . . . . . . . . . . . . . . . . 32
Contents 5

6

1 1Upgrading the Primary Servers to ZENworks 2017
Using the ZENworks 2017 installation media, you can directly upgrade a Primary Server to ZENworks 2017 if it is using ZENworks 11 SP4 (11.4.0) or later.
If the upgrade installer reports any of the following issues during the upgrade, follow the recommended procedures to resolve the problem:
Unsupported ZENworks version: Upgrade all Primary Servers to ZENworks 11 SP4. Ensure that all Primary Servers in the zone have the same version of ZENworks 11.4.x.
Unsupported operating systems: Upgrade the operating systems to a supported version.
For more information about the discontinued operating systems, see the ZENworks 2017 Update2 System Requirements.
IMPORTANT: Do not extract the ISO image and use it to install. The installation must be run from an installation DVD.
The following sections provide information about upgrading to ZENworks 2017:
Section 1.1, “Understanding the Upgrade Installer,” on page 7
Section 1.2, “Database Considerations,” on page 8
Section 1.3, “Understanding the Upgrade Order,” on page 8
Section 1.4, “Prerequisites,” on page 9
Section 1.5, “Upgrading the Remote OEM Sybase SQL Anywhere Database,” on page 11
Section 1.6, “Upgrading the Primary Servers,” on page 12
Section 1.7, “Troubleshooting,” on page 22
1.1 Understanding the Upgrade Installer Upgrades all ZENworks 11 SP4 Configuration Management components on the Primary
Servers, including Configuration Management, Asset Management, Asset Inventory, Endpoint Security Management, and Patch Management.
Upgrades the ZENworks database and the Audit database. This occurs when the first server is upgraded.
After you upgrade the first server to ZENworks 2017, the System Update is available for upgrading the supported versions of ZENworks Satellite Servers and managed devices to ZENworks 2017.
The time required to complete the upgrade on the first Primary Server depends on the size of the data present in database. For Primary Servers using an Microsoft SQL or Oracle database with more than 200,000 records to be purged, the Upgrade installer provides an option to prune the database before upgrading. For information, see “Database Purging” on page 15.
Upgrading the Primary Servers to ZENworks 2017 7

1.2 Database ConsiderationsBefore you perform the upgrade from ZENworks 11 SP4 to ZENworks 2017 later, consider the following guidelines:
If you are using an external database, you need to upgrade or migrate the external database to the supported latest version before upgrading the Primary Server.
NOTE: If the ZENworks database is configured to the compatibility level of an older version of the Microsoft SQL Server, for example, 2005, then it should be set to the current supported version of the SQL Server.
For more information about the supported database versions, see “Database Requirements”, in the ZENworks Server Installation Guide.
(Recommended) Select the type of database based on the number of devices in the environment:
For environments with up to 3,000 devices, use Embedded Sybase or Remote Sybase.
For environments with up to 40,000 devices, use MS SQL or Oracle.
For environments with more than 40,000 devices, use Oracle Enterprise Edition (with partitioning). For information about partitioning, see Oracle Enterprise with Partitioning, in the ZENworks Server Installation Guide.
If the existing database does not meet the recommendation, migrate the existing database after the upgrade is complete.
For upgrading database, you can either upgrade the database on the same device where it is running or you can migrate the database using a third-party upgrade installer.
If you are using an embedded Sybase database, the ZENworks Upgrade installer will upgrade and rebuild the database.
NOTE: On a server that hosts an embedded Sybase database, ensure that you have the required free space, equal to the size of the database file.
You can only upgrade to a higher version of the same database. You cannot migrate from one database to another using the Upgrade installer.
For all external databases, stop the ZENworks services before performing the database upgrade.
1.3 Understanding the Upgrade OrderEnsure that you perform the ZENworks 2017 upgrade tasks in the following order:
1. Upgrade the Operating System: If the operating system installed on the device is not supported by ZENworks, upgrade the operating system to the latest supported version.
For more information on the supported operating systems, see ZENworks 2017 Update2 System Requirements.
IMPORTANT: Before you perform the upgrade, ensure that you back up the data and the certificate information.
8 Upgrading the Primary Servers to ZENworks 2017

2. Upgrade ZENworks: Upgrade ZENworks to the latest version.
The ZENworks 2017 upgrade installer can upgrade only the server on which you run it.
If you are using an Embedded Sybase database, first upgrade the device that hosts the database, then upgrade the other Primary Servers.
NOTE: After you upgrade the first Primary Server to ZENworks 2017, all other servers must be upgraded to ZENworks 2017.
When you perform the upgrade for the first time in the Management Zone, only one Primary Server can be upgraded at a time. The subsequent upgrade of additional Primary Servers can be done in parallel, or in any order.
While upgrading the first Primary Server, you must stop the ZENworks services on all other Primary Servers. During the upgrade of additional Primary Servers, you must stop the services on those servers that have not been upgraded. If you do not stop the services, the database might be affected.
NOTE: The Schema and License information will be updated only during the first Primary Server upgrade, not during the subsequent server upgrades.
You must upgrade the Primary Servers first; then upgrade the Satellite Servers and agents in the zone.
IMPORTANT: When upgrading additional Primary Servers in the zone, ensure that the Novell ZENworks Server services are running on the upgraded first Primary Server. If the zone uses Embedded Sybase, the Embedded Sybase services must be running on the upgraded first Primary Server.
1.4 PrerequisitesWhen you upgrade a Primary Server to ZENworks 2017 for the first time in the Management Zone, complete the following tasks before running the upgrade:
Ensure that the Primary Server that you want to upgrade to ZENworks 2017 meets all the ZENworks 2017 Update2 System Requirements.
For more information, see “Database Requirements” in the ZENworks Server Installation Guide.
Back up the ZENworks database.
The time required to complete the upgrade on the first Primary Server depends on the size of the data present in database. If the first Primary Server upgrade is on a device that is using an Microsoft SQL or Oracle database, then run the upgrade in a test environment (with server data similar to the production environment). This is to calculate the outage time of the production server.
Ensure that there is no high CPU utilization or memory utilization during the first Primary Server upgrade.
Stop all ZENworks services on any Primary Server that is not being upgraded in order to prevent the database from being accessed during the upgrade. Otherwise, this might result in the database going into a nonrecoverable state.
For information about stopping ZENworks services:
On a Windows Primary Server: See “ZENworks Services on a Windows Server”in the ZENworks Primary Server and Satellite Reference.
Upgrading the Primary Servers to ZENworks 2017 9

On a Linux Primary Server: See “ZENworks Services on a Linux Server”in the ZENworks Primary Server and Satellite Reference.
When you upgrade the first server, then the System Update is available to upgrade the ZENworks Satellite Servers and managed devices to ZENworks 2017.
Ensure that the server hosting the database is running with an active database.
On a Linux Primary Server, ensure that the c3p0,the hibernate logs for ZENLoader, and ZENServer are disabled prior to the upgrade. For more information, see TID 7015032 (https://www.novell.com/support/kb/doc.php?id=7015032).
Ensure that the time on the server and the database are synchronized (time difference must be less than 2 minutes).
NOTE:
If the time difference is more than 2 minutes and less than 24 hours, a warning message is displayed during the upgrade.
If the time difference is more than 24 hours, an error message is displayed.
Ensure that the Windows Primary Servers have Windows Installer 4.5 or later versions installed and running.
Ensure that all fixed ports are free during the upgrade. If the fixed ports are blocked, the upgrade can not proceed. For the list of ports, see “TCP and UDP Ports Used by ZENworks Primary Servers” in ZENworks Primary Server and Satellite Reference.
If you have obtained the ZENworks upgrade software as an ISO image download, do one of the following to create the upgrade DVD:
“Using Windows to Create a ZENworks Installation DVD from an ISO Image” on page 10
“Using Linux to Create a ZENworks Installation DVD from an ISO Image” on page 10
IMPORTANT: Do not extract and use the ISO image for upgrading to ZENworks 2017.
1.4.1 Using Windows to Create a ZENworks Installation DVD from an ISO Image
1 Download the ZENworks upgrade ISO image from the Micro Focus Download site to a temporary location on your Windows device.
2 Burn the ISO image to a DVD.
1.4.2 Using Linux to Create a ZENworks Installation DVD from an ISO Image
1 Download the ZENworks upgrade ISO image from the Micro Focus Download site to a temporary location on your Linux device.
2 Mount the ISO image by using the following command:
mount -o loop /tempfolderpath/isoimagename.iso mountpoint
Replace tempfolderpath with the path of the temporary folder, replace isoimagename with the ZENworks ISO file name, and replace mountpoint with the path of the file system location where you want to mount the image. The path specified by mountpoint must already exist.
10 Upgrading the Primary Servers to ZENworks 2017

For example:
mount -o loop /zcm11/ZCM11upgr.iso /zcm11/upgrade
1.5 Upgrading the Remote OEM Sybase SQL Anywhere DatabaseIf you are using a remote OEM Sybase SQL Anywhere database, you should upgrade it to the latest, supported version on your remote database server. For information on the supported database versions, see the ZENworks 2017 Update2 System Requirements.
NOTE: Currently, OEM database install and upgrade is supported only in the GUI mode. Silent or Console modes are not supported.
Perform the following steps to upgrade the Sybase engine and rebuild the remote OEM Sybase SQL Anywhere database automatically:
1 Stop the ZENworks services on all the Primary Servers. The Upgrade installer stops and restarts the services on the ZENworks server.
2 The device on which remote OEM Sybase SQL Anywhere database is installed, insert the ZENworks 2017 installation DVD and run one of the following commands with administrator rights:
On Windows, run the following command on the external database server:
DVD_drive:\setup.exe --upgrade-oemdb
or
DVD_drive:\setup.exe -O
On Linux, run the following command on the external database server:
sh /media/cdrom/setup.sh --upgrade-oemdb
or
sh /media/cdrom/setup.sh -O
“O” should be typed in uppercase.
3 On the Introduction page, click Next.
4 On the License Agreement page, click Next.
5 On the Database File Location page, specify the location in which the ZENworks database are present, and then click Next.
NOTE: Based on the configured database, you will be prompted with either External ZENworks Database Configuration or Audit Database Configuration or both.
6 (Conditional) On the External ZENworks Database Configuration page, specify the following details, and then click Next:
Database Name: Name of the database.
User Name: User who can modify the database. The user must have read/write permissions to modify the database.
Password: Password of the user who has read/write permissions to the database.
Server Name: Name of the OEM Sybase SQL Anywhere database server.
Upgrading the Primary Servers to ZENworks 2017 11
7 (Conditional) On the External Audit Database Configuration page, specify the following details, and then click Next:
Database Name: Name of the database.
User Name: User who can modify the database. The user must have read/write permissions to modify the database.
Password: Password of the user who has read/write permissions to the database.
Server Name: Name of the OEM Sybase SQL Anywhere database server.
8 Click Next.
9 Click OK to proceed with the upgrade.
If the database configuration details specified in Step 6 on page 11 and Step 7 on page 12 are correct, then OEM Sybase SQL Anywhere database is upgraded and the Installation Complete page is displayed.
10 Click Next.
11 On the Upgrade Completed Successfully page, click Finish to complete the upgrade.
NOTE: After the upgrade is completed, check for errors in the log file (ZENworks_OEM_Database_Upgrade_<timestamp>.log.xml) located in <Install_location>/Novell/ZENworks/logs on Windows or in /var/opt/novell/log/zenworks on Linux. If there are any errors, contact Micro Focus Support for assistance.
1.6 Upgrading the Primary ServersYou can upgrade by using a graphical user interface (GUI) program or a command line (Linux only).
Section 1.6.1, “Appliance Migration,” on page 12
Section 1.6.2, “Using the GUI to Upgrade Linux and Windows Servers,” on page 13
Section 1.6.3, “Using a Command Line to Upgrade a Linux Server,” on page 19
Section 1.6.4, “Running ZENworks Diagnostic Center to Verify the Database Schema,” on page 21
IMPORTANT
Do not use the ZENworks System Update to upgrade the Primary Servers to ZENworks 2017.
Before upgrading the ZENworks server on a Windows device, run the Windows Update on the device to ensure that all the available updates are installed on the device. Subsequently, disable the Windows Update to ensure that there are no further updates on the device when you upgrade the ZENworks server on the device. Windows Update can be enabled after upgrading ZENworks.
Disable the Linux Update to ensure that there are no further updates on the device when you upgrade the ZENworks server on the device.
1.6.1 Appliance Migration
To migrate a ZENworks 11 SP4 Appliance to ZENworks 2017, see Chapter 3, “Appliance Migration,” on page 29.
12 Upgrading the Primary Servers to ZENworks 2017

1.6.2 Using the GUI to Upgrade Linux and Windows Servers
Perform the following procedure on the Primary Server that you want to upgrade to ZENworks 2017 if all the prerequisites explained in Section 1.4, “Prerequisites,” on page 9 are met:
1 To start the ZENworks 2017 upgrade program:
Linux: Open a Linux terminal, browse to the root of the ZENworks 2017 installation media, then enter the sh setup.sh command.
Windows: Do one of the following:
Browse to the root of the ZENworks 2017 installation media, then double-click setup.exe.
Open a DOS window, browse to the root of the ZENworks 2017 installation media, then enter the setup.exe command.
2 During upgrade, see Table 1-1, “Upgrade Information,” on page 14 for details on the upgrade data.
If you are using the GUI upgrade, you can also click the Help button for similar information.
3 Do one of the following on the Windows device:
If you selected to reboot automatically (you selected the Yes, restart the system option during the upgrade; see “Restarting the Server (applicable only for Windows)” on page 17), continue with Step 5 after the booting process has completed and the services have started.
If you selected to reboot manually (you selected the No, I will restart the system myself option during the upgrade; see “Restarting the Server (applicable only for Windows)” on page 17), wait for the upgrade to complete and the services to start in order to verify it in Step 4.
4 After the upgrade is complete and the ZENworks services are restarted, do any of the following to verify that ZENworks 2017 is running:
Check the Windows services by using the GUI:
On the server, click Start, select Administrative Tools > Services, then review the status of the Novell ZENworks Loader and Novell ZENworks Server services.
If the services are not running, start them. Right-click the Novell ZENworks Server service, select Start, right-click the Novell ZENworks Loader service, then select Start.
Alternatively, you can use the Restart option for Novell ZENworks Server to stop all of the related services, which stops and then starts each of them in their correct order, including Novell ZENworks Loader.
Launch ZENworks Control Center:
Use the following URL to open ZENworks Control Center in a web browser on any device in your network:
https://DNS_name_or_IP_address_of_Primary_Server:port_number/zenworks
Check the Linux services by using the specific service command:
On the server, run the following commands:
/etc/init.d/novell-zenserver status
/etc/init.d/novell-zenloader status
For SLES 12, or later servers run the following commands:
systemctl status novell-zenserver
systemctl status novell-zenloader
Upgrading the Primary Servers to ZENworks 2017 13
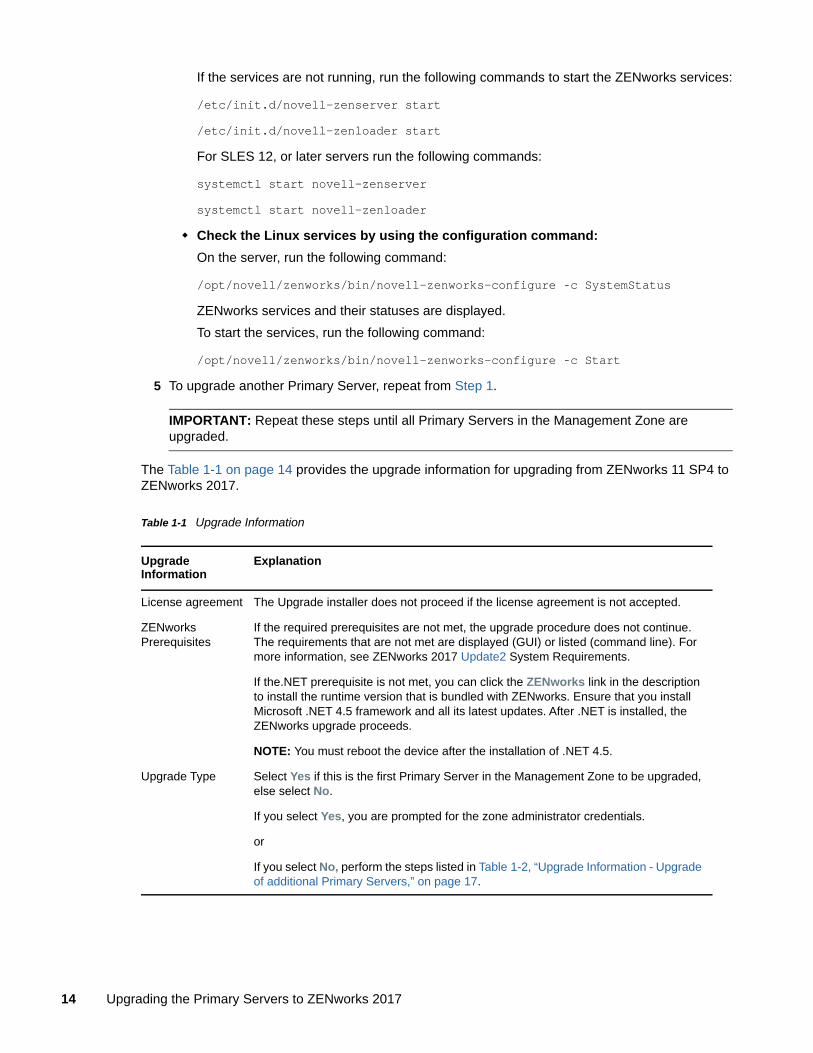
If the services are not running, run the following commands to start the ZENworks services:
/etc/init.d/novell-zenserver start
/etc/init.d/novell-zenloader start
For SLES 12, or later servers run the following commands:
systemctl start novell-zenserver
systemctl start novell-zenloader
Check the Linux services by using the configuration command:
On the server, run the following command:
/opt/novell/zenworks/bin/novell-zenworks-configure -c SystemStatus
ZENworks services and their statuses are displayed.
To start the services, run the following command:
/opt/novell/zenworks/bin/novell-zenworks-configure -c Start
5 To upgrade another Primary Server, repeat from Step 1.
IMPORTANT: Repeat these steps until all Primary Servers in the Management Zone are upgraded.
The Table 1-1 on page 14 provides the upgrade information for upgrading from ZENworks 11 SP4 to ZENworks 2017.
Table 1-1 Upgrade Information
Upgrade Information
Explanation
License agreement The Upgrade installer does not proceed if the license agreement is not accepted.
ZENworks Prerequisites
If the required prerequisites are not met, the upgrade procedure does not continue. The requirements that are not met are displayed (GUI) or listed (command line). For more information, see ZENworks 2017 Update2 System Requirements.
If the.NET prerequisite is not met, you can click the ZENworks link in the description to install the runtime version that is bundled with ZENworks. Ensure that you install Microsoft .NET 4.5 framework and all its latest updates. After .NET is installed, the ZENworks upgrade proceeds.
NOTE: You must reboot the device after the installation of .NET 4.5.
Upgrade Type Select Yes if this is the first Primary Server in the Management Zone to be upgraded, else select No.
If you select Yes, you are prompted for the zone administrator credentials.
or
If you select No, perform the steps listed in Table 1-2, “Upgrade Information - Upgrade of additional Primary Servers,” on page 17.
14 Upgrading the Primary Servers to ZENworks 2017

Database Purging The time required to complete the upgrade of the first Primary Server depends on the size of the data present in the database. On Primary Servers that are using an Microsoft SQL or Oracle Enterprise database, the upgrade installer checks the size of unwanted inventory data that can be purged. If there are more than 200,000 records to be purged, the Upgrade installer gives an option to purge the database before upgrading the Primary Server. For other database types, if there are less than 200,000 records to be purged, this page does not open.
Purge the database now: If this option is selected, the wizard will continue with purging the database. After the database is purged, re-initiate the upgrade process.
Configure the following settings for purging:
Remove the deleted products and components older than x day(s):
Specify the number of days after which to purge deleted product and component data. The default value is 180 days.
Remove the inventory history data older than x day(s): Specify the number of days after which to purge the inventory history. The default value is 180 days.
Remove the Software Application Usage data older than x day(s):
Specify the number of days after which to purge the software application usage data collected for Asset Management. The default value is 180 days.
Remove the Network Software Usage data older than x day(s):
Specify the number of days after which to purge the network software usage data collected for Asset Management. The default value is 180 days.
Remove the Web Application Usage data older than x day(s): Specify the number of days after which to purge the Web application usage data collected for Asset Management. The default value is 180 days.
IMPORTANT: If the purging process is interrupted, the database might become inconsistent.
Continue without purging the database: If this option is selected, the wizard continues with the upgrade process.
ZENworks Diagnostic Center
Verify the database using ZENworks Diagnostic Center. For more information, see “Running ZENworks Diagnostic Center to Verify the Database Schema” on page 21.
NOTE: Verify the database before you upgrade the first Primary Server to ZENworks 2017. You will not be prompted to verify the database for the subsequent server upgrades.
After you verify the database, select Yes, I have verified the database schema using ZDC. This option confirms that you have verified the ZENworks database schema is correct.
ZENworks Services Optimization
If ZENworks services are not configured for high performance, this page is displayed. You can select Yes to reconfigure the ZENworks Services setting during installation or select No to ignore.
If you select Yes, then the ZENworks upgrade installer increases the RAM configuration settings for ZENServer and ZENloader.
ZENworks Licensing
In the ZENworks Licensing page, enter the ZENworks 2017 license information.
Upgrade Information
Explanation
Upgrading the Primary Servers to ZENworks 2017 15

Pre-upgrade summary
The following fields are displayed in the summary:
ZENworks Home Directory: Displays the location on the Primary Server where the ZENworks software that is being upgraded is installed.
Zone Name: Displays the name of the Management Zone to which this server belongs.
Upgrade Database: Indicates the upgrade status of the ZENworks database and automatically checks whether it needs to be upgraded or not.
To make changes to any information, click Previous.
Upgrading process The upgrade process takes several minutes, depending on the capabilities of the hardware and size of data in the database.
During the upgrade, you can click Cancel to stop, which leaves changes in the files that were upgraded up to that point. For more information on what to do after canceling, contact Micro Focus Support.
Upgrading errors If there are errors during the upgrade, this page is displayed. For detailed information, see the log files in the following locations:
On Windows
%ZENWORKS_HOME%\logs
%ZENWORKS_HOME%\logs\ZENworks_Upgrade_<TimeStamp>.log.xml
%ZENWORKS_HOME%\logs\loader-messages.log
%ZENWORKS_HOME%\logs\system-update-import.log
%ZENWORKS_HOME%\logs\system-update\<Update GUID>
%ZENWORKS_HOME%\logs\pre-global-actions.log
%WINDOWS_SYSTEM_DRIVE%\tmp\err.log
On Linux
/var/opt/novell/log/zenworks
/var/opt/novell/log/zenworks/ZENworks_Upgrade_<TimeStamp>.log.xml
/var/opt/novell/log/zenworks/system-update/<Update GUID>
/var/opt/novell/log/zenworks/loader-messages.log
/var/opt/novell/log/zenworks/system-update-import.log
/var/opt/novell/log/zenworks/pre-global-actions.log
/tmp/err.log
Resolve the errors and restart the upgrade.
Post-upgrade actions
Choose to run the ZENworks System Status utility to launch the ZENworks services heartbeat check before closing the upgrade program. The results are posted in the upgrade log file.
Upgrade Information
Explanation
16 Upgrading the Primary Servers to ZENworks 2017

Table 1-2 Upgrade Information - Upgrade of additional Primary Servers
Restarting the Server (applicable only for Windows)
Upon a successful upgrade on a Windows Primary Server, you can select between rebooting immediately or later:
Yes, Restart the System: If you select this option, the server is rebooted to complete the upgrade process.
No, I Will Restart the System Myself: If you select this option, the upgrade process finishes when you reboot the server for the next time.
IMPORTANT: Reboot the server to complete the upgrade process.
Upgrade completion
The actions you selected previously are performed, including:
Upgrading the ZENworks database (done when the first Primary Server is upgraded).
Upgrading all ZENworks components installed on the Primary Server.
Importing System Update into the zone so that you can upgrade the managed devices in the zone.
Installation Information
Explanation
Primary Server and Zone Credentials
You are prompted for the details of the Primary Server that is already upgraded, the Zone credentials, and the SSL port number.
ZENworks Database Details
(Conditional) If the device cannot connect to the database through the Primary Server that is already upgraded, you are prompted for the details to connect directly to the database.
Port Number A few ports that might be blocked by your firewall need to be opened. You can open them now or you can manually open them later.
Pre-upgrade summary
WARNING: Before the Pre-upgrade summary page is displayed, the ZENworks services will be stopped on the server. If you cancel the upgrade at this time, you will need to restart the ZENworks services manually.
The following fields are displayed in the summary:
ZENworks Home Directory: Displays the location on the Primary Server where the ZENworks software that is being upgraded is installed.
Zone Name: Displays the name of the Management Zone to which this server belongs.
Upgrade Database: Indicates whether the ZENworks database will be upgraded. Its status is automatically checked by the program to see whether it needs to be upgraded.
Upgrading process
The upgrade process takes several minutes, depending on the capabilities of the hardware.
Upgrade Information
Explanation
Upgrading the Primary Servers to ZENworks 2017 17

Errors during upgrade
If there are errors during the upgrade, this page is displayed. For detailed information, see the log files in the following locations:
On Windows
%ZENWORKS_HOME%\logs
%ZENWORKS_HOME%\logs\ZENworks_Upgrade_<TimeStamp>.log.xml
%ZENWORKS_HOME%\logs\loader-messages.log
%ZENWORKS_HOME%\logs\system-update-import.log
%ZENWORKS_HOME%\logs\system-update\<Update GUID>
%ZENWORKS_HOME%\logs\pre-global-actions.log
%WINDOWS_SYSTEM_DRIVE%\tmp\err.log
On Linux
/var/opt/novell/log/zenworks
/var/opt/novell/log/zenworks/ZENworks_Upgrade_<TimeStamp>.log.xml
/var/opt/novell/log/zenworks/system-update/<Update GUID>
/var/opt/novell/log/zenworks/loader-messages.log
/var/opt/novell/log/zenworks/system-update-import.log
/var/opt/novell/log/zenworks/pre-global-actions.log
/tmp/err.log
You must resolve the errors and restart the upgrade.
Post-upgrade actions
Before closing the upgrade program, you can run the ZENworks System Status utility to launch a heartbeat check of the ZENworks services. The results are listed in the installation log.
Restarting the Server (applicable only for Windows)
After the upgrade on a Windows Primary Server, you can select either to reboot immediately or later:
Yes, Restart the System: Reboots the server to complete the upgrade process.
No, I Will Restart the System Myself: Completes the upgrade process, when you reboot the server the next time.
IMPORTANT: You must reboot the server to complete the upgrade process.
Upgrade completion
The actions you selected previously are performed, including:
Upgrading the ZENworks database (done when the first Primary Server is upgraded).
Upgrading all ZENworks components installed on the Primary Server.
Importing System Update into the zone so that you can upgrade the managed devices in the zone.
Installation Information
Explanation
18 Upgrading the Primary Servers to ZENworks 2017

1.6.3 Using a Command Line to Upgrade a Linux Server
Perform the following on the Primary Server that you want to upgrade from ZENworks 11 SP4 (11.4.x) to ZENworks 2017:
1 Ensure that the upgrade prerequisites are met, as explained in Section 1.4, “Prerequisites,” on page 9.
2 Start the ZENworks 2017 upgrade program, open a Linux terminal, browse to the root of the upgrade media, then enter the following command:
./setup.sh --console
or
./setup.sh -e
3 Select the language. English is the default language. Select the number corresponding to your language, then press Enter to continue.
4 Review the introduction, then press Enter to continue.
TIP: Type back and press Enter to return to a previous installation option to make the changes. Type quit to exit the wizard.
5 To accept the end-user license agreement (EULA), type 1, then press Enter.
6 To accept the license agreement, type 1, then press Enter.
If you disagree, the upgrade wizard quits.
7 The Prerequisite check page is displayed. If there are any warning or error messages, resolve the errors, then press Enter to continue.
8 Type 1 if this is the first Primary Server to be upgraded; otherwise, type 2,then press Enter.
9 (Conditional) If you typed 1 in the previous page, you will be prompted for the zone administrator credentials. Specify details, then press Enter and continue with Step 11.
10 (Conditional) If you typed 2 in the previous page, you will be prompted for the details of the upgraded Primary Server and the zone administrator credentials. Specify the required details, then press Enter.
(Conditional) If the device connects to the Primary Server, continue with Step 18.
(Conditional) If the device unable to connect to the Primary Server, you will be prompted for the database details. Specify the details and continue with Step 18.
11 At the end of the Enter the zone administrative user's name line, press Enter to accept the default (Administrator), or specify an administrator name, then press Enter.
12 Specify a password for the administrator, then press Enter.
If the device connects to the database server, continue with Step 13. If not, you will be prompted for the database details. Specify the database details, then press Enter.
13 Run ZENworks Diagnostic Center to verify the database. For more information, see “Running ZENworks Diagnostic Center to Verify the Database Schema” on page 21.
NOTE: Verify the database before you upgrade the first Primary Server to ZENworks 2017. You do not need to verify the database for the subsequent server upgrades.
14 Confirm that you have verified the ZENworks database schema by using the ZENworks Diagnostic Center. Press Y to continue.
You need to confirm to proceed with the upgrade.
Upgrading the Primary Servers to ZENworks 2017 19

15 In the ZENworks licensing page, enter the ZENworks 2017 license, and then click Next.
16 Stop the ZENworks services on all other Primary Servers, then press Enter to stop the services on the local server.
Before the upgrade, you should stop the services on all Primary Servers in the Management Zone.
Except for the database service, no ZENworks service should be running during the upgrade process.
17 If ZENworks services are not configured for high performance, select 1 to reconfigure the ZENworks services setting during installation or select 2 to ignore.
18 Review the pre-upgrade summary, then press Enter to continue.
If you are upgrading the other Primary Servers in the Management Zone, the upgrade starts when you press Enter in this step.
19 When Upgrade Complete is displayed, press Enter to continue.
If errors are displayed, see the installation logs in the /var/opt/novell/log/zenworks or /var/opt/novell/log/zenworks/systemupdate/<Update GUID> file.
20 Do any of the following to verify that ZENworks 2017 is running:
Check the Linux services by using the specific service commands
On the server, run the following commands:
/etc/init.d/novell-zenserver status
/etc/init.d/novell-zenloader status
For SLES 12, or later servers run the following commands:
systemctl status novell-zenserver
systemctl status novell-zenloader
If the services are not running, run the following commands to start the ZENworks services:
/etc/init.d/novell-zenserver start
/etc/init.d/novell-zenloader start
For SLES 12, or later servers run the following commands:
systemctl start novell-zenserver
systemctl start novell-zenloader
Check the Linux services by using the configuration command
On the server, run the following commands:
/opt/novell/zenworks/bin/novell-zenworks-configure -c SystemStatus
ZENworks services and their status are listed.
To start the services, run the following command:
/opt/novell/zenworks/bin/novell-zenworks-configure -c Start
Run ZENworks Control Center
Use the following URL to open the ZENworks Control Center in a web browser on any device in your network:
https://<DNS name of the Primary_Server>/zenworks
20 Upgrading the Primary Servers to ZENworks 2017

or
https://<IP address of the Primary_Server>/zenworks
21 To upgrade another Primary Server, repeat from Step 2.
For information on the post-upgrade tasks, see “Completing Post-Installation Tasks” in the ZENworks Server Installation Guide.
1.6.4 Running ZENworks Diagnostic Center to Verify the Database Schema
The first time you upgrade any Primary Server to ZENworks 2017, you must verify the database schema. Do not perform this procedure for the subsequent server upgrades.
“Verifying an Embedded Sybase or OEM Sybase Database Schema” on page 21
“Verifying an External Database Schema” on page 21
Verifying an Embedded Sybase or OEM Sybase Database Schema
1 At the Primary Server’s console prompt, run the following commands:
On Windows
cd to MEDIA_ROOT\Common\tools\zdc
zdc_verifyDB.bat
On Linux
cd to MEDIA_PATH/Common/tools/zdc
./zdc_verifyDB
ZENworks Diagnostic Center runs the diagnostic tests and generates the results in HTML format. On a Windows Primary Server, the reports are stored in the following location: %ZENWORKS_HOME%\logs\zdcreports\%SESSION%
On a Linux Primary Server the reports are stored in the following location:
/var/opt/novell/log/zenworks/zdcreports
To view the reports, open index.html, located in the report directory.
The complete log of diagnostic tests is stored in the following locations:
On Windows: %ZENWORKS_HOME%\logs\zdcreports\zdc_zen11_verify_%SESSION%.log
On Linux: /var/opt/novell/log/zenworks/zdcreports
Verifying an External Database Schema
Perform the following steps to verify an external database schema such as external Sybase, Microsoft SQL, or Oracle database schema:
1 At the Primary Server’s console prompt, run the following commands:
On Windows
cd to MEDIA_PATH/Common/tools/zdc
zdc_verifyDB.bat -d check
On Linux
cd to MEDIA_PATH/Common/tools/zdc
Upgrading the Primary Servers to ZENworks 2017 21

./zdc_verifyDB -d check
NOTE: The -d check parameter must be used only when you migrate the database from one device to another. Do not use the -d check parameter if the database is upgraded on the same device.
2 Specify the type of database. Type the relevant number based on the database type:
(1) Sybase
(2) MS-SQL
(3) Oracle
3 Specify the database details, based on the selected database (Microsoft SQL, Sybase, or Oracle).
NOTE: If you are using an Microsoft SQL database, based on the type of authentication you choose to log in, enter the user name in the relevant format:
Windows Authentication: <name>@<domain>
SQL Server Authentication: <name>
4 (Conditional) If the database is Remote Sybase, enter the Database Engine Name.
ZENworks Diagnostic Center runs the diagnostic tests and generates the results in HTML format. On a Windows Primary Server the reports are stored in the following location: %ZENWORKS_HOME%\logs\zdcreports\%SESSION%
On a Linux Primary Server the reports are stored in the following location:
/var/opt/novell/log/zenworks/zdcreports
To view the reports, open index.html, located in the report directory.
The complete log of diagnostic tests is stored in the following locations:
On Windows: %ZENWORKS_HOME%\logs\zdcreports\zdc_zen11_verify_%SESSION%.log
On Linux: /var/opt/novell/log/zenworks/zdcreports
1.7 TroubleshootingIf the ZENworks Server Upgrade fails, you must rectify the problem and re-run the ZENworks Upgrade Installer.
You must re-run the Upgrade Installer on the same server where the upgrade was started.
If the upgrade fails during the post-package upgrade database action, then on re-running and after zone authentication, the pre-upgrade Summary page displays and the upgrade proceeds to perform the database actions.
If Embedded Sybase database is used, ensure that the .dbR and .logR files are deleted from the database folder before re-running the Upgrade Installer.
The following sections provide solutions to the problems that you might encounter while upgrading the ZENworks Primary Server:
“During the Upgrade of any Windows Primary Server, Windows Explorer Automatically Restarts a Few Times” on page 23
“When ZENworks Upgrade is launched, if the database is executing any transactions, it might conflict with the upgrade process” on page 23
22 Upgrading the Primary Servers to ZENworks 2017

“While using an Oracle database, during the upgrade or database creation, the TNS error message is displayed” on page 24
“While using an MS-SQL database, during the upgrade or database creation, there are connection issues” on page 24
“Incorrect values displayed for the inventory records to be pruned” on page 25
“An error occurs when you delete a folder with a long name” on page 25
“Installing ZENworks 11 SP4 or Upgrading from ZENworks 11 SP3 to ZENworks 11 SP4 fails in a Windows environment” on page 25
“Upgrade fails after the System Update is successfully completed in a Windows environment” on page 26
During the Upgrade of any Windows Primary Server, Windows Explorer Automatically Restarts a Few Times
Explanation: During the upgrade of any Windows Primary Server, Windows Explorer automatically restarts a few times and the command prompt window with the following message is automatically launched:
For each prompt presented, press 'enter' to accept the <default> value, type ‘back’ to return to the previous action, or type 'quit' to exit.
Action: Ignore the messages.
When ZENworks Upgrade is launched, if the database is executing any transactions, it might conflict with the upgrade process
Source: ZENworks 11 SP4; Upgrade
Explanation: When the ZENworks Upgrade is launched, if the database is executing any transactions, it might conflict with the upgrade process.
Action: Kill the database session that conflicts with the upgrade process. Perform the following steps, to kill a database session:
1 Log in to the database as a system user and launch the SQL client.
2 Execute one of the following scripts, based on the database type:
Oracle:
select 'ALTER SYSTEM KILL SESSION '''||SID||','||SERIAL#||''';' AS "Drop Query",b.sql_text,a.* from gv$session a, gv$sql b where (case when a.sql_id is null then a.prev_sql_id else a.sql_id end)=b.sql_id and a.program='JDBC Thin Client' and a.logon_time< (sysdate-3/60/24) and a.username='<<ZENWORKSUSER>>';
Where:
ZENWORKSUSER is the ZENworks database user name.
MS SQL:
select 'KILL '+cast(spid as varchar(100)) as "Drop Query", r.text,s.* from sys.sysprocesses s cross apply sys.dm_exec_sql_text (sql_handle) r where
Upgrading the Primary Servers to ZENworks 2017 23

s.program_name='jTDS' and s.spid!=@@spid and s.login_time < dateadd(minute,-3,getdate()) and s.loginame='<<ZENWORKSUSER>>';
Where:
ZENWORKSUSER is the ZENworks database user name.
SQL Anywhere:
SELECT 'Drop connection '+cast(sa_conn_info.Number as varchar(100))+';' as "Drop Query", sa_conn_info.Number AS connection_number, DB_NAME( DBNumber ) AS database_name, sa_conn_info.name AS connection_name, sa_conn_info.userid, CONNECTION_PROPERTY( 'LoginTime', Number ) as "Login Time", CONNECTION_PROPERTY( 'LastStatement', Number ) As "Query" FROM sa_conn_info() where sa_conn_info.Number != @@spid and CONNECTION_PROPERTY( 'LoginTime', Number ) < dateadd(minute,-3,getdate()) and userid='<<ZENWORKSUSER>>';
Where
ZENWORKSUSER is the ZENworks database user name.
While using an Oracle database, during the upgrade or database creation, the TNS error message is displayed
Source: ZENworks 11 SP4; Upgrade
Explanation: While using an Oracle database during the upgrade or database creation, you get an error message: TNS:listener could not find available handler with matching protocol stack.
Action: Increase the maximum load for dedicated connections, which is determined by the PROCESSES parameter. If the issue persists, contact Novell Technical Support.
While using an MS-SQL database, during the upgrade or database creation, there are connection issues
Source: ZENworks 11 SP4; Upgrade
Explanation: While using an MS-SQL database, during the upgrade or database creation, there are connection issues with the following error message:
org.hibernate.exception.JDBCConnectionException: Cannot open connectionCaused by: java.sql.SQLException: I/O Error: Connection resetCaused by: java.net.SocketException: Connection reset
Action: Run select * from sys.configurations where name='user connections'
By default, the maximum connection is 32,767. You can adjust it to Number of Primary Servers * 200.
For more information on how to configure the user connections, see http://technet.microsoft.com/en-us/library/ms187030.aspx.
24 Upgrading the Primary Servers to ZENworks 2017

Check whether the MS-SQL server has high CPU utilization and database server load. Contact Novell Technical support for further assistance.
Incorrect values displayed for the inventory records to be pruned
Source: ZENworks 11 SP4; Upgrade
Explanation: When you opt for pruning in the Upgrade wizard, the number of records specified for deletion is displayed in the Pre-prune summary page.
For example, if you have marked 8,000,000 records out of the total 10,000,000 records for pruning, then 8,000,000 of 10,000,000 is displayed in the number of records specified for deletion field.
After successful pruning, when you relaunch the Upgrade wizard for pruning, the Database Pruning page displays an incorrect value in the Total number of records found to be deleted field.
For example, if 8,000,000 inventory records have been deleted out of 10,000,000 inventory records, then the ideal value to be displayed in the Total number of records found to be deleted field is 200,000.
Currently, an incorrect value is displayed. As a result, there is a mismatch in the values displayed for deleted Inventory records and for Inventory records that are yet to be deleted.
Action: There is no workaround.
An error occurs when you delete a folder with a long name
Source: ZENworks 11 SP4; Upgrade
Explanation: In a ZENworks zone that uses an SQL Server database, when you try to delete a ZENworks object (for example, device or folder) that has a name which exceeds 900 bytes, you will receive the following error:
com.novell.zenworks.datamodel.exceptions.InternalDataModelException: org.hibernate.exception.GenericJDBCException: Operation failed. The index entry of length 912 bytes for the index 'idx_zZENObject_Name' exceeds the maximum length of 900 bytes.
Action: Ensure that the length of ZENworks Object names in the zone does not exceed 900 bytes. For more information, see https://technet.microsoft.com/en-us/library/ms191241%28v=sql.105%29.aspx.
Installing ZENworks 11 SP4 or Upgrading from ZENworks 11 SP3 to ZENworks 11 SP4 fails in a Windows environment
Source: ZENworks 11 SP4; Upgrade
Explanation: When you try to upgrade from ZENworks 11 SP3 to ZENworks 11 SP4 or when you try to install ZENworks 11 SP4, upgrade or install fails.
Action: Disable the adapter and start the upgrade again. To disable the adapter:
1. Navigate to the Device Manager in your device.
2. Select Network Adapters from the Device Manager window.
3. Click the View tab.
Upgrading the Primary Servers to ZENworks 2017 25

4. Select Show Hidden Devices.
5. Right-click Microsoft ISATAP Adapter, and select Disable from the available options.
Upgrade fails after the System Update is successfully completed in a Windows environment
Source: ZENworks 11 SP4; Upgrade
Explanation: If you have not disabled the adapter as explained in the Installing ZENworks 11 SP4 or Upgrading from ZENworks 11 SP3 to ZENworks 11 SP4 fails in a Windows environment troubleshooting scenario, the upgrade will fail after the system update is successfully completed in a Windows environment.
Action: If you see the ExecuteZENUpdaterConfigureAction complete message in the logs (%ZENWORKS_HOME%/logs/ZENworks_Upgrade log), execute the following commands to complete the upgrade successfully:
novell-zenworks-configure -c "UpdateZENServerRolesConfigureAction"
novell-zenworks-configure -c "NCCRegisterConfigureAction"
26 Upgrading the Primary Servers to ZENworks 2017

2 2Updating Satellites and Managed Devices to ZENworks 2017
You can update the managed devices and Satellite Servers to ZENworks 2017 if they have ZENworks 11 and later versions installed.
To update the managed devices and Satellite Servers to ZENworks 2017, review the following sections:
Section 2.1, “Prerequisites for Updating Satellite Servers or Managed Devices,” on page 27
Section 2.2, “Updating Satellite Servers and Managed Devices,” on page 27
Section 2.3, “Known Limitations,” on page 28
2.1 Prerequisites for Updating Satellite Servers or Managed DevicesBefore updating a Satellite Server or managed device from a supported ZENworks version to ZENworks 2017, you must complete the following tasks:
NOTE: For information about the supported versions, see the ZENworks 2017 Update2 System Requirements.
Ensure that the device meets the minimum system requirements for ZENworks 2017.
For more information on managed device requirements, see ZENworks 2017 Update2 System Requirements.
Ensure that the Microsoft .NET 4.5, or later framework and its latest updates are installed and running on the device.
Ensure that the Windows Installer 4.5 or later version is installed.
Ensure that all the Primary Servers in the zone have been upgraded to ZENworks 2017.
If you choose to deploy the System Update in stages, ensure that the stage that you create contains at least one stage member (an individual device and a group that contain devices).
Ensure that the Update for ZENworks 2017 displays in the Available System Updates list in ZCC. If it is not available, then run the following command to import the update:
zman sui <install media\ISO>:\Common
2.2 Updating Satellite Servers and Managed DevicesTo update Satellite Servers or managed devices, use the System Update feature. For detailed information, see the ZENworks System Updates Reference.
If you encounter any issues while deploying the ZENworks update on the managed devices, see the following log files:
Updating Satellites and Managed Devices to ZENworks 2017 27
Windows: installation_path\novell\zenworks\logs\system-update\5017000000fc50000000002016121615\system-update.log
Linux: /var/opt/novell/log/zenworks/system-update/5017000000fc50000000002016121615/system-update.log
In the upgrade log file path, 5017000000fc50000000002016121615 indicates the System Update GUID.
NOTE
After updating from an older version of ZENworks on which ZENworks Patch Management is installed, DAU might fail on newly added devices until the next Patch Management subscription is updated.
After the DAU bundle is updated by the subscription and the version is incremented by the same, this issue will be resolved. This issue does not impact the existing ZENworks 11.x.x agents as they already have the analyze.exe module installed on them. Therefore, they continue to execute the old DAU and receive an updated patch agent when the subscription service updates the DAU bundle.
If you demote a Satellite Server before performing an update, you need to ensure that the demotion is successful before you proceed with the update.
2.3 Known Limitations Error messages or warnings might be incorrectly logged in ZENworks Control Center during the
upgrade of a managed device from ZENworks 11.4.x to ZENworks 2017 even if the upgrade is successful.
Action: Ignore the error messages and refresh the managed device.
28 Updating Satellites and Managed Devices to ZENworks 2017

3 3Appliance Migration
To migrate a ZENworks 11 SP4 Appliance to ZENworks 2017, you copy the ZENworks data and appliance network settings from the ZENworks 11 SP4 Appliance, deploy the ZENworks 2017 Appliance, and then transfer the ZENworks 11 SP4 data to the ZENworks 2017 Appliance.
In a multi-appliance ZENworks system, the order of migration is important only if you are using the embedded Sybase database. In this case, you need to migrate the appliance with the database first, followed by any other appliances. If you are using the remote Sybase database or an external database, you can migrate appliances in any order.
IMPORTANT: If you are in ZENworks 11.4.x version and want to migrate to 2017 or later versions, new active licenses for 2017 must be applied, as migrating the appliance to ZENworks 2017 might not continue if any of the ZENworks products are using 11.4.x active licenses.
Before starting the migration, check the ZENworks 2017 licenses available in the Micro Focus Customer Center portal and activate the products by entering the new license for ZENworks 2017.
To change the license state of a product, perform any of the following:
For Suite License: If you have Suite License Key, perform the following:
1 In ZCC, click Configuration.
2 In the Licenses panel, click ZENwork Suite if you have a suite license key.
3 Specify the license key in the Suite License Key, and click Apply.
OR
For a Product License Click a product to provide a product license key or to turn on the product evaluation.
For more information, see ZENworks Product Licensing Reference.
Summary:
Verify ZENworks 11 SP4 Appliance system integrity with ZENworks Diagnostic Center
Download and install the novell-zenworks-prereq-0.1-1.noarch.rpm file.
Copy the ZENworks 11 SP4 Appliance virtual disk that was created during Appliance deployment (vastorage)
Deploy ZENworks 2017 Appliance
Attach the ZENworks 11 SP4 Appliance virtual disk to ZENworks 2017
Mount any additional ZENworks 11 SP4 repository disks to the ZENworks 2017 Appliance
Power on the ZENworks 2017 Appliance
Configure ZENworks 2017 Appliance using the ZENworks Appliance console
The following sections provide information on how to migrate ZENworks 11 SP4 Virtual Appliance to ZENworks 2017 Virtual Appliance:
Section 3.1, “Preparing the ZENworks 11 SP4 Appliance for Migration,” on page 30
Section 3.2, “Deploying and Configuring the ZENworks 2017 Appliance,” on page 30
Appliance Migration 29

Section 3.3, “Migrating ZENworks 11 SP4 Data to ZENworks 2017 Appliance,” on page 32
Section 3.4, “Post migration,” on page 32
3.1 Preparing the ZENworks 11 SP4 Appliance for MigrationComplete the following steps to prepare the appliance for migration:
1 Check the health of the Primary Server by using ZENworks Diagnostic Center (ZDC):
1a Download the ZENworks Diagnostic Center to the appliance.
The ZDC (ZENworksDiagnosticCenter.zip) file is available in the common\tools folders of the ZENworks 2017 ISO file. The ZIP file includes ZDC for ZENworks 2017 and earlier versions.
Example: For ZENworks 11.4.3 Primary Servers, download the ZDC for version 11.4.3.
1b Extract the ZENworksDiagnosticCenter.zip file to the appliance.
1c Run the zdc command.
For running the Diagnostic Center, see Running ZDC in the ZENworks Command Line Utilities Reference.
2 Ensure that at least 20 GB of free space is available in the /vastorage disk for ZENworks 11 SP4 Appliance.
3 (Conditional) If the ZENworks 11 SP4 Appliance hosts an embedded database, ensure that the size of the /vastorage/var/opt/novell/zenworks/database directory does not exceed 50G.
To check the size of the database directory, run the du -sh /vastorage/var/opt/novell/zenworks/database command.
4 Download and install the novell-zenworks-prereq-0.1-1.noarch.rpm (http://download.novell.com/Download?buildid=rx4GdxBUGu8~) file on the ZENworks 11 SP4 Appliance.
For instructions on installing the RPM, refer to the readme included in the patch.
5 Back up the Primary Server configuration files, the Primary Server’s content repository and the ZENworks databases if they reside on the appliance.
(Optional) Take a snapshot of the appliance, and backup the Primary Server Configuration files, vastorage volume (disk), Primary Server’s content repository, and the database if they reside on the appliance.
For more information, see ZENworks 2017 Update 2 System Backup.
6 Power off the ZENworks 11 SP4 Appliance.
7 (Optional) If the ZENworks 11 SP4 Appliance was configured with an additional or external disk for content repository, then ensure that you mount the disk on the ZENworks 2017 Appliance.
For example, /dev/sdb1 mounted to /var/opt/novell/zenworks
8 Copy the ZENworks 11 SP4 Appliance virtual disk (vastorage).
3.2 Deploying and Configuring the ZENworks 2017 ApplianceYou need to deploy the ZENworks 2017 Appliance to migrate the existing appliance and then configure the ZENworks 2017 Appliance with the ZENworks 11 SP4 data and network settings.
30 Appliance Migration

IMPORTANT: The new appliance (ZENworks 2017) should be hosted on the same network as the ZENworks 11SP4 appliance.
1 Deploy the appliance as instructed in Deploying the Appliance in the ZENworks Appliance Deployment and Administration Reference and do not attach the new hard disk.
Do NOT power on the appliance at this time.
2 Take note of the ZENworks 11 SP4 Appliance RAM size and configure the ZENworks 2017 Appliance with the same RAM size.
3 Attach the migration hard disk (/vastorage) to the ZENworks 2017 Appliance.
4 Power on the ZENworks 2017 Appliance and wait till credential screen appears.
5 Specify the root and zenadmin passwords for the ZENworks 2017 Appliance.
The Appliance Configuration utility automatically populates the identity and network details for the ZENworks 2017 Appliance from the ZENworks 11 SP4 data and continues booting the appliance. When the process is complete, on the Appliance console the URL is displayed.
6 If the ZENworks 11 SP4 Appliance was using an external content repository, then attach the corresponding disk to ZENworks 2017 Appliance.
To configure the external disk, perform the following:
6a After restarting the ZENworks 2017 Appliance, log into the appliance as root and stop the ZENworks services.
If the appliance hosts the Embedded Sybase, then Sybase services (sybase-asa and sybase-audit-asa) should be running.
systemctl status sybase-asa
systemctl status sybase-audit-asa
6b Mount the disk partition on the ZENworks 2017 Appliance in the original structure.
6c After the hard disk is mounted, ensure that /etc/fstab is updated with mounted partition correctly. You may use YaST partitioner to mount the disk partition to correct ZENworks directory.
For information about mounting a content repository, see Creating a Permanent Mount in the ZENworks Primary Server and Satellite Reference.
6d Ensure that new mounted directory has required permissions. To modify the permissions, run the permissions.sh script.
7 Take note of the URLs displayed in the console, then continue with the next task, Migrating ZENworks 11 SP4 Data to ZENworks 2017 Appliance.
Appliance Migration 31

3.3 Migrating ZENworks 11 SP4 Data to ZENworks 2017 ApplianceAfter you have deployed and configured the ZENworks 2017 Appliance, you are ready to migrate ZENworks 11 SP4 data to the appliance.
1 In the supported browser, launch the URL that is displayed in the Appliance console.
For example, https://<ipAddress>:9443
2 Log in to ZENworks Appliance with the root or zenadmin credentials as configured in Deploying and Configuring the ZENworks 2017 Appliance under Step 5 on page 31.
3 Verify that all of the migration requirements are met, select the I have verified that all necessary steps have been completed check box, then click Next to display the ZENworks Management Zone credential screen.
If all of the migration requirements are not met, click Cancel, complete the requirements, then log into the ZENworks Appliance console again to complete the migration.
IMPORTANT
If the appliance is a second Primary Server and database is an Embedded Sybase, then you must ensure that sybase services (sybase-asa and sybase-audit-asa) on the first Primary Server are started.
4 Specify the ZENworks administrator credentials (for example, administrator and password) to access the ZENworks Management Zone.
5 In the ZENworks Licensing page, enter the ZENworks 2017 product license, and then click Finish.
The ZENworks migration begins and it might take several minutes. The migration process will continue in the background even if you close the browser or the browser times out.
6 When the ZENworks migration is finished, click Close to display the ZENworks Appliance configuration summary screen.
7 Click Open ZENworks Control Center to see your migrated data and continue managing your ZENworks system.
3.4 Post migration The NTP related configuration will not be migrated. Hence, you need to manually configure the
NTP settings in the ZENworks 2017 Appliance again. You must logged into appliance console as root to configure the NTP settings.
If NTP settings are not configured, a time sync warning message is displayed during ZENworks Console (ZCC) login.
Run ZDC to verify the migrated ZENworks 2017 Appliance System.
Ensure that all ZENworks services are running: novell-zenworks-configure -c SystemStatus
32 Appliance Migration