zebra mobile printers wireless configuration … mobile printers • wireless configuration guide...
TRANSCRIPT

Zebra Mobile Printers • Wireless Configuration Guide • rev. A
ZEBRA MOBILE PRINTERSWireless Configuration Guide
continued
CONTENTS
INFORMATION NEEDED FOR NETWORK CONFIGURATION ............................................ 3
USING LABEL VISTA TO CONFIGURE YOUR PRINTER ..................................................... 4Introduction to Label Vista .................................................................................................. 4
System Requirements For Label Vista ................................................................................. 4
Label Vista Installation ......................................................................................................... 5
Running Label Vista ............................................................................................................. 5
Contextual Help .................................................................................................................. 5
Connecting Your Printer ...................................................................................................... 5
Using the Printer Menu Com Port Setup ............................................................................. 6
WIRELESS NETWORK PRINTER SETUP ............................................................................ 7
WITH WLAN 802.11B RADIO ....................................................................................... 7Network Setup Using Label Vista ......................................................................................... 7
Quick Network Setup .......................................................................................................... 7
Network Setup With Encryption ......................................................................................... 10
Authentication Settings ..................................................................................................... 11
Pop 3 (Post Office Protocol 3) Setup ................................................................................. 12
FTP Mirror .......................................................................................................................... 14
BLUETOOTH™SETUP ..................................................................................................... 16Authentication .................................................................................................................. 16
PIN .................................................................................................................................... 17
Discoverable ..................................................................................................................... 17
Friendly Name .................................................................................................................. 17
USING PARAMETER COMMANDS TO CONFIGURE A NETWORK PRINTER .................... 18Parameter Command Format ......................................................................................... 18
CONFIGURATION PARAMETERS ........................................................................................ 19

Zebra Mobile Printers • Wireless Configuration Guide • rev. A
CONTENTS (Continued )
Networking Parameters .................................................................................................... 19
Virtual Private Network (VPN) Commands ........................................................................ 21
VPN Settings Using Label Vista ........................................................................................... 21
VPN Mode......................................................................................................................... 22
User Name ........................................................................................................................ 22
Password ........................................................................................................................... 22
Domain ............................................................................................................................. 22
VPN IP Address .................................................................................................................. 22
CPCL VPN COMMANDS ........................................................................................... 22
USING CPCL TO CONFIGURE A NETWORK PRINTER ................................................... 23LAN Command ................................................................................................................ 23
LAN Command: Setting the IP Address for Network Printers ............................................ 25
Network Printer Troubleshooting ....................................................................................... 26
CONFIGURING PRINTERS USING HTTP & TELNET ......................................................... 28Setting Configuration Protocols With Label Vista .............................................................. 28
Configuring With A Web Browser Via HTTP ........................................................................ 28
The Default Web Page ...................................................................................................... 28

Zebra Mobile Printers • Wireless Configuration Guide • rev. A 3
Table 1: Network Information Needed For Printer Set-up1. What is your wireless LAN’s ESSID (Extended Service SetIdentifier)?: ____________________________________2. Does the network supports DHCP (Dynamic HostConfiguration Protocol)?
• YES _______ (If “yes”, proceed to question 3)• NO______ (If “no”, fill out information below)
1. IP address____:_____:_____:____2. Subnet Mask:__:_____:____:____3. Gateway:____:_____:_____:______
3. If the Wireless network has WEP (Wired Equivalent Privacy)enabled then you need to know if it uses 40 bit or 128 bit WEPencryption and the encryption keys:
• 40 bit key: __________ ____________• 128 bit key: ____________________ _________ ___________• Which encryption key index is your network using (circleone): 1, 2, 3, 4
4. Authentication Information (not available with FrequencyHopping [FHSS] radios)
If you are using Cisco’s LEAP authentication scheme you willneed:
• User Name: __________ Password: __________If you are using the Kerberos authentication scheme you will
need:• User Name: __________ Realm: __________• Password: __________ KDC: __________
5. Zebra Mobile Network Printers support POP3 (Post OfficeProtocol 3) The information you will need to set up POP3 is:
• The IP address of the POP3 server: ____:____:____:_____• The user name of the POP3 account: _________________•. The password of the POP3 account: _________________• You will also need to decide how frequently you want theprinter to check for new e-mail. This is called the pollfrequency.Poll Frequency: ____________________
Information Needed for Network Configuration
Before you start to configure your printer for use on a Local AreaNetwork (LAN), you will need some basic information which willenable you to establish the network configuration for your printer.
Use Table 1 opposite as a guide to obtain information on importantnetworking settings. If you don’t know this information, you shouldobtain it from the network administrator.

Zebra Mobile Printers • Wireless Configuration Guide • rev. A 4
Using Label Vista to Configure Your Wireless PrinterINTRODUCTION TO LABEL VISTA
Label Vista™ is a program that allows users with little or no pro-gramming background to design labels which can be printed on thefull range of Zebra Technologies Corporation’s mobile printers. Itcombines an intuitive graphically based user environment along withpowerful, but easily mastered, editing tools.
In addition, Label Vista provides utilities making it easy to configureyour printer for a variety of purposes, including setting them up forwireless communications either on a Local Area Network (LAN) orusing the international Bluetooth™ communications standard.
Label Vista utilizes a subset of Zebra’s Portable Printer ControlLanguage (CPCL). Label files created in Label Vista are fully com-patible with other labels created using the complete set of CPCLcommands.SYSTEM REQUIREMENTS FOR LABEL VISTA
1) An IBM-compatible PC with a CD-ROM drive and the minimumconfiguration to run Windows 95/98/NT/2000/XP will have sufficientmemory to run Label Vista. You will need a serial (RS232-C) dataport and approximately 10 MB of disk space for the full Label Vistainstallation.2) Serial communications cable (Zebra P/N BL11757-000) to connect
your Zebra Mobile Printer to the 9 pin serial port of your PC.
You may need to supply adapter cables between the serial commu-nications cable and your computer if (1) your serial port has 25 pinsor (2) the connector gender of your computer does not agree withthe communications cable. Zebra’s standard communication cablehas a 9-pin female connector.
3) Label Vista™ Label Creation Utility Software, Revision 2.17 or higher.Label Vista can be installed from the Accessories CD which waspackaged with your printer or can be downloaded directly fromZebra’s Web site at:
http://www.zebra.com/SD/demos.htmcontinued

Zebra Mobile Printers • Wireless Configuration Guide • rev. A 5
LABEL VISTA INSTALLATION
Important: Please close all applications including Microsoft™Office and Microsoft Outlook before proceeding.
Place the Label Vista CD-ROM in your CD drive, and double clickon the “Setup.exe” icon to start the installation. You will be promptedfor the location of the Label Vista installation.
Note: the Label Vista installation procedure will automatically loadTrueType™ fonts included in the software package. You shouldinsure that these fonts will not conflict with any of your system’sexisting fonts, and that this installation will not exceed your system’smaximum number of installed fonts.RUNNING LABEL VISTA
After Label Vista has been installed, the program can be started bynavigating through the Start button on the bottom of the screen to thePrograms section, and selecting Label Vista.CONTEXTUAL HELP
Label Vista has extensive contextual help support. To use the help
utility, select the icon and click on a feature of Label Vista you
need information about (a menu item, an icon ,etc.).CONNECTING YOUR PRINTER
Label Vista installs drivers to allow you to communicate with Zebraportable printers.
Connect the printer’s communication cable from your computer’sCOM1 or COM2 (Serial I/O) connector to the mobile printer’s i/oconnector as shown opposite. (Refer to the section of this manual onthe Printer menu for more information on setting up communicationsparameters from your computer to your printer.) Refer to the Appen-dix for more information regarding interface cables.
continued
Mobile Printer(QL220 shown)
CommunicationCable
Communicationports
Adapter Cables(as needed)
Zebra Mobile Printers • Wireless Configuration Guide • rev. A 6
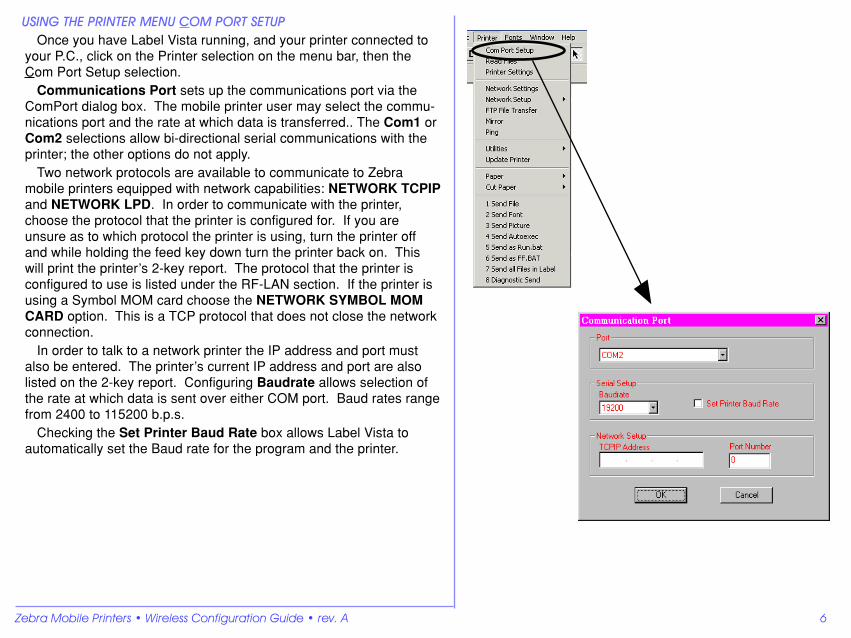
USING THE PRINTER MENU COM PORT SETUP
Once you have Label Vista running, and your printer connected toyour P.C., click on the Printer selection on the menu bar, then theCom Port Setup selection.
Communications Port sets up the communications port via theComPort dialog box. The mobile printer user may select the commu-nications port and the rate at which data is transferred.. The Com1 orCom2 selections allow bi-directional serial communications with theprinter; the other options do not apply.
Two network protocols are available to communicate to Zebramobile printers equipped with network capabilities: NETWORK TCPIPand NETWORK LPD. In order to communicate with the printer,choose the protocol that the printer is configured for. If you areunsure as to which protocol the printer is using, turn the printer offand while holding the feed key down turn the printer back on. Thiswill print the printer’s 2-key report. The protocol that the printer isconfigured to use is listed under the RF-LAN section. If the printer isusing a Symbol MOM card choose the NETWORK SYMBOL MOMCARD option. This is a TCP protocol that does not close the networkconnection.
In order to talk to a network printer the IP address and port mustalso be entered. The printer’s current IP address and port are alsolisted on the 2-key report. Configuring Baudrate allows selection ofthe rate at which data is sent over either COM port. Baud rates rangefrom 2400 to 115200 b.p.s.
Checking the Set Printer Baud Rate box allows Label Vista toautomatically set the Baud rate for the program and the printer.

Zebra Mobile Printers • Wireless Configuration Guide • rev. A 7
Wireless Network Printer SetupWith WLAN 802.11b Radio
You will need information for the Network to which you will beconnecting. It will be useful if you get this information before you startthe setup procedure. Refer to the information you compiled in Table 1when completing the set-up process.NETWORK SETUP USING LABEL VISTA
Label Vista has Network setup wizards to help the user to configurehis/her wireless network printer quickly and easily.
The three types of setup are:• Quick Network Setup (no Encryption)• Network Setup with Encryption• POP3 SetupLabel Vista will also allow you to set the Authentication settings.
QUICK NETWORK SETUP
Use this option if you do not need to use data encryption on yourwireless network.
Once your printer is connected via cable to your PC, open LabelVista. Ensure that communications to the printer is set per thepreceding section. To verify communication between your PC and theprinter click on Printer/ Read files. If there is communication, awindow showing the files in the printer memory will be displayed aftera few seconds.
• Open Label Vista and select “Printer” on the top bar menu. Onthe drop down menu, go to Network Setup. Then select: QuickNetwork Setup.• Follow the prompts provided by the set up Wizard, using theinformation filled in on Table 1.• At the end of the setup process you will be prompted to click on“Test Settings” to make sure the connection and settings havebeen established. After selecting “Test Settings” you will see actualcommunication between the printer and Access Point taking place.
continued

Zebra Mobile Printers • Wireless Configuration Guide • rev. A 8
QL320 WLANTCPIP: 10.14.86ESSID: ZEBRA_MKTGPORT: 6101 MORE BACK
You may then exit the wizard by clicking on the “Finish” button.
If your printer is equipped with a display, you can verify that theprinter has established communication with the Access Point. Theantenna symbol on the upper left hand side corner of the LCD will beshown.
You can scroll the screens of the printer LCD until you get to theWLAN TCP-IP screen. The IP address and the ESSID of the AccessPoint will be shown. If the printer is not associated with a networkradio access point, the antenna icon will be missing and the ESSIDfield will be blank.
If your printer does not have an LCD the “Power” LED will blink ifthe printer is not associated with an access point.
Antenna Icon Scroll Button
Power Button
A rapidly blinking indicatormeans radio communicationswith a host is taking place
A blinking power LED indicates that theprinter is not linked to an access point onthe network, or the printer’s battery needsre-charging
QL Series Keypad
QL Series Keypad with LCD
Feed Button
Power Button
Feed Button
Select Button

Zebra Mobile Printers • Wireless Configuration Guide • rev. A 9
If your printer does not have an LCD you can print a ConfigurationLabel (2-key report) and verify the network settings in the printer.
To print out a Configuration Label follow these steps:1. Turn the printer off. Load the media compartment with journalmedia (media with no black bars printed on the back)
2. Press and hold the Feed Button.
3. Press and release the Power button and keep the Feed buttonpressed. When printing starts, release the Feed button.
The printer will generate a configuration label as shown opposite.
The IP Addresswas automati-
cally assigned byDHCP
This printer has aCisco 802.11b
radio
ESSID setupwas successful
and thisprinter is
associated tothe Access
Point
A “? “ value for theBluetooth
.local_name and.address parameters
indicates noBluetooth radio is
installed.

Zebra Mobile Printers • Wireless Configuration Guide • rev. A 10
NETWORK SETUP WITH ENCRYPTION
• As was described in Quick Network Setup, open Label Vista andclick on “Printer” on the top menu. From the drop down menu go toNetwork Setup and select Network Setup with Encryption. Followthe wizard steps by clicking Next and by entering the informationfrom Table 1 as it was done in the Quick Network Setup.
If you don’t know some of the requested information, contact yournetwork administrator.
• Continue the setup by following the wizard windows. Just as in theQuick Network Setup you must:
• Enter the network port
• Enable the applicable network protocols. Consult with your net-work administrator to find out which protocols you want to enable.Note that if your printer has a Frequency Hopping (FHSS) radioinstalled you can only use 40 bit encryption.
• Test the settings and click “Finish” to end the wizard and finish thesetup procedure.
continued

Zebra Mobile Printers • Wireless Configuration Guide • rev. A 11
AUTHENTICATION SETTINGS
If you have a printer with a Cisco 802.11b/Symbol 802.11b radioand your network supports either the LEAP or Kerberos security, youcan set authentication by doing the following:
In Label Vista’s top menu click on Printer and select NetworkSettings from the drop down menu. Click on the “Authentication” taband then check the box next to either LEAP or Kerberos dependingon your authentication system. Enter the appropriate authenticationinformation you recorded in Table 1. (See picture opposite). Contactyour network administrator if you don’t know the required authentica-tion information.
NOTE: If you have an 802.11 FH (Frequency Hopping) radioinstalled, LEAP and Kerberos authentication are not available.

Zebra Mobile Printers • Wireless Configuration Guide • rev. A 12
continued
POP 3 (POST OFFICE PROTOCOL 3) SETUP
POP 3 (Post Office Protocol 3) is usually used to retrieve e-mailfrom a mail server, but it can also be used for sending print jobs to awireless mobile network printer. The printer should already beconfigured for wireless operation and associated with an access pointbefore running the POP3 setup wizard. (See the previous two sec-tions).
• Open Label Vista. In the top menu bar select Printer / NetworkSetup / POP3 Setup.
• The POP3 window will come up, and present a list of informationyou will need to continue. Remember that the printer should alreadybe associated with an access point in order to proceed.
Contact your network administrator if you don’t know the informa-tion requested.
• Enter the POP3 Server IP address and click “next”. (Contact yournetwork administrator to obtain this address).
• Next, you will need to enter the User Name and Password for thee-mail account being used. Click “Next”.
• You must now enter the frequency (in seconds) the printer willcheck the POP3 account for new mail.
Note that the recommended frequency should be set to greater thanthirty seconds to avoid printer unresponsiveness. Click on “Next”.
Select POP3networking option& enter the POP3Server IP address
Enter the POP3 Username and password
Enter how often theprinter will query thePOP3 server.

Zebra Mobile Printers • Wireless Configuration Guide • rev. A 13
• Select the POP3 desired options as shown in the last window.
If the “Print Body of E-Mails” option is selected, the printer willprint messages as they are received. E-mail messages sent to theprinter should be in ASCII text.
If you send an e-mail message to the printer that can be inter-preted as a CPCL command, the printer will attempt to execute thatcommand.
If you select the “Save E-Mail attachments to Printer” option, e-mail attachments will be saved in the printer’s flash memory. Thesize of the attachments that can be saved is limited to the memoryremaining. Attachment file names will be truncated to 11 characters(8 character file name and a three character extension.)
Click “Finish” when you have finished selecting the POP3 optoins.
Once you have finished setting up your printer it will becomerecognized as a unique device on your network with its own IPaddress.
Select the options for displaying yourPOP3 messages.

Zebra Mobile Printers • Wireless Configuration Guide • rev. A 14
FTP MIRROR
Zebra QL series printers support a file mirroring process thatallows the printer to synchronize files with those stored on anFTP server. Since the process relies solely on the FTPstandard, no other special utilities are required. The files on theFTP server can be printer firmware files, fonts, or lists of printerconfiguration commands (such as commands to change theprinter’s WEP key). In order for this file synchronization processto work properly, it is only required that the FTP server support“Unix style” directory listings and that the modification timestamps of the files stored on the FTP server are accurate.
Setting Up Mirror In Label VistaThe Mirror dialog box is a selection under the Printer menu inLabel Vista. You must fill out the FTP server information andyour user name and password as requested. Clicking on the“Auto” check box will instruct the printer to synchronize its filesper the number of minutes you enter in the Frequency box.
Setting Up Mirror With Parameter Commands The following set/get variables are available to enable FTPmirroring:
ip.mirror.auto: on/off
getvar example: !U1 getvar “ip.mirror.auto”
setvar example: ! U1 setvar “ip.mirror.auto” “on”
If “on”, the printer will automatically synchronize files uponpower-up, and then per the frequency setting. (seeip.mirror.freq, below)
ip.mirror.username: 20 bytes (string)
getvar example: !U1 getvar “ip.mirror.username”
setvar example: ! U1 setvar “ip.mirror.username” “test”
Username to use for FTP login
ip.mirror.password: 20 bytes (string)
getvar example: !U1 getvar “ip.mirror.password”
setvar example: ! U1 setvar “ip.mirror.password” “secret”
Password for FTP account
ip.mirror.server: 40 bytes (string)
getvar example: !U1 getvar “ip.mirror.server”
setvar example: ! U1 setvar “ip.mirror.server” “192.168.1.1”
Server ip address or name (if DNS server information isprovided via DHCP).
ip.mirror.path: 50 bytes (string)
getvar example: !U1 getvar “ip.mirror.path”
setvar example: ! U1 setvar “ip.mirror.path” “/zebra/ql”
Path on the FTP server where the mirror directory islocated. Defaults to “companyname/model”.
NOTE: this must be an absolute path (i.e. it must start with / or ~)
ip.mirror.freq: 0-99 minutes
continued
continued

Zebra Mobile Printers • Wireless Configuration Guide • rev. A 15
getvar example: !U1 getvar “ip.mirror.freq”
setvar example: ! U1 setvar “ip.mirror.freq” “25”
Number of minutes to wait before performing another filesynchronization. If this value is “0”, the mirror process will beperformed only once when the printer powers-up. Setting a lowvalue will cause the printer to spend most of its time performingthe mirror process. This parameter only applies if ip.mirror.autois “on”.
ip.mirror.fetch
do example: ! U1 do “ip.mirror.fetch” “yes”
Forces the mirror process to be run immediately. Theprinter will immediately contact the FTP server defined by“ip.mirror.server”, log on with the defined username andpassword and look for mirror file updates.
Refer to Section 14 of the CPCL Programming Manual for moreinformation on configuring FTP mirror with parametercommands.

Zebra Mobile Printers • Wireless Configuration Guide • rev. A 16
Bluetooth™ Setup
Bluetooth settings that are configurable by Label Vista:• Authentication
• Discoverable Mode
• Friendly Name
• PIN
By default, a Zebra Bluetooth printer comes with Authenticationturned OFF, Discoverable turned ON, and the “Friendly Name” of theprinter set as the printer’s serial number.
The printer will always be a “slave device” in Bluetooth parlance. Itwill not look for other Bluetooth devices to connect to, and will neverinitiate the communication link itself.
In order to change the Bluetooth settings the printer needs to beconnected to a PC through a serial cable as detailed in the firstsection.
• To change the Bluetooth parameters in the printer, open LabelVista from the top main menu and select Printer / Utilities / Bluetoothsettings.
• Once in the Bluetooth window (see opposite) you can change anyparameters that are not grayed out.
AUTHENTICATION
Authentication offers three choices: OFF, SET PIN and GENER-ATED.OFF: Authentication and encryption are turned off in the printer.
SETPIN: When setting a PIN value, authentication will be enabledand the PIN will be the value set by the user in the PIN field.
Select this option and enter your selected PIN in the box (see pic-ture). When authentication is enabled and a master device attemptsto communicate with the printer, the printer will require this PIN be-fore it accepts the connection.
continued

Zebra Mobile Printers • Wireless Configuration Guide • rev. A 17
GENERATED: Selecting this option will also enable authentication. Thisoption is available for backwards compatibility only and may not besupported in future editions of the Bluetooth library.
To enable authentication make sure you are using Bluetooth libraryversion 1.2.3 or higher and select the SETPIN option.PIN
Enter your desired PIN in this box. You can use between 4 and 10characters and any combination of letters and numbers (ASCII char-acters) is allowed. (See SETPIN option above.) NOTE: This fea-ture is available only when application software is at revision “44u”or higher.
DISCOVERABLE
Discoverable is set ON or OFF. If Discoverable is turned OFF, theprinter will not be discovered by any other device but can still can beconnected if the application developer knows the printer’s Bluetoothaddress. The printer’s Bluetooth address can be found by printing aConfiguration Label (2-key report), or by scrolling through the LCDif available. (Refer to pg. 9 of this manual or the printer’s User’sGuide for instructions on printing a Configuration Label.)
FRIENDLY NAME
The “Friendly Name” is the name that a master device will see whenthe printer is discovered. By default, the friendly name is the printer’sserial number. It can be changed to whatever name the end userdesires.
The picture opposite shows a Configuration Label (2-key report)with the Bluetooth configurable settings highlighted.
Printer serialnumber. Used asBluetooth default“friendly name”.
Discoverable andAuthentication
parameters can beturned “off.”
Encryption is turnedon when
Authenticationparameter is “On.”
Bluetooth Address.Barcode
representing theaddress is printed
above. TheBluetooth address
cannot be changed.
Bluetooth version:
Last 3 digits of theSoftware number are
its revision

Zebra Mobile Printers • Wireless Configuration Guide • rev. A 18
Using Parameter Commands to Configure a Network PrinterQL series printers use a series of parameter commands to setand retrieve network configurations. This set of commands isreferred to as the ”set/get/do” commands., and is available inthe printer applications version 40 and above. The softwareversion can be ascertained by performing a two-key reset. Thenumber in the “Software:” listing on the second report must endin 40 or above (e.g. “Software: HTLK40d”)
These commands follow a standard format as described below.
Note: All commands must be terminated with a CR/LF (0x0D,0x0A). Actions and parameter names must be specified inlowercase. Parameter values should be specified in lowercaseunless the parameter value itself is case sensitive, such as aprinter’s WLAN eSSID.
Refer to the Mobile Printer Programming Manual for a moredetailed description of the “set/get/do” commands and examplesof their use. The Manual is available on the Internet at:
http://www.zebra.com/SS/manuals.htmPARAMETER COMMAND FORMAT
Three commands are available: setvar, getvar, and do.
• “setvar” commands are used to configure printer operatingparameters to specified values.
• “getvar” commands are used to query the printer for its pa-rameter values.
• “do” commands are used to instruct the printer to perform vari-ous functions.
The formats of these commands are as follows:
getvar Command
The getvar command is used to get the current value of printerparameters. This command must be terminated by a CR/LF(0x0D, 0x0A). The printer will respond with the parameter valueof “?” if the parameter does not exist (usually due to incorrect
spelling of the parameter name) or it has not been configuredyet. The parameter name should be specified in lower case.
Format:
getvar ”{parameter name}”
{parameter name} = The name of the parameter to be retrieved.Please refer to the parameter list for valid parameter names.
setvar Command
The setvar command is used to set parameter values inthe printer. This command must be terminated by a CR/LF(0x0D, 0x0A). The parameter name and values must be in lowercase unless the parameter value itself is case sensitive, such asa printer’s WLAN eSSID.
Format:
setvar ”{parameter name}” ”{value}”
{parameter name} = The name of the parameter to be set. Pleaserefer to the parameter list for valid parameter names.
{value}= The new value to assign to the specified parameterabove.
do Command
The do command can be used to instruct the printer to performpredefined actions. Some do commands require one or moreparameters. These parameters should be enclosed in doublequotes. This command must be terminated by a CR/LF (0x0D,0x0A). The printer will perform the specified function immedi-ately after receiving the command.
Format:
do ”{action name}” ”{parameter}”
{action name} = The action to perform. Please refer to the pa-rameter list for valid action names.

Zebra Mobile Printers • Wireless Configuration Guide • rev. A 19
continued
Configuration ParametersThe following is a list of parameters which can be used toconfigure a printer for network use. This is not intended to be acomplete guide to using these parameters, only a brief synopsisof the commands available. Always refer to the Mobile PrinterProgramming Manual for more details and examples of their useand syntax.
NETWORKING PARAMETERS
The following parameters can be used only with the networkapplication versions 40 and above. Any changes made usingthe setvar command will not take effect until the printer’s powerhas been cycled or the device.reset command is issued.
These parameters determine the internet protocol settings of aprinter . Their use and definitions exceed the scope of thisdocument, but more detailed exposition of the full set of .ipparameters may be found in the CPCL Mobile PrinterProgramming Manual.
card.mac_addr
type: getvar
Example: ! U1 getvar “card.mac_addr”
This parameter will report the MAC address of the network cardinstalled in the printer.
ip.addr
type: getvar; setvar
setvar choices : Any valid IP address
getvar example: ! U1 getvar “ip.addr”
setvar example: ! U1 setvar “ip.addr” “10.14.4.235”
This parameter refers to the IP address of the printer. The DHCP
{parameter} = some actions require one or more parameters.The parameters should be specified as required by the corre-sponding action, enclosed within double quotes. For actions thatdo not require a parameter an empty parameter list should bespecified, i.e. “”.
setting (“ip.dhcp.enable” parameter) must be “off” to change theprinter’s IP address.
ip.bootp.enable
type: getvar; setvar
setvar choices: “on” – Printer will use BOOTP to get its IP in-
formation on startup.
“off” – Printer will not use BOOTP.
Default:“off”
getvar example: ! U1 “getvar” “ip.bootp enable”
setvar example: ! U1 setvar “ip.bootp.enable” “on”
This parameter will turn BOOTP on or off. BOOTP is a methodfor acquiring an IP address, netmask, and gateway automati-cally on printer power-up. It requires a BOOTP server on thelocal network.
If you are using static ip addressing, BOOTP must be "off".
NOTE: It is not recommended that BOOTP and DHCP both beenabled at the same time since this may increase the printerpower-up initialization time. You should contact your networkadministrator to determine whether your network supports eitherBOOTP or DHCP and enable only the proper parameter on theprinter.
ip.dhcp.enable
type: getvar; setvar
setvar choices: on”, “off”
Default “on”
getvar example: ! U1 getvar “ip.dhcp.enable”
setvar example: ! U1 setvar “ip.dhcp.enable” “off”
This parameter refers to DHCP setting. DHCP must be set to“off” before setting a static IP address.
NOTE: It is not recommended that BOOTP and DHCP both beenabled at the same time since this may increase the printerpower-up initialization time. You should contact your networkadministrator to determine whether your network supports eitherBOOTP or DHCP and enable only the proper parameter on theprinter.

Zebra Mobile Printers • Wireless Configuration Guide • rev. A 20
ip.dhcp.cid_prefix
type: getvar; setvar
setvar choices: Any text string up to 10 characters in length
Default “”
This parameter defines the prefix to be pre-pended to the DHCPclient identifier (option 61) when DHCP is enabled and“ip.dhcp.cid_type” is set to “0”.
NOTE: This parameter is only applicable if “ip.dhcp.enable” is setto “on”.
ip.dhcp.cid_type
type: getvar; setvar
setvar choices: • “0”: synthetic string
• “1”: use printer’s MAC address
Default: “1”
getvar example: ! U1 getvar “ip.dhcp.cid_prefix”
setvar example: ! U1 setvar “ip.dhcp.cid_prefix” “ZEB”
This parameter defines the type of Client Identifier (option 61)that will be sent if DHCP is enabled. A value of “1” means thetype is “Ethernet” and the printer’s MAC address will be used. Avalue of “0” means the type is “synthetic” and the client identifiersent will be “ip.dhcp.cid_prefix” concatenated with“ip.dhcp.cid_value”.
NOTE: This parameter is only applicable if “ip.dhcp.enable” is setto “on”.
ip.dhcp.cid_value
type: getvar; setvar
setvar choices: Any text string up to 20 characters in length
Default : If “ip.dhcp.cid_type” is “0” - the default is
the printer’s friendly name (see parameter
“device.friendly_name”)
If “ip.dhcp.cid_type” is “1” - the default is the printer’s MAC
address
getvar example: ! U1 getvar “ip.dhcp.cid_value”
setvar example: ! U1 setvar “ip.dhcp.cid_value” “PRT001”
This parameter defines the unique value to be used as the cli-ent identifier (option 61) if DHCP is enabled and“ip.dhcp.cid_type” is “1”.
NOTE: This parameter is only applicable if “ip.dhcp.enable” is setto “on”.
ip.ftp.enable
type: getvar; setvar
setvar choices : “on”, “off”
Default “on”
getvar example: ! U1 getvar “ip.ftp.enable”
setvar example: ! U1 setvar “ip.ftp.enable” “off”
This parameter refers to the FTP protocol setting.
ip.gateway
type: getvar; setvar
setvar choices: Any valid gateway address.
Default: “0.0.0.0”
getvar example: ! U1 getvar “ip.gateway”
setvar example: ! U1 setvar “ip.gateway” “38.10.4.1”
This parameter refers to the gateway address. This value is ig-nored if DHCP is enabled.
ip.http.enable
type: getvar; setvar
setvar choices: “on”, “off”
Default: “on”
getvar example: ! U1 getvar “ip.http.enable”
setvar example: ! U1 setvar “ip.http.enable” “on”
This parameter refers to the HTTP protocol / web sever setting.
ip.lpd.enable
type: getvar; setvar
setvar choices:: “on”, “off”
Default: “on”
getvar example: ! U1 getvar “ip.lpd.enable”
setvar example: ! U1 setvar “ip.lpd.enable” “on”continued

Zebra Mobile Printers • Wireless Configuration Guide • rev. A 21
This parameter refers to the LPD protocol setting. LPD commu-nications from the host should be directed to port 515.
ip.netmask
type: getvar; setvar
setvar choices : Any valid netmask.
Default : “255.255.255.0”
getvar example: ! U1 getvar “ip.netmask”
setvar example: ! U1 setvar “ip.netmask” “255.255.0.0”
This parameter refers to the subnet mask address. This value isignored if DHCP is enabled.
ip.ping_remote
type: do
do parameters: ip address; number of times to ping
do example: ! U1 do “ip.ping_remote “10”
This parameter directs the printer to ping a specified address“x” number of times. The address to be pinged is set by setvarip.remote.
wlan.international
type: getvar ,setvar
setvar choices: “on”, “off”
default: “on” for 802.11 FH radios; “off” for 802.11b radios
getvar example: ! U1 getvar “wlan.international_mode”
sevar example: ! U1 setvar “wlan.international_mode” “on”
Setting this parameter “on” allows a printer to operate in wire-less networks with settings different from standard US/Canadawireless network settings. Setting this parameter “off” instructsthe printer to operate according to US/Canada wireless networkstandards. Two radio cards are currently supported: SymbolSpectrum24 802.11b and Symbol Spectrum24 802.11 FrequencyHopping (FH).
NOTE: This parameter must be set according to the wirelessnetwork infrastructure used. Setting this parameter to “on” for an802.11b card in a network without active wireless access pointswith non US/Canada settings stops the printer from communicat-
continued
VIRTUAL PRIVATE NETWORK (VPN) COMMANDS
A Virtual Private Network (VPN) allows users in remotelocations to “log in” securely onto a network and use it asthough they were logged-in locally. The use of VPN ensuresprivacy, integrity and authentication of the customer’s wirelesslocal area network and wireless wide area communications.
The QL series of Zebra Mobile printers support VPN . Currentlythe printers support Symbol’s AirBEAMSafe VPN and VPNbased on IPSEC standards .
VPN SETTINGS USING LABEL VISTA
You can enable VPN in Zebra Mobile printers with the LabelVista application as follows:
Connect your printer via serial cable BL11757-000 or BL16555-1 to your PC. Open the “Label Vista” application and go to“Printer” on the top bar menu. Then click on the VPN tab andyou will find the list of parameters that need to be configured inthe printer for use on the VPN .
ing via its 802.11b card. Setting this parameter to “on” for 802.11FH radios causes the printer to take an additional 4 seconds toinitiate the 802.11 FH card.

Zebra Mobile Printers • Wireless Configuration Guide • rev. A 22
VPN MODE.
This parameter activates the VPN function and allows you toselect the type of VPN server you are connecting to. At presentthe only type of VPN server supported is “AirBEAM safe” fromSymbol.
USER NAME:
Obtains or changes the username that allows access to the VPNserver.
PASSWORD:
Obtains or changes the password required to log-on to the VPNserver.
DOMAIN:
Obtain or change the domain name of the VPN server you areconnecting to.
VPN IP ADDRESS:
This is the virtual IP address of the printer that is assigned bythe VPN server.
If you don’t know the value of the above parameters, you shouldcontact the Systems Administrator of your company to obtainthe value of the parameters needed.
continued
CPCL VPN Commands
You can also configure your printer for VPN using “get, set, do”parameters in the CPCL programming language:
ip.vpn.mode
type: getvar; setvar
getvar example: ! U1 getvar “ip.vpn.mode”
setvar example: ! U1 setvar “ip.vpn.mode” “AIRBEAM SAFE”
This parameter activates the VPN function allowing you to se-lect the VPN server type At present the only VPN server typesupported is “AirBEAM safe”.
ip.vpn.username
type: getvar; setvar
getvar example: ! U1 getvar “ip.vpn.username”
setvar example: ! U1 setvar “ip.vpn.username” “Zebrauser”
Obtains or changes the username that allows access to the VPNserver
ip.vpn.password
type; getvar; setvar
getvar example: ! U1 getvar “ip.vpn.password”
setvar example: ! U1 setvar “ip.vpn.password” “secret”
Obtains or changes the password required to log-on to the VPNserver.
ip.vpn.domain
Type: getvar; setvar
getvar example: ! U1 getvar “ip.vpn.domain”
setvar example: ! U1 setvar “ip.vpn.domain” “domain2”
Obtains or changes the domain name of the VPN server youare connecting to.
ip.vpn.addr
type: getvar
getvar example: ! U1 getvar “ip.vpn.addr”
Obtains the virtual IP address of the printer that is assigned bythe VPN server.

Zebra Mobile Printers • Wireless Configuration Guide • rev. A 23
Using CPCL to Configure a Network PrinterEncore and Cameo series Zebra Mobile Printers with MOMradios are programmed by commands in the CPCL language.Label Vista acts as an interface between the user and the actualCPCL command structure, but it creates files using a sub-set ofthis language.. Users desiring more precise control of theprinter’s network configuration can use CPCL commandsdirectly to set and read may network settings.
Cameo and Encore Network PrintersCameo and Encore network printers utilize the LAN commandto configure a printer for a wireless network. This command isstructured as below:
Note: More detailed information on the CPCL language and theLAN command may be found in the Mobile Printer ProgrammingManual available on-line at Zebra’s Web site:
(http://www.zebra.com/SS/manuals.htm)LAN COMMAND
Syntax:
! U1 LAN { Operation } { Options }…{ Operation } { Options }The LAN command can be used to interrogate and configurethe Wireless LAN (WLAN) card in a Zebra Cameo3 or Encore 3Network Printer. The entire LAN command must be terminatedby a CRLF pair (0x0D0x0A).
{Operation} is a required element. { Options } is a variableelement associated with the preceding Operation. Options caneither set or retrieve information.
An error will be returned if an invalid operation is specified (see‘LAN Command Response’ for error codes). Any desirednumber of Operations can be entered after the initial !U1 LANcommand.
The possible Operations are:
IPADDR – This operation allows manual specification of the printer’sTCP/IP address. (See the DHCP operation below) for a descrip-tion of automatic address assignment.) The option accompany-ing this operation must be a valid TCP/IP address in the typicalnotation of a set of four decimal numbers between 0 and 255separated by dots. (E.g., 100.150.200.150 is a valid address.)This value will most likely need to be assigned by the adminis-trator of the network the printer will operate on. If an invalid ad-dress is specified, this operation has no effect other than to printan error message.
GATEWAY-IPADDR- This operation can be used to set the gate-way IP address of the printer. The option accompanying thisoperation must be a valid TCP/IP address in the typical notationof a set of four decimal numbers between 0 and 255 separatedby dots.
REMOTE-IPADDR- This operation can be used to set the remoteIP address of the printer. (Available in printer application ver-sions 30A and higher.)
The option accompanying this operation must be a valid TCP/IPaddress in the typical notation of a set of four decimal numbersbetween 0 and 255 separated by dots.
SUBMASK- This operation can be used to set the subset mask ofthe printer. (Available in printer application versions 30A andhigher.)
The option accompanying this operation must be a valid TCP/IPaddress in the typical notation of a set of four decimal numbersbetween 0 and 255 separated by dots.
continued

Zebra Mobile Printers • Wireless Configuration Guide • rev. A 24
SSID- This operation allows the assignment of an RF SSID (RadioFrequency System Set ID). This ID allows several RF networksto operate independently in the same area without interference.The printer must have the same SSID as the RF Access Pointto which it is supposed to link. The option for this operation maybe any string up to 32 characters long.
MODE – This operation sets the operating mode of the printer.The two options are LPD and TCP.
• LPD is the standard printer protocol used by Unix and avail-able for Windows NT.
• TCP affords the ability to allow bare sends using only the TCPprotocol.
GET-STATUS – This operation causes the printer to report its cur-rent WLAN status. The two options are PRINT and REPLY. IfPRINT is used, the status dump is printed. If REPLY is used, thestatus dump is sent out over the CABLE. The status report is ofthe following form:
LAN Status report:ipAdr = nnn.nnn.nnn.nnn - a typical TCP/IP address.userName = {the user name} - a descriptive username set inthe radio.fwVersion = {LAN firmware version} - a descriptive firmwareversion set in the radio.swVersion = {LAN software version} - a descriptive softwareversion set in the radio.MAC addr = hh:hh:hh:hh:hh:hhassociated = {link state} - YES (linked) or NO (not linked)
GET-CONFIG – This operation causes the printer to report its cur-rent WLAN configuration. The two options are PRINT and RE-PLY
• If PRINT is used, the configuration is printed.
• If REPLY is used, the configuration is sent out over the CABLE.The configuration report is of the following form, similar to theGET-STATUS report above:
LAN Config report:ipAdr = nnn.nnn.nnn.nnn - a typical TCP/IP address.powerMode = {power mode state} - SAVE or FULLquiet = {quiet state} - YES or NO. YES means the radio onlytransmits normal data, NO means the radio transmits link statusinformation on power up and status change.protocol = {protocol selected}essID = {SSID string}DHCP = {DHCP state}DHCP_SAVE = {DHCP_SAVE state}
SOFT_RESET – This operation resets the WLAN card. TheSOFT_RESET operation should be tried first if re-setting theLAN card is desired, before using the RESET operation.
RESET – This operation performs a “hard” reset of the WLAN card.
DHCP – This operation allows for control over setting of the WLANcard’s IP address. The options for this operation are enabled(ON) or disabled (OFF). If DHCP is enabled, the WLAN card willattempt to obtain an IP address from a DHCP server. If DHCP isdisabled, the WLAN card will use the IP address programmedinto its non-volatile storage.
Syntax: DHCP {option}Where {option} = ON or OFF
Example: ! U1 LAN DHCP ON
continued

Zebra Mobile Printers • Wireless Configuration Guide • rev. A 25
DHCP-SAVE – This operation controls the storage of addressesobtained by DHCP. If ON, a new address obtained from DHCPwill be stored. If OFF, the new address will be used for this ses-sion only, leaving the previously stored address unchanged.
Syntax: DHCP-SAVE {option}Where {option} = ON or OFF
Example: ! U1 LAN DHCP-SAVE ON
DHCP-TIMEOUT – This operation allows for control of number oftimes the DHCP client will attempt to obtain an address from theDHCP server. The argument is the number of times the clientwill make a request before giving up. The client can be told tonever give up by making the argument 0.
Syntax: DHCP-TIMEOUT {0 – 15}
Example: ! U1 LAN DHCP-TIMEOUT 5
PORT – This operation allows for setting of the TCP port that theprinter will listen on while in TCP mode.
LAN COMMAND: SETTING THE IP ADDRESS FOR NETWORK PRINTERS
1. Create the following document in a text editor such as Notepad,replacing “192.0.11.195” with your Network Printer’s address,and “ZebraNet” with the SSID of your RF Access Point. It maybe necessary to obtain this information from your network ad-ministrator:
! UTILITIESLAN IPADDR 192.0.11.195 SSID ZebraNet MODE LPDPRINT
Insure each line, including the last, is terminated with <CRLF>.Save the file in a convenient location.
2. Connect the printer to the serial port of a PC loaded with theLabel Vista™ program as detailed in thesection on installing and running LabelVista. Open Label Vista and select the“Diagnostic Send” utility under the Printermenu.
3. Use the “Browse” button to navigate tothe file you created in step 1 and clickon the “Send” button. The file will besent to the printer, and the dialog boxwill indicate the download progress.
Once the IP address has been downloadedsuccessfully, it will stay resident in theprinter’s memory until a new IP address issent. The IP address can be verified byperforming a “2 key reset” on the printer asdetailed on page 8 of this manual
The printer will produce a line of interlocking“x” characters to insure all elements of theprint head are working, and then print out astatus report.
The resulting printout should include a WirelessCommunications section. You should verify that the following
continued

Zebra Mobile Printers • Wireless Configuration Guide • rev. A 26
lines are included, with your IP address and SSID:
ipAdr = (your IP address)associated = YESprotocol = LPDessID = (Your SSID)DHCP = OFF
If there is no Wireless Communications section or the parametervalues do not match what is expected, please refer to theNetwork Printer Troubleshooting discussion following thissection.
Details of this method of setting the IP address are coveredearlier in this section in the discussions of the IPADDR, SSIDand MODE operations.
LAN Command Response:
If an operation unsupported by the LAN command is given, theprinter will generate the following message:
***Invalid LAN option {operation}
where {operation} is the invalid operation
If an operation with an option unsupported by the LANcommand is given, the printer will print the following message:
Illegal{operation}option {option}
where {option} is the invalid option.
NETWORK PRINTER TROUBLESHOOTING
If the printer does not behave as described in this section,please take the following diagnostic steps:
1. Perform a 2 key reset on the printer. Refer opposite for an anno-tated sample of a status report.
2. Under the status report’s Program heading, the software shouldhave a label similar to HTLANxxx. If not, the LAN application is
not loaded on this printer and LAN operation is not supported.Call Zebra tech support.
3. Under the RF LAN INFORMATION section, if you see: "Couldnot get WLAN status" or "Could not get WLAN config" the inter-nal radio is not responding. If you repeat step 1 with the sameresult, call Zebra tech support.
Unit is associ-ated with LAN :Yes/No
Radio SoftwareVersion
I.P Address
Unit SerialNumber
Application:NetworkPrinters willhave “HTLAN“prefix.
SSID Address
I.P Address

Zebra Mobile Printers • Wireless Configuration Guide • rev. A 27
4. Under the RF LAN INFORMATION section, verify that the SSIDand IP address are set to the values you expect as described inthe Printer Setup section above. If not, repeat the printer setup.If the information is still not correct, call Zebra tech support.
5. Verify that the printer is associating with the RF Access Point.Bring the printer as close as you can to the RF Access Point youare using and do a 2 key reset. Check that the value for theassociated parameter under RF LAN INFORMATION is YES. Ifnot, call Zebra tech support .
6. If you do not get a label when you try printing, verify that theprinter is on.
Zebra Mobile Printers • Wireless Configuration Guide • rev. A 28
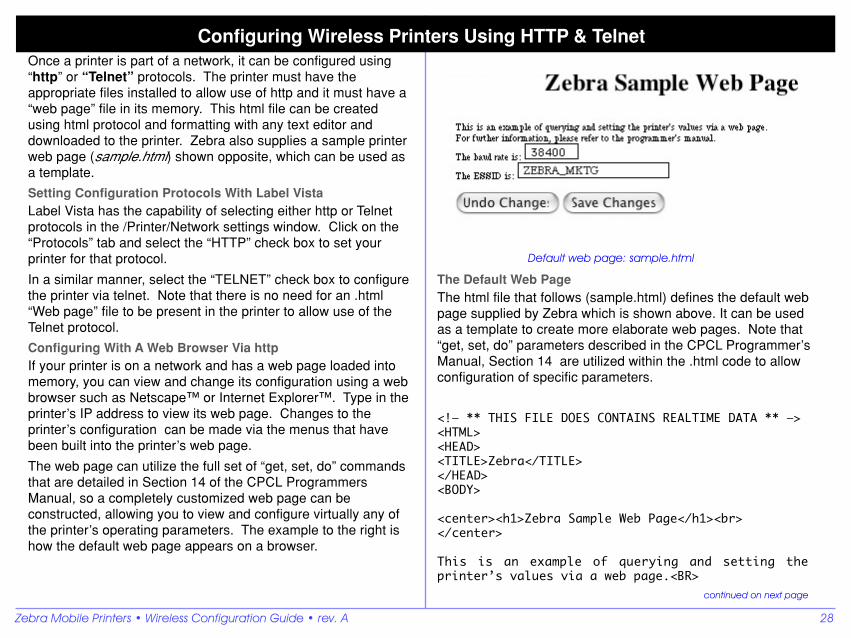
Configuring Wireless Printers Using HTTP & TelnetOnce a printer is part of a network, it can be configured using“http” or “Telnet” protocols. The printer must have theappropriate files installed to allow use of http and it must have a“web page” file in its memory. This html file can be createdusing html protocol and formatting with any text editor anddownloaded to the printer. Zebra also supplies a sample printerweb page (sample.html) shown opposite, which can be used asa template.
Setting Configuration Protocols With Label VistaLabel Vista has the capability of selecting either http or Telnetprotocols in the /Printer/Network settings window. Click on the“Protocols” tab and select the “HTTP” check box to set yourprinter for that protocol.
In a similar manner, select the “TELNET” check box to configurethe printer via telnet. Note that there is no need for an .html“Web page” file to be present in the printer to allow use of theTelnet protocol.
Configuring With A Web Browser Via httpIf your printer is on a network and has a web page loaded intomemory, you can view and change its configuration using a webbrowser such as Netscape™ or Internet Explorer™. Type in theprinter’s IP address to view its web page. Changes to theprinter’s configuration can be made via the menus that havebeen built into the printer’s web page.
The web page can utilize the full set of “get, set, do” commandsthat are detailed in Section 14 of the CPCL ProgrammersManual, so a completely customized web page can beconstructed, allowing you to view and configure virtually any ofthe printer’s operating parameters. The example to the right ishow the default web page appears on a browser.
Default web page: sample.html
The Default Web PageThe html file that follows (sample.html) defines the default webpage supplied by Zebra which is shown above. It can be usedas a template to create more elaborate web pages. Note that“get, set, do” parameters described in the CPCL Programmer’sManual, Section 14 are utilized within the .html code to allowconfiguration of specific parameters.
<!— ** THIS FILE DOES CONTAINS REALTIME DATA ** —><HTML><HEAD><TITLE>Zebra</TITLE></HEAD><BODY>
<center><h1>Zebra Sample Web Page</h1><br></center>
This is an example of querying and setting theprinter’s values via a web page.<BR>
continued on next page
Zebra Mobile Printers • Wireless Configuration Guide • rev. A 29
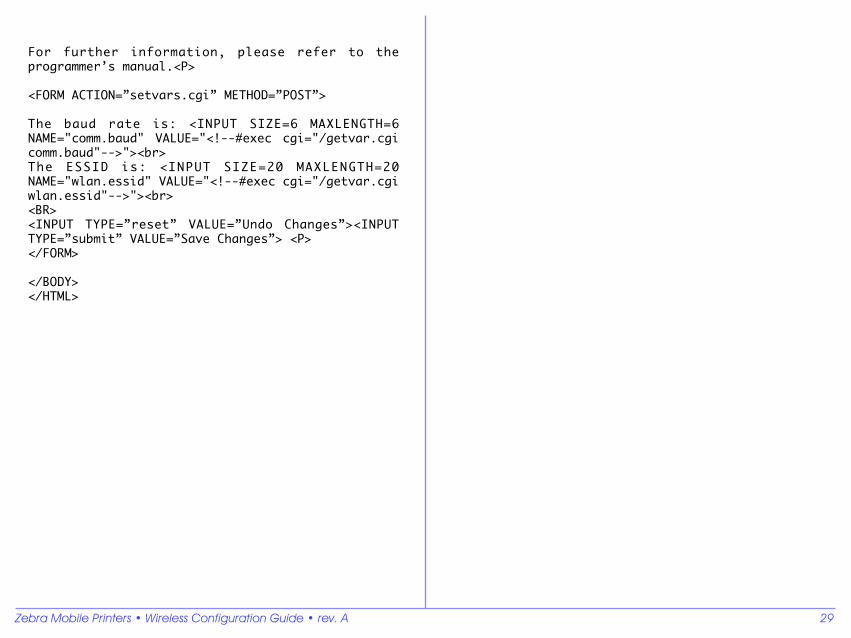
For further information, please refer to theprogrammer’s manual.<P>
<FORM ACTION=”setvars.cgi” METHOD=”POST”>
The baud rate is: <INPUT SIZE=6 MAXLENGTH=6NAME="comm.baud" VALUE="<!--#exec cgi="/getvar.cgicomm.baud"-->"><br>The ESSID is: <INPUT SIZE=20 MAXLENGTH=20NAME="wlan.essid" VALUE="<!--#exec cgi="/getvar.cgiwlan.essid"-->"><br><BR><INPUT TYPE=”reset” VALUE=”Undo Changes”><INPUTTYPE=”submit” VALUE=”Save Changes”> <P></FORM>
</BODY></HTML>