yokogawa instrument is packed carefully with shock absorbing materials, nevertheless, the instrument...
TRANSCRIPT

YOKOGAWA
InstructionManual
Model PH402GpH Converter
IM 12B6B3-E-E8th Edition

TABLE OF CONTENTS
PREFACE
1. INTRODUCTION AND GENERAL DESCRIPTION . . . . . . . . . . . . . . . . . . . . . . . . . . . . . . . . . . . 1-11-1. Instrument check . . . . . . . . . . . . . . . . . . . . . . . . . . . . . . . . . . . . . . . . . . . . . . . . . . . . . . . . .1-11-2. Application . . . . . . . . . . . . . . . . . . . . . . . . . . . . . . . . . . . . . . . . . . . . . . . . . . . . . . . . . .1-2
2. PH402 SPECIFICATIONS . . . . . . . . . . . . . . . . . . . . . . . . . . . . . . . . . . . . . . . . . . . . . . . . . . . . . . .2-12-1. General . . . . . . . . . . . . . . . . . . . . . . . . . . . . . . . . . . . . . . . . . . . . . . . . . . . . . . . . . .2-12-2. Operating specifications . . . . . . . . . . . . . . . . . . . . . . . . . . . . . . . . . . . . . . . . . . . . . . . . . . . . . .2-22-3. Model and suffix codes . . . . . . . . . . . . . . . . . . . . . . . . . . . . . . . . . . . . . . . . . . . . . . . . . . . . . .2-2
3. INSTALLATION AND WIRING . . . . . . . . . . . . . . . . . . . . . . . . . . . . . . . . . . . . . . . . . . . . . . . . . . .3-13-1. Installation and dimensions . . . . . . . . . . . . . . . . . . . . . . . . . . . . . . . . . . . . . . . . . . . . . . . . . . .3-1
3-1-1. Installation site . . . . . . . . . . . . . . . . . . . . . . . . . . . . . . . . . . . . . . . . . . . . . . . . . . . . . . . . .3-13-1-2. Mounting methods . . . . . . . . . . . . . . . . . . . . . . . . . . . . . . . . . . . . . . . . . . . . . . . . . . . . .3-1
3-2. Preparation . . . . . . . . . . . . . . . . . . . . . . . . . . . . . . . . . . . . . . . . . . . . . . . . . . . . . . . . . .3-33-3. Wiring the power supply . . . . . . . . . . . . . . . . . . . . . . . . . . . . . . . . . . . . . . . . . . . . . . . . . . . . .3-4
3-3-1. General precautions . . . . . . . . . . . . . . . . . . . . . . . . . . . . . . . . . . . . . . . . . . . . . . . . . . . .3-43-3-2. Access to terminal and cable entry . . . . . . . . . . . . . . . . . . . . . . . . . . . . . . . . . . . . . . . . .3-43-3-3. AC power . . . . . . . . . . . . . . . . . . . . . . . . . . . . . . . . . . . . . . . . . . . . . . . . . . . . . . . . . .3-53-3-4. DC power . . . . . . . . . . . . . . . . . . . . . . . . . . . . . . . . . . . . . . . . . . . . . . . . . . . . . . . . . .3-53-3-5. Grounding the housing . . . . . . . . . . . . . . . . . . . . . . . . . . . . . . . . . . . . . . . . . . . . . . . . . .3-53-3-6. Switching on the instrument . . . . . . . . . . . . . . . . . . . . . . . . . . . . . . . . . . . . . . . . . . . . . .3-5
3-4. Wiring the contact signals . . . . . . . . . . . . . . . . . . . . . . . . . . . . . . . . . . . . . . . . . . . . . . . . . . . .3-63-4-1. General precautions . . . . . . . . . . . . . . . . . . . . . . . . . . . . . . . . . . . . . . . . . . . . . . . . . . . .3-63-4-2. Contact outputs . . . . . . . . . . . . . . . . . . . . . . . . . . . . . . . . . . . . . . . . . . . . . . . . . . . . . . .3-6
3-5. Wiring the analog output signals . . . . . . . . . . . . . . . . . . . . . . . . . . . . . . . . . . . . . . . . . . . . . . .3-63-5-1. General precautions . . . . . . . . . . . . . . . . . . . . . . . . . . . . . . . . . . . . . . . . . . . . . . . . . . . .3-63-5-2. Analog output signals . . . . . . . . . . . . . . . . . . . . . . . . . . . . . . . . . . . . . . . . . . . . . . . . . . .3-6
3-6. Wiring the sensor system . . . . . . . . . . . . . . . . . . . . . . . . . . . . . . . . . . . . . . . . . . . . . . . . . . . . .3-73-6-1. Impedance measurement jumper settings . . . . . . . . . . . . . . . . . . . . . . . . . . . . . . . . . . . .3-7
3-7. Sensor wiring . . . . . . . . . . . . . . . . . . . . . . . . . . . . . . . . . . . . . . . . . . . . . . . . . . . . . . . . .3-103-7-1. Connection cable . . . . . . . . . . . . . . . . . . . . . . . . . . . . . . . . . . . . . . . . . . . . . . . . . . . . .3-113-7-2. Sensor cable connection with special grommet . . . . . . . . . . . . . . . . . . . . . . . . . . . . . .3-123-7-3. Sensor cable connections using junction box (BA10) and extension cable (WF10) . . . .3-13
3-8. Tag plate mounting . . . . . . . . . . . . . . . . . . . . . . . . . . . . . . . . . . . . . . . . . . . . . . . . . . . . . . . .3-15
4. OPERATION; DISPLAY FUNCTIONS AND SETTING . . . . . . . . . . . . . . . . . . . . . . . . . . . . . . . . .4-14-1. Operator interface . . . . . . . . . . . . . . . . . . . . . . . . . . . . . . . . . . . . . . . . . . . . . . . . . . . . . . . . . .4-14-2. Explanation of operating keys . . . . . . . . . . . . . . . . . . . . . . . . . . . . . . . . . . . . . . . . . . . . . . . . .4-24-3. Setting passcodes . . . . . . . . . . . . . . . . . . . . . . . . . . . . . . . . . . . . . . . . . . . . . . . . . . . . . . . . . .4-3
4-3-1. Passcode protection . . . . . . . . . . . . . . . . . . . . . . . . . . . . . . . . . . . . . . . . . . . . . . . . . . . .4-34-4. Display examples . . . . . . . . . . . . . . . . . . . . . . . . . . . . . . . . . . . . . . . . . . . . . . . . . . . . . . . . . .4-34-5. Display functions . . . . . . . . . . . . . . . . . . . . . . . . . . . . . . . . . . . . . . . . . . . . . . . . . . . . . . . . . .4-4
4-5-1. Display functions pH (default) . . . . . . . . . . . . . . . . . . . . . . . . . . . . . . . . . . . . . . . . . . . . .4-44-5-2. Display functions pH (ORP) . . . . . . . . . . . . . . . . . . . . . . . . . . . . . . . . . . . . . . . . . . . . . . .4-54-5-3. Display functions pH (rH) . . . . . . . . . . . . . . . . . . . . . . . . . . . . . . . . . . . . . . . . . . . . . . . . .4-6
5. PARAMETER SETTING . . . . . . . . . . . . . . . . . . . . . . . . . . . . . . . . . . . . . . . . . . . . . . . . . . . . . . . .5-15-1. Maintenance mode . . . . . . . . . . . . . . . . . . . . . . . . . . . . . . . . . . . . . . . . . . . . . . . . . . . . . . . . .5-2
5-1-1. Manual temperature selection and adjustment . . . . . . . . . . . . . . . . . . . . . . . . . . . . . . . .5-35-1-2. Process temperature measuring in ORP mode . . . . . . . . . . . . . . . . . . . . . . . . . . . . . . . .5-45-1-3. Manual activation of HOLD . . . . . . . . . . . . . . . . . . . . . . . . . . . . . . . . . . . . . . . . . . . . . . .5-45-1-4. Manual wash start/stop . . . . . . . . . . . . . . . . . . . . . . . . . . . . . . . . . . . . . . . . . . . . . . . . . .5-5
IM 12B6B3-E-E

5-1-5. Setpoint adjustment . . . . . . . . . . . . . . . . . . . . . . . . . . . . . . . . . . . . . . . . . . . . . . . . . . . .5-65-1-6. Manual impedance check . . . . . . . . . . . . . . . . . . . . . . . . . . . . . . . . . . . . . . . . . . . . . . . .5-7
5-2. Commissioning mode . . . . . . . . . . . . . . . . . . . . . . . . . . . . . . . . . . . . . . . . . . . . . . . . . . . . . . . . . .5-85-2-1. Setpoints . . . . . . . . . . . . . . . . . . . . . . . . . . . . . . . . . . . . . . . . . . . . . . . . . . . . . . . . . .5-95-2-2. Range . . . . . . . . . . . . . . . . . . . . . . . . . . . . . . . . . . . . . . . . . . . . . . . . . . . . . . . . .5-115-2-3. Hold . . . . . . . . . . . . . . . . . . . . . . . . . . . . . . . . . . . . . . . . . . . . . . . . . . . . . . . . .5-135-2-4. Wash . . . . . . . . . . . . . . . . . . . . . . . . . . . . . . . . . . . . . . . . . . . . . . . . . . . . . . . . .5-155-2-5. Service . . . . . . . . . . . . . . . . . . . . . . . . . . . . . . . . . . . . . . . . . . . . . . . . . . . . . . . . .5-16
5-3. Notes for guidance in the use of service coded settings . . . . . . . . . . . . . . . . . . . . . . . . . . . . . . .5-175-3-1. Parameter specific functions . . . . . . . . . . . . . . . . . . . . . . . . . . . . . . . . . . . . . . . . . . . . .5-185-3-2. Temperature compensation and measuring functions . . . . . . . . . . . . . . . . . . . . . . . . . .5-205-3-3. Calibration functions . . . . . . . . . . . . . . . . . . . . . . . . . . . . . . . . . . . . . . . . . . . . . . . . . . .5-225-3-4. mA Output functions . . . . . . . . . . . . . . . . . . . . . . . . . . . . . . . . . . . . . . . . . . . . . . . . . . .5-245-3-5. Contact outputs . . . . . . . . . . . . . . . . . . . . . . . . . . . . . . . . . . . . . . . . . . . . . . . . . . . . . .5-265-3-6. User interface . . . . . . . . . . . . . . . . . . . . . . . . . . . . . . . . . . . . . . . . . . . . . . . . . . . . . . . .5-305-3-7. Communication setup . . . . . . . . . . . . . . . . . . . . . . . . . . . . . . . . . . . . . . . . . . . . . . . . . .5-325-3-8. General . . . . . . . . . . . . . . . . . . . . . . . . . . . . . . . . . . . . . . . . . . . . . . . . . . . . . . . . .5-325-3-9. Test and setup mode . . . . . . . . . . . . . . . . . . . . . . . . . . . . . . . . . . . . . . . . . . . . . . . . . .5-34
6. CALIBRATION . . . . . . . . . . . . . . . . . . . . . . . . . . . . . . . . . . . . . . . . . . . . . . . . . . . . . . . . . .6-16-1. Automatic calibration . . . . . . . . . . . . . . . . . . . . . . . . . . . . . . . . . . . . . . . . . . . . . . . . . . . . . . . .6-16-2. Manual calibration . . . . . . . . . . . . . . . . . . . . . . . . . . . . . . . . . . . . . . . . . . . . . . . . . . . . . . . . . .6-16-3. Sample calibration . . . . . . . . . . . . . . . . . . . . . . . . . . . . . . . . . . . . . . . . . . . . . . . . . . . . . . . . . .6-16-4. Data entry . . . . . . . . . . . . . . . . . . . . . . . . . . . . . . . . . . . . . . . . . . . . . . . . . . . . . . . . . .6-16-5. Calibration procedures . . . . . . . . . . . . . . . . . . . . . . . . . . . . . . . . . . . . . . . . . . . . . . . . . . . . . . .6-2
6-5-1. Automatic calibration . . . . . . . . . . . . . . . . . . . . . . . . . . . . . . . . . . . . . . . . . . . . . . . . . . . .6-26-5-2. Automatic calibration with HOLD active . . . . . . . . . . . . . . . . . . . . . . . . . . . . . . . . . . . . . .6-36-5-3. Manual calibration (2nd parameter calibration) . . . . . . . . . . . . . . . . . . . . . . . . . . . . . . . . .6-46-5-4. Sample calibration . . . . . . . . . . . . . . . . . . . . . . . . . . . . . . . . . . . . . . . . . . . . . . . . . . . . . .6-6
7. MAINTENANCE . . . . . . . . . . . . . . . . . . . . . . . . . . . . . . . . . . . . . . . . . . . . . . . . . . . . . . . . . .7-17-1. Periodic maintenance for the EXA PH402 converter . . . . . . . . . . . . . . . . . . . . . . . . . . . . . . . .7-17-2. Periodic maintenance for the sensor system . . . . . . . . . . . . . . . . . . . . . . . . . . . . . . . . . . . . . .7-1
8. TROUBLESHOOTING . . . . . . . . . . . . . . . . . . . . . . . . . . . . . . . . . . . . . . . . . . . . . . . . . . . . . . . . . .8-18-1. Diagnostics . . . . . . . . . . . . . . . . . . . . . . . . . . . . . . . . . . . . . . . . . . . . . . . . . . . . . . . . . .8-2
8-1-1. Off-line calibration checks . . . . . . . . . . . . . . . . . . . . . . . . . . . . . . . . . . . . . . . . . . . . . . . .8-28-1-2. On-line impedance checks . . . . . . . . . . . . . . . . . . . . . . . . . . . . . . . . . . . . . . . . . . . . . . .8-2
9. SPARE PARTS . . . . . . . . . . . . . . . . . . . . . . . . . . . . . . . . . . . . . . . . . . . . . . . . . . . . . . . . . .9-1
10. APPENDIX . . . . . . . . . . . . . . . . . . . . . . . . . . . . . . . . . . . . . . . . . . . . . . . . . . . . . . . . .10-110-1. User setting table . . . . . . . . . . . . . . . . . . . . . . . . . . . . . . . . . . . . . . . . . . . . . . . . . . . . . . . . .10-110-2. Configuration checklist for PH402G . . . . . . . . . . . . . . . . . . . . . . . . . . . . . . . . . . . . . . . . . . .10-310-3. Setup for sensor compatibility . . . . . . . . . . . . . . . . . . . . . . . . . . . . . . . . . . . . . . . . . . . . . . .10-4
10-3-1. General . . . . . . . . . . . . . . . . . . . . . . . . . . . . . . . . . . . . . . . . . . . . . . . . . . . . . . . . .10-410-3-2. Selection of measurement and reference electrode . . . . . . . . . . . . . . . . . . . . . . . . . . .10-410-3-3. Selecting a temperature sensor . . . . . . . . . . . . . . . . . . . . . . . . . . . . . . . . . . . . . . . . . .10-4
10-4. Setup for other functions . . . . . . . . . . . . . . . . . . . . . . . . . . . . . . . . . . . . . . . . . . . . . . . . . . .10-510-5. Set up for Pfaudler Type 18 sensor . . . . . . . . . . . . . . . . . . . . . . . . . . . . . . . . . . . . . . . . . . .10-6
10-5-1. General set up . . . . . . . . . . . . . . . . . . . . . . . . . . . . . . . . . . . . . . . . . . . . . . . . . . . . . . .10-610-5-2. Calibration set up . . . . . . . . . . . . . . . . . . . . . . . . . . . . . . . . . . . . . . . . . . . . . . . . . . . .10-6
10-6. Software history . . . . . . . . . . . . . . . . . . . . . . . . . . . . . . . . . . . . . . . . . . . . . . . . . . . . . . . . .10-7
GLOSSARYERROR CODESQUALITY INSPECTION STANDARD & CERTIFICATE
IM 12B6B3-E-E

WARNING
CAUTION
IM 12B6B3-E-E
PREFACE
Electric dischargeThe EXA analyzer contains devices that can be damaged by electrostatic discharge. When servicing thisequipment, please observe proper procedures to prevent such damage. Replacement components shouldbe shipped in conductive packaging. Repair work should be done at grounded workstations usinggrounded soldering irons and wrist straps to avoid electrostatic discharge.
Installation and wiringThe EXA analyzer should only be used with equipment that meets the relevant IEC, American or Canadianstandards. Yokogawa accepts no responsibility for the misuse of this unit.
The Instrument is packed carefully with shock absorbing materials, nevertheless, the instrument may bedamaged or broken if subjected to strong shock, such as if the instrument is dropped. Handle with care.
Although the instrument has a weatherproof construction, the transmitter can be harmed if it becomessubmerged in water or becomes excessively wet.
Do not use an abrasive or solvent in cleaning the instrument.
NoticeContents of this manual are subject to change without notice. Yokogawa is not responsible for damage tothe instrument, poor performance of the instrument or losses resulting from such, if the problems arecaused by:l Improper operation by the user.l Use of the instrument in improper applicationsl Use of the instrument in an improper environment or improper utility programl Repair or modification of the related instrument by an engineer not authorized by Yokogawa.
Warranty and serviceYokogawa products and parts are guaranteed free from defects in workmanship and material under normaluse and service for a period of (typically) 12 months from the date of shipment from the manufacturer.Individual sales organisations can deviate from the typical warranty period, and the conditions of salerelating to the original purchase order should be consulted. Damage caused by wear and tear, inadequatemaintenance, corrosion, or by the effects of chemical processes are excluded from this warranty coverage.
In the event of warranty claim, the defective goods should be sent (freight paid) to the service department ofthe relevant sales organisation for repair or replacement (at Yokogawa discretion). The following informationmust be included in the letter accompanying the returned goods:l Part number, model code and serial numberl Original purchase order and datel Length of time in service and a description of the processl Description of the fault, and the circumstances of failurel Process/environmental conditions that may be related to the installation failure of the devicel A statement whether warranty or non-warranty service is requestedl Complete shipping and billing instructions for return of material, plus the name and phone number of a
contact person who can be reached for further information.
Returned goods that have been in contact with process fluids must be decontaminated/disinfected beforeshipment. Goods should carry a certificate to this effect, for the health and safety of our employees. Materialsafety data sheets should also be included for all components of the processes to which the equipment hasbeen exposed.

Introduction 1-1
1. INTRODUCTION AND GENERAL DESCRIPTION
The Yokogawa EXA 402 is a 4-wire transmitter designed for industrial process monitoring, measurementand control applications. This instruction manual contains the information needed to install, set up, operateand maintain the unit correctly. This manual also includes a basic troubleshooting guide to answer typicaluser questions.
Yokogawa can not be responsible for the performance of the EXA analyzer if these instructions are notfollowed.
1-1. Instrument CheckUpon delivery, unpack the instrument carefully and inspect it to ensure that it was not damaged duringshipment. If damage is found, retain the original packing materials (including the outer box) and thenimmediately notify the carrier and the relevant Yokogawa sales office.
Make sure the model number on the nameplate affixed to the top of the display board of the instrumentagrees with your order.
NOTE: The nameplate will also contain the serial number and power supply selection. Be sure to apply correct power to the unit.
Figure 1-1. Nameplate
Check that all the parts are present, including mounting hardware, as specified in the option codes at theend of the model number. For a description of the model codes, refer to Chapter 2 of this manual underGeneral Specifications.
Basic Parts List: Converter EXA 402Instruction Manual (See model code for language)Packet with special cable grommet and blanking piecesPacket with 4 screws for mounting on a panel (M6x8mm)Optional mounting hardware when specified (See model code)
MODELSERIAL NO.SUPPLY
PH402G-E-1-EFD 020 034110-120 VAC, 50/60 Hz, 10 VA
N200
IM 12B6B3-E-E
1-2 Introduction
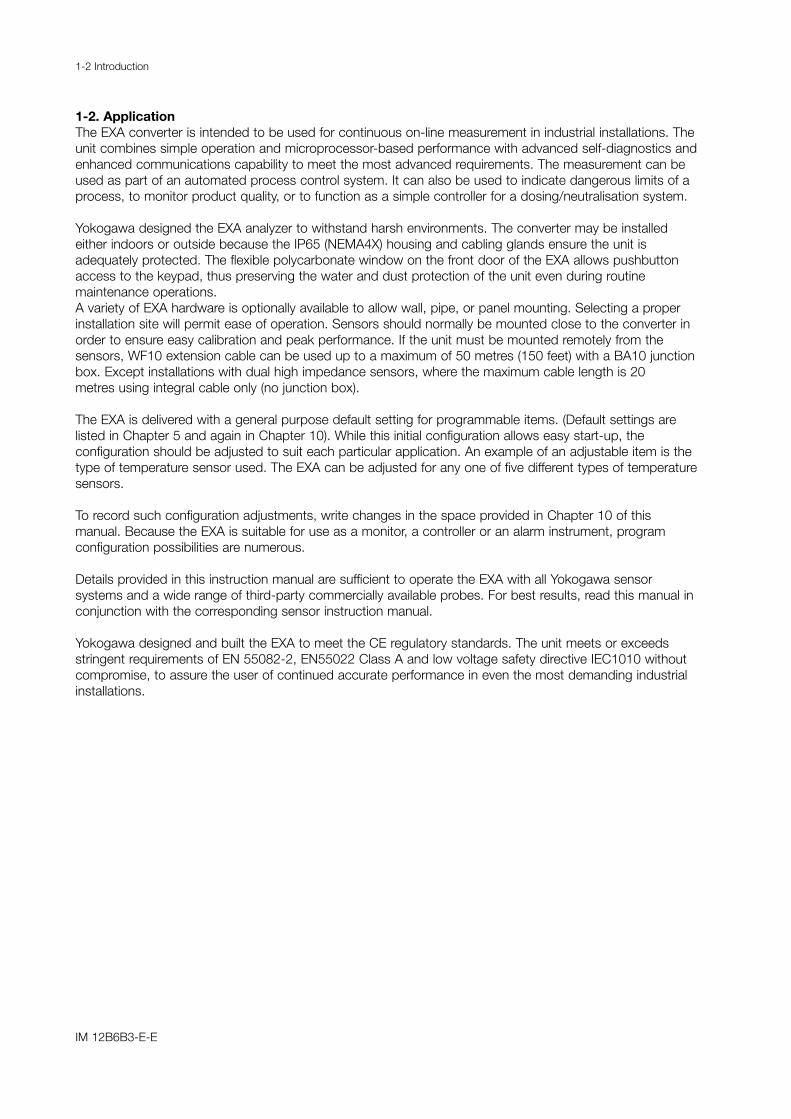
1-2. ApplicationThe EXA converter is intended to be used for continuous on-line measurement in industrial installations. Theunit combines simple operation and microprocessor-based performance with advanced self-diagnostics andenhanced communications capability to meet the most advanced requirements. The measurement can beused as part of an automated process control system. It can also be used to indicate dangerous limits of aprocess, to monitor product quality, or to function as a simple controller for a dosing/neutralisation system.
Yokogawa designed the EXA analyzer to withstand harsh environments. The converter may be installedeither indoors or outside because the IP65 (NEMA4X) housing and cabling glands ensure the unit isadequately protected. The flexible polycarbonate window on the front door of the EXA allows pushbuttonaccess to the keypad, thus preserving the water and dust protection of the unit even during routinemaintenance operations.A variety of EXA hardware is optionally available to allow wall, pipe, or panel mounting. Selecting a properinstallation site will permit ease of operation. Sensors should normally be mounted close to the converter inorder to ensure easy calibration and peak performance. If the unit must be mounted remotely from thesensors, WF10 extension cable can be used up to a maximum of 50 metres (150 feet) with a BA10 junctionbox. Except installations with dual high impedance sensors, where the maximum cable length is 20 metres using integral cable only (no junction box).
The EXA is delivered with a general purpose default setting for programmable items. (Default settings arelisted in Chapter 5 and again in Chapter 10). While this initial configuration allows easy start-up, the configuration should be adjusted to suit each particular application. An example of an adjustable item is thetype of temperature sensor used. The EXA can be adjusted for any one of five different types of temperature sensors.
To record such configuration adjustments, write changes in the space provided in Chapter 10 of thismanual. Because the EXA is suitable for use as a monitor, a controller or an alarm instrument, program configuration possibilities are numerous.
Details provided in this instruction manual are sufficient to operate the EXA with all Yokogawa sensor systems and a wide range of third-party commercially available probes. For best results, read this manual inconjunction with the corresponding sensor instruction manual.
Yokogawa designed and built the EXA to meet the CE regulatory standards. The unit meets or exceedsstringent requirements of EN 55082-2, EN55022 Class A and low voltage safety directive IEC1010 withoutcompromise, to assure the user of continued accurate performance in even the most demanding industrialinstallations.
IM 12B6B3-E-E

Specification 2-1
2. PH402 SPECIFICATIONS
2-1. GeneralA. Input specifications
: Dual high impedance inputs(2 x 10¹³Ω) with provision forliquid earth connection.Suitable for inputs from glassor enamel pH & referencesensors and ORP metalelectrodes.
B. Input ranges- pH : -2 to 16 pH - ORP : -1500 to 1500 mV- rH : 0 to 55 rH- Temperature : -30 to 140 ºC
(-20 -to 300 ºF)(for 8k55 sensor -10 to 120 ºC (10 to 250 ºF);for 10kPTC sensor -20 to
140 ºC (0 to 300 ºF))
C. Span- pH : min 1 max 20 pH - ORP : min 100 max 2000 mV- rH : min 2 max 55 rH- Temperature : min 25 ºC max 200 0C
min 50 ºF max 400 0F(for 8k55 sensor max 100 ºC(250 ºF))
D. Transmission Signals: Two isolated outputs of 0/4-
20 mA DC with commonnegative. Maximum load 600 Ω.Auxiliary output can bechosen from pH, temperature,ORP or rH (with suitablesensor), P.I. control. burn up (22 mA) or burn down (0/3.5 mA) to signal failure.
E. Temperature compensation- Range : Automatic or manual
compensation to Nernstequation.Process compensation byconfigurable temperaturecoefficient.Adjustable ITP (Isothermalpoint of intersection).
F. Calibration : Semi-automatic usingpreconfigured NIST buffertables 4, 7 & 9, or with user
defined buffer tables, withautomatic stability check.Manual adjustment to grabsample.Slope and AsymmetryPotential setting.Zero point can be selected forcalibration and display insteadof As. Pot. (IEC746-2)
G. Serial Communication: Bi-directional according to the
EIA-485 standard using HARTprotocol and PC402 software.
H. Logbook : Software record of importantevents and diagnostic data.Available through RS485, withkey diagnostic informationavailable in the display.
I. Display : Custom liquid crystal display,with a main display of 31/2
digits 12.5 mm high. Messagedisplay of 6 alphanumericcharacters, 7 mm high.Warning flags and units (pHand mV) as appropriate.
J. Contact outputs- General : Four (4) SPDT relay contacts
with LED indicators. For S1,S2, and S3, the LED is onwhen relay is powered.NOTE: For S4 (FAIL) LED
lights when power isremoved (Fail safe).
Contact outputs configurablefor hysteresis and delay time.
- Switch capacity : Maximum values 100 VA, 250 VAC, 5 Amps.Maximum values 50 Watts,250 VDC, 5 Amps.
- Status : High/Low process alarms,selected from pH, ORP, rHand temperature. Contact output is alsoavailable to signal “HoldActive”
- Control function : On / OffPI pulsed Proportional duty cycle
control with integral term.PI frequency Proportional frequency control
with integral term. In additionwash cleaning control signal onS3, and FAIL alarm for systemand diagnostic errors on S4
IM 12B6B3-E-E

2-2 Specifications
K. Contact input : Remote wash cycle start.
L. Power supply : 230 VAC ±15%, 50/60 Hz.Max. consumption 10 VA.115 VAC ±15%, 50/60 Hz.Max. consumption 10 VA.100 VAC ± 15% 50/60 Hz.Max. consumption 10 VA.24 VDC -20% / +30% Max. consumption 10 Watts.
M. Input isolation : 1000 VDC
N. Shipping details: Package size w x h x d290 x 225 x 170 mm.11.5 x 8.9 x 6.7 in.Packed weight approx. 2.5 kg (5lb).
2-2. Operating specifications
A. Performance : pH- Linearity : ≤0.01 pH ± 0.02 mA - Repeatability : ≤0.01 pH ± 0.02 mA- Accuracy : ≤0.01 pH ± 0.02 mAPerformance : ORP- Linearity : ≤1 mV ± 0.02 mA - Repeatability : ≤1 mV ± 0.02 mA- Accuracy : ≤1 mV ± 0.02 mAPerformance : Temperature with Pt1000
Ω, 3 kΩ Balco, 5 k1Ω and 10k PTC
- Linearity : ≤0.2 oC ± 0.02 mA - Repeatability : ≤0.1 oC ± 0.02 mA- Accuracy : ≤0.3 oC ± 0.02mAPerformance : Temperature with Pt100 Ω
& 8k55Ω- Linearity : ≤0.3 oC ± 0.02 mA - Repeatability : ≤0.1 oC ± 0.02 mA- Accuracy : ≤0.4 oC ± 0.02 mA
B. Ambient operating temperature: -30 to +70 oC (-20 to 160 ºF)
for mA output.-10 to +70 oC (10 to 160 ºF) for LCD
C. Storage temperature: -30 to +70 oC (-20 to 160 ºF)
D. Humidity : 10 to 90% RH non-condensing
E. HousingCase : Cast aluminium with
chemically resistant coating* For other languages contact local sales office
2-3. Model and suffix codes
Cover : flexible polycarbonate window. Case color : off-white and Cover color : moss green. Cable entry : via six 1/2” polyamide glands. Cable terminals : are provided for up to 2.5
mm2 finished wires. Protection : weather resistant to IP65 and
NEMA 4X standards. Mounting : Pipe wall or panel, using
optional hardware.
F. Data protection : EEPROM for configuration andlogbook, and lithium batteryfor clock.
G. Watchdog timer: Checks microprocessor
H. Automatic safeguard : Return to measuring mode
when no keystroke is madefor 10 min.
I. Power interruption : Less than 50 milliseconds no
effect. More than 50milliseconds reset tomeasurement.
J. Operation protection: 3-digit programmable
password.
K. Regulatory compliance- EMC : meets council directive
89/336/EEC- Emmission : meets EN 55022 Class A- Immunity : meets EN 50082-2- Low voltage : meets council directive
73/23/EEC- Installation : Designed for installation
conforming to IEC 1010-1.Category II.
Model Suffix Option Descriptioncode
PH402G .................................... pH/ORP transmitter-E ................................ Always E
Supply -1........................... 115 Volts 50/60 Hzvoltage -2........................... 230 Volts 50/60 Hz
-4........................... 24 Volts DC-5........................... 100 Volts 50/60 Hz
Instruction manual -E .................... English language *Options /U......... Pipe and wall mounting
hardware/PM...... Panel mounting hardware/Q ........ Quality certificate/SCT .... Stainless steel tag
IM 12B6B3-E-E

Installation and wiring 3-1
3. INSTALLATION AND WIRING
3-1. Installation and dimensions
3-1-1. Installation siteThe EXA converter is weatherproof and can be installed inside or outside. It should, however, be installed asclose as possible to the sensor to avoid long cable runs between sensor and converter. In any case, thecable length should not exceed 50 meters (162 feet). Select an installation site where:l Mechanical vibrations and shocks are negligiblel No relay/power switches are in the direct environmentl Access is possible to the cable glands (see figure 3-1)l The transmitter is not mounted in direct sunlight or severe weather conditionsl Maintenance procedures are possible (avoiding corrosive environments)
The ambient temperature and humidity of the installation environment must be within the limits of theinstrument specifications. (See chapter 2).
3-1-2. Mounting methodsRefer to figures 3-2 and 3-3. Note that the EXA converter has universal mounting capabilities:
l Panel mounting using optional bracketsl Surface mounting on a plate (using bolts from the back)l Wall mounting on a bracket (for example, on a solid wall)l Pipe mounting using a bracket on a horizontal or vertical pipe (maximum pipe diameter 50 mm)
min.185 (7.25)
min
.195
(7.7
5)
138 (5.43)
138
M6
M6
M5
cut - out = 138 x 138 (5.43 x 5.43)
Figure 3-1. Housing dimensions and layout ofglands
Figure 3-2. Panel mounting diagram
144(5.67)
144(
5.67
)11
5.5(
4.55
)24
(1)
16.5(0.65)
IM 12B6B3-E-E

3-2 Installation and wiring
Figure 3-3. Wall and pipe mounting diagram
Figure 3-4. Internal view of EXA wiring compartment
OPTION/U: Universal pipe/wall mounting kit
pipe mounting(vertical)
wall mounting pipe mounting(horizontal)80
(3.15)
2x ø6.5
(0.26)
4x ø10(0.4)
70
(2.75)
145
(5.70)
200
(7.8
7)
2” ND. pipe
IM 12B6B3-E-E

Installation and wiring 3-3
3-2. PreparationRefer to figure 3-4. The relay contact terminals and power supply connections are under the screening(shielding) plate. These should be connected first. Connect the sensor, outputs and data communicationconnections last.
To open the EXA 402 for wiring:1. Loosen the four frontplate screws and remove the cover.2. Use the rubber knob in the lower righthand corner and swing open the display board to the left.3. The upper terminal strip is now visible.4. Remove the screen (shield) plate covering the lower terminal strip.5. Connect the power supply and contact outputs. Use the three glands at the back for these cables.6. Replace the screen (shield) plate over the lower terminals.
Always replace the screen plate over the power and contact outputs for safety and avoidinterference.
7. Connect the analog output(s), the sensor input, and, if necessary, the RS485 serial bus.8. Use the front three glands for analog output, sensor input, contact input and communication cabling
(see figure 3-5).9. Close the display board and switch on the power. Commission the instrument as required or use the
default settings.10.Replace the cover and secure frontplate with the four screws.
Figure 3-5. Glands to be used for cabling
WARNING
12D7C3-04GLANDS TO BE
USED FOR CABLING
Suitable for cables with an outside diameter between 7 - 12 mm (9/32 - 15/32 in.)
Contact(S3,S4,FAIL)
outputcables
Sensorcables
Contact(S1,S2)outputcables
Analogoutputcables
Power cable
Communi-cation,contact
input
High voltage section
IM 12B6B3-E-E

3-4 Installation and wiring
Figure 3-6. System configuration
3-3. Wiring the power supply
3-3-1. General precautionsMake sure the power supply is switched off. Also, make sure that the power supply is correct for thespecifications of the EXA and that the supply agrees with the voltage specified on the nameplate. Removethe front cover by unscrewing the four screws to check this nameplate on the top of the display board.
Local health and safety regulations may require an external circuit breaker to be installed. The instrument isprotected internally by a fuse. The fuse rating is dependent on the supply to the instrument. The 250 VACfuses should be of the “time-lag” type, conforming to IEC127.
Fuse ratings are 230 VAC - 50 mA; 100 VAC - 100 mA; 115 VAC - 100 mA; 24 VDC - 1.0 A.
The internal fuse is located next to the power terminals (in the lower righthand corner).
3-3-2. Access to terminal and cable entryTerminals 1, 2 and 3 on the bottom terminal strip are used for the power supply. Guide the power cablesthrough the gland closest to the power supply terminals. The terminals will accept wires of 2.5 mm2 (14AWG). Use cable finishings if possible.
Connect the wires as indicated in the wiring diagram (refer to figure 3-6).
S1
S2
S4/FAIL
S3/WASH
SYSTEM CONFIGURATION
1SYSTEM CONFIGURATION
FRONT GLANDS
Sensor
Outputsignals
RS485
Power
Contactoutput
Contactoutput
0/4-20 mA
0/4-20 mA
REAR GLANDS
Contact input
IM 12B6B3-E-E
Installation and wiring 3-5
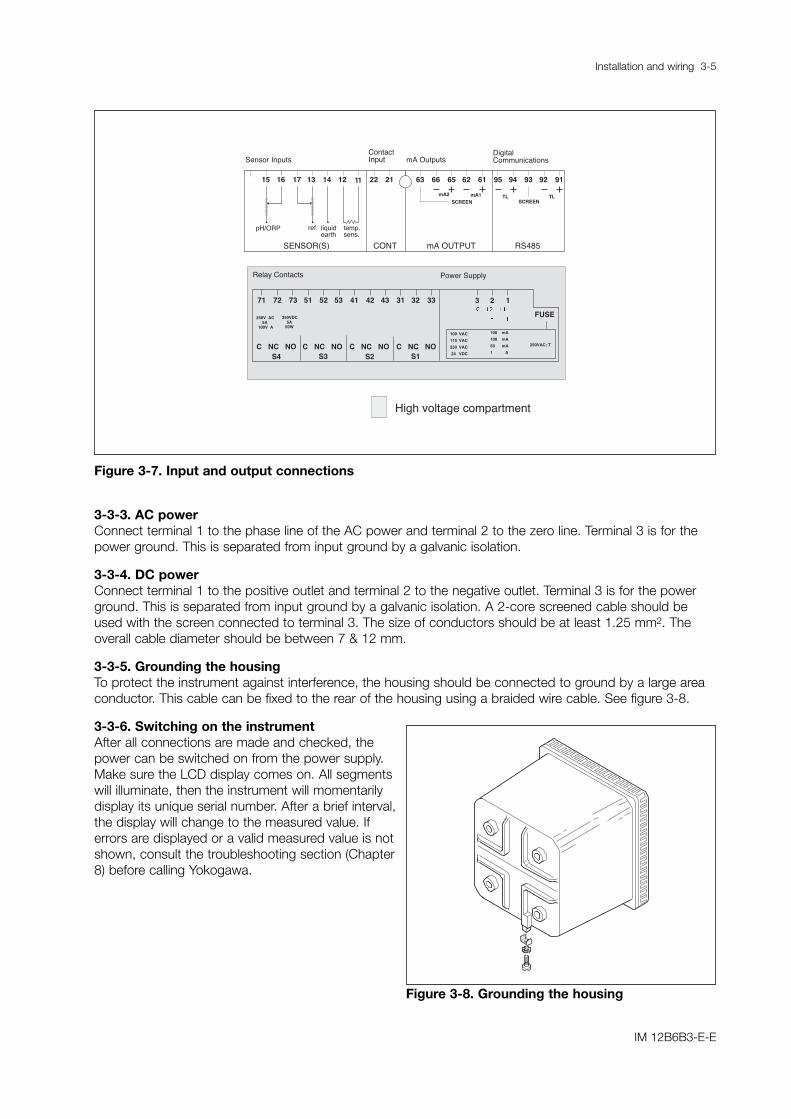
Figure 3-7. Input and output connections
3-3-3. AC powerConnect terminal 1 to the phase line of the AC power and terminal 2 to the zero line. Terminal 3 is for thepower ground. This is separated from input ground by a galvanic isolation.
3-3-4. DC powerConnect terminal 1 to the positive outlet and terminal 2 to the negative outlet. Terminal 3 is for the powerground. This is separated from input ground by a galvanic isolation. A 2-core screened cable should beused with the screen connected to terminal 3. The size of conductors should be at least 1.25 mm2. Theoverall cable diameter should be between 7 & 12 mm.
3-3-5. Grounding the housingTo protect the instrument against interference, the housing should be connected to ground by a large areaconductor. This cable can be fixed to the rear of the housing using a braided wire cable. See figure 3-8.
3-3-6. Switching on the instrumentAfter all connections are made and checked, thepower can be switched on from the power supply.Make sure the LCD display comes on. All segmentswill illuminate, then the instrument will momentarilydisplay its unique serial number. After a brief interval,the display will change to the measured value. Iferrors are displayed or a valid measured value is notshown, consult the troubleshooting section (Chapter8) before calling Yokogawa.
Figure 3-8. Grounding the housing
141317 1112 22 21 63 66 65 62 61 95 94 93 92 91
SCREEN
mA2 mA1SCREEN
TL TL
1615
71
S4 S3 S2 S1C NC NO
72 73 51 52 53 41 43 31 3342 32
250V AC5A
100V A
250VDC5A
50W
FUSE
100
115
230
24
250VAC; T
3 12
C NC NO C NC NO C NC NO
VAC
VAC
VAC
VDC
100 mA
100 mA
50 mA
1 A
Sensor InputsContactInput mA Outputs
DigitalCommunications
Relay Contacts Power Supply
pH/ORP ref. liquidearth
temp.sens.
High voltage compartment
SENSOR(S) CONT mA OUTPUT RS485
IM 12B6B3-E-E
3-6 Installation and wiring
3-4. Wiring the contact signals
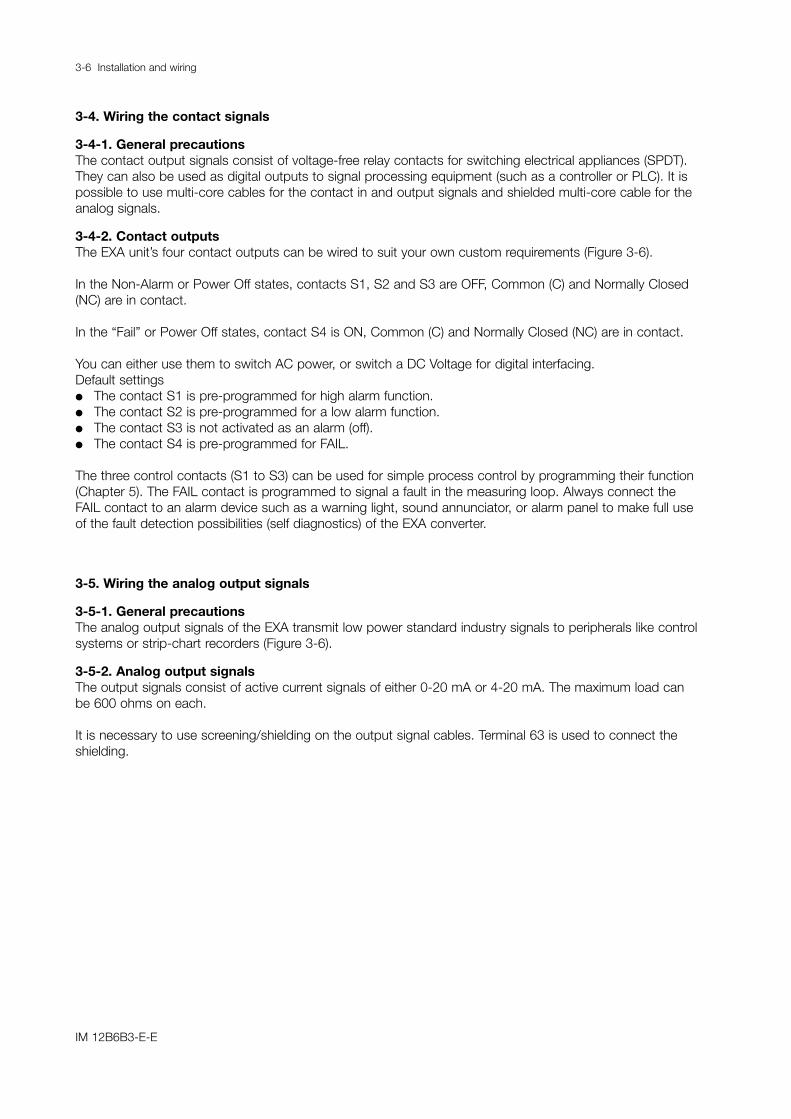
3-4-1. General precautionsThe contact output signals consist of voltage-free relay contacts for switching electrical appliances (SPDT).They can also be used as digital outputs to signal processing equipment (such as a controller or PLC). It ispossible to use multi-core cables for the contact in and output signals and shielded multi-core cable for theanalog signals.
3-4-2. Contact outputsThe EXA unit’s four contact outputs can be wired to suit your own custom requirements (Figure 3-6).
In the Non-Alarm or Power Off states, contacts S1, S2 and S3 are OFF, Common (C) and Normally Closed(NC) are in contact.
In the “Fail” or Power Off states, contact S4 is ON, Common (C) and Normally Closed (NC) are in contact.
You can either use them to switch AC power, or switch a DC Voltage for digital interfacing.Default settingsl The contact S1 is pre-programmed for high alarm function.l The contact S2 is pre-programmed for a low alarm function.l The contact S3 is not activated as an alarm (off).l The contact S4 is pre-programmed for FAIL.
The three control contacts (S1 to S3) can be used for simple process control by programming their function(Chapter 5). The FAIL contact is programmed to signal a fault in the measuring loop. Always connect theFAIL contact to an alarm device such as a warning light, sound annunciator, or alarm panel to make full useof the fault detection possibilities (self diagnostics) of the EXA converter.
3-5. Wiring the analog output signals
3-5-1. General precautionsThe analog output signals of the EXA transmit low power standard industry signals to peripherals like controlsystems or strip-chart recorders (Figure 3-6).
3-5-2. Analog output signalsThe output signals consist of active current signals of either 0-20 mA or 4-20 mA. The maximum load canbe 600 ohms on each.
It is necessary to use screening/shielding on the output signal cables. Terminal 63 is used to connect theshielding.
IM 12B6B3-E-E

Installation and wiring 3-7
3-6. Wiring the sensor system
3-6-1. Impedance measurement jumper settings
NOTE: It is important to decide first which application and which settings are appropriate for the installation. Thisdecision is best done before the jumpers are installed, because the cables will rest on top of the jumpers intheir installed positions.
Table 3-1. Impedance measuring jumpersFigure no. Jumper Settings Jumper Settings Application & Sensor Connections
Input #1 Input #2
1 High Impedance Low Impedance Normal pH sensors
Glass sensor on Input #1
Reference sensor on Input #2
2 High Impedance High Impedance Special electrodes using
2 glass sensors
(e.g. Pfaudler 18)
3 Low Impedance High Impedance ORP (pH compensated) and/or rH
metal sensor on Input #1
pH glass (as reference) on Input #2
4 Low Impedance Low Impedance ORP (Redox measurement)
metal sensor on Input #1
Normal reference on Input #2
The following four jumper figure illustrations (figure 3-9) show the jumper positions related to the figurenumbers in the above table.
IM 12B6B3-E-E

3-8 Installation wiring
Figure 3-9a. Impedance measurement jumper setting
2
1
12D8B2-02JUMPERS 1&2
Default jumper connections for :- Input 1, High impedance- Input 2, Low impedanceService code 03 = 1.1.1- Input 1, High impedance, Temp. comp., Check onService code 04 = 0.0.1- Input 2, Low impedance, Temp. comp. off, Check on
Jumper connections for :- Input 1, High impedance- Input 2, High impedanceService code 03 = 1.0.1- Input 1, High impedance, Temp. comp. off, Check onService code 04 = 1.0.1- Input 2, Low impedance, Temp. comp. off, Check on
IM 12B6B3-E-E

Installation and wiring 3-9
Figure 3-9b. Impedance measurement jumper setting
4
3
Jumper connections for :- Input 1, Low impedance- Input 2, High impedanceService code 03 = 0.0.1- Input 1, Low impedance, Temp. comp. off, Check onService code 04 = 1.1.1- Input 2, High impedance, Temp. comp. on, Check on
Jumper connections for :- Input 1, Low impedance- Input 2, Low impedanceService code 03 = 0.0.1- Input 1, Low impedance, Temp. comp. off, Check onService code 04 = 0.0.1- Input 2, Low impedance, Temp. comp. off, Check on
IM 12B6B3-E-E

3-10 Installation and wiring
Figure 3-10. Terminal identification labels
3-7. Sensor wiringRefer to figure 3-11, which includes drawings that outline sensor wiring.
The EXA PH402 can be used with a wide range of commercially available sensor types, both fromYokogawa and other manufacturers. The sensor systems from Yokogawa fall into two categories; the onesthat use a fixed cable and the ones with separate cables.
To connect sensors with fixed cables, simply match the terminal numbers in the instrument with theidentification numbers in the instrument on the cable ends.
The separate sensors and cables are not numbered, but instead use a color-coding system. The electrodeshave a colored band incorporated in the label on the connection cap:
l Red for measuring electrodes (both pH and ORP)l Yellow for reference electrodesl Blue for combined sensors with both measuring and reference elements in the same bodyl Green for temperature sensors
The recommended procedure is to color-code each end of the cables to match the sensors with the colorstrips provided with each cable. This provides a quick way to identify the ends of the cables belonging to aparticular sensor when they are installed. (The procedure for fixing the identification labels is described indetail in the instruction sheet provided with the cable.)
71
S4 S3 S2 S1C NC NO
72 73 51 52 53 41 43 31 3342 32
250V AC5A
100V A
250VDC5A
50W
100
115
230
24
250VAC; T
3 12
C NC NO C NC NO C NC NO
VAC
VAC
VAC
VDC
100 mA
100 mA
50 mA
1 A
SCREEN
mA2 mA1 TL
RS485
15 16 17 13 14 12 11 22 21 63 66 65 62 61 95 94 93 92 91
SCREEN
TL
INPUT 1LOW IMP
INPUT 2LOW IMP
INPUT 2HIGH IMP
INPUT 1HIGH IMP
Sensor inputsContactinput
mA outputs
Digital communications
Sensor(s) Cont mA output
Relay contacts Power supply
Fuse
IM 12B6B3-E-E

Installation and wiring 3-11
3-7-1. Connection cableThere are two types of connection cable, one for single sensors and one for combined sensors. The formeris a coaxial cable and has only two connections.l Red to measuring elementl Blue to screen (shield)
The latter is a triaxial cable with three connections, (it has an extra white wire termination) these wires areconnected:l Red to measuring elementl Blue to referencel White to screen (shield)
To connect the other sensor systems, follow the general pattern of the terminal connections as listed below:11 & 12 Temperature compensation resistor input (Pt100, Pt1000, 3k, 5k1, 8k55 and 10k PTC )13 Input no. 2 (normally the reference element)17 Screen (shield) for input no. 214 Liquid earth (solution ground) connection15 Input no. 1 (normally the measuring element)16 Screen (shield) for input no. 1
Figure 3-11a. Sensor wiring
*
*
*
*
12B6B3-03/1
12B6B3-03/3
*
*
*
12B6B3-03/2
pH transmitterGreen
Yellow
Red
Cable markers
11 Temperature12 Temperature13 Reference14 Solution ground15 Glass (measure)16 Shield17 Shield
Red
BlueRedBlack
RedBlueBlue
11 Temperature12 Temperature13 Reference14 Solution ground15 Glass (measure)16 Shield17 Shield
11 Temperature12 Temperature13 Reference14 Solution ground15 Glass (measure)16 Shield17
11 Temperature12 Temperature13 Reference14 Solution ground15 Glass (measure)16 Shield17 Shield
Combined pH/ref sensors
Cable markers
Red
BlueBlueBlack
Red
White
Green
Blue
FU20/FU25 4-in one sensor
Note: Connect cables to similarly marked
terminals: 11 to 11, 12 to 12, etc.
Retractable sensor assembly PR20
(Also PD20, PF20 & PS20)
NOTE: Connect cables to similarly marked terminals: 11to 11, 12 to 12, etc.
IM 12B6B3-E-E

IM 12B6B3-E-E
3-12 Installation and wiring
Figure 3-11b. Sensor wiring
11 TEMPERATURE
12 TEMPERATURE
13 REFERENCE
14 SOLUTION GROUND (ORP)
15 pH
16 SHIELD
17
"All in one" pH & ORP (or rH)Service code 01 set to pHService code 02 set to ORP (or rH)
Separate sensors ORPTemp. sensors optional for indicationonly, not for compensationService code 01 set to ORP
* Cable Markers
RED
BLUE
RED
BLACK
RED
BLUE
BLUE
Red*
Yellow*
Green*11 TEMPERATURE
12 TEMPERATURE
13 REFERENCE
14 SOLUTION GROUND
15 GLASS (MEASURE)
16 SHIELD
17 SHIELD
11 TEMPERATURE
12 TEMPERATURE
13 REFERENCE
14 SOLUTION GROUND
15 GLASS (MEASURE)
16 SHIELD
17 SHIELD
Separate sensors ORP/ref sensorTemp. sensors optional for indicationonly, not for compensationService code 01 set to ORP
* Cable Markers
RED
BLUE
BLUE
BLACK
RED
WHITE
Blue*
Green*
Separate sensors pH & ORP (or rH)Temp. sensors optional for indicationonly, not for compensationService code 01 set to pHService code 02 set to ORP (or rH)
* Cable Markers
RED
BLUE
RED
BLACK
RED
BLUE
BLUE
Red*
Yellow*
Green*11 TEMPERATURE
12 TEMPERATURE
13 REFERENCE
14 METAL ORP SENSOR
15 GLASS (MEASURE)
16 SHIELD
17 SHIELD
11 TEMPERATURE
12 TEMPERATURE
13 REFERENCE
14 SOLUTION GROUND
15 GLASS (MEASURE)
16 SHIELD
17 SHIELD
Combined pH/ORP sensorTemp. sensors optional for indicationonly, not for compensationService code 01 set to ORP
* Cable Markers
RED
BLUE
BLUE
BLACK
RED
WHITE
Blue*
Green*
"All in one" ORPService code 01 set to ORPService code 03 set to offService code 04 set to off
11 TEMPERATURE
12 TEMPERATURE
13 REFERENCE
14 SOLUTION GROUND (ORP)
15 pH
16 SHIELD
17
11
12
13
14
16 15
> Connect ions normal pH
A-15 B-13 C- D-14 E-11 F-12 S-3 or 63pH
refLE
temp
> Connections differential pH
A-15 B-14 C-13 D-17 E-11 F-12 S-3 or 63pH
pH ref LEtemp

17 Overall Screen
1112
12
1314
1416
15
1314
1416
15
17
1117
11 Red
12 Blue
15 Core 16 ScreenWhite Co-axial cable
13 Core 14 ScreenBrown Co-axial Cable
14 (screen)
17 (overall screen)
12 (blue)
11 (red)
13 (core)
16 (screen)
15 (core)
Co-axial cable(white)
Co-axial cable(brown)
WF10 Cable
EXA pH TRANSMITTER / CONVERTER
11
12
13
14
15
16
17
12B6W
2-06
11
12
13
17
15
16
14
Note that cables 14 & 17 connect toterminals 17 & 14 respectively.
Fig. 3-12. Connection of WF10 extension cable and BA10/BP10 junction box
IM 12B6B3-E-E
Installation and wiring 3-13
3-7-2. Sensor cable connection with special grommetIn order to seal multiple sensor cables into EXA PH402, a special grommet is provided that is designed toaccommodate one, two or three sensor cables (5 mm dia.) plus a liquid earth cable (2.5 mm dia.). In thepack with the grommet are blanking pieces to close any unused holes. When correctly assembled, thegrommet maintains the IP65 (NEMA 4X) rating of the EXA PH402 housing.
Refer to figure 3-12 to assemble the grommet connections:1. First remove the nut and standard rubber seal from the selected gland2. Discard the seal. This will be replaced later by the special grommet3. Thread the cables through the nut and the gland4. Connect the cables to their designated terminals5. Arrange the cables to avoid tangles and insert the grommet between the gland and the nut6. The grommet is split to permit the cables to be mounted after connection.
(This also ensures even length adjustment.)7. Ensure that any unused holes are filled with the blanking pieces8. Tighten the nut to form a firm seal. (Hand-tight is sufficient.)
Note: The special gland is intended to be used to seal the multiple cables from the Yokogawa flow fittingssuch as FF20 and FP20. The designated cables are WU20 sensor cables, which are approximately 5 mm (0.2 “) in diameter, and 82895002 liquid earth cables, which are approximately 2.5 mm (0.1 “)in diameter.
For sensor systems using a single cable, like the FU20 (FU25) and the PR20, PD20, PF20 and PS20, thestandard gland will accommodate the cable adequately. Single cables between approximately 7 mm and 12mm (0.28 “ and 0.47 “) can be sealed properly with these glands.
3-7-3. Sensor cable connections using junction box (BA10) and extension cable (WF10)Where a convenient installation is not possible using the standard cables between sensors and converter, ajunction box and extension cable may be used. The Yokogawa BA10 junction box and the WF10 extensioncable should be used. These items are manufactured to a very high standard and are necessary to ensurethat the specifications of the system can be met. The total cable length should not exceed 50 metres (e.g. 5 m fixed cable and 45 m extension cable). In the case of systems using dual high impedance sensors(e.g. Pfaudler 18), then the cable length is restricted to 20 metres (fixed cable only, no extension with F10).

3 cm
heat shrink
9 cm
remove insulation
Fig. 3-13a.
3. Remove loose copper screening, and cut off the cotton packing threads as short as possible.4. Strip insulation from the last 3 cm of the brown, and the white coaxial cores.
3 cm
cotton threads
Fig. 3-13b.
5. Extract the coaxial cores from the braid, and trim off the black (low-noise) screening material as short aspossible.
6. Insulate the overall screen and the 2 coaxial screens with suitable plastic tubing.7. Strip and terminate all ends with suitable (crimp) terminals and identify with numbers as shown.
1112
17
15
1613
14
12B6C
3-17T
ER
MIN
AT
ION
PR
OC
Fig. 3-13.c
8. Finally shrink the overall heat shrink tube into position.
IM 12B6B3-E-E
3-14 Installation and wiring
Extension cable may be purchased in bulk quantities or in pre-finished lengths. In the case of bulk quantitiescut to length, then it is necessary to terminate the cable as shown below.
Termination procedure for WF10 cable.1. Slide 3 cm of heat shrink tube (9 x 1.5) over the cable end to be terminated.2. Strip 9 cm of the outer (black) insulating material, taking care not to cut or damage internal cores.

Installation and wiring 3-15
Figure 3-14. Sensor cable connections with special grommet
3-8. Tag plate mountingWhen option /SCT is specified, a stainless steel tagplate is supplied with the designated Tag No. stampedor engraved. It is mounted as shown in figure 3-14 using one of the cable glands.
IM 12B6B3-E-E

IM 12B6B3-E-E

Operation 4-1
4. OPERATION; DISPLAY FUNCTIONS AND SETTING
4-1. Operator interfaceThis section provides an overview of the operation of the EXA operator interface. The basic procedures forobtaining access to the three levels of operation are described briefly. For a step-by-step guide to dataentry, refer to the relevant section of this instruction manual. Figure 4-1 shows the EXA operator interface.
LEVEL 1: MaintenanceThese functions are accessible by pushbutton through a flexible front cover window. The functions make upthe normal day-to-day operations that an operator may be required to complete. Adjustment of the displayand routine calibration are among the features accessible in this way. (See table 4-1).
LEVEL 2: CommissioningA second menu is exposed when the EXA front cover is removed and the display board is revealed. Usersgain access to this menu by pressing the button marked * in the lower right of the display board. This menuis used to set such values as the output ranges and hold and wash features. It also gives access to theservice menu. (See table 4-1).
LEVEL 3: ServiceFor more advanced configuration selections, press the button marked * , then press “NO” repeatedly untilyou reach SERVICE. Now push the “YES” button. Selecting and entering “Service Code” numbers in thecommissioning menu provide access to the more advanced functions. An explanation of the Service Codesis listed in chapter 5 and an overview table is shown in chapter 10.
Table 4-1. Operations overviewRoutine Function Chapter
Maintenance AUT CAL Calibration with programmed buffer solutions 6
MAN CAL Calibration with other buffer solutions 6
SAMPLE Grab sample calibration 6
DISPLAY Read auxiliary data or set message display 4
SETPOINTS Adjust alarm setpoints (when activated) 5
WASH Manual wash start (when activated) 5
MAN.IMP Manual start of impedance check 5
TEMPERATURE Select automatic or manual compensation 5
HOLD Switch hold on/off (when activated) 5
Commissioning SETPOINTS Adjust alarm setpoints 5
RANGE Adjust the output range 5
SET HOLD Activate the hold function 5
WASH Activate and configure the wash timer 5
Service SERVICE Fine tune the specialized functions of the 5
(Access to coded entries converter
from the commissioning
level)
NOTE: All three levels may be separately protected by a password. See Service Code 52 in chapter 5 ServiceCode table for details on setting passwords.
IM 12B6B3-E-E

4-2 Operation
Figure 4-1. PH402 operator interface
4-2. Explanation of operating keysMODE key This key toggles between the measuring and maintenance modes. Press once to obtain
access to the maintenance function menu. AUTO CALMAN CALDISPLAYSETPOINTWASHMAN.IMPTEMPERATUREHOLD
Press again to return to the measuring mode (press twice when hold is activated).YES/NO keys These are used to select choices from the menu.
YES is used to accept a menu selection. NO is used to reject a selection, or to move ahead to the next option.
DATA ENTRY keys ( )is used as a “cursor” key. Each press on this key moves the cursor or flashing digitone place to the right. This is used to select the digit to be changed when enteringnumerical data.is used to change the value of a selected digit. Each press on this key increases thevalue by one unit.The value can not be decreased, so in order to obtain a lower value,increase past nine to zero, then increase to the required number.When the required value has been set using the > & ^ keys, press ENT to confirm thedata entry. Please note that the EXA 402 does not register any change of data untilthe ENT key is pressed.
* key This is the commissioning mode key. It is used to obtain access to the commissioningmenu. This can only be done with the cover removed or opened. Once this button hasbeen used to initiate the commissioning menu, follow the prompts and use the other keysas described above.
HOLD FAIL
YES NO
ENT
SETPOINTSRANGESET HOLD
SERVICE
*
MEASURE
MAN.CALDISPLAY
HOLD
NO MODEYES
ENT
YOKOGAWA
MODE
TEMPERATURE
AUT.CAL
WASH
TEMP.MAN.
pH
mV
CONTACTS
S1
S2
WASH/S3
FAIL/S4
Output hold flag Manual temperaturecompensation flag
Fail flag
Menu pointer flags
Commissioning function menu
Commissioningmode access key
Relay contact status indicators
Measure/Maintenancemode key
Broken line indicates areathat can be seen throughfront cover
Adjustment keys> : Choose digit to
adjust^ : Adjust digitENT : Confirm change
Selection keysYES : Accept settingNO : Change setting
Key prompt flags
Message display
Main display
Units
IM 12B6B3-E-E

Operation 4-3
4-3. Setting passcodes
4-3-1. Passcode protectionIn Service Code 52, EXA users can set passcode protection for each one of the three operating levels, orfor any one or two of the three levels. This procedure should be completed after the initial commissioning(setup) of the instrument. The passcodes should then be recorded safely for future reference.
When passcodes have been set, the following additional steps are introduced to the configuration andprogramming operations:
MaintenancePress MODE key. The display shows 000 and *PASS* Enter a 3-digit passcode as set in Service Code 52 to obtain access to the Maintenance Mode
Commissioning Press * key. The display shows 000 and *PASS* Enter a 3-digit passcode as set in Service Code 52 to obtain access to the Commissioning Mode.
ServiceFrom the commissioning menu, select *Service by pressing YES key. The display shows 000 and *PASS* Enter a 3-digit passcode as set in Service Code 52 to obtain access to the Service Mode.
NOTE: See Service Code 52 for the setting of passcodes.
4-4. Display examplesThe following pages show the sequence of button presses and screens displayed when working in somestandard configurations.
More or less options will be made available by the configuration of some service codes. For instance theimpedance measurement screens do not appear when impedance checking is switched off in service codes03 and 04.
IM 12B6B3-E-E

IM 12B6B3-E-E
NOYES
pH
pH
pH
YES
pH
YES NO
pH
pH
pH
YES (See TempmenuChapter 5)
YES NOTEMP.
MODE
NO
YES
YES
NO
NO
NO
(See AutocalibrationChapter 6)
(See ManualcalibrationChapter 6)
YES NO
YES NO
YES NO
MEASURE
MAN.CALDISPLAY
HOLDTEMP.
AUT.CAL
MAN.CAL
DISPLAY
AUT.CAL
MAN.CAL
(See SamplecalibrationChapter 6)
SETPOINTSRANGESET HOLD
SERVICE
*
WASH
HOLD FAIL
YES NO
ENT
MEASURE
MAN.CALDISPLAY
HOLD
NO MODEYES
ENT
YOKOGAWA
MODE
TEMPERATURE
AUT.CAL
TEMP.MAN.
pH
mV
CONTACTS
S1
S2
WASH/S3
FAIL/S4
pH
pH
pH
pH
pH
pH
pH
pH
NO
NO
NO
NO
NO
NO
NO
NO
Display Access
Impedance of input 1
Impedance of input 2
Process temperature
Current output 1
Current output 2
Software release number
Offset(as. pot. orzero point)
Efficiency(slope)
Press YES to fixthe selected second
line of display
YES
YES NO
YES NO
YES NO
YES NO
YES NO
YES NO
YES NO
YES NO
DISPLAY
DISPLAY
DISPLAY
DISPLAY
DISPLAY
DISPLAY
DISPLAY
DISPLAY
12B6B3-21Display Functions pH (Default)
NO
YES (See ManualImpedancecheck Chapter 5)
NO
4-5. Display functions
4-5-1. Display functions pH (default)
4-4 Operation

pH
pH
12B6B3-19
pH
pH
TEMP.
See SetpointMenuchapter 5.5
See WashMenuchapter 5.4pH
NO
NO
NO
YES
YES
pH
pH
YES NO
YES NO
TEMP.
HOLD
HOLD
YES NO
YES NO
NO
DATE
pH
pH
pH
TIME
CAL -1
VALUE
Display Fuctions pH (ORP)
Service Code 01 Set for pH.Service Code 02 Set for ORPon parameter 2.
DISPLAY
DISPLAY
DISPLAY
DISPLAY
DISPLAY
"Logbook Scrolling"The display can give information
about calibrations performedwith date and time.
The example below showsAsymmetry Potential.
Scrolling of Data is alsoavailable on Slope.
As Pot ORPImpedance Input 1Impedance Input 2
When these functionsare enabled in Service
Codes.
MeasuringMode
As PotDisplay 2
Back tothe Top
pH
YES NO
DISPLAY
DISPLAY
DISPLAY
DISPLAY
DISPLAY
DISPLAY
DISPLAY
DISPLAY
DISPLAY
DISPLAY
YES
NO
NO
NO
NO
NO
NO
NO
NO
NO
pH
NO
MODE
NO
NO
YES
YES
YES
YES
YES
YES
YES
YES
NO
NO
NO
NO
pH
pH
pH
pH
YES NO
YES NO
YES NO
YES NO
YES NO
YES NO
YES NO
pH
pH
pH
pH
pH
pH
pH
pH
pH
MAN.CAL
MEASURE
MAN.CALDISPLAY
HOLDTEMP.
AUT.CAL
AUT.CAL
DISPLAY
YES NO YES NO
YES NO
YES NO
YES NO
YES NOYES NO
ENT
YES NO
ENT
YES NO
ENT
YES NO
ENT
YES NO
ENT
NO
NOYES
pH
NO
YES
YES
See TempMenuchapter 5
See HoldMenuchapter 5
YES
See Man.Imp. Checkchapter 5
4-5-2. Display functions pH (ORP)
IM 12B6B3-E-E
Operation 4-5

IM 12B6B3-E-E
pH
YES NO
DISPLAY
YES NO
pH
TEMP.
YES NO
pH
HOLD
NO
TEMP.
HOLD
NO
YES
YES
NO
NO
See Setpoints MenuChapter 5
YES NO
See Hold MenuChapter 5
See Temp MenuChapter 5
See Wash MenuChapter 5YES
YES NO
YES
pH
pH
MAN.CAL
NO
NOYES
pH
MEASURE
MAN.CALDISPLAY
HOLDTEMP.
AUT.CAL
NOYESAUT.CAL
NO
MODE
DISPLAY
NO
DISPLAY
DISPLAY
DISPLAY
mV
DISPLAY
DISPLAY
DISPLAY
DISPLAY
DISPLAY
DISPLAY
NO
NO
NO
NO
NO
NO
NO
NO
mV
YES NO
pH Display
CurrentOutput 1
CurrentOutput 2
As Pot ORP
ImpedanceInput 1
ImpedanceInput 2
SoftwareReleaseVersion
NO
SlopepH Sensor
As PotpH Sensor
YES NO
YES NO
YES NO
YES NO
YES NO
YES NO
YES NO
YES NO
pH
pH
pH
pH
pH
pH
pH
pH
pH
12B6B3-20
See Auto CalChapter 6
See Man CalChapter 6
See Man CalChapter 6
YESYES NO
YES NO
YES
YES
YES
pH
pH
pH
pH
Display Functions pH (rH)
Service Code 01 Set for pH.Service Code 02 Set to rHon parameter 2.
NO
Temp Display
NO
NOYES
pH
NO
YES See Man. Imp.check Chapter 5
4-6 Operation
4-5-3. Display functions pH (rH)

5. PARAMETER SETTING
5-1. Maintenance modeStandard operation of the EXA instrument involves use of the maintenance (or operating) mode to set upsome of the parameters.
Access to the maintenance mode is available via the six keys that can be pressed through the flexiblewindow in the instrument cover. Press the MODE-key once to enter this dialog mode.NOTE:At this stage the user will be prompted for pass code where this has been previously set up in service code52 in chapter 5.
Automatic calibration See “calibration” section 6.
Manual calibration See “calibration” section 6.
Sample calibration See “calibration” section 6.
Display setting See “operation” section 4.
Manual impedance check See “operation” section 5.
Setpoint Select and adjust setpoint (when enabled in service menu section 5,service code 51). See adjustment procedure in §5-1-5 and §5-2-1.
Wash Manually start/stop wash cleaning (when enabled in service menu section5, service code 51). See adjustment procedure in §5-1-4 and §5-2-4.
Temperature Set automatic or manual compensation and adjust manual reading (whenpH is set in section 5 service code 01). See adjustment procedure in §5-1-1.
Hold Manually switch on/off HOLD (when enabled in commissioning menusection). See adjustment procedure in §5-2-3..
IM 12B6B3-E-E
Parameter setting 5-1

IM 12B6B3-E-E
5-1-1. Manual temperature selection and adjustmentpH selected in service code 01.
TEMP.MAN.
ENT
MEASURE
NO MODEYES
ENT
YOKOGAWA
MODE
CONTACTS
S1
S2
WASH/S3
FAIL/S4
SETPOINTSRANGESET HOLD
SERVICE
*
WASH
NOYES
pH
AUT.CAL
YES NO
pH
TEMP.
pH
MODE
NONO
NONO
YES
NOYES
pH
NOYES
pH
NO
YES
5.1 Manual Temperature Selection & Adjustment. (pH Selected in Service Code 01)
Use keys to
adjust and enter manual temperature setting
5-2 Parameter setting

5-1-2. Process temperature measuring in ORP modeORP selected in service code 01.
MEASURE
MODE
mV
NO MODEYES
ENT
YOKOGAWA
CONTACTS
S1
S2
WASH/S3
FAIL/S4
SETPOINTSRANGESET HOLD
SERVICE
*
WASH
NOYES
mV
MAN.CAL
YES NO
TEMP.
mV
MODE
NONO
NONO
YES
NOYES
mV
NOYES
mVNO
YES
MEASURE
YES NO
mV
YES
5.2 Process Temperature Measuring in ORP mode. (ORP selected in Code 01)
Display return tomeasuring mode withtemperature reading.
IM 12B6B3-E-E
Parameter setting 5-3

IM 12B6B3-E-E
5-1-3. Manual activation of HOLD
MEASURE
NO MODEYES
ENT
YOKOGAWA
MODE
CONTACTS
S1
S2
WASH/S3
FAIL/S4
SETPOINTSRANGESET HOLD
SERVICE
*
WASH
12B6B3-27
pH
AUT.CAL
YES NO
pH
pH
MODE
NONO
NO
YES
NOYES
pH pH
HOLD
YES
NO
5.3 Manual Activation of Hold.
Note: The HOLD feature must first be activated in the commissioning mode section 5-2-3.
YES NO
MEASURE
NOYES
pH
NO YES
NO HOLD
5-4 Parameter setting

5-1-4. Manual wash start/stop
MEASURE
NO MODEYES
ENT
YOKOGAWA
MODE
CONTACTS
S1
S2
WASH/S3
FAIL/S4
SETPOINTSRANGESET HOLD
SERVICE
*
WASH
12B6B3-28
NOYES
pH
AUT.CAL
YES NO
pH
pH
MODE
NONO
NO
NOYES
pH
NOYES
pH
YES
MODE
YES
NO
5.4 Manual Wash Start/Stop.
Note: Wash must first be switched on in commissioning mode section 5-2-4, and set for adjustment in the maintenance mode, by service code 51.
WASH ACTIVE press YESto stop.
IM 12B6B3-E-E
Parameter setting 5-5

IM 12B6B3-E-E
5-1-5. Setpoint adjustment
MEASURE
NO MODEYES
ENT
YOKOGAWA
MODE
CONTACTS
S1
S2
WASH/3
FAIL/S4
SETPOINTSRANGESET HOLD
SERVICE
*
WASH
NOYES
pH
AUT.CAL
YES NO
pH
pH
MODE
NONO
NO
NOYES
pH
YES
NO
YES
NOYES
pH
NOYES
pH
YESFor adjustments,follow proceduresas in section 5-2-1.
5.5 Setpoint Adjustment
For adjustments,follow proceduresas in section 5-2-1.
Setpoint 3 and 4when enabled in
service codes42 and 43
Setpoint analoguecontrol output (mA2)
when enabled in code 31
Note: To enable adjustment of setpoints inmaintenance mode, Service Code 51must be set to "ON".Setpoints available will depend on theirconfiguration in the Service Code.
12B6B3-29/a
5-6 Parameter setting

5-1-6. Manual impedance check
MEASURE
NO MODEYES
ENT
YOKOGAWA
MODE
CONTACTS
S1
S2
WASH/3
FAIL/S4
SETPOINTSRANGESET HOLD
SERVICE
*
WASH
12B6B3-29/b
NOYES
pH
AUT.CAL
YES NO
pH
pH
MODE
NONO
NO
NOYES
pH
YES NO
NOYES
pH
5.6 Manual Impedance Check
Return to measuringmode after updating
impedance check
Note: The manual impedance startis available when the sensor impedancemeasurement is enabled in ServiceCode 3 and 4.This enables the impedance data to beupdated immediately after a maintenanceevent (e.g. replacing an electrode).
YES
IM 12B6B3-E-E
Parameter setting 5-7

IM 12B6B3-E-E
5-2. Commissioning modeIn order to obtain peak performance from the EXA, you must set it up for each custom application.
Setpoints Alarms are set by default S1 - high process alarmS2 - low process alarmS3 - WASHS4 - FAIL
The setpoints are at arbitrary default value. Therefore, you must set these tomeaningful values, or set them to off. (See service codes 40 to 49 and userinterface codes 50 to 59).
Output ranges mA output 1 is set as default to 0 - 14 pHmA output 2 is set as default to 0 - 100 °C
For enhanced resolution in more stable measuring processes, it may be desirableto select 5 - 10 pH range, for example, and maybe 0 - 25 °C temperature range.Service codes 30 to 39 can be used to choose other output parameters on mAoutput 2. Choose from ORP, temperature, rH or PI control.
Hold The EXA converter has the ability to “hold” the output during maintenance periods.This parameter should be set up to hold the last measured value, or a fixed valueto suit the process.
Wash cleaner The EXA can be set up to control a wash cleaner. When using this function, thetimings must be configured for interval, wash and recovery periods.
Service This selection provides access to the service menu.
What follows are pictorial descriptions of typical frontplate pushbutton sequences for each parametersetting function. By following the simple YES/NO prompts and arrow keys, users can navigate through theprocess of setting range, setpoints, hold, wash and service functions.
5-8 Parameter setting
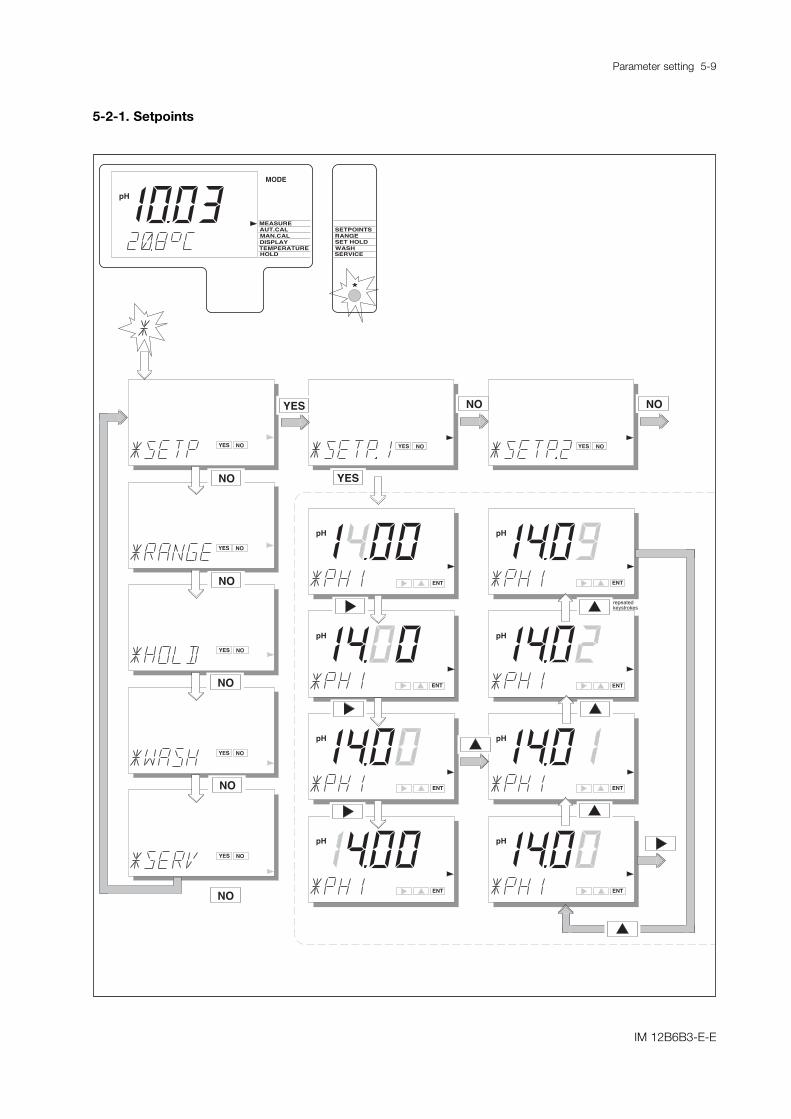
5-2-1. Setpoints
ENT
pH
pH
pH
pH
pH
pH
pH
pH
ENT
ENT
ENT ENT
ENT
ENT
ENT
repeatedkeystrokes
YES NO
NO
NO
NO
NO
NO
NO
YES NO
YES NO
YES
SETPOINTSRANGESET HOLD
SERVICE
*
MEASURE
MAN.CALDISPLAY
HOLD
MODE
TEMPERATURE
AUT.CAL
WASH
pH
Setpoints
YES NO
YES NO
YES NO
YES NO
YES NO
IM 12B6B3-E-E
Parameter setting 5-9

IM 12B6B3-E-E
pH
ENT
Adjust setpoint valueusing > ENT keysas shown for setpoint 1.
>
YES NO YES NO YES NO
NONO NO
Process Alarms onS.3 and S.4 areonly available whenenabled in ServiceCodes 40-49
Analogue control setpointis only available whenenabled in Service Code 31
pH
pH
pH
pH
ENT
YES NO
ENT
ENT
ENT
ENT
Setpoint confirmed-return to commissioningmenu.
YES
5-10 Parameter setting

5-2-2. Range
YES NO
YES NO
NO
NO
NO
NO
NO
pH
YES
pH
pH
pH
pH
pH
pH
SETPOINTSRANGESET HOLD
SERVICE
*
MEASURE
MAN.CALDISPLAY
HOLD
MODE
TEMPERATURE
AUT.CAL
WASH
pH
YES
NO
YES
ENT
YES NO
pH
See facingpage
ENT
ENT
ENT
ENT
ENT
ENT
ENT
ENT
YES NO
YES NO
YES NO
YES NO
IM 12B6B3-E-E
Parameter setting 5-11

IM 12B6B3-E-E
YES NO
NO
pH
ENT
pH
YES
ENT
YES
ENT ENT
ENT
Note: Range 2 does notappear when P1 controlset on mA2 Range Selection Options
are determinedby Service Code 31
ENT ENT
Choose Range to adjust, then set begin scale (0%)and end scale (100%) of the mA output signal, usingthe >, ,and ENT keys. Selection of mA output(0-20 / 4-20 mA) is in Service Code 30.
>
ENT
Range values set, returnto commission mode.
YES NO
YES NO
YES NO YES NO
YES NO
ORYES
Note: Range 2 does notappear when PI controlset on mA2
5-12 Parameter setting

5-2-3. Hold
YES NO
YES NOYES NO
YES NO
YES NO
YES NO
YES NO
NO
NO
NO
NO
NO
SETPOINTSRANGESET HOLD
SERVICE
*
MEASURE
MAN.CALDISPLAY
HOLD
MODE
TEMPERATURE
AUT.CAL
WASH
pH
YES
YES NO YES NO
YES NO
YES
NO
YES
YES
NO
Hold
HOLD activelast measuredvalue.
HOLD deactivated, returnto commissioning menu.
HOLD
YESHOLD
IM 12B6B3-E-E
Parameter setting 5-13

IM 12B6B3-E-E
YES NO
ENT
HOLD
HOLD
HOLD HOLD
HOLD
ENT
HOLD
ENT
ENT
ENT
HOLD values set,return to commissioningmenu.
ENT
ENT
Set HOLD "fixed value"for mA2.
YES Set HOLD "fixed value"for mA1.
5-14 Parameter setting

5-2-4. Wash
YES NO
YES NOYES NO
YES NO
YES NO
YES NO
YES NO
NO
NO
NO
NO
NO
SETPOINTSRANGESET HOLD
SERVICE
*
MEASURE
MAN.CALDISPLAY
HOLD
MODE
TEMPERATURE
AUT.CAL
WASH
pH
YES YES
Wash
(NOTE: The menu item "WASH"will not appear unless selected inService Code 42)
NO
YES NO
Wash system timingsare set with the >, ,and ENT keys in thesetpoint menu
>
ENT
ENT
ENT
ENT
ENT
ENT
IM 12B6B3-E-E
Parameter setting 5-15

IM 12B6B3-E-E
5-16 Parameter setting
5-2-5. Service
ENT
YES NO
YES NO
YES NO
YES NO
YES NO
NO
NO
NO
NO
NO
SETPOINTSRANGESET HOLD
SERVICE
*
MEASURE
MAN.CALDISPLAY
HOLD
MODE
TEMPERATURE
AUT.CAL
WASH
pH
Service
ENT
ENT
ENT
YES
ENT
ENT
Example: Service Code 01Select main parameter
for pH
for ORP
With the >, ,ENT keys>
ENT

5-3. Notes for guidance in the use of service coded settings
IM 12B6B3-E-E
Parameter setting 5-17

IM 12B6B3-E-E
5-3-1. Parameter specific functions
Code 1 pH/ORP Choose the main measuring parameter. The option of the ORP input is used withan inert metal electrode as measuring sensor which gives a reading directly in millivolts. This signal can then be interpreted to give information about the oxidation state of the process solution, and derived information like the absenceof a compound (like Cyanide for example which is destroyed in oxidizing solutions).
Code 2 PRM.2 Enable the use of a second measuring parameter simultaneously with pH (themain parameter). With the correct sensor (e.g. FU20), ORP measurement is possible as parameter 2.With the same sensor, rH measurement is possible as parameter 2, this is calculated from pH and ORP and is a value which gives the oxidizing power ofthe solution while compensating for the effect of pH.This function is particularly useful for applications where both the pH and oxidation-reduction potential of the process need to be controlled. The availabilityof both measurements in a single system is much more convenient, (and moreeconomical) than two separate systems.Note that in both cases a suitable sensor combination is needed to make thispossible. The Yokogawa FU20 (4-in-1) sensor can be used for this purpose, or acombination of individual sensors. Contact your local Yokogawa sales office foradvice regarding applications and sensor selection.
Code 3 & 4 Z1.CHK & The EXA PH402 has an impedance check capable of monitoring the impedance Z2.CHK of all sorts of sensor systems. In order to "fine tune" this diagnostic tool it is
necessary to set it up to match the sensors used. The default settings give agood setup for a conventional system comprising pH glass sensor and a reference electrode, either as individual electrodes or as a combination style sensor. The impedance limits will need to be adjusted to get the best from systems using heavy duty, or fast response electrodes.The impedance measuring system has a very wide span requirement. As it canmeasure in kΩ and also in GΩ (109) there are hardware switches to set highrange (1MΩ to 2 GΩ) or low range (1kΩ to 1MΩ) measuring. As a default the system is set to measure high impedances on input 1 (the one normally used forthe pH glass sensor input) and low impedances on input 2 (the one normallyused for the reference input). Examples of where these settings need to bechanged from the default, are Pfaudler enamel sensors which need two highimpedance settings, and Platinum sensors with a standard reference, which needtwo low impedance settings. In applications that have a tendency to leave deposits on the electrodes, and toclog the reference sensor junction there is the possibility to use the impedancecheck on the reference sensor to initiate the wash cleaning process. This provides an excellent way of handling variable processes and intermittent batchoperations.The temperature compensation of the impedance measurement is for conven-tional pH glass sensors. When other sensors are used, switch this feature off.
Code 5 CAL.CK The calibration checking feature, when enabled, gives security against enteringwrong calibration data. For example when aged sensors are due for replacement, the EXA flags an error message and prevents a calibration beingcompleted where the subsequent measurement can only exhibit errors and drift.Limits are set for the maximum permissible Asymmetry potential, and Slope.
5-18 Parameter setting
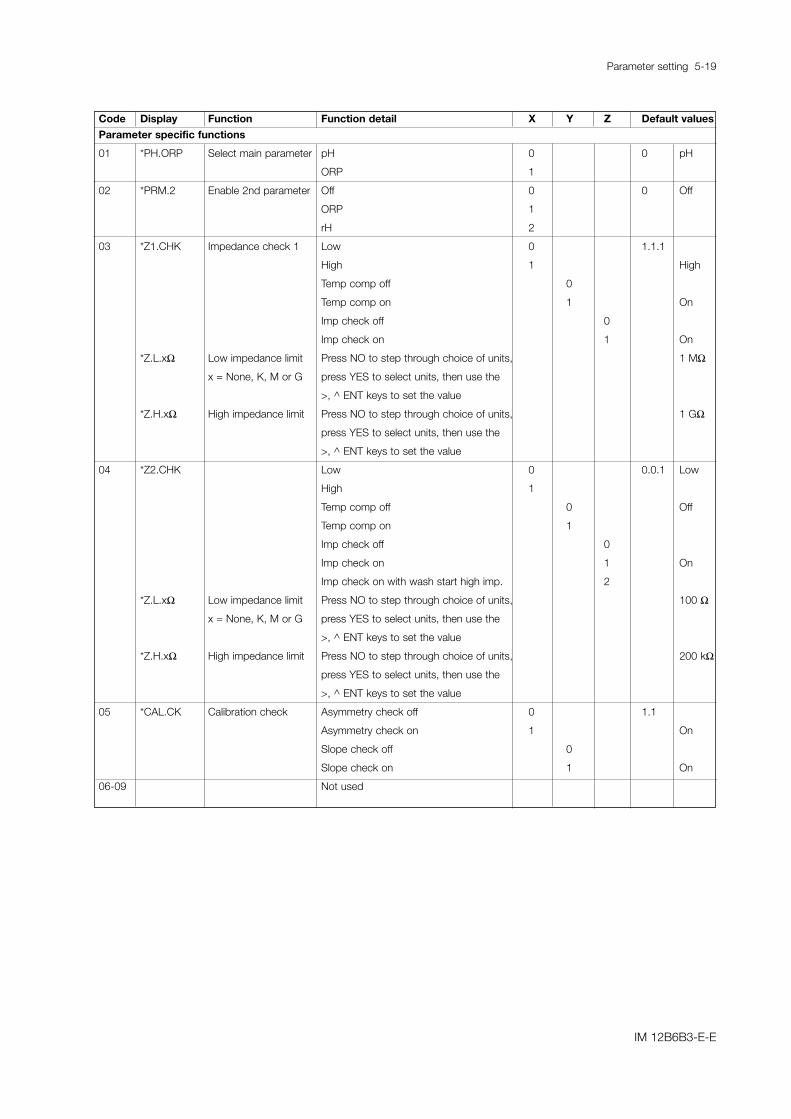
Code Display Function Function detail X Y Z Default values
Parameter specific functions
01 *PH.ORP Select main parameter pH 0 0 pH
ORP 1
02 *PRM.2 Enable 2nd parameter Off 0 0 Off
ORP 1
rH 2
03 *Z1.CHK Impedance check 1 Low 0 1.1.1
High 1 High
Temp comp off 0
Temp comp on 1 On
Imp check off 0
Imp check on 1 On
*Z.L.xΩ Low impedance limit Press NO to step through choice of units, 1 MΩ
x = None, K, M or G press YES to select units, then use the
>, ^ ENT keys to set the value
*Z.H.xΩ High impedance limit Press NO to step through choice of units, 1 GΩ
press YES to select units, then use the
>, ^ ENT keys to set the value
04 *Z2.CHK Low 0 0.0.1 Low
High 1
Temp comp off 0 Off
Temp comp on 1
Imp check off 0
Imp check on 1 On
Imp check on with wash start high imp. 2
*Z.L.xΩ Low impedance limit Press NO to step through choice of units, 100 Ω
x = None, K, M or G press YES to select units, then use the
>, ^ ENT keys to set the value
*Z.H.xΩ High impedance limit Press NO to step through choice of units, 200 kΩ
press YES to select units, then use the
>, ^ ENT keys to set the value
05 *CAL.CK Calibration check Asymmetry check off 0 1.1
Asymmetry check on 1 On
Slope check off 0
Slope check on 1 On
06-09 Not used
IM 12B6B3-E-E
Parameter setting 5-19

IM 12B6B3-E-E
5-3-2. Temperature compensation and measuring functions.
Code 10 T.SENS Selection of the temperature compensation sensor. The default selection is thePt1000 Ohm sensor, which gives excellent precision with the two wireconnections used. The other options give the flexibility to use a very wide rangeof other pH sensors.
Code 11 T.UNIT Celsius or Fahrenheit temperature scales can be selected to suit user preference.
Code 12 T.ADJ With the process temperature sensor at a stable known temperature, thetemperature reading is adjusted in the main display to correspond. The calibrationis a zero adjustment to allow for the cable resistance, which will obviously varywith length.The normal method is to immerse the sensor in a vessel with water in it, measurethe temperature with an accurate thermometer, and adjust the reading foragreement.
Code 13 T.COMP Process compensation automatically allows for changes in the pH of the processwith temperature. The characteristic of each process will be different, and theuser should determine if this feature is to be activated, and what compensationfigure to choose.
The compensation is given in pH per 10 °C.
Example:- For pure water with an alkali dose, (e.g. boiler feed water) a coefficientof approx. 0.35pH can be expected. However, applications vary and asimple test will determine what if any coefficient is suitable for theprocess.
5-20 Parameter setting

Code Display Function Function detail X Y Z Default values
Temperature measuring and compensation functions
10 *T.SENS Temperature sensor Pt1000 0 0 Pt1000
Pt100 1
3kBalco 2
5k1 3
8k55 4
10kPTC 7
11 *T.UNIT Display in °C or °F °C 0 0 °C
°F 1
12 *T.ADJ Calibrate temperature Adjust to allow for cable resistance None
13 *T.COMP Set temp comp Compensation for process changes off 0 0 Off
Compensation for process changes on 1
*T.COEF Adjust process TC Set for TC in pH per 10 °C - 0.0 pH per
10 °C
14-19 Not used
IM 12B6B3-E-E
Parameter setting 5-21

IM 12B6B3-E-E
5-3-3. Calibration Functions
Code 20 ∆t.SEC & These functions are used to determine the stability level demanded by the EXA as∆pH acceptance criteria for the automatic calibration. The default settings give a good
calibration for general purpose electrode systems with a fast response. Whereheavy duty electrodes are used, or when low temperatures are concerned, thesevalues should be adjusted. When adjusting these settings, the longer the time interval and the smaller the pHchange, the more stable will be the reading. However, it is important to bear inmind that the time taken to reach stability is an exponential function, and tooambitious a setting will cause the instrument to wait for a very long time beforeaccepting a calibration.
Code 21 AS.LOW & Limit values for the drift of an electrode system before an error is signalled when AS.HI a calibration is done. These default values should be adjusted to suit the
application, this will be especially important will enamel or Antimony probes.
Code 22 SL.LOW & Limit values for acceptable slope (sensitivity) calibrations.SL.HI
Code 23 ITP, SLOPE Values can be entered directly in this section. These data can be provided by the& ASPOT manufacturer of the probe, or by the users laboratory etc. They are determined
independently of the measuring loop. NOTE: it is not necessary to enter this data in most cases as the EXA
automatically does this while performing a calibration. The feature is usedin the case of special electrode systems and where calibration in theprocess environment is not possible.
Code 24, Buffer tables The following buffer calibration tables are programmed into the EXA. They are the25, & 26 primary buffer standards according to NIST (formerly NBS) and various other
national standards. We strongly recommend the use of these buffer solutions asthey give the best buffer capacity, reliability and accuracy when calibrating.
Table 5-1.
pH 4 pH 7 pH 9 pH 4 pH 7 pH 90 °C 4.00 6.98 9.46 45 °C 4.05 6.83 9.045 °C 4.00 6.95 9.40 50 °C 4.06 6.83 9.0110 °C 4.00 6.92 9.33 55 °C 4.08 6.83 8.9915 °C 4.00 6.90 9.28 60 °C 4.09 6.84 8.9620 °C 4.00 6.88 9.23 65 °C 4.11 6.84 8.9425 °C 4.01 6.87 9.18 70 °C 4.13 6.85 8.9230 °C 4.02 6.85 9.14 75 °C 4.15 6.85 8.9035 °C 4.02 6.84 9.10 80 °C 4.16 6.86 8.8940 °C 4.04 6.84 9.07
These tables may be adjusted in the case that the user wishes to use othercalibration solutions. The "name" of the buffer can be changed at the *BUF.IDprompt. The other values can then be adjusted in sequence.
Code 27 Zero Point As an alternative to Asymmetry Potential, the Zero point can be used to defineand calibrate the EXA pH unit.Note that this method conforms to the DIN standard for instruments No. IEC 746-2.
5-22 Parameter setting

Code Display Function Function detail X Y Z Default values
Calibration functions
20 *∆t.SEC Stability check time 5 sec.
*∆PH Stability check pH 0.02 pH
21 *AS.LOW As Pot low limit -120 mV
*AS.HI As Pot high limit 120 mV
22 *SL.LOW Slope low limit 70 %
*SL.HI Slope high limit 110 %
23 *ITP Set ITP Preset calibration data from manufacturer 7.00 pH
(pH) *SLOPE Set slope or from laboratory determinations. 100 %
*ASP.1D Set As Pot For the main parameter 0.0 mV
Press YES to confirm 0.1 mV resolution,
then set value with >, ^, ENT keys.
Press NO to change to *ASP.
*ASP Set As Pot For the main parameter
Press YES to confirm 1 mV resolution,
then set value with >, ^, ENT keys.
*ASPmV Set As Pot ORP For parameter 2 (when activated in
service code 02)
23 *ASP.1D Set As Pot (ORP) For the main parameter
(ORP) Press YES to confirm 0.1 mV resolution,
then set value with >, ^, ENT keys.
Press NO to change to *ASP.
*ASP Set As Pot For the main parameter
Press YES to confirm 1 mV resolution,
then set value with >, ^, ENT keys.
24 *BUF.ID Buffer table 4 Buffer tables to NIST (formerly NBS)
25 *BUF.ID Buffer table 7 (see section 10 for table details)
26 *BUF.ID Buffer table 9 User adjustable for special requirements
27 *ZERO.P Enable zero point in Disable zero point (enable As Pot) 0 0 Disabled
pH units Enable zero point (disable As Pot) 1
28-29 Not used
pH
mV
ITP
As pot
0 mV
0 ºC
10 ºC
25 ºC
12B6B3-12ASYMMETRY POTENTIAL
mV
500
0
- 20014
pHITP Zero Point0 7
Fig. 5-1.
IM 12B6B3-E-E
Parameter setting 5-23

IM 12B6B3-E-E
5-3-4. mA Output functionsCode 30 *mA Select required output signal. 0-20 or 4-20mA to suit associated
equipment (Recorders, controllers etc.).Code 31 OUTP.F Select the parameters to transmit on the two mA output signals mA1 &
mA2.
Note: The available choices are affected by the selection of primary parameter (pH/ORP) inservice code 01, and the selection of secondary parameter (off/ORP/rH) in service code 02.
With pH selected as parameter 1, the default configuration is with mA1 as linear pH output, and mA2 as temperature.The choices for mA1 (on terminals 61 & 62) are: linear pH, pH table output (21pt curve), linear parameter 2 (ORP/rH). The choices for mA2 (a terminal 64 & 65) are: linear pH, pH table, linear temperature, pH control (PI), parameter 2 control (PI).
Note: To transmit pH (parameter 1) and ORP/rH (parameter 2) simultaneously, set mA1 forORP/rH (parameter 2) and mA2 for pH (parameter 1). Service code 31 set to 2.0.
P.I. Control When PI control is selected for mA2 (choice 3 or 4) a further configuration step is needed.
*D/R This sets the direction of the control action. Direct is a rising output with rising signal. Reverse is a falling output with rising signal.
With ORP selected as parameter 1, the default configuration is with mA1 as linear ORP output and mA2 as temperature. The choices for mA1 (on terminals 61 & 62) are: linear ORP, ORP table output (21pt curve).The choices for mA2 (a terminal 64 & 65) are: linear ORP, ORP table, lineartemperature, ORP control (PI).
P.I. Control When PI control is selected for mA2 (choice 3) a further configuration step is needed.
*D/R This sets the direction of the control action. Direct is a rising output with rising signal. Reverse is a falling output with rising signal.
Code 32 BURN Diagnostic error messages can signal a problem by sending the outputsignals upscale or downscale (22mA or 0/3.5mA). This is called upscale ordownscale burnout, from the analogy with thermocouple failure signalling ofa burned-out or open circuit sensor. In the case of the EXA the diagnosticsare extensive and cover the whole range of possible sensor faults.
Code 33 RG.mA2 This function sets the proportional range for the mA output control signalCode 34 tI.mA2 This function sets the integral time for the mA output control signalCode 35 TABLE The table function allows the configuration of an output curve by 21 steps & 36 (intervals of 5%)
Table 5-2.0-20 mA 4-20 mA 0-20 mA 4-20 mA
0% 0 mA 4.0 mA 50% 10 mA 12.0 mA5% 1 mA 4.8 mA 55% 11 mA 12.8 mA10% 2 mA 5.6 mA 60% 12 mA 13.6 mA15% 3 mA 6.4 mA 65% 13 mA 14.4 mA20% 4 mA 7.2 mA 70% 14 mA 15.2 mA25% 5 mA 8.0 mA 75% 15 mA 16.0 mA30% 6 mA 8.8 mA 80% 16 mA 16.8 mA35% 7 mA 9.6 mA 85% 17 mA 17.6 mA40% 8 mA 10.4 mA 90% 18 mA 18.4 mA45% 9 mA 11.2 mA 95% 19 mA 19.2 mA
100% 20 mA 20.0 mA
5-24 Parameter setting

Code Display Function Function detail X Y Z Default ValuesmA Outputs30 *mA output signal 0-20 mA on mA1 0 1.1
4-20 mA on mA1 1 mA1 4-200-20 mA on mA2 04-20 mA on mA2 1 mA2 4-20
31 The choices below appear when pH was selected in service code 01pH *OUTP.F Output Parameter pH on mA1 0 0.2 pH on
mA1pH (table) on mA1 1Parameter 2 (ORP or rH) on mA1 2pH on mA2 0pH (table) on mA2 1Temperature on mA2 2 Temp. on
mA2pH PI control on mA2 3Parameter PI control on mA2 4
*D/R Direct or reverse For rising signal, set 0 0 Reverseacting PI control for decreasing mA output
For rising signal, set 1for increasing mA output
31 The choices below appear when ORP was selected in service code 01ORP *OUTPUT.F Output parameter ORP on mA1 0 0.2 ORP on
ORP (table) in mA1 1 mA1ORP on mA2 0ORP (table) on mA2 1Temperature on mA2 2 Temp on ORP PI control on mA2 3 mA2
*D/R Direct or reverse For rising signal, set 0 0 Reverseacting PI control for decreasing mA output
For rising signal, set 1for increasing mA output
32 *BURN Burn function mA 1 No burnout 0 0.0 No Burn.mA 1 Burnout downscale 1mA 1 Burnout upscale 2mA 2 No burnout 0 No Burn.mA 2 Burnout downscale 1mA 2 Burnout upscale 2
33 *RG.mA2 PI range Proportional range for mA control signal*pH.mA2 Display depends on (use >, ^, ENT keys to adjust value) 1.0 pH*mV.mA2 parameter selected 2.0 rH*rH.mA2 in code 31 50 mV
34 *tI.mA2 Integral time 100 sec.(for PI control)
35 *TABL1 Output table for mA1*0% Linearisation table for mA1 in 5% steps.*5% The measured value is set in the main *10% display using the >, ^, ENT keys, for... each of the 5% interval steps.... Where a value is not known, that value may*90% be skipped, and a linear interpolation will*100% take place.
36 *TABL2 Output table for mA2*0% Linearisation table for mA2 in 5% steps.*5% The measured value is set in the main *10% display using the >, ^, ENT keys, for... each of the 5% interval steps.... Where a value is not known, that value may*90% be skipped, and a linear interpolation will*100% take place.
37-39 Not used
IM 12B6B3-E-E
Parameter setting 5-25

IM 12B6B3-E-E
5-3-5. Contact outputs
Code 40 *S1 & *S2 Process relays can be set for a variety of alarm and control function.& 41
Digit "X" sets the type of trigger:Off means that the relay is not activeLow setpoint means that the relay is triggered by a decreasing measurement.High setpoint means that the relay is triggered by an increasing measurement"HOLD" active means that there is maintenance activity in progress so the measurement is not live.For *S3 There is the extra possibility to set up for a wash controller.For *S4 There is the extra possibility to set up for "FAIL" indication.
Digit "Y" sets the control action:Process alarm is a simple On/Off trip controlled by the high/low setpoint.Proportional duty cycle control has a pulse width modulation for proportionaldosing with solenoid valves.Proportional frequency control is used for controlling electrically positioned valves.Temperature alarm is an On/Off trip on the measured temperature.
Digit "Z" sets the control parameter:Alarm on main processControl on main process(Main process means pH/ORP depending on the setting of service code #1)Alarm on rH Control on rH (Available only when pH set in service code #1 & parameter 2 is set to rH in service code #2.
5-26 Parameter setting

Code Display Function Function detail X Y Z Default values
Contacts
40 *S1 Relay 1 settings Off 0 2.0.0
Low setpoint 1
High setpoint 2 High
Note: Main process “HOLD” active 3
means pH or ORP Process alarm 0 Alarm
whichever is set in Proportional duty cycle control 1
code #1 Proportional frequency control 2
Temperature alarm 3
Alarm on main process 0 Main
PI control on main process 1
Alarm on rH 2
PI control on rH 3
41 *S2 Relay 2 settings Off 0 1.0.0
Low setpoint 1 Low
High setpoint 2
Note: “HOLD” active “HOLD” active 3
relay contact is used Process alarm 0 Alarm
to indicate when the Proportional duty cycle control 1
measuring mode is Proportional frequency control 2
interrupted Temperature alarm 3
Alarm on main process 0 Main
PI control on main process 1
Alarm on rH 2
PI control on rH 3
42 *S3 Relay 3 settings Off 0 4.0.0
Low setpoint 1
High setpoint 2
“HOLD” active 3
Note: “WASH” relay Wash control 4 WASH
contact is used to Process alarm 0 Alarm
control the flow of Proportional duty cycle control 1
cleaner to a sensor Proportional frequency control 2
wash nozzle Temperature alarm 3
Alarm on main process 0 Main
PI control on main process 1
Alarm on rH 2
PI control on rH 3
43 *S4 Relay 4 settings Off 0 4.0.0
Low setpoint 1
High setpoint 2
“HOLD” active 3
Note: “FAIL” relay Fail alarm 4 FAIL
contact is used to Process alarm 0 Alarm
indicate when the Proportional duty cycle control 1
diagnostics detect a Proportional frequency control 2
problem Temperature alarm 3
Alarm on main process 0 Main
PI control on main process 1
Alarm on rH 2
PI control on rH 3
IM 12B6B3-E-E
Parameter setting 5-27

IM 12B6B3-E-E
Code 44 *D.TIME The delay time sets the minimum relay switching time. This function can beadjusted to give a good alarm function in a noisy process, preventing the relayfrom "chattering" or repeatedly switching when the signal is close to the setpoint.
*PH.HYS The hysteris is the value beyond the setpoint that the measured value must *mV.HYS exceed before the control function will start working.*rH.HYS*T.HYS
Code 45 *RANGE Proportional range is the value above (or below) the setpoint that generates fulloutput in proportional control. This is in the units of the main parameter (pH ormV).
*rH.RNG This is the proportional range in rH and is only enabled when the converter is setup for rH measurement.
*PER. The time period of the overall pulse control cycle (one ON and one OFF period).See fig. 5-3.
*FREQ. The maximum frequency for the pulse frequency control. See fig 5-4.
Code 46 *tI.CNT The integral time for the PI control settings.
Code 47 *EXPIR When a system is set up to control on the relay outputs, the expiry time can beenabled to warn of an ineffective control. In other words, when the setpoint isexceeded for more than 15 minutes an error message is generated. This canmean, for example, that the reagent tank is empty.
5-28 Parameter setting

Code Display Function Function detail X Y Z Default values
Contacts (continued)
44 *D.TIME Delay time Minimum relay switching time 0.2 sec.
*PH.HYS Hysteresis pH Minimum pH/ORP change for relay reset 0.1 pH
*mV.HYS Hysteresis ORP after switching 10 mV
*rH.HYS Hysteresis rH Minimum rH change for relay reset 0.2 rH
after switching
*T.HYS Hysteresis temp. Minimum temperature change for relay 1 °C
reset after switching (fig. 5-2)
45 *RANGE Proportional range When proportional control selected 1 pH
in code 40, 41, 42 or 43 (10 mV)
*rH.RNG Proportional range rH When rH proportional control selected in 2 rH
code 40, 41, 42 or 43
*PER. Duty cycle period Pulse control On time + Off time (fig. 5-3) 10 sec.
*FREQ. Maximum frequency 100% value for frequency control (fig. 5-4) 70 p/m
46 *tI.CNT Integral time Integral time for relay controls when 100 sec.
PI is set
47 *EXPIR Expiry time Warning of ineffective control action On 0 0 Off
Warning of ineffective control action Off 1
*tE min Set expiry time 15 min
48-49 Not used
t (sec)
LED off
Hys.
LED on
Delay time Delay time
LED off
pH/mVSetpoint
90%
100
50
0
ont toff
10%
50% 50%
10%
90%
100
50
0SC
0.3 s
12D7C21-13PULSE FREQUENCY CONTROL
Fig. 5-3. Fig. 5-4.
pH
% of setpoint value
pH
% of setpoint value
% duty cycle control
Setpoint
Proportionalrange
TimeSetpoint
Proportionalrange
Time
Maximum pulse frequency
50 % pulse frequency
No pulses
% controller output
Fig. 5-2.
IM 12B6B3-E-E
Parameter setting 5-29

IM 12B6B3-E-E
5-3-6. User interface
Code 50 *RET. When Auto return is enabled, the converter reverts to the measuring mode fromanywhere in the configuration menus, when no button is pressed during the settime interval of 10 minutes.
Code 51 *MODE The adjustment of the contact setpoints, the manual operation of the wash system and a manual impedance check (on demand) can be setup for operationin the maintenance mode. (Through the closed front cover).
Code 52 *PASS Passcodes can be set on any or all of the access levels, to restrict access to theinstrument configuration.
Code 53 *Err.4.1 Error message configuration. Two different types of failure mode can be set.
Hard fail gives a steady FAIL flag in the display, and a continuous contact closure.All the other contacts (controls) are inhibited (except HOLD contacts), and a Failsignal is transmitted on the outputs when enabled in code 32.
Soft fail gives a flashing FAIL flag in the display, and the relay contacts are pulsed.The other contacts (controls) are still functional, and the controller continues towork normally. The call for maintenance is a good example of where a SOFT fail isuseful. A warning that the regular maintenance is due, should not be used to shutdown the whole measurement.
*SOFT If soft set to 1, Soft fail only gives a flashing FAIL flag in the display and no pulsing contact
Code 54 Not used
Code 55 *CALL.M Call for maintenance is a contact trigger to signal that the system has been inservice for longer than the set time without calibration. The user can set up to250 days as a routine service interval.
Code 56 *DISP The display resolution can be set to either 0.01pH or 0.1pH. Not applicable to theORP (mV) display.
5-30 Parameter setting

Code Display Function Function detail X Y Z Default values
User interface
50 *RET Auto return Auto return to measuring mode Off 0
Auto return to measuring mode On 1 1 On
51 *MODE Mode setup Setpoints in maintenance mode Off 0 0.0.0 Off
Setpoints in maintenance mode On 1
Wash in maintenance mode Off 0 Off
Wash in maintenance mode On 1
Manual impedance check Off 0 Off
Manual impedance check On 1
52 *PASS Passcode Maintenance passcode Off 0 0.0.0 Off
Note # = 0 - 9, where Maintenance passcode On #
0 = no passcode Commissioning passcode Off 0 Off
1=111, 2=333, 3=777 Commissioning passcode On #
4=888, 5=123, 6=957 Service passcode Off 0 Off
7=331, 8=546, 9=847 Service passcode On #
53 *Err.4.1 Error setting Impedance low (input 1) Soft fail 0
Impedance low (input 1) Hard fail 1 1 Hard
*Err.5.1 Impedance high (input 1) Soft fail 0
Impedance high (input 1) Hard fail 1 1 Hard
*Err.4.2 Impedance low (input 2) Soft fail 0
Impedance low (input 2) Hard fail 1 1 Hard
*Err.5.2 Impedance high (input 2) Soft fail 0
Impedance high (input 2) Hard fail 1 1 Hard
*Err.07 Temperature too high Soft fail 0
Temperature too high Hard fail 1 1 Hard
*Err.08 Temperature too low Soft fail 0
Temperature too low Hard fail 1 1 Hard
*Err.09 pH out of range Soft fail 0
pH out of range Hard fail 1 1 Hard
*Err.11 Response (half-time fail) Soft fail 0 0 Soft
Response (half-time fail) Hard fail 1
*Err.16 Call for maintenance Soft fail 0 0 Soft
Call for maintenance Hard fail 1
*Err.22 Control time-out Soft fail 0 0 Soft
Control time-out Hard fail 1
*SOFT LCD + Fail contact 0 0 LCD/Fail
LCD only 1
54 Not used
55 *CALL.M Call for maintenance Set time limit for calibration Off 0 0 Off
Set time limit for calibration On 1
56 *DISP Display resolution Set pH decimal display 0.1 pH 0
Set pH decimal display 0.01pH 1 1 0.01 pH
57-59 Not used
IM 12B6B3-E-E
Parameter setting 5-31

IM 12B6B3-E-E
5-3-7. Communication setup
Code 60 *COMM. The settings should be adjusted to suit the communicating device connected tothe RS485 port.
*SET.*ADDR.
For the Yokogawa PC402 software package, the default settings match thesoftware as shipped.
Code 61 *HOUR The clock/calendar for the logbook is set for current date and time as reference.*MINUT*SECND*YEAR*MONTH*DAY
Code 62 *ERASE Erase logbook function to clear the recorded data for a fresh start. This may bedesirable when re-commissioning an instrument that has been out of service for awhile.
5-3-8. General
Code 70 *LOAD The load defaults code allows the instrument to be returned to the default set upwith a single operation. This can be useful when wanting to change from oneapplication to another.
Code 71 *tH.CHK The wash cleaner can be used to test the response of the electrode system, seefig. 5-5.The online response check gives a very good indication of the condition of theelectrode system. The first sign of deterioration of the sensors is usually theincrease in response time.
Code 72 *W. REV Wash reverse is used for very difficult applications where the process rapidlyattacks the sensors, or coats them, or otherwise spoils the measurement. Thewash is then operational most of the time, and is switched off to measure. Thistechnique gives an output which is updated on a sample and hold basis. Toobtain continuity of output is important therefore to set the hold to ON in thecommissioning menu.
Code 79 *CUST.D Load customer defaults. This code allows the instrument to be returned to the factory default set, except that buffer tables (code 24,25,26) are unchanged.
5-32 Parameter setting

Code Display Function Function detail X Y Z Default values
Communication
60 *COMM. Communication Set communication Off 0 0.1 Off
Set communication On 1
Communication write enable 0 write
Communication write protect 1 protect
*SET. Baud rate & parity Baud rate 1200 0 3.1
2400 1
4800 2
9600 3 9600
Parity Off 0
Odd 1 Odd
Even 2
*ADDR. Network address Set address 00 to 15 00
61 *HOUR Clock setup Adjust to current date and time using
*MINUT >, ^ and ENT keys
*SECND
*YEAR
*MONTH
*DAY
62 *ERASE Erase logbook Press YES to clear logbook data
63-69 Not used
Code Display Function Function detail X Y Z Default values
General
70 *LOAD Load defaults Reset configuration to default values
71 *tH.CHK Half-time check Response check when washing Off 0 0 Off
Response check when washing On 1
72 *W. REV Wash reverse Long wash, short measuring time Off 0
Long wash, short measuring time On 1
73-78 Not used
79 *CUST.D Load Customer Reset configuration to default values
Defaults except buffer tables
pHGOOD SENSOR
AGED SENSORFault E11
DYNAMIC RESPONSE CHECK AFTER WASH
tw tR
thalf Time
7.0
4.5
2.0
Contact S3 is used to control the wash cycle.- Adjustable parameters :
Cleaning time or washing time (tw)Recoverytime after washing (tr)Interval time for wash cycleAn on-line dynamic response test of theelectrode can be activated after cleaning. In the example shown, within the “half-time” the pH should recover to more than4.5. Otherwise an error message E11 willoccur.
Fig 5-5. Chemical cleaning of sensors
IM 12B6B3-E-E
Parameter setting 5-33

Code Display Function Function detail X Y Z Default values
Test and setup mode
80 *TEST Test and setup Built in test functions as detailed in QIS
and Service Manual
5-3-9. Test and setup mode
Code 80 *TEST The test mode is used to confirm the instrument setup. It is based on the factorysetup procedure and can be used to check the QIC (factory generated testcertificate). To use this test feature it is necessary to have the detail provided onlyin the QIS (Quality Inspection Standard) or the Service manual.
NOTE: attempting to change data in service code 80 and above without the proper instructions andequipment, can result in corruption of the instrument setup, and will impair the performance of theunit.
IM 12B6B3-E-E
5-34 Parameter setting

Calibration 6-1
6. CALIBRATION
The EXA PH402 can be calibrated in three distinct ways.
6-1. Automatic calibrationThis method uses internally programmed buffer tables, from Service Codes 24, 25 and 26, to calculate thebuffer value at the actual temperature during the calibration. In addition, the stability of the reading isautomatically calculated, and when the reading has stabilized fully automatic adjustments of slope andasymmetry are made. This eliminates the question of how long the operator should allow prior toadjustment. A menu driven prompt system conducts the operator through the simple, foolproof routine.
Default settings for the buffer solutions are the standard NIST (formerly NBS) recognised solutions “4”, “7”and “9”. These are known as primary buffers. They have a much better buffer capacity than the“commercial” or adjusted buffers. Yokogawa strongly recommends the use of these buffers to provide thebest pH calibration.
6-2. Manual calibrationIn this method, the operator decides on the actual value to enter. Manual calibration is most often used forsingle-point adjustment of the asymmetry potential, by comparison method.
Manual calibration can also be used to perform a full 2-point calibration with solutions other than the NISTbuffers that are listed in the calibration tables. In this case, the solutions are applied sequentially as in theAUT CAL method, but the user determines the adjustment of reading and stability.
NOTE:During manual calibration the temperature coefficient is still active. This means that the readings are referredto 25 °C. This makes grab sample calibration easy and accurate. However, if the manual calibrationtechnique is used for buffer calibration, the temperature coefficient must be set to zero in maintenancemode in the “TEMP”routine (see chapter 5).
6-3. Sample calibrationThe operator activates the “SAMPLE” calibration routine, at the same time as taking a representativeprocess sample. After determining the pH of this sample by independent methods, (in the lab for example)the reading can be adjusted. While the sample is being analyzed, EXA holds the sample data in memory,while continuing to control and read pH normally.
6-4. Data entryIn special circumstances, users can directly enter the calibration data in the service code menu (see chapter5). This is appropriate where the manufacturer provides calibration data for each probe (as with the Pfaudlersensors) or where electrodes are laboratory calibrated for subsequent installation on the plant.Service Code 23 allows the values of ITP, asymmetry potential (or zero point) and slope to be entered.
IM 12B6B3-E-E

6-2 Calibration
pH
pH
YES NO
YES NO
YES NO
pH
YES NO
pH
NO
pH
YES
Press YES for single point(As Pot) adjustment.Press NO to proceed to calibrate Slope.
The instruments waits forthe reading to stabilize.(The pH display flashes)When reading Is stable,the CAL END messageappears.
Transfer to second buffer (pH4) and press YES.
After briefly displaying WAIT, the displayreturns to the normal readout.
The display now flashes thepH value. The instrumentwaits for the reading to stabilize.
NOYES
pHNOYES
pH
YES
MEASURE
MAN.CALDISPLAY
HOLD
NO MODEYES
ENT
YOKOGAWA
MODE
TEMPERATURE
AUT.CAL
pH
CONTACTS
S1
S2
WASH/S3
FAIL/S4
12B6B3-22
NOYES
pH
Automatic Calibration Press the MODE key. AUT.CAL appears in the display, and theYES/NO key prompt flags flash. Press YES.
NEW.SNS: Display flashes YES/NO answer YES if new sensor fitted or NO if not.
Care! YES resets logbook calibration data.
Insert the sensors in pH 7 buffer solution.Press YES to start calibration.
NO
Note: To start calibration with another solution, press NO to cycle through the other options. "CAL 7" NO "CAL 4" NO "CAL 9" NO "CAL 7"
YES
When the reading is stable, the CAL ENDmessage appears. Press YES.
After briefly displaying WAIT, the display returns tothe normal readout.
6-5. Calibration procedures
6-5-1. Automatic calibration
IM 12B6B3-E-E

Calibration 6-3
pH
HOLD
NOYES
pH
YES
pH
HOLD
YES NO
pH
HOLD
pH
HOLD
HOLD
pH
NO
YES
MEASURE
MAN.CALDISPLAY
HOLD
NO MODEYES
ENT
YOKOGAWA
MODE
TEMPERATURE
AUT.CAL
pH
CONTACTS
S1
S2
WASH/S3
FAIL/S4
12B6B3-23
NOYES
pH
HOLD
pH
YES NO
HOLD
pH
pH
HOLD
NOYES
NOYES
NOYES
NOYES
Automatic Calibration With Hold Active
Note: To start calibration with another solution, press NO to cycle through the other options. "CAL 7" NO "CAL 4" NO "CAL 9" NO "CAL 7"
The single-pointcalibrationis nowcomplete.put sensorsback in theprocess andpress NO toswitch offHOLD andreturn tomeasuringmode.
Transfer to pH 4buffer and press YES.
The instrument then waits for the readingto stabilize. (The pH display flashes).
When the reading is stable, the CAL ENDmessage appears. Press YES.WAIT flashes briefly then HOLD
The calibration is now complete. Put the sensors back in the processand press NO to turn off HOLD and return to the measuring mode.
NO
Press YES for single point(As Pot) adjustment.Press NO to proceed to calibrate Slope.
The instruments waits forthe reading to stabilize.(The pH display flashes)When reading Is stable,the CAL END messageappears.
YES
Press the MODE key. AUT.CAL appears in the display, and theYES/NO key prompt flags flash. Press YES.
NEW.SNS: Display flashes YES/NO answer YES if new sensor fitted or NO if not.
Care! YES resets logbook calibration data.
Insert the sensors in pH 7 buffer solution.Press YES to start calibration.
6-5-2. Automatic calibration with HOLD active
IM 12B6B3-E-E

6-4 Calibration
pH
NOYES
pH
NOYES
YES
NO
NOYES
pH
YES
pH
pH
NOYES
ENT
pH
pH
pH
pH
NOYES
Put sensors in buffersolution. Press YES.
Set the valueusing the >, , ENT key.
Select the flashing digit with the > key.
Increase its value by pressing the key.
When the correct value is displayed, press ENT to enter the change.
>
>
MEASURE
MAN.CALDISPLAY
HOLD
NO MODEYES
ENT
YOKOGAWA
MODE
TEMPERATURE
AUT.CAL
pH
CONTACTS
S1
S2
WASH/S3
FAIL/S4
12B6B3-24/a
pH
NOYES
Manual Calibration. (2nd parameter calibration) Press the MODE key. The legend AUT.CAL appears,and the YES/NO key prompt flags flash. Press NO.
The display MAN.CAL appears.Press YES to start calibration.
Press YES or NO at NEW.SNS prompt.
YES
NO
For 2 point (As Pot and Slope)Adjustment select second buffer
solution and adjust as for pH7 buffer.
NO
ENT
ENT
YESWAIT is displayedbriefly then EXA returnsto measuring mode.
6-5-3. Manual calibration (2nd parameter calibration)
IM 12B6B3-E-E

Calibration 6-5
YES NO YES NO
YES NO
pH
pH
ENT
YES NO
pH
YES NO
pH
NO
YES
YES NO
ENT
YES
Adjust valuewith >, , ENT Keys>
YES
YES
Return tomeasuring mode.
YES
YES
Return tomeasuring mode.
Adjust valuewith >, , ENT Keys>
12B6B3-24/b
NO
Manual Calibration ofzero point accordingto IEC 746-2
Manual Calibration of mVoffset for ORP (2nd parameter).Where both pH and ORP (or rH)are measured, the offset (Asymmetrypotential) of the second parameteris calibrated as shown below.
IM 12B6B3-E-E
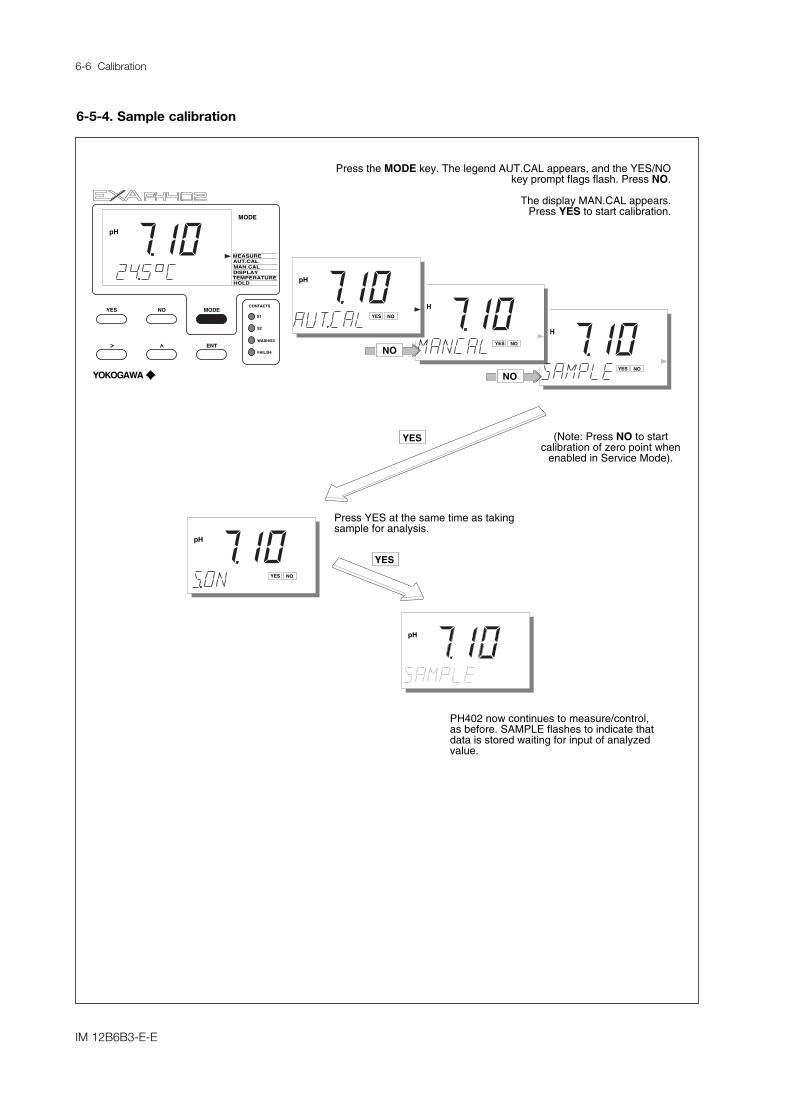
6-6 Calibration
pH
NOYES
NOYES
pH
pH
pH
NOYES
MEASURE
MAN.CALDISPLAY
HOLD
NO MODEYES
ENT
YOKOGAWA
MODE
TEMPERATURE
AUT.CAL
pH
CONTACTS
S1
S2
WASH/S3
FAIL/S4
12B6B3-16
pH
NOYES
Sample Calibration. Press the MODE key. The legend AUT.CAL appears, and the YES/NOkey prompt flags flash. Press NO.
The display MAN.CAL appears.Press YES to start calibration.
NO
YES
NO
YES
(Note: Press NO to startcalibration of zero point when
enabled in Service Mode).
Press YES at the same time as takingsample for analysis.
PH402 now continues to measure/control,as before. SAMPLE flashes to indicate thatdata is stored waiting for input of analyzedvalue.
6-5-4. Sample calibration
IM 12B6B3-E-E

Calibration 6-7
pH
NOYES
pH
NOYES
MAN.CAL
YES
ENT
pH
pH
NOYESYES
pH
NOYES
YES
MAN.CAL
pH
NOYES
pH
Set the valueusing the >, , ENT key.Select the flashing digit with the > key.Increase its value by pressing the key.When the correct value is displayed,press ENT to enter the change.
>
>
Press YES to returnto the measuring mode.
MODE
NO
pH
When the laboratory analysis is completedthe data is entered by first pressing MODE
Note: Display nowshows the same valueas at the time of takingthe sample.
Put sensors in buffersolution. Press YES.
ENT
YES
IM 12B6B3-E-E

IM 12B6B3-E-E
7-1 Maintenance
7. MAINTENANCE
7-1. Periodic maintenance for the EXA PH402 converterThe PH402 transmitter requires very little periodic maintenance. The housing is sealed to IP65 (NEMA 4X)standards, and remains closed in normal operation. Users are required only to make sure the front windowis kept clean in order to permit a clear view of the display and allow proper operation of the pushbuttons. Ifthe window becomes soiled, clean it using a soft damp cloth or soft tissue. To deal with more stubbornstains, a neutral detergent may be used.
NOTE: Never used harsh chemicals or solvents . In the event that the window becomes heavily stained orscratched, refer to the parts list (Chapter 9) for replacement part numbers.
When you must open the front cover and/or glands, make sure that the seals are clean and correctly fittedwhen the unit is reassembled in order to maintain the housing’s weatherproof integrity against water andwater vapor. The pH measurement uses high impedance sensors and may otherwise be prone to problemscaused by exposure of the circuitry to condensation.
The EXA instrument contains a lithium cell to support the clock function when the power is switched off.This cell needs to be replaced at 5 yearly intervals (or when discharged). Contact your nearest Yokogawaservice centre for spare parts and instructions.
7-2. Periodic maintenance for the sensor system
NOTE: Maintenance advice listed here is intentionally general in nature. Sensor maintenance is highly applicationspecific.
The sensor system must be kept clean to function well. This may require regular cleaning of the electrodes.(The effect of dirty electrodes will be to slow the system response and perhaps corrupt the measuring loopentirely). The frequency of cleaning and the method of cleaning will depend entirely on the process.
Where a refillable (flowing electrolyte) reference system is employed, make sure that the reservoir is kepttopped up. The rate of electrolyte consumption will again be process dependent, so experience will showhow often you must refill.
The periodic recalibration of the sensor system is necessary to ensure best accuracy. This takes intoaccount the aging of the sensors, and the nonrecoverable changes that take place. These processes areslow, however. If frequent recalibration is needed, it is usually because the cleaning process is not effective,the calibration is not well executed or the pH readings are temperature dependent. Monthly calibrationsshould be sufficient for most applications.
If a film remains on the pH sensor after cleaning, or if the reference junction is partly plugged, thenmeasuring errors can be interpreted as a need for recalibration. Because these changes are reversible withcorrect cleaning and/or proper selection or adjustment of the electrolyte flow through the junction, makesure that these items are correct before recalibrating the system.

Maintenance 7-2
Calibration procedures are described in step-by-step detail in chapter 6. However, follow these guidelines.
1. Before starting a calibration, make sure the electrode system is properly cleaned so that electrodes arefully functional. They must then be rinsed with clean water to avoid contamination of the calibrationsolution.
2. Always use fresh buffer solutions to avoid the possibility of introducing errors from contaminated or agedsolutions. Buffers supplied as liquids have a limited shelf life, especially alkaline buffers which absorbCO2 from the air.
3. Yokogawa strongly recommends NIST (primary) buffer standards in order to ensure the best accuracyand best buffer capacity is available. Commercially adjusted buffers (e.g. 7.00, 9.00 or 10.00pH) are acompromise as a standard, and are often supplied without the temperature dependency curve. Theirstability will be much worse than for NIST solutions.
NOTE: NIST (formerly NBS) buffers are available as consumable items from any Yokogawa sales office under thefollowing part numbers:
6C232 4.01 pH at 25°C6C237 6.87 pH at 25°C A box contains 5 packets of powder. Each makes a 200 ml solution.6C236 9.18 pH at 25°C
6C231 6C232 6C234 6C236 6C237
IM 12B6B3-E-E

8-1 Troubleshooting
8. TROUBLESHOOTING
The EXA PH402 is a microprocessor-based analyzer that performs continuous self-diagnostics to verify thatit is working correctly. Error messages resulting from faults in the microprocessor systems itself are few.Incorrect programming by the user can be corrected according to the limits set in the following text.
In addition, the EXA PH402 also checks the electrodes to establish whether they are still functioning withinspecified limits. The transmitter checks the glass-electrode impedance for a low value to determine if it isbroken or cracked, and for a high impedance to check for internal breakage or disconnection.
The reference system is prone to more faults than the glass electrode in general. The unit measures theimpedance value and compares it to the programmed value in memory to determine acceptance duringtesting. A high impedance signals pollution or poisoning of the reference electrode diaphragm.
Also, the EXA PH402 checks the electrodes during calibration to determine if the reaction time is suitable forpH measurement. A specially timed check can be activated following each cleaning cycle. After calibration,the unit checks the calculated asymmetry potential and the slope to determine if they are still within limitsspecified by the software.
The slow shift of asymmetry potential could signal a poisoning of the reference electrode system by theprocess. The decrease of slope equals a decrease of sensitivity of the glass electrode or can show acoating buildup at the electrode.
The EXA PH402 makes a distinction among diagnostic findings. All errors are signaled by the FAIL area inthe display. Only faults in the measuring circuits activate the FAIL contact switching.
What follows is a brief outline of some of the EXA PH402 troubleshooting procedures, followed by adetailed table of error codes with possible causes and remedies.
NOTE:The diagnostic function of the PH402 gives a variable time interval between impedance checks, up to 5minutes. When trouble shooting, a manual impedance check can be initiated by following the procedure insection 5-1-6.
IM 12B6B3-E-E

Troubleshooting 8-2
8-1. Diagnostics
8-1-1. Off-line calibration checksThe EXA PH402 transmitter incorporates a diagnostic check of the asymmetry potential after a calibrationhas been completed. This is a valid check for both manual and automatic calibration routines.
The actual value can be called up from the DISPLAY routine in the maintenance menu. A large value oftenindicates a poisoning or pollution of the reference system used. If the asymmetry potential exceedsprogrammable limits, the EXA PH402 generates an error (E2).
The EXA PH402 also performs diagnostics to check for the slope of the pH electrode after automaticcalibration is completed. The actual value of the slope can be called up on the DISPLAY routine in themaintenance menu (SL). This value is an indication of the age of the electrode. If the value stays within thelimits of 70 to 110 percent of the theoretical value (59.16 mV/pH at 25°C), it is accepted. Otherwise, theunit generates an error (E3).
Activation or deactivation of the asymmetry diagnostic check and slope check is made from the ServiceCodes. See Chapter 5 or Chapter 10 (Appendix).
8-1-2. On-line impedance checksThe EXA PH402 has a sophisticated impedance checking system. The sensors can be checked for theirimpedance over a very wide range, which makes the tool equally useful for glass, enamel, reference andmetal (ORP) sensors. The measurement is temperature compensated for the characteristic of the pH glasssensor.
In order to measure accurately over such a wide range, it is necessary to split the range into two. This isdone by a pair of jumper settings, high range and low range can be set on either input, making the systemextremely flexible.
The following error message table gives a list of problems that are indicated when the high or lowimpedance limits are exceeded for a sensor. Such things as fouling, breakage and cable faults are readilydetected. The non-immersion of the sensors in the process fluid is also signalled.
IM 12B6B3-E-E

9-1 Spare parts
9. SPARE PARTS
Table 9-1. Itemized parts listItem No. Description Part no.
1 Cover assembly including gasket and 4 fixing screws (M4 x 20) K1541JG
2 * Digital / display board K1543DB
3 EPROM (programmed memory chip) + latest software K1543BK
4 Protective cover for power terminal complete with fixing screw K1541JH
5 * Input and power board (230 VAC) K1543PE
Input and power board (115 VAC) K1543PG
Input and power board (100 VAC) K1543PN
Input and power board (24 VDC) K1543PL
6 Fuse holder K1543AA
7 EXA 402 case K1541JJ
8 Fuse (box of 10 pieces) for 230 V AC (250 V AC, 50 mA, T) K1543AK
Fuse (box of 10 pieces) for 115 V AC and 100V AC (250 V AC, 100 mA, T) K1543AL
Fuse (box of 10 pieces) for 24 V DC (250 V AC, 1 A, T) K1543AM
9 Cable gland set (one gland including seal and backing nut) K1500AU
10 Flat cable K1543AB
11 Securing screw set K1543AC
12 Hingepin K1543KS
13 Lithium cell (battery) K1543AJ
14 RS485/232 Converter for communication to PC K1543WM
Options
/U Pipe and wall mounting hardware K1542KW
/PM Panel mounting hardware K1541KR
/SCT Stainless steel tag plate K1543ST
* NOTE: Contact your nearest Yokogawa service centre for the procedure for changing items 2 and 5.
(Re-initialisation of the instrument).
1
2
3
4
5
6
7
12 10
11
8 9
13
Fig. 9-1. Exploded view
IM 12B6B3-E-E

Appendix 10-1
10. APPENDIX
10-1. User setting table
FUNCTION SETTING DEFAULTS USER SETTINGS
Parameter specific functions
01 *PH.ORP 0 pH
02 *PRM2 0 Off
03 *Z1.CHK 1.1.1 High range, TC on
check on
04 *Z2.CHK 0.0.1 Low range, TC off
check on
05 *CAL.CK 1.1 AP on, Slope on
Temperature functions
10 *T.SENS 0 Pt1000
11 *T.UNIT 0 °C
12 *T.ADJ None
13 *T.COMP 0 Off
*T.COEF - 0.0 pH/10°C
Calibration functions
20 *∆t.SEC 5 Sec
*∆pH 0.02 pH
21 *AP.LOW -120 mV
*AP.HI 120 mV
22 *SL.LOW 70 %
*SL.HI 110 %
23 *ITP 7.00 pH
*SLOPE 100.0 %
*ASP.1D 0.0 mV
*ASP.mV mV
24 *BUF.ID 4 NIST 4
25 *BUF.ID 7 NIST 7
26 *BUF.ID 9 NIST 9
27 *ZERO,P 0 disabled
mA outputs
30 *mA 1.1 both 4-20mA
31 *OUTP.F 0.2 pH (ORP) & Temp.
*D/R 0 Reverse (control)
32 *BURN 0.0 both off
33 *RG.mA2 prop band only for PI control
34 *tI.mA2 integ. time only for PI control
35 *TABL1 21 pt table see code 31
36 *TABL2 21 pt table see code 31
IM 12B6B3-E-E

10-2 Appendix
FUNCTION SETTING DEFAULTS USER SETTINGS
Contacts
40 *S1 2.0.0
41 *S2 1.0.0
42 *S3 4.0.0
43 *S4 4.0.0
44 *D.TIME 0.2 sec.
*PH.HYS 0.1 pH
45 *RANGE 1 pH
*PER 10 sec
*FREQ 70 p/min
46 *tI.CNT 100 sec
47 *EXPIR 0 off
*tE 15 min
User interface
50 *RET 1 on
51 *MODE 0.0 both off
52 *PASS 0.0.0 all off
53 *Err.4.1 1 hard fail
*Err.5.1 1 hard fail
*Err.4.2 1 hard fail
*Err.5.2 1 hard fail
*Err.07 1 hard fail
*Err.08 1 hard fail
*Err.09 1 hard fail
*Err.11 0 hard fail
*Err.16 0 hard fail
*Err.22 0 soft fail
*SOFT 0 LCD + Fail contact
55 *CALL.M 0 250 days
56 *DISP 1 0.01 pH
Communication
60 *COMM. 0.1 off/write prot.
*SET. 3.1 9600/odd
*ADDR. 00 00
61 *HOUR set time and date
62 *PASS 0.0.0 all off
General
70 *LOAD reset defaults
71 *tH.CHK 0 off
72 *W. REV 0 off
79 *CUST.D
Test and setup mode
80 *TEST
IM 12B6B3-E-E

Appendix 10-3
10-2. Configuration checklist for PH402G
Standard Configuration Options Reference forchange
Measured Variable(s)primary inputs pH, ORP and TemppH range 0-14 pH any span within -2-16 pH "range"pH range linearized disabled 21 point table codes 31& 35ORP range -500 to 500 mV spans up to 3000mV between "range"
-1500 to 1500mVTemperature range -30-140°C any span over 25°C "range"Temperature unit Celsius Fahrenheit code 11mA Outputsanalog output 4- 20 mA for pH 0- 20 mA or 4- 20 mA code 30second output 4- 20 mA for Temp 0- 20 mA or 4- 20 mA code 30output allocation pH and Temp pH, ORP, Temp, Table, PI cont code 31output linearization disabled pH/ORP codes 35 & 36Contact outputscontact outputs S1= high at 14 pH (4) freely programmable "setpoint"
S2= low at 0 pH code 40. 41, 42, 43S3= WASH S4= FAIL
contact allocation pH & FAIL pH, temp, ORP, rH, code 40- 43wash, PI control, HOLD, FAIL
contact variables dead time= 0.2 s; hyst= 0.1pH time: 0- 200 s; hyst 0- 16 pH code 44add. contact functions none time out alarm code 47control functions none PI on contacts or mA output code 45, 46, 34, 33digital Outputs none RS485 code 60Communicationdigital interface disabled RS485 code 60communication software external PC402 contact factoryvariables on display pH and temp pH, ORP, rH mA1, mA2, "display"
SL, AP, Z1, Z2 etc.burn out disabled burn low (3.5)/ high (22) on mA1/ mA2 code 32password protection disabled for maint/ comm./ serv level code 52autoreturn return to measure in 10 min. enable or disable code 50add. functions in MAINT disabled wash start/ setpoints/ Imp. chk. start code 51Diagnosticsimpedance checking active enable or disable code 03 & 04check on calibration data active enable or disable code 05check on stability 0.02 pH per 5 s choose stability level code 20response check disabled enable or disable code 71man. imp. check enabled manual start “maint”CompatibilitypH or ORP glass sensor/metal electrode pH or ORP code 01temperature sensor Pt 1000Ω Pt1000; Pt100, etc code 10other sensors enamel sensors (Pfaudler) impedance check setup codes 03 & 042nd parameter disabled pH & ORP/ pH &rH code 02manual temp. comp. disabled disable or enable "temp"Special Featuresbuffer table configuration NIST standard fully configurable codes 24, 25 & 26temperature calibration none adjustment +/- 20 °C code 12zero point calibration disabled disable or enable code 27sensor washing disabled interval 0.1 - 36 hours/time 0.1 - 10 min “wash”call for maintenance set time interval 1 - 250 days code 55HOLD during maintenance hold last or hold fix “hold”contact during HOLD possible on S1, S2 or S3 code 40 - 42process temp. compensation disabled set temperature coefficient code 13soft fail alarm disabled possible for E1 .. E9, E12, E22 code 53logbook disabled 2 x 50 events code 61, 62
IM 12B6B3-E-E

10-4 Appendix
10-3. Setup for sensor compatibility
10-3-1. GeneralThe inputs of the EXA transmitter are freely programmable for ease of installation. Standard glass pHelectrodes, Ag/AgCl reference electrodes and Pt100 and Pt1000 temperature sensors need no specialprogramming. The EXA indicates a fault with a signal in the display field if there is a mismatch of sensors inthe connection.
10-3-2. Selection of measurement and reference electrodeThe EXA PH402 is pre/programmed to accept industry standard glass electrodes and reference electrodes.The unit initiates checks for asymmetry and slope during calibration. The on-line impedance checkingfunction has been upgraded in this most recent EXA release.
The EXA is universally compatible with all types of electrodes, such as enamel and antimony. In suchsystems, however, the specific isothermal point of intersection (ITP), slope (pH/mV) and asymmetry potentialcan be set for the type of electrode.
10-3-3. Selecting a temperature sensorThe EXA PH402 reaches its highest accuracy when used with the Pt1000 temperature sensor. This elementoffers a 10-fold increase in resistance dependence over the Pt100 sensor. Choice of temperature sensor ismade in the Service Codes found in Chapter 5 and Chapter 10 (Appendix) of this manual.
l ITPMost Yokogawa sensor systems use an Iso-thermal point (ITP) of pH7 and a zero point at pH7. This isthe default condition for which the transmitter is set. It is only necessary to consider this adjustmentwhen installing a system with a different ITP. Antimony systems and Pfaudler probes are good examplesof systems with different ITP values. Service code 23 is used. This also permits the setting of calibrationdata for precalibrated sensors.
l Temperature sensorThe Pt 1000Ω RTD sensor is now becoming the most commonly used for temperature compensation.The transmitter accepts inputs from several different temperature sensors to suit most sensor systems.Service code 10-19 are used to set the temperature parameters and the process temperaturecoefficient.
l Temperature calibrationFor best accuracy, the temperature sensor should be calibrated to compensate for connection cableerrors. See Service code 12.
l pH CalibrationTraditionally, users select buffer solutions to suit the chosen output range. This is merely a continuation ofthe days of analog instruments that used indicators driven by the mA output. With digital technology, it isbetter to choose good buffer solutions and make an effective calibration than to use commercial(adjusted) buffers which may have round number values, but are less effective buffers with lower buffercapacity. It is for this reason that Yokogawa recommends that the NIST 4, 7 and 9 standard buffers beused to calibrate solutions. The temperature responses of these are pre-programmed into Service codes24, 25, and 26 in the EXA PH402. Where other buffers are used with the semi-automatic calibrationfunction, their temperature response should be programmed into the relevant code.
IM 12B6B3-E-E

Appendix 10-5
10-4. Setup for other functionsl Contact Outputs
Alarms, trips, and proportional control are all possible with the relay outputs, and configuration is byService codes 40-49. In addition, FAIL alarm and wash cycle controller are available.
l Current outputsTransmission signals for the measured parameters and control signals can be set up in service codes 30to 39.
l Wash cleaningWhen used with the correct hardware, the EXA can control a wash cleaning system. Refer to servicecodes 40, 71 and 72.
l Diagnostic ChecksImpedance checks, response time and stability checks are all included in the PH402. In order to get thebest performance from each of these features, the converter should be fine tuned according toexperience in the installation, and for the particular sensors selected. Service codes 3, 4, 5, 20 & 71 allcontribute to the diagnostics. Please note that the default settings provide an excellent starting point andprovide most valuable information about the performance of the electrode system.
l CommunicationsThe proprietary HART RS485 communication link allows remote configuration and data retrieval throughthe PC402 communication package. This is an excellent tool for the maintenance engineer, qualityengineer or plant manager. Service codes 60-69 are used to set up the communications.
l LogbookIn combination with the communications link, a “logbook” is available to keep an electronic record ofevents such as error messages, calibrations and programmed data changes. By reference to this log,users can easily evaluate diagnostic information to determine predictive maintenance schedules. Forexample, by monitoring the deterioration in the slope of the pH sensor, it can be changed before a failure(or process shutdown) occurs.
IM 12B6B3-E-E

10-6 Appendix
10-5. Set up for Pfaudler Type 18 sensor
The PH402 is intended to measure with all sorts of pH sensors, including the Pfaudler Type 18 sensor. ThePfaudler design of dual membrane system uses two enamels of differing sensitivity. The first a pH sensitivemembrane, and the second one that responds to Na+ and K+ and acts as a reference.
The analyzer has dual high impedance inputs which measure perfectly even with very high impedancesensors. However, the impedance measuring system (diagnostics) needs to be set up for best performance.
10-5-1. General set up
1. Set impedance measuring hardware. This is done by the use of links on the terminals adjacent to theinput terminals. For the Pfaudler system, this means that the terminals should have the linksdisconnected in order to set for HIGH/HIGH impedance measuring.
2. Set the impedance check in software. Use codes 03 & 04 to enable the measurement and set for highimpedance and configure appropriate limits.
Code 03 set to 1.0.1 Iow limit 1 Megaohmhigh limit 1 Gigaohm
Code 04 set to 1.0.1 Iowlimit 1 Megaohmhigh limit 1 Gigaohm
3. Set the temperature compensation sensor as 100 Ohm Platinum RTD with service code 10.
Code 10 set to 1 100 Ohms Pt.
The system will now respond properly to the Pfaudler type 18 sensor, and the other functions of the EXAanalyzer will need to be set in the normal way to suit the use to which the loop is being put. Output ranges,control functions and alarms should all be set as described elsewhere in this manual.
10-5-2. Calibration set up
4. The alternative Zero point (calibration and display) according to IEC 746-2 may be enabled in servicecode 27, and set in the MAN.CAL routine. A value of 10.5 pH is a good starting point for the Pfaudler 18sensor.
5. Where lab test data are available for the sensor, service code 23 can be used to set values for ITP &Slope (and As pot for parameter 2 when enabled).
(This method can be useful for the type 18 sensor, as it is not usual to perform regular calibrations on thissystem as with normal sensors. This is because the system may well respond differently, to ordinary buffers,than with the process solutions. The procedure is to determine the temperature response (ITP) and thesensitivity (Slope) of the sensor, and enter these values in code 23.)
Because this is a rather complex procedure, it is recommended instead to use the default settings of ITP =7.00, and Slope = 100 %, and make a single point (MAN.CAL) calibration in the process at the workingtemperature, and at the normal operating (control setpoint) pH. This ensures that the desired control pointwill be measured accurately, even if there may be small deviations when there is a big deviation from thesetpoint. This of course has no effect on the accuracy of a control loop. The special construction of thePfaudler sensor ensures that there is practically no drift in the calibration. All that is necessary is to keep thesensor membranes clean. This is best done by cleaning with low pressure steam, which restores the originalcondition of the sensor, including the original calibration values.
IM 12B6B3-E-E

Appendix 10-7
10-6. Software historySoftware changes of the PH402
• Changes made by software release 1.1- In the PH402 the limits for the impedance measurement can be set-up in service-code 3 and 4. When the
measured impedance value goes beyond these limits, an impedance to low/high error is generated andtheSet-up limit value is displayed. More convenient is to measure beyond these limits and show the measuredvalue all the time.
• Changes made by software release 1.2- When was function is started automatically, at the end of the wash function the question HOLD yes/no
was displayed and the instrument was waiting 10 minutes in HOLD. In release 1.2 the HOLD isautomatically switched off after the wash function is completed.When the hardware limits for the impedance measurements are reached, the text Z1/2.LOW/HIGH isdisplayed instead of displaying the limit value.Reset problem during 3rd pH-buffer programming (SC26) is solved.In case of pH device with second parameter ORP-measurement enabled (SC02), the instrument returnedwith an inverted ORP value. Calculation updated in this release.New temperature sensors are added (in combination with a future new analog board). Hence theinitialization procedure for PH402 is changed starting with software 1.2
• Changes made by software release 1.3- Normally an E20 error indicates that programmed data is lost and no longer valid.
In software versions 1.0, 1.1 and 1.2 an E20 error might occur wrongly; the contents of the EEpromis still correct.This error happened arbitrary just after starting up the PH402. The reason is a softwarebug which is solved in version 1.3 .
The next features are added concerning mA1/2 output and contacts 1..4:-mA2: PI control is now also available on ORP of 2nd parameter; this used to be available only for
rH.-mA1: linear output on 2nd parameter is transferred from the menu of mA2 output to the menu of
mA1 output. -Contacts 1..4: alarm is now also available on ORP of 2nd parameter; this used to be available only for rH.
PI control is now also available on ORP of 2nd parameter; this used to be available only forrH.
After every wash cycle an impedance measurement will be performed now.
• Changes made by software release 1.4- If something goes wrong during autocalibration or manual calibration, an E0, E1, E2 or E3 error will be
generated. In software release 1.3 and below, the error was set as a soft fail error which could only becleared by a new, correct calibration. In version 1.4 the error is displayed as a message only; afterpressing the YES,NO or MODE key, the error message will be erased.
- The rH calculation was wrong in version 1.3 and below, because of a polarity fault. In release 1.4 it hasbeen corrected.
- An E12 error indicates that the second process value (ORP/rH) exceeds its limits. In version 1.3 andbelow, the E12 error could be generated even when the second process value was disabled.In release 1.4, no E12 error will occur anymore if the second parameter is disabled.
- In release version 1.3 and below, scrolling through logbook was only available when pincode wasinstalled. In release 1.4 logbook scrolling is always available, independent of pincode.
- Upgrading of communication software.
IM 12B6B3-E-E

10-8 Appendix
• Changes made by software release 1.5In release 1.3 sometimes a spike on the current output occurs. The repetition rate is very low (each weekonce or twice) and irregular. In release 1.5 this problem is solved.REMARK: this new version is based on release 1.3 and therefore does not have the functionality of release1.4.
• Changes made by software release 1.6- In version 1.6 the new functions of 1.4 and 1.5 are combined.
• Changes made by software release 1.7- The software version 1.7 for the PH402 is functional identical to the software version 1.6, only small
software changes for production improvement have been done.
• Changes made by software release 1.8- The rH calculation was incorrect. There was a sign-error in the calculation formula. Also a 304mV offset
voltage has been added in the calculation to make it right for a modern sensor. The rH calculation iscorrect now for a pH sensor with a buffer solution of pH 7 and an Ag/AgCl/KCl reference system. Theold calculation was based on a sensor with a buffer solution of pH 1 (with HCl reference system).
- The instrument locked up when entering a wrong password.- When manual temperature is active and HIF is entered, the manual value is showed for all temperature
sensors.- To improve EEPROM integrity the PEN (Program Enable) Pin is only enabled when there is an write-
command to the EEPROM - Sample calibration is not correct when the Temp. Comp. <> 0. The offset due to the T.C. is wrongly
processed as a calibration correction.
• Changes made by software release 1.9- Sensor check is switched OFF now during the start of CAL to prevent an unclear situation for the
customer.
• Changes made by software release 2.0- Service code 79 added for loading all defaults except pH buffer tables.- No longer PIN needed for PI, communication and logbook scrolling.- Select in service code 53 to do/don’t toggle the failcontact periodically in case of a softfail.- Default *T.COEFF changed from 0.00 into -0.00. - 10k PTC added
• Changes made by software release 2.1- Bug fixed in configuring contact S4 as control contact.
• Changes made by software release 2.2- E20 is cleared after the programmed data was recovered.
• Changes made by software release 2.3- Prevent incorrect values in case open temperature input and manual temperature setting.
• Changes made by software release 3.0- The maximum ORP span is set to 3000mV (was 2000mV).
• Changes made by software release 3.1- Communication is enable as a factory default setting.
• Changes made by software release 3.2- Added manual impedance check setting through HART command S1.- Maximum value for high impedance setting raised to 2 GΩ.
IM 12B6B3-E-E

Glossary
GLOSSARY
pH (-log [H+] ) This is a logarithmic function of the Hydrogen ion activity (concentration). Thisprovides a quick indication of the acidic or alkaline behavior of a dilute solution.Normally measured on a scale of 0-14 pH where low numerical values are acidic (0is approximately 1 Normal acid) and high numbers are alkaline (14 is approximately1 Normal NaOH). The neutral point is pH 7.Defined by Nernst in the following equation: E = Eo + RT/nF x Ln [H+]E = measured potential R = gas constantT = absolute temperaturen = valenceF = Faraday numberLn = Napierian logarithm[H+] = activity of the Hydrogen ionEo = Reference potential
ORP Oxidation reduction potential is a measure of oxidizing power of a solution. Thegreater the milliVolt value with a negative polarity, the greater the oxidizing power.Reducing power is indicated by positive values of mV.
rH This is a composite value that indicates the oxidizing power of a solutioncompensating for the influence of the acid or alkaline components. The scale is 0-55 rH, where oxidizing solutions provide the highest readings.
Asymmetry potential This is the difference between the isothermal point of intersection and the zeropoint.
Slope This is the sensitivity of the pH electrode (mV/pH) usually expressed as a % of thetheoretical value (Nernst).
ITP This is the isothermal point of intersection. This is the value in pH at which thetemperature response of the system is at a null point. In other words, the point ofintersection of the temperature lines on a graph of millivolts vs pH. This point iscritical to the correct operation of the temperature compensation circuitry.
Zero point This is the value of pH at which the electrode combination yields 0 mV as anoutput.
pH
mV
ITP
As pot
0 mV
0 ºC
10 ºC
25 ºC
12B6B3-12ASYMMETRY POTENTIAL
mV
500
0
- 20014
pHITP Zero Point0 7
IM 12B6B3-E-E

Error CodesCode Error description Possible cause Suggested remedy
E0 Buffer solution temperature Buffer solution too hot or too cold Adjust buffer temperature
outside the range 0- 50°C Check cabling
E1 Measurement failed to stabilize . Sensors fouled Clean sensors
during the calibration Sensors too slow (aged sensor) Replace sensors
E2 Asymmetry potential too high. Sensors are aged or polluted Check buffer solution
(Limits set in service code 21.) Mistake in calibration Recalibrate at pH7
Replace sensor
E3 Slope (sensitivity) is outside limits. Measuring sensor aged Replace measuring sensor
(Limits set in service code 22.) Poor insulation at the connector Replace or dry cables
E4.1 Impedance of input 1 too low. Measuring sensor broken Replace measuring sensor
(Limits set in service code 03.) Damaged or damp connections Replace or dry cable
E4.2 Impedance of input 2 too low. Reference sensor broken Replace reference sensor
(Limits set in service code 04.) Damaged connections Replace cables
E5.1 Impedance of input 1 too high. Measuring sensor disconnected Check connections
(Limits set in service code 03.) Sensors not immersed in process Check process
Liquid earth disconnected Check connections
E5.2 Impedance of input 2 too high. Reference sensor fouled Clean or replace sensor
(Limits set in service code 04.) Liquid earth disconnected Check sensor immersion
Insuffiicent electrolyte Check electrolyte reservoir
E7 Measured temperature too high>140 °C Process too hot Check process
Wrong temperature sensor setting Check sensor & setting
Temperature sensor damaged Check connections
E8 Measured temperature too low <-30 °C Process too cold Check process
Wrong temperature sensor used Check sensor & setting
Temperature sensor damaged Check connections
E9 Measurement out of range (-2 to 16 pH) Sensors disconnected Check cabling
Sensor wrongly connected Check cabling
Sensor(s) defective Replace sensor(s)
E10 EEPROM write failure Fault in electronics Try again, if unsuccessful
contact Yokogawa
E11 Wash response time check failure. Measuring sensor aged Replace measuring sensor
Half-value recovery time too long. Sensor still coated after washing Check cleaning system
Defective wash system if needed adjust timings
E12 ORP / rH outside of preset limits Sensors disconnected or wrongly Check cabling
connected
E14 No valid calibration data. Data lost after switching from Recalibrate
pH to ORP
E15 Cable resistance to temperature Cable resistance too high Use Pt1000Ω
sensor exceeds limits. Corroded contacts Clean and reterminate
Wrong sensor programmed Reprogram
E16 Call for maintenance interval time exceeded. System not maintained in Perform maintenance
preset time period Reset interval
E17 Output span too small <1pH or <50 °C/°F Incorrect configuration by user Reprogram
E18 Table values make no sense
E19 Programmed values outside acceptable limits Incorrect configuration by user Reprogram
E20 All programmed data lost Fault in electronics Contact Yokogawa
Very severe interference
E21 Checksum error Software problem Contact Yokogawa
E22 Alarm activation time exceeded Process control not effective Check control equipment
within set time. Adjust value in code 47
E23 Zeropoint outside limits Sensors are aged or polluted Check buffer solution
Mistake in calibration Recalibrate at pH7
Replace sensor
IM 12B6B3-E-E

IM 12B6B3-E-E
Radiumweg
YOKOGAWA Databankweg 203821 AL AmersfoortThe Netherlands
QIS 12B6B3-E
1st Edition May 1996
1. Introduction
This inspection procedure applies to the model PH402 microprocessor based converter. There is a serialnumber, unique to the instrument which is stored in non-volatile memory. Each time the converter is poweredup, the serial number is shown in the display. An example is shown below:
Unique Number
025F70.00
Line NumberATE (automatic test equipment no.)Month codeYear code
2. General
Final testing begins with a visual inspection of the unit to ensure that all the relevant parts are present andcorrectly fitted.
3. Insulation Test
During the production testing procedures, the insulation is tested between terminal 3, the supply earth, andpower terminals 1 and 2. The test used applies the following criteria:AC instruments - 2.1 kV DC, <1 mA, for >1 min.DC instruments - 0.7 kV DC, <1 mA, for >1 min.
The outputs are also tested for isolation from earth ≥10 MΩ.
4. Accuracy Testing
The automated checks in service code 80 are used in this procedure. This automatically sets the outputranges to 0-14 pH and switches off the process temperature compensation. Temperature measurement is set
to display in °C. Calibration data are also reset to 100% slope and 0 mV As. Pot. (Note: all setting are restoredwhen the test mode 80 is completed.)The test equipment needed is :
1. A resistance box of 0.1 Ω - 100 kΩ, accuracy 0.1% for temperature sensor simulation.
2. A 300 Ω resistor, accuracy 1% for mA output load resistor.3. A millivolt source ranging from -1500 to +1500 mV with an accuracy of 0.1%.4. A power supply to suit the converter (100 VAC, 115 /230 VAC or 24 VDC)5. A mA meter with a range of 25 mA and an accuracy of 0.1% and a resolution of 1 µA.6. A multimeter capable of measuring megohm ranges to check insulation impedance.7. Screened cable to connect the input signals.8. Single core flexible cable for liquid earth connection.
QualityInspectionStandard
EXA SeriesModel PH402GConverter for pH / ORP
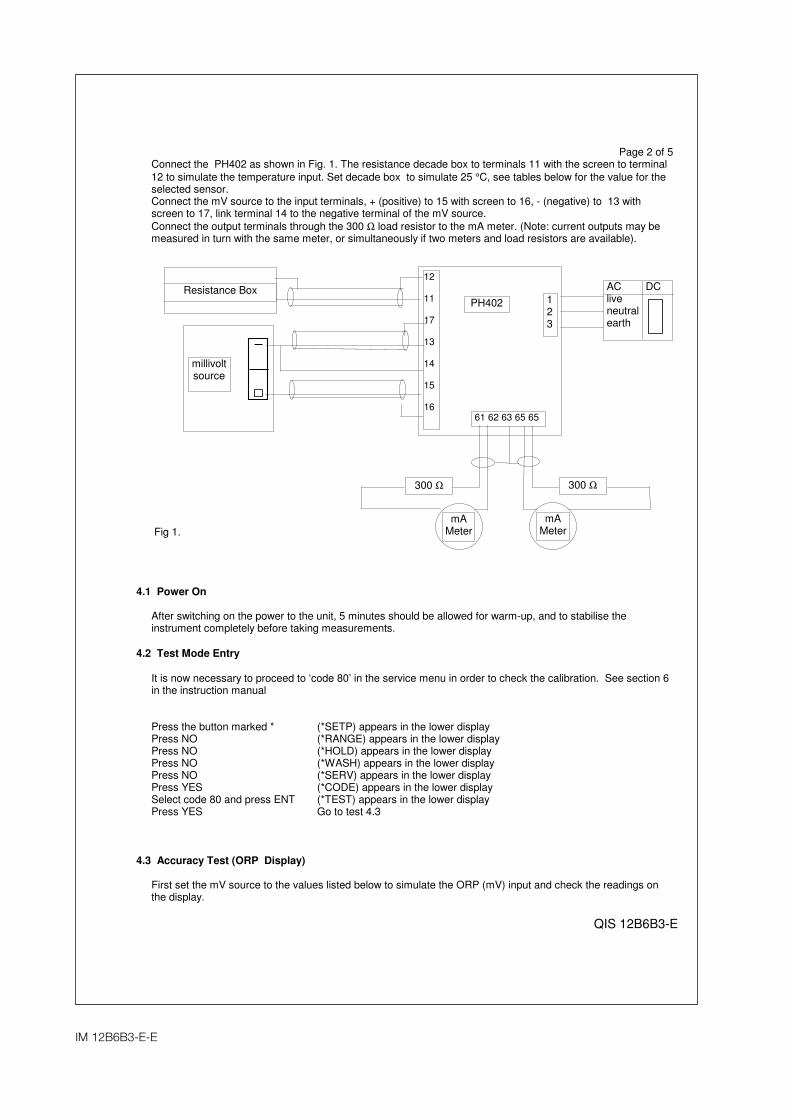
IM 12B6B3-E-E
Page 2 of 5
QIS 12B6B3-E
Connect the PH402 as shown in Fig. 1. The resistance decade box to terminals 11 with the screen to terminal
12 to simulate the temperature input. Set decade box to simulate 25 °C, see tables below for the value for theselected sensor.Connect the mV source to the input terminals, + (positive) to 15 with screen to 16, - (negative) to 13 withscreen to 17, link terminal 14 to the negative terminal of the mV source.
Connect the output terminals through the 300 Ω load resistor to the mA meter. (Note: current outputs may bemeasured in turn with the same meter, or simultaneously if two meters and load resistors are available).
4.1 Power On
After switching on the power to the unit, 5 minutes should be allowed for warm-up, and to stabilise theinstrument completely before taking measurements.
4.2 Test Mode Entry
It is now necessary to proceed to ‘code 80’ in the service menu in order to check the calibration. See section 6in the instruction manual
Press the button marked * (*SETP) appears in the lower displayPress NO (*RANGE) appears in the lower displayPress NO (*HOLD) appears in the lower displayPress NO (*WASH) appears in the lower displayPress NO (*SERV) appears in the lower displayPress YES (*CODE) appears in the lower displaySelect code 80 and press ENT (*TEST) appears in the lower displayPress YES Go to test 4.3
4.3 Accuracy Test (ORP Display)
First set the mV source to the values listed below to simulate the ORP (mV) input and check the readings onthe display.
millivoltsource
PH402
12
11
17
13
14
15
16
Resistance Box
mAMeter
300 Ω
61 62 63 65 65
mAMeter
300 Ω
123
AC DCliveneutralearth
Fig 1.

IM 12B6B3-E-E
Page 3 of 5
QIS 12B6B3-E
Input Display Tolerance Actual Display *
1500 mV 1500 mV ± 1 mV 1501 mV
750 mV 750 mV ± 1 mV 750 mV
0 mV 0 mV ± 1 mV 0 mV
-750 mV -750 mV ± 1 mV -749 mV
-1500 mV -1500 mV ± 1 mV -1500 mV
* figures in italics are typical values shown for example only.
Next vary the settings on the resistor decade box as listed below and check the temperature readings on thesecond row of the display.
4.3.1 Accuracy Test (Temperature Display with Pt 100ΩΩΩΩ RTD)
Resistance Temperature Tolerance Actual Display *
92.2 Ω -20 °C ± 0.4 °C -20.0 °C
109.7 Ω 25 °C ± 0.4 °C 25.1 °C
129.0 Ω 75 °C ± 0.4 °C 75.1 °C
149.8 Ω 130 °C ± 0.4 °C 130.0 °C
4.3.2 Accuracy Test (Temperature Display with Pt1000 RTD)
Resistance Temperature Tolerance Actual Display *
921.6 Ω -20 °C ± 0.3 °C -20.0 °C
1097.4 Ω 25 °C ± 0.3 °C 25.1 °C
1290.0 Ω 75 °C ± 0.3 °C 75.1 °C
1498.3 Ω 130 °C ± 0.3 °C 130.0 °C
4.3.3 Accuracy Test (Temperature Display with 3kΩΩΩΩ Balco Sensor)
Resistance Temperature Tolerance Actual Display *
2406 Ω -20 °C ± 0.3 °C -20.0 °C
3000 Ω 25 °C ± 0.3 °C 25.1 °C
3660 Ω 75 °C ± 0.3 °C 75.1 °C
4386 Ω 130 °C ± 0.3 °C 130.0 °C

IM 12B6B3-E-E
Page 4 of 5
QIS 12B6B3-E
4.3.4 Accuracy Test (Temperature Display with 5k1ΩΩΩΩ Sensor)
Resistance Temperature Tolerance Actual Display *
4273.8 Ω -20 °C ± 0.3 °C -20.0 °C
5100.0 Ω 25 °C ± 0.3 °C 25.1 °C
6018.0 Ω 75 °C ± 0.3 °C 75.1 °C
7027.8 Ω 130 °C ± 0.3 °C 130.0 °C
4.3.5 Accuracy Test (Temperature Display with 8k55ΩΩΩΩ Sensor)
Resistance Temperature Tolerance Actual Display *
47000 Ω -10 °C ± 0.3 °C -10.0 °C
8550.0 Ω 25 °C ± 0.3 °C 25.1 °C
1263.0 Ω 75 °C ± 0.3 °C 75.1 °C
343.0 Ω 120 °C ± 0.3 °C 119.9 °C
4.3.6 Overall Accuracy Test
Still with the equipment setup as before, measure the current outputs with the following settings and confirmagreement with the table below.
Input Display Tolerance Actual
Reading *
Nominal mA
0-20 or 4-20
Tolerance
mA
Actual
mA1 *
Actual
mA2 *
414.1 mV 0.00 pH ± 0.01 pH 0.01 pH 0.00 4.00 ± 0.06 4.00 4.00
177.5 mV 4.00 pH ± 0.01 pH 4.01 pH 5.71 8.57 ± 0.06 5.72 8.58
0 mV 7.00 pH ± 0.01 pH 7.00 pH 10.00 12.00 ± 0.06 12.01 12.00
-177.5 mV 10.00 pH ± 0.01 pH 9.99 pH 14.29 15.43 ± 0.06 14.28 15.42
-414.1 mV 14.00 pH ± 0.01 pH 14.00 pH 20.00 20.00 ± 0.06 20.00 20.00
The tolerances specified relate to the performance of the PH402G in the controlled environment of the testingfacility. Production testing is carried out in combination with specially calibrated automatic test equipment(ATE). In the field, the accuracy and linearity of the test equipment affects the error in the reading. As much asan additional 0.1 mA may be seen in the mA output readings.
After completing these tests Press ENTER. This automatically starts the next test.

IM 12B6B3-E-E
Page 5 of 5
QIS 12B6B3-E
5. Accuracy & Linearity Check mA output circuits
This test is automatically generated in service code 80. Step through this test by repeatedly pressing ENTER.
Simulated Output Tolerance
mA
Actual Output 1
mA *
Actual output 2
mA *
0.0 ± 0.02 0.00 0.00
4.0 ± 0.02 4.01 4.00
8.0 ± 0.02 8.01 8.01
12.0 ± 0.02 11.99 12.01
16.0 ± 0.02 16.01 15.99
20.0 ± 0.02 20.00 20.01
22.0 ± 0.02 22.01 21.99
This test is completed when the Display reads (*S1).
6. Relay Operation Check
This test is also automatically generated in service code 80.> Key is used to select the relay to be tested. S1, S2, S3 or S4.^ Key is used to toggle between ON /OFF states of the relay chosen.ENT Key is used to exit this test mode.
Relay Number Actual *
S1 OK
S2 OK
S3 OK
S4 OK
7. Communication Check
Press ENT (*COMM) is displayed.The PH402G generates a message to confirm function of the RS485 communication. Specialised equipmentis needed for this test. This test is not normally performed in the field.
Note
The testing of the PH402G is carried out under controlled environmental conditions. The end user may well findthat his ambient conditions vary considerably from the ones noted in this certificate. In this case it is necessaryto refer to the General Specification sheet for the details of ambient temperature drift etc.
* Values in italics are shown for example only.
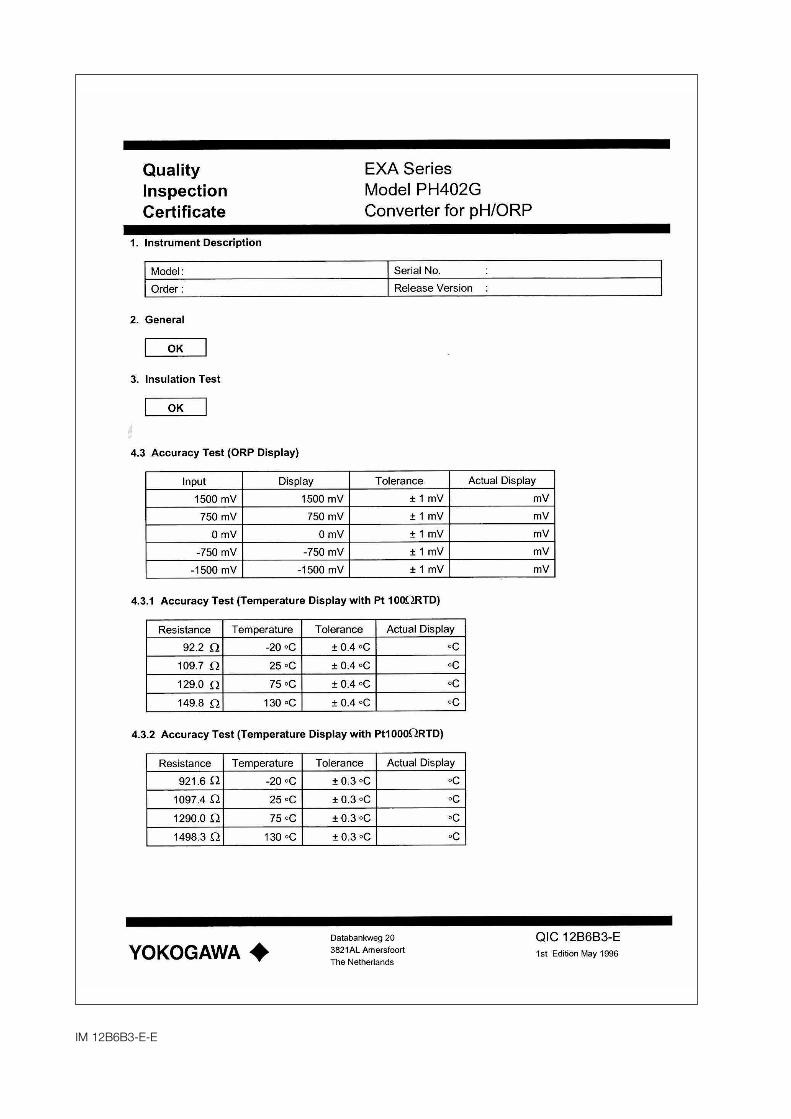
IM 12B6B3-E-E

IM 12B6B3-E-E

IM 12B6B3-E-E

IM 12B6B3-E-E

IM 12B6B3-E-ESubject to change without notice Printed in The Netherlands, 08-504 (A) QCopyright ©
YOKOGAWA
YOKOGAWA EUROPE B.V.Databankweg 203821 AL AmersfoortThe NetherlandsTel. +31-33-4641 611Fax +31-33-4641 610E-mail: [email protected]/eu
YOKOGAWA CORPORATION OF AMERICA2 Dart RoadNewnan GA 30265United StatesTel. (1)-770-253-7000Fax (1)-770-251-2088E-mail: [email protected]/us
YOKOGAWA ELECTRIC ASIA Pte. Ltd.5 Bedok South RoadSingapore 469270SingaporeTel. (65)-241-9933Fax (65)-241-2606E-mail: [email protected]
YOKOGAWA HEADQUARTERS9-32, Nakacho 2-chome,MusashinoshiTokyo 180JapanTel. (81)-422-52-5535Fax (81)-422-55-1202E-mail: [email protected]
Yokogawa has an extensive sales anddistribution network. Please refer to the European website(www.yokogawa.com/eu) to contact yournearest representative.