yates.cayates.ca/dx7/aftertouch-magazine/aftertouch-1986-07.pdf · harmonize your melodies in a...
TRANSCRIPT
- -- -- - - -- - - -- -- -- ----........ ........ ---THE OFFICIAL PUBLICATION OF THE YAMAHA USERS GROUP
i
JULY 1986 8YAMAHA® .··.

Editor Tom Darter
Operations Sibyl Darter
Editorial Board Bob Frye Bill Hinely Mark Koenig Phil Moon Jim Smerdel
Production Leslie Bartz Rick Eberly Pat Gates Paul Haggard Chris Ledgerwood Cheryl Matthews Joyce Phillips June Ramirez Joe Verri
A product of GPI Editorial Services Tom Darter, Director P.O. Box 2338, Northridge, CA 91323-2338
AFrERTOUCH is published monthly. Third class postage paid at Long Prairie, MN and additional points of entry. SUBSCRIPTIONS: Free. Address subscription correspondence to AFrERTOUCH, P.O. Box 2338, Northridge, CA 91323-2338. POSTMASTER: Send form 3579 to P.O. Box 2338, Northridge, CA 91323-2338.
--- -- -----~---~i=~§
---------July 1986 Volume 2, Number 7
Issue #10 4 MEP4
5
6
7
8
9
Use the MEP4 to create diatonic counterpoint to a solo line. By John McEnary.
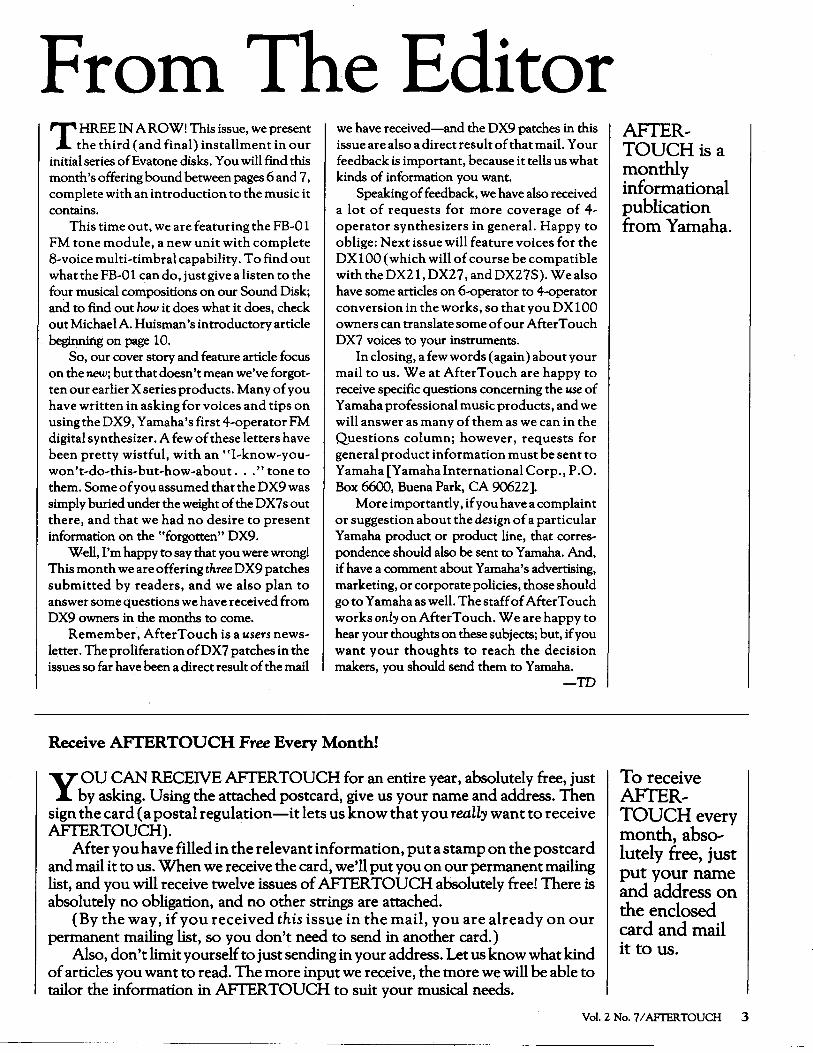
uBaroque G" A new MEP4 setup created by John McEnary.
FB-01 Disk An introduction to our third Evatone Data Disk, which con~ tains four musical performances featuring the FB..01 FM tone module. By Tom Darter.
uorgan B3" A new DX9 voice created by Gary Sharum.
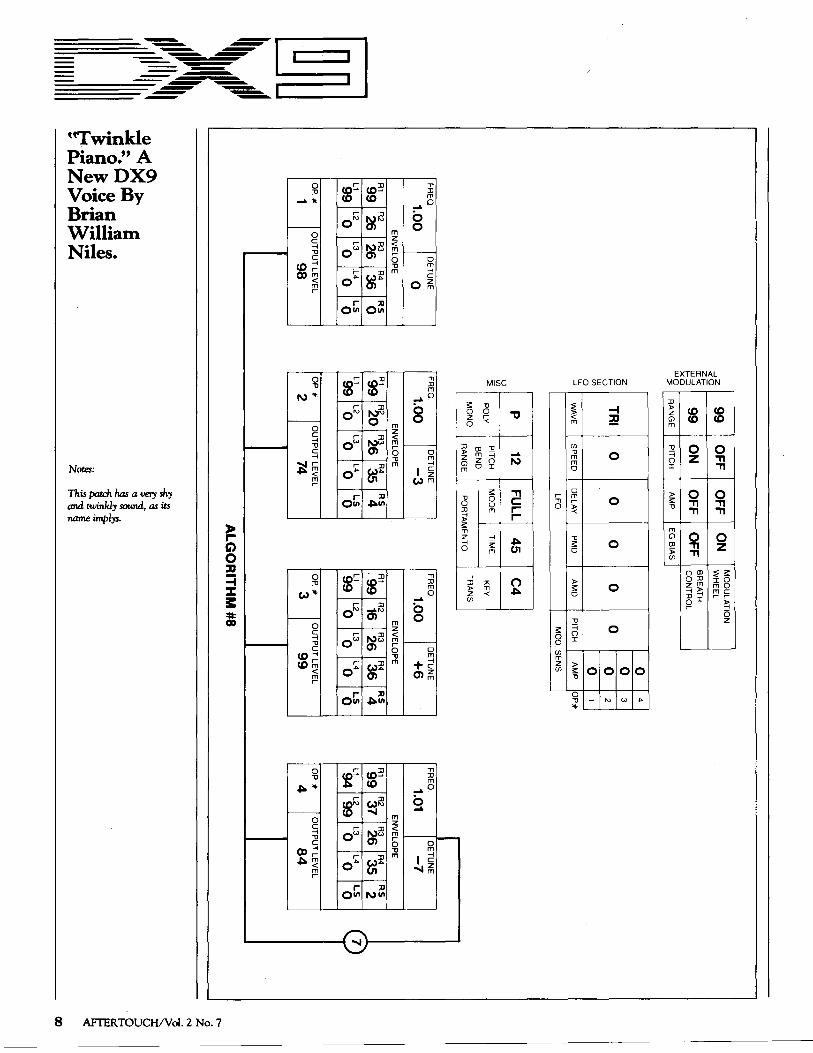
uTwinkle Piano" A new DX9 voice created by Brian William Niles.
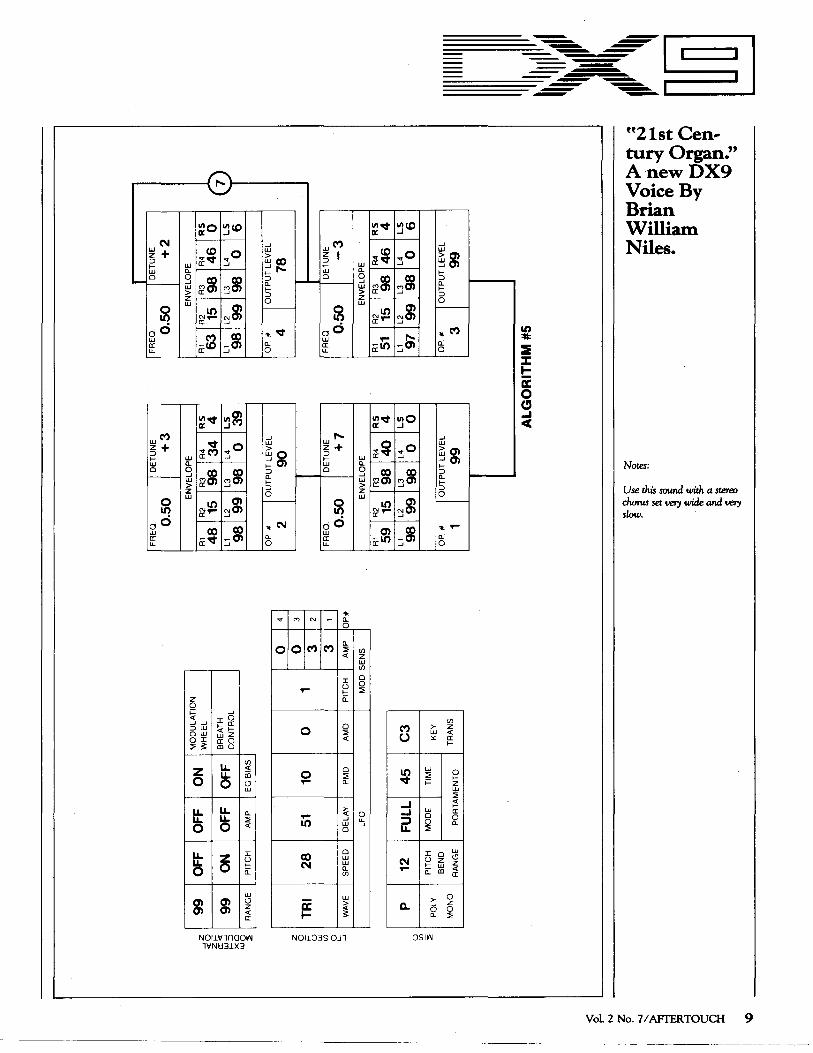
uz1st Century Organ" A new DX9 voice created by Brian William Niles.
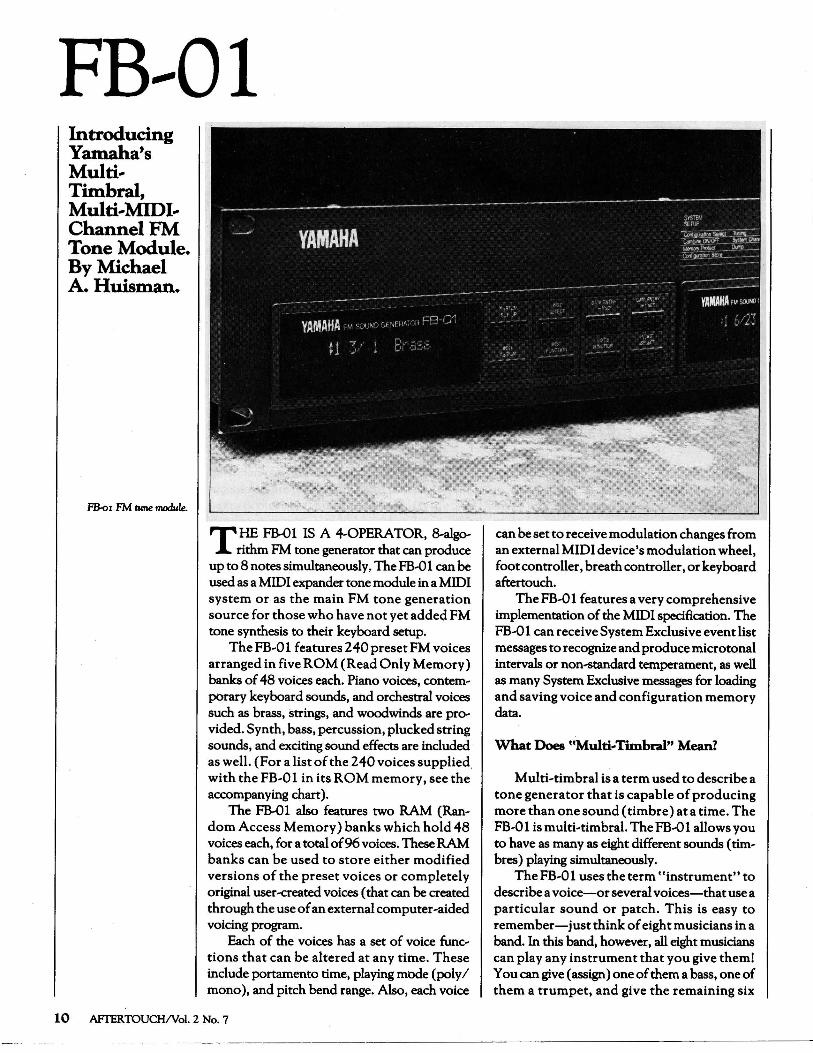
10 FB-01 Introducing Yamaha's multi~timbral, multi~MIDI~channel FM tone module. By Michael A. Huisman.
15 uFlt&Blk" A new FB~O 1 voice created by Michael A. Huisman.
15 udigilog" A new FB~01 voice created by Michael A. Huisman.
16 Final Touch Hot tips on using the QX1 as a teaching tool, adding ufeel" to RX11~composed songs, setting up a tuning bank on the QX 1 for use with the TX816, and using the MEP4 to convert Aftertouch data to Breath Controller data.
18 DX7 Tone Control Step~by~step instructions for setting up your Modulation Wheel (or Foot Controller) to act as an interactive tone con~ trol. By John McEnary.
~ 1986 Yamaha International Corporation. No part of this publication may be reproduced, stored in a retrieval system, or transmitted in any form or by any means, electronically, mechanically, photocopying, recording, or otherwise, without the prior written permission of Yamaha International Corporation.
2 AFrERTOUCH/Vol. 2 No.7
Frotn The Editor T HREE IN A ROW! This issue, we present
the third (and final) installment in our initial series ofEvatone disks. You will find this month's offering bound between pages 6 and 7, complete with an introduction to the music it contains.
This time out, we are featuring the FB-0 1 FM tone module, a new unit with complete 8-voice multi-timbral capability. To find out what the FB-0 1 can do, just give a listen to the four musical compositions on our Sound Disk; and to find out how it does what it does, check out Michael A. Huisman's introductory article beginning on page 10.
So, our cover story and feature article focus on the new; but that doesn't mean we've forgotten our earlier X series products. Many of you have written in asking for voices and tips on using the DX9, Yamaha's first 4-operator FM digital synthesizer. A few of these letters have been pretty wistful, with an "!-know-youwon't-do-this-but-how-about ... "tone to them. Some of you assumed thatthe DX9 was simply buried under the weight of the DX7s out there, and that we had no desire to present information on the "forgotten" DX9.
W-ell, I'm happy to say that you were wrong! This month we are offering three DX9 patches submitted by readers, and we also plan to answer some questions we have received from DX9 owners in the months to come.
Remember, After Touch is a users newsletter. The proliferation ofDX7 patches in the issues so far have been a direct result of the mail
we have received-and the DX9 patches in this issue are also a direct result of that mail. Your feedback is important, because it tells us what kinds of information you want.
Speaking of feedback, we have also received a lot of requests for more coverage of 4-operator synthesizers in general. Happy to oblige: Next issue will feature voices for the OX 100 (which will of course be compatible withtheDX21, DX27, andDX27S). We also have some articles on 6-operator to 4-operator conversion in the works, so that you OX 100 owners can translate some of our AfterT ouch DX7 voices to your instruments.
In closing, a few words (again) about your mail to us. We at AfterTouch are happy to receive specific questions concerning the use of Yamaha professional music products, and we will answer as many of them as we can in the Questions column; however, requests for general product information must be sent to Yamaha [Yamaha International Corp., P .0. Box 6600, Buena Park, CA 90622 ].
More importantly, if you have a complaint or suggestion about the design of a particular Yamaha product or product line, that correspondence should also be sent to Yamaha. And, if have a comment about Yamaha's advertising, marketing, or corporate policies, those should go to Yamaha as well. The staff of AfterT ouch works only on AfterTouch. We are happy to hear your thoughts on these subjects; but, if you want your thoughts to reach the decision makers, you should send them to Yamaha.
-TD
Receive AFrERTOUCH Fr~ Every Month!
Y OU CAN RECEIVE AFTER TOUCH for an entire year, absolutely free, just by asking. Using the attached postcard, give us your name and address. Then
sign the card (a postal regulation-it lets us know that you really want to receive AFTER TOUCH).
After you have filled in the relevant information, put a stamp on the postcard and mail it to us. When we receive the card, we'll put you on our permanent mailing list, and you will receive twelve issues of AFTER TOUCH absolutely free! There is absolutely no obligation, and no other strings are attached.
(By the way, if you received this issue in the mail, you are already on our permanent mailing list, so you don't need to send in another card.)
Also, don't limit yourself to just sending in your address. Let us know what kind of articles you want to read. The more input we receive, the more we will be able to tailor the information in AFTER TOUCH to suit your musical needs.
AFTER, TOUCH is a monthly informational publication from.Yamaha.
To receive AFTER, TOUCH every month, abso, lutely free, just put your name and address on the enclosed card and mail it to us.
Vol. 2 No. 7 I AFTER TOUCH 3

MEP4 Diatonic Harmony& Counterpoint With The MEP4.By John McEnary.
This basic MIDI .rystem, using a DX7 and a TX7 with the MEP4, is all that's needed to take admntoge of the MEP 4 techniques described in this article (and featured in the MEP 4 setup on page 5).
II
T HROUGH THE MAGIC OF MIDI, it is possible to program the MEP4 so that it
will generate a diatonic harmony line to a solo part in any key. The harmony part will always be inverted-that is, when the solo line goes up in pitch, the harmony part generated by the MEP4 goes down. It is also possible to create interesting quasi~Baroque counterpoint by further programming the MEP4 to delay the inverted harmony part.
All you will need to try out this technique is a simple MIDI system that includes one MIDI keyboard synthesizer (such as the DX7), one MIDI tone generator (such as the TX7), and the MEP4 MIDI Event Processor. Connect the MIDI OUT of the keyboard synthesizer to the MIDI IN of the MEP4, and connect the MIDI OUT #1 of the MEP4 to the MIDI IN of the tone generator (see the accompanying diagram).
To program an MEP4 setup that will create the harmony part, first enter the DATA MODIFIER and select MESSAGE as follows:
O:MSG:9n.xx. yy
This means that the Note On data will be modified.
Next, Modify the data using REVERSE by setting Step 1 as follows:
1:REV:xx, FIX=40
This means that note number "xx" will be modified, around the fixed note 40.
Finally, set Step 2 to OFFSET; then set the OFFSET value for the key you will be playing in, according to this chart:
thruout----;n--
DX7
--out -th~u '---;n
~lilli]:!.*:H::-, .-•• -•• -•• -•• -•• --.. \
TX7
4 AFI'ERTOUCH/Vol. 2 No. 7
Major Key c Db D Eb E F Gb G Ab A Bb B
OFFSET Value -3 -1 1 3 5
-5 '-3
-1 1 3 5
-5
So, for the key of C major, you would set Step 2 as follows:
2:0FS:xx, V= ~3
Relative minor keys, modes, and pentatonic scales also work well with this setup. For exam~ ple, using an OFFSET value of -3, you can harmonize your melodies in A minor, D dorian minor, and A and D pentatonic {minor form), as well as several keys related to Gb Major (F# Major). I feel the blues scale works best around the dorian minor OFFSET key. So, for- sim~ plicity, play the blues scale one step higher than the Major Key OFFSET setting you have chosen.
It is often advantageous to add 12 or 24 to your OFFSET Value. This raises the harmony part one or two octaves. Another nice touch is to lower the dynamic level of the harmony part by adding an OFFSET Value of about -24 to the second data byte "yy" -which in this case is key velocity. For example, set Step 3 as follows:
3:0FS:yy, V= -24
Now, to add a quasi~Baroque counterpoint to your melodies, simply set the DELAY PRO~ CESSOR to a relatively long time setting such as 600 milliseconds. If you are using several MIDI tone generators, you may wish to set some of them up for unison or octave doubling of the melody, and others for the inverted harmony part. Experiment with different delay settings on different tone generators. As long as you play in the key( s) you have chosen in your MEP4 setup, all of your harmony and counterpoint lines will be diatonic.
PR
OC
ES
SO
R 1
P
RO
CE
SS
OR
2
DA
TA
PR
ES
ET
TE
R
DA
TA
PR
ES
ET
TE
R
PR
OG
RA
M
OF
F
PR
OG
RA
M
OF
F
PIT
CH
O
FF
P
ITC
H
OF
F
CO
NT
RO
L 1
O
FF
C
ON
TR
OL
1
OF
F
CO
NT
RO
L 2
O
FF
C
ON
TR
OL
2
OF
F
CH
AN
NE
L F
ILT
ER
C
HA
NN
EL
FIL
TE
R
OM
NI:
O
N
OM
NI:
O
N
1 2
3 4
5 6
7 8
1 2
3 4
5 6
9 1
0
11
12
1
3
14
1
5
16
9
10
11
12
1
3
14
ME
SS
AG
E F
ILT
ER
M
ES
SA
GE
FIL
TE
R
NO
TE
OF
F
ON
N
OT
E O
FF
O
N
NO
TE
ON
O
N
NO
TE
ON
O
N
PO
LY A
. T
OU
CH
O
FF
P
OLY
A.
TO
UC
H
CO
NT
RO
L N
O.
CO
NT
RO
L N
O.
PR
OG
RA
M C
HA
NG
E
OF
F
PR
OG
RA
M C
HA
NG
E
CH
A.
TO
UC
H
OF
F
CH
A.
TO
UC
H
PIT
CH
BE
ND
O
FF
P
ITC
H B
EN
D
CH
M
OD
E M
ES
. O
FF
C
H
MO
DE
ME
S.
SY
ST
EM
ME
S
OF
F
SY
ST
EM
ME
S
DA
TA
MO
DIF
IER
D
AT
A M
OD
IFIE
R
0 M
SG
· 9n
.xx.
yy
0 M
SG
9n
.xx.
yy
1 R
EV
xx
, F
IX=4
0 1
OF
S
xx,V
= -1
2
2 O
FS
xx
, V
= -1
2
OF
S
YY
,V=
-24
3 O
FS
yy
,V=
-24
3
4 4
DE
LA
Y P
RO
CE
SS
OR
D
EL
AY
PR
OC
ES
SO
R
DE
LA
Y T
IME
60
0 D
EL
AY
TIM
E I
600
OU
TP
UT
AS
SIG
NE
R
OU
TP
UT
AS
SIG
NE
R
OU
T-C
H A
SS
IGN
1
OU
T-C
H A
SS
IGN
O
UT
-CH
OF
FS
ET
0
OU
T-C
H O
FF
SE
T
OU
TP
OR
T A
SS
IGN
1
OU
TP
OR
T A
SS
IGN
~ r- N ~
. ~
I ~ g @
\11
7 15
1 0 1
PR
OC
ES
SO
R 3
DA
TA
PR
ES
ET
TE
R
PR
OG
RA
M
(ON
I
OF
F)
PIT
CH
(O
N
I O
FF
) C
ON
TR
OL
1
(ON
I
OF
F)
CO
NT
RO
L 2
(O
N
I O
FF
)
CH
AN
NE
L F
ILT
ER
OM
NI:
O
N/O
FF
8 1
2 3
4 5
6 7
8 1
6
9 1
0
11
12
1
3
14
1
5
16
ME
SS
AG
E F
ILT
ER
NO
TE
OF
F
ON
I
OF
F
NO
TE
ON
O
N
I O
FF
O
FF
P
OLY
A.
TO
UC
H
ON
I
OF
F
CO
NT
RO
L N
O
AL
L
I O
FF
P
RO
GR
AM
CH
AN
GE
O
N
I O
FF
O
FF
C
H A
. T
OU
CH
O
N
I O
FF
O
FF
P
ITC
H B
EN
D
ON
I
OF
F
OF
F
CH
M
OD
E M
ES
. O
N
I O
FF
O
FF
S
YS
TE
M M
ES
. O
N
I O
FF
DA
TA
MO
DIF
IER
0 M
SG
1 2 3 4
DE
LA
Y P
RO
CE
SS
OR
DE
LA
Y T
IME
I
OU
TP
UT
AS
SIG
NE
R
OU
T-C
H A
SS
IGN
O
UT
-CH
OF
FS
ET
O
UT
PO
RT
AS
SIG
N
ll R l?
. s· [
? B'
;!
z i ~
s· ~ ~
a. ~ j
~-~
·~(4
~.5"
;7"~
~-&
. tll
l~~~
~~
~s-~'T.I::-:~ogll
;:f
r;;·~ ~
iil §
;;· 1
'1
... !i
;3. ~~il
a~~: lr~
~-
PR
OC
ES
SO
R 4
DA
TA
PR
ES
ET
TE
R
PR
OG
RA
M
(ON
I
OF
F)
PIT
CH
(O
N
I O
FF
) C
ON
TR
OL
1
(ON
I
OF
F)
CO
NT
RO
L 2
(O
N
I O
FF
)
CH
AN
NE
L F
ILT
ER
OM
NI:
O
N/O
FF
1 2
3 4
5 6
7 8
9 1
0
11
12
1
3
14
1
5
16
ME
SS
AG
E F
ILT
ER
NO
TE
OF
F
ON
I
OF
F
NO
TE
ON
O
N
I O
FF
P
OLY
A.
TO
UC
H
ON
I
OF
F
CO
NT
RO
L N
O.
AL
L
I P
RO
GR
AM
CH
AN
GE
O
N
I O
FF
C
H A
. T
OU
CH
O
N
I O
FF
P
ITC
H B
EN
D
ON
I
OF
F
CH
M
OD
E M
ES
. O
N
I O
FF
S
YS
TE
M M
ES
. O
N
I O
FF
DA
TA
MO
DIF
IER
0 M
SG
1 i
2 3 4
DE
LA
Y P
RO
CE
SS
OR
DE
LA
Y T
IME
I
OU
TP
UT
AS
SIG
NE
R
OU
T-C
H A
SS
IGN
O
UT
-CH
OF
FS
ET
O
UT
PO
RT
AS
SIG
N
~~W>r;S
~r~~
j ~
o::J~
=
~ -<
~~
~2
~
,.
~
tT1 ~ ~
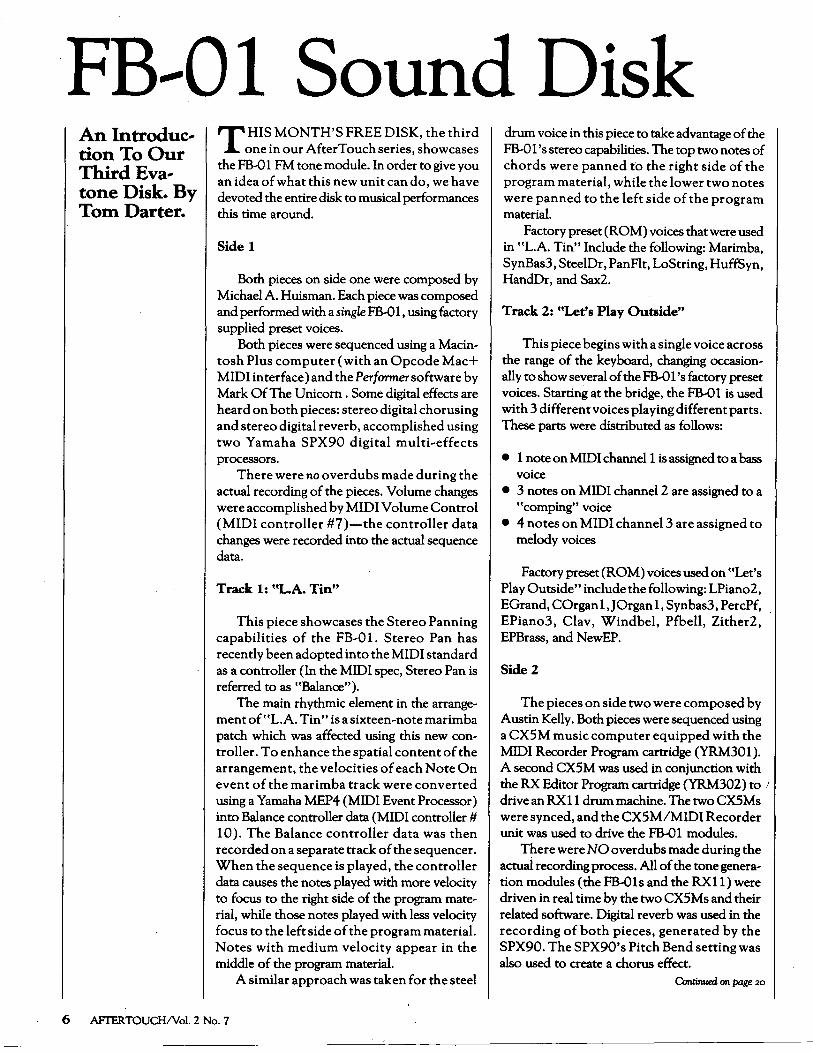
FB--0 1 Sound Disk An Introduction To Our Third Evatone Disk. By Tom Darter.
T HIS MONTH'S FREE DISK, the third one in our After Touch series, showcases
the FB..() 1 FM tone module. In order to give you an idea of what this new unit can do, we have devoted the entire disk to musical performances this time around.
Side 1
Both pieces on side one were composed by Michael A. Huisman. Each piece was composed and performed with a single FB..()1, using factory supplied preset voices.
Both pieces were sequenced using a Macin~ tosh Plus computer (with an Opcode Mac+ MID I interface) and the Performer software by Mark Of The Unicorn . Some digital effects are heard on both pieces: stereo digital chorusing and stereo digital reverb, accomplished using two Yamaha SPX90 digital multi~effects processors.
There were no overdubs made during the actual recording of the pieces. Volume changes were accomplished by MIDI Volume Control (MIDI controller #7)-the controller data changes were recorded into the actual sequence data.
Track 1: ttL.A. Tin"
This piece showcases the Stereo Panning capabilities of the FB~Ol. Stereo Pan has recently been adopted into the MIDI standard as a controller (In the MIDI spec, Stereo Pan is referred to as "Balance").
The main rhythmic element in the arrange~ ment of "L.A. Tin" is a sixteen~note marimba patch which was affected using this new con~ troller. To enhance the spatial content of the arrangement, the velocities of each Note On event of the marimba track were converted using a Yamaha MEP4 (MIDI Event Processor) into Balance controller data (MIDI controller# 10). The Balance controller data was then recorded on a separate track of the sequencer. When the sequence is played, the controller data causes the notes played with more velocity to focus to the right side of the program mate~ rial, while those notes played with less velocity focus to the left side of the program material. Notes with medium velocity appear in the middle of the program material.
A similar approach was taken for the steel
6 AFrERTOUCH/Vol. 2 No. 7
drum voice in this piece to take advantage of the FB~01 's stereo capabilities. The top two notes of chords were panned to the right side of the program material, while the lower two notes were panned to the left side of the program material.
Factory preset (ROM) voices that were used in "L.A. Tin" Include the following: Marimba, SynBas3, SteelDr, PanFlt, LoString, HuffSyn, HandDr, and Sax2.
Track 2: nLet's Play Outside"
This piece begins with a single voice across the range of the keyboard, changing occasion~ ally to show several of the FB..()1 's factory preset voices. Starting at the bridge, the FB..() 1 is used with 3 different voices playing different parts. These parts were distributed as follows:
• 1 note on MIDI channel1 is assigned to a bass voice
• 3 notes on MIDI channel2 are assigned to a "comping" voice
• 4 notes on MIDI channel3 are assigned to melody voices
Factory preset (ROM) voices used on "Let's Play Outside" include the following: LPiano2, EGrand, COrgan 1, }Organ 1, Synbas3, PercPf, EPiano3, Clav, Windbel, Pfbell, Zither2, EPBrass, and NewEP.
Side 2
The pieces on side two were composed by Austin Kelly. Both pieces were sequenced using a CXSM music computer equipped with the MIDI Recorder Program cartridge (YRM301). A second CXSM was used in conjunction with the RX Editor Program cartridge (YRM302) to 1
drive an RX11 drum machine. The two CX5Ms were synced, and the CXSM/MIDI Recorder unit was used to drive the FB..()1 modules.
There were NO overdubs made during the actual recording process. All of the tone genera~ tion modules (the FB..o1s and the RX11) were driven in real time by the two CX5Ms and their related software. Digital reverb was used in the recording of both pieces, generated by the SPX90. The SPX90's Pitch Bend setting was also used to create a chorus effect.
Continued on page 20

t- r- N ~ -..J
I ~ -.:1
...J
z ..
:0
z;::
: a:
..:
UJ...
J e
-:::
J x
o
UJO
::;
z 0 ;:::
u UJ
Ul
0 u.. ...J
u Ul :!'
25
OFF
O
FF
ON
0 NA
NA
NA
R
AN
GE
P
ITC
H
AM
P
EG
BIA
S
TR
I 32
47
0
WA
VE
S
PE
ED
D
ELA
Y
PM
D
LFO
p NA
NA
NA
PO
LY
PIT
CH
M
OD
E
TIM
E
BE
ND
M
ON
O
RA
NG
E
PO
RT
AM
EN
TO
FR
EQ
D
E T
UN
E
0.50
+
4
EN
VE
LOP
E
R1
R2
R3
R4
RS
99
9
9
99
9
9
7 L1
L2
L3
L4
L
S 9
9
99
9
9
0 56
OP
#
I OUT
PU
T L
EV
EL
1 95
MO
DU
LAT
ION
W
HE
EL
BR
EA
TH
C
ON
TR
OL
2 4
2 3
28
1 2
2
2 1
AM
D
PIT
CH
A
MP
O
P#
MO
D
SE
NS
C3
KE
Y
TR
AN
S
FR
EQ
D
ET
UN
E
2.0
0
+5
EN
VE
LOP
E
R1
R2
R3
R4
RS
99
9
9
99
9
9
7 L
1 L2
L3
L4
L
S 9
9
99
9
9
0 75
OP
. #
I OUTPUT~EL
2 AL
GO
RIT
HM
#7
~ ~-
§: ~
lf [
:" F
~ z
("
"'""'!
:! p_
C:
~ ~
.. ~&
-~r~~I
.. l ~
~ ~-1
: §.
t~
~!
~-~§
:1
l]'"~
s~·r
lll
..,[
t ~1:"'
~fa.
~J~l
~ 8
.
FR
EQ
D
ET
UN
E
3.98
+
6
EN
VE
LOP
E
R1
R2
R3
R4
99
9
9
99
9
9
L 1
L2
L3
L4
99
0
0 0
OP
#
I OUT
PU
T L
EV
EL
4 8
6
FR
EQ
. D
ET
UN
E
3.0
0
+5
E
NV
ELO
PE
R1
R2
R3
R4
99
9
9
99
9
9
L1
L2
L3
L4
99
9
9
99
0
OP
.#
I OU
TP
UT
LE
VE
L
3 9
9
RS 0
7 L
S 48
RS 7 LS 53
ga~~>~
~ ~ "
"·Z
~ s~~
t:tj
~~
• -<
t' t
:tj
~~
\0
...
1111
11
llllllllllil
ll
111111
11111 --, ~
~ 11111111'1~1
111111
FR
EQ
D
ET
UN
E
1.0
0
0
EN
VE
LOP
E
Rl
R2
R3
R4
RS
99
26
26
3
6
0
Ll
L2 L3
L4 L
S 9
9
0 0
0 0
OP
# I O
UT
PU
T LE
VE
L
1 9
8
L .. --
--
---
..2<~>-~ .. Q~
~ d .. 0.
"' d
; •
·~
.... (ij ....
~
~; ~·s·c== ~·s:z:>~~z
--
-'z
9
9
OF
F
<(0
Z
f=
Cl:<(
99
O
N
U.J...J
f-::J xo
U
.JO
RA
NG
E
PITC
H
::;;
z 0 TR
I 0
>= 0 U.J (/)
0 u._ ...J
WA
VE
S
PE
ED
p 1
2
0 (/)
::i P
OLY
P
ITCH
BE
ND
M
ON
O
RA
NG
E
FRE
Q
DE
TU
NE
1.0
0
-3
EN
VE
LOP
E
Rl
R2
o R~6
R4
99
3
5
L 1 L2
L3 L4
99
0
0 0
OP. #
I OUT
PU
T LE
VE
L
2 7
4
---
j
MO
DU
LAT
ION
O
FF
O
N
WH
EE
L
BR
EA
TH
OF
F
OF
F
CO
NT
RO
L
AM
P
EG
BIA
S
0 0 0
0 0
0 0 0
DE
LAY
P
MD
A
MD
P
ITCH
A
MP
LFO
MO
D
SE
NS
.
FU
LL 4
5
C4
MO
DE
TIM
E
KE
Y
PO
RTA
ME
NTO
T
RA
NS
FRE
Q
DE
TU
NE
1.0
0
+6
EN
VE
LOP
E
RS
Rl
R2
R3
R4
4 .9
9
16
2
6
36
LS
Ll
L2 L3
L4 0
99
0
0 0
OP
# l OU
TP
UT
LEV
EL
3 9
9
AL
GO
RIT
HM
#8
~.;
~~ <Sl ::1
...
..c..?;~~
11.t ~11
--
I I i
4 3 2 1
OP
#
FR
EQ
D
ET
UN
E
1.0
1
-7
EN
VE
LOP
E
RS
Rl
R2
R3
R4
RS
4 9
9
37
2
6
35
2
LS
Ll
L2 L3
L4 L
S 7
0 9
4
99
0
0 0
OP
# I O
UT
PU
T LE
VE
L
4 8
4
r-~ N
~ I 00
~ :- N ~ ~ ~ ~ \0
-'z
<(0
~~
W-'
1
-:::
l xo
w
o ::; z 0 i=
0 w
(f) 0 u._
...J 0 (f) ~
99
99
R
AN
GE
TRI
WA
VE
p
PO
LY
MO
NO
OF
F
OF
F
ON
ON
O
FF
O
FF
PIT
CH
A
MP
E
G B
IAS
28
51
10
SP
EE
D
DE
LAY
P
MD
LFO
12
FU
LL
4
5
PIT
CH
M
OD
E
TIM
E
BE
ND
RA
NG
E
PO
RT
AM
EN
TO
MO
DU
LAT
ION
W
HE
EL
BR
EA
TH
C
ON
TR
OL
0 4
!
0 3
0 1
3 2
3 1
I A
MD
P
ITC
H
AM
P
OP
#
MO
D
SE
NS
C3
KE
Y
TR
AN
S
FR
EQ
D
ET
UN
E
0.5
0
+3
EN
VE
LOP
E
R1
R2
R3
R4
48
15
9
8
34
L1
L2
L3
L4
98
9
9
98
0
OP
#
IOUT
PU~V
EL
2
FR
EQ
D
ET
UN
E
0.5
0
+7
R1 59
L
1 98
OP
# 1
EN
VE
LOP
E
R2
R3
R4
15
98
4
0
L2
L3
L4
99
9
8
0
I OUTP
UT
LE
VE
L
99
t~lf
~
. ~
s-~
1\ ~·
3l
·~~
t~
§ ~
FR
EQ
D
ET
UN
E
0.5
0
+2
EN
VE
LOP
E
RS
R1
R2
R3
R4
RS
4 6
3
15
98
4
6
0 L
S L1
L2
L3
L4
L
S 7
39
9
8
99
98
0
6
OP
#
I OUT
PU
T L
EV
EL
4 78
FR
EQ
D
ET
UN
E
0.5
0
-3
EN
VE
LOP
E
RS
R1
R2
R3
R4
RS
4 51
15
9
8
46
4
LS
L1
L2
L3
L4
LS
0 97
9
9
98
0
6
OP
#
I OUT
PU
T L
EV
EL
3 9
9
L_
__
_
AL
GO
RIT
HM
#5
z~t=~>a~
= .... !:
!. 9.
=' ..
, ,....
~=~n~'<fiJ
rr""'·='~~o ....
a
t:=~
~~
-< '
"""~
=' ><
=''
\C)
....
...
1111
11
111111
111111
11
1111
Ill 111
1
nT
FB--01 Introducing Yamaha's MultiTimbral, Multi-MIDIChannelFM Tone Module. By Michael A. Huisman.
FB-or.FM IWle module.
T HE FB...o1 IS A 4..0PERATOR, tY.tlgo-rithm FM tone generator that can produce
up to 8 notes simultaneously, The FB...() 1 can be used as a MIDI expander tone module in a MIDI system or as the main FM tone generation source for those who have not yet added FM tone synthesis to their keyboard setup.
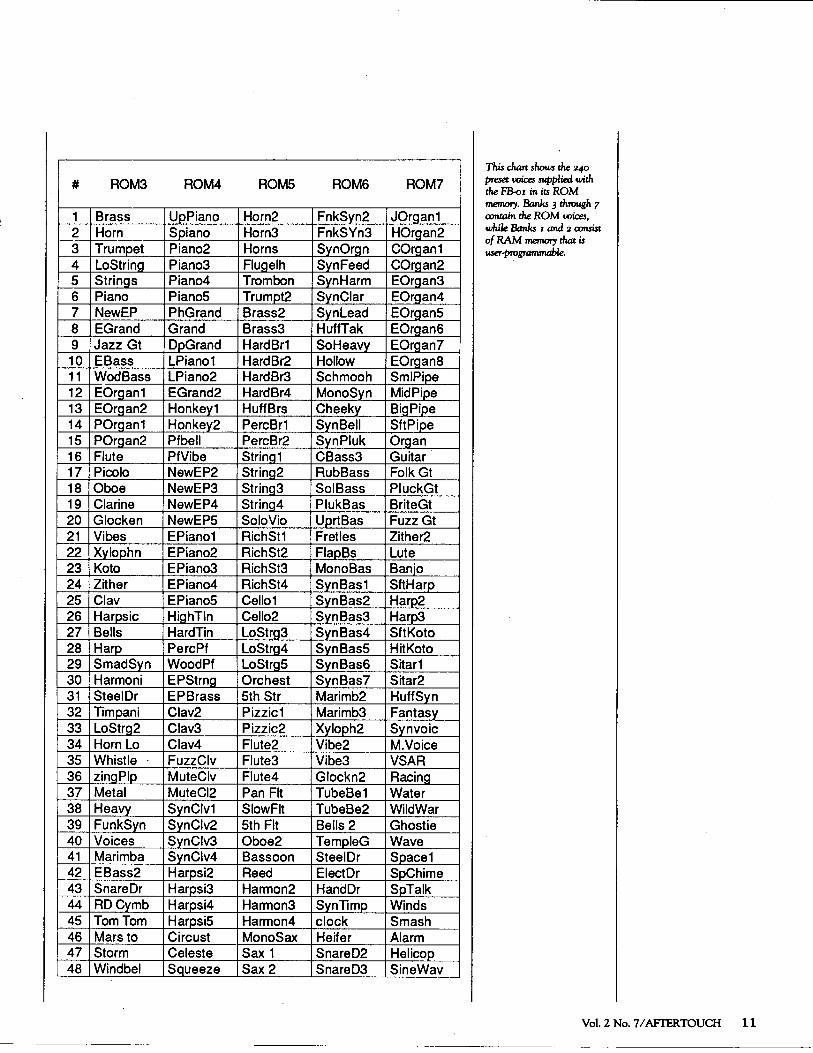
The FB~O 1 features 240 preset FM voices arranged in five ROM (Read Only Memory) banks of 48 voices each. Piano voices, contem~ porary keyboard sounds, and orchestral voices such as brass, strings, and woodwinds are pro-vided. Synth, bass, percussion, plucked string sounds, and exciting sound effects are included as well. (For a list of the 240 voices supplied. with the FB~O 1 in its ROM memory, see the accompanying chart).
The FB~1 also features two RAM (Ran~ dom Access Memory) banks which hold 48 voices each, for a total of96 voices. These RAM banks can be used to store either modified versions of the preset voices or completely original user~eated voices (that can be created through the use of an external computer~aided voicing program.
Each of the voices has a set of voice func~ tions that can be altered at any time. These include portarnento time, playing mode (poly I mono), and pitch bend range. Also, each voice
10 AFI'ERTOUCH/Vol. 2 No. 7
can be set to receive modulation changes from an external MIDI device's modulation wheel, foot controller, breath controller, or keyboard aftertouch.
The FB~01 features a very comprehensive implementation of the MIDI specification. The FB~01 can receive System Exclusive event list messages to recognize and produce micro tonal intervals or non~tandard temperament, as well as many System Exclusive messages for loading and saving voice and configuration memory data.
What Does ''Multi-Timbral" Mean?
Multi~timbral is a term used to describe a tone generator that is capable of producing more than one sound (timbre) at a time. The FB~O 1 is multi~timbral. The FB~O 1 allows you to have as many as eight different sounds (tim~ bres) playing simultaneously.
The FB~O 1 uses the term "instrument" to describe a voice-or several voices-that use a particular sound or patch. This is easy to remember-just think of eight musicians in a band. In this band, however, all eight musicians can play any instrument that you give them! You can give (assign) one of them a bass, one of them a trumpet, and give the remaining six
#
1 2 3 4 5 6 7 8 9 10 11 12 13 14 15 16 17 18 19 20 21 22 23 24 25 26 27 28 29 30 31 32 33 34 35 36 37 38 39 40 41 42 43 44 45 46 47 48
ROM3 ROM4 ROMS ROMS ROM?
Brass UpPiano Horn2 FnkSyn2 J0rgan1 Horn Spiano Horn3 FnkSYn3 H0rgan2 Trumpet Piano2 Horns SynOrgn C0rgan1 LoString Piano3 Flugelh SynFeed C0rgan2 Strings Piano4 Trombon SynHarm E0rgan3 Piano PianoS Trumpt2 SynCiar E0rgan4 NewEP PhGrand Brass2 SvnLead EOrganS EGrand Grand Brass3 HuffTak E0rgan6 Jazz Gt OpGrand HardBr1 So Heavy EOrgan7 EBass LPiano1 HardBr2 Hollow E0rgan8 WodBass LPiano2 HardBr3 Schmooh SmiPipe E0rgan1 EGrand2 HardBr4 MonoSyn Mid Pipe E0raan2 Honkev1 HuffBrs Cheeky Big Pipe P0rgan1 Honkey2 PercBr1 SynBell SftPipe P0man2 Pfbell PercBr2 SynPiuk Organ Flute PfVibe String1 CBass3 Guitar Picolo NewEP2 String2 Rub Bass FolkGt Oboe NewEP3 String3 Sol Bass PluckGt Clarine NewEP4 String4 PlukBas BriteGt Glocken NewEPS SoloVio UprtBas Fuzz Gt Vibes EPiano1 RichSt1 Fretles Zither2 Xvlophn EPiano2 RichSt2 FlapBs Lute Koto EPiano3 RichSt3 Mono Bas Banjo Zither EPiano4 RichSt4 SynBas1 SftHarp Clav EPianoS Cello1 SynBas2 Harp2 Harpsic High Tin Cello2 SynBas3 Harp3 Bells HardTin LoStrg3 SynBas4 SftKoto Harp PercPf LoStra4 SvnBasS HitKoto SmadSvn WoodPf LoStrgS SynBas6 Sitar1 Harmoni EPStrng Orchest SynBas7 Sitar2 Steel Dr EPBrass 5th Str Marimb2 HuffSyn Timpani Clav2 Pizzic1 Marimb3 Fantasy LoStrg2 Clav3 Pizzic2 Xyloph2 Synvoic Horn Lo Clav4 Flute2 Vibe2 M.Voice Whistle · FuzzCiv Flute3 Vibe3 VSAR zing Pip MuteCiv Flute4 Glockn2 Racing Metal MuteCI2 Pan Fit TubeBe1 Water Heavy SynCiv1 SlowFit TubeBe2 WildWar FunkSvn SvnCiv2 5th Fit Bells2 Ghostie Voices SynCiv3 Oboe2 TempleG Wave Marimba SvnCiv4 Bassoon Steel Dr Space1 EBass2 Harpsi2 Reed ElectOr SpChime Snare Dr Harpsi3 Harmon2 Hand Dr SpTalk RDCvmb Harpsi4 Harmon3 SvnTimp Winds Tom Tom Harps iS Harmon4 clock Smash Mars to Circust MonoS ax Heifer Alarm Storm Celeste Sax 1 SnareD2 Helicop Windbel SQueeze Sax 2 Snare03 SineWav
·-- -- --·-· ------------
This chart shows the 240
preset ooices supplied with the FB·OI in its ROM memory. Banks 3 through 7 contain the ROM ooices, while Banks I and 2 oonsist of RAM memory that is user-programmable.
Vol. 2 No. 7 I AFTER. TOUCH 11
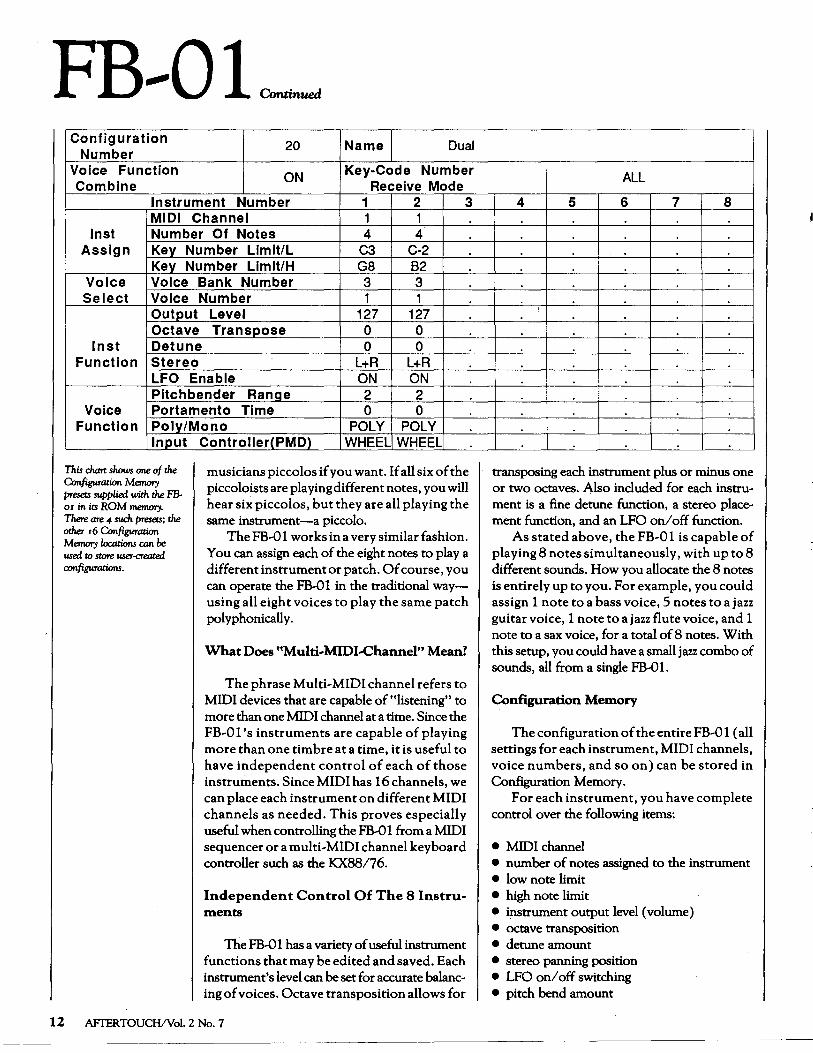
FB--0 1 Cmmn~ Configuration 20 Name Dual
Number Voice Function ON Key-Code Number Combine Receive Mode
Instrument Number 1 2 3 MIDI Channel 1 1
lnst Number Of Notes 4 4 Assign Key Number Limit/L C3 C-2
Key Number Limlt/H G8 82 Voice Voice Bank Number 3 3 Select Voice Number 1 1
Output Level 127 127 Octave Transpose 0 0
lnst Detune 0 0 Function Stereo L+R L+R
LFO Enable ON ON Pitch bender Range 2 2
Voice Portamento Time 0 0 Function Poly/Mono POLY POLY
ln_Qut Controller(PMD) WHEEL WHEEL
This chart shows one of the Configuration Memory presets supplied with the FBoi in its ROM memory. There are 4 such presets; the other 16 Configuration Memory loauions can be used to store wer-creaied configurations.
musicians piccolos if you want. If all six of the piccoloists are playing different notes, you will hear six piccolos, but they are all playing the same instrument-a piccolo.
The FB~O 1 works in a very similar fashion. You can assign each of the eight notes to play a different instrument or patch. Of course, you can operate the ~1 in the traditional wayusing all eight voices to play the same patch polyphonically.
What Does ttMulti-MIDI-Channel" Mean?
The phrase Multi~ MID I channel refers to MIDI devices that are capable of "listening" to more than one MIDI channel at a time. Since the FB~01 's instruments are capable of playing more than one timbre at a time, it is useful to have independent control of each of those instruments. Since MID I has 16 channels, we can place each instrument on different MIDI channels as needed. This proves especially useful when controlling the~ 1 from a MIDI sequencer or a multi~ MIDI channel keyboard controller such as the KX88/76.
Independent Control Of The 8 Instruments
The FB-01 has a variety of useful instrument functions that may be edited and saved. Each instrument's level can be set for accurate balanc~ ing of voices. Octave transposition allows for
12 AFrERTOUCH/Vol. 2 No. 7
ALL
4 5 6 7 8
I
transposing each instrument plus or minus one or two octaves. Also included for each instru~ ment is a fine detune function, a stereo place~ ment function, and an LFO on/ off function.
As stated above, the FB~O 1 is capable of playing 8 notes simultaneously, with up to 8 different sounds. How you allocate the 8 notes is entirely up to you. For example, you could assign 1 note to a bass voice, 5 notes to a jazz guitar voice, 1 note to a jazz flute voice, and 1 note to a sax voice, for a total of 8 notes. With this setup, you could have a small jazz combo of sounds, all from a single FB-0 1.
Configuration Memory
The configuration of the entire FB~O 1 (all settings for each instrument, MIDI channels, voice numbers, and so on) can be stored in Configuration Memory.
For each instrument, you have complete control over the following items:
• MIDI channel • number of notes assigned to the instrument • low note limit • high note limit • instrument output level (volume) • octave transposition • detune amount • stereo panning position • LFO on/ off switching • pitch bend amount
• portamento time • poly/mono mode • pitch modulation source device • which voice (timbre) to play
The FB,Q 1 has 20 configuration memory locations, 16 of which are RAM configurations where you can store your own conf~gurations, plus 4 more ROM configurations that are set at the factory. (For a complete listing of the con, tents of one of the FB,Q 1 's configurations in ROM memory, see the accompanying diagram.)
u1 Was A ~Op Snob •••• "-Are You Still?
What is a six,op snob? In a musical world dominated by the sounds of the DX?, TX816, TX?, DXS, and DX 1, it is easy to ignore the capabilities of the 4~perator instruments. This is an oversight that many of us have been guilty of for quite some time. For example, there are a number ofL.A.,area electronic musicians who have been raving about a particular OX? brass patch. It turns out that this brass patch (yes, it is pretty good) uses only 2 out of the 6 operators available on the DX?! The moral of the story is that FM synthesis packs quite a lot of power and that whether we are talking about 6~perator or 4~perator FM, it is worth our time to make the most of what's available.
CAV: Computer-Aided Voicing
The FB,Q 1 has the ability to voice new patches using its extensive MIDI capabilitiesbut not by editing from the front panel. For musicians interested in creating their own· voices, the FB,Q1 can be voiced by using an external computer and fB,Q1 voicing software. This concept is not new: Many of us have used the CXSM program, the DX,PRO for the Apple II, or other similar FM computer,aided voicing programs, and most musicians prefer this method of creating and editing voices.
One such FB,Q1 voicing program is avail, able for the CXSM computer. Yamaha's fB,Q1 Voicing Program cartridge (YRM506) allows you to create voices or edit configurations that are displayed on the screen.
Another fB,Q1 voicing program, fB,PRO, written by Digital Music Services (the same company who wrote and now distributes DX, PRO), is designed for the Apple Macintosh
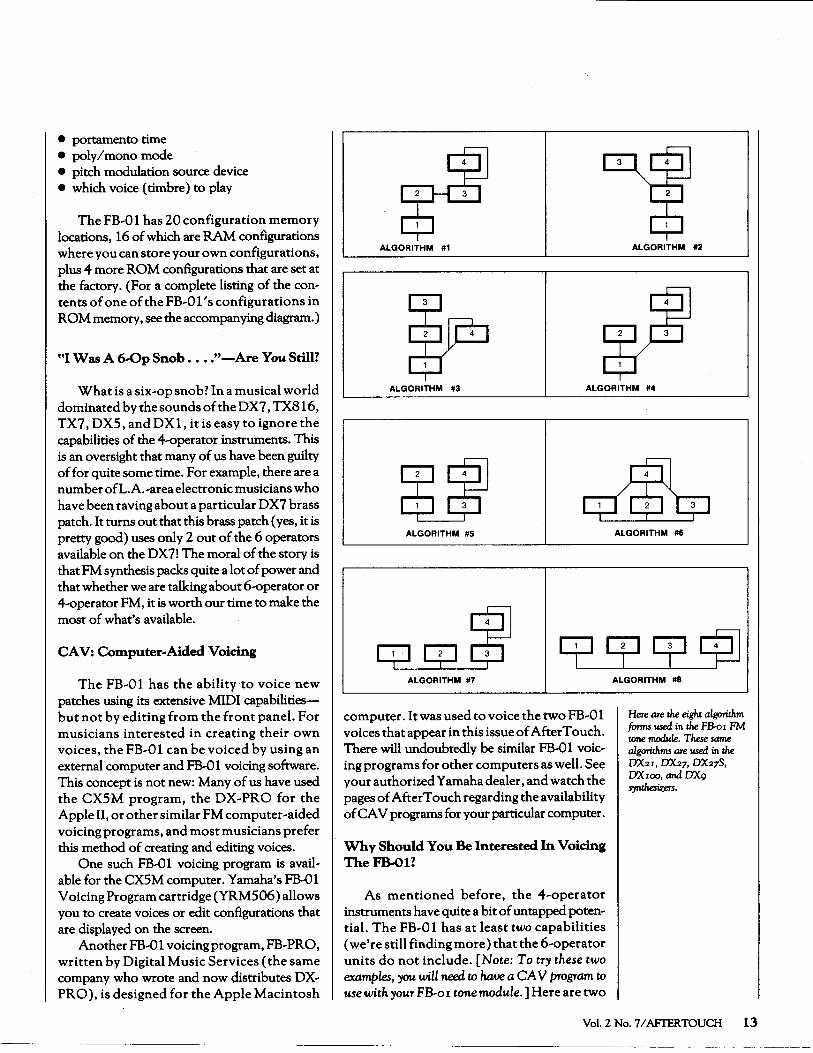
ALGORITHM #1 ALGORITHM #2
ALGORITHM #3 ALGORITHM #4
c:pQ] ~
ALGORITHM #5
ALGORITHM #7
computer. It was used to voice the two FB,Q 1 voices that appear in this issue of After Touch. There will undoubtedly be similar fB,Q1 voic, ing programs for other computers as well. See your authorized Yamaha dealer, and watch the pages of After Touch regarding the availability of CA V programs for your particular computer.
Why Should You Be Interested In Voicing The FB-01?
As mentioned before, the 4,operator instruments have quite a bit of untapped poten, tial. The FB,Q 1 has at least two capabilities (we're still finding more) that the 6,operator units do not include. [Note: To try these two examples, you will need to have a CA V program to
use with your FB-o I tone module.] Here are two
ALGORITHM #6
ALGORITHM #8
Here me the eight algorithm forms used in the FB-oz FM tone module. These same algorithms are used in the DX.2z, DX27, DX27S, DXzoo, and DX9 syntheskers.
Vol. 2 No. 7 I AFTER TOUCH 13
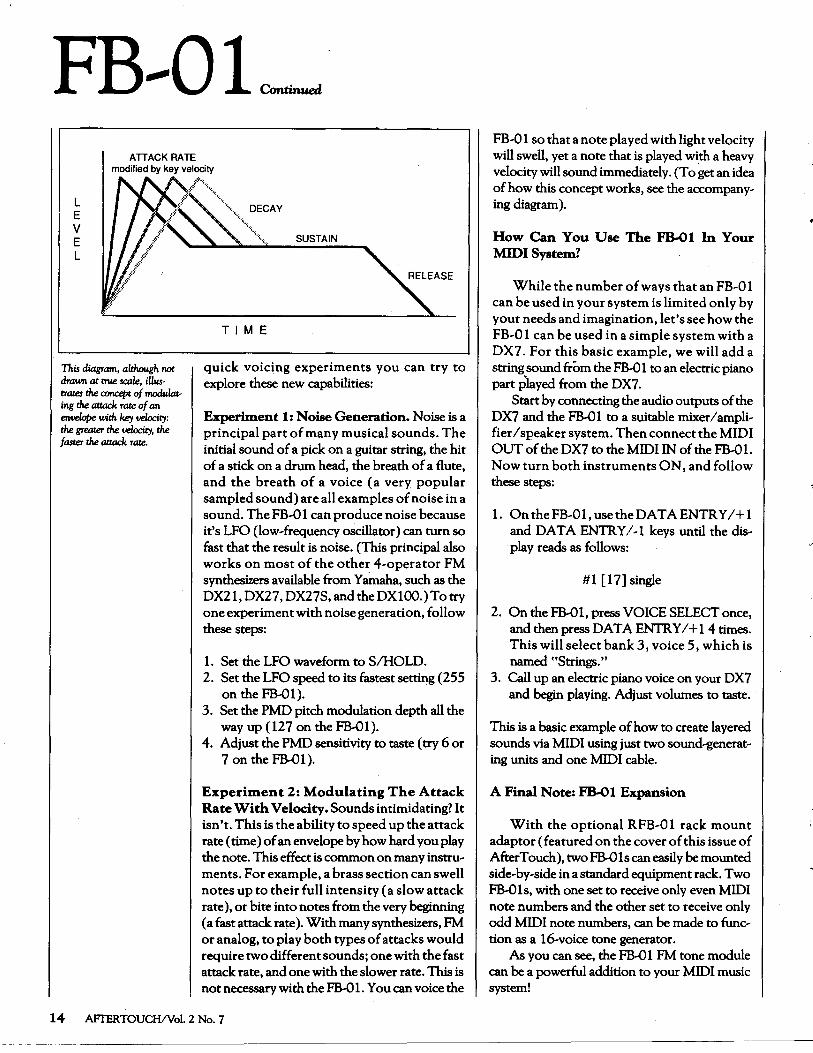
FB--01~· ATTACK RATE
modified by key velocity
L E v E L
This diagram, although not
dTawn at tTI4e scale, iUustrate.s the ronapt of modulating the attack Tate of an en.elope with key velocity: the greater the velocity, the faster the attack Tate.
SUSTAIN
TIME
quick voicing experiments you can try to explore these new capabilities:
Experiment 1: Noise Generation. Noise is a principal part of many musical sounds. The initial sound of a pick on a guitar string, the hit of a stick on a drum head, the breath of a flute, and the breath of a voice (a very popular sampled sound) are all examples of noise in a sound. TheFB#01 can produce noise because it's LFO (low#frequency oscillator) can turn so fast that the result is noise. (This principal also works on most of the other 4#operator FM synthesizers available from Y alnaha, such as the DX21,DX27,DX27S,andtheDX100.)Totry one experiment with noise generation, follow these steps:
1. Set the LFO waveform to SIHOLD. 2. Set the LFO speed to its fastest setting (255
onthe~1). 3. Set the PMD pitch modulation depth all the
way up (127 on the ~1). 4. Adjust the PMD sensitivity to taste (try 6 or
7onthe~1).
Experiment 2: Modulating The Attack Rate With Velocity. Sounds intimidating? It isn't. This is the ability to speed up the attack rate (time) of an envelope by how hard you play the note. This effect is common on many instru# ments. For example, a brass section can swell notes up to their full intensity (a slow attack rate), or bite into notes from the very beginning (a fast attack rate). With many synthesizers, FM or analog, to play both types of attacks would require two different sounds; one with the fast attack rate, and one with the slower rate. This is not necessary with the~ 1. You can voice the
14 AFrERTOUCHNol. 2 No. 7
FB#O 1 so that a note played with light velocity will swell, yet a note that is played with a heavy velocity will sound immediately. (To get an idea of how this concept works, see the accompany# ing diagram).
How Can You Use The FB-01 In Your MIDI System?
While the number of ways that an FB#O 1 can be used in your system is limited only by your needs and imagination, let's see how the FB#O 1 can be used in a simple system with a DX7. For this basic example, we will add a string sound from the ~1 to an electric piano part played from the DX7.
Start by connecting the audio outputs of the DX7 and the ~1 to a suitable mixerlampli# fierI speaker system. Then connect the MIDI OUT of the DX7 to the MIDI IN of the ~1. Now turn both instruments ON, and follow these steps:
1. OntheFB#01,usetheDATAENTRYI+1 and DATA ENTRYI#1 keys until the dis# play reads as follows:
#1 [ 17] single
2. On the ~1. press VOICE SELECT once, and then press OAT A ENTRY I+ 1 4 times. This will select bank 3, voice 5, which is named "Strings."
3. Call up an electric piano voice on your DX7 and begin playing. Adjust volumes to taste.
This is a basic example of how to create layered sounds via MIDI using just two sound~enerat# ing units and one MIDI cable.
A Final Note: FB-01 Expansion
With the optional RFB#01 rack mount adaptor (featured on the cover of this issue of AfterTouch), two~1scaneasily be mounted side#by#side in a standard equipment rack. Two ~1s, with one set to receive only even MIDI note numbers and the other set to receive only odd MIDI note numbers, can be made to func# tion as a 1~voice tone generator.
As you can see, the ~1 FM tone module can be a powerful addition to your MIDI music system!
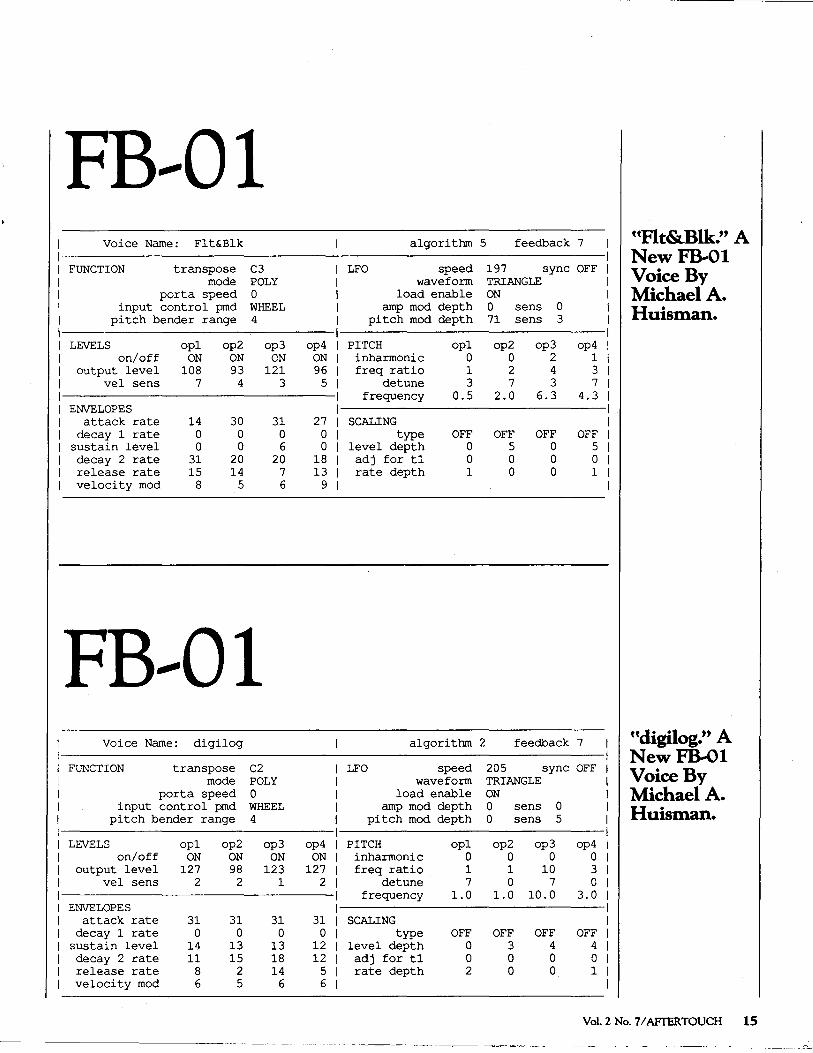
FB--01 Voice Name: Flt&Blk algorithm 5 feedback 7 uFlt&Blk." A
NewFB-01 FUNCTION transpose C3 LFO speed 197 sync OFF Voice By mode POLY waveform TRIANGLE
porta speed 0 load enable ON MichaelA. input control pmd WHEEL amp mod depth 0 sens 0 Huisman. pitch bender range 4 pitch mod depth 71 sens 3
LEVELS opl op2 op3 op4 PITCH opl op2 op3 op4 on/off ON ON ON ON inharmonic 0 0 2 1
output level 108 93 121 96 freq ratio 1 2 4 3 vel sens 7 4 3 5 de tune 3 7 3 7
frequency 0.5 2.0 6.3 4.3 ENVELOPES
attack rate 14 30 31 27 SCALING decay 1 rate 0 0 0 0 type OFF OFF OFF OFF
sustain level 0 0 6 0 level depth 0 5 0 5 decay 2 rate 31 20 20 18 adj for tl 0 0 0 0 release rate 15 14 7 13 rate depth 1 0 0 1 velocity mod 8 5 6 9
FB--01 Voice Name: digilog algorithm 2 feedback 7 udigilog." A
NewFB-01 C2 FUNCTION transpose LFO speed 205 sync OFF Voice By mode POLY waveform TRIANGLE
porta speed 0 load enable ON MichaelA. input control pmd WHEEL amp mod depth 0 sens 0 Huisman. pitch bender range 4 pitch mod depth 0 sens 5
LEVELS opl op2 op3 op4 PITCH opl op2 op3 op4 on/off ON ON ON ON inharmonic 0 0 0 0
output level 127 98 123 127 freq ratio 1 1 10 3 vel sens 2 2 1 2 de tune 7 0 7 0
frequency 1.0 1.0 10.0 3.0 ENVELOPES
attack rate 31 31 31 31 SCALING decay 1 rate 0 0 0 0 type OFF OFF OFF OFF
sustain level 14 13 13 12 level depth 0 3 4 4 decay 2 rate 11 15 18 12 adj for t1 0 0 0 0 release rate 8 2 14 5 rate depth 2 0 0 1 velocity mod 6 5 6 6
Vol. 2 No. 7/AFrERTOUCH 15
Final Touch Hot Tips For TheQXl, RXll, TX816,And MEP4.
Using The QXl As A Teaching Tool
By Steve Berg
AB piano teachers, my wife and I are con~ standy searching for new ways of teaching that will help students master the various skills necessary in music. Originally, we purchased a QX1 sequencer, a DX7 synthesizer, and various modules including a TX216 stricdy for per~ formance use. However, this setup has also proven to be helpful in teaching, both as a motivator and as a way to develop important music skills.
Our technique is to give a student each part of a piece, either classiCal or pop, which we have scored for our configuration of instruments. When the student learns all of the parts, we make a recording of the entire piece into the QXl.
The first step is to select an appropriate piece of music. Piano duets work nicely-just record each hand separately and you have a four~track arrangement which can be voiced to your taste. For more advanced students, I like the Arganbright Three Baroque Pieces. Bach Inventions and Fugues would also adapt easily, though fugue parts should be written out sepa~ rately or highlighted with different colored pens or pencils.
Popular music will usually have to be arranged by the teacher. Start with sheet music. Then write out parts for each "instrument," dividing the piece into melody, bass, and accompaniment lines. It helps to listen to a recording and try to hear what instruments were used to play each part. The complexity of your arrangement will depend on both your equi~ ment and the level of the students who will be playing it. Keep your arrangements simple, as they will probably prove to be harder than you think. After all, a three~part piece is still big time stuff for an eight year old! To save time, arrange pieces everyone will like ("Chariots Of Fire" is a sure winner), and never give out your original score unless you happen to like copying music over.
While your students are learning the parts, do your own QX1 recording of the piece and write down your procedure step by step. Know~ ing which part goes on which track and which voices to use will gready enhance the quality of your future recording sessions with students.
16 AFrERTOUCH/Vol. 2 No. 7
When the student has learned each part and can play them on the piano with a metronome, move to the DX7 and begin recording. I handle the QX1 while the student plays the various parts, starting with whichever part seems to be the most logical first track. A piano type of 5ound probably works best for recording, since it is what the student is used to hearing and it has a precise attack. Once recorded, the modules can be set to any voice desired, and the teacher can write them into the recording with the Program function.
AB the piece builds up, the students are amazed as they hear how the parts fit together. Also, there is a real satisfaction with the finished product for the student, because they know that they did the entire thing. If time permits, dif~ ferent voicings might be tried-this might be used as the subject of a class lesson. The stu~ dents will learn much about orchestration, ensemble playing, balance, and the importance of counting accurately. And they will do it in an enjoyable and challenging way.
* * * *
Adding "Feel" To RXll..COmposed Songs
By Thomas F. Sheehan, Jr.
I've found that by introducing slight tempo changes periodically during a song programmed on the RX 11, I can get a better "live" feel to the drum track.
AB with any other "trick," moderation is the key here. I start by mapping out the song (the patterns, repeats, breaks, and so on); then, every so often, I alter the tempo as I am st~ programming the patterns into songs. I say "every so often" because I don't want to imply that there is a fixed formula.· It's more of a "pinch of this and a dash of that" type of thing.
Also, the tempo changes should never be radical. Let's assume that the baseline tempo is 96 beats per minute (with a basic 414 time signature). To get more of a "live" feel, I might alter the tempo randomly between 94 and 98 beats per minute. The difference in tempo is ever so slight, but it is there-and you don't want it to stick out like a sore thumb, so be tasteful.
* * * *
Tuning The TX816 With The Aid Of A QXl
By Gerry Olszowy
An easy way to tune your TX816 is to set up a "tune"BankforyourQXl. On track 1,setup a measure of A--440 quarter~notes; make sure to include Pitch Bend OFF and Modulation OFF commands.
Copy this measure several hundred times, and then copy track 1 to all of the other tracks.
When you want to tune your TX816, plug your tuner into the headphone send of your mixer and PLAY your QX 1 "tune" Bank. You can now solo any one of the TX816's modules for tuning without having to play notes on your keyboard controller.
* * * *
Use The MEP4 To Convert Aftertouch Data To Breath Controller Data, For Recording On The QXl
By Tom Darter
As you QX1 owners know, the unit is incapable of recording Aftertouch data. Using the MEP4 MIDI Event Processor, it is possible to convert Aftertouch data to Breath Controller data, which the QX1 can record. To achieve this effect, program the MEP4 as follows:
1. Find a blank memory position on the MEP4.
2. Press the UTILITY button to enter Utility mode.
3. Press and hold GROUP SELECT, then use the right and left cursor keys until the display reads as follows:
4. PresstheiNC("yes")buttontwice. You have now initialized the edit buffer.
5. Enter Edit mode by pressing the EDIT key. 6. Press and hold the GROUP SELECT but~
ton, then use the right and left cursor keys until the display reads as follows:
MESSAGE FILTER
7. Now press the right cursor key until you see this display:
CH A.TOUCH =OFF
8. Press the INC button. The display will now read:
CH A. TOUCH= ON
9. Press and hold the GROUP SELECT but~ ton, then press the right cursor key until the display reads as follows:
DATA MODIFIER
When you release the GROUP SELECT but~ ton, you will see this display:
O:MSG:**
10. Press the INC button until the display reads as follows:
O:MSG:Dn.xx
11. Now press the right cursor key until you ·see this:
4·***· . .
Also, make sure that the cursor is positioned over the right asterisk("*").
12. Press the INC button until the display reads as follows:
4:CNV:--Bn.xx.yy
13. Press the right cursor key once; then press INC until the display reads as follows:
4:CNV:--Bn.02.yy
14. Press the right cursor key once; then press DEC once. The display should now read:
4:CNV: ... Bn.02.xx
At this point, the setup is programmed, and all you need to do is name it and store it into memory by following the instructions in the MEP4 owners manual.
Vol. 2 No. 7 I AFTER TOUCH 17
~~-~? ~~------- -
Program Your Mod Wheel To Be ATone Control. By John McEnary.
T HERE IS A CONVENIENT way to set up your DX7 voices so that the Modulation
Wheel (or Foot Controller) acts as an interactive tone control. This allows you to adjust and set the timbre of a voice without going into the EDIT mode. Voices set up this way in the TX7 or TX816 can also be adjusted to a desired tone setting without the use of a computer.
Setting up your voices this way also allows you to use the Modulation Wheel, Foot Controller, Breath Controller, or Aftertouch to subtly vary the timbre of a voice as you perform. This allows a great deal of expressive control, especially when combined with velocity sensitivity and vibrato.
As an example, take the BRASSHORNS voicefrom the factory ROM #A Cartridge (Voice #5 ). Set the Modulation Wheel function parameters as follows:
MODULATION WHEEL
RANGE 99 PITCH OFF AMPLITUDE OFF EGBIAS ON
You will notice that the Modulation Wheel no longer controls vibrato. This can be added later. As an alternative, you could use the Foot Controller to control timbre by setting the Foot Control function parameters exactly like the Modulation Wheel function parameters listed above.
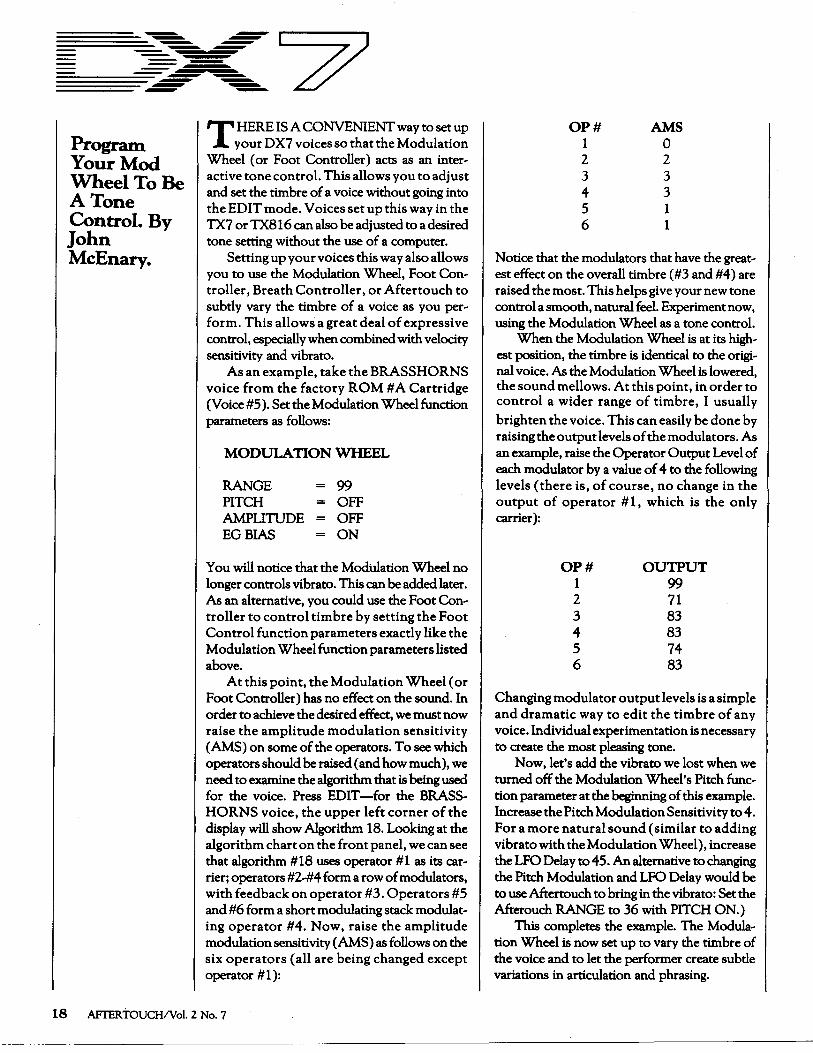
At this point, the Modulation Wheel (or Foot Controller) has no effect on the sound. In order to achieve the desired effect, we must now raise the amplitude modulation sensitivity (AMS) on some of the operators. To see which operators should be raised (and how much), we need to examine the algorithm that is being used for the voice. Press EDIT -for the BRASSHORNS voice, the upper left corner of the display will show Algorithm 18. Looking at the algorithm chart on the front panel, we can see that algorithm #18 uses operator #1 as its carrier; operators #2-#4 form a row of modulators, with feedback on operator #3. Operators #5 and #6 form a short modulating stack modulating operator #4. Now, raise the amplitude modulation sensitivity (AMS) as follows on the six operators (all are being changed except operator # 1 ):
18 AFrERTOUCH!Vol. 2 No. 7
OP# AMS 1 0 2 2 3 3 4 3 5 1 6 1
Notice that the modulators that have the greatest effect on the overall timbre ( #3 and #4) are raised the most. This helps give your new tone control a smooth, natural feel. Experiment now, using the Modulation Wheel as a tone control.
When the Modulation Wheel is at its highest position, the timbre is identical to the original voice. As the Modulation Wheel is lowered, the sound mellows. At this point, in order to control a wider range of timbre, I usually brighten the voice. This can easily be done by raising the output levels of the modulators. As an example, raise the Operator Output Level of each modulator by a value of 4 to the following levels (there is, of course, no change in the output of operator # 1, which is the only carrier):
OP# 1 2 3 4 5 6
OUTPUT 99 71 83 83 74 83
Changing modulator output levels is a simple and dramatic way to edit the timbre of any voice. Individual experimentation is necessary to create the most pleasing tone.
Now, let's add the vibrato we lost when we turned off the Modulation Wheel's Pitch function parameter at the beginning of this example. Increase the Pitch Modulation Sensitivity to 4. For a more natural sound (similar to adding vibrato with the Modulation Wheel), increase the LFO Delay to 45. An alternative to changing the Pitch Modulation and LFO Delay would be to use Aftertouch to bring in the vibrato: Set the Afterouch RANGE to 36 with PITCH ON.)
This completes the example. The Modulation Wheel is now set up to vary the timbre of the voice and to let the performer create subtle variations in articulation and phrasing.
--~ ..._. ,_,. ~
-=-~-=---- ---- - Series D SET
NUMBER
II mcs1 ~ mCS2 ~r-
B
MIDI CHANNEL I A I TRANSPOSE I A I II
I
0 lDJS1)
I
I
~CS3 ~ t-KEY ASSIGN MODE I sinqle I dual I split I I I
I
D lDTS2j
I
mcs4 A Be-
I
lMSH
lMS21
lMS3l
lMS4)
I MS5)
' ' 7E INVITE YOU TO CONTRIBUTE TO AFTER TOUCH. If you've VV developed a novel use of one of the AFTER TOUCH products, write it up and
send it to us. Don't worry about your writing style-just get the information down. If we decide to use your idea as a full article in AFTER TOUCH, we'll try it ourselves, write it up in the magazine, put your name on it, and send you a check for $100.00.
If you've got a hot tip on applications or use, send it along. If we use it, you '11 receive full editorial credit, plus a check for $25.00.
Do you have a great new DX7 patch, a CX5M program, or a great pattern for the RXll? Send them in-we'll pay $25.00 for each one used.
By the way, we cannot assume liability for the safe return of unused ideas, patches, or manuscripts. We will only be able to return unused material to you if you enclose a self~addressed, stamped envelope with your material.
If you just have a question regarding the use of Yamaha professional products, send it along too, and we'll do our best to answer it in the pages of AFTER TOUCH. (We regret that we won't be able to answer questions through the mail, but we will use all of your questions to guide us in our choice of future topics.)
Finally, if youjustwant to get something off your chest, or if you'd like to establish direct contact with other X users, send something in to our letters column, uTouch Response." We'll do our best to print names and addresses of all those who are interested in starting up regional users groups.
AFTER TOUCH is your publication. Let us hear from you!
~f-B
~f-B
~ ~ f-B
~ ~ ~ l -~
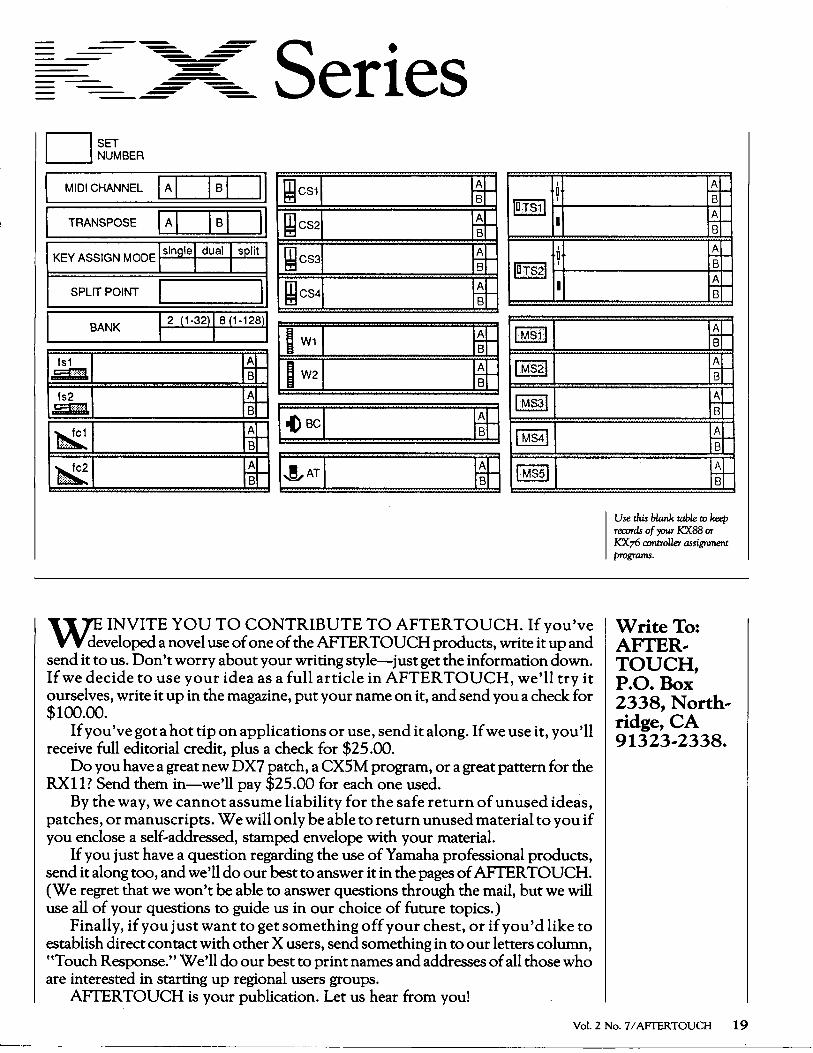
Use this blank table to keep recards of your KXBB or KX76 controller assignment programs.
Write To: AFTER .. TOUCH, P.O. Box 2338, North .. ridge, CA 91323 .. 2338.
Vol. 2 No. 7/AFTERTOUCH 19
AFTER TOUCH P.O. Box 2338 Northridge, CA 91323~2338
Bulk Rate
U.S. Postage
PAID long Prairie, MN
Permit No. 56
FB--0 1 Sound Disk Continued from page 6
Track 1: uSonic Rise"
Two FB..() 1 tone modules were used for this piece. The dominant sound on the track is the SynBell preset. All of the FB~O 1 voices heard here are factory supplied preset voices.
Track 2: uMass Transit"
20 AFI'ERTOUCH/Vol. 2 No.7
A total of four FB~O 1 tone modules were used on this recording. Given the luxury of four tone generators, the basic approach was to use a single timbre.from each unit (instead of relying on each module's multi~timbral capability). The lead sound here is the MonoSax preset. All of the FB~O 1 voices heard here are part of the instrument's permanent preset (ROM) library.
' l