yale v10 ydr2108 - 耶魯鎖yale香港 · ydr2108 user manual keep this manual safe for future...
TRANSCRIPT


YDR2108
User ManualKeep this manual safe for future reference
※The functions and design of this product can be changed without notice for quality improvement.

Please read the followings before using your Yale GATEMAN product
·This product is designed and manufactured to assure personal safety. Improper use can result in personal damageor property loss. Please observe the procedures for installation, use and servicing.
·Yale GATEMAN is a precision electronic device. All safety and operating instructions should be read before theproduct is operated.
·Refer all servicing to qualified service personnel. Servicing is required when the product has been damaged orshould be re-installed.
·Check your installation conditions with the local service provider before installation as your door prep might bedifferent from the standard this lock conforms with.
·The products warranty does not cover defects or damages arising from the door defects, improper installation, lackof or improper maintenance, improper storage, shipping and handling, ordinary wear and tear, misuse, abuse,accident, unauthorized service or use with unauthorized service parts.
·Disassembly, rework and reverse engineering are prohibited without a written approval of Yale except for a normalinstallation of the product.
·The trademarks, trade names, designs, copyright, patents and other proprietary right used on or embodied in theproduct and this manual shall remain the exclusive property of the manufacturer, cannot be copied or used in anyform unless otherwise authorized in writing by Yale.
·Visit our website www.yalelock.com for more information on the products.
·The information in this manual is subject to change without notice.
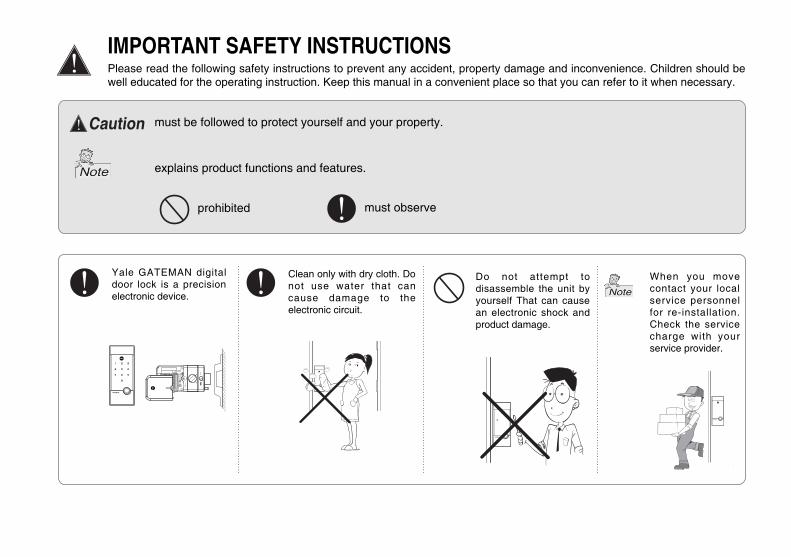
must be followed to protect yourself and your property.
explains product functions and features.
prohibited must observe
IMPORTANT SAFETY INSTRUCTIONSPlease read the following safety instructions to prevent any accident, property damage and inconvenience. Children should bewell educated for the operating instruction. Keep this manual in a convenient place so that you can refer to it when necessary.
Do not attempt todisassemble the unit byyourself That can causean electronic shock andproduct damage.
Clean only with dry cloth. Donot use water that cancause damage to theelectronic circuit.
When you movecontact your localservice personnelfor re-installation.Check the servicecharge with yourservice provider.
Yale GATEMAN digitaldoor lock is a precisionelectronic device.
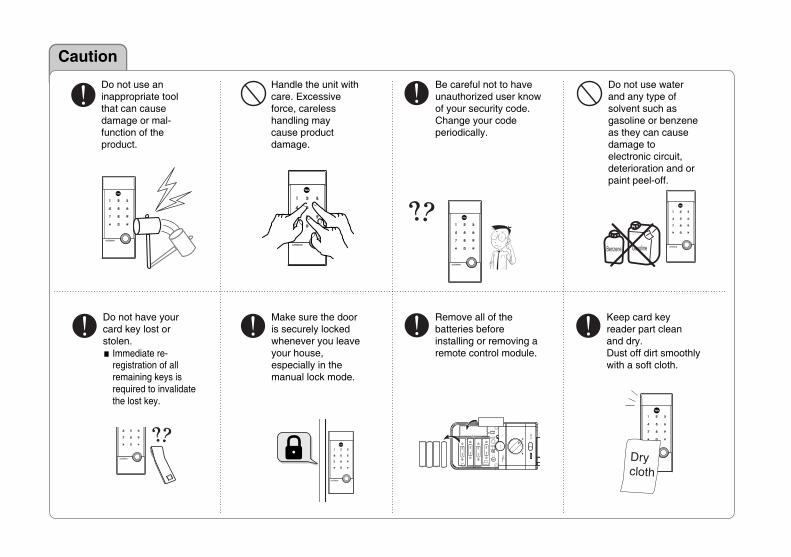
Do not use waterand any type ofsolvent such asgasoline or benzeneas they can causedamage toelectronic circuit,deterioration and orpaint peel-off.
Be careful not to haveunauthorized user knowof your security code.Change your codeperiodically.
Do not use aninappropriate toolthat can causedamage or mal-function of theproduct.
Handle the unit withcare. Excessiveforce, carelesshandling maycause productdamage.
Do not have yourcard key lost orstolen.■ Immediate re-
registration of allremaining keys isrequired to invalidatethe lost key.
Make sure the dooris securely lockedwhenever you leaveyour house,especially in themanual lock mode.
Remove all of thebatteries beforeinstalling or removing aremote control module.
Keep card keyreader part cleanand dry. Dust off dirt smoothly with a soft cloth.
Caution

Overview■ Floating ID technology
The iButton key in the product applies Floating ID technology, thatgenerates new encryption code in every use.
■ Dual accessYou can unlock the door using your ibutton key or security code atyour convenience. You do not need to worry about accidentallockouts by losing or forgetting keys.
■ Easy re-registration of keysIf you lose a key, you can invalidate the lost key by re-registeringall other keys. You can register up to 20 card keys to add users.
■ Verification with the palmThe security code is verified by palm touching to randomize anyfingerprint residues on the keypad so protect from exposing it.
■ Easy and simple operationOne-touch operation allows every user including children andsenior the simplest use.
■ Automatic lockingJust closing the door will automatically lock the door. Manual operation is also available.
■ Break-in/Damage alarm80dB alarm will go off if anyone attempts to damage the lock orforces the door open.
■ Self-checkingThe lock checks the system status and alerts you in case ofmalfunction or low battery power.
■ Heat sensorIf the lock detects over 60℃ temperature in case of fire, it raisesthe alarm and automatically withdraw the locking bolt.
■ Emergency power supplyWhen the batteries are completely discharged you can easilysupply emergency power to the lock with a 9V battery.
■ Forced lock modeInternal forced lock prevents anyone to unlock from the outsideand external forced lock makes only manual thumbturn availableto open the lock from the inside.
■ Volume controlYou can change the operating volume without disturbing others.The break-in alarm still operates even if the silent mode is on.
■ Remote controlYou can use the remote control by installing the applicableremote control module. This option may not be availabledepending on your country or local dealer.
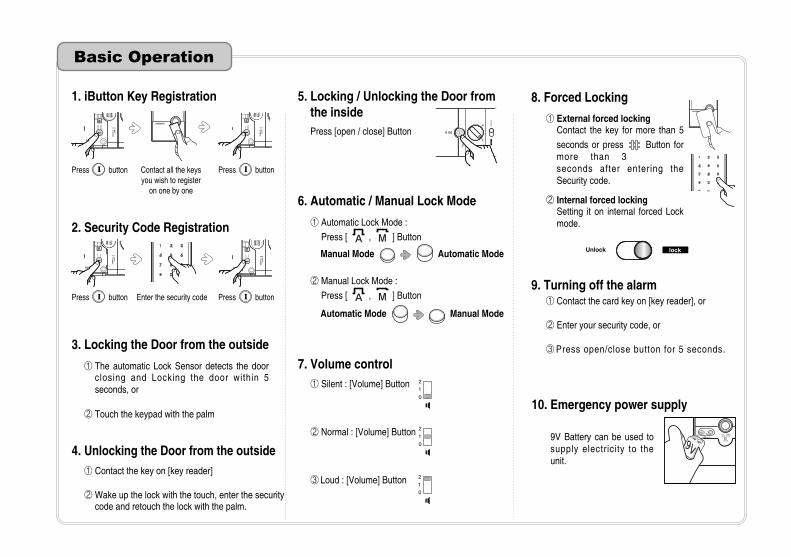
8. Forced Locking
Basic Operation
1. iButton Key Registration 5. Locking / Unlocking the Door fromthe inside
10. Emergency power supply
6. Automatic / Manual Lock Mode
7. Volume control
2. Security Code Registration
Press button Contact all the keysyou wish to register
on one by one
① Contact the key on [key reader]
② Wake up the lock with the touch, enter the securitycode and retouch the lock with the palm.
① The automatic Lock Sensor detects the doorclosing and Locking the door within 5seconds, or
② Touch the keypad with the palm
① External forced lockingContact the key for more than 5
seconds or press Button formore than 3seconds after entering theSecurity code.
② Internal forced lockingSetting it on internal forced Lockmode.
① Contact the card key on [key reader], or
② Enter your security code, or
③Press open/close button for 5 seconds.
9V Battery can be used tosupply electricity to theunit.
① Silent : [Volume] Button
② Normal : [Volume] Button
③ Loud : [Volume] Button
① Automatic Lock Mode :
Press [ , ] Button
② Manual Lock Mode :
Press [ , ] Button
Manual Mode Automatic Mode
Press [open / close] Button
Enter the security code
Press button
Press button Press button
3. Locking the Door from the outside
4. Unlocking the Door from the outside
Automatic Mode Manual Mode
Unlock lock
9. Turning off the alarm

09
08
11
13
15
16
18
19
20
21
22
24
25
26
28
29
30
31
32
Cautions
37
38
38
33
34
Option1. Remote control Module
2. Remote control
1. Emergency Power Supply
2. Lost key
3. Product malfunction
Specifications
Identification of Product
How to use1. Registering iButton key
2. Registering security code
3. Locking the Door from the outside
4. Unlocking the Door from the outside
5. Locking the Door From the inside
6. Unlocking the Door From the inside
7. Setting it on Manual Lock Mode Alarm
8. Automatic / Manual Lock Mode
9. External Forced Lock
10. Internal Forced Lock
11. Using Manual Knob in Emergency
12. Break-in / Damage Alarm
13. Heat Alarm
14. Wrong-try Lock-out
15. Volume Control
16. Battery Replacement
17. Displaying operation status
C O N T E N T S

Specifications
08
Sold separately
Specifications
Front Body
Back Body
Remote control
iButton Key
Battery
19(D)×64.6(W)×160.2(H) Die cast zinc
36(D)×85(W)×158(H) Glass fiber enforced plastic
4 EA
4EA 1.5V AA alkaline batteries(Operating voltage: 4.5 ~ 6 V)
Operating temperature : -15 ~ 55℃
Up to 20 keys registration (sold separately)
Lasts up to 1 year (assuming product is used 10 times a day)
Remarks
※ Battery life may vary depending on temperature, moisture levels, frequency of use and the quality of the batteries. ※ Please make sure that all parts are included when purchasing the product. ※ Optional products may not be available depending on your country or local dealer.
Parts
Wireless
Front Body BackBody
■Basic Contents■Option
·Card Key
·Screws
·Batteries
·Installation Template
·Users Manual Remote control Remote control module

1. Front (Front Body, install on the outside of the door)
Ide
ntific
atio
n o
f Pro
du
ct
09
Identification of Product
Key reader
Reset button
Emergency Power Supply Terminal
(Sold separately)
Low Battery indicator
LED
Keypad
Jammed Locking bolt
Cover
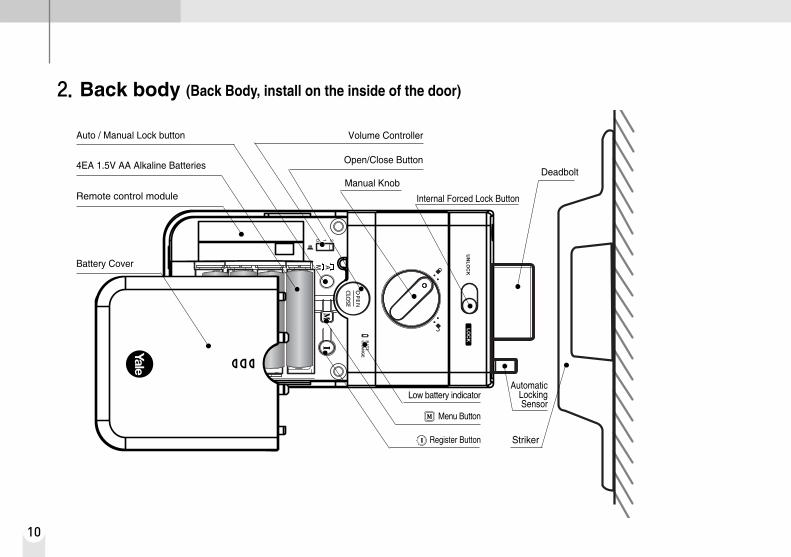
2. Back body (Back Body, install on the inside of the door)
10
Open/Close Button
Manual Knob
Internal Forced Lock Button
Menu Button
Low battery indicator
Register Button
Deadbolt
Remote control module
Battery Cover
4EA 1.5V AA Alkaline Batteries
Auto / Manual Lock button
AutomaticLockingSensor
Striker
Volume Controller
1. Registering Card Keys
11
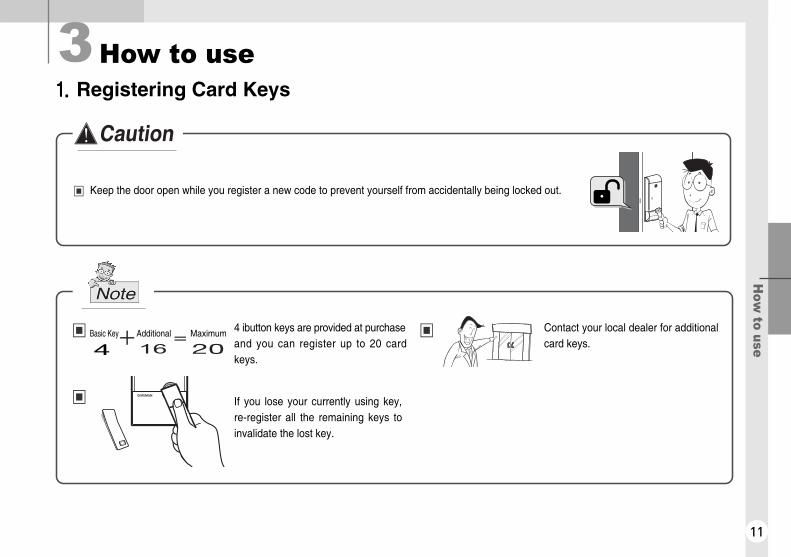
▣ Keep the door open while you register a new code to prevent yourself from accidentally being locked out.
4 ibutton keys are provided at purchaseand you can register up to 20 cardkeys.
▣
If you lose your currently using key,re-register all the remaining keys toinvalidate the lost key.
▣
Contact your local dealer for additionalcard keys.
▣
How to use
Basic Key Additional Maximum
Ho
w to
use4

12
Press [Registration]button
If it takes too long(over 7 seconds) toenter the code afterpressing[Registration]button,the code will not beregistered.
The registration is
complete with a “pi-bi-
bing” sound.
If you hear a “pik”
Sound, the card keys
are registered. If you
hear a “t i-to-t i-to”
sound, the key had
been already registered.
Check the keyoperation
Opening the door with
your card key.
Press [wake-up] button
and contact your card
key to [card key reader].
Pi-bing Pi-bi-bing
Pik
Press [Registration]button
Contact all the keysyou wish to register onthe [card key reader]one by one

2. Registering Security Code
13
▣ Keep the door open while you register the security code to prevent yourself from accidentally getting locked out.
Set a code of 4~12 digits using thenumber buttons
(4digits) (12digits)0000 ~ 000000000000
The old code is automatically deleted when registering a new code.
If incorrect codes are entered 5 times in a row all functions shut down for about 3 minutes.Use manual thumbturn or just wait 3 minutes to resume the operation.
▣
▣
▣
Ho
w to
use

14
Press[Registration]button
The registration iscomplete with a “pi-bi-bing” sound.
Press [Registration]button
Open [Battery Cover] and Press[Registration] button.
If i t takes too long(over 7 seconds) toenter the code afterpressing [registersecurity code] button,the code will not beregistered.
< *> and <#> buttons
can not be used for
security codes.
Enter yoursecurity code
Enter the code youwish to register.(4~12 digits)
Check yoursecurity code
Once registration iscompleted make it sure to open the lock withyour new security code.
Opening the doorwith your codeTouch the keypad
with the palm
Enter code
Retouch the keypad
with the palm
Press [Registration]button
Slide up [keypad cover]and press 3, 5, 4 and 6consecutively
Ex) Changing yourcode to 3, 5, 4, 6
Press [Registration]button. If you hear a “pi-bi-bing” melody, registration iscompleted.
Pi-bing Pi-bi-bing
Pi-bi-bing
Pi-bing

3. Locking the Door from the Outside
15
The automatic lock sensor detects thedoor closing and locks the doorautomatically within 5 seconds.
The door locks when touch thekeypad with the palm
As the automatic lock function does not work in manual lock mode, make sure to check that the door is securely locked when leavingthe premises.
Within 5 secondsAutomaticlock mode
Manual lockmode
Di-di-ding
Di-di-ding
Ho
w to
use
4. Unlocking the Door from the Outside
16
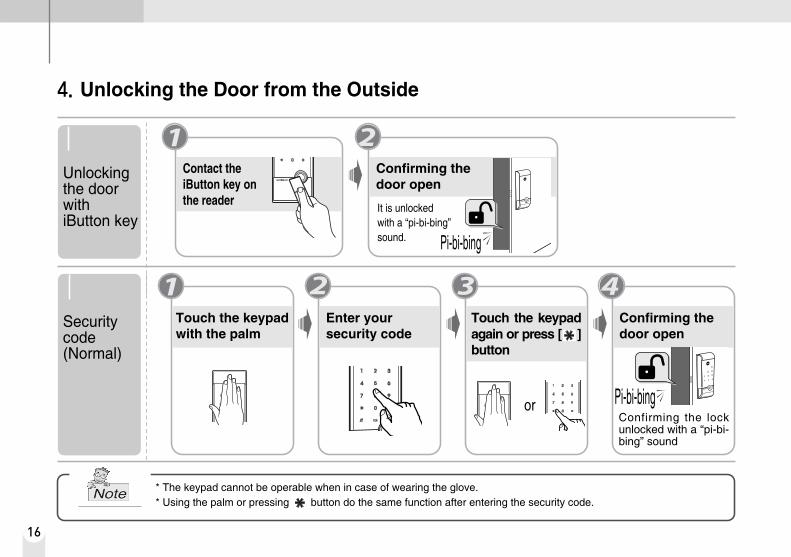
Confirming thedoor open
It is unlockedwith a “pi-bi-bing”sound.
Unlockingthe doorwith iButton key
Pi-bi-bing
Touch the keypadagain or press [ ]button
Touch the keypadwith the palm
Enter yoursecurity code
Security code(Normal)
Confirming the lockunlocked with a “pi-bi-bing” sound
Pi-bi-bing
Confirming thedoor open
Contact theiButton key onthe reader
or
* The keypad cannot be operable when in case of wearing the glove.* Using the palm or pressing button do the same function after entering the security code.

17
Ho
w to
use
Touch thekeypad withthe palm
Enter thesecurity codetwo times in arow
Confirming thedoor open
SecurityCode(Exposure-proof)
Touch thekeypad again orpress button
* Exposure-proof function is useful when there is danger of exposing the security code.
* All the numbers on the keypad are blinking with every touch when exposure-proof function is in operation.
or
Press
2 times
Pi-bi-bing

5. Locking the Door from the Inside
18
When set on automatic lock mode.The automatic lock sensor detects thedoor closing and locks the doorautomatically within 5 seconds.
Use [manual knob] on the back body.
Within 5 seconds
Automaticlock mode
Manual lock mode
Di-di-ding
Di-di-ding

6. Unlocking the Door from the Inside
19
Confirming the door openPress [open/close] button on theback body
Ho
w to
use
7. Setting it on Manual Lock Mode Alarm
20
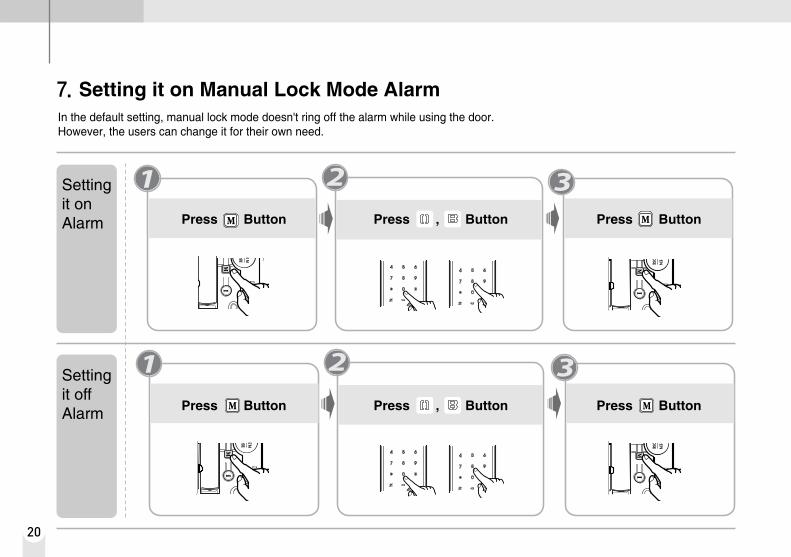
Press , Button
Settingit onAlarm Press Button
Settingit offAlarm
Press Button
Press , ButtonPress Button Press Button
In the default setting, manual lock mode doesn't ring off the alarm while using the door. However, the users can change it for their own need.
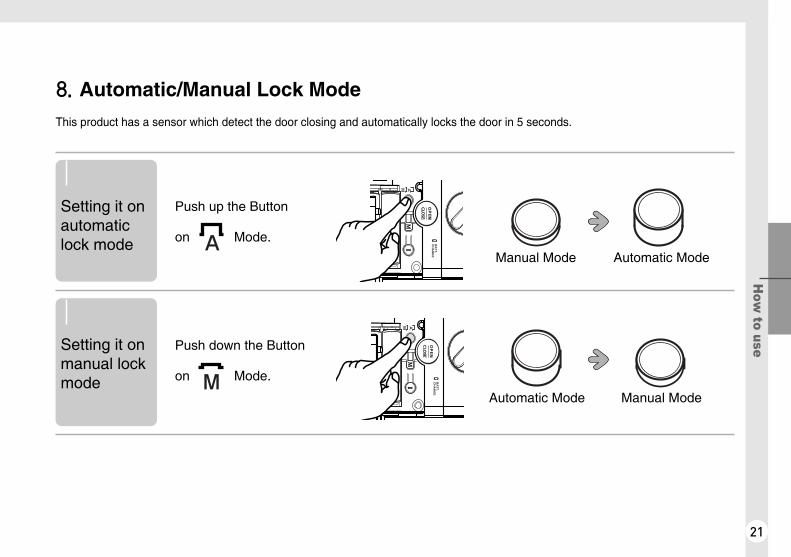
8. Automatic/Manual Lock Mode
This product has a sensor which detect the door closing and automatically locks the door in 5 seconds.
21
Setting it onautomaticlock mode
Setting it onmanual lockmode
Push up the Button
on Mode.
Manual Mode Automatic Mode
Automatic Mode Manual Mode
Push down the Button
on Mode.
Ho
w to
use

9. External Forced Lock
22
Setting external forced lock mode on with iButton key
In external forced lock mode, the door cannot be unlocked from the inside. It is useful to prevent a break-in in case of long absence of theusers from the premises.
⊙ It sounds the warning beeps if
you press [open/close] button
on the back body in external
forced lock mode.
⊙ In order to turn the alarm off ;(1) Contact your registered iButton key, or (2) enter the registered security code, or (3) press and hold [open/close] button for 5 seconds.
⊙ In case of using the manual knob, alarm may go off.
Contact the cardkey for more than5 seconds unti lyou hear 3 beeps
External forcedlock is set onwith a “di-ri-rik”soundpikpikpik di-ri-ring
Pi-pi-pik
SettingexternalForced Lockmodeon withiButton key
Contact the iButtonkey for 5 seconds
Confirming externalforced Lock mode

23
<iButton key> <security code>
Setting external forced lock mode off
Press and holdbutton
Touch the keypadwith the palm
Enter the securitycode
Settingexternalforced lockmode on withThe securitycode
Press and holdbutton for about 3seconds until externalforced lock mode isset on with 3 beeps.
To unlock the door from theoutside in external forced lockmode, use your iButton key orsecurity code to unlock the door.Once the door unlocks, the systemautomatically switches theexternal forced lock mode off.
Ho
w to
use
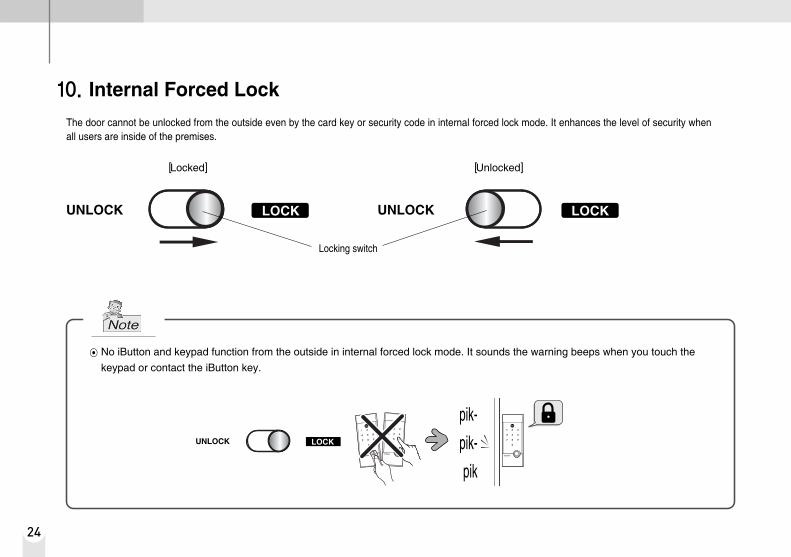
10. Internal Forced Lock
24
[Locked]
Locking switch
The door cannot be unlocked from the outside even by the card key or security code in internal forced lock mode. It enhances the level of security whenall users are inside of the premises.
[Unlocked]
UNLOCK
⊙ No iButton and keypad function from the outside in internal forced lock mode. It sounds the warning beeps when you touch the
keypad or contact the iButton key.
pik-
pik-
pik
LOCK
UNLOCK LOCK
UNLOCK LOCK
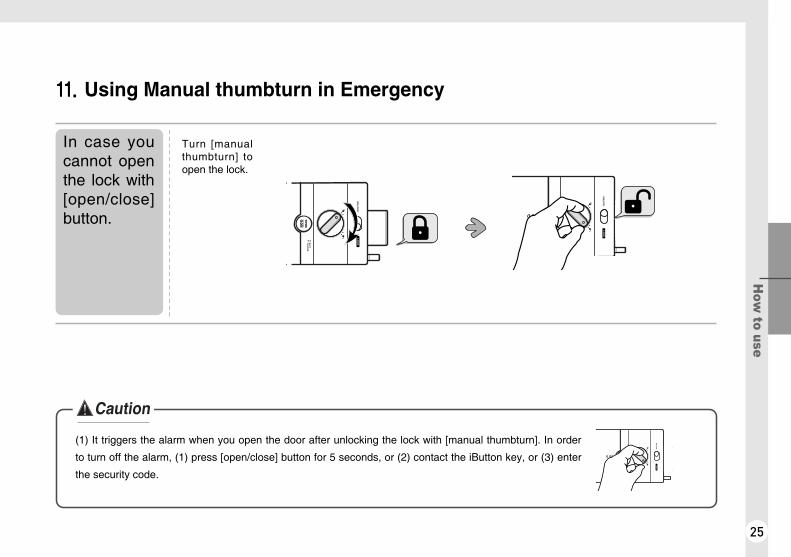
11. Using Manual thumbturn in Emergency
25
(1) It triggers the alarm when you open the door after unlocking the lock with [manual thumbturn]. In order
to turn off the alarm, (1) press [open/close] button for 5 seconds, or (2) contact the iButton key, or (3) enter
the security code.
In case youcannot openthe lock with[open/close]button.
Turn [manualthumbturn] toopen the lock.
Ho
w to
use

12. Break-in / Damage Alarm
26
Break-in alarm
Damage alarm
•If the lock is damaged or entry is forcedwhile the door is locked, a 80dB alarm istriggered.
•It sounds the alarm to open the lock
with [manual thumbturn] while the
door is closed.
•If the lock is damaged on the outsidethe damage alarm is triggered.
The alarm lasts up to 30 minutes or until a verification is made.

27
Contact youriButton key
① Touch the keypad with the palm
② Enter the security code
③ Touch the keypad with the palm again or press button
Enter thesecuritycode
Press and hold [open/close] button for 5 seconds.Press[open/close]button
① Contact the card key on the [iButton key reader].
Turning the alarm off
5 seconds
Ho
w to
use
(Choose one of the three options below.)

13. Heat Alarm
28
The lock triggers the alarm and automatically unlocks if it detects temperature as high as 60ºC(140ºF). The detection temperature can be different depending on the surroundings.
⊙ The heat alarm can be turned off by removing batteries or entering the iButton key or the security code.
[Locked] [Automatically unlocked]
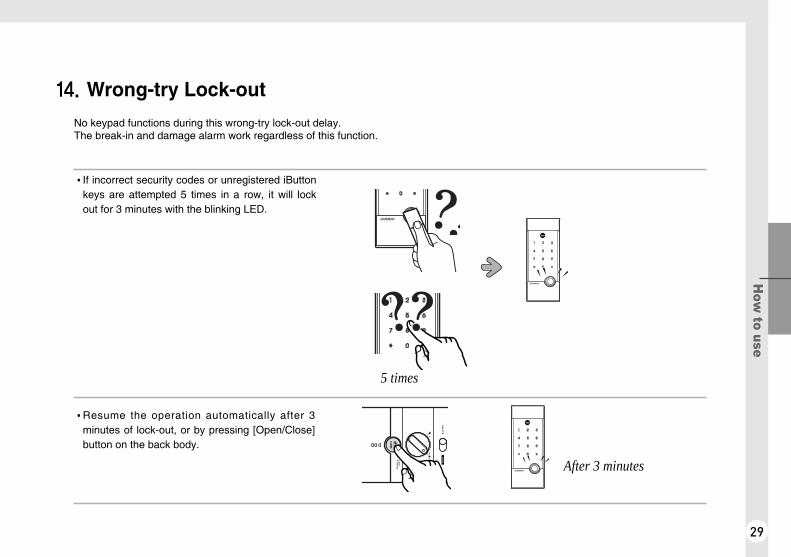
14. Wrong-try Lock-out
29
No keypad functions during this wrong-try lock-out delay.The break-in and damage alarm work regardless of this function.
•If incorrect security codes or unregistered iButtonkeys are attempted 5 times in a row, it will lockout for 3 minutes with the blinking LED.
5 times
•Resume the operation automatically after 3minutes of lock-out, or by pressing [Open/Close]button on the back body.
After 3 minutes
Ho
w to
use

15. Volume control
30
❶ Silent Mode
❷ Normal Mode
❸ Loud Mode
This function can control the operating sounds so that the door can be opened and closed without disturbing others.
Setting the volume Button on “ 0 ”
Setting the volume Button on “ 1 ”
Setting the volume Button on “ 2 ”
* In the silent mode, the alarm still operates.

16. Battery & Replacement
31
Do not mix new andused batteries.
This product uses 4 1.5V alkalineAA batteries which can be usedapproximately one year on thecondition of 10 times open/closecycles per day.
※ Battery life mayvary due totemperature,moisture,frequency of useand the quality ofthe batteries.
1:1 actual size
1.5V AA size alkaline battery
·Always check + and - directions when inserting batteries.·Use the authentic alkaline batteries. It is a user’s responsibility for damage caused by
using unauthentic batteries.·Risk of explosion if battery is replaced by an incorrect type.·Dispose of used batteries according to the instructions.
■ Battery replacementwarning
Replace all 4 batteries when alow battery warning melody ringsand the LED turns red.
LED(Red)
The low battery LED turns on
When lowbattery warningmelody rings
1 Year
Ho
w to
use

32
17. Displaying operation status (Independent lighting)
After
1minute
After
1minute
❶ Low battery
❷ Jammed locking bolt
❸ Wrong-try lock-out delay for 3 minutes
❹ External / Internal forced locking
Starting from the left column, the LED comes
on from left to right to left for twice.
❺ In case of emergency
The LED keeps coming on to the clockwise.
❻ When registering a security code
It shows what the user has just registered in order.
❼ When registering the iButtonkeys
It shows how many keys are registered.
33
Op
tion
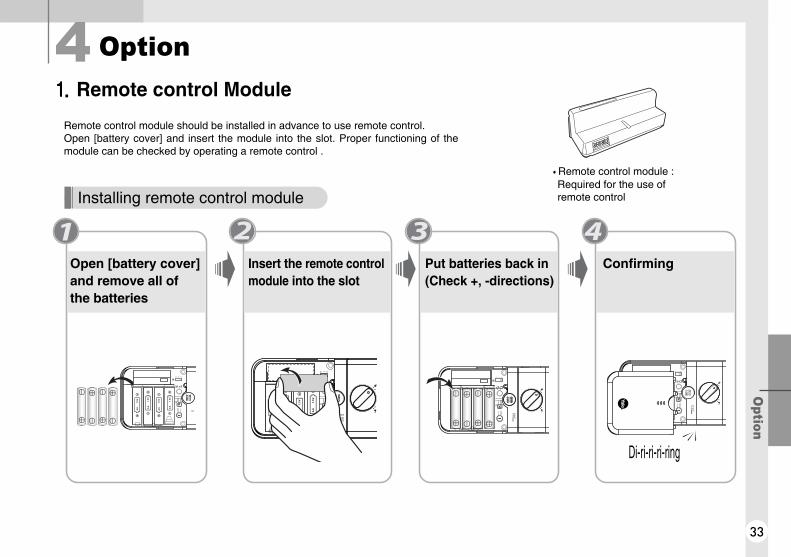
1. Remote control Module
Open [battery cover]and remove all ofthe batteries
Insert the remote controlmodule into the slot
Put batteries back in (Check +, -directions)
Confirming
Installing remote control module
•Remote control module :Required for the use ofremote control
Di-ri-ri-ri-ring
Option
Remote control module should be installed in advance to use remote control.Open [battery cover] and insert the module into the slot. Proper functioning of themodule can be checked by operating a remote control .
34
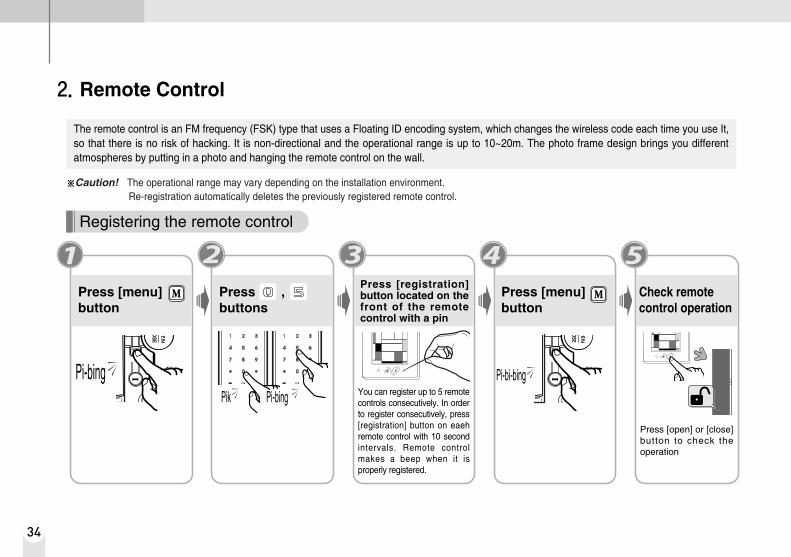
2. Remote Control
The remote control is an FM frequency (FSK) type that uses a Floating ID encoding system, which changes the wireless code each time you use It,so that there is no risk of hacking. It is non-directional and the operational range is up to 10~20m. The photo frame design brings you differentatmospheres by putting in a photo and hanging the remote control on the wall.
※Caution! The operational range may vary depending on the installation environment. Re-registration automatically deletes the previously registered remote control.
Press [menu]button
Press , buttons
Press [registration]button located on thefront of the remotecontrol with a pin
You can register up to 5 remotecontrols consecutively. In orderto register consecutively, press[registration] button on eaehremote control with 10 secondintervals. Remote controlmakes a beep when it isproperly registered.
Press [menu] button
Press [open] or [close]button to check theoperation
Registering the remote control
Pi-bingPi-bing
Pi-bi-bingPik
Check remotecontrol operation

35
In case you do not use remote control or lose it, deleting remote control registration may lengthen the battery life.
Deleting the remote control registration
Press [menu] button
Press ,buttons
Deleting remotecontrol registration
Remote control registrationis cancelled with a “di-ri-ri-ring” sound.
Press [menu] button
Pi-bingPi-bingPik
Di-ri-ri-ri-ring
Op
tion

36
Open up the battery cover at the back ofthe remote control and change thebatteries.
Unlocking the door Locking the door
How to use the remote control
Changing the batteries
Press [close] button, and it will lock within2~3 seconds.
Press [open] button, and it will unlock within2~3 seconds.

37
1. Emergency power supply
Cautions
In case the batteries are completely discharged, 9V battery can be used to supply electricity to the unit. Unlock with the card key or securitycode while contacting a 9V battery just like the below instruction. Discharged batteries should be replaced right away.
Discharged Holding a 9Vbattery
Touch the keypad with the palm,enter the security code andretouch the keypad or press
button.
Holding a 9V battery to [emergencypower supply terminal], contactyour iButton key on the [keyreader]
Replace all of thebatteries
Check out if a iButtonkey and security codework properly afterreplacing all batteries.
Open thedoor
ChangingBatteries
ConfirmingiButton key use
Security code use
Ca
utio
ns

38
2. Lost iButton key
If you lose the iButton key, re-registering remaining keys is required to prevent
other people from using the lost card key.
Enter the security code in case you lose the iButton key or you are not carrying it.
※ It is a user’s liability to break the lock because the user did not register a security code.
Press reset button located the below of [iButton key reader] with the pin and try again with the key or the security
code. If it still does not work, call for after-sales service.
3. In case of product malfunction
Lost iButton keyRe-registering iButton key
Lost iButtonkey
reset button

Ca
utio
ns