xpr 6550 xpr 6580 user guide - auburn university this equipment does cause harmful interference to...
TRANSCRIPT
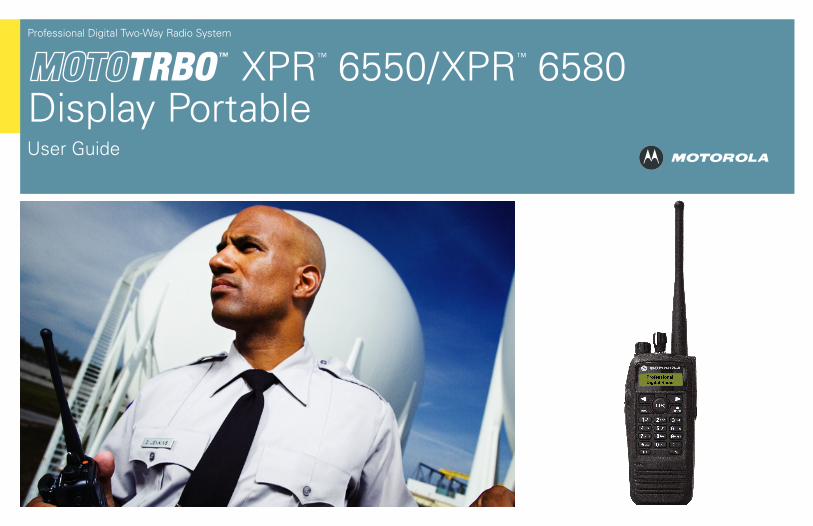
Professional Digital Two-Way Radio System
XPR™ 6550 / XPR™ 6580Display PortableUser Guide

Declaration of C
onformity
English
i
C logo shown below.
a)
C Rules. Operation is subject to the
ce that may cause undesired operation.
NAG-LACR.book Page i Tuesday, March 9, 2010 3:35 PM
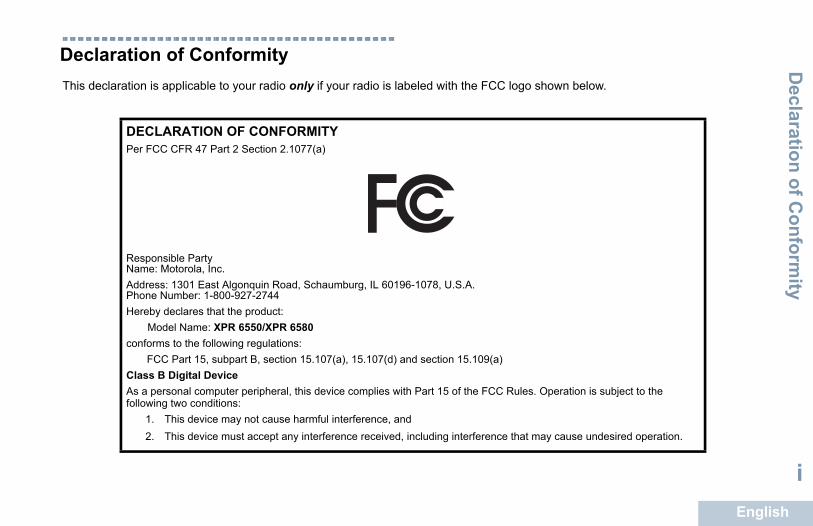
Declaration of ConformityThis declaration is applicable to your radio only if your radio is labeled with the FC
DECLARATION OF CONFORMITYPer FCC CFR 47 Part 2 Section 2.1077(a)
Responsible Party Name: Motorola, Inc.Address: 1301 East Algonquin Road, Schaumburg, IL 60196-1078, U.S.A.Phone Number: 1-800-927-2744Hereby declares that the product:
Model Name: XPR 6550/XPR 6580conforms to the following regulations:
FCC Part 15, subpart B, section 15.107(a), 15.107(d) and section 15.109(Class B Digital DeviceAs a personal computer peripheral, this device complies with Part 15 of the FCfollowing two conditions:
1. This device may not cause harmful interference, and 2. This device must accept any interference received, including interferen
E
i
a Class B digital device, pursuant to part rotection against harmful interference in a radio frequency energy and, if not ful interference to radio communications. icular installation.
reception, which can be determined by ct the interference by one or more of the
which the receiver is connected.
NAG-LACR.book Page ii Tuesday, March 9, 2010 3:35 PM
Dec
lara
tion
of C
onfo
rmity
nglish
i
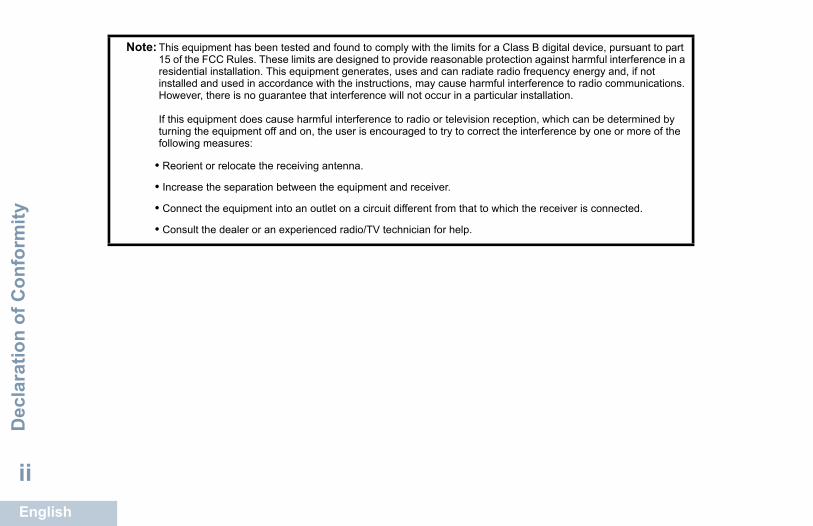
Note: This equipment has been tested and found to comply with the limits for 15 of the FCC Rules. These limits are designed to provide reasonable presidential installation. This equipment generates, uses and can radiateinstalled and used in accordance with the instructions, may cause harmHowever, there is no guarantee that interference will not occur in a part
If this equipment does cause harmful interference to radio or television turning the equipment off and on, the user is encouraged to try to correfollowing measures:
• Reorient or relocate the receiving antenna.
• Increase the separation between the equipment and receiver.
• Connect the equipment into an outlet on a circuit different from that to
• Consult the dealer or an experienced radio/TV technician for help.
Contents
English
iii
ng Radio Controls . . . . . . . . . . . . . . . . . . . . 5Controls . . . . . . . . . . . . . . . . . . . . . . . . . . . . . 6mmable Buttons . . . . . . . . . . . . . . . . . . . . . . . 7nable Radio Functions . . . . . . . . . . . . . . . . . 7
gnable Settings or Utility Functions . . . . . . . . . 8ing the Programmed Functions . . . . . . . . . . . 8
the Keypad . . . . . . . . . . . . . . . . . . . . . . . . . . . 9o-Talk (PTT) Button . . . . . . . . . . . . . . . . . . . 10ing Between Conventional Analog and l Mode . . . . . . . . . . . . . . . . . . . . . . . . . . . . . . 11ity Plus . . . . . . . . . . . . . . . . . . . . . . . . . . . . . 11
ng Status Indicators . . . . . . . . . . . . . . . . . . 12 Icons . . . . . . . . . . . . . . . . . . . . . . . . . . . . . . 12ns . . . . . . . . . . . . . . . . . . . . . . . . . . . . . . . . 13
em Icons . . . . . . . . . . . . . . . . . . . . . . . . . . . 14dicator . . . . . . . . . . . . . . . . . . . . . . . . . . . . . 14Tones . . . . . . . . . . . . . . . . . . . . . . . . . . . . . . 15or Tones . . . . . . . . . . . . . . . . . . . . . . . . . . . . 16
and Receiving Calls . . . . . . . . . . . . . . . . . . 16ng a Site . . . . . . . . . . . . . . . . . . . . . . . . . . . 16ng a Zone . . . . . . . . . . . . . . . . . . . . . . . . . . . 17ng a Radio Channel, Subscriber ID, up ID . . . . . . . . . . . . . . . . . . . . . . . . . . . . . . 17ing and Responding to a Radio Call . . . . . . 18
NAG-LACR.book Page iii Tuesday, March 9, 2010 3:35 PM
ContentsThis User Guide contains all the information you need to use the MOTOTRBO XPR Series Digital Portable Radios.
Declaration of Conformity . . . . . . . . . . . . . . . . . . . . . iImportant Safety Information . . . . . . . . . . . . . . . . . vii
Product Safety and RF Exposure Compliance . . vii
Software Version . . . . . . . . . . . . . . . . . . . . . . . . . . . viiComputer Software Copyrights . . . . . . . . . . . . . . viiiGetting Started . . . . . . . . . . . . . . . . . . . . . . . . . . . . . . 1
How to Use This Guide . . . . . . . . . . . . . . . . . . . . . . . 1What Your Dealer/System Administrator Can Tell You . . . . . . . . . . . . . . . . . . . . . . . . . . . . . . 1
Preparing Your Radio for Use . . . . . . . . . . . . . . . . . . 2Charging the Battery . . . . . . . . . . . . . . . . . . . . . . . . . 2Attaching the Battery . . . . . . . . . . . . . . . . . . . . . . . . . 2Attaching the Antenna . . . . . . . . . . . . . . . . . . . . . . . . 3Attaching the Belt Clip . . . . . . . . . . . . . . . . . . . . . . . . 3Attaching the Universal Connector Cover (Dust Cover) . . . . . . . . . . . . . . . . . . . . . . . . . . . . . . 4
Powering Up the Radio . . . . . . . . . . . . . . . . . . . . . . . 4Adjusting the Volume . . . . . . . . . . . . . . . . . . . . . . . . 5
IdentifyiRadio Progra
AssigAssi
AccessUsing Push-TSwitchDigita
Capac
IdentifyiDisplayCall IcoSent ItLED InAudio Indicat
Making SelectiSelectiSelectior Gro
Receiv

E
iv
Receiving and Responding to a Group Call . . . . 18 Deleting an Entry from the Scan List . . . . . . . . 31ng and Editing Priority for an in the Scan List . . . . . . . . . . . . . . . . . . . . 31
. . . . . . . . . . . . . . . . . . . . . . . . . . . . . . . . . . 32g and Stopping Scan . . . . . . . . . . . . . . . . 32nding to a Transmission During a Scan . . 33g a Nuisance Channel . . . . . . . . . . . . . . . 33ing a Nuisance Channel . . . . . . . . . . . . . . 34 Settings . . . . . . . . . . . . . . . . . . . . . . . . . . 34 a Group Call from Contacts . . . . . . . . . . 35 a Private Call from Contacts . . . . . . . . . 36 a Private Call by Alias Search . . . . . . . . 37ator Settings . . . . . . . . . . . . . . . . . . . . . . 38ing and Deactivating Call Ringers for Calls . . . . . . . . . . . . . . . . . . . . . . . . . . . . 38ing and Deactivating Call Ringers for essage . . . . . . . . . . . . . . . . . . . . . . . . . . 38ing and Deactivating Call Ringers for try Status with Text . . . . . . . . . . . . . . . . 39
ing Ring Styles . . . . . . . . . . . . . . . . . . . . 39ting Alarm Tone Volume . . . . . . . . . . . . . . 40Features . . . . . . . . . . . . . . . . . . . . . . . . . 40g Recent Calls . . . . . . . . . . . . . . . . . . . . . 40 Call Screen . . . . . . . . . . . . . . . . . . . . . . . 41 an Alias or ID from the Missed Call List . 41
NAG-LACR.book Page iv Tuesday, March 9, 2010 3:35 PM
Con
tent
s
nglish
Receiving and Responding to a Private Call . . . 19Receiving an All Call . . . . . . . . . . . . . . . . . . . . . . 20
Making a Radio Call . . . . . . . . . . . . . . . . . . . . . . . . 20Making a Call with the Channel Selector Knob . . 20
Making a Group Call . . . . . . . . . . . . . . . . . . . . 20Making a Private Call . . . . . . . . . . . . . . . . . . . 21Making an All Call . . . . . . . . . . . . . . . . . . . . . . 22
Making a Group or Private Call with the One Touch Access Button . . . . . . . . . . . . . . . . . 22
Stopping a Radio Call . . . . . . . . . . . . . . . . . . . . . . 23Talkaround . . . . . . . . . . . . . . . . . . . . . . . . . . . . . . . 24Monitoring Features . . . . . . . . . . . . . . . . . . . . . . . . 25
Monitoring a Channel . . . . . . . . . . . . . . . . . . . . . 25Permanent Monitor . . . . . . . . . . . . . . . . . . . . . . . 25
Advanced Features . . . . . . . . . . . . . . . . . . . . . . . . . 26Radio Check . . . . . . . . . . . . . . . . . . . . . . . . . . . . . 26
Sending a Radio Check . . . . . . . . . . . . . . . . . . . 26Remote Monitor . . . . . . . . . . . . . . . . . . . . . . . . . . . 28
Initiating Remote Monitor . . . . . . . . . . . . . . . . . . 28Stopping Remote Monitor . . . . . . . . . . . . . . . . . . 29
Scan Lists . . . . . . . . . . . . . . . . . . . . . . . . . . . . . . . . 30Viewing an Entry in the Scan List . . . . . . . . . . . . 30Editing the Scan List . . . . . . . . . . . . . . . . . . . . . . 30
Adding a New Entry to the Scan List . . . . . . . . 30
SettiEntry
Scan . . StartinRespoDeletinRestor
ContactsMakingMakingMaking
Call IndicActivatPrivateActivatText MActivatTelemeAssignEscala
Call Log ViewinMissedStoring

Contents
English
v
sending a Text Message . . . . . . . . . . . . . . . 53rwarding a Text Message . . . . . . . . . . . . . . . 53iting a Text Message . . . . . . . . . . . . . . . . . . 54aging Sent Text Messages . . . . . . . . . . . . . . 54wing a Sent Text Message . . . . . . . . . . . . . 55nding a Sent Text Message . . . . . . . . . . . . . 55leting All Sent Text Messages from nt Items . . . . . . . . . . . . . . . . . . . . . . . . . . . . 56iving a Text Message . . . . . . . . . . . . . . . . . 57ing a Text Message . . . . . . . . . . . . . . . . . . . 57
aging Received Text Messages . . . . . . . . . . 57wing a Text Message from the Inbox . . . . . 58wing a Telemetry Status Text Message
m the Inbox . . . . . . . . . . . . . . . . . . . . . . . . . . 58plying to a Text Message from the Inbox . . . 58leting a Text Message from the Inbox . . . . . 59leting All Text Messages from the Inbox . . . 60 . . . . . . . . . . . . . . . . . . . . . . . . . . . . . . . . . . 60
one Multi Frequency (DTMF) . . . . . . . . . . . 61 Connect . . . . . . . . . . . . . . . . . . . . . . . . . . . 62ing an Automatic Site Search . . . . . . . . . . . . 62ping an Automatic Site Search . . . . . . . . . . . 63ing a Manual Site Search . . . . . . . . . . . . . . . 64ty . . . . . . . . . . . . . . . . . . . . . . . . . . . . . . . . . 64o Disable . . . . . . . . . . . . . . . . . . . . . . . . . . . 64o Enable . . . . . . . . . . . . . . . . . . . . . . . . . . . . 65
NAG-LACR.book Page v Tuesday, March 9, 2010 3:35 PM
Deleting a Call from a Call List . . . . . . . . . . . . . . 42Call Alert Operation . . . . . . . . . . . . . . . . . . . . . . . . . 42
Receiving and Responding to a Call Alert . . . . . . 42Making a Call Alert from the Contacts List . . . . . . 43Making a Call Alert with the One Touch Access Button . . . . . . . . . . . . . . . . . 43
Emergency Operation . . . . . . . . . . . . . . . . . . . . . . . 44Receiving an Emergency Alarm . . . . . . . . . . . . . 44Responding to an Emergency Alarm . . . . . . . . . . 45Sending an Emergency Alarm . . . . . . . . . . . . . . . 46Sending an Emergency Alarm with Call . . . . . . . 46Sending an Emergency Alarm with Voice to Follow . . . . . . . . . . . . . . . . . . . . . . . . . . . . . . . . . 47Reinitiating an Emergency Mode . . . . . . . . . . . . . 48Exiting Emergency Mode . . . . . . . . . . . . . . . . . . . 48
Text Message Features . . . . . . . . . . . . . . . . . . . . . 49Writing and Sending a Text Message . . . . . . . . . 49Sending a Quick Text Message . . . . . . . . . . . . . . 50Sending a Quick Text Message with the One Touch Access Button . . . . . . . . . . . . . . . . . . 51Accessing the Drafts Folder . . . . . . . . . . . . . . . . . 51
Viewing a Saved Text Message . . . . . . . . . . . . 51Editing and Sending a Saved Text Message . . 52Deleting a Saved Text Message from Drafts . . 52
Managing Fail-to-Send Text Messages . . . . . . . . 53
ReFoEd
ManVieSeDeSe
ReceReadMan
VieViefroReDeDe
PrivacyDual TIP Site
StartStopStart
SecuriRadiRadi

E
v
Lone Worker . . . . . . . . . . . . . . . . . . . . . . . . . . . . . . 66 Accessories . . . . . . . . . . . . . . . . . . . . . . . . . . . . . . . 74s . . . . . . . . . . . . . . . . . . . . . . . . . . . . . . . . 74 . . . . . . . . . . . . . . . . . . . . . . . . . . . . . . . . . 75vices . . . . . . . . . . . . . . . . . . . . . . . . . . . . . 75 . . . . . . . . . . . . . . . . . . . . . . . . . . . . . . . . 76
and Earpieces . . . . . . . . . . . . . . . . . . . . . 76s and Headset Accessories . . . . . . . . . . . 76Speaker Microphones . . . . . . . . . . . . . . . . 77nce Accessories . . . . . . . . . . . . . . . . . . . . 77eous Accessories . . . . . . . . . . . . . . . . . . 78
nd Chargers Warranty . . . . . . . . . . . . . 79arranty . . . . . . . . . . . . . . . . . . . . . . . . . . . 80
NAG-LACR.book Page vi Tuesday, March 9, 2010 3:35 PM
Con
tent
s
nglish
i
Utilities . . . . . . . . . . . . . . . . . . . . . . . . . . . . . . . . . . 67Locking and Unlocking the Keypad . . . . . . . . . . . 67Turning Keypad Tones On or Off . . . . . . . . . . . . 67Setting the Squelch Level . . . . . . . . . . . . . . . . . 68Setting the Power Level . . . . . . . . . . . . . . . . . . . 68Turning the Option Board Feature(s) On or Off . 69Turning the Voice Operating Transmission (VOX) Feature On or Off . . . . . . . . . . . . . . . . . . . 69Controlling the Display Backlight . . . . . . . . . . . . 70Turning the Radio Tones/Alerts On or Off . . . . . 70Setting the Tone Alert Volume Offset Level . . . . 71Turning the Talk Permit Tone On or Off . . . . . . . 71Turning the LED Indicator On or Off . . . . . . . . . . 71Turning the Introduction Screen On or Off . . . . . 72Accessing General Radio Information . . . . . . . . 72
Accessing the Battery Information . . . . . . . . . . 72Checking the Radio ID . . . . . . . . . . . . . . . . . . 73Checking the Firmware Version . . . . . . . . . . . . 73Checking the Codeplug Version . . . . . . . . . . . 73
AntennaBatteriesCarry DeChargersEarbudsHeadsetRemote SurveillaMiscellan
Batteries aLimited W
Important Safety Inform
ation
English
vii
e Versionures described in the following sections are by the radio's software version R01.06.00 or
ing the Firmware Version on page 73 to your radio's software version.
your dealer or system administrator tails of all the features supported.
NAG-LACR.book Page vii Tuesday, March 9, 2010 3:35 PM
Important Safety Information
Product Safety and RF Exposure Compliance
ATTENTION!
This radio is restricted to occupational use only to satisfy FCC RF energy exposure requirements. Before using this product, read the RF energy awareness information and operating instructions in the Product Safety and RF Exposure booklet enclosed with your radio (Motorola Publication part number 6881095C98) to ensure compliance with RF energy exposure limits.
For a list of Motorola-approved antennas, batteries, and other accessories, visit the following website:
http://www.motorola.com/governmentandenterprise
SoftwarAll the featsupported later.
See Checkdetermine
Check withfor more de
Before using this product, read the operating instructions for safe usage contained in the Product Safety and RF Exposure booklet enclosed with your radio.
!� � � � � � �

E
vii
TM voice coding Technology embodied in s protected by intellectual property rights ent rights, copyrights and trade secrets of Systems, Inc.
ding Technology is licensed solely for use mmunications Equipment. The user of this
s explicitly prohibited from attempting to verse engineer, or disassemble the Object
ny other way convert the Object Code into a ble form.
s. #5,870,405, #5,826,222, #5,754,974, #5,715,365, #5,649,050, #5,630,011, #5,517,511, #5,491,772, #5,247,579, nd #5,195,166.
NAG-LACR.book Page viii Tuesday, March 9, 2010 3:35 PM
Com
pute
r Sof
twar
e C
opyr
ight
s
nglish
i
Computer Software CopyrightsThe Motorola products described in this manual may include copyrighted Motorola computer programs stored in semiconductor memories or other media. Laws in the United States and other countries preserve for Motorola certain exclusive rights for copyrighted computer programs including, but not limited to, the exclusive right to copy or reproduce in any form the copyrighted computer program. Accordingly, any copyrighted Motorola computer programs contained in the Motorola products described in this manual may not be copied, reproduced, modified, reverse-engineered, or distributed in any manner without the express written permission of Motorola. Furthermore, the purchase of Motorola products shall not be deemed to grant either directly or by implication, estoppel, or otherwise, any license under the copyrights, patents or patent applications of Motorola, except for the normal non-exclusive license to use that arises by operation of law in the sale of a product.
The AMBE+2this product iincluding patDigital Voice
This voice cowithin this CoTechnology idecompile, reCode, or in ahuman-reada
U.S. Pat. No#5,701,390, #5,581,656, #5,226,084 a
Getting Started
English
1
tures are also available on the single-site trunking city Plus. See Capacity Plus on page 11 for more
Your Dealer/System Administrator ell You
sult your dealer or system administrator about the
dio programmed with any preset conventional
ttons have been programmed to access other
onal accessories may suit your needs?
NAG-LACR.book Page 1 Tuesday, March 9, 2010 3:35 PM
Getting StartedTake a moment to review the following:How to Use This Guide . . . . . . . . . . . . . . . . . . . . . . . . . page 1What Your Dealer/System Administrator
Can Tell You. . . . . . . . . . . . . . . . . . . . . . . . . . . . . . . . page 1
How to Use This Guide
This User Guide covers the basic operation of the MOTOTRBO Portables.
However, your dealer or system administrator may have customized your radio for your specific needs. Check with your dealer or system administrator for more information.
Throughout this publication, the icons below are used to indicate features supported in either the conventional Analog mode or conventional Digital mode:
For features that are available in both conventional Analog and Digital modes, no icon is shown.
Selected feamode, Capainformation.
What Can T
You can confollowing:
• Is your rachannels?
• Which bufeatures?
• What opti
Indicates a conventional Analog Mode-Only feature.
Indicates a conventional Digital Mode-Only feature.
E
2
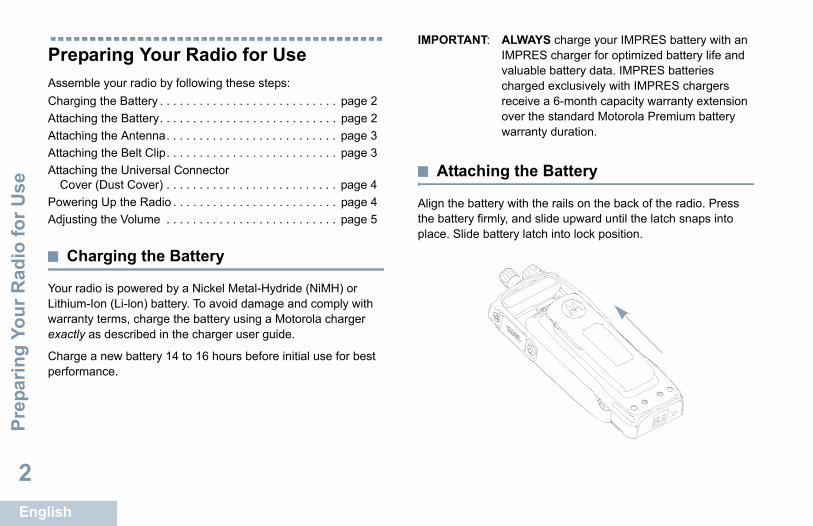
IMPORTANT: ALWAYS charge your IMPRES battery with an IMPRES charger for optimized battery life and valuable battery data. IMPRES batteries charged exclusively with IMPRES chargers receive a 6-month capacity warranty extension over the standard Motorola Premium battery warranty duration.
g the Battery
ry with the rails on the back of the radio. Press ly, and slide upward until the latch snaps into ttery latch into lock position.
NAG-LACR.book Page 2 Tuesday, March 9, 2010 3:35 PM
Prep
arin
g Yo
ur R
adio
for U
se
nglish
Preparing Your Radio for UseAssemble your radio by following these steps:Charging the Battery . . . . . . . . . . . . . . . . . . . . . . . . . . . page 2Attaching the Battery. . . . . . . . . . . . . . . . . . . . . . . . . . . page 2Attaching the Antenna. . . . . . . . . . . . . . . . . . . . . . . . . . page 3Attaching the Belt Clip. . . . . . . . . . . . . . . . . . . . . . . . . . page 3Attaching the Universal Connector
Cover (Dust Cover) . . . . . . . . . . . . . . . . . . . . . . . . . . page 4Powering Up the Radio . . . . . . . . . . . . . . . . . . . . . . . . . page 4Adjusting the Volume . . . . . . . . . . . . . . . . . . . . . . . . . . page 5
Charging the Battery
Your radio is powered by a Nickel Metal-Hydride (NiMH) or Lithium-Ion (Li-lon) battery. To avoid damage and comply with warranty terms, charge the battery using a Motorola charger exactly as described in the charger user guide.
Charge a new battery 14 to 16 hours before initial use for best performance.
Attachin
Align the battethe battery firmplace. Slide ba

Preparing Your Radio for U
se
English
3
he antenna, turn the antenna counterclockwise. ou turn off the radio and remove the universal over (dust cover) first.
ing the Belt Clip
oves on the clip n the battery and ard until you hear
he clip, press the away from the g a key. Then slide ard and away from
If antenna needs to be replaced, ensure that only MOTOTRBO antennas are used. Neglecting this will damage your radio. See Antennas on page 74 for a list of available antennas.
NAG-LACR.book Page 3 Tuesday, March 9, 2010 3:35 PM
To remove the battery, turn the radio off. Move the battery latch into unlock position and hold, and slide the battery down and off the rails.
Attaching the Antenna
With the radio turned off, set the antenna in its receptacle and turn clockwise.
To remove tMake sure yconnector c
Attach
Align the growith those opress downwa click.
To remove tbelt clip tab battery usinthe clip upwthe radio.
Battery Latch
!� � � � � � �

E
4
g Up the Radio
/Off/Volume clockwise a click. You and ) on the
momentarily, torola once
s green and en lights up if etting is set matically.
ome screen does not light up during a power up if D indicator is disabled (see Turning the LED
ator On or Off on page 71).
unds, indicating that the power up test is
is no power up tone if the radio tones/alerts on is disabled (see Turning the Radio Tones/ On or Off on page 70).
LED Indicator
NAG-LACR.book Page 4 Tuesday, March 9, 2010 3:35 PM
Prep
arin
g Yo
ur R
adio
for U
se
nglish
Attaching the Universal Connector Cover (Dust Cover)
The universal connector is located on the antenna side of the radio. It is used to connect MOTOTRBO accessories to the radio.
Place the universal connector cover loop over the attached antenna. Slide it all the way down to the base of the antenna.
Insert the hooked end of the cover into the slots above the universal connector. Press downward on the cover to seat the lower tab properly into the RF connector.
Turn the thumbscrew clockwise to secure the connector cover to the radio.
To remove the universal connector cover, press down on the cover and turn the thumbscrew counterclockwise. Lift the cover up, slide the connector cover loop upwards, and remove it from the attached antenna.
Replace the dust cover when the universal connector is not in use.
Powerin
Rotate the OnControl Knobuntil you hear see MotorolaMOTOTRBO (TM
radio’s displayfollowed by Momore.
The LED blinkthe Home screthe backlight sto turn on auto
NOTE: The Hthe LEIndic
A brief tone sosuccessful.
NOTE: TherefunctiAlerts
Universal Connector Cover (Dust Cover)
Identifying Radio C
ontrols
English
5
ing Radio Controlsent to review the following:ols . . . . . . . . . . . . . . . . . . . . . . . . . . . . . . . .page 6ble Buttons . . . . . . . . . . . . . . . . . . . . . . . . .page 7he Programmed Functions . . . . . . . . . . . . .page 8eypad. . . . . . . . . . . . . . . . . . . . . . . . . . . . . .page 9k (PTT) Button. . . . . . . . . . . . . . . . . . . . . .page 10etween Conventional Analog and de . . . . . . . . . . . . . . . . . . . . . . . . . . . . . . . page 11s . . . . . . . . . . . . . . . . . . . . . . . . . . . . . . . . page 11
NAG-LACR.book Page 5 Tuesday, March 9, 2010 3:35 PM
If your radio does not power up, check your battery. Make sure that it is charged and properly attached. If your radio still does not power up, contact your dealer.
To turn off the radio, rotate this knob counterclockwise until you hear a click. You see a brief Powering Down on the radio’s display.
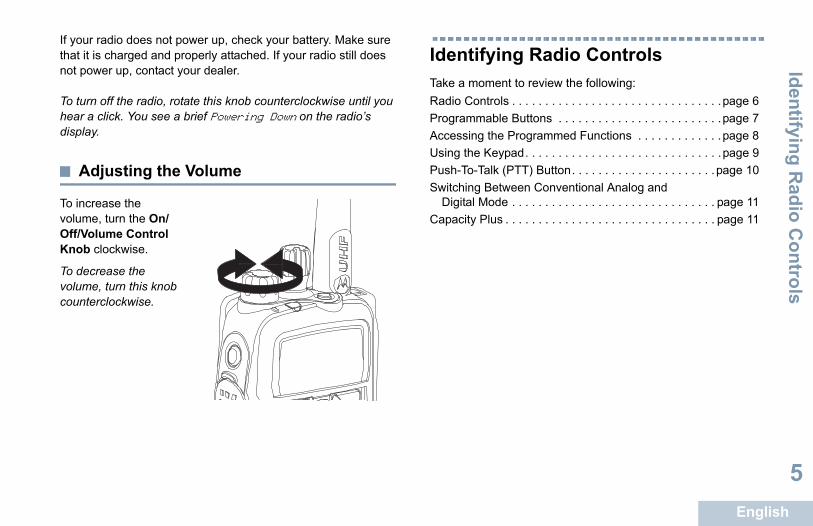
Adjusting the Volume
To increase the volume, turn the On/Off/Volume Control Knob clockwise.
To decrease the volume, turn this knob counterclockwise.
IdentifyTake a momRadio ContrProgrammaAccessing tUsing the KPush-To-TalSwitching B
Digital MoCapacity Plu

E
6
tton 1*
-Talk (PTT) Button
tton 2*
tton 3*
utton P1*
one
r
utton P2*
avigation Keys
al Connector for Accessories
ncy Button*
uttons are programmable.
NAG-LACR.book Page 6 Tuesday, March 9, 2010 3:35 PM
Iden
tifyi
ng R
adio
Con
trol
s
nglish
Radio Controls
Channel Selector Knob
On/Off/Volume Control Knob
LED Indicator
11
3
17
15
1413
12
8
76
5
21
9
16
4
10
123
Side Bu
Push-to
Side Bu
Side Bu
Front B
Microph
Speake
Front B
Keypad
Menu N
Univers
Display
Emerge
Antenna
* These b
4567891011121314151617

Identifying Radio C
ontrols
English
7
hannel Delete* – Temporarily removes an hannel, except for the Selected Channel, from the e Selected Channel refers to the user’s selected el combination from which scan is initiated.
Access – Directly initiates a predefined roup Call, a Call Alert or a Quick Text message.
rd Feature – Toggles option board feature(s) on or board-enabled channels.
Monitor* – Monitors a selected channel for all radio nction is disabled.
– Toggles privacy on or off.
k – Determines if a radio is active in a system.
le – Allows a target radio to be remotely
ble – Allows a target radio to be remotely
nitor – Turns on the microphone of a target t it giving any indicators.
lkaround* – Toggles between using a repeater nicating directly with another radio.
gles scan on or off.
* Not applicable in Capacity Plus
NAG-LACR.book Page 7 Tuesday, March 9, 2010 3:35 PM
Programmable Buttons
Your dealer can program the programmable buttons as shortcuts to radio functions or preset channels/groups depending on the duration of a button press:
• Short press – Pressing and releasing rapidly (0.05 seconds).
• Long press – Pressing and holding for the programmed duration (between 1.00 second and 3.75 seconds).
• Hold down – Keeping the button pressed.
NOTE: The programmed duration of a button press is applicable for all assignable radio/utility functions or settings. See Emergency Operation on page 44 for more information on the programmed duration of the Emergency button.
Assignable Radio Functions
Contacts – Provides direct access to the Contacts list.
Emergency – Depending on the programming, initiates or cancels an emergency alarm or call.
Manual Dial – Initiates a call by keying in any subscriber ID.
Manual Site Roam* – Starts the manual site search.
Monitor – Monitors a selected channel for activity.
Nuisance Cunwanted cscan list. Thzone/chann
One TouchPrivate or G
Option Boaoff for option
Permanenttraffic until fu
Privacy
Radio Chec
Radio Enabenabled.
Radio Disadisabled.
Remote Moradio withou
Repeater/Taand commu
Scan* – Tog

E
8
ing the Programmed Functions
s various radio functions through one of the :
ng press of the grammable buttons.
OR
u Navigation Buttons as follows:
the menu, press the S button. Press the Menu Scroll button (Por Q) to access
unctions.
function or enter a sub-menu, press the N
one menu level, or to return to the previous ss the R button. Long press the R button the Home screen.
adio automatically exits the menu after a period ctivity and returns to your Home screen.
NAG-LACR.book Page 8 Tuesday, March 9, 2010 3:35 PM
Iden
tifyi
ng R
adio
Con
trol
s
nglish
Site Lock On/Off* – Toggles the automatic site roam on or off.
Telemetry Control – Controls the Output Pin on a local or remote radio.
Text Message – Selects the text message menu.
Transmit Interrupt Remote Dekey – Stops the transmission of a remote monitored radio without giving any indicators, or an ongoing interruptible call to free the channel.
Voice Operating Transmission (VOX) – Toggles VOX on or off.
Zone – Allows selection from a list of zones.
Assignable Settings or Utility Functions
All Tones/Alerts – Toggles all tones and alerts on or off.
Backlight – Toggles display backlight on or off.
Keypad Lock – Toggles keypad between locked and unlocked.
Power Level – Toggles transmit power level between high and low.
Squelch – Toggles squelch level between tight and normal.
Access
You can accesfollowing ways
• A short or lorelevant pro
• Use the Men
1 To access appropriatethe menu f
2 To select abutton.
3 To go backscreen, preto return to
NOTE: Your rof ina
* Not applicable in Capacity Plus
Identifying Radio C
ontrols
English
9
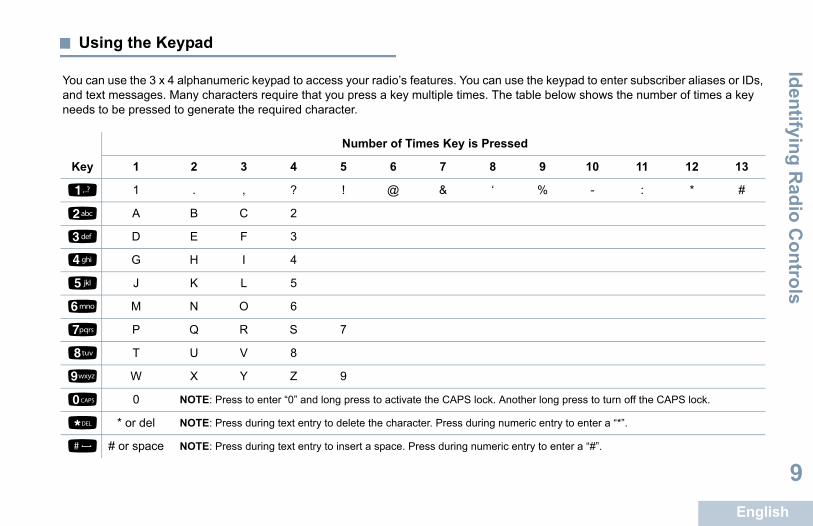
n use the keypad to enter subscriber aliases or IDs, The table below shows the number of times a key
essed
9 10 11 12 13
‘ % - : * #
. Another long press to turn off the CAPS lock.
numeric entry to enter a “*”.
eric entry to enter a “#”.
NAG-LACR.book Page 9 Tuesday, March 9, 2010 3:35 PM
Using the Keypad
You can use the 3 x 4 alphanumeric keypad to access your radio’s features. You caand text messages. Many characters require that you press a key multiple times. needs to be pressed to generate the required character.
Number of Times Key is Pr
Key 1 2 3 4 5 6 7 8
1 1 . , ? ! @ &
2 A B C 2
3 D E F 3
4 G H I 4
5 J K L 5
6 M N O 6
7 P Q R S 7
8 T U V 8
9 W X Y Z 9
0 0 NOTE: Press to enter “0” and long press to activate the CAPS lock
* * or del NOTE: Press during text entry to delete the character. Press during
# # or space NOTE: Press during text entry to insert a space. Press during num
E
10
If the Talk Permit Tone (see Turning the Talk Permit Tone On 71) or the PTT Sidetone is enabled, wait
alert tone ends before talking.
call, if the Channel Free Indication feature is n your radio (programmed by your dealer), you short alert tone the moment the target radio (the
is receiving your call) releases the PTT button, the channel is free for you to respond.
lso hear the Channel Free Indication tone if your rrupted, for example when the radio receives an
cy Call.urn off the Channel Free Indication tone or the
tone by disabling all radio tones and alerts ing the Radio Tones/Alerts On or Off on
NAG-LACR.book Page 10 Tuesday, March 9, 2010 3:35 PM
Iden
tifyi
ng R
adio
Con
trol
s
nglish
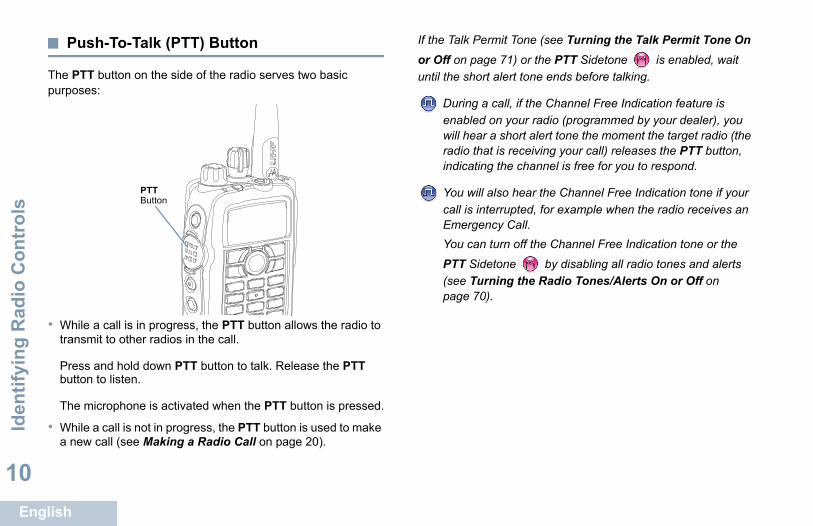
Push-To-Talk (PTT) Button
The PTT button on the side of the radio serves two basic purposes:
• While a call is in progress, the PTT button allows the radio to transmit to other radios in the call.
Press and hold down PTT button to talk. Release the PTT button to listen.
The microphone is activated when the PTT button is pressed.
• While a call is not in progress, the PTT button is used to make a new call (see Making a Radio Call on page 20).
or Off on pageuntil the short
During a enabled owill hear aradio thatindicating
You will acall is inteEmergenYou can t
PTT Side(see Turnpage 70).
PTT Button
Identifying Radio C
ontrols
English
11
ity Plus
s is a single-site trunking configuration of the radio system, which uses a pool of channels to
dreds of users and up to 254 Groups. This feature radio to efficiently utilize the available number of d channels while in Repeater Mode.
y access channel(s) with Capacity Plus via the lector Knob, while features supported in Capacity accessed via the menu and/or a programmable .
tures not applicable to Capacity Plus will not be the menu. You will hear a negative indicator tone if a feature not applicable to Capacity Plus via a ble button press.
lso has features that are available in both l digital mode and Capacity Plus. However, the nces in the way each feature works does NOT rformance of your radio.
your dealer or system administrator for more on this system.
NAG-LACR.book Page 11 Tuesday, March 9, 2010 3:35 PM
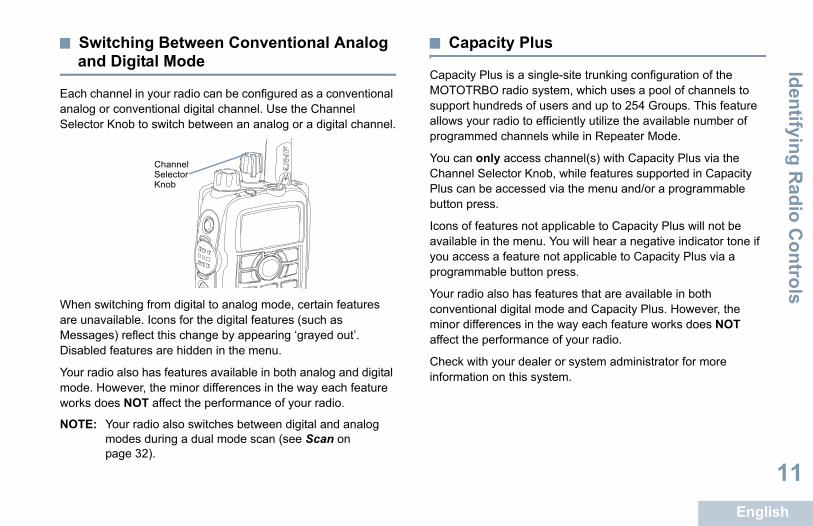
Switching Between Conventional Analog and Digital Mode
Each channel in your radio can be configured as a conventional analog or conventional digital channel. Use the Channel Selector Knob to switch between an analog or a digital channel.
When switching from digital to analog mode, certain features are unavailable. Icons for the digital features (such as Messages) reflect this change by appearing ‘grayed out’. Disabled features are hidden in the menu.
Your radio also has features available in both analog and digital mode. However, the minor differences in the way each feature works does NOT affect the performance of your radio.
NOTE: Your radio also switches between digital and analog modes during a dual mode scan (see Scan on page 32).
Capac
Capacity PluMOTOTRBOsupport hunallows your programme
You can onlChannel SePlus can bebutton press
Icons of feaavailable in you access programma
Your radio aconventionaminor differeaffect the pe
Check with information
ChannelSelector Knob

E
12
wer Leveldio is set at Low power.
dio is set at High power.
es Disablees are turned off.
tion Board Option Board is enabled.
tion Board Non-Function Option Board is disabled.
S Available GPS feature is enabled. The icon stays lit when
osition fix is available.
S Not Available/Out of Range GPS feature is enabled but is not receiving data the satellite.
n*
n feature is enabled.
ority Scan*
dio detects activity on channel/group designated Priority 1 (if • is blinking) or Priority 2 (if • is ady).
* Not applicable in Capacity Plus
NAG-LACR.book Page 12 Tuesday, March 9, 2010 3:35 PM
Iden
tifyi
ng S
tatu
s In
dica
tors
nglish
Identifying Status IndicatorsYour radio indicates its operational status through the following:Display Icons. . . . . . . . . . . . . . . . . . . . . . . . . . . . . . . . page 12Call Icons . . . . . . . . . . . . . . . . . . . . . . . . . . . . . . . . . . page 13Sent Item Icons . . . . . . . . . . . . . . . . . . . . . . . . . . . . . . page 14LED Indicator . . . . . . . . . . . . . . . . . . . . . . . . . . . . . . . page 14Audio Tones . . . . . . . . . . . . . . . . . . . . . . . . . . . . . . . . page 15Indicator Tones . . . . . . . . . . . . . . . . . . . . . . . . . . . . . . page 16
Display Icons
The full dot matrix, black and white, liquid crystal display (LCD) of your radio shows radio status, text entries, and menu entries.
The following are icons that appear on the radio’s display.
Received Signal Strength Indicator (RSSI)The number of bars displayed represents the radio signal strength. Four bars indicate the strongest signal. This icon is only displayed while receiving.
MonitorSelected channel is being monitored.
PoRa
Ra
TonTon
OpThe
OpThe
GPThea p
GPThefrom
ScaSca
PriRaas ste
or
Identifying Status Indicators
English
13
ons
g icons appear on the radio’s display during a call. also appear in the Contacts list to indicate ID type.
rivate Callndicates a Private Call in progress. In the Contacts st, it indicates a subscriber alias (name) or ID number).
roup Call/All Callndicates a Group Call or All Call in progress. In the ontacts list, it indicates a group alias (name) or ID
number).
NAG-LACR.book Page 13 Tuesday, March 9, 2010 3:35 PM
Call Ic
The followinThese icons
Unread Message User has unread message(s) in the Inbox.
Inbox Full User’s Inbox is full.
EmergencyRadio is in Emergency mode.
Secure The Privacy feature is enabled.
Unsecure The Privacy feature is disabled.
Site Roaming* The site roaming feature is enabled.
Talkaround*
In the absence of a repeater, radio is currently configured for direct radio to radio communication.
BatteryThe number of bars (0 – 4) shown indicates the charge remaining in the battery.Blinks when the battery is low.
PIli(
GIC(
* Not applicable in Capacity Plus

E
14
icator
ator shows the operational status of your radio.
Radio is transmitting at low battery condition, mergency transmission or has failed the self-test up.
Radio is monitoring a channel.
w – Radio is scanning for activity or receiving a
ng yellow – Radio is no longer connected to the in Capacity Plus or all Capacity Plus channels usy.
LED Indicator
NAG-LACR.book Page 14 Tuesday, March 9, 2010 3:35 PM
Iden
tifyi
ng S
tatu
s In
dica
tors
nglish
Sent Item Icons
The following icons appear at the top right corner of the radio’s display in the Sent Items folder.
LED Ind
The LED indic
Blinking red –receiving an eupon powering
Solid yellow –
Blinking yelloCall Alert.
Double blinkirepeater whileare currently b
Sent SuccessfullyThe text message is sent successfully.
Send FailedThe text message cannot be sent.
In-Progress
• The text message to a group alias or ID is pending transmission.
• The text message to a subscriber alias or ID is pending transmission, followed by waiting for acknowledgement.
Identifying Status Indicators
English
15
Tones
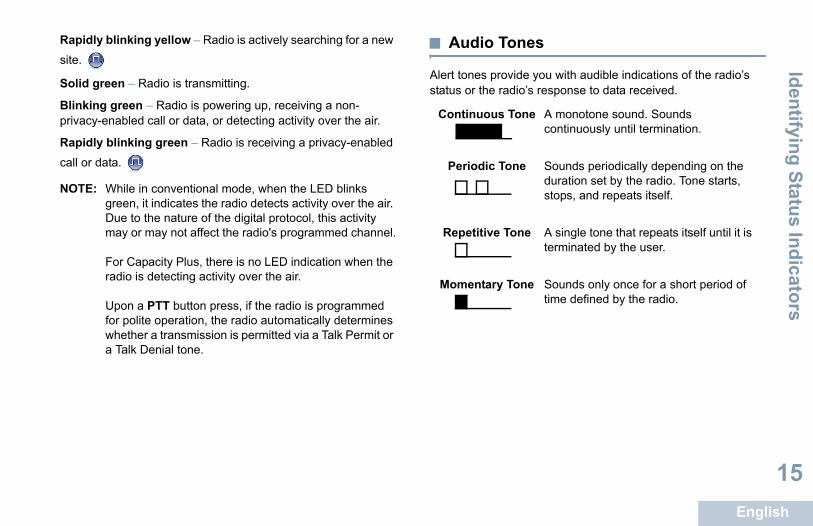
rovide you with audible indications of the radio’s radio’s response to data received.
s Tone A monotone sound. Sounds continuously until termination.
Tone Sounds periodically depending on the duration set by the radio. Tone starts, stops, and repeats itself.
e Tone A single tone that repeats itself until it is terminated by the user.
ry Tone Sounds only once for a short period of time defined by the radio.
NAG-LACR.book Page 15 Tuesday, March 9, 2010 3:35 PM
Rapidly blinking yellow – Radio is actively searching for a new
site.
Solid green – Radio is transmitting.
Blinking green – Radio is powering up, receiving a non-privacy-enabled call or data, or detecting activity over the air.
Rapidly blinking green – Radio is receiving a privacy-enabled
call or data.
NOTE: While in conventional mode, when the LED blinks green, it indicates the radio detects activity over the air. Due to the nature of the digital protocol, this activity may or may not affect the radio's programmed channel.
For Capacity Plus, there is no LED indication when the radio is detecting activity over the air.
Upon a PTT button press, if the radio is programmed for polite operation, the radio automatically determines whether a transmission is permitted via a Talk Permit or a Talk Denial tone.
Audio
Alert tones pstatus or the
Continuou
Periodic
Repetitiv
Momenta
E
16
nd Receiving Callserstand how your MOTOTRBO Portable is u are ready to use your radio.
ation guide to familiarize yourself with the basic
te . . . . . . . . . . . . . . . . . . . . . . . . . . . . . . page 16ne . . . . . . . . . . . . . . . . . . . . . . . . . . . . . page 17dio Channel, Subscriber ID, . . . . . . . . . . . . . . . . . . . . . . . . . . . . . . . page 18 Responding to a Radio Call . . . . . . . . . page 18io Call. . . . . . . . . . . . . . . . . . . . . . . . . . . page 20dio Call . . . . . . . . . . . . . . . . . . . . . . . . . page 23. . . . . . . . . . . . . . . . . . . . . . . . . . . . . . . . page 24atures. . . . . . . . . . . . . . . . . . . . . . . . . . . page 25
g a Site
cific area where a base station is placed to l coverage for the radio.
r radio is able to connect to different available ternet Protocol (IP) network.
onnect on page 62 for more information.
NAG-LACR.book Page 16 Tuesday, March 9, 2010 3:35 PM
Mak
ing
and
Rec
eivi
ng C
alls
nglish
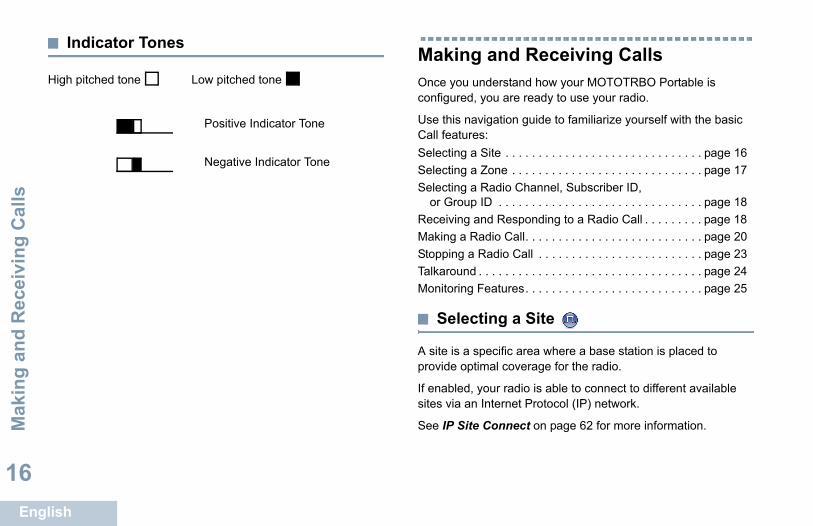
Indicator Tones
High pitched tone Low pitched tone
Making aOnce you undconfigured, yo
Use this navigCall features:Selecting a SiSelecting a ZoSelecting a Ra
or Group IDReceiving andMaking a RadStopping a RaTalkaround . . Monitoring Fe
Selectin
A site is a speprovide optima
If enabled, yousites via an In
See IP Site C
Positive Indicator Tone
Negative Indicator Tone
Making and R
eceiving Calls
English
17
ing a Radio Channel, Subscriber ID, up ID
required zone is displayed (if you have multiple our radio), turn the programmed Channel Selector elect the channel, subscriber alias or ID, or group .
NAG-LACR.book Page 17 Tuesday, March 9, 2010 3:35 PM
Selecting a Zone
A zone is a group of channels. Your radio supports up to 250 zones, with a maximum of 16 channels per zone.
Use the following procedure to select a zone.
Procedure:Press the programmed Zone button and proceed to Step 3. ORFollow the procedure below.
1 S to access the menu.
2 Por Q to Zone and press N to select.
3 The current zone is displayed and indicated by a .
4 Por Q to the required zone and press N to select.
5 The display shows <Zone> Selected momentarily and returns to the selected zone screen.
Selector Gro
Procedure:Once the zones in yKnob to salias or ID
E
18
Procedure:eive a Group Call (while on the Home screen):
links green.
e of the display shows the caller alias, and the The second line displays the group alias and the l icon (in Digital mode only).
dio vertically 1 to 2 inches (2.5 to 5.0 cm) from .
Channel Free Indication feature is enabled, you short alert tone the moment the transmitting radio e PTT button, indicating the channel is free for ond.TT button to respond to the call.
Voice Interrupt feature is enabled, press the PTT top the current call from the transmitting radio and annel for you to talk/respond.
ghts up solid green.
Talk Permit Tone to finish (if enabled) and speak the microphone.
or the PTT Sidetone to finish (if enabled) and rly into the microphone.
e PTT button to listen.
NAG-LACR.book Page 18 Tuesday, March 9, 2010 3:35 PM
Mak
ing
and
Rec
eivi
ng C
alls
nglish
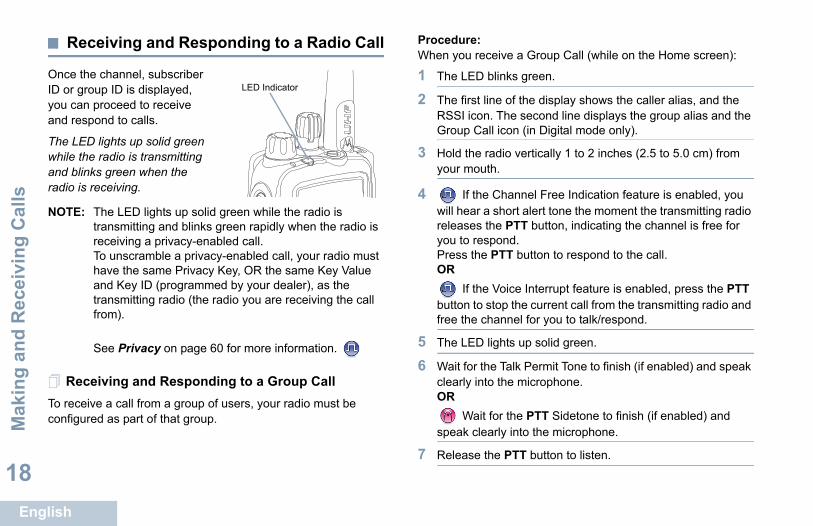
Receiving and Responding to a Radio Call
Once the channel, subscriber ID or group ID is displayed, you can proceed to receive and respond to calls.
The LED lights up solid green while the radio is transmitting and blinks green when the radio is receiving.
NOTE: The LED lights up solid green while the radio is transmitting and blinks green rapidly when the radio is receiving a privacy-enabled call.To unscramble a privacy-enabled call, your radio must have the same Privacy Key, OR the same Key Value and Key ID (programmed by your dealer), as the transmitting radio (the radio you are receiving the call from).
See Privacy on page 60 for more information.
Receiving and Responding to a Group CallTo receive a call from a group of users, your radio must be configured as part of that group.
When you rec
1 The LED b
2 The first linRSSI icon.Group Cal
3 Hold the rayour mouth
4 If the will hear a releases thyou to respPress the POR
If the button to sfree the ch
5 The LED li
6 Wait for theclearly intoOR
Wait fspeak clea
7 Release th
LED Indicator

Making and R
eceiving Calls
English
19
line of the display shows the subscriber alias or ID, RSSI icon. The second line displays Private Call Private Call icon.
radio vertically 1 to 2 inches (2.5 to 5.0 cm) from uth.
annel Free Indication feature is enabled, you will hort alert tone the moment the transmitting radio the PTT button, indicating the channel is free for spond.e PTT button to respond to the call.
ice Interrupt feature is enabled, press the PTT stop the current call from the transmitting radio and channel for you to talk/respond.
lights up solid green.
the Talk Permit Tone to finish (if enabled) and speak to the microphone.
the PTT button to listen.
s no voice activity for a predetermined period of call ends.
r a short tone. The display shows Call Ended.
a Private Call on page 21 for details on making a .
NAG-LACR.book Page 19 Tuesday, March 9, 2010 3:35 PM
8 If there is no voice activity for a predetermined period of time, the call ends.
See Making a Group Call on page 20 for details on making a Group Call.
NOTE: If the radio receives a Group Call while not on the Home screen, it remains on its current screen prior to answering the call.
Long press the R button to go to the Home screen to view the caller alias before replying.
Receiving and Responding to a Private Call A Private Call is a call from an individual radio to another individual radio.
There are two types of Private Calls. The first type, where a radio presence check is performed prior to setting up the call, while the other sets up the call immediately.
When your radio is checked, the LED blinks green.
Only one of these call types can be programmed to your radio by your dealer.
Procedure:When you receive a Private Call:
1 The LED blinks green.
2 The firstand the and the
3 Hold theyour mo
4 If the Chhear a sreleasesyou to rePress thORIf the Vobutton tofree the
5 The LED
6 Wait for clearly in
7 Release
8 If there itime, the
9 You hea
See MakingPrivate Call
E
20
a Radio Call
t a channel, subscriber ID, or group by using:
l Selector Knob
ed One Touch Access button
ts list (see Contacts Settings on page 34)
(via Contacts) – This method is for Private Calls ialed using the keypad (see Making a Private ontacts on page 36)
adio must have the Privacy feature enabled on annel to send a privacy-enabled transmission.
target radios with the same Privacy Key OR the Key Value and Key ID as your radio will be able cramble the transmission.
rivacy on page 60 for more information.
Call with the Channel Selector Knob
Group Calll to a group of users, your radio must be part of that group.
NAG-LACR.book Page 20 Tuesday, March 9, 2010 3:35 PM
Mak
ing
and
Rec
eivi
ng C
alls
nglish
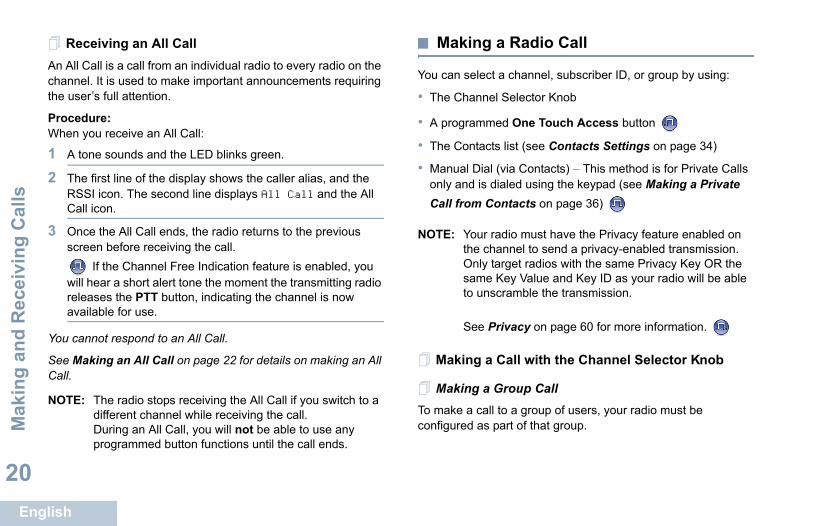
Receiving an All CallAn All Call is a call from an individual radio to every radio on the channel. It is used to make important announcements requiring the user’s full attention.
Procedure:When you receive an All Call:
1 A tone sounds and the LED blinks green.
2 The first line of the display shows the caller alias, and the RSSI icon. The second line displays All Call and the All Call icon.
3 Once the All Call ends, the radio returns to the previous screen before receiving the call.
If the Channel Free Indication feature is enabled, you will hear a short alert tone the moment the transmitting radio releases the PTT button, indicating the channel is now available for use.
You cannot respond to an All Call.
See Making an All Call on page 22 for details on making an All Call.
NOTE: The radio stops receiving the All Call if you switch to a different channel while receiving the call.During an All Call, you will not be able to use any programmed button functions until the call ends.
Making
You can selec
• The Channe
• A programm
• The Contac
• Manual Dialonly and is dCall from C
NOTE: Your rthe chOnly sameto uns
See P
Making a
Making a To make a calconfigured as

Making and R
eceiving Calls
English
21
turns to the screen you were on prior to initiating the
o make a Group Call via Contacts (see Making a from Contacts on page 35).
a Private Call
an receive and/or respond to a Private Call n authorized individual radio, your radio
grammed for you to initiate a Private Call.
r a negative indicator tone, when you make a via the Contacts list, Call Log, One Touch Access e Channel Selector Knob, if this feature is not
t Message or Call Alert features to contact an dio. See Text Message Features on page 49 or peration on page 42 for more information.
Channel Selector Knob to select the channel with e subscriber alias or ID.
radio vertically 1 to 2 inches (2.5 to 5.0 cm) from uth.
NAG-LACR.book Page 21 Tuesday, March 9, 2010 3:35 PM
Procedure:
1 Turn the Channel Selector Knob to select the channel with the active group alias or ID.
2 Hold the radio vertically 1 to 2 inches (2.5 to 5.0 cm) from your mouth.
3 Press the PTT button to make the call. The LED lights up solid green. The display shows the group alias or ID, and the Group Call icon.
4 Wait for the Talk Permit Tone to finish (if enabled) and speak clearly into the microphone.OR
Wait for the PTT Sidetone to finish (if enabled) and speak clearly into the microphone.
5 Release the PTT button to listen.When the target radio responds, the LED blinks green. You see the Group Call icon, the group alias or ID, and transmitting radio alias or ID on your display.
6 If the Channel Free Indication feature is enabled, you will hear a short alert tone the moment the target radio releases the PTT button, indicating the channel is free for you to respond. Press the PTT button to respond.ORIf there is no voice activity for a predetermined period of time, the call ends.
7 Radio recall.
You can alsGroup Call
Making
While you cinitiated by amust be pro
You will heaPrivate Callbutton, or thenabled.
Use the Texindividual raCall Alert O
Procedure:
1 Turn thethe activ
2 Hold theyour mo
E
22
3 Press the PTT button to make the call. The LED lights up Procedure:
hannel Selector Knob to select the channel with All Call group alias or ID.
dio vertically 1 to 2 inches (2.5 to 5.0 cm) from .
TT button to make the call. The LED lights up . The display shows the All Call group alias or ID, Call icon.
Talk Permit Tone to finish (if enabled) and speak the microphone.
or the PTT Sidetone to finish (if enabled) and rly into the microphone.
hannel cannot respond to an All Call.
Group or Private Call with the One Touch utton
h Access feature allows you to make a Group or a predefined alias or ID easily. This feature can a short or long programmable button press.
have one alias or ID assigned to a One Touch . Your radio can have multiple One Touch s programmed.
NAG-LACR.book Page 22 Tuesday, March 9, 2010 3:35 PM
Mak
ing
and
Rec
eivi
ng C
alls
nglish
solid green. The first line displays the subscriber alias or ID. The second line displays Private Call and the Private Call icon.
4 Wait for the Talk Permit Tone to finish (if enabled) and speak clearly into the microphone.
5 Release the PTT button to listen. When the target radio responds, the LED blinks green.
6 If the Channel Free Indication feature is enabled, you will hear a short alert tone the moment the target radio releases the PTT button, indicating the channel is free for you to respond. Press the PTT button to respond.ORIf there is no voice activity for a predetermined period of time, the call ends.
7 You hear a short tone. The display shows Call Ended.
You can also make a Private Call via Contacts (see Making a Private Call from Contacts on page 36) or perform a quick alphanumeric search for the required alias via a keypad entry (see Making a Private Call by Alias Search on page 37).
Making an All CallThis feature allows you to transmit to all users on the channel. Your radio must be programmed to allow you to use this feature.
1 Turn the Cthe active
2 Hold the rayour mouth
3 Press the Psolid greenand the All
4 Wait for theclearly intoOR
Wait fspeak clea
Users on the c
Making aAccess B
The One ToucPrivate Call tobe assigned to
You can ONLYAccess buttonAccess button
Making and R
eceiving Calls
English
23
ing a Radio Call
allows you to stop an ongoing Group or Private Call hannel for transmission. For example, when a radio a “stuck microphone” condition where the PTT dvertently pressed by the user.
ust be programmed to allow you to use this feature.
required channel:
e programmed Transmit Interrupt Remote Dekey
lay shows Remote Dekey.
acknowledgment.
o sounds a positive indicator tone and the display emote Dekey Success, indicating that the channel ee.
o sounds a negative indicator tone and the display emote Dekey Failed.
shows Call Interrupted, and the radio sounds a icator tone until you release the PTT button, if it is an interruptible call that is stopped via this feature.
NAG-LACR.book Page 23 Tuesday, March 9, 2010 3:35 PM
Procedure:
1 Press the programmed One Touch Access button to make a Group or Private Call to the predefined alias or ID.
2 Hold the radio vertically 1 to 2 inches (2.5 to 5.0 cm) from your mouth.
3 Press the PTT button to make the call. The LED lights up solid green. The display shows the group/subscriber alias or ID, and the Group/Private Call icon.
4 Wait for the Talk Permit Tone to finish (if enabled) and speak clearly into the microphone.OR
For Group Call only: Wait for the PTT Sidetone to finish (if enabled) and speak clearly into the microphone.
5 Release the PTT button to listen. When the target radio responds, the LED blinks green.
6 If the Channel Free Indication feature is enabled, you will hear a short alert tone the moment the target radio releases the PTT button, indicating the channel is free for you to respond. Press the PTT button to respond.ORIf there is no voice activity for a predetermined period of time, the call ends.
7 Radio returns to the screen you were on prior to initiating the call.
For a Private Call, you hear a short tone when the call ends.
Stopp
This featureto free the cexperiencesbutton is ina
Your radio m
Procedure:While on the
1 Press thbutton.
2 The disp
3 Wait for
4 The radishows Ris now frORThe radishows R
The display negative indtransmitting

E
24
5 You see Turn On if the radio is currently in Repeater mode.
rn Off if the radio is currently in Talkaround
to select.
y shows Talkaround On.
y shows Talkaround Off.
automatically returns to the previous menu.
d setting is retained even after powering down.
NAG-LACR.book Page 24 Tuesday, March 9, 2010 3:35 PM
Mak
ing
and
Rec
eivi
ng C
alls
nglish
Talkaround
You can continue to communicate when your repeater is not operating, or when your radio is out of the repeater’s range but within talking range of other radios.
This is called “talkaround”.
NOTE: This feature is not applicable in Capacity Plus.
Procedure:Press the programmed Repeater/Talkaround button to toggle between talkaround and repeater modes.ORFollow the procedure below.
1 S to access the menu.
2 Por Q to Utilities and press N to select.
3 Por Q to Radio Settings and press N to select.
4 Por Q to Talkaround and press N to select.
ORYou see Tumode.
6 Press N
7 The displaORThe displa
8 The screen
The Talkaroun
Making and R
eceiving Calls
English
25
ent Monitormanent Monitor feature to continuously monitor a nnel for activity.
s feature is not applicable in Capacity Plus.
e programmed Permanent Monitor button.
unds an alert tone, the LED lights up solid yellow, display shows Permanent Monitor On. The icon appears on the display.
e programmed Permanent Monitor button to exit nt Monitor mode.
unds an alert tone, the LED turns off, and display ermanent Monitor Off.
NAG-LACR.book Page 25 Tuesday, March 9, 2010 3:35 PM
Monitoring Features
Monitoring a ChannelUse the Monitor feature to make sure a channel is clear before transmitting.
Procedure:
1 Press and hold the programmed Monitor button and listen for activity.
2 The monitor icon appears on the display and the LED lights up solid yellow.
3 You hear radio activity or total silence, depending on how your radio is programmed.
4 When you hear “white noise” (that is, the channel is free), press the PTT button to talk and release it to listen.
PermanUse the Perselected cha
NOTE: Thi
Procedure:
1 Press th
2 Radio soand the monitor
3 Press thPermane
4 Radio soshows P
E
26
heck
feature allows you to determine if another radio ystem without disturbing the user of that radio. No al notification is shown on the target radio.
only applicable for subscriber aliases or IDs.
a Radio Check
mmed Radio Check button.
rogrammed Radio Check button.
to the required subscriber alias or ID and press ct.
y shows Radio Check: <Subscriber Alias or ting that Radio Check is in progress. The LED lid green.
knowledgement.
NAG-LACR.book Page 26 Tuesday, March 9, 2010 3:35 PM
Adv
ance
d Fe
atur
es
nglish
Advanced FeaturesUse this navigation guide to learn more about advanced features available with your radio:Radio Check . . . . . . . . . . . . . . . . . . . . . . . . . . . . . . . . page 26Remote Monitor. . . . . . . . . . . . . . . . . . . . . . . . . . . . . . page 28Scan Lists . . . . . . . . . . . . . . . . . . . . . . . . . . . . . . . . . . page 30Scan . . . . . . . . . . . . . . . . . . . . . . . . . . . . . . . . . . . . . . page 32Contacts Settings . . . . . . . . . . . . . . . . . . . . . . . . . . . . page 34Call Indicator Settings . . . . . . . . . . . . . . . . . . . . . . . . . page 38Call Log Features . . . . . . . . . . . . . . . . . . . . . . . . . . . . page 40Call Alert Operation. . . . . . . . . . . . . . . . . . . . . . . . . . . page 42Emergency Operation . . . . . . . . . . . . . . . . . . . . . . . . . page 44Text Message Features. . . . . . . . . . . . . . . . . . . . . . . . page 49Privacy . . . . . . . . . . . . . . . . . . . . . . . . . . . . . . . . . . . . page 60Dual Tone Multi Frequency (DTMF) . . . . . . . . . . . . . . page 61IP Site Connect . . . . . . . . . . . . . . . . . . . . . . . . . . . . . . page 62Security . . . . . . . . . . . . . . . . . . . . . . . . . . . . . . . . . . . . page 64Lone Worker . . . . . . . . . . . . . . . . . . . . . . . . . . . . . . . . page 66Utilities. . . . . . . . . . . . . . . . . . . . . . . . . . . . . . . . . . . . . page 67
Radio C
If enabled, thisis active in a saudible or visu
This feature is
Sending Procedure: Use the progra
1 Press the p
2 Por QN to sele
3 The displaID>, indicalights up so
4 Wait for ac
Advanced Features
English
27
to Radio Check and press N to select.
lay shows Radio Check: <Subscriber Alias or icating that Radio Check is in progress. The LED solid green.
acknowledgement.
get radio is active in the system, a tone sounds and lay briefly shows Target Radio Available.
get radio is not active in the system, a tone sounds display briefly shows Target Radio Not le.
turns to the subscriber alias or ID screen.
utton is pressed when the radio is waiting for ement, a tone sounds, and the radio terminates all xits Radio Check mode.
NAG-LACR.book Page 27 Tuesday, March 9, 2010 3:35 PM
5 If the target radio is active in the system, a tone sounds and the display briefly shows Target Radio Available.ORIf the target radio is not active in the system, a tone sounds and the display briefly shows Target Radio Not Available.
6 Radio returns to the subscriber alias or ID screen.
OR
Procedure: Use the menu.
1 S to access the menu.
2 Por Q to Contacts and press N to select.
3 Por Q to the required subscriber alias or ID and press N to select.ORPor Q to Manual Dial and press N to select. If there was previously dialed ID, the ID appears along with a blinking cursor. Use the keypad to edit the ID. Press N to select.ORPor Q to Manual Dial and press N to select. Key in the subscriber alias or ID and press N.
4 Por Q
5 The dispID>, indlights up
6 Wait for
7 If the tarthe dispORIf the tarand the Availab
8 Radio re
If the R backnowledgretries and e

E
28
6 If successful:tarts receiving audio from the monitored radio for
med duration. imer expires, the radio sounds an alert tone and rns off. The display shows Remote Monitor
ssful:epeats the attempt until the programmed number ires.
.
cess the menu.
to Contacts and press N to select.
to the required subscriber alias or ID and press ct.
to Manual Dial and press N to select. s previously dialed ID, the ID appears along with ursor. Use the keypad to edit the ID. Press N to
to Manual Dial and press N to select. Key in iber alias or ID and press N to select.
NAG-LACR.book Page 28 Tuesday, March 9, 2010 3:35 PM
Adv
ance
d Fe
atur
es
nglish
Remote Monitor
Use the Remote Monitor feature to turn on the microphone of a target radio (subscriber alias or IDs only). No audible or visual indication is given to the target radio. You can use this feature to monitor, remotely, any audible activity surrounding the target radio.
Your radio must be programmed to allow you to use this feature.
Initiating Remote MonitorProcedure: Use the programmed Remote Monitor button.
1 Press the programmed Remote Monitor button.
2 Por Q to the required subscriber alias or ID and press N to select.
3 Radio sounds an alert tone and the LED blinks green.
4 Wait for acknowledgment.
5 The display shows Remote Monitor Successful.ORThe display shows Remote Monitor Failed.
The radio sa programOnce the tthe LED tuEnded.ORIf unsucceThe radio rof tries exp
OR
Procedure: Use the menu
1 S to ac
2 Por Q
3 Por QN to seleORPor QIf there waa blinking cselect.ORPor Qthe subscr

Advanced Features
English
29
g Remote Monitor
e programmed Transmit Interrupt Remote Dekey
lay shows Remote Dekey.
acknowledgment.
o sounds a positive indicator tone and the display emote Dekey Success, indicating that the channel ee.
o sounds a negative indicator tone and the display emote Dekey Failed.
NAG-LACR.book Page 29 Tuesday, March 9, 2010 3:35 PM
4 Por Q to Remote Mon. and press N to select.
5 Radio sounds an alert tone and the LED blinks green.
6 Wait for acknowledgment.
7 The display shows Remote Monitor Successful.ORThe display shows Remote Monitor Failed.
8 If successful:The radio starts receiving audio from the monitored radio for a programmed duration. Once the timer expires, the radio sounds an alert tone and the LED turns off. The display shows Remote Monitor Ended.ORIf unsuccessful:The radio repeats the attempt until the programmed number of tries expires.
StoppinProcedure:
1 Press thbutton.
2 The disp
3 Wait for
4 The radishows Ris now frORThe radishows R
E
30
Scan Lists e Scan List
New Entry to the Scan List
cess the menu.
to Scan and press N to select.
to View/Edit List and press N to select.
to Add Member and press N to select.
to the required alias or ID and press N to
to the required priority level and press N to
y shows Entry Saved, followed immediately by er?.
to Yes and press N to select, to add another repeat Steps 5 and 6.
to No and press N to select to save the current
NAG-LACR.book Page 30 Tuesday, March 9, 2010 3:35 PM
Adv
ance
d Fe
atur
es
nglish
Scan lists are created and assigned to individual channels/groups. Your radio scans for voice activity by cycling through the channel/group sequence specified in the scan list for the current channel/group.
Your radio can support up to 250 scan lists, with a maximum of 16 members in a list. Each scan list supports a mixture of both analog and digital entries.
You can add, delete, or prioritize channels by editing a scan list.
NOTE: This feature is not applicable in Capacity Plus.
Viewing an Entry in the Scan ListProcedure:
1 S to access the menu.
2 Por Q to Scan and press N to select.
3 Por Q to View/Edit List and press N to select.
4 Use Por Q to view each member on the list.
The priority icon appears left of the member’s alias, if set, to indicate whether the member is on a Priority 1 or Priority 2 channel list. You cannot have multiple Priority 1 or Priority 2 channels in a scan list.
There is no priority icon if priority is set to None.
Editing th
Adding a
Procedure:
1 S to ac
2 Por Q
3 Por Q
4 Por Q
5 Por Qselect.
6 Por Qselect.
7 The displaAdd Anoth
8 Por Qentry, and ORPor Qlist.
Advanced Features
English
31
and Editing Priority for an Entry in the Scan
access the menu.
to Scan and press N to select.
to View/Edit List and press N to select.
to the required alias or ID and press N to
to Edit Priority and press N to select.
to the required priority level and press N to
lay shows Entry Saved before returning to the screen.
rity icon appears left of the member’s name.
priority icon if priority is set to None.
NAG-LACR.book Page 31 Tuesday, March 9, 2010 3:35 PM
Deleting an Entry from the Scan List
Procedure:
1 S to access the menu.
2 Por Q to Scan and press N to select.
3 Por Q to View/Edit List and press N to select.
4 Por Q to the required alias or ID and press N to select.
5 Por Q to Delete and press N to select.
6 At Delete Entry?, Por Q to Yes and press N to select, to delete the entry. The display shows Entry Deleted. ORPor Q to No and press N to select to return to the previous screen.
7 Repeat Steps 4 to 6 to delete other entries.
After deleting all required aliases or IDs, long press R to return to the Home screen.
Setting List
Procedure:
1 S to
2 Por Q
3 Por Q
4 Por Qselect.
5 Por Q
6 Por Qselect.
7 The dispprevious
8 The prio
There is no

E
32
nd Stopping Scan
rammed Scan button to start or stop Scan.
cedure below.
annel Selector Knob to select a channel ed with a scan list.
cess the menu.
to Scan and press N to select.
y shows Turn On if scan is disabled.
y shows Turn Off if scan is enabled.
to select.
links yellow and the scan icon is displayed when abled.
rns off and the scan icon is not displayed when abled.
g, the radio will only accept data (e.g. text tion, telemetry, or PC data) if received on its nel.
NAG-LACR.book Page 32 Tuesday, March 9, 2010 3:35 PM
Adv
ance
d Fe
atur
es
nglish
Scan
When you start a scan, your radio cycles through the programmed scan list for the current channel looking for voice activity.
The LED blinks yellow and you see the scan icon on the display.
During a dual mode scan, if you are on a digital channel, and your radio locks onto an analog channel, it automatically switches from digital mode to analog mode for the duration of the call. This is also true for the reverse.
There are two ways of initiating scan:
• Main Channel Scan (Manual): Your radio scans all the channels/groups in your scan list. On entering scan, your radio may – depending on the settings – automatically start on the last scanned “active” channel/group or on the channel where scan was initiated.
• Auto Scan (Automatic): Your radio automatically starts scanning when you select a channel/group that has Auto Scan enabled.
NOTE: This feature is not applicable in Capacity Plus.
Starting aProcedure: Press the progOR Follow the pro
1 Use the Chprogramm
2 S to ac
3 Por Q
4 The displaORThe displa
5 Press N
6 The LED bScan is enORThe LED tuScan is dis
While scanninmessage, locaSelected Chan

Advanced Features
English
33
g a Nuisance Channel continually generates unwanted calls or noise uisance” channel), you can temporarily remove the
hannel from the scan list.
lity does not apply to the channel designated as the annel.
ur radio “locks on to” an unwanted or nuisance , press the programmed Nuisance Channel Delete ntil you hear a tone.
the Nuisance Channel Delete button. The channel is deleted.
nuisance” channel is only possible through the d Nuisance Channel Delete button. This feature is ble through the menu.
NAG-LACR.book Page 33 Tuesday, March 9, 2010 3:35 PM
Responding to a Transmission During a ScanDuring scanning, your radio stops on a channel/group where activity is detected. The radio stays on that channel for a programmed time period known as “hang time”.
Procedure:
1 Hold the radio vertically 1 to 2 inches (2.5 to 5.0 cm) from your mouth.
If the Channel Free Indication feature is enabled, you will hear a short alert tone the moment the transmitting radio releases the PTT button, indicating the channel is free for you to respond.
2 Press the PTT button during hang time. The LED lights up solid green.
3 Wait for the Talk Permit Tone to finish (if enabled) and speak clearly into the microphone.OR
Wait for the PTT Sidetone to finish (if enabled) and speak clearly into the microphone.
4 Release the PTT button to listen.
5 If you do not respond within the hang time, the radio returns to scanning other channels/groups.
DeletinIf a channel(termed a “nunwanted c
This capabiSelected Ch
Procedure:
1 When yochannelbutton u
2 Releasenuisance
Deleting a “programmenot accessi

E
34
Contacts Settings
ides “address-book” capabilities on your radio. rresponds to an alias or ID that you use to initiate
ach entry, depending on context, associates with es of calls: Group Call, Private Call, All Call, PC h Call.
ispatch Call are data-related. They are only the applications. Refer to the data applications for more information.
Privacy feature is enabled on a channel, you ake privacy-enabled Group Call, Private Call, ll Call on that channel. Only target radios with me Privacy Key OR the same Key Value and as your radio will be able to unscramble the ission.
rivacy on page 60 for more information.
NAG-LACR.book Page 34 Tuesday, March 9, 2010 3:35 PM
Adv
ance
d Fe
atur
es
nglish
Restoring a Nuisance ChannelProcedure: To restore the deleted nuisance channel, do one of the following:
• Turn the radio off and then power it on again, OR
• Stop and restart a scan via the programmed Scan button or menu, OR
• Change the channel via the Channel Selector Knob.
Contacts provEach entry coa call.
Additionally, eone of five typCall or Dispatc
PC Call and Davailable with documentation
NOTE: If the can mand Athe saKey IDtransmSee P

Advanced Features
English
35
radio vertically 1 to 2 inches (2.5 to 5.0 cm) from uth.
e PTT button to make the call. The LED lights up en. The display shows the group alias or ID, and p Call icon.
the Talk Permit Tone to finish (if enabled) and speak to the microphone.
it for the PTT Sidetone to finish (if enabled) and early into the microphone.
the PTT button to listen. When any user in the sponds, the LED blinks green. You see the Group , the group ID, and that user’s ID on your display.
e Channel Free Indication feature is enabled, you a short alert tone the moment the target radio the PTT button, indicating the channel is free for spond. Press the PTT button to respond.
s no voice activity for a programmed period of time, nds.
NAG-LACR.book Page 35 Tuesday, March 9, 2010 3:35 PM
Your radio supports two Contacts lists, one for Analog contacts and one for Digital contacts, with a a maximum of 500 members for each Contacts list.
Each entry within Contacts displays the following information:• Call Type
• Call Alias
• Call ID
NOTE: You can add, delete, or edit subscriber IDs for the Digital Contacts list.
For the Analog Contacts list, you can only view the list and initiate a Call Alert. Adding, deleting, and editing capabilities can only be performed by your dealer.
Making a Group Call from ContactsProcedure:
1 S to access the menu.
2 Por Q to Contacts and press N to select.The entries are alphabetically sorted.
3 Por Q to the required group alias or ID.
4 Hold theyour mo
5 Press thsolid grethe Grou
6 Wait for clearly inOR
Waspeak cl
7 Releasegroup reCall icon
8 If thwill hearreleasesyou to reORIf there ithe call e
E
36
5 Press the PTT button to make the call. The LED lights up . The first line displays the subscriber alias or ID. d line displays Private Call and the Private
Talk Permit Tone to finish (if enabled) and speak the microphone.
e PTT button to listen. When the target radio the LED blinks green and the display shows the g user's ID.
nel Free Indication feature is enabled, you will rt alert tone the moment the target radio releases tton, indicating the channel is free for you to ress the PTT button to respond.
o voice activity for a programmed period of time, ds.
short tone. The display shows Call Ended.
NAG-LACR.book Page 36 Tuesday, March 9, 2010 3:35 PM
Adv
ance
d Fe
atur
es
nglish
Making a Private Call from Contacts Procedure:1 S to access the menu.
2 Por Q to Contacts and press N to select.The entries are alphabetically sorted.
3 Por Q to the required subscriber alias or ID.ORPor Q to Manual Dial and press N to select.If there was previously dialed subscriber alias or ID, the alias or ID appears along with a blinking cursor. Use the keypad to edit the ID.ORPor Q to Manual Dial and press N to select.Use the keypad to enter a new subscriber alias or ID.
4 Hold the radio vertically 1 to 2 inches (2.5 to 5.0 cm) from your mouth.
solid greenThe seconCall icon.
6 Wait for theclearly into
7 Release thresponds, transmittin
8 If the Chanhear a shothe PTT burespond. PORIf there is nthe call en
9 You hear a

Advanced Features
English
37
the PTT button to listen. When the target radio s, the LED blinks green.
annel Free Indication feature is enabled, you will hort alert tone the moment the target radio releases button, indicating the channel is free for you to . Press the PTT button to respond.
s no voice activity for a programmed period of time, nds.
r a short tone. The display shows Call Ended.
ou release the PTT button while the radio is setting the call, it exits without any indication and returns to previous screen.
r radio may be programmed to perform a radio sence check prior to setting up the Private Call. If target radio is not available, you hear a short tone see Party Not Available on the display.
radio returns to the menu prior to initiating the io presence check.
NAG-LACR.book Page 37 Tuesday, March 9, 2010 3:35 PM
Making a Private Call by Alias Search You can also use alias or alphanumeric search to retrieve the required subscriber alias.
This feature is only applicable while in Contacts.
Procedure:
1 S to access the menu.
2 Por Q to Contacts and press N to select. The entries are alphabetically sorted.
3 Key in the first character of the alias.
4 Por Q to the required alias.
5 Hold the radio vertically 1 to 2 inches (2.5 to 5.0 cm) from your mouth.
6 Press the PTT button to make the call. The LED lights up solid green. The first line displays the target radio’s ID. The second line displays Private Call and the Private Call icon.
7 Wait for the Talk Permit Tone to finish (if enabled) and speak clearly into the microphone.
8 Releaserespond
9 If the Chhear a sthe PTTrespondORIf there ithe call e
10 You hea
NOTE: If yup the
Youpretheand
Therad
E
38
Call Indicator Settings g and Deactivating Call Ringers for Text n or off the ringing tones for a received Text
cess the menu.
to Utilities and press N to select.
to Radio Settings and press N to select.
to Tones/Alerts and press N to select.
to Call Ringers and press N to select.
to Text Message and press N to select.
t tone is indicated by a .
to the preferred tone and press N to select. y shows Tone <Number> Selected and a ft of the selected tone.
to Turn Off and press N to select. The ws Text Message Ringer Off and a
ft of Turn Off.
NAG-LACR.book Page 38 Tuesday, March 9, 2010 3:35 PM
Adv
ance
d Fe
atur
es
nglish
Activating and Deactivating Call Ringers for Private Calls
You can turn on or off the ringing tones for a received Private Call.
Procedure:
1 S to access the menu.
2 Por Q to Utilities and press N to select.
3 Por Q to Radio Settings and press N to select.
4 Por Q to Tones/Alerts and press N to select.
5 Por Q to Call Ringers and press N to select.
6 Por Q to Private Call and press N to select.
7 The display shows Turn On. Press N to enable Call Ringers for Private Calls. The display shows Private Call Ringer On. ORThe display shows Turn Off. Press N to disable Call Ringers for Private Calls. The display shows Private Call Ringer Off.
ActivatinMessage
You can turn oMessage.
Procedure:
1 S to ac
2 Por Q
3 Por Q
4 Por Q
5 Por Q
6 Por Q
7 The curren
8 Por QThe displaappears leORPor Qdisplay shoappears le
Advanced Features
English
39
ing Ring Styles gram your radio to sound one of ten predefined s when receiving a Call Alert or a Text Message ular contact.
access the menu.
to Contacts and press N to select.The re alphabetically sorted.
to the required alias or ID and press N to
to Ring Style and press N to select.
cates the current selected tone.
to the required tone and press N to select.
lay shows Contact Saved.
unds out each ring style as you navigate through
NAG-LACR.book Page 39 Tuesday, March 9, 2010 3:35 PM
Activating and Deactivating Call Ringers for Telemetry Status with Text
You can turn on or off the alert tones for a received Telemetry Status with Text.
Procedure:
1 S to access the menu.
2 Por Q to Utilities and press N to select.
3 Por Q to Radio Settings and press N to select.
4 Por Q to Tones/Alerts and press N to select.
5 Por Q to Call Ringers and press N to select.
6 Por Q to Telemetry and press N to select.
7 The current tone is indicated by a .
8 Por Q to the preferred tone and press N to select. The display shows Tone <Number> Selected and a appears left of the selected tone.ORPor Q to Turn Off and press N to select. The display shows Telemetry Ringer Off and a appears left of Turn Off.
AssignYou can proringing tonefrom a partic
Procedure:
1 S to
2 Por Qentries a
3 Por Qselect.
4 Por Q
5 A indi
6 Por Q
7 The disp
The radio sothe list.
E
40
Features
ps track of all recent outgoing, answered, and Calls. Use the call log feature to view and t calls.
rm the following tasks in each of your call lists:
ontacts
ecent Callsissed, Answered, and Outgoing.
cess the menu.
to Call Log and press N to select.
to preferred list and press N to select.
y shows the most recent entry at the top of the
to view the list.
button to start a Private Call with the current or ID.
NAG-LACR.book Page 40 Tuesday, March 9, 2010 3:35 PM
Adv
ance
d Fe
atur
es
nglish
Escalating Alarm Tone VolumeYou can program your radio to continually alert you when a radio call remains unanswered. This is done by automatically increasing the alarm tone volume over time. This feature is known as Escalert.
Procedure:
1 S to access the menu.
2 Por Q to Utilities and press N to select.
3 Por Q to Radio Settings and press N to select.
4 Por Q to Tones/Alerts and press N to select.
5 Por Q to Escalert and press N to select.
6 The display shows Turn On. Press N to enable Escalert. The display shows Escalert On.ORThe display shows Turn Off. Press N to disable Escalert. The display shows Escalert Off.
Call Log
Your radio keemissed Privatemanage recen
You can perfo
• Store ID to C
• Delete
Viewing RThe lists are M
Procedure:
1 S to ac
2 Por Q
3 Por Q
4 The displalist.
5 Por Q
Press the PTTselected alias
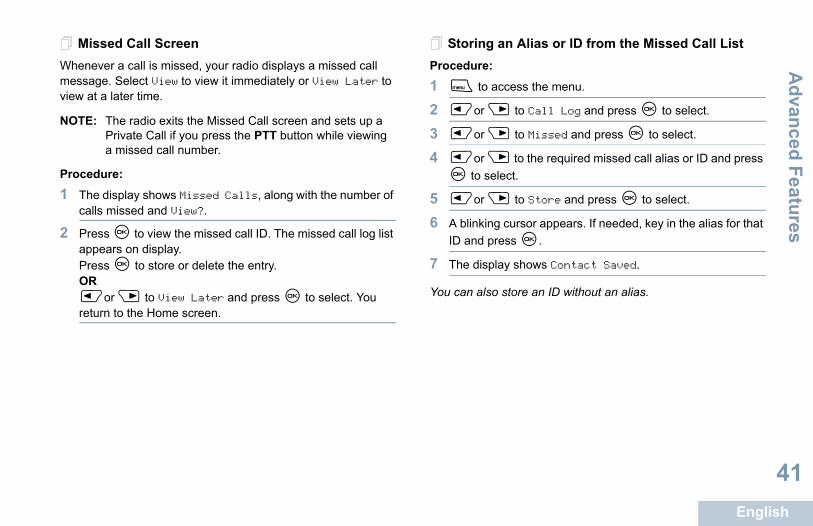
Advanced Features
English
41
an Alias or ID from the Missed Call List
access the menu.
to Call Log and press N to select.
to Missed and press N to select.
to the required missed call alias or ID and press lect.
to Store and press N to select.
g cursor appears. If needed, key in the alias for that ress N.
lay shows Contact Saved.
o store an ID without an alias.
NAG-LACR.book Page 41 Tuesday, March 9, 2010 3:35 PM
Missed Call ScreenWhenever a call is missed, your radio displays a missed call message. Select View to view it immediately or View Later to view at a later time.
NOTE: The radio exits the Missed Call screen and sets up a Private Call if you press the PTT button while viewing a missed call number.
Procedure:
1 The display shows Missed Calls, along with the number of calls missed and View?.
2 Press N to view the missed call ID. The missed call log list appears on display.Press N to store or delete the entry.ORPor Q to View Later and press N to select. You return to the Home screen.
StoringProcedure:
1 S to
2 Por Q
3 Por Q
4 Por QN to se
5 Por Q
6 A blinkinID and p
7 The disp
You can als
E
42
rt Operation
ng enables you to alert a specific radio user to call n they are able to do so.
applicable for subscriber aliases or IDs only and hrough the menu via Contacts or manual dial.
and Responding to a Call Alerteive a Call Alert page, you see Call Alert that the alias or ID of the calling radio on the display.
repetitive tone. The LED blinks yellow.
TT button within four (4) seconds of receiving a age to respond to the Private Call.
to select Ignore? and to exit the Call Alert.
NAG-LACR.book Page 42 Tuesday, March 9, 2010 3:35 PM
Adv
ance
d Fe
atur
es
nglish
Deleting a Call from a Call ListProcedure:
1 S to access the menu.
2 Por Q to Call Log and press N to select.
3 Por Q to the required list and press N to select.
4 Por Q to the required alias or ID and press N to select.
5 Por Q to Delete Entry? and press N to select.
6 Press N to select Yes to delete the entry. The display shows Entry Deleted.ORPor Q to No to return to the previous screen.
When you select a call list and it contains no entries, the display shows List Empty, and sounds a low tone if Keypad Tones are turned on (see Turning Keypad Tones On or Off on page 67).
Call Ale
Call Alert pagiyou back whe
This feature isis accessible t
ReceivingWhen you recalternates with
Procedure:
1 You hear a
2 Press the PCall Alert pORPress N
Advanced Features
English
43
a Call Alert with the One Touch Access
e programmed One Touch Access button to make ert to the predefined alias or ID.
lay shows Call Alert: <Subscriber Alias or icating that the Call Alert has been sent.
lights up solid green when your radio is sending Alert.
ll Alert acknowledgement is received, a tone and the display shows Call Alert Successful.
ll Alert acknowledgement is not received, a tone and the display shows Call Alert Failed.
NAG-LACR.book Page 43 Tuesday, March 9, 2010 3:35 PM
Making a Call Alert from the Contacts ListProcedure:
1 S to access the menu.
2 Por Q to Contacts and press N to select.
3 Por Q to the required subscriber alias or ID and press N to select.ORPor Q to Manual Dial and press N to select.A blinking cursor appears. Enter the subscriber ID you want to page and press N.
4 Por Q to Call Alert and press N to select.
5 The display shows Call Alert: <Subscriber Alias or ID>, indicating that the Call Alert has been sent.
6 The LED lights up solid green when your radio is sending the Call Alert.
7 If the Call Alert acknowledgement is received, a tone sounds and the display shows Call Alert Successful.ORIf the Call Alert acknowledgement is not received, a tone sounds and the display shows Call Alert Failed.
MakingButton
Procedure:
1 Press tha Call Al
2 The dispID>, ind
3 The LEDthe Call
4 If the Casounds ORIf the Casounds
E
44
In addition, each alarm has the following types:
adio transmits an alarm signal and shows audio l indicators.io transmits an alarm signal without any audio or tors. Radio receives calls without any sound radio’s speaker, until you press the PTT button to all.Voice – Radio transmits an alarm signal without r visual indicators, but allow incoming calls to gh the radio’s speaker.
he Emergency Alarms above can be assigned to ed Emergency button.
an Emergency Alarm
iving an Emergency Alarm, the display shows the y icon, the number of alarms received, and Alarm h alternates with the alias or ID of the sender.
nds and the LED blinks red.
automatically acknowledges the Emergency nabled).
NAG-LACR.book Page 44 Tuesday, March 9, 2010 3:35 PM
Adv
ance
d Fe
atur
es
nglish
Emergency Operation
An Emergency Alarm is used to indicate a critical situation. You are able to initiate an Emergency at any time on any screen display even when there is activity on the current channel.Your dealer can set the duration of a button press for the programmed Emergency button, except for long press, which is similar with all other buttons:
• Short press – Between 0.05 seconds and 0.75 seconds
• Long press – Between 1.00 second and 3.75 seconds
The Emergency button is assigned with the Emergency On/Off feature. Check with your dealer for the assigned operation of the Emergency button.
If short press the Emergency button is assigned to turn on the Emergency mode, then long press the Emergency button is assigned to exit the Emergency mode.
If long press the Emergency button is assigned to turn on the Emergency mode, then short press the Emergency button is assigned to exit the Emergency mode.
Your radio supports three Emergency Alarms:
• Emergency Alarm
• Emergency Alarm with Call
• Emergency Alarm with Voice to Follow
• Regular – Rand/or visua
• Silent – Radvisual indicathrough the initiate the c
• Silent with any audio osound throu
Only ONE of tthe programm
ReceivingProcedure:
1 When receEmergencRcvd, whic
2 A tone sou
3 Your radioAlarm (if e

Advanced Features
English
45
ding to an Emergency Alarm
ing an Emergency Alarm:
y button to stop all Emergency Alarm received ns.
radio vertically 1 to 2 inches (2.5 to 5.0 cm) from uth.e Channel Free Indication feature is enabled, you a short alert tone the moment the transmitting radio the PTT button, indicating the channel is now for use.
T button to transmit non-emergency voice to the oup that the Emergency Alarm was targeted to. The ts up solid green. Your radio remains in the cy mode.
the Talk Permit Tone to finish (if enabled) and speak to the microphone.
it for the PTT Sidetone to finish (if enabled) and early into the microphone.
the PTT button to listen. When the emergency radio responds, the LED blinks green. You see the all icon, the group ID, and transmitting radio ID on lay.
NAG-LACR.book Page 45 Tuesday, March 9, 2010 3:35 PM
When your radio receives an Emergency Alarm, it displays the Emergency Alarm received indications until acknowledgement is sent (if enabled) and you exit the Emergency mode.
You will not be able to receive any other indications or displays for any other calls until you exit the Emergency Alarm received screen.
NOTE: Press R, then press Emergency Off button immediately to clear the Emergency Alarm received indications and exit Emergency mode.
Press R, then press Emergency On button immediately to toggle the Emergency feature between hidden or shown.
When your radio receives an Emergency Alarm, and you change the radio channel, the Emergency Alarm list is hidden. The new channel displays the Emergency icon and the LED blinks red. When you change the radio channel back to the previous channel, it also displays the Emergency icon and the LED blinks red.
ResponProcedure:
When receiv
1 Press anindicatio
2 Hold theyour mo
If thwill hearreleasesavailable
3 Press PTsame grLED lighEmergen
4 Wait for clearly inOR
Waspeak cl
5 ReleaseinitiatingGroup Cyour disp

E
46
6 Once your call ends, press R, then press Emergency 4 Radio exits the Emergency Alarm mode and returns to the en.
set to Silent, it will not display any audio or visual ng Emergency mode.
an Emergency Alarm with Calllows you to send an Emergency Alarm to a group n acknowledgement by a radio within the group, dios can communicate over a programmed annel.
rogrammed Emergency On button.
y shows Sending Alarm, which alternates with ID. The LED lights up solid green and the y icon appears on the Home screen display.
mergency Alarm acknowledgment is received, ency tone sounds and the LED blinks green. The ws Emergency Alarm Successful.
dio vertically 1 to 2 inches (2.5 to 5.0 cm) from .
button to make the call. The LED lights up solid the group icon appears on the display.
NAG-LACR.book Page 46 Tuesday, March 9, 2010 3:35 PM
Adv
ance
d Fe
atur
es
nglish
Off button immediately to clear the Emergency Call received indications and exit Emergency mode.
7 The radio returns to the Home screen.
Emergency voice can only be transmitted by the emergency initiating radio. All other radios (including the emergency receiving radio) transmit non-emergency voice.
Sending an Emergency AlarmThis feature allows you to send an Emergency Alarm, a non-voice signal, which triggers an alert indication on a group of radios.
Procedure:
1 Press the programmed Emergency On button.
2 The display shows Sending Alarm, which alternates with your radio ID. The LED lights up solid green and the Emergency icon appears on the Home screen display.
3 When an Emergency Alarm acknowledgment is received, the Emergency tone sounds and the LED blinks green. The display shows Emergency Alarm Successful.ORIf your radio does not receive an Emergency Alarm acknowledgement, and after all retries have been exhausted, a tone sounds and the display shows Emergency Alarm Failed.
Home scre
If your radio isindicators duri
Sending This feature alof radios. Upothe group of raEmergency ch
Procedure:
1 Press the p
2 The displayour radio Emergenc
3 When an Ethe Emergdisplay sho
4 Hold the rayour mouth
5 Press PTTgreen and
Advanced Features
English
47
g an Emergency Alarm with Voice to allows you to send an Emergency Alarm to a group ur radio’s microphone is automatically activated, to communicate with the group of radios without PTT button.
d microphone state is also known as “hot mic”.
the PTT button during the programmed hot mic period, the radio ignores the PTT press and mergency mode.
ou press the PTT button during hot mic, and tinue to press it after the hot mic duration expires, radio continues to transmit until you release the button.
e programmed Emergency On button.
lay shows Sending Alarm. The LED lights up solid d the Emergency icon is displayed.
e display shows Emergency Alarm Successful, early into the microphone. When hot mic has been , the radio automatically transmits without a PTT til the hot mic duration expires.
NAG-LACR.book Page 47 Tuesday, March 9, 2010 3:35 PM
6 Wait for the Talk Permit Tone to finish (if enabled) and speak clearly into the microphone.OR
Wait for the PTT Sidetone to finish (if enabled) and speak clearly into the microphone.
7 Release the PTT button to listen.
8 When the channel is free for you to respond, a short alert
tone sounds ( if the Channel Free Indication feature is enabled). Press the PTT button to respond.OROnce your call ends, press Emergency Off button to exit the Emergency mode.
9 The radio returns to the Home screen.
If your radio is set to Silent, it will not display any audio or visual indicators during Emergency mode, or allow any received calls to sound through the radio’s speaker, until you press the PTT button to initiate the call.
If your radio is set to Silent with Voice, it will not display any audio or visual indicators during Emergency mode, but allow incoming calls to sound through the radio’s speaker. The indicators will only appear once you press the PTT button to initiate, or respond to, the call.
SendinFollow
This featureof radios. Yoallowing youpressing the
This activate
If you presstransmissionremains in E
NOTE: If yconthePTT
Procedure:
1 Press th
2 The dispgreen an
3 Once thspeak clenabledpress un
E
48
4 While transmitting, the LED lights up solid green and the ng an Emergency Mode
eature is only applicable to the radio sending the gency Alarm.
instances where this can happen:
the channel while the radio is in Emergency exits the Emergency mode. If Emergency Alarm is this new channel, the radio reinitiates Emergency.
e programmed Emergency On button during an initiation/transmission state. This causes the this state, and to reinitiate Emergency.
mergency Mode
eature is only applicable to the radio sending the gency Alarm.
s Emergency mode when one of the following
Alarm acknowledgement is received (for Alarm only), OR
send the alarm have been exhausted, OR
ency Off button is pressed.
r radio is powered off, it exits the Emergency . The radio will not reinitiate the Emergency mode atically when it is turned on again.
NAG-LACR.book Page 48 Tuesday, March 9, 2010 3:35 PM
Adv
ance
d Fe
atur
es
nglish
Emergency icon appears on the display.
5 Once the hot mic duration expires, the radio automatically stops transmitting. To transmit again, press the PTT button.
If your radio is set to Silent, it will not display any audio or visual indicators during Emergency mode, or allow any received calls to sound through the radio’s speaker, until the programmed hot mic transmission period is over, and you press the PTT button.
If your radio is set to Silent with Voice, it will not display any audio or visual indicators during Emergency mode when you are making the call with hot mic, but allow sound through the radio’s speaker when the target radio responds after the programmed hot mic transmission period is over. The indicators will only appear when you press the PTT button.
NOTE: If the Emergency Alarm request fails, the radio does not retry to send the request, and enters the hot mic state directly.
Reinitiati
NOTE: This fEmer
There are two
• You changemode. This enabled on
• You press thEmergency radio to exit
Exiting E
NOTE: This fEmer
Your radio exitoccurs:
• Emergency Emergency
• All retries to
• The Emerg
NOTE: If youmodeautom
Advanced Features
English
49
to Write and press N to select.
g cursor appears. keypad to type your message.
to move one space to the left. or the # key to move one space to the right.
e *DEL key to delete any unwanted characters.
once message is composed.
to Send and press N to send the message.
to Save and press N to save the message to ts folder.
edit the message.ain to delete the message or save it to the Drafts
to the required alias or ID and press N to
to Manual Dial and press N to select. e subscriber ID and press N.
Advanced
NAG-LACR.book Page 49 Tuesday, March 9, 2010 3:35 PM
Text Message Features
Your radio is able to receive data, for example a text message, from another radio or an e-mail application.
The maximum length of characters for a text message, including the subject line (seen when receiving message from an e-mail application), is 138.
The radio exits the current screen once the inactivity timer expires. Any text message in the writing/editing screen will automatically be saved to the Drafts folder.
NOTE: Long press R at any time to return to the Home screen.
Writing and Sending a Text MessageProcedure:Press the programmed Text Message button and proceed to Step 3.ORFollow the procedure below.
1 S to access the menu.
2 Por Q to Messages and press N to select.
3 Por Q
4 A blinkinUse the Press PPress QPress th
5 Press N
6 Por QORPor Qthe DrafORR to R agfolder.
7 Por Qselect.ORPor QKey in th

E
50
8 The display shows Text Message: <Subscriber/Group 4 Por Q to the required Quick Text and press N to
cursor appears. ypad to edit the message, if required. to move one space to the left. or the # key to move one space to the right.DEL key to delete any unwanted characters.
once message is composed.
to Send and press N to send the message.
to Save and press N to save the message to folder.
it the message. to delete the message or save it to the Drafts
to the required alias or ID and press N to
to Manual Dial and press N to select. subscriber alias or ID and press N.
y shows Text Message: <Subscriber/Group ID>, confirming your message is being sent.
NAG-LACR.book Page 50 Tuesday, March 9, 2010 3:35 PM
Adv
ance
d Fe
atur
es
nglish
Alias or ID>, confirming your message is being sent.
9 If the message is sent, a tone sounds and the display shows Message Sent.ORIf the message is not sent, a low tone sounds and the display shows Message Send Failed.
If the text message fails to send, the radio returns you to the Resend option screen (see Managing Fail-to-Send Text Messages on page 53).
Sending a Quick Text MessageYour radio supports a maximum of ten (10) Quick Text messages as programmed by your dealer.
While Quick Text messages are predefined, you can edit each message before sending it.
Procedure: Press the programmed Text Message button and proceed to Step 3.OR Follow the procedure below.
1 S to access the menu.
2 Por Q to Messages and press N to select.
3 Por Q to Quick Text and press N to select.
select.
5 A blinking Use the kePress PPress QPress the *
6 Press N
7 Por QORPor Qthe Drafts ORR to edR againfolder.
8 Por Qselect.ORPor QKey in the
9 The displaAlias or

Advanced Features
English
51
ing the Drafts Foldere a text message to send it at a later time.
ton press or a mode change causes the radio to exit sage writing/editing screen while you are in the riting or editing a text message, your current text
automatically saved to the Drafts folder.
cent saved text message is always added to the top list.
older stores a maximum of ten (10) last saved hen the folder is full, the next saved text message
ly replaces the oldest text message in the folder.
g press R at any time to return to the Home een.
a Saved Text Message
ogrammed Text Message button and proceed to
rocedure below.
access the menu.
to Messages and press N to select.
NAG-LACR.book Page 51 Tuesday, March 9, 2010 3:35 PM
10 If the message is sent successfully, a tone sounds and the display shows Message Sent.ORIf the message cannot be sent, a low tone sounds the display shows Message Send Failed.
If the text message fails to send, the radio returns you to the Resend option screen (see Managing Fail-to-Send Text Messages on page 53).
Sending a Quick Text Message with the One Touch Access Button
Procedure:
1 Press the programmed One Touch Access button to send a predefined Quick Text message to a predefined alias or ID.
2 The display shows Text Message: <Subscriber/Group Alias or ID>, confirming your message is being sent.
3 If the message is sent successfully, a tone sounds and the display shows Message Sent.ORIf the message cannot be sent, the display shows Message Send Failed.
If the text message fails to send, the radio returns you to the Resend option screen (see Managing Fail-to-Send Text Messages on page 53).
AccessYou can sav
If a PTT butthe text mesprocess of wmessage is
The most reof the Drafts
The Drafts fmessages. Wautomatical
NOTE: Lonscr
Viewing
Procedure:Press the prStep 3.ORFollow the p
1 S to
2 Por Q
E
52
3 Por Q to Drafts and press N to select. 5 If the message is sent, a tone sounds and the display shows ent.
age is not sent, a low tone sounds and the ws Message Send Failed.
sage fails to send, it is moved to the Sent Items rked with a Send Failed icon.
Saved Text Message from Drafts
rammed Text Message button and proceed to
cedure below.
cess the menu.
to Messages and press N to select.
to Drafts and press N to select.
to the required message and press N to
to Delete and press N to delete the text
NAG-LACR.book Page 52 Tuesday, March 9, 2010 3:35 PM
Adv
ance
d Fe
atur
es
nglish
4 Por Q to the required message and press N to select.
Editing and Sending a Saved Text Message
Procedure:
1 Press N again while viewing the message.
2 Por Q to Edit and press N to select.A blinking cursor appears. Use the keypad to edit your message.Press P to move one space to the left. Press Q or the # key to move one space to the right.Press the *DEL key to delete any unwanted characters.Press N once message is composed.ORPor Q to Send and press N to select.
3 Por Q to the required alias or ID and press N to select.ORPor Q to Manual Dial and press N to select. Key in the subscriber alias or ID and press N.
4 The display shows Sending to: <Subscriber/Group Alias or ID>, confirming your message is being sent.
Message SORIf the messdisplay sho
If the text mesfolder and ma
Deleting a
Procedure:Press the progStep 3.ORFollow the pro
1 S to ac
2 Por Q
3 Por Q
4 Por Qselect.
5 Por Qmessage.

Advanced Features
English
53
ing a Text Message
ard to send the message to another subscriber/or ID.
to Forward and press N to select.
to the required alias or ID and press N to
to Manual Dial and press N to select. e subscriber ID and press N.
lay shows Text Message: <Subscriber/Group r ID>, confirming your message is being sent.
ssage is sent, a tone sounds and the display shows Sent.
ssage is not sent, a low tone sounds and the hows Message Send Failed.
NAG-LACR.book Page 53 Tuesday, March 9, 2010 3:35 PM
Managing Fail-to-Send Text MessagesYou can select one of the following options while at the Resend option screen:
• Resend
• Forward
• Edit
NOTE: If the channel type (i.e. conventional digital or Capacity Plus) is not a match, you can only edit and forward a Fail-to-Send message.
Resending a Text Message
Procedure:
1 Press N to resend the same message to the same subscriber/group alias or ID.
2 If the message is sent successfully, a tone sounds and the display shows Message Sent.ORIf the message cannot be sent, the display shows Message Send Failed.
Forward
Select Forwgroup alias
Procedure:
1 Por Q
2 Por Qselect.ORPor QKey in th
3 The dispAlias o
4 If the meMessageORIf the medisplay s
E
54
5 Por Q to the required alias or ID and press N to
to Manual Dial and press N to select. subscriber ID and press N.
y shows Text Message: <Subscriber/Group ID>, confirming your message is being sent.
age is sent, a tone sounds and the display shows ent.
age is not sent, a low tone sounds and the ws Message Send Failed.
Sent Text Messagesge is sent to another radio, it is saved in Sent st recent sent text message is always added to Sent Items list.
s folder is capable of storing a maximum of sent messages. When the folder is full, the next age automatically replaces the oldest text e folder.
press R at any time to return to the Home n.
NAG-LACR.book Page 54 Tuesday, March 9, 2010 3:35 PM
Adv
ance
d Fe
atur
es
nglish
Editing a Text Message
Select Edit to edit the message before sending it.
NOTE: If a subject line is present (for messages received from an e-mail application), you cannot edit it.
Procedure:
1 Por Q to Edit and press N to select.
2 A blinking cursor appears beside the message. Use the keypad to edit your message.Press P to move one space to the left. Press Q or the # key to move one space to the right.Press the *DEL key to delete any unwanted characters.
3 Press N once message is composed.
4 Por Q to Send and press N to send the message.ORPor Q to Save and press N to save the message to the Drafts folder.ORR to edit the message.R again to delete the message or save it to the Drafts folder.
select.ORPor QKey in the
6 The displaAlias or
7 If the messMessage SORIf the messdisplay sho
ManagingOnce a messaItems. The mothe top of the
The Sent Itemthirty (30) last sent text messmessage in th
NOTE: Long scree

Advanced Features
English
55
e channel type (i.e. conventional digital or Capacity s) is not a match, you can only edit, forward, or ete a Sent message.
again while viewing the message.
to Resend and press N to select.
lay shows Sending to: <Subscriber/Group r ID>, confirming that the same message is being
he same target radio.
ssage is sent, a tone sounds and the display shows Sent.
ssage is not sent, a low tone sounds and the hows Message Send Failed.
ge fails to send, the radio returns you to the Resend n. Press N to resend the message to the same roup alias or ID.
nging the volume, and pressing any button, except N, P, or Q, returns you to the message.
radio exits the Resend option screen if you press PTT button to initiate a Private or Group Call, or to pond to a Group Call. The radio also exits the een when it receives a text or telemetry message, emergency call or alarm, or a call alert.
NAG-LACR.book Page 55 Tuesday, March 9, 2010 3:35 PM
Viewing a Sent Text Message
Procedure:Press the programmed Text Message button and proceed to Step 3.ORFollow the procedure below.
1 S to access the menu.
2 Por Q to Messages and press N to select.
3 Por Q to Sent Items and press N to select.
4 Por Q to the required message and press N to select.A subject line may be shown if the message is from an e-mail application.
The icon at the top right corner of the screen indicates the status of the message (see Sent Item Icons on page 14).
Sending a Sent Text Message
You can select one of the following options while viewing a sent text message:
• Resend
• Forward
• Edit
• Delete
NOTE: If thPludel
Procedure:
1 Press N
2 Por Q
3 The dispAlias osent to t
4 If the meMessageORIf the medisplay s
If the messaoption screesubscriber/g
NOTE: Chafor
Thetheresscran
E
56
The display returns to the Resend option screen if you ll Sent Text Messages from Sent Items
rammed Text Message button and proceed to
cedure below.
cess the menu.
to Messages and press N to select.
to Sent Items and press N to select.
to Delete All and press N to select.
Message?, press N to select Yes. The display t Items Cleared.
Message?, Por Q to No and press N to e previous screen.
ct Sent Items and it contains no text messages, ows List Empty, and sounds a low tone if are turned on (see Turning Keypad Tones On 67).
NAG-LACR.book Page 56 Tuesday, March 9, 2010 3:35 PM
Adv
ance
d Fe
atur
es
nglish
press the PTT button to respond to a Private Call (except when the radio is displaying the Missed Call screen), and at the end of an All Call.
Press Por Q to access the Forward, Edit, or Delete option screen:
• Select Forward to send the selected text message to another subscriber/group alias or ID (see Forwarding a Text Message on page 53).
• Select Edit to edit the selected text message before sending it (see Editing a Text Message on page 54).
• Select Delete to delete the text message.
NOTE: If you exit the message sending screen while the message is being sent, the radio updates the status of the message in the Sent Items folder without providing any indication in the display or via sound.
If the radio changes mode or powers down before the status of the message in Sent Items is updated, the radio cannot complete any In-Progress messages and automatically marks it with a Send Failed icon.
The radio supports a maximum of five (5) In-Progress messages at one time. During this period, the radio cannot send any new message and automatically marks it with a Send Failed icon.
Deleting A
Procedure:Press the progStep 3.ORFollow the pro
1 S to ac
2 Por Q
3 Por Q
4 Por Q
5 At Deleteshows SenORAt Deletereturn to th
When you selethe display shKeypad Tonesor Off on page
Advanced Features
English
57
r Q to access the Read Later or Delete option
ad Later to return to the screen you were on prior g the text message.
lete to delete the text message.
ng Received Text Messagesox to manage your text messages. The Inbox is toring a maximum of 30 messages.
upports the following options for text messages:
e channel type (i.e. conventional digital or Capacity s) is not a match, you can only forward, delete, or ete all Received messages.
es in the Inbox are sorted according to the most eived.
g press R at any time to return to the Home een.
NAG-LACR.book Page 57 Tuesday, March 9, 2010 3:35 PM
Receiving a Text MessageWhen your radio receives a message, the display shows the alias or ID of the sender and the message icon at the far left of the screen.
You can select one of the following options when receiving a text message:
• Read?
• Read Later
• Delete
NOTE: The radio exits the Text Message alert screen and sets up a Private or Group Call if the PTT button is pressed when the radio is displaying the alert screen.
Reading a Text MessageProcedure:
1 Por Q to Read? and press N to select.
2 Selected message in the Inbox opens. A subject line may be shown if the message is from an e-mail application.
3 Press N to return to the Inbox.ORPress N to reply, forward, or delete the text message.
Press Poscreen:
• Select Reto receivin
• Select De
ManagiUse the Inbcapable of s
Your radio s
• Reply
• Forward
• Delete
• Delete All
NOTE: If thPludel
Text messagrecently rec
NOTE: Lonscr

E
58
4 Por Q to the required message and press N to
y shows Telemetry: <Status Text Message>.
R to return to the Home screen.
ply to a Telemetry Status text message.
to a Text Message from the Inbox
rammed Text Message button and proceed to
cedure below.
cess the menu.
to Messages and press N to select.
to Inbox and press N to select.
to the required message and press N to
ine may be shown if the message is from an lication.
once more to access the sub-menu.
to Reply and press N to select.
NAG-LACR.book Page 58 Tuesday, March 9, 2010 3:35 PM
Adv
ance
d Fe
atur
es
nglish
Viewing a Text Message from the Inbox
Procedure:
1 S to access the menu.
2 Por Q to Messages and press N to select.
3 Por Q to Inbox and press N to select.
4 Por Q to view the messages. A subject line may be shown if the message is from an e-mail application.
5 Press N to select the current message, and press N again to reply, forward, or delete that message.ORLong press R to return to the Home screen.
Unread messages are indicated with an exclamation mark (!).
Viewing a Telemetry Status Text Message from the Inbox
Procedure:
1 S to access the menu.
2 Por Q to Messages and press N to select.
3 Por Q to Inbox and press N to select.
select.
5 The displa
6 Long press
You cannot re
Replying
Procedure: Press the progStep 3.OR Follow the pro
1 S to ac
2 Por Q
3 Por Q
4 Por Qselect.A subject le-mail app
5 Press N
6 Por Q

Advanced Features
English
59
a Text Message from the Inbox
ogrammed Text Message button and proceed to
rocedure below.
access the menu.
to Messages and press N to select.
to Inbox and press N to select.
to the required message and press N to
t line may be shown if the message is from an pplication.
once more to access the sub-menu.
to Delete and press N to select.
e Message?, Por Q to Yes and press N to
lay shows Message Deleted.
en returns to the Inbox.
NAG-LACR.book Page 59 Tuesday, March 9, 2010 3:35 PM
7 Por Q to Write and press N to select. A blinking cursor appears. Use the keypad to write your message.ORPor Q to Quick Text and press N to select. A blinking cursor appears. Use the keypad to edit your message, if required.
8 Press N once message is composed.
9 The display shows Text Message: <Subscriber/Group Alias or ID>, confirming your message is being sent.
10 If the message is sent successfully, a tone sounds and the display shows Message Sent.ORIf the message cannot be sent, the display shows Message Send Failed.
If the message fails to send, the radio returns you to the Resend option screen (see Managing Fail-to-Send Text Messages on page 53).
Deleting
Procedure:Press the prStep 3.OR Follow the p
1 S to
2 Por Q
3 Por Q
4 Por Qselect.A subjece-mail a
5 Press N
6 Por Q
7 At Deletselect.
8 The disp
9 The scre
E
60
feature helps to prevent eavesdropping by sers on a channel by the use of a software-
ling solution. The signaling and user identification ansmission are not scrambled.
st have privacy enabled on the channel to send a d transmission, although this is not a necessary r receiving a transmission. While on a privacy-el, the radio is still able to receive clear transmissions.
ports two types of privacy:
y
rivacy
he privacy types above can be assigned to the
a privacy-enabled call or data transmission, st be programmed to have the same Privacy Key acy), OR the same Key Value and Key ID (for acy) as the transmitting radio.
ceives a scrambled call that is of a different R a different Key Value and Key ID, you will arbled transmission (Basic Privacy) or nothing
ed Privacy).
NAG-LACR.book Page 60 Tuesday, March 9, 2010 3:35 PM
Adv
ance
d Fe
atur
es
nglish
Deleting All Text Messages from the InboxProcedure:Press the programmed Text Message button and proceed to Step 3.OR Follow the procedure below.1 S to access the menu.
2 Por Q to Messages and press N to select.
3 Por Q to Inbox and press N to select.
4 Por Q to Delete All and press N to select.
5 At Delete Message?, Por Q to Yes and press N to select.
6 The display shows Inbox Cleared.
When you select the Inbox and it contains no text messages, the display shows List Empty, and sounds a low tone if Keypad Tones are turned on (see Turning Keypad Tones On or Off on page 67).
Privacy
If enabled, thisunauthorized ubased scrambportions of a tr
Your radio muprivacy-enablerequirement foenabled chann(unscrambled)
Your radio sup
• Basic Privac
• Enhanced P
Only ONE of tradio.
To unscrambleyour radio mu(for Basic PrivEnhanced Priv
If your radio rePrivacy Key, Oeither hear a gat all (Enhanc

Advanced Features
English
61
one Multi Frequency (DTMF)
ne Multi Frequency (DTMF) feature allows the radio a radio system with an interface to telephone
DTMF call.
d hold the PTT button.
e desired number.
off the DTMF tone by disabling all radio tones and urning the Radio Tones/Alerts On or Off on
NAG-LACR.book Page 61 Tuesday, March 9, 2010 3:35 PM
The LED lights up solid green while the radio is transmitting and blinks green rapidly when the radio is receiving an ongoing privacy-enabled transmission.
NOTE: Some radio models may not offer this Privacy feature. Check with your dealer or system administrator for more information.
Procedure:Press the programmed Privacy button to toggle privacy on or off.OR Follow the procedure below.1 S to access the menu.
2 Por Q to Utilities and press N to select.
3 Por Q to Radio Settings and press N to select.
4 Por Q to Privacy and press N to select.
5 The display shows Privacy and Turn On. Press N to enable privacy. The display shows the secure icon and Privacy On.ORThe display shows Privacy and Turn Off. Press N to disable privacy. The display shows the unsecure icon and Privacy Off.
If the radio has a privacy type assigned, the Home screen shows the secure or unsecure icon, except when the radio is sending or receiving an Emergency call or alarm.
Dual T
The Dual Toto operate insystems.
Procedure:
To initiate a
1 Press an
2 Enter th
You can turnalerts (see Tpage 70).
E
62
A Members list supports a maximum of 16 channels (including hannel).
annot manually add or delete an entry to the ers list. Check with your dealer or system istrator for more information.
n Automatic Site Search
dio only scans for a new site if the current signal k or when the radio is unable to detect any signal he current site. If the RSSI value is strong, the remains on the current site.
rammed Site Lock On/Off button.
nds and the display shows Site Unlocked.
links yellow rapidly when the radio is actively for a new site, and turns off once the radio locks .
y shows the site roaming icon and channel alias.
NAG-LACR.book Page 62 Tuesday, March 9, 2010 3:35 PM
Adv
ance
d Fe
atur
es
nglish
IP Site Connect
This feature allows your radio to extend communication beyond the reach of a single site, by connecting to different available sites via an Internet Protocol (IP) network.
NOTE: This feature is not applicable in Capacity Plus.
When the radio moves out of range from one site and into the range of another, it connects to the new site's base station to send or receive calls/data transmissions. Depending on your settings, this is done automatically or manually.
If the radio is set to do this automatically, it scans through all available sites when the signal from the current site is weak or when the radio is unable to detect any signal from the current site. It then locks on to the base station with the strongest Received Signal Strength Indicator (RSSI) value.
In a manual site search, the radio searches for the next site in the roam list that is currently in range (but which may not have the strongest signal) and locks on to it.
NOTE: Each channel can only have either Scan or Roam enabled, not both at the same time.
Channels with this feature enabled can be added to a particular roam list. The radio searches the channel(s) in the Members list during the automatic roam operation to locate the best site.
the Selected C
NOTE: You cMembadmin
Starting a
NOTE: The rais weafrom tradio
Procedure: Press the prog
1 A tone sou
2 The LED bsearching on to a site
3 The displa
OR
Advanced Features
English
63
g an Automatic Site Searchdio is actively searching for a new site:
ogrammed Site Lock On/Off button.
ounds and the display shows Site Locked.
turns off and the display shows the channel alias.
nu.
access the menu.
to Utilities and press N to select.
to Radio Settings and press N to select.
to Site Roaming and press N to select.
to Lock Site and press N to select. A tone and the display shows Site Locked.
turns off and the radio returns to the Home screen. lay shows the channel alias.
NAG-LACR.book Page 63 Tuesday, March 9, 2010 3:35 PM
Procedure: Use the menu.
1 S to access the menu.
2 Por Q to Utilities and press N to select.
3 Por Q to Radio Settings and press N to select.
4 Por Q to Site Roaming and press N to select.
5 Por Q to Unlock Site and press N to select. A tone sounds and the display shows Site Unlocked.
6 The radio returns to the Home screen. The display shows the site roaming icon and channel alias.
7 The LED blinks yellow rapidly when the radio is actively searching for a new site, and turns off once the radio locks on to a site.
The radio also performs an automatic site search (site is unlocked) during a PTT button press or data transmission if the current channel, an IP Site Select channel with an attached roam list, is out of range.
StoppinWhen the ra
Procedure:Press the pr
1 A tone s
2 The LED
OR
Procedure:Use the me
1 S to
2 Por Q
3 Por Q
4 Por Q
5 Por Qsounds
6 The LEDThe disp
E
64
y
e or disable any radio in the system. For example, t to disable a stolen radio, to prevent the thief nd enable that radio, when it is recovered.
rming Radio Disable and Enable is limited to with these functions enabled. Check with your r or system administrator for more information.
able
mmed Radio Disable button.
rogrammed Radio Disable button.
to the required alias or ID and press N to
y shows Radio Disable: <Subscriber Alias d the LED lights up solid green.
knowledgment.
ul, a tone sounds and the display shows Radio uccessful.
essful, a tone sounds and the display shows able Failed.
NAG-LACR.book Page 64 Tuesday, March 9, 2010 3:35 PM
Adv
ance
d Fe
atur
es
nglish
Starting a Manual Site SearchProcedure: Press the programmed Manual Site Roam button and proceed to Step 6.ORFollow the procedure below.
1 S to access the menu.
2 Por Q to Utilities and press N to select.
3 Por Q to Radio Settings and press N to select.
4 Por Q to Site Roaming and press N to select.
5 Por Q to Active Search and press N to select.
6 A tone sounds and the display shows Finding Site.The LED blinks green.
7 If a new site is found, a tone sounds and the LED turns off. The display shows Site <Alias> Found. ORIf there is no available site within range, a tone sounds and the LED turns off. The display shows Out of Range.ORIf a new site is within range, but the radio is unable to connect to it, a tone sounds and the LED turns off. The display shows Channel Busy.
8 The radio returns to the Home screen.
Securit
You can enablyou might wanfrom using it, a
NOTE: Perforadiosdeale
Radio DisProcedure: Use the progra
1 Press the p
2 Por Qselect.
3 The displaor ID> an
4 Wait for ac
5 If successfDisable SORIf not succRadio Dis

Advanced Features
English
65
nable grammed Radio Enable button.
e programmed Radio Enable button.
to the required alias or ID and press N to
lay shows Radio Enable: <Subscriber Alias and the LED lights up solid green.
acknowledgment.
sful, a tone sounds and the display shows Radio Successful.
ccessful, a tone sounds and the display shows nable Failed.
nu.
access the menu.
to Contacts and press N to select. The re alphabetically sorted.
NAG-LACR.book Page 65 Tuesday, March 9, 2010 3:35 PM
OR
Procedure: Use the menu.
1 S to access the menu.
2 Por Q to Contacts and press N to select. The entries are alphabetically sorted.
3 Por Q to the required alias or ID and press N to select.ORPor Q to Manual Dial and press N to select. Key in the subscriber alias or ID and press N.
4 Por Q to Radio Disable and press N to select. The LED blinks green.
5 The display shows Radio Disable: <Subscriber Alias or ID> and the LED lights up solid green.
6 Wait for acknowledgment.
7 If successful, a tone sounds and the display shows Radio Disable Successful.ORIf not successful, a tone sounds and the display shows Radio Disable Failed.
Do not press R during the Radio Disable operation as you will not get an acknowledgement message.
Radio EProcedure:Use the pro
1 Press th
2 Por Qselect.
3 The dispor ID>
4 Wait for
5 If succesEnable ORIf not suRadio E
OR
Procedure:Use the me
1 S to
2 Por Qentries a

E
66
3 Por Q to the required alias or ID and press N to orker
rompts an emergency to be raised if there is no uch as any radio button press or activation of the tor, for a predefined time.
ser activity for a programmed duration, the radio user via an audio indicator once the inactivity
no acknowledgment by the user before the inder timer expires, the radio initiates an
arm.
e following Emergency Alarms is assigned to this
Alarm
Alarm with Call
Alarm with Voice to Follow
ains in the emergency state allowing voice roceed until action is taken. See Emergency
page 44 on ways to exit Emergency.
eature is limited to radios with this function ed. Check with your dealer or system istrator for more information.
NAG-LACR.book Page 66 Tuesday, March 9, 2010 3:35 PM
Adv
ance
d Fe
atur
es
nglish
select.ORPor Q to Manual Dial and press N to select. Key in the subscriber alias or ID and press N.
4 Por Q to Radio Enable and press N to select. The LED blinks green.
5 The display shows Radio Enable: <Subscriber Alias or ID> and the LED lights up solid green.
6 Wait for acknowledgment.
7 If successful, a tone sounds and the display shows Radio Enable Successful.ORIf not successful, a tone sounds and the display shows Radio Enable Failed.
Do not press R during the Radio Enable operation as you will not get an acknowledgement message.
Lone W
This feature puser activity, schannel selec
Following no upre-warns thetimer expires.
If there is still predefined remEmergency Al
Only one of thfeature:
• Emergency
• Emergency
• Emergency
The radio remmessages to pOperation on
NOTE: This fenabladmin
Advanced Features
English
67
Keypad Tones On or Offble and disable keypad tones if needed.
access the menu.
to Utilities and press N to select.
to Radio Settings and press N to select.
to Tones/Alerts and press N to select.
to Keypad Tones and press N to select.
lay shows Turn On. Press N to enable keypad he display shows Keypad Tone On.
lay shows Turn Off. Press N to disable keypad he display shows Keypad Tone Off.
NAG-LACR.book Page 67 Tuesday, March 9, 2010 3:35 PM
Utilities
Locking and Unlocking the KeypadYou can lock your radio’s keypad to avoid inadvertent key entry.
Procedure:
1 S to access the menu.
2 Por Q to Utilities and press N to select.
3 Por Q to Radio Settings and press N to select.
4 Por Q to Keypad Lock and press N to select.
5 The display shows Keypad Locked and returns to the Home screen.
6 To unlock the keypad, press S followed by *.
7 The display shows Keypad Unlocked and returns to the Home screen.
TurningYou can ena
Procedure:
1 S to
2 Por Q
3 Por Q
4 Por Q
5 Por Q
6 The disptones. TORThe disptones. T

E
68
e Power Level mize your radio’s power setting to high or low for
gh enables communication with radios located at distance from you. Low enables communication
closer proximity.
rammed Power Level button to toggle transmit tween high and low.
cedure below.
cess the menu.
to Utilities and press N to select.
to Radio Settings and press N to select.
to Power and press N to select.
ur current setting as prompted on the display.
to select a new power level.
urns to the previous menu.
to return to the Home screen. The power level
NAG-LACR.book Page 68 Tuesday, March 9, 2010 3:35 PM
Adv
ance
d Fe
atur
es
nglish
Setting the Squelch Level You can adjust your radio's squelch level to filter out unwanted calls with low signal strength or channels that have a higher than normal background noise.
Settings: Normal is the default. Tight filters out (unwanted) calls and/or background noise. However, calls from remote locations may also be filtered out.
Procedure: Press the programmed Squelch button to toggle squelch level between normal and tight.ORFollow the procedure below.
1 S to access the menu.
2 Por Q to Utilities and press N to select.
3 Por Q to Radio Settings and press N to select.
4 Por Q to Squelch and press N to select.
5 Choose either Tight or Normal and press N to select.
6 Screen returns to the previous menu.
Setting thYou can custoeach channel.
Settings: Hia considerablewith radios in
Procedure: Press the progpower level beORFollow the pro
1 S to ac
2 Por Q
3 Por Q
4 Por Q
5 Change yo
6 Press N
7 Screen ret
Long press Ricon is visible.
Advanced Features
English
69
ogrammed VOX button to toggle the feature on or
rocedure below.
access the menu.
to Utilities and press N to select.
to Radio Settings and press N to select.
to VOX and press N to select.
lay shows VOX On. Press N to disable VOX. A nds and the display shows VOX Off.
lay shows VOX Off. Press N to enable VOX. A nds and the display shows VOX On.
ermit Tone feature is enabled (see Turning the Talk e On or Off on page 71), use a trigger word to all. Wait for the Talk Permit Tone to finish before arly into the microphone.
NAG-LACR.book Page 69 Tuesday, March 9, 2010 3:35 PM
Turning the Option Board Feature(s) On or OffA channel can support up to 6 option board features. Refer to your dealer or system administrator for more information.
Procedure: Press the programmed Option Board Feature button to toggle the feature on or off.
Turning the Voice Operating Transmission (VOX) Feature On or Off
This feature allows you to initiate a hands-free voice activated call on a programmed channel. The radio automatically transmits, for a programmed period, whenever the microphone on the VOX-capable accessory detects voice.
Pressing the PTT button during radio operation will disable VOX. To re-enable VOX, do one of the following:
• Turn the radio off and power it on again, OR
• Change the channel via the Channel Selector Knob, OR
• Follow the procedure below.
NOTE: Turning this feature on or off is limited to radios with this function enabled. Check with your dealer or system administrator for more information.
Procedure:Press the proff.ORFollow the p
1 S to
2 Por Q
3 Por Q
4 Por Q
5 The disptone souORThe disptone sou
If the Talk PPermit Toninitiate the cspeaking cle

E
70
he Radio Tones/Alerts On or Offe and disable all radio tones and alerts (except for mergency alert tone) if needed.
rammed All Tones/Alerts button to toggle all .
cedure below.
cess the menu.
to Utilities and press N to select.
to Radio Settings and press N to select.
to Tones/Alerts and press N to select.
to All Tones and press N to select.
y shows Turn On. Press N to enable all tones The display shows All Tones On.
y shows Turn Off. Press N to disable all tones The display shows All Tones Off.
NAG-LACR.book Page 70 Tuesday, March 9, 2010 3:35 PM
Adv
ance
d Fe
atur
es
nglish
Controlling the Display BacklightYou can enable or disable the radio’s display backlight as needed. The setting also affects the Menu Navigation Buttons and keypad backlighting accordingly.
Procedure: Press the programmed Backlight button to toggle the backlight settings.ORFollow the procedure below.
1 S to access the menu.
2 Por Q to Utilities and press N to select.
3 Por Q to Radio Settings and press N to select.
4 Por Q to Backlight and press N to select.
5 The display shows Auto On. Press N to enable the display backlight. The display shows Backlight Auto On.ORThe display shows Turn Off. Press N to disable the display backlight. The display shows Backlight Turn Off.
The display backlight and keypad backlighting are automatically turned off if the LED indicator is disabled (see Turning the LED Indicator On or Off on page 71).
Turning tYou can enablthe incoming E
Procedure: Press the progtones on or offORFollow the pro
1 S to ac
2 Por Q
3 Por Q
4 Por Q
5 Por Q
6 The displaand alerts.ORThe displaand alerts.

Advanced Features
English
71
the Talk Permit Tone On or Off ble and disable the Talk Permit Tone if needed.
access the menu.
to Utilities and press N to select.
to Radio Settings and press N to select.
to Tones/Alerts and press N to select.
to Talk Permit and press N to select.
lay shows Turn On. Press N to enable the Talk one. The display shows Talk Permit Tone On.
lay shows Turn Off. Press N to disable the Talk one. The display shows Talk Permit Tone Off.
the LED Indicator On or Offble and disable the LED Indicator if needed.
access the menu.
to Utilities and press N to select.
to Radio Settings and press N to select.
NAG-LACR.book Page 71 Tuesday, March 9, 2010 3:35 PM
Setting the Tone Alert Volume Offset Level You can adjust the Tone Alert Volume Offset level if needed. This feature adjusts the volume of the tones/alerts, allowing it to be higher or lower than the voice volume.
Procedure:
1 S to access the menu.
2 Por Q to Utilities and press N to select.
3 Por Q to Radio Settings and press N to select.
4 Por Q to Tones/Alerts and press N to select.
5 Por Q to Vol. Offset and press N to select.
6 Por Q to the required volume value. The radio sounds a feedback tone with each corresponding volume value.
7 Press N to keep the required displayed volume value. The display shows Volume Offset Selected. ORRepeat Step 6 to select another volume value.ORR to exit without changing the current volume offset settings.
TurningYou can ena
Procedure:
1 S to
2 Por Q
3 Por Q
4 Por Q
5 Por Q
6 The dispPermit TORThe dispPermit T
TurningYou can ena
Procedure:
1 S to
2 Por Q
3 Por Q

E
72
4 Por Q to LED Indicator and press N to select. g General Radio Informationtains information on the following:
rsion
ersion
R at any time to return to the previous screen g press R to return to the Home screen.
g the Battery Informationation on your radio battery.
cess the menu.
to Utilities and press N to select.
to Radio Info and press N to select.
to Battery Info and press N to select.
NAG-LACR.book Page 72 Tuesday, March 9, 2010 3:35 PM
Adv
ance
d Fe
atur
es
nglish
5 The display shows Turn On. Press N to enable the LED Indicator. The display shows All LEDs On.ORThe display shows Turn Off. Press N to disable the LED Indicator. The display shows All LEDs Off.
The display backlight, buttons, and keypad backlighting are automatically turned off if the LED indicator is disabled (see Controlling the Display Backlight on page 70).
Turning the Introduction Screen On or OffYou can enable and disable the Introduction Screen if needed.
Procedure:
1 S to access the menu.
2 Por Q to Utilities and press N to select.
3 Por Q to Radio Settings and press N to select.
4 Por Q to Intro Screen and press N to select.
5 The display shows Turn On. Press N to enable the Introduction Screen. The display shows Intro Screen On.ORThe display shows Turn Off. Press N to disable the Introduction Screen. The display shows Intro Screen Off.
AccessinYour radio con
• Battery
• Radio ID
• Software Ve
• Codeplug V
NOTE: Pressor lon
AccessinDisplays inform
Procedure:
1 S to ac
2 Por Q
3 Por Q
4 Por Q

Advanced Features
English
73
to My Number and press N to select.
lay shows the radio ID.
g the Firmware Version
firmware version on your radio.
access the menu.
to Utilities and press N to select.
to Radio Info and press N to select.
to Firmware Ver. and press N to select.
lay shows the current firmware version.
g the Codeplug Version
codeplug version on your radio.
access the menu.
to Utilities and press N to select.
to Radio Info and press N to select.
to CP Ver. and press N to select.
lay shows the current codeplug version.
NAG-LACR.book Page 73 Tuesday, March 9, 2010 3:35 PM
5 The display shows the battery information.ORFor IMPRES batteries ONLY: The display reads Recondition Battery if the battery requires reconditioning in an IMPRES charger. After the reconditioning process, the display then shows the battery information.
For IMPRES batteries ONLY:
Press Por Q to access the Remaining Capacity, Date of Initial Use, or Service Life option screen:
• Select Remaining Capacity to view battery capacity level, indicated by a horizontal bar and percentage reading.
• Select Date of Initial Use to view the date when battery is first used.
• Select Service Life to view the potential and current capacity of the battery.
Checking the Radio ID
Displays the ID of your radio.
Procedure:
1 S to access the menu.
2 Por Q to Utilities and press N to select.
3 Por Q to Radio Info and press N to select.
4 Por Q
5 The disp
Checkin
Displays the
Procedure:
1 S to
2 Por Q
3 Por Q
4 Por Q
5 The disp
Checkin
Displays the
Procedure:
1 S to
2 Por Q
3 Por Q
4 Por Q
5 The disp

E
74
• Combination VHF/GPS, 160 – 174 MHz, Helical Antenna5 _)
and, 136 – 174 MHz, Double Helical Antenna6 _)
147 MHz, Stubby Antenna4 (PMAD4093_)
160 MHz, Stubby Antenna3 (PMAD4094_)
174 MHz, Stubby Antenna5 (PMAD4095_)
UHF/GPS, 403 – 433 MHz, Folded Monopole MAE4018_)
UHF/GPS, 403 – 433 MHz, Stubby Antenna1 _)
– 470 MHz, Whip Antenna3 (PMAE4022_)
UHF1/GPS, 430 – 470 MHz, Stubby Antenna2 _)
UHF1/GPS, 430 – 470 MHz, Folded Monopole MAE4024_)
UHF2/GPS, 450 – 527 MHz, Stubby Antenna7 _)
– 527 MHz, Whip Antenna7 (PMAE4049_)
NAG-LACR.book Page 74 Tuesday, March 9, 2010 3:35 PM
Acc
esso
ries
nglish
AccessoriesYour radio is compatible with the accessories listed in this chapter. Contact your dealer for details.Antennas. . . . . . . . . . . . . . . . . . . . . . . . . . . . . . . . . . . page 74Batteries . . . . . . . . . . . . . . . . . . . . . . . . . . . . . . . . . . . page 75Carry Devices . . . . . . . . . . . . . . . . . . . . . . . . . . . . . . . page 75Chargers . . . . . . . . . . . . . . . . . . . . . . . . . . . . . . . . . . . page 76Earbuds and Earpieces. . . . . . . . . . . . . . . . . . . . . . . . page 76Headsets and Headset Accessories . . . . . . . . . . . . . . page 76Remote Speaker Microphones . . . . . . . . . . . . . . . . . . page 77Surveillance Accessories . . . . . . . . . . . . . . . . . . . . . . page 77Miscellaneous Accessories . . . . . . . . . . . . . . . . . . . . . page 78
Antennas
The diagram on the right shows the location of the color indicator for the following antennas. See the footnote at the end of the list for the colors.
• Combination VHF/GPS, 136 – 147 MHz, Helical Antenna4 (PMAD4067_)
• Combination VHF/GPS, 147 – 160 MHz, Helical Antenna3 (PMAD4068_)
(PMAD4069
• VHF Wideb(PMAD4088
• VHF, 136 –
• VHF, 147 –
• VHF, 160 –
• CombinationAntenna1 (P
• Combination(PMAE4021
• UHF1, 403
• Combination(PMAE4023
• CombinationAntenna2 (P
• Combination(PMAE4048
• UHF2, 450
Accessories
English
75
Li-Ion, 1400 mAh Submersible (IP57) Battery, ly Safe (FM) (PMNN4069_)
Li-Ion, 2200 mAh Submersible (IP57) Battery 77_)
00 mAh Submersible (IP57) Battery (PMNN4065_)*
le to the 800/900 band.
Devices
or 2-Inch Belt Width (PMLN4651_)
or 2.5-Inch Belt Width (PMLN4652_)
rry Case with 3-Inch Fixed Belt Loop for Display LN5015_)
er Carry Case with 2.5-Inch Swivel Belt Loop y Radio (PMLN5016_)
er Carry Case with 3-Inch Swivel Belt Loop for adio (PMLN5017_)
er Carry Case with 3-Inch Fixed Belt Loop for adio (PMLN5018_)
ther Carry Case with 2.5-Inch Swivel Belt Loop y Radio (PMLN5019_)
ther Carry Case with 3-Inch Swivel Belt Loop for adio (PMLN5020_)
NAG-LACR.book Page 75 Tuesday, March 9, 2010 3:35 PM
• Combination UHF2/GPS, 450 – 495 MHz, Folded Monopole Antenna8 (PMAE4050_)
• Combination UHF2/GPS, 495 – 527 MHz, Folded Monopole Antenna6 (PMAE4051_)
• Combination 800/900/GPS, 806 – 941 MHz, Helical Antenna9 (PMAF4003_)
• Public Safety Microphone UHF Stubby Antenna1, 403 – 433 MHz (PMAE4046_)
• Public Safety Microphone UHF Stubby Antenna2, 430 – 470 MHz (PMAE4047_)
• Public Safety Microphone VHF Antenna5, 150 – 174 MHz (PMAD4086_)
• Public Safety Microphone VHF Antenna4, 136 – 153 MHz (PMAD4087_)
Color Code:
Batteries
• IMPRES Li-Ion, 1500 mAh Submersible (IP57) Battery (PMNN4066_)*
• IMPRES Intrinsical
• IMPRES (PMNN40
• NiMH, 13
* Not applicab
Carry
• Belt Clip f
• Belt Clip f
• Nylon CaRadio (PM
• Soft Leathfor Displa
• Soft LeathDisplay R
• Soft LeathDisplay R
• Hard Leafor Displa
• Hard LeaDisplay R
1 Red 3 Black 5 Blue 7 Brown 9 Purple
2 Green 4 Yellow 6 White 8 Orange

E
76
• Hard Leather Carry Case with 3-Inch Fixed Belt Loop for • Medium Custom Earpiece for Surveillance Kits, Right Ear )
m Earpiece for Surveillance Kits, Right Ear )
m Earpiece for Surveillance Kits, Left Ear )
stom Earpiece for Surveillance Kits, Left Ear )
m Earpiece for Surveillance Kits, Left Ear )
rpiece, Black (RLN6279_)
rpiece, Beige (RLN6280_)
t Foam Ear Pad and Windscreen (RLN6283_)
th Acoustic Tube Assembly, Beige (RLN6284_)
th Acoustic Tube Assembly, Black (RLN6285_)
th High Noise Kit, Beige (RLN6288_)
th High Noise Kit, Black (RLN6289_)
ts and Headset Accessories
adset (PMLN5102_)
Noise-Canceling Headset (FM) (PMLN5275_)
Headset (RMN5058_)
NAG-LACR.book Page 76 Tuesday, March 9, 2010 3:35 PM
Acc
esso
ries
nglish
Display Radio (PMLN5021_)
• 2.5-Inch Replacement Swivel Belt Loop (PMLN5022_)
• 3-Inch Replacement Swivel Belt Loop (PMLN5023_)
• 1.75-Inch Black Leather Belt (4200865599)
Chargers
• IMPRES Multi-Unit Charger (WPLN4212_)
• IMPRES Multi-Unit Charger with Displays (WPLN4219_)
• IMPRES Single-Unit Charger (WPLN4232_)
Earbuds and Earpieces
• Receive-Only Earbud (AARLN4885_)
• D-Shell Receive-Only Earpiece (PMLN4620_)
• Receive-Only Earpiece (RLN4941_)
• Over-the-Ear Receiver for Remote Speaker Microphone (WADN4190_)
• D-Shell Earset (PMLN5096_)
• IMPRES Temple Transducer (PMLN5101_)
• Small Custom Earpiece for Surveillance Kits, Right Ear (RLN4760_)
(RLN4761_
• Large Custo(RLN4762_
• Small Custo(RLN4763_
• Medium Cu(RLN4764_
• Large Custo(RLN4765_
• Standard Ea
• Standard Ea
• Replacemen
• Earpiece wi
• Earpiece wi
• Earpiece wi
• Earpiece wi
Headse
• Ultra-Lite He
• Heavy Duty
• Lightweight

Accessories
English
77
peaker Microphone Replacement Coil Cord Kit with PMMN4024_ and PMMN4040_) (RLN6074_)
peaker Microphone Replacement Coil Cord Kit with PMMN4025) (RLN6075_)
le to the 800/900 band.
illance Accessories
3-Wire Surveillance, Black (PMLN5097_)
3-Wire Surveillance, Beige (PMLN5106_)
3-Wire Surveillance Kit with Clear, Comfortable ube, Black (PMLN5111_)
3-Wire Surveillance Kit with Clear, Comfortable ube, Beige (PMLN5112_)
nly Surveillance Kit, Black (Single Wire) _)
nly Surveillance Kit, Beige (Single Wire) _)
2-Wire Surveillance Kit, Black (RLN5880_)
2-Wire Surveillance Kit, Beige (RLN5881_)
2-Wire Surveillance Kit with Clear, Comfortable ube, Black (RLN5882_)
NAG-LACR.book Page 77 Tuesday, March 9, 2010 3:35 PM
Remote Speaker Microphones
• Remote Speaker Microphone (PMMN4024_)
• IMPRES Remote Speaker Microphone (PMMN4025_)
• Remote Speaker Microphone, Submersible (IP57) (PMMN4040_)
• IMPRES Public Safety Microphone, 30-Inch Cable (PMMN4041_)*
• IMPRES Public Safety Microphone, 24-Inch Cable (PMMN4042_)*
• IMPRES Public Safety Microphone, 18-Inch Cable (PMMN4043_)*
• IMPRES Remote Speaker Microphone, with Volume, IP57 (PMMN4046_)
• IMPRES Submersible Public Safety Microphone, 30-Inch Cable (PMMN4047_)*
• IMPRES Submersible Public Safety Microphone, 24-Inch Cable (PMMN4048_)*
• IMPRES Submersible Public Safety Microphone, 18-Inch Cable (PMMN4049_)*
• IMPRES Remote Speaker Microphone, Noise-Canceling (PMMN4050_)
• Remote S(For Use
• Remote S(For Use
* Not applicab
Surve
• IMPRES
• IMPRES
• IMPRES Acoustic T
• IMPRES Acoustic T
• Receive O(RLN5878
• Receive O(RLN5879
• IMPRES
• IMPRES
• IMPRES Acoustic T
E
78
• IMPRES 2-Wire Surveillance Kit with Clear, Comfortable • Replacement Ear Tips, Clear, Pack of 25 (For Use with (RLN6282_)
t Strap for RLN4570_ and HLN6602_ Chest 596Z02)
ust Cover (1571477L01)
t Foam Plugs, Pack of 50 (For Use with (5080384F72)
adioPAK Extension Belt (4280384F89)
NAG-LACR.book Page 78 Tuesday, March 9, 2010 3:35 PM
Acc
esso
ries
nglish
Acoustic Tube, Beige (RLN5883_)
• Surveillance Low Noise Kit (RLN5886_)
• Surveillance High Noise Kit (RLN5887_)
Miscellaneous Accessories
• Universal Chest Pack (HLN6602_)
• Waterproof Bag, Includes Large Carry Strap (HLN9985_)
• Shoulder Strap (Attaches to D-Rings on Carry Case) (NTN5243_)
• Small Clip, Epaulet Strap (RLN4295_)
• Break-A-Way Chest Pack (RLN4570_)
• Universal RadioPAK and Utility Case (Fanny Pack) (RLN4815_)
RLN5886_)
• ReplacemenPacks (1505
• Accessory D
• ReplacemenRLN5887_)
• Universal R

Batteries and C
hargers Warranty
English
79
ity Warranty warranty guarantees 80% of the rated capacity for the ation.
al-Hydride (NiMH) or Lithium-Ion tteries 12 Months
atteries, When Used Exclusively S Chargers 18 Months
NAG-LACR.book Page 79 Tuesday, March 9, 2010 3:35 PM
Batteries and Chargers Warranty
The Workmanship Warranty The workmanship warranty guarantees against defects in workmanship under normal use and service.
The CapacThe capacitywarranty dur
All MOTOTRBO Batteries Two (2) Years
IMPRES Chargers (Single-Unit and Multi-Unit, Non-Display) Two (2) Years
IMPRES Chargers (Multi-Unit with Display) One (1) Year
Nickel Met(Li-lon) Ba
IMPRES Bwith IMPRE
E
80
obligations or liability for additions or modifications to this warranty writing and signed by an officer of MOTOROLA.
a separate agreement between MOTOROLA and user purchaser, MOTOROLA does not warrant the intenance or service of the Product.
annot be responsible in any way for any ancillary furnished by MOTOROLA which is attached to or tion with the Product, or for operation of the Product ry equipment, and all such equipment is expressly this warranty. Because each system which may use nique, MOTOROLA disclaims liability for range, eration of the system as a whole under this
PROVISIONS:ets forth the full extent of MOTOROLA'S regarding the Product. Repair, replacement or rchase price, at MOTOROLA’s option, is the
dy. THIS WARRANTY IS GIVEN IN LIEU OF ALL ESS WARRANTIES. IMPLIED WARRANTIES, ITHOUT LIMITATION, IMPLIED WARRANTIES OF ILITY AND FITNESS FOR A PARTICULAR E LIMITED TO THE DURATION OF THIS LIMITED NO EVENT SHALL MOTOROLA BE LIABLE FOR
EXCESS OF THE PURCHASE PRICE OF THE R ANY LOSS OF USE, LOSS OF TIME, CE, COMMERCIAL LOSS, LOST PROFITS OR THER INCIDENTAL, SPECIAL OR IAL DAMAGES ARISING OUT OF THE USE OR
NAG-LACR.book Page 80 Tuesday, March 9, 2010 3:35 PM
Lim
ited
War
rant
y
nglish
Limited Warranty
MOTOROLA COMMUNICATION PRODUCTS
I. WHAT THIS WARRANTY COVERS AND FOR HOW LONG:
MOTOROLA INC. (“MOTOROLA”) warrants the MOTOROLA manufactured Communication Products listed below (“Product”) against defects in material and workmanship under normal use and service for a period of time from the date of purchase as scheduled below:
MOTOROLA, at its option, will at no charge either repair the Product (with new or reconditioned parts), replace it (with a new or reconditioned Product), or refund the purchase price of the Product during the warranty period provided it is returned in accordance with the terms of this warranty. Replaced parts or boards are warranted for the balance of the original applicable warranty period. All replaced parts of Product shall become the property of MOTOROLA.
This express limited warranty is extended by MOTOROLA to the original end user purchaser only and is not assignable or transferable to any other party. This is the complete warranty for the Product manufactured by MOTOROLA. MOTOROLA assumes no
unless made in
Unless made inthe original endinstallation, ma
MOTOROLA cequipment not used in connecwith any ancillaexcluded from the Product is ucoverage, or opwarranty.
II. GENERALThis warranty sresponsibilitiesrefund of the puexclusive remeOTHER EXPRINCLUDING WMERCHANTABPURPOSE, ARWARRANTY. INDAMAGES IN PRODUCT, FOINCONVENIENSAVINGS OR OCONSEQUENT
XPR Series Digital Portable Radios Two (2) Years
Product Accessories (Excluding Batteries and Chargers) One (1) Year

Limited W
arranty
English
81
damage from improper testing, operation, ce, installation, alteration, modification, or adjustment.
or damage to antennas unless caused directly by material workmanship. subjected to unauthorized Product modifications, les or repairs (including, without limitation, the addition
duct of non-MOTOROLA supplied equipment) which affect performance of the Product or interfere with LA's normal warranty inspection and testing of the verify any warranty claim.hich has had the serial number removed or made
able batteries if:the seals on the battery enclosure of cells are broken vidence of tampering.
age or defect is caused by charging or using the quipment or service other than the Product for which it
d.sts to the repair depot. which, due to illegal or unauthorized alteration of the irmware in the Product, does not function in e with MOTOROLA’s published specifications or the acceptance labeling in effect for the Product at the time ct was initially distributed from MOTOROLA. or other cosmetic damage to Product surfaces that ffect the operation of the Product.d customary wear and tear.
NAG-LACR.book Page 81 Tuesday, March 9, 2010 3:35 PM
INABILITY TO USE SUCH PRODUCT, TO THE FULL EXTENT SUCH MAY BE DISCLAIMED BY LAW.
III. STATE LAW RIGHTS:SOME STATES DO NOT ALLOW THE EXCLUSION OR LIMITATION OF INCIDENTAL OR CONSEQUENTIAL DAMAGES OR LIMITATION ON HOW LONG AN IMPLIED WARRANTY LASTS, SO THE ABOVE LIMITATION OR EXCLUSIONS MAY NOT APPLY.
This warranty gives specific legal rights, and there may be other rights which may vary from state to state.
IV. HOW TO GET WARRANTY SERVICE:You must provide proof of purchase (bearing the date of purchase and Product item serial number) in order to receive warranty service and, also, deliver or send the Product item, transportation and insurance prepaid, to an authorized warranty service location. Warranty service will be provided by MOTOROLA through one of its authorized warranty service locations. If you first contact the company which sold you the Product (e.g., dealer or communication service provider), it can facilitate your obtaining warranty service. You can also call MOTOROLA at 1-800-927-2744 US/Canada.
V. WHAT THIS WARRANTY DOES NOT COVER:A) Defects or damage resulting from use of the Product in other
than its normal and customary manner.B) Defects or damage from misuse, accident, water, or neglect.
C)Defects ormaintenan
D)Breakagedefects in
E) A Productdisassembto the ProadverselyMOTOROProduct to
F) Product willegible.
G)Recharge(1) any of or show e(2) the dambattery in eis specifie
H)Freight coI) A Product
software/faccordancFCC type the Produ
J) Scratchesdoes not a
K) Normal an
E
82
VI. PATENT AND SOFTWARE PROVISIONS: MOTOROLA will have no liability with respect to any claim of patent hich is based upon the combination of the Product or hereunder with software, apparatus or devices not OTOROLA, nor will MOTOROLA have any liability ncillary equipment or software not furnished by hich is attached to or used in connection with the regoing states the entire liability of MOTOROLA with gement of patents by the Product or any parts
ited States and other countries preserve for ertain exclusive rights for copyrighted MOTOROLA s the exclusive rights to reproduce in copies and s of such MOTOROLA software. MOTOROLA e used in only the Product in which the software was died and such software in such Product may not be d, distributed, modified in any way, or used to rivative thereof. No other use including, without tion, modification, reproduction, distribution, or
ering of such MOTOROLA software or exercise of OTOROLA software is permitted. No license is
lication, estoppel or otherwise under MOTOROLA copyrights.
ING LAW:s governed by the laws of the State of Illinois, U.S.A.
NAG-LACR.book Page 82 Tuesday, March 9, 2010 3:35 PM
Lim
ited
War
rant
y
nglish
MOTOROLA will defend, at its own expense, any suit brought against the end user purchaser to the extent that it is based on a claim that the Product or parts infringe a United States patent, and MOTOROLA will pay those costs and damages finally awarded against the end user purchaser in any such suit which are attributable to any such claim, but such defense and payments are conditioned on the following:A) that MOTOROLA will be notified promptly in writing by such
purchaser of any notice of such claim;B) that MOTOROLA will have sole control of the defense of such
suit and all negotiations for its settlement or compromise; andC)should the Product or parts become, or in MOTOROLA’s opinion
be likely to become, the subject of a claim of infringement of a United States patent, that such purchaser will permit MOTOROLA, at its option and expense, either to procure for such purchaser the right to continue using the Product or parts or to replace or modify the same so that it becomes non-infringing or to grant such purchaser a credit for the Product or parts as depreciated and accept its return. The depreciation will be an equal amount per year over the lifetime of the Product or parts as established by MOTOROLA.
infringement wparts furnishedfurnished by Mfor the use of aMOTOROLA wProduct. The forespect to infrinthereof.
Laws in the UnMOTOROLA csoftware such adistribute copiesoftware may boriginally emboreplaced, copieproduce any delimitation, alterareverse enginerights in such Mgranted by imppatent rights or
VII. GOVERNThis Warranty i


*6880309T24*6880309T24-H
Motorola, Inc.1301 E. Algonquin Rd.Schaumburg, IL 60196-1078, U.S.A.
MOTOROLA and the Stylized M Logo are registered in the U.S. Patent and Trademark Office. All other product or service names are the property of their respective owners.© 2006 – 2010 by Motorola, Inc.All rights reserved. Printed in the U.S.A.March 2010
www.motorola.com/mototrbo