xopero centrally managed backup solution - user manual.pdf · application 2 proxy settings if it is...
TRANSCRIPT
User Manual
Xopero
Centrally managed backup solution

Xopero BACKUP AND SYNCHRONIZ ATION IN ONE
APPLICATION
1 |
Contents
Desktop application .................................................................................................................................2
Requirements .........................................................................................................................................2
The installation process ......................................................................................................................3
Logging in to the application...........................................................................................................6
First logging in to the application ..................................................................................................7
First run wizard – step 1 .................................................................................................................7
First run wizard – step 2 .................................................................................................................8
First run wizard – step 3 .............................................................................................................. 11
The interface of the application ................................................................................................... 13
Start .................................................................................................................................................... 15
My backupsets ............................................................................................................................... 17
Restoring .......................................................................................................................................... 20
Briefcase ............................................................................................................................................ 21
Event log ........................................................................................................................................... 22
Backup ................................................................................................................................................... 23
Mechanism ...................................................................................................................................... 24
Backupset wizard ........................................................................................................................... 25
Local data ......................................................................................................................................... 27
Microsoft Outlook ......................................................................................................................... 28
MS SQL .............................................................................................................................................. 29
Firebird .............................................................................................................................................. 29
Network drives ............................................................................................................................... 29
MS Exchange ................................................................................................................................... 30
Pre and post scripts ...................................................................................................................... 30
Schedule ........................................................................................................................................... 31
Defined schedule ........................................................................................................................... 32
Advanced options ......................................................................................................................... 33
Xopero BACKUP AND SYNCHRONIZ ATION IN ONE
APPLICATION
2 |
Data restoring ..................................................................................................................................... 35
Restoring selected file versions ................................................................................................ 37
Deleting data....................................................................................................................................... 38
The Briefcase ....................................................................................................................................... 39
Configuring the Briefcase folder .............................................................................................. 40
Using the Briefcase ....................................................................................................................... 40
Application settings .......................................................................................................................... 42
Changing the encryption key .................................................................................................... 44
Application logs ............................................................................................................................. 45
Glossary of terms ................................................................................................................................... 46
Xopero BACKUP AND SYNCHRONIZ ATION IN ONE
APPLICATION
2 |
DESKTOP APPLICATION
Xopero Desktop application is meant for installing on PCs with Microsoft Windows
operating systems. It allows the PC user to create backup and synchronize data.
Xopero works both as an application and as a service. The application provides only
a graphical user interface, which can be used to configure the application
and all settings reffering to backups. The service, works in the background and does
not require user intervention; it is responsible for creating backups
and synchronization of the Briefcase. Thanks to this solution, after creating backup
sets and configuring the Briefcase there is no need to run the client application,
whereas the service will work in the background and carry out entrusted operations;
everything will become transparent for the user.
Requirements
The computer user must meet the following requirements in order to download
and use the Xopero application without any problems.
OS: Windows XP Service Pack 3
Windows Vista
Windows 7
Windows 8
Windows Server 2003
Windows Server 2008
Windows Server 2012
RAM: 512 MB
Disk Space: 23 MB
Additional software: .NET Framework 3.5 SP2
Microsoft Visual C++ Redistributable
2010
Other: Internet connection (recommended
minimum 512 kbps)

Xopero BACKUP AND SYNCHRONIZ ATION IN ONE
APPLICATION
3 |
The installation process
After downloading the application you should go to the catalog in which
the application installer is located and then run it by clicking it twice.
During its launch a User Account Control might appear (Desktop 1), where you have
to click the Yes button in order to start the installation process.
Installation 1 Security warning
In the next step an MSI installer will run: it checks, whether required components have
been already installed on the PC. If not, they will be downloaded and installed with
user permission.
Installation 2 MSI Installer

Xopero BACKUP AND SYNCHRONIZ ATION IN ONE
APPLICATION
4 |
After installing the required components (or if they were already installed) you should
click the Install button, which will cause the proper Xopero installer to run.
Installation 3 Installation startup screen
Clicking the Next button causes the installer to enter into its next step, in which
the license agreement will be shown. After acquainting yourself with its content,
select the I accept terms and conditions of the License Agreement, then click Next.
Installation 4 License agreement

Xopero BACKUP AND SYNCHRONIZ ATION IN ONE
APPLICATION
5 |
In the last step of the installer you can click on Back in order to come back
to previous steps, or Install in order to start the installation process.
Installation 5 Installation progres
When the installer has finished its work, the user receives an appropriate message.
After this window is closed an information about successful installation will appear.
Finally, the Xopero application has been installed and you can start it,
log in and begin performing backups and synchronizing data.

Xopero BACKUP AND SYNCHRONIZ ATION IN ONE
APPLICATION
6 |
Logging in to the application
After starting the application, a login window will appear (in case Log in automatically
has not been marked earlier).
Application 1 Login screen
In order to log into the application it is necessary to enter a correct login, password
and for the account created in the Xopero system. You will find all the information
necessary to connect in the Xopero Control Panel. Finally, you have to confirm
by clicking Log in.
The application allows the user to log in automatically so they do not have
to give authentication data (login and password). In order to do this, mark
Log in automatically before clicking on the Log in button.
Xopero BACKUP AND SYNCHRONIZ ATION IN ONE
APPLICATION
7 |
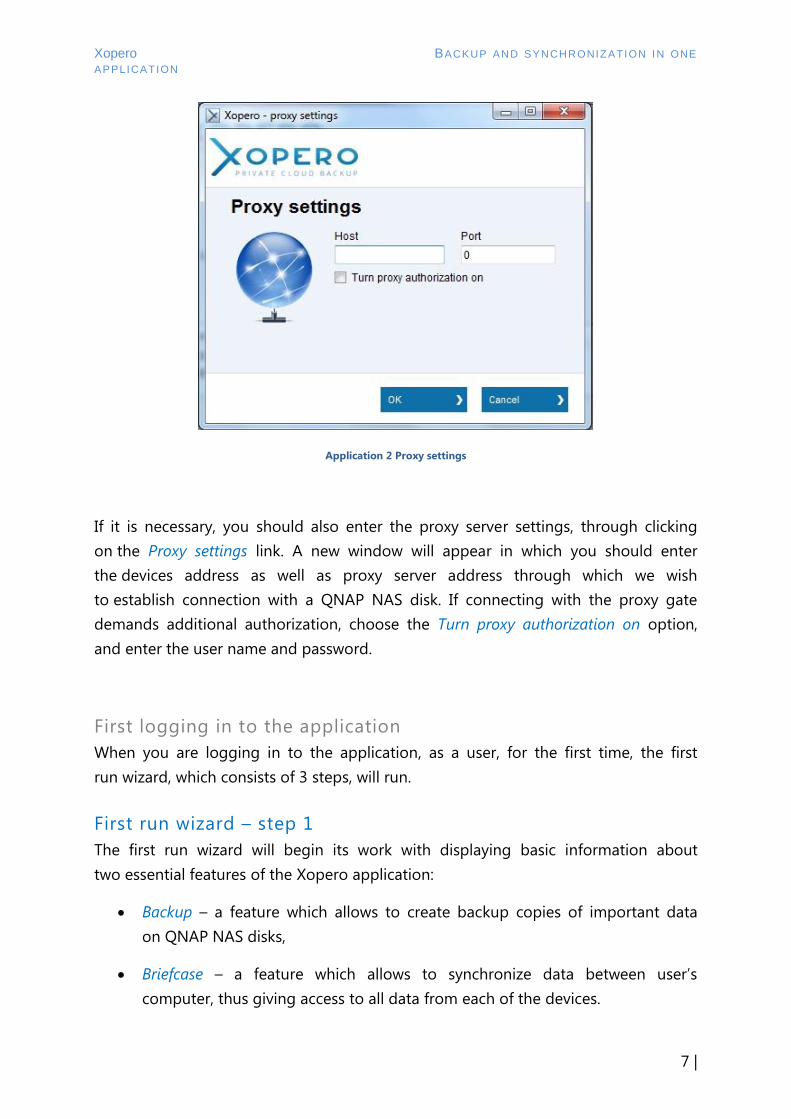
Application 2 Proxy settings
If it is necessary, you should also enter the proxy server settings, through clicking
on the Proxy settings link. A new window will appear in which you should enter
the devices address as well as proxy server address through which we wish
to establish connection with a QNAP NAS disk. If connecting with the proxy gate
demands additional authorization, choose the Turn proxy authorization on option,
and enter the user name and password.
First logging in to the application
When you are logging in to the application, as a user, for the first time, the first
run wizard, which consists of 3 steps, will run.
First run wizard – step 1
The first run wizard will begin its work with displaying basic information about
two essential features of the Xopero application:
Backup – a feature which allows to create backup copies of important data
on QNAP NAS disks,
Briefcase – a feature which allows to synchronize data between user’s
computer, thus giving access to all data from each of the devices.

Xopero BACKUP AND SYNCHRONIZ ATION IN ONE
APPLICATION
8 |
Application 3 The first step of the Wizard
In order proceed to the next step, click on the Next button.
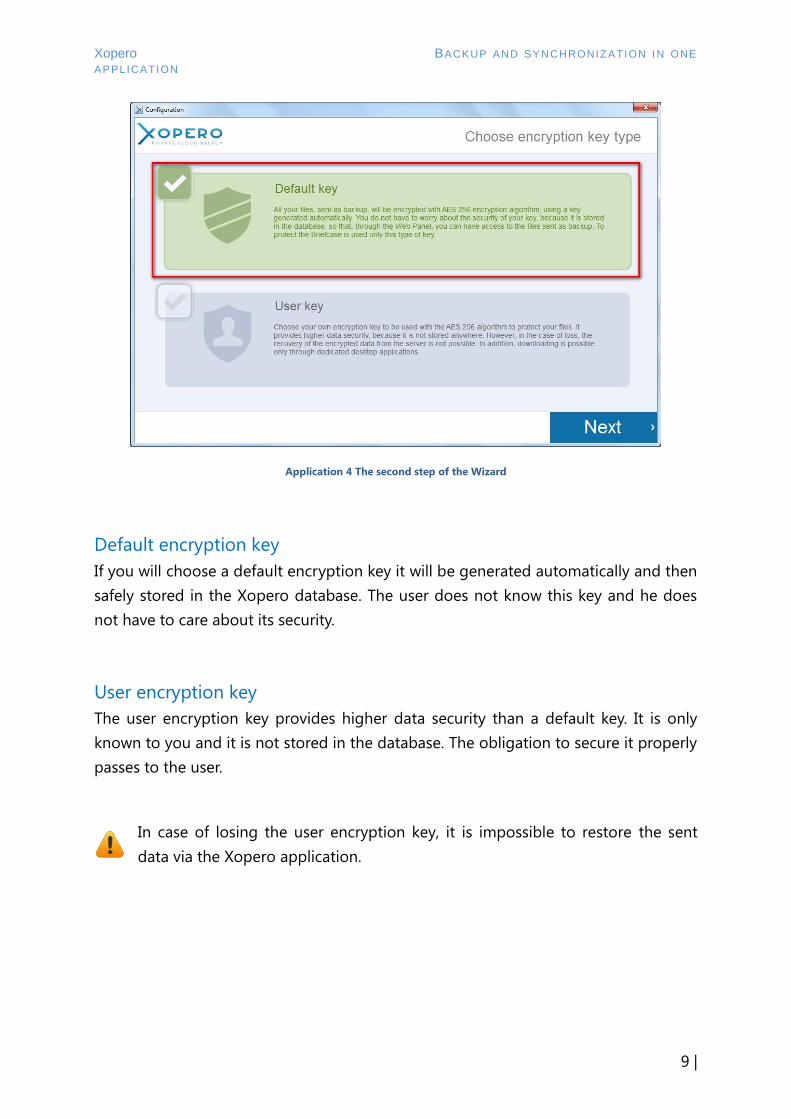
First run wizard – step 2
All data sent by Xopero application are encrypted before sending on the user’s
computer. It is encrypted using an AES 256 algorithm with one of the chosen keys –
a default or user key. In the second step, the user has to define which key he wants
to use for backup encryption.
Files synchronized in the Briefcase are encrypted with a seperate key, different
than the one used during backups. It is generated automatically.
Xopero BACKUP AND SYNCHRONIZ ATION IN ONE
APPLICATION
9 |
Application 4 The second step of the Wizard
Default encryption key
If you will choose a default encryption key it will be generated automatically and then
safely stored in the Xopero database. The user does not know this key and he does
not have to care about its security.
User encryption key
The user encryption key provides higher data security than a default key. It is only
known to you and it is not stored in the database. The obligation to secure it properly
passes to the user.
In case of losing the user encryption key, it is impossible to restore the sent
data via the Xopero application.
Xopero BACKUP AND SYNCHRONIZ ATION IN ONE
APPLICATION
10 |
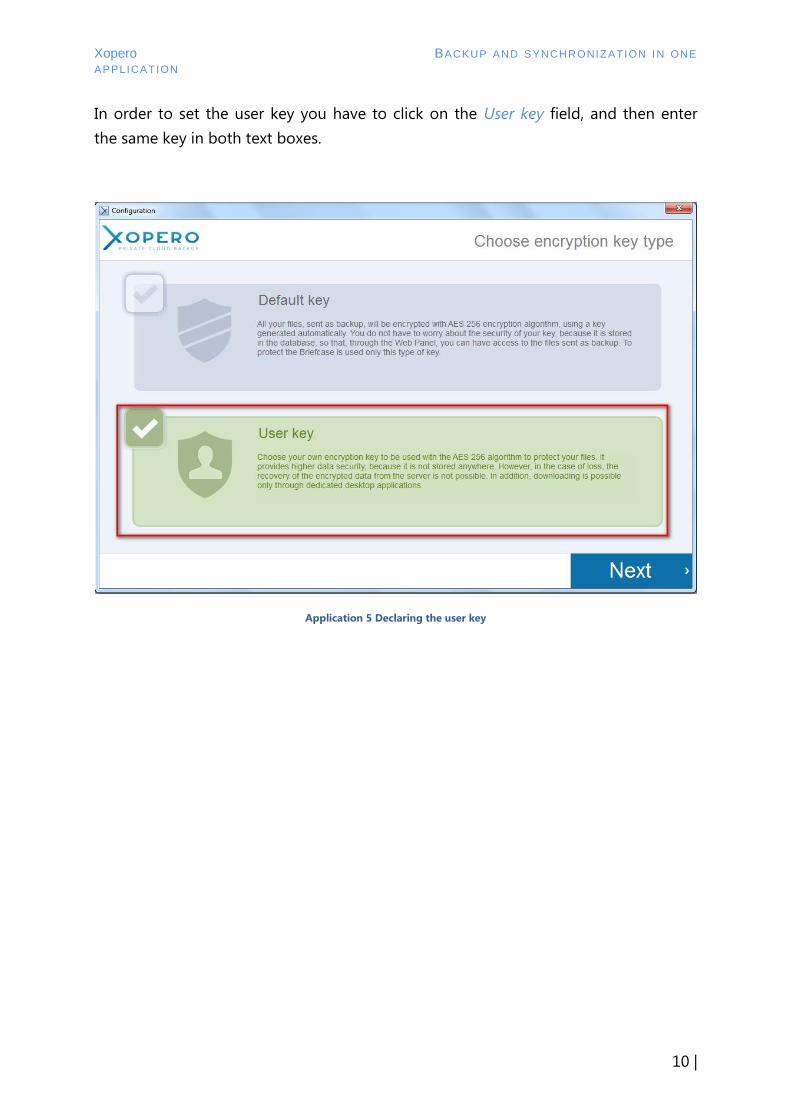
In order to set the user key you have to click on the User key field, and then enter
the same key in both text boxes.
Application 5 Declaring the user key

Xopero BACKUP AND SYNCHRONIZ ATION IN ONE
APPLICATION
11 |
First run wizard – step 3
The last step of the First run wizard is creating a first backupset. We have
the possibility of choosing between automatic and advanced backup.
Application 6 The third step of the Wizard
Selecting the Automatic option will cause to choose, for the first backup, the files
from the User folder (ie. C:\Użytkownicy\John) which size are not larger than 4GB.
This limit is set by default, user can change it manually by editing the project.
In the case of subsequent automatic backup or choosing an advanced type
of backup, there is no file size limit.
Selecting the Advanced option will run the Backupset wizard. By choosing it, the user
will have the possibility to choose the type of data to be backed up, set the backup
schedule and advanced options. All the abilities of the backupset wizard are
described in the Backupset wizard chapter. After setting the backup options and
giving the project a unique name, click Save in order to finish the configuration
and run the application. Choosing Cancel will close the wizard without saving
the backupset and launch the application.

Xopero BACKUP AND SYNCHRONIZ ATION IN ONE
APPLICATION
12 |
Application 7 Creator of first backup
Xopero BACKUP AND SYNCHRONIZ ATION IN ONE
APPLICATION
13 |
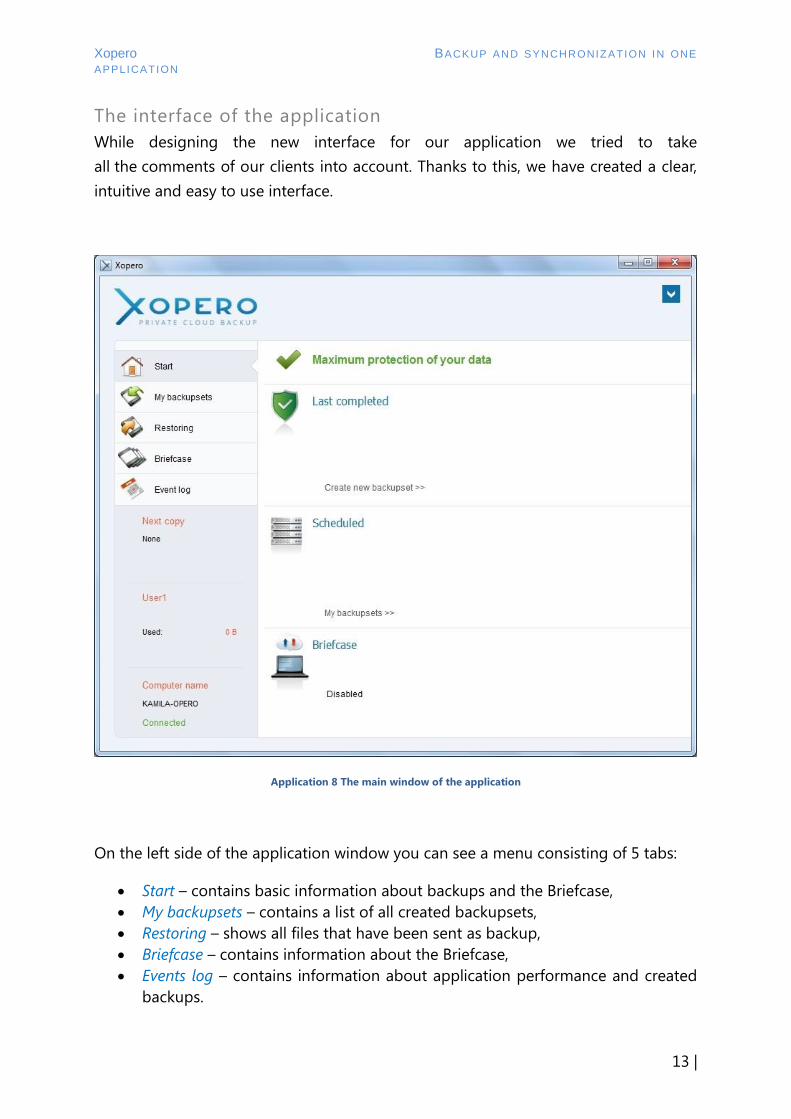
The interface of the application
While designing the new interface for our application we tried to take
all the comments of our clients into account. Thanks to this, we have created a clear,
intuitive and easy to use interface.
Application 8 The main window of the application
On the left side of the application window you can see a menu consisting of 5 tabs:
Start – contains basic information about backups and the Briefcase,
My backupsets – contains a list of all created backupsets,
Restoring – shows all files that have been sent as backup,
Briefcase – contains information about the Briefcase,
Events log – contains information about application performance and created
backups.
Xopero BACKUP AND SYNCHRONIZ ATION IN ONE
APPLICATION
14 |
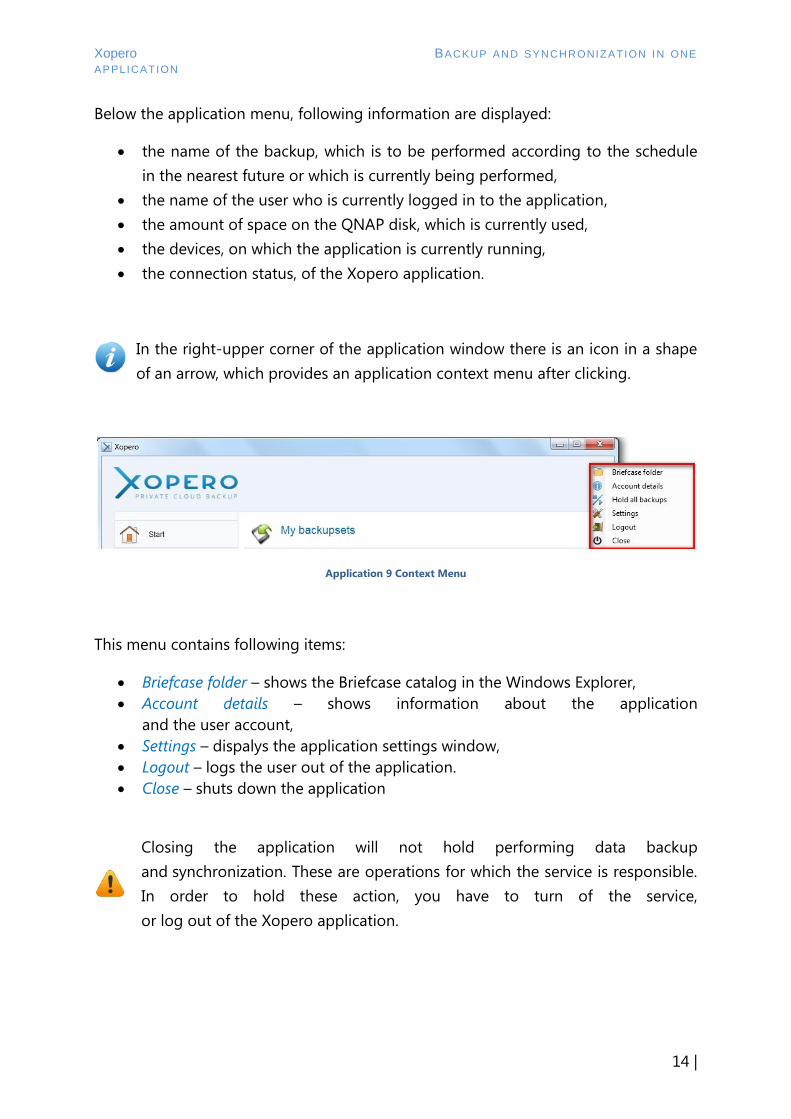
Below the application menu, following information are displayed:
the name of the backup, which is to be performed according to the schedule
in the nearest future or which is currently being performed,
the name of the user who is currently logged in to the application,
the amount of space on the QNAP disk, which is currently used,
the devices, on which the application is currently running,
the connection status, of the Xopero application.
In the right-upper corner of the application window there is an icon in a shape
of an arrow, which provides an application context menu after clicking.
Application 9 Context Menu
This menu contains following items:
Briefcase folder – shows the Briefcase catalog in the Windows Explorer,
Account details – shows information about the application
and the user account,
Settings – dispalys the application settings window,
Logout – logs the user out of the application.
Close – shuts down the application
Closing the application will not hold performing data backup
and synchronization. These are operations for which the service is responsible.
In order to hold these action, you have to turn of the service,
or log out of the Xopero application.
Xopero BACKUP AND SYNCHRONIZ ATION IN ONE
APPLICATION
15 |
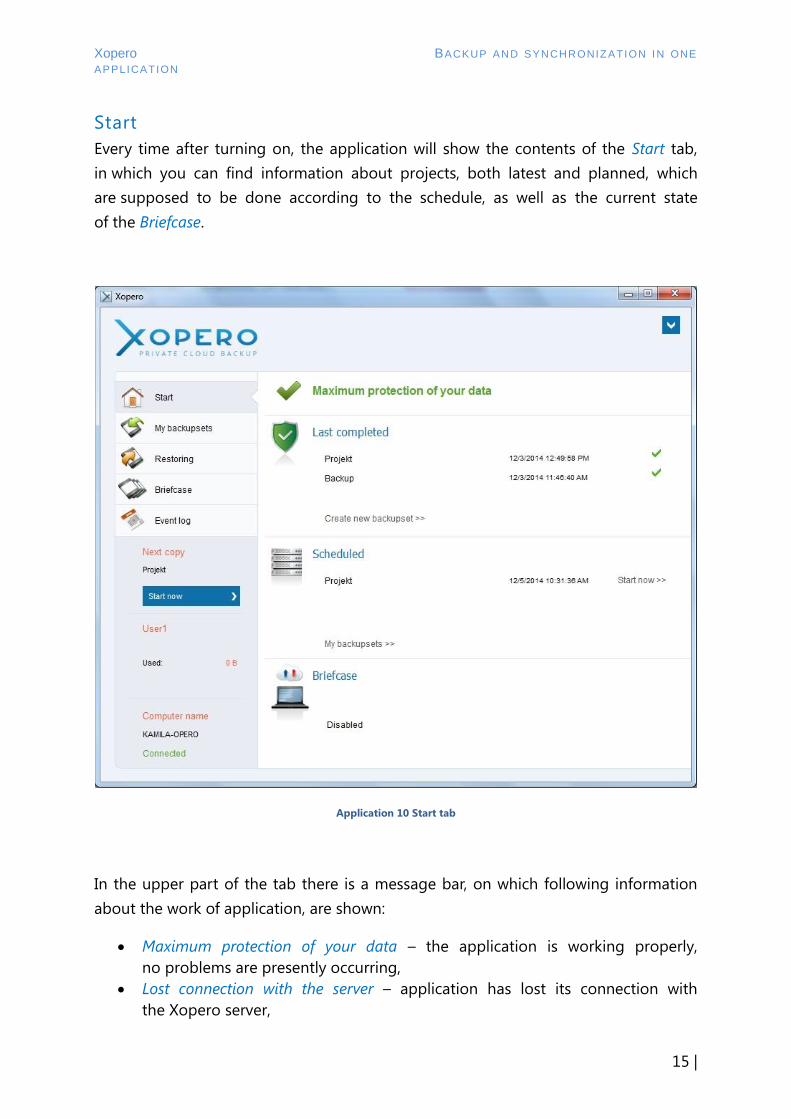
Start
Every time after turning on, the application will show the contents of the Start tab,
in which you can find information about projects, both latest and planned, which
are supposed to be done according to the schedule, as well as the current state
of the Briefcase.
Application 10 Start tab
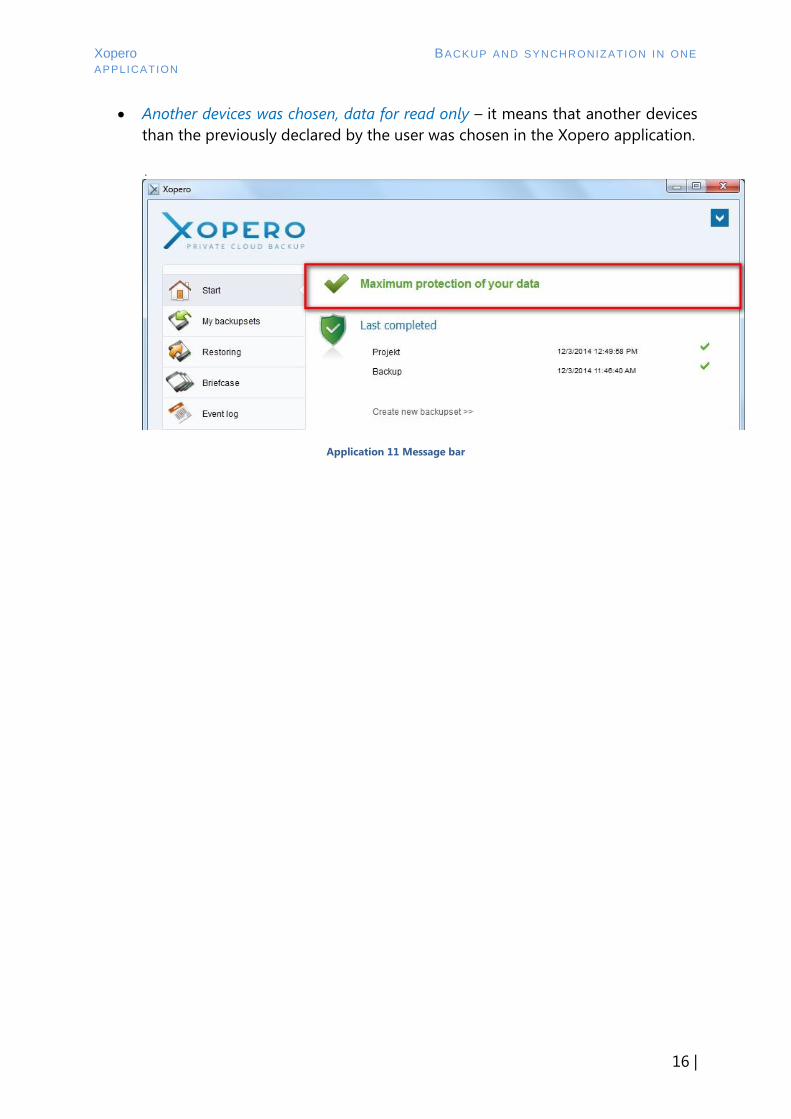
In the upper part of the tab there is a message bar, on which following information
about the work of application, are shown:
Maximum protection of your data – the application is working properly,
no problems are presently occurring,
Lost connection with the server – application has lost its connection with
the Xopero server,
Xopero BACKUP AND SYNCHRONIZ ATION IN ONE
APPLICATION
16 |
Another devices was chosen, data for read only – it means that another devices
than the previously declared by the user was chosen in the Xopero application.
.
Application 11 Message bar

Xopero BACKUP AND SYNCHRONIZ ATION IN ONE
APPLICATION
17 |
My backupsets
In the My backupsets tab all backupsets created by the user, are stored.
Application 12 My backupsets tab
For each backup set following information are displayed: name, the date
it was finished and its status (whether or not the project was successfully performed).
When pressed, the icon in the Active column activates or deactivates the backup
project.
If the project is inactive, it will be grayed out on the list of projects,
it will not backup data automatically according to the declared schedule,
but the user will still have the option to create backup manually.

Xopero BACKUP AND SYNCHRONIZ ATION IN ONE
APPLICATION
18 |
Application 13 Inactive backupset
The Status column includes icons that provide description of condition of each
project, these include:
all files were sent properly,
backup ended properly, although warnings appeared,
backup ended with failure.
Application 14 Details of the performed backupset

Xopero BACKUP AND SYNCHRONIZ ATION IN ONE
APPLICATION
19 |
Buttons at the bottom of the tab allow for:
Start now – performs the chosen project immediately, providing there
is no other project being performed at the moment,
Delete backupset – deletes the chosen project irretrievably,
New backupset – starts up the project wizard, which allows you to create
a new project.
Deleting the backupset by the user does not result in deletion of files already
sent onto the Xopero server, these files will still be stored.
Creation of projects has been described precisely in Backup chapter.

Xopero BACKUP AND SYNCHRONIZ ATION IN ONE
APPLICATION
20 |
Restoring
The Restoring tab includes a list of all the files which you have sent to server
as backup, up to this point.
Application 15 Restoring tab
At the top part of the tab the user can choose a devices and a project for which
he wants information to be shown. Additionally, thanks to revision control of data,
he can choose a specific date for which he wants the state of file repository
to be shown.
At the bottom of the tab 3 buttons are located:
Delete – deletes marked files from the repository,
Refresh – refreshes the contents of the window,
Restore selected – after marking selected files, starts the file restoration wizard.
Data recovery has been described in the Data restoring chapter.

Xopero BACKUP AND SYNCHRONIZ ATION IN ONE
APPLICATION
21 |
Briefcase
In the Briefcase tab, two file lists are located – Files to synchronization
and Last synchronized files.
Application 16 The Briefcase tab
Between the lists there are two buttons located: Pause synchronization stops
the process of Briefcase synchronization, while Go to Briefcase shows its catalog
in the Windows explorer.
The Briefcase in the Xopero application has been described in the Briefcase
chapter.
Xopero BACKUP AND SYNCHRONIZ ATION IN ONE
APPLICATION
22 |
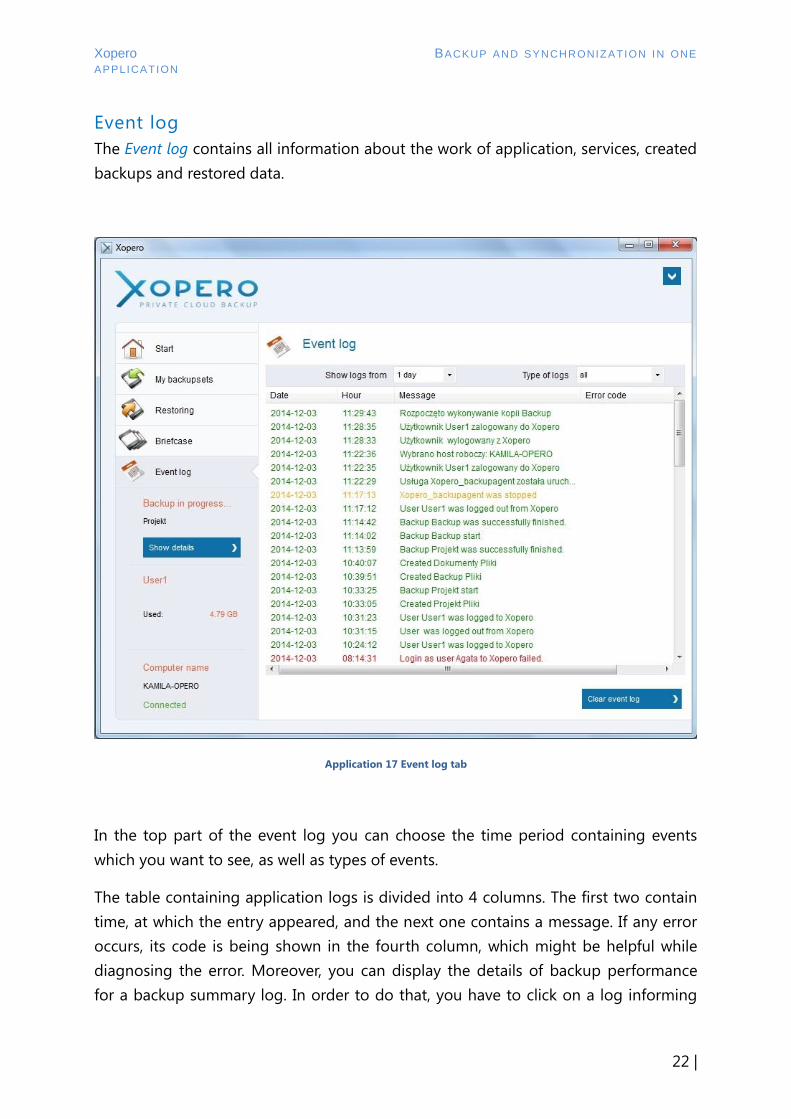
Event log
The Event log contains all information about the work of application, services, created
backups and restored data.
Application 17 Event log tab
In the top part of the event log you can choose the time period containing events
which you want to see, as well as types of events.
The table containing application logs is divided into 4 columns. The first two contain
time, at which the entry appeared, and the next one contains a message. If any error
occurs, its code is being shown in the fourth column, which might be helpful while
diagnosing the error. Moreover, you can display the details of backup performance
for a backup summary log. In order to do that, you have to click on a log informing

Xopero BACKUP AND SYNCHRONIZ ATION IN ONE
APPLICATION
23 |
about ending a backup project, and click on the Details button, which will
be displayed at the bottom of the tab.
Application 18 The Details button in the Event log tab
Backup
Backup is a process of creating security copies of key data in order to recreate them
after their loss or damage. Security copies should be stored in locations different than
the original data.
All backups created by the Xopero application are incremental and differential. During
first backup full data is sent, and later only differences which appeared in particular
files since their last sending.
Xopero also supports data versioning, which means that the user can restore
any of the previous file versions, not necessarily the last one.
Xopero BACKUP AND SYNCHRONIZ ATION IN ONE
APPLICATION
24 |
Mechanism
All backups in the Xopero application are sent according to the same scheme.
At the beginning - except where the Volume Shadow Copy option is enabled - each
file is individually copied to a temporary location, where it is encrypted - unless this
feature is disabled while creating the project - and divided into smaller parts.
It is then sent to the user’s QNAP disk. Backup can be performed using delta
compression so that the application receives and sends only data modifications,
or newly created documents. The Xopero application supports two types of delta
backup:
• Differential - receives and sends only document changes, which appeared since
performing the last full backup.
• Incremental - receives and sends only document changes which appeared since
the last backup, regardless of whether it was full or incremental backup.
The use of these technologies in our application saves time and disk space while
creating backups and restoring data from QNAP network drives.
Delta is a method of storing and sending data in a form of differences between
particular file version, instead of full file versions.
Thanks to the delta mechanism, besides reducing the amount of sent files, we have
also increased their security.

Xopero BACKUP AND SYNCHRONIZ ATION IN ONE
APPLICATION
25 |
Backupset wizard
In order to create a new backup project, you have to start the backupset wizard,
which can be done in 2 ways:
1. Click on Create new backupset in the Start tab in the Last completed section.
2. Click on New backupset in the My backupsets tab.
Application 19 Creating a new backup set in the Start tab
Choosing one of these options results in launching the backupset wizard, which
is divided into two sections: Basic information and Advanced. First of them allows
you to indicate data type and data of which backup you want to create, the second
one allows you to choose advanced options which are to be applied
during backup creation.

Xopero BACKUP AND SYNCHRONIZ ATION IN ONE
APPLICATION
26 |
Application 20 Backupset Wizard
Depending on the chosen type of copy, the appearance
of the Basic information tab is going to change, and some of the advanced
options might be inactive.
It is required, for each project, to name it in a unique way within the user account.

Xopero BACKUP AND SYNCHRONIZ ATION IN ONE
APPLICATION
27 |
Local data
In order to create backup of data located on the user's PC, you have to choose
the Local data option in the What you want to backup? section.
Application 21 Backupset Wizard – Local data
Below the Name field two windows are shown, which allow you to explore catalogs
on the local PC. By marking the checkboxes next to particular files and/or folders,
the user can pinpoint data intended for archiving. Chosen data appear below
on the list of chosen paths. If a given path is supposed to be deleted from backup,
click on the icon in the Delete column, located next to the selected path.
Application 22 Files chosen for backup in the Backupset Wizard
Xopero BACKUP AND SYNCHRONIZ ATION IN ONE
APPLICATION
28 |
After naming the backupset, selecting all the data, setting the schedule, and possibly
Advanced options, you have to click on Save in order to create a project.
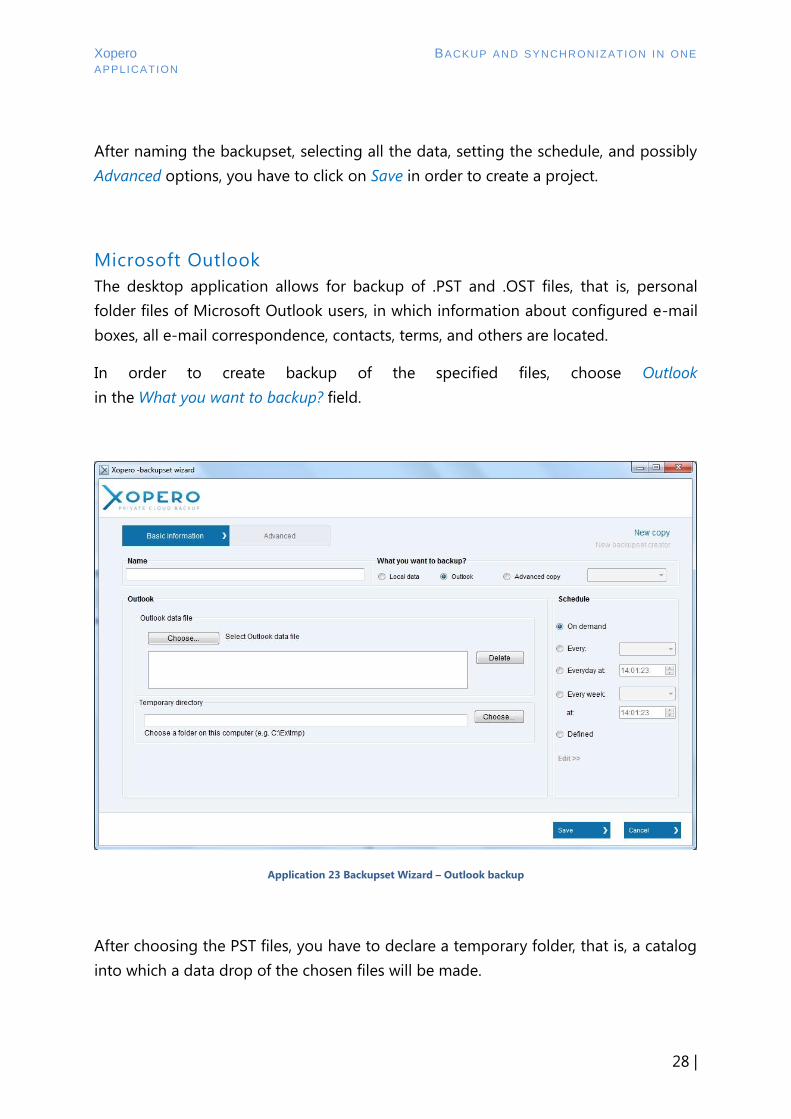
Microsoft Outlook
The desktop application allows for backup of .PST and .OST files, that is, personal
folder files of Microsoft Outlook users, in which information about configured e-mail
boxes, all e-mail correspondence, contacts, terms, and others are located.
In order to create backup of the specified files, choose Outlook
in the What you want to backup? field.
Application 23 Backupset Wizard – Outlook backup
After choosing the PST files, you have to declare a temporary folder, that is, a catalog
into which a data drop of the chosen files will be made.
Xopero BACKUP AND SYNCHRONIZ ATION IN ONE
APPLICATION
29 |
Xopero application can backup Microsoft Outlook data during its work, there
is no need to turn the application off or to stop the synchronization.
After selecting all the data, setting the schedule and possibly Advanced options,
you have to click on Save in order to create a project.
MS SQL
Backup of MS SQL programs databases is one of the Advanced copies. Available
for users of the Business- type license.
Exact description of MS SQL databases backup project creation and their recovery
has been described in another document, available on the Xopero site.
Firebird
Backup of Firebird databases is one of the Advanced copies. Available for users
of the Business - type license.
Detailed description of Firebird databases backup project creation and their recovery
has been described in another document, available on the Xopero site.
Network drives
Advanced copy of network drives allows for backup of all data which
are available in the network environment of the PC (providing that
the PC has an installed Xopero application).
Detailed description of network drives databases backup project creation and their
recovery has been described in another document, available on the Xopero site.

Xopero BACKUP AND SYNCHRONIZ ATION IN ONE
APPLICATION
30 |
MS Exchange
Backup of MS Exchange databases of 2007 and 2010 versions is available only
for Business - type license and with an application installed on Windows Server
system.
Detailed description of MS Exchange databases backup project creation and their
recovery has been described in another document, available on the Xopero site.
Pre and post scripts
Pre and post scripts are one of the Advanced copies and allow you to execute
certain operations before or after backup. Available only for Business –
type licenses.
Detailed description of creating backup projects using pre and post scripts and their
recovery has been described in another document, made available by Xopero.

Xopero BACKUP AND SYNCHRONIZ ATION IN ONE
APPLICATION
31 |
Schedule
For each created backup the user can set the schedule that is, determine
the frequency with which its copies will be created.
The basic schedule is declared in the backupset wizard, at the right hand side
of the Basic information tab in the backupset wizard.
Application 24 The backupset schedule
The basic backup schedule contains the following options:
On demand – backup will start only manually at the request of the user,
Every: - backup will be carried out at a defined (selected from the list) time,
Every day at: - backup will be carried out each day at the time set by the user,
Every week – on the selected day of the week, at the time set by the user,
Defined – checking this option allows you to edit your own schedule.
Xopero BACKUP AND SYNCHRONIZ ATION IN ONE
APPLICATION
32 |
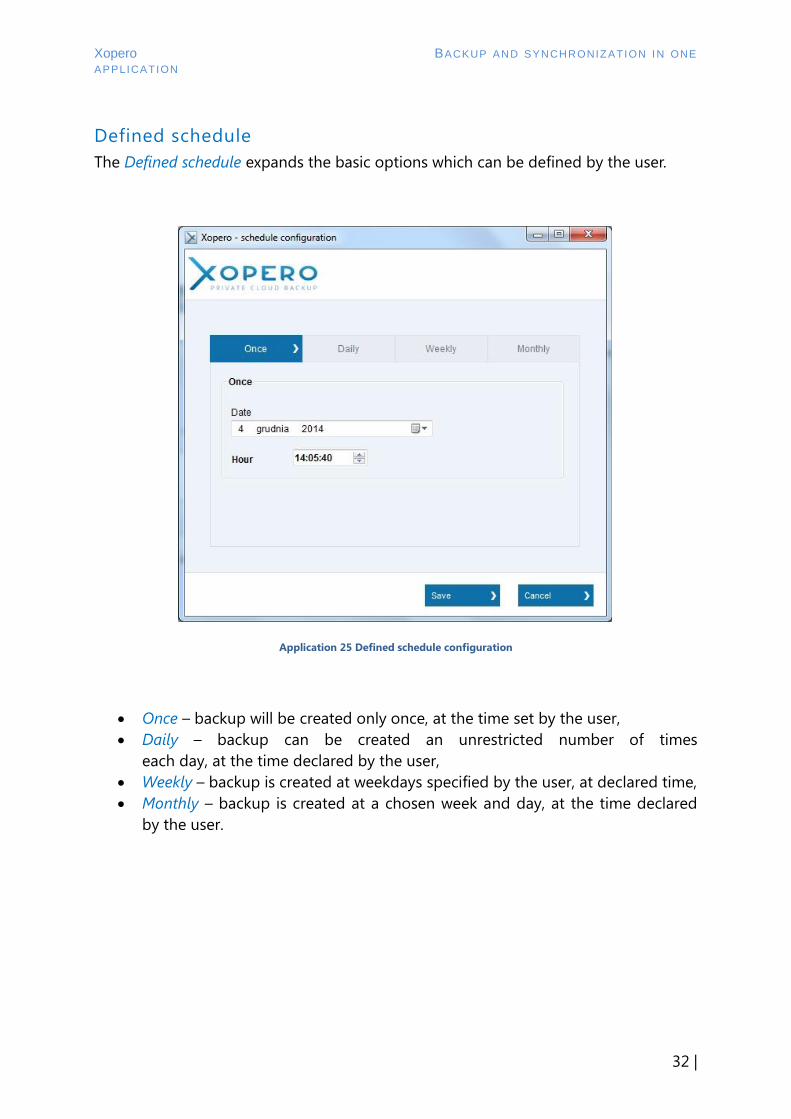
Defined schedule
The Defined schedule expands the basic options which can be defined by the user.
Application 25 Defined schedule configuration
Once – backup will be created only once, at the time set by the user,
Daily – backup can be created an unrestricted number of times
each day, at the time declared by the user,
Weekly – backup is created at weekdays specified by the user, at declared time,
Monthly – backup is created at a chosen week and day, at the time declared
by the user.
Xopero BACKUP AND SYNCHRONIZ ATION IN ONE
APPLICATION
33 |
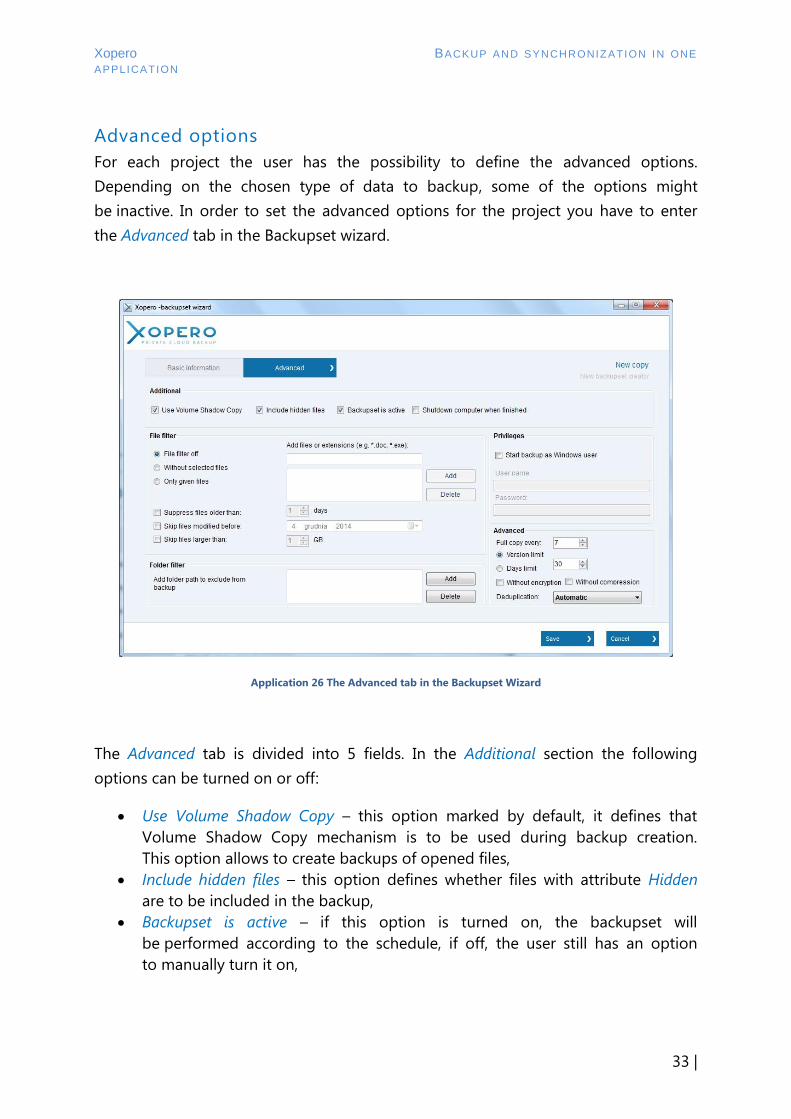
Advanced options
For each project the user has the possibility to define the advanced options.
Depending on the chosen type of data to backup, some of the options might
be inactive. In order to set the advanced options for the project you have to enter
the Advanced tab in the Backupset wizard.
Application 26 The Advanced tab in the Backupset Wizard
The Advanced tab is divided into 5 fields. In the Additional section the following
options can be turned on or off:
Use Volume Shadow Copy – this option marked by default, it defines that
Volume Shadow Copy mechanism is to be used during backup creation.
This option allows to create backups of opened files,
Include hidden files – this option defines whether files with attribute Hidden
are to be included in the backup,
Backupset is active – if this option is turned on, the backupset will
be performed according to the schedule, if off, the user still has an option
to manually turn it on,
Xopero BACKUP AND SYNCHRONIZ ATION IN ONE
APPLICATION
34 |
Shutdown computer when finished – after creating a backup, a 5-minute-long
reminder will be displayed during which the user has the option to cancel
the automatic shutdown,
Delete backupset – this button appears only after the first save of the newly
created backupset, it deletes the project, not files stored on the server
The File filter field allows the user to choose which files are to be excluded
(Without selected files), or included in the backup (Only given files). This option
is available for backupsets of Local data and Network drives.
The Folder filter allows you to exclude given paths and catalogs, which were
declared before in the Basic information section.
The next field in the Advanced tab is Privileges, where the user can provide a Windows
user name and password, so that the application will be working on conditions set by
this user during backup creation. This function is applied when you want to create
backup of files for which you need additional authorization. In the User name and
Password fields, you have to enter the Windows system user information, of whose
data backup is to be performed.
By default the Xopero service works on authorization of a local Windows
system service.
The last section in this tab are the Advanced settings. These settings allow to disable
compression and encryption, as well as to set the version limit for a backupset
and the frequency of full backup. Additionally, the user can choose the type
of deduplication:
• Automatic - data deduplication will take place automatically, using the most
advantageous method.
• None - data deduplication will be disabled, data will each time be sent in its full
version.
• Binary Delta - Incremental - any changes in files that are subject to backup since
the last full backup will be sent.
• Binary Delta - Differential - any changes in files that are subject to backup since
any last performed backup, will be sent.
Xopero BACKUP AND SYNCHRONIZ ATION IN ONE
APPLICATION
35 |
• Progressive block - splits files into smaller parts. If one or more files have been
modified, only the part that has changed is sent to the server.
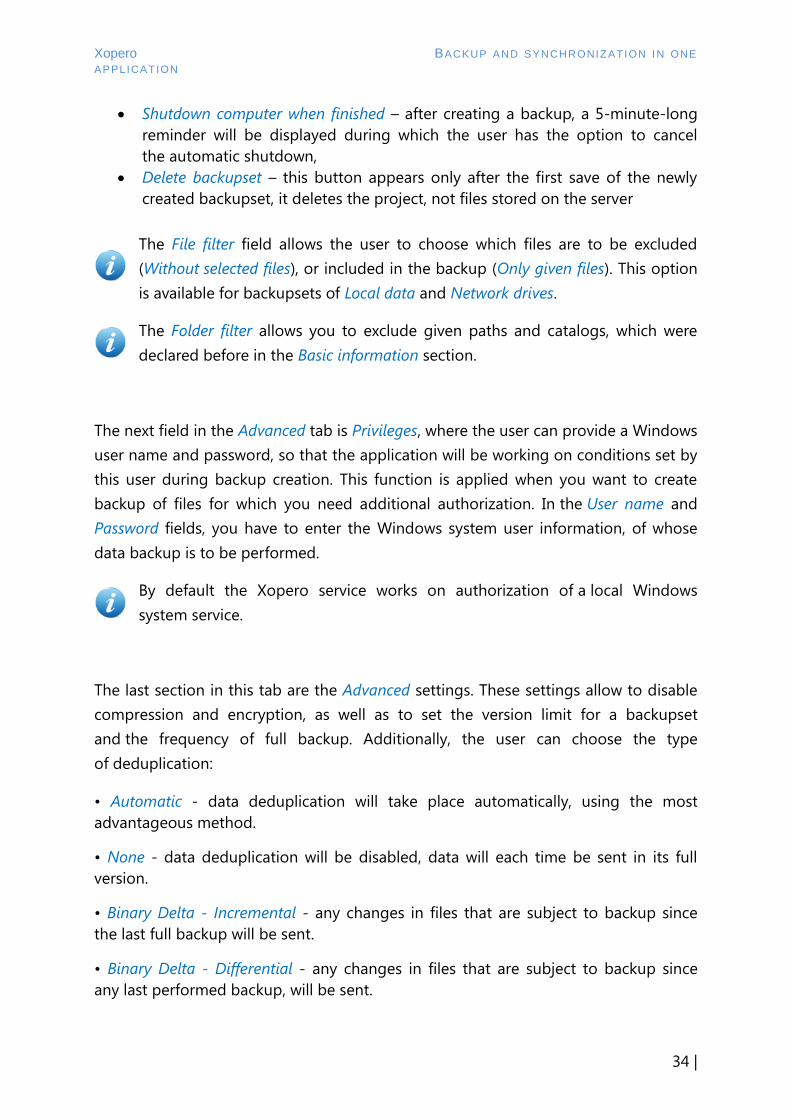
Data restoring
The Xopero application user can restore at any given moment data, which has been
sent to the QNAP NAS disk as backup.
Application 27 Restoring tab
At the upper part of the Restoring tab there is a bar with three expandable lists:
Computer – if the user has more than one devices within his Xopero account,
here he can choose one of them, from which he wants data to be restored.
It does not have to be the very same computer which the user it using
at the moment.
Xopero BACKUP AND SYNCHRONIZ ATION IN ONE
APPLICATION
36 |
Backupset – the user can choose one of the former projects in order to see files
contained therein.
Version – in case none of the projects has been chosen, the user can display
the state of storage at given date, while after choosing the project, he
can display versions sent at the date of sending this backupset.
The user can also search for files, which he has sent, with a search engine
located at the upper right side of the tab.
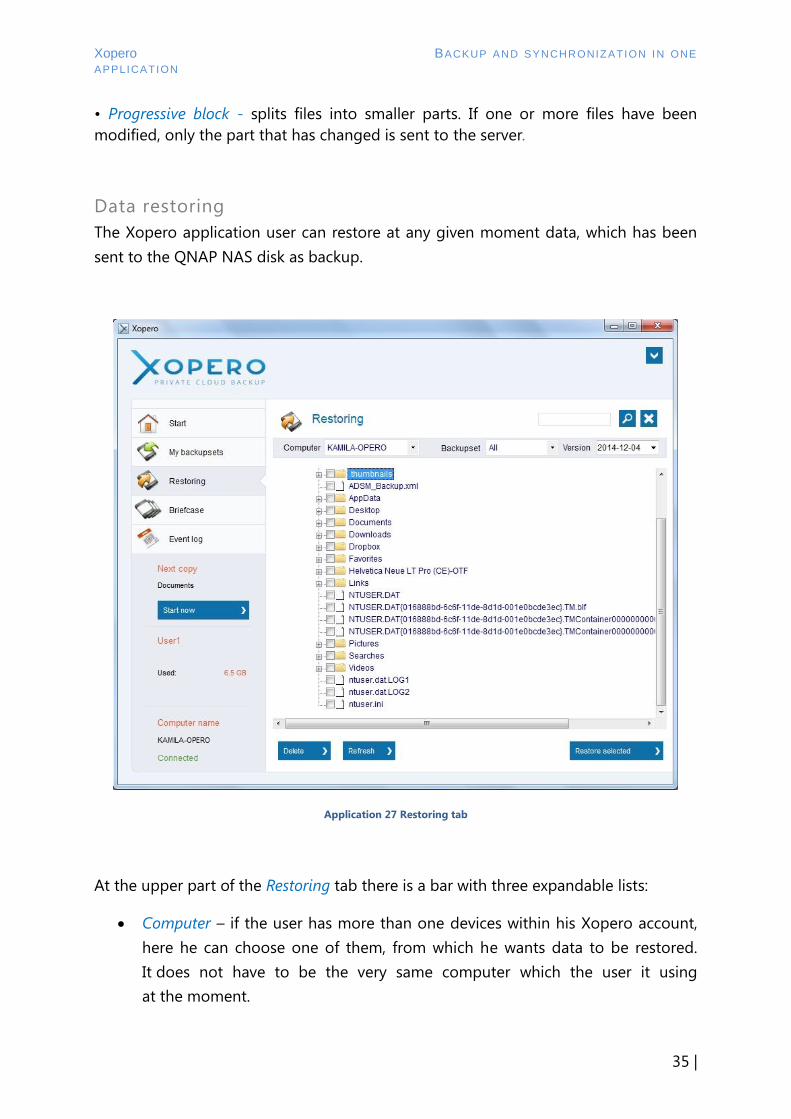
In order to restore data from the Xopero servers, you have to mark files and/or
folders in the Restoring tab, then click the Restore selected button. File restore settings
will be then displayed.
Application 28 File restore settings
Xopero BACKUP AND SYNCHRONIZ ATION IN ONE
APPLICATION
37 |
In the displayed window, choose a location for the restored data between original
(from which the files were send) and chosen by the user. Additionally, you can choose
operations that the application is supposed to carry out if there are files sharing
the same name in the chosen localization. The application can overwrite files always
or never if existing files are older. If you choose overwriting of files (Create a copy
of overwritten files), a *.bak extension will be added to those files, and both files will
be stored in the same location.
The process of data restoration in the worst case may need up to three times
more disk space, than the largest file which has been selected for recovery. This
case can occur only when restoring files sent using the Binary delta.
Restoring selected file versions
All sent files have their versions controlled, that is, the user can restore them
in a version in which they were during one of the backups (not necessarily the last
one), thanks to which you can recreate changes in the file.
In order to do that, enter the Restoring tab, right-click on a given file and choose
the Show file versions option, which will display a list of backed up versions of the file.
Xopero BACKUP AND SYNCHRONIZ ATION IN ONE
APPLICATION
38 |
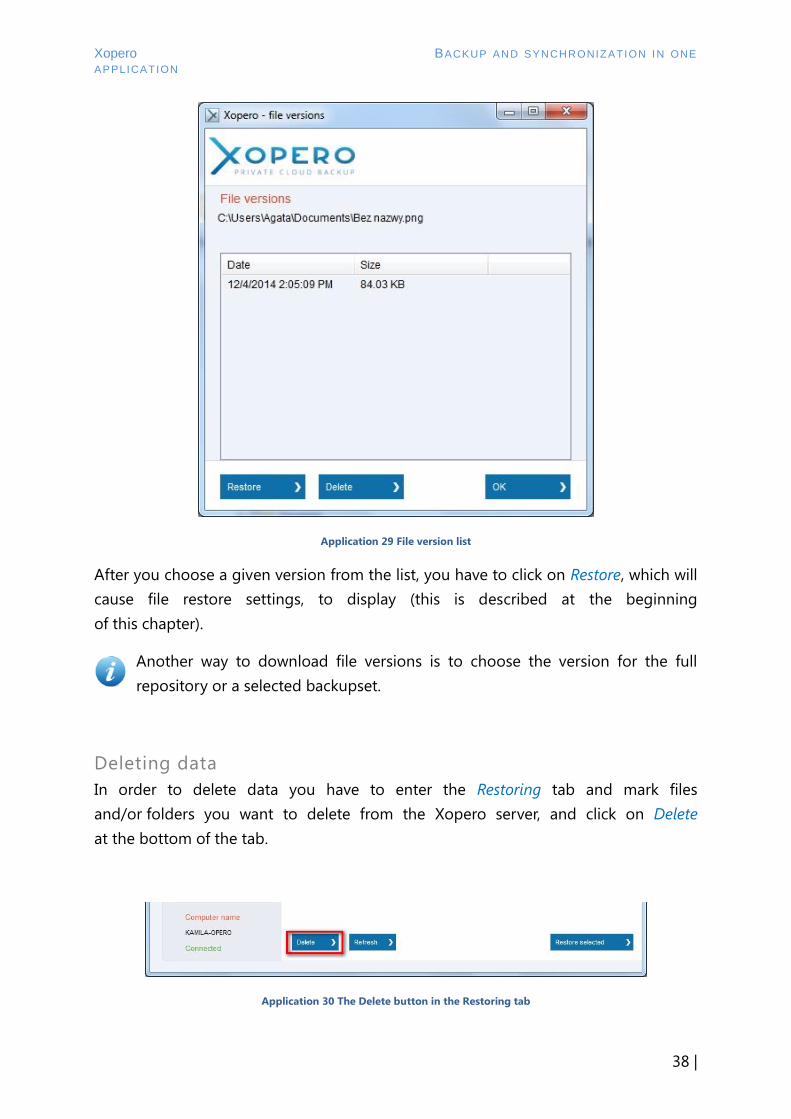
Application 29 File version list
After you choose a given version from the list, you have to click on Restore, which will
cause file restore settings, to display (this is described at the beginning
of this chapter).
Another way to download file versions is to choose the version for the full
repository or a selected backupset.
Deleting data
In order to delete data you have to enter the Restoring tab and mark files
and/or folders you want to delete from the Xopero server, and click on Delete
at the bottom of the tab.
Application 30 The Delete button in the Restoring tab

Xopero BACKUP AND SYNCHRONIZ ATION IN ONE
APPLICATION
39 |
A warning about data deletion will be shown, you have to confirm
it for selected data to be deleted irreversibly.
Application 31 Warning during data deletion
The user can also delete selected file versions. In order to do so, after
displaying a list with file versions (it was described in the earlier chapter)
and marking the selected version you have to click on Delete. This will cause
only a version of the file to be deleted, not the whole file.
Application 32 The delete button in the file version list
If you want to delete all the data sent by one user from all his devices, simply
change the encryption key (Changing the encryption key).
The Briefcase
The Briefcase allows you to synchronize data between a selected catalog on the user's
PC and the Xopero server, as well as other devices in the user's account.
Files, which will be added to the Briefcase catalog, are automatically sent to the QNAP
disk, and analogically any change in the Briefcase space from another devices
is performed on the user's local PC. Thanks to this, each device has the same
state of the Briefcase.

Xopero BACKUP AND SYNCHRONIZ ATION IN ONE
APPLICATION
40 |
The Xopero Briefcase is also encrypted on the user's part, so all data are sent
and stored in an encrypted form. However, a different key is used to encrypt
data in the Briefcase than in backups.
Configuring the Briefcase folder
The Briefcase folder can be declared from the Application settings. By default,
the defined Briefcase folder is the User catalog, in which a directory named
Xopero is created.
Using the Briefcase
The Briefcase performs all operations of data synchronization automatically, without
user interference, you just have to add, change or delete a file in the Briefcase
catalog. In the Briefcase tab, information about synchronized data is being displayed.
Xopero BACKUP AND SYNCHRONIZ ATION IN ONE
APPLICATION
41 |
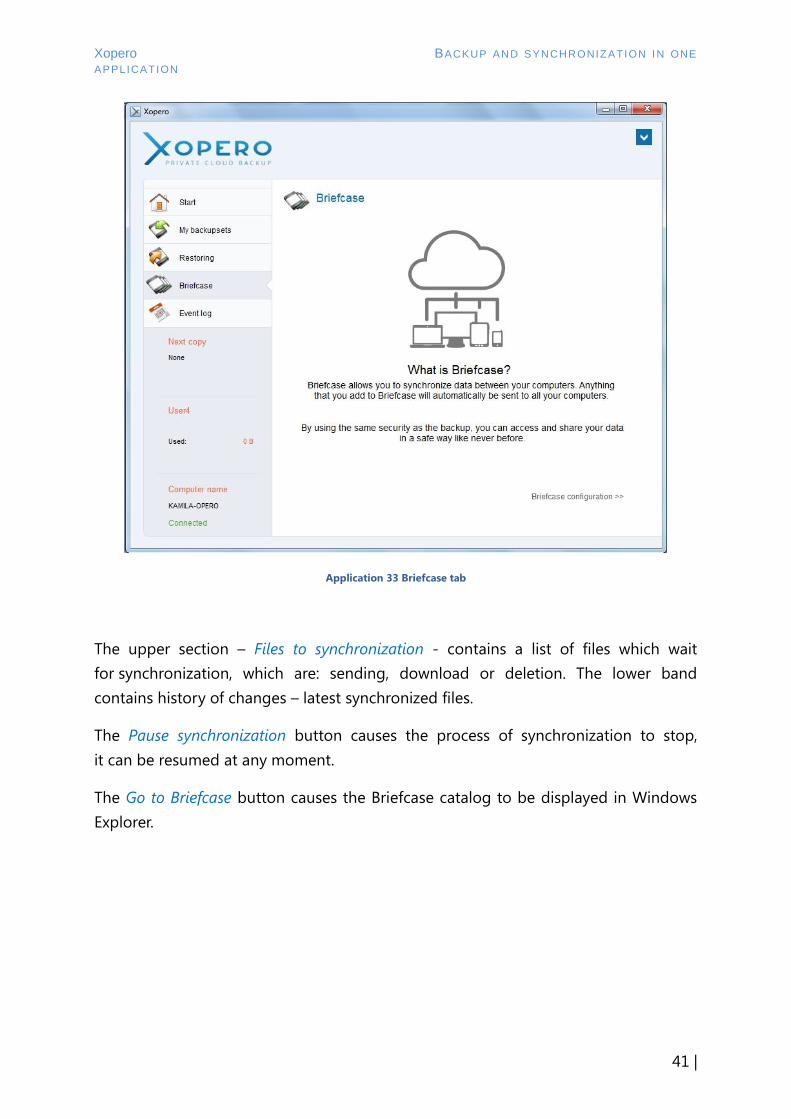
Application 33 Briefcase tab
The upper section – Files to synchronization - contains a list of files which wait
for synchronization, which are: sending, download or deletion. The lower band
contains history of changes – latest synchronized files.
The Pause synchronization button causes the process of synchronization to stop,
it can be resumed at any moment.
The Go to Briefcase button causes the Briefcase catalog to be displayed in Windows
Explorer.
Xopero BACKUP AND SYNCHRONIZ ATION IN ONE
APPLICATION
42 |
Application settings
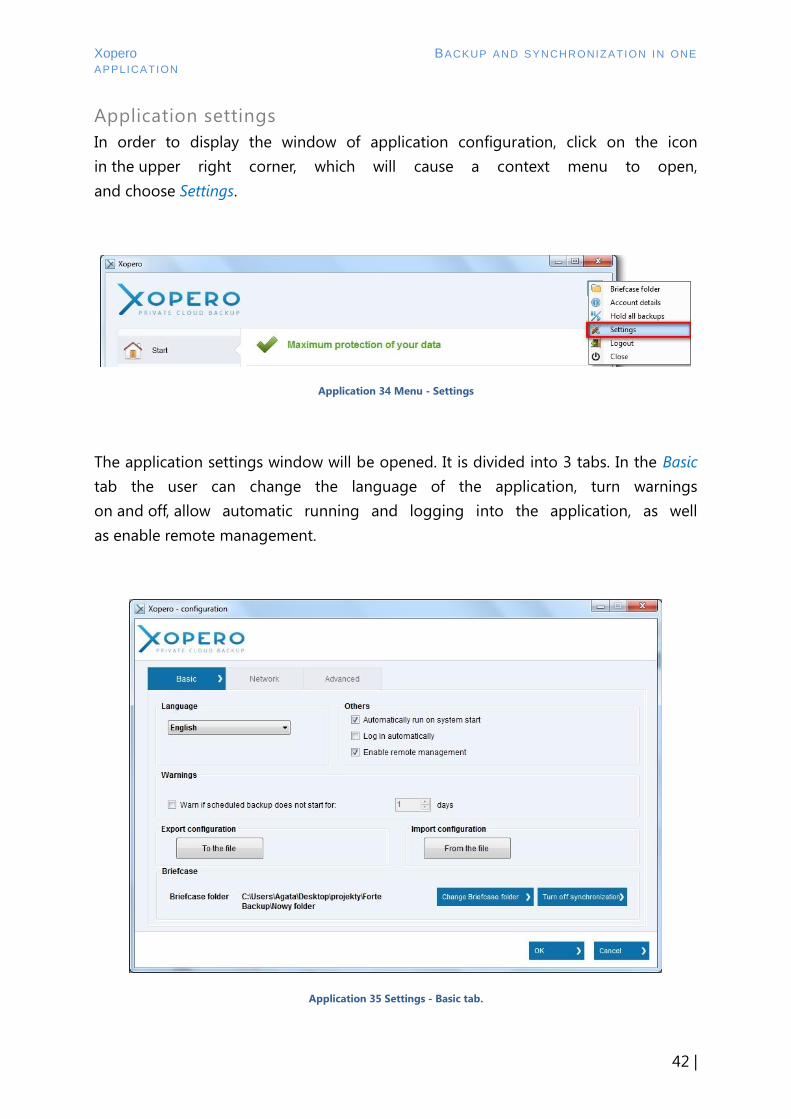
In order to display the window of application configuration, click on the icon
in the upper right corner, which will cause a context menu to open,
and choose Settings.
Application 34 Menu - Settings
The application settings window will be opened. It is divided into 3 tabs. In the Basic
tab the user can change the language of the application, turn warnings
on and off, allow automatic running and logging into the application, as well
as enable remote management.
Application 35 Settings - Basic tab.

Xopero BACKUP AND SYNCHRONIZ ATION IN ONE
APPLICATION
43 |
Export configuration allows you to save all application settings to a file, along
with created backupsets.
Import configuration allows you to, according to your choice, import settings
from the exported configuration file.
In the Basic tab you can also declare the Briefcase catalog, if it has not been declared
before, or change its location if the Briefcase has not been activated yet.
The Network tab allows to limit the upload and download of data of the Xopero
application, by using the sliders. There is also an option to choose the number
of cores used while sending data, depending on whether computer performance
or the quickness of backup is more important to us. Marking the Perform with a lower
priority option will cause to slow down the backup process and speed up the work
of other processes.
The Advanced tab is the last one and it contains application settings which ought
to be changed in a conscious manner, because they affect application performance
and user accounts.
Application 36 Settings - Advanced tab
Xopero BACKUP AND SYNCHRONIZ ATION IN ONE
APPLICATION
44 |
The user can change the File version limit, or the amount of versions for each of files
stored on the server. 30 versions is the default option.
The Temporary data folder defines a catalog to which every file is copied before
sending it to the server. In case of backup with the Volume Shadow Copy option, files
are not copied to that catalog.
The option Password change redirects the user to a website, where he can change
his password.
The option Switch user causes the currently logged in user to log out and a login
window to appear, and the Proxy settings button causes to display a window, in which
you can enter the proxy gate settings. The process of connecting to the QNAP disk
by a proxy server is described in the First logging in to the application chapter.
Changing the encryption key
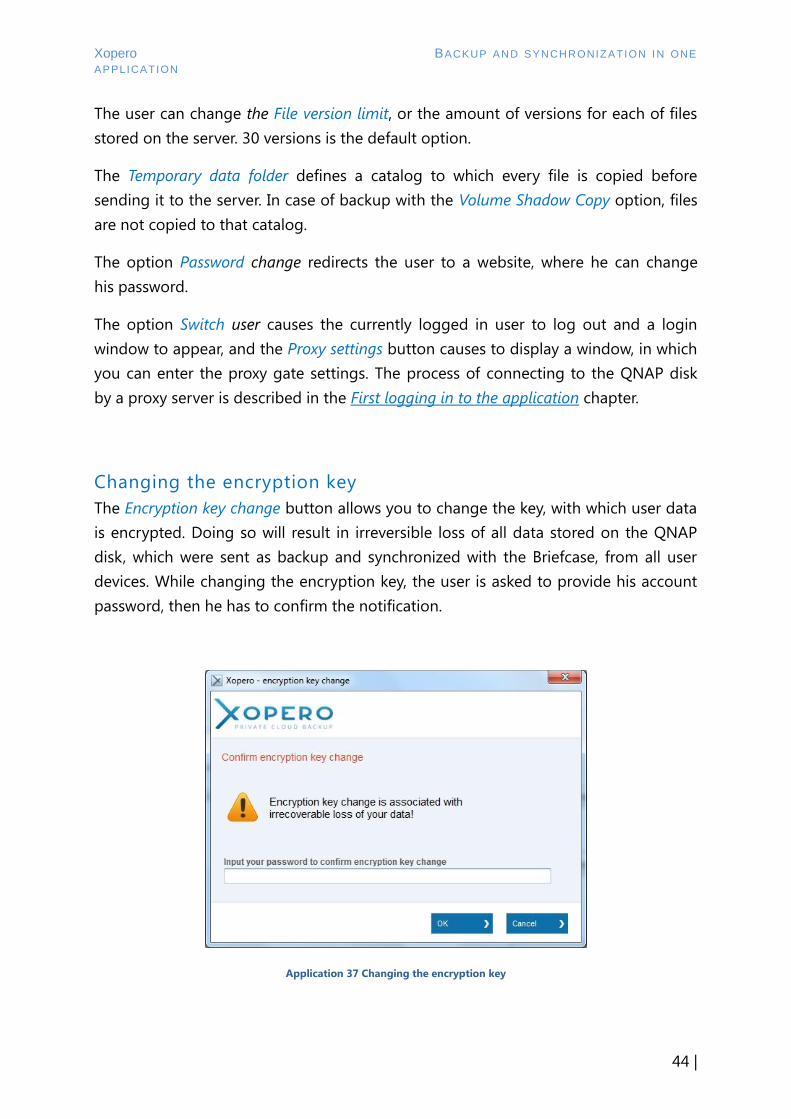
The Encryption key change button allows you to change the key, with which user data
is encrypted. Doing so will result in irreversible loss of all data stored on the QNAP
disk, which were sent as backup and synchronized with the Briefcase, from all user
devices. While changing the encryption key, the user is asked to provide his account
password, then he has to confirm the notification.
Application 37 Changing the encryption key

Xopero BACKUP AND SYNCHRONIZ ATION IN ONE
APPLICATION
45 |
Application logs
Application logs, which are necessary to correctly diagnose existing errors
and problems by the Xopero team, are located on the user's PC in the catalog
%ProgramData%\Backuplogs.

Xopero BACKUP AND SYNCHRONIZ ATION IN ONE
APPLICATION
46 |
GLOSSARY OF TERMS
AES 256 - an encryption algorithm which performs 14 rounds of encryption, making
it virtually impossible to break, and thus guarantees the security of transmitted data.
Completely resistant to all known attacks of linear and differential cryptanalysis.
Briefcase – the space within which the files of the user are stored. The data is coded
with an AES 256 algorithm. The contents of the folder is synchronized on each
computer on which the Xopero application is installed, within all computers of one
user.
Backup – creating a backup copy of all important data, in order to restore them later
in case of their damage of loss. Backup copies should be performed periodically and
stored in a location different than the original. All backupsets are encrypted with
an AES 256 algorithm, unless the option is turned off in the backupset wizard.
Backupsets (projects) – they represent files, which the user has backed up, by using
the Xopero application. The files are distinguished by the devices form which they
were backed up. All backupsets are encrypted with an AES 256 algorithm, unless the
option is turned off in the backupset wizard.
Delta - a mechanism which detect differences in files, and allows to send only
the modified parts of files, instead of full files than entire files. Xopero supports two
types of Delta mechanisms:
Differential - downloads and sends only the changes in the documents appearing
since performing the last full backup.
Incremental - downloads and sends only the changes in the documents appearing
since the last backup, regardless of whether it was full or incremental.
The use of these technologies has a very beneficial effect on the backup and data
restore speed and allows to save space on the QNAP disk.
Devices – it represents one computer, operated by one Xopero application. This
allows to maintain a cohesive structure of folders on different PCs in the process of
backup and data restore. The number of devices is limited according to the product.
Xopero BACKUP AND SYNCHRONIZ ATION IN ONE
APPLICATION
47 |
NAS (Network Attached Storage) - a technology which allows connecting disk
storage resources directly to the network. This type of solution allows for simple
configuration of data access from different points of the network.
QNAP - a company which produces high-quality NAS drives and disk arrays.
Proxy server (proxy, proxy gate) - server or software which establishes a connection
on behalf of the user.
Volume Shadow Copy – a Windows service that allows you to create backup
of opened files. This service is not available for Windows XP users.
Versioning - a mechanism through which the user has the ability to restore a previous
version of the file, not necessarily the last one.