xl c/c++: installation guide - university of toronto · enabling ibm tivoli license compliance...
TRANSCRIPT

IBM XL C/C++ for AIX, V10.1
Installation Guide
Version 10.1
GC23-8889-00
���


IBM XL C/C++ for AIX, V10.1
Installation Guide
Version 10.1
GC23-8889-00
���
Note
Before using this information and the product it supports, read the information in “Notices” on page 33.
First edition
This edition applies to IBM XL C/C++ for AIX, V10.1 (Program number 5724-U81) and to all subsequent releases
and modifications until otherwise indicated in new editions. Make sure you are using the correct edition for the
level of the product.
© Copyright International Business Machines Corporation 2003, 2008. All rights reserved.
US Government Users Restricted Rights – Use, duplication or disclosure restricted by GSA ADP Schedule Contract
with IBM Corp.
Contents
About this information . . . . . . . . v
Who should read this document . . . . . . . . v
How to use this document . . . . . . . . . . v
How this document is organized . . . . . . . vi
Conventions . . . . . . . . . . . . . . vi
Related information . . . . . . . . . . . . ix
IBM XL C/C++ information . . . . . . . . ix
Standards and specifications . . . . . . . . xi
Other IBM information . . . . . . . . . . xi
Other information . . . . . . . . . . . xi
Technical support . . . . . . . . . . . . xii
How to send your comments . . . . . . . . xii
Chapter 1. Before installing XL C/C++ . . 1
The installation image and filesets . . . . . . . 1
System prerequisites . . . . . . . . . . . . 6
Previewing the installation and license agreements . 7
Chapter 2. Basic installation . . . . . . 9
Tasks for basic installation . . . . . . . . . . 9
Using SMIT . . . . . . . . . . . . . . 10
Using installp . . . . . . . . . . . . . . 11
Chapter 3. Advanced installation . . . 13
Limitations of non-default installation . . . . . 13
Tasks for advanced installation . . . . . . . . 13
Non-default installation procedure . . . . . . . 14
Installing on an i5/OS PASE system . . . . . 16
Running XL C/C++ from a non-default location . . 16
Chapter 4. Update installation . . . . . 17
Tasks for update installation . . . . . . . . . 17
Preparing a PTF package for installation . . . . . 18
Updating a basic installation . . . . . . . . . 18
Using SMIT . . . . . . . . . . . . . 18
Using installp . . . . . . . . . . . . 19
Updating an advanced installation using vacppndi 20
Product version migration . . . . . . . . . 21
Operating system migration . . . . . . . . . 21
Chapter 5. After installing XL C/C++ . . 23
Checking compiler and fileset information . . . . 23
Enabling IBM Tivoli License Compliance Manager
(ITLCM) . . . . . . . . . . . . . . . 24
Configuring compiler defaults . . . . . . . . 24
Setting environment variables . . . . . . . . 24
Enabling the XL C/C++ error messages . . . . . 25
Enabling the manual pages . . . . . . . . . 25
Creating shortcuts to the XL C/C++ invocation
commands . . . . . . . . . . . . . . . 26
Accessing the local documentation . . . . . . 27
Viewing the HTML documentation . . . . . 27
Viewing the PDF documentation . . . . . . 27
Viewing the manual pages . . . . . . . . 28
Testing the installation . . . . . . . . . . . 28
Chapter 6. Uninstalling XL C/C++ . . . 31
Uninstalling a basic installation . . . . . . . . 31
Uninstalling an advanced installation . . . . . . 32
Uninstalling versions of the MASS components
downloaded from the Web . . . . . . . . . 32
Uninstalling the electronic license agreement . . . 32
Notices . . . . . . . . . . . . . . 33
Trademarks and service marks . . . . . . . . 35
Index . . . . . . . . . . . . . . . 37
© Copyright IBM Corp. 2003, 2008 iii

iv XL C/C++: Installation Guide

About this information
This guide provides detailed installation instructions for IBM® XL C/C++ for AIX®,
V10.1. It guides you through multiple ways to perform tasks and directs you to
reference information in cases requiring atypical installations. It also shows you
how to test the installation, launch remotely-accessible HTML help, and enable and
view different types of documentation. Please read it carefully before installing.
Please also read the README file in the root directory of your installation media,
which contains current information about the compiler.
Who should read this document
This document is intended for anyone responsible for installing IBM XL C/C++ for
AIX, V10.1.
The basic installation methods detailed in this document address the needs of the
majority of users. Basic examples are tailored to reflect, as much as possible, the
steps required to perform a basic installation.
The advanced installation method addresses the needs of users who require a
customized installation for various purposes, such as maintaining more than one
version of XL C/C++ on a single system. These are users who are familiar with
compiler installations and with the file structures of the versions of the compiler
products installed on the system. Advanced examples are tailored to reflect, as much
as possible, the steps required to perform an advanced installation.
How to use this document
This document provides procedures for three main installation scenarios:
″Basic″ installation
This scenario allows you to install a single version of XL C/C++ to a
default location. This scenario is applicable to the majority of users, and is
the recommended method of installation.
For an overview of the steps that you need to follow to perform a basic
installation, refer to Chapter 2, “Basic installation,” on page 9.
″Advanced″ installation
This scenario allows you to maintain multiple versions of XL C/C++ on a
single system, or to install the compiler to a non-default location. This
scenario is only applicable to advanced users who have specialized needs,
and is not recommended for the majority of users.
For an overview of the steps that you need to follow to perform an
advanced installation, refer to Chapter 3, “Advanced installation,” on page
13.
″Update″ installation
This scenario applies to users who have obtained a Program Temporary Fix
(PTF) package for an existing XL C/C++ V10.1 installation.
For an overview of the steps required to install a PTF, refer to Chapter 4,
“Update installation,” on page 17.
© Copyright IBM Corp. 2003, 2008 v

For highly specialized installation scenarios that are outside the scope of this
document, refer to the Technotes at http://www.ibm.com/software/awdtools/xlcpp .
How this document is organized
This book is organized to reflect the pre-installation, installation, post-installation,
and troubleshooting phases of an XL C/C++ installation.
Table 1. Phases of an XL C/C++ installation
Phase Chapters User segment
Pre-installation Chapter 1, “Before
installing XL C/C++,” on
page 1
All users
Installation Chapter 2, “Basic
installation,” on page 9
Users who:
v Want to use the simplest, most direct
installation process
v Do not have any special requirements,
such as the use of multiple versions of the
compiler.
Chapter 3, “Advanced
installation,” on page 13
Users who:
v Want to install the compiler in a
non-default location
v Want to have multiple versions of the
compiler on the same system
Post-installation Chapter 4, “Update
installation,” on page 17
Users who want to update XL C/C++ V10.1
to the next fix level
Chapter 5, “After installing
XL C/C++,” on page 23
All users
Product
removal
Chapter 6, “Uninstalling
XL C/C++,” on page 31
Any user who needs to remove an XL
C/C++ compiler from the system
Conventions
Typographical conventions
The following table explains the typographical conventions used in the IBM XL
C/C++ for AIX, V10.1 information.
Table 2. Typographical conventions
Typeface Indicates Example
bold Lowercase commands, executable
names, compiler options, and
directives.
The compiler provides basic
invocation commands, xlc and xlC
(xlc++), along with several other
compiler invocation commands to
support various C/C++ language
levels and compilation environments.
italics Parameters or variables whose
actual names or values are to be
supplied by the user. Italics are
also used to introduce new terms.
Make sure that you update the size
parameter if you return more than
the size requested.
underlining The default setting of a parameter
of a compiler option or directive.
nomaf | maf
vi XL C/C++: Installation Guide

Table 2. Typographical conventions (continued)
Typeface Indicates Example
monospace Programming keywords and
library functions, compiler builtins,
examples of program code,
command strings, or user-defined
names.
To compile and optimize
myprogram.c, enter: xlc myprogram.c
-O3.
Qualifying elements (icons)
Most features described in this information apply to both C and C++ languages. In
descriptions of language elements where a feature is exclusive to one language, or
where functionality differs between languages, this information uses icons to
delineate segments of text as follows:
Table 3. Qualifying elements
Qualifier/Icon Meaning
C only, or C only
beginsC
C
C only ends
The text describes a feature that is supported in the C language only;
or describes behavior that is specific to the C language.
C++ only, or C++
only beginsC++
C++
C++ only ends
The text describes a feature that is supported in the C++ language
only; or describes behavior that is specific to the C++ language.
IBM extension
beginsIBM
IBM
IBM extension ends
The text describes a feature that is an IBM extension to the standard
language specifications.
Syntax diagrams
Throughout this information, diagrams illustrate XL C/C++ syntax. This section
will help you to interpret and use those diagrams.
v Read the syntax diagrams from left to right, from top to bottom, following the
path of the line.
The ��─── symbol indicates the beginning of a command, directive, or statement.
The ───� symbol indicates that the command, directive, or statement syntax is
continued on the next line.
The �─── symbol indicates that a command, directive, or statement is continued
from the previous line.
The ───�� symbol indicates the end of a command, directive, or statement.
About this information vii

Fragments, which are diagrams of syntactical units other than complete
commands, directives, or statements, start with the │─── symbol and end with
the ───│ symbol.
v Required items are shown on the horizontal line (the main path):
�� keyword required_argument ��
v Optional items are shown below the main path:
�� keyword
optional_argument ��
v If you can choose from two or more items, they are shown vertically, in a stack.
If you must choose one of the items, one item of the stack is shown on the main
path.
�� keyword required_argument1
required_argument2 ��
If choosing one of the items is optional, the entire stack is shown below the
main path.
�� keyword
optional_argument1
optional_argument2
��
v An arrow returning to the left above the main line (a repeat arrow) indicates
that you can make more than one choice from the stacked items or repeat an
item. The separator character, if it is other than a blank, is also indicated:
��
�
,
keyword
repeatable_argument
��
v The item that is the default is shown above the main path.
��
keyword default_argument
alternate_argument
��
v Keywords are shown in nonitalic letters and should be entered exactly as shown.
v Variables are shown in italicized lowercase letters. They represent user-supplied
names or values.
v If punctuation marks, parentheses, arithmetic operators, or other such symbols
are shown, you must enter them as part of the syntax.
Sample syntax diagram
The following syntax diagram example shows the syntax for the #pragma
comment directive.
viii XL C/C++: Installation Guide
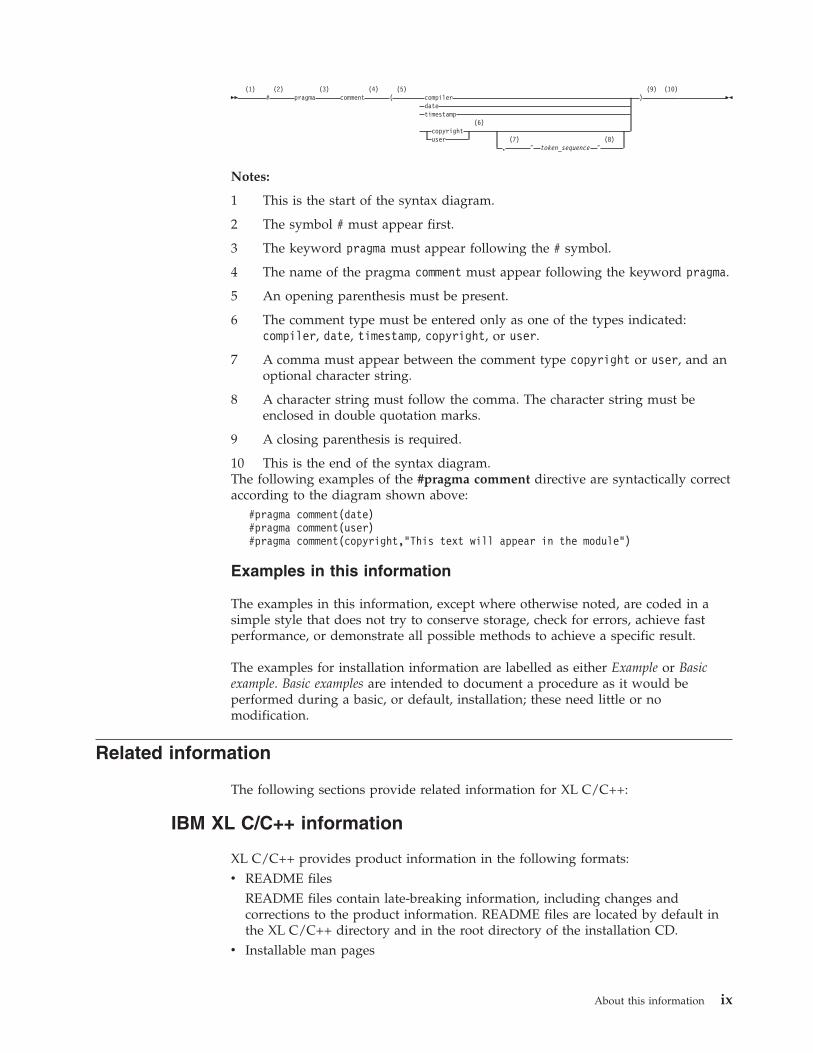
�� (1) (2) (3) (4) (5) (9) (10)
#
pragma
comment
(
compiler
)
date
timestamp
(6)
copyright
user
(7)
(8)
,
″
token_sequence
″
��
Notes:
1 This is the start of the syntax diagram.
2 The symbol # must appear first.
3 The keyword pragma must appear following the # symbol.
4 The name of the pragma comment must appear following the keyword pragma.
5 An opening parenthesis must be present.
6 The comment type must be entered only as one of the types indicated:
compiler, date, timestamp, copyright, or user.
7 A comma must appear between the comment type copyright or user, and an
optional character string.
8 A character string must follow the comma. The character string must be
enclosed in double quotation marks.
9 A closing parenthesis is required.
10 This is the end of the syntax diagram.The following examples of the #pragma comment directive are syntactically correct
according to the diagram shown above:
#pragma comment(date)
#pragma comment(user)
#pragma comment(copyright,"This text will appear in the module")
Examples in this information
The examples in this information, except where otherwise noted, are coded in a
simple style that does not try to conserve storage, check for errors, achieve fast
performance, or demonstrate all possible methods to achieve a specific result.
The examples for installation information are labelled as either Example or Basic
example. Basic examples are intended to document a procedure as it would be
performed during a basic, or default, installation; these need little or no
modification.
Related information
The following sections provide related information for XL C/C++:
IBM XL C/C++ information
XL C/C++ provides product information in the following formats:
v README files
README files contain late-breaking information, including changes and
corrections to the product information. README files are located by default in
the XL C/C++ directory and in the root directory of the installation CD.
v Installable man pages
About this information ix

Man pages are provided for the compiler invocations and all command-line
utilities provided with the product. Instructions for installing and accessing the
man pages are provided in the IBM XL C/C++ for AIX, V10.1 Installation Guide.
v Information center
The information center of searchable HTML files can be launched on a network
and accessed remotely or locally. Instructions for installing and accessing the
online information center are provided in the IBM XL C/C++ for AIX, V10.1
Installation Guide.
The information center is viewable on the Web at http://publib.boulder.ibm.com/infocenter/comphelp/v101v121/index.jsp.
v PDF documents
PDF documents are located by default in the /usr/vacpp/doc/LANG/pdf/
directory, where LANG is one of en_US, zh_CN, or ja_JP. The PDF files are also
available on the Web at http://www.ibm.com/software/awdtools/xlcpp/library.
The following files comprise the full set of XL C/C++ product information:
Table 4. XL C/C++ PDF files
Document title
PDF file
name Description
IBM XL C/C++ for AIX,
V10.1 Installation Guide,
GC23-8889-00
install.pdf Contains information for installing XL C/C++
and configuring your environment for basic
compilation and program execution.
Getting Started with IBM
XL C/C++ for AIX, V10.1,
GC23-8897-00
getstart.pdf Contains an introduction to the XL C/C++
product, with information on setting up and
configuring your environment, compiling and
linking programs, and troubleshooting
compilation errors.
IBM XL C/C++ for AIX,
V10.1 Compiler Reference,
SC23-8886-00
compiler.pdf Contains information about the various
compiler options, pragmas, macros,
environment variables, and built-in functions,
including those used for parallel processing.
IBM XL C/C++ for AIX,
V10.1 Language Reference,
SC23-8888-00
langref.pdf Contains information about the C and C++
programming languages, as supported by IBM,
including language extensions for portability
and conformance to nonproprietary standards.
IBM XL C/C++ for AIX,
V10.1 Optimization and
Programming Guide,
SC23-8887-00
proguide.pdf Contains information on advanced
programming topics, such as application
porting, interlanguage calls with Fortran code,
library development, application optimization
and parallelization, and the XL C/C++
high-performance libraries.
Standard C++ Library
Reference, SC23-8890-00
standlib.pdf Contains reference information about the
standard C++ runtime libraries and headers.
C/C++ Legacy Class
Libraries Reference,
SC09-7652-00
legacy.pdf Contains reference information about the USL
I/O Stream Library and the Complex
Mathematics Library.
To read a PDF file, use the Adobe® Reader. If you do not have the Adobe
Reader, you can download it (subject to license terms) from the Adobe Web site
at http://www.adobe.com.
More information related to XL C/C++ including redbooks, white papers, tutorials,
and other articles, is available on the Web at:
x XL C/C++: Installation Guide

http://www.ibm.com/software/awdtools/xlcpp/library
Standards and specifications
XL C/C++ is designed to support the following standards and specifications. You
can refer to these standards for precise definitions of some of the features found in
this information.
v Information Technology – Programming languages – C, ISO/IEC 9899:1990, also
known as C89.
v Information Technology – Programming languages – C, ISO/IEC 9899:1999, also
known as C99.
v Information Technology – Programming languages – C++, ISO/IEC 14882:1998, also
known as C++98.
v Information Technology – Programming languages – C++, ISO/IEC 14882:2003(E),
also known as Standard C++.
v Information Technology – Programming languages – Extensions for the programming
language C to support new character data types, ISO/IEC DTR 19769. This draft
technical report has been accepted by the C standards committee, and is
available at http://www.open-std.org/JTC1/SC22/WG14/www/docs/n1040.pdf.
v Draft Technical Report on C++ Library Extensions, ISO/IEC DTR 19768. This draft
technical report has been submitted to the C++ standards committee, and is
available at http://www.open-std.org/JTC1/SC22/WG21/docs/papers/2005/n1836.pdf.
v AltiVec Technology Programming Interface Manual, Motorola Inc. This specification
for vector data types, to support vector processing technology, is available at
http://www.freescale.com/files/32bit/doc/ref_manual/ALTIVECPIM.pdf.
v Information Technology – Programming Languages – Extension for the programming
language C to support decimal floating-point arithmetic, ISO/IEC WDTR 24732. This
draft technical report has been submitted to the C standards committee, and is
available at http://www.open-std.org/JTC1/SC22/WG14/www/docs/n1176.pdf.
v Decimal Types for C++: Draft 4 http://www.open-std.org/jtc1/sc22/wg21/docs/papers/2006/n1977.html
Other IBM information
v AIX Commands Reference, Volumes 1 - 6, SC23-4888
v Technical Reference: Base Operating System and Extensions, Volumes 1 & 2, SC23-4913
v AIX National Language Support Guide and Reference, SC23-4902
v AIX General Programming Concepts: Writing and Debugging Programs, SC23-4896
v AIX Assembler Language Reference, SC23-4923
All AIX information is available at http://publib.boulder.ibm.com/infocenter/pseries/v5r3/index.jsp.
v Parallel Environment for AIX: Operation and Use
v ESSL for AIX V4.2 Guide and Reference, SA22-7904, available at
http://publib.boulder.ibm.com/clresctr/windows/public/esslbooks.html
Other information
v Using the GNU Compiler Collection available at http://gcc.gnu.org/onlinedocs
About this information xi

Technical support
Additional technical support is available from the XL C/C++ Support page at
http://www.ibm.com/software/awdtools/xlcpp/support. This page provides a
portal with search capabilities to a large selection of Technotes and other support
information.
If you cannot find what you need, you can send e-mail to [email protected].
For the latest information about XL C/C++, visit the product information site at
http://www.ibm.com/software/awdtools/xlcpp.
How to send your comments
Your feedback is important in helping to provide accurate and high-quality
information. If you have any comments about this information or any other XL
C/C++ information, send your comments by e-mail to [email protected].
Be sure to include the name of the information, the part number of the
information, the version of XL C/C++, and, if applicable, the specific location of
the text you are commenting on (for example, a page number or table number).
xii XL C/C++: Installation Guide

Chapter 1. Before installing XL C/C++
Before you install IBM XL C/C++ for AIX, V10.1:
v Familiarize yourself with the installation image, which contains the installable
compiler filesets.
v Ensure that system prerequisites such as disk space and operating system are
met.
v Determine the tasks you need to perform, depending on your installation
requirements.
v Become either the root user or a user with administrator privileges.
The installation image and filesets
The installation image contains filesets for all components of the compiler for all
supported language locales.
The installation image for XL C/C++ is available physically on an installation CD
and electronically in the xlcpp.10.1.0.aix.GM.tar.Z installation package, in the
/usr/sys/inst.images directory.
The image includes filesets for the following compiler components:
v “XL C compiler filesets 10.1” on page 2
v “XL C++ compiler filesets 10.1” on page 2
v “XL C++ runtime environment filesets 10.1” on page 4
v “XL C/C++ compiler online help filesets 3.1” on page 4
v “Runtime debug memory routine filesets 5.4” on page 4
v “Shared-memory parallelism (SMP) runtime environment filesets 1.8” on page 4
v “Mathematical Acceleration Subsystem (MASS) filesets 5.0” on page 5
v “IBM Debugger filesets 6.1” on page 5
Filesets
The following tables list the filesets included in the installation image and the
default directories to which the fileset contents are installed during a basic
installation. You may optionally install all available filesets, or only the ones you
want. If you select specific filesets for installation, you may also choose to
automatically install any prerequisite filesets required by your selections by using
the installp -g flag.
When fileset names differ only by the locale code, you can choose to install only
the filesets relevant to your desired language and location. The LANG
environment variable determines which message catalogs are used. The en_US
(English) message catalogs are installed by default. If LANG is not defined or is
assigned an unsupported locale, en_US message catalogs are used. See “National
language support” on page 6 for a list of available locales.
© Copyright IBM Corp. 2003, 2008 1
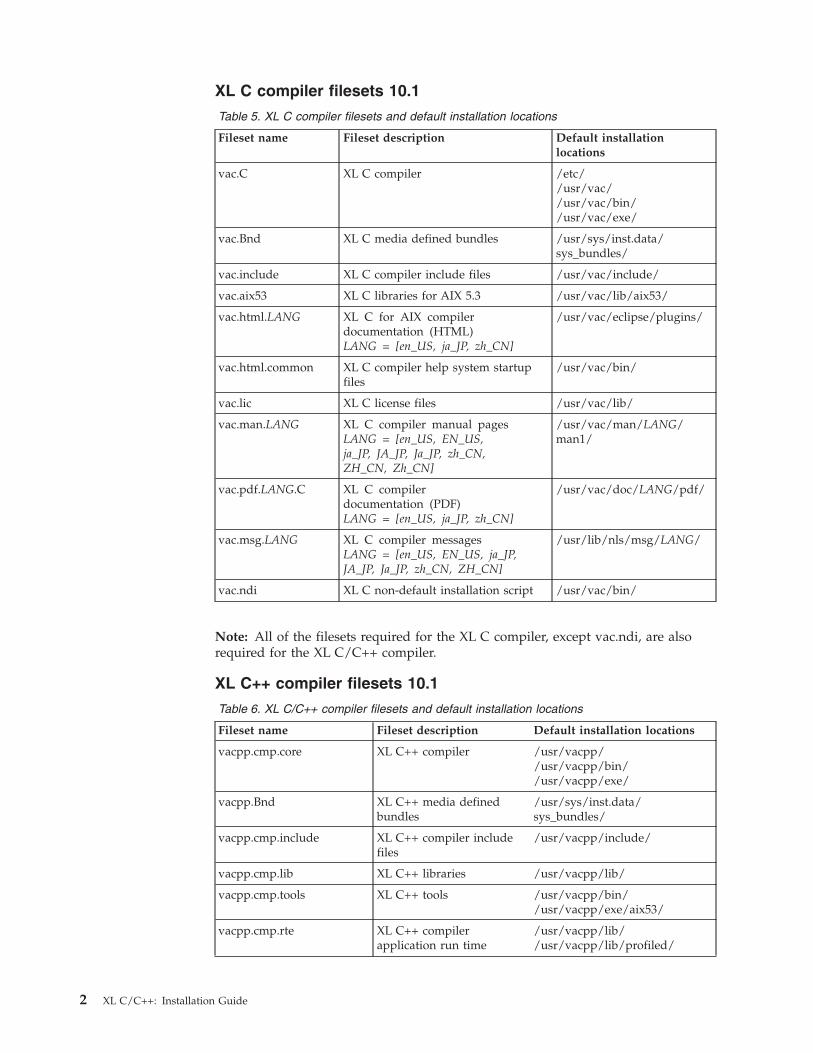
XL C compiler filesets 10.1
Table 5. XL C compiler filesets and default installation locations
Fileset name Fileset description Default installation
locations
vac.C XL C compiler /etc/
/usr/vac/
/usr/vac/bin/
/usr/vac/exe/
vac.Bnd XL C media defined bundles /usr/sys/inst.data/sys_bundles/
vac.include XL C compiler include files /usr/vac/include/
vac.aix53 XL C libraries for AIX 5.3 /usr/vac/lib/aix53/
vac.html.LANG XL C for AIX compiler
documentation (HTML)
LANG = [en_US, ja_JP, zh_CN]
/usr/vac/eclipse/plugins/
vac.html.common XL C compiler help system startup
files
/usr/vac/bin/
vac.lic XL C license files /usr/vac/lib/
vac.man.LANG XL C compiler manual pages
LANG = [en_US, EN_US,
ja_JP, JA_JP, Ja_JP, zh_CN,
ZH_CN, Zh_CN]
/usr/vac/man/LANG/man1/
vac.pdf.LANG.C XL C compiler
documentation (PDF)
LANG = [en_US, ja_JP, zh_CN]
/usr/vac/doc/LANG/pdf/
vac.msg.LANG XL C compiler messages
LANG = [en_US, EN_US, ja_JP,
JA_JP, Ja_JP, zh_CN, ZH_CN]
/usr/lib/nls/msg/LANG/
vac.ndi XL C non-default installation script /usr/vac/bin/
Note: All of the filesets required for the XL C compiler, except vac.ndi, are also
required for the XL C/C++ compiler.
XL C++ compiler filesets 10.1
Table 6. XL C/C++ compiler filesets and default installation locations
Fileset name Fileset description Default installation locations
vacpp.cmp.core XL C++ compiler /usr/vacpp/
/usr/vacpp/bin/
/usr/vacpp/exe/
vacpp.Bnd XL C++ media defined
bundles
/usr/sys/inst.data/sys_bundles/
vacpp.cmp.include XL C++ compiler include
files
/usr/vacpp/include/
vacpp.cmp.lib XL C++ libraries /usr/vacpp/lib/
vacpp.cmp.tools XL C++ tools /usr/vacpp/bin/
/usr/vacpp/exe/aix53/
vacpp.cmp.rte XL C++ compiler
application run time
/usr/vacpp/lib/
/usr/vacpp/lib/profiled/
2 XL C/C++: Installation Guide
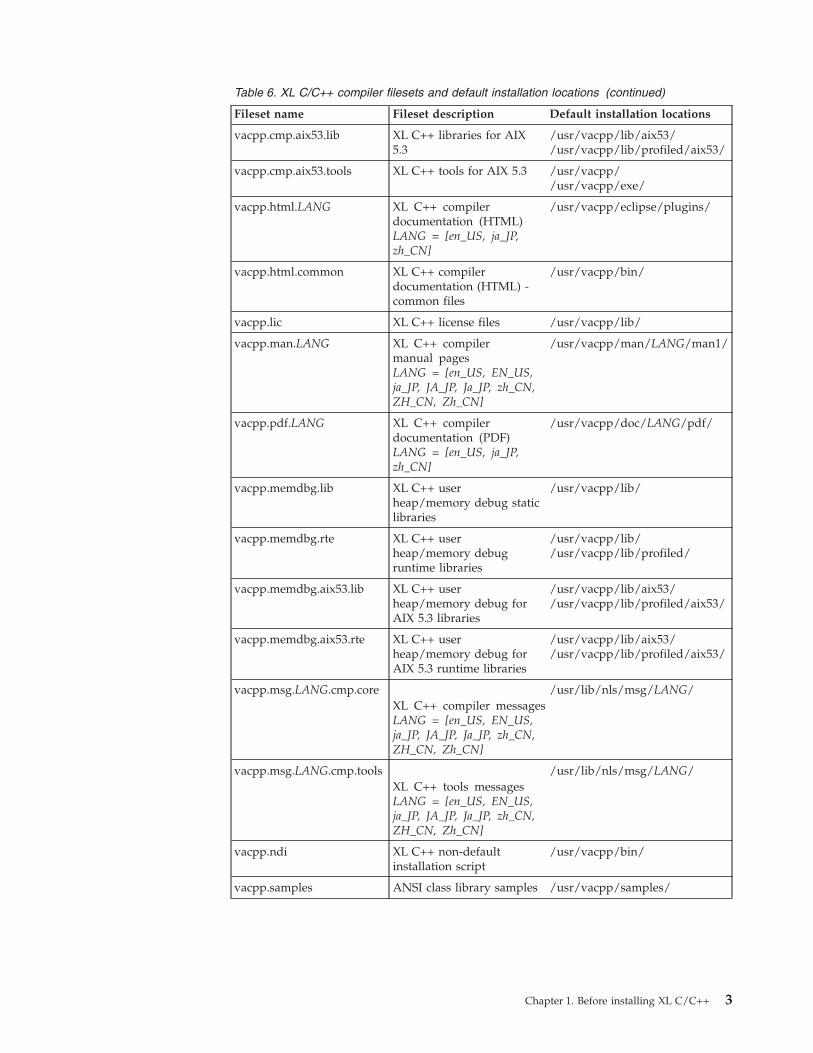
Table 6. XL C/C++ compiler filesets and default installation locations (continued)
Fileset name Fileset description Default installation locations
vacpp.cmp.aix53.lib XL C++ libraries for AIX
5.3
/usr/vacpp/lib/aix53/
/usr/vacpp/lib/profiled/aix53/
vacpp.cmp.aix53.tools XL C++ tools for AIX 5.3 /usr/vacpp/
/usr/vacpp/exe/
vacpp.html.LANG XL C++ compiler
documentation (HTML)
LANG = [en_US, ja_JP,
zh_CN]
/usr/vacpp/eclipse/plugins/
vacpp.html.common XL C++ compiler
documentation (HTML) -
common files
/usr/vacpp/bin/
vacpp.lic XL C++ license files /usr/vacpp/lib/
vacpp.man.LANG XL C++ compiler
manual pages
LANG = [en_US, EN_US,
ja_JP, JA_JP, Ja_JP, zh_CN,
ZH_CN, Zh_CN]
/usr/vacpp/man/LANG/man1/
vacpp.pdf.LANG XL C++ compiler
documentation (PDF)
LANG = [en_US, ja_JP,
zh_CN]
/usr/vacpp/doc/LANG/pdf/
vacpp.memdbg.lib XL C++ user
heap/memory debug static
libraries
/usr/vacpp/lib/
vacpp.memdbg.rte XL C++ user
heap/memory debug
runtime libraries
/usr/vacpp/lib/
/usr/vacpp/lib/profiled/
vacpp.memdbg.aix53.lib XL C++ user
heap/memory debug for
AIX 5.3 libraries
/usr/vacpp/lib/aix53/
/usr/vacpp/lib/profiled/aix53/
vacpp.memdbg.aix53.rte XL C++ user
heap/memory debug for
AIX 5.3 runtime libraries
/usr/vacpp/lib/aix53/
/usr/vacpp/lib/profiled/aix53/
vacpp.msg.LANG.cmp.core
XL C++ compiler messages
LANG = [en_US, EN_US,
ja_JP, JA_JP, Ja_JP, zh_CN,
ZH_CN, Zh_CN]
/usr/lib/nls/msg/LANG/
vacpp.msg.LANG.cmp.tools
XL C++ tools messages
LANG = [en_US, EN_US,
ja_JP, JA_JP, Ja_JP, zh_CN,
ZH_CN, Zh_CN]
/usr/lib/nls/msg/LANG/
vacpp.ndi XL C++ non-default
installation script
/usr/vacpp/bin/
vacpp.samples ANSI class library samples /usr/vacpp/samples/
Chapter 1. Before installing XL C/C++ 3

XL C++ runtime environment filesets 10.1
Table 7. XL C++ runtime environment filesets and default installation locations
Fileset name Fileset description Default installation locations
xlC.adt.include C Set ++® application
development toolkit
/usr/include/
xlC.rte XL C++ runtime libraries /usr/lpp/xlC/lib/
/usr/lpp/xlC/lib/profiled/
xlC.aix50.rte XL C++ runtime environment for
AIX 5.3 libraries
/usr/lpp/xlC/lib/aix53/
/usr/lpp/xlC/lib/profiled/aix53/
xlC.aix61.rte XL C++ runtime environment for
AIX 6.1 libraries
/usr/lpp/xlC/lib/aix61/
/usr/lpp/xlC/lib/profiled/aix61/
xlC.msg.LANG.rte XL C++ runtime messages
LANG = [en_US, ja_JP, Ja_JP]
/usr/lib/nls/msg/LANG/
XL C/C++ compiler online help filesets 3.1
Table 8. XL C/C++ compiler online help filesets and default installation locations
Fileset name Fileset description Default installation
locations
xlhelp.com XL compiler help system /usr/xlhelp/eclipse/
/usr/xlhelp/bin/
xlhelp.html.LANG XL compiler common documentation
LANG = [en_US, ja_JP, zh_CN]
/usr/xlhelp/eclipse/plugins/ibm.com.compilers.aix.doc/
Runtime debug memory routine filesets 5.4
Table 9. Runtime debug memory routine filesets and default installation locations
Fileset name Fileset description Default installation
locations
memdbg.adt User heap/memory debug toolkit /usr/vac/lib/
/usr/vac/lib/profiled/
memdbg.aix53.adt User heap/memory debug toolkit for
AIX 5.3
/usr/vac/lib/aix53/
/usr/vac/lib/profiled/aix53/
memdbg.msg.LANG User heap/memory debug messages
LANG = [en_US, EN_US, ja_JP,
JA_JP, Ja_JP, zh_CN, ZH_CN]
/usr/lib/nls/msg/LANG
Shared-memory parallelism (SMP) runtime environment filesets
1.8
Table 10. SMP runtime filesets and default installation locations
Fileset name Fileset description Default installation locations
xlsmp.rte SMP runtime library /usr/include/
/usr/lpp/xlsmp/default_msg/
xlsmp.msg.LANG.rte SMP runtime messages
LANG = [en_US, EN_US,
ja_JP, JA_JP, Ja_JP, zh_CN,
ZH_CN, Zh_CN]
/usr/lib/nls/msg/LANG/
4 XL C/C++: Installation Guide

Table 10. SMP runtime filesets and default installation locations (continued)
Fileset name Fileset description Default installation locations
xlsmp.aix53.rte SMP runtime libraries for AIX
5.3
/usr/lpp/xlsmp/aix52/
Mathematical Acceleration Subsystem (MASS) filesets 5.0
Table 11. MASS filesets and default installation locations
Fileset name Fileset description Default installation
locations
xlmass.adt.include IBM MASS application development
include files
/usr/xlmass/include/
xlmass.lib IBM MASS libraries /usr/xlmass/lib/
xlmass.aix53.lib IBM MASS libraries for AIX 5.3 /usr/xlmass/lib/aix53/
IBM Debugger filesets 6.1
Table 12. IBM Debugger filesets
Fileset name Fileset description
ibmdebugger IBM Debugger for AIX
ibmdebugger.engine IBM Debugger for AIX Compiled Languages Engine
ibmdebugger.engine.msg.LANG IBM Debugger messages
LANG = [de_DE, en_US, en_ES, fr_FR, it_IT, ja_JP,
ko_KR, pt_BR, zh_CN, zh_TW]
ibmdebugger.jre IBM Debugger for AIX JRE
ibmdebugger.ui IBM Debugger for AIX UI Components
The Eclipse-based IBM Debugger for AIX, V6.1 is included with the XL C/C++
installation image, and adds source-level debugging to your development
environment. In addition, a Windows® version of the Debugger UI is included with
the installer, which allows you to remotely debug AIX applications from a
Windows platform.
Note: IBM Debugger for AIX, V6.1 supersedes IBM Distributed Debugger. If the
IBM Distributed Debugger V9.2 is installed on your system, it will be removed
upon installation of the IBM Debugger for AIX, V6.1. The post-installation script
then modifies the idebug fileset levels in the Object Data Manager (ODM) database
to 99.99.9999.9999 to prevent future installations of idebug.* filesets after
ibmdebugger.* filesets have been installed.
Preparing the electronic distribution package
If you have downloaded the XL C/C++ electronic distribution package,
xlcpp.10.1.0.aix.GM.tar.Z, follow these steps before attempting to install:
Note: You must be logged in as root user or have superuser authority.
1. Uncompress and unpack the downloaded package into an empty directory:
a. To uncompress the file, use the command
uncompress xlcpp.10.1.0.aix.GM.tar.Z
b. To unpack the resulting tar file, use the command
Chapter 1. Before installing XL C/C++ 5
tar -xvf xlcpp.10.1.0.aix.GM.tar
2. Use the command inutoc directory_name to generate a .toc file in the specified
directory.
The following example shows the steps to prepare the electronic distribution
package, xlcpp.10.1.0.aix.GM.tar.Z, located in the new directory, /compiler/install/
for installation.
cd /compiler/install
uncompress -f xlcpp.10.1.0.aix.GM.tar.Z
tar -xvf xlcpp.10.1.0.aix.GM.tar
cd usr/sys/inst.images
inutoc .
Refer to “System prerequisites” to ensure that system prerequisites are met and use
the installation methods described in either Chapter 2, “Basic installation,” on page
9 or Chapter 3, “Advanced installation,” on page 13 to install the compiler.
National language support
The XL C/C++ messages support the following language locales:
v en_US (ISO8859-1)
v EN_US (UTF-8)
v ja_JP (IBM-eucJP)
v JA_JP (UTF-8)
v Ja_JP (IBM-943)
v zh_CN (IBM-eucCN)
v ZH_CN (UTF-8)
v Zh_CN (GB18030)
English (en_US) is the default national language. Following installation, you can
set the NLSPATH so that messages are displayed in a different language. See
“Enabling the XL C/C++ error messages” on page 25.
System prerequisites
All system prerequisites must be present on your system before XL C/C++ and its
accompanying documentation can be successfully installed and run.
v Supported operating systems:
– AIX V5.3 TL 5300-06
– AIX V6.1
– i5/OS® PASE V6R1v Required hard disk space: 500 MB
v Required software for documentation:
– HTML browser
– PDF viewer
Verifying the amount of hard disk space available
You can use the following command to determine the amount of space available in
the default installation location (/usr/vacpp/):
df -m /usr
6 XL C/C++: Installation Guide

If you plan to install the compiler to a non-default location, you can use the
following command:
df -m installation_path
where installation_path represents the non-default location.
Verifying that the required filesets are installed
The following filesets must be installed on your system in order to install IBM XL
C/C++ for AIX, V10.1:
Fileset name Fileset description
bos.adt.include Base application development include files
bos.adt.lib Base application development libraries
bos.adt.libm Base application development math libraries
bos.rte Base operating system run time
bos.rte.libc Base application runtime library
As well as at least one of the following locale-specific filesets:
Fileset name Fileset description
bos.loc.LANG Base locale support
bos.loc.pc.LANG Base system locale PC code set
bos.loc.utf.LANG Base system locale UTF code set
bos.loc.iso.LANG Base system locale ISO code set
You can view information about the installed filesets by using the lslpp command.
Use the following command to determine if the required filesets have been
installed:
lslpp -L bos.adt.include bos.adt.lib bos.adt.libm bos.loc.* bos.rte bos.rte.libc
Previewing the installation and license agreements
Before installing IBM XL C/C++ for AIX, V10.1, you can verify the default
installation process, check file sizes and disk space and preview the license
agreements using either SMIT or installp.
The terms and conditions for using XL C/C++ are specified in the following PDF
files, which are located in the root directory of the distribution package:
v LicAgree.pdf
v LicInfo.pdf
After basic installation, the license files can be found in the /usr/vacpp/ directory
with the file names:
v LicenseAgreement.pdf
v license.pdf
Chapter 1. Before installing XL C/C++ 7
Using SMIT
You can use the System Management Interface Tool (SMIT) to preview the basic XL
C/C++ installation.
Follow the steps to install the compiler to the default location given in “Using
SMIT” on page 10. When prompted with the SMIT dialog to customize the
installation in step 3, set the Preview only? field to yes. With this setting enabled,
SMIT displays progress messages at each stage of the installation but does not
actually install the compiler on your system.
Using installp
You can also preview the command line installation process and write the output
to a log file, using the installp command. Follow the steps to install the compiler
to the default location given in “Using installp” on page 11 and specify the -p flag
to preview the process without installing the compiler.
The following example previews the installation of all available compiler filesets in
the /cdrom/usr/sys/inst.images source directory to the default location,
/usr/vacpp/ and writes an installation log file to /tmp/install.log.
Example:
installp -paXgd /cdrom/usr/sys/inst.images -e /tmp/install.log all
8 XL C/C++: Installation Guide

Chapter 2. Basic installation
You should use the basic installation procedure to install XL C/C++ as long as the
following are true:
v You are installing IBM XL C/C++ for AIX, V10.1 to the default directory,
/usr/vacpp/.
v You are maintaining a single version of XL C/C++ on your system, and you
agree to remove any previously installed XL C/C++ components.
If both these conditions apply, the basic installation is the easiest and fastest
method, as it allows you to automatically uninstall previous versions of XL
C/C++, install the latest version, and configure the compiler, all through the use of
a single installation tool.
If either of these conditions does not apply, do not use basic installation. Instead,
see the procedures in Chapter 3, “Advanced installation,” on page 13.
The basic installation methods below will install XL C/C++ to the default
directory. If you have root access or a profile with superuser privileges, you can
use either the System Management Interface Tool (SMIT) or the installp command
to install the compiler.
You can use the basic installation methods to do any of the following:
v Install IBM XL C/C++ for AIX, V10.1 on a clean system.
v Install IBM XL C/C++ for AIX, V10.1 on a system where IBM XL Fortran for
AIX, V12.1 is already installed. In this case, both compilers will use the SMP and
MASS libraries provided with XL C/C++ for AIX. (For information about
installing XL Fortran, refer to the IBM XL Fortran for AIX, V12.1 Installation
Guide.)
v Install an update on a system where IBM XL C/C++ for AIX, V10.1 has already
been installed. In this case, use the procedure in Chapter 4, “Update
installation,” on page 17.
Tasks for basic installation
Before you perform a basic installation, you should make sure that you have a user
account with administrator privileges and that your system meets all system
requirements. After you have finished installing the compiler, you should confirm
that the installation was successful and enable the compiler’s man pages.
The complete procedure for basic installation is outlined in the following table:
Table 13. Steps for basic installation: new or upgrade installation
Task For more information, see . . .
Become either the root user or a user with
administrator privileges.
Documentation supplied with the
operating system.
Ensure that all system prerequisites are satisfied. “System prerequisites” on page 6
Use SMIT or the installp command to install and
configure the compiler, using the default paths.
“Using SMIT” on page 10 or “Using
installp” on page 11
© Copyright IBM Corp. 2003, 2008 9

Table 13. Steps for basic installation: new or upgrade installation (continued)
Task For more information, see . . .
Confirm that the compiler packages were
successfully installed, and test the installation.
“Checking compiler and fileset
information” on page 23, “Testing the
installation” on page 28
Enable the compiler man pages. “Enabling the manual pages” on page
25
If your system locale and/or encoding are not
en_US, enable the compiler error messages.
Otherwise, you can skip this step.
“Enabling the XL C/C++ error
messages” on page 25
Using SMIT
The SMIT guides you step-by-step through the installation process.
To install the compiler using the SMIT interface, follow these steps:
1. Enter the command smit install_latest. This command invokes the SMIT,
which presents a menu-driven user interface for the installation process. It will
ask you to specify the INPUT device/directory of the software.
2. Press F4 to select from a list of suggested devices and directories, or type in the
name of the CD-ROM device or the path to the location of the packages. If you
want to install over a network you must have a network server installed, and
then specify the directory on the client that corresponds to the installation
source on the network server.
3. Press Enter. At this stage you are prompted with a list of questions that will
help you customize the compiler installation on your system. Verify the default
values, or modify them where necessary to accommodate your preferences.
Important: You must select yes next to Accept new LICENSE agreements? to
continue with the installation.
Note:
v You can select the SOFTWARE to install field and press F4 to view the
installable filesets on the device or in the directory, then select the filesets to
install. Install the runtime libraries first, then install the other filesets in any
order. It is recommended that you keep the default setting, _all_latest, to
install all the filesets.
v To preview the installation process without actually installing the compiler
select yes next to the Preview only? field.4. Press Enter and then Enter again.
Note:
v If you use the command smit install_latest, SMIT will produce an error
message indicating that either xlC.aix50.rte or xlC.aix61.rte failed to install.
This is normal, and you should ignore the error message. If you are installing
the compiler onto a system running AIX 5.3, only xlC.aix50.rte is required,
and xlC.aix61.rte will automatically fail to install. Likewise, if you are
installing the compiler onto a system running AIX 6.1, only xlC.aix61.rte is
required, and xlC.aix50.rte will fail to install.
v Similarly, any language specific filesets that are not supported by your
system will produce an error message and fail to install. For example, if local
10 XL C/C++: Installation Guide

support is not present for Ja_JP, you will get a failure when attempting to
install a Ja_JP specific language fileset for the compiler. These error messages
are normal and should be ignored.
v The runtime libraries and compiler filesets are always required.
v You do not need all of the compile-time and runtime message catalogs, only
those for the national languages that you need for compile-time and runtime
messages.
v Messages are displayed as each part is successfully installed.
v The installation log will be stored to file /home/smit.log.
Using installp
You can install XL C/C++ directly from the command line using the AIX command
installp.
To install the compiler and write the installation output to a log file using the
installp command, follow these steps:
Run the command:
installp -aXYgd install_images_location -e logfile fileset_names
�� - installp -aYg fileset_names
-p
-X
-d
install_images_location
-e
logfile ��
-aYg
Specifies that all the latest installable filesets available in the
install_images_location directory are applied and that the required software
license agreement is accepted.
-p
Performs a preview of the installation process by running the preinstallation
checks. See previewing the installation.
-X
Attempts to expand the file system at the default location if there is insufficient
space to complete the install.
-d install_images_location
Specifies the directory where the filesets are located. This path may also be a
mounted CD-ROM drive.
-e logfile
Specifies the name and location of the installation log file.
fileset_names
Specifies a list of names of the filesets in install_images_location that you want
to install.
Note: The keyword all can be used to indicate that all filesets should be
attempted during installation.
The following example installs all available compiler filesets in the
/cdrom/usr/sys/inst.images source directory to the default locations, as specified
in “Filesets” on page 1, and writes an installation log file to /tmp/install.log.
Example:
installp -aXYgd /cdrom/usr/sys/inst.images -e /tmp/install.log all
Chapter 2. Basic installation 11

Note:
v If you use the keyword all, as in the example above, installp will produce an
error message indicating that either xlC.aix50.rte or xlC.aix61.rte failed to install.
This is normal, and you should ignore the error message. If you are installing
the compiler onto a system running AIX 5.3, only xlC.aix50.rte is required, and
xlC.aix61.rte will automatically fail to install. Likewise, if you are installing the
compiler onto a system running AIX 6.1, only xlC.aix61.rte is required, and
xlC.aix50.rte will fail to install.
v Similarly, any language specific filesets that are not supported by your system
will produce an error message and fail to install. For example, if local support is
not present for Ja_JP, you will get a failure when attempting to install a Ja_JP
specific language fileset for the compiler. These error messages are normal and
should be ignored.
12 XL C/C++: Installation Guide

Chapter 3. Advanced installation
You should use the advanced installation procedure if any of the following are
true:
v You are maintaining multiple versions of the same product on a single system.
v You are installing the product to a non-default location.
v You are installing on an i5/OS PASE system.
To perform an advanced installation, you will need to use the vacppndi Perl script
provided with the installation image. This allows you to install XL C/C++ to a
non-default directory and run multiple versions of XL C/C++ on a single system.
The script is packaged in the vacpp.ndi fileset. To avoid unexpected behavior
during installation, do not modify this script.
Limitations of non-default installation
Although non-default installation gives you more freedom to choose how many
versions of XL C/C++ to keep on your system and where to install them, in many
ways a non-default installation is also more restrictive, demanding to implement,
and difficult to maintain than a basic installation.
v The recommended method for installing XL C/C++ is installing to the default
location. You should only use the vacppndi script to install XL C/C++ if you are
an expert user familiar with the compiler and the standard installation process.
v The vacppndi script does not check whether prerequisite packages are installed.
v You cannot use this script to install the product filesets individually.
v You will not be able to use AIX tools (such as lslpp) to uninstall or to query
installed filesets for version or release level information.
v Service refreshes of the compiler assume a default installation path. For a
non-default compiler installation, the vacppndi script must be used to apply
service packages.
v To run vacppndi, you must have Perl version 5.5.3 or higher, runtime
environment perl.rte, installed on your system. This fileset is shipped with the
AIX base operating system.
v The vacppndi script requires that the original filesets not be renamed. This
means that you cannot install the compiler using filesets that have been copied
by the SMIT sub-option ″Copy Software to Hard Disk for Future Installation″
because the version number of the compiler is appended to the filesets when
they are copied.
Tasks for advanced installation
Before you perform an advanced installation, you should make sure that you have
a user account with administrator privileges and that your system meets all system
requirements. You may also want to uninstall any previous versions of XL C/C++
on your system. After you have finished installing the compiler you should
confirm that the installation was successful and enable the compiler’s man pages.
The complete recommended procedure for advanced installation is outlined in the
following table:
© Copyright IBM Corp. 2003, 2008 13

Table 14. Steps for advanced installation: new or upgrade installation
Task For more information, see . . .
Become either the root user or a user with
administrator privileges.
Documentation supplied with the
operating system.
Ensure that all system prerequisites are satisfied. “System prerequisites” on page 6
If you do not need to maintain multiple versions
of the product on your system, remove any
existing versions of XL C/C++ for AIX.
Chapter 6, “Uninstalling XL C/C++,”
on page 31
Use the non-default installation script to install
the compiler.
“Non-default installation procedure”
Confirm that the compiler packages were
successfully installed, and test the installation.
“Checking compiler and fileset
information” on page 23, “Testing the
installation” on page 28
Enable the compiler man pages. “Enabling the manual pages” on page
25
If your system locale and/or encoding are not
en_US, enable the compiler error messages.
Otherwise, you can skip this step.
“Enabling the XL C/C++ error
messages” on page 25
Non-default installation procedure
To install XL C/C++ to a non-default location, first use installp to install the
vacpp.ndi fileset, then use the vacppndi Perl script included in that fileset to install
the compiler.
Follow these steps to install XL C/C++ to an alternate location:
1. First use the installp command to install the vacpp.ndi fileset. Run the
command:
installp -aYgd install_images_location -e logfile vacpp.ndi
�� - installp -aYg vacpp.ndi
-p
-X
-d
install_images_location
-e
logfile ��
-aYg
Specifies that all the latest installable filesets available in the
install_images_location directory are applied and that the required software
license agreement is accepted.
-d install_images_location
Specifies the directory where the filesets are located. This path may also be
a mounted CD-ROM drive.
-e logfile
Specifies the name and location of the installation log file. By default, the
installation log file vacppndi.log will be stored in your working directory.
-p
Performs a preview of the installation process by running the
preinstallation checks. See “Previewing the installation and license
agreements” on page 7.
-X
Attempts to expand the file system at the default location if there is
insufficient space to complete the install.
14 XL C/C++: Installation Guide

Example:
installp -aYgd /cdrom/usr/sys/inst.images -e /tmp/install.log vacpp.ndi
Note: This command automatically installs and accepts the license agreement
fileset, vacpp.licAgreement, required to install vacpp.ndi.
2. Install any available updates to the vacpp.ndi fileset. You can download the
latest compiler updates from the support web site: http://www.ibm.com/software/awdtools/xlcpp/support
To check the version number of the vacpp.ndi fileset currently installed on your
system, use the following command:
lslpp -l vacpp.ndi
To install a new version of the vacpp.ndi fileset, use the following command:
installp -aYgd ptf_images_location -e logfile vacpp.ndi
3. Install XL C/C++ by entering the following command:
�� perl /usr/vacpp/bin/vacppndi -d source_path
-e
logfile �
� -b
target_dir
-rte
-eval
-version ��
perl /usr/vacpp/bin/vacppndi -d source_path [-e logfile] [-b target_dir] [-rte] [-eval]
[-version]
where:
-d source_path
Specifies the directory where the filesets are located. This path may also be
a mounted CD-ROM drive.
-e logfile
Specifies the name and location of the installation log file. By default, the
installation log file vacppndi.log will be stored in your working directory.
-b target_dir
Specifies the location where the filesets should be copied and expanded. By
default, the files will be copied to the vacppndi directory in your working
directory. If the directory exists already, you will receive an error message
and the installation will stop.
-rte
Specifies that only the runtime component is installed.
-eval
Specifies that the installation is for the evaluation version of XL C/C++.
-version
Displays the version of the non-default installation tool.The following example uses the vacppndi Perl script to install all available
compiler filesets in the /cdrom/usr/sys/inst.images source directory to the
non-default location, /compiler/xlcpp/ and writes the installation log file to
/tmp/xlcpp.ndi.inst.log.
Example:
perl /usr/vacpp/bin/vacppndi -d /cdrom/usr/sys/inst.images -b /compiler/xlcpp/
-e /tmp/xlcpp.ndi.inst.log
Chapter 3. Advanced installation 15
Installing on an i5/OS PASE system
Users installing XL C/C++ on an i5/OS PASE system must use the non-default
installation method since the AIX SMIT and installp utilities are not supported.
If, during installation, the vacppndi script determines that you are installing the
compiler onto a PASE system, it will modify the XL C/C++ configuration file’s
name and one of its variables, oslevel, to match the version of PASE you are
running. For example, if the compiler were installed on a system running i5/OS
PASE V6R1, vac.cfg.53 would be renamed vac.cfg.61 and the value of oslevel
would be changed from 5.3 to 6.1.
For more information about the steps required to install XL C/C++ on a PASE
system, search the IBM System i™ information center for keywords ’Install AIX
compilers’.
Running XL C/C++ from a non-default location
The compiler invocation commands are installed to /target_dir/usr/vacpp/bin/,
where target_dir is the location of the compiler as set by the -b flag during the
non-default installation.
For example, if you installed XL C/C++ to the /compiler/xlcpp directory, you can
run the compiler using:
/compiler/xlcpp/usr/vacpp/bin/xlC -o hello_C hello.C
Alternatively, you can create a shortcut to the compiler invocations, as described in
“Creating shortcuts to the XL C/C++ invocation commands” on page 26.
16 XL C/C++: Installation Guide
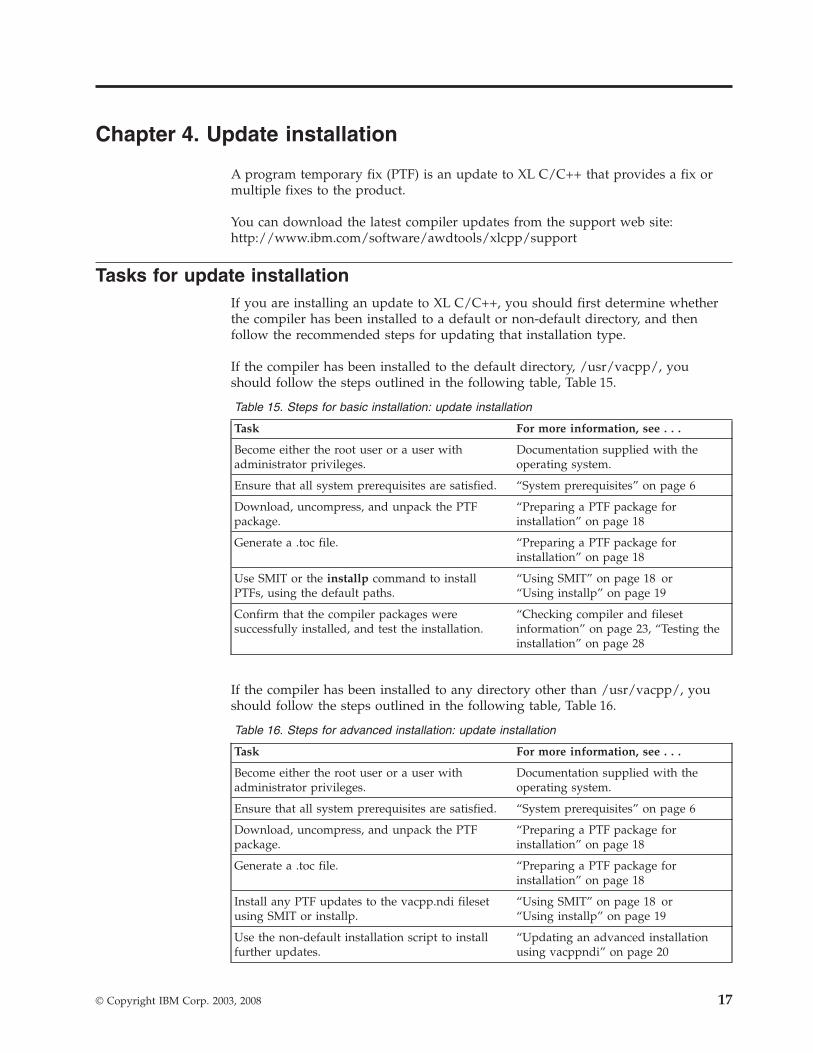
Chapter 4. Update installation
A program temporary fix (PTF) is an update to XL C/C++ that provides a fix or
multiple fixes to the product.
You can download the latest compiler updates from the support web site:
http://www.ibm.com/software/awdtools/xlcpp/support
Tasks for update installation
If you are installing an update to XL C/C++, you should first determine whether
the compiler has been installed to a default or non-default directory, and then
follow the recommended steps for updating that installation type.
If the compiler has been installed to the default directory, /usr/vacpp/, you
should follow the steps outlined in the following table, Table 15.
Table 15. Steps for basic installation: update installation
Task For more information, see . . .
Become either the root user or a user with
administrator privileges.
Documentation supplied with the
operating system.
Ensure that all system prerequisites are satisfied. “System prerequisites” on page 6
Download, uncompress, and unpack the PTF
package.
“Preparing a PTF package for
installation” on page 18
Generate a .toc file. “Preparing a PTF package for
installation” on page 18
Use SMIT or the installp command to install
PTFs, using the default paths.
“Using SMIT” on page 18 or
“Using installp” on page 19
Confirm that the compiler packages were
successfully installed, and test the installation.
“Checking compiler and fileset
information” on page 23, “Testing the
installation” on page 28
If the compiler has been installed to any directory other than /usr/vacpp/, you
should follow the steps outlined in the following table, Table 16.
Table 16. Steps for advanced installation: update installation
Task For more information, see . . .
Become either the root user or a user with
administrator privileges.
Documentation supplied with the
operating system.
Ensure that all system prerequisites are satisfied. “System prerequisites” on page 6
Download, uncompress, and unpack the PTF
package.
“Preparing a PTF package for
installation” on page 18
Generate a .toc file. “Preparing a PTF package for
installation” on page 18
Install any PTF updates to the vacpp.ndi fileset
using SMIT or installp.
“Using SMIT” on page 18 or
“Using installp” on page 19
Use the non-default installation script to install
further updates.
“Updating an advanced installation
using vacppndi” on page 20
© Copyright IBM Corp. 2003, 2008 17

Table 16. Steps for advanced installation: update installation (continued)
Task For more information, see . . .
Confirm that the compiler packages were
successfully installed, and test the installation.
“Checking compiler and fileset
information” on page 23, “Testing the
installation” on page 28
Preparing a PTF package for installation
Updates to the compiler are supplied as PTF packages. Before these PTF packages
can be used to update the compiler, they must be downloaded and uncompressed,
and a .toc file must be generated.
Use the following instructions to prepare the update package for installation:
Note: You must be logged in as root or have superuser authority.
1. Download the desired PTF package (for example
vacpp.101.aix.mthyear.ptf.tar.Z) into an empty directory.
2. Restore the compressed file and extract the PTF filesets from the downloaded
package:
a. To uncompress the file, use the command
uncompress package_name.tar.Z
b. To unpack the resulting tar file, use the command
tar -xvf package_name.tar
3. Use the command inutoc directory_name to generate a .toc file in the same
directory as the unpacked filesets.
The following example shows the steps to prepare the package,
vacpp.101.aix.mthyear.ptf.tar.Z, located in the new directory,
/compiler/update/ for installation.
cd /compiler/update
uncompress -f vacpp.101.aix.mthyear.ptf.tar.Z
tar -xvf vacpp.101.aix.mthyear.ptf.tar
inutoc .
Updating a basic installation
If you used a basic installation process to install XL C/C++ to a default location, it
is recommended that you use SMIT or the installp command to install PTFs.
Using SMIT
To install a PTF using the SMIT interface, follow these steps:
1. Run the command: smit install_all. This command invokes the SMIT, which
presents a menu-driven user interface for the installation process.
2. When asked to, specify the INPUT device/directory of the software, enter the
path of the directory where the PTF filesets and .toc are located.
3. Press Enter.
At this stage, you are prompted with a list of questions that will help you
customize the compiler installation on your system. Verify the default values,
or modify them where necessary, to accommodate your preferences.
18 XL C/C++: Installation Guide

Note: You must select yes next to Accept new LICENSE agreements? to continue
with the installation.
4. Press Enter and then Enter again.
Messages are displayed as each part is successfully installed, and the
installation log is stored to /home/smit.log.
Note: PTF packages often ship base level filesets as prerequisites. If the command
smit update_all is used, then those packages will not install, which may cause
requisite failures. For this reason we recommend that you use smit install_all,
which will install the prerequisites and commit the updates.
Using installp
To install a PTF by using the installp command and write the output to a log file,
follow these steps:
Run the command:
�� - installp -aYg fileset_names
-p
-X
-d
PTF_filesets_location
-e
logfile ��
installp -aXYgd PTF_filesets_location -e logfile fileset_names
-aYg
Specifies that all the latest installable filesets available in the
PTF_filesets_location directory are applied and that the required software license
agreement is accepted.
-p
Performs a preview of the installation process by running the preinstallation
checks. See “Previewing the installation and license agreements” on page 7.
-X
Attempts to expand the file system at the default location if there is insufficient
space to complete the install.
-d PTF_filesets_location
Specifies the directory where the filesets are located. This path may also be a
mounted CD-ROM drive.
-e logfile
Specifies the name and location of the installation log file.
fileset_names
Specifies a list of names of the filesets in PTF_filesets_location that you want to
install.
Note: The keyword all can be used to indicate that all filesets should be
attempted during installation.
The following example installs all available PTF filesets in the /compiler/update/
source directory to the default locations, as specified in “Filesets” on page 1, and
writes an installation log file to /tmp/install.log.
Example:
installp -aXYgd /compiler/update/ -e /tmp/install.log all
Chapter 4. Update installation 19

Updating an advanced installation using vacppndi
If the XL C/C++ compiler has been installed to a non-default directory, you should
use vacppndi to install PTFs.
To update a non-default installation, do the following:
1. Begin by installing the vacpp.ndi fileset included in the PTF. This fileset must
be installed first, so that the vacppndi script inside it can be used to correctly
install the remaining filesets.
To determine the version number of the vacpp.ndi fileset currently installed on
your system, run the command:
lslpp -l vacpp.ndi
To install a new version of the vacpp.ndi fileset, run the command:
installp -aYgd ptf_images_location -e logfile vacpp.ndi
2. Create a text file listing the PTF filesets you want to install. This text file should
contain the name of a single PTF file on each line. You can use the ls command
to do this: ls source_path > ptf_names_file.
Example:
ls /compiler/update/ > /compiler/update/ptflist
3. Use the perl command to run the vacppndi script:
�� perl /usr/vacpp/bin/vacppndi -d source_path -u ptf_names_file �
� -e
logfile
-b
target_dir
-rte
-version ��
perl /usr/vacpp/bin/vacppndi -d source_path -u ptf_names_file [-e logfile]
-b [target_dir]
where:
-d source_path
Specifies the directory where the filesets are located. This path may also be
a mounted CD-ROM drive.
-u ptf_names_file
Specifies the text file containing the names of PTF filesets you want to
install.
-e logfile
Specifies the name and location of the installation log file. By default, the
installation log file vacppndi.log will be stored in your working directory.
-b target_dir
Specifies the location where the filesets should be copied and expanded. By
default, the files will be copied to the vacppndi directory in your working
directory. If the directory exists already, you will receive an error message
and the installation will stop.
-rte
Specifies that only the runtime component is installed.
-version
Displays the version of the non-default installation tool.
20 XL C/C++: Installation Guide

The following example uses the vacppndi Perl script to install all available PTF
filesets in the /compiler/update/ source directory to the non-default location,
/compiler/xlcpp/ and writes the installation log file to /tmp/xlcpp.ndi.inst.log.
Example:
perl /usr/vacpp/bin/vacppndi -d /compiler/update/ -u /compiler/update/ptflist
-b /compiler/xlcpp/ -e /tmp/xlcpp.ndi.inst.log
Product version migration
If you have a previous version of the compiler, you can replace it with the current
version. You can also maintain mutiple versions of the compiler on your system.
Before installing IBM XL C/C++ for AIX, V10.1, any previously installed versions
of the compiler should be uninstalled. If you intend to maintain multiple versions
of XL C/C++ on your system, refer to Chapter 3, “Advanced installation,” on page
13, otherwise see Chapter 6, “Uninstalling XL C/C++,” on page 31.
If you are upgrading to XL C/C++ VV10.1 using a basic installation, any previous
versions of the filesets already installed on your system are automatically detected
and migrated to the current version.
Once IBM XL C/C++ for AIX, V10.1 is installed, older compiler versions cannot be
installed unless VV10.1 is uninstalled first.
Operating system migration
If you have the compiler installed on AIX 5.3, you may want to migrate the
operating system to AIX 6.1.
The compiler filesets are not OS specific and do not require migration if XL C/C++
VV10.1 is installed on AIX 5.3 and the operating system is migrated to AIX 6.1 or
higher. If an OS specific fileset is required in the future for a higher level of AIX, it
will be identified in a Tech Note tied to the PTF that will add support for that
version of AIX.
Note: When an AIX 5.3 machine is migrated to AIX 6.1, the AIX 5.x C++ runtime
fileset (xlC.aix50.rte) is uninstalled, and the AIX 6.1 C++ runtime fileset
(xlC.aix61.rte) is installed from the AIX 6.1 install image. The service level of the
AIX 6.1 C++ runtime on the install image may be different from the service level of
the AIX 5.x C++ runtime on your machine prior to migration. This means that after
an OS migration, any PTFs applied to the C++ runtime before OS migration will be
gone, and will have to be re-installed.
Chapter 4. Update installation 21

22 XL C/C++: Installation Guide

Chapter 5. After installing XL C/C++
There are some optional setup and verification procedures that you can use after
you have installed the compiler. You may also want to use the product
documentation.
These are documented in the following sections:
v “Checking compiler and fileset information”
v “Enabling IBM Tivoli License Compliance Manager (ITLCM)” on page 24
v “Setting environment variables” on page 24
v “Enabling the XL C/C++ error messages” on page 25
v “Enabling the manual pages” on page 25
v “Accessing the local documentation” on page 27
v “Testing the installation” on page 28
Checking compiler and fileset information
You can check the versions of the compiler and individual filesets installed by
using the lslpp command, the -qversion compiler option, or by viewing the
.vrmf_history file.
Using lslpp
You can view information on the installed filesets by using the lslpp command:
lslpp option_string
where option_string can be:
-L fileset
Displays the version and state of the fileset specified
-f fileset
Displays the files and symbolic links associated with the fileset specified
-w filename
Indicates which fileset the specified file (filename) belongs to
Note: lslpp does not detect filesets that were not installed using the SMIT or
installp methods.
Using -qversion
To get more details on the version, release, and PTF levels of the compiler, you can
use the -qversion compiler option. For more information, refer to the XL C/C++
Compiler Reference.
Viewing the .vrmf_history file
If you installed XL C/C++ to a non-default location, you can view the version
information for each fileset installed by viewing the .vrmf_history text file which
is installed in the compiler’s main directory.
© Copyright IBM Corp. 2003, 2008 23
Note: This file should not be edited as it may result in unexpected behaviour of
the vacppndi script.
Enabling IBM Tivoli License Compliance Manager (ITLCM)
IBM Tivoli® License Compliance Manager (ITLCM) is a Web-based solution that
can help you manage software usage metering and license allocation services on
supported systems. In general, ITLCM recognizes and monitors the products that
are installed and in use on your system.
IBM XL C/C++ for AIX, V10.1 is ITLCM-enabled for inventory support only, which
means that ITLCM is able to detect product installation of XL C/C++, but not its
usage.
Note: ITLCM is not a part of the XL C/C++ compiler offering, and must be
purchased and installed separately.
Once installed and activated, ITLCM scans your system for product inventory
signatures that indicate whether a given product is installed on your system.
ITLCM also identifies the version, release, and modification levels of the product.
Inventory signature files are not updated after PTF installation.
If XL C/C++ is installed in the default location, the signature files are in the
/usr/vac/ directory. Otherwise, if XL C/C++ is installed in a non-default location,
the signature files are in the /target_dir/usr/vac/ directory, where target_dir is the
target directory for installation specified by the -b option of the non-default
installation script. For more information about IBM Tivoli License Compliance
Manager Web, see: http://www.ibm.com/software/tivoli/products/license-mgr/.
Configuring compiler defaults
You can change many of the compiler’s default settings by altering the compiler
configuration file or the GCC options configuration file.
If you installed XL C/C++ onto a system running AIX 5.3, the configuration file is
/etc/vac.cfg.53, and if you installed the compiler onto a system running AIX 6.1,
the configuration file is /etc/vac.cfg.61. The GCC options configuration file is
/etc/gxlc.cfg.
For more information on how to change the XL C/C++ compiler’s settings, see
″Customizing the configuration file″ and ″Configuring the gxlc or gxlc++ option
mapping ″ in the XL C/C++ Compiler Reference.
Setting environment variables
Before using the compiler, verify that the environment variables LANG,
MANPATH, NLSPATH, and PATH are set.
You can use the echo command to determine the current setting of these variables:
echo "\n $LANG \n\n $NLSPATH \n\n $MANPATH \n\n $PATH"
24 XL C/C++: Installation Guide

LANG Specifies the national language for message and help files. See
“National language support” on page 6.
The LANG environment variable can be set to any of the locales
provided on the system. See the description of locales in AIX
General Programming Concepts for more information.
The national language code for United States English is en_US. If
the appropriate message catalogs have been installed on your
system, any other valid national language code can be
substituted for en_US.
MANPATH Optionally specifies the directory search path for finding man
pages. MANPATH must contain /usr/vacpp/man/LANG before the
default man path.
NLSPATH Specifies the path name of the message and help files.
PATH Specifies the directory search path for the executable files of the
compiler.
Note: The LANG and NLSPATH environment variables are initialized when the
operating system is installed, and might differ from the ones you want to use.
Enabling the XL C/C++ error messages
If your system uses the en_US locale and encoding, the compiler message catalogs
are automatically configured to display correctly, whether you used the basic or
advanced method of installation and configuration. However, if your system uses
any other supported locale, you must set the NLSPATH environment variable so
that the compiler and runtime functions can find the appropriate message catalogs
following installation.
For example, to specify the Japanese locale with the IBM_eucJP code page, use the
following commands:
LANG=ja_JP
NLSPATH=/usr/lib/nls/msg/%L/%N:/usr/lib/nls/msg/prime/%N
export LANG NLSPATH
Substitute any valid national language code for ja_JP, provided the associated
message catalogs are installed.
See “National language support” on page 6 for a list of supported language
locales.
Enabling the manual pages
Manual pages are provided for the compiler invocation commands and other
compiler utilities.
Before you can view the manual pages, you must add the manual page directory
to the MANPATH environment variable by entering the following on the
command line:
export MANPATH=$MANPATH:/usr/vacpp/man/LANG
where LANG may be any one of:
Chapter 5. After installing XL C/C++ 25
v en_US
v EN_US
v ja_JP
v JA_JP
v Ja_JP
v zh_CN
v ZH_CN
v Zh_CN
For example, to set the language of the manual pages to English, run the
commands:
MANPATH=$MANPATH:/usr/vacpp/man/en_US
export MANPATH
Alternatively, to set the language of the manual pages to one of the other
supported languages, run the command:
MANPATH=$MANPATH:/usr/vacpp/man/$LANG
export MANPATH
where $LANG is set to any of the language locales listed above.
To test whether the manual pages have been successfully installed, open one or
more of the manual pages, as described in “Viewing the manual pages” on page
28.
Creating shortcuts to the XL C/C++ invocation commands
The compiler invocation commands are not automatically installed in /usr/bin/.
To invoke the compiler without having to specify the full path, create a shortcut to
the invocation commands.
To create a shortcut to the XL C/C++ invocation commands, do one of the
following:
Either
v Create symbolic links for the specific drivers from /usr/vac/bin/ and
/usr/vacpp/bin/ to /usr/bin/.
Example:
ln -s /usr/vacpp/bin/xlc /usr/bin/xlc
or
v Add /usr/vac/bin/ and /usr/vacpp/bin/ to your PATH environment variable.
Example:
PATH=$PATH:/usr/vacpp/bin/
export PATH
Note: If XL C/C++ resides in a non-default location, the invocation commands are
installed to /target_dir/usr/vacpp/bin where target_dir is the target directory for
installation specified by the -b option of the non-default installation script. You can
create a shortcut to the invocation commands of a non-default installation by
adding the location of the compiler invocations, target_dir/usr/vacpp/bin/, to the
PATH environment variable.
26 XL C/C++: Installation Guide
For example, if you installed XL C/C++ to the /compiler/xlcpp directory, you
would run the commands:
PATH=$PATH:/compiler/xlcpp/usr/vacpp/bin/
export PATH
Accessing the local documentation
Help using IBM XL C/C++ for AIX, V10.1 is available in both HTML and PDF
formats. Manual pages for the compiler invocation commands and other command
utilities are also included.
Viewing the HTML documentation
XL C/C++ includes a fully searchable HTML-based information center.
The information center can be accessed from the machine on which the compiler is
installed or from any other computer on the network.
Note: You must have root access to launch and shut down the Eclipse server
(information center).
Follow these steps to access the help system:
1. Run the command:
/usr/xlhelp/bin/xlhelp
to launch the Eclipse server. (It may take a few minutes to load completely)
2. You can view the information center either locally or remotely:
v To view locally, run:
/usr/vacpp/bin/xlc++help
You need to have a web browser, such as Mozilla, installed on your machine
to run this command. Otherwise, you can manually go to the following URL
in any web browser:
http://localhost:1012/help/index.jsp
v To view remotely, open the following URL in your web browser:
http://machine_name:1012/help/index.jsp
where machine_name is the name of the computer on which the Eclipse server
was launched.3. To shut down the Eclipse server, run the command:
/usr/xlhelp/bin/xlhelp_end
Note that the IBM Debugger for AIX, V6.1 documentation consists of HTML online
help and additional HTML documentation accessible from the graphical user
interface.
Viewing the PDF documentation
PDF versions of the XL C/C++ product manuals are available in the
/doc/LANG/pdf/ directory of the installation media (either product CD or
electronic package).
After default installation, the PDF documentation can be found in the
/usr/vacpp/doc/LANG/pdf/ directory. For non-default installations, the PDF
Chapter 5. After installing XL C/C++ 27

documentation is located in the /target_dir/usr/vacpp/doc/LANG/pdf/ directory,
where target_dir is the target directory for installation specified by the -b option of
the non-default installation script.
LANG can be en_US, ja_JP or zh_CN.
See “Related information” on page ix for a list of IBM XL C/C++ publications and
descriptions of the PDF files available with the product.
Viewing the manual pages
Man pages are included for all compiler invocation commands and utilities.
For instructions on how to enable the man pages for viewing, see “Enabling the
manual pages” on page 25.
To invoke a manual page, run the command:
man command
where command is any XL C/C++ invocation or utility command.
Example:
man xlc
Testing the installation
To test the product installation and the critical search paths, try building,
compiling, and running a couple of simple programs.
For example:
1. Create the following C and C++ programs:
[hello.c]
#include <stdio.h>
int main(void)
{
printf("Hello World!\n");
return 0;
}
[hello.cpp]
#include <iostream>
int main()
{
std::cout << "Hello World!\n" << std::endl;
return 0;
}
2. Compile the test programs. For example:
xlc hello.c -o hello
xlc++ hello.cpp -o hello
Note: To use shortcuts to the compiler invocation commands, see: “Creating
shortcuts to the XL C/C++ invocation commands” on page 26. Otherwise,
include the full path to the commands to compile the program.
3. Run the program:
./hello
The expected result is that ″Hello World!″ is displayed on the screen.
4. Check the exit code of the program:
28 XL C/C++: Installation Guide
echo $?
The result should be zero.
Chapter 5. After installing XL C/C++ 29

30 XL C/C++: Installation Guide
Chapter 6. Uninstalling XL C/C++
This section outlines the steps required to uninstall both basic and advanced
installations of XL C/C++.
Note:
1. You must have root user access to uninstall XL C/C++.
2. Some filesets may not be uninstalled if they are required by other installed
products. See “Filesets” on page 1 for details about filesets included with IBM
XL C/C++ for AIX, V10.1.
3. Because automatically uninstalling dependent packages may introduce
problems, it is recommended that you preview uninstallation to ensure that all
dependent filesets are no longer required.
Uninstalling a basic installation
To uninstall the compiler from the default location, you can use either SMIT or
installp to remove the compiler filesets.
If you attempt to remove a fileset that is required by another installed fileset, the
selected fileset will not be removed unless its dependents are also being removed.
Using SMIT
The following steps illustrate how to uninstall IBM XL C/C++ for AIX, V10.1 using
the SMIT interface:
v Run the command:
smit remove
v In the SOFTWARE name field, enter the fileset names (wildcards accepted)
separated by a space. If you have XL Fortran installed in its default location, you
must not remove any filesets which are shared between the compilers. In this
case, enter the following in the field:
vac.* vacpp.*
Otherwise, enter the following in the field:
vac.* vacpp.* memdbg.* xlhelp.* xlmass.* xlsmp.*
In the REMOVE dependent software? field, select yes.
Note: To preview the uninstallation, set the PREVIEW only? value to yes.
Using installp
To uninstall IBM XL C/C++ for AIX, V10.1 using the installp command, enter the
following on the command line:
installp -ugw filesets
where filesets is the list of filesets (wildcards accepted) to uninstall.
If you have XL Fortran installed in its default location, you must not remove any
filesets which are shared between the compilers. In this case, filesets should be:
© Copyright IBM Corp. 2003, 2008 31

vac.* vacpp.*
Otherwise, filesets should be:
vac.* vacpp.* memdbg.* xlhelp.* xlmass.* xlsmp.*
Uninstalling an advanced installation
If the compiler is installed to a non-default location, you will have to remove the
filesets yourself.
To uninstall the XL C/C++ compiler installed to a non-default location, simply
delete the compiler directory.
To determine which version of each fileset is installed, refer to “Checking compiler
and fileset information” on page 23.
To delete the compiler directory, enter the following on the command line:
rm -rf target_dir
where target_dir is the target directory for installation specified by the -b option of
the non-default installation script.
Uninstalling versions of the MASS components downloaded from the
Web
If you previously installed the MASS libraries on the system on which you are
installing the IBM XL C/C++ for AIX, V10.1, it is recommended that you uninstall
the libraries by removing the directory in which they were installed.
To remove the MASS directory, type:
rm -rf mass_directory
where mass_directory is the location of the MASS libraries (/usr/lpp/mass/ by
default). If you created symbolic links in the /usr/lib/ directory to the libraries in
the MASS directory, you should delete them as well. The compiler installation
automatically handles the creation of the necessary symbolic links.
Uninstalling the electronic license agreement
The license agreement text file remains on the system after the license fileset has
been uninstalled. This is so you do not have to accept the product license again if
you reinstall XL C/C++.
To remove the license agreement text file, run the commands:
ODMDIR=/usr/lib/objrepos; odmdelete -o lag -q "fileset=vacpp.licAgreement"
rm -rf /usr/swlag/vacpp/101
32 XL C/C++: Installation Guide
Notices
This information was developed for products and services offered in the U.S.A.
IBM may not offer the products, services, or features discussed in this document in
other countries. Consult your local IBM representative for information on the
products and services currently available in your area. Any reference to an IBM
product, program, or service is not intended to state or imply that only that IBM
product, program, or service may be used. Any functionally equivalent product,
program, or service that does not infringe any IBM intellectual property right may
be used instead. However, it is the user’s responsibility to evaluate and verify the
operation of any non-IBM product, program, or service.
IBM may have patents or pending patent applications covering subject matter
described in this document. The furnishing of this document does not give you
any license to these patents. You can send license inquiries, in writing, to:
IBM Director of Licensing
IBM Corporation
North Castle Drive
Armonk, NY 10504-1785
U.S.A.
For license inquiries regarding double-byte (DBCS) information, contact the IBM
Intellectual Property Department in your country or send inquiries, in writing, to:
IBM World Trade Asia Corporation
Licensing
2-31 Roppongi 3-chome, Minato-ku
Tokyo 106, Japan
The following paragraph does not apply to the United Kingdom or any other
country where such provisions are inconsistent with local law:
INTERNATIONAL BUSINESS MACHINES CORPORATION PROVIDES THIS
PUBLICATION ″AS IS″ WITHOUT WARRANTY OF ANY KIND, EITHER
EXPRESS OR IMPLIED, INCLUDING, BUT NOT LIMITED TO, THE IMPLIED
WARRANTIES OF NON-INFRINGEMENT, MERCHANTABILITY OR FITNESS
FOR A PARTICULAR PURPOSE. Some states do not allow disclaimer of express or
implied warranties in certain transactions, therefore, this statement may not apply
to you.
This information could include technical inaccuracies or typographical errors.
Changes are periodically made to the information herein; these changes will be
incorporated in new editions of the publication. IBM may make improvements
and/or changes in the product(s) and/or the program(s) described in this
publication at any time without notice.
Any references in this information to non-IBM Web sites are provided for
convenience only and do not in any manner serve as an endorsement of those Web
sites. The materials at those Web sites are not part of the materials for this IBM
product and use of those Web sites is at your own risk.
IBM may use or distribute any of the information you supply in any way it
believes appropriate without incurring any obligation to you.
© Copyright IBM Corp. 2003, 2008 33

Licensees of this program who wish to have information about it for the purpose
of enabling: (i) the exchange of information between independently created
programs and other programs (including this one) and (ii) the mutual use of the
information which has been exchanged, should contact:
Lab Director
IBM Canada Ltd. Laboratory
8200 Warden Avenue
Markham, Ontario L6G 1C7
Canada
Such information may be available, subject to appropriate terms and conditions,
including in some cases, payment of a fee.
The licensed program described in this document and all licensed material
available for it are provided by IBM under terms of the IBM Customer Agreement,
IBM International Program License Agreement or any equivalent agreement
between us.
Any performance data contained herein was determined in a controlled
environment. Therefore, the results obtained in other operating environments may
vary significantly. Some measurements may have been made on development-level
systems and there is no guarantee that these measurements will be the same on
generally available systems. Furthermore, some measurements may have been
estimated through extrapolation. Actual results may vary. Users of this document
should verify the applicable data for their specific environment.
Information concerning non-IBM products was obtained from the suppliers of
those products, their published announcements or other publicly available sources.
IBM has not tested those products and cannot confirm the accuracy of
performance, compatibility or any other claims related to non-IBM products.
Questions on the capabilities of non-IBM products should be addressed to the
suppliers of those products.
All statements regarding IBM’s future direction or intent are subject to change or
withdrawal without notice, and represent goals and objectives only.
This information contains examples of data and reports used in daily business
operations. To illustrate them as completely as possible, the examples include the
names of individuals, companies, brands, and products. All of these names are
fictitious and any similarity to the names and addresses used by an actual business
enterprise is entirely coincidental.
COPYRIGHT LICENSE:
This information contains sample application programs in source language, which
illustrates programming techniques on various operating platforms. You may copy,
modify, and distribute these sample programs in any form without payment to
IBM, for the purposes of developing, using, marketing or distributing application
programs conforming to the application programming interface for the operating
platform for which the sample programs are written. These examples have not
been thoroughly tested under all conditions. IBM, therefore, cannot guarantee or
imply reliability, serviceability, or function of these programs. You may copy,
modify, and distribute these sample programs in any form without payment to
IBM for the purposes of developing, using, marketing, or distributing application
programs conforming to IBM’s application programming interfaces.
34 XL C/C++: Installation Guide

Each copy or any portion of these sample programs or any derivative work, must
include a copyright notice as follows:
© (your company name) (year). Portions of this code are derived from IBM Corp.
Sample Programs. © Copyright IBM Corp. 1998, 2008. All rights reserved.
Trademarks and service marks
IBM, the IBM logo, and ibm.com are trademarks or registered trademarks of
International Business Machines Corporation in the United States, other countries,
or both. These and other IBM trademarked terms are marked on their first
occurrence in this information with the appropriate symbol (® or
™), indicating US
registered or common law trademarks owned by IBM at the time this information
was published. Such trademarks may also be registered or common law
trademarks in other countries. A complete and current list of IBM trademarks is
available on the Web at http://www.ibm.com/legal/copytrade.shtml.
Adobe, the Adobe logo, PostScript, and the PostScript logo are either registered
trademarks or trademarks of Adobe Systems Incorporated in the United States,
and/or other countries.
Linux is a registered trademark of Linus Torvalds in the United States, other
countries, or both.
Microsoft and Windows are trademarks of Microsoft Corporation in the United
States, other countries, or both.
Cell Broadband Engine is a trademark of Sony Computer Entertainment, Inc. in the
United States, other countries, or both and is used under license therefrom.
UNIX is a registered trademark of The Open Group in the United States and other
countries.
Other company, product, or service names may be trademarks or service marks of
others.
Notices 35

36 XL C/C++: Installation Guide

Index
Special charactersinstallp
compiler installation 11
compiler uninstallation 31
preview installation 8
update installation 19
lslpp 7, 23
Aadvanced installation 13
compiler invocation commands 16
instructions 13
limitations 13
overview 13
procedure 14
testing 28
uninstallation 32
update 20
advanced user, described v
Bbasic example, described ix
basic installationinstructions 9
overview 9
testing 28
uninstallation 31
update 18
basic user, described v
Ccompiler defaults, configuring 24
configuration file 24
Ddebugger 5
default installation 9
documentation 27
HTML 27
man pages 28
PDF 27
Eelectronic distribution package 5
environment variables, setting 24
error messages, enabling 25
Ffilesets
checking 23
included in installation image 1
required 7
Hhard disk space available
determining 6
required 6
help files 27
Iinstallation CD 1
installation image 1
invocation commandsadvanced installation 16
creating shortcuts 26
ITLCM 24
Llanguages
environment variables 24
locale-specific filesets 7
man pages 25
supported 6
license agreementpreviewing 7
uninstallation 32
License Compliance Manager, IBM
Tivoli 24
locales, supported 6
Mman pages 25
enabling 25
viewing 28
migration 21
operating system 21
product version 21
Nnational language support 6
non-default installation 13
Ooperating system
migration 21
required 6
PPASE 16
post-installation 23
pre-installation 1
prerequisites 6
previewing 7
installation 7
license agreements 7
product versionmigration 21
PTF 17
SSMIT
compiler installation 10
compiler uninstallation 31
preview installation 8
update installation 18
Ttesting the installation 28
Uuninstallation 31
advanced 32
basic 31
electronic license agreement 32
MASS libraries 32
update installation 17
advanced 20
basic 18
overview 17
preparing 18
© Copyright IBM Corp. 2003, 2008 37

38 XL C/C++: Installation Guide


����
Program Number: 5724-U81
Printed in USA
GC23-8889-00