xcm user guide version 10 - xcm solutions€¦ · 8.10 add/delete task jurisdictions/deliverables...
TRANSCRIPT

XCM User Guide June 2013 Version 10.0

XCM Solutions XCM User Guide
Page 2
TABLE OF CONTENTS What is XCM? ............................................................................................................................ 5 1.0 My View Tab Header and Status Bars ............................................................................ 6
1.1 Tasks Assigned To Me And Extensions Assigned To Me .......................................... 7 1.2 Other Views And Status Bars .................................................................................... 8
2.0 Task TabTask Information Dropdown Menu ............................................................... 10 2.1 Task Tab ................................................................................................................. 11
3.0 Direct Task Page Link For Manage Clients ................................................................. 16 3.1 Print Routing Information ......................................................................................... 17 3.2 Move Task ............................................................................................................... 18 3.3 Creating And Moving Extension Tasks .................................................................... 18 3.4 Issues/Points ........................................................................................................... 20 3.4.1 Issues/Points Create Email....................................................................................................... 23 3.4.2 Adding Issues/Points in Bulk .................................................................................................... 24 3.4.3 Carry Over Selections for Issues/Points ................................................................................... 25 3.4.4 Current Period End ................................................................................................................... 26 3.4.5 Next Period End ........................................................................................................................ 26 3.4.6 Current & Next Period End ....................................................................................................... 26 3.4.7 Permanent ................................................................................................................................ 26 3.5 CheckLists ............................................................................................................... 27
4.0 Task Information Dropdown Menu ............................................................................... 30 4.1 Jurisdictions............................................................................................................. 31 4.2 Jurisdictions/Deliverables – Multiple Tasks, Same Task Type ................................. 33 4.3 Jurisdictions/Deliverables – Multiple Tasks, Different Task Types ........................... 34
5.0 Task Information ........................................................................................................... 35 5.1 Firm Specific Jurisdictions ....................................................................................... 35 5.2 Task Specific Jurisdictions ....................................................................................... 35 5.3 Recurring Tasks ...................................................................................................... 38 5.4 Extensions ............................................................................................................... 38 5.4.1 Create An Extension ................................................................................................................. 38 5.4.2 Close EXT Task Button ............................................................................................................ 41 5.4.3 Primary Task Staffing Popup Screen ....................................................................................... 42 5.4.4 Extension Detail Button ............................................................................................................ 43 5.4.5 History Page ............................................................................................................................. 44 5.4.6 Issues/Points Hyperlink ............................................................................................................ 45 5.5 Assembly ................................................................................................................. 46 5.6 Shipping .................................................................................................................. 48 5.6.1 Shipping Page Details Section ................................................................................................. 49 5.7 Rollover ................................................................................................................... 51 5.8 Details ..................................................................................................................... 52 5.9 eFile ........................................................................................................................ 53 5.9.1 eFile – Multiple Tasks, Same eFile Status ............................................................................... 55 5.10 SignOffs .................................................................................................................. 55 5.10.1 SignOff Fields Defined .............................................................................................................. 57 5.10.2 SignOff Dropdown List .............................................................................................................. 58 5.10.3 SignOff Comments ................................................................................................................... 58 5.10.4 SignOff By Category ................................................................................................................. 58

XCM Solutions XCM User Guide
Page 3
5.10.5 SignOff By Task Type ............................................................................................................... 59 5.10.6 SignOff Notification Prompts .................................................................................................... 59 5.10.7 SignOff Warning Notification..................................................................................................... 59 5.10.8 SignOff Required Notification – Single Task Move .................................................................. 59 5.10.9 SignOff Required Notification – Multiple Tasks Move .............................................................. 60 5.10.10 SignOff Both Warning & Required Notification – Multiple Tasks Move ............................ 61 5.11 Engagement ............................................................................................................ 61
6.0 Search Tab ..................................................................................................................... 62 6.1 Saving Search Filters .............................................................................................. 66 6.2 Advanced Search .................................................................................................... 68 6.3 Bulk Moving Tasks From Search Or My View Tabs ................................................. 69 6.4 Additional Move Button (Single & Multiple) Options ................................................. 70 6.5 Adding Actual Time To Routing Sheet When Moving Tasks .................................... 71 6.6 Searching For Multiple Clients ................................................................................. 71
7.0 Reports Tab ................................................................................................................... 72 7.1 User-Level Customized Reports .............................................................................. 73 7.2 Firm-Level Customized Reports .............................................................................. 79
8.0 Utilities Tab .................................................................................................................... 81 8.1 Manage Users ......................................................................................................... 82 8.1.1 User Information ....................................................................................................................... 82 8.1.2 User Rights Management ......................................................................................................... 83 8.1.3 Assigning User Rights – No Groups ......................................................................................... 85 8.1.4 Assigning User Rights – Using Groups .................................................................................... 86 8.1.5 User Account Details ................................................................................................................ 87 8.1.6 User Options ............................................................................................................................. 89 8.2 Manage Staffing Assignments ................................................................................. 90 8.3 Change User Password ........................................................................................... 92 8.4 Bulk Manage User Groups And User Rights ............................................................ 93 8.4.1 Adding a Group ......................................................................................................................... 93 8.4.2 Bulk Add Users to the User Groups ......................................................................................... 95 8.5 Manage clients ........................................................................................................ 97 8.5.1 Clients With Identical Names .................................................................................................... 99 8.6 Manage Groups ....................................................................................................... 99 8.7 Create New Task ................................................................................................... 100 8.8 Rollover Tasks ....................................................................................................... 102 8.9 Manage Recurring Tasks....................................................................................... 104 8.10 Add/Delete Task Jurisdictions/Deliverables ........................................................... 110 8.11 Bulk Operation Status ............................................................................................ 111 8.12 Delete Task and Data Purge ................................................................................. 112 8.13 Restore Deleted Tasks .......................................................................................... 113 8.14 Delete & Restore Jurisdictions/Deliverables .......................................................... 114 8.15 Manage Settings and Defaults ............................................................................... 114 8.15.1 Custom Grid ............................................................................................................................ 116 8.15.2 Manage Users ........................................................................................................................ 117 8.15.3 Expertise ................................................................................................................................. 117 8.15.4 Industry ................................................................................................................................... 118 8.15.5 Department ............................................................................................................................. 118 8.15.6 Title/Level ............................................................................................................................... 119 8.15.7 Niche/Group ............................................................................................................................ 119 8.16 Manage Workflow Statuses ................................................................................... 119 8.17 Manage Task Type ................................................................................................ 120

XCM Solutions XCM User Guide
Page 4
8.17.1 Auto Rollover Tasks ................................................................................................................ 121 8.18 Create Jurisdictions/Deliverables ........................................................................... 125 8.19 Manage Import ...................................................................................................... 132 8.20 Manage SignOff .................................................................................................... 133 8.21 Manage CheckList ................................................................................................. 134 8.22 Mapping Workflows ............................................................................................... 136
9.0 XCM Windows File System Integration& URL Links ................................................. 138 9.1 Attaching Network Files ......................................................................................... 138 9.2 Detaching Network Files ........................................................................................ 142 9.3 Opening and editing Network Files ........................................................................ 143 9.4 Attach URL/Website Hyperlink .............................................................................. 143
10.0 Quick Start Guide To Outsourcing ......................................................................... 144 11.0 Outsourcing With Xpitax ......................................................................................... 145
11.1 Create Upload And Download Folders................................................................... 145 11.2 Prepare to Outsource A Task ................................................................................ 145 11.3 Export Client’s Tax Application File For Outsourcing ............................................. 146 11.4 Upload Task Documents For Outsourcing ............................................................. 146 11.5 Move The Task To Outsourced ............................................................................. 149 11.6 Downloading Files From Xpitax ............................................................................. 150 11.7 Move Task To Next Workflow Status ..................................................................... 152 11.8 Import Client’s Tax Application File Back Into Firm Tax Application ....................... 152 11.9 iMail™ ................................................................................................................... 152 11.10 Reviewing Xpitax Workpapers ............................................................................... 153
12.0 Quick Start Guide to Preparing for Tax Year .......................................................... 154 13.0 Internet Explorer Settings ....................................................................................... 155

XCM Solutions XCM User Guide
Page 5
W H A T I S X C M ? XCM is a patent-pending web-based process workflow solution for the tax and accounting professions which increases efficiency, productivity, and profitability within a firm. XCM workflow technology virtually eliminates the need to manually move files throughout your office, provides instant access to client information, and reduces anxiety and stress during the busy season at the Partner, Professional Staff, and Administrative Staff levels. With its cutting edge technology, XCM Solutions helps firms increase productivity in processing such work as tax returns, tax notices, financial statements, bookkeeping, and other processes throughout their offices. The increase in productivity enables firms to assume a greater workload, ultimately resulting in increased profitability. XCM can also be used to efficiently outsource work. Through XCM, tax return information is outsourced to our Xpitax back office accountants who access your clients’ information stored on our secure U.S. hosting site. Our accountants prepare the tax return or other assigned Task, post questions, and send the completed files back to your firm. Your tax returns and other Tasks are prepared in an efficient, accurate, and cost-effective manner through the XCM web application. For those firms using our outsourcing process, XCM merges the in-house workflow process and the outsource workflow process into one seamless application, making their offices more productive and more profitable. This user guide will illustrate the features within XCM which can be used for either a Task processed internally by a tax or accounting firm, or one outsourced to Xpitax. For specific guidance related to the additional steps associated with outsourcing a financial document, see the Outsourcing section of this guide. To open the XCM application, use Internet Explorer to connect to www.xcmsolutions.com, then select Client Login from the web page displayed. When the XCM login screen appears, login to the XCM site by entering your User ID and Password provided to you by your firm’s XCM System Administrator. Upon login, you should see the following tabs (some may not appear depending on user rights). You can also click Help on this screen to access User Guides, register for trainings, support documents, and training videos.
My View The home page for professional or administrative staff. This is the status page for all staff at a firm to see Tasks they are responsible for completing. In the Views list box on the right, select what types of Task status should be displayed in My View.
My View [+] Header Bars and [X] Status Bars
Organize displayed Tasks according to their current status. Click on a Header Bar [+] sign to see Status Bars which show X number of Tasks of that status type, then click on the Status Bar [X] sign to view the enumerated Tasks.
Tasks Create a new Task for a new or existing client, edit/view notes about an existing Task.
Search Define search criteria to list some or all created Tasks.
Reports Run reports and create query-based reports.

XCM Solutions XCM User Guide
Page 6
Utilities Used by the firm’s System Administrator to manage all user accounts and firm settings.
1 . 0 M Y V I E W T A B H E A D E R A N D S T A T U S B A R S My View is a personalized “Home Page” used by the Professional and Administrative Staff at the firm to manage their assigned Client Tasks. My View welcomes the user and appears as follows:
In addition to the “Classic” My View page, seen above, users also have the ability to display an “Alternate” My View page. The Alternate View displays all Tasks in a report format giving them visibility into all jobs at one time. Users can ask their internal XCM administrator to set their preferred view as a default setting within their login session.

XCM Solutions XCM User Guide
Page 7
1.1 TASKS ASSIGNED TO ME AND EXTENSIONS ASSIGNED TO ME
The dark blue "Tasks Assigned to Me" and other Header Bars are expandable by clicking their [+] signs. When there are Tasks listed beneath these bars, a light blue Status Bar will appear with a number count [X]of the Tasks with that status. These Status Bars inform the user of what step in the preparation process a particular Task is in, and what action is required from the user. The Status Bars have a Category prefix to allow you to better manage and organize the work within your office. Users can expand these bars to see the clients displayed within by clicking anywhere on the light blue status bar.
Most Staff, Managers, and Partners will spend a majority of their time under “Tasks Assigned to Me.” The Status Bars listed under the “Tasks Assigned To Me” Header Bar may include but is not limited to:
Pre Prep Comp Review My Task to be reviewed to make sure return information is complete prior to sending to Preparation.
Post Prep Comp Review My Task which has been prepared and is awaiting information.
Preparation My Task to be prepared internally.
Questions Posted My Task with questions posted.
Review My Task which has been prepared - to be reviewed.
Open Points My Task with open points posted by a reviewer.
Cleared Points My Task with review points cleared.
Signer Review My Task which has been prepared - to be reviewed (Final Review).
Post Outsource Comp Review My Task which has been outsourced - to be reviewed to make sure all open items have been resolved
Data Input My Task that needs to have data entered in tax or financial application.
To Be Outsourced My Task that needs to be prepared for outsourcing (e.g., scanned).
Questions Answered My Task with questions answered - Task to be completed by the preparer.
To Be Assembled My Task that needs to be assembled for signature and shipping.
To Be Signed My Task ready for signature or SignOff.
To Be Shipped My Task that needs to be shipped.
In addition, based on selections in Manage Status (Firm Wide), and whether or not Tasks are being outsourced and/or extended, other Status Bars may appear under “Tasks Assigned To Me.”
“Extensions Assigned To Me” represent tax returns where an extension has been created and assigned to a user. The Extension Task reflects the Jurisdictions being filed for a tax return and is directly linked to the original

XCM Solutions XCM User Guide
Page 8
Task. Since the extension process within a CPA firm is unique and independent from process for the tax return, a separate Task is created. This Extension Task can be moved by selecting the Move Extension button, opposed to the Move Task button. The status points for the Extension Tasks are described below.
Users utilizing the Alternate View will not see the status bar displays and will instead see all “Tasks assigned to them displayed in a report format within their My View page. Users utilizing the Alternate view must utilize one of the “Other Views” described below to access their Extensions Assigned to Me Task list
1.2 OTHER VIEWS AND STATUS BARS
Your firm’s XCM System Administrator sets up each user with one or more default Views for the My View page by configuring them in the Manage Firm Users utility (hold the Control key down to select multiple Views).The ability to add additional default views is only available to users utilizing the Classic View in XCM. Users can change the current View during their login session to another View by choosing one from the View listbox in the upper right corner of the My View page, but it will revert to your defaults at next login. If you would like your default views changed, contact your firm’s XCM System Administrator.
Other available Views can be selected from the Views list box on the right of the My View page. As each view is selected, in addition to the Tasks and extensions assigned to the logged in user, other headings will be added to the page, allowing easy access to additional Tasks.
Tasks I Moved Tasks previously
Unassigned
assigned to the user logged onto the system that have not been completed.
Any Task in the following Status: • Unassigned • Unassigned Awaiting Information • Unassigned Review
Outsourced Any Task in the following Status: • All statuses within the outsourced process with Xpitax
Admin
Any Task in the following Status: • Info In Not Moved • To Be Assembled • To Be Extended • To Be Signed • To Be Shipped • To Be Bookmarked • To Be Scanned • To Be Scheduled • To Be Outsourced • OS Awaiting Acceptance • Recurring (populates if a recurring Task isn’t assigned to a specific user)
eFile
Any Task in the following Status: • eFile - Awaiting Taxpayer Consent Form • eFile -To Be Transmitted • eFile - Awaiting Government Acceptance
Extensions Assigned to Me (Alternate View Only)
All Extension Tasks assigned to the users logged into that session.
XCM Solutions XCM User Guide
Page 9
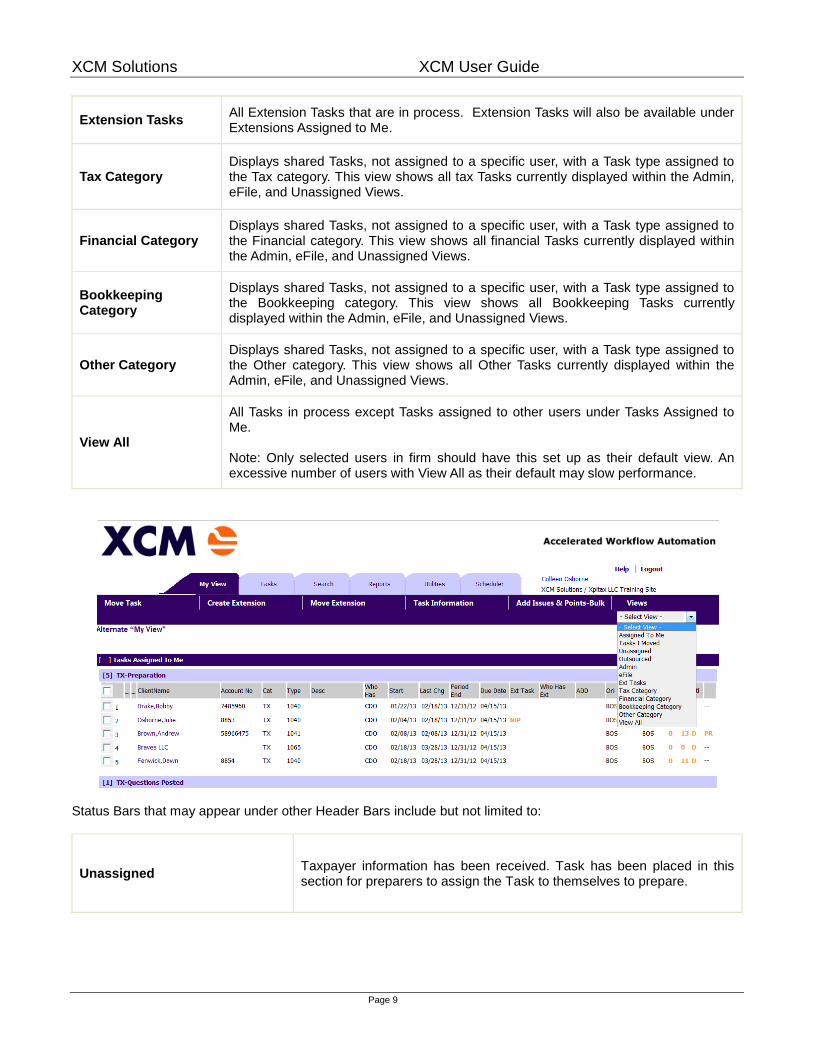
Extension Tasks All Extension Tasks that are in process. Extension Tasks will also be available under Extensions Assigned to Me.
Tax Category Displays shared Tasks, not assigned to a specific user, with a Task type assigned to the Tax category. This view shows all tax Tasks currently displayed within the Admin, eFile, and Unassigned Views.
Financial Category Displays shared Tasks, not assigned to a specific user, with a Task type assigned to the Financial category. This view shows all financial Tasks currently displayed within the Admin, eFile, and Unassigned Views.
Bookkeeping Category
Displays shared Tasks, not assigned to a specific user, with a Task type assigned to the Bookkeeping category. This view shows all Bookkeeping Tasks currently displayed within the Admin, eFile, and Unassigned Views.
Other Category Displays shared Tasks, not assigned to a specific user, with a Task type assigned to the Other category. This view shows all Other Tasks currently displayed within the Admin, eFile, and Unassigned Views.
View All
All Tasks in process except Tasks assigned to other users under Tasks Assigned to Me. Note: Only selected users in firm should have this set up as their default view. An excessive number of users with View All as their default may slow performance.
Status Bars that may appear under other Header Bars include but not limited to:
Unassigned Taxpayer information has been received. Task has been placed in this section for preparers to assign the Task to themselves to prepare.

XCM Solutions XCM User Guide
Page 10
Unassigned Awaiting Info Task needing additional information before being assigned to In House Preparation, Unassigned, To Be Outsourced or Outsourced.
Outsourced Task outsourced - In Process by Xpitax.
Outsourced Awaiting Acceptance*
Task that has been completed by the outsource team and needs to be downloaded by the OS Coordinator, and then moved to the next process step (i.e. Post Outsource Comp Review).
eFile-Awaiting Taxpayer Consent Form
Tasks for returns being eFiled, where the consent form has been delivered to the taxpayer.
eFile-To Be Transmitted Tasks for returns being eFiled, where the consent form has been received and returns need to be transmitted.
eFile-Awaiting Government Acceptance
Tasks for returns being eFiled, where the return has been transmitted and the firm is awaiting the government acceptance notification.
To Be Bookmarked Tasks which are to be bookmarked.
Outsource (Send Back) Tasks which have been outsourced, and have been sent back to Xpitax for a second or third preparation cycle.
EXT Prepare Extension Tasks (tax returns where an extension has been created) to be prepared.
EXT Review Extension Tasks (tax returns where an extension has been created) to be reviewed.
EXT Awaiting Checks Extension Tasks (tax returns where an extension has been created) awaiting checks.
EXT Assemble Extension Tasks (tax returns where an extension has been created) to be assembled.
EXT To Be Signed Extension Tasks (tax returns where an extension has been created) to be signed.
EXT To Be Shipped Extension Tasks (tax returns where an extension has been created) to be shipped.
EXT eFile Extension Tasks (tax returns where an extension has been created) to be eFiled.
2 . 0 T A S K T A B T A S K I N F O R M A T I O N D R O P D O W N M E N U The navigational dropdown menus are on the My View, Task, and Search pages for several reasons.
First, instead of requiring the user to set focus on the Task (by opening it) before moving to a sub page for specific Task Information, XCM allows users to navigate to specific Task Information pages directly from the My View and Search pages.

XCM Solutions XCM User Guide
Page 11
Along with direct access to Task Information, you also have ability to display and edit Task Information for multiple Tasks at once. This helps save many steps and vastly increasing user productivity.
In all examples below, first open the My View or Search page to display or filter for a set of Tasks. Either action will allow you to check, from the listed Tasks, one or multiple Tasks to modify.
2.1 TASK T AB
When you select the Task tab at the top of the screen, a blank Task page will appear. The top third of the page contains client information. To find a Task that doesn’t appear on the My View page, go to the Search Tab, search for the client and open up the Task.

XCM Solutions XCM User Guide
Page 12
To create a new Task, you must first choose a client. Next to Client/Entity Name, either click the orange “C” or start typing in your client’s last name or entity name. If you select the orange “C,” from the Client Details page, search for the client, select the client, and then click the Apply button. This action populates the client section of the Task page with the client information stored the database. If you chose to add a new client to your XCM site at this time, please note that the Partner, Manager, and Staff fields are not required, but the Responsible Person is mandatory. Completing these fields with names of users at your firm will populate the My Clients selection of the applicable users under the Search tab.
If edits are needed on the assigned role name fields for the Task you are creating, simply click the blue “Clr” then start typing in the last name of the person you would like to assign to that particular role. The edit made will only apply to the Task you currently have open and will not impact and current or future jobs for that client. If you wish to make global changes you should access you Manage Staffing Assignments Utility. To make an edit on a going forward basis for your client you should make the appropriate edit within the Manage Clients Utility.

XCM Solutions XCM User Guide
Page 13
The Budget and Actual Time fields to the right of the assigned users allow you to put in budgeted time for a job, as well as record the actual time spent on the job. Your XCM site also allows for the population of Time Remaining on each job. Users can input Budget, Actual, and Remaining time on jobs by clicking directly within the associated time fields. Users can also add Actual time within the Move Task screen.
To add/edit Budget, Actual Time, or Est. Time to Complete, simply type the time you wish to add directly into the appropriate field. XCM will automatically calculate Over/Under time associated with each responsible role and for the total Task. They application will also provide a record of who added time to the Task within the Details page accessible through the My View, Task, and Search pages.

XCM Solutions XCM User Guide
Page 14
The middle section of the Task page is where Task information is entered into the application. The required fields within this section are the Type of Task, which you can access from the pull down menu, and the Period End Date. The Anticipated Delivery date field, description field, level of difficulty and priority are all optional.
Note the period end default will be the period end you set for your client when entering them into XCM. If you did not enter a period end date when adding your client to XCM the system will default to a 12/30 year end.
The bottom third of the page enables the ability to link to local Windows network files, link to files stored in ProSystem fx Document®, link to URLs, and/or Upload or Download files for Xpitax outsourcing. Which ones of these features appear depends on global firm settings configured by XCM support. Details about linking files to the Task can be found later in this user guide. Firms that outsource will Upload and Download files to the XCM site as part of the outsourcing process, which is explained in the outsourcing portion of this user guide.
In a row at the top of the Task page are actions that can be applied to the Task. Please note that these buttons become active only after a Task has been created. The Tasks buttons are:
New Task Create a new Task
Move Task Move a Task through the system to workflow Status and User.
Issues/Points Prepare and respond to Knowledge/Instructions, Questions and Review Points.
Jurisdictions Opens the Task’s Jurisdiction page to add states and other jurisdictions being filed with a tax return.
Extension Creates an Extension Task, and opens the Extension Task to move, complete or add information.
Shipping Opens the Task’s Shipping page to Complete the Shipping Instructions forms and to Complete the Task.

XCM Solutions XCM User Guide
Page 15
Assembly Opens the Task’s Assembly page. Assembly instructions include a designation for paper filing or eFiling a tax return.
Rollover Create a copy of the existing Task for a subsequent period. This may also been done for a batch of Tasks and is typically performed using the Rollover Utility.
eFile Appears only after a Task enters the eFile process.
Details Display Task history.
Linked Tasks Allows users to link associated Tasks and/or view Tasks already linked.
Portal Allows users to upload documents to a client’s portal, download documents from the client’s portal, and access the client portal directly.
The fields that can be modified for each Client on the Task page are:
Staffing Fields XCM allows for a minimum of nine and a maximum of fifty staffing designations which appear on the Task page. These role names can be customized through the Manage Settings and Defaults utility.
Budget & Actual Time Enter in whole and partial hours and, if known, enter in the hours for the responsible people assigned to the Task.
The following fields are specific to the Task as opposed to the Client.
Current Location Location defaults to the location of the user assigned to the Task or if not assigned, the location of the user that created the Task.
Type of Task Select from various tax forms, tax notices, bookkeeping, binder conversion, and other types of Tasks.
Period End The period end defaults to the period end for the clients on the Client Form. The year defaults to the firm default in the Utilities section Firm Defaults.
Description This field is used to provide additional descriptions of Tasks and to allow duplicate Tasks to be created. This is most often used for Bookkeeping Tasks, special projects and amended returns.
Software Choose tax software used to prepare the Task or other service.
Client Letter Date Enter the date for client acceptance of the client engagement letter or 7216 regulations.

XCM Solutions XCM User Guide
Page 16
Comments Enter any comments specific to the Task.
Due Date This date reflects the next date one of the Deliverables/Jurisdictions is due.
Anticipated Delivery Date Enter the expected delivery date (optional)
Level Of Difficulty Select the level of difficulty of the Task.
Priority Select the Priority of the Task.
3 . 0 D I R E C T T A S K P A G E L I N K F O R M A N A G E C L I E N T S This feature allows for easier access to the Client information page. On the Task page the Client/Entity Name is a hyperlink to the Client Details page, allowing users to easily change Client information and keep data current. Users must have the Manage Clients user right to access the client information page hyperlink.

XCM Solutions XCM User Guide
Page 17
3.1 PRI NT ROUTING INFORMATI ON
User have the ability to easily view all Task related information through the Print Routing Information link at the top of the Task page.
XCM Solutions XCM User Guide
Page 18
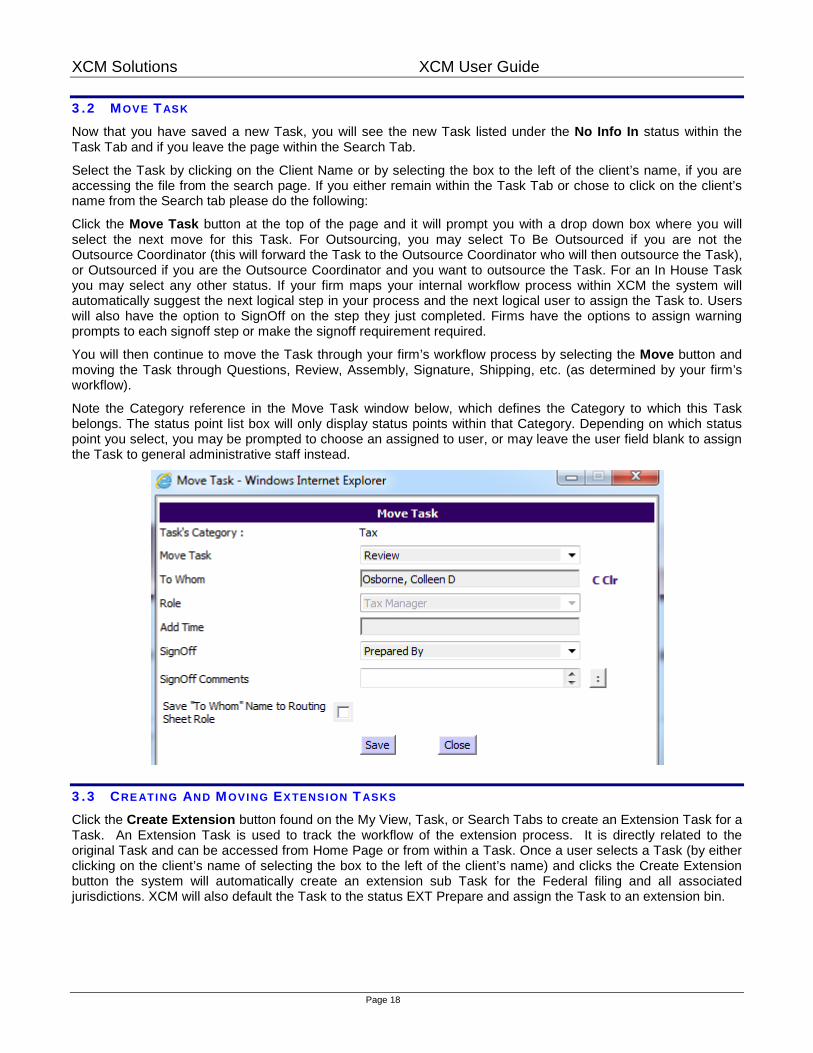
3.2 MOVE TASK
Now that you have saved a new Task, you will see the new Task listed under the No Info In status within the Task Tab and if you leave the page within the Search Tab.
Select the Task by clicking on the Client Name or by selecting the box to the left of the client’s name, if you are accessing the file from the search page. If you either remain within the Task Tab or chose to click on the client’s name from the Search tab please do the following:
Click the Move Task button at the top of the page and it will prompt you with a drop down box where you will select the next move for this Task. For Outsourcing, you may select To Be Outsourced if you are not the Outsource Coordinator (this will forward the Task to the Outsource Coordinator who will then outsource the Task), or Outsourced if you are the Outsource Coordinator and you want to outsource the Task. For an In House Task you may select any other status. If your firm maps your internal workflow process within XCM the system will automatically suggest the next logical step in your process and the next logical user to assign the Task to. Users will also have the option to SignOff on the step they just completed. Firms have the options to assign warning prompts to each signoff step or make the signoff requirement required.
You will then continue to move the Task through your firm’s workflow process by selecting the Move button and moving the Task through Questions, Review, Assembly, Signature, Shipping, etc. (as determined by your firm’s workflow).
Note the Category reference in the Move Task window below, which defines the Category to which this Task belongs. The status point list box will only display status points within that Category. Depending on which status point you select, you may be prompted to choose an assigned to user, or may leave the user field blank to assign the Task to general administrative staff instead.
3.3 CRE ATI NG AND MOVING EXTENSION T ASKS
Click the Create Extension button found on the My View, Task, or Search Tabs to create an Extension Task for a Task. An Extension Task is used to track the workflow of the extension process. It is directly related to the original Task and can be accessed from Home Page or from within a Task. Once a user selects a Task (by either clicking on the client’s name of selecting the box to the left of the client’s name) and clicks the Create Extension button the system will automatically create an extension sub Task for the Federal filing and all associated jurisdictions. XCM will also default the Task to the status EXT Prepare and assign the Task to an extension bin.

XCM Solutions XCM User Guide
Page 19
Click the Move Extension header to move an Extension Task. Extension Tasks have a unique workflow and can only be moved in conjunction with other Extension Tasks. Your firm has the option to map your extension workflow through the Manage Workflow Mapping Utility. If you chose to map your workflow XCM will automatically suggest the next logical workflow step and assigned to user for you providing the option to override any of the suggested selections. If you do not map your extension workflow process, simply select the status you would like to move your extension Task to and the person you would like to have complete the work, see screenshots below.
If you map your EXT workflow process XCM will populate the move extension screen for you:
If you do not map your EXT workflow process simply select the next step and the assigned to user:

XCM Solutions XCM User Guide
Page 20
Select the Choose button next to Assigned (Moved) to whom to select the User. Verify the correct location is selected; highlight the user and click Apply, then click Save to assign the user.
3.4 ISSUES/POINTS
The User performing the Task should keep XCM open while working on the Task. When the User has a question, he/she will post the question to the Task by clicking the Issues/Points button and selecting one of the following tabs:
• Knowledge / Instructions

XCM Solutions XCM User Guide
Page 21
• Questions • Review Points • All (to display all the above entries in one list) • CheckLists
A small circle next to Issues/Points on the Task page will be solid blue when there are closed issues and/or points. If it is white, it indicates that there are open Issues/Points for this Task which requires a response or action.
The User should type questions in the Points box in the pop-up window, refer to the Reference Page # in the source documents to which the question relates, and document the Prior Year Amount. After typing the question or a Response, select Save or Add New. Upon completing the questions, the user can click Send to CPA Responsible on the Issues/Points menu. Send to CPA Responsible will only appear when Task is in the status Preparation and if at least one Issue/Point is Open.
This logic facilitates standardizing the firm’s workflow and limits the required clicks to move the Task.
By selecting one or multiple boxes to the left of a question or review point, the User entering the questions can use the buttons in the middle of the page to:
• Leave Open – change the status of selected questions to open

XCM Solutions XCM User Guide
Page 22
• Close– change the status of selected questions to closed • Create Email – create an email to Client with selected questions • Delete – delete selected questions • Print – print selected questions • Export – export selected questions to Microsoft Excel
The functionality of the Knowledge/Instructions and Review Points features are similar to the Questions feature. To see all the Knowledge/Information, Questions, and Review Points, select the All tab.
Users also have the ability to link directly into prior year issues/points by selecting the work “prior” found in the upper right hand corner of the page under the client’s contact information and Task year end.

XCM Solutions XCM User Guide
Page 23
3.4.1 ISSUES/POINTS CREATE EMAIL
To e-mail points to a client, select the boxes to the left of the appropriate Questions, knowledge, Instructions, or Review Points and click Create Email.
Whatever e-mail application you have defined as the default e-mail application in Internet Explorer (see the Internet Explorer section for details) will initialize a new message, populating it with information from the Issues/Points selected.
For instance, if Outlook is your default e-mail application, a new email message will be generated as seen below. The client’s e-mail address will be added to the “To” field if it was entered on the Client setup screen.
After an email has been generated from the Issues/Points page, an M will appear next to the point to indicate the email was created. You can track the email that was created by reviewing your outlook messages.

XCM Solutions XCM User Guide
Page 24
3.4.2 ADDING ISSUES/POINTS IN BULK
This menu action item, available on the My View and Search tabs, allows you to add Issues/Points to multiple Tasks simultaneously.
After navigating to Tasks on the My View tab, or searching for them on the Search tab, check one or more Tasks, and then click the Add Issues/Points-Bulk action menu item at the top of the page.
The following screen will appear.

XCM Solutions XCM User Guide
Page 25
Add suitable text in the Points field, select the type of Issues/Points, the Period End Date treatment, and then click either the Add New – Leave Open or Add New – Close Issue button to save your entry. You can also add more entries to apply to the same selected Tasks, or click the Close button to return to the previous screen.
You also have the option of checking one or more added entries, then clicking the Delete button to remove them from Issues/Points.
You may also add an Issues/Points entry to a future Tasks that will be created through rolling over current Tasks.
Navigate to or Search for the current Tasks or last year’s Tasks. Check one or more of the Tasks, and then click the Add Issues/Points-Bulk action menu item at the top.
Enter your Points and/or Response text, and select the Next Period End radio button. After you save the entry (only the Add New – Close Issue button is available) it will be recorded on each current Task with an Issues/Points status of Closed. When the Task is rolled over, the Issues/Points entry will appear with a status of Open, guaranteeing that the Issues/Points entry will not be overlooked.
3.4.3 CARRY OVER SELECTIONS FOR ISSUES/POINTS
XCM Provides the ability to have Issues/Points (Knowledge/Instructions, Questions, and Review Points) rollover with the related Task. This feature allows you to designate an applicable period end for each individual Issues/Points entry.
You may also continue to use the Rollover utility if you would like all the Issues/Points of a particular type rollover.
We have four radio button selections within the Issues/Points page. The selected radio button setting applies to the highlighted Issues/Points entry in the matrix below and can be edited, just like text and other information, and saved by clicking either the Save/leave issue open or Save/close issue button.
Current Period End (blank)
Next Period End (N)
Current & Next Period End (CN)
Permanent (P)
XCM Solutions XCM User Guide
Page 26
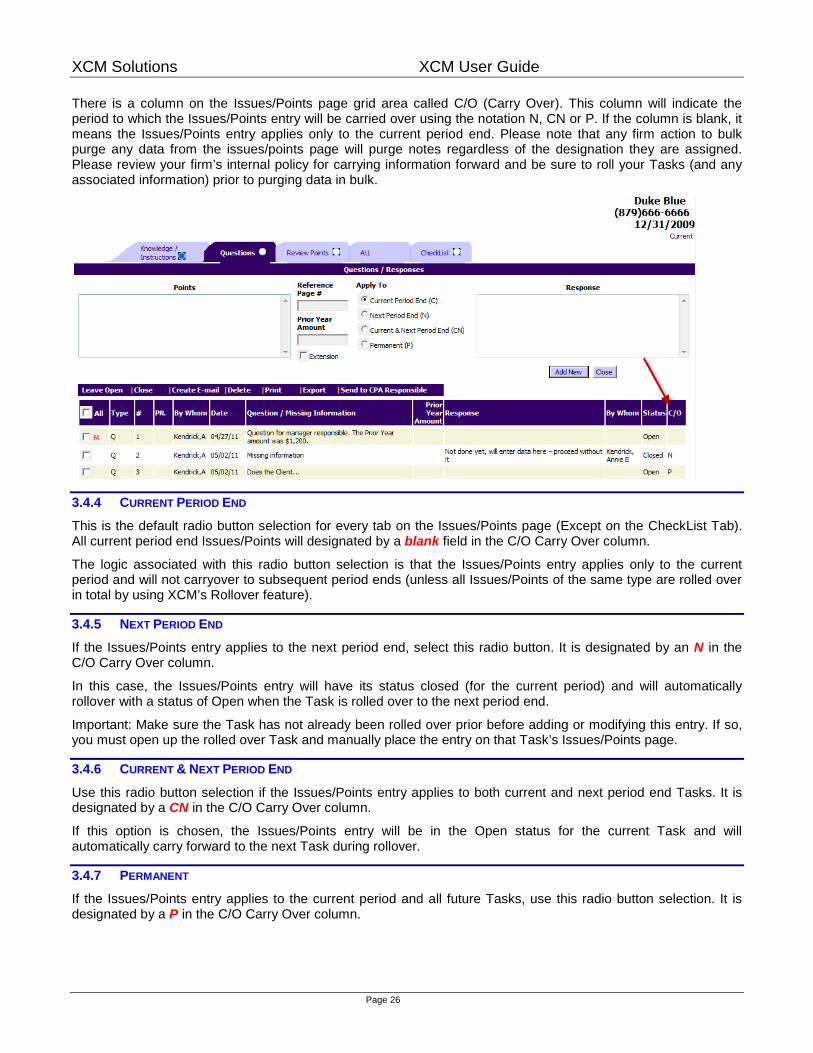
There is a column on the Issues/Points page grid area called C/O (Carry Over). This column will indicate the period to which the Issues/Points entry will be carried over using the notation N, CN or P. If the column is blank, it means the Issues/Points entry applies only to the current period end. Please note that any firm action to bulk purge any data from the issues/points page will purge notes regardless of the designation they are assigned. Please review your firm’s internal policy for carrying information forward and be sure to roll your Tasks (and any associated information) prior to purging data in bulk.
3.4.4 CURRENT PERIOD END
This is the default radio button selection for every tab on the Issues/Points page (Except on the CheckList Tab). All current period end Issues/Points will designated by a blank field in the C/O Carry Over column.
The logic associated with this radio button selection is that the Issues/Points entry applies only to the current period and will not carryover to subsequent period ends (unless all Issues/Points of the same type are rolled over in total by using XCM’s Rollover feature).
3.4.5 NEXT PERIOD END
If the Issues/Points entry applies to the next period end, select this radio button. It is designated by an N in the C/O Carry Over column.
In this case, the Issues/Points entry will have its status closed (for the current period) and will automatically rollover with a status of Open when the Task is rolled over to the next period end.
Important: Make sure the Task has not already been rolled over prior before adding or modifying this entry. If so, you must open up the rolled over Task and manually place the entry on that Task’s Issues/Points page.
3.4.6 CURRENT & NEXT PERIOD END
Use this radio button selection if the Issues/Points entry applies to both current and next period end Tasks. It is designated by a CN in the C/O Carry Over column.
If this option is chosen, the Issues/Points entry will be in the Open status for the current Task and will automatically carry forward to the next Task during rollover.
3.4.7 PERMANENT
If the Issues/Points entry applies to the current period and all future Tasks, use this radio button selection. It is designated by a P in the C/O Carry Over column.

XCM Solutions XCM User Guide
Page 27
The Issues/Points entry will be reflected as Open for the current Task and will be automatically carried forward to future Tasks in the Open status.
3.5 CHECKLISTS
The CheckList Page is accessible from the Issue/Points navigational pull-down menu. The CheckList items and related information can come from two areas of the application:
1) Using the CheckList Utility (see below) you can create a standard list of CheckList items at a per Task type level, so that when a user creates a new Task, the standard list of CheckList items will automatically populate the CheckList page, along with the related information.
2) A user with the Manage SignOff and CheckList Item user rights can add and/or change an existing CheckList item. This will allow the user to customize the CheckList page for a particular client. Whatever changes are made to the particular CheckList item will carry over to the following year is the users chooses to roll forward CheckList items at the Task level rather than rolling information over from the utility
3) A User with the Manager SignOff and CheckList item user right can add a custom CheckList at an individual Task level building a CheckList from scratch for a particular client job. The function applies to recurring one off Tasks for clients.
4) All users can change the Associated Status, Assigned Person and the Completion Due Date fields manually from the CheckList page itself.
The CheckList page is shown below with a detailed review of all the features on the page.

XCM Solutions XCM User Guide
Page 28
Add CheckList Items: As noted above, if you use the Manage CheckList Utility, all the standardized CheckList items will come pre-populated. However, a user who has the user right can add and/or change the CheckList item. To add a new CheckList item, type the text in the box and click the Add new button. To change an existing CheckList item, click on the box for the CheckList item and change the text in the Add CheckList Item box and click the Save Button.
CheckList Page Indicators: The page contains an orange letter designation found to the right of the CheckList numbering system. An “O” means the CheckList is the original item populated at the time the Task was created. An “E” means the CheckList item was modified. If you mouse over the orange “E” the system will provide you with the name of the user that made the edit and the date the modification was made. A “C” indicates a change to the default CheckList items meaning a user either added a CheckList item to the default list and/or added a new CheckList item to the Task. If a user hovers the mouse over these letter designations you will see the name of the user that made the change along with the date the change was made.
Associated Status, Assigned Person and Completion Due date fields: All these fields will come pre-populated if standardized using the Manage CheckList Utility. They can be changed by simply using the fields located at the top right section of the page and clicking the Save button. All data can be deleted as well. All users have the right to make changes onto these fields.
The purpose of the fields are as follows:

XCM Solutions XCM User Guide
Page 29
1) Associated Status field: - Information field only. This field prompts the user to move the Task itself to the appropriate status.
2) Assigned Person Field: - This is an important field. When the CheckList item is Assigned, the application looks to this field to determine whose home page the CheckList item Task will appear and who to send the email notification that they have been assigned a CheckList item.
3) Completion Due Date: - Information field only. This field reminds the user when a particular CheckList item needs to be completed.
Action Buttons: The following is a description of the action items listed on the CheckList page:
1) Done, Not Done, and NA. - To mark a CheckList item as Done, simply click the box next to the CheckList item and click the Done action button. The CheckList item will be marked Done in the grid and the user’s name and date will be recorded in the grid as well. If marking the item as done for someone else, use the comments field to note you are completing the CheckList item for another person. Use the Not Done to reverse the Done action and the NA action button to note that the CheckList item is not applicable.
2) Create Email - Often it is necessary to email CheckList items to staff within your firm. Use the Create Email button to have the application automatically create an email that will have related CheckList items included in the body of the email. Simply click on the box next to the CheckList items you want included in the email and click the Create Email action button. The email is created and generated in your client email application. XCM will populate a red “M” indicator to the left of the Associated Status column showing that a message was sent regarding the CheckList item(s).
3) Print - Use the print action button to print the CheckList items to Adobe or to a printer. 4) Export - Use this export action button to export the CheckList items to Excel or to other formats. 5) SignOff page - Because the CheckList items and SignOffs are often used in conjunction with one
another, use this action button to access the specific SignOff page to complete the related SignOff. 6) Default - Use this action button to have the CheckList page reflect the default CheckList items that have
been set up using the Manage CheckList Utility. This action button is often used when a Task has been created or rolled over prior to the standardized CheckList being created using the Manage CheckList Utility.
7) Assign - Use this action button to assign a CheckList item to a user. When a CheckList item is assigned to a user, two things will occur: The particular CheckList item sub-Task will be reflected on the My View page of the user under a new bucket called Assigned CheckList Items. In addition, the users who are assigned the CheckList items will receive an email notifying them of the CheckList item(s) to which they have been assigned. The user will not be able to move the CheckList sub-Task like other Tasks using the move button. In order to reassign the CheckList sub-Task to another person, access the CheckList page, change the person assigned and click the Assign button. Note, once the Task is completed and marked Done using the button referenced above, the CheckList item sub-Task will be removed from the user’s home page.
To assign a CheckList item or items to a user or multiple users, simply check the box next to the CheckList items and click the Assign button. The application will look at the Assigned Person field in the grid to determine two whom the CheckList Item sub-Tasks should be assigned. Once the CheckList item is assigned, the date of the assignment will be reflected in the grid below.
Important: Assigning the CheckList items will only move the sub-Task to the person responsible for completing the CheckList Item. You should still move the Task through the normal workflow using the Move button from the My View, Search and Routing pages so that Partners, Managers and Firm Admin can see an overall view of the Task’s progress.

XCM Solutions XCM User Guide
Page 30
8) UnAssign Button - If you assign a CheckList item by mistake, hit the UnAssign button and the sub-Task will be eliminated from the user’s My View page and the date of assignment will be eliminated from the grid below.
Note that once the CheckList sub Task is assigned, the subTask will appear on the user’s My View page under Tasks Assigned To Me. If the CheckList item is assigned to Admin, it will appear in the Admin bucket on the My View page. The only way the user is able to clear the CheckList item from their My View page is to mark the item (within the CheckList page) as Done, Not Done, or NA.
We also have a column on the right-hand side of the My View and Search pages that shows the number of open CheckList items and provides a hyperlink directly into the CheckList page.
4 . 0 T A S K I N F O R M A T I O N D R O P D O W N M E N U The navigational dropdown menus are on the My View, Task, and Search pages for several reasons.
XCM was originally designed to focus users on the Task page, with further information about the Task organized on sub pages accessible only after opening the Task page. However, getting to a specific type of information only through the Task page involves more steps than are best for efficiency. Each additional step, repeated many times throughout the day as the user works, detracts from productivity and we have addressed that unnecessary overhead.
Users spend a majority of their time in XCM on the My View and Search pages. So instead of requiring the user to focus on the Task (by opening it) before moving to a sub page for specific Task Information, XCM allows users to navigate to specific Task Information pages directly from the My View and Search pages.

XCM Solutions XCM User Guide
Page 31
Along with direct access to Task Information, you also have ability to display and edit Task Information for multiple Tasks at once. This helps save steps vastly increasing user productivity.
In all examples below, first open the My View or Search page to display or filter for a set of Tasks. Either action will allow you to check, from the listed Tasks, one or multiple Tasks to modify.
4.1 JURISDICTIONS
Click Jurisdictions at the top of the Task Information pop-up screen to assign an existing (select the appropriate Jurisdiction from the list box), or new (click the Task Specific Jurisdiction radio button to create a Task specific Jurisdiction, enter a Jurisdiction name, form type, and due date), Jurisdiction to the Task.
Although you cannot delete Federal and General Task jurisdictions, there is an alternative that gives you the ability to mark these jurisdictions (and any other jurisdictions) as Not Filing. What this setting does is suspend the jurisdiction from being used and eliminates that jurisdiction’s due dates from being reflected on the My View, Task, and Search pages.
To change a jurisdiction to Not Filing, from the Task page, open the Jurisdiction page, click on the box next to the jurisdiction and click the Not Filing button. You will get a warning message; click the OK button to continue.

XCM Solutions XCM User Guide
Page 32
The affected jurisdiction entry will turn dark orange signifying that the jurisdiction is not to be filed. This color will be reflected on the Assembly, Shipping, eFile and Extension pages for the jurisdiction Not Filing. The Jurisdiction Task Status will reflect the Not Filing status as well.
As an additional way to identify the jurisdictions that have been deleted or marked as Not Filing, there is a section on the routing page as seen below.
XCM Solutions XCM User Guide
Page 33
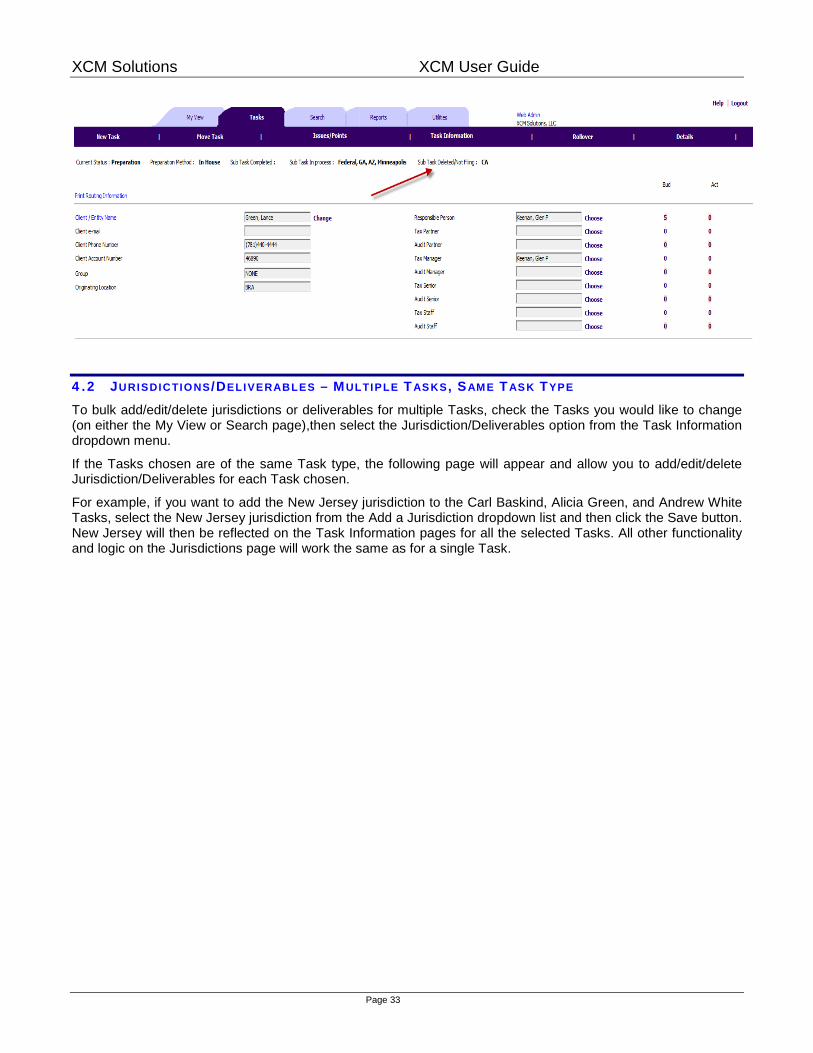
4.2 JURISDICTIONS/DELIVERABLES – MULTIPLE TASKS, SAME TASK TYPE
To bulk add/edit/delete jurisdictions or deliverables for multiple Tasks, check the Tasks you would like to change (on either the My View or Search page),then select the Jurisdiction/Deliverables option from the Task Information dropdown menu.
If the Tasks chosen are of the same Task type, the following page will appear and allow you to add/edit/delete Jurisdiction/Deliverables for each Task chosen.
For example, if you want to add the New Jersey jurisdiction to the Carl Baskind, Alicia Green, and Andrew White Tasks, select the New Jersey jurisdiction from the Add a Jurisdiction dropdown list and then click the Save button. New Jersey will then be reflected on the Task Information pages for all the selected Tasks. All other functionality and logic on the Jurisdictions page will work the same as for a single Task.
XCM Solutions XCM User Guide
Page 34
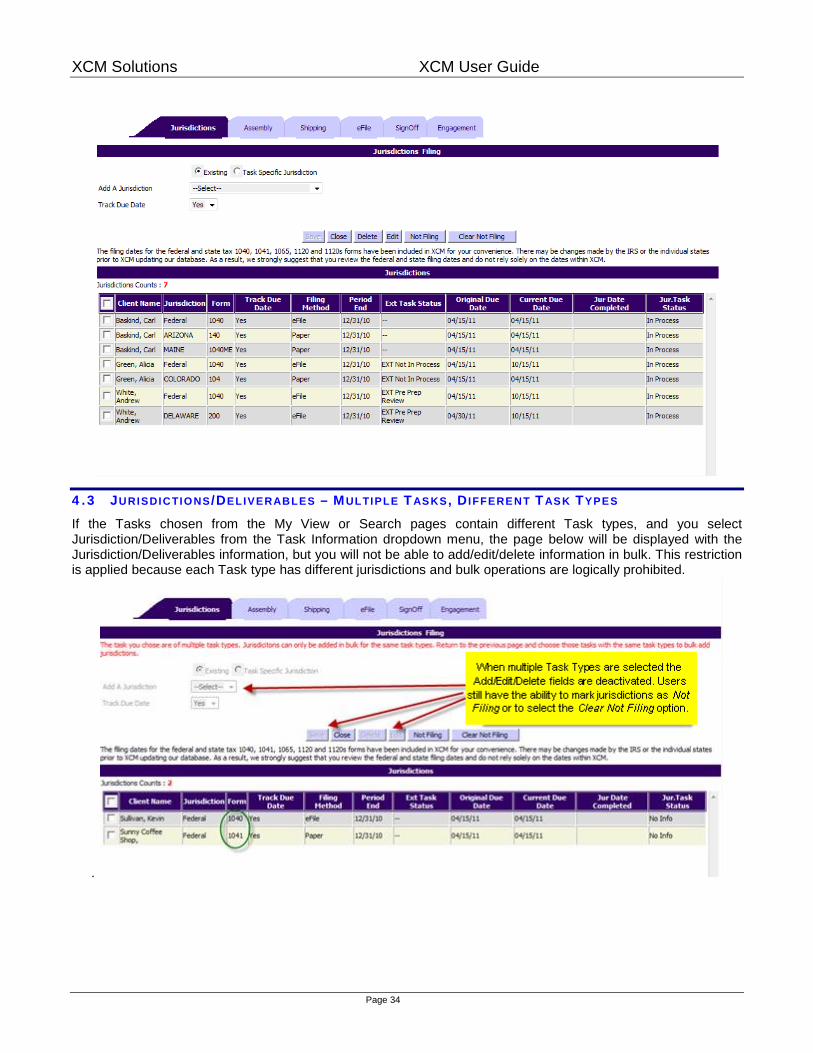
4.3 JURISDICTIONS/DELIVERABLES – MULTIPLE TASKS, DIFFERENT TASK TYPES
If the Tasks chosen from the My View or Search pages contain different Task types, and you select Jurisdiction/Deliverables from the Task Information dropdown menu, the page below will be displayed with the Jurisdiction/Deliverables information, but you will not be able to add/edit/delete information in bulk. This restriction is applied because each Task type has different jurisdictions and bulk operations are logically prohibited.
.

XCM Solutions XCM User Guide
Page 35
5 . 0 T A S K I N F O R M A T I O N
5.1 FIRM SPECIFIC JURISDI CTIONS
XCM has the ability for firms to create and use their own Jurisdictions at both the Firm level, created by a firm administrator with the appropriate User Right and available for use by all firm users on all Tasks, and at the individual Task level, created within the Task by any user and available for that Task only.
In order to create a Firm Specific Jurisdiction, a user must be granted the following User Right by a firm administrator.
Firm Specific Jurisdictions can be administered through the Create Jurisdictions/Deliverables and the Add/Delete Task Jurisdictions/Deliverables pages on the Utilities tab. Each Jurisdiction is associated with a single Task type and is available for selection in the Jurisdiction Tab drop down list box only on Tasks of that Task type.
To add a Firm Specific Jurisdiction to a Task, open the Task and click the Jurisdiction header to bring up the Jurisdictions tab. Click the Existing radio button, then select a Jurisdiction from the list box. Note that the Firm Specific Jurisdictions will appear in the list now (those that are associated with the current Task’s Task type) in addition to the statutory entries, and will be distinguished from them with the letters FS appended to the Jurisdiction name.
To View, Edit, or Delete existing Firm Specific Jurisdictions, open the Manage Firm Specific Jurisdictions utility.
5.2 TASK SPECIFIC JURISDI CTIONS
All users have the ability to create a Task Specific Jurisdiction within a Task.
With a Task open, click the Jurisdictions header to open the Jurisdictions tab.

XCM Solutions XCM User Guide
Page 36
Click the Task Specific Jurisdiction radio button and the following screen will appear.

XCM Solutions XCM User Guide
Page 37
Enter a name and form number for the Jurisdiction. NOTE: There are reserved letter combinations for statutory filings and you may see the following error message when you save the Jurisdiction if a naming conflict is seen by the system.
In the Jurisdiction Original Due Date area, choose the method by which the due date will be determined relative to the Period End Date.
Enter applicable Extension dates, and then save by clicking the Save/Add New Jurisdiction button if you are going to add another Jurisdiction, or the Save/Close button to exit the screen.
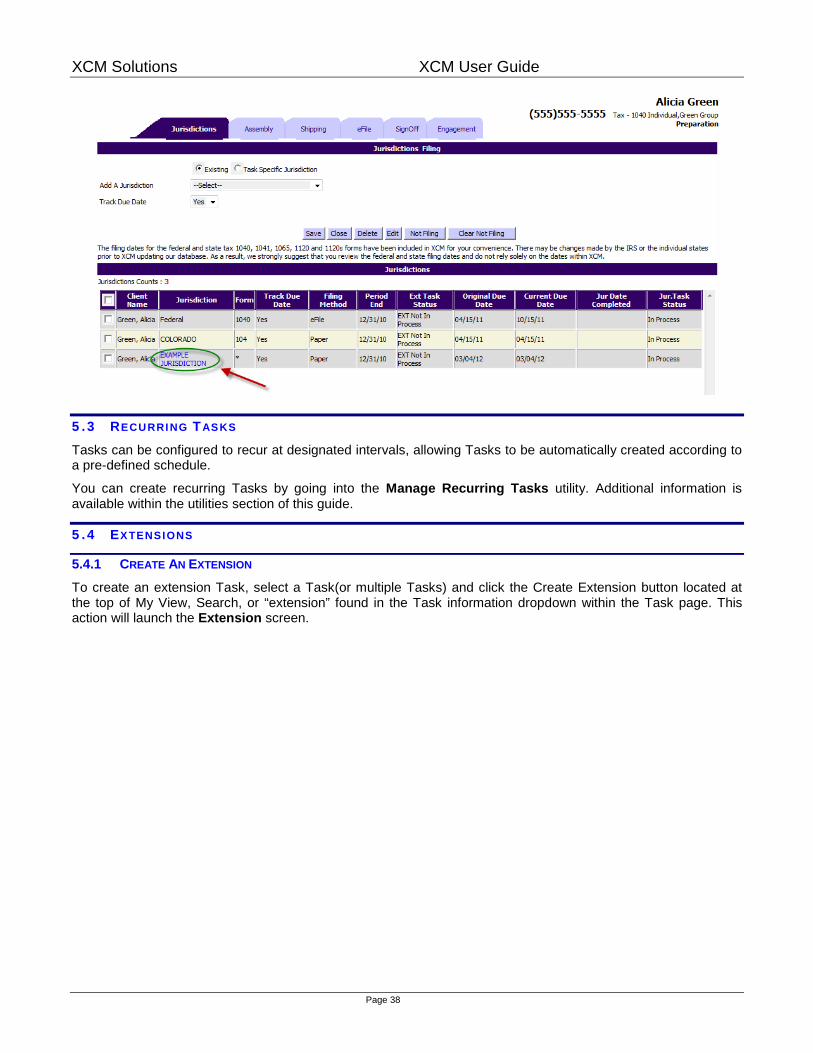
The Task Specific Jurisdiction will now appear on the Task’s Jurisdictions page. Unlike other displayed Jurisdictions, you can edit a Task Specific Jurisdiction directly from this page, it appears as a hyperlink.
XCM Solutions XCM User Guide
Page 38
5.3 RECURRI NG TASKS
Tasks can be configured to recur at designated intervals, allowing Tasks to be automatically created according to a pre-defined schedule.
You can create recurring Tasks by going into the Manage Recurring Tasks utility. Additional information is available within the utilities section of this guide.
5.4 EXTENSIONS
5.4.1 CREATE AN EXTENSION
To create an extension Task, select a Task(or multiple Tasks) and click the Create Extension button located at the top of My View, Search, or “extension” found in the Task information dropdown within the Task page. This action will launch the Extension screen.

XCM Solutions XCM User Guide
Page 39
Click Jurisdiction at the top of the screen to assign a Jurisdiction to the extension. This will open the original Task Jurisdiction page and reflect all Jurisdictions associated with Task.
Click Details to see history of the Extension Task.
Click Move Extension to move the Extension Task through your firm’s extension process. The extension can be moved to a specific person or to a general admin role for batch processing. If your firm maps your extension process through the Manage Workflow Mapping utility the system will automatically suggest the next logical step in your extension process and the user the extension Task should be moved to.

XCM Solutions XCM User Guide
Page 40
If you do not map your workflow process the system will require users to select the nest step in your process through the Move Extension Dropdown menu and to click the “choose” button found to the right of the Assigned (Moved) to Whom selection screen to select which users to whom you would like to move the Task.

XCM Solutions XCM User Guide
Page 41
5.4.2 CLOSE EXT TASK BUTTON
Clicking this button is a quick way to close the extension Task, removing the extension Task from the MY View page of the person assigned the extension Task. The Close EXT Task button will be active for only those users that have the user right Manage Extension. For all other users, the Close EXT Task button will be grayed, helping to prevent unintentional closing of the extension Task.
If a user wishes to extend the Task due date they should first populate the Date EXT Filed field, select the EXT Filing Method, then click the “Update & extend Jur” button to populate the extension filing information within the grid at the bottom of the page. Entering this information will push the due date of each jurisdiction to the Next EXT Date listed when accessing the page.

XCM Solutions XCM User Guide
Page 42
5.4.3 PRIMARY TASK STAFFING POPUP SCREEN
Clicking the Primary Task Staffing link will populate a listing of all staffing roles and the associated staff for the particular Task you are extending.

XCM Solutions XCM User Guide
Page 43
5.4.4 EXTENSION DETAIL BUTTON
The Extension Detail page mirrors the existing Task detail page, providing better information related to the movement of the extension sub-Task.
When you click the Extension Detail button, the Extension Detail page appears.
XCM Solutions XCM User Guide
Page 44
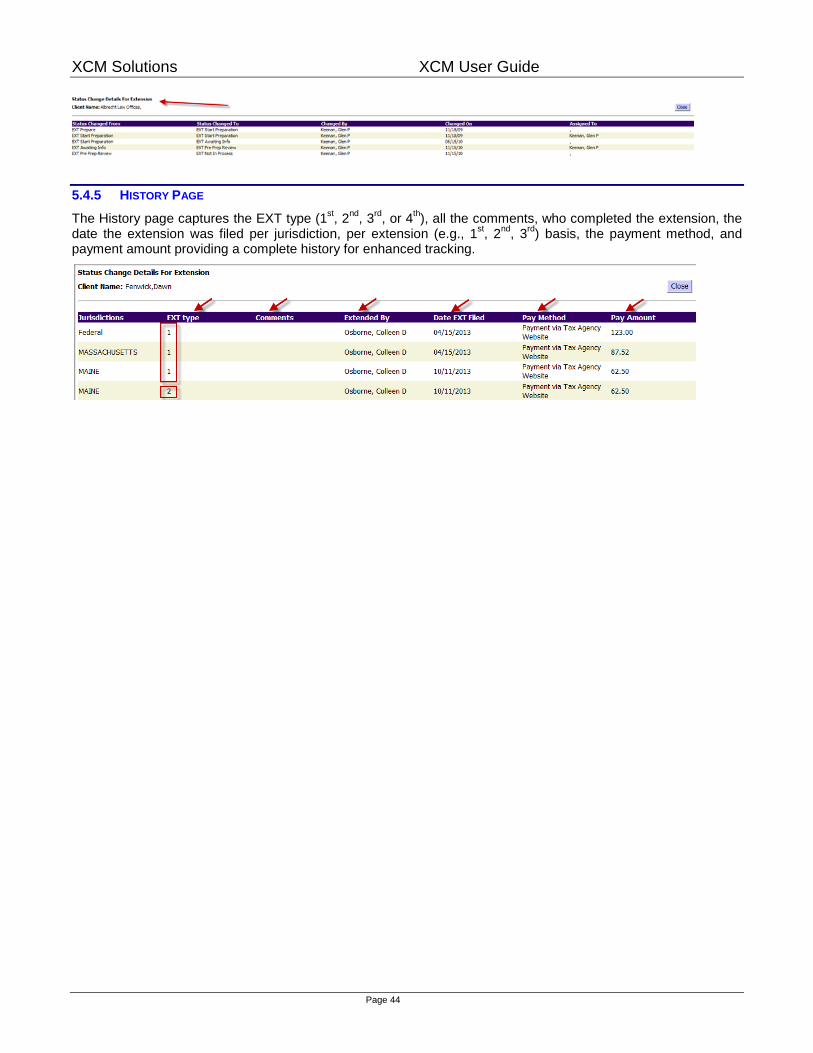
5.4.5 HISTORY PAGE
The History page captures the EXT type (1st, 2nd, 3rd, or 4th), all the comments, who completed the extension, the date the extension was filed per jurisdiction, per extension (e.g., 1st, 2nd, 3rd) basis, the payment method, and payment amount providing a complete history for enhanced tracking.

XCM Solutions XCM User Guide
Page 45
5.4.6 ISSUES/POINTS HYPERLINK
Users can directly access the Task’s Issues/Points page through the hyperlink available within the Extension page. The link provides direct access to all the tabs within the Issue/Points page.
On the Issues/Points page, there is an Extension checkbox. If the Extension checkbox is checked during the saving of an Issues/Points entry, the Questions, Knowledge, Instructions and Review types will be preceded with an E to differentiate them from main Task entries (EQ, EK, EI, ER).

XCM Solutions XCM User Guide
Page 46
5.5 ASSEMBLY
Click the Assembly header within the Task Information page and the Assembly Instructions from appears. This screen allows you to enter instructions for the method you want used when assembling the Task. For example, you inform the assembler who will be responsible for signing the Task how it should be filed (Paper or eFile); as well as add whatever additional items need to be attached to the assembled Task.
This first field is important. You should select Paper if you are planning to file the tax Task in paper format, or if the Task being worked on is a non-tax Task project. This Task will move to a status of Completed after it is shipped.
You should select eFile if you are planning to file the tax Task in electronic format. This Task will move through the various eFile status points upon completion.
You should select None if the Task is an internal or operations Task and nothing is being filed. The Task will be completed with no filing record recorded.
Enter Comments as needed, click Choose to select a person to sign the Task, then click Save.
Click Add Attachment to add additional items to the Assembly. Select from the attachment list or create a new attachment type, click Add To Task to save your entry, then click Close to return to the Assembly page. The attachments apply to all Jurisdictions. If an attachment is not applicable for a Jurisdiction, a comment should be added.

XCM Solutions XCM User Guide
Page 47
After the Assembly instructions are complete, click Close to return to the Task page. All notes and attachments entered will be easily accessible, and legible for all users needing this information.

XCM Solutions XCM User Guide
Page 48
5.6 SHIPPING
The shipping page comprises two distinct areas of shipping information.
The first is the shipping instructions area that allows all users to enter information regarding how the end product is to be shipped to the client.
The second section is the Shipping Details section. Access to this section requires a user the right to add shipping information and complete the Task. Users can be assigned the “Shipping” user right through the Manage Users utility. The Shipping Details portion of the shipping page must be populated and each Deliverable Status must display as “Complete” prior to the Task being moved to the completed status.

XCM Solutions XCM User Guide
Page 49
XCM allows editing of the Shipping Detail section up until the Task is completed, so the Task does not need to be moved to the To Be Shipped or Completed status before the section is activated.
Firm users are completing jurisdictions and deliverables at various stages of the workflow before the Task itself is completed. A Task can remain in its current status while allowing users to complete a jurisdiction/deliverable in the Shipping Details section of the shipping page. There is no need to first move the Task to To Be Shipped or Completed status. If you firm has your site set to Lock Completed Tasks through the Manage Settings and Defaults utility your users need the Override and Move Tasks Out of Completed Status to modify completed jobs. If you have your site set to leave Completed Tasks open (have your setting set to No) then any user with the Manage Shipping right can modify shipping history of completed Tasks and all users can modify other Task data.
5.6.1 SHIPPING PAGE DETAILS SECTION
Click the Task page Shipping header to define the method your shipper should use when shipping this Task. This page is Category sensitive and formatted based on the Task’s type. When the Task is moved to To Be Shipped or Completed, a full shipping page will open allowing each Jurisdiction to be shipped in batch mode or individually.
Tax Category Shipping Page

XCM Solutions XCM User Guide
Page 50
Financial Category Shipping Page
Client Accounting Services Category Shipping Page

XCM Solutions XCM User Guide
Page 51
Other Category Shipping Page
5.7 ROLLOVER
When the return has been completed, the user may click the Rollover header to create a Task for the subsequent period, preserving those parts of the existing Task that are checked. This function may also be performed globally

XCM Solutions XCM User Guide
Page 52
by the System Administrator at a firm-wide level. Click Apply to rollover the Task, then Close to return to the Task page.
5.8 DETAI LS
The Details header located on the Task page allows users to view the status point history of the selected Task. From the My View page, you can also click the D on the right of a Task line item to view the details without having to open the Task itself.
Each time the Task is moved from one status to another, the history is recorded of what the status was changed from and to, by whom and to whom, plus the date the status changed. If your firm utilized the Budgeted/Actual time feature within the application the Details page will also record a record of who entered time within a Task.

XCM Solutions XCM User Guide
Page 53
5.9 EFILE
If you select eFile on the Task information selection dropdown, XCM will track information about the eFile.

XCM Solutions XCM User Guide
Page 54
The Task will be moved through the following status points:
eFile Awaiting Tax Payer Consent Form
eFile To Be Transmitted
eFile Awaiting Government Acceptance
When an eFile Task Consent Form is Shipped to the client on the Shipping tab, the Task will move to eFile Awaiting Taxpayer Consent Form. On the eFile tab, complete the Consent Form Received On field (select Jurisdictions and click Save). This moves the Task into the eFile Awaiting Taxpayer Consent Form section of the eFile view.
After the taxpayer returns the Consent Form, open the Task page and select the eFile button. Now you should complete the final two fields (Date Consent Form Received and Comments) in the eFile Client Form section and click Save. This indicates that you have received the consent form and are ready to electronically file the Task.
This moves the Task into the eFile To Be Transmitted section of the Manage Tasks home page.
Again, open the Task and click the eFile button. This will open the eFile Details form.
You will use this form to enter tracking information about the Federal and State tax Tasks filed electronically. Enter the Document Control Number, enter the date in the Date Task eFiled field and click Save.
When you receive notification of eFile acceptance, open the eFile Awaiting Government Acceptance section of the eFile View and open the taxpayer’s Task. Click the eFile button to open the eFile Details form. Click on the appropriate Federal or State line. If the Task was accepted, enter the date in the Date eFile Task Accepted field. If the Task was rejected, enter the date in the Date eFile Task Rejected field. Click Save. The appropriate line will be updated.
If you are not entering information for all Tasks click Cancel and the Task will remain in the eFile Awaiting Government Acceptance section of the eFile view.
Once you have received all Acceptance dates, click the eFile Move Task to Complete.

XCM Solutions XCM User Guide
Page 55
5.9.1 EFILE – MULTIPLE TASKS, SAME EFILE STATUS
If the Task Information dropdown menu eFile option is selected, and all the Tasks chosen are all in the same eFile status, the appropriate eFile page will appear and allow you to add/edit/delete information on that page for the multiple Tasks.
5.10 SIGNOFFS
If you click on Jurisdictions, Assembly, or Shipping from the Task page, you can then select the SignOff tab from the next screen. This page allows the user to SignOff on appropriate steps completed. It is Category-sensitive and formatted based on the Task type.
If the Task category is Financial, the SignOff page is more extensive, displaying all the necessary SignOffs usually associated with Audits, Reviews, and Compilations. This SignOff page will also allow you to track and control the 45- and 60-day lock down periods on a global client basis.

XCM Solutions XCM User Guide
Page 56
Tax Category Sign Off Page
Financial Category Sign Off Page
Client Accounting Services Category Sign Off Page

XCM Solutions XCM User Guide
Page 57
Other Category Sign Off Page
5.10.1 SIGNOFF FIELDS DEFINED
There are two fields on the Move Task screen (which appears when you move Tasks).
SignOff dropdown that shows the available SignOffs for a particular Task or a group of Tasks
SignOff Comments field to allow the user to enter comments for a particular SignOff

XCM Solutions XCM User Guide
Page 58
5.10.2 SIGNOFF DROPDOWN LIST
If a single Task is selected for the move, the SignOff dropdown will reflect the SignOffs associated with the Task type of the Task being moved.
From the SignOff dropdown list, choose the SignOff type you want completed. When the Save button is clicked, in addition to the Task being moved to the next status selected, the selected SignOff for that Task will be completed with the logged in user’s name and current date recorded on the SignOff.
When only a single Task is being moved, if there is a SignOff Notification prompt assigned to the status the Task is being moved from, there will be a W (Warning Notification Prompt) or an R (Required notification Prompt) next to the related SignOff on the SignOff Dropdown. The W or R will not appear when multiple Tasks have been selected for the move.
When multiple Tasks have been selected for the move, the SignOff dropdown will reflect all the SignOffs for the entire workflow category. For example, if you have different SignOffs for the 1040, 1065 and 1120 Task types, and are moving multiple 1040, 1065, and 1120 Tasks at one time, the complete list of SignOffs for the 1040, 1065 and 1120 Task types will appear in the SignOff dropdown.
5.10.3 SIGNOFF COMMENTS
Use the SignOff Comments field to record comments on the SignOff page for the Task(s) being moved. Either
enter your SignOff text directly within the comments bock or click the ellipsis button to the right of the SignOff Comments box to enter your text, and then click the Apply button.
For example, if Susan (tax partner) asks the admin person to move and complete the Signed By SignOff for her, the admin person would move the Task, choose the Signed By SignOff from the dropdown, and then add the text “Signed off for Susan” in the SignOff Comments field. In addition to the logged in user’s name (admin person) and current date, the text will be recorded on the SignOff page for all the Tasks that are being moved.
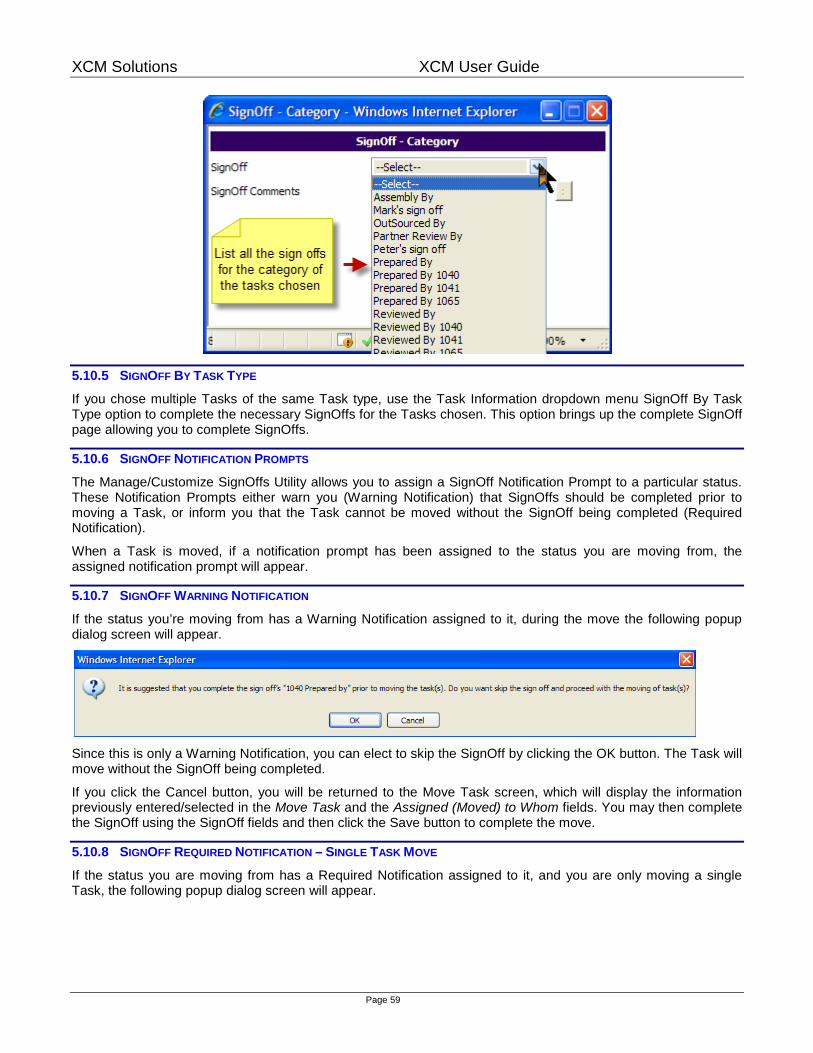
5.10.4 SIGNOFF BY CATEGORY
Use the Task Information dropdown menu SignOff By Category option if you choose multiple Tasks that have multiple Task types, and you want to complete the SignOffs.
After you select the SignOff By Category option, a popup screen will appear displaying the SignOffs for each of the SignOff pages used for the category. Choose the SignOff you want to complete, add any comments to the SignOff Comments field and then click the Save button. The SignOffs for the Tasks chosen will be completed.
XCM Solutions XCM User Guide
Page 59
5.10.5 SIGNOFF BY TASK TYPE
If you chose multiple Tasks of the same Task type, use the Task Information dropdown menu SignOff By Task Type option to complete the necessary SignOffs for the Tasks chosen. This option brings up the complete SignOff page allowing you to complete SignOffs.
5.10.6 SIGNOFF NOTIFICATION PROMPTS
The Manage/Customize SignOffs Utility allows you to assign a SignOff Notification Prompt to a particular status. These Notification Prompts either warn you (Warning Notification) that SignOffs should be completed prior to moving a Task, or inform you that the Task cannot be moved without the SignOff being completed (Required Notification).
When a Task is moved, if a notification prompt has been assigned to the status you are moving from, the assigned notification prompt will appear.
5.10.7 SIGNOFF WARNING NOTIFICATION
If the status you’re moving from has a Warning Notification assigned to it, during the move the following popup dialog screen will appear.
Since this is only a Warning Notification, you can elect to skip the SignOff by clicking the OK button. The Task will move without the SignOff being completed.
If you click the Cancel button, you will be returned to the Move Task screen, which will display the information previously entered/selected in the Move Task and the Assigned (Moved) to Whom fields. You may then complete the SignOff using the SignOff fields and then click the Save button to complete the move.
5.10.8 SIGNOFF REQUIRED NOTIFICATION – SINGLE TASK MOVE
If the status you are moving from has a Required Notification assigned to it, and you are only moving a single Task, the following popup dialog screen will appear.

XCM Solutions XCM User Guide
Page 60
Since this notification indicates a mandatory SignOff, when you click the OK button you will be returned to the Move Task screen. You must select the appropriate SignOff from the dropdown list before the Task move can be completed.
5.10.9 SIGNOFF REQUIRED NOTIFICATION – MULTIPLE TASKS MOVE
If you have selected multiple Tasks for the move, and one or more of the statuses you are moving from have a Required Notification assigned, the following popup dialog screen will appear:
If you click the OK button, the SignOff Log (see below) will appear where you can individually complete the SignOffs for each Task being moved.
If you click the Cancel button, you will be returned to the Move Task screen, which will display the information previously entered/selected in the Move Task and the Assigned (Moved) to Whom fields. You can then complete the Required SignOff using the SignOff field, assuming you know which SignOff is required.

XCM Solutions XCM User Guide
Page 61
5.10.10 SIGNOFF BOTH WARNING & REQUIRED NOTIFICATION – MULTIPLE TASKS MOVE
If you have selected multiple Tasks to move, and the statuses being moved from have been assigned include a combination of Warning and Required Notification prompts, the following popup dialog screen will appear.
If you click the OK button, those Tasks that have the Warning Notifications associated with them will automatically be moved.
In addition, for those Tasks that have Required Notifications assigned, the SignOff Log will appear with the Tasks displayed, allowing you to individually SignOff on each Task. Once the Required SignOffs are completed, you will have to move theses Tasks again.
If you click the Cancel button, you will be returned to the Move Task screen.
5.11 ENG AGEMENT
The Engagement tab is accessible through the Task information dropdown found within the My View, Task, and Search pages. Although this page is accessible for all Task categories the page should be utilized for Tasks within the Financial Task category. . This page captures information ranging from type of engagement, industry, type of tax entity, basis of accounting, client acceptance, scheduling and financials information, partner rotation, and various completion dates. There are two Compliance Reports tied to this page which are the Engagement Dates and Engagement Details reports.

XCM Solutions XCM User Guide
Page 62
6 . 0 S E A R C H T A B The Search tab brings up the Search page which allows users to find some or all Tasks using criteria to define the Search. Use the filters below the Client Details line to search for:
• My Clients or All Clients
• Fiscal Year (defaults to year selected in Utilities Tab – Manage Firm Settings), users can select one or multiple year ends
• Name (enter last name or entity name)
• Keyword (enter text string from first/last/entity name or description fields). This field also allows users to search for client account numbers. Users have the option to select the Account Number radio button to limit their key word search criteria to only search for account numbers
• Period End From and To
• Open Points
• CheckList Items Open
• Task Category
• Type of Task
• Status
• Group
• Original Location
• Current Location
• Who Has Task
• Client(s) which have a Portal (available for XCMportal users only)
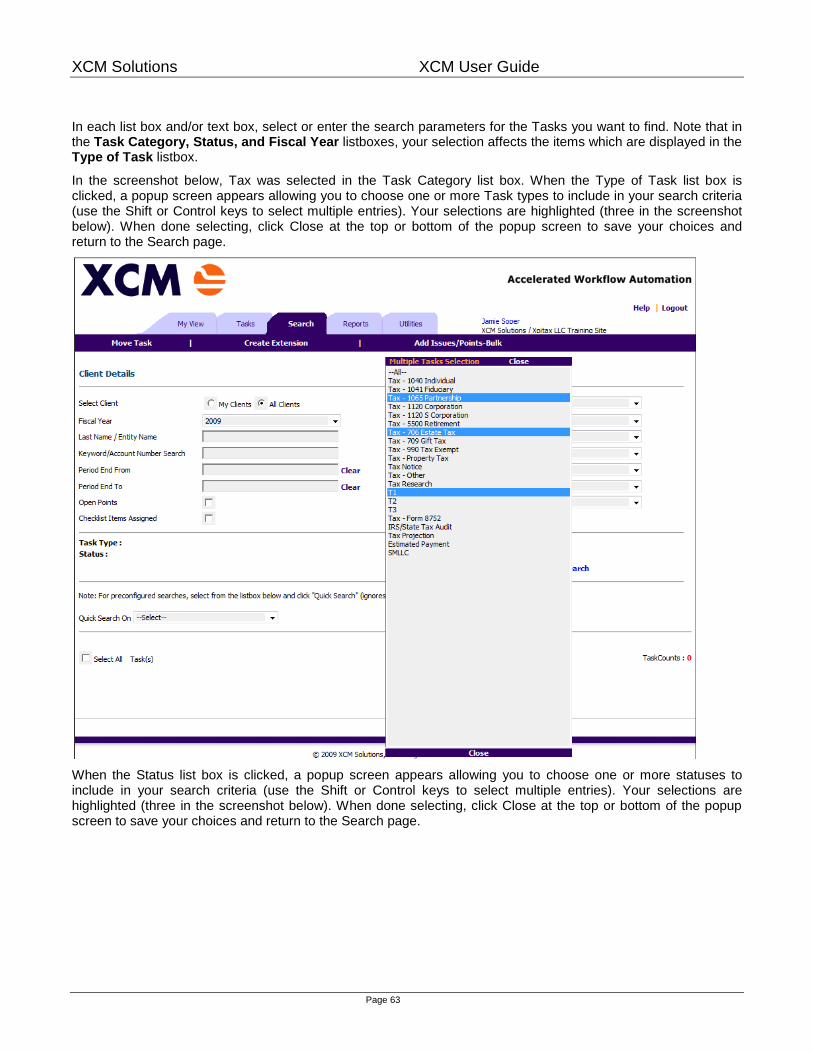
XCM Solutions XCM User Guide
Page 63
In each list box and/or text box, select or enter the search parameters for the Tasks you want to find. Note that in the Task Category, Status, and Fiscal Year listboxes, your selection affects the items which are displayed in the Type of Task listbox.
In the screenshot below, Tax was selected in the Task Category list box. When the Type of Task list box is clicked, a popup screen appears allowing you to choose one or more Task types to include in your search criteria (use the Shift or Control keys to select multiple entries). Your selections are highlighted (three in the screenshot below). When done selecting, click Close at the top or bottom of the popup screen to save your choices and return to the Search page.
When the Status list box is clicked, a popup screen appears allowing you to choose one or more statuses to include in your search criteria (use the Shift or Control keys to select multiple entries). Your selections are highlighted (three in the screenshot below). When done selecting, click Close at the top or bottom of the popup screen to save your choices and return to the Search page.

XCM Solutions XCM User Guide
Page 64
After you have made your Type of Task and Status selections, they will be confirmed on the Task page.

XCM Solutions XCM User Guide
Page 65
If you leave a list box as “—Select—“ or leave a text box blank, that field will not affect the outcome of the Search. After defining your Search, click the Search button.
The results of your Search and the number of Tasks which match its criteria will be displayed at the bottom of the Search page. From the results list, you can open a Task by clicking on the Client name, click on any Who Has EXT to see the Extension details, and/or click on the Details of a Task to see its history.

XCM Solutions XCM User Guide
Page 66
You can also export or print the search results by clicking the blue Report button. The following export formats are supported: XML, CSV (comma delimited text), TIFF, PDF, Web Archive, and Microsoft Excel.
To start another Search, click on the Reset button and define the new criteria.
6.1 SAVI NG SE ARCH FILTERS
After selecting search filters, users have the option to save the selected filters for future use. Instead of clicking the “search” button to generate the search users can click the “Save Filter/s” button allowing the user to save the selected criteria for future use.

XCM Solutions XCM User Guide
Page 67
Once the Save Filter/s option has been selected you will see a pop-up screen where you will enter your Search Name, Search Description, Search level (Firm level, Branch Level, or User Level), and rate your Favorite level for your search (up to five points).

XCM Solutions XCM User Guide
Page 68
After saving your search you can access your search, along with any other saved searches, by clicking the View All Saved Filters button in the upper right corner of the search page, above the Client Details header.
Your saved search pop-up box will list your search results in the order of your favorite rating. The listing will include the Search Name, Search Description, Search Level (FL = Firm Level; UR = User Level; BL = Branch Level; QS = Quick Search), an Edit button, Delete button, and Favorites listing. The QS, Quick Search, report level is a default saved search within XCM. Users do not have the ability edit the name, description, or to delete this saved search. Users do have the ability to change the Favorite rating for the report, a lower rating will push the saved search to the bottom of the list.
6.2 ADV ANCE D SE ARCH
You can also click Go To Advanced Search to specify more search criteria on the Advanced Search page. In addition to the filters available on the search page users have the ability to search based on user role designation, group number, level of difficulty, priority, Task Category, Extension Status, Original due date range, and Currently due date range.
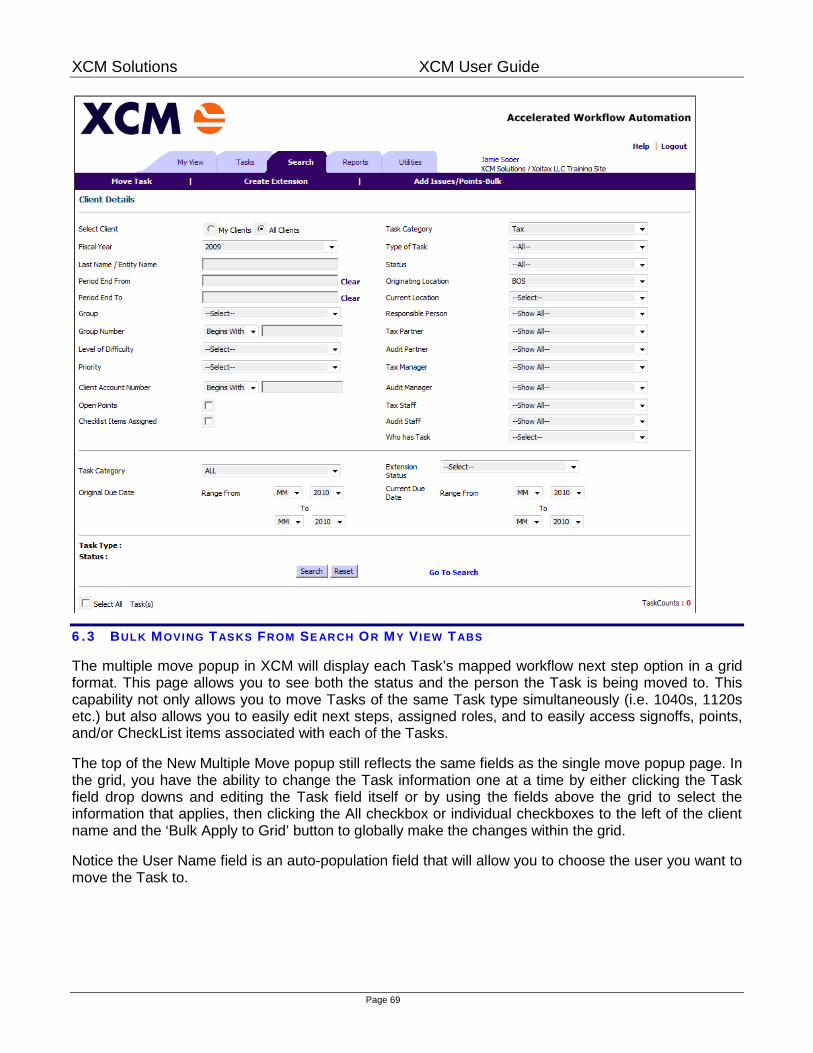
XCM Solutions XCM User Guide
Page 69
6.3 BULK MOVING TASKS FROM SE ARCH OR MY VI EW TABS
The multiple move popup in XCM will display each Task’s mapped workflow next step option in a grid format. This page allows you to see both the status and the person the Task is being moved to. This capability not only allows you to move Tasks of the same Task type simultaneously (i.e. 1040s, 1120s etc.) but also allows you to easily edit next steps, assigned roles, and to easily access signoffs, points, and/or CheckList items associated with each of the Tasks.
The top of the New Multiple Move popup still reflects the same fields as the single move popup page. In the grid, you have the ability to change the Task information one at a time by either clicking the Task field drop downs and editing the Task field itself or by using the fields above the grid to select the information that applies, then clicking the All checkbox or individual checkboxes to the left of the client name and the ‘Bulk Apply to Grid’ button to globally make the changes within the grid.
Notice the User Name field is an auto-population field that will allow you to choose the user you want to move the Task to.

XCM Solutions XCM User Guide
Page 70
6.4 ADDI TION AL MOVE BUTTON (SINGLE & MULTIPLE) OPTIONS
Both the Single Move popup and the Multiple Move popup allow you to update the user listed in the Role section of the routing sheet with the user you are moving the Task to in order to make sure the routing sheet reflects the most current information. This check box will include a default in the Utilities Tab Manage Firm Settings and Defaults page that will allow you to have the checkbox automatically checked on or off as the move popup appears.

XCM Solutions XCM User Guide
Page 71
6.5 ADDI NG ACTU AL T IME TO ROUTI NG SHEET WHEN MOVING TASKS
Both the Single Move popup and the Multiple Move popup will include a new field that will allow the user to add their time to the routing sheet as they move the Task. If time is added from the Move popup page, the actual hours listed on the routing sheet for the person moving the Task will be increased. See Actual/Budget time to the Routing sheet below.
6.6 SE ARCHING FOR MULTI PLE CLIENTS
You are able to run searches for multiple clients at the same time Instead of selecting one Task at a time and moving the Task. You can select multiple clients to search for and move them all at one time. Think about the amount of time that is saved by searching multiple Tasks at a time when 10 or 20 returns come in during the day and need to be started.
Using the Last Name/Entity Name field, type in and select each client you wish to search for. The client’s name will populate within the “Clients” display section found in the middle of the page. Each selected client will populate

XCM Solutions XCM User Guide
Page 72
with a red “X” after their name. In the event that you select the wrong client, you can simply click the “X” to remove the client from your list prior to clicking the “Search” button.
7 . 0 R E P O R T S T A B The Reports tab provides access to various useful reports. As new XCM features are added, and in response to customer requests, the reports list changes over time.
Just like a Search, each Report has criteria (a filter) you can select or enter to define the scope of the Report.
Once the Report has been generated and appears on the screen, you can click Print to print the report or Export to create a spreadsheet file that can be opened in Microsoft Excel.
All report formats allow export to XML file with report data, CSV (comma delimited), TIFF File, Acrobat (PDF) file, Web archive and Excel. As an example, the following Report header is from the Issues / Points Open Report:

XCM Solutions XCM User Guide
Page 73
NOTE: Because of the complexity of some of the reports, they may take several minutes to process and display.
7.1 USER-LEVEL CUSTOMIZED REPORTS
Customized reports are configured and saved at the user level and can only be seen and run by the user who created them.
Most reports have the ability to set a filter for a selected firm user. You can search for information related to any firm user. The reports’ My Client/All Client dropdown list allows you to choose a specific user as a filter.
You can customize reports by choosing the columns that you want displayed in your report and by modifying the report’s sort order.
Your customizations can be saved for ongoing use as a report definition. Instead of having to select criteria filters and columns each time you run the report, simply select and run your saved custom report.
Once the custom report definition has been saved, you can edit its name, criteria filters, included columns, and sort order.
Without using a saved custom report, for a one-off report, after selecting criteria filters, you can either include all columns or instead use your saved custom columns and sort order, just by clicking a radio button.
The following steps to configure and save a custom report apply to all the new XCM reports (a small number of reports do not allow column selection).
Step 1
Open a report and choose the search criteria filters that will give you the desired results. In the example below, the Due Date Summary report is used.

XCM Solutions XCM User Guide
Page 74
*Note: The Type of Task and Status selections allow selecting multiple entries from the popup lists that appear when you click the list box.
After you highlight (hold the CTRL key down while clicking multiple items) one or more entries and then click Close at the top or bottom of the popup screens above, your Type of Task and Status selections are listed on the report page for reference.
Step 2
For the Select Client filter, either click the All Clients radio button to include all clients, or use the My Clients radio button and its listbox to highlight a user and restrict the results to only those clients who have that user assigned to ANY of the user role fields (this filter is not available on all reports).

XCM Solutions XCM User Guide
Page 75
Step 3
Click the Default radio button next to Pick Columns and Sort Order, and then click Choose when it appears.
This action will bring up the Select Columns popup.

XCM Solutions XCM User Guide
Page 76
Check or uncheck entries to customize your report’s columns (click the Reset button to uncheck all or click the Select All button to check all columns), and then click the Save & Next button to continue.

XCM Solutions XCM User Guide
Page 77
Select up to two columns for your sort order. Move column names between the left and right windows by highlighting an entry and clicking the > or < button. The report sort will be hierarchical using the order of the Sort By right window. Currently, there is no way to change the order of the right window entries, so if you want to reverse or change the sort order, remove the entries from the right window, then add them back in the desired order.
Once your sort order is defined, click the Save & Close button to return to the report page.
Step 4
Now that you’ve defined your filters, columns, and sort order, click the Save Custom Report button to name and save your report. Enter a report name and description in the screen below. The report name and description fields can’t contain any special characters and are limited to letters and numbers.
Note that you can’t change the name of a report once you save it, but may alter the description field. If you need to change the name of a report, first edit (see Edit section below) the report without making any filter changes, save it as a different report with the corrected name, then delete the old report.

XCM Solutions XCM User Guide
Page 78
Click the Save button to return to the report page. Your custom report will be displayed at the bottom of the report page in the Custom Reports section.
Now that your report has been saved, you have several operations you can perform on the report by clicking the appropriate button or colored text.
Execute the report using the designed parameters
Modify the criteria filters. When you click this button, you will be returned to the report page, but it will be displayed with the custom report’s existing filter selections. Simply modify your criteria filters, and then click the Save Custom Report button to save your changes.
Note in the screen above that you are presented with the option of saving the report with its changes as a different report (check Save as different report). This is an efficient method of creating multiple reports with only slightly varying criteria.
For example, if you want to run separate due date reports for each firm partner, you would create an initial report using filters specific to one partner, include the columns you want shown on the report, and save the report with an intuitive name related to that partner. Then, click on the report’s Edit button, alter the filters to be specific to another partner, and then click the Save Custom Report button. With Save as a different report checked, alter the report’s name and description, and then click the Save button. You will now see two reports in the Custom Report section, one for each partner, and can efficiently create additional partner-specific reports as needed.

XCM Solutions XCM User Guide
Page 79
Change Column/Sort
Add/delete columns and/or the sort order (Step 3 above)
Change Description
Modify the report’s description (the report’s name can’t be altered)
Delete
Remove the report from the Custom Reports section
When running a one-off report and not a saved custom report, you have the flexibility of choosing columns and sort order instead of being limited to all columns as in previous report versions. After opening the report page, select your filters. If you click the Run Report button, all columns will be included in the report. However, you can first click the Default radio button next to Pick Columns and Sort Order, then Choose to select columns and the sort order (as in Step 3 above).
The number of selected columns will be displayed on the reports page. When you click the Run Report button, the selected columns and sort order will be applied.
7.2 FIRM-LEVEL CUSTOMIZED REPORTS
Along with user-level customized reports there is also the availability to customize firm-level reports. Users that have been granted the user right Manage Firm Level Reports will have the right to create and save custom reports that are available for all firm users. Only users with this right are able to create, modify, or delete the firm-level custom reports, but all users can run them.

XCM Solutions XCM User Guide
Page 80
All of the Reports filter pages will now show two blue bars at the bottom; a Firm Wide Custom Reports section that displays the firm-wide customized versions that have been created for that particular report (and viewable by all firm users), and a My Custom Reports section that shows the logged on user’s personal customized reports.
For users with the user right Manage Firm Level Reports, a radio button will appear on all the reports allowing you to save the report you’re designing as a Firm Wide report, so that all firm users can view and run the report, or as a personal My Reports report. If the Firm Wide radio button is chosen, the report will appear in the Firm Wide Custom Reports section of the report page, allowing all firm users to access the report.
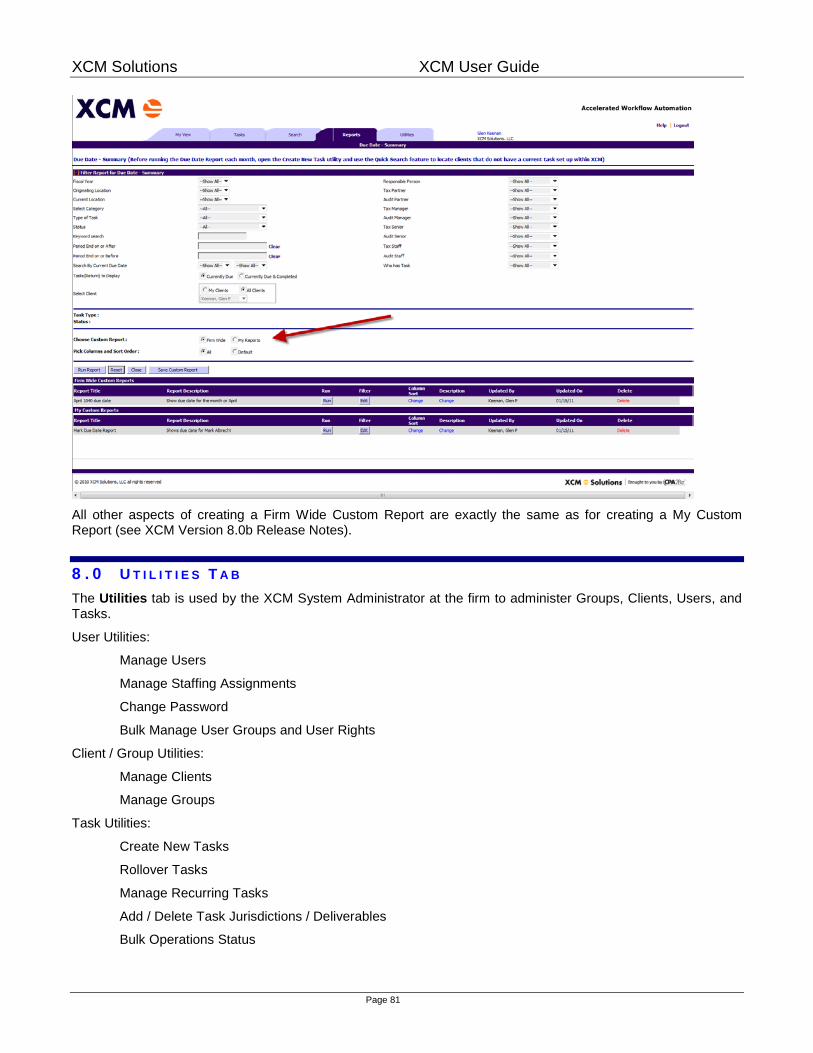
XCM Solutions XCM User Guide
Page 81
All other aspects of creating a Firm Wide Custom Report are exactly the same as for creating a My Custom Report (see XCM Version 8.0b Release Notes).
8 . 0 U T I L I T I E S T A B The Utilities tab is used by the XCM System Administrator at the firm to administer Groups, Clients, Users, and Tasks.
User Utilities:
Manage Users
Manage Staffing Assignments
Change Password
Bulk Manage User Groups and User Rights
Client / Group Utilities:
Manage Clients
Manage Groups
Task Utilities:
Create New Tasks
Rollover Tasks
Manage Recurring Tasks
Add / Delete Task Jurisdictions / Deliverables
Bulk Operations Status

XCM Solutions XCM User Guide
Page 82
Delete / Purge Utilities:
Delete Tasks & Purge Data
Restore Deleted Tasks
Delete & Restore Jurisdictions / Deliverables
Setup Utilities:
Manage Settings and Defaults
Manage Workflow Statuses
Manage Task Types
Create Jurisdictions / Deliverables
Manage / Customize SignOffs
Manage / Customize CheckLists
Prepare For Import
Manage Workflow Mapping
Each of the following administrative operations can be accessed through the Utilities tab. Which ones appear depends on what user rights are applied to the logged in user.
8.1 M AN AGE USERS
By selecting the Utilities tab and clicking Manage CPA Users, this screen will appear listing all the Users set up within your firm
The System Administrator can then add users to XCM by selecting the Add New button. To select a specific location for multi-office firms, select the appropriate Location in the list box.
One suggestion is to re-use user accounts that have been coded inactive instead of creating a new user, especially if the new user takes on the responsibilities of the previous user. You can change the user logon field and other fields to completely redefine the user account for a new employee, allowing all database references for the old employee in Tasks to now reflect the new employee instead
8.1.1 USER INFORMATION
The top portion of the Add/Edit Users page allows you to enter details relating to your user. This information includes the following information: User Name IP Restrict - limits IP addresses from which a user can log into XCM Employee ID Phone Number My View Setting (Classic or Alternate) CPA Home Page Employee Address Email (Login name) Password

XCM Solutions XCM User Guide
Page 83
Primary Billing Rate Secondary Billing Rate Work Experience Begin Date / Year Task Location(s) - users can search/report on all locations listed Industry Group Belongs To Group(s) – Groups are linked to User Right Selections below Primary Role Secondary Role Title/Level Date Hire Date Terminated Part Time Employee Department Niche/Group Expertise
8.1.2 USER RIGHTS MANAGEMENT
Each User can be assigned various rights that affect access levels into XCM.
Recommended settings are that the System Administrator has all rights, and all other users are assigned rights only as required by their roles within the Firm.
For firms with multiple locations, some rights can be granted specifically for a location (see This Location in the table below); some rights are granted across all locations (see Firm Wide in the table below).
User Rights Management:
Reports for Due Date Monitor (This Location):
This gives the user the ability to view and run due date related reports.
Outsource Coordinator: This allows the user to move Tasks to the outsource status. Apply Rollover: This allows the user to bulk rollover Tasks in the Manager Rollover

XCM Solutions XCM User Guide
Page 84
Utility. Manage Users: This gives the user the ability to create new users and edit current
users’ information. Manage email Alerts (Firm Wide): Workflow Statuses Utility.
This allows the user to turn email alerts on and off within the Manage
Manage Status (Firm Wide): This gives the user the ability to enable and disable statuses, as well as create custom statuses within the Manage workflow Status Utility.
Manage Task List (Firm Wide): This allows the user to enable and disable Task types as well as create custom Task types in the Manage Task Type Utility.
Global User: This allows users to view Tasks, clients, and users from all firm locations.
Access Billing Report: This allows the user to run the Billing Report for outsourced items. Manage Clients: This gives the user the ability to add new clients and edit client
details within the Manage Client Utility. Manage Deleted Tasks and Purge Data:
This allows the user to delete/restore Tasks and purge specific information from a Task.
Manage Shipping: This allows the user to manage the shipping information on a Task. Manage Extension: This allows the user to manage extensions. This includes showing the
extension has been filed and the ability to close an extension Task. Manage Map Workflows: This allows the user to customize the firm’s workflow within the
Manage Workflow Mapping utility. Manage Integration Services: This allows the user to manage Integration services. Manage Portal: This give the user the ability to manage the XCMportal. Access Reports: This right allows the user to access the Reports section of XCM. Manage Firm Level Reports: This allows users to create, customize, and save reports that are
available firm wide. Create New Tasks: This right allows the user to create Tasks in bulk in the Create New
Task Utility. Create Recurring Tasks: This right allows the user to customize the defaults throughout the
XCM site. Manage Firm Settings (Firm Wide): This right allows the user to customize the defaults throughout
the XCM site. Manage Import (Firm Wide): This allows the user to export firm locations, active Task Types,
Users, and Groups to enable later import of Users and Clients into XCM.
Add Firm Specific Jurisdictions (Firm Wide):
This allows the user to Create Firm Specific Jurisdictions and apply due dates to Tasks in no info in within the Bulk add/delete Jurisdictions/Deliverables utility.
Manage Staff Assignments: This allows the user to access the Manage Staffing Assignments Utility.
Manage SignOff (Firm Wide): This allows the user to customize the SignOff page for each Task type.
Manage CheckList (Firm Wide): This allows the user to customize the CheckList page for each Task type.

XCM Solutions XCM User Guide
Page 85
Manage Groups (Firm Wide): This right allows the user to organize Clients into Groups to enhance searches and administration. This can be done in the Manage Group Utility.
Do Not Roll Over: This gives the user the ability to check the Do not rollover checkbox on the Task routing sheet.
Create Extension(s): This gives the user the ability to create extension Tasks.
Delete/Restore Jurisdiction(s): This allows the user to permanently delete or restore jurisdictions. Override And Move Tasks Out Of Completed Status
This right only populates if your firm setting (within your Manage Settings and Defaults Utility) is set to Lock Completed Tasks. The right allows a user with this right to edit Tasks after they have been moved to complete.
Enable Default Check List: This right allows the user to pull the default CheckList on the CheckLists Page.
Manage Bulk User Groups and User Rights:
This gives the user the ability to access the Bulk Manage User Groups and User Rights Utility.
Delete/Undelete CheckLists (Task Level)
This right allows a user to delete CheckList items within a Task. Deleted CheckList items will soft delete for the current period and will be removed from the Task when it rolls forward.
Set Required SignOff(s)(Task Level): This allows the user to enable the required signoff prompt on the signoff page.
Enable Scheduler Tab & Reassign in Scheduler
Only firms utilizing XCM Scheduler will
Save Search Filter at Firm Level Users with this right can save searches at the firm level Save Search Filter at Branch Level Users with this right can save searches at the branch level
8.1.3 ASSIGNING USER RIGHTS – NO GROUPS
The Firm User Rights Management section of the page will have one of two views, dependent on whether your firm created user groups or not. If your firm did not create user groups you will see a listing of all user rights. To enable a user right check the box to the left of any item you wish to activate from the dropdown listing. Your site view will look like the screenshot below.
Ungrouped Rights:

XCM Solutions XCM User Guide
Page 86
8.1.4 ASSIGNING USER RIGHTS – USING GROUPS
The Alternative view for this page populates if you create User Groups prior to accessing the utility. Once a User Group has been created your user rights will be organized by group profile. Any user rights not grouped will populate at the bottom of the page. You can apply a group of rights to a user by selecting one or multiple group profiles within the “Belongs To Group(s)” section of the User Information section of the page. Once a profile has been selected you have the ability to customize a profile by activating or deactivating any of the user rights within the utility.

XCM Solutions XCM User Guide
Page 87
8.1.5 USER ACCOUNT DETAILS
Below is a listing of user information fields within XCM. The only required fields needed to add a user account are as follows: First Name, Last Name, Email (Login Name), Confirm Email (Login Name), Password, and Confirm Password. You have the option to associate user rights individually within the page or to create user groups and bulk associate user rights through the Bulk Manage User Groups and User Rights utility.
Location Select location of primary office for each user. If single office = HQ
First Name Enter user’s first name
Middle Name/Initial Enter user’s middle name or initial
Last Name Enter user’s last name

XCM Solutions XCM User Guide
Page 88
Suffix Select the generation suffix from the drop down list
IP Address Restrictions
Entering an IP address will restrict a user’s access to XCM so they can only log into the system from the IP address listed
Employee ID Enter user’s employee ID
Phone Enter the user’s phone number
My View Sets the default My View preference for the user. You can chose the Classic view or Alternate view for the user’s home page
CPA Home Page Select the default View(s) for the user
Address
(see Views section for detail description of each)
Allows you to record the user’s address
Email Address (Login Name)
Email addresses will continue to serve as login names. However, login names can be edited by the XCM System Administrator (but must still be unique).
Confirm Email (Login Name) Enter the same email address/login name to confirm the data is correct
Password Designate a password - the password must contain at least one non-alphanumeric character and be a minimum of 6 characters
Confirm password Re-enter password
Primary Billing Rate Enter the primary billing rate for this user
Secondary Billing Rate Enter the secondary billing rate for this user
Work Experience Begin Date / Year
Enter the date/year of the user’s first experience working within their current experience level and/or within their current industry
Task Locations If you are a multi office firm, enter the locations you want this user to have access to.
Industry Group Enter the industry group(s) this user has experience in.
Belongs to Groups Select which user right groups you want the user to belong to.

XCM Solutions XCM User Guide
Page 89
Primary Role Select which staffing designation best represents your user’s primary role within your firm
Secondary Role Select the secondary staffing designation that best represents your user’s secondary role within your firm
Title / Level Apply the user’s title to their profile
Date Hired Enter the user’s hire date.
Date Terminated If disabling a user account, enter the date the employee was terminated.
Part Time Employee Check this box if they employee doesn’t work full time.
Department Enter the department(s) the employee works within.
Niche/Group Membership Enter all Niche/Group memberships the user might have experience in.
Expertise Enter the areas the user has expertise in.
8.1.6 USER OPTIONS
Account Disabled Select to disable an account. If a user leaves the firm, use this setting to disable their account and deny access to XCM.
Must Change Password
Select to force user to change password during their next login (recommended as an initial setting when creating a new user)
Reset Password Check this box, enter and confirm a new password, then click Save to reset a user’s password. You are unable to enter information in an existing user account’s password field without first checking this box.
XCM strongly suggests that you do not use common passwords among your employees. Since XCM activity is tracked by user logins, unique username/passwords provide for better security and ensure accurate workflow tracking.

XCM Solutions XCM User Guide
Page 90
8.2 MANAGE STAFFING ASSIGNMENTS
The purpose of this utility is to allow you to modify Client records (defaults) or active Tasks, finding and/or replacing existing users (or blanks) that hold one of the Task responsibility roles with another user.
When you open the utility, the following Step 1 screen allows you to define your search criteria. Click either Client Database, which modifies the default settings for client records, or Active Task, which does not modify the client defaults, but instead modifies existing Tasks. Next to Find Person, click Choose to search for a specific user or leave it blank to find unassigned entries. Select the Originating Location and Client Type, then hold down the Control key and click on one or more Responsibility roles. Then click Search.
The Step 2 screen now appears with the results of the Search from Step 1.

XCM Solutions XCM User Guide
Page 91

XCM Solutions XCM User Guide
Page 92
Note that in the original Step 1 Search, Annie Kendrick was selected in the Find Person box. This is verified in the upper right of the Step 2 screen next to Find.
Click Choose to select the Replace With user that will be substituted for the original user. Click No or Yes to additionally replace all blank entries for the selected Responsibility roles with the new user (hold down the Control key to select multiple responsibility roles). Check All or specific line items below to have them included in the replace action, then click Apply to have your changes implemented.
In Step 2 above, the selected records which have Jamie Soper as the responsible person will now have Colleen Osborne in her place. Also, any blank Tax Manager will be replaced with Colleen Osborne.
You can further refine the replacement behavior with two options:
• Check the Replace Staff Assignment only; ignore “Replace From” search box
• Check the Apply Change to both Client Database and Active Tasks box
You can also click Report to either Print or Export your results.
8.3 CHANGE USER PASSWORD
Open this utility to change your password by entering your old password and setting a new one, then click Change. The password must be a minimum of 8 characters and include at least one non-alphanumeric character (example - $, ^, %).

XCM Solutions XCM User Guide
Page 93
8.4 BULK MANAGE USER GROUPS AND USER RIGHTS
The Bulk Manage User Groups and User Rights utility allows a user, with the Manage Bulk User Groups and User Rights user right, to build user group profiles in your XCM site. Each group has user rights, from the Manage Users utility, associated with it. One important thing to note is each user right can only belong to one user group profile. Once your user group profiles have been built, you can bulk add users to the group using the “Bulk Add Users to the Groups” section of the utility.
8.4.1 ADDING A GROUP
To add a group to your Bulk Manage User Groups and User Rights utility first client the “Add new record” button in the top left corner of the page.

XCM Solutions XCM User Guide
Page 94
Once in the “Add new record” screen type your group name then select the user rights you wish to assign the group and move them to the Selection box using the arrows. Keep in mind you will only see rights in the Pick List that haven’t already been assigned to a group. After entering the criteria above click the “Create” button at the bottom of the page to add your group. Within the utility you have the option to view the rights at any time by clicking the “View” button found to the left of each group name.

XCM Solutions XCM User Guide
Page 95
8.4.2 BULK ADD USERS TO THE USER GROUPS
Once you have created your Group Names you have the option to Bulk add users to each of the groups. This utility will not only allow you to bulk apply users to group profiles, it also allows you to bulk associate Expertise, Industry, Department, Title/Level, and Niche/Group information to users. To access this functionality click “Bulk Add Users to The User Groups” found on the right hand side of the page in blue.

XCM Solutions XCM User Guide
Page 96
After clicking the link XCM will provide instructions on using the utility in blue at the top of the page. Step 1 allows you to narrow your search by location, specific user, user status, or any combination of the three. Once you enter your criteria, click “search” and XCM will bring a list of user details that can be updated in bulk and also provide users that match your search criteria at the bottom of the page.
Step 2 allows you to set the primary role, secondary role, Title/Level, Primary Billing Rate, Secondary Billing Rate, Group Name, Industry Group(s), Expertise, Task Location(s), Department, Niche/Group, and CPA Home Page details to be applied to multiple users in the last section of the page.

XCM Solutions XCM User Guide
Page 97
Step 3 allows you to apply the details from step 2 to multiple users. To accomplish this, check the box to the left of the user names and click “Apply”.
8.5 MANAGE CLIENTS
The Manage Clients utility allows users to change Client settings in bulk. This creates great efficiencies for changing client primary Task type, client type, location, group, status and fiscal year end.

XCM Solutions XCM User Guide
Page 98
Select search and filter criteria using fields and drop down lists, then select Search. Then, either select checkbox to left of Client, checkbox on top of page to the left of Client Name (selects all Clients on page), or Select all Clients (selects all clients from search, all pages). Choose appropriate changes to primary Task type, client type, location, group, status and fiscal year end, and select Apply Changes.
Add a new client by selecting Add Client. To edit an existing client, enter part or all of the Client Name in the search box and click Search, then directly on the client name.
Both will bring you to the Client Details page.

XCM Solutions XCM User Guide
Page 99
Enter or edit the fields above. First Name for Individuals can contain both first names for the Taxpayer and Spouse.
To select the Responsible Person, Partner, Manager or Staff, click Choose and select the appropriate user for each role from the Select Staff page by highlighting the user and clicking the appropriate role button.
The Client Group field is optional. Adding a Group will provide enhanced search and reporting capabilities for Clients who are related. Add a Group by selecting Choose to the right of Client Group in the Client Details window above. Select the appropriate Group and click Apply, edit an existing group by highlighting it and clicking Edit, enable or disable an existing Group, or select Add Group to create a new Group (also see Manage Groups utility below).
8.5.1 CLIENTS WITH IDENTICAL NAMES
XCM allows clients with identical names as long as they have unique Client Account Numbers. If the clients are individuals, then all four name fields (First, Middle, Last, Suffix) are included in the uniqueness check.
If you attempt to add a client which matches exactly an existing client’s name and Client Account Number, you will get this error message.
8.6 MANAGE GROUPS
Clients can be organized into Groups for ease of administration and can be searched for based on Group membership (most Search pages include a list box for Group). This Utility is the interface for creating and maintaining Group membership.

XCM Solutions XCM User Guide
Page 100
You can Add and Edit Groups, change Client membership in Groups, and mark Groups as Active or Inactive. Inactive Groups do not show up in Group listboxes.
When adding a client to a group, the utility provides multiple filters making client selection simple.
8.7 CREATE NEW TASK
This utility enables you to create a new Task for one or more clients. First Search for Clients by entering or selecting criteria in the field provided, and then click Search.

XCM Solutions XCM User Guide
Page 101
From the Client list which displays, check All or individual Clients, then click Create Task. Select or enter the Task attributes that should apply to all the new Tasks, click Apply to create the new Tasks.

XCM Solutions XCM User Guide
Page 102
Additional preconfigured searches can be accessed through the Quick Search area within the utility. XCM will provide the ability to show clients that do not have a primary Task for a specific year and location allowing users to ensure Task accuracy.
8.8 ROLLOVER TASKS
Manager Rollover provides a global method of creating new Tasks by selecting previous year Tasks and creating new ones based on their properties.
As in other utilities, you first Search for Tasks by entering or selecting criteria. You also have a Quick Search button that displays Tasks for clients in the selected Location which have not already been rolled over for the selected Year.

XCM Solutions XCM User Guide
Page 103
Once the resulting Tasks are displayed, you can select which ones to Rollover by checking either All or individual Tasks, then clicking the Rollover Task button.

XCM Solutions XCM User Guide
Page 104
See the Quick Start Guide to Preparing for Tax Year section for steps to be performed prior to rollover.
8.9 MANAGE RECURRING TASKS
The Manage Recurring Tasks utility allows you to automate the creation of Tasks according to a user-defined schedule.
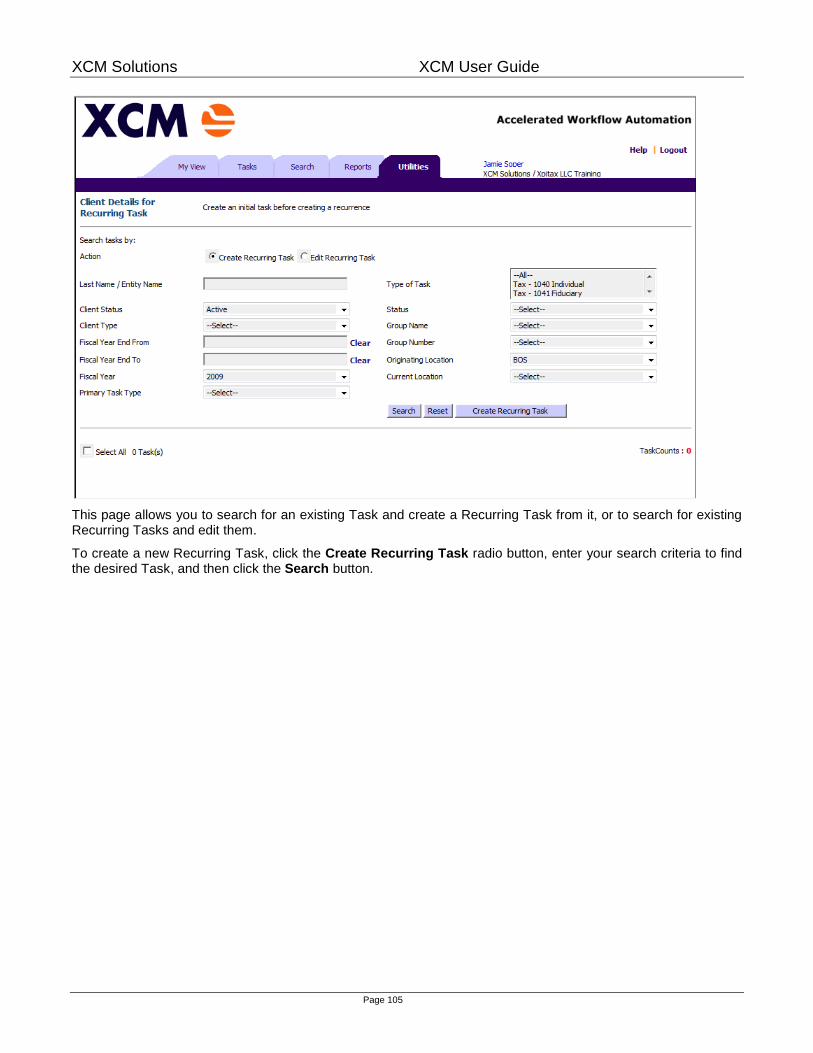
XCM Solutions XCM User Guide
Page 105
This page allows you to search for an existing Task and create a Recurring Task from it, or to search for existing Recurring Tasks and edit them.
To create a new Recurring Task, click the Create Recurring Task radio button, enter your search criteria to find the desired Task, and then click the Search button.

XCM Solutions XCM User Guide
Page 106
Check one or more of the Tasks in the resulting list, then click the Create Recurring Task button.
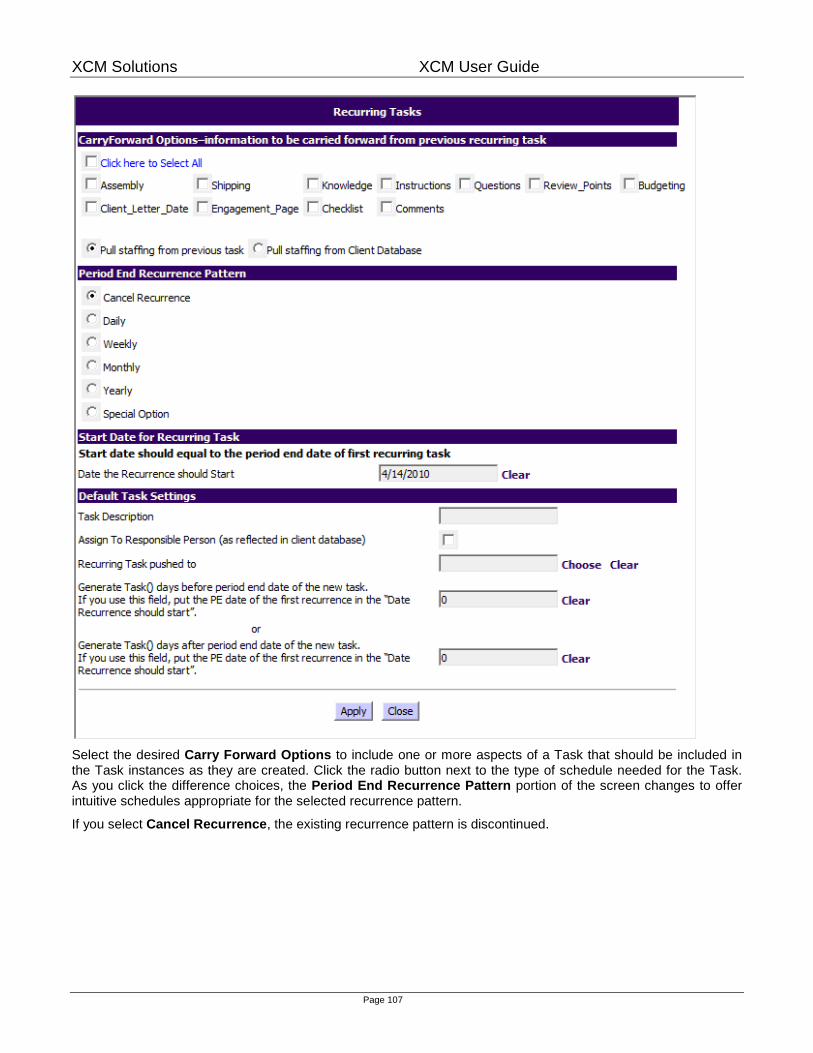
XCM Solutions XCM User Guide
Page 107
Select the desired Carry Forward Options to include one or more aspects of a Task that should be included in the Task instances as they are created. Click the radio button next to the type of schedule needed for the Task. As you click the difference choices, the Period End Recurrence Pattern portion of the screen changes to offer intuitive schedules appropriate for the selected recurrence pattern.
If you select Cancel Recurrence, the existing recurrence pattern is discontinued.

XCM Solutions XCM User Guide
Page 108

XCM Solutions XCM User Guide
Page 109
The Special Option Recurrence Pattern allows you to select up to any six dates, independent of any preset schedule.
Once you have configured the Recurrence Pattern, enter the Date the Recurrence Should Start under Period End Date of Recurring Task. This is the date that the recurrence scheduler will start creating instances of the Recurring Task. The first created instance of the Recurring Task will have a Period End Date determined by your selection for the Period End Recurrence Pattern. It is important that The Start Date equals the Period End Date of the next Task to be created.
Under Default Task Settings, enter a Task Description, whether the Task should be assigned to the Responsible Person or a specific user, and when, relative to each Period End Date, the associated Recurring Task instance should be created.
For instance, if you have a monthly Recurring Task with a Period End Date of the 20th of each month, and you want the monthly Recurring Task instance to be created on the 24th of each month, allowing time for the Task data to become available, you would enter “4” in the Generate Task() days after period end date of the new Task.
Once done, click the Apply button to save your settings
When creating a new Recurring Task, it’s possible to have a conflict between the Date the Recurrence Should Start date and the Generate Task() days before period end date of the new Task entry.
Example: On July 27th you create a monthly Recurring Task with a Period End Date of the 30th of each month. For the Date the Recurrence Should Start you put July 28th, intending to have the first instance of the Recurring Task created with a Period End Date of July 30th. In addition, you would like each Task instance to be generated 5 days prior to the Period End Date. As a result, each Task instance would be created on the 25th of each month.
However, when you attempt to save the Recurring Task by clicking the Apply button, the following error message will appear.
The system can’t create the needed Task for the Period End Date of July 30th (the first applicable Period End Date after the Date the Recurrence Should Start) because it’s now already July 27th.
In order to fulfill the logic of the Recurring Task as you’ve configured it, the system has to create the Task 5 days prior to the Period End Date. In this case, the first instance should be generated on July 25th. However, since July 25th is in the past, it’s not possible to generate the first instance of the Recurring Task.
After clicking OK to close the error message, you will have to change the Date the Recurrence Should Start to a date after July 30th and before August 25th, and then manually create the Task for July. The first instance of the Recurring Task will be successfully created on August 25th.
The process for editing and deleting Recurring Tasks is almost identical to the above. From the Utilities page, open Manage Recurring Tasks and click the Edit Recurring Task radio button.

XCM Solutions XCM User Guide
Page 110
Enter your search criteria and click the Search button. Note that ONLY Recurring Tasks are displayed and that the results will show the latest Task created by the recurrence scheduler for each Recurring Task. Click one or more entries from the resulting Task list and click the Edit Recurring Task button.
8.10 ADD/DELETE TASK JURISDICTIONS/DELIVERABLES
If Firm Specific Jurisdictions need to be added to existing Tasks (must be in No Info In status), or need to be deleted from existing Tasks, under Step 1 define search criteria to find the applicable Tasks, and then click the Search button. From the search results at the bottom of the page under Step 2, check the appropriate Tasks, select the desired Jurisdiction in the list box next to “Jurisdiction to be Added To Tasks in No Info In” or “Delete a Jurisdiction from Tasks in No Info In,” and then click the Apply button.
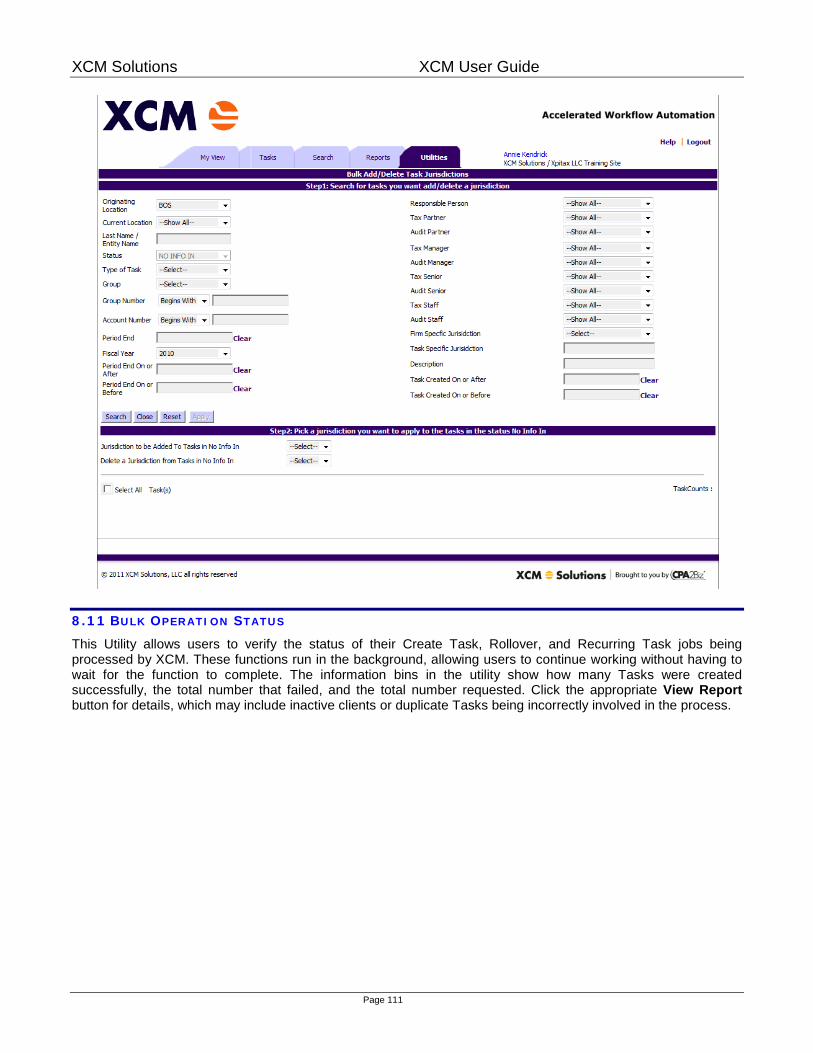
XCM Solutions XCM User Guide
Page 111
8.11 BULK OPERATION STATUS
This Utility allows users to verify the status of their Create Task, Rollover, and Recurring Task jobs being processed by XCM. These functions run in the background, allowing users to continue working without having to wait for the function to complete. The information bins in the utility show how many Tasks were created successfully, the total number that failed, and the total number requested. Click the appropriate View Report button for details, which may include inactive clients or duplicate Tasks being incorrectly involved in the process.

XCM Solutions XCM User Guide
Page 112
8.12 DELETE TASK AND DATA PURGE
This Utility allows you to Delete Tasks in their entirety, or Data Purge selected data within selected Tasks. These operations stage the Tasks in a temporary holding area that XCM applications administrators permanently purge each month.
First select Tasks by entering in criteria and clicking Search. From the resulting Task list, check All or individual Tasks.

XCM Solutions XCM User Guide
Page 113
If you next click Data Purge at the top of the screen, you must next select which data to purge from the selected Tasks (only Tasks in Completed status are eligible for Data Purge). The Tasks themselves remain.
Alternatively, if you next click Delete Task(s), you will be prompted twice to confirm that you want to delete the selected Tasks. Information will be permanently lost (only Tasks in No Info In, NLC, No Longer Task/To Be Deleted, and/or Recurring statuses are eligible for Delete Tasks).
8.13 RESTORE DELETED TASKS
Tasks which have been deleted using the Delete Tasks & Data Purge utility can be undeleted here.
If any Tasks have previously been deleted, they will show up when you open this utility. Check one or more Tasks and click the Restore button to undelete them.

XCM Solutions XCM User Guide
Page 114
8.14 DELETE & RESTORE JURISDICTIONS/DELIVERABLES
If a Jurisdiction has been deleted using the Delete feature on the Jurisdictions page, rather than being deleted directly, it is marked for deletion. This Utility allows you to permanently delete the Jurisdiction or to Restore it if the original deletion was unintended.
Select one or more entries and click either the Delete or Restore button to complete your transaction.
8.15 MANAGE SETTINGS AND DEFAULTS
The Manage Firm Settings utility allows you to select the default Shipping method, Default category, and current Fiscal Year default for new Tasks. Select and click Apply.
Firm Fiscal Year changes the default fiscal year for new Tasks created by using the Fiscal year end for the client selected. This field is also the default date for the Search page and Reports. Administrators should change this date annually.
Firms also have the ability to determine if they want to allow all users, or just those with the Override And Move Tasks Out Of Completed Status user right the ability to modify Tasks after they are moved to the completed status. Those who chose to “Lock Completed Tasks” will have to assign a user right to allow select users the ability to modify completed Tasks. Firms that chose not to lock completed Tasks will not see the Override And Move Tasks Out Of Completed Status right since it is not applicable to their process.
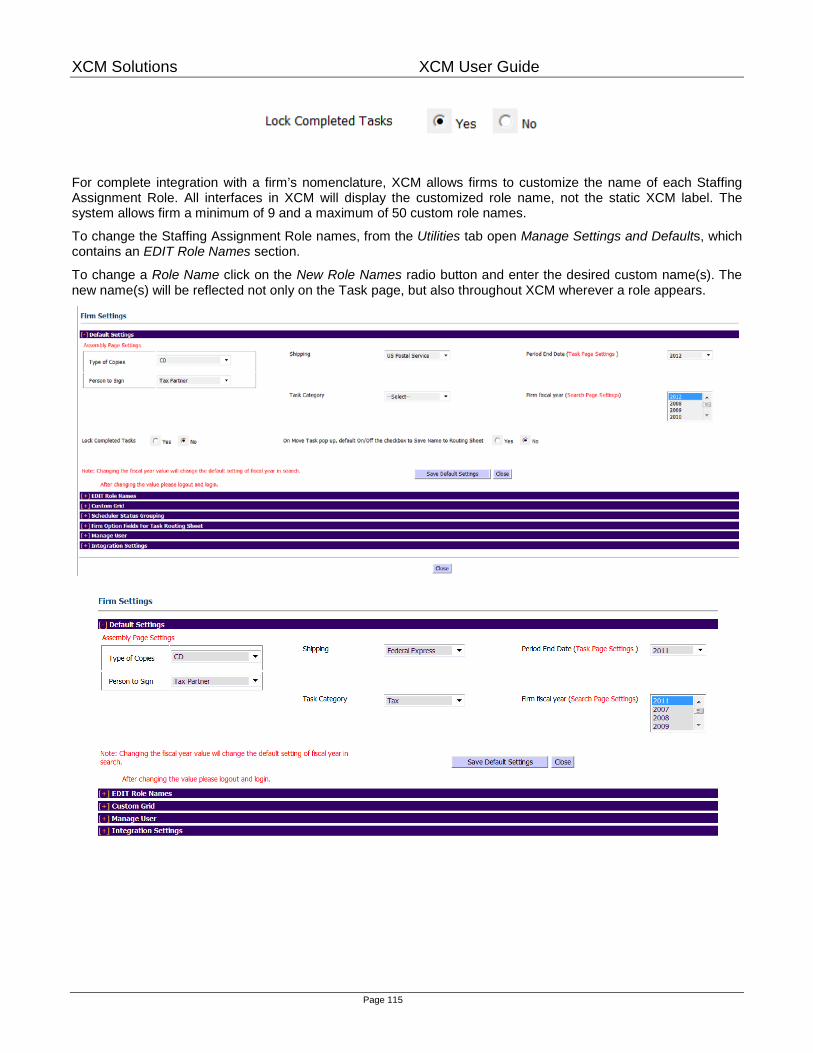
XCM Solutions XCM User Guide
Page 115
For complete integration with a firm’s nomenclature, XCM allows firms to customize the name of each Staffing Assignment Role. All interfaces in XCM will display the customized role name, not the static XCM label. The system allows firm a minimum of 9 and a maximum of 50 custom role names.
To change the Staffing Assignment Role names, from the Utilities tab open Manage Settings and Defaults, which contains an EDIT Role Names section.
To change a Role Name click on the New Role Names radio button and enter the desired custom name(s). The new name(s) will be reflected not only on the Task page, but also throughout XCM wherever a role appears.

XCM Solutions XCM User Guide
Page 116
NOTE: If your firm is using XCM’s integration with ProSystem fx Document®, the Manage Firm Settings will have additional configuration items. Please see the XCM ProSystem fx Document® Integration Setup Guide for details.
8.15.1 CUSTOM GRID
XCM has expanded the search page view allowing firms to choose which information fields they wish to see. Firms are able to move items from the “Grid Pick List” to the “Grid Selection” and chose the order they wish to view information when running a query within the Search page. Once the “Grid Selection” is set up with the desired default information fields in the correct order, click the “Save Custom Grid” button and the search view will be updated for all firm users. Note: All Information fields with an asterisk (*) are required fields. If you do not wish to view some of these fields XCM recommends you move the columns to the bottom of your selection list. This will move items you don’t wish to view to the far right of your screen.

XCM Solutions XCM User Guide
Page 117
8.15.2 MANAGE USERS
The Manage Users section of the Manage Settings and Defaults Utility allows you to create Expertise, Industry, Department, Title/Level, and Niche/Group profiles you can apply to your users through either the Manage Users or the Bulk Manage Users and User Rights utilities. The grid comes with repopulated profiles you can either add to or replace to best match the attributes within your office.
To add a new record, within any of the five profile groups, click the “add new record” button and populate the information screens. Once you are satisfied with the information added click “insert” to update your list. This process can be utilized up update your Expertise, Industry, Department, Title/Level, and/or Niche/Group listings. Once list items have been added they are available to apply to user accounts within the Manage Users and the Bulk Manage Users and User Rights utilities.
8.15.3 EXPERTISE
Expertise allows you to build out areas of proficiency for your users. This is designed to build a foundation you will be able to report on in future releases. At this time you can look at a user’s profile and identify core areas of proficiency each staff member has.
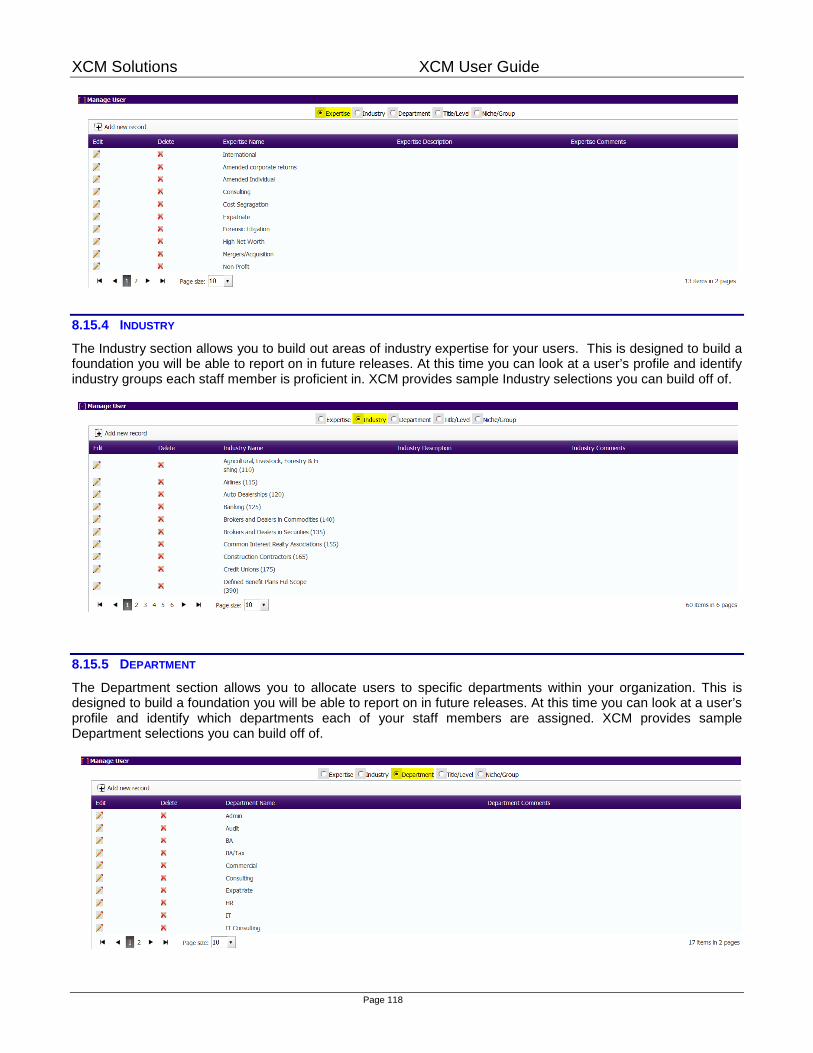
XCM Solutions XCM User Guide
Page 118
8.15.4 INDUSTRY
The Industry section allows you to build out areas of industry expertise for your users. This is designed to build a foundation you will be able to report on in future releases. At this time you can look at a user’s profile and identify industry groups each staff member is proficient in. XCM provides sample Industry selections you can build off of.
8.15.5 DEPARTMENT
The Department section allows you to allocate users to specific departments within your organization. This is designed to build a foundation you will be able to report on in future releases. At this time you can look at a user’s profile and identify which departments each of your staff members are assigned. XCM provides sample Department selections you can build off of.

XCM Solutions XCM User Guide
Page 119
8.15.6 TITLE/LEVEL
The Title/Level section allows you to build out titles and/or organization levels within your organization. This is designed to build a foundation you will be able to report on in future releases. At this time you can look at a user’s profile and identify which level that user is within your organization. XCM provides sample Title/Level selections you can build off of.
8.15.7 NICHE/GROUP
The Niche/Group section allows you to build out specific sub groups your users may be a part of. This is designed to build a foundation you will be able to report on in future releases. At this time you can look at a user’s profile and identify which Niche/Group(s) each staff member is proficient in. XCM provides sample Niche/Group selections you can build off of.
8.16 MANAGE WORKFLOW STATUSES
XCM now contains four workflow silos (Tax, Financial, Bookkeeping/Accounting, and Other), which reflect a total of over 185 status points that you can turn on or off in order to customize your workflows.
By clicking on the Utilities tab and selecting Manage Firm Wide Status, the firm’s XCM System Administrator can toggle on or off certain status Move Options, allowing you to customize XCM to your firm’s workflow.
To edit what status points will be available to your firm’s users, you must first select the desired status category from the list box. After the category is selected, its associated status points will be displayed. You can now turn each status point on or off (check to allow the status point to be used, uncheck to hide it from users), as well as its associated notification email (check the email box to send an email notification to the user when assigned to that status point in a Task’s workflow, uncheck to prohibit an email notification).

XCM Solutions XCM User Guide
Page 120
Once you have chosen the statuses you would like to use within your workflow process click the save button that is located at the bottom of the screen. The statuses you turned on will now be displayed every time a user creates a Task associated with that Category.
8.17 MANAGE TASK TYPE
For a baseline, there are default Task Types included in XCM. Using this utility, firms can extend XCM’s functionality by adding firm-specific Task Types.
To add a custom Task Type, enter a 1 to 5 character Task Code and a Task Description, make sure that the appropriate Category is selected in the Category list box to associate your Task Type with the correct status Category, and then click the Add button.
To modify the Category for a custom Task Type, highlight it, change the Category in the Category list box, and then click the Update button. To disable or enable a firm-specific Task Type, select the box to the left of the Description to enable, and uncheck it to disable. The Tasks Types in the screen below that are enabled (checked) will be displayed in the Task Type list box on the Task page.
You can modify the Task Category and Task Filing Method Default for listed Task Types by following the directions on the screen. You can disable a Task Type to prevent its future use. There are default Task Types which cannot be deleted, signified by a grayed out checkbox.

XCM Solutions XCM User Guide
Page 121
8.17.1 AUTO ROLLOVER TASKS
As with the other current rollover features, the auto rollover will only create the next period Tasks and place them in the No Info In status. Unlike recurring Tasks, Auto Rollover will not assign the rolled over Task to a user.
One important aspect of this feature is that in this initial release the rolled over Task creation is an action directly tied to when the previous Task is moved to completed status. However, as large numbers of Tasks set for Auto Rollover are moved to completed, the necessary Task additions to the XCM database may affect performance. To avoid this possibility and ensure that even during the busy season XCM remains as responsive as possible, between February 1st and April 15th the scheduler will delay processing completed Tasks marked for Auto Rollover until shortly after April 15th, during off hours. Outside of these dates, the rolled over Tasks will be created almost instantaneously.
If a Task has already been manually created prior to its Auto Rollover, the rollover will be skipped. XCM will determine if the rollover Task should be created based on the Client name, Period End Date, and Description. If there is an existing Task that matches those three fields, the rollover Task will not be created.
To enable Auto Rollover for a specific Task Type, from the XCM Utilities tab, open the Manage Task Types utility. Note: select multiple Task Types to enable rollover for all of them at once.
Double-click the Task Type Code checkbox to clear the checkboxes for all Task Types (see screenshot below).
Check the checkboxes in the Task Type Code column next to those Task Types for which you want to turn on Auto Rollover.

XCM Solutions XCM User Guide
Page 122
Click the Auto Rollover button at the top of the page.
On the Auto Rollover screen that appears, select the Task contents that you want to include in the rollover, the New Period End Date, whether to pull staffing from the previous Task or retrieve it from the Client’s current settings, and then click the Apply button.

XCM Solutions XCM User Guide
Page 123
Those Task Types that have Auto Rollover enabled will display On/Edit in the Auto Rollover column.
To modify or cancel the Auto Rollover settings for a specific Task Type, click its On/Edit. On the Rollover screen which appears, modify the settings and click the Apply button to update the Task Type rollover configuration. Or, if you want to turn off Auto Rollover for this Task Type, click the AutoRollover Turn Off button. The Task Type will revert to Not Set in the Auto Rollover column.

XCM Solutions XCM User Guide
Page 124
You can turn on or edit Auto Rollover when multiple Task Types are checked, but if any of the entries already have Auto Rollover configured, you will get this warning screen. Click the OK button to proceed and make the changes to all selected Task Types, or click the Cancel button to exit without making any changes.
*Note: The AutoRollover Turn Off button does not work if you are editing multiple Task Types, the Task Types remain enabled.
A further enhancement included with Auto Rollover is the ability to choose how you would like the Budgeted and Actual hours rolled over. On the Auto Rollover screen, if you check the Budgeting checkbox, three radio buttons will appear offering different options for carrying forward hours:
Budget to this year budget
Actual to this year budget
Both

XCM Solutions XCM User Guide
Page 125
8.18 CREATE JURISDICTIONS/DELIVERABLES
In order to create a Firm Specific Jurisdiction, a user must be granted the following User Right by a firm administrator.

XCM Solutions XCM User Guide
Page 126
Firm Specific Jurisdictions can be administered through the Manage Firm Specific Jurisdictions and the Manage Bulk Add/Delete Firm Specific Jurisdictions pages on the Utilities tab. Each Jurisdiction is associated with a single Task type and is available for selection in the Jurisdiction Tab drop down list box only on Tasks of that Task type.
To create a new Firm Specific Jurisdiction, from the Manage Firm Specific Jurisdictions page on the Utilities tab click the Add New Jurisdiction button.
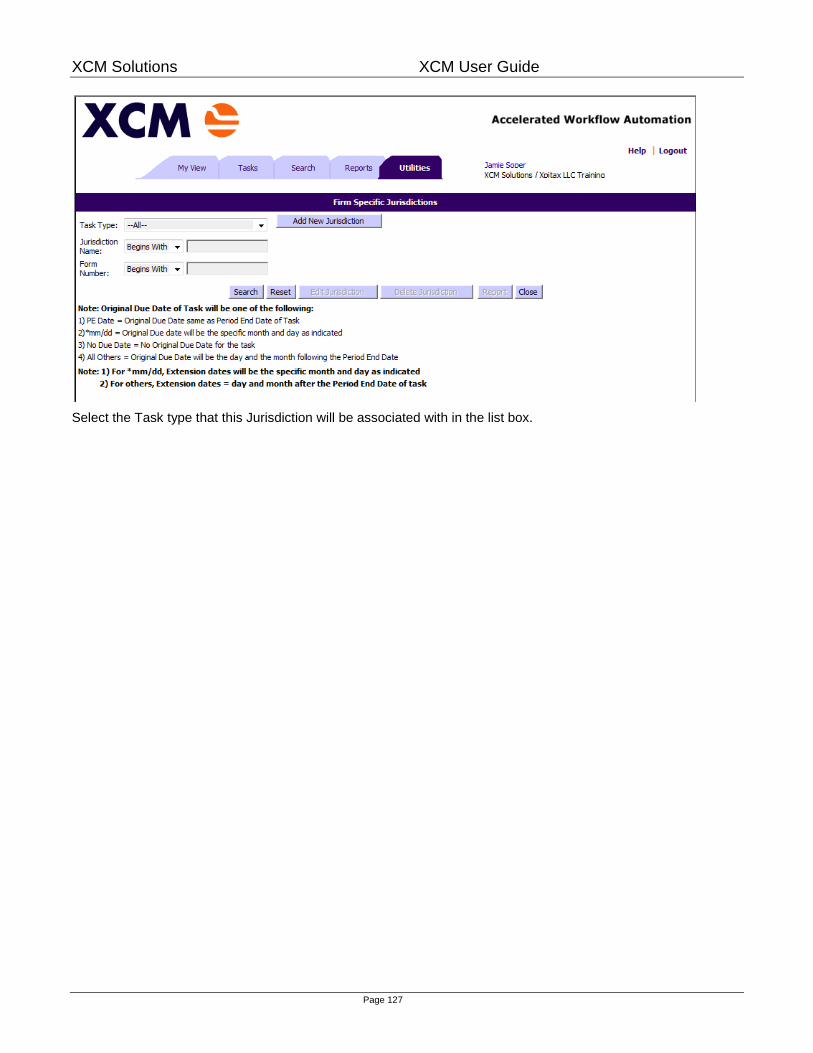
XCM Solutions XCM User Guide
Page 127
Select the Task type that this Jurisdiction will be associated with in the list box.

XCM Solutions XCM User Guide
Page 128
Enter a name and form number for the Jurisdiction. NOTE: There are reserved letter combinations for statutory filings and you may see the following error message when you save the Jurisdiction if a naming conflict is seen by the system.

XCM Solutions XCM User Guide
Page 129
In the Jurisdiction Original Due Date area, choose the method by which the due date will be determined relative to the Period End Date.
Enter applicable Extension dates, and then save by clicking the Save/Add New Jurisdiction button if you are going to add another Jurisdiction, or the Save/Close button to exit the screen.
To add a Firm Specific Jurisdiction to a Task, open the Task and click the Jurisdiction header to bring up the Jurisdictions tab. Click the Existing radio button, then select a Jurisdiction from the list box. Note that the Firm Specific Jurisdictions will appear in the list now (those that are associated with the current Task’s Task type) in addition to the statutory entries, and will be distinguished from them with the letters FS appended to the Jurisdiction name.
To View, Edit, or Delete existing Firm Specific Jurisdictions, open the Manage Firm Specific Jurisdictions utility.

XCM Solutions XCM User Guide
Page 130
Define your search criteria and click Search.
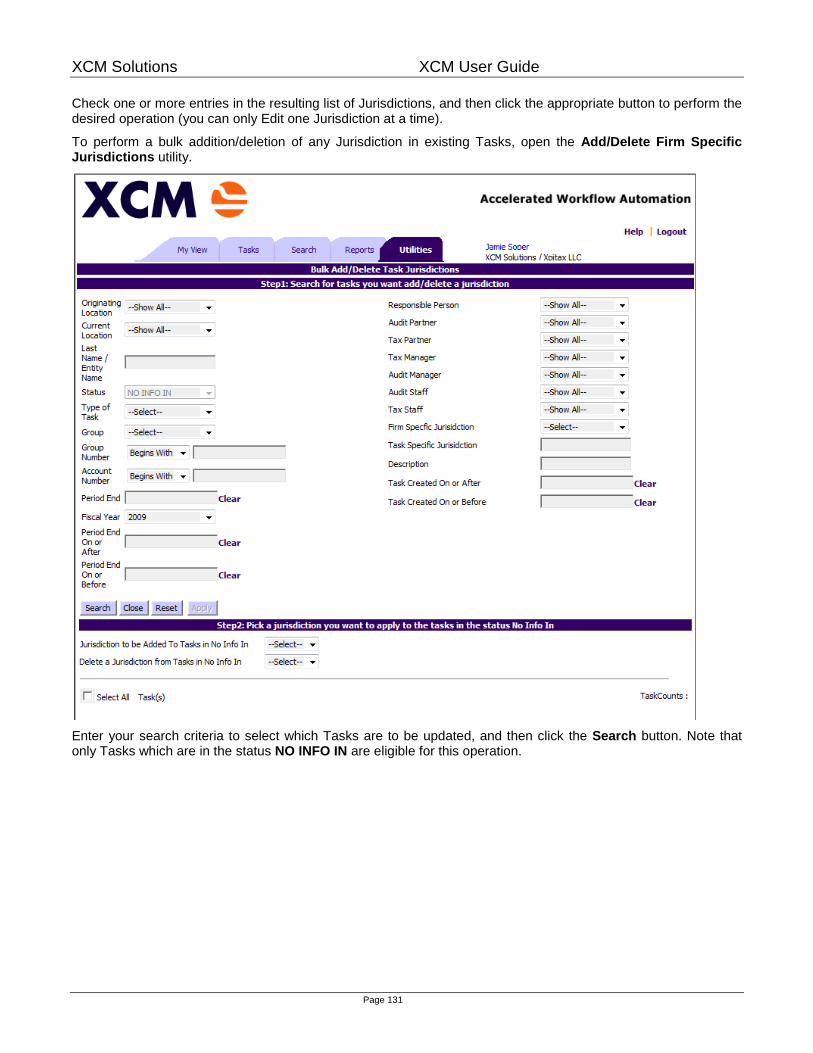
XCM Solutions XCM User Guide
Page 131
Check one or more entries in the resulting list of Jurisdictions, and then click the appropriate button to perform the desired operation (you can only Edit one Jurisdiction at a time).
To perform a bulk addition/deletion of any Jurisdiction in existing Tasks, open the Add/Delete Firm Specific Jurisdictions utility.
Enter your search criteria to select which Tasks are to be updated, and then click the Search button. Note that only Tasks which are in the status NO INFO IN are eligible for this operation.

XCM Solutions XCM User Guide
Page 132
From the resulting list of Tasks, check those that are to be updated. From whichever list box is appropriate, select a Jurisdiction to be either added or deleted from the selected Tasks. Note that the firm specific Jurisdictions have FS appended to the end of the name to distinguish them from the statutory entries. Click the Apply button to make your changes.
8.19 MANAGE IMPORT
This Utility exports an Excel workbook containing spreadsheets listing Firm data for
• Locations • Users • Groups • Task Types

XCM Solutions XCM User Guide
Page 133
This information is used to help populate the Import Spreadsheet, which can be obtained by emailing [email protected]. The Import Spreadsheet is the mechanism for mass data entry into XCM, allowing you to create Clients and Tasks without having to enter them individually.
8.20 MANAGE SIGNOFF
The Manage SignOff utility has been created to allow you to customize the SignOff page at a per Task type level. This new utility will allow greater flexibility to create specific SignOff pages that you may require as part of your control process.
The Manage SignOff utility is separated into three distinct sections:
1) Section #1 is where you select the Task types for which you would like to customize the SignOff page. 2) Section #2 is where you are able to add new SignOffs to the Pick List and then choose which SignOffs
you would like displayed on the SignOff page. 3) Section #3 is where you are able to add the Notification Prompts and the responsible roles that are
required to SignOff.
Follow the steps below to create a customized SignOff page
Step #1 – Using the drop down list, select the category of the Task type(s) for which you want to customize the SignOff page. Next, click on the Task type for which you want to customize the SignOff page and, using the arrows, move the Task type to the Task Type Selection box. You are able to customize the SignOff page for multiple Task types at the same time. Use the control and shift keys to pick multiple Task types and move them over in bulk.

XCM Solutions XCM User Guide
Page 134
Click on the Task Type within the Selection box to view the existing SignOffs and notification prompts for the Task type chosen. You can only click on one Task type at a time to view the existing SignOffs.
Step #2 - To create a custom SignOff, add the new SignOff description in the text field, and then click the Add button. This will add your custom SignOff to the pick list. You can delete a SignOff from the pick list by highlighting the SignOff and clicking the “Delete from Pick list” button. This will delete the SignOff from the pick list but will not delete the SignOff from any existing SignOff pages.
To add a SignOff, simply select the SignOff you would like added from the SignOff Pick List and use the arrow buttons to move it to the SignOff Selection box. Use your control and shift keys to move multiple PickList items at one time.
Step #3 – Use the up and down button to reorder the SignOffs as they are to appear on the SignOff page. Once you are finished arranging the SignOffs, click on the Save/Update button to have the SignOffs apply to the Task types in the Task Type Section box above. Important: all Task types, not just the highlighted Task type, listed in the Task Type Selection box will be updated with the new SignOffs.
Step #4 - Once the Save/Update button is clicked, the grid will reflect the new SignOffs. Click on the box to the left of SignOff and using the Type of Prompt and Status Prompt pull-down menus, add/change the notification prompt. The Warning prompt will indicate that a SignOff has not been completed, but will allow a user to continue to move the Task. The Required prompt will indicate that a SignOff has not been completed and will not allow you to move the Task until the SignOff has been completed (we suggest in most cases that the Required prompt only be used in limited areas such as when the Task is moved to the status Completed).
In addition to the Warning/Required notification, you need to indicate when the prompt should appear. To do that, use the Status Prompt drop down to pick the associated status. The SignOff Prepared By in the screen shot above is associated with the status Preparation. If the user tries to move the Task out of the status Preparation, without completing the Prepared By SignOff, a prompt will appear reminding the user the SignOff needs to be completed.
8.21 MANAGE CHECKLIST
The Manage CheckList Utility was created to allow the firm/company to standardize the work that needs to be done in order to complete a Task. XCM allows this standardization to be created at the Task type level, so that you can create a standard set of CheckList items for a form 1120 tax return as opposed to an audited financial statement. Because this information is captured within XCM, it will allow partners, managers and firm administrators to quickly view, in detail, how work on their clients is progressing, and provides a guide to staff members of what needs to be done for a particular Task.
The Manage CheckList Utility operates much the same way as the Manage SignOff Utility. The Utility is separated into three distinct sections:
1) Section #1 is where you select the Task types for which you would like to customize the CheckList page. 2) Section #2 is where you are able to add new CheckList items to the Pick List and then choose which
CheckList items you would like displayed on the CheckList page. 3) Section #3 is where you are able to add the Associated Status and the Assign Person staffing role (which
is populated from the staffing reflected on the Routing page) to the CheckList page
Follow the steps below to create a standardized CheckList page

XCM Solutions XCM User Guide
Page 135
Step #1 – Pick the category of the Task Type that you want to standardize the CheckList page using the drop down. Then, click on the Task Type for which you want to customize the CheckList page and use the arrow buttons to move the Task Type to the Task Type Selection box. Because you can customize the CheckList page for multiple Task types at one time, use the control and shift keys to pick multiple Task types.
Click on the Task Type within the Selection box to view the existing CheckList items for the particular Task type chosen. You can only click on one Task type at a time to view the existing CheckList items.
Step # 2 - Using the text field, add the CheckList Name and CheckList Description for the new CheckList items to be added to the pick list, and then click the Add button. You can delete a CheckList item from the pick list by highlighting the CheckList name within the pick list and then clicking the “Delete from Pick list” button. This will

XCM Solutions XCM User Guide
Page 136
delete the CheckList items from the pick list but will not delete the CheckList items from any existing CheckList page.
To choose a CheckList item, simply highlight the CheckList item and use the arrow button to move to the CheckList Selection box.
Step # 3 – Use the up and down buttons to reorder the CheckList items to match how they are to appear on the CheckList page. Once you are finished with selecting the CheckList items, click on the Save/Update button to have the CheckList items apply to the Task types in the Task Type Section box above. Important: whatever Task types are listed in the Task Type Selection box will be updated with the new SignOffs.
Step # 4 - Once the Save/Update button is clicked, the grid will reflect the new CheckList items. Click on the box next to the CheckList item(s) and using the Associated Status and roles drop down lists, complete the grid. The associated status will be displayed on the CheckList page and the application will look to the routing page for the recorded role to populate the Assigned Person field on the CheckList page. These are not required fields.
8.22 MAPPING WORKFLOWS
Workflow mapping allows the firm to map their individual workflows on a per TaskType basis. This feature is used to provide customized workflow processes for firm users to follow as they process their work.
Once the workflow for a specific TaskType is mapped, the next Status and the Move Task To Whom fields shown on the Move Task popup screen will be pre-populated with the configured mapped workflow. Unless the specific Status has been locked down by the firm’s administrator (who might want to limit interns to moving a Task only to a specific Status), the user still has the flexibility to ignore the mapped workflow selection by choosing another Status or user instead.
From the Utilities tab, click Manage Workflow Mapping to bring up its interface.
This page operates much like the Manage/Customize CheckLists and Manage/Customize SignOffs utilities. In the category listbox, first choose the category of the Task Type for which you want to map the workflow. From the Task Type PickList box on the left, choose one or more Task Types (hold down the CTRL or Shift key while clicking to highlight more than one), then click the > button to move them to the Task Type Selection box on the right.
In the Task Type Selection box, highlight one of the entries. This action will activate the Workflow Mapping section of the page below and apply your configured workflow steps to the highlighted Task Type.
As an initial step in configuring your workflow for the selected Task Type(s), you would typically start by selecting No Info In Status from the From Status listbox. Then, from the Next Status listbox, choose the appropriate next workflow Status. Finally, if the Next Status selected calls for a specific user who should be assigned to that Status, you would pick the Staffing Assignment Role of that user for the Move Task To Whom listbox.

XCM Solutions XCM User Guide
Page 137
When the Task is actually moved to this Status during the actual workflow process, the Move Task To Whom field on the Move Task popup screen will automatically display the name of the user who holds that Staffing Assignment Role assigned for that Task.
Leave the Move Task To Whom selection as --Select-- (blank) if the Task is to be moved to the Admin pool.
When your workflow step is defined, click the Save/Update button to save that entry, and then create the rest of the workflow steps following the same procedures. In the Workflow Mapping section, you can click the checkboxes next to entries to modify or delete them. For editing ease, using the arrows on the right, you can also move the entries up or down as needed, changing their order in the workflow.
An example of a completed workflow for a Form 1040 Individual is shown below:
If you want to lock down a specific Status so that users are forced to follow the configured workflow, check the checkbox next to the appropriate workflow entry, and then check the Lock Workflow checkbox on the right. The Workflow Status icon for that entry will appear locked signifying that it is not optional and must be followed by users when the Move Task popup screen appears.

XCM Solutions XCM User Guide
Page 138
Our design of the workflow mapping component allows a great deal of flexibility in how workflow is configured. It doesn’t have to be a linear set of steps, but can be a branching decision tree with multiple Next Status selections possible for a current Status by not defining a specific Next Status for it, or simply not locking that entry (the Status selections themselves that appear as choices in the Move Task popup screen are controlled by the Manage Task Type utility). You can also have multiple Statuses all have the identical Next Status as their configured next step in the workflow.
For example, you could configure Preparation as not mapped to a specific Next Status in your workflow. Then, you could configure Review, International Review, and Salt Review to map to Open Points next. So, when the Task is in Preparation and the Next Status is normally Review, the user could instead choose International Review on the Move Task popup screen (because there is no defined Next Status, or that Status move is not locked) and still stay within the firm’s configured workflow since the subsequent Status would still be Open Points.
9 . 0 X C M W I N D O W S F I L E S Y S T E M I N T E G R A T I O N & U R L L I N K S XCM has the ability for firms to create links to files stored on the firm’s local network directly on the Task page. This feature provides an efficient way to organize and access reference documents necessary to complete the Task.
This feature must first be turned on for the firm by an XCM administrator so that the Task page displays the needed interface.
9.1 ATTACHING NETWORK FILES
From an open Task, click the plus (+) sign on the left of the Attach Local (Network) Files header in order to display or attach files.

XCM Solutions XCM User Guide
Page 139
Click the Attach File button.
The first time you use this feature on your workstation, an ActiveX control will be downloaded to your system, so there may be a short delay while the control is installed. After installation, the File Explorer screen will appear.

XCM Solutions XCM User Guide
Page 140
Just as you would in My Computer or Windows Explorer from your desktop, use the left-hand window to navigate to the desired folder on your network. Once you’ve selected the proper folder, click to highlight one or more files in the right-hand window (you can use the Shift and Control keys to select multiple documents at once), then click the Attach File button.

XCM Solutions XCM User Guide
Page 141
You will see a confirmation appear in the lower left of the screen.
You can now browse for other files to attach, or can click the Close button to return to the Task page, which will refresh and will display the attached documents.
Note that the Document Title column displays the network path to the file in addition to the file’s name. This is the path that uniquely defines the file’s location on your firm’s network. It may be slightly different than what you would expect to see because you may have browsed to the file through a mapped drive (for instance, the S: drive). However, when in this format, the file can be found even if you don’t have the mapped S: drive, helping to avoid connectivity problems between different users attempting to access the same file, and assisting your local IT engineer in diagnosing problems.
These files are actually just linked through the Task page, not uploaded to XCM’s server.
The Attach Local (Network) Files header displays the number of files attached on the left, so even if this header is minimized by clicking the minus (-) sign on the left, you’ll still be able to see how many files are attached.
In addition to the displayed Document Tile and Attached Date, you can add or edit a helpful reference Comment
to the file by clicking the ellipsis button to the right of the file.

XCM Solutions XCM User Guide
Page 142
Click the Save button to save your comment, or click the Close button to exit with saving your changes.
If you attempt to open a link to an attached file, and the file has been moved or deleted from its original location on the network, you will get the following error message. You should contact your local support personnel to determine where the file is now located, Detach the file (see next section) to remove the inaccurate link, and then Attach it from its current location.
9.2 DETACHING NETWORK FILES
To remove a file from the Task, click the checkbox next to one or more files, and then click the Detach File button.
The screen will refresh and now display any remaining files.

XCM Solutions XCM User Guide
Page 143
9.3 OPENING AND EDITING NETWORK FILES
You can open and edit the attached files directly from the Task page without having to use My Computer and browse for them.
Click on the Document Title column link to the file to open it. The first time you do this on your workstation, there may be a slight delay while an ActiveX control is downloaded and installed.
The file will open using whatever application is associated with the file’s extension; just as it would work in My Computer when you click open a file.
In this case, when the Explorerdetailsview.pdf file above is clicked, Adobe Acrobat Reader automatically opens the file because of the PDF extension.
You can edit the open file and save your changes.
9.4 ATTACH URL/WEBSITE HYPERLINK
The Attach Local (Network) Files and ProSystem fx Document Files Links sections have a new button available named URL File Link. This button allows the user to place a hyperlink on the routing page to a particular website. Simply click on the URL File Link button and copy and paste the related URL address to the field. The hyperlink to the website will be added to the routing page for future reference or review.

XCM Solutions XCM User Guide
Page 144
1 0 . 0 Q U I C K S T A R T G U I D E T O O U T S O U R C I N G
A. Login To XCM
1. Using your browser, navigate to www.xcmsolutions.com
2. Select Client Login and, when prompted, enter your login name and password to login to XCM
B. Set Up Users
1. Select Utilities Tab, then select Manage CPA Users
2. Add users to provide firm employees access to XCM
C. Set Up Clients and Tasks
1. Option #1
a. Email
- Complete Import Spreadsheet
b. Populate the Import Spreadsheet with your client base and related Tasks, and return the completed
document to XCM.
to request Microsoft Excel Import Spreadsheet.
2. Option #2
a. Select the Task tab to create a new Task
– Add Clients Manually
b. Choose Client c. Select the Add New Client button
d. Complete required fields including CPA Responsible, then click Save
e. On Task page, select Task Type and enter Period End Date(Tax only), then click Save
D. Scan Supporting Informational Documents(PDFs, spreadsheets, etc.) to
z:\Xpitax Files Uploaded\
E. Copy Tax Data File(see Outsourcing With Xpitax for specific Tax Software Instructions) to
z:\Xpitax Files Uploaded\
F. Attach Files To Task
1. Open up the Task to be outsourced (select Search tab, search for and select a Task to bring up the Task
page).
2. Select Upload and navigate to the folders above to attach Source Documents PDF file (and/or other
supporting documentation) and Tax Data File (Tax Only) to the Task.
G. Move Task to Outsource
1. Select Move button on the Task to move the return to Outsource.
H. Accept Return And Download Completed Files
1. Select My View, open the status bar Admin View, and click on the OS Awaiting Acceptance status.
2. Click open the Task.
3. On the To Firm side of the Task at the bottom, check the boxes next to the files to be downloaded, click the
Download button, browse your network for the folder below, click the Download button, and the files will be
transferred locally to the selected folder.
z:\Xpitax Files Downloaded\

XCM Solutions XCM User Guide
Page 145
I. Restore The Tax Data File (if outsourcing a tax return)into your tax software (see Outsourcing with Xpitax for
specific Tax Software Instructions).
J. Move Task to the next step in your firm’s workflow (e.g., Post Outsource Completion Review or
Unassigned Awaiting Review).
1 1 . 0 O U T S O U R C I N G W I T H X P I T A X This section familiarizes Outsource Coordinators with the procedures of sending files to and receiving files from the Xpitax processing center using XCM. Xpitax accountants (preparers, bookmarkers and supervisors) are seamlessly integrated into your firm’s workflow, allowing you to outsource Tasks efficiently and easily.
Basically, you are going to scan documents, save them on your network and send them to Xpitax through an XCM Task.
These documents can be any supporting information, tax application files, spreadsheets, PDFs, etc., and are used by Xpitax accountants to help complete the Tasks assigned to them.
Files can be attached to a Task at any time and are transferred to secure servers in a Boston datacenter (see Uploading Files below).
Except for the file transfers, the steps involved in processing a Task are identical to those outlined previously in this guide. The only difference is that some of the steps in the process of completing the Task are handled by Xpitax personnel rather than firm employees. Communication between various responsible persons occurs through XCM Issues/Points, just as it does for Tasks processed in-house.
Once work is completed by Xpitax personnel, the Task is Moved to its next status as defined by your firm and responsibility for the next step is assigned to the appropriate firm employee.
There are just a couple of steps needed to prepare your environment for Outsourcing.
11.1 CREATE UPLOAD AND DOWNLOAD FOLDERS
Each firm’s network is different, so in the following text, when the Z: network drive location is mentioned, substitute your firm’s shared storage drive/location. If you are unsure where you should be storing files to be outsourced, please see your firm’s network administrator.
Create the following folders on your firm’s network:
z:\Xpitax Files Uploaded
z:\Xpitax Files Downloaded
Users must be able to read and write to these folders. They will provide a temporary storage location for files on their way to and from Xpitax Outsource.
11.2 PREPARE TO OUTSOURCE A TASK
Create a new Task that will be Outsourced, defining the Task Type and other specifics on the Task page.
Scan the client organizer and source documents to a PDF file. Save the PDF file using the following location and naming format:
XCM Solutions XCM User Guide
Page 146
z:\Xpitax Files Uploaded\SmithJohn200x.PDF
Export the data file from your firm’s tax application software (see below) and save it to:
z:\Xpitax Files Uploaded\
Depending on the division of responsibilities within your firm, you may also Move the Task to To Be Outsourced status to note that it is destined to be outsourced as opposed to being processed in-house.
11.3 EXPORT CLIENT’S TAX APPLICATION FILE FOR OUTSOURCING
You must export the client’s tax application file in preparation for the upload to XCM.
For export instructions specific to your firm’s tax software, please read the appropriate XCM Tax Software Export/Import Guide. Guides can be downloaded from the Help page (after logging in to XCM, click Help on the main login page) and include these and other applications:
ProSystem fx™ Lacerte™ UltraTax™ ProSeries™
11.4 UPLOAD TASK DOCUMENTS FOR OUTSOURCING
1. Open the Task page.

XCM Solutions XCM User Guide
Page 147
2. To attach a file to the Task, click the Upload button.
3. A window will open with “Loading Control. Please wait...” displayed (may pass very quickly), then the Upload Manager will initialize and appear.
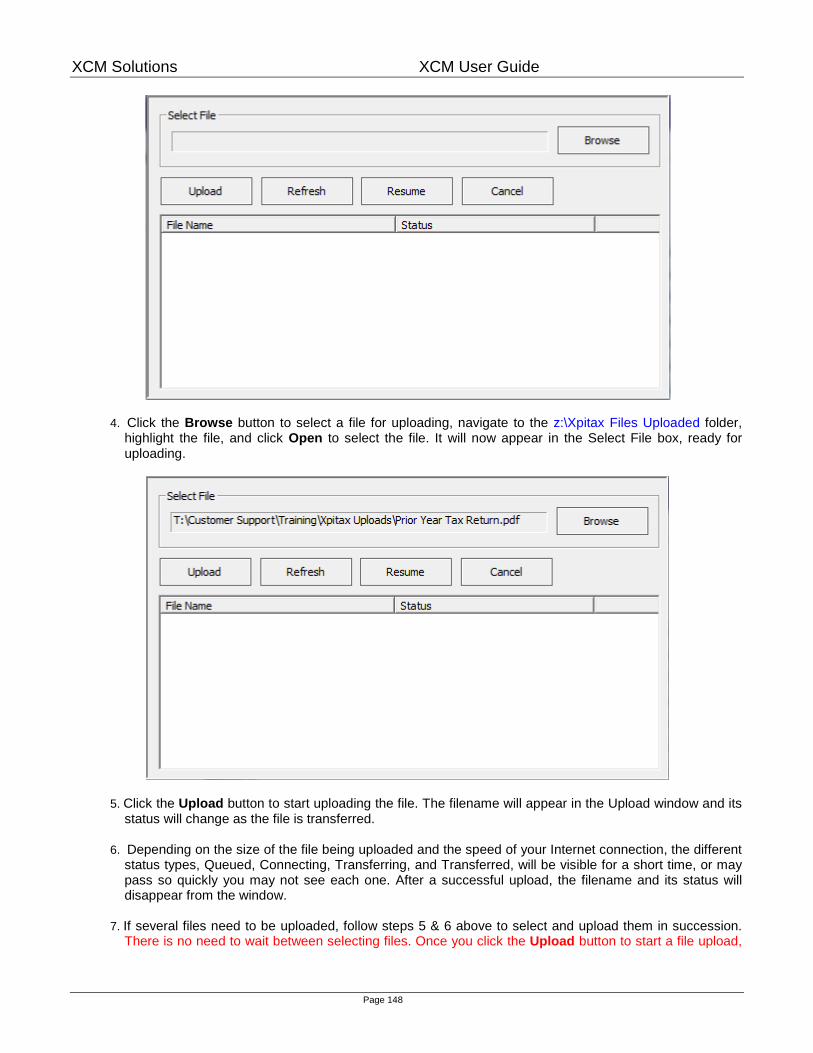
XCM Solutions XCM User Guide
Page 148
4. Click the Browse button to select a file for uploading, navigate to the z:\Xpitax Files Uploaded folder, highlight the file, and click Open to select the file. It will now appear in the Select File box, ready for uploading.
5. Click the Upload button to start uploading the file. The filename will appear in the Upload window and its status will change as the file is transferred.
6. Depending on the size of the file being uploaded and the speed of your Internet connection, the different
status types, Queued, Connecting, Transferring, and Transferred, will be visible for a short time, or may pass so quickly you may not see each one. After a successful upload, the filename and its status will disappear from the window.
7. If several files need to be uploaded, follow steps 5 & 6 above to select and upload them in succession.
There is no need to wait between selecting files. Once you click the Upload button to start a file upload,
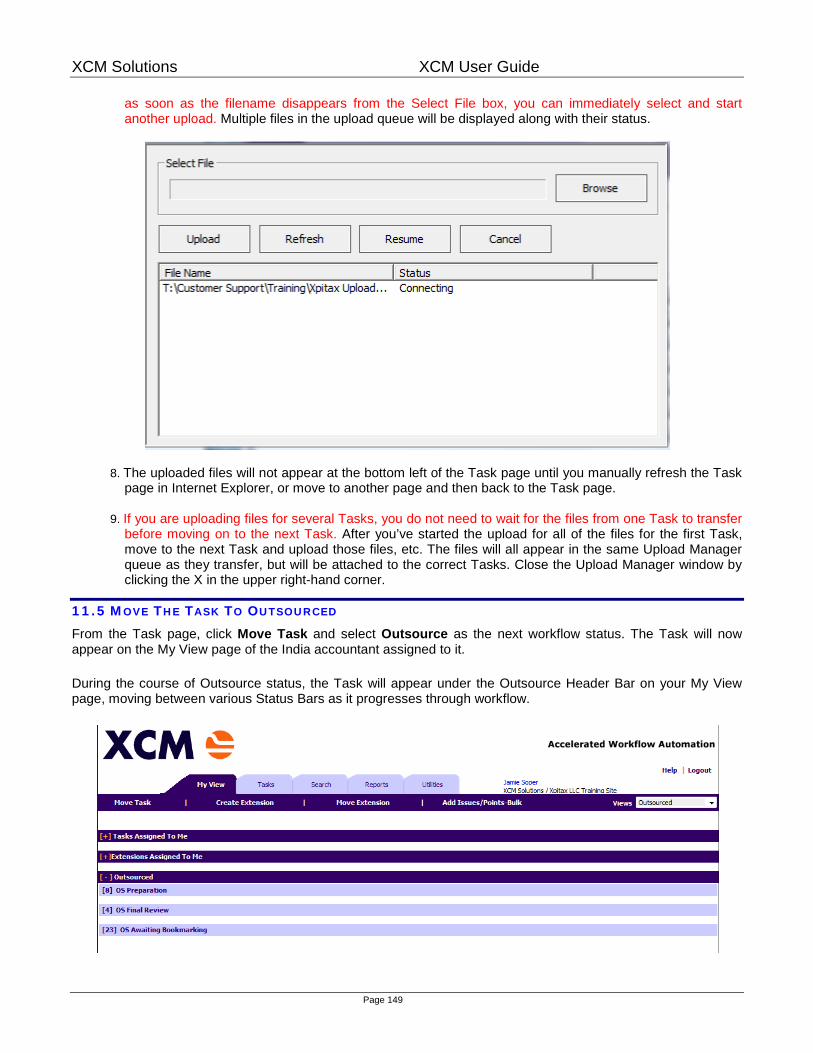
XCM Solutions XCM User Guide
Page 149
as soon as the filename disappears from the Select File box, you can immediately select and start another upload. Multiple files in the upload queue will be displayed along with their status.
8. The uploaded files will not appear at the bottom left of the Task page until you manually refresh the Task page in Internet Explorer, or move to another page and then back to the Task page.
9. If you are uploading files for several Tasks, you do not need to wait for the files from one Task to transfer
before moving on to the next Task. After you’ve started the upload for all of the files for the first Task, move to the next Task and upload those files, etc. The files will all appear in the same Upload Manager queue as they transfer, but will be attached to the correct Tasks. Close the Upload Manager window by clicking the X in the upper right-hand corner.
11.5 MOVE THE TASK TO OUTSOURCED
From the Task page, click Move Task and select Outsource as the next workflow status. The Task will now appear on the My View page of the India accountant assigned to it.
During the course of Outsource status, the Task will appear under the Outsource Header Bar on your My View page, moving between various Status Bars as it progresses through workflow.
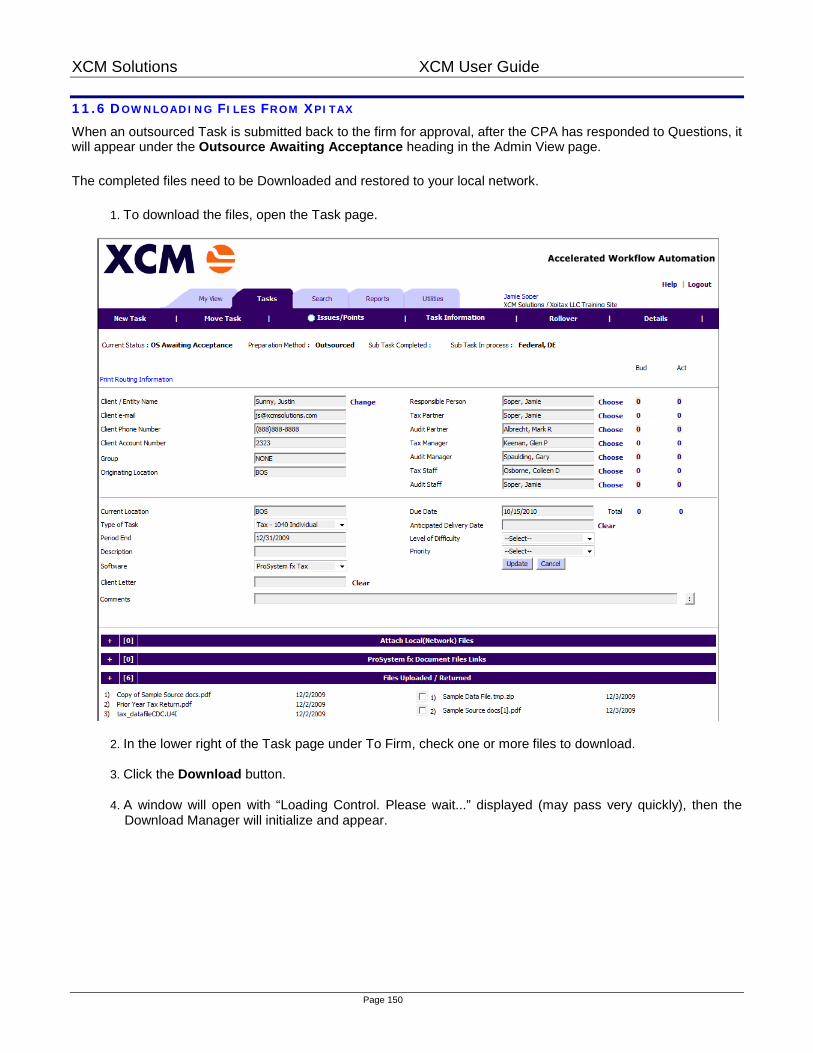
XCM Solutions XCM User Guide
Page 150
11.6 DOWNLOADING FILES FROM XPITAX
When an outsourced Task is submitted back to the firm for approval, after the CPA has responded to Questions, it will appear under the Outsource Awaiting Acceptance heading in the Admin View page.
The completed files need to be Downloaded and restored to your local network.
1. To download the files, open the Task page.
2. In the lower right of the Task page under To Firm, check one or more files to download.
3. Click the Download button.
4. A window will open with “Loading Control. Please wait...” displayed (may pass very quickly), then the Download Manager will initialize and appear.

XCM Solutions XCM User Guide
Page 151
5. Click the Browse button to select a destination location for downloaded files, navigate to and highlight the appropriate folder, and click OK to select it. The folder will now appear in the Select Destination Folder box, ready to receive downloaded files.
6. Click the Download button to start downloading the file(s). Each filename will appear in the Download window and its status will change as the file is transferred.

XCM Solutions XCM User Guide
Page 152
7. Depending on the size of the file being downloaded and the speed of your Internet connection, the different status types which may appear, Queued, Connecting, Transferring, and Transferred, will be visible for a short time, or may pass so quickly you may not see each one. After a successful download, the filename and its status will disappear from the window. Close the Download Manager window by clicking the X in the upper right-hand corner.
11.7 MOVE TASK TO NEXT WORKFLOW STATUS
From the Task page, you will now be able to move this Task to your firm’s next appropriate workflow status by clicking Move Task (see Move Task section above). Select the next step in your firm’s process. Options include Post Outsource Comp Review, To Be Assembled, To Be Signed and To Be Shipped.
11.8 IMPORT CLIENT’S TAX APPLICATION FILE BACK INTO FIRM TAX APPLICATION
You must import the client’s tax application file back into your firm’s tax application.
For import instructions specific to your firm’s tax software, please read the appropriate XCM Tax Software Export/Import Guide. Guides can be downloaded from the Help page (after logging in to XCM, click Help on the main login page) and include these and other applications:
ProSystem fx™ Lacerte™ UltraTax™ ProSeries™
11.9 IMAIL™
IPswitch’s iMail™ is a web-based, secure messaging system that must be used for communication (in addition to Issues/Points) between the Outsource Coordinator and the team Supervisor. After your first training session, you should receive an introduction iMail™ message from your Supervisor.
When an iMail™ message is sent to you, it is delivered to your mailbox on the iMail™ server. An email notification that a message has been received is automatically generated and sent to your company email address.

XCM Solutions XCM User Guide
Page 153
To access the iMail™ site and open the message, click on the link listed in the email notification, or open Internet Explorer and go to https://webmail.xcmsolutions.com (save this link as a Favorite in your browser) to login to iMail™ (this is a separate username and password from your XCM login).
NOTE: iMail™ can be used ONLY to communicate to and from iMail™ addresses. Do not include any other Internet email addresses in messages – your message will not be delivered.
After you login to iMail™, you will see your mailbox.
To open the introductory message from your Supervisor, click View Mail or Inbox to see your incoming messages, and then click on the message subject to open it.
A good first step is to save the Supervisor’s return address in your iMail™ address book (for security reasons, usernames are deliberately not intuitive). Simply click Save Address at the top of the message. When you next compose a message, you will be able to select the Supervisor’s username from the Address Book which appears at the top of the Compose screen.
11.10 REVIEWING XPITAX WORKPAPERS When Xpitax receives your scanned source document, each page is bookmarked. This bookmarking step allows the reviewer to quickly navigate to where information resides in the document. If a complete review is being

XCM Solutions XCM User Guide
Page 154
performed, reviewers can be assured they have reviewed each page if they begin at the top left of the Adobe screen and work from top to bottom.
Each page will be annotated to let the reviewer know what information has been used in the preparation process. It will also note where the information was input and if there was information that had no tax implications and so therefore not used by the preparer.
If a user has Adobe Standard or Professional installed on the PC or laptop, he/she will be able to annotate the PDF file as well. For instance, a reviewer may want to use the pencil tool to mark off pages that have been reviewed (similar to using a red or blue pencil when reviewing original source documents). This functionality is also available using Adobe Reader 7.0 for documents created in Adobe Professional 7.0.
1 2 . 0 Q U I C K S T A R T G U I D E T O P R E P A R I N G F O R TA X Y E A R
IMPORTANT: The following steps should be completed in order to maximize efficiency.
1) Create Firm Settings – Utilities Tab, select Manage Firm Settings
i) Add default shipping method
ii) Change fiscal year (i.e. to 20xx)
2) Create Task Settings for filing method – Utilities Tab, select Manage Firm Wide Task Type
i) It is important to change the default filing method from paper to e-file or none, before creating new
Tasks.
3) Update Clients and Groups -Utilities Tab, select Manage Groups
i) Add new groups (optional)
ii) Assign clients to group, or select Manage Clients and assign groups to clients
4) Update client information and add new fields – Utilities Tab, select Manage Clients
i) Add new clients manually or request new client import sheet from [email protected]
ii) Add Fiscal Year End to existing clients
iii) Add Primary Task Type to existing clients
iv) Assign groups (if not completed above)
5) Update staffing assignments for Clients – Utilities Tab, select Manage Staffing Assignments
i) Change the staffing and CPA responsible for terminated and/or promoted staff.
6) Update User rights and disable terminated employees – Utilities Tab, select Manage CPA Users
7) Delete Tasks & Data Purge
i) Delete Tasks created which are still in No Info In (ONLY if client should not be rolled forward to 2006)
ii) Select Manage Delete Tasks – review and delete Tasks selected above (control to avoid deleting
Tasks in error)
8) Rollover Tasks from 20xx to 20xx, – Utilities Tab, select Manage Rollover
i) Rollover Tasks from 20xx to 20xx –
9) Create New Tasks for clients not rolled over from previous year – Utilities Tab, select Create New Tasks
review firm policy when determining information to roll forward.
10) Purge Data from 20xxTasks (optional).
i) – Utilities Tab, select Delete Tasks & Purge Data
IMPORTANT – once data is purged, it cannot be restored.

XCM Solutions XCM User Guide
Page 155
1 3 . 0 I N T E R N E T E X P L O R E R S E T T I N G S For best results, you must prepare your Internet Explorer browser so that interactions with the XCM site are fully trusted (XCM only supports Microsoft’s Internet Explorer). If your firm has an IT department, you may need to get them involved to apply the required configuration steps to your workstation’s browser.
IE settings also affect how emails are generated from XCM Issues/Points and how any third-party integration behaves, so it is very important to make sure your settings conform to the published standards. After logging into XCM, download the IE Settings Document from the XCM Help page and apply the settings as specified.