x1 special edition -...
TRANSCRIPT
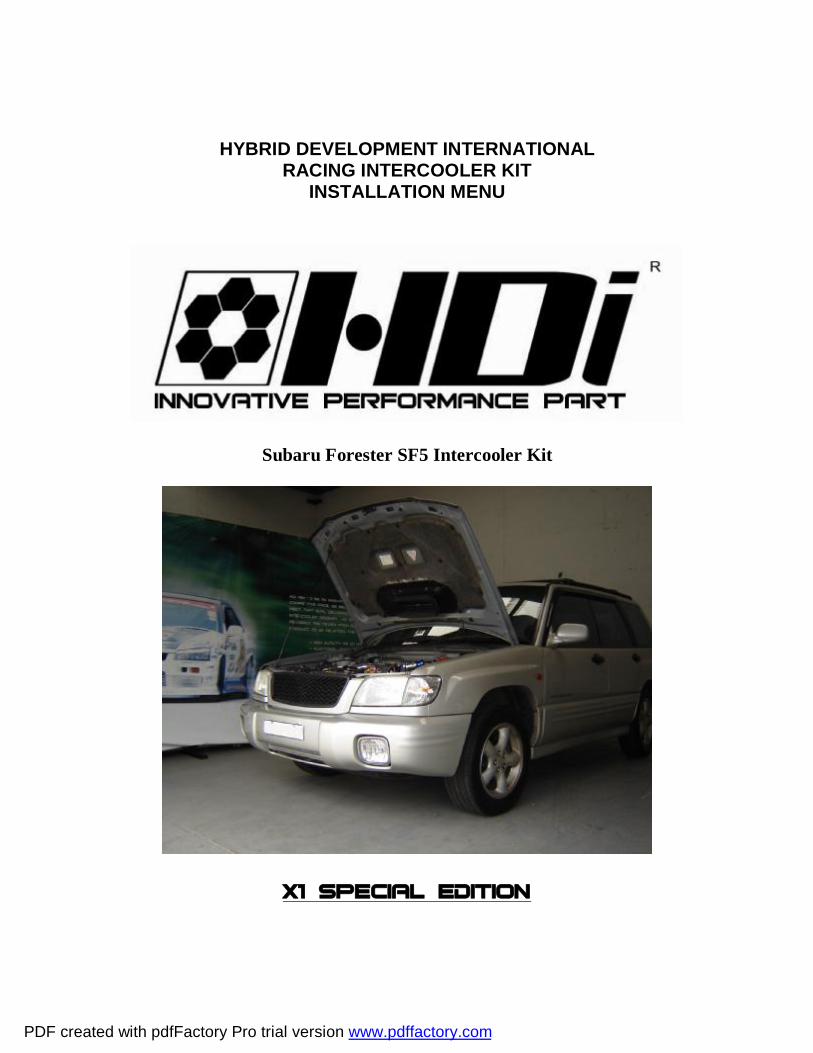
HYBRID DEVELOPMENT INTERNATIONAL RACING INTERCOOLER KIT
INSTALLATION MENU
Subaru Forester SF5 Intercooler Kit
X1 Special Edition
PDF created with pdfFactory Pro trial version www.pdffactory.com
Please read before continue Please read through all the instruction and practice all precaution in all aspect of safety and every step prior
and during the installation. This installation menu is purely for HYBRID DEVELOPMENT INTERNATIONAL RACING INTERCOOLER KIT
and is used as guide only. As different vehicles in different countries may have different specifications and component layout. Therefore, it is important to make sure the connection is properly done by authorized personals or dealers.
Warning • Check and clean all open area for foreign object inside. • Installation should only be carried out by authorized dealer or agent only. • Avoiding water, liquid or fluid during and post installation. • Do not install the unit in a place that will interface the driver. • This product is off road only not for public road. • Never adjust the fitment when the car is moving or on public road ,doing so is dangerous to
yourselves and others • Make sure there is adequate ventilation if you are installing or setting it in door.
LIMITED WARRANTY
Hybrid Development (HK) ltd will warranty for the period of 1 year from original purchase against all defects in workmanship and materials. Hybrid Development (HK) ltd is not responsible for expenses incurred for labor, personal injury or inconvenience. Hybrid Development (HK) ltd sole responsibility is to offer a replacement product or to repair the damaged product. Hybrid Development (HK) ltd cannot warranty products damaged by improper installation. All other products sold by Hybrid Development (HK) ltd are warranted by the original manufactures and is not the responsibility of Hybrid Development (HK) ltd. All products are for racing use only.
All rights reserved.
For more information please visit www.hybrid-power.com or contact [email protected]
PDF created with pdfFactory Pro trial version www.pdffactory.com

Using a Heavy duty Car Jack, lift the
car and place it on Jack Stands or place the vehicle on a workshop hoist.
Remove the plastic splash guard from under the car front bumper bar.
Remove the front grille and plastic moldings from under the headlights on Both sides.
Remove the factory Fog lights from the bumper bar by unscrewing fittings.
PDF created with pdfFactory Pro trial version www.pdffactory.com
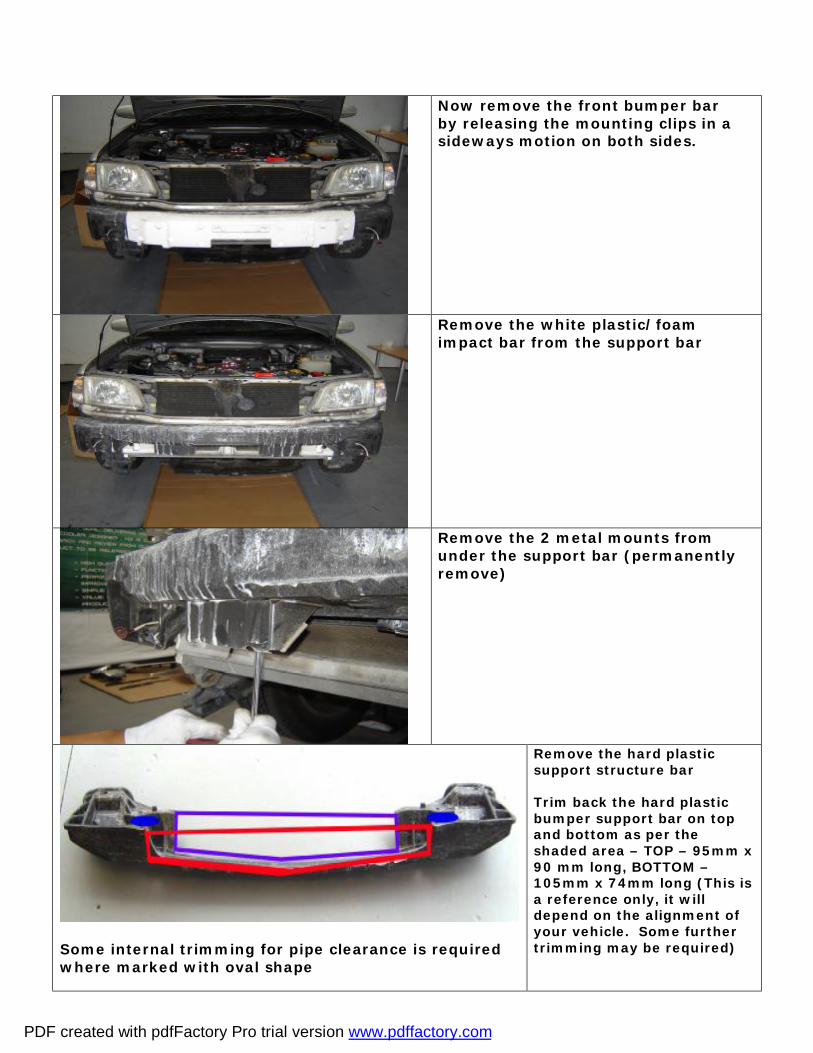
Now remove the front bumper bar by releasing the mounting clips in a sideways motion on both sides.
Remove the white plastic/foam impact bar from the support bar
Remove the 2 metal mounts from under the support bar (permanently remove)
Some internal trimming for pipe clearance is required where marked with oval shape
Remove the hard plastic support structure bar Trim back the hard plastic bumper support bar on top and bottom as per the shaded area – TOP – 95mm x 90 mm long, BOTTOM – 105mm x 74mm long (This is a reference only, it will depend on the alignment of your vehicle. Some further trimming may be required)
PDF created with pdfFactory Pro trial version www.pdffactory.com
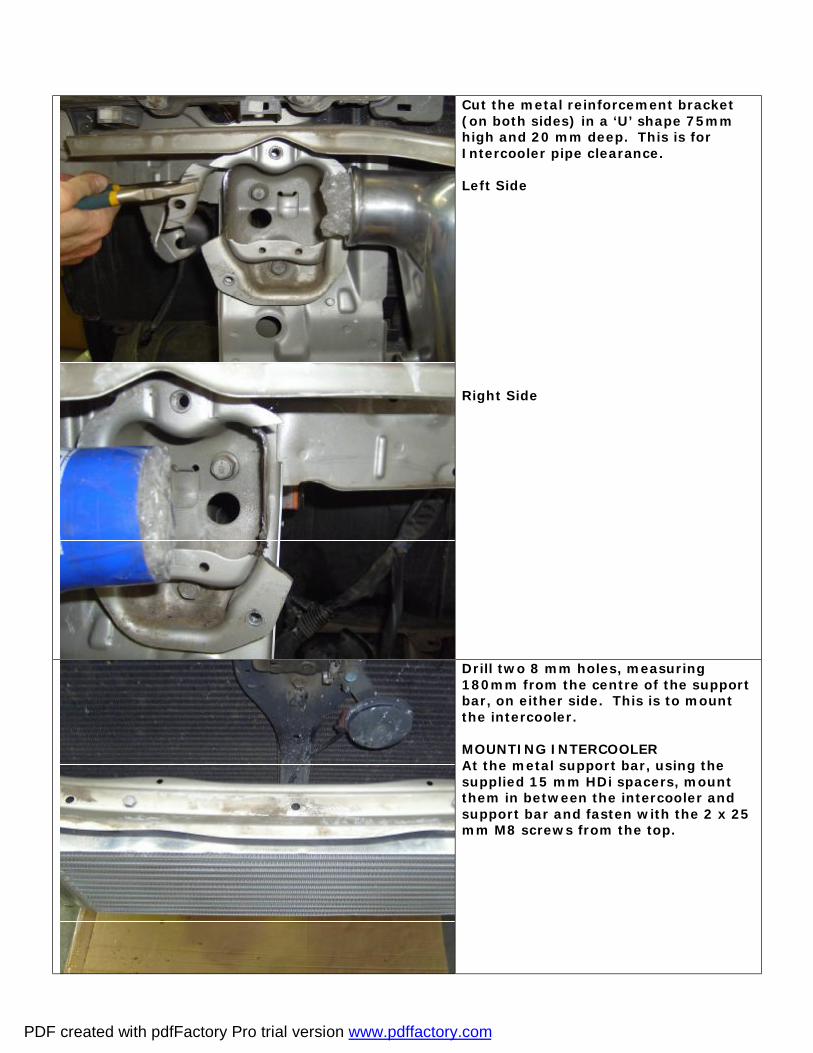
Cut the metal reinforcement bracket (on both sides) in a ‘U’ shape 75mm high and 20 mm deep. This is for Intercooler pipe clearance. Left Side Right Side
Drill two 8 mm holes, measuring 180mm from the centre of the support bar, on either side. This is to mount the intercooler. MOUNTING INTERCOOLER At the metal support bar, using the supplied 15 mm HDi spacers, mount them in between the intercooler and support bar and fasten with the 2 x 25 mm M8 screws from the top.
PDF created with pdfFactory Pro trial version www.pdffactory.com
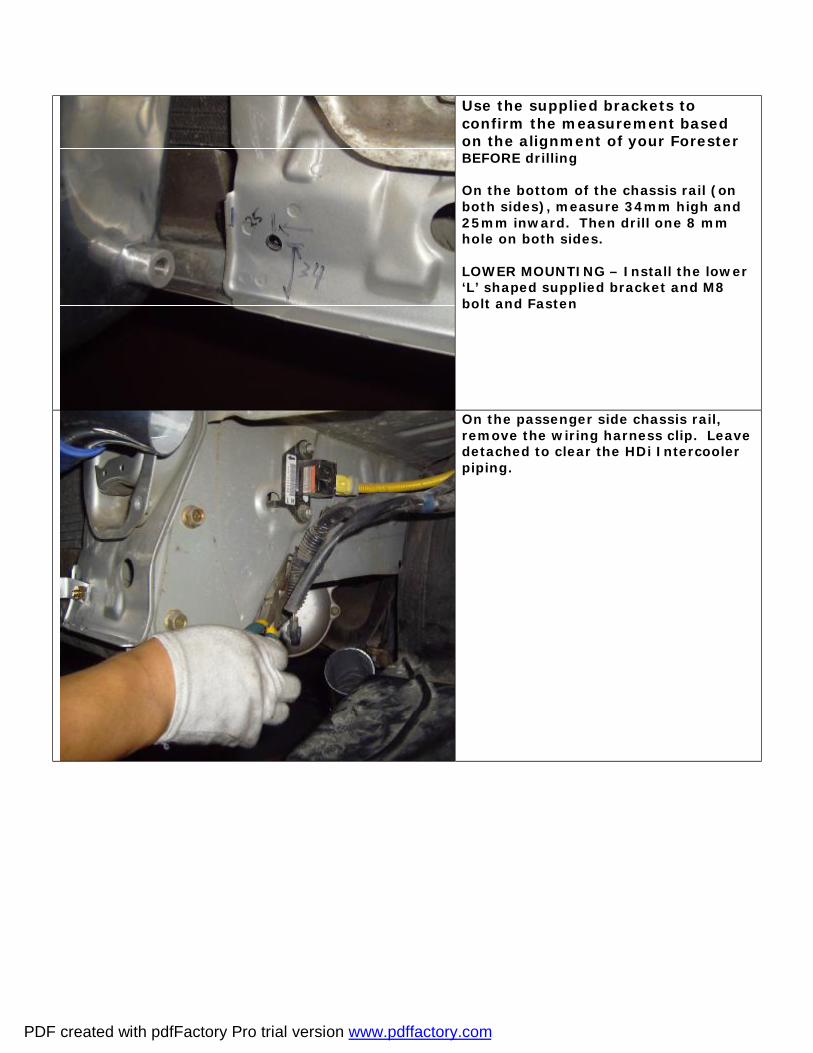
Use the supplied brackets to confirm the measurement based on the alignment of your Forester BEFORE drilling On the bottom of the chassis rail (on both sides), measure 34mm high and 25mm inward. Then drill one 8 mm hole on both sides. LOWER MOUNTING – Install the lower ‘L’ shaped supplied bracket and M8 bolt and Fasten
On the passenger side chassis rail, remove the wiring harness clip. Leave detached to clear the HDi Intercooler piping.
PDF created with pdfFactory Pro trial version www.pdffactory.com
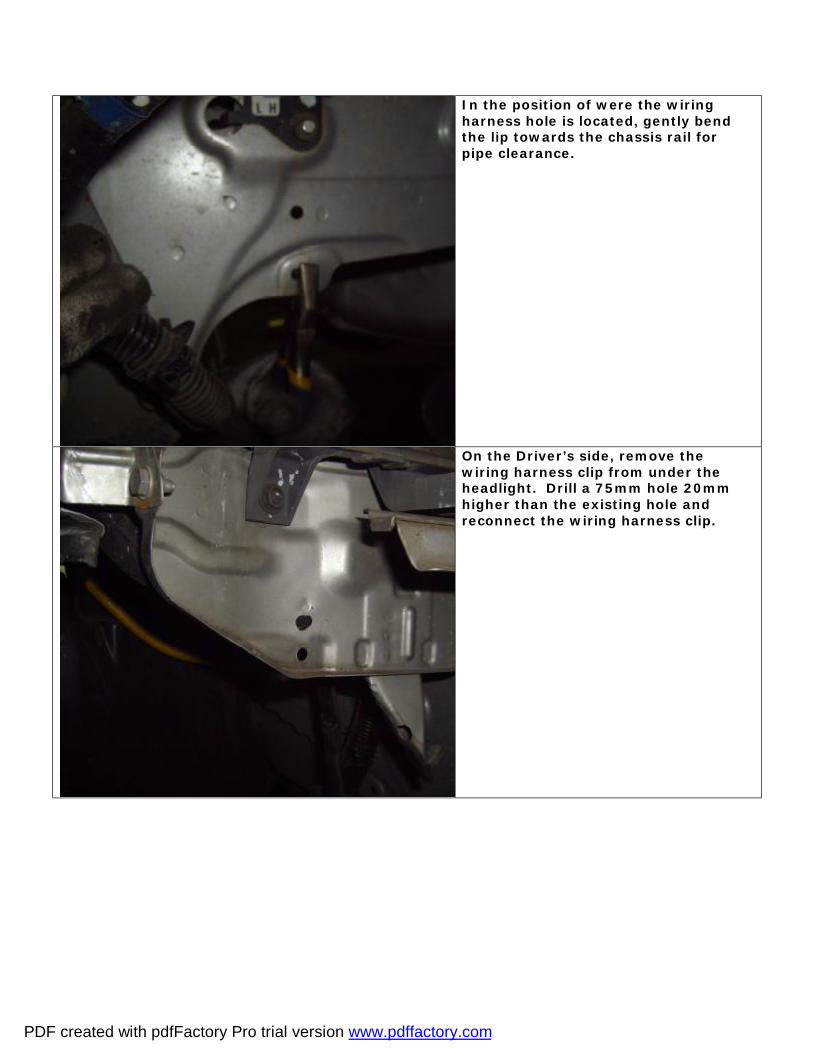
In the position of were the wiring harness hole is located, gently bend the lip towards the chassis rail for pipe clearance.
On the Driver’s side, remove the wiring harness clip from under the headlight. Drill a 75mm hole 20mm higher than the existing hole and reconnect the wiring harness clip.
PDF created with pdfFactory Pro trial version www.pdffactory.com
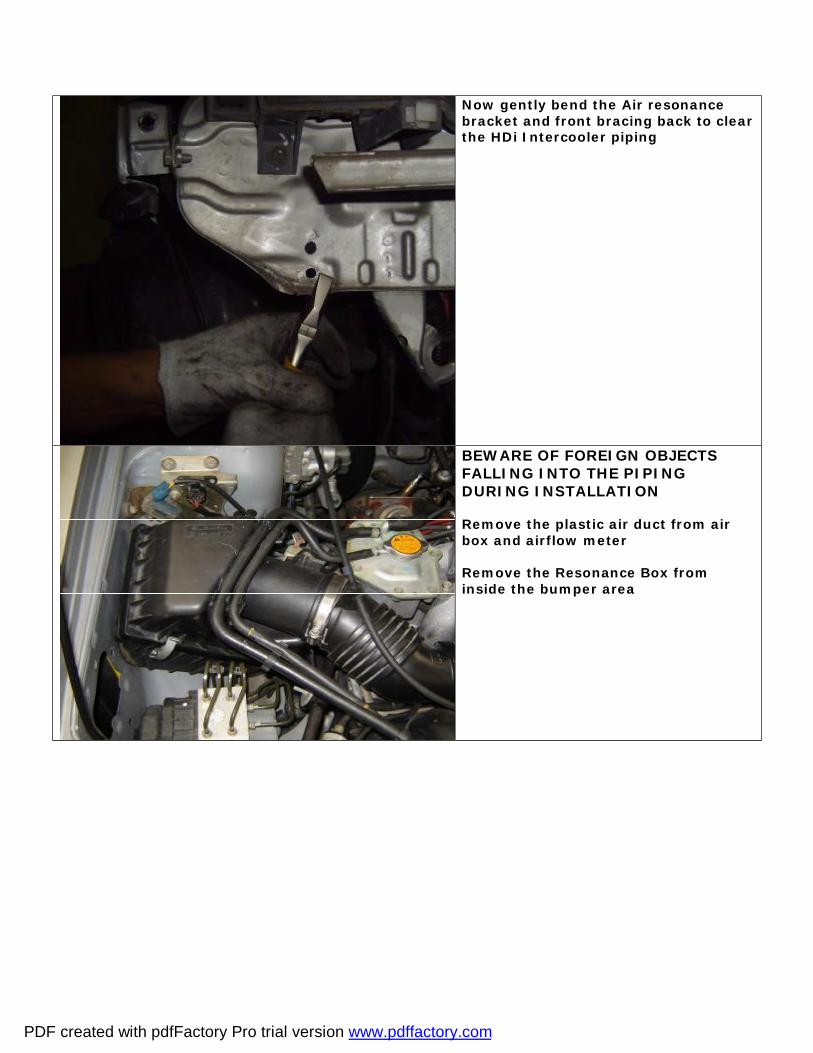
Now gently bend the Air resonance bracket and front bracing back to clear the HDi Intercooler piping
BEWARE OF FOREIGN OBJECTS FALLING INTO THE PIPING DURING INSTALLATION Remove the plastic air duct from air box and airflow meter Remove the Resonance Box from inside the bumper area
PDF created with pdfFactory Pro trial version www.pdffactory.com
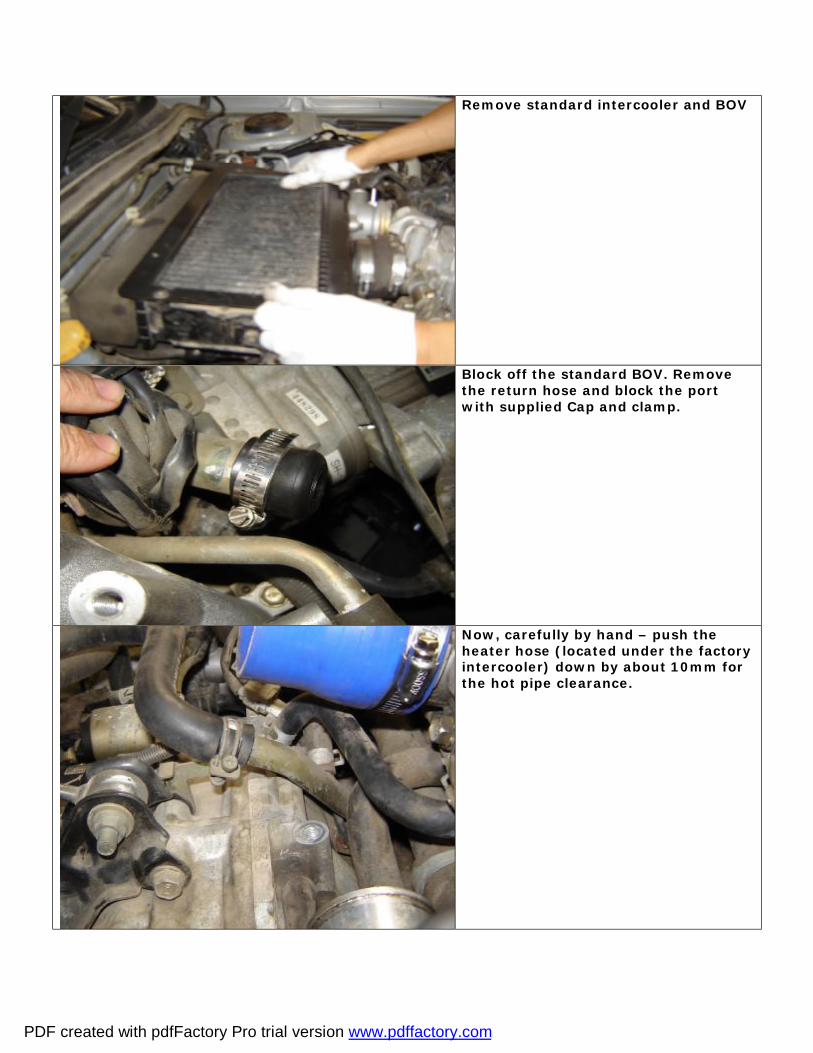
Remove standard intercooler and BOV
Block off the standard BOV. Remove the return hose and block the port with supplied Cap and clamp.
Now, carefully by hand – push the heater hose (located under the factory intercooler) down by about 10mm for the hot pipe clearance.
PDF created with pdfFactory Pro trial version www.pdffactory.com

Install a 2.0” HDi silicon hose to the Turbo and fasten with the supplied standard clamps. Fasten tightly. Install the HDi Intercooler hot pipe to the 2.0” HDi silicon hose and fasten with a HDi clamp
Install 2 x HDi Super Clamp to a 2.5” HDi silicon hose then install the lower passenger side under engine intercooler pipe. Do NOT fasten tightly to make adjustments
PDF created with pdfFactory Pro trial version www.pdffactory.com
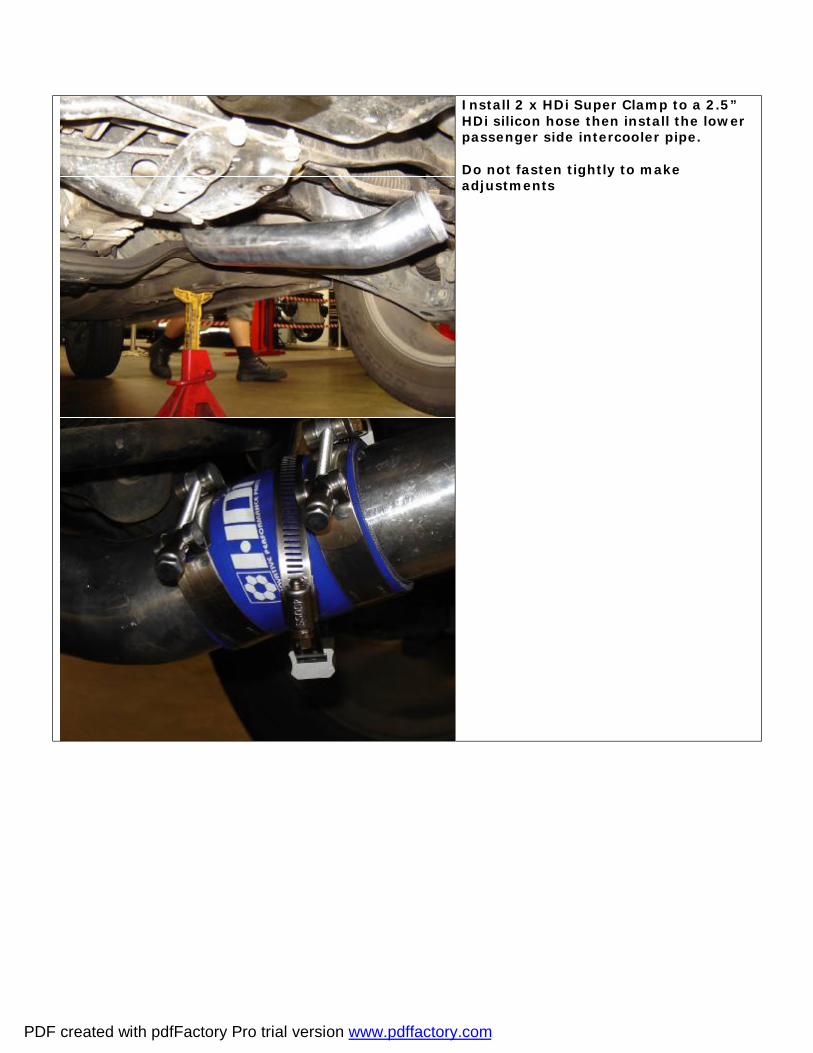
Install 2 x HDi Super Clamp to a 2.5” HDi silicon hose then install the lower passenger side intercooler pipe. Do not fasten tightly to make adjustments
PDF created with pdfFactory Pro trial version www.pdffactory.com
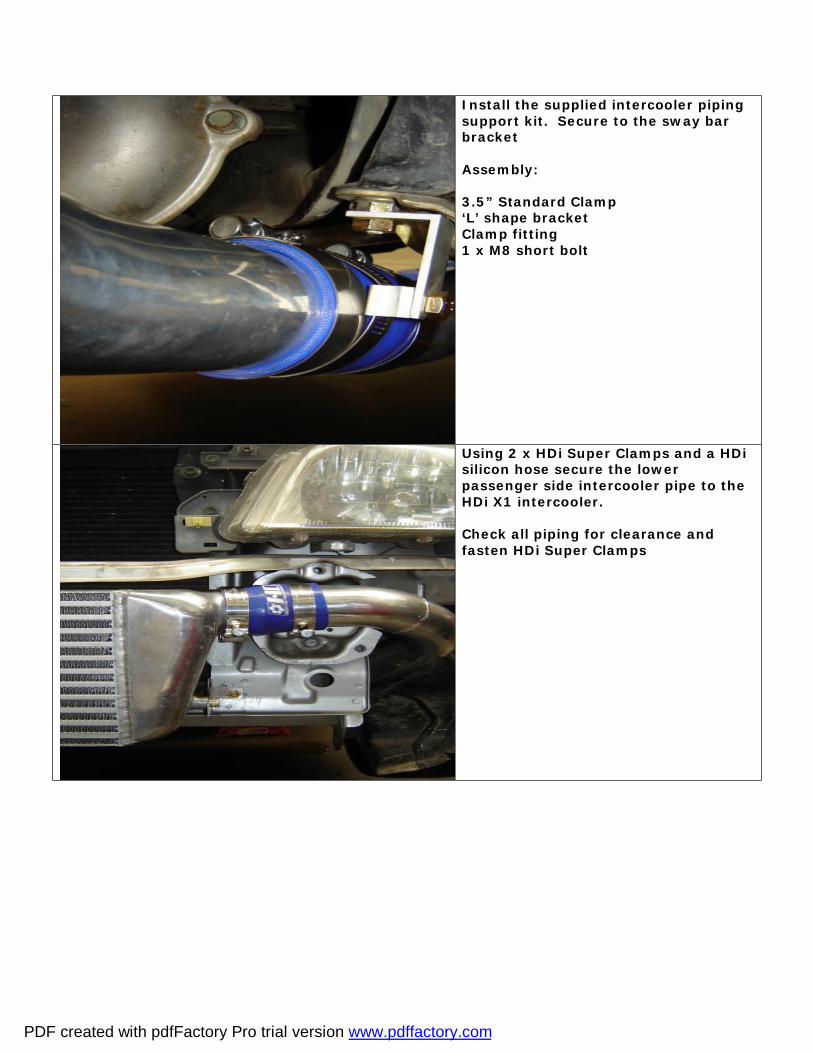
Install the supplied intercooler piping support kit. Secure to the sway bar bracket Assembly: 3.5” Standard Clamp ‘L’ shape bracket Clamp fitting 1 x M8 short bolt
Using 2 x HDi Super Clamps and a HDi silicon hose secure the lower passenger side intercooler pipe to the HDi X1 intercooler. Check all piping for clearance and fasten HDi Super Clamps
PDF created with pdfFactory Pro trial version www.pdffactory.com
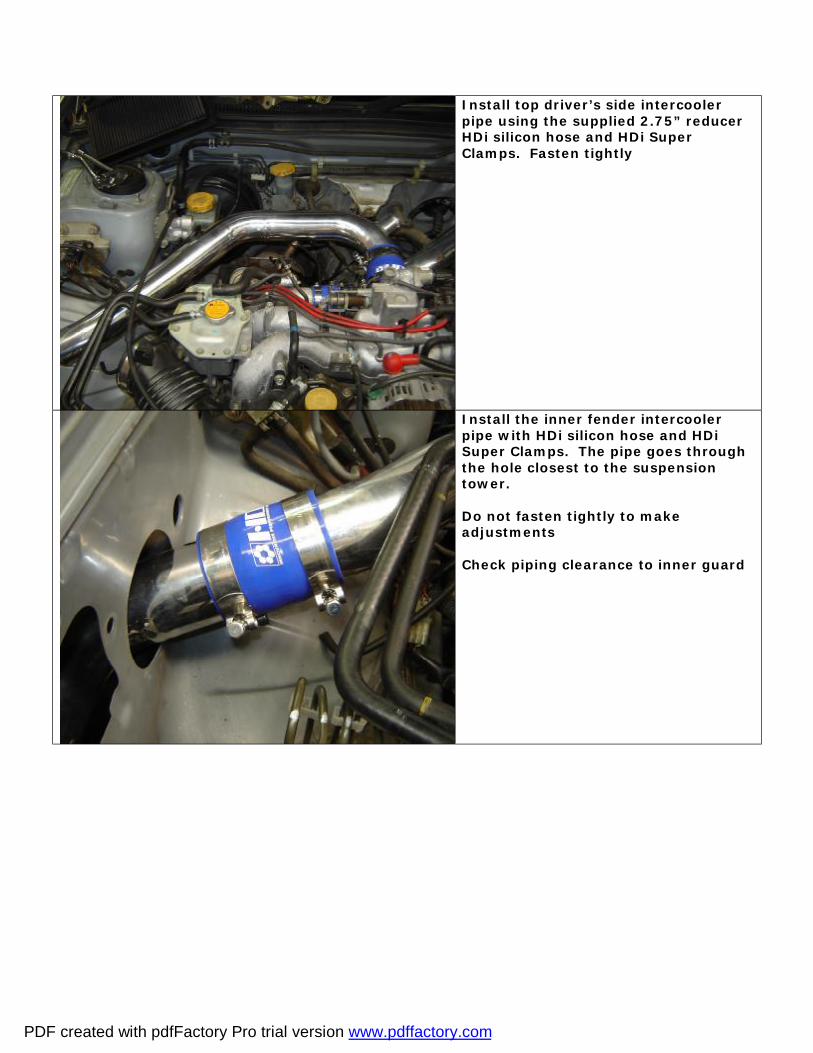
Install top driver’s side intercooler pipe using the supplied 2.75” reducer HDi silicon hose and HDi Super Clamps. Fasten tightly
Install the inner fender intercooler pipe with HDi silicon hose and HDi Super Clamps. The pipe goes through the hole closest to the suspension tower. Do not fasten tightly to make adjustments Check piping clearance to inner guard
PDF created with pdfFactory Pro trial version www.pdffactory.com

Join the lower driver’s side intercooler pipe with supplied HDi silicon hose and HDi Super Clamps to the HDi X1 intercooler Check all piping for clearance and fasten HDi Super Clamps
IMPORTANT: Check all pipes and fasteners for proper clearance, than tighten all HDi Super Clamps and mounting brackets
PDF created with pdfFactory Pro trial version www.pdffactory.com

Install your universal after market BOV to the supplied port on the intercooler cold pipe
Re install the hard plastic support structure bar and plastic/foam impact bar. Check for clearance. Trim the bumper bar to suit, clearing the intercooler. Re install the bumper bar and Fog lights Re install the splash guard under the bumper bar (some trimming maybe required, varies depending on model) Finally, re insert the front grille and radiator plastic shroud. Ready for test drive…feel the power
Note: Due to the high flow and low pressure drop characteristic of the HDi intercoolers – the turbo efficiency may increase and the factory boost limiter maybe reached. If this is experienced, please consult an HDi Technical Dealer.
PDF created with pdfFactory Pro trial version www.pdffactory.com