writing and drawing to continue reading, use the scrollbar ...€¦ · tips for better handwriting...
TRANSCRIPT

1
This chapter teaches you how best to write and draw on the MessagePad 2000. Thereare several methods and tools you can use to enhance recognition, correct mistakes,and manipulate text and drawings. Go through the chapter to find the best tools foryour needs.
If you want to go through a brief tutorial about writing, you can use the HandwritingInstructor. To access this, tap Extras E to open the Extras Drawer, tap the folder taband in the list that appears, tap Setup. Then tap HW Instructor Ó.
About recognition
This section offers a general description of handwriting recognition usedin the MessagePad and discusses some of the factors that may affect how well itrecognizes your handwriting.
When you write on your MessagePad, you write in normal printed or cursivecharacters, as well as numbers, punctuation, and gestures. Often you write Englishwords, but not always.
1 Writing and Drawing

The MessagePad tries to detect when you are writing English words, abbreviations,and common expressions. It uses a large dictionary to aid in recognizing these thingsquickly and accurately. When you write things that are neither simple numbers norEnglish words (such as initials, dates, telephone numbers, file names, or serialnumbers) your MessagePad tries to match the characters you write to the commonpatterns of these entries. If no such pattern can be discerned, your MessagePad doesits best to recognize the characters individually.
Generally speaking, your MessagePad is somewhat better at recognizing poorlyformed characters if they are part of English words (or other items that are in the MessagePad’s dictionary). When you’re writing things such as license platenumbers, you’ll find that extra care in forming your characters neatly contributes toimproved accuracy.
Your MessagePad distinguishes characters and words in part by detecting pauses inyour writing. It’s a good idea when writing to complete each character withoutpausing too long before it’s finished, and similarly to complete your words withoutpausing in the middle.
Your MessagePad is also sensitive to the way your writing is spaced. In normal writingor text there is a clear difference between the amount of space separating letterswithin words and the amount of space separating words themselves. The moredistinct and consistent you make this difference when you write on your MessagePad,the better recognition tends to be. A control in the Handwriting Recognition slipallows you to let your MessagePad know whether your writing tends to be widelyspaced or more tightly crowded. Experimenting with this setting may result inimproved accuracy.
Generally, the MessagePad tends to deliver the best overall recognition accuracy ifyou select Printing as your handwriting style. This means you must print usingseparate letters only, taking care to lift the pen between characters when you write.
If you write in cursive style (always joining letters) or mix cursive and printed styles,you should select Cursive as your handwriting style. Both styles are then recognized,even when mixed, although overall accuracy may decrease somewhat.
2 Chapter 1

Selecting a handwriting recognition setting
In some areas of the MessagePad, such as the Notepad, you can choose a handwritingrecognition setting to help your MessagePad interpret what you are writing or drawing.
The Recognition button on the bottom left of the MessagePad screen controls theway the MessagePad recognizes your writing and drawing. Tap the Recognitionbutton and a pop-up list appears.
Tap your choice and the picture in the Recognition button changes to the new setting.
Choose Purpose
A Text To have your words and numbers recognized as text.
a Ink Text To take notes quickly and keep your handwriting as is in electronic ink.
S Shapes To draw and have the MessagePad smooth curves and straighten lines.
) Sketches To keep your drawings as is; the MessagePad does not smooth curves orstraighten lines.
i Preferences To modify preferences for the way your MessagePad recognizes andworks with text, draws shapes, and displays electronic ink.
Writing and Drawing 3

Setting your handwriting recognition preferences
Using the Recognition button, you can also set the way your MessagePad recognizesyour handwriting.
To set your handwriting preferences:
1 Tap the Recognition button Ú and, in the list that appears, tap Preferences.
2 In the slip that appears, select the appropriate settings, then tap X to close the slip.The settings are discussed in further detail in the following pages.
Handwriting styles: Printing and Cursive
The MessagePad uses different methods to recognize printing and cursive writing. Itis important that you choose one style and write that way consistently. When youchange your writing style, you must also change the style setting in the HandwritingRecognition slip.
4 Chapter 1
Tap a button next to Printing or Cursive to
select your writing style.
Tap the pen on theslider and move it to
set your word spacing.
Tap here to setadditional writing
options or to revert tothe default settings. Tap here to align the
pen and screen.
Tap this checkbox to set up your MessagePad for a guest user.

The highest overall recognition accuracy is achieved when you print, using separate,unconnected letters.
m Select Printing as your style when you often write information that is not wholewords or common abbreviations. If you select Printing, you must lift the penbetween characters so that characters are separated and easily distinguishablefrom one another.
m Select Cursive as your style when you join some or all of the characters you write.
Word spacing
When you write, your MessagePad must decide which groups of pen strokes tointerpret as words, along with what words these strokes represent.
You can improve your MessagePad’s ability to distinguish words by writing yourcharacters somewhat close together and your words somewhat far apart. Use theslider in the Handwriting Recognition slip to set the distance between words. Thishelps your MessagePad recognize words more easily.
Tips on word spacing
m If your MessagePad tends to run your words or expressions together, try writingthem farther apart.
m If your MessagePad tends to break apart your words or expressions, try writing thecharacters closer together.
m If you want to deliberately combine two separate words into one, write the secondword extremely close to the first word.
m If you want to separate a string of characters into two words, be sure to leave extraspace between the two expressions.
Writing and Drawing 5

Other options
You can set additional preferences by using the Options button. Tap the Optionsbutton and a list appears.
The options you see depend on which writing style you selected—Printing or Cursive.Tap an option in the list and in the slip that appears, enter the appropriateinformation. The various options are described below.
Text Editing Settings
Use this to set the scaling of ink text, to specify whether to insert words at the caret,and to automatically add new words to your word list.
m Ink Text Scaling—Tap the diamond u and, in the list that appears, tap No Scaling,75% Scaling, or 50% Scaling.
m Insert new words at caret—If this box is checked, you can tap the pen on thescreen to place the caret ^. Anything you write on the screen is then placed atthe caret. If the checkbox is not checked, your writing appears wherever you writeit on the screen.
m Add new words to Personal Word List—If you selected Cursive as your handwritingstyle and this is checked, any words the MessagePad interprets that are not alreadyin a word list (such as someone’s last name) are automatically placed in yourpersonal word list.
6 Chapter 1

Handwriting Settings
This option only appears if you selected Cursive as your writing style. Use this to addletter-by-letter recognition to the MessagePad and to indicate whether you want theMessagePad to learn your handwriting.
Letter-by-letter recognition controls the MessagePad’s ability to recognize text that isnot in its dictionary. If a word is not in the dictionary, the MessagePad uses letter-by-letter recognition to interpret the word. If letter-by-letter recognition is turned off(not checked) and the word is not in the dictionary, the MessagePad displays theword closest to it in the dictionary.
For example, if you wrote “snapko,” the MessagePad would only be able to recognizethat word if letter-by-letter recognition is selected, since “snapko” is not in thedictionary.
“Letter-by-letter in fields” controls recognition in the Name File and in informationfields in other applications. “Letter-by-letter in notes” controls recognition in theNotepad. Some people get good results if they turn letter-by-letter recognition off innotes but on in fields. Fields typically have more unusual words in them and it’susually better to have letter-by-letter recognition turned on. Since most words in theNotepad are words found in the dictionary, it is sometimes better not to select“Letter-by-letter in notes.”
“Learn my handwriting” tells your MessagePad to learn your handwriting. If thisoption is selected (checked), the MessagePad accumulates information about yourwriting style based on how you correct its recognition. The letter forms in LetterShapes change as the MessagePad learns how you write. For people with consistenthandwriting this option improves accuracy of recognition. If you find that recognitiondoesn’t improve or worsens, uncheck “Learn my handwriting,” then open the LetterShapes panel and tap the “Use Default Settings” button. If “Learn my handwriting” isnot checked, the MessagePad does not learn your handwriting and recognition staysthe same as when you first started to use your MessagePad.
Writing and Drawing 7

Letter Shapes
This option only appears if you selected Cursive as your writing style. You use LetterShapes to help the MessagePad improve handwriting recognition by identifying lettershapes you don’t use.
Your settings do not prevent the MessagePad from recognizing the letters if you writethem in other ways.
Tap a letter form once to select it. Tap it again to see how it’s written (notice thedirection of the strokes). Then tap Often, Rarely, or Never to indicate how often youwrite the letter this way. (If more than one form is boxed, your choice affects all theforms in the box.)
8 Chapter 1
Tap a letter orcharacter to go to it.
Tap the arrows to goto the next character.

Fine Tuning
Use these settings to let the MessagePad know how fast to recognize and transform your handwriting.
Use default settings
If you wish to discard all the Letter Styles preferences you’ve set and everything theMessagePad has learned about your handwriting, tap Use Default Settings in theOptions list.
Tips for better handwriting recognition
Writing is one of the most convenient ways to put information into your MessagePad. There are several tips to keep in mind while you are writing. Most ofthese tips are common sense, and help the MessagePad interpret your handwritingmore accurately.
m Write at an even pace.
Don’t pause in the middle of a word. Finish what you write—don’t go back to aword to change it until you’ve finished writing it.
m You don’t have to wait for a word to be recognized to continue writing.
m Write simply and neatly.
Avoid adding flourishes, like serifs, to your letters. Don’t write at too much of anangle or slant your characters. Close your letters properly.
m Exaggerate the space between words, but not between letters.
This helps your MessagePad determine when one word ends and another begins.
Writing and Drawing 9

m Write capital letters and tall letters (such as t and l) so they are twice as tall as small letters.
m Correct as you go.
Write a few words, then wait while your MessagePad recognizes them. If there aremistakes, go back and fix them one at a time. If you don’t, your MessagePadassumes the word is correct and adjusts its recognition accordingly.
m When dotting your i’s, keep the dot close to and above the i. Make sure it doesn’tlook like an accent mark.
m When you cross t’s, make sure you don’t cross any other tall letters. Make thecross horizontal, not slanted.
m Don’t crowd words at the edge of the screen.
m Make parentheses bigger than tall letters.
m Keep punctuation close to the word. If your MessagePad turns a punctuation mark into a letter, you’re leaving too much space between the word and the punctuation.
m Write colons and semicolons from top to bottom and make them half as tall ascapital letters.
m Write exclamation points the same size as tall letters.
m Make slashes long and slanted.
m If your MessagePad is having problems recognizing certain cursive letters orcharacters, go to Letter Shapes and identify the letter forms you use.
10 Chapter 1

Setting the styles for text and drawings
You can change the style and size of text and the thickness of lines and shapes. Whenyou make changes, it affects the selected items (if any) and everything you write ordraw subsequent to the change.
1 Select the text, line, or shape you want to change. (If you want to set styles beforeyou write or draw, make sure nothing is selected.)
Hold down the pen near the item until a heavy mark appears under the pen, anddraw the mark over or around the item.
2 Tap Extras E to open the Extras Drawer.
3 Tap the folder tab and in the list that appears, tap Unfiled Icons. (If you filed Styles inanother folder, tap that name.)
4 Tap Styles º.
5 In the slip that appears, tap your choices.
6 You can make the following choices:
m Font—Choose Fancy, Simple, or Casual (for Text only).
Writing and Drawing 11
To move the Styles box, hold the penon the picture hanger and drag it.
You can move the pen downover the line to select it.

m Size—Choose 10-, 12-, or 18-point size (for Text and Ink Text). You can also use 9-point size with the Fancy and Simple fonts.
m Style—Choose Plain, Bold, Italic, Outline or Underline (for Text and Ink Text).
m Pen—Choose a pen width of 1-, 2-, 3-, or 4-point size (for drawings and sketches).
7 When you finish making your selections, tap X to close the slip.
12 Chapter 1

^ Using the caret
You can insert a word or phrase at a specific place on the screen using the caret. Ifyou choose to enter text without a caret, the text is placed in the general area whereyou wrote.
To use the caret, follow these steps:
1 Tap the Recognition button Ú and in the list that appears, tap i Preferences.
2 Tap Options and in the list that appears, tap Text Editing Settings.
3 Tap the checkbox next to “Insert new words at caret.”
4 Go back to the item where you want to insert text.
5 Tap the pen where you want the word(s) to go on the screen.
A caret appears where the words will be placed.
6 Write the new word or words anywhere on the screen. The text is placed at the caret.
Using the on-screen keyboard
The MessagePad has four on-screen keyboards: a typewriter keyboard and threetypes of numeric keyboards (for entering calculations, telephone numbers, andtimes/dates).
Writing and Drawing 13

Displaying and moving a keyboard
There are several ways to view the on-screen keyboard.
m Tap the Keyboard button _ near the bottom of the screen. Tap the Keyboardbutton again and in the list that appears, tap the type of keyboard you want to use.
m Tap a misinterpreted word twice, then tap the keyboard at the bottom of the listthat appears.
m Tap twice anywhere you’re writing, such as in a note, on a Date Book page, or in ablank you need to fill.
To move a keyboard, hold the pen on the picture hanger on the keyboard slip anddrag it to where you want the keyboard on the screen.
Changing the layout of the typewriter keyboard
If you want a different text keyboard arrangement, use the Locale preferences tochange the keyboard layout.
1 Tap Extras E to open the Extras Drawer.
2 Tap the folder tab and in the list that appears, tap Unfiled Icons. (If you filed Prefs inanother folder, tap that folder’s name.)
3 Tap Prefs π and, in the slip that appears, tap Locale ©.
4 Tap Keyboard, then tap the keyboard layout you want.
14 Chapter 1

Entering symbols and other special characters
If you have selected Cursive as your handwriting style, you must use the keyboard toenter accent marks. Your MessagePad does not recognize handwritten accent markson cursive letters.
Display the typewriter keyboard on the screen. Then tap the Option key, or theOption key and then the Shift key, to see the available special characters (such assymbols, accent marks, and accented letters).
Erasing text and drawings
You erase text and pictures by “scrubbing them out” with a zig-zag line.
m The zig-zag must go back and forth at least four times.
m You can draw the zig-zag in any of four orientations.
m Draw the zig-zag with sharp corners, making each segment about the same length.
m Don’t draw the zig-zag so it loops or crosses over itself.
m The zig-zag lines should go well above and below the word or drawing.
Writing and Drawing 15

You can scrub out
A single word.
A group of words.
A whole shape.
Part of a shape.
Selected text and drawings; start the zig-zag outside the selection toavoid moving it (see “Selecting Text and Drawings” later in this chapter).
A single letter (make sure you scrub over the letter at least four times).
16 Chapter 1

Correcting a misinterpreted word
There are several ways you can correct words that the MessagePad hasmisinterpreted.
One letter corrections
If only one letter is wrong, write the correct letter over the incorrect one. Correctonly one letter at a time.
Scrubbing
You can scrub out the word to erase it and then rewrite the word. To scrub, draw a zig-zag line over the word or phrase. Make sure the line goes back and forth at least four strokes. For more information, see “Erasing Text and Drawings” earlier inthis chapter.
Using the pop-up list
You can double-tap on a word. A list appears.
Writing and Drawing 17
Keyboard button.
Corrector button.
“Try letters” appears if you selectCursive as your writing style.

m If the correct word is in the list, tap it.
m If the correct word is not in the list, you can tap the Corrector button L or theKeyboard button _ to rewrite or retype the word. If you selected Cursive asyour handwriting style, you can also tap “Try letters” to let the MessagePad try torecognize the word again, using letter-by-letter recognition.
If you tap the Corrector button L in the list, you can write directly over a letter tochange it. You can also tap once on the letter and in the list that appears, tap achoice—the lower- or uppercase version of the existing letter, Delete, or Insert. Youcan also tap a blank space to add punctuation marks or another word, as well as todelete or insert a space.
If you tap the Keyboard button _ in the list, the on-screen keyboard appears. Tapout the word.
If you tap “Try letters,” the MessagePad uses letter-by-letter recognition instead of itsdictionary to interpret the word. It then displays its best guess. This option is useful ifyou don’t have letter-by-letter recognition turned on and you write a word that is notlikely to be in the dictionary. It is also helpful if you write a word and the MessagePadguesses a number, or if you write an unusual combination of letters and numbers thatisn’t recognized.
18 Chapter 1
Tap the arrows to moveto the next character.

Selecting text and drawings
To select an item, hold the pen near the item until a heavy mark appears under thepen and the MessagePad makes a squeak. (If the pen sound effects in Prefs π or thevolume are turned off, you won’t hear the squeak.) Draw the mark over or aroundthe item.
To select words, draw the highlighting mark across them.
To select text on more than one line, draw the highlighting mark from the beginningof the first word to the end of the last word.
To select several whole lines of text, draw the highlighting mark vertically through thelines of text.
To select lines in a shape, draw the highlighting mark along the lines.
To select groups of text or drawings, circle them with the highlighting mark. TheMessagePad puts a box around the things you select.
To deselect an item, tap the pen anywhere outside the selection.
Writing and Drawing 19

Converting your handwriting to text
If you wrote something using the Ink Text or Sketches recognition setting, you canconvert the ink text to text at any time.
m To convert a single word, double-tap on it. An arrow appears as it is converted.
m To convert more than one word, follow these steps:
1 Select the words or phrases you want to convert to text. Hold the pen near the itemuntil a heavy mark appears under the pen and draw the mark over or around theitems.
Your writing is surrounded by a black box.
2 Double-tap in the selection.
Your MessagePad places an arrow on each word as it is recognized and then convertsthe entire phrase. If words are misinterpreted, you can use the correction techniquesdescribed earlier in this chapter.
20 Chapter 1

Copying text or drawings
You can duplicate a drawing or words and phrases. First you must select them. Holdthe pen near the item until a heavy mark appears under the pen and draw the markover or around the item.
Then, copy the selected item by tapping twice inside the selection, keeping the pendown on the second tap. Then move the pen to move the duplicate away. You canalso use this technique to copy items in the Clipboard.
Moving text or drawings
You can move words or drawings around on the screen. To move an item, you firsthave to select it. Hold the pen near the item until a heavy mark appears under thepen and draw the mark over or around the word.
To move an item around on the screen, hold the pen inside the selection, and movethe pen to where you want the item.
Writing and Drawing 21

To move an item to a location not currently on the screen:
1 Go to the item and select it.
2 Hold the pen inside the selection and move it to the top, left, or right of the screen.
The item becomes a miniature box and moves to the Clipboard, a box on the rightedge of the screen. If you selected text or ink text, words appear in the box; if youselected a drawing, you see the word “drawing” in the box.
3 Go where you want to put the item.
4 Hold the pen on the miniature item at the edge of the screen. The text appears andyou can move it where you want. The item returns to its normal size.
22 Chapter 1
When you hold the pen on theselection, the entire item appears foryou to move around on the screen.

Modifying drawings
You can modify the size or shape of a drawing in several ways.
1 Select the drawing. Hold the pen on or near the drawing until a heavy mark appearsunder the pen and draw the highlighting mark over or around the drawing.
2 Use the following techniques to modify the drawing:
m Hold the pen on the dot where the two line segments meet, then move the pen.
m Hold the pen on a corner or edge of the box and drag to stretch, shrink, or distortthe picture. Grab a side or corner if you want to stretch or shrink the drawinghorizontally or vertically.
m Scrub out a line to erase it.
Formatting text and drawings
Your MessagePad provides easy ways to insert text, add punctuation, capitalize words,change margins, and create indents using tabs.
Inserting space in text and joining words
To insert space in text, draw carets and lines as shown in the following table. The topof the caret should line up with the baseline of the letters. Draw the caret in onestroke; do not use a separate stroke for each side of the caret.
Writing and Drawing 23

It’s best if you aim the tip of the pen at the baseline. If you are joining words, the topof the caret should be at the baseline.
Inserts space for a single letter.
Joins two words.
Inserts space for a word (the longer the line, the bigger the space).
Inserts space for a single line.
Inserts space for several lines (the longer the vertical line, the biggerthe space).
Breaks the line and inserts space for several lines.
24 Chapter 1

Adding punctuation
Sometimes punctuation marks can be misinterpreted by your MessagePad. You canquickly add punctuation marks by using the caret or the on-screen keyboard.
To add punctuation marks using the caret:
1 Tap the pen where you want the punctuation mark to appear. A caret appears.
2 Tap the caret.
In the slip that appears, tap the punctuation mark you want.
Writing and Drawing 25
Tap here to delete a space.
Tap here to add a space.
Tap here to add areturn character.

The punctuation mark you selected is placed at the caret.
You can also use the punctuation slip to add returns and spaces to phrases and todelete characters.
Capitalizing words
To change how a word is capitalized, select the word by holding the pen near theitem until a heavy mark appears under the pen (the MessagePad makes a squeak),and draw the mark over or around the word. Then draw a vertical line over the wordas shown.
Draw from bottom to top Ò; becomes “Apple.”
Draw from top to bottom ¬; becomes “apple.”
Draw from bottom to top Ò; becomes “APPLE.”
Draw from top to bottom ¬; becomes “apple.”
When you’re changing the initial capitalization of a word, make sure that there is nospace selected before the word. If there is, the first letter of the word does not change.
26 Chapter 1

Changing paragraph margins
1 Select the paragraph by drawing a selection box around it.
Hold the pen near the item until a heavy mark appears under the pen (theMessagePad makes a squeak), and draw the mark over or around the paragraph.
Note: Selecting text by drawing a line through it does not create a selection box. Tochange paragraph margins, you must select by drawing around the paragraph.
2 Hold the pen on the left or right edge of the box and move it.
Indenting and using tabs
You can indent a paragraph after it’s written. (Make sure you’ve selected “Insert newwords at caret” in the Text Editing Settings within the Handwriting Recognition slip.(See “Setting Your Handwriting Recognition Preferences” earlier in this chapter.) Tapthe pen at the beginning of the sentence. The caret appears. Tap the Keyboardbutton _ (make sure the Typewriter keyboard is selected), then tap the tab key onthe keyboard.
Writing and Drawing 27

Using the word list
When you write text or convert ink text, the MessagePad recognizes the words bycomparing the words you write to the word list in the MessagePad. The MessagePadcan recognize words more easily if they are in its word list. Words in the word listcannot exceed 30 characters.
To see your personal word list, follow these steps:
1 Tap the Keyboard button _.
The keyboard appears. (If the Typewriter keyboard is not shown, tap the Keyboardbutton again and in the list that appears, tap Typewriter.)
2 Tap the Dictionary button d in the lower-left corner of the on-screen keyboard.
The word list appears.
28 Chapter 1

Viewing the word list
You can review the words you’ve added to the word list, so that you can add morewords or remove words you no longer use.
To review the word list, tap a letter along the bottom of the list to go to that letter inthe list. You can also tap the up and down arrows to go through the list.
Adding or removing words in the list
You should add words that you are likely to use often, and remove words that you don’t use often. A word list of more than a thousand words or so may cause memory problems.
The capitalization you use when you add a word helps determines how it will becapitalized when the MessagePad recognizes the word the next time you write it. TheMessagePad first tries to discern the capitalization you’ve used from yourhandwriting. If your capitalization isn’t clearly recognized, the MessagePad uses thepreference for capitalization in the word list.
To add a word to the list, tap it out on the keyboard, then tap Add.
m If the word is not already in the MessagePad’s list, it is added to your personalword list.
m If the word is in the MessagePad’s list, a message appears telling you that the wordis already in the list. (It may be that you typed a capitalized or lowercase version ofthe word.) Tap Yes to add the word or No not to add it.
To remove a word from the list, go to it in the list and tap it. Then tap Remove. Theword is automatically deleted.
Writing and Drawing 29

Revising recently written words
If you select Cursive as your handwriting style, words you write that are not in theMessagePad’s dictionary are placed in the Recently Written Words list. When there aremany words in this list, a blinking star may appear at the top of the screen each timeyou write another word that’s not in the dictionary.
The star is a reminder to evaluate the list and select the words you want to add toyour personal word list.
To see the list of recently written words, tap the Keyboard button _ and then tapthe Dictionary button d.
To add a word to your personal word list, tap the word and tap Add. To close the slip,tap X.
30 Chapter 1

Teaching the MessagePad 2000 to recognize abbreviations
You can write an abbreviation or shortened form of a word and have the MessagePadrecognize it as the expanded word. For instance, if you write the word “example” alot, you can choose to write “ex” and have the MessagePad automatically recognizethis as “example.” You can also use this method to interpret and expand a word withaccented characters.
You can expand a word in two ways. You can add it to your word list and expand it atthe same time. Or, you can expand a word or expression that is already in your list.
To expand a word that is not in your list, you first add the expression, then expand it.
1 Tap the Keyboard button _ and then tap the Dictionary button d.
Your personal word list appears.
2 Tap the word or expression you want to expand on the keyboard, then tap Add.
3 When a slip appears asking if you really want to add the word, tap Yes.
Writing and Drawing 31

4 Make sure the expression is selected, or highlighted, then tap Expand.
The words “Expand to” appear in the slip.
5 Tap the expanded word out on the keyboard, then tap Expand.
The shortened word and the expanded word appear together in your word list.
32 Chapter 1
Tap the word you want to expand.
Tap Expand, then tap out the expandedword using the on-screen keyboard.

To expand a word that is already in your list:
1 Tap the Keyboard button _, then tap the Dictionary button d.
Your personal word list appears.
2 Go to the word in the list, tap it, then tap Expand.
3 Tap out the expanded word on the on-screen keyboard.
4 Tap Expand.
The shortened word and the expanded word appear together in your word list.
Writing and Drawing 33
Tap the word you want to expand.
Tap Expand, then tap out the expandedword using the on-screen keyboard.

Setting up a guest user
You can set up your MessagePad for a guest user and have that person enter writingstyle preferences.
To do this, tap the Recognition button Ú, and in the list that appears, tap i Preferences.
In the slip that appears, tap the checkbox next to “Configure for guest user.” Have theguest user set writing preferences in the slip while it’s still open.
When the guest user is finished using your MessagePad, tap the checkbox next to“Configure for guest user” to deselect it. All handwriting settings now revert to your settings.
For additional help and practice
To get information on writing while you are using the MessagePad, you can gothrough the Handwriting Instructor. This interactive tutorial helps you learn aboutwriting on the MessagePad. To see how well your MessagePad recognizes yourhandwriting, you can use Writing Practice.
To use the Handwriting Instructor or Writing Practice:
1 Tap Extras E to open the Extras Drawer.
2 Tap the folder tab.
3 Tap Setup.
4 Tap HW Instructor Ó or tap Writing Practice W.
34 Chapter 1

35
The Notepad is like a long roll of paper. It always contains at least one item. You canuse it to write and draw notes and other items.
The Notepad is initially set as the default application, or backdrop, that you see whenyou close all other applications. When the Notepad is the backdrop, it is always open,though it may be hidden underneath other things. To see the Notepad, you mustclose everything else by tapping all the X’s you see.
Creating a new item in the Notepad
You can create several types of items, called stationery.
m Note—Use this to write or draw.
m Checklist—Use this to create a list of items you can check off.
m Outline—Use this to outline reports or documents.
m Recording—Use this to record and play voice messages and sounds.
If you have other applications installed, you may see other types of stationery as well.
2 Using the Notepad

To create a new item:
1 Tap all X’s to return to the Notepad.
If you’ve changed the backdrop to an application other than the Notepad, tap Extras E to open the Extras Drawer, then tap Notes.
2 Tap New.
A list appears showing the different types of items, or stationery, you can create.
3 Tap the type of item you want to create.
A blank note, checklist, outline, or recording note appears.
You are now ready to write, draw, or record. To learn how to enter information intothe various types of stationery, refer to one of the next sections, “Creating a Note,”“Creating and Using a Checklist or Outline,” or “Creating a Recording.”
To create a new item of the same type as the item you are viewing, you can also drawa horizontal line across the screen. A new item appears.
36 Chapter 2

Creating a note
Tap the Recognition button Ú and from the list that appears, tap your choice—Text,Ink Text, Shapes, or Sketches.
If you are writing, tap the pen where you want your words to appear on the screen. A caret appears. You can now write anywhere on the screen and the information isplaced at the caret. If you are drawing, your drawings appear wherever you drawthem on the screen.
Using the Notepad 37
Your handwriting or text is placed at the caret.
This is an example of a note.

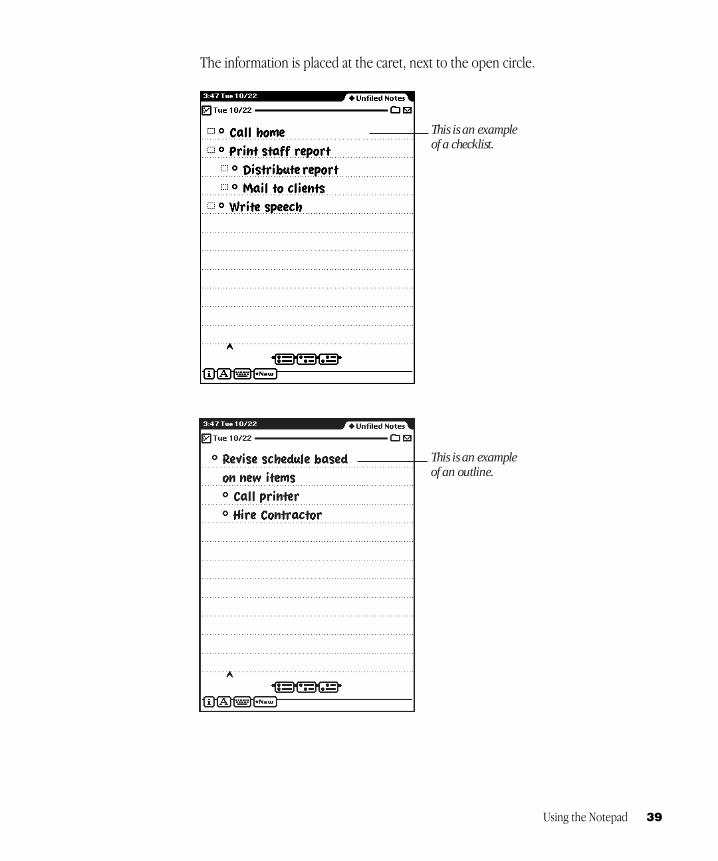
Creating and using a checklist or outline
You can use the checklist stationery to create a list of entries that you can check off asyou complete them. The outline is similar to the checklist, but you don’t have theability to check off entries.
When you create a new checklist or outline, a small circle appears on the left. This iswhere your first entry is placed. The checklist also includes a checkbox to the left ofthe circle.
1 Enter your first entry by writing with the pen, or double-tap anywhere on the screento use the on-screen keyboard to tap out the entry.
38 Chapter 2
A new entry is placed at the caret.
Using the Notepad 39
The information is placed at the caret, next to the open circle.
This is an example of a checklist.
This is an example of an outline.

2 Tap one of the buttons near the bottom of the screen to create another entry.
You can create up to eight levels in the checklist and outline stationery.
Checking off entries in a checklist
To check off entries completed, tap the checkbox next to an entry. When you checkan entry, all its subentries are also checked off.
40 Chapter 2
Tap this button to create an entryat a higher level than the oneyou just created.
Tap this button tocreate an entry
at the same level asthe one you just
created.
Tap this button to create a subentry for the entry you just created.
When you tap thecheckbox on this entry,
its subentries are alsochecked off.

Moving entries to different levels
You can rearrange entries and move an entry to a higher or lower level. Tap the opencircle next to the entry and drag it where you want it to go—to the right, left, up, or down.
Collapsing and expanding items in a checklist or outline
To collapse an entry and its subentries, tap the open circle next to the entry. Thecircle is then filled in.
Using the Notepad 41
The filled-in circletells you that this
entry has subentries.

To expand an entry and its subentries, tap the filled circle. It becomes an open circleand all entries are shown.
42 Chapter 2
This entry is now expanded and you can see its subentries.

Creating a recording
You can record messages and sounds in a note using a recording note and theMessagePad’s built-in microphone. You can also play back recorded messages,listening to them over the MessagePad speaker. You’ll find recording notes is a handyway to quickly dictate an idea or record aural information rather than write it down.
1 Tap New.
A list appears showing the types of stationery you can use.
2 Tap Recording.
A note appears with recording controls.
3 Tap the Record (circle) button to start recording.
4 Record your message.
5 To stop recording, tap the Stop (square) button.
Your message is now ready to play. To hear it tap the triangle button. You can play therecording as often as you want.
After you record a note, tapping the Record button (circle) again records over apreviously recorded message.
Using the Notepad 43
Tap here to record.While recording,tap here again to
pause.
Tap here to play your recording.While playing a message, tap here again to pause.
Tap here to stop recording or playing a message.

Setting recording preferences
You can change the way the MessagePad makes recordings by setting recording preferences.
You can record sounds and messages using either the MessagePad microphone or acable connected to the Newton InterConnect port and a sound input device.
You can also change the quality of recording by selecting how much information isrecorded per second. For example, for a voice message that might not require thehighest-quality sound, you can record at a low rate of information per second; forrecording sounds or music, you might record at a higher rate for increased clarity andfidelity.
You can also adjust the recording volume to better pick up quiet or loud sounds.
To set your recording preferences:
1 Tap Extras E.
2 Tap Prefs π in the Extras Drawer.
3 Tap Recording.
The Recording preferences slip appears.
m To select your recording method, tap “Recording source” and select eitherMicrophone or Line-in (when using a cable connected to your NewtonInterConnect port).
m To change the recording quality, tap “Recording quality” and select your choice ofrecording rate: Voice or Music.
m To change the recording volume, move the “Recording volume” slider to set thedesired volume.
4 Close the Recording preferences slip.
5 Close the Prefs slip.
44 Chapter 2

Viewing items in the Notepad
To see other items, tap the up and down arrows. All items in the Notepad are sortedby the date and time they were created. Tap up to see older notes; tap down to seenewer ones.
Viewing a long item
Go to the item you want to see and tap the up or down arrows to move through the item.
Listing all of the items in the Notepad
1 Tap the Overview button Ω.
A list of items appears.
Using the Notepad 45

2 Do one of the following:
m To go to a particular item, tap the item.
m To see more of the list (if it’s longer than one screen), tap the up and down arrows—the down arrow moves you closer to the end of the list, the up arrowmoves you closer to the beginning of the list.
Getting information about a specific item
1 Go to an item.
2 Tap the Picture button in the upper-left corner of the item.
A different button appears depending on which application and type of item you
are viewing.
A slip appears with information on the item.
m Title of item
If you haven’t named the item, this shows the date and time the item was created.To change the title, scrub out the day and date and then write the title. You canchange a title at any time
46 Chapter 2
Tap the Picturebutton to find out
more about aparticular item in
the Notepad.

m Type of item (note, checklist, outline, or recording)
m Time and date the item was created
m Size of the item in bytes
m Where the item is stored (internally or on a storage card)
3 When you are finished viewing the slip, tap X to close it.
Setting preferences for the Notepad
1 Tap the Information button ;.
2 In the list that appears, tap Prefs.
The Notepad Preferences slip appears.
3 Tap the checkbox if you want to store new items in the internal memory of your MessagePad.
This preference overrides any settings on a storage card.
4 Tap X to close the slip.
Using the Notepad 47
Tap the checkbox to automatically
store items ininternal memory.

Faxing, beaming, mailing, duplicating, or deleting items
1 Go to the item you want to route.
To select more than one item, tap the Overview button Ω and in the list thatappears, tap the checkbox next to each item you want to route.
2 Tap the Routing button µ.
3 In the list that appears, tap your choice.
For more information, see Chapter 7, “Routing Information.”
48 Chapter 2
These two items are selected for routing.

49
You can use the Name File as an address book to store information about people,companies, and groups. The Name File contains name cards that you create. Each cardhas information such as name, address, telephone numbers, electronic mail addresses,and notes. You can also create your own field labels for special information.
Tap Names ‰ to go to the Name File. Tap it again to put away the Name File. Youcan also tap X in the lower-right corner of the Name File to put it away.
3 Using the Name File
This is a sample name card.

Creating a new name card for a person or company
You can create a name card for a person or a company. To do this, follow these steps:
1 Tap Names ‰ to open the Name File.
2 Tap New.
3 In the list that appears, tap Person N or Company Ç.
4 In the slip that appears, enter the appropriate information.
50 Chapter 3
This is an example of the slip you see for a person.

5 When you are finished, tap X to close the slip.
If you want to add other information to the card, tap the Add button and see the nextsection, “Adding Information to a Card.”
Using the Name File 51
This is an example of the slip you see for a company.

Adding information to a card
You can add information to a name card at any time.
1 Go to the card and tap Add.
The Add button appears in both the Card and All Info views, but not in the Overview.
2 In the list that appears, tap the type of information you want to add. For each type ofcard you can add the following types of information:
m Person—company, address, phone, e-mail address, pager number, dates, affiliate,and notes
m Company—affiliate, address, phone, e-mail, and notes
m Group—notes
You can also create custom fields of information for each type of card. See “CreatingCustom Field Labels,” below.
If you enter a birthday or anniversary in the Dates field for a person, it isautomatically entered as an annual event in the Date Book.
3 In the slip that appears, enter the appropriate information.
4 When you are finished, tap X to close the slip.
To see the information, tap Show and in the list that appears, tap All Info.
52 Chapter 3
Tap Add to enter additional information on a card.

Creating custom field labels
You can create your own field labels for name cards if you want to enter information thatis not in the Add pop-up list. For example, you might want to add a Department field.
1 Go to the card and tap Add.
2 In the list that appears, tap Custom.
A slip appears for you to enter the name of the field.
3 Tap the pen on a blank line.
The caret appears.
4 Enter the name of the new field.
5 Tap X to close the slip.
Another slip appears with the field label you just created.
Using the Name File 53
Write the new field name here.
Tap on another line to create additional field labels.

6 Enter information on the blank line and tap X when you are finished.
To view custom field information
The field labels you create do not appear in the Card view. To see custom fieldinformation, tap Show and, in the list that appears, tap All Info.
To enter custom field information in another card
Once you create a custom field label, you can use that field in any name card. To dothis, go to a name card and tap Add. In the list that appears, tap the custom fieldlabel. Enter the appropriate information in the slip and tap X when you are finished.
Changing information on an existing card
1 Go to the card you want to change.
2 Tap the information you want to change.
If you are in the Card view and the information you want to change is shown, tap it. Ifthe information is not shown in the Card view, tap Show, then tap All Info.
Do not tap the Phone button q or the MessagePad dials the phone number.
3 Scrub out the information and enter new information, if desired.
If there is no information in a field, it does not appear in any view.
4 When you are finished, tap X to close the slip.
54 Chapter 3
Enter information for the custom label on the line.
Tap here to change the name of the custom field label.

Creating a card for a group address
You can create a group address to conveniently send faxes or electronic mailmessages to multiple individuals or companies.
1 Tap New.
2 In the list that appears, tap Group G.
3 In the slip that appears, enter the appropriate information.
4 When you are finished, tap X to close the slip.
The new group address card is added to your Name File.
Using the Name File 55
Enter the name of the group here.
Tap the folder you want to view.
Use the scroll arrows to move up and down in the list, if necessary.
Tap the diamond and then tap “Faxes”or “E-Mail address.”
Tap a checkbox nextto an entry to select it.
Tap the diamond and in the listthat appears, tap the informationyou want in the group address.
Tap the checkbox to see in the list only those in the group.

To add or delete entries in a group address
Go to the group address card and tap the group name or the Picture button next to it.
The group address slip appears. Make any changes and when you are finished, tap Xto close the slip.
Viewing the Name File
To see other cards, tap the up and down arrows. Tap the up arrow to see cardstoward the beginning of the alphabet; tap the down arrow to see cards toward theend. You can also tap a lettered tab to see cards within that letter range. If you tapthe lettered tab a second time, you see cards that are filed under the second letteron the tab.
m Tap the Overview button Ω.
A list of your name cards appears.
To see other cards in the folder, tap the up and down arrows to move through the list or tap the lettered tabs.
56 Chapter 3
Tap here if you wantto change the folder you are viewing.
This is the list of cardslocated in the currently
selected folder.

Sorting name cards
You can sort name cards several ways:
m Default Order–last name for a person and name of the company or group
m First Name
m Company Name
m Card Category–person, company, and group
m Zip Code
Note: Cards that don’t include information in the field you are sorting by are placedat the beginning of the sort order.
To sort cards, follow these steps:
1 Tap the Information button i and in the list that appears, tap Prefs.
The Names Preferences slip appears.
2 Under “Sort by,” tap how you want to sort the cards.
3 Tap X to close the slip.
A message appears saying that the sort order is being changed.
Using the Name File 57

Creating and sorting cards written in ink text
You can enter information in ink text and have the MessagePad sort these cards by aletter or number.
1 Tap New and in the list that appears, tap your choice.
A new card slip appears.
2 Tap the Recognition button and in the list that appears, tap Ink Text :.
3 Write the appropriate information. Then tap X to close the slip.
A keypad appears.
4 Tap the letter or number that you want to sort the card by. Then tap X to close the slip.
If you don’t choose a letter or number, the card is placed at the beginning of the sort order.
58 Chapter 3

Sorting companies with information in the birthday field
Company entries created using an earlier version of the Newton operating systemthat have information in the birthday field may not be sorted correctly.
In the Newton 2.0 operating system, birthday information is displayed in the Lastname or Untitled Person field. When entries are sorted by the information in the Last name field, entries with birthday information may be placed at the beginning ofthe alphabet.
This may occur when you
m Use data and information from a storage card that has been converted to theNewton 2.0 operating system.
m Beam or mail a company name card from a Newton device that uses an earlierversion of the Newton operating system to your MessagePad, and then select “PutAway” in the InOut Box.
Using the Name File 59

Changing a card’s appearance
There are several different styles, or layouts, that you can choose for a name card.
1 Go to the card.
2 Tap Show and in the list that appears, tap All Info.
3 Tap Card Style or the picture of the card.
A slip of different card styles appears.
4 Tap the style you want to use.
The selected style now has a thick border around it.
5 To see the new card style, tap X, tap Show, and in the list that appears, tap Card.
60 Chapter 3
Shows the current card style.
Tap a style to select it.

Adding and viewing notes
You can add a note to a name card and view notes attached to cards.
To add a note
1 Go to the card.
2 Tap Add and in the list that appears, tap Notes.
3 In the slip that appears, enter your information.
Tap the Recognition button Ú in the lower-left corner if you want to change therecognition setting for the note. Tap the scroll arrows ≈ on the right side to movedown in the note if you need more space.
4 When you are finished, tap X to close the slip.
Using the Name File 61

To view a note
1 Go to the card.
2 Tap Show and in the list that appears, tap All Info.
The note text appears in quotation marks if it was written as text. If it was writtenusing a combination of text, ink text, shapes, or sketches you see the designation“[notes].”
3 Tap the note shown on the screen.
The note slip appears. Tap the scroll arrows ≈ to move up and down in the note.
You can find text in a note attached to a name card by tapping Find. For moreinformation, see Chapter 6, “Organizing and Finding Information.”
Setting Names preferences
You can set preferences for the Name File to choose how the cards are sorted,whether you want to beam note information with a card, and whether to store newnames internally.
1 Tap Names ‰ to open the Name File, if it’s not already open.
2 Tap the Information button ;.
3 In the list that appears, tap Prefs.
The Names Preferences slip appears.
62 Chapter 3
The default sorting order is alphabetical by the person’s last name, company name,or name of group.

4 Enter or change any information.
m Under “Sort by” tap how you want the MessagePad to sort your name cards. Only name cards with information in the selected field appear. Cards that don’tinclude information in the field you are sorting by are placed at the beginning ofthe sort order.
m Tap the “Send notes data with names” checkbox to beam any notes with name cards.
m Tap the “Always store new names internally” checkbox if you want to store newitems in the internal memory of your MessagePad.
This preference overrides any settings on a storage card.
5 Tap X to close the slip.
If you changed the sorting preference, you now see the cards in the new sort order.
Printing cards in the Name File
1 If you want to print several, but not all, cards, tap the Overview button Ω and, in thelist that appears, tap the checkbox next to each card you want to print. Otherwise, goto step 2.
2 Tap the Routing button µ.
3 In the list that appears, tap Print Name.
A print slip appears.
4 If necessary, tap Printer and in the list that appears, tap your choice. (For moredetailed information on printing, see “Printing” in Chapter 7, “Routing Information.”)
5 Tap Format and in the list that appears, tap your choice.
Using the Name File 63

m Single Card—to print the card you are currently viewing. (If you selected more than one card to print from the Overview, the choice “Single Card” doesn’t appear.)
m Phone Book—to print information on each card in alphabetical order, withtelephone numbers in a separate column to the right.
m Cards and Notes—to print cards and notes.
m Cards—to print cards only (no notes).
m Summary—to print all information for each card including text notes. If you haveink text, a drawing, or a sketch in the notes field, notes are not printed; thedesignation “[notes]” appears instead.
6 To preview the list, tap Preview.
A miniature of the format is shown.
Tap Next to view any remaining preview screens.
7 Tap X to close the preview slip.
8 Tap Print to print the card or cards in the selected format.
64 Chapter 3
This is a preview of a single card.

Faxing, beaming, mailing, duplicating, or deleting cards
1 Go to the card.
To select more than one name card, tap the Overview button Ω and in the list thatappears, tap the checkbox next to each card you want to route.
2 Tap the Routing button µ.
3 In the list that appears, tap your choice.
If you want to send the notes associated with Names information, open thePreferences slip for Names and select the “Send notes data with names” checkbox.
For more information about sending information, see Chapter 7, “RoutingInformation.”
Dialing telephone numbers
You can place a telephone call while you are in the Name File. You can also tap Assistor use the Calls application in the Extras Drawer to make calls.
s Warning Do not connect your modem to a digital telephone line. It may damagethe modem. s
Important Because of local telephone regulations, tone dialing through theMessagePad speaker may not be available in some countries.
The MessagePad can look up phone numbers in the Name File and dial them for you,using the speaker or an optional modem. When you enter phone numbers, alwaysinclude the area code. Based on the information in Time Zones and Owner Info, yourMessagePad decides whether to dial an area code and whether to include prefixesand calling card numbers.
For more information, see Chapter 5, “Managing the MessagePad 2000.”
Important The MessagePad’s dialing feature does not work with all phones. Somephones, such as PBX phones, do not recognize the tones from MessagePad’s speaker.
Using the Name File 65
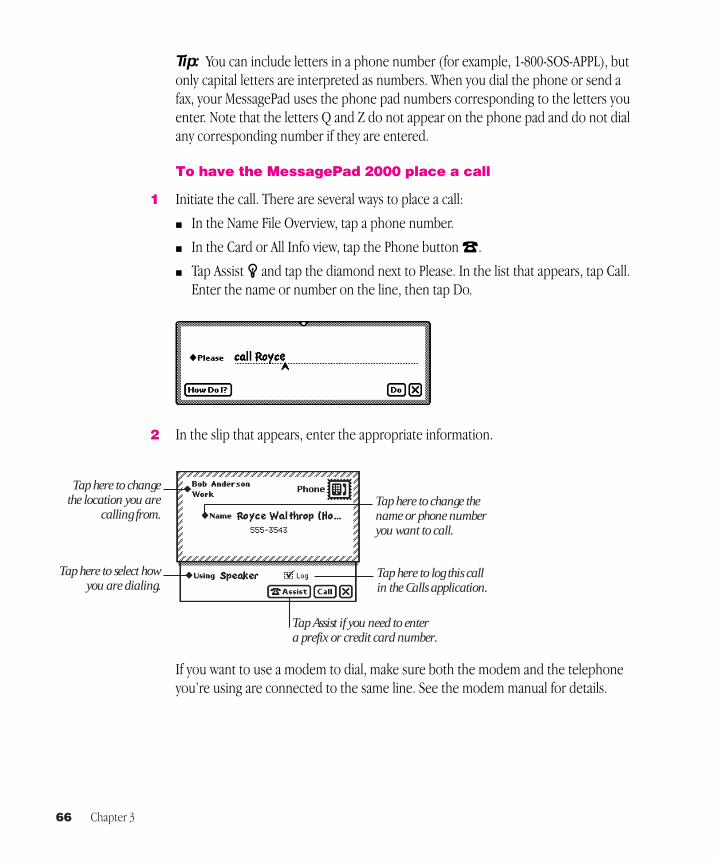
Tip: You can include letters in a phone number (for example, 1-800-SOS-APPL), butonly capital letters are interpreted as numbers. When you dial the phone or send afax, your MessagePad uses the phone pad numbers corresponding to the letters youenter. Note that the letters Q and Z do not appear on the phone pad and do not dialany corresponding number if they are entered.
To have the MessagePad 2000 place a call
1 Initiate the call. There are several ways to place a call:
m In the Name File Overview, tap a phone number.
m In the Card or All Info view, tap the Phone button q.
m Tap Assist R and tap the diamond next to Please. In the list that appears, tap Call.Enter the name or number on the line, then tap Do.
2 In the slip that appears, enter the appropriate information.
If you want to use a modem to dial, make sure both the modem and the telephoneyou’re using are connected to the same line. See the modem manual for details.
66 Chapter 3
Tap here to log this call in the Calls application.
Tap here to changethe location you are
calling from.
Tap here to select howyou are dialing.
Tap Assist if you need to enter a prefix or credit card number.
Tap here to change the name or phone number you want to call.

3 Tap Call.
If you’re dialing through the speaker, position the MessagePad’s speaker at the centerof the telephone mouthpiece.
The number is dialed and a message appears telling you the MessagePad is dialing.
Note: If you tapped Log in the Call slip, the call is automatically logged in the Callsapplication in the Extras Drawer and you see a different screen after you tap Call. Formore information, see “Calls” in Part 2, “Using the Built-in Applications” in Chapter 5,“Managing the MessagePad 2000.”
Speaker
Telephonemouthpiece
Using the Name File 67


69
The Date Book has two parts: a calendar that you use to keep track of meetings andevents, and a daily to-do list, which forwards unfinished items to the current date.
Tap Dates ¬ to go to the Date Book. Tap it again to put away the Date Book. Youcan also tap X in the lower-right corner of the Date Book to put it away.
4 Using the Date Book: Calendar and To Do List

Summary of the Calendar
70 Chapter 4
Tap the scroll arrows to move up and down in the schedule.
Tap Show to see different views of the Date Book.
Each meeting has a marker, button, and title.
Tap New to create a new item in the Date Book or a new To Do task.
Tap the month and a list appears;you can choose to see the last 3months, next 9 months, or today.
Tap a date to go to it.
Events are shown inthe top-left corner.
Tap the arrows tomove to the next or
previous month.

Scheduling meetings and events
You can create a variety of items in the calendar, including single, weekly, and otherrepeating meetings, along with single, multiday, and annual events. Meetings are timebased and events are date based. You can also add notes to calendar items and setalarms for them.
Scheduling a meeting
You can schedule a single, one-time meeting or a repeating meeting. (To schedule aweekly meeting, see the next section.)
1 Tap Dates ¬.
2 Tap New.
3 From the list that appears, tap Meeting M.
4 Enter the information in the slip that appears.
Using the Date Book: Calendar and To Do List 71
Write the title of the meeting here.
Tap a diamond next to an entry to enter information.
Tap here to add anote to this meeting.

72 Chapter 4
Write the title. To enter other information, tap the diamond u next to an item. Youcan include the following information:
m Title—displays the name of the meeting. (You’ll see a diamond here if you havecreated other meetings, except for weekly meetings.)
m Date—shows the day and year of the meeting.
m Time—lists the time and length of the meeting.
m Invitees—shows who is attending the meeting. (Your MessagePad gets theinformation from the Name File.)
Tap an arrow to change the month.
Tap a date to select it.
Tap the upper half of a number to increaseit; tap the lower half to decrease it.
Tap the folder tab to select a folder.
Tap the upper half of a number to increaseit; tap the lower half to decrease it.Remember to set AM or PM.
Tap the checkboxes next to those invited to the meeting.
Tap the diamond tochange how long the
meeting will be.
Tap New to add a name to your invitee list that is not already in your Name File.

m Location—tells where the meeting is being held.
m Alarm—sets an alarm and a message to appear a specified amount of time beforethe meeting.
To choose the type of sound and volume for the alarm, go to Prefs π in the ExtrasDrawer and tap Alarm ≥. Then go to Sound preferences and turn on “Action soundeffects.” For more information, see “Prefs” in Part 2 of Chapter 5, “Managing theMessagePad 2000.”
m Repeat—tells how often the meeting repeats, if necessary.
m Add Notes—allows you to add additional information about the meeting.
To add more information or edit existing information, tap Edit Notes in the meetingslip. Scrub any information you want to delete.
Using the Date Book: Calendar and To Do List 73

This is an example of a meeting slip that has been filled out.
5 When you are finished entering information, tap X to close the slip.
e Scheduling a weekly meeting
You can schedule a meeting for the same day and time each week.
1 Tap Dates ¬.
2 Tap New.
3 From the list that appears, tap Weekly Meeting Â.
4 Enter the information in the slip that appears.
Write the title. To enter other information, tap the diamond u next to an item.
74 Chapter 4

You can include the following information:
m Title—displays the name of the meeting. (You’ll see a diamond next to this if youhave created other weekly meetings.)
m Time—lists the time and length of the meeting.
m Invitees—shows who is attending the meeting.
m Location—tells where the meeting is being held.
m Alarm—sets an alarm and a message to appear a specified amount of time beforethe meeting.
Using the Date Book: Calendar and To Do List 75
Tap the folder tab to select a folder.
Tap the checkboxes next to those invited to the meeting.
Tap New to add a name to your invitee list that is not already in your Name File.

To choose the type of sound and volume for the alarm, go to Prefs π in the ExtrasDrawer and tap Alarm ≥. Then go to Sound preferences and turn on “Action soundeffects.” For more information, see “Prefs” in Part 2 of Chapter 5, “Managing theMessagePad 2000.”
m Dates—shows the beginning day and year of the meeting and the end date (if it’snot ongoing).
m Add Notes—allows you to add additional information about the meeting.
To add more information or edit existing information, tap Edit Notes in the meetingslip. Scrub any information you want to delete.
76 Chapter 4
Tap an arrow to change the month.
Tap a date to select it.
Tap this diamond to set how often the meeting will be scheduled.

This is an example of a Weekly Meeting slip that has been filled out.
5 When you are finished entering information, tap X to close the slip.
e Scheduling an event
You can schedule an event on a particular day.
1 Tap Dates ¬.
2 Tap New.
3 From the list that appears, tap Event e.
4 Enter the information in the slip that appears.
Write the title. To enter other information, tap the diamond next to an item. You caninclude the following information:
m Title—displays the name of the event. (You’ll see a diamond here if you havecreated other events.)
Using the Date Book: Calendar and To Do List 77

m Date—shows the day and year of the event.
m Alarm—sets an alarm and a message slip to appear a specified amount of timebefore the event.
To choose the type of sound and volume for the alarm, go to Prefs π in the ExtrasDrawer and tap Alarm ≥. Then go to Sound preferences and turn on “Action soundeffects.” For more information, see “Prefs” in Part 2 of Chapter 5, “Managing theMessagePad 2000.”
m Repeat—tells how often the event repeats, if necessary.
78 Chapter 4
Tap an arrow to change the month.
Tap a date to select it.
Tap the upper half of a number to increase it; tap the lower half to decrease it.

m Add Notes—allows you to add additional information about the event.
Once you’ve added information in a note, to add more information or edit existinginformation while the meeting slip is still open, tap Edit Notes in the event slip. Scrubany information you want to delete.
This is an example of an event slip that has been filled out.
5 When you are finished entering information, tap X to close the slip.
¸ Scheduling a multiday event
You can also schedule events that last more than one day, such as a conference orsales meeting.
1 Tap Dates ¬.
2 Tap New.
3 From the list that appears, tap Multi-Day Event ¸.
Using the Date Book: Calendar and To Do List 79

4 Enter the information in the slip that appears.
Write the title. To enter other information, tap the diamond u next to an item. Youcan include the following information:
m Title—displays the name of the event. (You’ll see a diamond here if you havecreated other multiday events.)
m Alarm—sets an alarm and a message slip to appear a specified amount of timebefore the event.
m Dates—shows the date the event occurs.
m Add Notes—allows you to add additional information about the event.
To add more information or edit existing information, tap Edit Notes in the event slip.Scrub any information you want to delete.
80 Chapter 4
Tap an arrow to change the month.
Tap this diamond to set the length of the event.

This is an example of a Multi-Day Event slip that has been filled out.
5 When you are finished entering information, tap X to close the slip.
å Scheduling an annual event
Use this to include events that occur on one day each year, such as birthdays oranniversaries.
1 Tap Dates ¬.
2 Tap New.
3 From the list that appears, tap Annual Event å.
Using the Date Book: Calendar and To Do List 81

4 Enter the information in the slip that appears.
Write the title. To enter other information, tap the diamond u next to an item. Youcan include the following information:
m Title—displays the name of the event. (You’ll see a diamond here if you havecreated other annual events.)
m Alarm—sets an alarm to go off and a message slip to appear a specified amount oftime before the event.
m Dates—shows the dates the event occurs on.
m Add Notes—allows you to add additional information about the event.
To add more information or edit existing information, tap Edit Notes in the event slip.Scrub any information you want to delete.
82 Chapter 4
Tap an arrow to change the month.
Tap a date to select it.
Tap this diamond to set how often the event occurs.

This is an example of an Annual Event slip that has been filled out.
5 When you are finished entering information, tap X to close the slip.
Adding notes to an existing meeting or event
You can annotate a meeting or event and add information.
1 Tap Dates ¬.
2 Tap the Picture button next to the meeting or event title. The meeting or event slip appears.
3 Tap Add Notes.
If you’ve already entered notes, the button is labeled Edit Notes.
Using the Date Book: Calendar and To Do List 83
This is the Picture button for a meeting.

4 Enter the information in the Meeting Notes slip that appears.
5 Tap X to close the notes slip, then tap X to close the meeting slip.
Using the alarm to notify you
When an alarm goes off, a message appears on the MessagePad screen. You can alsochoose to have the MessagePad play a sound when the alarm goes off.
To set the type of sound and volume for an alarm:
1 Tap Extras E, then tap the folder tab and tap Unfiled Icons.
2 Tap Prefs π, then tap Alarm ≥.
In the slip that appears, tap your preferences.
3 Tap X to close the slip.
4 Tap Sound ˆ and in the slip that appears, tap the checkbox next to “Action soundeffects.”
This turns on sound effects so you can hear the alarm.
For more information, see “Prefs” in Part 2 of Chapter 5, “Managing the MessagePad 2000.”
84 Chapter 4

Scheduling overlapping meetings
You can set two meetings for overlapping times by placing them side by side.
Schedule the first meeting, then do one of the following:
m Tap New and in the list that appears, tap the type of meeting you want. In themeeting slip that appears, enter the appropriate information, and then tap X toclose the slip. The new meeting appears in the middle of the screen at thespecified time.
m Draw a vertical line near the middle of the calendar, specifying the time of thesecond meeting. A marker and Picture button for the second meeting appear.Write the title next to the new Picture button or tap the Picture button and enterthe appropriate information in the slip that appears, then tap X to close the slip.
m Schedule the second meeting at a different time, then move it. For moreinformation, see “Moving Items in the Date Book,” later in this chapter.
Using the Date Book: Calendar and To Do List 85

Moving around in the Date Book
You use the monthly calendar in the top-right corner of the Date Book to go quicklythrough the Date Book.
m To go to another date, tap the date.
m To see the next or previous month, tap the arrows.
m To see several days at a time, select the days you want, up to seven days. Tap adate, then drag to the end date. You can select the same day over consecutiveweeks (vertically) or days in a single week (horizontally).
You can also see consecutive days spanning two weeks by dragging the pen diagonally.
86 Chapter 4
Tap the month and a list appears; you can choose to see the last 3 months, next 9 months, or today.
Tap the arrows to move to the next orprevious month.
Tap a date to go to it.

1 Tap Dates ¬ to open the Date Book.
2 Tap Show and in the list that appears, tap your choice.
The default view is the current day. If you choose a week view, it shows the weekcontaining the current day.
m Tap Day to view a particular day.
Using the Date Book: Calendar and To Do List 87
Tap one of these to view other items in the Date Book.
Tap one of these to choose the type of view for showing the Calendar items.
Tap here to showitems for the current day.

m Tap Week to see the overview for a particular week.
m Tap Month to see one month at a time. The dark bands represent meetings andevents and the flags represent events.
To go to a particular date in the month, tap the day in either the large month viewor the minicalendar in the upper-right corner.
88 Chapter 4

To go to another month, you can
m Tap the name of the month and, from the list that appears, tap your choice.
m Tap the arrows next to the name of the month.
m Tap the up and down arrows next to the Overview button Ω.
Using the Date Book: Calendar and To Do List 89

m Tap Year to see a distant date. A ten-month calendar appears. Tap the up and downarrows next to the Overview button Ω to see more months. You can tap themonth or the date you want to see.
m Tap To Do List to see your tasks.
For more information, see “Using the To Do List,” later in this chapter.
90 Chapter 4

m Tap Day’s Agenda to see meetings, events, and to-do tasks for the day you areviewing. Tap the Picture button for an item to see more information about it.
m Tap Today to go quickly to today’s schedule.
Viewing items in the Date Book
You can use the Overview button Ω to see a list of items in the Date Book. There areseveral ways to do this, depending upon what you want to see.
m Meetings and events—Tap Show and in the list that appears, tap Day. Tap theOverview button Ω.
Using the Date Book: Calendar and To Do List 91

m To Do Tasks—Tap Show and in the list that appears, tap To Do List. Tap theOverview button Ω.
m Multiple meetings, events, and to-do tasks—If you have four or more meetings,events, or tasks in one day and you want to see them all, tap Show and in the listthat appears, tap Day’s Agenda. Tap the Overview button Ω.
Duplicating meetings or events
To duplicate a meeting or event:
1 Tap Dates ¬.
2 Go to a specific date.
3 Tap the Picture button for the meeting or event. The Meeting slip appears.
4 Tap the Routing button µ.
92 Chapter 4

5 From the list that appears, tap Duplicate.
A copy of the slip appears.
6 Change information in the slip as appropriate.
If you change the time or date of the meeting, the MessagePad automatically moves itto the new time or date.
If you don’t change the time or date of the meeting, it appears next to the originalitem in the day’s schedule. To move the item to another time or date, see the nextsection, “Moving Items in the Date Book.”
Using the Date Book: Calendar and To Do List 93

Moving items in the Date Book
You can quickly move meetings or events to a different time or date or change thelength of a meeting or event.
Moving a meeting within the same day
To move a meeting to a different time in the same day, hold the pen on the Picturebutton for the meeting or event. Move the item to the desired time.
Another way to do this is to tap the Picture button for the meeting, tap Time, and inthe slip that appears, tap the new time.
94 Chapter 4

Moving a meeting to another date
To move a meeting or event to a different date, tap the Picture button for themeeting, tap Dates, and in the slip that appears, tap the new date.
You can also hold the pen on the Picture button for the meeting or event and drag itall the way to the right or left edge of the screen. A box appears. Tap the date on thecalendar that you want to move the meeting to. Hold the pen on the box and move itto the time you want on the selected day.
If you want to move a meeting within the same week, tap Show, then tap Week. Tapthe Picture button for the meeting and drag it to the new date.
Changing the length of a meeting
To change the length of a meeting:
m Hold the pen on the marker for the meeting until it turns white and drag to thenew beginning or ending time.
Using the Date Book: Calendar and To Do List 95
The marker was moved from 3 PM to 4 PM.

m Tap the Picture button for a meeting, tap Time, and in the slip that appears, tapthe new time.
To change the time of a meeting, tap the Picture button and drag it to the newtime. Tap the scroll arrows ≈ on the right if you need to move up or down in theschedule.
Using the To Do List
The Date Book includes a daily To Do list that forwards unfinished items to thecurrent date.
96 Chapter 4
Tap the scroll arrows to move up or down in the schedule.
This meeting wasmoved from
2 PM to 11 AM.

Creating a To Do Task
1 Tap Dates ¬.
2 Tap New.
3 In the list that appears, tap To Do Task.
4 Enter the information in the slip that appears.
To enter information, tap the diamond next to the item you want to enter. You caninclude the following information:
m Title—displays what the task is.
m Date—lists the date you want to do this task.
m Priority—sets a numbered priority for the task.
Using the Date Book: Calendar and To Do List 97
Tap an arrow to change the month.
Tap a date to select it.
Tap the upper half of a number to increase it; tap the lower half to decrease it.

m Reminder—sets how many days in advance to start displaying the To Do task.
m Repeat—sets the task to reappear at a specified interval.
This is an example of a To Do Task slip that has been filled out.
5 When you are finished entering information, tap X to close the slip.
98 Chapter 4

Viewing the To Do List
1 Tap Dates ¬.
2 Tap Show.
3 In the list that appears, tap To Do List.
4 To see more information about a specific task, tap the Picture button next to thecheckbox.
Your MessagePad automatically turns itself on at 3:00 A.M. every morning and movesunfinished tasks to the next day. The MessagePad then turns itself off.
Changing the level of a to-do task
Tap the Picture button of a to-do task and drag it to the level of priority you want.
If you move the task above a higher-priority item, it becomes a higher priority. If youmove the task below a lower-priority item, it becomes a lower priority.
Using the Date Book: Calendar and To Do List 99
Tap this button to seemore information on
the to-do task.

Completing a to-do task
1 Tap Dates ¬.
2 Tap Show.
3 In the list that appears, tap To Do List.
4 Tap the checkbox next to any items you have finished.
Tasks that are completed move to the bottom of the list.
Deleting a to-do task
1 Tap Dates ¬.
2 Tap Show.
3 In the list that appears, tap To Do List.
4 Tap the Picture button next to the checkbox of the item you want to delete.
5 Tap the Routing button µ.
6 Tap Delete.
100 Chapter 4
Completed tasks have a checkmark in the box and are
placed at the bottom of the to-do list.

Duplicating a to-do item
1 Tap Dates ¬.
2 Go to a specific date.
3 Tap Show.
4 In the list that appears, tap To Do List.
5 Tap the Picture button next to the checkbox of the item you want to duplicate.
6 Tap the Routing button µ.
7 Tap Duplicate.
A copy of the task appears in the list. You can tap its Picture button to change anyinformation.
Other ways to create meetings and to-do tasks
There are several ways you can create meetings and to-do tasks without using theNew button.
m If you are in the Day view and want to create a new meeting, tap the pen on theline at the approximate time, then write a name for the meeting. You can alsodraw a vertical line to create a new meeting marker.
m If you are in the To Do List view and want to create a new task, tap the pen on aline and write the task.
Faxing, beaming, mailing, and duplicating meetings,events, and to-do tasks
1 Go to the item.
To select more than one item, tap the Overview button Ω and, in the list thatappears, tap the checkbox next to each item you want to route.
2 Tap the Routing button µ.
3 In the list that appears, tap your choice.
For more information, see Chapter 7, “Routing Information.”
Using the Date Book: Calendar and To Do List 101

Sending repeating to-do tasks
When you e-mail or beam a repeating to-do task, it is sent to the recipient as a non-repeating task. To make it repeat, the recipient must tap the to-do task to open theslip, tap Repeat, and in the list that appears, tap a choice.
Deleting meetings, events, and to-do tasks
You can free up your MessagePad’s internal memory by deleting old and out-of-dateitems from the Date Book.
To delete a single meeting, event, or to-do task, go to the item, tap its Picture button,and tap the Routing button µ. In the list that appears, tap Delete.
To delete more than one item, use the overview. There are several ways to do this,depending upon what you want to delete.
m Meetings and events
Tap the Overview button Ω in the Day view. Tap the checkbox next to eachmeeting or event you want to delete. Tap the scroll arrows to see days in the pastand future. When you are finished selecting items, tap the Routing button µ and,in the list that appears, tap Delete.
m To Do Tasks
Tap the Overview button Ω in the To Do List view. Tap the checkbox next to eachtask you want to delete. Tap the scroll arrows ≈ to see tasks in the past and future.When you finish selecting tasks, tap the Routing button µ and, in the list thatappears, tap Delete.
m Meetings, events, and to-do tasks
Tap the Overview button Ω in the Day’s Agenda view. Tap the checkbox next toeach item you want to delete. Tap the scroll arrows ≈ to see items in the past andfuture. When you finish selecting items, tap the Routing button µ and, in the listthat appears, tap Delete.
102 Chapter 4

Setting preferences for the Date Book
1 Tap Dates ¬.
2 Tap the Information button ;.
3 In the list that appears, tap Prefs.
The Dates Preferences slip appears.
4 Enter the appropriate information, then tap X to close the slip.
Setting a default alarm time for meetings
1 Tap “Default alarm time for meetings.”
2 From the list that appears, tap your choice.
Using the Date Book: Calendar and To Do List 103
Tap one of these buttons to set the first day of the week.
Tap these diamonds to set how much time in advance you want an alarm to go off.
Tap these checkboxesto store new
information in theinternal memory
of the MessagePadregardless of whether
a storage card is inserted.

To set an alarm time other than those shown, tap Other and enter the appropriateinformation.
Settting a default alarm time for events
1 Tap “Default alarm time for events.”
2 From the list that appears, tap your choice.
To set an alarm time other than those shown, tap Other and enter the number of days.
104 Chapter 4
Then tap the diamond to set the notice for the alarm.
Write anumber here.
Write a number here.

105
This chapter contains information about the MessagePad and is divided into two parts:
Part 1: Managing the Extras Drawer
Part 2: Using the built-in applications
Use the first part of this chapter to learn how to manage the Extras Drawer and theitems in it.
Use the second part of this chapter to learn how to use the applications that comewith your MessagePad.
5 Managing the MessagePad 2000

Part 1: Managing the Extras Drawer
The Extras Drawer contains icons you can tap to go to different areas of yourMessagePad, other than the Name File, Date Book, and Notepad. If you install moreapplications, either internally or on a storage card, their icons may appear in theExtras Drawer.
To open the Extras Drawer, tap Extras E. Tap the icon again to close the ExtrasDrawer. You can also tap X to close the Extras Drawer.
You can also manage the information and applications in the Extras Drawer. As inmany areas of the MessagePad, the Extras Drawer is organized by folders.
106 Chapter 5
These are the typical icons filed in the Unfiled Icons folder (the contents of your Unfiled Icons folder may look different).
Tap Rotate to change theorientation of the screen.
The checkmark shows which folder you are currently viewing.
This is a list of other folders in the Extras Drawer, including ones that you create.
Tap one of these to select which storagelocation you want to view—the MessagePad only, a storage card only, or both.
Tap the folder tab to view thecontents of another folder inthe Extras Drawer.

The following folders are present when you first receive your MessagePad:
m Unfiled Icons—contains many built-in applications, such as the InOut Box, Calls,Calculator, Formulas, Time Zones, Connection, Card, Styles, Prefs, Owner Info,and Clock.
m Setup—contains Setup, Newton Tour, HW Instructor, and Writing Practice.
m Help—includes the on-screen help application for the Newton operating system(help files from other applications you install are also located here).
m Extensions—contains fonts, system extensions, and some applications.
m Storage—contains data from all of your applications.
You can create new folders and edit existing folder names. For more information, seeChapter 6, “Organizing and Finding Information.”
Setting where new information is stored
All new items you create in the Notepad, Name File, and Date Book are storedinternally in the MessagePad, unless you specify otherwise.
You can store new information automatically on a storage card. To do this:
1 Insert a storage card.
2 Tap Extras E to open the Extras Drawer.
3 Tap the folder tab, tap Unfiled Icons, then tap Card B. (If you filed Card in anotherfolder, tap the name of that folder, then tap Card B.)
4 In the slip that appears, tap “Save new info and packages on this card.” If the card is locked, you can’t choose this option.
Managing the MessagePad 2000 107
Tap here to save all newinformation on this card.
This icon indicates whether the card is unlocked or locked.

5 Tap X to close the slip.
Any new information you create on your MessagePad will now be stored on that card,unless you change storage locations for individual items or applications.
Checking memory used in built-in applications
Some applications have information filed in the Storage folder of the Extras Drawer.These files contain data and other information specific to that application. You cansee the number of items in each application and the amount of memory these itemstake up. You can also route and file this data.
1 Tap Extras E to open the Extras Drawer.
2 Tap the folder tab, then tap Storage.
The Storage folder shows a storage icon ¨ for each information file.
3 Tap the icon for the application you want to see.
A slip appears, showing the number of items in the application and the amount ofmemory these items take up. If you have a card installed, it lists this information forthe card also.
m To delete items in storage for the application, tap Delete. A warning messageappears, asking if you want to delete all the items. Tap OK.
m To file the items into a folder in the internal memory or on a storage card, tap theFolder button F. In the slip that appears, select the appropriate information, thentap File. A message appears asking if you want to file the information. Tap OK.
4 When you are finished viewing the slip, tap X to close it.
108 Chapter 5
This is the information thatappears when you tap the Names Storage icon.

Checking battery status, setting contrast and volume
To check the amount of power left in your batteries, change the screen contrast, orvolume of sound, tap Extras ´ to open the Extras Drawer.
m Look at the battery gauge in the lower-right corner of the Extras Drawer. Thisindicates how much power is left.
m To change the screen contrast, hold the pen on the contrast slider and move itright or left.
Note: The contrast of your MessagePad screen may vary slightly depending uponthe surrounding temperature.
m To change the volume, hold the pen on the volume slider and move it right forhigher volume or left for lower volume.
Checking the available memory
1 Tap Extras E to open the Extras Drawer.
2 Tap the Information button ; and, in the list that appears, tap Memory Info.
A slip appears showing you the amount of internal memory used. If you have astorage card inserted, the memory used on the card is also listed.
Managing the MessagePad 2000 109

Changing the backdrop
The backdrop is the application you see when you close all other applications. Whenyou first receive your MessagePad, the Notepad is set as the backdrop. You canchange the backdrop—for example, if you use a specific application, such as NameFile, more than the Notepad.
When you make an application other than the Notepad the backdrop, a Notes iconnallowing you to access the Notepad appears in the Extras Drawer.
If you reset your MessagePad by tapping the Reset button, the backdrop does notchange. If you do a hard reset (which erases all the information on yourMessagePad), the backdrop reverts to the Notepad.
Making the Extras Drawer the backdrop
1 Tap Extras E to open the Extras Drawer.
2 Tap the Information button ; in the lower-left corner and in the list that appears,tap Memory Info.
A slip appears.
3 Tap the button to make the Extras Drawer the backdrop.
Another slip appears, asking you to confirm that you want to change the backdrop.
4 Tap OK.
Now you see the Extras Drawer when you close all other applications.
110 Chapter 5
Tap here to make Extras the backdrop.

Making any other application the backdrop
You can make any application in the Extras Drawer the backdrop.
1 Tap Extras E to open the Extras Drawer.
2 Tap the folder tab, then tap the name of the folder that contains the application youwant as the backdrop.
3 Hold the pen on or near the icon until a heavy mark appears under the pen, thendraw the highlighting mark over or around the icon to select it.
4 Tap the Routing button µ.
5 From the list that appears, tap Make Backdrop. A slip appears, asking if you want tochange the backdrop.
6 Tap OK.
Now when you close all other applications you see the application you selected.
Managing the MessagePad 2000 111
Calls is selected.

Viewing items in the Extras Drawer
You can view items in the Extras Drawer in two ways—by icon (default view) and as alist. To see a list, or overview, of items, go to a folder in the Extras Drawer and tap theOverview button Ω.
The overview shows the amount of memory used for each installed application andwhere applications are stored (card or internal memory). To file or route applicationsin the list, tap the checkbox next to each application, then tap the Folder button For the Routing button µ.
Note: Built-in applications, such as the the Names storage icon ¨, can’t be routed.
To go back to the icon view, tap the Overview button Ω again.
Selecting, moving, and deleting icons
Icons are small pictures on the screen that represent items stored on yourMessagePad. They include:
m Built-in or installed applications and packages, such as Dock or the Newton Tour.
m Documents you create with an application, such as a Newton book.
You can select icons and move them around in the Extras Drawer to change theirposition. You can also delete icons from the Extras Drawer, except for built-inapplications.
112 Chapter 5

Selecting and moving icons
To select an icon, hold the pen on or near the item until a heavy mark appears underthe pen, and draw the mark over or around the icon. The icon is selected.
To select several icons at once, draw the mark over or around all the icons you wantto select. To move an icon, select it, then hold the pen on the selection and drag theicon where you want to place it. You can also drag items into and out of the buttonbar to customize it.
Deleting icons
You can delete any type of icon, except those that represent built-in applications ordata. To delete an icon, do one of the following:
m Scrub out the icon you want to delete.
m Select the icon, tap the Routing button µ and in the list that appears, tap Delete.A message appears asking if you really want to delete it. Tap OK.
m Go to the folder in the Extras Drawer that contains the icon. Tap the Overviewbutton Ω and tap the checkbox next to each icon you want to delete. Tap theRouting button µ. In the list that appears, tap Delete. A message appears askingif you really want to delete it. Tap OK.
Managing the MessagePad 2000 113
This icon is selected.

Beaming icons
You can beam applications to another Newton device. You cannot beam built-in orcopy-protected applications.
1 Tap Extras E to open the Extras Drawer.
2 Tap the folder tab, then tap the name of the folder that contains the icon you want tobeam.
3 Select the icon or icons.
4 Tap the Routing button µ. In the list that appears, tap Beam Icon.
A slip appears showing you the progress of the beam. When the beam is complete,the slip disappears.
For more information on beaming, see “Sending and Receiving Beamed Information”in Chapter 7, “Routing Information.”
Putting away beamed icons
If you receive an application that was beamed to you from another Newton device,you can store it in the Extras Drawer.
1 Tap Extras E to open the Extras Drawer, tap the folder tab, then tap Unfiled Icons(if you filed the InOut Box in another folder, tap the name of the folder).
2 Tap InOut Box I. Tap the In Box button, if necessary.
3 Tap the checkbox next to the beamed icon.
m To file the item in a folder in the In Box, tap the Folder button F. In the slip thatappears, tap the name of the folder, then tap File.
m To create a log entry in the In Box, tap the Tag button t, then tap Log.
m To file the item in the Unfiled Icons folder in the Extras Drawer, tap the Tagbutton, then tap Put Away.
114 Chapter 5

Sending icons by electronic mail
You can send applications to someone by electronic mail. You cannot e-mail icons ofbuilt-in or copy-protected applications.
1 Tap Extras E to open the Extras Drawer.
2 Tap the folder tab, then tap the name of the folder that contains the icon you wantto mail.
3 Select the icon or icons.
4 Tap the Routing button µ and in the list that appears, tap Mail.
A mail slip appears.
5 Enter the appropriate information.
6 Tap Mail.
Rotating the screen
You can rotate the screen to landscape mode. You can also change the position of thearrow buttons and Overview button.
Note: Not all applications work in a rotated, or landscape, mode. If an application can’tbe used in landscape mode, a message appears when you open the application askingyou to return to portrait mode.
1 Tap Extras E to open the Extras Drawer.
2 Tap the Rotate button on the left side of the status bar at the bottom of the screen.
3 Tap which way you want to rotate the screen.
In portrait mode, you can also select where the control buttons appear. In landscape,you can choose where the button bar appears. The MessagePad rebuilds the display.
4 If a message appears telling you to recalibrate the screen, follow the directions.
Managing the MessagePad 2000 115

Part 2: Using the Built-In Applications
The MessagePad has built-in applications you can use for a variety of purposes.
c Calculator For simple arithmetic calculations.
Q Calls For making and logging telephone calls.
B Card For choosing what information to store on a storage card and for backingup and restoring information.
C Clock For setting the time and date, a daily alarm, and a timer.
k Dock For connecting to applications running on your computer using serial,modem, and AppleTalk connections.
∞ Formulas For conversions and financial calculations.
h Help For accessing information on how to perform tasks.
Ó HW Instructor For learning the basics of writing and recognition.
I InOut Box For receiving electronic mail, beamed information, and other items, andfor storing items waiting to be printed or sent as faxes, beamedinformation, and electronic mail.
‹ Newton Tour For learning the basics of the MessagePad.
8 Owner Info For setting owner and worksite information.
π Prefs For fine-tuning your MessagePad.
s Setup For entering personal information and settings.
º Styles For choosing the appearance of text and lines.
z Time Zones For setting your location and determining times around the world.
W Writing Practice For practicing writing.
In addition, your MessagePad contains various information files for certainapplications. These files are found in the Storage folder.
116 Chapter 5

c Calculator
You use the Calculator to perform various calculations. You can also copy informationfrom the Calculator to another area.
Tap the up and down arrows to see more calculations. You can scroll up to 30 lines.
To copy calculations, select the information, then move it to the edge of the screenor to whatever is behind the calculator (such as the Notepad or the Date Book).
You cannot copy numbers or calculations from other applications into the Calculator.
Note: If you divide by certain values, such as zero, you hear a sound to let you knowthat this calculation is impossible.
Q Calls
You use Calls to keep track of your telephone calls and to place calls. If you want touse a modem to place the call, make sure both the modem and the telephone areconnected to the same line. See the documentation that came with your modem formore information.
Managing the MessagePad 2000 117

To place a call
1 Tap New and in the slip that appears, enter the appropriate information.
You can tap a diamond u to enter the name or date. If you don’t specify a time anddate, the MessagePad uses the current time and date.
118 Chapter 5
The Add to Names button allows you tocreate a new card in the Name File usinginformation in this slip.

2 Tap Place Call.
A slip appears.
3 Tap Using and in the list that appears, tap one of the following:
m Modem—if you’re using a modem to dial the number.
m Speaker—to have your MessagePad’s speaker dial the phone number.
m Telephone—to dial the phone number manually.
4 If you need to dial a prefix or use a credit-card number to make the call, tap Assistand in the slip that appears, enter the necessary information. Then tap X to closethe slip.
Managing the MessagePad 2000 119
Tap here to change the worksite you are calling from.
Tap Name to change the call recipient or the phone number.
Tap Assist to add a prefix or credit card number.
Tap Using to choose how tomake the call.

5 Tap Call.
If you’re dialing through the speaker, hold the mouthpiece of your phone near theMessagePad’s speaker. If you’re dialing through the modem, wait until the modemhas finished dialing, then pick up your telephone handset.
The time, date, and telephone number appear in the call slip as the call is made. Atthe lower-right corner of the slip is a timer that shows the duration of the call.
6 When you are finished, tap Hang Up, and in the list that appears, tap a choice.
The end time of the call is then recorded in the log, along with any information you’vewritten. Your choice appears under the entry, along with the duration of the call.
7 If this call was made to someone you would like to add to your Name File, tap theAdd to Names button K.
8 When a message appears asking if you want to add this new name, tap Yes.
120 Chapter 5
You can write notes or otherinformation in this area.

Viewing calls
To view calls in a particular folder, tap the folder tab and in the list that appears, tapthe name of the folder you want to see.
To go through the calls, tap the up and down arrows. To see a list of calls, tap theOverview button Ω. To view a particular call, tap its Picture button or title.
Deleting calls
To delete a call, go to it and tap the Routing button µ. In the list that appears, tapDelete. To delete more than one call, tap the Overview button Ω, then tap thecheckbox next to each call you want to delete. Tap the Routing button µ and in thelist that appears, tap Delete. A message appears asking if you want to delete allselected items. Tap OK.
Managing the MessagePad 2000 121

Filing entries
You can file log entries in Calls into existing folders or ones that you create. To file anentry, go to it and tap the Folder button F. In the slip that appears, enter theappropriate information, then tap File.
To file multiple entries at one time, tap the Overview button Ω, then tap thecheckbox next to each entry you want to file. Tap the Folder button F and in theslip that appears, enter the appropriate information, then tap File.
Setting Phone preferences
Tap the Information button ; and in the list that appears, tap Prefs. Enter theappropriate information, then tap X to close the slip.
B Card
You tap Card to get information on a storage card that is inserted in yourMessagePad. You also use this to back up, restore, and erase information on the card.
For more information, see Chapter 10, “Backing Up and Restoring Information.”
122 Chapter 5
Tap Erase to deleteinformation on
a card.
This is the name of the card.
This shows information for the card.
Tap Restore to copy information from abackup on a card to your MessagePad.
Tap Backup to copy onto a cardinformation and packages that are stored in the MessagePad’s internal memory.

C Clock
You use the Clock application to set a daily alarm and minute timer, change the timeand date, and set other clock options. You can also access the Clock by tapping thetime and date in the upper-left corner of the Notepad.
1 Tap Set.
2 In the list that appears, tap your choice.
A slip appears.
3 Enter the appropriate information.
m Daily Alarm
Note: The daily alarm sound is a digital alarm and can’t be changed.
When the daily alarm goes off, the Clock appears and you hear the digital alarmsound. You hear the sound for approximately one minute, or until you tap X toclose the Clock.
Managing the MessagePad 2000 123
The clock face shows a night scene from 6 PM to 6 AM and a day scene at all other times.
Tap the checkboxto turn the alarmon and off.
Tap the upper half of a number toincrease it; tap the lower half todecrease it. Tap a letter to changefrom am to pm and vice versa.

m Minute Timer
After the set number of minutes has elapsed, the timer sounds and a messageappears. If you want the timer to go off again, tap Snooze and, in the list thatappears, tap the number of minutes. Tap X to close the slip.
m Time/Date
Set the time, month, and year, then tap X to close the slip.
m Options
Set the type of clock you want, then tap X to close the slip.
4 When you are finished, tap X to close the Clock.
124 Chapter 5
Tap the upper half of a number to increase it; tap the lower half to decrease it. Tap a letter to change from AM to PM and vice versa.
Tap the arrows to change the month or year.
Tap month and, in the list that appears, tap a month.
Tap the upper half of a number to increaseit; tap the lower half to decrease it.

k Dock
You use Dock to make connections to computers and to install packages from acomputer. You can use serial, modem, or AppleTalk connections.
Note: AppleTalk is not available for the Microsoft Windows operating system.
For more information on connecting to a computer, see your connection softwaredocumentation.
Setting dock preferences
While you are in Dock, tap the Information button ;. In the list that appears, tapPrefs. The Dock Preferences slip appears.
Tap the checkboxes next to the preferences you want to select. When you arefinished, tap X to close the slip.
m Save password—This saves the password you set up in your connection software.The password prevents others from creating or restoring a backup file withoutyour permission.
m Remove exact duplicates when importing—Each entry must be exact in every way(the only field that is not checked is the last modified time) to be removed. Thismay slow down the import process.
Managing the MessagePad 2000 125

m Stop connection if no activity—This option is applicable only when yourMessagePad is running on battery power (no power adapter). If you are using apower adapter, the connection is not stopped even if there is no activity.
When this option is not selected, if there is no response from the computer, yourMessagePad does not go to sleep. This may drain your MessagePad’s batteries.
When this option is selected (a checkmark appears in the box), the connection isstopped after approximately one minute if there is no response from thecomputer, or if you haven’t requested any type of connection for five minutessince the last connection closed. Your MessagePad then goes to sleep according toyour choice in the Sleep preferences.
m Always backup all information—If this is checked, your MessagePad backs up allyour information during an Auto Dock session. If this is not checked, a slipappears that allows you to back up selected applications using your connectionsoftware.
m Auto Dock—When this option is selected, the MessagePad automatically performsa backup or synchronization of its information with your files on your computer.You must first start up the Newton Connection Utilities on your computer. Youconnect your cable to the computer and the other end of the cable and NewtonSerial Adapter to the MessagePad. On connecting the Newton Serial Adapter to theMessagePad, a slip appears that allows you to automatically backup or synchronizeinformation between your computer and the MessagePad. Your MessagePad backsup or synchronizes according to the settings you selected in the NewtonConnection Utilities on your computer. For more information about setting upand using the Newton Connection Utilities, see the Newton Connection Utilitiesmanual that came with your MessagePad.
If this option is not checked, your MessagePad does not automatically back up orsynchronize when you first establish a connection.
To enable Auto Docking, you must also select the Auto Dock preference in thePrefs π.
126 Chapter 5

Connecting using a serial cable
1 Tap “Connect via” and, in the list that appears, tap Serial.
Make sure the serial cable and Newton Serial Adapter are connected to the NewtonInterConnect port of your MessagePad and the other end of the cable is connected toa serial port on your computer.
2 Tap Connect. A slip appears showing you the progress of the connection.
Connecting using a modem
Make sure you’ve set your modem preferences. See “Prefs,” later in this section.Modem connections may not be available for some connection applications.
1 Tap “Connect via” and, in the list that appears, tap Modem.
2 Enter the appropriate information.
Managing the MessagePad 2000 127
Tap here tochange the owner
or worksite.
Tap here tochoose a worksite
to connect to.

3 If you need to dial a prefix or use a credit card number to make the call, tap Assistq. In the slip that appears, enter the necessary information. Then tap X to closethe slip.
4 Tap Connect. A slip appears showing you the progress of the connection.
Connecting via AppleTalk
1 Tap “Connect via” and, in the list that appears, tap AppleTalk.
2 Tap “Connect to” and, in the list that appears, tap the worksite or computer you wantto connect to.
If you tap “Other computer,” a slip appears. Tap the computer you want to connect to.
If you tap Other Worksite, a slip appears. Enter information about the worksite, thentap X to close the slip.
3 Tap Connect. A slip appears showing you the progress of the connection.
Note: AppleTalk is not available for the Microsoft Windows operating system.
Connecting via IrDA
Your MessagePad has the capability to connect to a computer or printer usinginfrared wireless transmission. The Infrared Data Association, or IrDA, promotesstandards for worldwide two-way infrared “point and beam” wireless datatransmission. Your MessagePad supports this standard and can send and receiveinformation at up to 115,200 bits/second.
128 Chapter 5

To connect your MessagePad to a computer or printer using IrDA, you need to use acomputer or printer that supports IrDA data transmission. For more information, seethe documentation that came with your computer or printer.
1 Tap “Connect via” and, in the list that appears, tap IrDA.
2 Tap Connect.
Make sure you point the infrared window of the MessagePad toward the infraredwindow on the computer or printer. A slip appears showing you the progress of the connection.
∞ Formulas
You use Formulas for financial calculations or to convert measurements or dates. Tapthe formula you want to use and a slip appears.
If you fill out all but one value, that is the value that is calculated.
Note: Once a value is calculated, you can solve for another field without closing theslip by tapping the Clear button at the bottom of the slip or scrubbing out theinformation in at least two fields.
Managing the MessagePad 2000 129

Metric Conversion
Use this to convert U.S. measurements to metric, or vice versa. Tap Measurement. Inthe list that appears, tap the type of measurement you want to convert.
Enter the value you know. The converted value appears.
Loan Payment
Use this to answer questions about loans paid back monthly with a constantinterest rate.
Enter the values you know. The calculated value appears.
130 Chapter 5

Net Present Value
Use this to answer questions about periodic interest and payments.
Enter the values you know. To indicate money you’re paying out, write the amount asa negative number. To indicate money you’re receiving, write the amount as apositive number. Do not include a percent sign when you write interest rates. Thecalculated value appears.
Currency Exchange
Use this to convert from one currency to another or to determine an exchange rate.
Tap a diamond u to change the country and currency. Enter the value you know.The converted value appears.
Managing the MessagePad 2000 131

Date Calculator
Use this to determine the number of days between two dates or the date that is aspecified number of days from another date.
Enter the values. Tap Start Date or End Date, enter dates, or write the number of days.
Date Conversion
Use this to determine the day of the week, week in the year, and day in the year for aparticular date.
Tap Date to enter the date. The calculated value appears in the space below.
132 Chapter 5
This shows the number of dayssince the year began and the daysuntil the year ends.

h Help
The on-screen help provides you with quick information about the MessagePad. Tapa topic and a list of tasks appears.
Tap a subtopic and information on that task appears.
Tap Topics to view the main help screen again, or tap X to leave Help.
Managing the MessagePad 2000 133

Ó HW Instructor
The Handwriting Instructor is an interactive tutorial that teaches the basics ofwriting. Knowing the best writing techniques is important for using yourMessagePad effectively. The Handwriting Instructor is a good way for you tobecome knowledgeable about recognition and setting writing and drawingpreferences in the MessagePad.
To access the instructor:
m Go to the Extras Drawer, tap the Folder tab, and tap Setup. Tap the HW Instructoricon Ó.
After going through the tutorial, you may want to make a backup on a card, and thendelete the tutorial from the MessagePad internal memory to free up more memory.See “Selecting, Moving, and Deleting Icons” earlier in this chapter for moreinformation.
I InOut Box
You use the InOut Box to manage items that you route. The InOut Box containsitems that have been routed to you, such as incoming faxes, beamed messages, andelectronic mail. It also contains items that you have routed or that are waiting to be routed.
Setting preferences for the InOut Box
The InOut Box Preferences slip lets you set preferences for viewing items in theInOut Box and lets you choose whether to show logged items and where to storeitems.
134 Chapter 5

Go to the InOut Box. Tap the Information button ;, and in the list that appears, tap Prefs.
When you finish selecting preferences, tap X to close the slip.
Setting preferences for routing
You can access the preferences slips for routing tasks while you have the InOut Box open.
Tap the Information button ;and in the list that appears, tap your choice. Enter theappropriate information in the slip that appears, then tap X to close it.
For more information, see Chapter 7, “Routing Information.”
Managing the MessagePad 2000 135

Viewing the InOut Box
Tap the InOut Box icon and then tap the In Box button. A list of items in the In Boxappears. To view items in a specific folder, tap the folder tab, and in the list thatappears, tap the folder you want to see.
To view a specific item, tap the item. A slip appears with information about the item.When you finish viewing it, tap X to close the slip. You can view items in the In Boxin several ways:
m by date
m by transport type—the way items were routed (beamed items, faxed items, and so on)
m by status—unread, read, and so on
See “Setting Preferences for the InOut Box” earlier in this chapter.
136 Chapter 5
Tap the folder tab to change thefolder you are viewing.
Tap the checkboxnext to an item to
select it.
Tap the Tag button to put away or log items.
Tap Receive to receive a fax,beamed item, update, or e-mail.

Viewing the Out Box
Tap InOut Box icon and then tap the Out Box button. If any items are in the Out Box,a list appears. To view items in a specific folder, tap the folder tab, and in the list thatappears, tap the folder you want to see.
To view a specific item, tap the item. A slip appears with information about the item.When you finish viewing it, tap X to close the slip. You can view items in the OutBox in several ways:
m by date
m by transport type—the way items were routed
m by status—unread, read, and so on
For more information, see “Setting Preferences for the InOut Box” earlier in this chapter.
Managing the MessagePad 2000 137
Tap Send to send selected items.
Tap the folder tab to change thefolder you are viewing.
Tap the Tag button to readdress a selected item.
Tap the checkboxnext to an item to
select it.

‹ Newton Tour
The Newton Tour is a brief tour that highlights the features and capabilities of yourMessagePad. It takes only a few minutes to go through and is a good way for you tobecome familiar with the MessagePad.
To access the tour:
m Go to the folder where the Newton Tour is filed. (If you didn’t file or delete it, it isin the Setup folder.) Tap the Newton Tour icon ‹.
After going through the tour, you may want to make a backup on a card, and deletethe tour from your MessagePad to free up more memory. See “Selecting, Moving, andDeleting Icons” earlier in this chapter for more information.
8 Owner Info
This slip contains information about owners and worksites that you set up. Thisinformation is used in various routing slips when you print, fax, beam, and mailitems, place telephone calls, and make connections to other computers.
An owner is a person who uses the MessagePad. The information under Owner caninclude name, address, company, telephone and pager numbers, electronic mailaddresses, credit card and bank account information, birthday and anniversaries, andan electronic signature. You can set up several owners or several personas for thesame owner if, for example, you want a separate identity for a private business.
A worksite is a place where an owner establishes his or her address and affiliatedinformation. For example, you can set up two worksites—one for your home andone for your office. Worksite information can include telephone numbers anddialing prefixes, printer, connection, and electronic mail information. You can createseveral worksites.
138 Chapter 5

Creating an owner
When you first received your MessagePad, you probably went through the Setupapplication. This sets up basic owner information for you. If you want to createanother owner, follow these steps:
1 Tap Owner Info 8.
A slip appears with the current owners and worksites listed.
2 Tap New and in the list that appears, tap Owner.
3 In the slip that appears, enter the appropriate information.
Managing the MessagePad 2000 139

4 When you are finished, tap X to close the slip.
Creating a worksite
To create a worksite, follow these steps:
1 Tap Owner Info 8.
A slip appears with the current owners and worksites listed.
2 Tap New and in the list that appears, tap Worksite &.
3 In the slip that appears, enter the appropriate information.
4 When you are finished, tap X to close the slip.
Adding or changing information for an owner or worksite
1 Go to Owner Info 8 in the Extras Drawer.
2 Tap the owner or worksite you want to modify.
3 Do one of the following:
m To add information, tap Add and in the list that appears, tap your choice. In theslip that appears, enter the appropriate information. Then tap X to close the slip.
m To change information, scrub it out and enter the new information.
The new or revised information is shown when you tap Show and in the list thatappears, tap All Info.
140 Chapter 5
This automatically sets the areacode and e-mail access number.

Viewing owner and worksite information
Go to the card you want to view and tap Show. In the list that appears, tap Card tosee the name card view, or tap All Info to see all of the information entered.
To see a list of all of the owners and worksites, tap the Overview button Ω. To go toa specific owner or worksite, tap it.
Creating additional owner cards for more than one e-mail address
If you use more than one electronic mail address to send and receive items, you cancreate an owner card for each e-mail address. This allows you to select an addressquickly and easily. See “Owner Info” earlier in this chapter.
8 Setting preferences for Owner Info
Tap Owner Info 8 and, in the slip that appears, tap the Information button ;. Tap Prefs.
Tap the checkbox if you want to protect your Owner Info. Then, any time Owner Infois accessed, a keypad appears allowing you to enter the security PersonalIdentification Number, or PIN. (You must select a PIN before doing this. See the nextsection, “Prefs.”)
Managing the MessagePad 2000 141

π Prefs
In Prefs you can change various aspects of your MessagePad’s operation.
m Tap a topic and a slip appears. Enter the appropriate information. The variouspreferences you can set are explained in detail on the following pages.
x Security
To prevent unauthorized people from using your MessagePad you can set apassword, or Personal Identification Number (PIN), that your MessagePad asks foronce a day, once an hour, or each time it’s turned on.
Important Write your PIN down and store it in a safe place.
s Warning If you forget your PIN you won’t be able to back up your information andyou will have to do a hard reset in order to use your MessagePad, which will erase alldata stored in your MessagePad. Apple is not responsible for lost data due toresetting the MessagePad. s
142 Chapter 5

1 Tap Set PIN. A slip appears.
2 Tap your PIN on the keypad, then tap “ent.”
3 On the confirmation slip that appears, tap your PIN again, then tap “ent.”
New buttons appear in the Security slip.
4 Tap Ask For PIN, tap your PIN on the keypad that appears, and tap “ent.”
5 In the list that appears, tap your choice—every time you turn on your MessagePad,once an hour, once a day, or never.
Note: If you want to change this setting in the future, you have to enter your PIN.
6 Tap X to close the Security slip. Then tap X again to close the Preferences slip.
Entering your PIN
When your MessagePad asks for your PIN, a keypad appears. Tap your PIN, then tap “ent.”
Managing the MessagePad 2000 143
Tap your PIN on the keypad.
Tap “ent” when you are finished.
Tap “del” to delete a number.
You can specify when to enter your PIN:each time you turn on your MessagePad,once an hour, once a day, or never.

Changing your password
Tap Change PIN. Tap your current PIN on the keypad, then tap “ent.” Then tap a newPIN on the keypad and tap “ent.” A confirmation slip appears. Tap your new PINagain, then tap “ent.”
Changing when you must enter your PIN
Tap Ask For PIN and tap your PIN on the keypad, then tap “ent.” In the list thatappears, tap your new choice. Tap X to close the Security slip, then tap X again toclose the Preferences slip.
Removing the password
Tap Remove PIN. Tap your current PIN on the keypad, then tap “ent.”
© Locale
Use this area to choose which country’s standards to use. This affects things such asthe date, time, keyboard, and paper size.
Tap a diamond u and in the list that appears, tap your choice:
m Country—to set your country.
m Keyboard—to choose the type of keyboard layout you use.
m Paper Size—to choose the size of paper you use for printing and faxing.
144 Chapter 5

ˆ Sound
You can use this to play sounds over the MessagePad internal speaker, over a soundoutput device connected to the MessagePad, or both. You can also set the type andvolume of the sound for alert messages, and can choose to hear sound effects whileusing the pen.
Á Recording
You can use this to change the way the MessagePad makes sound recordings. You canrecord sounds and messages using either the MessagePad microphone or a cableconnected to your MessagePad Newton InterConnect port and to a sound inputdevice. You can also change the quality of recording by selecting how muchinformation is recorded per second. For example, for a voice message that might notrequire the highest-quality sound, you can record at a low rate of information persecond, whereas when recording music, you might record at a higher rate, forincreased clarity and fidelity.
You can also adjust the recording volume to better pick up quiet or loud sounds.
Managing the MessagePad 2000 145

≥ Alarm
You can use this to set the type and volume of sound for the daily alarm, minutetimer, and calendar alarm.
m Tap Alarm Sound and in the list that appears, tap your choice. This affects thesound you hear for the minute timer and calendar alarm. The daily alarm has itsown sound (similar to a digital clock) and can’t be changed.
m Hold the pen on the Alarm volume slider and move it to the desired volume level(to the right is louder).
m Tap Use System Volume to make the alarm volume the same as the volume for thesystem. The Alarm volume slider disappears. (See “Checking Battery Status,Setting Contrast and Volume” earlier in this chapter for information on setting thesystem volume.)
m Tap Persistent Alarms to see a notification slip and hear a series of beeps atintervals of several seconds when the alarm goes off. You can set the alarm to“snooze” for a selected time, after which the alarm goes off again.
Daily alarm
When the daily alarm goes off, you hear a digital alarm clock sound and the Clockappears. Tap X to close the Clock and turn off the sound.
146 Chapter 5

Minute timer and calendar alarm
When the minute timer or the calendar alarm (for a meeting or event) goes off, youhear the selected alarm sound and see a slip.
To have your MessagePad sound the alarm again at a specified time interval, tapSnooze and in the list that appears, tap your preference. The message slip closes. Thealarm goes off and another message slip appears at the selected time interval.
If you don’t tap Snooze, tap X to close the message slip.
˘ Sleep
Use this if you want to save power and have your MessagePad automatically turnitself off after a specified period of time. You can also set the MessagePad not tosleep when plugged into a power adapter and set when to turn off backlighting.
m Tap Sleep and in the list that appears, tap the interval of inactivity after whichyou want your MessagePad to turn off. To turn your MessagePad back on, slidethe Power switch down and quickly release it.
Managing the MessagePad 2000 147
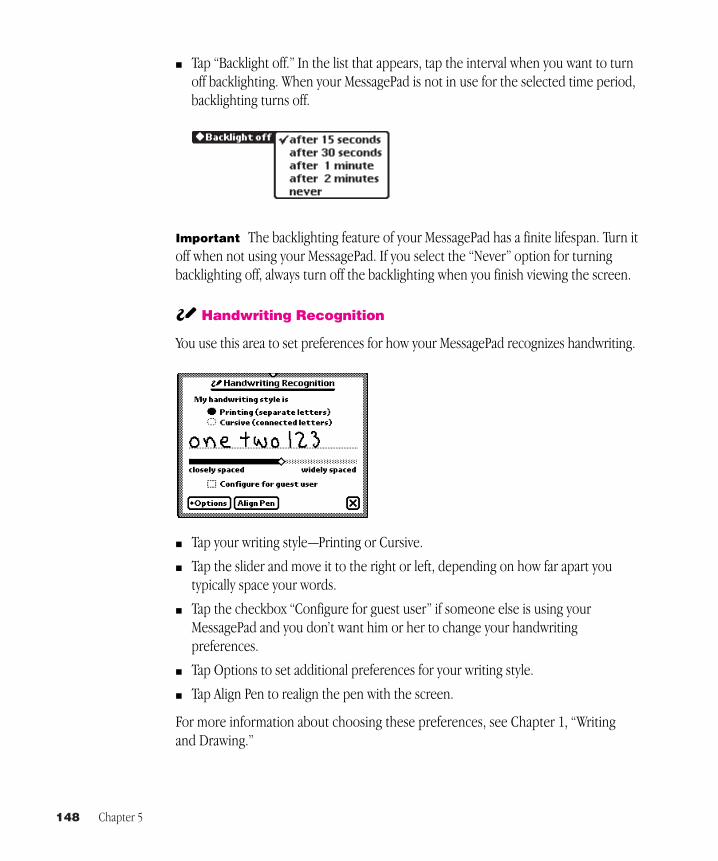
m Tap “Backlight off.” In the list that appears, tap the interval when you want to turnoff backlighting. When your MessagePad is not in use for the selected time period,backlighting turns off.
Important The backlighting feature of your MessagePad has a finite lifespan. Turn itoff when not using your MessagePad. If you select the “Never” option for turningbacklighting off, always turn off the backlighting when you finish viewing the screen.
„ Handwriting Recognition
You use this area to set preferences for how your MessagePad recognizes handwriting.
m Tap your writing style—Printing or Cursive.
m Tap the slider and move it to the right or left, depending on how far apart youtypically space your words.
m Tap the checkbox “Configure for guest user” if someone else is using yourMessagePad and you don’t want him or her to change your handwritingpreferences.
m Tap Options to set additional preferences for your writing style.
m Tap Align Pen to realign the pen with the screen.
For more information about choosing these preferences, see Chapter 1, “Writingand Drawing.”
148 Chapter 5

7 Modem
You use this area to choose preferences for your modem setup.
m Modem volume—Tap the slider, hold thepen down, and move it to the right or left.
m Require dial tone—Tap the checkbox toturn this on or off.
m Tap Pulse Dialing or Tone Dialing,depending on what type of telephone system you have.
m Tap “Connect using” and in the list that appears, tap how you are connecting themodem—by the default method (modem port), PC Card, or Serial Port.
m Tap “Modem setup” and, in the list that appears, tap the type of modem you areusing. The MessagePad automatically configures itself for that type of modem.
If your modem is not in the list, check with the manufacturer of your modem tosee if it’s compatible with the MessagePad and with one of the modem types listedor if the appropriate driver software is available.
m Tap Use Defaults to reset all modem preferences to their original factory settings.
Managing the MessagePad 2000 149

k Auto Dock
You use the Auto Dock preference to turn the Auto Dock on or off. When “EnableAuto Docking” is checked, your MessagePad automatically backs up or synchronizeswith information on your computer when you start up the Newton ConnectionUtilities on your computer and connect your MessagePad to your computer. To turnon Auto Dock, you must also select the Auto Dock preference in the Dockapplication.
s Setup
You use the Setup application to personalize your MessagePad. It allows you to setthe time, date, and owner information, align the pen with the screen, set yourhandwriting style, and enter an electronic signature.
When you first received your MessagePad and turned it on, you should’ve seen theWelcome screen of the Setup application and taken a few minutes to go through theseries of screens.
If you did not go through the Setup application, and would like to do so, open theExtras Drawer, tap the Folder tab, and tap Setup. (If you filed Setup in another folder,tap the name of that folder.) Tap Setup s.
150 Chapter 5

The Welcome screen appears.
Follow the instructions on each screen. On the last screen, you can change anyinformation you entered, or tap Done if you are finished and want to use yourMessagePad.
Managing the MessagePad 2000 151

º Styles
You can change the font, style, and size for recognized text, and the pen thickness fordrawing.
1 Select the text, line, or shape you want to change. (If you want to set styles beforeyou write or draw, make sure nothing is selected.)
2 Tap Extras E to open the Extras Drawer.
3 Tap the folder tab and in the list that appears, tap Unfiled Icons.
4 Tap Styles º.
5 In the slip that appears, tap your choices.
6 You can make the following choices:
m Font—Choose Fancy, Simple, or Casual.
m Size—Choose 10-, 12-, or 18-point size (also 9-point for Fancy and Simple).
m Style—Choose Plain, Bold, Italic, Outline, or Underline.
m Pen—Choose a pen width of 1-, 2-, 3-, or 4-point size.
To see examples of the styles above, see “Setting the Styles for Text and Drawings” inChapter 1, “Writing and Drawing.”
7 When you finish making your selections, tap X to close the slip.
152 Chapter 5

z Time Zones
You use this application to tell your MessagePad which city you’re in (or closest to).Your home time zone determines your e-mail access number. You can also set asecond time zone if you’re traveling, to get information on specific cities andcountries.
Setting your current time zone
When you tap Time Zones z, the following slip appears.
At the top is your current time zone, based on the worksite information. To changethis, tap the diamond. In the list that appears, choose the worksite you want as yourcurrent time zone. To choose another city, tap Other City. In the slip that appears, tapa city, then tap X to close the slip.
Setting or changing the second time zone
A second time zone is listed near the bottom of the Time Zones slip. You can set thisif you travel or want to see the time and date for a particular city. The distance fromyour current time zone is also listed.
To change the second time zone, follow these steps:
1 Tap the diamond u next to the second time zone.
A slip appears with the name of the country at the top and the city highlighted.
Managing the MessagePad 2000 153
This is the home city; tap the diamond to change it.
This is the second city; tap the diamond to change it.
Tap the Routing button to delete information on a city.
Tap Show to see different items.

2 To change the country:
m Tap the name of the country and from the list that appears, tap your choice. Usethe scroll arrows to move up and down in the list or tap the lettered tabs at theside of the slip.
m Tap X to close the country slip.
3 To change the city, tap a city in the list that appears. Then tap X to close thecountry slip.
If the city you want is not listed, tap the nearest city in the list, or add the city. See“Adding a City,” next.
154 Chapter 5
Tap a tab to see a list of different cities.
Tap the scroll arrowsto move up and down in the list.
Tap a tab to see a list ofdifferent countries; tap it againto see the countries filed underthe second letter on the tab,and so forth.
Tap the scroll arrows to move up and down in the list.
Tap a country to select it.

Adding a city
To add a city tap the New button in the Time Zones slip. Then enter the appropriateinformation in the slip that appears.
m Tap Closest City and in the slip that appears, tap the nearest city. Tap X to closethe slip. This automatically sets the area code, country, time zone, and prefix for dialing.
m Tap Country and in the slip that appears, tap the country to change it. Tap X toclose the slip.
m Tap Lat./Long. to change the latitude and longitude for the selected city.
m Tap GMT Offset to change the Greenwich Mean Time Offset, which tells howmany hours the city’s time is from GMT. Cities to the east have positive values.Cities to the west have negative values.
m Tap Daylight Savings to change the type of time system you want.
The new city now appears at the bottom of the Time Zones slip.
Deleting a city
To delete a city, select it as your second city. Tap the Routing button and tap Delete.
If you delete a city that already existed (you did not add it), you can only get thisinformation back if you do a hard reset. See Chapter 12, “Troubleshooting” for moreinformation.
Managing the MessagePad 2000 155

Seeing different views in Time Zones
You can view information in Time Zones several different ways. Tap Show and in thelist that appears, tap your choice.
m All Info—Shows information on the city and country listed in your second time zone.
m Notes—Allows you to enter and view notes about the city in the second time zone.
m City Info—Allows you to see and change information on the city in your secondtime zone.
156 Chapter 5

m Country Info—Allows you to see and change information on the country in yoursecond time zone.
m Two Clocks—displays two clocks showing the time and date for both selected timezones.
Managing the MessagePad 2000 157

WWriting Practice
Once you’ve gone through the Handwriting Instructor, you may want to practicewriting. Writing Practice is found in the Setup folder. You can use Writing Practice tosee how well the MessagePad can interpret your writing. By practicing in this area,you may be able to adapt your writing style to improve text recognition.
158 Chapter 5
Write the suggested word here.
This shows how well the MessagePadwould recognize what you wrote.
Tap Same Word to try again toimprove your score (percentage).
Tap here toaccess differentkinds of words.

159
You can organize the information in your MessagePad by filing things in folders thatyou can create and name. You can also use your MessagePad to find any textinformation that is stored in the internal memory of your MessagePad or on astorage card.
Organizing information
You can file name cards, notes, calls, and icons in the Extras Drawer into folders. Ifyou create a new item while you’re in a folder, the new item is automatically stored inthat folder. If you create an item while you’re looking at a list of all your items orcards, the new item or card goes into the Unfiled folder.
Using global and local folders
The MessagePad has two types of folders–global and local. Global folders exist inevery location on your MessagePad, while local folders appear only in the applicationthey are created in. You can create up to 12 global and 12 local folders, except in theExtras Drawer, where you can only create local folders.
For example, you may want to create a folder called “Friends” in the Name File andyou don’t want that folder to show up in any other application. You can make the“Friends” folder local to the Name File.
6 Organizing and Finding Information

Your MessagePad comes with four global folders that are already named—Unfiled,Business, Miscellaneous, and Personal. These folders, except for Unfiled, can berenamed or deleted.
Note: If you reach the limit of 12 global folders and want to create another folder, amessage appears telling you that the folder will be created only in the currentapplication (so it becomes a local folder). If you reach the limit of 12 global and 12local folders, a message appears telling you that you cannot create any more folders.
You can also file items into folders on a storage card. For more information, see “Filing Information on a Storage Card” in Chapter 9, “Using Storage andApplication Cards.”
Putting notes or name cards into folders
1 Go to the item you want to file.
2 Tap the Folder button F.
The folder slip appears.
3 Tap the name of the folder you want the item to be stored in, then tap File.
If you’re in one folder and move an item to another folder, the item seems todisappear, because it moves immediately to another folder.
Filing multiple items and cards
You can put a number of items or name cards in a folder all at once.
1 Go to the Notepad or Name File.
2 Tap the folder tab, then tap the name of the folder you want to view.
3 Tap the Overview button Ω.
A list of all the items or cards in that folder appears.
160 Chapter 6
Tap File to file the item into the selected folder.
Tap the name of thefolder you want to
file the item in.

4 Tap the checkbox next to each item or card you want to file.
A checkmark appears in the box next to each selected item.
5 Tap the Folder button F and in the slip that appears, tap the name of the folder thatyou want to file the items or cards in.
6 Tap File.
Putting icons from the Extras Drawer into folders
You can select icons in the Extras Drawer and put them into different folders.
1 Tap Extras E to open the Extras Drawer.
2 Tap the folder tab and from the list that appears, tap the name of the folder thatcontains the icons you want to file (usually this is the Unfiled Icons folder).
Organizing and Finding Information 161
These two items are selected for filing.

3 Select an icon by placing the pen on or near it until a heavy mark appears under thepen. Then draw the highlighting mark over or around the icon.
You can select more than one icon to file at a time.
4 Tap the Folder button F and in the slip that appears, tap the name of the folder thatyou want to file the icons in.
5 Tap File.
Viewing items by folder
1 Go to a specific area, such as the Notepad, Name File, or Extras Drawer.
2 Tap the folder tab.
A list appears.
3 Tap the folder you want to view.
Items stored in that folder appear. Tap the Overview button Ω to see a list of all ofthe items.
Creating, renaming, and deleting folders
The MessagePad comes with several existing folders. You can create additional foldersand delete and rename folders.
1 Go to the application where you want to create new folders, such as the Notepad.
162 Chapter 6
This icon is selected.

2 Tap the Folder button F.
The folder slip appears. If a card is inserted in your MessagePad, separate buttonsappear for internal storage and the card.
3 Do one of the following:
m To create a new folder, tap New. Write the name of the new folder and tap X toclose the slip.
m To rename a folder, tap Edit Folder. Scrub out the name of the folder and write thenew name. A slip appears asking if you want to change the name of the folder. TapOK to change the name. The folder name is updated and the revised folder nameappears in the folder slip. Then tap X to close the slip. The items in the folderremain there.
m To delete a folder, choose the folder, tap Edit Folder, then tap Delete. A slipappears asking if you really want to delete the folder. Tap OK. Then tap X to closethe slip. The items inside the folder move to the Unfiled folder.
4 Tap X when you are finished.
Organizing and Finding Information 163
Tap Edit Folder to rename or delete an existing folder.
Tap one of thebuttons to choosewhere the folder
is located.
Tap New to create anew folder.
Write the name of the new folder on the blank line.
Tap here to create a local folder, just for the application
you are in.

Finding information
The MessagePad makes it easy to find specific pieces of information no matter whereyou have filed them. You can search for:
m whole words written in text
m the first letters of words written in text
m more than one word at a time written in text
m information created before a certain date
m information created on a certain date
m information created after a certain date
To find information:
1 Tap the Find button •.
2 Tap “Look for” and in the list that appears, do one of the following:
m Tap “text” to search for information that is in text format (not ink text). Enter thewords or characters you want to find on the dotted line.
m Tap “dates before,” “dates on,” or “dates after” to select a date. A slip appears.
164 Chapter 6
Enter the text you want to find.

To move to another month, tap the arrows. To change the year, tap the upper half ofa number to increase it, and the lower half to decrease it. Tap a day to select it. Whenyou have selected the date, tap X to close the slip.
3 Choose where you want to look for the information.
m Tap Everywhere to search the Notepad, Name File, Date Book, InOut Box, To DoList, Calls, and applications or books you have added to your MessagePad.
m Tap the current application.
m Tap Selected to search only specific areas or applications in your MessagePad. Inthe list that appears, tap the checkbox next to each area you want to search.
Organizing and Finding Information 165
Tap the upper half of a number to increase it; tap the lower half to decrease it.
Tap here to select adate; a slip appears.
Tap the arrows to change the month.
Selected areas have a checkmark
in the box.Tap the scroll arrows to move up and down in the list.
Tap a date to select it.

4 Tap Find.
m If the MessagePad finds only one item, it displays the item.
m If the MessagePad finds more than one item, it displays a list of the items it found.
166 Chapter 6

Tap the title of an item to go to it. Tap the Overview button Ω to go back to the listof found items.
m If a slip appears saying that too many items were found and you must narrow yoursearch, you can
m go back to the Find slip and narrow the search.
m close some or all open applications to free up memory and perform the search again.
Organizing and Finding Information 167


169
You can use your MessagePad to send and receive information. This includesprinting, faxing, beaming, and sending electronic mail. You can also duplicate anddelete items.
Printing
You can use many Apple printers and printers from other manufacturers with your MessagePad. For a list of printers you can use, see Appendix D, “Printer Compatibility.”
The MessagePad does not have to be connected to a printer when you choose toprint an item. If you choose to print at a later time, the item waits in your InOut Box,ready to print.
Connecting your MessagePad 2000 to a printer
To connect directly to an Apple printer, plug one end of the printer or serial cable andNewton Serial Adapter into the Newton InterConnect port on your MessagePad andthe other end into the printer.
If you are using a network printer, plug a LocalTalk box into your MessagePad andconnect it to another LocalTalk box. The second LocalTalk box can either be on thenetwork or plugged directly into the printer.
To connect a printer that has a parallel (Centronics-type) interface, you need theNewton Print Pack, available from your Apple-authorized Newton dealer.
7 Routing Information

Preparing to print
m Make sure you have filled out an owner and worksite in Owner Info. Theinformation is used in your return address when you print memos or letters.
m Choose a paper size in the Locale preferences.
m Set your print preferences as described in the section below.
Setting print preferences
To set print preferences:
1 Tap Extras E to open the Extras Drawer, tap the folder tab, then tap Unfiled Icons.(If you filed the InOut Box in another folder, tap that folder’s name.)
2 Tap InOut Box I.
3 Tap the Information button ; and, in the list that appears, tap Print Preferences.
4 In the slip that appears, select the appropriate information.
m To see status messages while you are printing, make sure the checkbox next to“Show status dialogs” is selected.
m To set when you want to print an item, tap “When printing” and, in the list thatappears, tap “Send now,” “Send later,” or “Specify when.” “Send now” prints theitem right away. “Send later” places the item in the InOut Box until you decide toprint it. “Specify when” gives you a choice of Now or Later when you fill out therouting slip.
m To choose what to do with an item after printing it, tap “After printing” and in thelist that appears, tap File, Log, or Delete.
5 When you are finished, tap X to close the slip.
170 Chapter 7

Printing an item
1 Go to the item you want to print.
2 Tap the Routing button µ and, in the list that appears, tap Print.
A routing slip appears. Enter the appropriate information.
m Tap the diamond u at the upper-left corner of the slip to change your worksite.
m Tap Printer.
To select a personal printer, tap your printer’s name in the list if you see it. If not, tapChoose Other Printer and in the slip that appears, tap your choice.
Routing Information 171
Tap Printer to select the type of printer.
Tap Print to print the item ortransfer it to the InOut Box.
Tap Format to choose a format.
Tap here to set yourlocation.
Tap Preview to seewhat the pages will
look like.
Tap Choose Network Printer if your MessagePad is connected to a network printer.
Tap Choose OtherPrinter to select a printer that is
not listed.
Tap your printer.
Tap X when you are finishedselecting your printer.

To select a network printer, tap Choose Network Printer and in the slip that appears,tap your network zone and then tap your printer. If you don’t see your printer, makesure you’re connected to the network and have selected the correct zone. (Somenetworks don’t have zones.)
m Tap Format and in the list that appears, tap a selection.
If you choose a format that requires an addressee, such as Memo or Letter, fill inthe addressee information, then tap X to close the slip. If the addressee is in theName File, write the first or last name, tap the diamond, then tap the full name tocopy the Name File information automatically.
m Tap Preview to see what the pages will look like.
Tap Next to see other pages. Tap X when you are finished.
3 Tap Print.
4 In the slip that appears, tap Now or Later.
If you tap Later, the item is routed to the InOut Box. To print items that are in theInOut Box, see “Routing Items in the InOut Box” later in this chapter.
172 Chapter 7
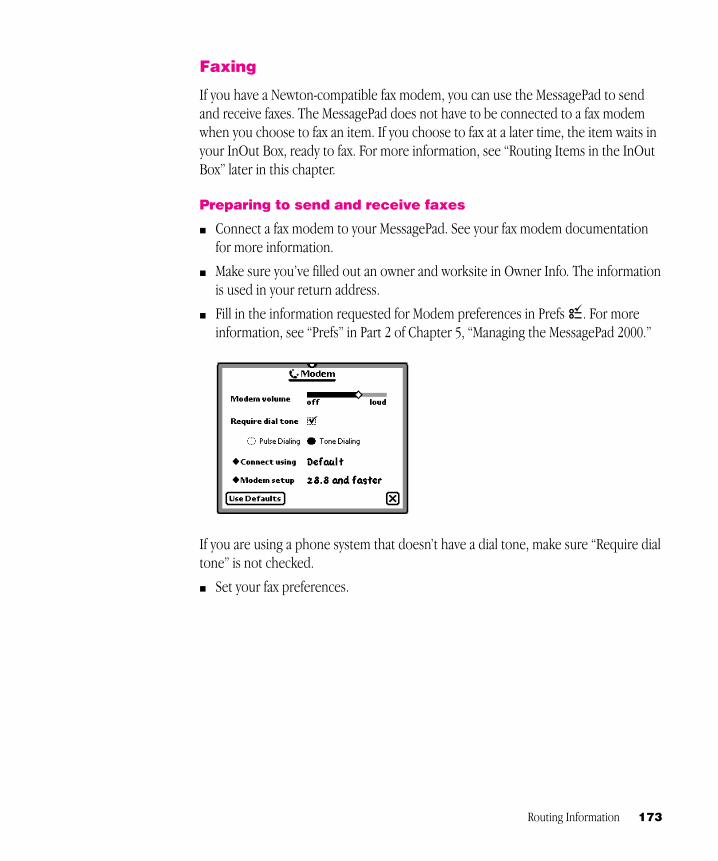
Faxing
If you have a Newton-compatible fax modem, you can use the MessagePad to sendand receive faxes. The MessagePad does not have to be connected to a fax modemwhen you choose to fax an item. If you choose to fax at a later time, the item waits inyour InOut Box, ready to fax. For more information, see “Routing Items in the InOutBox” later in this chapter.
Preparing to send and receive faxes
m Connect a fax modem to your MessagePad. See your fax modem documentationfor more information.
m Make sure you’ve filled out an owner and worksite in Owner Info. The informationis used in your return address.
m Fill in the information requested for Modem preferences in Prefs π. For moreinformation, see “Prefs” in Part 2 of Chapter 5, “Managing the MessagePad 2000.”
If you are using a phone system that doesn’t have a dial tone, make sure “Require dialtone” is not checked.
m Set your fax preferences.
Routing Information 173

Setting fax preferences
To set fax preferences:
1 Tap Extras E to open the Extras Drawer, tap the folder tab, then tap Unfiled Icons.(If you filed the InOut Box in another folder, tap that folder’s name.)
2 Tap InOut Box I.
3 Tap the Information button ; and, in the list that appears, tap Fax Preferences.
4 In the slip that appears, select the appropriate information.
m Tap “Answer phone after” to set the number of rings it takes to answer the phone.In the list that appears, tap your choice.
m Tap “When faxing” to set when you want to fax an item. In the list that appears, tapyour choice.
m Send now—always faxes the item right away.
m Send later—always routes the item to the InOut Box. The items wait in theInOut Box until you choose to fax them. If you designate a specific time andday to route items, they are sent then.
m Specify when—gives you a choice of Now or Later when you fill out the routing slip.
m Tap “After sending a fax” to select what to do with an item after it is faxed. In thelist that appears, tap your choice.
m Tap “File read faxes in” to choose where to file faxes that you have received andread. In the list that appears, tap your choice.
174 Chapter 7
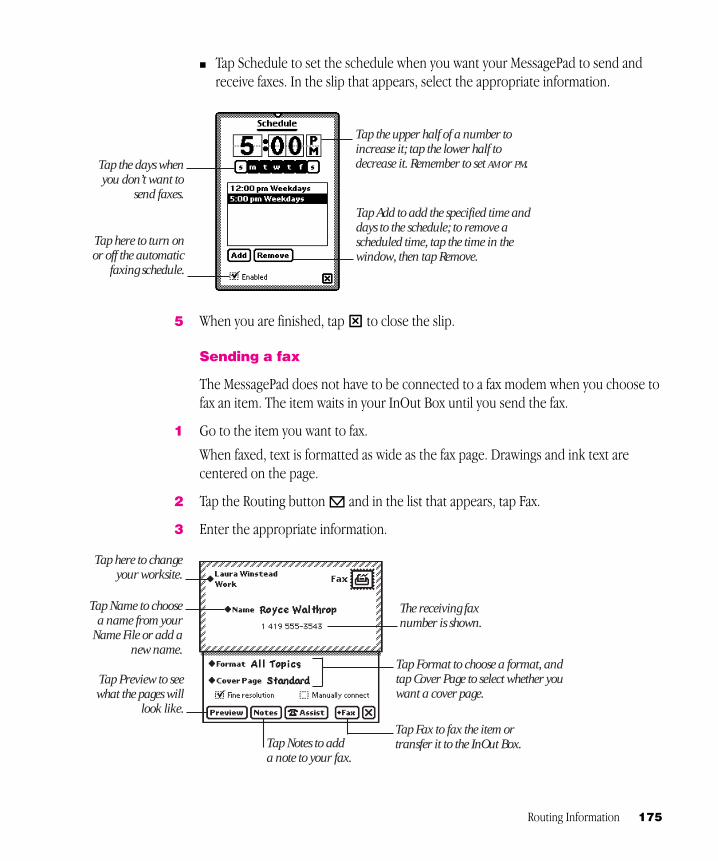
m Tap Schedule to set the schedule when you want your MessagePad to send andreceive faxes. In the slip that appears, select the appropriate information.
5 When you are finished, tap X to close the slip.
Sending a fax
The MessagePad does not have to be connected to a fax modem when you choose tofax an item. The item waits in your InOut Box until you send the fax.
1 Go to the item you want to fax.
When faxed, text is formatted as wide as the fax page. Drawings and ink text arecentered on the page.
2 Tap the Routing button µ and in the list that appears, tap Fax.
3 Enter the appropriate information.
Routing Information 175
Tap the upper half of a number to increase it; tap the lower half todecrease it. Remember to set AM or PM.
Tap Add to add the specified time anddays to the schedule; to remove ascheduled time, tap the time in thewindow, then tap Remove.
Tap here to turn onor off the automatic
faxing schedule.
Tap the days whenyou don’t want to
send faxes.
Tap Format to choose a format, andtap Cover Page to select whether youwant a cover page.
Tap Notes to adda note to your fax.
The receiving fax number is shown.
Tap Fax to fax the item ortransfer it to the InOut Box.
Tap Preview to seewhat the pages will
look like.
Tap here to changeyour worksite.
Tap Name to choosea name from your
Name File or add anew name.

m Tap the diamond u at the upper-left corner of the slip to change your worksite.
m Tap Name to select whom you want to fax the item to. If the name is not in the listthat appears, tap “Other Names” and in the name card overview, tap the name. Tochange the fax number you are sending the item to, tap the diamond u next tothe fax number in the name card overview.
m Tap Format and in the list that appears, tap a format.
If you choose a format where you can enter optional information, such as a name or subject, a slip appears. Enter the appropriate information. Tap X toclose the slip.
m Tap Cover Page and, in the list that appears, tap your choice.
If you want to send notes on the cover page, tap Notes and write what you want toappear on the cover page. Tap X when you are finished.
m Tap the checkbox to select fine or standard resolution.
m Tap the checkbox next to “Manually connect” if you don’t want the modem to dialthe fax number. (See the next section, “Manual dialing.”)
m Tap Preview to see what the pages will look like. Tap Next to see other pages. Tap X when you are finished.
m Tap Notes to add notes to the cover page. In the slip that appears, enter theinformation. Tap X to close the slip.
m Tap Assist to change the fax number, dialing prefix, or credit card number. In theslip that appears, enter the appropriate information. Tap X to close the slip.
4 Tap Fax.
5 In the slip that appears, tap Now or Later.
If you tap Later, the item is routed to the InOut Box. To fax items that are in the OutBox, see “Routing Items in the InOut Box” later in this chapter.
176 Chapter 7

Manual dialing
Sometimes you may need to dial the fax number yourself; for example, when askingan operator for a particular extension or faxing on a telephone connection thatyou’ve already established.
1 Connect the MessagePad to a fax modem. Make sure a phone is connected to thesame line. (See your modem manual for instructions.)
2 Go to the item you want to fax.
3 Tap the Routing button µ and in the list that appears, tap Fax.
A routing slip appears.
4 Enter the appropriate information. Be sure to check the “Manually connect” box inthe fax routing slip.
5 Dial the number on your phone and wait until you hear a high-pitched tone on theother end of the line.
6 Tap Fax and in the slip that appears, tap Now.
7 Wait about eight seconds, until you hear sounds from the modem speaker.
8 Hang up the phone.
Using Assist to send a fax
If the text of the fax includes the recipient’s name, and if the recipient has a faxnumber in the Name File, you can tap Assist R to have the MessagePad automaticallyfax the item. To do this, select the recipient’s name, tap Assist R, and tap Please. Inthe list that appears, tap Fax. Tap Do and enter the information in the Fax slip thatappears. Tap Fax to send the fax.
Routing Information 177

Receiving a fax
1 Tap Extras E to open the Extras Drawer, tap the folder tab, then tap Unfiled Icons.(If you filed the InOut Box in another folder, tap that folder’s name.)
2 Tap InOut Box I.
3 Tap Receive and in the list that appears, tap Fax.
A slip appears, asking if you want to wait for the call or connect manually.
m If you tap Wait For Call, the MessagePad prepares the fax modem and waits for thefax telephone call. Once the connection is made, a slip appears showing you thestatus of the fax.
m If you tap Manually Connect, a slip appears with instructions. Follow theseinstructions, then tap Fax. Once the connection is made, a slip appears showingyou the status of the fax.
Viewing a fax
You can view items that have been faxed to you in several formats.
1 Tap Extras E to open the Extras Drawer, tap the folder tab, then tap Unfiled Icons.(If you filed the InOut Box in another folder, tap that folder’s name.)
2 Tap InOut Box I.
178 Chapter 7

3 Tap the faxed item you want to view.
A viewer appears showing you the information.
4 Tap Tools and in the list that appears, tap a choice to see different views of the itemor to rotate the image.
Routing Information 179
Tap Tools to view the faxin different ways.
Tap the Folder button to filethe item in a folder.
Indicates who sent the faxand when it was received.
Tap the Routing button to print the item.
Tap the Tag button toput away or log the
item or reply.

m Show Thumbnail—displays tiny representations of the pages.
m Fit In Window—shows the entire fax image on the MessagePad screen.
m Original Size—displays the item in the size it was originally sent.
m Full Resolution—displays the item pixel for pixel.
m Enlarge Fax—displays the item larger than actual size.
m Rotate right; Rotate 180°; Rotate left—rotates the image on the screen.
5 To reply to a fax, tap the Tag button t. Write information on the fax and send it withyour annotations.
6 Tap X when you are finished.
Sending and receiving beamed information to Newton devices
You can send information from one Newton device to another using an infraredbeam. The infrared windows on the Newton devices should point directly at eachother and should be less than 1 meter (about 3 feet) apart—closer in bright sunlight.
Setting beam preferences
To set beam preferences:
1 Tap Extras E to open the Extras Drawer, tap the folder tab, then tap Unfiled Icons.(If you filed the InOut Box in another folder, tap that folder’s name.)
2 Tap InOut Box I.
3 Tap the Information button ; and, in the list that appears, tap Beam Preferences.
A slip appears.
180 Chapter 7

4 Select the appropriate information.
m Tap the checkbox next to “Receive beams automatically” if you want yourMessagePad to receive beams at any time. Receiving automatically uses morebattery power.
m Tap the checkbox next to “Put away beams automatically” if you want yourMessagePad to put beamed information into the corresponding application. Forexample, if you receive a note, it is automatically filed in your Notepad.
m Tap the checkbox next to “Show status dialogs” if you want to see status messageswhile you are beaming.
m Tap “When beaming” to set when you want to beam an item.
m Send now—always beams the item right away.
m Send later—always routes the item to the InOut Box. The items wait in the OutBox until you choose to beam them.
m Specify when—gives you a choice of Now or Later when you fill out the routing slip.
m Tap “After beaming” to select what to do with an item after it is beamed. In the listthat appears, tap your choice.
m Tap “File read items in” to choose where to file beamed items that you havealready read. In the list that appears, tap your choice.
5 When you are finished, tap X to close the slip.
Routing Information 181

Beaming an item
1 Go to the item you want to beam.
2 Tap the Routing button µ and, in the list that appears, tap Beam ı.
Make sure the infrared windows on both Newton devices are pointed directly at eachother, that there’s a clear line of sight between them, and that the other Newtondevice is ready to receive your beam (see the next section, “Receiving BeamedInformation”). The two devices should be no closer than 7 inches (20 centimeters)and no farther than 3.2 feet (1 meter) apart.
A slip appears showing you the status of the beam. The MessagePad tries to beam theitem for about two minutes. If it doesn’t succeed, a message appears in the InOutBox and the item stays in the InOut Box until you try again.
182 Chapter 7

Receiving beamed information
There are two ways you can receive beamed information.
Receiving beams automatically
If you have set your MessagePad to receive beams automatically (see “Setting BeamPreferences” earlier in this chapter), you can receive beams any time. Make sure theinfrared windows on both Newton devices are pointed directly at each other and thatthere’s a clear line of sight between them. A slip appears showing you the progress ofthe beam. Receiving automatically uses more battery power.
Receiving beams manually
If you haven’t set up your MessagePad to receive beams automatically, follow these steps:
1 Tap Extras E to open the Extras Drawer, tap the folder tab, then tap Unfiled Icons. (If you filed the InOut Box in another folder, tap that folder’s name.)
2 Tap InOut Box I.
3 Tap Receive and in the list that appears, tap Beam ı.
Make sure the infrared windows on both Newton devices are pointed directly at eachother, that there’s a clear line of sight between them, and that the other Newtondevice is ready to receive your beam.
The item appears in the InOut Box.
Routing Information 183
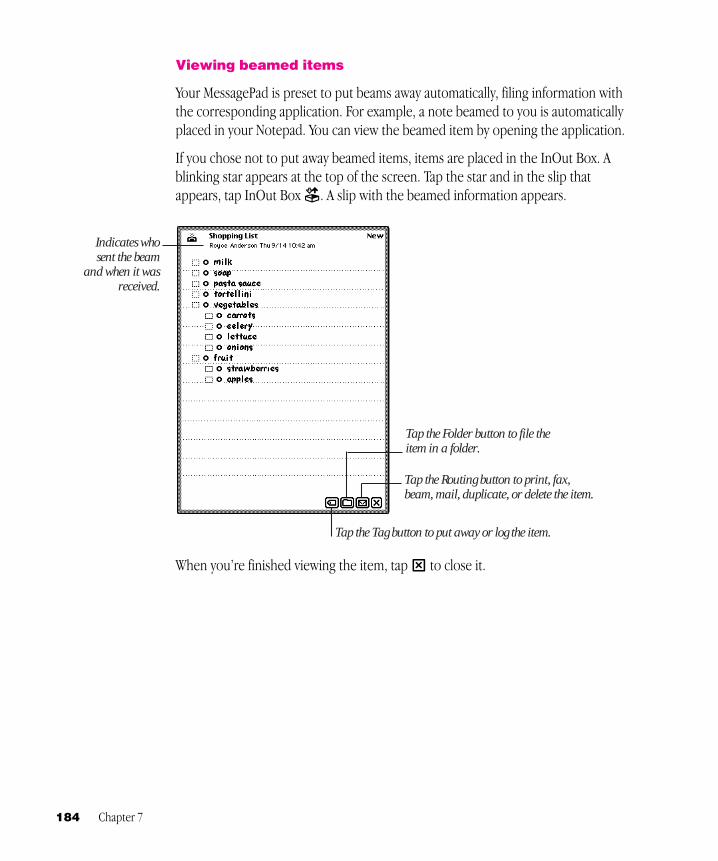
Viewing beamed items
Your MessagePad is preset to put beams away automatically, filing information withthe corresponding application. For example, a note beamed to you is automaticallyplaced in your Notepad. You can view the beamed item by opening the application.
If you chose not to put away beamed items, items are placed in the InOut Box. Ablinking star appears at the top of the screen. Tap the star and in the slip thatappears, tap InOut Box I. A slip with the beamed information appears.
When you’re finished viewing the item, tap X to close it.
184 Chapter 7
Tap the Routing button to print, fax,beam, mail, duplicate, or delete the item.
Tap the Folder button to file theitem in a folder.
Indicates whosent the beam
and when it wasreceived.
Tap the Tag button to put away or log the item.

Using electronic mail
You can use electronic mail, or e-mail, to send and receive text messages, packages,and entire items from the Notepad, Name File, Date Book, Calls, or InOut Box. Somethird-party applications may also support the mail option.
To send and receive e-mail you must have
m A Newton-compatible modem and the cables required to connect it to the phoneline and to your MessagePad (see your modem manual for more information).
m An e-mail account with an e-mail service provider.
Important Because of local regulations, electronic mail options may be different orunavailable in some countries.
Connecting your MessagePad 2000 to a modem
To connect a modem, see the instructions that came with the device. TheMessagePad does not have to be connected to a modem when you choose to send anitem. Items to be mailed wait in the InOut Box until you decide to mail them.
Preparing to send and receive e-mail
m Make sure you’ve filled out owner and worksite information in Owner Info. Theinformation is used in your return address and for dialing. If you want to avoidlong distance charges, you can change the e-mail access number in Owner Info.
Note: If you have more than one e-mail address, see “Creating Additional Owner Cards for More Than One E-mail Address” in Chapter 5, “Managing theMessagePad 2000.”
Routing Information 185

m Fill in the information requested for Modem preferences in Prefs.
For more information, see “Prefs” in Chapter 5, “Managing the MessagePad 2000.”
If you are using a phone system that doesn’t have a dial tone, make sure “Requiredial tone” is not checked.
Sending e-mail
1 Go to the item you want to send.
If you want to mail a package, go to the package and select it.
2 Tap the Routing button µ and in the list that appears, tap Mail.
3 In the slip that appears, enter the appropriate information.
Note: The routing slip may look different depending upon the e-mail service you have.
If you need to change your access number, see the next section, “Receiving Electronic Mail.”
4 Tap Mail.
186 Chapter 7
Tap these diamonds tochoose recipients.
Tap Subject and in the slip thatappears, enter a subject.
Tap here to changethe return address.
Tap Show Textto see what the
message looks like.

5 In the slip that appears, tap Now or Later.
If you tap Later, the item is routed to the Out box of the InOut Box. To mail itemsthat are in the InOut Box, see “Routing Items in the InOut Box” later in this chapter.
If you tap Now, enter the appropriate information in the slip that appears.
6 Tap Connect to send the mail.
Receiving electronic mail
You can receive messages and packages via e-mail.
1 Tap Extras E to open the Extras Drawer, tap the folder tab, then tap Unfiled Icons.(If you filed the InOut Box in another folder, tap that folder’s name.)
2 Tap InOut Box I.
3 Tap Receive and in the list that appears, tap the name of your e-mail service.
4 In the slip that appears, enter the appropriate information.
m Tap Assist q to change the access number, add a prefix, or enter credit card information.
5 Tap Connect.
Routing Information 187
This is an access number; tap the diamond to change it.
Tap here to changethe return address.
If you need to change the phonenumber, or enter a prefix or credit carddialing information, click here.
This is the access numberautomatically entered by theMessagePad; tap the diamond tochange it.
Tap here to changethe receiving address.

Viewing e-mail messages
To view items that are received as e-mail, do the following:
1 Tap Extras E to open the Extras Drawer.
2 Tap the folder tab, then tap Unfiled Icons. (If you filed the InOut Box in anotherfolder, tap that folder’s name.)
3 Tap InOut Box I.
4 Tap the item you want to view.
It appears on the screen.
5 You can now do one of the following:
m Tap the Tag button t and, in the list that appears, tap your choice:
Put Away—places items where they should logically go (for example, textmessages are placed in the Notepad).
Log—marks the message as read in the InOut Box.
Forward—forwards the item to someone via e-mail.
Reply—sends a reply via e-mail.
188 Chapter 7

m Tap the Folder button F to file the item.
m Tap the Routing button µ to print, fax, beam, duplicate, or delete it the item.
You may also see an option labeled Add to Names, which creates a card in the NameFile for the sender and includes the sender’s e-mail information.
Using downloaded packages
Packages that are sent to you via e-mail must be put away in the Extras Drawer beforeyou can use them. Go to the InOut Box and tap the item. Tap the Tag button t andin the list that appears, tap Put Away. The package is placed in the Extras Drawer.
Replying to and forwarding an e-mail message
You can reply to or forward an e-mail message and select the text you want to includein the reply or in the forwarded message.
1 Go to the e-mail message you received in the InOut Box.
2 Select the portion of the text you want in the reply. Hold the pen on or near the text until a heavy mark appears under the pen, then draw the mark over or aroundthe text.
You can select up to one screen of information.
3 Tap the Tag t button and in the list that appears, tap Reply or Forward.
A slip appears.
4 Enter the appropriate information in the slip.
The item is automatically tagged “Pending.”
5 Tap Send and a routing slip appears.
Enter the appropriate information and tap Mail.
Routing Information 189

Routing items in the InOut Box
You can place items in the InOut Box to route at a later time or date. Items that havenot been sent are logged as “Ready.”
To route these items, do the following:
1 Tap Extras E to open the Extras Drawer.
2 Tap the folder tab, then tap Unfiled Icons. (If you filed the InOut Box in anotherfolder, tap that folder’s name.)
3 Tap InOut Box I.
4 Tap the item you want to route or the checkbox next to it.
You can select multiple items, but they must all be routed the same way (for example,all faxes or all e-mail). To do this, tap the checkbox next to each item you want to select.
5 Tap Send and in the list that appears, tap your choice.
A slip appears showing you the status of the connection. The item is then logged as “Sent.”
190 Chapter 7

Using the blinking star notification
When you are routing an item and the status slip is hidden (if you’ve opened anotherapplication or tapped X to close the status slip), a blinking star appears at the top ofthe screen.
Tap the star to see the status slip.
The blinking star also appears when you receive new items in your InOut Box whileit is not open. For example, if you selected “Receive beams automatically” in theBeam Preferences slip and someone beams you information while you’re working inthe Notepad, the star appears at the top of the screen indicating that something is inthe InOut Box. Tap the star and a list appears. Tap InOut Box I to open it and seethe item.
Note: A blinking star also appears at the top of the screen each time you write aword that is not in the MessagePad’s dictionary. For more information, see “Using theWord List” in Chapter 1, “Writing and Drawing.”
Routing Information 191


193
You can have the MessagePad automatically perform certain tasks for you usingAssist. The tasks that can be performed include sending faxes or electronic mail,dialing telephone numbers, scheduling, setting the time and date, finding text,printing, and entering items in your To Do list. You can also tap Assist to access on-screen help.
You can make requests in several ways:
m Tap Assist R and, in the slip that appears, tap Please. In the list that appears, tapyour choice.
m Tap Assist R and, in the slip that appears, write your request on the blank line nextto Please.
m Write your request, such as “Call Alice,” and select it. Then tap Assist R.
Using the Assist button
1 Make sure no text is selected, then tap Assist R.
A slip appears.
8 Using Assist and Accessing On-Screen Help

2 You can enter your request in two ways:
m Write your request on the line.
m Tap Please and in the list that appears, tap the request word you want.
The word appears on the line.
3 Add more words if you like, such as a name or date.
You may find it easier to add the details in the confirmation slip.
4 Tap Do.
A confirmation slip appears with some information already entered, based on your request.
5 Enter any other necessary information.
194 Chapter 8
This is an example of a confirmationslip that appears when you make a schedule request from Assist.

6 When you’re finished, tap the button near the bottom of the slip to perform theaction. Tap Schedule, for instance, to schedule the meeting.
Writing your request
1 Write at least one word of your request, beginning with a request word or one of itssynonyms.
2 Select the request. Place the pen on or near the item until a heavy mark appearsunder the pen. Then draw the highlighting mark over or around the item.
Using Assist and Accessing On-Screen Help 195
Example of selected text from a checklist.

3 Tap Assist R.
The MessagePad interprets the request and a confirmation slip appears with someinformation already entered, based on your request.
4 Enter other necessary information.
5 When you’re finished, tap the button near the bottom of the slip to perform theaction. Tap Call, for instance, to place the call.
Using the correct request words
The MessagePad understands the following requests and their synonyms. (If you have other applications installed on your MessagePad, the other applicationsmay recognize additional request words.)
m Call to dial a telephone number.
Synonyms: phone, ring, dial
Call Bob at home looks in the Name File to find Bob’s home phone number, thenputs it in the call slip.
m Fax to fax the item on the screen.
Synonyms: none
Fax Anderson opens a fax slip with the name Anderson and Anderson’s fax numberfilled in.
m Find to search for text.
Synonyms: locate, search for, look for
Find Linda opens a find slip and enters “Linda.”
196 Chapter 8

m Mail to send the item on the screen as electronic mail.
Synonyms: email, send
Mail Anderson opens a mail slip with the name Anderson filled in.
m Print to print the item on the screen.
Synonyms: none
Print opens a print slip for the item on the screen.
m Remember to add a reminder to your to-do list.
Synonyms: remember to, don’t forget to, don’t let me forget to, to do, remind,remind me, remind me to
Remember to back up Monday opens a to-do slip with Monday’s date and “back up”as the subject.
m Schedule to add a meeting or event to your calendar.
Synonyms: meet, meet me, meet with, talk to, talk with, breakfast, breakfast with,brunch, brunch with, lunch, lunch with, dinner, dinner with, holiday, birthday, b-day,bday, anniversary
Lunch Linda opens a schedule slip. The date and time depend on when you makethe request.
If you make the request The MessagePad assumes lunch will be
before noon today at noon
before 1:00 pm the next half hour
after 1:00 pm tomorrow at noon
specifying a day first occurrence of that day at noon
Using Assist and Accessing On-Screen Help 197

If the MessagePad’s assumption is wrong, you can make corrections in theconfirmation slip.
m Time to look up the time in a city or country.
Synonyms: time in, the time in, what time, what is the time, what is the time in, whattime is it, what time is it in
Time displays the Time Zone map.
Time in Paris opens the Time Zone map and shows the time in Paris.
Tips on using Assist
The MessagePad infers important information to help you carry out your requests.
m Your MessagePad knows which area in the MessagePad you are using, whichmakes it easy to request assistance. For example, if you tap Assist R, tap thediamond u, and tap Print, your MessagePad assumes you want to print the itemyou’re looking at.
m Your MessagePad also knows the last thing you did. For example, if you write aname, tap Assist R, tap the diamond u, and tap Fax, your MessagePad assumesyou want to fax the item you’re looking at to the person whose name youpreviously wrote.
m Your MessagePad knows what you select. For example, if you select a name froman item in the Notepad, tap Assist R, tap the diamond u, and tap Mail, theMessagePad assumes you want to e-mail the note you’re looking at to the personwhose name you selected.
198 Chapter 8

Accessing on-screen help using Assist
On-screen help is available at any time on the MessagePad. On-screen help containsbasic information on how to perform various tasks.
To access the on-screen help:
1 Make sure no text is selected, then tap Assist R.
A slip appears.
2 Tap How Do I?
A list of help topics appears. The on-screen help is organized by topics and subtopics.The topics cover main areas, while the subtopics list specific tasks.
3 If necessary, tap a topic to see the list of subtopics.
Using Assist and Accessing On-Screen Help 199
This is a topic; subtopicsappear below it.

4 Tap a subtopic.
The information on that subject is shown.
5 When you finish viewing information, tap Topics to go back to the list of topics, or tapX to leave the on-screen help.
200 Chapter 8
Tap X to close the on-screen help.
Tap Topics to go backto the main list of
topics and subtopics.

201
You can use PC cards with your MessagePad. There are three types of cards:application cards (also called titles), storage cards (which add more storage space toyour MessagePad), and accessory cards (such as modems). For information aboutusing an accessory card, see the documentation that came with the card.
Inserting and removing cards
Before you can use a card, you must remove the plastic card that came in the slotwith your MessagePad.
1 Push the release button beside the card slot.
The button pops out ready to release the plastic card.
2 Release the card by pushing the release button again, which pushes the card out ofthe slot.
Always use the release button to remove a card. Never pry the card or use anotherobject to pull a card from the slot.
3 Take the plastic card out.
9 Using Storage and Application Cards

4 Insert the new card in the card slot.
The card fits only one way; don’t force it. Push the card all the way in until it locks ineven with the side of the MessagePad.
Your MessagePad takes a few moments to examine the card. When your MessagePadis ready to use the card, a slip appears with information about the card.
What you see next on your MessagePad depends on what type of card you inserted:
m New storage card—A message appears telling you the card cannot be read and you need to erase all the information on it. See the next section, “UsingStorage Cards.”
m Previously used storage card—A slip appears showing the name of the card. See the next section, “Using Storage Cards.”
m Application card—An icon appears in the Extras Drawer. See the section “UsingApplication Cards” later in this chapter.
m Accessory card—A slip appears showing that a communications card has beeninserted. For information about using an accessory card, see the documentationthat came with the card.
Important After removing a card, always insert another card or insert theprotective plastic card that came with your MessagePad. Never use or store yourMessagePad while the card slot is empty.
Release button
202 Chapter 9

Using storage cards
You can use storage cards to store new information and to back up information inyour MessagePad.
You can use any Newton storage card with your MessagePad. Other cards may alsowork, including SRAM (static random-access memory) cards that have their ownbatteries. Ask your Apple-authorized dealer for more information.
Important Most storage cards have a write-protect switch that allows you to lockand unlock the card for security purposes. If you lock the card, you cannot move orrevise information that is on the card. To find out whether a card is locked, see thesection “Protecting Information on a Storage Card,” later in this chapter.
Preparing a new storage card
Storage cards that are new or that have been used on devices other than aMessagePad may need to be erased and formatted before you can use them.
Note: To use a card that has been used in a device with an earlier version of theNewton operating system, see the next section, “Using a Storage Card Formattedwith an Earlier Version of the Newton Operating System.”
1 Insert the new storage card.
A message appears.
s Warning Tapping Erase erases any information and data on the card, includingpackages or a backup. s
2 Tap Erase.
You see another warning message asking if you really want to erase the informationon the card.
Using Storage and Application Cards 203
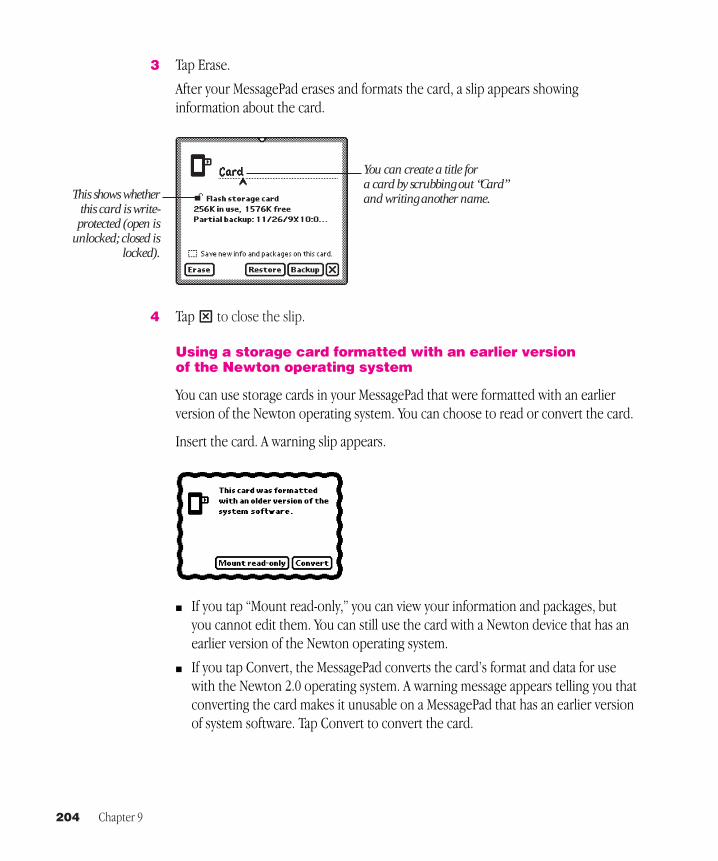
3 Tap Erase.
After your MessagePad erases and formats the card, a slip appears showinginformation about the card.
4 Tap X to close the slip.
Using a storage card formatted with an earlier version of the Newton operating system
You can use storage cards in your MessagePad that were formatted with an earlierversion of the Newton operating system. You can choose to read or convert the card.
Insert the card. A warning slip appears.
m If you tap “Mount read-only,” you can view your information and packages, butyou cannot edit them. You can still use the card with a Newton device that has anearlier version of the Newton operating system.
m If you tap Convert, the MessagePad converts the card’s format and data for usewith the Newton 2.0 operating system. A warning message appears telling you thatconverting the card makes it unusable on a MessagePad that has an earlier versionof system software. Tap Convert to convert the card.
204 Chapter 9
You can create a title for a card by scrubbing out “Card”and writing another name.This shows whether
this card is write-protected (open is
unlocked; closed islocked).

Important Some applications and application data may not be compatible with theNewton 2.0 operating system. Please contact the software publisher for moreinformation about compatibility or an upgrade.
Filing information on a storage card
You can file name cards, notes, calls, and icons in the Extras Drawer in folders on astorage card.
1 Go to the item you want to file.
To file an icon from the Extras Drawer, you must first select it. See the section“Putting Icons from the Extras Drawer Into Folders” in Chapter 6, “Organizing andFinding Information.” You cannot move built-in icons, such as Formulas, to a folderon a storage card.
2 Tap the Folder button F and, in the slip that appears, tap the name of the card andthe name of the folder.
3 Tap File.
The item is now moved to the card and isn’t available if you remove the card. A small triangle appears on the Folder button for the item, unless it’s stored in theExtras Drawer.
Using Storage and Application Cards 205
Tap the circle next to thecard name to select it.Tap a circle to
select the folder to file an item in.
The triangle on the Folder button tells you that this note is filed, orstored, on a card.

Automatically storing information on a card
To store new information that you create and packages that you transfer to yourMessagePad, open the Card slip.
1 Tap Extras E to open the Extras Drawer, tap the Folder tab, then tap Unfiled Icons.
(If you filed Card in another folder, tap that folder’s name.)
2 Tap Card B.
A slip appears.
3 Tap “Save new info and packages on this card.” Your MessagePad automatically savesyour new information and packages on the card.
For more information on organizing information into folders, see Chapter 6,“Organizing and Finding Information.”
Checking the amount of space available on a storage card
You can check the amount of available space on a storage card whenever the card is inserted into your MessagePad. Tap Extras E to open the Extras Drawer, then tapCard B. (If you filed Card in another folder, tap that folder’s name.) A slip appears.
206 Chapter 9
Tap this checkbox to store newinformation on a card.
The amount of availablespace is listed.

Deleting information on a storage card
You can remove software that you no longer use or need from a storage card.
1 Tap Extras E to open the Extras Drawer. (If you filed Card in another folder, tap thatfolder’s name.)
2 Tap Card B.
The card slip appears.
2 Tap Erase.
3 In the slip that appears, tap a choice.
m Entire card—deletes all of the information on a card.
m Backup only—deletes only the backup file.
m Information only—deletes the data files only for all applications; packages andbackup files are not deleted.
4 Tap Erase.
Using Storage and Application Cards 207

Deleting specific items on a card
1 Go to the item on the card that you want to delete.
If you want to delete more than one item, tap the Overview button Ω and, in the listthat appears, tap the checkbox next to each item you want to delete.
Note: You can tell from the Overview list which items are on the card.
2 Tap the Routing button µ and, in the list that appears, tap Delete.
Protecting information on a storage card
You can lock most storage cards so that you can’t move, delete, or change anyinformation that’s on the card (although you can see, copy, and use the information).You can’t store new information on a locked card.
To lock a card, remove it from the card slot and slide the write-protection switchtoward the edge of the card, as shown.
To unlock the card, slide the write-protection switch back toward the center of the card.
Changing batteries in a storage card
See your storage card instructions to determine whether the card has a battery. If itdoes, you must change the battery when you see a message that the card’s battery islow. To change the battery, follow the instructions that came with the card.
208 Chapter 9

Using application cards
Application cards contain software in a variety of categories, including financial tools, business and personal productivity tools, travel guides, reference information,and games.
To use an application card:
1 Insert the card.
Make sure you push it all the way into its slot.
Wait for a slip to appear indicating that the MessagePad has examined the card.
2 Tap Extras E to open the Extras Drawer.
An icon for the application appears in the Extras Drawer.
3 Tap the icon and follow the instructions that came with the application.
Using Storage and Application Cards 209


Backing Up and Restoring Information 211211
You can back up information from your MessagePad to a storage card. A copy of allthe information in your MessagePad is called a backup. You use the backup to restoreinformation in the unlikely event that your MessagePad seriously malfunctions andinformation is lost or damaged.
To keep your MessagePad information safe, you should always have a recent copy ofall the information in your MessagePad. You can keep a backup on a storage card oron a computer.
Backing up information to a storage card
1 Insert a storage card into your MessagePad.
A slip appears indicating that the MessagePad recognizes the card.
s Warning Each storage card can only store one backup file for a particularMessagePad. If there’s already a backup stored on the card, it is replaced with thenew backup. (Other information on the card is not erased.) s
2 Tap Extras E to open the Extras Drawer.
10 Backing Up and Restoring Information

3 Tap Card B.
The card slip appears.
4 Tap Backup.
A backup slip appears.
5 Tap the applications whose information you want to back up.
If you want to make a backup copy of everything on your MessagePad, tap All. Tap itagain to deselect all applications. To back up all the packages stored in the internalmemory (not including the built-in applications), tap the checkbox next to “Backupall packages.”
212 Chapter 10
Tap here to make a backupof your information.
Tap the scroll arrows to moveup and down in the list.
Tap All to select all information(this doesn’t include packages).
Tap the checkbox next to eachapplication you want to back up.
Tap “Backup allpackages” if you want
to make a backup ofthe packages stored inthe internal memory.

6 Tap Backup.
A slip appears showing you the progress of the backup.
The MessagePad automatically creates a new backup. If there was a previous backupon the card, your MessagePad replaces the old backup with the new backup.
When the MessagePad is finished backing up the information, the progress slip goesaway. A Restore button now appears on the card slip.
7 Tap X to close the card slip.
Restoring information from a storage card
If something causes you to lose information stored on your MessagePad, you canrestore it if you’ve made a backup on a storage card.
1 Insert the storage card with the backup information into your MessagePad.
2 If the card slip is not open, tap Extras E to open the Extras Drawer, then tap Card B.
The card slip appears.
Backing Up and Restoring Information 213

3 Tap Restore.
A slip appears. Tap the applications and packages you want to restore. If you want torestore everything, tap both All buttons. Tap them again to deselect all applicationsand packages.
4 Tap Restore.
A message appears asking you if you really want the information on your MessagePadto be replaced with the information in the backup.
5 Tap Restore.
A slip appears showing you the progress of the restoration. When your MessagePad isfinished restoring the information, a slip appears telling you to restart yourMessagePad.
6 Tap Restart.
Your MessagePad restarts.
7 Tap X to close the card slip.
214 Chapter 10
Tap the checkbox next to eachapplication you want to restore.
Tap All to select all information.
Tap the checkbox next to thepackages you want to restore.
Tap All to restore all packages.

215
You can use the Newton Book Reader application to view a Newton book on theMessagePad. When you install a Newton book, the package appears with its own iconand title. The Newton Book Reader automatically becomes available on yourMessagePad when you install a book package.
Using Newton Book Reader, you can do all the following:
m open a Newton book
m move from page to page to view the book
m open a table of contents to jump to a specific topic
m set bookmarks to move quickly to a particular page whenever you want
m make annotations in the text
m copy and paste text (but not edit text)
m print or fax a book
11 Viewing Newton Books

Opening a book on your MessagePad 2000
You can only have one Newton book open at a time.
If you installed the book on your MessagePad, you can find the book icon in theExtras Drawer.
To open a book:
1 Tap ExtrasE to open the Extras Drawer, then locate the book icon.
2 Tap the book icon.
216 Chapter 11
An example of a Newton book icon installed in the internal memory.

Viewing pages
After you open a book, the book appears on the screen.
You can move page by page through a book by tapping the up or down arrows.
Viewing Newton Books 217
An example of a Newton book

Using a table of contents
A Newton book may have a table of contents that lists the topics in the book. You canquickly view a particular topic by tapping it.
To use the Contents slip to see a specific topic:
1 Tap the Overview button Ω.
The Contents slip appears listing the topics of the book. You can tap the scroll arrows≈ on the right side to move through the table of contents, if necessary.
2 Tap the topic you want to view.
The topic appears behind the Contents slip.
If there are subtopics in the table of contents, they appear below the main topic.
3 If you want, tap a subtopic in the list.
The desired subtopic appears behind the Contents slip.
4 Tap X to close the Contents slip.
You can use the Newton Book Reader controls to navigate, annotate, or printinformation in the book.
218 Chapter 11
Use these scroll arrows to move up and down in the table of contents.

Viewing Newton Books 219
Using Newton Book Reader controls
When a book is open, you see the Newton Book Reader controls. These controlsallow you to view and annotate the Newton book.
You can mark up and make notes on a book. You can hide or display the annotationswhenever you want. You can also print or fax the book if your MessagePad isconnected to a printer or a fax modem.
Going to a specific page
When the controls appear, the number of the currently displayed page appears in thepage number button.
To move to a specific page:
1 Tap the Page Number button 1.
The page number slip appears.
2 Write the number of the page you want to go to.
The page you entered appears behind the slip.
3 Tap X to close the page number slip.
Tap here to go to a specific page.
Tap here to print or fax.Tap here to seta bookmark.
Tap here to close the book.
Tap here toannotate a book.
Tap here to getinformation about
the book, access help,and set preferences.

Creating bookmarks
You can easily display pages that you refer to frequently by setting bookmarks.
When you tap the Bookmark button J, the bookmark slip appears. This slip showsminiature images of the pages that are currently marked. The size of the slip changesdepending on how many pages you mark. You can mark up to six pages in a book.
To set a bookmark
1 Display the page you want to mark.
2 Tap the Bookmark button J.
The bookmark slip appears listing the page number you are currently viewing.
3 Tap the Mark Page button.
A new image for that page is added to the Bookmark slip.
If you create more than six bookmarks, the last bookmark is added to the slip and thefirst bookmark you created is erased.
220 Chapter 11

Viewing Newton Books 221
To display a marked page
1 Tap the Bookmark button J.
The Bookmark slip appears.
2 Tap the page image you want to see.
The Bookmark slip disappears and the page you selected is shown on the screen.
To erase bookmarks
1 Tap the Bookmark button J.
The Bookmark slip appears.
2 Tap Unmark.
A list appears.

3 Tap the page you want to unmark, or tap All Marks to erase all bookmarks.
The picture of the unmarked page disappears from the slip.
Copying parts of a book
You can select and copy any text in a book. You can move the copied text to anotherapplication.
To copy parts of a Newton book
1 Go to the part of the Newton book you want to copy.
2 Select the text you want to copy.
Your MessagePad places a box around the selected item.
222 Chapter 11
Selected text to copy.

3 Drag the selected item to one side of the screen.
The item becomes a small box, waiting for you to place it in another document.
4 Tap X to close the book.
Viewing Newton Books 223
Selected text becomes a box.

5 Open the application where you want the selected information to appear.
The small box indicating the selected item is on the side of the screen.
6 Drag the box from the side of the screen to where you want it.
The information appears and is still selected.
224 Chapter 11
The box with the selectedinformation appears here.

7 Tap the selection to deselect it.
The information is in its new location.
Viewing Newton Books 225

Annotating books
You can add your own annotations to a book by tapping the Markup button.
You cannot edit a Newton book on your MessagePad. You can however, mark thecopy by writing, drawing, or typing on the on-screen keyboard. You can also hideyour annotations. After marking up a book, you can print it or fax it with your annotations.
To annotate a book:
1 Tap the Markup button j.
2 Make the annotations you want.
You can write, draw, or use the on-screen keyboard. When you’re annotating, youcannot select text in the book, but you can select, move, and erase (scrub) yourannotations.
To hide your annotations, tap the Markup button j again.
226 Chapter 11

Printing and faxing a Newton book
You can print or fax all or part of a Newton book when your MessagePad is connectedto a printer or fax modem. If you annotated the book, you can choose to includeyour annotations when you tap Format to select a format.
To print or fax a book, follow these steps:
1 Connect your MessagePad to a printer, a fax modem, or fax modem card.
See Chapter 7, “Routing Information,” for more information.
2 Open the book you want to print or fax.
3 Tap the Routing button µ.
4 In the list that appears, tap Print Book or Fax.
A page number slip appears on top of a print or fax slip.
5 Write the page numbers you want to print.
6 Tap X to close the page number slip.
7 Enter the appropriate information in the print or fax slip.
Tap Format to choose a format. You can print or fax with or without the annotations.
8 Tap Print Book or Fax.
Viewing Newton Books 227


229
This chapter describes common problems and suggests solutions. If, after trying the suggested solutions, you still can’t solve the problem, call 1-800-SOS-APPL (1-800-767-2775) in the United States. Outside the United States, contact your localApple-authorized dealer.
Many of the procedures in this section are described in more detail in other chapters.Topics in this chapter include:
m Resetting the MessagePad
m The screen
m Personal Identification Number (PIN)
m Alert messages
m Writing and drawing
m Modems and cellular telephones
m Power and batteries
m Electronic mail
m Printing, faxing, and dialing
m Beaming
12 Troubleshooting

Resetting the MessagePad
Resetting your MessagePad can resolve some problems. You can try three differenttypes of reset: a software reset, a hardware reset, and a system reset. Be sure to trythese resets in the order presented to limit the risk of losing data.
m Software reset: Press and hold down the Reset button (on the back of theMessagePad) for two seconds. This procedure does not erase the information thatyou have stored in your MessagePad and may solve many problems.
m Hardware reset: Press and hold down the Reset button (on the back of theMessagePad) for twenty seconds. When you perform a hardware reset, you risklosing the last information most recently entered on your MessagePad.
m System reset: Remove the batteries from your MessagePad and leave them out forat least twenty minutes. When you perform a system reset, you risk losing someinformation entered on your MessagePad, and will need to reset your clock andcalendar information.
Check the time in the Date and Time preferences whenever you press Reset. (TheMessagePad’s clock may lose some time when you press Reset.)
Hard reset
If you’ve tried the software, hardware, and system resets and your MessagePad stilldoesn’t work properly, call 1-800-SOS-APPL to find out if there’s anything else you cando. If not, you can try a hard reset.
s Warning A hard reset erases all data and information in the MessagePad’s internalmemory. This includes any applications that were already on your MessagePad whenyou bought it (including the Newton Tour and HW Instructor). It also erasesinformation you have stored, such as name cards, notes, calls, and pages in the DateBook. This procedure does not remove the MessagePad’s built-in programs,operating system software, or system updates. s
230 Chapter 12

To do a hard reset:
1 Remove any storage or application cards that are inserted in the MessagePad.
2 Press and hold down the Reset button and then press and hold down the Powerswitch.
3 Hold down the Reset button for two seconds, then release it while continuing to holddown the Power switch. Continue holding down the Power switch until a messageappears asking if you want to erase your data completely.
4 Tap Yes.
Another slip appears telling you that all of the data will be erased.
5 Tap OK.
All the information (including any packages you loaded and other applications thatare not built in) is erased and your MessagePad reverts to the defaults set at thefactory. This procedure may take several minutes.
The screen
The screen appears too light or too dark.
m Adjust the contrast.
m Adjust your viewing angle.
m Adjust the surrounding lighting.
m If the surrounding lighting is too dark, you may want to turn the backlighting on.If the surrounding lighting is too bright, you may want to turn backlighting off. SeeChapter 1 of the Getting Started manual for more information.
m Make sure your MessagePad is not too hot or too cold (it’s designed to be used intemperatures between 32° F and 104° F, or 0° C and 40° C).
The screen action seems slow.
Make sure your MessagePad is not too cold (it’s designed to be used in temperaturesbetween 32° F and 104° F, or 0° C and 40° C).
Troubleshooting 231

Personal Identification Number (PIN)
The MessagePad doesn’t recognize my password.
Tap your Personal Identification Number (PIN) on the keypad again.
I forgot my PIN.
Your only option is to do a hard reset. This erases all data and information on yourMessagePad. If you set a PIN in the future, remember to record the PIN in a safe placeand always keep your information backed up. See the instructions in “Hard Reset”earlier in this chapter.
Alert messages
A message says the internal memory or storage card is full.
m Close any applications not in use.
m Check to see how much available space there is on your MessagePad and anystorage card you have inserted. Tap ExtrasE, then tap the Information button;. In the list that appears, tap Memory Info.
m Delete some applications, such as the Newton Tour or HW Instructor. ( You canmake a backup copy and then delete them from your MessagePad.)
m You can change the default storage settings. Tap Extras E, then tap CardB. If youwant, tap the checkbox next to “Store new info and packages on this card.”
A message says there is nothing to undo.
Your MessagePad can undo only the last change you made. If you tap it again, it willredo your last action. There are some actions the MessagePad cannot undo, such asbacking up and restoring information.
A message asks for a card I’ve removed.
Reinsert the card.
s Warning Do not insert any card except the one asked for. Information on thesecond card could become damaged. s
If the card isn’t available, you can start over by doing a software reset (press the Resetbutton on the back of the device for two seconds). However, if you do not reinsertthe card, you may lose information stored on it.
232 Chapter 12

A message says my MessagePad is out of memory and suggests that Irestart it.
Your MessagePad has no more memory available to complete your request. Tap theRestart button; usually this corrects the problem.
To avoid this situation in the future:
m Don’t run too many applications at once. Close applications when you are nolonger using them; even if you’re not doing anything in an open application, it stilltakes up valuable memory.
m Limit the number of background activities. Turn off “Receive beams automatically”in the Beam preferences. Don’t set the MessagePad to receive calls using themodem (in the Calls preferences). Wait for an item to finish printing beforecontinuing with another activity (don’t, for example, write in the Notepad while aprint job is active). Close applications before attempting communication.
m Remove unneeded applications. Even if you never use or open an application, ituses a small amount of memory. Limiting the number of packages you haveinstalled may be enough to avoid out-of-memory situations.
A message says a storage card is write-protected.
m Take the card out of your MessagePad and turn off the card’s write-protection bysliding the switch on the exposed edge of the card.
m The storage card may be full. Tap ExtrasE, tap the Information button;, then tap Memory Info. In the slip that appears, you’ll see how much space is lefton the card.
When using Find, a message says too many items were found.
m Your MessagePad may be running out of memory. Close some applications. Thenperform the search again.
m Go back to the Find slip and narrow the search further by adding additional termsor searching by date.
Troubleshooting 233

Writing and drawing
I’m not tapping where I think I’m tapping.
You need to realign the pen. Tap the Recognition buttonÚ and, in the list thatappears, tap Preferences. Tap Align Pen and follow the instructions on the screen. Tap X to close the slip.
Why isn’t my handwriting recognized?
If your handwriting is not recognized and appears as ink text, there may be severalreasons.
m Make sure you’ve selected the Text recognition setting Ú.
m If you are using the Text recognition setting but your handwriting wasn’tconverted, the MessagePad may have been too busy—for example, sending a fax orreceiving beamed information—to convert your handwriting. Scrub out thehandwritten text and try again, or double-tap the word to try converting again.
m Double-tap on the selected ink text again.
m Your MessagePad may be low on memory. Try quitting some applications (tap Xto close them).
m Try not to write too far ahead of the recognition.
m Space out your words more.
m You may be writing long, overhanging crossbars on letters such as capital J andcapital and lowercase t. Try using shorter strokes when you form these letters.
m You may be writing long, underhanging strokes on letters such as lowercase g or y.Try using shorter strokes when you form these letters.
m If you selected Printing as your handwriting style, you may be writing in cursive, inparticular, long cursive words or expressions. You must write in the style that youselect in order for the MessagePad to recognize your writing. In this case, eitheruse printing, or change your handwriting style selection to Cursive.
I wrote information in Ink Text. Can I convert it to text?
Yes. Select your handwriting and tap it twice. To convert a single word, tap it twice.
234 Chapter 12

The MessagePad misinterpreted a word I wrote.
When you select the Text recognition setting Ú, the MessagePad uses a word list tointerpret the words you’re writing. You can use the on-screen keyboard to enter theword in the MessagePad’s word list.
m To correct a word, tap it twice. If the correct word is not in the list, use thecorrector button L or the on-screen keyboard _ to enter the word correctly.
m Make sure the checkbox next to “Add new words to Personal Word List” ischecked. To do this, tap Extras E, tap the folder tab, then tap Unfiled Icons (ifyou filed Prefs in a different folder, tap the name of that folder). Tap Prefs π, thentap Handwriting Recognition „. Now tap Options and, from the list that appears,tap Text Editing Settings.
m Check the options in the Handwriting Recognition preferences to make sure theyreflect your own writing style.
The MessagePad interprets my handwriting too slowly.
Check the settings in the Handwriting Recognition preferences. You can also selectthe Ink Text recognition setting : to store your handwriting as ink text, which canbe recognized later if you want.
When I erase by scrubbing, the scrub mark turns into letters.
Try scrubbing more slowly. Make sure your scrub mark is a zig-zag with at least four line segments joined at sharp angles. Make sure it goes well above and below the word.
Long jagged lines appear on the screen while I’m writing or drawing.
Be careful not to rest your hand on the screen while you’re writing or drawing. Use alittle more pressure when writing.
Troubleshooting 235

When I write numbers, phone numbers, dates, or times, theMessagePad interprets them as words.
Use an on-screen keyboard to enter the numeric information. If the on-screenkeyboard is not open, tap the Keyboard button _ twice and, in the list thatappears, tap the type of keyboard you want to use. If the on-screen keyboard is open,tap the Keyboard button _ once more.
You might want to use Writing Practice and practice writing numeric information. Touse this, tap ExtrasE, tap the folder tab and tap Setup (if you filed Writing Practicein another folder, tap that name). Tap Writing PracticeW.
The MessagePad changes my drawings to something else.
The Shape recognition setting ß cleans up your shapes. If you don’t want theMessagePad to do this, select the Sketches recognition setting ‚.
My writing doesn’t appear under the tip of the pen.
m Realign the pen. Tap Extras E to open the Extras Drawer. Tap Prefs π and, inthe slip that appears, tap Handwriting Recognition „. In the slip that appears,tap Align Pen. Follow the instructions on the screen.
m The option to insert new words at the caret may be turned on. Tap theRecognition button Ú, tap Preferences, then tap Options. Tap Editing Settings.Tap the checkbox next to “Insert new words at caret.”
m If pen alignment remains a problem, try resetting your MessagePad.
I can’t write all of my information on a line
Sometimes a line is too short or your handwriting is too large to let you fit all yourinformation on one line. If so, in some areas you can write on the screen and use thecaret to place the information where you want it. Follow these steps:
1 Tap the Recognition button Ú and in the list that appears, tap Preferences π.
2 Tap Options and in the list that appears, tap Text Editing Settings.
3 Tap the checkbox next to “Insert new words at caret,” to select it.
4 Tap every X until you return to the application you were using.
5 Tap on a line to place the caret ^.
6 Write the information you want. It is placed at the caret.
236 Chapter 12

Modems and cellular telephones
A message says my modem is not responding or warns about usingdigital lines.
m If you are using an external fax modem, check to make sure the batteries in themodem are good.
m If you are using a PC card fax modem, make sure the modem is inserted properlyin the card slot.
m Check all of the cable connections. Make sure you are using a standard analogphone line and you are getting a dial tone. Reset your MessagePad.
My cellular phone and modem don’t seem to work.
m Make sure your modem is inserted properly in the card slot.
m Make sure the cable is connected between the modem and your cellulartelephone.
m Make sure you’ve chosen the right Modem setup. See Chapter 7, “RoutingInformation.”
m Make sure your cellular telephone is on. If you’re using a flip-phone, make surethe mouthpiece is flipped closed.
m Make sure you are calling from a location that has a strong signal.
Power and batteries
I can’t turn the MessagePad on.
m Press the Power button once and wait for 30 seconds for the system to reset.
m If you’ve recently replaced the batteries, press the Reset button.
m Make sure that each battery’s + and – terminals are positioned properly. Makesure the batteries are fresh.
m If you’ve connected a power adapter to the MessagePad, make sure it’s pluggedinto a working outlet. If it’s plugged into a power strip, make sure the power stripis turned on.
m Follow the resetting procedures listed earlier in this chapter.
Troubleshooting 237

My batteries don’t last as long as they used to.
m Setting the MessagePad to receive beams automatically uses extra battery power.
m The more you use peripherals for faxing, mailing, and printing, the faster thebatteries lose power.
m If you’re using an optional rechargeable battery pack, it may have reached the endof its life. Dispose of it safely and legally and get a new one.
Important Use only alkaline batteries or a rechargeable battery pack designed foryour MessagePad.
m The more you use backlighting (or have it turned on), the faster the batteriesuse power. Turn off backlighting when you don’t need it. You can also changethe backlighting preferences. See “Prefs” in Chapter 5, “Managing theMessagePad 2000.”
The batteries leaked and my MessagePad won’t work.
Any damage caused by leaking batteries is not covered by the warranty.
Electronic mail
There is no dial tone.
m Make sure that your modem has adequate power from batteries or a poweradapter and that it is connected to a working telephone line.
m You may be using a phone system that does not generate a dial tone (as is the casewith some analog PBX systems). In the Modem preferences slip, make sure thecheckbox next to “Require dial tone” is not checked.
The local access number won’t answer.
Make sure that the number you are dialing is correct and appropriate for yourlocation. If you need to dial a number to get an outside line, enter that number,followed by a comma, before the access phone number.
I lost the connection while transmitting.
Make sure you turn off call waiting while using the modem. Contact your local phonecompany if you need instructions.
238 Chapter 12

When I try to connect, my modem doesn’t dial or I get a “Please wait”message.
Press the Reset button on the back of the device, then try connecting again.
The MessagePad says “No modem is connected” when my Newton-compatible fax modem is connected.
If your modem has batteries, make sure they are fresh and properly installed. Makesure your phone is on the hook.
Printing, faxing, and dialing
I couldn’t print.
m Make sure you’ve selected the correct type of printer.
m Check all the cable connections.
m Turn the printer off, wait 30 seconds, and turn it back on; then try again.
I don’t see my network printer in the list.
m Check your cable connections.
m Check the network hardware between the MessagePad and the printer.
m If your network has zones, make sure you’ve selected the correct zone.
My return address is missing from faxes and printouts.
Make sure you’ve entered information for an owner and worksite. Tap Extras E, tapthe folder tab, tap Setup, and tap Owner Info 8.
The MessagePad dialed the wrong number.
m Make sure you’re using the appropriate calling options for the phone from whichyou are placing the call.
m The MessagePad’s dialing feature does not work with all phones. Some phones,such as PBX phones, do not recognize the tones of the MessagePad’s speaker.
Troubleshooting 239

The phone is not dialing the correct phone number when I use thespeaker to dial.
m Try changing the distance between the phone handset and the MessagePad’sspeaker. Try changing the orientation of the phone handset and the MessagePad’sspeaker.
m You can also try using different phones or a different phone system.
Extra numbers appear in the phone number I’m trying to call.
m Make sure the following settings are correct: Time/Date settings in Clock C, TimeZones z, and Locale © in Prefs π.
m Verify that the local dialing information area code is correct for the location youare dialing.
Beaming
I’m not getting items that are beamed to me.
m Make sure the infrared windows on the Newton devices are pointing directly ateach other and are less than 1 meter (about 3 feet) apart—closer in bright sunlight.
m You may not have chosen to receive beams automatically. To receive beamsautomatically, go to the InOut Box I, tap the Information button ; and, in thelist that appears, tap Beam Prefs. Tap the checkbox next to “Receive beamsautomatically.”
Other
The MessagePad has gotten wet.
m If the MessagePad gets wet while it’s plugged in using a power adapter, unplug thepower adapter from the MessagePad before you do anything else.
m Remove the main batteries and allow the unit to dry for at least 24 hours at roomtemperature. Don’t place the device in an oven or microwave oven.
240 Chapter 12

The time or date is wrong.
m Tap Extras E, tap the folder tab, then tap Unfiled Icons. (If you filed Clock inanother folder, tap that folder’s name.) Tap Clock C, then tap Set. In the list thatappears, tap Time/Date, then set the correct date and time.
m The MessagePad’s clock may lose time when you press the Reset button. Checkthe time and date in Clock C whenever you press Reset.
Many of my items seem to be missing.
m You may be looking at the contents of only one folder.
m If you filed or stored information on a storage card, you need to insert the card toview those items.
Nothing happens when I tap buttons at the bottom of the screen (suchas the Overview button).
When a lot of information is stored in an area, the MessagePad may take a fewseconds to display it.
I want to erase everything stored in the MessagePad.
See “Resetting the MessagePad” earlier in this chapter.
Troubleshooting 241


243
Your MessagePad 2000 uses:
m four AA alkaline batteries or a Newton Rechargeable Battery Pack
m a super capacitor as a backup power source
To see the battery level indicator, tap Extras E to open the Extras Drawer. At thebottom of the screen on the right side, you see the battery level.
The black portion of the gauge shows the remaining battery power.
Appendix AInstalling and Replacing Batteries

Battery warnings
The MessagePad displays a warning when the battery level is low.
When you first see the warning, you have less than an hour of power left in your batteries.
If you don’t change the batteries in time, the MessagePad turns itself off automaticallyto save the information in its memory. You can turn the MessagePad back on onceyou’ve replaced the batteries or plugged in a power adapter.
Rechargeable batteries
You can use a Newton Rechargeable Battery Pack instead of alkaline batteries. Useonly the battery pack designed for your MessagePad. Follow the instructions thatcome with the battery pack.
If you buy a rechargeable battery pack, you also need a Newton 9W Power Adapter.When the MessagePad is plugged in, the battery pack recharges automatically.
244 Appendix A

Replacing batteries
s Warning When replacing the batteries:
m Make sure each battery’s + and – ends are in the correct position. Follow thediagram in the battery holder or battery compartment. If you install batteries thewrong way, the batteries may leak and damage your MessagePad. Leaking batteriesmay be hazardous and any damage they cause is not covered by your warranty.
m Replace all the batteries at the same time. Don’t mix old and new batteries.
m Install only alkaline batteries or a Newton Rechargeable Battery Pack designedspecifically for your MessagePad.
m Don’t leave your MessagePad without batteries for longer than one hour, or yourclock and calendar information may need to be reset when the backup charge ofthe super capacitor becomes depleted. If you must remove your batteries for anextended time without replacing them, attach the Newton 9W Power Adapter. s
s Warning Do not use individual rechargeable nickel metal-hydride or nickel-cadmium (NiCad) batteries. The battery level indicator is not calibrated for that typeof battery. s
Installing and Replacing Batteries 245

To replace the batteries:
1 Turn off your MessagePad and close the cover.
2 Slide the battery latch to open the battery compartment and remove it.
Battery compartment latch
246 Appendix A

3 Install four AA batteries in the battery compartment.
Make sure you position each battery’s + and – terminals according to the diagram inthe compartment (the batteries don’t all have the same orientation). If you install thebatteries the wrong way, they may leak and damage your MessagePad. Leakingbatteries may be hazardous.
Load the last battery as shown above.
Alkaline batteries should last about three to six weeks in normal use.
Note: If you use backlighting frequently, the life of your batteries is reduced. Youmay want to use the Newton 9W Power Adapter to conserve battery power.
4 Slide the battery compartment back into your MessagePad until it locks in place.
Insert this battery last
Installing and Replacing Batteries 247

Battery tips
m Batteries are inherently hazardous due to internal caustic materials and highenergy levels. For this reason, always handle batteries carefully. Do not drop,puncture, disassemble, mutilate, or incinerate batteries. Don’t put batteries inyour mouth.
m Do not leave batteries in hot places.
m Use only alkaline AA batteries or the Newton Rechargeable Battery Pack designedfor your MessagePad. The battery indicator doesn’t work with other types ofbatteries, and your MessagePad can run out of power with little or no warning.
m Always turn off the MessagePad before changing the batteries, to minimize thechance of losing your information.
m Do not short-circuit battery terminals—that is, do not touch both terminals with ametal object at the same time. Doing so may cause an explosion or a fire.
m Do not install both old and new AA batteries; replace all four alkaline AA batteriesat the same time to ensure optimum battery life.
m To avoid battery leakage or lost data, replace the batteries as soon as theybecome weak.
m In normal circumstances, turn off the MessagePad only by using the Power switchto avoid losing information.
m If you expect to store the MessagePad for a prolonged period, it’s a good idea toremove the batteries to prevent leakage during storage.
248 Appendix A
249
Apple User Assistance
If you need assistance, Apple’s trained staff members are ready to help you.
To contact Apple User Assistance in the United States, refer to your Apple SupportCard for detailed information.
m In Australia, call 1-300-300-995
m In Canada, call 1-800-263-3394
m In the United Kingdom, call FREE 0800-639866
Outside the countries listed above, contact your local Apple-authorized reseller.
Your Apple warranty and Apple repair services
Your MessagePad 2000 comes with the Apple One-Year Limited Warranty, covering allremedial repairs (repairs required because of defects in workmanship). In the UnitedStates, if you suspect your MessagePad needs repair services, call 1-800-500-7078. Ourtrained staff members will help in determining if service is needed and will explainApple’s mail-in repair options.
If you are outside the United States and need to have your in-warranty MessagePadrepaired, you can take it to any Apple-authorized service provider for repair at nocharge. Please refer to the Apple One-Year Limited Warranty included with yourMessagePad for more information.
Appendix BService and Support

Extended service agreement
Many Apple-authorized resellers offer an extended service agreement at the time youpurchase your MessagePad, or at any time during the warranty period, to coverrepairs after your warranty expires.
You may also purchase AppleCare, Apple’s extended service agreement, from anApple-authorized reseller or from Apple through AppleCare Direct. AppleCare offersup to 36 months of the same protection as the original Apple One-Year LimitedWarranty, beginning when your warranty expires.
If your warranty has expired and you have not purchased an extended serviceagreement, you can contact an Apple-authorized service provider or Apple for repairservices. Nonwarranty repair charges are usually based on an hourly service rate plusthe cost of parts.
250 Appendix B

251
Your MessagePad uses the Newton 2.1 operating system. You can beam and mailitems and share storage cards between another Newton device with the Newton 2.0or 2.1 operating system and your MessagePad.
There are some limitations, however, when you are beaming or mailing items fromyour MessagePad to a Newton device that has an earlier version of the Newtonoperating system. There are also some limitations when a device with an earlierversion of the Newton operating system is beaming or mailing items to yourMessagePad. You may also run into problems when using storage cards in deviceswith different versions of the Newton operating system.
The next few pages show you the details of compatibility between your MessagePadand devices with an earlier version of the Newton operating system.
Appendix CCompatibility Information

Newton 2.1 OS to Newton 2.0 OS Feature compatibility
Beaming
Faxes Yes
Icons (application packages) Yes
Name Cardsm Person Yesm Company Yesm Group Yes
Owner Cards Yes
Worksite Cards Yes
Beam My Card Yes
Calls Yes
Meetings Yes
To Do Tasks Yes
Checklists and Outlines Yes
Notes Yes
Mailing
Faxes Yes
Calls Yes
Icons (application packages) Yes
Name Cards Yes
Meetings Yes
To Do Tasks Yes
Storage cards
Interchangeability Yes
252 Appendix C

Newton 2.1 OS to an earlier Newton 1.x OS
Beaming
Faxes No
Icons (application packages) No
Name Cardsm Person Yes (no 2.0 info, no ink text)m Company Yes (no 2.0 info, no ink text)m Group No
Owner Cards Yes
Worksite Cards No
Beam My Card No
Calls No
Meetings Yes (no 2.0 info)
To Do Tasks Yes (no 2.0 info)
Checklists and Outlines Yes (converted to note with tabs)
Notes Yes (ink text converted to sketch with some formatting loss)
Mailing
Faxes No
Calls No
Icons (application packages) No
Name Cards Yes (no 2.0 info, no ink text)
Meetings Yes (no 2.0 info)
To Do Tasks Yes (no 2.0 info)
Storage cards
Interchangeability No
Compatibility Information 253

Using items from an earlier version of the Newtonoperating system
A Newton device with system software earlier than the Newton 2.0 operating systemcan beam and mail certain types of information to a Newton device with the Newton 2.1 operating system.
Here’s what you can do:
m Beam—name cards for a person or company, meetings, to-do tasks that have nosketches or shapes, and items in the Notepad.
m Mail—name cards and meetings.
m Share storage cards—you can share storage cards with devices that have theNewton 2.1 operating system only if you choose “Mount read-only” (not“Convert”) when you insert the card into your MessagePad. For more information,see Chapter 9, “Using Storage and Application Cards.”
m Convert to-do tasks that do not contain ink text, shapes, and sketches—youcannot convert to-do tasks that include ink text, shapes, or sketches.
If you want to keep this information, you have two options:
m Ink text—convert it to text on the device with the earlier version of the Newton operating system. Then back up the information and restore it to your MessagePad.
m Ink text, sketches, or shapes—copy or cut and paste the information from the to-do task into a note in the Notepad. After you restore information, you can leavethe ink text, sketches, or shapes in the Notepad, or move them to any place thataccepts that kind of information, such as the notes of a meeting. You cannot putsketches or shapes into a to-do task.
254 Appendix C

255
You can use your MessagePad to print information on many kinds of printers.
In general you can use the following types of printers:
m Apple personal printers connected serially, including the StyleWriter I and IIprinters; the StyleWriter 1200; the StyleWriter 1500; the Color StyleWriter 2200,2400, and 2500; the Personal LaserWriter 300; and the Personal LaserWriter LS.
m Apple network printers (PostScript printers connected using AppleTalk), includingthe LaserWriter 360 and most other LaserWriters.
m If you have the Newton Print Pack, printers using a parallel (Centronic-type)interface, such as the Epson LQ, Epson FX, HP Deskjet, HP DeskWriter, HPLaserJet, Canon BubbleJet, Portable StyleWriter, and printers that emulate them.
m Printers that use the Infrared connection, such as the HP LaserJet 5MP, and HPDeskJet 340.
The following is a specific list of Apple printers that work with your MessagePad:
Appendix DPrinter Compatibility

Printer Connection
StyleWriter I and II serial
Personal LaserWriter 300 serial
StyleWriter 1200 serial
StyleWriter 1500 serial
StyleWriter 2200 serial
StyleWriter 2400 serial
StyleWriter 2500 serial
LaserWriter LocalTalk
LaserWriter Plus LocalTalk
Personal LaserWriter NT LocalTalk
Personal LaserWriter NTR LocalTalk
Personal LaserWriter 320 LocalTalk
LaserWriter II NT LocalTalk
LaserWriter II NTX LocalTalk
LaserWriter IIf LocalTalk
LaserWriter IIg LocalTalk
LaserWriter 4/600 PS LocalTalk
LaserWriter Select 360 LocalTalk
LaserWriter Pro 600 LocalTalk
LaserWriter Pro 630 LocalTalk
LaserWriter Pro 810 LocalTalk
LaserWriter 16/600 PS LocalTalk
LaserWriter 12/600 PS LocalTalk
256 Appendix D

You can also use the following printers via Infrared connection:
Printer Connection
HP LaserJet 5MP IrDA
HP Deskjet 340 IrDA
The following printers don’t work with the MessagePad 2000:
Printer Connection
ImageWriter I & II serial or AppleTalk
ImageWriter LQ serial or AppleTalk
ImageWriter IISC serial or AppleTalk
LaserWriter Select 300 serial or AppleTalk
LaserWriter Select 310 serial or AppleTalk
LaserWriter Pro 810 Fax Card serial or AppleTalk
LaserWriter 16/600 PS Fax Card serial or AppleTalk
LaserWriter Select 360 Fax Card serial or AppleTalk
Printer Compatibility 257


259
If you have an optional Newton keyboard, follow the instructions here for attachingand using the keyboard.
Connecting the Newton keyboard
Connect the keyboard cable to the Newton Serial Adapter that came with yourMessagePad 2000 and then insert the adapter into the Newton InterConnect port.(Make sure the power is turned on.)
Newton InterConnect port
Newton Serial Adapter
Appendix EUsing the Newton Keyboard

Using the Newton keyboard
You can use the Newton keyboard to enter information in any area that accepts text.
1 Turn on your MessagePad.
2 Go to the application where you want to enter information (such as the Notepad).
3 Tap the MessagePad pen on the screen where you want the text to be placed.
A caret appears.
4 Type your information.
Note: Some keys, such as the Tab key, may work differently in various applications.
When you are finished using the keyboard
1 Disconnect the keyboard cable and adapter from your MessagePad.
2 Store the keyboard in the case to protect it. Store your adapter in a safe place.
260 Appendix E
Caret

Care and maintenancem Keep your keyboard away from extreme heat.
m Don’t leave your keyboard anyplace that is extremely dusty, damp, or wet.
m Don’t place heavy objects on the keyboard.
m Take care not to spill any liquid on your keyboard. If you do, turn off yourMessagePad immediately. Unplug the keyboard and tilt it to let the liquid drainout. Let the keyboard dry for 24 hours at room temperature.
To clean the keyboard
m Turn off your MessagePad and disconnect the keyboard.
m Clean your keyboard with a soft cloth dampened with water and mild soap. Donot use solvents.
Using the Newton Keyboard 261


263
A
abbreviations, teaching MessagePad 2000 to recognize 31–33
accent marks 15accessory cards 201–202actions, undoing 232Add button 52adding
addresses to name cards 52, 55bookmarks 220city to time zones 155entries in group address 56information to name cards 52–54notes to meetings or events 83–84notes to name cards 61owner information 140passwords 142–143punctuation in text 25–26words to personal word list 29worksite information 140
address book. See Name Fileaddresses
adding to name cards 52, 55missing from faxes 239
alarmsdaily 123, 146default alarm times 103–104minute timer 147preferences for 146–147setting 123–124using in Date Book 84
alert messages 232–233annotating Newton books 226annual events, scheduling 81–83Apple-authorized service provider 229, 249,
250. See also help, sources of;troubleshooting
AppleCare 250Apple Support Card 249AppleTalk network
connecting MessagePad to computer via 128
Microsoft Windows operating system and 128
printers and 255, 256, 257Apple User Assistance 249. See also help,
sources of; troubleshootingApple warranty information 249, 250application cards 201–202, 209
IndexIndex

application programs. See also iconsapplication cards and 209backdrop and 35, 110, 111deleting 113in Extras Drawer 116–158
Calculator 117Calls 117–122Card 122Clock 123–124Dock 125–129Formulas 129–132Help 133Handwriting Instructor 34, 134InOut Box 134–137Newton Tour 138Owner Info 138–141Prefs 142–150Setup 150–151Styles 152Time Zones 153–157Writing Practice 34, 158
memory used by 108, 112, 233moving 112, 113Newton Book Reader 429–437personal information management
Date Book 69–104Name File 49–67Notepad 35–48
rotating screen and 115selecting 112, 113
Assist button 177, 193–200Auto Dock, preferences for 150
B
backdropchanging 110–111default 35, 110Extras Drawer as 110Notepad as 35, 110
backing up information to storage card211–213
backlighting featurebatteries and 148, 238, 247sleep and 147troubleshooting and 231, 238
batteries 243–248backlighting and 148, 238, 247beaming and 183, 238checking status of 109, 243illustration of 247installing 245–247life of 247low-level warning 244rechargeable 238, 244, 245replacing in MessagePad 245–247replacing in storage cards 208tips for 248troubleshooting 237–238warning about 245
beamed informationreceiving automatically 183, 238receiving manually 183sending 182viewing 184
beamingbattery power and 183events 101icons 113items in Notepad 48meetings 101name cards 65to other Newton devices 180–184setting preferences for 180–181to-do tasks 101troubleshooting 240
beams. See beamed information; beamingbirthday field 52, 59blinking star
Recently Written Word list and 30routing and 191
Bookmark button 220, 221bookmarks, Newton books 220–222
264 Index

Book Reader application. See Newton BookReader application
built-in applications 116–158built-in microphone, recording with 43Business folder 160buttons. See individual buttons
C
cables viii, 127calculations, copying 117Calculator application 117Calendar 70–96. See also Date Book;
To Do Listdeleting items in 102duplicating meetings or events in 92–93moving around in 86–91moving items in 94–95scheduling meetings and
events in 71–85using the alarm 84viewing items in 91–92
calendar alarm, preferences for 147Call request word 196calls. See telephone callsCalls application 117–122. See also
modems; telephone callsdeleting calls 121filing logged entries of calls 122placing calls 118–120setting preferences in 122viewing calls 121
capitalizing words 26, 29Card application 122cards. See accessory cards; application cards;
name cards; storage cardscard slots viii, 201caret (^)
inserting punctuation with 25–26inserting words or spaces with 6, 13
case, care of viii
cellular telephones 237. See also Callsapplication; modems;telephone calls
changingappearance of name cards 60backdrop 110batteries in MessagePad 245–247batteries in storage cards 208fonts in text and drawings 11–12information on existing cards 54layout of on-screen keyboard 14length of meetings 95–96line thickness in drawings 11–12owner information 140paragraph margins 27passwords 144priority of to-do tasks 99screen contrast 109second time zone 153–154size and shape of drawings 11–12, 23sleep time 147text formatting 23–24when PIN is entered 144worksite information 140
character spacing, handwriting recognitionand 2
checklist stationery 38–42cleaning
case viiiNewton Keyboard 261pen viiiscreen vii
Clipboard, copying items in 21, 22Clock application 123–124closing
Date Book 69Extras Drawer 106
compatibility informationother Newton devices 251–254printers 255–257
Index 265

connectingMessagePad to desktop
computers 125–129MessagePad to modems 185MessagePad to printers 169Newton Keyboard 259
connection, setting preferences for 125–126connectors viiicontrast, screen 109controls, in Newton Book Reader 219–227converting
currencies 131dates 132handwriting to text 20ink text to text 234measurements 129, 130
copyingcalculations 117drawings 21events 92–93, 101items 21, 48, 254meetings 92–93, 101name cards 65parts of a Newton book 222–225text 21to-do tasks 101
correcting misinterpreted words 17–18Corrector button 17, 18creating
checklists 38–40custom field labels 53–54documents 37drawings 37folders 162, 163items in Notepad 35–44meetings 101name cards 50–51, 55–56, 58notes 37outlines 38–40owner for MessagePad 139–140
recording notes 43–44to-do tasks 97–98, 101worksite for MessagePad 140
Currency Exchange formula 131Cursive handwriting style 4–5customer support. See help, sources ofcustom field labels, creating 53–54
D
daily alarm 123, 146date
setting 124troubleshooting 241
Date Book 69–104Calendar 70–96closing 69deleting items in 102memory and 102moving around in 86–91moving items in 94–95opening 69setting preferences for 103–104To Do List 96–102viewing items in 91–92
Date Calculator formula 132Date Conversion formula 132deleting
application programs 113bookmarks 221–222calls 121cities from time zones 155documents 113entries from group address 56events 102everything stored in MessagePad 241folders 162, 163icons 113information on storage cards 207–208items 48, 102
266 Index
meetings 102name cards 65text and drawings 15–16, 235to-do tasks 100, 102words in personal word list 29
deselecting text and drawings 19desktop computers, connecting MessagePad
to 125–129dialing
letters in telephone numbers 66manual 177PBX phones and 65telephone numbers from Name File
65–67troubleshooting 238, 239–240
dictionary 2, 7, 191. See also personal wordlist
Dictionary button 28digital telephone lines, warning about 65display. See screenDock application 125–129documents. See also icons; items
deleting 113moving 12, 113printing 171–172selecting 112, 113
downloaded packages 189drawing
erasing 15–16notes and 35, 36, 37“scrubbing out” 15–16troubleshooting 234–236
drawings. See also itemschanging fonts in 11–12changing line thickness in 11–12changing shape sizes in 11–12copying 21
deselecting 19formatting 23–24modifying 23moving 21–22printing 171–172selecting 19setting styles for 11–12
duplicatingcalculations 117drawings 21events 92–93, 101items 21, 48, 254meetings 92–93, 101name cards 65parts of a Newton book 222–225text 21to-do tasks 101
E
electronic mail 185–189. See also mailingforwarding 189preparing to send and receive 185–186receiving 187replying to 189sending 186–187sending items via 48, 65, 101, 115troubleshooting 238–239viewing 188–189
entries in group address 56equipment, care of vii–ix, 261erasing. See deletingerror messages 232–233events
adding notes to 83–84annual 81–83beaming 101default alarm time for 104
Index 267

deleting 102duplicating 92–93, 101e-mailing 101faxing 101multiday 79–81scheduling 77–83viewing 91, 92
expanding words 31–33extended service agreement 250Extensions folder 107Extras Drawer
applications contained in 116–158closing 106filing icons into folders 112, 161–162managing 106–115opening 106routing applications in 112using as backdrop 110viewing items in 112
F
faxes. See also faxing; fax modem; modemsmanual dialing and 177preparing to send and receive 173–175receiving 178replying to 180scheduling 175sending 175–177viewing 178–180
faxing 173–180. See also faxes; fax modem;modems
Assist and 177events 101items in Notepad 48meetings 101name cards 65Newton books 227preferences for 174–175to-do tasks 101troubleshooting 239
fax modem. See faxes; faxing; modemsFax request word 196field labels, custom 53–54files. See documents; drawings; itemsfiling
icons in Extras Drawer into folders112, 161–162
information on storage cards 205items into folders 159–161logged call entries 122multiple items 160–161
Find button 164finding information 164–167, 233Find request word 196Fine Tuning option 9Folder button 112, 160, 162, 163folders
creating 162, 163deleting 162, 163in Extras Drawer 106–107filing icons from Extras Drawer into
112, 161–162filing items into 159–161global 159–160limit on 160local 159–160organizing information in 159–163renaming 162, 163viewing items by 162
fontschanging in text and drawings 11–12Styles application and 152
forgetting passwords 232formatting
drawings 23–24storage cards 203–204text 23–24
Formulas application 129–132forwarding electronic mail messages 189
268 Index

G
global folders 159–160graphics. See drawingsgroup address 55–56guest users, setting up 34
H
handwriting. See also handwritingrecognition
converting to text 20correcting misinterpreted words 17–18Handwriting Instructor tutorial 34, 134notes and 35, 36, 37styles of 4–5Writing Practice application 34, 158
Handwriting Instructor tutorial 34, 134handwriting recognition 1–10. See also
handwritingpreferences for 4–9, 148Recognition button and 3, 4selecting setting for 3tips for 9–10troubleshooting 234–236word spacing and 5
Handwriting Settings option 7hard reset 230–231help, sources of. See also troubleshooting
Apple-authorized service provider229, 249, 250
Apple User Assistance 249Assist button 193–200Handwriting Instructor tutorial 34Newton Tour 138on-screen help 133, 199–200Writing Practice application 34
Help application 133Help folder 107HW Instructor tutorial 1, 34, 134
I, J
icons. See also application programs;documents
beaming 113–114deleting 113description of 112e-mailing 115filing into folders 112, 161–162moving 112, 113selecting 112, 113
illustrations. See drawingsIn Box, viewing items in 136indenting paragraphs 27information. See also drawings; items; text
adding to name cards 52–54automatically storing on cards 206backing up to storage cards 211–213changing on existing cards 54deleting on storage cards 207–208filing on storage cards 205finding 164–167, 233getting about items 46–47organizing in folders 159–163owner 138–141restoring from storage card 213–214routing 169–191storing 107–108, 206viewing in Time Zones application
107–108worksite 140–141
Information button 47, 62, 107, 109, 110.See also preferences
infrared window 182, 311infrared wireless transmission. See IrDA
data transmissionink text
converting to text 234creating and sorting cards written in 58scaling of 6
Index 269

Ink Text recognition setting 3InOut Box 134–137
routing items in 190setting preferences for 134–135
insertingaccessory cards 201–202application cards 201–202punctuation in text 25–26spaces in text 13, 23–24storage cards 201–202words in text 6, 13
installing batteries 245–247IrDA data transmission
connecting MessagePad to desktopcomputer via 128–129
connecting printers to MessagePad via255, 257
items. See also documents; drawings; stationery
beaming in Notepad 48copying 21, 48creating in Notepad 35–44deleting in Notepad 48duplicating in Notepad 48e-mailing in Notepad 48faxing 48, 175–177filing into folders 159–161getting information about 46–47missing 241moving in Date Book 94–95moving in Extras Drawer 112, 113moving on screen 21–22printing 171–172routing in InOut Box 190selecting 19, 112, 113viewing by folder 162viewing in Date Book 91–92viewing in Extras Drawer 112viewing in Notepad 45–46
joining words 23–24
K
keyboardcare of 261Newton Keyboard 259–261on-screen keyboards 13–15spills on 261using 261
Keyboard button 14, 17, 18, 28
L
landscape mode, screen 115“Learn my handwriting” option 7letter-by-letter recognition 7Letter Shapes option 8lid viilines
changing thickness of in drawings 11–12, 152
selecting in text and drawings 19Loan Payment formula 130locale preferences 144local folders 159–160LocalTalk box 169LocalTalk connection 256locking storage cards 208
M
mailing. See also electronic mailevents 101items in Notepad 48meetings 101name cards 65to-do tasks 101
Mail request word 197manual dialing, faxes and 177margins, changing 27Mark Page button 220
270 Index

Markup button 226measurements, converting 129, 130meetings
adding notes to 83–84beaming 101changing length of 95–96creating 101default alarm time for 103–104deleting 102duplicating 92–93, 101e-mailing 101faxing 101moving 94–95scheduling overlapping meetings 85scheduling single meeting 71–74scheduling weekly meetings 74–77viewing 91, 92
memory. See also storage cardsapplications and 108, 112, 233checking 109Date Book and 102personal word list and 29troubleshooting 232, 233
MessagePadcare of vii–ixcompatibility information 251–254connecting to desktop computers
125–129connecting to printers 169creating owner for 139–140creating worksite for 140erasing everything stored in 241getting wet ix, 240managing 105–158placing calls with 66–67printers used with 255–257resetting 230–231, 232sleep and 147–148teaching to recognize abbreviations
31–33
troubleshooting 229–241turning on 237
MessagePad pencare of viiicopying items with 21deselecting items with 19moving items with 21–22, 112, 113placing caret (^) with 6selecting items with 19, 112, 113
messagesalert 232–233recording 43–44
Metric Conversion formula 130Microsoft Windows operating system,
AppleTalk and 128minicalendar 86, 88minute timer 124, 147Miscellaneous folder 160modems. See also faxes; faxing
connecting MessagePad to 185connecting MessagePad to desktop
computer via 127–128preferences for 149troubleshooting 237, 238–239warning about connecting to digital
phone lines 65modifying drawings 23moving
applications 112, 113documents 112, 113drawings 21–22icons 112, 113items in Date Book 94–95items in Extras Drawer 112, 113items on screen 21–22on-screen keyboard 14text 21–22
multiday events, scheduling 79–81multiple items, filing 160–161
Index 271

N
name cards. See also Name Fileadding information to 52–54adding notes to 61beaming 65changing appearance of 60changing information on 54creating 50–51, 58creating for group addresses 55–56custom field labels in 54–55deleting 65duplicating 65e-mailing 65faxing 65filing 159–161previewing 64printing 63routing 65viewing notes on 62
Name File 49–67. See also name cardsclosing 49dialing telephone numbers from 65–67opening 49printing name cards in 63–64setting preferences for 62–63viewing 56
navigating in Date Book 86–91Net Present Value formula 131networks, printers and 172, 239, 255, 257new folders, creating 162, 163Newton Book Reader application 429–437Newton Book Reader controls 219–227Newton books
annotating 226copying parts of 222–225faxing 227opening 216printing 227routing 227
table of contents in 218using bookmarks in 220–222viewing 215–227
Newton InterConnect port 44, 145, 169, 259Newton Keyboard 259–261Newton 9W Power Adapter
moisture and ixrechargeable battery pack and 244
Newton operating systembirthday field and 59compatibility information 251–254storage cards and 204–205
Newton Rechargeable Battery Pack 244Newton Serial Adapter viii, 169Newton Tour 138Notepad 35–48
beaming items in 48creating new item in 35–44as default backdrop 35, 110deleting items in 48displaying 35duplicating items in 48e-mailing items in 48faxing items in 48getting information about items in 46–47setting preferences for 47viewing items in 45–46
notesadding to meetings or events 83–84adding to name cards 61creating 37filing 159–161printing in Name File 63–64recording messages and sounds in 43–44sorting 57–59viewing on name cards 62
notes to name cards 61
272 Index

O
on-screen helpaccessing with Assist 199–200Help application 133
on-screen keyboards 13–15, 25opening
Date Book 69Extras Drawer 106Newton books 216
Options button, handwriting recognitionpreferences 6–9
organizing information 159–163Out Box, viewing items in 137outline stationery 38–42Overview button 45, 56, 91, 112, 115.
See also viewingOwner Info application 138–141
P, Q
packages, downloaded 189Page Number button 219pages
marked 221viewing in Newton books 217
paper size, printing and 170parallel interface 169passwords
adding 142–143changing 144forgetting 232removing 144saving 125
pauses in writing 2PBX phones, dialing feature and 65
pencare of viiicopying items with 21deselecting items with 19moving items with 21–22, 112, 113placing caret (^) with 6selecting items with 19, 112, 113
Personal folder 160Personal Identification Number (PIN)
changing password 144changing when entered 144entering 143forgetting 232not recognized 232setting 142–143
personal word list 6, 28–33. See also dictionary
Phone button 66phone calls. See telephone callsPicture button 46PIN. See Personal Identification
Number (PIN)placing calls 66–67, 118–120pop-up lists, word 17–18portrait mode, screen 115ports
handling viiiNewton Interconnection port 44, 145,
169, 259serial 127, 255, 256, 257
PostScript printers, using with MessagePad 255
power adaptermoisture and ixNewton 9W Power Adapter ix, 244troubleshooting 237
Index 273

Power button, turning on MessagePad with 237
preferencesalarm 103–104, 146–147Auto Dock 150beam 180–181Calls application 122connection 125–126Date Book 103–104fax 174–175handwriting recognition 4–9, 148InOut Box 134–135locale 144modem 149Name File 62–63Notepad 47Owner Info 141Prefs application 142–149print 170recording 44, 145security 142–144sleep 147–148sound 145word spacing 5
Preferences recognition setting 3Prefs application 142–150.
See also preferencesprinters. See also printing
compatible with MessagePad 255–257connecting MessagePad to 169incompatible with MessagePad 257networked 170, 172parallel interface and 169selecting 171–172
printing 169–172. See also printerschoosing paper size 170items 171–172name cards in Name File 63–64Newton books 227preparation for 170
setting preferences for 170troubleshooting 239
Printing handwriting style 2, 4–5Print request word 197problems. See troubleshootingprograms. See application programspunctuation 10, 25–26putting away beamed icons 114
R
receivingbeamed information 183, 238electronic mail messages 187faxes 178
Recently Written Words list 30rechargeable batteries, using with
MessagePad 238, 244, 245Recognition button 3, 4recording messages and sounds 43–44recording preferences 44, 145Remember request word 197removing
accessory cards 201–202application cards 201–202password 144storage cards 201–202words from personal word list 29
renaming folders 162, 163repeating to-do tasks 102replacing
batteries in MessagePad 245–247batteries in storage cards 208
replying to electronic mail messages 189request words 196–198resetting MessagePad 230–231, 232restoring information from storage cards
213–214revising words 30Rotate button 115
274 Index

rotating screen 115routing. See also beaming; copying;
electronic mail; faxing; printingapplications in Extras Drawer 112information 169–191items in Date Book 101items in InOut Box 190items in Notepad 48name cards 65Newton books 227preferences for 135
Routing button 48, 65, 101, 112, 227
S
scaling ink text 6Schedule request word 197scheduling
annual events 81–83events 77–83faxes 175multiday events 79–81overlapping meetings 85single meeting 71–74weekly meetings 74–77
screencare of vii, viiirotating 115setting contrast of 109troubleshooting 213
“scrubbing out”drawings 15–16misinterpreted words 17problems with 235text 15–16, 17
security preferences 142–144selecting
applications 112, 113documents 112, 113drawings 19
icons 112, 113items 19, 112, 113printers 171–172text 19
sendingbeams 182electronic mail messages 186–187faxes 175–177
serial cablesconnecting MessagePad to desktop
computer via 127connecting printers to MessagePad via
255, 256service 249–250. See also help, sources ofsetting
bookmarks 220current time zone 153daily alarm 123date 124minute timer 124Personal Identification Number (PIN)
142–143screen contrast 109second time zone 153–154styles for text and drawings 11–12tabs 27time 124time zones 153–154volume 109where information is stored 107–108
setting preferencesalarm 146–147Auto Dock 150beam 180–181connection 125–126Date Book 103–104default alarm times 103–104faxing 174–175handwriting recognition 4–9, 148InOut Box 134–135
Index 275

locale 144modem 149Name File 62–63Notepad 47Owner Info 141phone 122print 170recording 44, 145routing 135security 142–144sleep 147–148sound 145word spacing 5
settings, handwriting recognition 3, 4–9setting up
guest users 34printers 170sending and receiving electronic mail
185–186sending and receiving faxes 173–175
Setup application 150–151Setup folder 107shapes, changing size of in drawings 11–12Shapes recognition setting 3single meetings, scheduling 71–74Sketches recognition setting 3sleep feature 147–148slips 50, 51software. See application programssoftware reset 232sorting name cards 57–59sound
preferences for 145recording 43–44
spaces, inserting in text 13, 23–24spacing, word 5
speakersdialing through 67sound preferences and 145
special characters, typing 15SRAM (static-random access memory)
cards 203star. See blinking starstationery, Notepad and 35–44storage cards. See also memory
backing up information to 211–213Card application and 122changing batteries in 208checking space on 206deleting information on 207–208earlier versions of operating system and
204–205filing information on 205formatting 203–204inserting 201–202locking 208preparing a new storage card 203–204removing 201–202replacing batteries in 208restoring information from 213–214storing information on 107–108, 206troubleshooting 232unlocking 208using 203–208write-protection of 233
Storage folder 107storing information 107–108, 206styles
handwriting 4–5setting for drawings 11–12, 152setting for text 11–12, 152
Styles application 152support 249–250. See also help, sources ofsymbols, typing 15
276 Index

T
table of contents, Newton books 218tabs, indenting paragraphs with 27Tag button 179, 180tasks, to-do 97–98. See also To Do Listtelephone calls. See also Calls application;
modemsdeleting 121dialing from Name File 65–67filing 159placing 118–120viewing 121
textadding punctuation to 25–26changing fonts in 11–12converting handwriting to 20converting ink text to 234copying 21deleting 15–16deselecting 19erasing 15–16finding 164–167formatting 23–24inserting space in 13, 23–24moving 21–22“scrubbing out” 15–16, 17selecting 19setting styles for 11–12, 152troubleshooting 241
Text Editing Settings option 6Text recognition setting 3time, setting 124Time request word 198Time Zones application 153–157titles. See application cardsTo Do List 96–102. See also Calendar;
Date Bookcompleting tasks 100creating tasks 97–98deleting tasks 100, 102duplicating tasks 101viewing 99
to-do tasks 97–98beaming 101changing level of 99completing 100creating 97–98, 101deleting 100, 102duplicating 101e-mailing 101faxing 101repeating tasks 102
troubleshooting 229–241. See also help,sources of
alert messages 232–233batteries 237–238beaming problems 240cellular telephones 237date 241dialing 239–240drawing 234–236electronic mail 238–239faxing 239finding information 233handwriting recognition 10, 234–236memory 29, 232, 233MessagePad gets wet ix, 240modems 237, 238–239passwords 232Personal Identification
Number (PIN) 232power adapter 237printing 239resetting the MessagePad 230–231screen 213solutions to common problems 229–241storage cards 232time 241turning on MessagePad 237writing 234–236
turning on MessagePad 237tutorials, Handwriting Instructor 34, 134
Index 277

U
undo actions, troubleshooting 232Unfiled folder 160Unfiled Icons folder 107unlocking storage cards 208Use Default Settings option 9users, guest 34
V
viewingbeamed items 184calls 121custom field information 54electronic mail messages 188–189faxes 178–180In Box 136information about items 46–47items by folder 162items in Date Book 91–92items in Extras Drawer 112items in Notepad 45–46Name File 56Newton Books 215–227Notepad 35notes on name cards 62on-screen keyboard 14Out Box 137owner information 141pages in Newton books 217personal word list 28, 29time zone information 158To Do List 99worksite information 141
volumeadjusting recording volume 44setting 109
W, X, Y, Z
warranty information vii, 249, 250weekly meetings, scheduling 74–77word list. See personal word listword pop-up list 17–18words. See also text
adding to personal word list 29capitalizing 26correcting misinterpreted 17–18expanding 31–33finding 164–167inserting with caret (^) 6, 13joining 23–24recognizing abbreviations of 31–33removing from personal word list 29request 196–198revising 30“scrubbing out” 15–16, 17selecting 19viewing in personal word list 29
word spacing, handwriting recognition and2, 5
worksite information 138, 140–141write-protection, storage cards 233writing. See handwritingWriting Practice application 34, 158zig-zag line, erasing with 15–16, 17
278 Index

MessagePad 2000User’s Manual

K Apple Computer, Inc.© 1997 Apple Computer, Inc. All rights reserved. 1 Infinite Loop Cupertino, CA 95014-2084408-996-1010http://www.apple.com
Every effort has been made to ensure that the information in this manual is accurate. Apple is not responsible forprinting or clerical errors.
Apple, the Apple logo, AppleCare, AppleTalk, Imagewriter, LaserWriter, LocalTalk, the Light bulb logo, Macintosh,MessagePad, Newton, and StyleWriter are trademarks of Apple Computer, Inc., registered in the U.S. and othercountries.
Adobe, Adobe Illustrator, Adobe Photoshop, and PostScript are trademarks of Adobe Systems Incorporated,which may be registered in certain jurisdictions.
Centronics is a registered trademark of Centronics Data Computer Corporation.
DeskJet, HP, and LaserJet are registered trademarks of Hewlett-Packard Co.
Epson is a registered trademark of Seiko Epson Corp.
Exposure is a registered trademark of Preferred Publishers, Inc.
Helvetica is a registered trademark of Linotype-Hell AG and/or its subsidiaries.
Microsoft is a trademark, and Windows is a registered trademark, of Microsoft Corp.
QuarkXPress is a registered trademark of Quark, Inc.
This product is powered by Advanced RISC Machine’s high performance, power efficient, 32-bit RISCmicroprocessor.
For more information:
m USA: 408-399-5199
m UK: 44-223-400400
m Japan: 81 44 850 1301
Simultaneously published in the United States and Canada.
Mention of third-party products is for informational purposes only and constitutes neither an endorsement nor a recommendation. Apple assumes no responsibility with regard to the performance or use of these products.

ContentsCommunications regulation information viii
Preface Safety, Care, and Maintenance xi
1 Writing and Drawing 1
About recognition 1Selecting a handwriting recognition setting 3Setting your handwriting recognition preferences 4Tips for better handwriting recognition 9Setting the styles for text and drawings 11Using the caret 13Using the on-screen keyboard 13Erasing text and drawings 15Correcting a misinterpreted word 17Selecting text and drawings 19Converting your handwriting to text 20Copying text and drawings 21Moving text and drawings 21Modifying drawings 23Formatting text and drawings 23Adding punctuation 25Changing paragraph margins 27Using the word list 28Setting up a guest user 34For additional help and practice 34
2 Using the Notepad 35
Creating a new item in the Notepad 35Creating a recording 43Viewing items in the Notepad 45
iii

Getting information about a specific item 46Setting Preferences for the Notepad 47Faxing, beaming, mailing, duplicating or deleting items 48
3 Using the Name File 49
Creating a new name card for a person or company 50Adding information to a card 52Changing information on an existing card 54Creating a card for a group address 55Viewing the name file 56Sorting name cards 57Changing a card’s appearance 60Adding and viewing notes 61Setting Names preferences 62Printing cards in the Name File 63Faxing, beaming, mailing, duplicating, or deleting cards 65Dialing telephone numbers 65
4 Using the Date Book: Calendar and To Do List 69
Summary of the Calendar 70Scheduling meetings and events 71Scheduling overlapping meetings 85Viewing items in the Date Book 91Duplicating meetings or events 92Moving items in the Date Book 94Using the To Do List 96Other ways to create meetings and to-do tasks 101Faxing, beaming, mailing, and duplicating meetings, events, and to-do tasks 101Sending repeating to-do tasks 102Deleting meetings, events, and to-do tasks 102Setting preferences for the Date Book 103
iv Contents

5 Managing the MessagePad 2000 105
Part 1: Managing the Extras Drawer 106Setting where new information is stored 107Checking memory used in built-in applications 108Checking battery status, setting contrast and volume 109Changing the backdrop 110Viewing items in the Extras Drawer 112Selecting, moving, and deleting icons 112Beaming icons 114Sending icons by electronic mail 115Rotating the screen 115Part 2: Using the Built-In Applications 116Calculator 117Calls 117Card 122Clock 123Dock 125Formulas 129Help 133HW Instructor 134InOut Box 134Newton Tour 138Owner Info 138Prefs 142Setup 150Styles 152Time Zones 153Writing Practice 158
Contents v

6 Organizing and Finding Information 159
Organizing information 159Finding information 164
7 Routing Information 169
Printing 169Faxing 173Sending and receiving beamed information to Newton devices 180Using electronic mail 185Routing items in the InOut Box 190Using the blinking star notification 191
8 Using Assist and Accessing On-Screen Help 193
Using the Assist button 193Accessing on-screen help using Assist 199
9 Using Storage and Application Cards 201
Inserting and removing cards 201Using storage cards 203Using application cards 209
10 Backing Up and Restoring Information 211
Backing up information to a storage card 211Restoring information from a storage card 213
11 Viewing Newton Books 215
Opening a book on your MessagePad 2000 216Viewing pages 217Using a table of contents 218Using Newton Book Reader controls 219
vi Contents

12 Troubleshooting 229
Resetting the MessagePad 230The screen 231Personal Identification Number (PIN) 232Alert messages 232Writing and drawing 234Modems and cellular telephones 237Power and batteries 237Electronic mail 238Printing, faxing, and dialing 239Beaming 240Other 240
Appendix A Installing and Replacing Batteries 243
Appendix B Service and Support 249
Appendix C Compatibility Information 251
Appendix D Printer Compatibility Information 255
Appendix E Using the Newton Keyboard 259
Index 263
Contents vii

Communications regulation information
FCC declaration of conformity
This device complies with part 15 of the FCC rules. Operation is subject to the following two conditions: (1) Thisdevice may not cause harmful interference, and (2) this device must accept any interference received, includinginterference that may cause undesired operation. See instructions if interference to radio or television receptionis suspected.
Radio and television interference
The equipment described in this manual generates, uses, and can radiate radio-frequency energy. If it is notinstalled and used properly—that is, in strict accordance with Apple’s instructions—it may cause interference withradio and television reception.
This equipment has been tested and found to comply with the limits for a Class B digital device in accordancewith the specifications in Part 15 of FCC rules. These specifications are designed to provide reasonable protectionagainst such interference in a residential installation. However, there is no guarantee that interference will notoccur in a particular installation.
You can determine whether your Newton device is causing interference by turning it off. If the interference stops,it was probably caused by the Newton device or one of the peripheral devices.
If your Newton device does cause interference to radio or television reception, try to correct the interference byusing one or more of the following measures:
m Turn the television or radio antenna until the interference stops.
m Move the Newton device to one side or the other of the television or radio.
m Move the Newton device farther away from the television or radio.
m Plug the Newton device into an outlet that is on a different circuit from the television or radio. (That is, makecertain the computer and the television or radio are on circuits controlled by different circuit breakers or fuses.)
Important Changes or modifications to this product not authorized by Apple Computer, Inc., could void theFCC certification and negate your authority to operate the product.
This product was tested for FCC compliance under conditions that included the use of Apple peripheral devicesand Apple shielded cables and connectors between system components. It is important that you use Appleperipheral devices and shielded cables and connectors between system components to reduce the possibility ofcausing interference to radios, television sets, and other electronic devices. You can obtain Apple peripheraldevices and the proper shielded cables and connectors through an Apple-authorized dealer. For non-Appleperipheral devices, contact the manufacturer or dealer for assistance.
Responsible party: Robert Steinfeld, Apple Computer, Inc., 1 Infinite Loop, Cupertino, CA 95014-2084, 408-974-2618.
viii Communications Regulation Information

Industry Canada statement
DOC Class B Compliance This digital apparatus does not exceed the Class B limits for radio noise emissions fromdigital apparatus as set out in the interference-causing equipment standard entitled “Digital Apparatus,” ICES-003of the Department of Communications.
Observation des normes—Classe B Cet appareil numérique respecte les limites de bruits radioélectriquesapplicables aux appareils numériques de Classe B prescrites dans la norme sur le matériel brouilleur : “AppareilsNumériques”, NMB-003 édictée par le ministre des Communications.
VCCI Class 2 statement
Communications Regulation Information ix


As you work with your Apple MessagePad 2000 device, follow these safeguards toprotect yourself and the device. Failure to comply with these safeguards may causeinjury, and resulting damage to the device may not be covered by warranty.
Screen carem Take care not to break the glass screen. Don’t drop the MessagePad. Don’t subject
it to any strong impact. Don’t put it into your back pocket because, if you sit on it,the glass may break.
m Don’t press too hard on the screen when writing, drawing, or tapping. Don’tforcefully jab or hit the screen.
m Be careful not to scratch the screen. Use only the pen that comes with yourMessagePad. Don’t use ink pens or any other sharp object.
m Clean the screen frequently to ensure that dust and grit do not build up on thesurface. Clean the screen only with a soft cloth—such as a cloth made for cleaningeyeglasses. Do not use strong solvents to clean the screen, although you can usegeneral purpose eye-glass cleaners or isopropol alcohol to remove fingerprintsand spots. Don’t pour cleaning liquids directly on the screen; apply to a cleaningcloth before cleaning.
m When your MessagePad is not in use, keep the lid closed to protect the screen.
xi
Preface
Safety, Care, and Maintenance

Pen carem Keep the tip of your MessagePad pen clean by occasionally rubbing it gently with a
soft dry cloth. Do not use solvents.
m To prolong the life of the pen and screen, use only your MessagePad pen to tap,draw, and write.
Cleaning the casem Clean the case only with isopropyl alcohol (rubbing alcohol) and a soft cloth. Do
not use other solvents.
Cables, ports, card slotsm Never leave a card slot empty. If you don’t have a card in the slot, leave the plastic
protection card installed.
m Keep the ports covered when you’re not using them.
m Do not use cables that are frayed or otherwise damaged. Hold a cable only by itsconnector—the plug, not the cord—when connecting or disconnecting it.
m Never force a connector into a port if the connector and port do not join easily.Make sure that the connector matches the port and that it’s properly alignedbefore you attach it.
m When transporting your MessagePad, always disconnect the Newton SerialAdapter.
Heat, moisture, dustm Keep the device away from extreme heat. Don’t leave it on the dashboard or in the
trunk of a car or near a heater. Heat can damage the screen, the plastic case, andinternal parts of the MessagePad.
m Use the device only in environments where the temperature is between 32° F and104° F (0° C and 40° C). Temperatures outside that range can cause theMessagePad to malfunction. Extreme heat or cold can damage the MessagePad. Ifthe MessagePad becomes too hot, the screen turns black. If the device becomestoo cold, the screen turns white.
xii Preface

m Don’t leave the device any place that is extremely dusty, damp, or wet. Dust andmoisture can damage the MessagePad and cause it to malfunction.
m If the MessagePad gets wet, remove the main batteries and allow the unit to dryfor at least 24 hours at room temperature.
m If the MessagePad gets wet while it’s plugged in with an optional Newton 9WPower Adapter, unplug the power adapter from the MessagePad before you doanything else.
Preface xiii