wp know your digital enemy
TRANSCRIPT

8/20/2019 Wp Know Your Digital Enemy
http://slidepdf.com/reader/full/wp-know-your-digital-enemy 1/36
White Paper
By Michael G. SpohnPrincipal Consultant, Incident Response & Digital Forensic Practice
McAfee® Foundstone® Professional Services
Know Your Digital EnemyAnatomy of a Gh0st RAT

8/20/2019 Wp Know Your Digital Enemy
http://slidepdf.com/reader/full/wp-know-your-digital-enemy 2/36
Know Your Digital Enemy2
Table of Contents
Background 3
Gh0st RAT Overview 3
Gh0st RAT Capabilities 8
Gh0st RAT Operation 9
Gh0st RAT Components 12
RESSDT.SYS 14
SVCHOST.DLL 16
INSTALL.EXE 17
GH0ST.EXE 21
Function ResetSSDT() 21
Gh0st RAT Encryption 22
Gh0st RAT Network Communication 23
Gh0st RAT Source Code 29
Gh0st RAT Defenses 34
Summary 36
About the Author 36About McAfee Foundstone Professional Services 36

8/20/2019 Wp Know Your Digital Enemy
http://slidepdf.com/reader/full/wp-know-your-digital-enemy 3/36
3Know Your Digital Enemy
Background
On March 29, 2009, the Information Warfare Monitor1 (IWM) published a document titled Tracking
Gh0stNet—Investigation of a Cyber Espionage Network . This document details the extensive
investigative research surrounding the attack and compromise of computer systems owned by the
Private Office of the Dalai Lama, the Tibetan Government-in-Exile, and several other Tibetan enterprises.After 10 months of exhaustive investigative work, this team of talented cyber investigators identified the
tool used to compromise victim systems—a sophisticated piece of malware named Gh0st RAT (Remote
Access Terminal).
On May 25, 2011, cyber investigator, forensic tool writer, and author Harlan Carvey, published a blog
post listing some of his favorite forensic tools. In this post, Harlan referred to an interesting, yet dated,
website that described, in detail, the capabilities of the Gh0st RAT malware. This site, “xpl0it Analysis,”
even includes links to download a beta version (3.6) of the Gh0st RAT source code.
As soon as I navigated to the stale “xpl0it Analysis” website and read the details of the Gh0st RAT
malware, I became very interested in learning more about it. Even though the links to the Gh0st
Beta source code on the xpl0it Analysis site were removed long ago, I was able to find a copy of it
somewhere on the Internet and decided to analyze it.
Examination of the Gh0st RAT source code revealed that it is a derivative of the same code used to create
the RAT binaries described in the IWM research paper and the xpl0it Analysis website. Unfortunately, the
code base would not compile due to numerous coding bugs and missing dependencies.
After many weeks of work, I was able to correct hundreds of bugs in the source code which allowed me
to build a working version of Gh0st RAT Beta 3.6. Although I converted the resource text labels from
Chinese to English, the base source code was left intact.
This document describes what I learned during my analysis of the Gh0st RAT source code. I describe in
great detail how the multiple binaries work together, the extensive capabilities of the malware, and the
structure of the source code tree. I also explore how the malware compromises a host, its obfuscation
and encryption methods, and how it communicates. Finally, I provide some tips on how to identify a host
compromised by the RAT and how to defend against it.
Even though this Gh0st RAT contains source code dating back to 2001, the lessons we can learn fromit are very relevant today. In early 2011, McAfee Foundstone and McAfee researchers identified a Gh0st
RAT, very similar to the one described in this paper, that was used to attack large corporations in the oil
and gas industry. This investigation, known as Night Dragon, is described in a separate white paper.
The use of RAT tools by cybercriminals continues because they are very efficient and powerful. They are
lightweight and provide complete remote control access to a compromised host. The command and
control (C2) component can manage thousands of compromised hosts. Understanding how these tools
work is critical if we want to understand the threat and put in place countermeasures to defend against
their use.
Gh0st RAT Overview
If you are not familiar with the technical capabilities of a Gh0st RAT, in this section I show the actual
operation of a RAT using screen shots. There are two main components of a Gh0st RAT system: theclient and the server.
The server is a small Microsoft Windows DLL that runs on a compromised host. It runs as a Windows
service and starts up when the system starts. Upon startup, it connects and “checks in” to a C2 client
and awaits further instructions.

8/20/2019 Wp Know Your Digital Enemy
http://slidepdf.com/reader/full/wp-know-your-digital-enemy 4/36
4 Know Your Digital Enemy
The client component is a standard Windows application. It provides a graphical view, using a grid, to list
all of the RAT servers that have checked in. It has a dropdown menu with a list of operations to perform
on a remote server. Figure 1 below shows a running C2 client. Notice that there are two checked-in RAT
servers. A right-click on a server entry displays a menu that provides complete control of the remote host.
Figure 1. Gh0st RAT client (C2).
Figures 2 to 9 show screen shots of the popular and more useful features from the C2 client.
Figure 2. File Manager.

8/20/2019 Wp Know Your Digital Enemy
http://slidepdf.com/reader/full/wp-know-your-digital-enemy 5/36
5Know Your Digital Enemy
Figure 3. Screen Control.
Figure 4. Keylogger.

8/20/2019 Wp Know Your Digital Enemy
http://slidepdf.com/reader/full/wp-know-your-digital-enemy 6/36
Know Your Digital Enemy6
Figure 5. Remote Terminal.
Figure 6. System Management—processes.

8/20/2019 Wp Know Your Digital Enemy
http://slidepdf.com/reader/full/wp-know-your-digital-enemy 7/36
7Know Your Digital Enemy
Figure 7. System Management—Dialup Users.
Figure 8. Live video feed.
Figure 9. Live audio capture.

8/20/2019 Wp Know Your Digital Enemy
http://slidepdf.com/reader/full/wp-know-your-digital-enemy 8/36
8 Know Your Digital Enemy8
After reviewing these screen shots, the threat of this tool is frighteningly clear. Let there be no doubt a
host compromised by a Gh0st RAT is completely and totally owned. Also, don’t overlook the danger the
Remote Terminal (Figure 5) presents. An attacker can use this tool to move laterally across your network.
I also want to emphasize the video and audio feeds the server provides really do work. On a relatively
fast network, the video and audio are crystal clear. This tool demands respect and attention from thoseof you responsible for protecting your corporate assets.
In the next section, we look at the capabilities of the Gh0st RAT in more detail.
Gh0st RAT Capabilities
The Gh0st RAT Beta 3.6 code base builds a completely functional RAT with amazing capabilities. A list of
its capabilities is shown below in Table 1.
Table 1: Gh0st RAT Capabilities
Gh0st RAT Capabilities
Existing Rootkit Removal Clears System Service Descriptor Table SSDT of all existing hooks.
File Manager Complete file explorer capabilities for local and remote hosts.
Screen Control Complete control of remote screen.
Process Explorer Complete listing of all active processes and all open windows.
Keystroke Logger Real-time and offline remote keystroke logging.
Remote Terminal Fully functional remote shell.
Web Cam Eavesdropping Live video feed of remote web camera, if available.
Voice Monitoring Live remote listening using installed microphone, if available.
Dial-Up Profile Cracking Listing of Dial-Up profiles, including cracked passwords.
Remote Screen Blanking Blanks compromised host screen, making computer unusable.
Remote Input Blocking Disables compromised host mouse and keyboard.
Session Management Remote shutdown and reboot of host.
Remote File Downloads Ability to download binaries from the Internet to remote host.
Custom Gh0st Server Creation Configurable server settings placed into custom binary.
There are four binary components that make up the Gh0st suite. The first is a very small device driver
that performs a single task: resetting the Windows System Service Dispatch Table (SSDT). This is the only
kernel level binary in the toolset. It runs at system startup on the compromised host and removes all
hooks in the SSDT.
The second binary is a Windows DLL that gets installed on a compromised host as a Windows service.
This service is the server component of the Gh0st toolkit. It checks in to the Gh0st C2 controller (client)
on startup and awaits instructions. It is this binary that contains the capabilities described in Table 1.
The third binary is the Gh0st install program. This is commonly called “the dropper.” It contains the two
above described binaries and performs all of the work necessary to install the Gh0st server on a host and
startup the Gh0st service.
The final binary is the C2 controller, known as the Gh0st client. This is a typical Windows application
that is used to track and manage Gh0st servers on remote compromised hosts. This is the tool the
cybercriminals use to exfiltrate information from your networks.

8/20/2019 Wp Know Your Digital Enemy
http://slidepdf.com/reader/full/wp-know-your-digital-enemy 9/36
9Know Your Digital Enemy 9
Gh0st RAT Operation
The operation of the RAT tool is very straightforward. Upon startup, the client component presents a
tabbed window that allows remote operation of compromised hosts. The main window of an online RAT
client is shown below in Figure 10.
Figure 10. Gh0st RAT client (C2).
Notice there are three tabs at the bottom of the main frame: Connections, Settings, and Build. The
Connections tab lists all of the compromised hosts that have checked in and are awaiting further
instructions. This view contains columns including a unique ID for each host, WAN and LAN addresses,
hostname, installed OS, CPU speed, ping speed, and whether the host has a webcam installed. You can
see in Figure 10 that there are two hosts that have checked in.
The status bar contains four panes. On the far left is the IP address of the client computer. The second
pane displays the TX/RX communication rate in KB/S for each remote host. The third pane shows theport the C2 client is listening on. Finally, the fourth pane shows the number of checked in hosts.
The Settings tab is where you provide configuration settings for the C2 client. You provide the
information in this form that will be baked into the server application on the Build tab. This tab is shown
below in Figure 11.
Figure 11. Gh0st Settings tab

8/20/2019 Wp Know Your Digital Enemy
http://slidepdf.com/reader/full/wp-know-your-digital-enemy 10/36
10 Know Your Digital Enemy10
You can see that I have set my listening port to 80 and that I limit the maximum number of client
connections to 8,000. You can set this value to unlimited by checking the No Limit checkbox. You also
have the option to disable tooltips if desired.
The On-line signature group of controls is used to create a unique Key String that a server must use to
find a C2 client. Here you provide the IP or URL and port you want the server to use when checking in.You can also provide proxy settings and credentials if a proxy is in use.
You will notice in Figure 11 that the Key String value is delimited by AAAA. The data between the AAAA
delimiters is the encoded data in the On-line signature fields.
The Key String value in Figure 11 is the encoded string 192.168.1.249:80. The encoding algorithm is
Base64 and then each byte is obfuscated further using addition and XOR. This signature is appended to
the end of the server binary when you build a server component.
The Build tab is used to create a custom server application using the unique key string created on the
Settings tab. This is shown in Figure 12.
Figure 12. Gh0st Build tab.
You have two choices in how you provide the key string to the server. First, you can provide a URL and
file name. To do so, check the Enabled box and enter a valid URL and filename. The contents of the file,
hosted somewhere on the Internet, must contain the Key String for the C2 client.
For example, if the enabled checkbox is checked, and the URL http://www.badurl.zzz/ip.jpg was entered
this URL will be encoded in the Key String value and placed at the end of the server binary file. Whenthe server is installed on a compromised host, the server will connect to the URL provided and download
the file ip.jpg. The contents of this file must contain the Key String of the C2 client. Using this method o
providing a Key String to a RAT allows the C2 operators to move the C2 client whenever needed.
If you want to bake the Key String into the server binary and not use a URL, uncheck the Enabled
checkbox and paste your key string in the Key String field. In Figure 12, you can see I copied and pasted
the Server Key from the Settings tab since I want to use the same computer the C2 client is currently
running on.

8/20/2019 Wp Know Your Digital Enemy
http://slidepdf.com/reader/full/wp-know-your-digital-enemy 11/36
11Know Your Digital Enemy 11
The Display Name and Description fields are placed in the compromised host registry and will display
in the Services.msc management console service name and description fields. I suggest that you make
these fields appear as legitimate services. Also remember, the Display Name must be unique on the host
or the creation of the RAT service will fail.
When you are satisfied with your settings, click on the Generate button. You will be asked where youwant to save the server binary and what you want to name it (default Server.exe). The Gh0st client will
extract the Server.exe binary from the Resource section of its own binary and save it to disk.
The Key String and the encrypted display name and description fields are appended to the end of the
binary. You can see this in a hex dump of the binary shown in Figure 13.
Figure 13. Encrypted Server Key in SERVER.EXE.
I describe the encryption algorithm and SERVER.EXE in greater detail later in this report.

8/20/2019 Wp Know Your Digital Enemy
http://slidepdf.com/reader/full/wp-know-your-digital-enemy 12/36
12 Know Your Digital Enemy
Gh0st RAT Components
In this section we dive deeper into the structure of the Gh0st RAT components. Figure 14 below shows
how all of the components fit together.
Figure 14. Gh0st RAT components.

8/20/2019 Wp Know Your Digital Enemy
http://slidepdf.com/reader/full/wp-know-your-digital-enemy 13/36
13Know Your Digital Enemy
The binaries that make up the Gh0st toolset are described below in Table 2.
Table 2: Gh0st RAT Components
Gh0st RAT Components
RESSDT.SYS Device driver that clears the SSDT of all existing hooks.
SVCHOST.DLL Windows service DLL that runs on a compromised host (server).
INSTALL.EXE Dropper application used to install SVCHOST.DLL.
SERVER.EXE INSTALL.EXE binary with encrypted configuration info appended to end.
GH0ST.EXE C2 server management tool and custom INSTALL.EXE creator (client).
The Gh0st architecture takes advantage of the ability to create custom Windows resources in a Windows
binary. This mechanism is used quite often by malware authors. The process involves the creation of a
custom resource and then hiding another binary executable in this custom resource section of the executable.
In other words, you can hide an executable within an executable.
If you refer back to Figure 14, you can see that Gh0st makes extensive use of this capability. Notice the binary
RESSDT.SYS is placed in the resource section of SVCHOST.DLL. This means SVCHOST.DLL is carrying a device
driver payload in its resource section that can reset the SSDT of a Windows host.
Likewise, you can see that INSTALL.EXE contains SVCHOST.DLL in its resource section. This means that
INSTALL.EXE has a payload in its resource section that contains two binaries: RESSDT.SYS and SVCHOST.DLL.
Finally, you can see the GH0ST.EXE binary contains INSTALL.EXE within its resource section. This means
that the GH0ST.EXE binary contains all of the components of the Gh0st RAT infrastructure.
The Gh0st RAT source code base contains Microsoft Visual Studio (MSVS) project files that create
the four binaries. When the projects are compiled, the required binaries are placed with the resource
sections. Below is a list that describes how all these pieces work together.
1. The Windows Driver Kit (WDK) is used to compile the RESSDT.C code and create RESSDT.SYS binary.2. The MSVS project SVCHOST compiles/creates the SVCHOST.DLL binary. The RESSDT.SYS binary is
placed in its resource section.
3. The MSVS project INSTALL compiles/creates the INSTALL.EXE binary. The SVCHOST.DLL binary is
placed in its resource section.
4. The MSVS project GH0ST compiles/creates the GH0ST.EXE binary. The INSTALL.EXE binary is placed in
its resource section.
5. The GH0ST.EXE application is used to configure a custom Gh0st server binary (See Gh0st RAT
Operation section). When the Generate button on the Build tab is clicked, the INSTALL.EXE binary is
extracted from its own resource section and saved to disk (default name is SERVER.EXE).
6. The encrypted configuration information from the Build tab is appended to the SERVER.EXE binary.
You can see this in Figure 13.
7. The SERVER.EXE binary is placed on a host that is about to be compromised and executed.
8. SERVER.EXE extracts the SVCHOST.DLL binary from its resource section and places it in the %Temp%
folder with a random file name. Next, the RESSDT.SYS binary is extracted from the SVCHOST.DLL and
also placed in the %TEMP% folder.
9. SERVER.EXE resets the SSDT using the RESSDT.SYS device driver. It then does all its magic
compromising the host by changing security settings, creating the Gh0st server service, making
registry changes, and more. It then completes its work by starting the Gh0st server service.
10. When the compromised host starts up and the Gh0st server service starts, the RESSDT.SYS binary
is extracted from the SVCHOST.DLL and placed in the %TEMP% folder with a random file name.
The device driver is loaded and used to reset the SSDT. The device driver is then unloaded and the
temporary file is deleted.
11. The Gh0st server service seeks out its C2 controller, checks in, and awaits further instructions.

8/20/2019 Wp Know Your Digital Enemy
http://slidepdf.com/reader/full/wp-know-your-digital-enemy 14/36
14 Know Your Digital Enemy
RESSDT.SYS
The first Gh0st RAT component we will examine is a device driver named RESDST.SYS. As the name
suggests, this small driver performs only one function: it resets the SSDT in the Windows kernel. This
device driver gets loaded during the Gh0st server install on a compromised host and every time the
Gh0st server service starts at Windows boot time.
Why would the Gh0st authors go to the trouble to write a device driver that removes all hooks in the
SSDT? I suggest that there are two reasons for this. First, resetting the SSDT to boot-time condition
disables any other rootkits or other malware that may already have hooks in place. Second, this act will
also remove any SSDT hooks put there by security tools such as host intrusion prevention systems (HIPS)
or antivirus engines. I know, for example, the Cisco Security Agent (CSA) hooks every entry in the SSDT
so it can keep a close eye on kernel activity. These hooks will get removed by this device driver.
The device driver code is very compact and quite elegant. It uses the DeviceIOControl infrastructure of
a Windows device driver to receive IO Request Packets (IRP) from a user-land application. There are four
functions defined in the driver shown below in Table 3.
Table 3: RESSDT.SYS Function Declarations
RESSDT.SYS Function Declarations
NTSTATUS DriverEntry( IN PDRIVER_OBJECT theDriverObject, IN PUNICODE_STRING theRegistryPath )
NTSTATUS DisPatchCreateClose(PDEVICE_OBJECT pDriverObj,PIRP pIrp);
NTSTATUS DispatchDeviceControl(IN PDEVICE_OBJECT DeviceObject,IN PIRP pIrp);
void DriverUnload(PDRIVER_OBJECT pDriverObj);
The DriverEntry() function has a predefined argument list and is required by Windows. This function is
where a driver places all its setup code. Our driver performs the following tasks within this function.
1. Sets all IRP_MJ_MAXIMUM_FUNCTION table entries to point to function DisPatchCreateClose().2. Sets the IRP_MJ_DEVICE_CONTROL table entry to point to function DispatchDeviceControl().
3. Sets theDriverObject->DriverUnload pointer to point to function DriverUnload().
4. Creates an IODevice object with the name \\Device\\RESSDT.
5. Creates a symbolic link to the IODevice object with the name \\??\RESSDTDOS.
The driver sets up its function call table by pointing all table entries to function DisPatchCreateClose()
except for the IOControl function which points to DispatchDeviceControl(). In short, the only operation
this driver is interested in is IOControlRequests. This is pretty standard stuff. Forensic investigators should
take note of the device driver names. These names should always raise suspicion because it is pretty rare
to have a device driver that resets the SSDT.
• The DisPatchCreateClose() function does nothing but return STATUS_SUCCESS. It is an empty function• The DriverUnload() function deletes the IODevice symbolic link and then deletes the IODevice object.
This leaves only the function DispatchDeviceControl() for us to examine. In short, this function is
designed to receive an IRP from Windows whenever a user-land application makes a DeviceIOControl
call to this driver. As I will show later on, the user-land application calls the DeviceIOControl function and
passes it two pieces of information: a SSDT table index number and a pointer to a function. The device
driver simply places the passed-in function pointer in the SSDT table at the passed in index.

8/20/2019 Wp Know Your Digital Enemy
http://slidepdf.com/reader/full/wp-know-your-digital-enemy 15/36
15Know Your Digital Enemy
Below is a list of actions the DispatchDeviceControl() function performs for those of you interested in
the details:
1. Calls IoGetCurrentIrpStackLocation(pIrp) to obtain a pointer to the user-land stack.
2. Sets up variables to hold the IOControlCode, pointers to the user-land input and output buffers
passed via the stack pointer location, and the sizes of these buffers.
3. Enters a switch() statement that only triggers on the value IOCTL_SETPROC.
a. Verifies that the pointers to the input and output buffers are valid.
b. Reads the SSDT index variable from the user-land input buffer.
c. Verifies that the index variable value is <= the maximum number of SSDT entries.
d. Sets up a pointer to the base of the kernel SSDT.
e. Uses the register CR0 trick to gain write access to the SSDT.
f. Sets the requested SSDT entry to the requested SSDT function pointer.
g. Uses the register CR0 trick to reset read-only access to the SSDT.
4. Returns STATUS_SUCCESS.
In short, a user-land application makes a DeviceIOControl() function call to the device driver, passing itan index into the SSDT and a function pointer that the driver is to place in that index. The driver obtains
a pointer to the base of the SSDT from the kernel, abuses register CR0 by changing the SSDT memory
pages to write mode, and then makes the required change to the SSDT. The driver then switches the
SSDT memory pages back to read-mode and returns a success code to the user-land application.
The register CR0 hack was first widely published by Greg Hoglund and James Butler in their book
Rootkits—Subverting the Windows Kernel .2 You can see in the code snippet in Figure 15 how this works.
Figure 15. CR0 hack code snippet.
On line 114, a pointer is set to point to the base of the SSDT. Then, in-line assembly code changes CR0
to allow writes to protected kernel memory. On line 123, the SSDT pointer is incremented to point to
the correct table entry requested by the caller and a function pointer is placed in that table entry. Finally,
the CR0 register is set back to read-only.
If it is not clear to you how all this works, the important thing to remember is that RESDDT.SYS is a small
device driver whose only purpose in life it to reset the Windows kernel SSDT to the state it was in when
the system booted. The bottom line is all existing hooks/hacks to the SSDT are removed.

8/20/2019 Wp Know Your Digital Enemy
http://slidepdf.com/reader/full/wp-know-your-digital-enemy 16/36
16 Know Your Digital Enemy
SVCHOST.DLL
The second Gh0st RAT component we will examine is the DLL that gets installed as a service on a
compromised host and provides the Gh0st RAT server functions. The setup and installation of this DLL as
a service is done by the install program (Dropper) SERVER.EXE. I will cover the details of the installation
and configuration of the RAT service in the INSTALL.EXE section of this document.Below is the list of tasks the service DLL performs from startup until it checks in with its C2 controller.
1. Calls function FindConfigString(). This function searches the DLL’s own binary image for the
configuration string delimiter AAAAAA, starting from the end. If this string is not found, the DLL will
exit and the service fails to start. If the string is found, the configuration string is loaded into memory
This configuration string will have either an IP address and a port, or a URL with a file name.
2. Sets a Windows station, first by saving the current station by calling GetProcessWindowStation().
Then it creates a new Windows station named winsta0 by calling OpenWindowStation(). Since I was
not familiar with these calls, I queried MSDN. Here is what I discovered:
“Windows provides three main categories of objects: user interface, graphics device interface
(GDI), and kernel. Kernel objects are securable, while user objects and GDI objects are not.
Therefore, to provide additional security, user interface objects are managed using window
stations and desktops, which themselves are securable objects.”3
3. Checks to see if a global instance variable is not NULL. If it has a value other than NULL, it means an
instance of the service is already running. If this is the case, a series of function calls occur that resets
the SSDT and restarts the service.
4. Calls getLoginInfo(). This function decrypts the configuration string found in Step 1. If the
configuration string contains a URL, this function will open an Internet connection to the URL and
download the configuration string and decrypt it. If it does not contain a URL, the string is simply
decrypted and parsed. This function populates the following variables with the relative data:
a. lpszHost
b. dwPort
c. lpszProxyHost
d. dwProxyPorte. lpszProxyUser
f. lpszProxyPass
(Note: These variable values will be seen in a memory dump so be prepared to look for them.)
5. If the above proxy-related variables are populated, the connection socket used to connect to the C2
client is configured to use the PROXY_SOCKS_VER5 configuration.
6. Calls and saves the return value of GetTickCount(). This is used to determine how long the server is
connected to the client.
7. Calls sendLoginInfo(). This function collects the column values shown by the client C2 grid columns
and then attempts to report in to the C2 client.
8. Creates an instance of the class CKernelManager setting the socket, service name, event, hostname,
and port variables. It then sets the socketClient object callback function to the new CKernelManager
instance. In short, this means any socket communication received from the C2 client is processed bythe CKernelManager.
9. Enters a do/while loop waiting for an instruction from the C2 client.
(Note: if the server cannot connect to the C2 client, it will sit in a loop and attempt to reconnect every
1 minute.)

8/20/2019 Wp Know Your Digital Enemy
http://slidepdf.com/reader/full/wp-know-your-digital-enemy 17/36
17Know Your Digital Enemy
INSTALL.EXE
The third Gh0st RAT component we will examine is the Dropper INSTALL.EXE. This is a stand-alone
Windows application that contains all required code to prepare a compromised host for the installation
of the Gh0st RAT server service and the launching of that service.
Below is the list of tasks the INSTALL.EXE application performs from startup until it starts theserver service.
1. The first action is a series of interesting function calls. First, the Win32 API GetInputState() function
is called. This function returns TRUE if there are mouse button or keyboard messages in the calling
thread’s message queue. Next is a call to PostThreadMessage() with a NULL message type. Finally,
GetMessage() is called. It is very interesting that none of the return values of these functions are
examined. It appears the application just wants to prime its Windows message pump.
2. Next is a call to FindConfigString(hInstance, “AAAAAA”). This function calls the Win32 API
GetmoduleFilename() to determine its own filename. It then calls CreateFile() to open its own binary
in read mode. It then seeks (to the byte) 1024 bytes from the end of its own binary and searches
for the string AAAAAA. You may recall this is a delimiter used to encode the server KeyString. If
it finds the delimiter string, it returns a string pointer to the beginning of the configuration string.
The AAAAAA delimiter points to the beginning of the C2 hostname:port or the URL containing theServerKey string.
3. The application makes a second call to FindConfigString(hInstance, CCCCCC). This time the function
is asked to return a string pointer to the CCCCCC delimiter of the encrypted configuration string
in its own binary. The CCCCCC delimiter points to the beginning of the server service name and
description strings. If the configuration string is not found, the program exits.
4. The two previously located encrypted configuration strings are decrypted with two calls to the
MyDecode() function. The encryption details of the Gh0st RAT are discussed in the “Encryption”
section of this report.
5. Calls GetCommandLine() and searches for a command line string Gh0st Update. If it does not find
this command line argument, it creates a Mutex using the encrypted configuration string as its name.
If this Mutex name already exists, the program exits. Otherwise it releases and closes the Mutex. This
action ensures that two instances of the install program will not run at the same time.6. Calls SetAccessRights(). This function performs the following actions:
a. Calls Win32 API GetSystemDirectory() to determine where the \Windows\System32 folder is.
b. Calls Win32 API GetUserName() to determine what user account it is running under.
c. Calls the Win32 API AddAccessRights() function passing in the current user name and
requesting GENERIC_ALL access rights to the Windows\System32 and \Windows\System32\
Drivers folder.
d. Calls the Win32 API NetGetLocalGroups() to obtain a list of groups the current user belongs to.
e. Calls the Win32 API AddAccessRights() function passing in the current user name and
requesting GENERIC_ALL access rights to all of the groups the current user belongs to
(identified in step d).
7. Calls local function ResetSSDT(). A description of this function can be found in the “ResetSSDT
Function” section of this document.
8. Calls local function InstallService(). This function performs the following steps:
a. The prototype for this function is:
char* InstallService(LPCSTR lpServiceDisplayName,
LPCST lpServiceDescription,
LPCSTR lpConfigureString);
As you can see, the unencrypted service display name string, service description string, and the
encrypted ServerKey string are passed into this function.
b. All of the following actions are taken within one huge Try{ and }Catch block. So, the installation
of the server is an all or nothing proposition.

8/20/2019 Wp Know Your Digital Enemy
http://slidepdf.com/reader/full/wp-know-your-digital-enemy 18/36
18 Know Your Digital Enemy
c. Calls Win32 API RegOpenKeyEx() function to open the registry key SOFTWARE\Microsoft\
Windows NT\CurrentVersion\Svchost.
d. Queries the above key for the value “netsvcs.” This value is of type REG_MULTI_SZ. On my
Windows XP test system, this registry value contains 46 strings. The first 26 of these values are
shown in Figure 6. These strings are the names of Windows services that may be running onyour system. Just because a service is listed under this key does not mean that service is installed
and running on your system.
Figure 16. “netsvcs” Registry value (partial).
e. Obtains a HANDLE to the Service Control Manager by calling the Win32 API call
OpenSCManager().
f. Calls Win32 API call GetSystemDirectory() to determine where the \Windows\System32 is.
g. Loops through each string in the netsvcs Registry value and queries the Registry key MACHINE\\
SYSTEM\\CurrentControlSet\\Services to determine if the service is installed on the system. For
example, the first query from my list in Figure 16 would look for the value MACHINE\\SYSTEM\\
CurrentControlSet\\Services\\AppMgmt.h. When a netsvcs value is found that is not installed (that is, not used) as a service on the host,
this netsvcs value will be used as the Gh0st RAT service.
i. Calls local function AddsvchostService(). This function appends a string to the Registry value
SOFTWARE\Microsoft\Windows NT\CurrentVersion\Svchost\netsvcs queried in step d above.
The appended string will be in the form netsvs_0xN, where N is a number starting with 0 (that
is, netscvs_0x0). If the string netsvs_0x0 already exists in the key value, it will add the string
netsvs_0x1 and so on. Once a value has been added, the function returns a string with the
service name it added to this Registry key value. This entry is used to keep track of the location
of the INSTALL.EXE program location.

8/20/2019 Wp Know Your Digital Enemy
http://slidepdf.com/reader/full/wp-know-your-digital-enemy 19/36
19Know Your Digital Enemy
j. Calls Win32 API call CreateService(). The details of this function call parameters are shown in
Figure 17.
Figure 17. CreateService() API call.
This function creates an entry in the SCM database for the new service. The ptr parameter
contains the name of the unused service string identified in step g above. More information
about this function call can be located here on MSDN.
k. If the CreateService() function call fails, it gets called again. This second call changes the
SERVICE_WIN32_SHARE_PROCESS parameter to SERVICE_WIN32_OWN_PROCESS. The bet is
that one of these two functions calls will succeed.
l. Now that the new service has been added to the SCM database, service details are written to
the SYSTEM\CurrentControlSet\Services key. You can see these values in Figures 18 through 20.
Figure 18. Gh0st RAT Service Registry Key.
Figure 19. Gh0st RAT Service Registry Parameters Key.

8/20/2019 Wp Know Your Digital Enemy
http://slidepdf.com/reader/full/wp-know-your-digital-enemy 20/36
20 Know Your Digital Enemy
Figure 20. Gh0st RAT Service Registry Security Key.
Notice in Figure 20 the REG_BINARY Security value under the security key. This data value
contains the encrypted Server Key value.
m. Calls local function ReleaseResource(). The Gh0st RAT server binary is now extracted from the
INSTALL.EXE’s own resource section. (The name of this resource is “BIN”). Once the binary is
extracted, it is writtent to the \Windows\System32 folder with the name of the installed serviceappended with ex.dll. For example, on my test system the name of the hijacked (unused) service
used by INSTALL.EXE is Irmon. The name of the RAT binary is Irmonex.dll. This binary also has
the Hidden attribute set.
9. Creates a Registry key “SYSTEM\CurrentControlSet\Services\netsvc_0xN. This key name will be
the same name created back in step i. A subkey is created named InstallModule with a sting value
containing the full path of the INSTALL.EXE application (Figure 21). This registry key is used by the
Gh0st server service to find and delete the program that installed it.
Figure 21. netsvcs_0xn Registry Key.
10. Calls local function StartService(). This function calls the Win32 API function OpenSCManager().
It next calls the Win32 API OpenService() passing it the name of the newly created Gh0st service.
Finally, it calls StartService() to begin the fun. It closes all open SCM handles and returns. The Gh0st
service starts and looks for its C2 client.
11. At this point everything is in place, so the INSTALL.EXE kills itself by calling the Win32 API callExitProcess().
So there you have it. The complete picture of what the INSTALL.EXE application does to compromise a
host and install the Gh0st service. I am sure you will agree that somebody went to a lot of trouble to
implement this very innovative process. Obviously, the authors of this tool have a deep understanding of
the Windows operating system.
8/20/2019 Wp Know Your Digital Enemy
http://slidepdf.com/reader/full/wp-know-your-digital-enemy 21/36
21Know Your Digital Enemy
GH0ST.EXE
The final Gh0st RAT component we will examine is the C2 client GH0ST.EXE. From a code perspective,
this is the largest component in the toolset. It contains all of the C&C capabilities of the RAT system. The
two main functions this module serves is the management and control of Gh0st servers and the ability
to create customized server install programs.
Most of the capabilities of the GH0ST.EXE binary were covered in the “Gh0st Rat Overview” and “Gh0st
Rat Operations” sections of this report, so I won’t repeat them here. The process of building a custom
Gh0st server application is very simple. The INSTALL.EXE binary containing both the SVCHOST.DLL and
RESSDT.SYS binaries are hidden in the GH0ST.EXE binary Resource section. When the Build command
is used, GH0ST.EXE simply extracts the INSTALL.EXE from its resource section and saves it to disk. It
then appends the encrypted ServerKey, Service Name, and Service Description strings to the end of the
extracted file.
Function ResetSSDT()
I think it is important to explore a very interesting function that resets the SSDT of the compromised
host. As you recall from the “Gh0st Rat Components” section, there is a device driver named RESSDT.
SYS that implements the device driver IOControl capabilities to receive requests from a user-land
application. This driver accepts an SSDT index number and a function pointer from the user-landapplication. It places the function pointer in the requested SSDT table index. Let’s take a look at how the
user-land application uses this device driver.
In this case, the two user-land applications that call this function are INSTALL.EXE and SVCHOST.DLL.
INSTALL.EXE (SERVER.EXE) calls this function during the compromise/install process of the Gh0st server
sevice. SVCHOST.DLL (?????EX.DLL) calls this function every time the service starts at system boot t ime.
Below is a list detailing what the ResetSSDT() function does.
1. Calls the local function RestoreSSDT(), which performs the following actions:
a. Calls local function LoadDriver(). This function essentially completely hijacks the Windows beep.sys
device driver. It does this by opening the SCM and stopping the Beep service if it is running and
does the following:
i. Calls the Win32 API function SetFileAttributes() to change the beep.sys device driver file
to FILE_ATTRIBUTE_NORMAL.
ii. Loads the beep.sys into a memory-mapped file.
iii. Extracts the RESSDT.SYS binary from the resource section of the SVCHOST.DLL binary.
iv. Replaces the beep.sys code in the memory-mapped file with the RESSDT.SYS binary.
v. Saves the new beep.sys code back to \Windows\System32\Drivers folder.
vi. Starts the Beep service using the SCM API.
vii. Calls the Win32 API function CreateFileA() and opens a file named \\.\RRESSDTDOS,
which you may recall is the symbolic link name of the RESSDT.SYS device driver.
viii. Returns a HANDLE to the RESSDT.SYS device driver.
b. Calls local function ReSSDT(). This function accepts the above handle to the RESSDT.SYS device
driver and performs the following actions.i. Calls Win32 API function GetProcAddress(GetModuleHandle(“ntdll.dll”),
“NtQuerySystemInformation”) to obtain a function pointer.
ii. Calls Win32 API function NtQuerySystemInformation() using the undocumented SYSTEM_
MODULE_INFORMATION parameter to obtain a pointer to a MODULES structure. This
structure is used to identify the image name of the windows kernel.
iii. Calls Win32 API function LoadLibraryEx() to obtain a handle to the Windows kernel.
iv. Calls Win32 API function GetProcAddress(“KeServiceDescriptorTable”) to obtain a pointer
to the SSDT.
v. Walks the Windows kernel image to obtain pointers to each service loaded into the SSDT.
8/20/2019 Wp Know Your Digital Enemy
http://slidepdf.com/reader/full/wp-know-your-digital-enemy 22/36
22 Know Your Digital Enemy
vi. For each service found in the kernel, the SSDT index and function pointer is passed to the
RESSDT.SYS device driver using an IOControl call.
c. Calls local function UnloadDriver() to stop the RESSDT.SYS device driver running under the
Beep service.
This is pretty impressive code. The Gh0st authors went to a lot of trouble to include this capability of
resetting the SSDT to remove existing rootkits and security software hooks.
Gh0st RAT Encryption
In this section we take a look at the method the Gh0st tools use for encryption. There are three levels
of encryption/obfuscation used in the system: Base64 encoding, a custom encoding scheme, and
compression of network traffic streams using the standard zip compression algorithm.
The Base64 encoding is done by the function base64_encode(). Comparing the code in this function
with published public domain Base64 algorithms confirms this is legitimate Base64 encoding scheme.
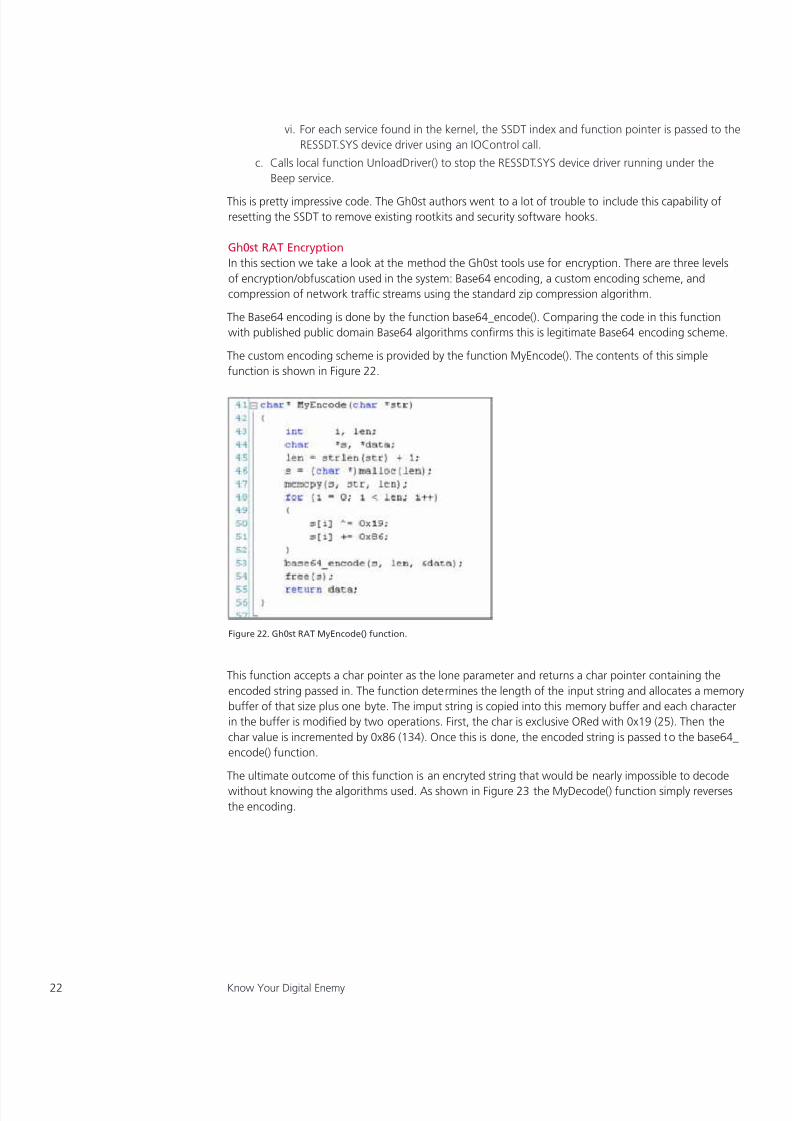
The custom encoding scheme is provided by the function MyEncode(). The contents of this simple
function is shown in Figure 22.
Figure 22. Gh0st RAT MyEncode() function.
This function accepts a char pointer as the lone parameter and returns a char pointer containing the
encoded string passed in. The function determines the length of the input string and allocates a memory
buffer of that size plus one byte. The imput string is copied into this memory buffer and each character
in the buffer is modified by two operations. First, the char is exclusive ORed with 0x19 (25). Then the
char value is incremented by 0x86 (134). Once this is done, the encoded string is passed to the base64_
encode() function.
The ultimate outcome of this function is an encryted string that would be nearly impossible to decode
without knowing the algorithms used. As shown in Figure 23 the MyDecode() function simply reverses
the encoding.

8/20/2019 Wp Know Your Digital Enemy
http://slidepdf.com/reader/full/wp-know-your-digital-enemy 23/36
23Know Your Digital Enemy
Figure 23. Gh0st RAT MyDecode() function.
Gh0st RAT Network Communication
The network communication between the Gh0st RAT C2 client and a compromised host (server) is very
simple. A data packet consists of four fields:
1. A five-byte packet header. This header contains the characters Gh0st.
2. A four-byte integer that contains the size in bytes of the entire packet.
3. A four-byte integer that containes the size in bytes of the entire packet when uncompressed.
4. A variable-sized packet that contains the packet payload. The client sends small requests that contain
commands, and the server responds to those commands with the requested data.
The header, 13 bytes in length, is sent in the clear. This means you can clearly see the the Gh0stheader
text on the wire. I was surprised by this discovery and doubt newer versions of Gh0st RATs do this. It is
too easy to detect.
The packet payload is compressed using the open source zlib compression library. There is no obfuscation
or other encyption used. I confirmed this in my research by capturing network data using WireShark andunencrypting the packet payloads with a Python script using the zlib module unencrypt() function.
After the header, the first byte of the packet payload contains an operation code. There are three types
of codes: Commands, Tokens, and Modes. In the source code, these codes are contained in a large
enum in a header file.
Command codes are sent by the client (C2) instructing the server what to do. If you study the list of
commands in Table 4, you can see the command codes correspond very closely to the menu items that
appear when you right-click a server in the client connections grid.
Table 4. Gh0st RAT Command Codes
Command Code Value
COMMAND_ACTIVED 0x00
COMMAND_LIST_DRIVE 0x01
COMMAND_LIST_FILES 0x02
COMMAND_DOWN_FILES 0x03
COMMAND_FILE_SIZE 0x04
COMMAND_FILE_DATA 0x05
COMMAND_EXCEPTION 0x06
COMMAND_CONTINUE 0x07

8/20/2019 Wp Know Your Digital Enemy
http://slidepdf.com/reader/full/wp-know-your-digital-enemy 24/36
24 Know Your Digital Enemy
Command Code Value
COMMAND_STOP 0x08
COMMAND_DELETE_FILE 0x09
COMMAND_DELETE_DIRECTORY 0x10
COMMAND_SET_TRANSFER_MODE 0x11
COMMAND_CREATE_FOLDER 0x12
COMMAND_RENAME_FILE 0x13
COMMAND_OPEN_FILE_SHOW 0x14
COMMAND_OPEN_FILE_HIDE 0x15
COMMAND_SCREEN_SPY 0x16
COMMAND_SCREEN_RESET 0x17
COMMAND_ALGORITHM_RESET 0x18
COMMAND_SCREEN_CTRL_ALT_DEL 0x19
COMMAND_SCREEN_CONTROL 0x20
COMMAND_SCREEN_BLOCK_INPUT 0x21
COMMAND_SCREEN_BLANK 0x22
COMMAND_SCREEN_CAPTURE_LAYER 0x23
COMMAND_SCREEN_GET_CLIPBOARD 0x24
COMMAND_SCREEN_SET_CLIPBOARD 0x25
COMMAND_WEBCAM 0x26
COMMAND_WEBCAM_ENABLECOMPRESS 0x27
COMMAND_WEBCAM_DISABLECOMPRESS 0x28
COMMAND_WEBCAM_RESIZE 0x29
COMMAND_NEXT 0x30
COMMAND_KEYBOARD 0x31
COMMAND_KEYBOARD_OFFLINE 0x32
COMMAND_KEYBOARD_CLEAR 0x33
COMMAND_AUDIO 0x34
COMMAND_SYSTEM 0x35
COMMAND_PSLIST 0x36
COMMAND_WSLIST 0x37
COMMAND_DIALUPASS 0x38
COMMAND_KILLPROCESS 0x39
COMMAND_SHELL 0x40
COMMAND_SESSION 0x41
COMMAND_REMOVE 0x42
COMMAND_DOWN_EXEC 0x43

8/20/2019 Wp Know Your Digital Enemy
http://slidepdf.com/reader/full/wp-know-your-digital-enemy 25/36
25Know Your Digital Enemy
Command Code Value
COMMAND_UPDATE_SERVER 0x44
COMMAND_CLEAN_EVENT 0x45
COMMAND_OPEN_URL_HIDE 0x46
COMMAND_OPEN_URL_SHOW 0x47
COMMAND_RENAME_REMARK 0x48
COMMAND_REPLAY_HEARTBEAT 0x49
The Token codes are used by the server to identify the payload types is returns to the client. You can see
these codes in Table 5.
Table 5: Gh0st RAT Token Codes
Token Code Value
TOKEN_AUTH 100
TOKEN_HEARTBEAT 101
TOKEN_LOGIN 102
TOKEN_DRIVE_LIST 103
TOKEN_FILE_LIST 104
TOKEN_FILE_SIZE 105
TOKEN_FILE_DATA 106
TOKEN_TRANSFER_FINISH 107
TOKEN_DELETE_FINISH 108
TOKEN_GET_TRANSFER_MODE 109
TOKEN_GET_FILEDATA 110
TOKEN_CREATEFOLDER_FINISH 111
TOKEN_DATA_CONTINUE 112
TOKEN_RENAME_FINISH 113
TOKEN_EXCEPTION 114
TOKEN_BITMAPINFO 115
TOKEN_FIRSTSCREEN 116
TOKEN_NEXTSCREEN 117
TOKEN_CLIPBOARD_TEXT 118
TOKEN_WEBCAM_BITMAPINFO 119
TOKEN_WEBCAM_DIB 120
TOKEN_AUDIO_START 121
TOKEN_AUDIO_DATA 122
TOKEN_KEYBOARD_START 123
TOKEN_KEYBOARD_DATA 124

8/20/2019 Wp Know Your Digital Enemy
http://slidepdf.com/reader/full/wp-know-your-digital-enemy 26/36
26 Know Your Digital Enemy
Token Code Value
TOKEN_PSLIST 125
TOKEN_WSLIST 126
TOKEN_DIALUPASS 127
TOKEN_SHELL_START 128
The Mode codes are used by both the client and the server to request/respond to specific action setting.
You can see these codes in Table 6.
Table 6. Gh0st RAT Mode Codes
Mode Code Value
TRANSFER_MODE_NORMAL 0x00
TRANSFER_MODE_ADDITION 0x01
TRANSFER_MODE_ADDITION_ALL 0x02
TRANSFER_MODE_OVERWRITE 0x03
TRANSFER_MODE_OVERWRITE_ALL 0x04
TRANSFER_MODE_JUMP 0x05
TRANSFER_MODE_JUMP_ALL 0x06
TRANSFER_MODE_CANCEL 0x07
To illustrate a packet exchange, let’s first explore what a server Check-in packet looks like. This is the first
communication between the server and the client. The Gh0st RAT network communications relies on
data structures to constuct payloads. The Check-in or Login packet data is encapsulated in a structure
named LOGININFO (Figure 24).
Figure 24. Gh0st RAT LOGININFO structure.
The LOGININFO field content is described below:
• bToken contains the TOKEN value TOKEN_LOGIN (102). See Figure 25.
• OsVerInfoEx is a Win32 API structure that contains much information about the host operating system
You can learn more about this structure on MSDN. This structure is populated by the server with a call
to the Win32 API function GetVersionEx().
• The CPUClockMhz value is populated by querying the Registry key “HARDWARE\DESCRIPTION\System\
CentralProcessor\0\~Mhz” key value
• The IPAddress field is populated by querying an open socket structure

8/20/2019 Wp Know Your Digital Enemy
http://slidepdf.com/reader/full/wp-know-your-digital-enemy 27/36
27Know Your Digital Enemy
• The HostName string is populated by a call to the Win32 API function gethostname()
• The bIsWebCam value is populated by a call to the Win32 API function capGetDriverDescription(). This
function returns TRUE is a capture driver is present or FALSE otherwise.
• The dwSpeed value always appears to be 0
Once the LOGININFO is populated, the structure is passed to the zlib compress() function. A packet
header is constructed with the Gh0st signature, the compressed length of the entire packet, and the
uncompressed length of the entire packet. The header and payload are combined and sent down the
wire to the C2 client.
I captured a Login exchange between a server and client using Wireshark. The Login packet sent by the
server is shown in Figure 28.
Figure 25. Gh0st RAT Server Login packet.
In this packet capture, you can see the server (192.168.1.224) exchange the SYN, SYN-ACK, ACK
packets with the client (192.168.1.249) to establish a TCP session on Port 80. Once the TCP session is
established, the server sends the Login packet. The contents of the login packet are highlighted in blue
in Figure 25.
Notice you can clearly see the Gh0st header signature highlighted in yellow in Figure 26. The four-
byte header value highlighted in green is the size of the entire packet compressed, which is 158 bytes
(Little-endian 0x9e). The magenta header value is the size of the entire packet uncompressed which is
224 bytes (Little-endian 0xe0).
Figure 26. Gh0st RAT Login packet header.

8/20/2019 Wp Know Your Digital Enemy
http://slidepdf.com/reader/full/wp-know-your-digital-enemy 28/36
28 Know Your Digital Enemy
I used a Python script to uncompress the data payload of the Login packet. A hex dump of the
unencrypted payload is shown in Figure 27.
Figure 27. Gh0st RAT uncompressed Login packet.
The first byte of the payload contains the Token code. You can see this value, highlighted in yellow, is
0x66 (102) which is the TOKEN_LOGIN value shown in Table 4. The data immediately following the
Token code is the binary OSVERSIONINFOEX structure followed by the CPUClockMhz value and the
binary IP address. Highlighted in green is the HostName field, which you can clearly see is EeePC. The
field highlighted in magenta is the Boolean bIsWebCam value. In this case it is a 0x01, which means this
host has a webcam onboard.
Once the client receives the Login packet, it is uncompressed and parsed. A new row is added to the
Connections tab grid of the client and the details of the server host are populated in the appropriate
fields. The number of active connections displayed on the Connections tab grid status bar is incremented
by 1.
Once a server has logged it to the client (C2), it waits for commands. When a user of the C2 client
wants to perform an action on a server, a Command packet is created and sent. To illustrate what a
command packet looks like refer to Figure 28.
Figure 28. Gh0st RAT Command packet.
Here again we see the Gh0st header signature and see the compressed size of the packet is 0x16 (22)
and the uncompressed size is 0x01 (1). This is a case where compressing the packet works against you.
You can see in Figure 29, the uncompressed payload data is one byte with a value of 0x23 (35). Looking
at Table 4, you see the command is COMMAND_SYSTEM, which is a request for a remote command
shell (Terminal).

8/20/2019 Wp Know Your Digital Enemy
http://slidepdf.com/reader/full/wp-know-your-digital-enemy 29/36
29Know Your Digital Enemy
Figure 29. Gh0st RAT unencrypted Command payload.
It should be clear from the above discussion that the Gh0st RAT client and server communicate using
a series of pre-defined Commands, Tokens, and Modes. A network packet contains a 13-byte header
with the string Gh0st clearly visible. The data payload of a RAT network packet is compressed using the
standard open-source zlib compression library. No encryption is used.
The communication process is very simple. A Gh0st RAT server connects to a client and sends a Login
packet containing information about the compromised host. The client adds the server to its connection
grid and displays the details of the host. From this point on, the client sends Command request packets
to the server. The server processes the request and sends back to the client the requested data, whether
it is remote screen data, voice, video, or more.
Gh0st RAT Source CodeThe Gh0st RAT Beta 3.6 source code was contained in a ZIP file containing 258 files. I found it at a
suspicious looking site on the Internet. There was no way for me to determine the original source or the
contents of the file. I downloaded it to a Linux box and examined the contents. Initial review identified
the structure of the ZIP file contents contained a Microsoft Visual Studio (MSVS) development project.
The MSVC workspace file identifies it was created with MSVS Version 6.0. Figure 30 below shows the
structure of the workspace.
Figure 30. Gh0st Visual Studio workspace.
The structure of the solution fits perfectly within the Gh0st framework. RESSDT.sys gets compiled into
SVCHOST.DLL, in the svchost project, the server workhorse of the Gh0st suite. The SVCHOST.DLL gets
compiled into INSTALL.EXE created by the install project. Finally, the INSTALL.EXE is compiled into the
GH0ST.EXE client produced by the gh0st project.
The svchost project has many source files since this is where most of the Gh0st functionality resides.
Figures 31 and 32 below show the file composition of the svchost project. Notice at the bottom of the
figure the RESSDT.SYS is included in this project because it is added to the projects resource section.

8/20/2019 Wp Know Your Digital Enemy
http://slidepdf.com/reader/full/wp-know-your-digital-enemy 30/36
30 Know Your Digital Enemy
Figure 31. Svchost project header files. Figure 32. Svchost project implementation files.
The install project is much simpler than the svchost project. As you can see in Figure 33 below, the
svchost project has one implementation file: install.cpp. The svchost.dll binary is included in this project
because it is placed in the resource section.
Remember, the only role of the INSTALL.EXE program is to provide a dropper mechanism to compromise
a host.
Figure 33. Install project files.

8/20/2019 Wp Know Your Digital Enemy
http://slidepdf.com/reader/full/wp-know-your-digital-enemy 31/36
31Know Your Digital Enemy
Of the three projects, the Gh0st project has the most source files. This is due to the fact the Gh0st
application is a Win32 graphical user interface (GUI) project. Most of the source files in this project drive
the GUI components of the Gh0st client.
A listing of the project files are shown in Figures 34 and 35 below.
Figure 34. Gh0st project header files. Figure 35. Gh0st project implementation files.

8/20/2019 Wp Know Your Digital Enemy
http://slidepdf.com/reader/full/wp-know-your-digital-enemy 32/36
32 Know Your Digital Enemy
As discussed in previous sections, once the Gh0st project is successfully compiled, there are four binary
files that make up the suite of malware tools: RESSDT.SYS, SVCHOST.DLL, INSTALL.EXE, and GH0ST.EXE.
Figure 36 below shows the resource section of the SVCHOST.DLL. The resource BIN with an ID of 102
contains the RESSDT.SYS binary.
Figure 36. SVCHOST.DLL resource section.
Figure 37 shows the resource section of INSTALL.EXE. The resource BIN with an ID of 101 contains the
SVCHOST.DLL binary.
Figure 37. INSTALL.EXE resource section.

8/20/2019 Wp Know Your Digital Enemy
http://slidepdf.com/reader/full/wp-know-your-digital-enemy 33/36
33Know Your Digital Enemy
Finally, Figure 38 shows the resource section of GH0ST.EXE. It is contained in the resource named BSS
with an ID of 173. This resource contains the INSTALL.EXE binary.
Figure 38. GH0ST.EXE resource section.
The above figures clearly illustrate the power and convenience of hijacking resource sections of a PE
file to embed other PE files. This is very common with all types of malware. Good forensic investigators
should always check suspicious binaries for embedded PE files.
It should be noted the Gh0st solution has three external dependencies. First, the svchost and
Gh0st projects link in code from the zlib project’s static library. This makes sense since the network
communication stream between the client and server is compressed using the standard zlib compression
algorithm. You can find out more about the zlib project here: http://zlib.net/ .
The second dependency is in the Gh0st project. It statically links with a Microsoft Foundation Classes
(MFC) library named CJ60. Research on the web revealed this is an older freeware library of Windows
GUI helper classes. This includes fancy buttons, toolbars, and list boxes. The below text is from the class
library main header file. It shows the code library was created between 1998 and 1999 by Kirk Stowell.
“// CJ60Lib.h : header le
//
// Copyright 1998-99 Kirk Stowell
// mailto:[email protected]
// http://www.codejockeys.com/kstowell/
//
// This source code may be used in compiled form in any way you desire.
// Source le(s) may be redistributed unmodied by any means PROVIDING
// they are not sold for prot without the authors expressed written consent,
// and providing that this notice and the author’s name and all copyright
// notices remain intact. If the source code is used in any commercial
// applications then a statement along the lines of:
//
// “Portions Copyright 1998-99 Kirk Stowell” must be included in the
// startup banner, “About” box or printed documentation. An email letting

8/20/2019 Wp Know Your Digital Enemy
http://slidepdf.com/reader/full/wp-know-your-digital-enemy 34/36
34 Know Your Digital Enemy
// me know that you are using it would be nice as well. That’s not much to ask
// considering the amount of work that went into this.
//
// This software is provided “as is” without express or implied warranty. Use
// it at your own risk! The author accepts no liability for any damage/loss of
// business that this product may cause.”
Since the CJ60 code library uses Microsoft’s MFC framework, the third dependency of the Gh0st project
is the static Microsoft MFC library file nafxcw.lib. Statically linking the MCF library makes the Gh0st binary
slightly larger, but it removes the requirement of having the right MFC DLL on a compromised host system
A couple of final notes about the Gh0st solution source code. First, based on the style of the source
code, it appears that there were several code writers involved in this project. The coding style is different
across the source files. Some source files have many comments, while others have none. Unfortunately,
all of the comments are illegible in the source code due to failure of accurate code set translation from
Chinese to English.
Second, there is almost a complete lack of error and/or exception handling in the entire code base. It
appears that the coders did not want to invest the time into building robust code. In almost all of the
code, if a serious error occurs, the application simply exits. If non-fatal errors occur, the code simply
ignores the error and moves on.
Gh0st RAT Defenses
If you spent time studying this document, you now have a detailed understanding of how sophisticated
the Gh0st RAT malware is. Even though the sources for this particular RAT are a few years old, this type
of malware is in wide use within certain hacking undergrounds. Current variants of the Gh0st RATs use a
more sophisticated network communication protocol.
So how do you defend against a Gh0st RAT? It is certainly not easy—but fundamental security practices
and knowing what to look for go a long way in defending your infrastructure. I suggest there are six
things you can do to identify Gh0st RATs in your enterprise:
1. Put eyes on the wire.2. Perform regular internal port scans.
3. Monitor your DNS servers.
4. Closely monitor end-node services.
5. Closely monitor end-node event logs.
6. Increase end-user security awareness training.
1. Put eyes on the wire.
I do a great deal of emergency incident response work and am constantly amazed at how many
organizations lack the ability to closely monitor network traffic at the packet level. IDS/IPS systems
or solutions that provide deep packet inspection monitoring are a critical component of a competent
security arsenal. You simply must know what is moving across your networks.
If you have these technologies in place, detecting the Gh0st RAT examined in this white paper would be
trivial due the use of the Gh0st handshake in the packet headers. A simple IDS signature is all you would
need. Today’s Gh0st RATs are much more sophisticated and harder to find on the wire.
Some things to look for with your IDS/IPS or network monitoring solutions include:
• Outbound port 80 (HTTP) and 443 (HTTPS) traffic to IP addresses and URLs in the Far East4
• Outbound port 80 (HTTP) traffic connecting to remote server without sending user-agent information
• Create IDS signatures to detect the unique data content at the end of the dropper application (for
example, AAAAAA or CCCCCC)
• Create IDS signatures to detect embedded PE files within PE files

8/20/2019 Wp Know Your Digital Enemy
http://slidepdf.com/reader/full/wp-know-your-digital-enemy 35/36
35Know Your Digital Enemy
Remember, the modern Gh0st RATs are going to be using a lot more sophisticated network
communications then what is in Gh0st RAT Beta 3.6.
2. Perform regular internal port scans.
One of the interesting things about Gh0st RATs, is that they tend to establish persistent connections toa client. This means the compromised host will have open TCP ports that cannot be explained. Routinely
scanning your internal network for suspicious open ports on systems, particularly workstations, can help
you find Gh0st RATs.
3. Monitor your DNS servers.
Every time I suggest to a client that they should be logging DNS requests, I also get that look followed
by “You have got to be kidding.” Logging DNS is painful, but it can be invaluable when hunting down
Gh0st RATs. Most modern malware uses dynamic DNS to allow the cybercriminals the most flexibility in
moving their RAT clients.
At the very least, you should configure your DNS servers to log or alert on any requests to dynamic DNS
locations. You should also consider logging all DNS requests to sites in the Far East. There are plenty of
resources available to provide you IP address ranges based on geography as well as list of popular and/or
malicious dynamic DNS hosting providers.
4. Closely monitor end-node services.
In the last few years, there has been a lot of discussion about the increasing use of rootkits by
cybercriminals. For the purposes of this discussion, I consider a rootkit as malware designed to run in
Ring 0 alongside the kernel. In general, I am talking about device drivers.
In my experience, most malware today still runs in user-land (Ring 3). Writing device drivers is tedious
and error-prone. There are also a lot fewer programmers who can write them. Instead, most malware
authors write code that abuses the Windows services infrastructure to survive reboot. The result? Most
malware runs as a service—hiding in plain sight.
Whenever I am analyzing a host for indicators of compromise, I focus like a laser on installed services.
You should too. One of my colleagues recently wrote a tool that scans a network of Windows hostslooking for suspicious services. This tool is very effective at sniffing out malware. I encourage you to
implement techniques to monitor what services are running on your systems.
5. Closely monitor end-node event logs.
As long as you are monitoring services on end nodes, you should also be centrally logging and
monitoring Windows event logs. Everybody dislikes dealing with event logs, but as a forensic
investigator, there is gold in that data. I encourage you to turn on auditing and enable logging for
both successful and failed logins.
I also recommend you pay particularly close attention to the security event log entries 528 and 540
(successful logins). Drill down and look for logon types 3 (SMB shares) and 10 (RDP). Finally, identify the
logon account.
Almost all intruders will move laterally across you network, remotely logging onto workstations andservers using elevated privileged accounts. They will either connect to another machine via SMB admin
shares (C$, IPC$, or ADMIN$) or using remote desktop. Either way, you should be monitoring event logs
for this activity.
6. Increase end-user security awareness training.
If I were given just one option to improve an organization’s security posture, it would be an easy choice:
end-user security awareness training. Why? Because end users are going to be the ones who let the bad
guys in by falling victim to phishing attacks or URL redirection. They also are going to be the ones to
alert you when something is wrong.

8/20/2019 Wp Know Your Digital Enemy
http://slidepdf.com/reader/full/wp-know-your-digital-enemy 36/36
In my experience, most serious security incidents are identified in one of three ways: end-user complaints
to the help desk, alert network security personnel who sense that something is amiss, and notifications
that a system has been compromised by a third party.
If you invest in end-user training, you are enabling every single employee to learn what security threats
exist and how not to fall prey to them. You are also increasing their sensitivity to report suspiciouscomputer behavior.
For example, if an end-user understands the capabilities of Gh0st RAT, they are much less likely to ignore
mouse cursor movements when they are not at the keyboard. They will also find it very suspicious their
webcam light is on when they have no video application open.
Security awareness training is one of the best investments you can make to reduce your risk of compromise
Summary
If you made it this far, then you obviously have some interest in understanding the deep internal workings
of a Gh0st RAT. In this paper, you learned how capable, and dangerous, this genre of malware is. The
threat this malware brings to your organization is two-fold. First, once installed on a compromised host, it
provides the remote cybercriminal complete remote control of the system. It also evades antivirus and HIPS
detection because it does nothing suspicious once the service is installed. It simply starts up at boot time,
connects to a remote client on port 80 or 443 and awaits further instructions.
Identifying outbound network traffic from a Gh0st RAT is also problematic. Since most RATs use HTTP or
HTTPS communications channels with encrypted payloads, it is very difficult to identify the presence of a
RAT on the wire.
My goal in writing this paper is to increase the awareness of these RAT tools, particularly in
environments that are subject to advanced persistent threat (APT) attacks. As always, the best defense
against these tools is to focus on good old security fundamentals.
About the Author
Michael Spohn is a principal security consultant at McAfee Foundstone, where he provides incident
response (IR) and digital forensic services to clients. His duties include creating IR management programsanalyzing and testing existing IR plans, conducting forensic investigations, and providing IR and forensic
training. He is also a member of the McAfee Foundstone Emergency IR Team, which provides emergency
services to clients when an elevated security breach occurs.
About McAfee Foundstone Professional Services
McAfee Foundstone Professional Services, a division of McAfee, offers expert services and education to
help organizations continuously and measurably protect their most important assets from the most critical
threats. Through a strategic approach to security, McAfee Foundstone identifies and implements the right
balance of technology, people, and process to manage digital risk and leverage security investments more
effectively. The company’s professional services team consists of recognized security experts and authors
with broad security experience with multinational corporations, the public sector, and the US military.
1 Kehrer, Paul. “Trustwave’s SpiderLabs Security Advisory TWSL2011-007,” July 2011. https://www.trustwave.com/spiderlabs/advisories/TWSL2011-007.txt2 Apple. “About the security content of iOS 4.3.5 Software Update for iPhone,” July 2011. http://support.apple.com/kb/HT48243 Apple. “About the security content of iOS 4.2.10 Software Update for iPhone,” July 2011. http://support.apple.com/kb/HT4825