workshop 4.1 – linear structural analysis
TRANSCRIPT
Linear Structural Analysis
Workshop 4.1

August 26, 2005Inventory
#002266WS4.1-2
AN
SYS Workbench - Sim
ulationA
NSYS W
orkbench - Simulation
Workshop Supplement
Linear Structural Analysis
Workshop 4.1 - Goals• Workshop 4 consists of a 5 part assembly representing an
impeller type pump. Our primary goals are to analyze the assembly with a preload on the belt of 100N to test:– That the impeller will not deflect more than 0.075mm with the
applied load.– That the use of a plastic pump housing will not exceed the
material’s elastic limits around the shaft bore.
August 26, 2005Inventory
#002266WS4.1-3
AN
SYS Workbench - Sim
ulationA
NSYS W
orkbench - Simulation
Workshop Supplement
Linear Structural Analysis
Workshop 4.1 - Assumptions• We’ll assume the pump housing is rigidly mounted to the
rest of the pump assembly. To simulate this, a frictionless support is applied to the mounting face.
• Similarly, frictionless surfaces on the mounting hole counter bores will be used to simulate the mounting bolt contacts. (Note if accurate stresses were desired at the mounting holes, a “compression only” support would be a better choice).
• Finally, a bolt load (X = 100 N) is used on the pulley to simulate the load from the drive belt. The bolt load will distribute the force over the face of the pulley only where the belt contact occurs (compression only).

August 26, 2005Inventory
#002266WS4.1-4
AN
SYS Workbench - Sim
ulationA
NSYS W
orkbench - Simulation
Workshop Supplement
Linear Structural Analysis
Workshop 4.1 – Contact Assumptions• For the workshop we will use the 2 forms of linear contact
available in DS, bonded and no separation. It’s important to review and understand all assumptions related to contact behavior when including it in an analysis.

August 26, 2005Inventory
#002266WS4.1-5
AN
SYS Workbench - Sim
ulationA
NSYS W
orkbench - Simulation
Workshop Supplement
Linear Structural Analysis
Workshop 4.1 - Start Page• From the launcher start Simulation.
• Choose “Geometry > From File . . . “ and browse to the file “Pump_assy3.x_t”.
• When DS starts, close the Template menu by clicking the ‘X’ in the corner of the window.
August 26, 2005Inventory
#002266WS4.1-6
AN
SYS Workbench - Sim
ulationA
NSYS W
orkbench - Simulation
Workshop Supplement
Linear Structural Analysis
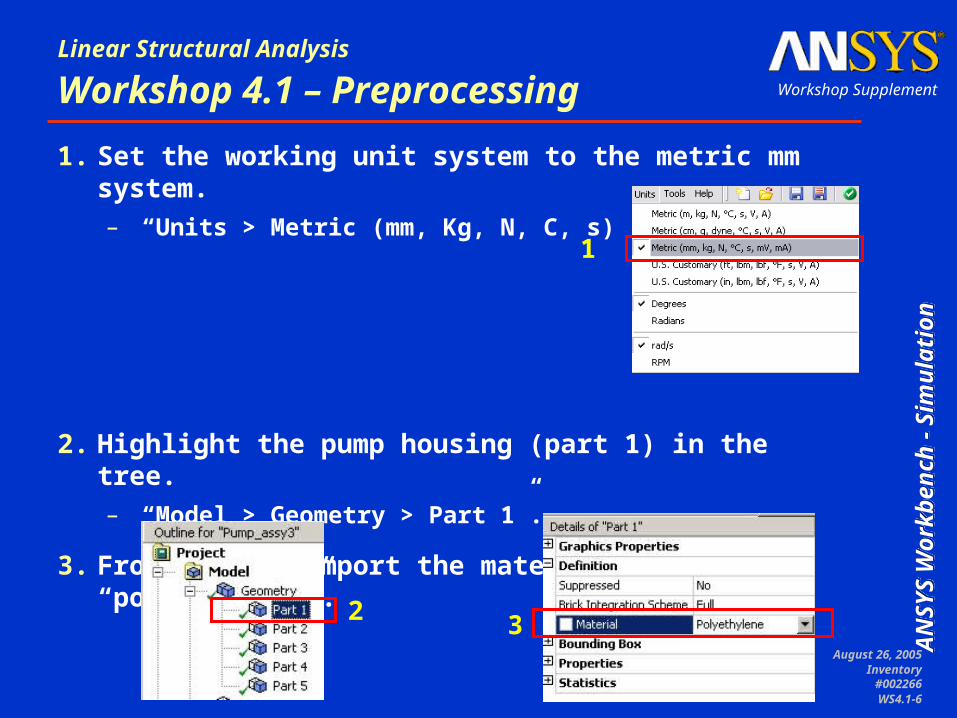
Workshop 4.1 – Preprocessing1. Set the working unit system to the metric mm system.
– “Units > Metric (mm, Kg, N, C, s)”.
2. Highlight the pump housing (part 1) in the tree.– “Model > Geometry > Part 1”.
3. From details import the material “polyethylene”.
2 3
1
August 26, 2005Inventory
#002266WS4.1-7
AN
SYS Workbench - Sim
ulationA
NSYS W
orkbench - Simulation
Workshop Supplement
Linear Structural Analysis
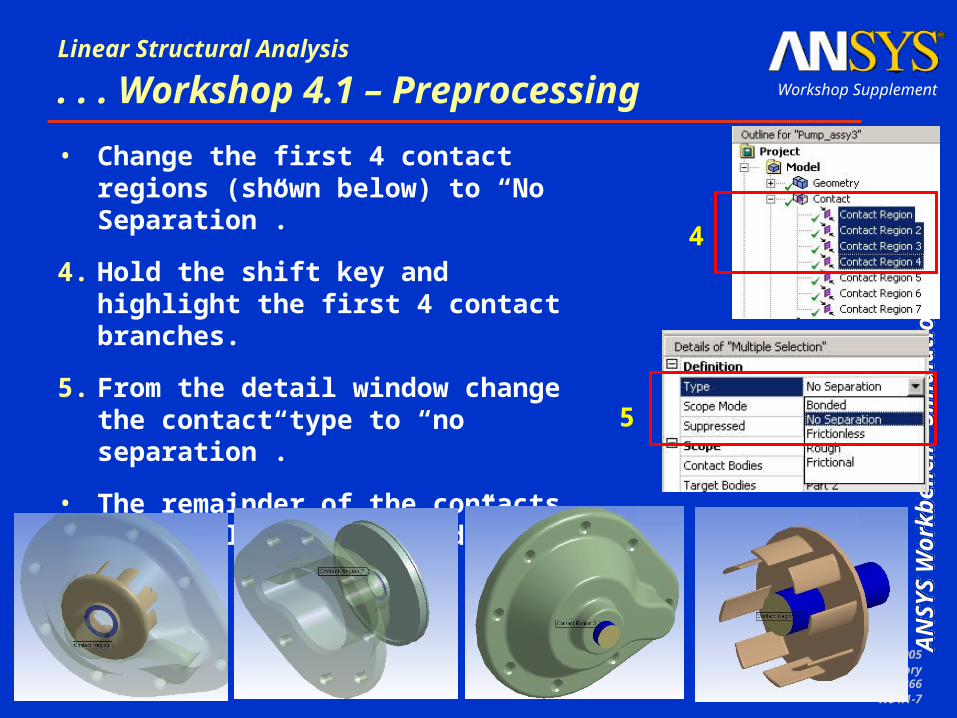
. . . Workshop 4.1 – Preprocessing• Change the first 4 contact regions
(shown below) to “No Separation”.
4. Hold the shift key and highlight the first 4 contact branches.
5. From the detail window change the contact type to “no separation”.
• The remainder of the contacts will be left as “bonded”.
4
5
August 26, 2005Inventory
#002266WS4.1-8
AN
SYS Workbench - Sim
ulationA
NSYS W
orkbench - Simulation
Workshop Supplement
Linear Structural Analysis
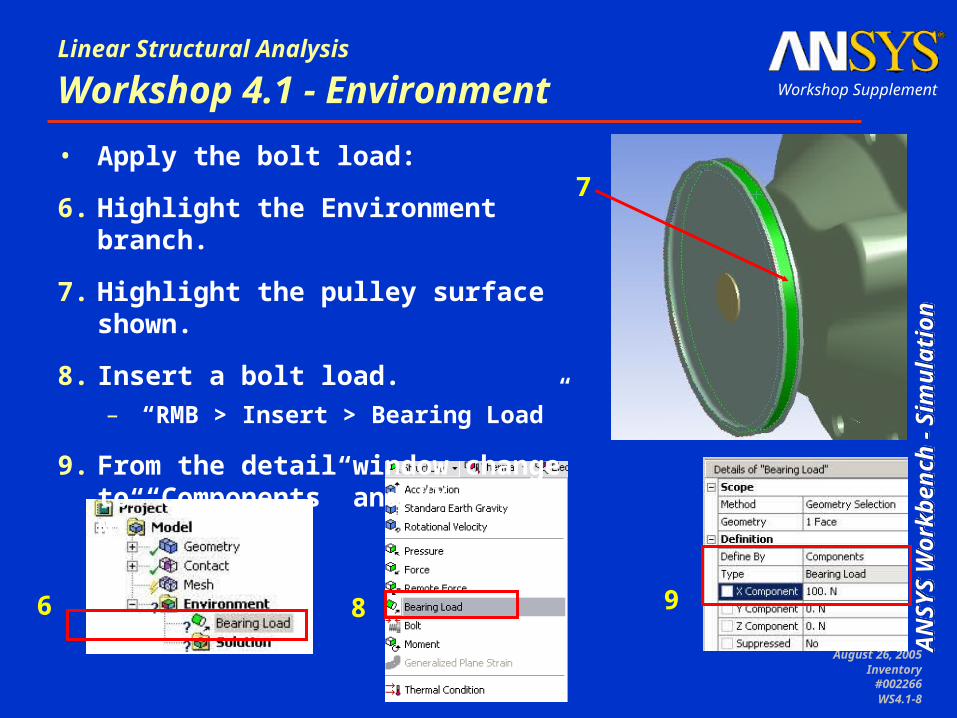
Workshop 4.1 - Environment• Apply the bolt load:
6. Highlight the Environment branch.
7. Highlight the pulley surface shown.
8. Insert a bolt load.– “RMB > Insert > Bearing Load”
9. From the detail window change to “Components” and “X = 100 N”.
7
6 8 9
August 26, 2005Inventory
#002266WS4.1-9
AN
SYS Workbench - Sim
ulationA
NSYS W
orkbench - Simulation
Workshop Supplement
Linear Structural Analysis
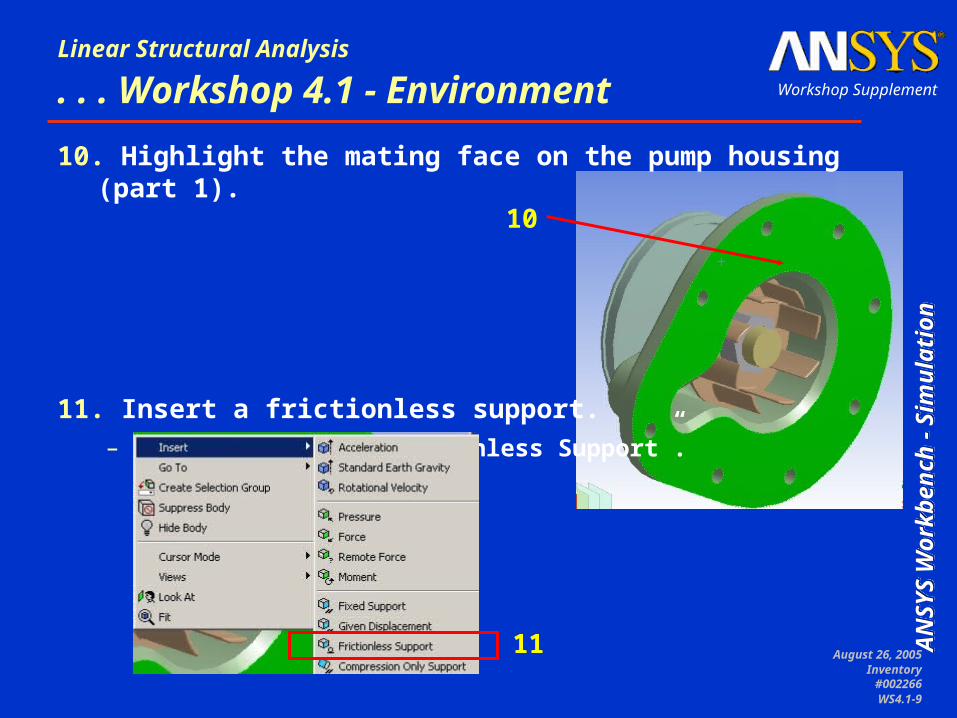
. . . Workshop 4.1 - Environment10. Highlight the mating face on the pump housing (part 1).
11. Insert a frictionless support.– “RMB > Insert > Frictionless Support”.
11
10
August 26, 2005Inventory
#002266WS4.1-10
AN
SYS Workbench - Sim
ulationA
NSYS W
orkbench - Simulation
Workshop Supplement
Linear Structural Analysis
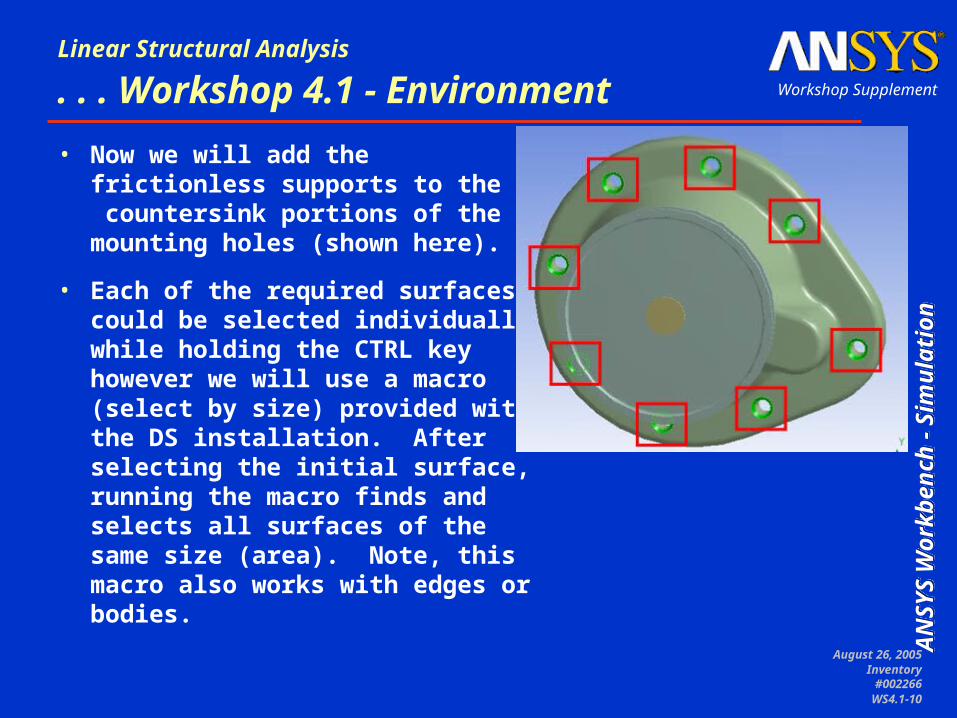
. . . Workshop 4.1 - Environment• Now we will add the frictionless
supports to the 8 countersink portions of the mounting holes (shown here).
• Each of the required surfaces could be selected individually while holding the CTRL key however we will use a macro (select by size) provided with the DS installation. After selecting the initial surface, running the macro finds and selects all surfaces of the same size (area). Note, this macro also works with edges or bodies.
August 26, 2005Inventory
#002266WS4.1-11
AN
SYS Workbench - Sim
ulationA
NSYS W
orkbench - Simulation
Workshop Supplement
Linear Structural Analysis
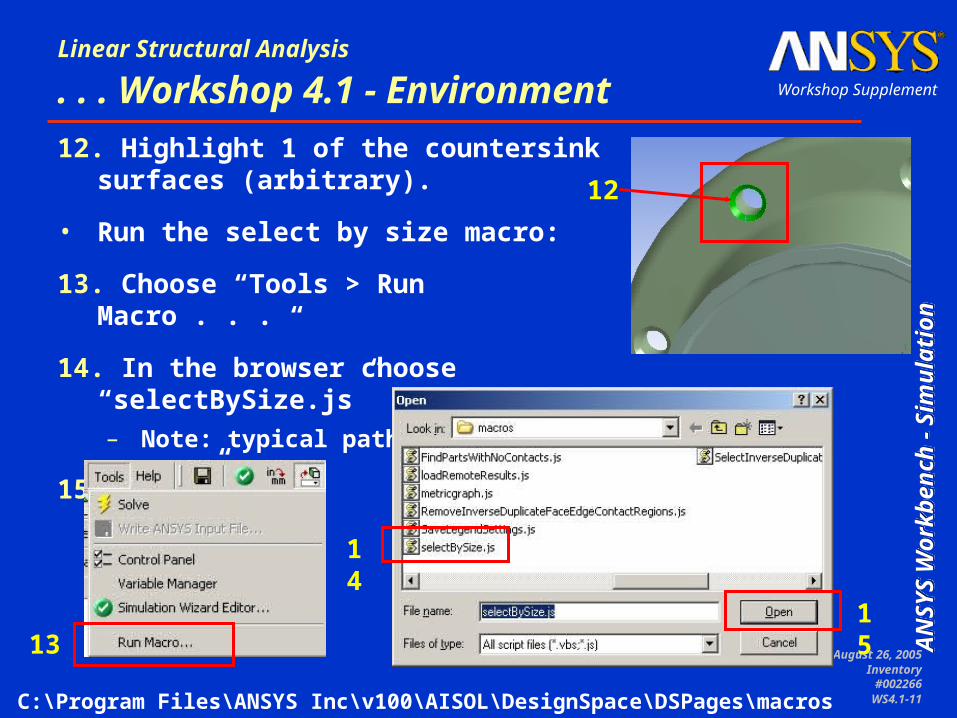
. . . Workshop 4.1 - Environment12. Highlight 1 of the countersink surfaces
(arbitrary).
• Run the select by size macro:
13. Choose “Tools > Run Macro . . . “
14. In the browser choose “selectBySize.js”– Note: typical path shown below.
15. “Open”
13
14
15
12
C:\Program Files\ANSYS Inc\v100\AISOL\DesignSpace\DSPages\macros
August 26, 2005Inventory
#002266WS4.1-12
AN
SYS Workbench - Sim
ulationA
NSYS W
orkbench - Simulation
Workshop Supplement
Linear Structural Analysis
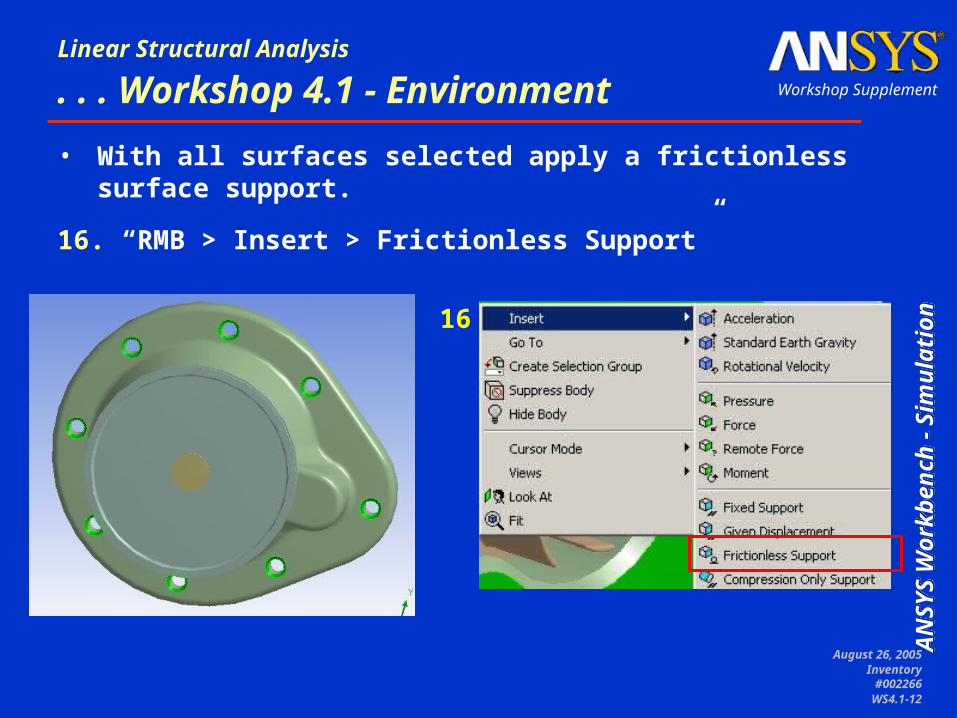
. . . Workshop 4.1 - Environment• With all surfaces selected apply a frictionless surface
support.
16. “RMB > Insert > Frictionless Support”
16
August 26, 2005Inventory
#002266WS4.1-13
AN
SYS Workbench - Sim
ulationA
NSYS W
orkbench - Simulation
Workshop Supplement
Linear Structural Analysis
Workshop 4.1 – Macro Notes• The result of running the selectBySize macro is that all
similarly sized surfaces are automatically added to the selection set as shown on the previous page.
• While the selections here (8 surfaces) would be trivial to select individually, this technique can be a valuable time saver when a large selection set is needed.
• Care should be taken when using select by size. All entities of the same size will be selected. Make sure “extra” selections do not occur.
• Other macros are also available in the same directory. Macros are written in Jscript and can be opened and viewed using typical text editors such as Notepad.
August 26, 2005Inventory
#002266WS4.1-14
AN
SYS Workbench - Sim
ulationA
NSYS W
orkbench - Simulation
Workshop Supplement
Linear Structural Analysis
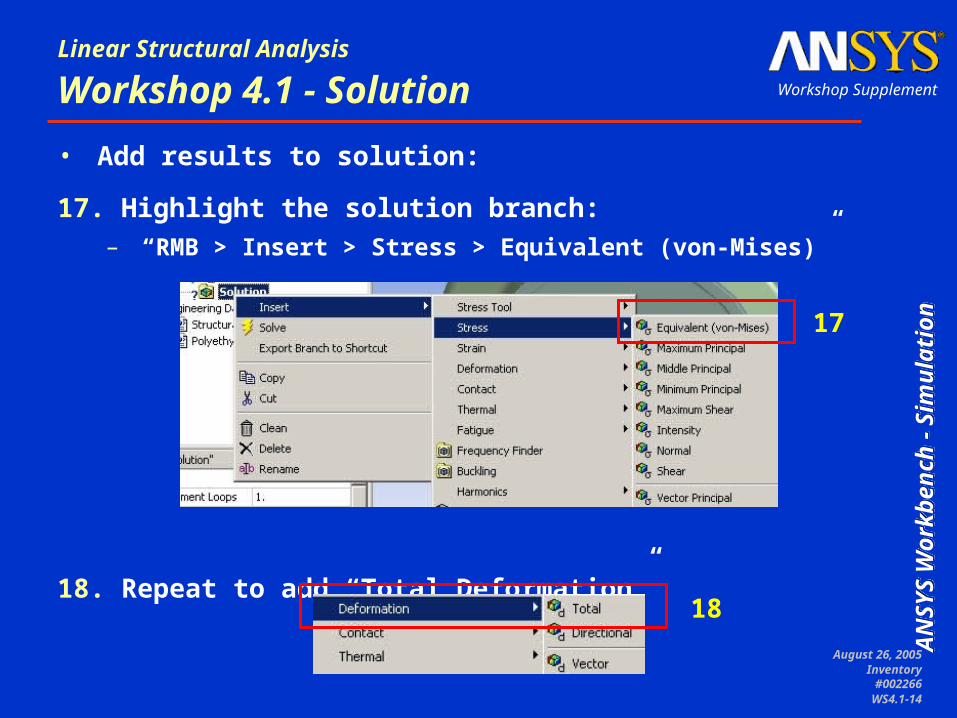
Workshop 4.1 - Solution• Add results to solution:
17. Highlight the solution branch:– “RMB > Insert > Stress > Equivalent (von-Mises)”
18. Repeat to add “Total Deformation”
17
18
August 26, 2005Inventory
#002266WS4.1-15
AN
SYS Workbench - Sim
ulationA
NSYS W
orkbench - Simulation
Workshop Supplement
Linear Structural Analysis
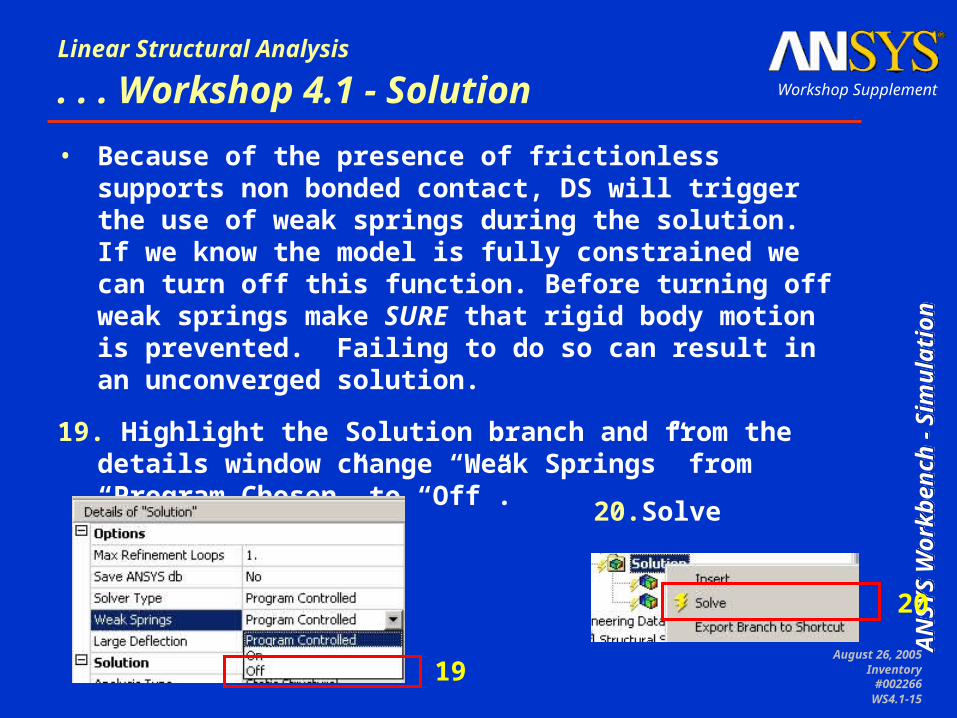
. . . Workshop 4.1 - Solution• Because of the presence of frictionless supports non
bonded contact, DS will trigger the use of weak springs during the solution. If we know the model is fully constrained we can turn off this function. Before turning off weak springs make SURE that rigid body motion is prevented. Failing to do so can result in an unconverged solution.
19. Highlight the Solution branch and from the details window change “Weak Springs” from “Program Chosen” to “Off”.
19
20. Solve
20
August 26, 2005Inventory
#002266WS4.1-16
AN
SYS Workbench - Sim
ulationA
NSYS W
orkbench - Simulation
Workshop Supplement
Linear Structural Analysis
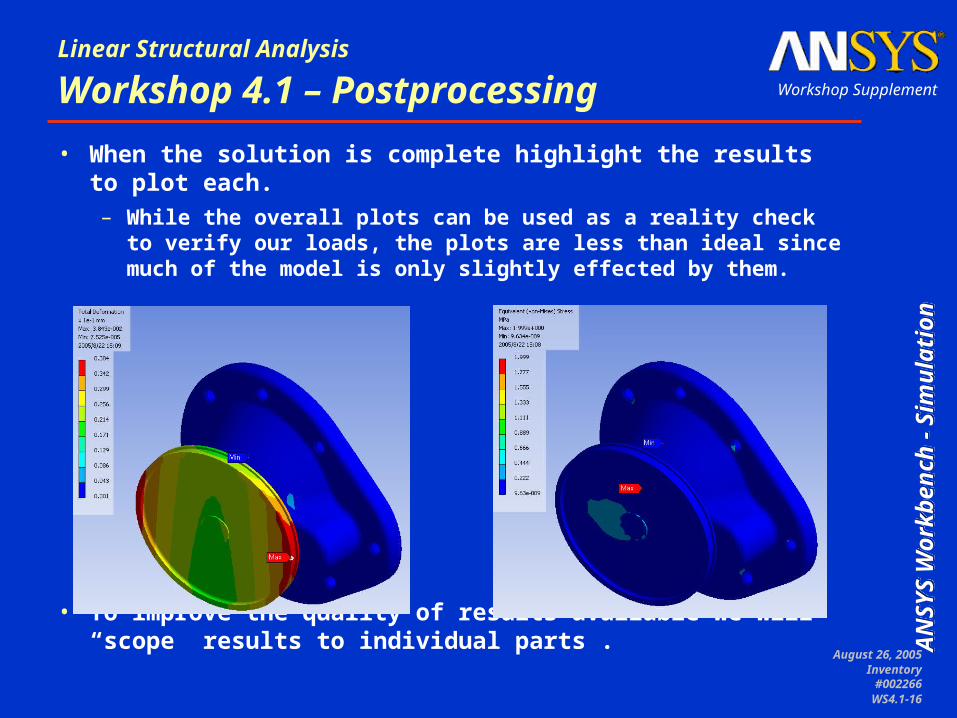
Workshop 4.1 – Postprocessing• When the solution is complete highlight the results to plot
each. – While the overall plots can be used as a reality check to verify
our loads, the plots are less than ideal since much of the model is only slightly effected by them.
• To improve the quality of results available we will “scope” results to individual parts”.

August 26, 2005Inventory
#002266WS4.1-17
AN
SYS Workbench - Sim
ulationA
NSYS W
orkbench - Simulation
Workshop Supplement
Linear Structural Analysis
. . . Workshop 4.1 – Postprocessing21. Highlight the “Solution” branch and
switch the selection filter to “Body” select mode.
22. Select the impeller (part 2).
• Insert equivalent stress.– “RMB > Insert > Stress > equivalent (von
Mises)”
• Notice the detail for the new result indicates a scope of 1 Body.
21
22

August 26, 2005Inventory
#002266WS4.1-18
AN
SYS Workbench - Sim
ulationA
NSYS W
orkbench - Simulation
Workshop Supplement
Linear Structural Analysis
. . . Workshop 4.1 – Postprocessing• Repeat the procedure on the previous page to insert “Total
Deformation” results for the impeller part.
• Repeat the procedure to add individually scoped stress and total deformation results to the pump housing (part 1).
• Rename the new results as shown here to simplify postprocessing.
• Solve again. – Note: adding new results and resolving the model will not cause
a complete solution to take place. Results are stored in the database and new quantities requires only an update.

August 26, 2005Inventory
#002266WS4.1-19
AN
SYS Workbench - Sim
ulationA
NSYS W
orkbench - Simulation
Workshop Supplement
Linear Structural Analysis
. . . Workshop 4.1 – Postprocessing• By checking the impeller deformation we can verify that
one of our goals is met. The maximum deformation is approximately 0.024mm (goal < 0.075mm).
August 26, 2005Inventory
#002266WS4.1-20
AN
SYS Workbench - Sim
ulationA
NSYS W
orkbench - Simulation
Workshop Supplement
Linear Structural Analysis
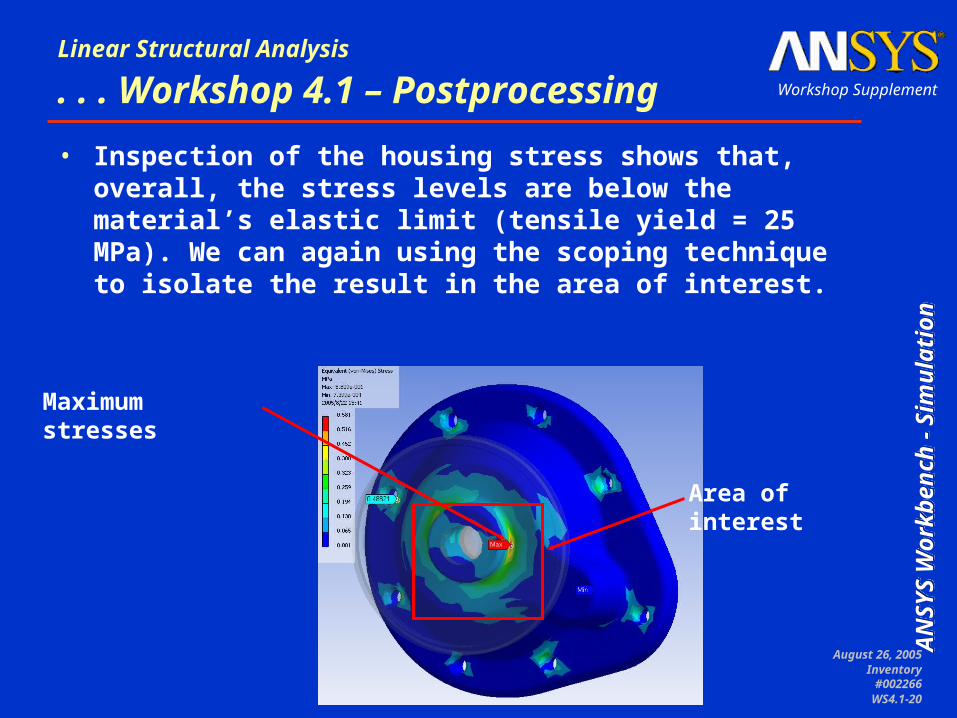
. . . Workshop 4.1 – Postprocessing• Inspection of the housing stress shows that, overall, the
stress levels are below the material’s elastic limit (tensile yield = 25 MPa). We can again using the scoping technique to isolate the result in the area of interest.
Maximum stresses
Area of interest

August 26, 2005Inventory
#002266WS4.1-21
AN
SYS Workbench - Sim
ulationA
NSYS W
orkbench - Simulation
Workshop Supplement
Linear Structural Analysis
. . . Workshop 4.1 – Postprocessing• To simplify scoping first hide the pulley and impeller parts.
23. Select the pulley then “RMB > Hide Body” (note: although we are hiding the entire body this also works while in face or edge select mode).
• Repeat for the impeller part.
23
August 26, 2005Inventory
#002266WS4.1-22
AN
SYS Workbench - Sim
ulationA
NSYS W
orkbench - Simulation
Workshop Supplement
Linear Structural Analysis
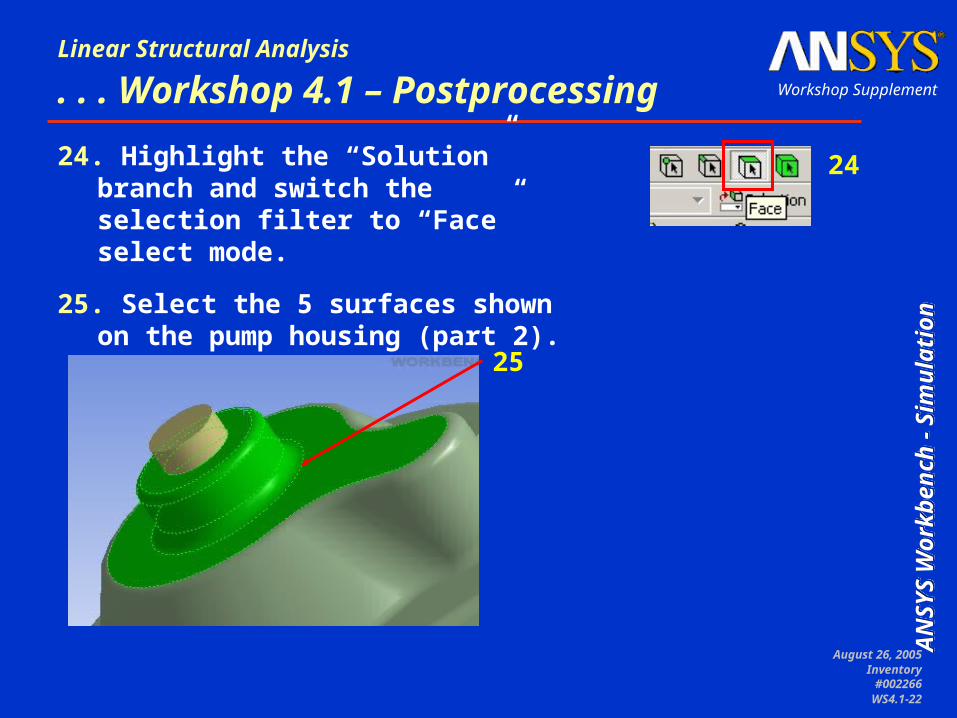
. . . Workshop 4.1 – Postprocessing24. Highlight the “Solution” branch and
switch the selection filter to “Face” select mode.
25. Select the 5 surfaces shown on the pump housing (part 2).
24
25

August 26, 2005Inventory
#002266WS4.1-23
AN
SYS Workbench - Sim
ulationA
NSYS W
orkbench - Simulation
Workshop Supplement
Linear Structural Analysis
. . . Workshop 4.1 – Postprocessing• Insert equivalent stress.
– “RMB > Insert > Stress > equivalent (von Mises)”
• Notice the detail for the new result indicates a scope of 1 Body.
• Select the back face (shown here) and repeat the process.
August 26, 2005Inventory
#002266WS4.1-24
AN
SYS Workbench - Sim
ulationA
NSYS W
orkbench - Simulation
Workshop Supplement
Linear Structural Analysis
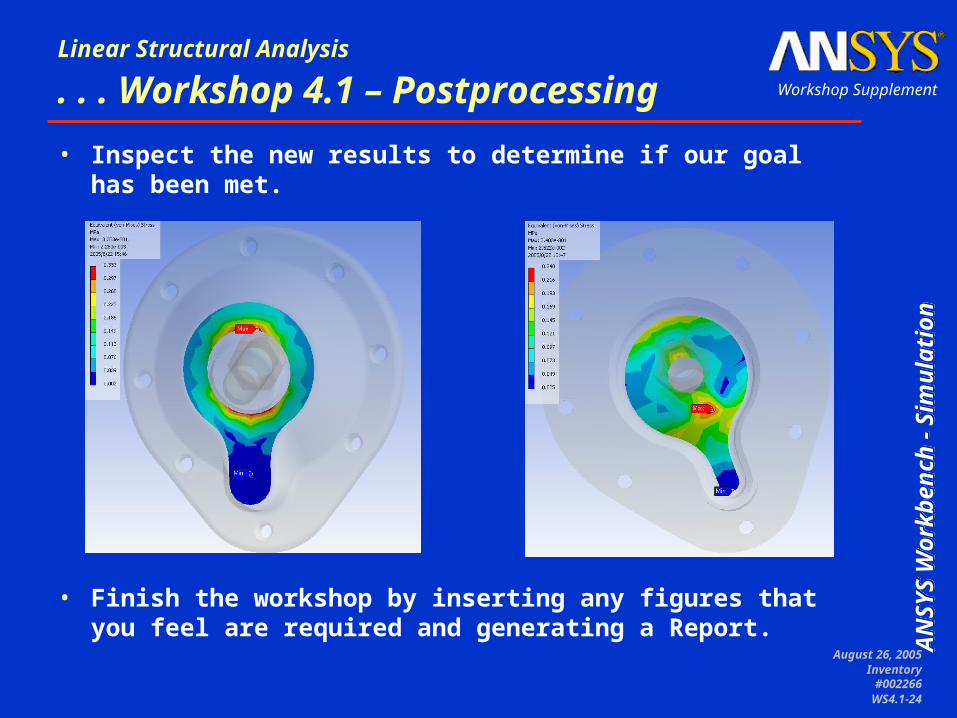
. . . Workshop 4.1 – Postprocessing• Inspect the new results to determine if our goal has been
met.
• Finish the workshop by inserting any figures that you feel are required and generating a Report.