working with themes, style sets, backgrounds, quick parts, and text...
TRANSCRIPT

201
Working with Themes, Style Sets, Backgrounds, Quick Parts, and Text Boxes 7
KEY TERMS • AutoText
• building blocks
• document theme
• drop cap
• fi eld
• pull quote
• Style Set
• text box
• Unicode
• watermarks
LESSON SKILL MATRIX
Skill Exam Objective Objective Number
Formatting, Creating, and Customizing a Theme Change document themes. 1.3.2
Formatting a Document Using Style Sets Change document Style Sets. 1.3.3
Formatting a Document’s Background Insert watermarks. 1.3.5
Using Quick Parts in a Document Insert Quick Parts.
Append text to a document.
Insert Built-in Fields.
5.1.1
2.1.1
2.1.6
Applying and Manipulating Text Boxes Insert text boxes. 5.1.2
Making Text Graphically Appealing and Inserting
a Special Character
Insert special characters (©, ™, ₤). 2.1.7
© n
yul/
iSto
ckp
hot
o

Lesson 7202
Y ou are a content manager for Flatland Hosting Company, a position in
which you are responsible for writing and editing all client material, such
as hosting guidelines and agreements. When creating and revising
documents, several Word commands can help you work more effi ciently.
In this lesson, you learn to apply a theme to a document, and add content
to a document using Quick Parts, and insert page numbers, headers,
and footers.
FORMATTING, CREATING, AND CUSTOMIZING A THEME
Word provides features such as Themes to produce creative and professional documents. In this lesson, you learn to change the appearance of a document using an existing theme, and then create and customize the theme.
Formatting a Document with a Theme
Predefi ned formatting preferences allow you to change the overall appearance of the document by selecting and applying a theme. A document theme is a set of predefi ned formatting options
The Bottom Line
SOFTWARE ORIENTATION
The Design Tab
The Design tab is new in Word 2013 and it offers several different ways to format a document using Themes or selecting from the Document Formatting gallery. Changing the appearance of the document can capture the attention of your audience. After opening a document, you can access the commands on the Design tab, shown in Figure 7-1. Use this fi gure as a refer-ence throughout this lesson as well as the rest of the book.
Document Formatting group
Page Background group
Word provides options to change the appearance of a document with preset, built-in format-ting Style Sets using themes or selecting from the Document Formatting gallery. Once a theme or document formatting is applied, the colors, fonts, and effects can be changed or customized. You also have the option to set the formatting as your default without having to reset each time you work on a new document. Another new feature in Word 2013 is Paragraph Spacing—the line and paragraph spacing is quickly changed to predefi ned values. Changing the appearance of a document’s background will defi nitely grab someone’s attention.
Figure 7-1
Design tab
© nyul/iStockphoto

Working with Themes, Style Sets, Backgrounds, Quick Parts, and Text Boxes 203
Figure 7-2
Colors menu
Theme fonts contain a heading font and a body text font. Click the Fonts button to change the fonts for the current theme, as shown in Figure 7-3.
that includes theme colors, fonts, and effects. In this exercise, you learn how to apply a document theme in Word.
Theme colors contain four text and background colors, six accent colors, and two hyperlink col-ors. Click the Colors button to change the colors for the current theme as shown in Figure 7-2.

Lesson 7204
Theme effects are sets of lines and fi ll effects. Click the Effects button to change the effects for the current theme, as shown in Figure 7-4.
Figure 7-3
Fonts menu
Figure 7-4
Effects menu

Working with Themes, Style Sets, Backgrounds, Quick Parts, and Text Boxes 205
STEP BY STEP Format a Document with a Theme
OPEN the Hosting document from the data fi les for this lesson.
1. On the Design tab, in the Document Formatting group, click Themes ; the Themes menu
opens , as shown in Figure 7-5.
This document has already been preformatted with styles.
In Lesson 3, you learn to format text using styles. Cross Ref
Figure 7-5
Document Themes
2. Place your mouse pointer over any built-in theme and notice that the document
changes to display a live preview of the theme.
Applying a theme changes the overall design of the entire document.
3. Click the View theme and the elements are applied to the document. Scroll down and
view the changes in the document.
4. SAVE the document as Hosting Term in the lesson folder on your fl ash drive.
PAUSE. LEAVE the document open to use in the next exercise.
Take Note
How do you change a document’s theme?
1.3.2

Lesson 7206
Creating and Customizing a Document Theme
In a business environment, the company might want to show consistency by customizing a theme to be used for reports throughout the organization. In this exercise, you create, customize, and apply a new theme to a document.
STEP BY STEP Create and Customize a Document Color
USE the document that is open from the previous exercise.
1. In the Document Formatting group, click the Colors button to open the Colors menu
(refer to Figure 7-2). The Colors menu contains predefi ned formatting colors with four
text and background colors, six accent colors, and two hyperlink colors. These colors
can be customized and saved with a new name.
2. At the bottom of the Colors menu, click Customize Colors ; the Create New Theme
Colors dialog box opens (see Figure 7-6).
Figure 7-6
Create New Theme Colors dialog box
Four text/Background
colorsPreview of your selection
Defines a new custom name
Six Accent colors
Resets back to
default colors
A hyperlink is a link to a
document or a Web site
Throughout this chapter, you see information that appears within brackets, such as [your e-mail address]. The information contained in the brackets is intended to be directions for you rather than something you actually type word for word. It instructs you to perform an action or substi-tute text. Do not type the actual text that appears within brackets.
3. In the Name box, replace Custom 1 by typing Corporate [your initials].
4. Click Save ; the dialog box closes and you have defi ned a new custom theme color
name based on default colors.
5. Click Colors and under the Custom section, place your insertion point over Corporate
[your initials] . Right-click the theme name, and then click Edit from the shortcut menu
that appears. The Edit Theme Colors dialog box appears.
6. In the list of theme colors, click the Accent 2 drop-down arrow to produce a menu of
colors for this element.
Take Note
Another WayYou can edit the
Colors and Fonts in the Styles group, under Styles or use the shortcut keys, ALT 1 CTRL 1 SHIFT 1 S .

Working with Themes, Style Sets, Backgrounds, Quick Parts, and Text Boxes 207
Figure 7-7
Sample bevel shapewith effects
Applying one of the Effects
produces a different effect
on the bevel shape
3. SAVE the document as Hosting Term1 in your fl ash drive in the lesson folder.
PAUSE. LEAVE the document open to use in the next exercise.
How would you create a customized effect and apply
it to a document?
1.3.2
7. Select Tan, Text 2, Darker 50% .
8. Click Save . You changed the default color to a specifi c color and created your own
custom theme colors for your document.
9. SAVE the document in the lesson folder on your fl ash drive.
PAUSE. LEAVE the document open to use in the next exercise.
STEP BY STEP Create and Customize a Document Font
USE the document that is open from the previous exercise.
1. Click the Fonts button to produce the Fonts menu (refer to Figure 7-3). In the menu,
click Customize Fonts ; the Create New Theme Fonts dialog box opens.
2. In the Name box , replace Custom 1 by typing Corporate Fonts [your initials] .
3. Change the Heading Font and Body Font to Arial .
Notice the preview of your font choices that appears in the Sample pane of the
dialog box.
4. Click Save to close the dialog box and apply your font choices to the document.
5. SAVE the document in the lesson folder on your fl ash drive.
PAUSE. LEAVE the document open to use in the next exercise.
A quick way to change fonts is by typing the font name in the Font box.
STEP BY STEP Create and Customize Document Effects
USE the document that is open from the previous exercise.
1. Position the insertion point anywhere in the document.
2. Click the Effects button and select Glossy from the menu that appears (refer to Figure 7-4).
When applying shapes to your document, such as a bevel shape, the shape displays
based on the effect you selected. Notice the change in the bevel shape on page 1 next
to the second paragraph under the heading Introduction (see Figure 7-7).
How would you create a customized color and apply
it to a document?
1.3.2
How would you create a customized font and apply
it to a document?
1.3.2
Take Note

Lesson 7208
Document formatting is the same throughout all Offi ce programs , and documents can share the same appearance.
Applying Paragraph Spacing
Applying the paragraph spacing changes the line and paragraph spacing for the entire document. You can apply one of the predefi ned options or customize your own. When you customize para-graph spacing, the Manage Styles dialog box opens and you have the option to create a new style, edit styles, and restrict styles. Note that the Manage Styles feature will not be covered in this les-son because it is an advanced command. You also have an option to return the document back to the default settings.
STEP BY STEP Apply Paragraph Spacing
USE the document that is open from the previous exercise.
1. Position the insertion point anywhere in the fi rst paragraph. In the Document
Formatting group, click the Paragraph Spacing button.
The built-in menu appears (see Figure 7-8).
Take Note
Figure 7-8
Paragraph Spacing Style Set
Built-In settings
Default settings
Option to customize
the Paragraph Spacing
2. Hover over each of the built-in settings and notice the changes on the whole document.
Also, a ScreenTip appears displaying the line and paragraph setting for that option.
Select Open .
3. SAVE the document as Hosting Term2 in your fl ash drive in the lesson folder.
PAUSE. LEAVE the document open to use in the next exercise.
FORMATTING A DOCUMENT USING STYLE SETS
Word 2013 has a new group called Document Formatting on the Design tab. The Document Format-ting group contains many different Style Sets that change the appearance of the whole document. The Bottom Line

Working with Themes, Style Sets, Backgrounds, Quick Parts, and Text Boxes 209
Applying a Style Set to a Document
In Lesson 3, you learn to apply styles to text using the gallery of styles, and in this section you apply Style Sets that will affect the whole document. These Style Sets are predefi ned styles with fonts and paragraph spacing defi ned. You have an option to reset the document back to its default or save a new Style Set. In this exercise, you learn to apply a Style Set.
STEP BY STEP Apply a Style Set to a Document
USE the document that is open from the previous exercise.
1. Hover the mouse over a few of the built-in Style Sets in the Document Formatting
group and watch how the appearance of the document changes. Note, before applying
Style Sets, the document must contain styles.
In Lesson 3, you learn to apply styles to text and modify styles.
2. Click the More button and select Lines (Distinctive) as shown in Figure 7-9.
Cross Ref
Figure 7-9
Document Formatting Style Sets
3. SAVE the document as Hosting Term3 in your fl ash drive in the lesson folder, and then
CLOSE the fi le.
PAUSE. LEAVE the document open to use in the next exercise.
FORMATTING A DOCUMENT’S BACKGROUND
Word’s enhanced features allow the user to produce a creatively formatted document by changing the background color, inserting a watermark, and adding a border to the document.
Inserting a Page Color
Adding a background color to the title page of a report conveys originality. For example, you might want to distinguish your research paper from others by adding a background color to the fi rst page. It is important to use background colors in moderation and to choose a page color that will not interfere with the text. If text is dark, for example, the background color should be light. If text is light, a dark background would improve the document’s readability. Word also lets you
How would you change a document’s style?
1.3.3
The Bottom Line

Lesson 7210
add interesting Fill Effects for the Page Background, such as gradients, textures, patterns, and pictures. In this exercise, you learn to insert a page color in a document.
STEP BY STEP Insert a Page Color
OPEN the Hosting document from the data fi les for this lesson.
1. Click the Design tab.
2. In the Page Background group, click the Page Color button to open the color menu and
gallery, as shown in Figure 7-10.
Figure 7-10
Page Color menu
3. Click to select White, Background 1, Darker 5% ; the page color is applied.
4. SAVE the document as Hosting Term 4 in your fl ash drive in the lesson folder.
PAUSE. LEAVE the document open to use in the next exercise.
Formatting the Page Color Background
You can apply formatting to a page color background with one color or with a fi ll effect, such as gradient, texture, pattern, or a picture. A gradient fi ll is a shape fi ll that changes from one color to another based on the shading style selected or applied with one of the preset colors. The layout of the page colors provides emphasis to the document. In this exercise, you learn to format the page background using two colors and changing the shading style.
STEP BY STEP Format the Page Color Background
USE the document that is open from the previous exercise.
1. With the Design tab active, click the Page Color button, to display the menu.
2. Click Fill Effects . The Fill Effects dialog box opens with the Gradient tab active.
3. Under the Colors section, select Preset .
4. Click the Preset colors drop-down arrow to view available background colors in the
Sample area.

Working with Themes, Style Sets, Backgrounds, Quick Parts, and Text Boxes 211
5. In the Gradient tab under the Colors section, change your selection to Two colors . Two
options appear, Color 1 and Color 2.
6. Under Color 2, click the drop-down arrow to produce the color palette. Select Black, Text 1,
Lighter 50% . The selected color appears in the box under Color 2 (see Figure 7-11).
Figure 7-11
Fill Effects dialog box
7. Under the Variants section, samples of the two colors are displayed. Under the Shading
Styles section, you have choices on how the style should appear in the document.
Select From Center . Notice the lower-right corner produces the Color 1 in the Center
and Color 2 outside. Click OK .
8. SAVE the document as Hosting Term5 in the lesson folder on your fl ash drive.
PAUSE. LEAVE the document open to use in the next exercise.
Inserting a Watermark
In business, some documents might contain sensitive information, and the nature of a document’s status should be clearly conveyed on its pages. Word provides built-in text called watermark s that display lightly behind text as words, such as confi dential , draft , or urgent . Watermarks can be customized to include text or images, including company logos. In this exercise, you learn to insert a watermark using text, an image, and a custom watermark.
STEP BY STEP Insert a Watermark
USE the document that is open from the previous exercise.
1. In the Page Background group of the Design tab, click the Watermark menu and select
Confi dential 1 .
The watermark is placed behind the text and is semitransparent.
2. SAVE the document with the same fi lename in the lesson folder on your fl ash drive.
PAUSE. LEAVE the document open to use in the next exercise. How do you insert a watermark?
1.3.5
Lesson 7212
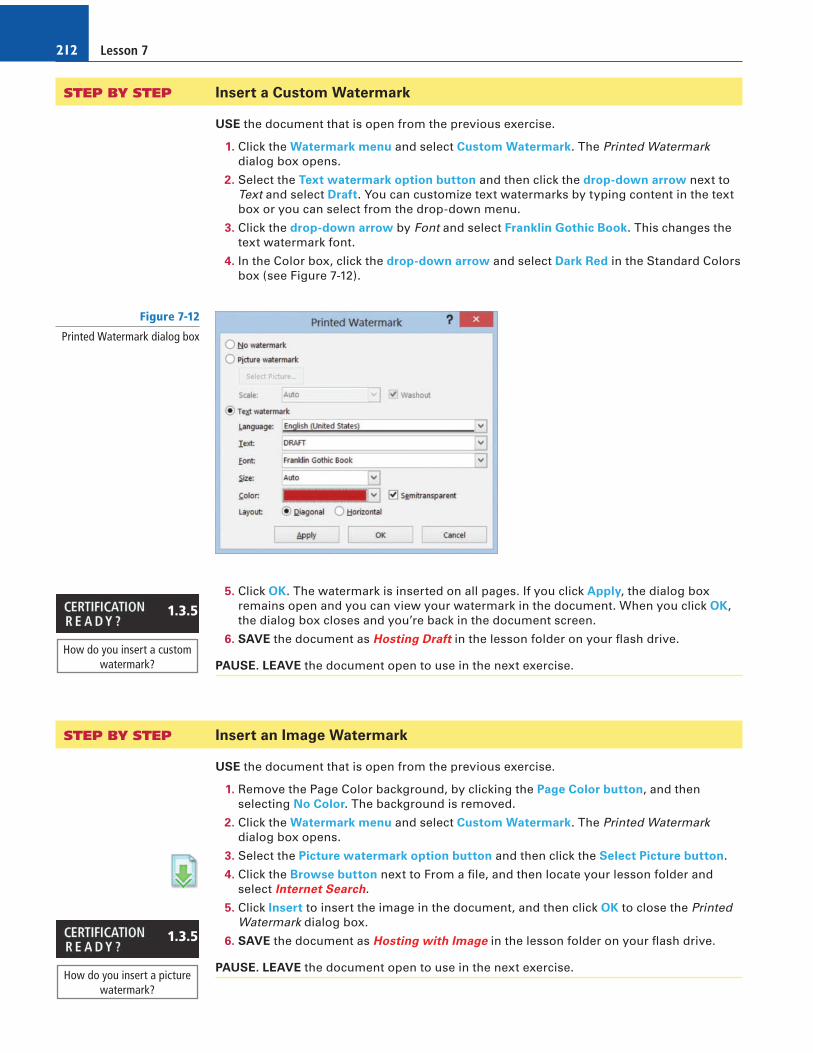
STEP BY STEP Insert a Custom Watermark
USE the document that is open from the previous exercise.
1. Click the Watermark menu and select Custom Watermark . The Printed Watermark
dialog box opens.
2. Select the Text w atermark option button and then click the drop-down arrow next to
Text and select Draft . You can customize text watermarks by typing content in the text
box or you can select from the drop-down menu.
3. Click the drop-down arrow by Font and select Franklin Gothic Book . This changes the
text watermark font.
4. In the Color box , click the drop-down arrow and select Dark Red in the Standard Colors
box (see Figure 7-12).
Figure 7-12
Printed Watermark dialog box
5. Click OK . The watermark is inserted on all pages. If you click Apply , the dialog box
remains open and you can view your watermark in the document. When you click OK ,
the dialog box closes and you’re back in the document screen.
6. SAVE the document as Hosting Draft in the lesson folder on your fl ash drive.
PAUSE. LEAVE the document open to use in the next exercise.
STEP BY STEP Insert an Image Watermark
USE the document that is open from the previous exercise.
1. Remove the Page Color background, by clicking the Page Color button, and then
selecting No Color . The background is removed.
2. Click the Watermark menu and select Custom Watermark . The Printed Watermark
dialog box opens.
3. Select the Picture w atermark option button and then click the Select Picture button.
4. Click the Browse button next to From a fi le, and then locate your lesson folder and
select Internet Search .
5. Click Insert to insert the image in the document, and then click OK to close the Printed
Watermark dialog box.
6. SAVE the document as Hosting with Image in the lesson folder on your fl ash drive.
PAUSE. LEAVE the document open to use in the next exercise. How do you insert a picture
watermark?
1.3.5
How do you insert a custom watermark?
1.3.5

Working with Themes, Style Sets, Backgrounds, Quick Parts, and Text Boxes 213
STEP BY STEP Remove a Watermark
USE the document that is open from the previous exercise.
1. Open the Watermark menu and select Remove Watermark . The watermark is removed
from the document.
2. Click the Undo button.
3. SAVE the document in the lesson folder on your fl ash drive, and then CLOSE the fi le.
PAUSE. LEAVE Word open for the next exercise.
Later in this lesson, you learn to insert a watermark using the Building Blocks Organizer.
Adding a Page Border
The Page Borders command allows you to insert a border around a document’s page. Adding a border improves the appearance of the document. Applying elements by changing the color, width, and style adds emphasis to the page. In this lesson, you learn to add elements to a page border and insert them into a document.
STEP BY STEP Add a Page Border
1. OPEN the Hosting Term5 document you created earlier.
2. In the Page Background group of the Design tab, click the Page Borders button. The
Borders and Shading dialog box appears with Page Border as the active tab.
3. In the Setting section, click the Shadow option. Notice the Preview area displays a
shadow effect on the bottom and right border.
4. Click the drop-down arrow on the Color menu and choose Black, Text 1, Lighter 5% .
You apply a specifi c color to the border.
5. Click the drop-down arrow on the Width menu and choose 2 1/4 pt . The width of the
border is increased to provide emphasis.
6. Click the drop-down arrow on the Apply to menu and click This section–First page only
as shown in Figure 7-13. The page border is applied only to the fi rst page of this section.
Cross Ref
Figure 7-13
Borders and Shading dialog box
Available options on
where to apply the border

Lesson 7214
7. Click OK .
Scroll and review your document, and notice that the border does not appear on
other pages.
8. Select the bevel shape on page 1 and press Delete . Hint: you need to see a solid border
to delete the shape.
9. SAVE the document as Hosting Term6 in the lesson folder on your fl ash drive.
PAUSE. LEAVE the document open to use in the next exercise.
In Lesson 4, you learn to place a border around text and paragraphs using the Borders and Shading dialog box.
USING QUICK PARTS IN A DOCUMENT
Building blocks contain built-in reusable content such as text, graphics, and objects. Building blocks are easily managed and inserted in a document for a quick format. Building blocks are or-ganized in galleries and sorted by category. In the Building Blocks gallery, you can insert cover pages, headers, footers, page numbers, text boxes, and watermarks. In this exercise, you learn to use built-in building blocks and insert fi elds in a document.
Using Built-In Building Blocks
Another term for b uilding b locks is AutoText , and both features are used the same way. Word pro-vides a number of predefi ned building blocks or you can create or customize your own building blocks to be used in other documents. The Building Blocks Organizer provides a way to manage building blocks by editing, deleting, and/or inserting them. In the left pane of the dialog box, the built-in building blocks are listed by name; the Gallery column indicates the gallery that contains each building block, and the Category column indicates each element’s general type, whereas the Template column indicates within which template the element is stored. You can use the buttons at the bottom of the dialog box to delete and edit selected building blocks. The right pane previews your selections (see Figure 7-15).
In this exercise, you learn to use built-in building blocks and insert fi elds in a document.
STEP BY STEP Use Built-In Building Blocks
USE the document that is open from the previous exercise.
1. On the Insert tab, in the Text group, click the Quick Parts button to display the Quick
Parts menu, as shown in Figure 7-14.
Cross Ref
The Bottom Line
Figure 7-14
Quick Parts menu
2. Click the Building Blocks Organizer menu option to display the Building Blocks
Organizer dialog box, as shown in Figure 7-15.

Working with Themes, Style Sets, Backgrounds, Quick Parts, and Text Boxes 215
3. Click the Name heading to sort the building blocks by name.
4. Scroll down the list and select Confi dential 1 W atermark .
You can adjust the Name column by dragging the resize bar to the right to change the width.
5. Click the Insert button. The Confi dential watermark appears behind the text on every
page.
6. Position the insertion point at the beginning of the fi rst paragraph under Introduction.
7. Display the Building Blocks Organizer dialog box.
8. Click the Gallery heading to sort the building blocks by gallery.
9. Scroll down and select Austin Quote from the Text Box gallery. Click Insert and a pull
quote is inserted in the document as shown in Figure 7-16. You can type text in the
placeholders or drag and drop text in the area.
Troubleshooting
Figure 7-15
Building Blocks Organizer
Preview area
Name and description
of building blockOptions to edit
properties,
delete, and insert
Click to sort
the headings
How would you insert a watermark using a
Quick Part?
5.1.1

Lesson 7216
10. Under the heading, Introduction , select the second paragraph beginning with
Questions or comments . . . .
11. Move the selected text inside the quote area by dragging and dropping.
12. Use the Show/Hide Editing Marks button to delete both line breaks after the fi rst
paragraph under Introduction .
13. Select the text box, and the Layout Options button appears on the right side of the
text box.
14. Click the Layout Options button to open the menu. Options are available on
laying out the text box in the document.
15. Click the See more … link to open the Layout dialog box.
16. Click the Text Wrapping tab and select Square .
17. Click the Left only option button under the Wrap text section (see Figure 7-17). Click OK .
Figure 7-16
Document with Text BoxPull Quote
Figure 7-17
Layout dialog box

Working with Themes, Style Sets, Backgrounds, Quick Parts, and Text Boxes 217
18. Place your pointer on the text box border—the pointer changes to four arrows to
allow you to drag and drop. Drag the quote to the end of the fi rst paragraph until the
last seven lines of the paragraph wrap around it (see Figure 7-18).
Figure 7-18
Document with Text BoxPull Quote wrapped
around paragraph
Layout Options
button appears when
Text Box is selected
Deselect the text box and select again to see the border around the text box.
19. Press Ctrl 1 End to move the insertion point to the end of the document.
20. Display the Building Blocks Organizer dialog box.
21. Scroll down and select Motion Sidebar from the Text Box gallery.
22. Click Insert . The text box is inserted at the end of the document and positioned on the
left side of the document. Your next step is to insert text into the text box.
23. Select the paragraph above Refusal of Service beginning with You and Flatland Hosting
further agree . . . When selecting the paragraph, do not select the paragraph mark,
because this will avoid displaying the horizontal line in the Text Box twice.
24. Change the font color to white so that the text will be visible on the sidebar.
25. Drag and drop the selection in the text box.
26. At the top of the text box, delete the [Sidebar Title] placeholder and blank line to move
the text up one line.
27. SAVE the document as Hosting Term 7 in the lesson folder on your fl ash drive.
PAUSE. LEAVE Word open to use in the next exercise.
Troubleshooting

Lesson 7218
STEP BY STEP Insert a Cover Page Using the Built-In Building Blocks
USE the document that is open from the previous exercise.
1. Click the Building Blocks Organizer to display the dialog box and select Whisp in the
Cover Pages gallery.
2. Click Insert . The cover page is inserted as page 1.
3. Type the following information in the placeholders:
Year : 2 0XX (The current date can be selected or you can type the year.)
Document Title : Flatland Hosting Company
Document Subtitle : Guidelines & Agreements
Author Name : A. Becker
4. Remove the placeholders for the Company Name.
5. SAVE the document as Hosting Term8 in the lesson folder on your fl ash drive, and then
CLOSE the fi le.
PAUSE. LEAVE Word open to use in the next exercise.
If you experience problems in saving the author’s name, complete one of the following actions: (1) Right-click next to the placeholder and click Remove Content Control ; (2) Change the author’s name in Properties—located in Backstage; (3) Click the File tab, and then click Options . In the General category, under the Personalize your copy of Microsoft Offi ce section, type the author’s name next to the User name box and initials. Changing the user name is discussed in Lesson 9.
Inserting an Equation
Microsoft Word 2013 has built-in equations, which can be inserted from the Quick Parts gallery or by using the Equation command. When you create a table that contains values, you can calcu-late your answer by inserting an equation. The same rules that you learned in Math apply when inserting equations. You can use the Equation Tools Design tab, which displays when an equation is inserted in a document, to edit or construct your own equation. In this exercise, you learn to insert equations in a document.
STEP BY STEP Insert an Equation
OPEN a new blank Word document.
1. Open the Quick Parts menu, and then click Building Blocks Organizer .
2. In the Building Blocks Organizer dialog box, in the Equations gallery, locate and click
the Expansion of a Sum equation.
3. Click Insert . The Expansion of a Sum equation is inserted in the document.
4. Position the insertion point after the equation placeholder, and then press the Enter key
twice to place a blank line below the placeholder.
5. Open the Building Blocks Organizer dialog box, locate and click the Area of Circle
equation, and then click Insert .
6. Position the insertion point after the equation placeholder, and then press the Enter key
twice to place a blank line below the placeholder.
7. Open the Building Blocks Organizer dialog box, then locate and click the Binomial
Theorem equation.
8. Click Insert .
9. Click after the equation placeholder, and press the Enter key twice.
10. SAVE the document as Equations in the lesson folder on your fl ash drive, and then
CLOSE the fi le.
PAUSE. LEAVE Word open to use in the next exercise.
How do you append a cover page to an existing
document?
2.1.1
Another WayOn the Insert tab, in
the Pages group, click the Cover Page button to insert a cover page.
Troubleshooting
Another WayIn the Insert tab, in
the Symbols group, click the Equation button, and select an equation from the built-in menu.
How do you append an equation to an existing
document?
2.1.1

Working with Themes, Style Sets, Backgrounds, Quick Parts, and Text Boxes 219
Inserting a Field from Quick Parts
A fi eld is a placeholder where Word inserts content in a document. Word automatically uses fi elds when specifi c commands are activated, such as those for inserting dates, formulas, page numbers, and a table of contents. When you insert a date fi eld in a document, the date is updated automat-ically each time the document is opened. In this exercise, you learn to insert a fi eld in a document.
Fields, also called fi eld codes , appear between curly brackets ( { } ) when displayed. Field codes are turned off by default. To display fi eld codes in a document, press Alt 1 F9 . You can toggle back and forth to display text and fi eld codes by pressing Alt 1 F9 . To edit a fi eld, place the insertion point within the fi eld, right-click, and then click Edit Field .
STEP BY STEP Insert the Date and Time
OPEN the Billing Table document from the lesson folder.
1. Position the insertion point on the last cell of the table in the second column.
2. Press Tab to insert a new row. Pressing the Tab key advances the insertion point to the
next cell. If you are in the last cell of the table, it inserts a row quickly without having to
access the Ribbon.
3. Position the insertion point in the fi rst column, fi fth row. Type Total and align
center right.
4. Press Tab . This time, the next cell is selected.
5. On the Insert tab, in the Text group, click the Quick Parts button to open the menu.
6. Click Field on the menu. The Field dialog box appears (see Figure 7-19).
Figure 7-19
Field dialog box
Field names
Categories
listing
Description of
field name
appears here

Lesson 7220
7. The default 5 (Formula) is selected in the Field names box. Click the Formula
button. The Formula dialog box opens. This is the same dialog box that
is opened from the Table Tools Layout tab. Word automatically reads the values listed
above the formula, and 5 SUM(ABOVE) appears in the formula box.
8. Change the Number Format by selecting the third option. Click OK .
In Lesson 6, you learn to turn the fi eld codes on and display them in the document.
9. Place the insertion point on the blank line below the table and press Enter three times.
10. Type Last Updated: in bold and press the spacebar once after the colon.
11. On the Insert tab, in the Text group, click the Quick Parts button and click Field on
the menu.
12. From the Categories drop-down list, click Date and Time .
If the Field is shaded in gray, double-click the text in the cell.
13. In the Field Names list, click Date .
14. In the Date Formats list, select the ninth option with the Day Month Year format.
d MMMM yyyy appears in the Date Formats box. These symbols represent how the
date will look in your document.
15. Click OK to close the dialog box and insert the date and time fi eld in your document.
The document should look similar to the one shown in Figure 7-20, with the exception
that the current date will appear.
Cross Ref
Troubleshooting
Figure 7-20
Document with Formula and Date fi eld inserted
16. Disable the Show/Hide Editing Marks button.
17. SAVE the document as Billing Update in the lesson folder on your fl ash drive.
PAUSE. LEAVE the document open to use in the next exercise.
Creating, Saving, and Inserting AutoText
AutoText adds text automatically when you type the fi rst few characters as you learn in Lesson 1 when you typed the month. There are times when you type the same text many times, and creat-ing AutoText entries saves your time. The entries are stored as building blocks in the Building Blocks Organizer and can be edited once they are created. After an AutoText is created and saved, you can insert the AutoText in the document. In this exercise, you learn to create, save, and insert an AutoText in a document.
Another WayOn the Insert tab, in
the Text group, click Date & Time to open the Date and Time dialog box.
How would you insert a fi eld in a document?
2.1.6

Working with Themes, Style Sets, Backgrounds, Quick Parts, and Text Boxes 221
STEP BY STEP Create an AutoText
USE the document that is open from the previous exercise.
1. Position the insertion point on the blank line above the date and type Reviewed by
Hazel Loera .
2. Select Reviewed by Hazel Loera . To add text to the AutoText, you must fi rst select text.
Be careful not to select the paragraph mark.
3. On the Insert tab, in the Text group, click the Quick Parts button and click AutoText on
the menu. As shown in Figure 7-21, the Save Selection to AutoText Gallery is active.
Figure 7-21
Save Selection to AutoText Gallery
4. Click Save Selection to AutoText Gallery . The Create New Building Block dialog box
opens (see Figure 7-22).
Figure 7-22
Create New Building Block dialog box
5. Type the following information into the dialog box:
Name : Reviewed by Hazel Loera
Gallery : Select AutoText .
Category : Select General category or you can create a new category.
6. Type the following text into the dialog box:
Description : The reviewer is the last individual to review all billings before mailing .
A description of the building block—this description—appears in the Building
Blocks Organizer.
7. Under Save In : Select Normal .
This is the template listing of where you would select to save the AutoText. If the
extension .dotm appears after Normal, then the extension for known types is enabled
allowing you to see the extension in the document title or dialog boxes. The default to
save the AutoText is in the Normal format, which is a Macro-Enabled Template. In
Lesson 12, you learn more about macros.

Lesson 7222
8. Under Options : Select Insert content only .
There are three options to choose from: Insert content in its own page —building block
will be placed on separate page with page breaks inserted, Insert content in its own
paragraph —the content will be placed in its own paragraph, even if the user’s insertion
point is in the middle of a paragraph, and Insert content only —the content will be
inserted inline.
9. Click OK .
10. Delete the selected text, Reviewed by Hazel Loera .
11. Type the fi rst four characters, and a ScreenTip appears displaying the AutoText. Press
Enter . The AutoText is inserted into your document.
12. Another way to insert the AutoText is to click the Quick Parts button and hover the
mouse over AutoText. You should see your text.
13. Click the Quick Parts button, and then click Building Blocks Organizer .
The Building Blocks Organizer Gallery should be sorted, and the new AutoText
should appear as the fi rst entry as shown in Figure 7-23. Close the Building Blocks
Organizer.
AutoText name
appears here
Delete
button
AutoText name and
description
Edit Properties
allows you to change
the name,
description, or one of
the other properties
Figure 7-23
Building Blocks Organizerdialog box with AutoText
14. SAVE the document as Billing Final in the lesson folder on your fl ash drive, and then
CLOSE the fi le.
PAUSE. LEAVE Word open for the next exercise.
In Lesson 1, you learn to show fi le extensions. Cross Ref

Working with Themes, Style Sets, Backgrounds, Quick Parts, and Text Boxes 223
SOFTWARE ORIENTATION
Text Box Tools in the Ribbon
Before you begin working with text boxes, it is a good idea to become familiar with the new tools available in the Ribbon. When you insert a text box, the Drawing Tools FORMAT tab appears in the Ribbon, as shown in Figure 7-24.
Figure 7-24
The Drawing Tools FORMAT tab
The Drawing Tools FORMAT tab provides commands for editing text boxes. Use this fi gure as a reference throughout this lesson as well as the rest of this book.
The Size group
provides options
to edit the Height
and Width
Moves the text or
image forward to
the surface
Sends text or
image to the
background
Rotate
object
Selection Pane
opens and
makes it easier
to select object
WordArt Styles
group
Shape
Styles
group
Opens the
Format Shape
pane with the
Text Options
active
Opens the
Layout
dialog box
Changes Text
Direction
Insert Shapes
group
Opens the Format Shape
pane with the Shape
Options active
STEP BY STEP Delete a Building Block
OPEN a blank document.
1. Open the Building Blocks Organizer .
2. Highlight Reviewed by Hazel Loera .
At the bottom of the Building Blocks Organizer dialog box is the Delete button.
3. Click the Delete button.
A prompt appears asking “Are you sure you want to delete the selected building
block?”
4. Click Yes to close the Building Blocks Organizer.
5. CLOSE the document and do not save.
PAUSE. LEAVE Word open for the next exercise.
APPLYING AND MANIPULATING TEXT BOXES
A text box is a, formatted box in which you can insert and position text and/or graphic objects. Text boxes can be used for a variety of purposes. Most often, they are used to insert text within other document text or to lay out text for specifi c emphasis or visual interest. After you insert a text box, you can format the box using the Drawing Tools. You can also format the text in the box using the Font formats. A pull quote is a small selection of text that is pulled out or quoted from a larger selection of text. It is displayed within a box on the page that is formatted for emphasis, and it is often used along with drop caps in newsletters, advertisements, and magazines.
The Bottom Line

Lesson 7224
Inserting a Text Box
Word provides a gallery of built-in text boxes with pull quotes and sidebars that you can insert in a document. When you need a different kind of text box, you can draw and insert your own empty, unformatted text box. When drawing a text box, the Layout Options provide an option to wrap text around the object. In this exercise, you insert a preformatted text box and draw a text box.
STEP BY STEP Insert a Text Box
OPEN the Hosting document from the data fi les for this lesson.
1. Position the insertion point after the fi rst paragraph after the Introduction heading.
2. On the Insert tab, in the Text group, click the Text Box button. A menu of built-in quote
and sidebar text box styles appears.
3. Click the Simple Text Box option. The text box, containing placeholder text, is inserted
in the fi rst paragraph.
4. Select the second paragraph beginning with Questions or comments....com and drag
and drop in the text box.
The Layout Options button appears to the right of the text box.
5. Click the Layout Options button to open the Layout Options menu.
6. In the With Text Wrapping section, select Tight .
The text box wraps tightly around the paragraph. You also have the option to type text
in the text box.
7. Delete one of the line breaks after the fi rst paragraph.
8. Press Ctrl + End to go to the end of the document.
9. Click the Insert tab.
10. In the Text group, click the Text Box button, and then select Draw Text Box . A crosshair
( 1 ) appears.
11. Press and hold the left mouse button to draw a text box in the blank line below the last
paragraph under the Refusal of Service heading.
12. Use the Size group in the Format tab to change the width and height to 2.22 ” wide and
.95 ” in height.
13. Select the fi rst sentence under the Refusal of Service heading beginning with Flatland
Hosting . . . no refunds and drag and drop it into the text box.
14. Press Ctrl + E to center the text in the text box.
15. Select the text box until you see the move arrow to move the text box and then drag
the text box to the right to horizontally center—use the ruler as your guide. Your
document should resemble Figure 7-25.
Figure 7-25
Document with text box horizontally centered

Working with Themes, Style Sets, Backgrounds, Quick Parts, and Text Boxes 225
16. SAVE the document as Hosting Term9 in the lesson folder on your fl ash drive.
PAUSE. LEAVE the document open to use in the next exercise.
Formatting a Text Box
When a text box is selected, the Drawing Tools Format tab appears. In this exercise, you practice using these tools to format a text box.
STEP BY STEP Format a Text Box
USE the document that is open from the previous exercise.
1. Select the text box on page 7.
2. Click the Format tab.
3. In the Arrange group, click the Position button to open the menu, and select Position in
Middle Right with Square Text Wrapping from the drop-down menu that appears. The
text box is moved slightly down to the right of the document as shown in Figure 7-26.
How do you insert text in a text box?
5.1.2
Figure 7-26
Text box Position in Middle Right with Square
Text Wrapping
4. The text box should still be selected. On the Format tab, in the Shape Styles group,
click the More button to display the gallery of styles (see Figure 7-27).

Lesson 7226
5. Click the Intense Effect – Red Accent 2 style from the Shape Styles gallery. The text
box is formatted with the preformatted style.
6. Select the text and use the Mini toolbar to change the font color to white.
7. Press Ctrl + Home to return to the beginning of the document.
8. Select the text box.
9. Click the Edit Shape button in the Insert Shapes group on the Format tab to display
the menu.
10. Click Change Shape to display the Shapes menu as shown in Figure 7-28.
Figure 7-27
Shape Styles gallery

Working with Themes, Style Sets, Backgrounds, Quick Parts, and Text Boxes 227
Figure 7-28
Change Shape menu
Figure 7-29
Text box with new shape
11. Under the Basic Shapes section, select the Hexagon shape in the fi rst row, eighth
option. The text box shape takes on a hexagon shape.
12. With the text box still selected, in the Size group, change the height to .8” and width to 4 ” .
13. Change the font size to 9 pt. Your document should match Figure 7-29. You might need
to reposition the text box back toward the middle.

Lesson 7228
3. In the Name box, type Hexagon Shape .
4. In the Description box, type Use this shape for questions or comments. Keep the
remaining defaults as listed.
5. Click OK . The saved selection for the Hexagon text box is saved in the gallery under the
General category.
6. To view, click in a blank area of the document to deselect the text box. In the Text
group, click the Text Box button. In the Built-in section, scroll down to the end of the
list as shown in Figure 7-31.
14. Select the Hexagon shape, and click the Format tab.
15. In the Shapes Styles group, click the Shapes Effects button to display the menu.
16. Click the Bevel to display the additional options in the menu.
17. Under the Bevel section in the fi rst row, click Cool Slant . The shape object acquires
more depth and a shadow effect.
18. In the Arrange group, click the Position button and select Position in Middle Left with
Square Text Wrapping to reposition the text box.
19. SAVE the document as Hosting Term10 in the lesson folder on your fl ash drive.
PAUSE. LEAVE the document open for the next exercise.
Saving a Selection to the Text Box Gallery
After you customize a text box style by changing the color, weight, and so on, you can save the customized style to the Text Box gallery for reuse. In this exercise, you learn to save the hexagon text box in the gallery.
STEP BY STEP Save a Selection to the Text Box Gallery
USE the document that is open from the previous exercise.
1. Select the Hexagon text box.
2. From the Insert tab, click the Text Box button in the Text group. From the menu that
appears, choose Save Selection to Text Box Gallery . The Create New Building Block
dialog box opens as shown in Figure 7-30.
Figure 7-30
Create New Building Block dialog box

Working with Themes, Style Sets, Backgrounds, Quick Parts, and Text Boxes 229
Figure 7-31
Text Box gallery
Hexagon Shape
saved to the Text Box
gallery
7. SAVE the document as Hosting Final in the lesson folder on your fl ash drive.
PAUSE. LEAVE the document open to use in the next exercise.
MAKING TEXT GRAPHICALLY APPEALING AND
INSERTING A SPECIAL CHARACTER
The Text group in Word lets you insert professionally formatted text elements such as pull quotes and drop caps quickly. A drop cap is a large initial letter that drops down two or more lines at the beginning of a paragraph to indicate that a new block of information is beginning and to give interest to newsletters, magazine articles, and other documents.
Creating a Drop Cap
Drop caps are used to add visual interest to newsletters or magazine articles. In this exercise, you learn to add a drop cap to a Word document.
STEP BY STEP Create a Drop Cap
USE the document that is open from the previous exercise.
1. Click the View tab and click the Navigation Pane check box to open the Navigation Pane.
2. Under the Headings tab, click Account Information , and then select the Y that begins
the sentence You agree to notify…
The Bottom Line

Lesson 7230
Figure 7-32
Drop Cap menu
3. Click the Insert tab, and click the Drop Cap button in the Text group. The Drop Cap
menu appears, as shown in Figure 7-32.
Figure 7-33
Drop Cap dialog box
Position
options
Click the drop-down arrow
to choose Font options
The Lines to drop can be
increased or decreased
The Distance from text
can be increased or
decreased
4. Select Dropped from the menu. A drop cap is inserted and extends down three lines in
the paragraph, which is the default line drop length.
5. With the text box still selected, click the Drop Cap button in the Text group to display
the Drop Cap menu. Select Drop Cap Options to produce the Drop Cap dialog box. You
can use the options in this dialog box to change the position, font, and size of the drop
cap. The default settings for Font, number of Lines to drop, and Distance from text are
shown in Figure 7-33.
6. Click the Font drop-down arrow and change the font to Bookman Old Style .
7. Click OK to apply your changes and close the dialog box.
8. Click outside the drop cap to deselect it. The drop cap font is set to Bookman Old Style,
whereas the remaining text is unaffected.
9. To provide more emphasis to the Drop Cap, select the Y and change the font color to
dark red.
10. SAVE your document in the lesson folder on your fl ash drive.
PAUSE. LEAVE the document open to use in the next exercise.
Inserting Special Characters
Special characters include recognizable symbols used by individuals or businesses to differentiate their product or service to a specifi c target population. Copyright © symbols are used to protect books, songs, and other original work from authors or artists. Trademark™ is an unregistered

Working with Themes, Style Sets, Backgrounds, Quick Parts, and Text Boxes 231
trademark and is used to promote the company’s goods. Other symbols used are fractions ½, em dash (—), and much more. Depending on the font that you select, you can insert international monetary symbols such as the pound sign, £ , or yen sign, ¥. These symbols are represented by Unicode , which is a character code. Unicode enables most of the languages in the world to be symbolized with a special character identifi cation. These special characters can be inserted using the Symbol command on the Ribbon, the Symbol dialog box, or keyboard shortcuts. In this exer-cise, you insert a special character in a document.
STEP BY STEP Insert Special Characters
USE the document that is open from the previous exercise.
1. Press Ctrl + End to move to the end of the document.
2. Press Enter once after the last paragraph under the heading, Refusal of Service .
3. Type Copyright Flatland Hosting 201 3 . All Rights Reserved.
4. Place the insertion point after the t in Copyright and press the Spacebar once.
5. On the Insert tab in the Symbols group, click the Symbol button, and then click More
Symbols .
6. Click the Special Characters tab to make it available. The Symbol dialog box is shown
in Figure 7-34.
Figure 7-34
Symbol dialog box
Opens the AutoCorrect
dialog box
Additional symbols are
available in the Symbols tab
Opens the Customize
Keyboard dialog box
Available Special
Characters
7. Select Copyright from the list and click Insert .
8. Click Close . The copyright symbol is inserted in front of the company name followed by
the year this document was created.
9. SAVE your document in the lesson folder on your fl ash drive, and then CLOSE the fi le.
As you c lose Word, a prompt appears stating, You have modifi ed styles, building
blocks (such as cover pages or headers), or other content that is stored in “Building
Blocks.” Do you want to save changes to “Building Blocks”?
How would you insert a special character in a
document?
2.1.7

Lesson 7232
10. Click SAVE . This allows you to continue using the customized text box that you saved.
CLOSE Microsoft Word. Another WayA quick way to
insert the copyright symbol is using the assigned keyboard shortcut Alt 1 Ctrl1C .
SKILL SUMMARY
In this lesson, you learned to: Exam Objective Objective Number
Format, Create, and Customize a
Theme
Change document themes. 1.3.2
Format a Document Using Style Sets Change document Style Sets. 1.3.3
Format a Document’s Background Insert watermarks. 1.3.5
Use Quick Parts in a Document Insert Quick Parts.
Append text to a document.
Insert Built-in Fields.
5.1.1
2.1.1
2.1.6
Apply and Manipulate Text Boxes Insert text boxes. 5.1.2
Make Text Graphically Appealing
and Insert Special Characters
Insert special characters
(©, ™, ₤).
2.1.7
Knowledge Assessment
Multiple Choice
Select the best response for the following statements.
1. Building blocks can be sorted by all EXCEPT which of the following?
a. Name
b. Creator
c. Gallery
d. Category
2. can be found within the Quick Parts menu.
a. AutoComplete
b. Auto Organizer
c. AutoText Insert
d. AutoText
3. Identify the feature that includes a label for instructing you on the type of text to
include and a placeholder that reserves a place for your new text.
a. Placeholder
b. Fields
c. Content Control
d. All of the above
4. A document theme includes sets of which of the following?
a. Colors
b. Fonts
c. Effects
d. All of the above
5. A line inserted around the document page is called a:
a. Document page border.
b. Page layout border.
c. Page border.
d. None of the above.
6. To preview a style or a theme, you must do which of the following?
a. Place your mouse pointer over the choice
b. Print the document

Working with Themes, Style Sets, Backgrounds, Quick Parts, and Text Boxes 233
c. Set up the document properties
d. It is not possible to preview a style or theme
7. The provides a way to manage building blocks by editing, deleting, and/
or inserting them.
a. Quick Organizer
b. Cover Page
c. Text box
d. Building Blocks Organizer
8. A is a placeholder that tells Word to insert changeable data into a
document.
a. fi eld name
b. fi eld
c. data fi eld
d. data source
9. A customized company logo applied to a page background behind a document’s text is
called a(n):
a. MarkArt.
b. Insert Picture refer to.
c. watermark.
d. SmartArt.
10. In the dialog box, you can specify to insert a page border on only the
fi rst page of a document.
a. Page Border
b. Borders and Shading
c. Page Border tab dialog box
d. Line Border
True/False
Circle T if the statement is true or F if the statement is false.
T F 1. A watermark is text or a graphic printed behind text.
T F 2. When a Style Set has been inserted in a document, the spacing of the Style Set
can be easily changed.
T F 3. Inserting special characters in a document can be completed using the Ribbon
or a keyboard shortcut.
T F 4. AutoText can be inserted using the Building Blocks Organizer.
T F 5. If you make any changes to the colors, fonts, or effects of the current theme,
you can save it as a custom theme and apply it to future documents.
T F 6. A picture can be inserted as a page background.
T F 7. You can customize a building block.
T F 8. Formulas can be inserted using only the Equation button.
T F 9. Page colors refer to the background color of a page.
T F 10. After a text box has been inserted, the text box can be moved to another
location in the document.
Competency Assessment
Project 7-1: Creating Elevator Communications
Montgomery, Slade & Parker uses elevator communications for in-house announcements, invita-tions, and other employee-relations documents. In each elevator, a durable 8½0 3 140 clear plastic frame has been installed in which announcements can be inserted and changed on a regular basis. Create a draft document for approval that recognizes employee award winners and invites employ-ees to a reception to honor these award winners.

Lesson 7234
GET READY. LAUNCH Word if it is not already running.
1. OPEN Congratulations from the data fi les for this lesson.
2. SAVE the document as 7-1 Congratulations Reception in the lesson folder on your fl ash
drive.
3. On the Design tab, in the Page Background group, click the Page Color menu. In the
Theme Colors section, select Olive Green, Accent 3, Lighter 80 % .
4. Click the Page Borders button. In the Borders and Shading dialog box, click Shadow in
the Setting section. Click the Width menu and choose 3 pt. In the Color section, select
Olive Green, Accent 3, Darker 50% . Click OK to apply the changes to the whole
document.
5. On the Page Layout tab, in the Page Setup group, click the Size menu and select Legal .
The legal option may not be included in the menu if you don’t have a printer that uses
legal sized paper; if not, just skip this step.
6. Launch the Page Setup dialog box and click the Layout tab to change the Vertical
Alignment to Center .
7. Select Congratulations! Change the font color to Olive Green, Accent 3, Darker 50% to
match the page border.
8. Click the Watermark button in the Page Background group on the Insert tab and select
Custom Watermark . The Printed Watermark dialog box opens.
9. Select the Text w atermark option and then click the drop-down arrow next to Text .
Select Draft .
10. Customize the watermark by changing the color to dark red.
11. SAVE the document in the lesson folder on your fl ash drive, and then CLOSE the fi le.
LEAVE Word open for the next project.
Project 7-2: Creating a Reference Letter
A former employee at Flatland Hosting Company has asked for a reference letter.
GET READY. LAUNCH Word if it is not already running.
1. OPEN Reference Letter from the data fi les for this lesson.
2. SAVE the document as 7-2 Jasmine Reference in the lesson folder on your fl ash drive.
3. On the Design tab, in the Document Formatting group, select Basic ( Simple) from the
Style Set gallery.
4. Click the Fonts button to produce the Fonts menu. In the menu, click Customize Fonts .
The Create New Theme Fonts dialog box opens.
5. In the Name box, replace Custom 1 by typing Reference Letter Fonts [ your initials ] .
6. Change the Heading and Body Font to Times New Roman .
7. Click Save to close the dialog box and apply your font choices to the document.
8. SAVE the document in the lesson folder on your fl ash drive, and then CLOSE the fi le.
LEAVE Word open for the next project.
Profi ciency Assessment
Project 7-3: Creating Letterhead
Create a new letterhead for the Flatland Hosting Company.
GET READY. LAUNCH Word if it is not already running.
1. OPEN a new blank document.
2. SAVE the document as 7-3 FHC Letterhead in the lesson folder on your fl ash drive.

Working with Themes, Style Sets, Backgrounds, Quick Parts, and Text Boxes 235
3. On the Insert tab, in the Text group, open the Building Blocks Organizer dialog box and
insert the Sideline built-in header.
4. In the [Document title] placeholder, type the document title as Flatland Hosting
Company . Bold the text and change the size to 22 pt .
5. The Header & Footer Tools Design tab is active. From the Insert group, click the Quick
Parts button, and then open the Building Blocks Organizer dialog box.
6. Insert the Sideline built-in footer and select the page number and press Delete . Hint:
Do not select the ¶ mark.
7. Type the company address along with inserting the solid diamond symbol as 1234
Grand Street ♦ Forest Grove, OR 97116 and center. In the Insert tab, in the Symbols
group, click the Symbol button and select More Symbols. In the Symbol dialog box,
change the font to Wingdings and select symbol 116.
8. Click close Header and Footer in the Ribbon.
9. Change the view to one page.
10. SAVE the document in the lesson folder on your fl ash drive, and then CLOSE the fi le.
LEAVE Word open for the next project.
Project 7-4: Formatting a Two-Page Resume
Your friend Mike has revised and added some information to his resume, and it is now two pages long. Update the formatting to include a header and footer.
GET READY. LAUNCH Word if it is not already running.
1. OPEN MZ Resume2 from the data fi les for this lesson.
2. SAVE the document as 7-4 MZ Resume2 Updat e in the lesson folder on your fl ash
drive.
3. Open the Page Setup dialog box, and change the top, bottom, left, and right margins to
1.25 ” . Click OK .
4. Click the Insert tab, in the Text group, open the Building Blocks Organizer , and insert
the Austin header.
5. In the header document title, type Resume of Michael J. Zuberi and right-align.
6. In the Options group, click the Different First Page box. Notice the text is no longer on
the fi rst page.
7. Close the Header and Footer.
8. On the Design tab, in the Document Formatting group, select Black & White
(Classic) .
9. If necessary, enable the Show/Hide Editing Marks button and remove all blank lines.
10. Select LONNCO, LTD—PLANO, TEXAS 1998 TO 2002 and STAFF ACCOUNTANT and
apply the Keep with Next command.
11. Change the view to 100% .
12. SAVE the document in your fl ash drive in the lesson folder, and then CLOSE the fi le.
LEAVE Word open for the next project.
Mastery Assessment
Project 7-5: Customizing a Postcard
It’s soccer season again, and the YMCA is sending out postcards to all participants who played last season.

Lesson 7236
GET READY. LAUNCH Word if it is not already running.
1. OPEN Soccer from the data fi les for this lesson.
2. SAVE the document as 7-5 Soccer P ost Card in the lesson folder on your fl ash drive.
3. Customize the page size to 4 ” x 6 ” , the orientation to Landscape , and the margins to
Narrow .
4. Insert a page b order and add a Dark Blue , Text 2 double-line page border with a box
setting and set the width to 3/4 pt .
5. In the Page Color, Fill Effects dialog box, select Two Colors. In the Color 2 section, and
select Blue, Accent 1, Lighter 80%. In the Shading styles section, select Diagonal
down. Under Variants, click the sample pattern in the lower-right corner.
6. Insert the soccer ball image from the data fi les as a picture watermark.
7. SAVE the document in your fl ash drive in the lesson folder, and then CLOSE the fi le.
LEAVE Word open for the next project.
Project 7-6: Creating a Thank-You Card
Create thank-you note cards that match the style of Mike’s new two-page resume.
GET READY. LAUNCH Word if it is not already running.
1. Create a new blank document.
2. SAVE the document as 7-6 Thank You in the lesson folder on your fl ash drive.
3. Customize the page size to 3.9” x 3 .5 ” , leave the orientation at the default, and change
the margins to Narrow .
4. Refer to the built-in header used in the MZ Resume2 Updated document and insert the
same format to be used as a footer in your current document.
5. In the footer, replace pg 1 with Michael J. Juberi and right-align.
6. Insert the T hank Y ou image as a picture watermark.
7. SAVE the document in your fl ash drive in the lesson folder, and then CLOSE the fi le.
CLOSE Word.