word: managing your thesis - weblearn : gateway : … managing your thesis trwg january 2016 iv it...
TRANSCRIPT

Word: Managing Your Thesis

Word: Managing Your Thesis TRWG
January 2016 ii IT Services
How to Use This Course Book
This handbook accompanies the taught sessions for the course. Each section contains a brief overview of a topic for your reference and then one or more exercises.
The Exercises
Exercises are arranged as follows:
A title and brief overview of the tasks to be carried out
A numbered set of tasks, together with a brief description of each
A numbered set of detailed steps that will achieve each task
Some exercises, particularly those within the same section, assume that you have completed earlier exercises. Your lecturer will direct you to the location of files that are needed for the exercises. If you have any problems with the text or the exercises, please ask the lecturer or one of the demonstrators for help.
This book includes plenty of exercise activities – more than can usually be completed during the hands-on sessions of the course. You should select some to try during the course, while the teacher and demonstrator(s) are around to guide you. Later, you may attend follow-up sessions at IT Services called Course Clinic, where you can continue work on the exercises, with some support from IT teachers. Other exercises are for you to try on your own, as a reminder or an extension of the work done during the course.
Writing Conventions
A number of conventions are used to help you to be clear about what you need to do in each step of a task.
In general, the word press indicates you need to press a key on the keyboard. Click, choose or select refer to using the mouse and clicking on items on the screen (unless you have your own favourite way of operating screen features).
Names of keys on the keyboard, for example the Enter (or Return) key, are shown like this ENTER.
Multiple key names linked by a + (for example, CTRL+Z) indicate that the first key should be held down while the remaining keys are pressed; all keys can then be released together.
Words and commands typed in by the user are shown like this.
Labels and titles on the screen are shown l ike this .
Drop-down menu options are indicated by the name of the options separated by a vertical bar, for example Fi le|Pr int . In this example you need to select the option Print from the Fi le menu. To do this, click with the mouse button on the Fi le menu name; move the cursor to Print ; when Print is highlighted, click the mouse button again.
A button to be clicked will look l ike this .
The names of software packages are identified like this, and the names of files to be used l ike this .
TRWG Word: Managing Your Thesis
IT Services iii January 2016
Software Used
Word 2013
Windows 7
Files Used
AutoMark for 2Cities.docx Handbook for Index.docx Info for CrossRefs.docx Info for Updating.docx Student Book for Outlining.docx Student Handbook Draft.docx Two Cities for AutoMark.docx Vindication for Notes.docx Vindication For TOC continued.docx Vindication For TOC.docx
Revision Information
Version Date Author Changes made
1.0 August 2005 Pamela Stanworth Created
1.1 January 2006 Pamela Stanworth Re-arrange topics
1.2 November 2006 Pamela Stanworth Corrections
2.0 January 2006 Pamela Stanworth Moved topics
3.0 July 2009 Stephen Eyre Updated for Word 2007
4.0 July 2011 Stephen Eyre Updated for Word 2010
5.0 July 2015 Stephen Eyre Updated for Word 2013
Copyright
The copyright of this document lies with Oxford University IT Services.
Word: Managing Your Thesis TRWG
January 2016 iv IT Services
Contents
1 Introduction ........................................................................ 1
1.1 What You Should Already Know ...................................................... 1
1.2 What You Will Learn ......................................................................... 1
1.3 Using Office 2013 .............................................................................. 1
1.4 Where Can I Get a Copy? ................................................................. 3
2 Starting With Word Documents .......................................... 4
2.1 Starting Word .................................................................................. 4
Exercise 1: Starting the word processor ...................................................... 5
2.2 A Sample Document ........................................................................ 5
Exercise 2: Looking at a sample document (optional) ............................... 5
3 Multi-Level Numbering for Headings ................................. 7
3.1 Numbering Schemes ........................................................................ 7
3.2 Multi-Level Numbering as a Direct Format .................................... 7
3.3 Multi-Level Numbering Through Built-In Heading Styles ............. 8
3.4 Custom Numbering Scheme ............................................................ 9
Exercise 3: Multi-Level Numbering for Headings .................................... 10
4 Footnotes & Endnotes ....................................................... 13
4.1 Inserting a Footnote or Endnote .................................................... 13
4.2 Working With Footnotes and Endnotes ......................................... 14
4.3 Footnote Options ............................................................................ 14
Exercise 4: Footnotes and endnotes .......................................................... 15
4.4 Footnote Text Continuation ............................................................16
4.5 Separator Line ................................................................................. 17
4.6 Style of Footnote Marker and Footnote Text ................................ 18
4.7 Third-Party Software for Managing References ............................ 18
Exercise 5: More on footnotes and endnotes .............................................19
5 Table of Contents ............................................................... 21
5.1 Automated References in a Document ........................................... 21
5.2 Preparing the Document ................................................................. 21
5.3 Inserting a New Table of Contents ................................................ 22
5.4 Options ........................................................................................... 23
5.5 Using the Table of Contents ........................................................... 23
Exercise 6: Creating a table of contents .................................................... 24
5.6 Updating a Table of Contents ........................................................ 25

TRWG Word: Managing Your Thesis
IT Services v January 2016
5.7 Changing the Design of a Table of Contents.................................. 26
5.8 Choosing Which Entries Are Included .......................................... 26
5.9 Changing the Appearance of a Table of Contents ......................... 27
5.10 Further Options for a Table of Contents ...................................... 27
Exercise 7: Working with a table of contents ............................................ 28
6 Indexes .............................................................................. 30
6.1 Marking Entries for the Index - Manual Method .......................... 30
6.2 Compound Entries in an Index ....................................................... 31
6.3 Marking Entries Automatically ...................................................... 31
6.4 Building an Index ........................................................................... 33
6.5 Changing the Design of an Index ................................................... 33
6.6 Updating an Index ......................................................................... 33
6.7 Adding More Index Marks ............................................................. 33
6.8 Deleting Index Marks ..................................................................... 34
Exercise 8: Building and changing an index ............................................. 35
Exercise 9: Automatic index marking ....................................................... 37
7 Captions ............................................................................. 38
7.1 Assigning a Caption to a Figure - Manual Method ........................ 38
7.2 Caption Options ............................................................................. 38
7.3 Building a Table of Figures ............................................................ 38
7.4 Table of Figures Options ................................................................ 39
Exercise 10: Captions for Figures and Tables ........................................... 40
8 Cross-References ............................................................... 43
8.1 Creating A Cross-Reference To A Numbered Heading ................. 43
8.2 Creating a Cross-Reference to an Un-Numbered Heading ........... 44
8.3 Inserting A Cross-Reference Using A Bookmark .......................... 44
8.4 Updating Cross-References ........................................................... 45
Exercise 11: Cross references .................................................................... 45
9 Field Codes ........................................................................ 49
9.1 Displaying and Hiding Field Codes ............................................... 49
9.2 Why Update Field Codes? .............................................................. 49
9.3 Updating a Single Field .................................................................. 49
9.4 Updating a Whole Document ........................................................ 49
9.5 Editing a Field Code - an Example (optional) ............................... 50
Exercise 12: Updating field codes .............................................................. 51

Word: Managing Your Thesis TRWG
January 2016 vi IT Services
10 Document Information (Optional) ................................... 53
10.1 Properties ...................................................................................... 53
10.2 Word Count .................................................................................. 54
11 Other Resources ................................................................ 55
11.1 Other Word-processing Courses ................................................... 55
11.2 EndNote Courses ........................................................................... 55
11.3 Lynda.com ..................................................................................... 55
11.4 Course Clinic ................................................................................. 55
11.5 IT Services Help Centre................................................................. 55
11.6 Downloadable Course Materials from Portfolio ........................... 55
11.7 e-Theses ......................................................................................... 55

TRWG Word: Managing Your Thesis
IT Services 1 January 2016
1 Introduction Welcome to the course Word: Managing Your Thesis .
This booklet accompanies the course delivered by IT Services, IT Learning Programme. Although the exercises are clearly explained so that you can work through them yourselves, you will find that it will help if you also attend the taught session where you can get advice from the lecturers, demonstrators and even each other!
If at any time you are not clear about any aspect of the course, please make sure you ask your lecturer or demonstrator for some help. If you are away from the class, you can get help by email from your lecturer or from [email protected]
1.1 What You Should Already Know
This session is one of a series that cover the important aspects of using Microsoft Word to build and manage text documents.
We will assume that you have some knowledge of Word which may be gained via the course Word: Creating Professional Documents and that you are familiar with paragraph formatting including styles and with dividing a document into sections with different regimes of page setup, headers/footers and so on. In this course we will make extensive use of the styles which are built-in with Word, Heading1, Heading2, Heading3 and so on.
The computer network in IT Services may differ slightly from that which you are used to in your College or Department; if you are confused by the differences, ask for help from the lecturer or demonstrators.
1.2 What You Will Learn
This course will help you learn to use Microsoft Word to produce large formal documents such as theses. It is a single session, covering time-saving techniques and automations, and provides tasks for hands-on practice.
In this session we will cover the following topics:
Automated numbering for headings and sub-headings
Tables of contents, indexes and cross-references
Managing and using field codes in a document
Footnotes and endnotes
Document properties and information
1.3 Using Office 2013
These notes deal with Word 2013. Having worked through these notes, you should also be able to adapt to earlier versions (for example, Word 2003), and also to later releases, since most of the basic principles hold true regardless of the version of the software.
Getting to grips with a package as sophisticated and powerful as Word can be time-consuming, so allow yourself plenty of time for practice. To increase your understanding of Word, make use of the Help facilities available within Word.
In these notes, topics marked Optional are additional material which may not necessarily be covered by your lecturer in the taught course. Depending on the
Word: Managing Your Thesis TRWG
January 2016 2 IT Services
work you need to use Word for, you may find some of these extra topics helpful. For further information on these, consult Word’s Help.
Topics covered in related Word courses, should you be interested, are given in Section 10.
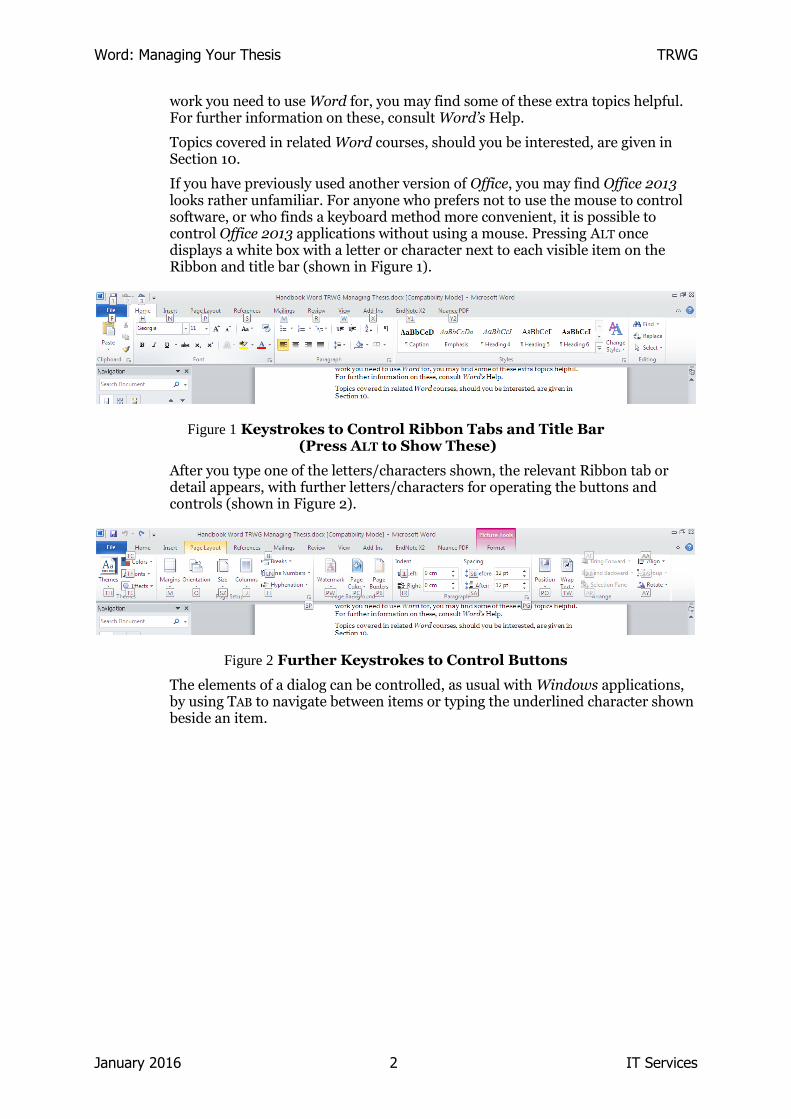
If you have previously used another version of Office, you may find Office 2013 looks rather unfamiliar. For anyone who prefers not to use the mouse to control software, or who finds a keyboard method more convenient, it is possible to control Office 2013 applications without using a mouse. Pressing ALT once displays a white box with a letter or character next to each visible item on the Ribbon and title bar (shown in Figure 1).
Figure 1 Keystrokes to Control Ribbon Tabs and Title Bar (Press ALT to Show These)
After you type one of the letters/characters shown, the relevant Ribbon tab or detail appears, with further letters/characters for operating the buttons and controls (shown in Figure 2).
Figure 2 Further Keystrokes to Control Buttons
The elements of a dialog can be controlled, as usual with Windows applications, by using TAB to navigate between items or typing the underlined character shown beside an item.
TRWG Word: Managing Your Thesis
IT Services 3 January 2016
1.4 Where Can I Get a Copy?
If you have a copy of Microsoft Office Enterprise 2013, then you already have a copy of Word 2013. If you are unable to find it on your computer, it may not have been installed and you should talk to your IT support contact (or the IT Services Help Desk).
If you are a member of staff, you can obtain a copy of Microsoft Office Enterprise 2013 from the IT Services shop. Students can obtain a Microsoft Student Licence, but this must be bought through a Microsoft Authorised Education Reseller; the IT Services shop can direct you to a suitable reseller.

Word: Managing Your Thesis TRWG
January 2016 4 IT Services
2 Starting With Word Documents
2.1 Starting Word
There are a number of ways that you can start Word. These include:
Double-click on a Word icon if there is one on your desktop,
Select Star t Al l Programs and select Word
Double-click on a Word document icon on your Desktop
Select a Word file from within Documents
The exact method of starting will depend upon the system setup of your computer.
Figure 3 Word Start Icon
When you start Word you will see a similar screen to that shown in Figure 3.
Figure 4 A Blank Word Document
Ruler
Status bar
Scroll bar

TRWG Word: Managing Your Thesis
IT Services 5 January 2016
Exercise 1: Starting the word processor
Start your computer and start Word
Task 1
Start Word 2013
Step 1
Switch on your computer if it is not already switched on
Step 2
; double-click on it
Step 3
(On your office or home computer you are more likely to
start the program using an Word icon on the Desktop, or using the Star t button on the Task Bar at the bottom of the screen)
Task 2
Maximise the Word screen
Step 1
A Word licence screen appears briefly, then a blank
Word document appears, as in Figure 4
If you are prompted for any user information, just click on OK
Step 2
During this course you will primarily be using Word, so maximise the program window and the document window if these are not already the settings
2.2 A Sample Document
Exercise 2: Looking at a sample document (optional)
Open a sample document
Examine the automatic features used to construct it
You will learn more about all these later in the course
All the files for these exercises have been provided for you on a network drive. Your teacher will show you where to find them.
Task 1 Step 1
A file has been prepared for you to try out some of the automatic features covered in this course
Word: Managing Your Thesis TRWG
January 2016 6 IT Services
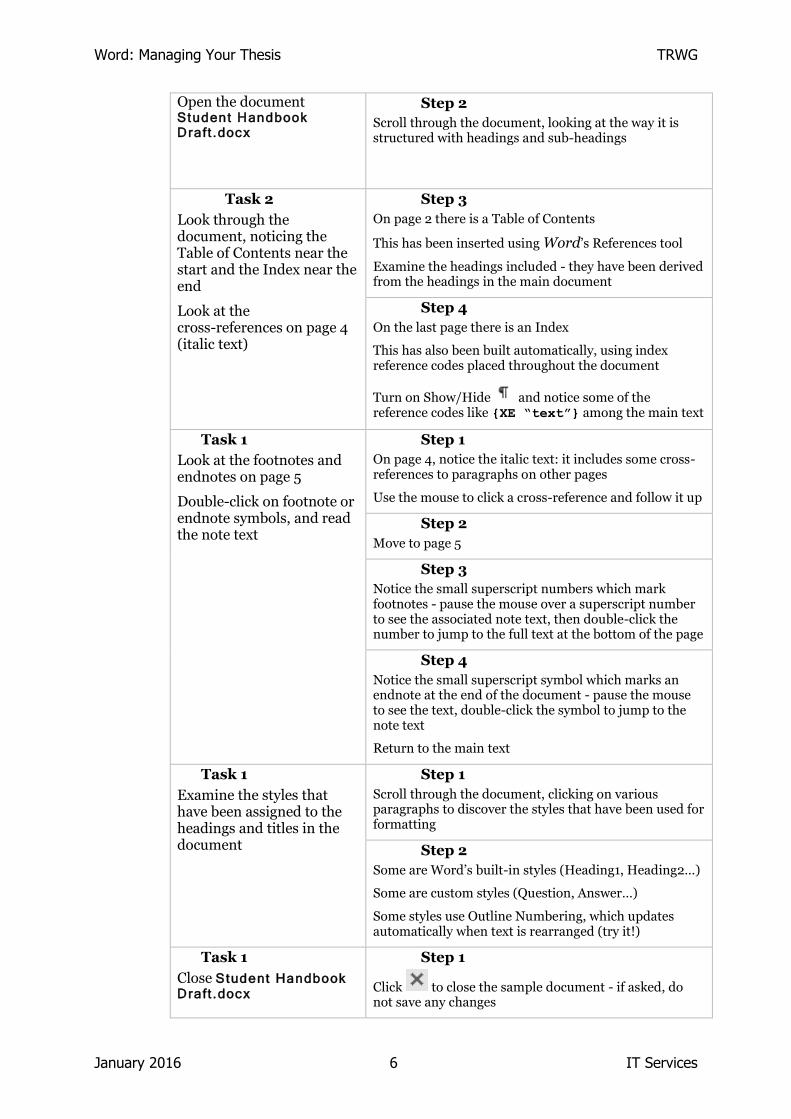
Open the document Student Handbook Draft .docx
Step 2
Scroll through the document, looking at the way it is structured with headings and sub-headings
Task 2
Look through the document, noticing the Table of Contents near the start and the Index near the end
Look at the cross-references on page 4 (italic text)
Step 3
On page 2 there is a Table of Contents
This has been inserted using Word’s References tool
Examine the headings included - they have been derived from the headings in the main document
Step 4
On the last page there is an Index
This has also been built automatically, using index reference codes placed throughout the document
Turn on Show/Hide and notice some of the reference codes like {XE “text”} among the main text
Task 1
Look at the footnotes and endnotes on page 5
Double-click on footnote or endnote symbols, and read the note text
Step 1
On page 4, notice the italic text: it includes some cross-references to paragraphs on other pages
Use the mouse to click a cross-reference and follow it up
Step 2
Move to page 5
Step 3
Notice the small superscript numbers which mark footnotes - pause the mouse over a superscript number to see the associated note text, then double-click the number to jump to the full text at the bottom of the page
Step 4
Notice the small superscript symbol which marks an endnote at the end of the document - pause the mouse to see the text, double-click the symbol to jump to the note text
Return to the main text
Task 1
Examine the styles that have been assigned to the headings and titles in the document
Step 1
Scroll through the document, clicking on various paragraphs to discover the styles that have been used for formatting
Step 2
Some are Word’s built-in styles (Heading1, Heading2…)
Some are custom styles (Question, Answer…)
Some styles use Outline Numbering, which updates automatically when text is rearranged (try it!)
Task 1
Close Student Handbook Draft .docx
Step 1
Click to close the sample document - if asked, do not save any changes
TRWG Word: Managing Your Thesis
IT Services 7 January 2016
3 Multi-Level Numbering for Headings
3.1 Numbering Schemes
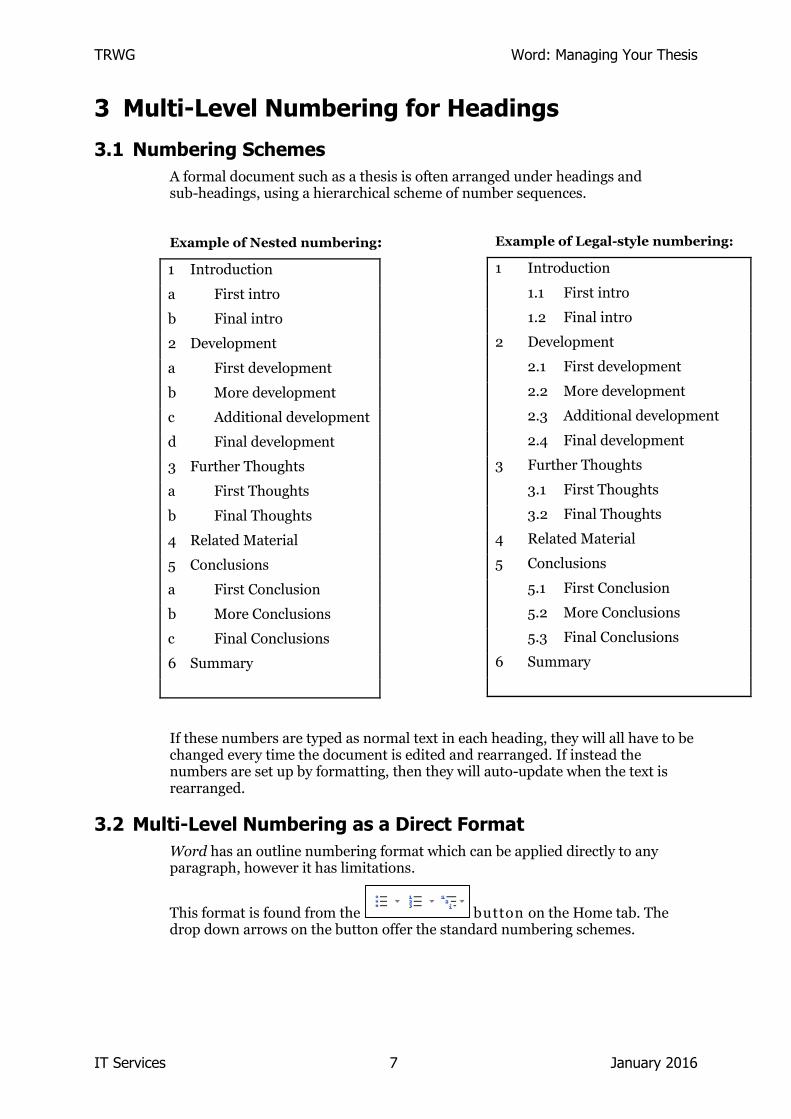
A formal document such as a thesis is often arranged under headings and sub-headings, using a hierarchical scheme of number sequences.
Example of Nested numbering:
1 Introduction
a First intro
b Final intro
2 Development
a First development
b More development
c Additional development
d Final development
3 Further Thoughts
a First Thoughts
b Final Thoughts
4 Related Material
5 Conclusions
a First Conclusion
b More Conclusions
c Final Conclusions
6 Summary
Example of Legal-style numbering:
1 Introduction
1.1 First intro
1.2 Final intro
2 Development
2.1 First development
2.2 More development
2.3 Additional development
2.4 Final development
3 Further Thoughts
3.1 First Thoughts
3.2 Final Thoughts
4 Related Material
5 Conclusions
5.1 First Conclusion
5.2 More Conclusions
5.3 Final Conclusions
6 Summary
If these numbers are typed as normal text in each heading, they will all have to be changed every time the document is edited and rearranged. If instead the numbers are set up by formatting, then they will auto-update when the text is rearranged.
3.2 Multi-Level Numbering as a Direct Format
Word has an outline numbering format which can be applied directly to any paragraph, however it has limitations.
This format is found from the button on the Home tab. The drop down arrows on the button offer the standard numbering schemes.

Word: Managing Your Thesis TRWG
January 2016 8 IT Services
Figure 5 The bullet, numbered, and multi-levelled dialog boxes
After applying this format directly, you can promote and demote individual
paragraphs using the indent buttons and .
The numbering scheme you choose, with any customisations, is effective throughout the document wherever Outline Numbering is applied. Beware that this can lead to unpredictable results, especially in long or complex documents.
3.3 Multi-Level Numbering Through Built-In Heading Styles
A structured document is more easily managed if the headings and sub-headings are formatted by applying Word’s built-in styles Heading1, Heading2, Heading3 etc.
A heading style can be modified to include outline numbering, as follows.
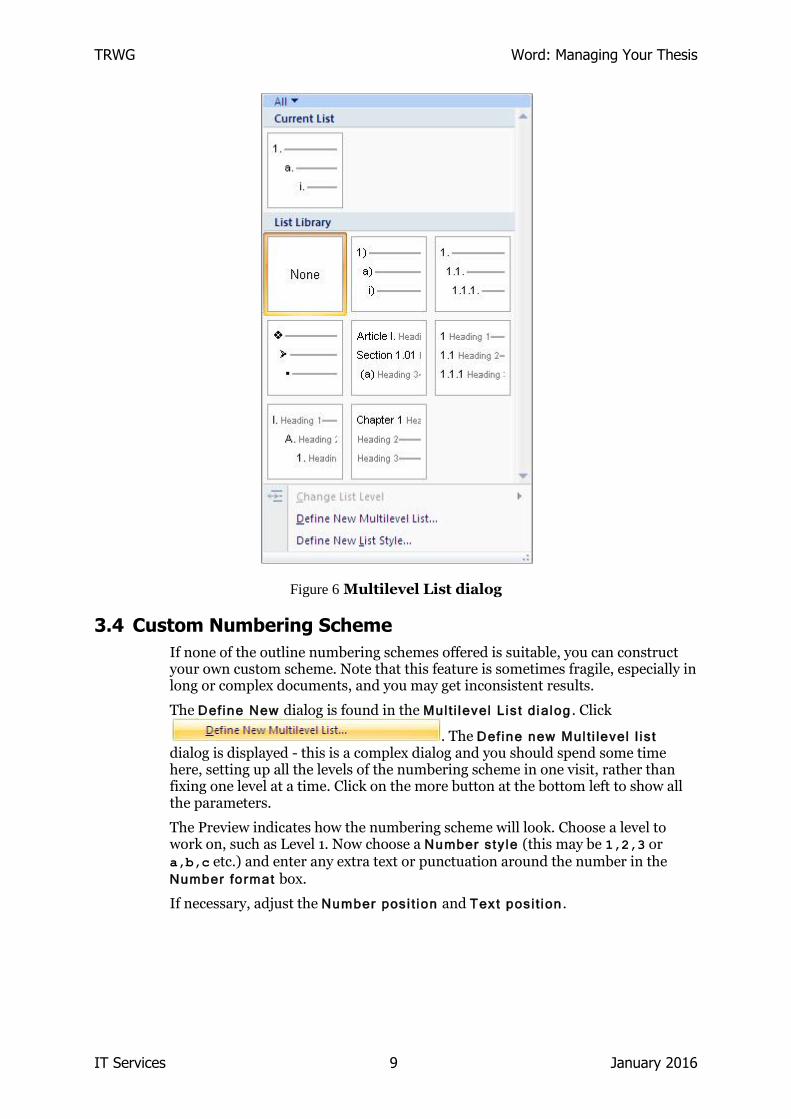
With the insertion point on a Heading1 paragraph, you would click on the drop
down arrow on the Multilevel List button . Here you would choose one of the schemes from the List Library. It is very important to choose one of lists that has heading styles. By choosing this, you are redefining the family of heading styles to use this multi-level numbering scheme.
TRWG Word: Managing Your Thesis
IT Services 9 January 2016
Figure 6 Multilevel List dialog
3.4 Custom Numbering Scheme
If none of the outline numbering schemes offered is suitable, you can construct your own custom scheme. Note that this feature is sometimes fragile, especially in long or complex documents, and you may get inconsistent results.
The Define New dialog is found in the Mult i level List dialog . Click
. The Define new Mul t i level l is t dialog is displayed - this is a complex dialog and you should spend some time here, setting up all the levels of the numbering scheme in one visit, rather than fixing one level at a time. Click on the more button at the bottom left to show all the parameters.
The Preview indicates how the numbering scheme will look. Choose a level to work on, such as Level 1. Now choose a Number sty le (this may be 1,2,3 or a,b,c etc.) and enter any extra text or punctuation around the number in the Number format box.
If necessary, adjust the Number posi t ion and Text posi t ion .
Word: Managing Your Thesis TRWG
January 2016 10 IT Services
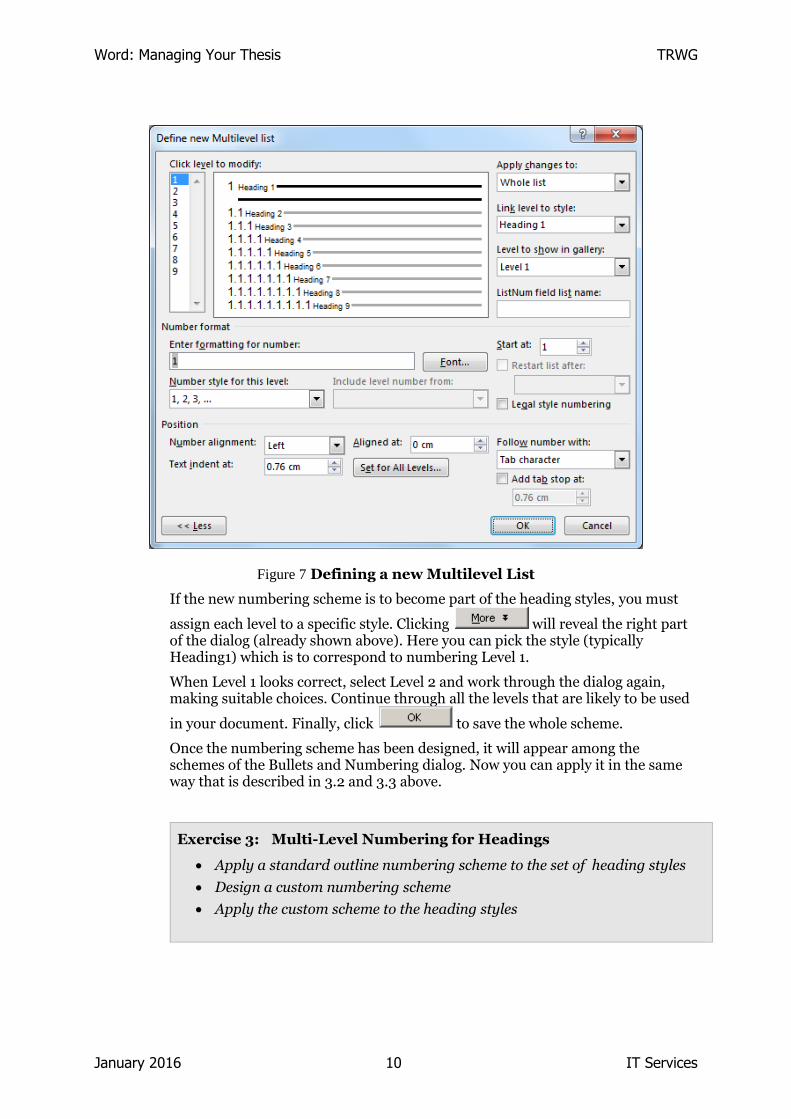
Figure 7 Defining a new Multilevel List
If the new numbering scheme is to become part of the heading styles, you must
assign each level to a specific style. Clicking will reveal the right part of the dialog (already shown above). Here you can pick the style (typically Heading1) which is to correspond to numbering Level 1.
When Level 1 looks correct, select Level 2 and work through the dialog again, making suitable choices. Continue through all the levels that are likely to be used
in your document. Finally, click to save the whole scheme.
Once the numbering scheme has been designed, it will appear among the schemes of the Bullets and Numbering dialog. Now you can apply it in the same way that is described in 3.2 and 3.3 above.
Exercise 3: Multi-Level Numbering for Headings
Apply a standard outline numbering scheme to the set of heading styles
Design a custom numbering scheme
Apply the custom scheme to the heading styles

TRWG Word: Managing Your Thesis
IT Services 11 January 2016
All the files for these exercises have been provided for you on a network drive.
Task 1
Find the document Student Book for Outl ining.doc x and open it
Task 2
Scroll through, noting the heading structure
Step 1
Note that this document has headings and sub-headings, which are formatted using the built-in styles Heading1, Heading2 and Heading3
Step 2
Examine the document structure by scrolling through, or by using Outline View or the Navigation Pane
Task 3
Modify the set of styles Heading1, Heading2 and Heading3 to include an outline numbering scheme of the form 1 1.1 1.1.1
Scroll through the document, noting the effect of the new numbering styles
Step 1
Click in any paragraph that has the style Heading1
Step 2
Choose Mul t i level List from the Home tab
Step 3
Select a preview that has multi-level numbers of this form:
1 heading1
1.1 heading2
1.1.1 heading3
Step 4
Notice the effect on the heading you first selected
Step 5
Scroll through the document in Outline View, Print Layout view or the Navigation Pane, to see the new numbering scheme in use
Step 6
(Optional) Explore how the heading numbers adapt when an individual heading is promoted or demoted, and when headings are rearranged
Task 4
Use the Multilevel List dialog, and devise a custom numbering scheme for the heading styles
Give it this form:
Chapter 1:
Part A:
(i)
Step 1
Change to Print Layout View
Step 2
Choose Mul t i level List dialog
Click on
Step 3
Select 1 in the Level box at top left
Select the Number sty le 1,2,3
In the Number format box, type Chapter before the
number 1 and type : after it, to build an entry Chapter 1:

Word: Managing Your Thesis TRWG
January 2016 12 IT Services
Step 4
Click if necessary to reveal the right part of the dialog
Set Link level to sty le to Heading1
Step 5
Select 2 in the Level box at top left
Select the Number sty le A,B,C
In the Number format box, type Part before the
letter A and type : after it, to build an entry Part A:
Link this level to the style Heading2
Ensure that Star t at is set to A
Step 6
Continue for Level 3, and build an entry (i) linked to
the Heading3 style
Step 7
Finally click
The new numbering scheme is now available for use, either as direct formatting or, as in this example, as part of a style definition
Task 5
Note the effect of the new outline numbering
Step 1
Scroll through the document in Outline View, Print Layout view or the Document Map, to see the new numbering scheme in use throughout the document

TRWG Word: Managing Your Thesis
IT Services 13 January 2016
4 Footnotes & Endnotes Extra information may be included in a document, out of the main sequence of text, by inserting a footnote or endnote. A small marker (a number or punctuation symbol) is placed in the text, referring the reader to further information at the bottom of the page (a footnote) or at the end of the document (an endnote). Word can insert and manage these.
We refer here to footnotes, however endnotes are managed in exactly the same way - just make sure you select Endnotes when inserting them.
4.1 Inserting a Footnote or Endnote
With the insertion point at the relevant point in the main text, choose the References r ibbon and launch the Footnote and Endnote dialog .
Figure 8 Footnote and Endnote Dialog
In the dialog, you choose between a footnote and an endnote, then select the position (bottom of page etc.).
When you click , a marker is inserted in the main text* and a place is opened at the bottom of the page where you can type the additional text. When this is complete, navigate as usual (e.g. use the mouse) to return to the main text.
If you are working in Draft View, then when you insert a note a special window area is opened at the bottom of the screen, where all the notes are listed. Edit
them here, then click at the top right of the new window to return to the main paragraphs.
* This is a footnote

Word: Managing Your Thesis TRWG
January 2016 14 IT Services
The note text is placed at the bottom of the page, above any footer.
4.2 Working With Footnotes and Endnotes
Once a note (a footnote or an endnote) has been inserted in a document, the reference number or symbol acts as a hyperlink. Pause the mouse pointer over the reference, and a ScreenTip appears, giving the text of the note.
If you double-click the reference, the insertion point moves to the note text, ready for editing.
In Print Layout View, double-clicking the reference number/symbol in a note will move the insertion point to the reference in the main text.
Figure 9 Footnotes on a Page
The note text can be edited directly, in Print Layout View.
To delete a note, select the reference in the main text (perhaps using SHIFT with an arrow key rather than the mouse to drag over a single character) and press DELETE. The whole note is then deleted along with the reference character.
If the document is rearranged, and paragraphs containing note symbols are moved, the notes will be rearranged automatically. If there is a numbered series of notes, they will be renumbered when the text is rearranged.
4.3 Footnote Options
There are different number formats available - numbers, letters or the conventional sequence of indicator symbols such as *. These are offered in the
TRWG Word: Managing Your Thesis
IT Services 15 January 2016
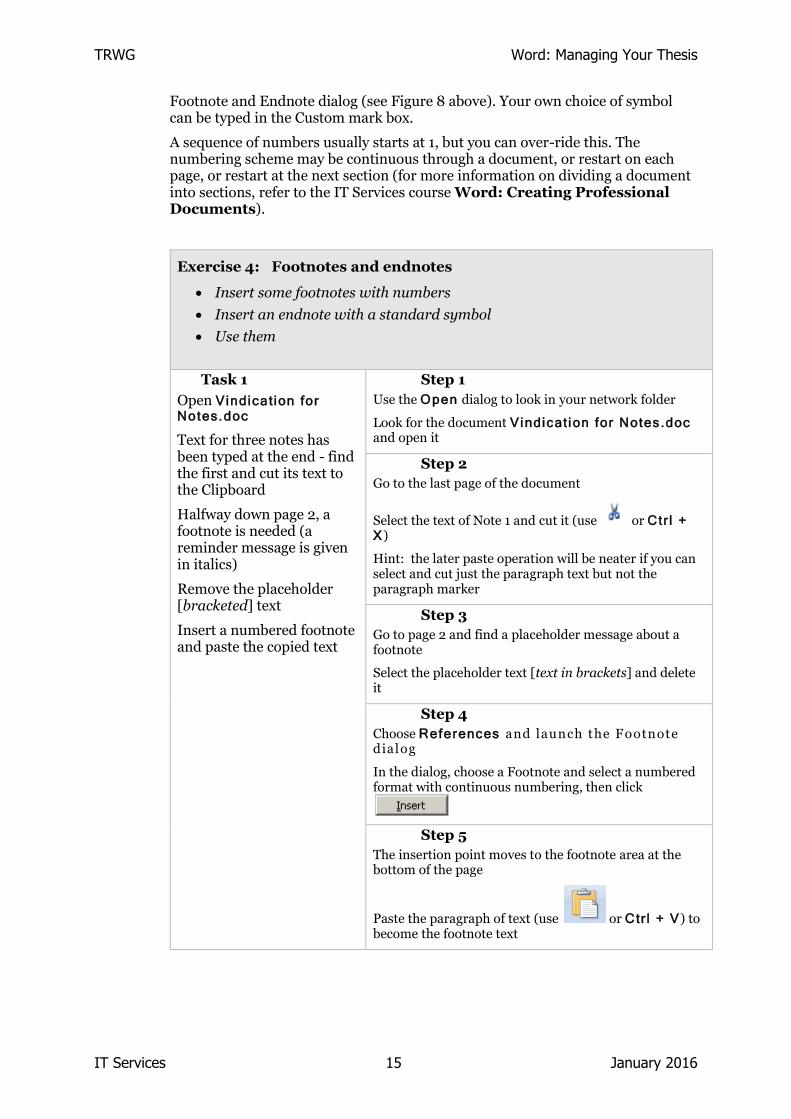
Footnote and Endnote dialog (see Figure 8 above). Your own choice of symbol can be typed in the Custom mark box.
A sequence of numbers usually starts at 1, but you can over-ride this. The numbering scheme may be continuous through a document, or restart on each page, or restart at the next section (for more information on dividing a document into sections, refer to the IT Services course Word: Creating Professional Documents).
Exercise 4: Footnotes and endnotes
Insert some footnotes with numbers
Insert an endnote with a standard symbol
Use them
Task 1
Open Vindicat ion for Notes.doc
Text for three notes has been typed at the end - find the first and cut its text to the Clipboard
Halfway down page 2, a footnote is needed (a reminder message is given in italics)
Remove the placeholder [bracketed] text
Insert a numbered footnote and paste the copied text
Step 1
Use the Open dialog to look in your network folder
Look for the document Vindicat ion for Notes.doc and open it
Step 2
Go to the last page of the document
Select the text of Note 1 and cut it (use or Ctr l + X)
Hint: the later paste operation will be neater if you can select and cut just the paragraph text but not the paragraph marker
Step 3
Go to page 2 and find a placeholder message about a footnote
Select the placeholder text [text in brackets] and delete it
Step 4
Choose References and launch the Footnote dialog
In the dialog, choose a Footnote and select a numbered format with continuous numbering, then click
Step 5
The insertion point moves to the footnote area at the bottom of the page
Paste the paragraph of text (use or Ctr l + V) to become the footnote text

Word: Managing Your Thesis TRWG
January 2016 16 IT Services
Task 2
Repeat this: use the text of Note 2 on the last page to create a second footnote where indicated on page 6
Step 1
Go to near the bottom of the document to Note 2
Select the text and cut it
Hint: the later paste operation will be neater if you can select and cut just the paragraph text but not the paragraph marker
Step 2
Go to page 6 and find the placeholder for another footnote
Delete the placeholder text
Step 3
Choose References| Inser t Footnote
Choose the same numbered format
Paste the text from Note 2 as the note text
Task 3
Select and cut the text of the third note
Find the final placeholder on page 12 and insert an endnote with a * symbol and the pasted text
Step 1
Go to Note 3, near the bottom of the document
Select the text and cut it (try not to include the paragraph marker)
Step 2
Go to page 12 and find the placeholder for an endnote
Delete the placeholder text
Step 3
Choose References| Inser t Footnote
Choose an Endnote, and choose * from the list of number formats
Paste the text from Note 3 (this time it goes to the end of the document)
Task 4
Examine the footnotes and endnotes in document
Step 1
For each note, pause over its symbol and see the text appearing in a ScreenTip
Jump between the symbol and the note text by double-clicking the reference symbol
Task 5
Save the document, leaving it open
4.4 Footnote Text Continuation
A very long note may look clumsy if it is all placed at the bottom of one page, so Word may automatically move part of the note text to the next page. The exact positioning of this will depend on the page layout (margins, paper size and so on).
Beware that if there are a large number of notes, especially if they are long, Word may have difficulty with the pagination and placement of the notes, and the results may be unpredictable.

TRWG Word: Managing Your Thesis
IT Services 17 January 2016
Figure 10 A Long Footnote, Continued on the Next Page
4.5 Separator Line
By default, a short separator line appears between the main text and any notes near the bottom of the page. The appearance of this line can be changed.
In Outline View, footnotes and endnotes are seen in the Notes area (reached by double-clicking a footnote reference character).
Figure 11 Editing the Footnote Separator Line
A drop-down list box is used to select Footnote Separator. Then the line can be edited as required. A different line can be created using a series of punctuation characters. Fancier lines may be inserted from collections of ClipArt.
In the Notes area, you can also create a continuation notice, usually text such as /continued, which will appear whenever it is necessary to break note text over two or more pages. A different separator line can be created, for very long notes that continue on the next page, called the Footnote Continuation Separator.

Word: Managing Your Thesis TRWG
January 2016 18 IT Services
There is a separate set of continuation notices and separator lines for the endnotes. These can be edited independently of the footnote set.
4.6 Style of Footnote Marker and Footnote Text
The formatting of notes is determined by styles. The note text is inserted, by default, in the style Footnote Text . The reference number or symbol that is inserted in the main text has the character style Footnote Reference .
Different formatting or a different style can of course be applied to individual text in the usual way (such as using the Font or Styles section on the Home r ibbon).
Alternatively, either style can be re-defined. Then all footnotes (or endnotes) in the document will have the same formatting. This would be appropriate, for instance, to ensure that the note text has the same font as the main document text, rather than the default Times New Roman.
A style can be redefined within one document, by using the Styles dialog . First select relevant text, such as the note text which already has the style Footnote Text. In the Style dialog, select options and choose In current document in the Select styles to show drop down list. The style Footnote text will be selected. Click
to open the Manage Styles dialog. Choose Modi fy on that menu. In the Modi fy Style dialog that appears, choose the desired formatting then choose
after making sure the style category is correct. Now all notes in this document will have the same formatting. Working with styles is covered further in the IT Services course Word: Creating Professional Documents.
4.7 Third-Party Software for Managing References
Word’s footnote and endnote tool is suitable for inserting and managing a moderate number of notes in a single document. If you are dealing with a quantity of references, perhaps citing each one in several documents, you should consider using specialist software such as EndNote. This is a third-party product (not supplied by Microsoft), which is designed to integrate well with Word. It acts as a database where you collect many citations relevant to your field of work. Then when you need to cite a reference in a Word document, EndNote can insert a suitable marker field which displays the reference in a footnote/endnote, using a suitable format and layout for the publication you are aiming for.
For more information about IT Services EndNote courses, please refer to the IT Courses web pages at http://www.it.ox.ac.uk/courses/
TRWG Word: Managing Your Thesis
IT Services 19 January 2016
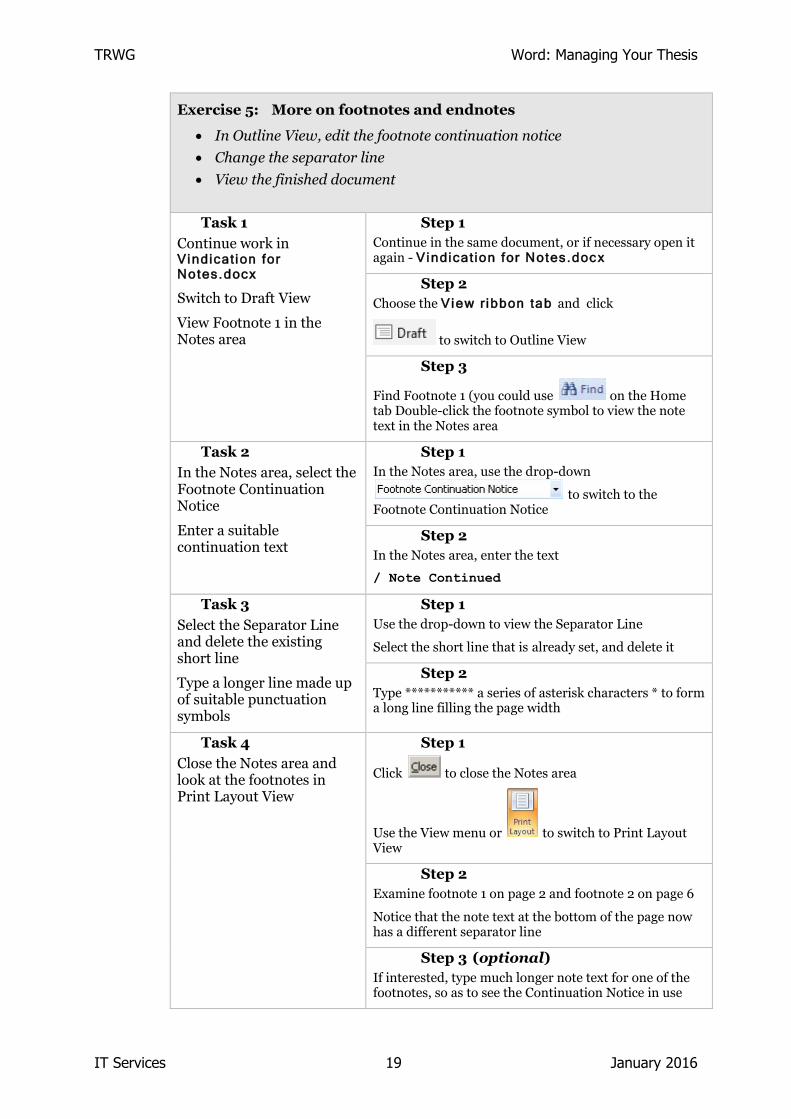
Exercise 5: More on footnotes and endnotes
In Outline View, edit the footnote continuation notice
Change the separator line
View the finished document
Task 1
Continue work in Vindicat ion for Notes.docx
Switch to Draft View
View Footnote 1 in the Notes area
Step 1
Continue in the same document, or if necessary open it again - Vindicat ion for Notes.docx
Step 2
Choose the View r ibbon tab and click
to switch to Outline View
Step 3
Find Footnote 1 (you could use on the Home tab Double-click the footnote symbol to view the note text in the Notes area
Task 2
In the Notes area, select the Footnote Continuation Notice
Enter a suitable continuation text
Step 1
In the Notes area, use the drop-down
to switch to the Footnote Continuation Notice
Step 2
In the Notes area, enter the text
/ Note Continued
Task 3
Select the Separator Line and delete the existing short line
Type a longer line made up of suitable punctuation symbols
Step 1
Use the drop-down to view the Separator Line
Select the short line that is already set, and delete it
Step 2
Type *********** a series of asterisk characters * to form a long line filling the page width
Task 4
Close the Notes area and look at the footnotes in Print Layout View
Step 1
Click to close the Notes area
Use the View menu or to switch to Print Layout View
Step 2
Examine footnote 1 on page 2 and footnote 2 on page 6
Notice that the note text at the bottom of the page now has a different separator line
Step 3 (optional)
If interested, type much longer note text for one of the footnotes, so as to see the Continuation Notice in use

Word: Managing Your Thesis TRWG
January 2016 20 IT Services
Task 5
Close and save the document

TRWG Word: Managing Your Thesis
IT Services 21 January 2016
5 Table of Contents
5.1 Automated References in a Document
In a large, formal document, you can save a lot of time and repetitive work if you let Word manage references - that is, places in a document where you refer to another point in the document.
Word provides tools for building and maintaining a table of contents, an index and so on, which remove much of the labour and scope for mistakes.
It is common to provide a table of contents near the start of a document, giving a list of the chapters, parts or other segments and the page where each begins. This would usually be placed after the title page but before the main content begins.
Figure 12 Typical Table of Contents
5.2 Preparing the Document
Word can build and manage a table of contents in your document, provided that you have already structured the headings and sub-headings using styles. Using and creating styles is covered in a separate IT Services course (see Section 11.1).
A suitable set of styles comes built-in with Word, called Heading1, Heading2, Heading3 and so on. These can be applied using the Style section of the Home tab:

Word: Managing Your Thesis TRWG
January 2016 22 IT Services
Figure 13 Document Headings with Built-in Styles
You would usually provide a separate page near the start of the document, with a title, where the Table of Contents is to be placed.
5.3 Inserting a New Table of Contents
The Table of Contents dialog is found from References |Table of Contents

TRWG Word: Managing Your Thesis
IT Services 23 January 2016
Figure 14 Table of Contents dialog
5.4 Options
Here you can select from 3 different built in tables; Automatic Tables 1 and 2, and a Manual Table. Hovering over the table selections shows how many levels of heading/sub-heading are to be included in the Contents table, and gives a brief description of the Manual Table selection.
5.5 Using the Table of Contents
When you click on a template, the table of contents is assembled in your document. It comprises a set of field codes, although these are not usually seen. By default, when you click once on the table of contents, the automatic part is shaded in grey. You can use it to navigate to the named parts of the document - point to a listed heading and CTRL+click.

Word: Managing Your Thesis TRWG
January 2016 24 IT Services
Figure 15 A selected Table of Contents for Navigation
Exercise 6: Creating a table of contents
Open a document which has already been formatted with Heading styles
Set up a page to contain the Table of Contents
Insert a table of contents
Specify some popular options
Navigate by CTRL+click
Task 1
Open Vindicat ion For TOC.docx
Examine the document, and notice the styles that have been applied to the various headings and sub-headings
Step 1
In the Open dialog, look in your network drive
Find the file called Vindicat ion For TOC.docx and open it
Step 2
Scroll through the document
Click on some of the headings, especially the Chapter headings and Section headings and sub-headings
Notice the built-in styles Heading1, Heading2 and Heading3 which have been used to format the headings
Step 3
Notice that the major title of the whole document has a custom style MyHeading
Step 4
A table of contents is typically placed near the start of a document
Move to page 2
On a new paragraph line, type a title Contents

TRWG Word: Managing Your Thesis
IT Services 25 January 2016
Task 2
On page 2, enter a title Contents and apply the style MyHeading to it
Remove the placeholder text in [square brackets]
Step 1
With the insertion point still on the Contents title, Launch the styles pane to apply the style MyHeading
Step 2
Select the placeholder text in [square brackets] and delete it
Step 3
Press ENTER as necessary to create a blank paragraph line below the Contents title on page 2
Task 3
On a blank line on page 2, insert a table of contents
Choose the Automatic Table 1
Choose to show page numbers right-aligned, with a tab leader of your choice
Choose to include 3 levels of heading in the table of contents
Step 1
References r ibbon|Table of Contents
Step 2
In the main part of the menu, choose the Automatic Table 1
Step 3
In the Table of Contents dialog, select Custom Table of Contents (towards bottom)
Tick the checkbox to right-align page numbers
Choose a Tab leader from the drop down list
Click
Step 4
Look at the table of contents that has been automatically inserted
Task 4
Examine the table of contents
Use a hyperlink in the table to jump to the paragraph entitled Grand Purpose of Life, in Chapter XIII
Step 1
Notice that every heading with the styles Heading1, Heading2 and Heading3 has been referenced in the table of contents
Step 2
Point to the reference to Grand Purpose of Life (part of Chapter XIII)
Hold CTRL and click this reference : you jump through the document to this paragraph
Task 5
Save the document
Step 1
Click to save the changes to the document
Leave the document open for the next exercise
5.6 Updating a Table of Contents
Either right-click in the table of contents, then choose Update Table , or click once then press F9 (this key updates any selected field). In the next dialog, choose whether to update just the page numbers, leaving the structure of the table

Word: Managing Your Thesis TRWG
January 2016 26 IT Services
unchanged, or whether to have the entire table re-assembled with updated headings and page numbers.
Figure 16 Updating the Table of Contents
5.7 Changing the Design of a Table of Contents
You can change the appearance and layout of a table of contents. Click anywhere in the existing table of contents, then display the dialog from the References|Table of Contents , Custom Table of Contents , then choose the Modi fy tab.
In the dialog, choose different options (described above). When you click
, you are asked to confirm that you want to replace the existing table of contents. The new table replaces the previous one.
5.8 Choosing Which Entries Are Included
A heading paragraph must be distinguished by having a different style from the body text, in order for the ToC tool to detect it. Styles must be used consistently on headings and sub-headings throughout the document.
By default, a table of contents is built by linking to any paragraphs in the document which have the styles Heading1, Heading2 or Heading3.
Use the Show levels control in the dialog to reduce this to just Heading1 and Heading2, or to extend it to include Heading4 or even Heading5 etc.
If you have paragraphs with other styles, these can be picked up by the table of
contents if you use the button from the dialog. In the Options dialog, you specify which styles are to be used, by entering a rank number next to each (1 is top rank, 3 is a lesser rank, and so on).

TRWG Word: Managing Your Thesis
IT Services 27 January 2016
5.9 Changing the Appearance of a Table of Contents
The entries in a ToC are presented using a separate set of styles, called TOC1, TOC2 and so on for the various levels. If the style definitions are not appropriate for your work, you can modify them as you would any other style. A special
button is provided for this , in the Insert Table of Contents dialog. This displays a dialog with a list of the TOCn styles. Here you can select a style
and click another , then select the formatting you require for your table of contents entries (font, paragraph or other formatting). Do this for all TOC styles which you wish to change.
Figure 17 Modifying TOC Styles
5.10 Further Options for a Table of Contents
Special effects can be set up by adding letter switches inside the table of contents field {TOC}. This is discussed below, in section 9.5.
Word: Managing Your Thesis TRWG
January 2016 28 IT Services
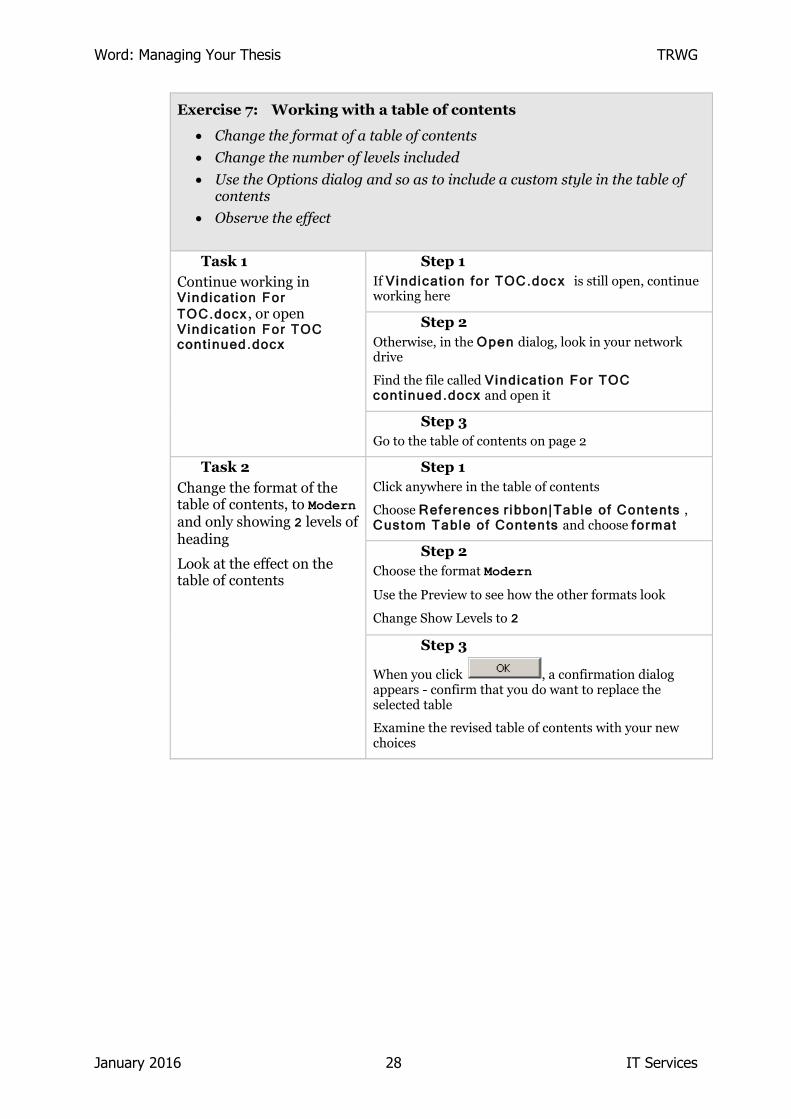
Exercise 7: Working with a table of contents
Change the format of a table of contents
Change the number of levels included
Use the Options dialog and so as to include a custom style in the table of contents
Observe the effect
Task 1
Continue working in Vindicat ion For
TOC.docx , or open Vindicat ion For TOC continued.docx
Step 1
If Vindicat ion for TOC.doc x is still open, continue working here
Step 2
Otherwise, in the Open dialog, look in your network drive
Find the file called Vindicat ion For TOC continued.docx and open it
Step 3
Go to the table of contents on page 2
Task 2
Change the format of the table of contents, to Modern and only showing 2 levels of heading
Look at the effect on the table of contents
Step 1
Click anywhere in the table of contents
Choose References r ibbon|Table of Contents , Custom Table of Contents and choose format
Step 2
Choose the format Modern
Use the Preview to see how the other formats look
Change Show Levels to 2
Step 3
When you click , a confirmation dialog appears - confirm that you do want to replace the selected table
Examine the revised table of contents with your new choices
TRWG Word: Managing Your Thesis
IT Services 29 January 2016
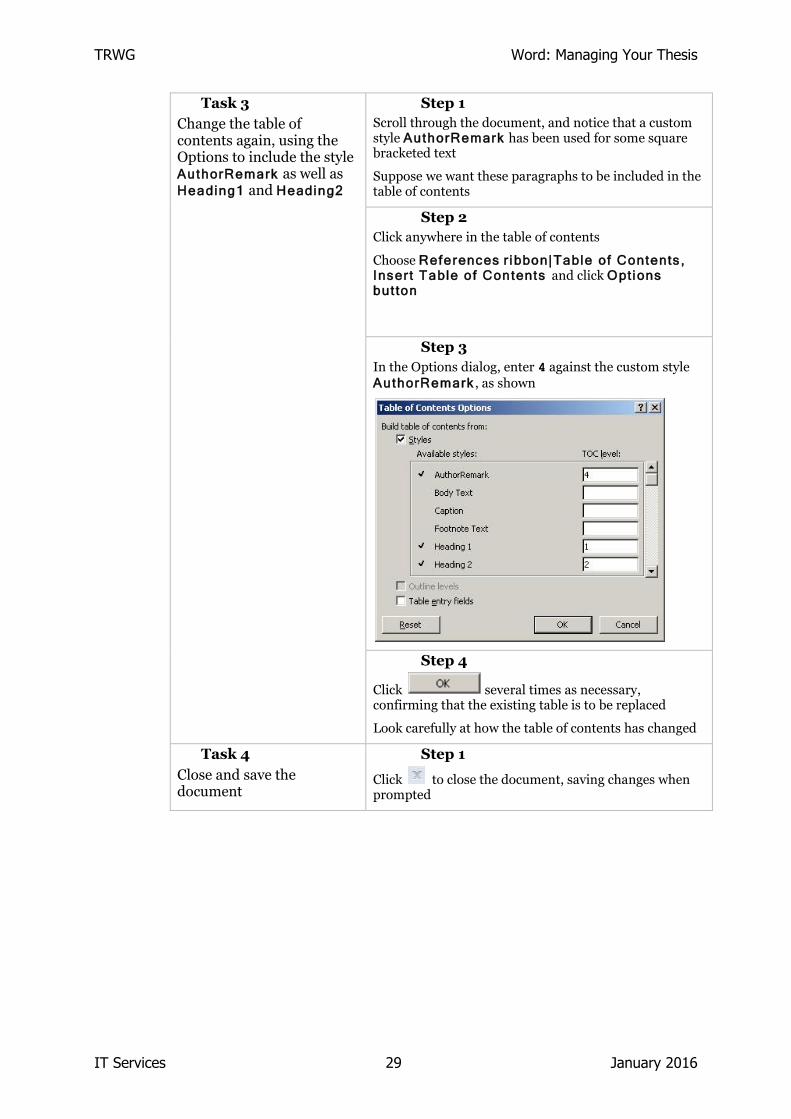
Task 3
Change the table of contents again, using the Options to include the style AuthorRemark as well as Heading1 and Heading2
Step 1
Scroll through the document, and notice that a custom style AuthorRemark has been used for some square bracketed text
Suppose we want these paragraphs to be included in the table of contents
Step 2
Click anywhere in the table of contents
Choose References r ibbon|Table of Contents , Inser t Table of Contents and click Options but ton
Step 3
In the Options dialog, enter 4 against the custom style
AuthorRemark , as shown
Step 4
Click several times as necessary, confirming that the existing table is to be replaced
Look carefully at how the table of contents has changed
Task 4
Close and save the document
Step 1
Click to close the document, saving changes when prompted
Word: Managing Your Thesis TRWG
January 2016 30 IT Services
6 Indexes A formal document may include an Index near the end: this is a list of names, places, technical terms and key phrases which are used in the document, with the pages where they are to be found.
Word can assemble an index automatically, although you must first go through the document marking the terms and phrases you want included.
6.1 Marking Entries for the Index - Manual Method
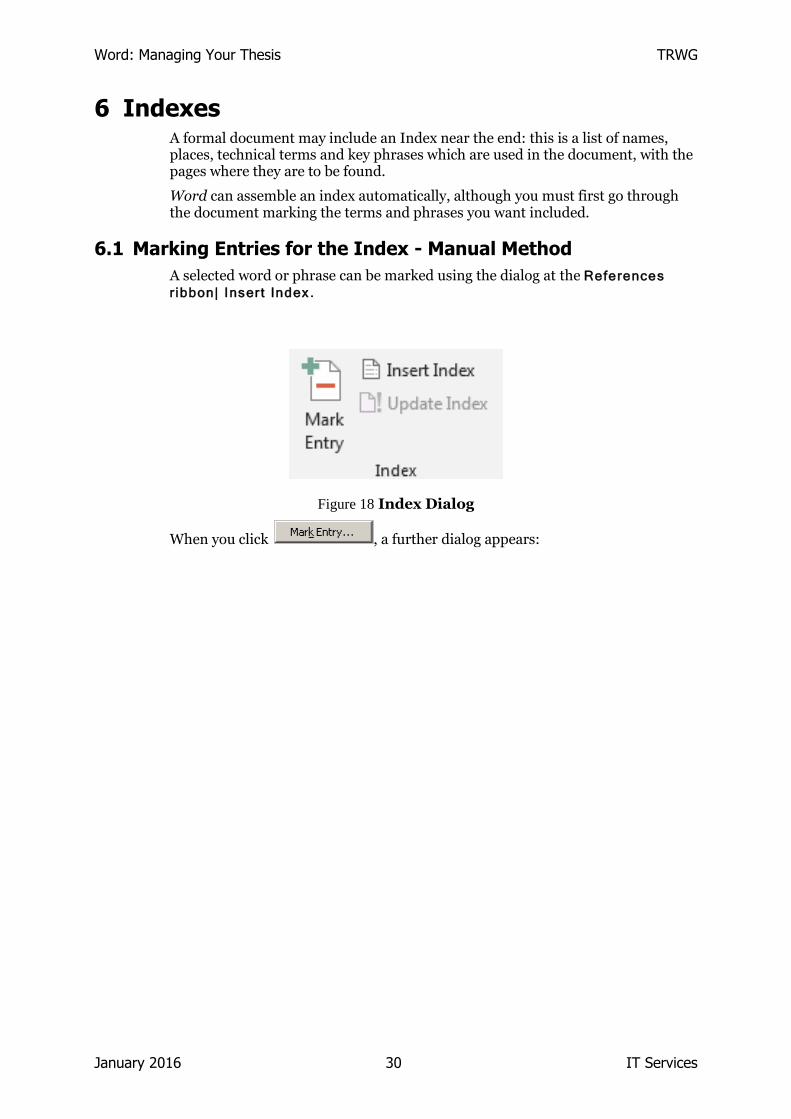
A selected word or phrase can be marked using the dialog at the References
r ibbon| Inser t Index .
Figure 18 Index Dialog
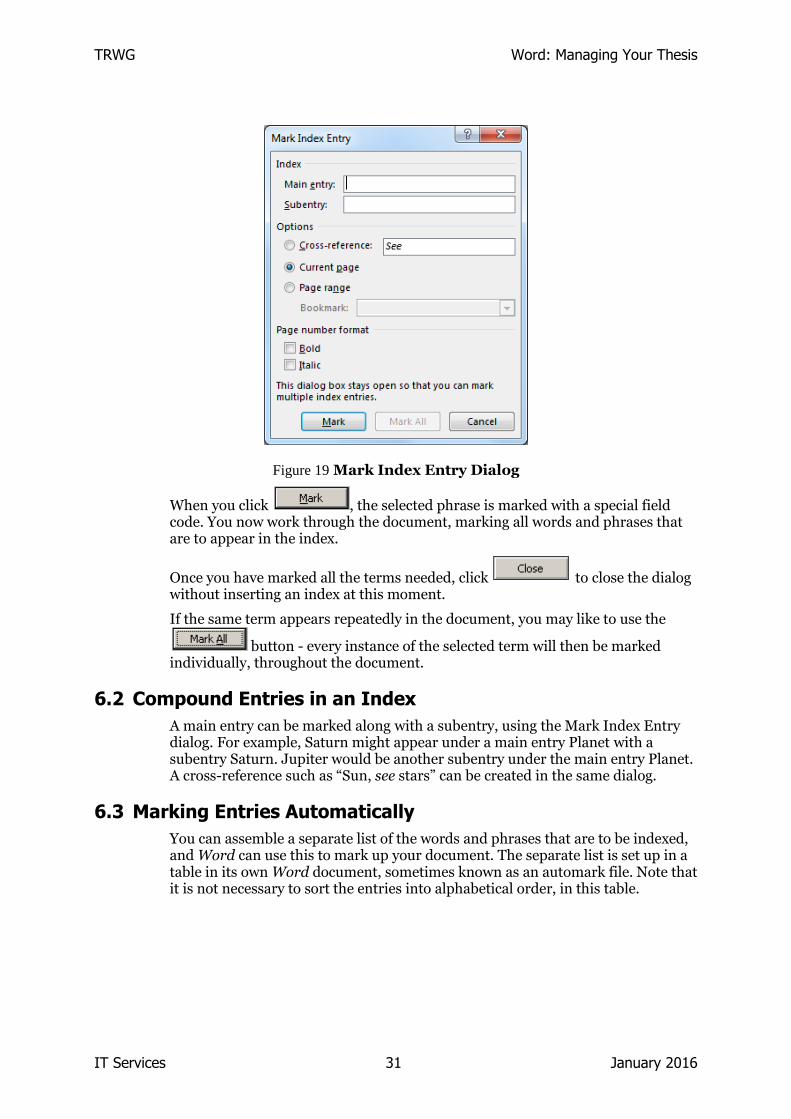
When you click , a further dialog appears:
TRWG Word: Managing Your Thesis
IT Services 31 January 2016
Figure 19 Mark Index Entry Dialog
When you click , the selected phrase is marked with a special field code. You now work through the document, marking all words and phrases that are to appear in the index.
Once you have marked all the terms needed, click to close the dialog without inserting an index at this moment.
If the same term appears repeatedly in the document, you may like to use the
button - every instance of the selected term will then be marked individually, throughout the document.
6.2 Compound Entries in an Index
A main entry can be marked along with a subentry, using the Mark Index Entry dialog. For example, Saturn might appear under a main entry Planet with a subentry Saturn. Jupiter would be another subentry under the main entry Planet. A cross-reference such as “Sun, see stars” can be created in the same dialog.
6.3 Marking Entries Automatically
You can assemble a separate list of the words and phrases that are to be indexed, and Word can use this to mark up your document. The separate list is set up in a table in its own Word document, sometimes known as an automark file. Note that it is not necessary to sort the entries into alphabetical order, in this table.

Word: Managing Your Thesis TRWG
January 2016 32 IT Services
Figure 20 An AutoMark File
In the Index dialog, click then choose the automark filename.
Each time a term from the first column of the automark file is found in the text document, the term is marked for the index. The same automark file may be used to index-mark a number of text documents, even if some terms in the automark do not arise in some of the text documents.
Compound entries can be created by using the second column of the table, as shown in Figure 20. In the illustration, where the phrase Internet Explorer is found, it will be listed under B in the index, as a browser. Several possible mis-spellings of the term ShineALite are expected, and these are all collected in one group under the correct spelling, given in the second column.
Figure 21 A Document With Index Markings
TRWG Word: Managing Your Thesis
IT Services 33 January 2016
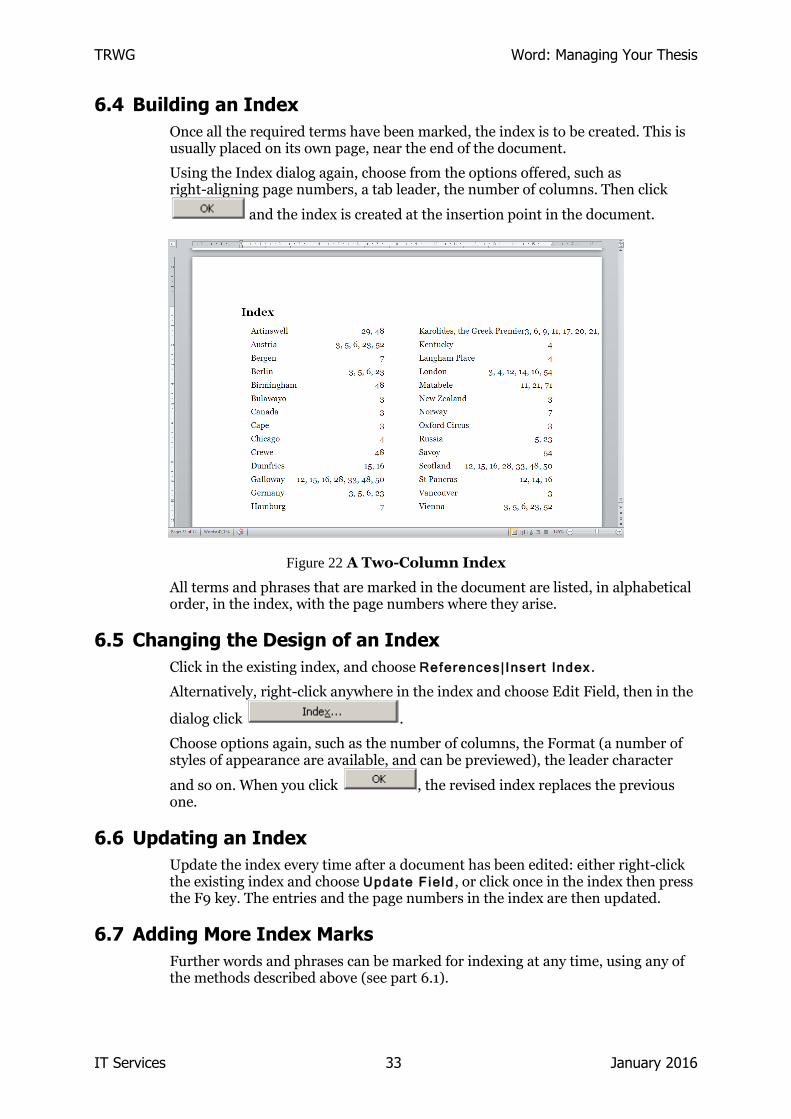
6.4 Building an Index
Once all the required terms have been marked, the index is to be created. This is usually placed on its own page, near the end of the document.
Using the Index dialog again, choose from the options offered, such as right-aligning page numbers, a tab leader, the number of columns. Then click
and the index is created at the insertion point in the document.
Figure 22 A Two-Column Index
All terms and phrases that are marked in the document are listed, in alphabetical order, in the index, with the page numbers where they arise.
6.5 Changing the Design of an Index
Click in the existing index, and choose References| Insert Index .
Alternatively, right-click anywhere in the index and choose Edit Field, then in the
dialog click .
Choose options again, such as the number of columns, the Format (a number of styles of appearance are available, and can be previewed), the leader character
and so on. When you click , the revised index replaces the previous one.
6.6 Updating an Index
Update the index every time after a document has been edited: either right-click the existing index and choose Update Field , or click once in the index then press the F9 key. The entries and the page numbers in the index are then updated.
6.7 Adding More Index Marks
Further words and phrases can be marked for indexing at any time, using any of the methods described above (see part 6.1).
Word: Managing Your Thesis TRWG
January 2016 34 IT Services
6.8 Deleting Index Marks
If a portion of text is deleted, make sure that any associated index field codes are deleted as well (they appear in {braces} and are revealed using the Show/Hide
button ).
If a single index mark is no longer needed, you can select it and delete it. A typical index mark in text is similar to { XE “Show/Hide” }.
You can search through a document, looking for all the index marks in turn, by using Home|Find with the search text XE and Match Case checked (provided that
Show/Hide is turned on).
Optional: You may like to record a macro which finds the next case of XE, moves backwards two characters, selects forwards one character (this will select the whole field code as a unit) and deletes.

TRWG Word: Managing Your Thesis
IT Services 35 January 2016
Exercise 8: Building and changing an index
Mark index entries by hand
Build an index
Task 1
Open Handbook for Index.docx
Step 1
In the network drive, find the document Handbook for Index.docx and open it
Task 2
On page 4, find the phrase Graduate Studies
Committee and mark it for indexing
Step 1
Use Home|Find to find the phrase Graduate
Studies Committee on page 4
Step 2
Select the phrase and choose References r ibbon|Mark Entry
Step 3
Click to mark the selected phrase
Leave this dialog open for marking further text
Task 3
On page 3, find the word matriculation and mark all instances of this word for indexing
Step 1
Use Home|Find to find the word matriculation on
page 3
Step 2
In the Mark Index Entry dialog, accept the default
settings and click to mark this word wherever it appears in this document
Leave this dialog open for marking further text
Task 4
On page 3, find the phrase Probationary Research
Student, and mark this for indexing, with the subentry PRS
Step 1
Use Home|Find to find the phrase Probationary
Research Student on page 3
Step 2
In the Mark Index Entry dialog, type PRS in the
Main entry box and click
Leave this dialog open for marking further text
Task 5
Mark some more words and phrases throughout the document
Several have already been done for you
Step 1
Select another word or phrase which you think should go in the Index
Mark it as an index entry (either just once or mark all instances)
Step 2
Repeat this for practice - index-mark some more terms
You will see a few terms have already been done for you – each field code appears in {braces}, in hidden text
which is only seen when you have Show/Hide turned to Show
Word: Managing Your Thesis TRWG
January 2016 36 IT Services
Step 3
After marking enough terms, click
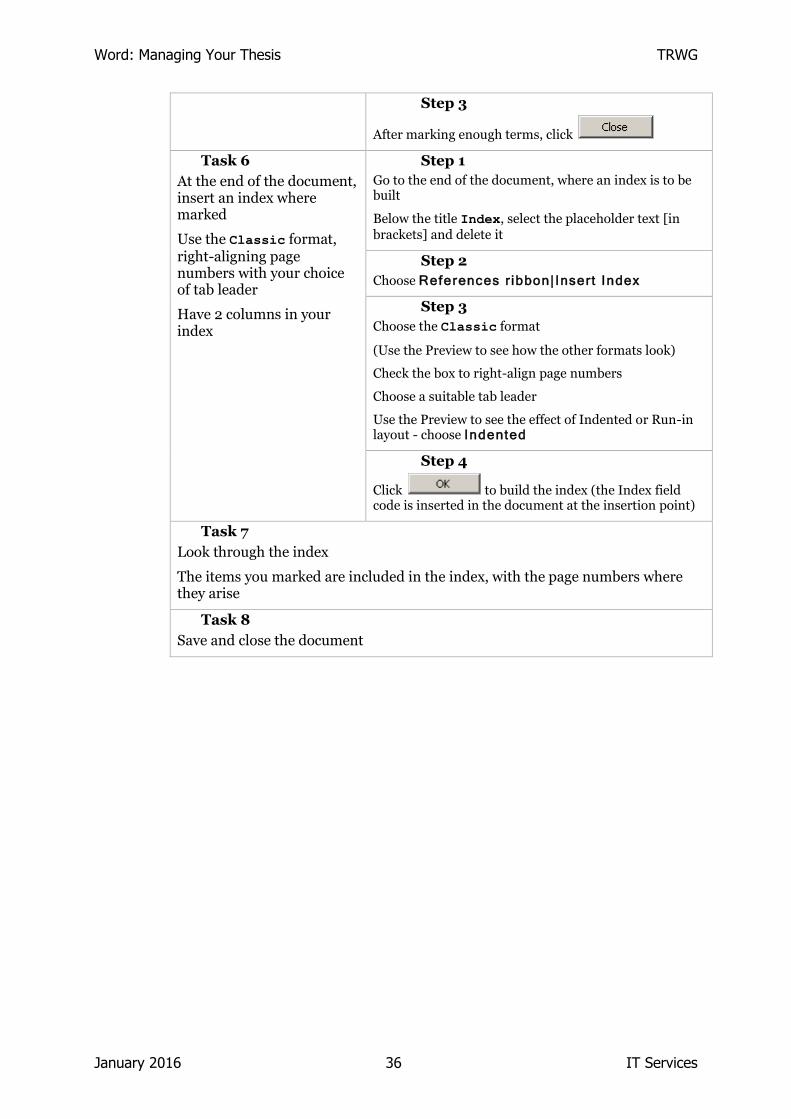
Task 6
At the end of the document, insert an index where marked
Use the Classic format, right-aligning page numbers with your choice of tab leader
Have 2 columns in your index
Step 1
Go to the end of the document, where an index is to be built
Below the title Index, select the placeholder text [in brackets] and delete it
Step 2
Choose References r ibbon| Insert Index
Step 3
Choose the Classic format
(Use the Preview to see how the other formats look)
Check the box to right-align page numbers
Choose a suitable tab leader
Use the Preview to see the effect of Indented or Run-in layout - choose Indented
Step 4
Click to build the index (the Index field code is inserted in the document at the insertion point)
Task 7
Look through the index
The items you marked are included in the index, with the page numbers where they arise
Task 8
Save and close the document

TRWG Word: Managing Your Thesis
IT Services 37 January 2016
Exercise 9: Automatic index marking
Mark index entries automatically
Build another index
Task 1
Open Two Ci t ies for AutoMark.docx
Step 1
In the network drive, find the document Two Ci t ies for AutoMark.docx and open it
Scroll through the document and briefly note its contents
Task 2
Also open AutoMark for
2Ci t ies .docx and examine the words and phrases in the table
Close the AutoMark file
Step 1
Find the document AutoMark for 2Ci t ies .docx and open it as well
Step 2
Notice the words and phrases listed in the table - most but not all are likely to arise in the text document
Close AutoMark for 2Ci t ies .docx without making any changes
Task 3
Use this to mark terms in the Two Cities document, automatically for indexing
Step 1
In the main text document, choose References r ibbon| Insert Index
Click
Step 2
Browse to the document with the table of terms: AutoMark for 2Ci t ies .docx and select it
Any terms from the table which are found in the main document are now marked for indexing
Task 4
Create an index at the end of the story
Step 1
At the end of the document, find and remove the prompt text for the index
Place the insertion point on a blank line below the title Index
Step 2
Choose References r ibbon| Insert Index
Click
Examine the index you have built
Task 5
Close and save the Two Cities document

Word: Managing Your Thesis TRWG
January 2016 38 IT Services
7 Captions A caption can be associated with each figure (or equation, table, photo etc.), with numbering that runs through a document. If this is done using Word’s automatic captioning tool, then appropriate styles will be applied. These are then used to assemble a list of the figures or other captioned items - for example this might be a Table of Figures, commonly included near the Contents of a document.
7.1 Assigning a Caption to a Figure - Manual Method
This is done by selecting a figure (or table, photo and so on) and using the Insert Caption dialog, found from the References|Caption menu.
Figure 23 The Insert Caption dialog
Here you can enter further text after the number in the Caption box.
When you click , the caption is inserted in the document, either below or above the figure as preferred. The caption is a separate paragraph, automatically formatted using the built-in Caption style.
The text of a caption can later be edited directly in the document in the usual way.
7.2 Caption Options
The Label drop-down in the Caption dialog offers some other labels (new labels
can be created by using the button). A formal document may include several series running in parallel, for example a series of Figures, a series of Photos and a series of Equations. Each series has a different label and a separate numbering sequence.
Alternative numbering series such as a,b,c or i,ii,iii may be chosen via
.
7.3 Building a Table of Figures
A table of figures can be built automatically, based on the style applied to the captions.
This uses References| Insert Table of Figures

TRWG Word: Managing Your Thesis
IT Services 39 January 2016
Figure 24 Inserting a Table of Figures
This dialog tab is used in the same way as the Table of Contents and Index tabs, described earlier.
The table must be updated after text has been rearranged or edited, in the same way as the other tables - select it and press F9 to update individually. Alternatively, select the whole document and update all fields including this one.
7.4 Table of Figures Options
Using , you can nominate another style to be built into the table of figures.
Figure 25 Table of Figures Options
Using , you can present the table of figures using an alternative style.
Word: Managing Your Thesis TRWG
January 2016 40 IT Services
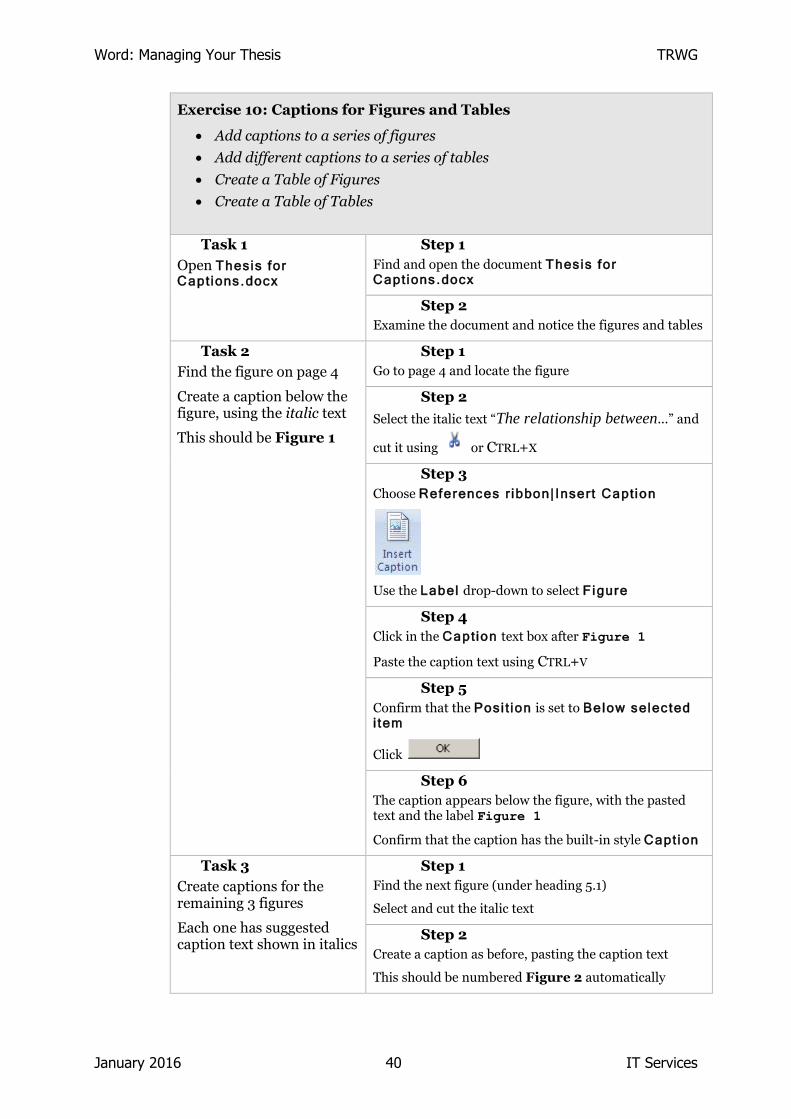
Exercise 10: Captions for Figures and Tables
Add captions to a series of figures
Add different captions to a series of tables
Create a Table of Figures
Create a Table of Tables
Task 1
Open Thesis for Captions .docx
Step 1
Find and open the document Thesis for Captions .docx
Step 2
Examine the document and notice the figures and tables
Task 2
Find the figure on page 4
Create a caption below the figure, using the italic text
This should be Figure 1
Step 1
Go to page 4 and locate the figure
Step 2
Select the italic text “The relationship between...” and
cut it using or CTRL+X
Step 3
Choose References r ibbon| Insert Caption
Use the Label drop-down to select Figure
Step 4
Click in the Caption text box after Figure 1
Paste the caption text using CTRL+V
Step 5
Confirm that the Posi t ion is set to Below selected i tem
Click
Step 6
The caption appears below the figure, with the pasted text and the label Figure 1
Confirm that the caption has the built-in style Caption
Task 3
Create captions for the remaining 3 figures
Each one has suggested caption text shown in italics
Step 1
Find the next figure (under heading 5.1)
Select and cut the italic text
Step 2
Create a caption as before, pasting the caption text
This should be numbered Figure 2 automatically

TRWG Word: Managing Your Thesis
IT Services 41 January 2016
They should become Figures 2,3 and 4
Step 3
Now use the same method to create similar captions for the remaining figures in this document
They should be numbered Figure 3 and Figure 4 automatically
Task 4
Find the table on page 3
Create a caption above the table, using the bold text
This should be Table I
Step 1
On page 3, locate the table
Select the suggested caption text which is shown in bold
“Comparison of Alternative...” and cut it using
Step 2
Choose References r ibbon| Insert Caption
Use the Label drop-down to select Table
Step 3
Click in the Caption text box after Table 1
Paste the caption text using
Step 4
Set the Posi t ion to Above selected i tem
Click
Step 5
The caption appears above the table, with the pasted text and the label Table I
Confirm that the caption has the built-in style Caption
Task 5
Create captions for the remaining 2 tables
Each one has suggested caption text shown in bold
They should become Tables II and III
Step 1
Find the next table
Select and cut the bold text
Step 2
Create a caption as before, pasting the caption text
This should be numbered Table II automatically
Step 3
Now use the same method to create similar captions for the remaining table
It should be numbered Table III automatically
Task 6
On page 1, where indicated, create a Table of Figures
Step 1
On page 1, locate the title “Table of Figures”
Remove the prompt text and [square brackets]
Place the insertion point on an empty line below the title
Word: Managing Your Thesis TRWG
January 2016 42 IT Services
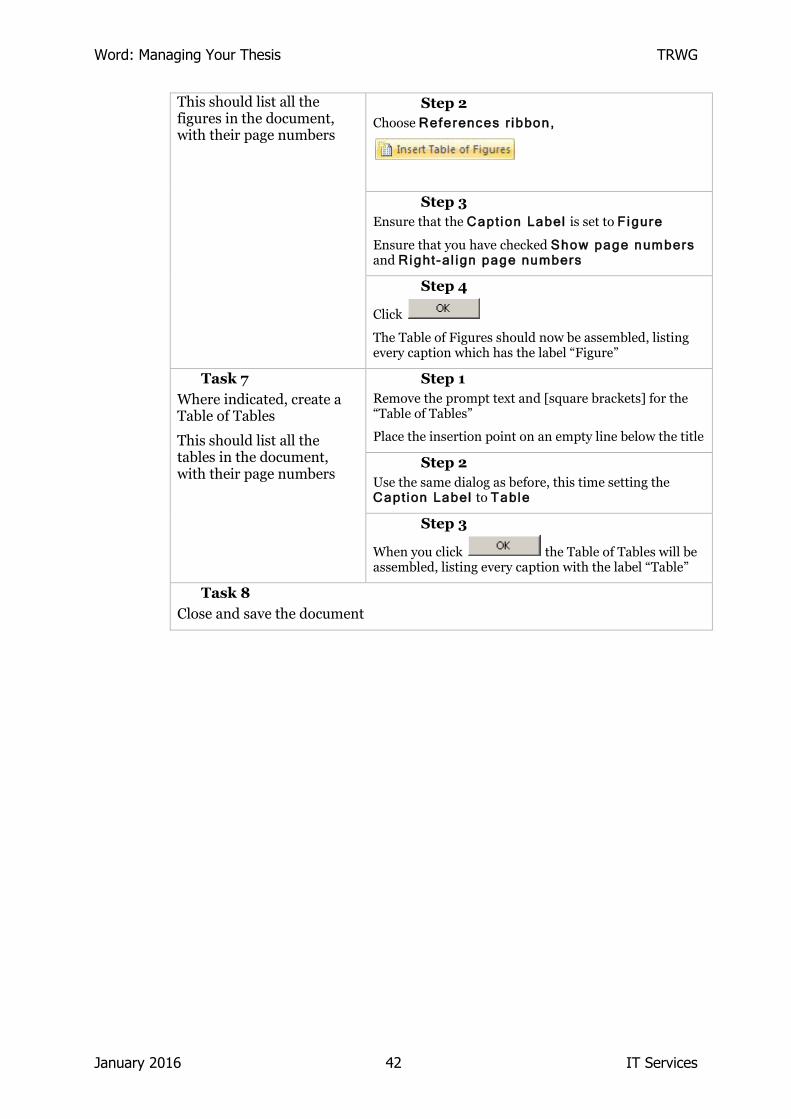
This should list all the figures in the document, with their page numbers
Step 2
Choose References r ibbon,
Step 3
Ensure that the Caption Label is set to Figure
Ensure that you have checked Show page numbers and Right-al ign page numbers
Step 4
Click
The Table of Figures should now be assembled, listing every caption which has the label “Figure”
Task 7
Where indicated, create a Table of Tables
This should list all the tables in the document, with their page numbers
Step 1
Remove the prompt text and [square brackets] for the “Table of Tables”
Place the insertion point on an empty line below the title
Step 2
Use the same dialog as before, this time setting the Caption Label to Table
Step 3
When you click the Table of Tables will be assembled, listing every caption with the label “Table”
Task 8
Close and save the document

TRWG Word: Managing Your Thesis
IT Services 43 January 2016
8 Cross-References If you refer to a point elsewhere in the document, the Cross-Reference tool can help you create and manage a suitable field code. The code can be updated after the document is edited or repaginated.
A cross-reference may refer to a heading or numbered item, a footnote or endnote or any one of the numbered sequences such as figures, tables etc. or simply to a bookmark that has been inserted in a convenient position. The cross-reference may mention the referenced point by its page number (above/below), heading number or paragraph text.
8.1 Creating A Cross-Reference To A Numbered Heading
Within a paragraph of text, insert a reference to a numbered heading elsewhere
by using the menu Insert r ibbon|Cross-reference
Figure 26 Inserting a Cross-Reference
By default, this dialog offers a list of numbered items. If necessary, change the choice in the Reference type box. Scroll through the list of items offered and select the appropriate one. In the Insert reference to: box, choose whether to cite the paragraph’s number, the page it appears on, or another reference. Then click
to insert the field in your text.

Word: Managing Your Thesis TRWG
January 2016 44 IT Services
8.2 Creating a Cross-Reference to an Un-Numbered Heading
Figure 27 Inserting a Cross Reference to an Un-Numbered Heading
8.3 Inserting A Cross-Reference Using A Bookmark
A cross-reference may mention a point in the document, even if that point is not marked by any numbering sequence. You first insert a bookmark at the point to be referenced, using Insert |Bookmark .
Figure 28 Inserting a Bookmark
Type a name for the new bookmark in the box at the top. A bookmark name cannot contain spaces, and the first character must be a letter.
Now place the insertion point at the place where the cross-reference is required. Then use Insert r ibbon|Cross-reference , choose Bookmark as the Reference Type and find the required bookmark in the list. Choose to insert the reference to
the Page number (for instance) and click .

TRWG Word: Managing Your Thesis
IT Services 45 January 2016
Figure 29 Inserting a Cross-Reference Using a Bookmark
8.4 Updating Cross-References
After a document has been edited, the cross-referenced points are likely to be moved. It is important to update cross-references, especially just before printing. Do not assume that Word does this automatically.
Update an individual cross-reference by right-clicking it and choosing Update
Field . Update the whole set of fields by selecting the whole document (Edi t |Select Al l or CTRL+A) then pressing F9.
Exercise 11: Cross references
Create a cross-reference to a numbered heading
Create a cross-reference to a page number
Create a bookmark, then create a cross-reference to it
Task 1
Open In fo for CrossRefs .docx
Look at the headings and sub-headings used in this document
Step 1
In your network folder, open the document In fo for CrossRefs .docx
Step 2
Examine the way this document is laid out
Either scroll through it, noting the headings and sub-headings with their styles and outline numbering
scheme, or use the Navigation pane
Word: Managing Your Thesis TRWG
January 2016 46 IT Services
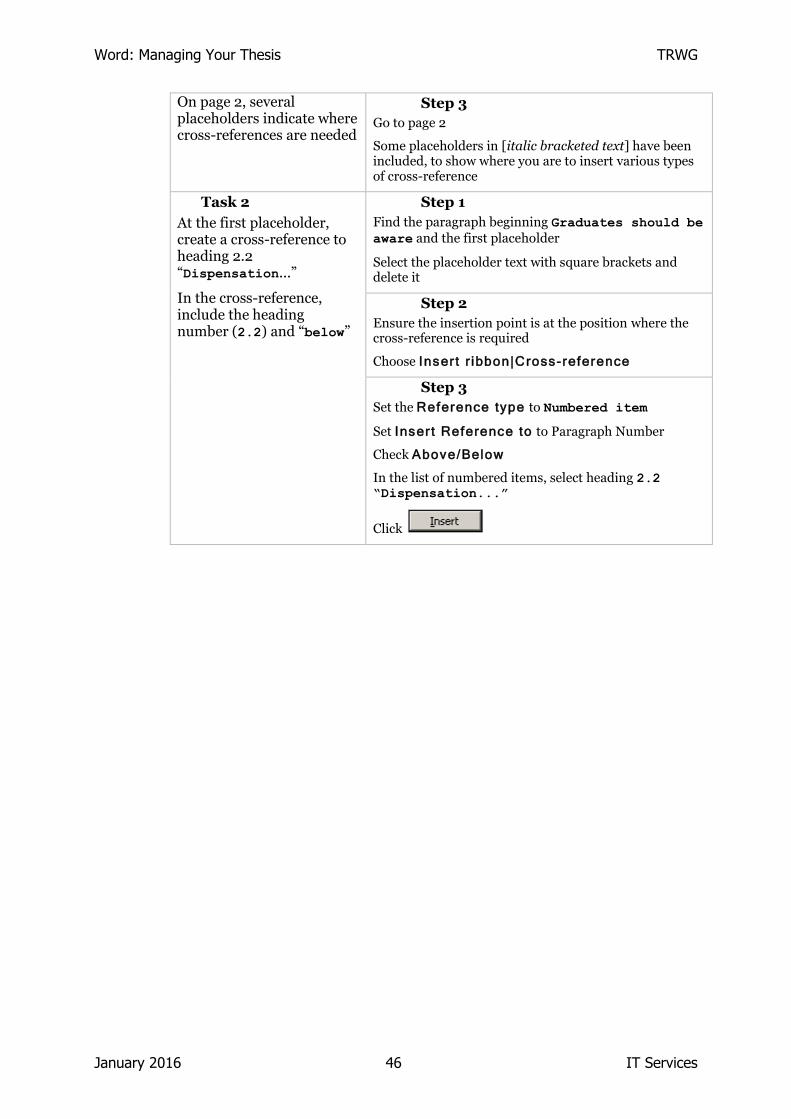
On page 2, several placeholders indicate where cross-references are needed
Step 3
Go to page 2
Some placeholders in [italic bracketed text] have been included, to show where you are to insert various types of cross-reference
Task 2
At the first placeholder, create a cross-reference to heading 2.2 “Dispensation...”
In the cross-reference, include the heading number (2.2) and “below”
Step 1
Find the paragraph beginning Graduates should be
aware and the first placeholder
Select the placeholder text with square brackets and delete it
Step 2
Ensure the insertion point is at the position where the cross-reference is required
Choose Inser t r ibbon|Cross-reference
Step 3
Set the Reference type to Numbered item
Set Inser t Reference to to Paragraph Number
Check Above/Below
In the list of numbered items, select heading 2.2 “Dispensation...”
Click
TRWG Word: Managing Your Thesis
IT Services 47 January 2016
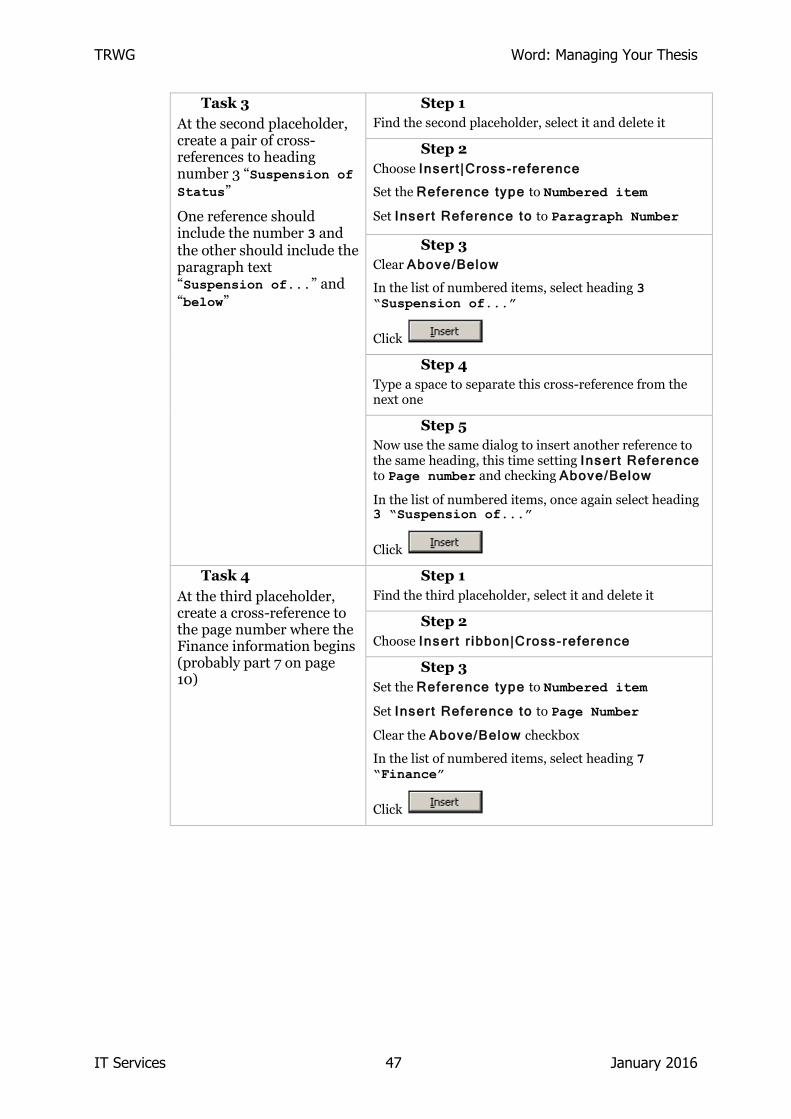
Task 3
At the second placeholder, create a pair of cross-references to heading number 3 “Suspension of Status”
One reference should include the number 3 and the other should include the paragraph text “Suspension of...” and “below”
Step 1
Find the second placeholder, select it and delete it
Step 2
Choose Inser t |Cross-reference
Set the Reference type to Numbered item
Set Inser t Reference to to Paragraph Number
Step 3
Clear Above/Below
In the list of numbered items, select heading 3 “Suspension of...”
Click
Step 4
Type a space to separate this cross-reference from the next one
Step 5
Now use the same dialog to insert another reference to the same heading, this time setting Inser t Reference to Page number and checking Above/Below
In the list of numbered items, once again select heading 3 “Suspension of...”
Click
Task 4
At the third placeholder, create a cross-reference to the page number where the Finance information begins (probably part 7 on page 10)
Step 1
Find the third placeholder, select it and delete it
Step 2
Choose Inser t r ibbon|Cross-reference
Step 3
Set the Reference type to Numbered item
Set Inser t Reference to to Page Number
Clear the Above/Below checkbox
In the list of numbered items, select heading 7 “Finance”
Click
Word: Managing Your Thesis TRWG
January 2016 48 IT Services
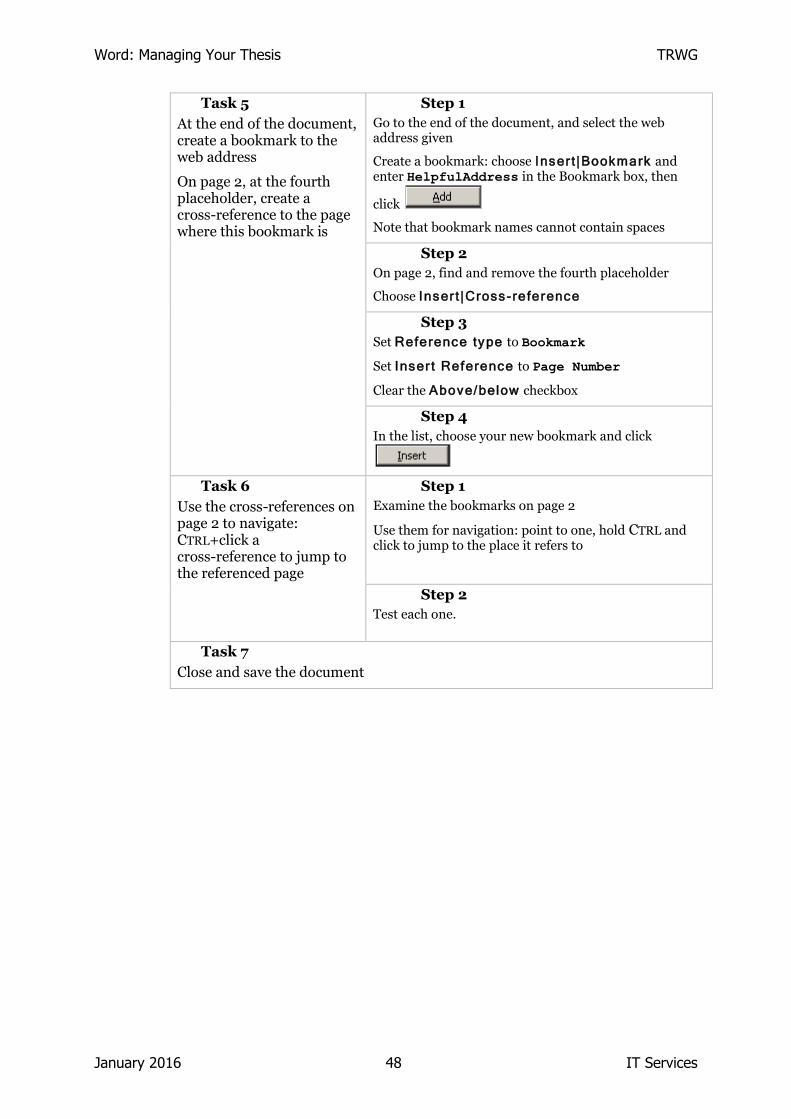
Task 5
At the end of the document, create a bookmark to the web address
On page 2, at the fourth placeholder, create a cross-reference to the page where this bookmark is
Step 1
Go to the end of the document, and select the web address given
Create a bookmark: choose Inser t |Bookmark and enter HelpfulAddress in the Bookmark box, then
click
Note that bookmark names cannot contain spaces
Step 2
On page 2, find and remove the fourth placeholder
Choose Inser t |Cross-reference
Step 3
Set Reference type to Bookmark
Set Inser t Reference to Page Number
Clear the Above/below checkbox
Step 4
In the list, choose your new bookmark and click
Task 6
Use the cross-references on page 2 to navigate: CTRL+click a cross-reference to jump to the referenced page
Step 1
Examine the bookmarks on page 2
Use them for navigation: point to one, hold CTRL and click to jump to the place it refers to
Step 2
Test each one.
Task 7
Close and save the document
TRWG Word: Managing Your Thesis
IT Services 49 January 2016
9 Field Codes The automatic features discussed above, the table of contents, index and cross-reference, all make use of Word’s field codes. As you insert any of these features, Word inserts a suitable code enclosed in braces { and }.
9.1 Displaying and Hiding Field Codes
These codes are usually hidden, and their results are shown instead, but they can be revealed.
The {XE} codes which mark individual pieces of text for indexing are displayed
(and hidden) by clicking the Show/Hide button .
Other codes, including {TOC}, {INDEX} and {PAGEREF} can be displayed using ALT+F9. This keystroke toggles the document between showing the codes and their results. Alternatively, you may be able to right-click an individual field and choose Toggle Field Codes .
9.2 Why Update Field Codes?
After a document has been edited, headings will have moved between pages and new headings may have been inserted, so the table of contents must be updated. The text content and the order of the material is likely to have changed, so any index and cross-references should be updated.
Do not assume that Word updates this or other fields when you open, save or print the document. In recent versions of Word, this is no longer the default behaviour. You must update the table, index or cross-reference, especially before printing or after any significant edits. It is good practice to save your work, then update all fields, then save again each time before printing.
9.3 Updating a Single Field
Either right-click in the field, then choose Update Field , or click once then press F9 (this key updates any selected field).
9.4 Updating a Whole Document
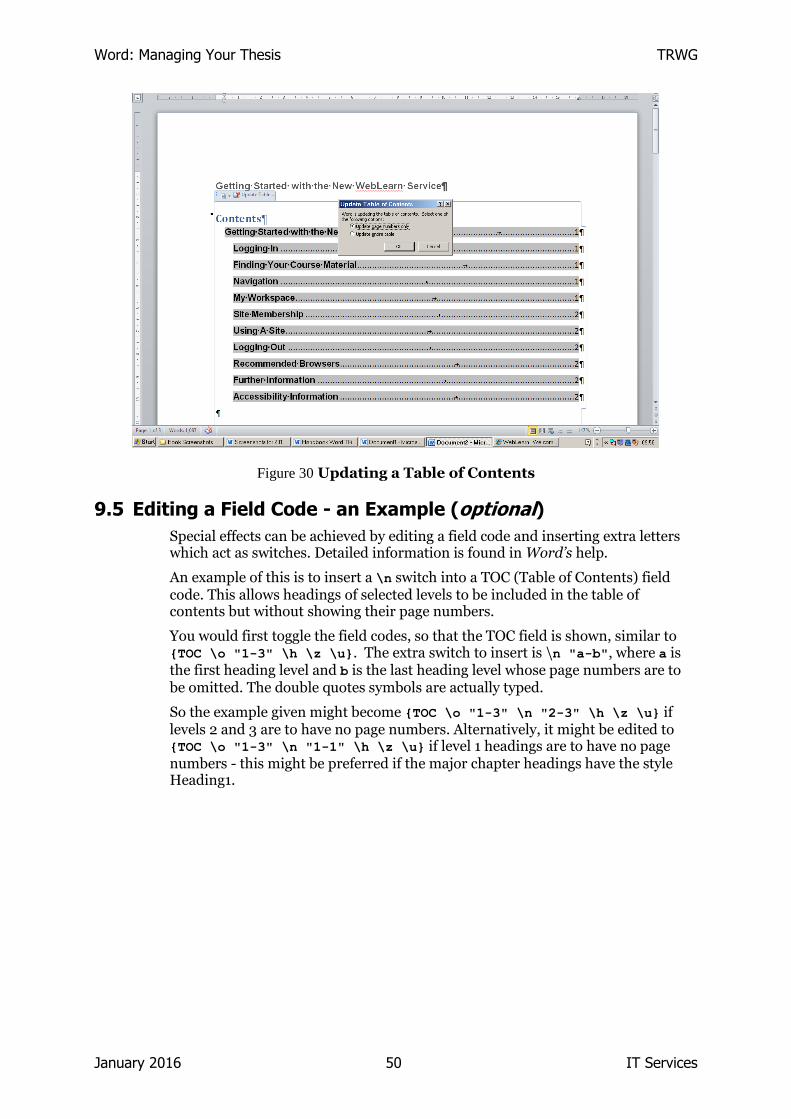
You might choose to update all the fields in a document at a stroke, by selecting the whole document (Home, Select Al l or CTRL+A) then pressing F9 to update any fields found.
If one of the selected fields is a table of contents, a further dialog appears: here you choose whether to update just the page numbers, leaving the structure of the table unchanged, or whether to have the entire table re-assembled with updated headings and page numbers.
Word: Managing Your Thesis TRWG
January 2016 50 IT Services
Figure 30 Updating a Table of Contents
9.5 Editing a Field Code - an Example (optional)
Special effects can be achieved by editing a field code and inserting extra letters which act as switches. Detailed information is found in Word’s help.
An example of this is to insert a \n switch into a TOC (Table of Contents) field code. This allows headings of selected levels to be included in the table of contents but without showing their page numbers.
You would first toggle the field codes, so that the TOC field is shown, similar to {TOC \o "1-3" \h \z \u}. The extra switch to insert is \n "a-b", where a is the first heading level and b is the last heading level whose page numbers are to be omitted. The double quotes symbols are actually typed.
So the example given might become {TOC \o "1-3" \n "2-3" \h \z \u} if levels 2 and 3 are to have no page numbers. Alternatively, it might be edited to {TOC \o "1-3" \n "1-1" \h \z \u} if level 1 headings are to have no page numbers - this might be preferred if the major chapter headings have the style Heading1.

TRWG Word: Managing Your Thesis
IT Services 51 January 2016
Exercise 12: Updating field codes
Rearrange a document using cut & paste
Update fields in the whole document
Now delete a chunk from the text
Update the table of contents individually by the Update command
Update the index individually
Update each of the cross-references individually
Task 1
Open In fo for Updating.docx
Notice that it already has a table of contents (page 1) and an index (last page) and some cross-references (page 2)
Step 1
Find and open the document In fo for Updating.docx
Step 2
Examine the table of Contents on page 1 and the Index on the last page
Step 3
Locate the cross-references on page 2 (if the fields are not already shown shaded, they may become shaded when you attempt to select them, with an unusual dark shading)
Task 2
Rearrange some parts of the document, using cut and paste or Outline View etc.
Notice that the table of contents, the index and the cross-references do not update automatically
The paragraph numbers on the headings do auto-update
Step 1
Select part 4, The organisation of the
University and cut it
Paste it at the end of the document, just before the Index
Step 2
Select what is now part 8, Employment and cut it
Paste it near the start of the document, just after the Contents and before part 1 Fees
Step 3
Notice that the numbered headings are re-numbered immediately
Look carefully at the Contents and the Index - they have not been updated immediately
Task 3
Update all fields in the document
Confirm that entries in the table of contents and index are now correct
Step 1
Select the whole of the document (Edi t |Select Al l or
CTRL+A)
Step 2
Press F9
When asked, choose to update the entire table
Step 3
Examine the Contents and the Index again, and note that the page numbers have been updated
Similarly, all the cross-references in the Fees part, and any other fields present in the document will have been updated

Word: Managing Your Thesis TRWG
January 2016 52 IT Services
Task 4
Delete the part entitled The Colleges
Step 1
Go to the part on The Colleges
Select the whole part, down to the next heading Finance and delete it
Again, all the field codes in the document require updating
Task 5
Update the table of contents individually
Step 1
In the Contents, right-click and choose Update Field from the menu (and when asked, agree to update the entire table)
Task 6
Update the index individually
Step 1
In the Index, update it, either using the right-click
method or by selecting it and pressing F9
Task 7
Update each cross-reference in the part on Fees
Step 1
Practice updating each cross-reference in the Fees section
Task 8
Close and save the document
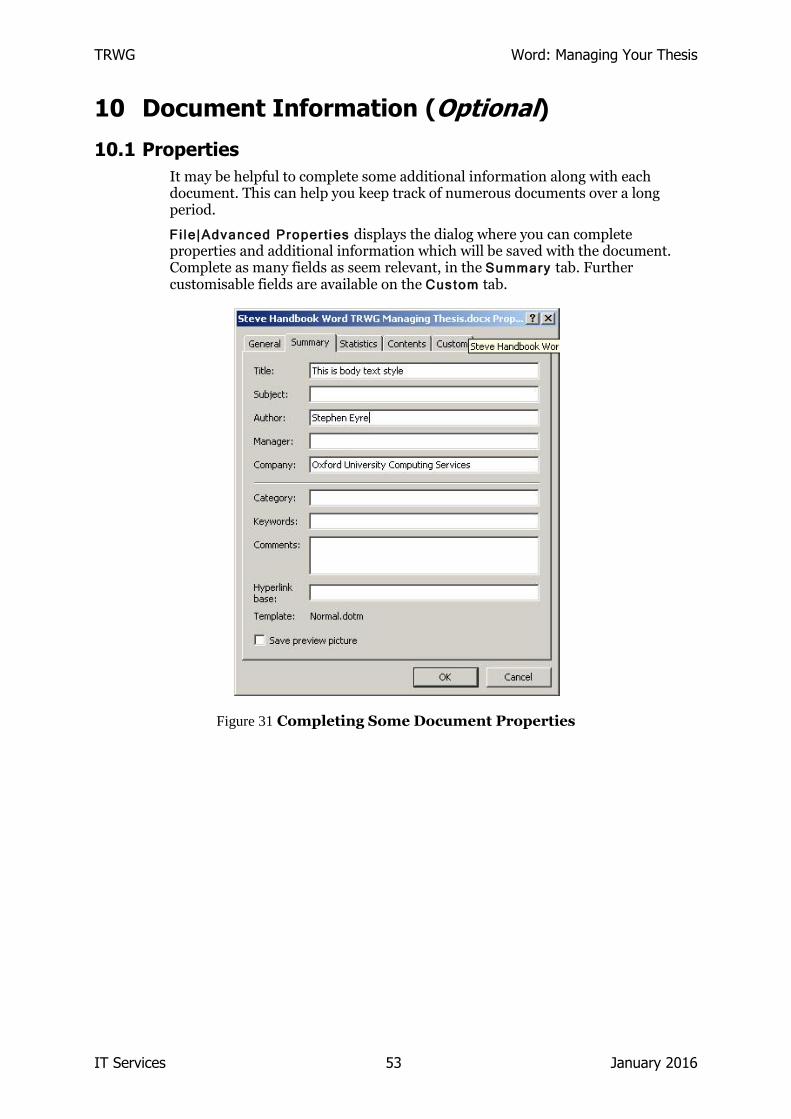
TRWG Word: Managing Your Thesis
IT Services 53 January 2016
10 Document Information (Optional)
10.1 Properties
It may be helpful to complete some additional information along with each document. This can help you keep track of numerous documents over a long period.
Fi le|Advanced Proper t ies displays the dialog where you can complete properties and additional information which will be saved with the document. Complete as many fields as seem relevant, in the Summary tab. Further customisable fields are available on the Custom tab.
Figure 31 Completing Some Document Properties

Word: Managing Your Thesis TRWG
January 2016 54 IT Services
10.2 Word Count
The tool for counting the number of words in a document is found on the Review
r ibbon menu.
Figure 32 Word Count Dialog
Note that there is an option to include the text of footnotes and endnotes in the count.
The word count for the document is also shown in the status bar.
TRWG Word: Managing Your Thesis
IT Services 55 January 2016
11 Other Resources Courses offering training in word-processing and related topics are described below. In all cases, please refer to the IT Services IT Courses web page (http://www.it.ox.ac.uk/courses/) for further details.
11.1 Other Word-processing Courses
Word: Fundamentals
Word: Creating Professional Documents
Word: Charts, Pictures and Diagrams
Word: Building Your Long Documents
11.2 EndNote Courses
EndNote: Introduction
EndNote: Creating Bibliographic Databases
EndNote: Style and Citation Formats
11.3 Lynda.com
Go to courses.it.ox.ac.uk/lynda to log in.
11.4 Course Clinic
We encourage everyone to work at their own pace. This may mean that you don’t manage to finish all of the exercises for this session. If this is the case, and you would like to complete the exercises while someone is on hand to help you, come along to one of the Course Clinic sessions that run during term time. More details are available at www.courses.it.ox.ac.uk
11.5 IT Services Help Centre
The Help Centre is a good place to get advice about any aspect of using computer software or hardware. You can contact the Help Centre on (2)73200 or by email on [email protected]
11.6 Downloadable Course Materials from Portfolio
These course materials, plus the files you need to complete the exercises, are available through ITLP Portfolio:
Follow this direct link: http://portfolio.it.ox.ac.uk
11.7 e-Theses
University Regulations will require some research students to submit their theses in paper form and in electronic “e-thesis” form. For details, please visit www.ora.ox.ac.uk

TRWF Word: Creating Professional Documents 08/01/2016
1
IT Learning Programme
Word
Managing Your Thesis
Today’s arrangements
Your teacher is: Stephen Eyre
Your demonstrators are:
We finish at: 17:00
You will have: Course book
Your safety and comfort are important
Where is the fire exit?
Please report any equipment faults to us
The toilets are along the corridor outside the
lecture rooms
The rest area is where you registered;
it has vending machines and a water cooler
TRWF Word: Creating Professional Documents 08/01/2016
2
The Course Handbook
Notes on each topic
Tasks for you to practice during today’s course
Work at your own pace!
Be selective
Follow-up work
Continue with exercises after the session
Course clinic drop-in sessions at IT Services
Course Topics
Multi-level numbering schemes
Footnotes & endnotes
Creating a table of contents
ToC options
Building an index
Cross-references
Captions for figures, tables etc.
Tables of illustrations
e-theses
IT Learning Programme
Getting Started
TRWF Word: Creating Professional Documents 08/01/2016
3
The files you need for the exercises
can be found here:
Start Word using an icon or menuWord 2013 in IT Services
rooms
IT Learning Programme
Multi-Level Numbering
for Headings
Multi-Level Numbering
- Direct Format -
This format is found from the numbering button
on the home ribbon.
Choose a scheme
Promote and demote individual paras using
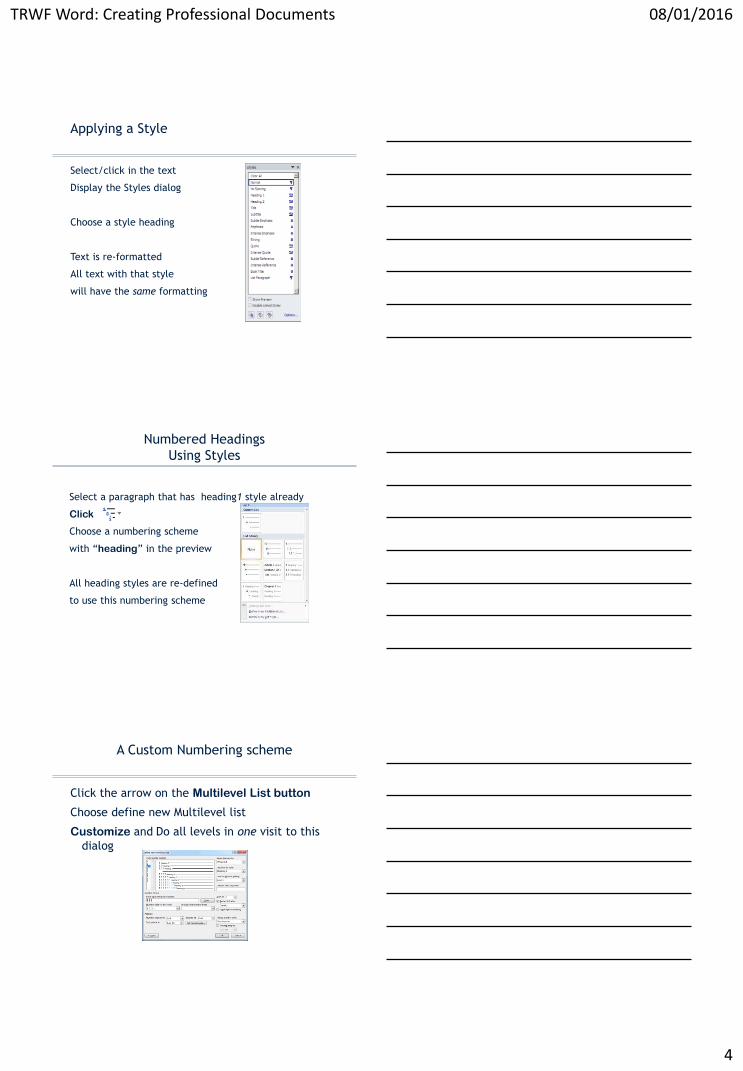
TRWF Word: Creating Professional Documents 08/01/2016
4
Applying a Style
Select/click in the text
Display the Styles dialog
Choose a style heading
Text is re-formatted
All text with that style
will have the same formatting
Numbered Headings
Using Styles
Select a paragraph that has heading1 style already
Click
Choose a numbering scheme
with “heading” in the preview
All heading styles are re-defined
to use this numbering scheme
A Custom Numbering scheme
Click the arrow on the Multilevel List button
Choose define new Multilevel list
Customize and Do all levels in one visit to this
dialog

TRWF Word: Creating Professional Documents 08/01/2016
5
IT Learning Programme
Footnotes and Endnotes
Footnotes and Endnotes
Footnotes - at the foot of the page
Endnotes - at the end of a document (or section)
There are special software packages for creating bibliographies and reference lists (EndNote)
Creating Footnotes and Endnotes
Reference ribbon |Footnote…
Choice of numbering scheme or
symbols
Continuous numbering or restart on
each page (or section)
Use the reference symbols to navigate
Footnote numbers recount when text is
rearranged

TRWF Word: Creating Professional Documents 08/01/2016
6
Footnotes and Endnotes
use Styles
Symbol and note text use built-in styles
Footnote text, Footnote reference
Endnote text, Endnote reference
Modify any style in the Styles task pane
The Notes Area
Available options
Outline view with
Footnotes pane displayed
Word: Managing Your Thesis
Exercises: 1-5
Exercise 2 looks at a sample finished document –optional
TRWF Word: Creating Professional Documents 08/01/2016
7
IT Learning Programme
Table of Contents
Table of Contents
Table of Contents
References ribbon| Table of Contents,
Insert Table of Contents
Choose:
Showing page numbers
Right-aligning
Tab leader
Format
Levels to include

TRWF Word: Creating Professional Documents 08/01/2016
8
Working with a Table of Contents
Navigating<Ctrl>+click to jump to a heading
Changing the designClick in the table of contentsReferences ribbon |Table of Contents, Insert table of contentsMake choices to replace the table
Table of Contents Options
Click
and choose which styles are to
build the ToC
Click
and re-define the styles used to
display the ToC
24
Field Codes
Word uses field codes for automatic features
e.g. Table of Contents, Index, Cross-reference
EndNote uses field codes for citations and bibliography
Updating
Not automatic!
Right-click and choose Update Field
Show all field codes using <Alt+F9>
Replace a field code with its result (ready for publisher) <Ctrl+Shift+F9>

TRWF Word: Creating Professional Documents 08/01/2016
9
IT Learning Programme
Index
Indexing
Automatic Index Marking
– AutoMark File –

TRWF Word: Creating Professional Documents 08/01/2016
10
Glossary or Other Lists
•Use the Table of Authorities
tool
•Create a new category such
as “Glossary”
•Mark all terms
•Build a list
Word: Managing Your Thesis
Exercises: 6-9
IT Learning Programme
Captions

TRWF Word: Creating Professional Documents 08/01/2016
11
Captions
You can add captions to:
Tables
Figures
Images
Anything you like!
A document can have several parallel series of
captions
A list can be built from the captions
Creating a Caption
Select a figure
References ribbon| Insert
Caption
Choose a label, position,
numbering etc.
Create a new label
using
Table of Figures
Lists can be based automatically on captionsSeparate lists for Figures, Tables, Maps etc.
References ribbon| Insert Table of Figures
button
TRWF Word: Creating Professional Documents 08/01/2016
12
IT Learning Programme
Cross-References
Cross-References
A reference to a point elsewhere
in the document
Cross reference:
Numbered item
Heading
Bookmark
Footnote
Endnote
Equation
Figure
Table
As:
Page number
Paragraph number
Paragraph text
Above/Below
(and combinations)
Cross-Referencing
References ribbon |Cross-reference…
<F9> updates field codes after editing the document
Use
hyperlinks to
move around
the
document
TRWF Word: Creating Professional Documents 08/01/2016
13
IT Learning Programme
e-Thesis
Research Theses in electronic form
New research students must submit theses as
electronic files and in print
http://ora.ox.ac.uk
Oxford Research Archive will be searchable by
researchers via internet
Theses, reports, papers etc
What to submit
Upload the document at ORA site
Up to 10MB
Any format – editable or pdf or XML?
Be discoverable – use headingn styles
Plus up to 10 supporting files
Data sets, high-res images etc.
Using copyright material??

TRWF Word: Creating Professional Documents 08/01/2016
14
IT Learning Programme
More on Word
Sources of Help
IT Services
On line forums or discussion groups, e.g.
http://word.mvps.org/index.html
http://www.allexperts.com/
Microsoft
Technical database at
http://support.microsoft.com/
then follow links to their knowledge base
Other Word Courses
Word:
Creating Professional Documents
Charts, Pictures and Diagrams
More advanced Word:
Building Your Long Documents
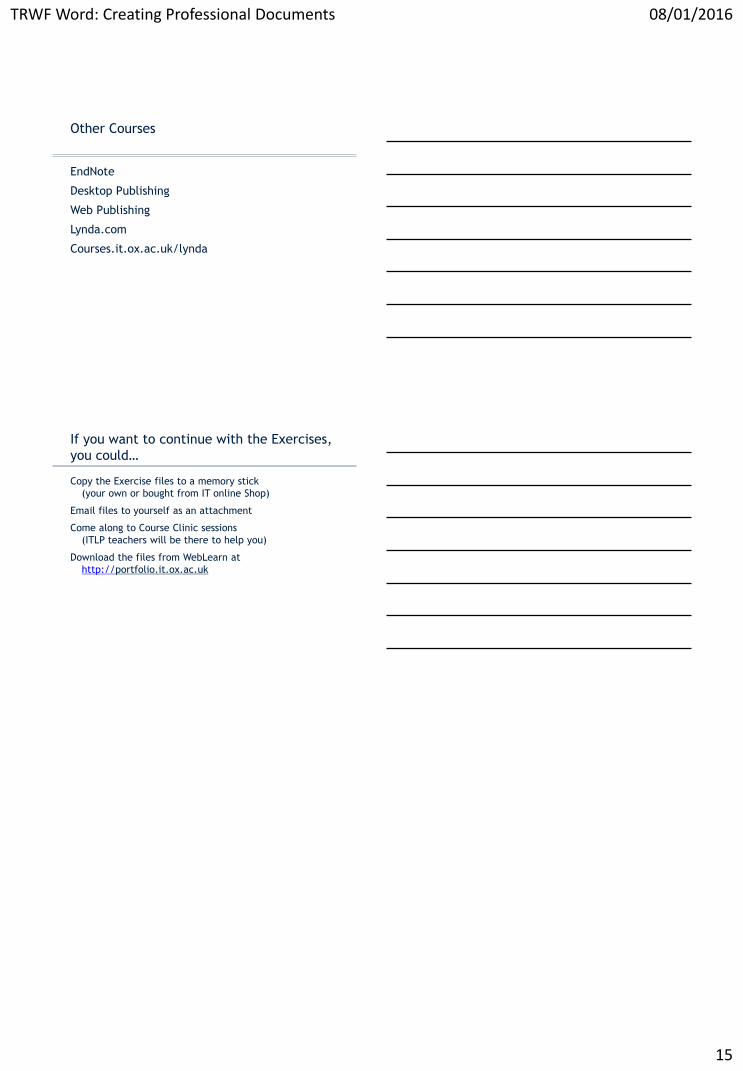
TRWF Word: Creating Professional Documents 08/01/2016
15
Other Courses
EndNote
Desktop Publishing
Web Publishing
Lynda.com
Courses.it.ox.ac.uk/lynda
If you want to continue with the Exercises,
you could…
Copy the Exercise files to a memory stick
(your own or bought from IT online Shop)
Email files to yourself as an attachment
Come along to Course Clinic sessions
(ITLP teachers will be there to help you)
Download the files from WebLearn at
http://portfolio.it.ox.ac.uk