word - increasing your productivity
TRANSCRIPT

Word – Increasing your Productivity
May 2004 Central Computing Services Doc 5.126 Ver 1 John Matthews
Prerequisites This document assumes that you are familiar with the use of a computer keyboard and mouse and have a working knowledge of Microsoft Windows and Word
Contents
1 The Format Painter ............................................................................1 2 Show/Hide........................................................................................2 3 Using Pictures ...................................................................................3 4 Changing the default font ...................................................................5 5 Table of contents ...............................................................................6 6 Cross references................................................................................9 7 Selecting and moving text...................................................................9 8 Autocorrect..................................................................................... 12 9 Autotext ......................................................................................... 13 10 Wordart ......................................................................................... 15 11 Line Spacing ................................................................................... 16 12 Taking control of tabs....................................................................... 17 13 Reordering tables and lists ................................................................ 19 14 Styles ............................................................................................ 21 15 Adding pictures to Shapes................................................................. 23 16 Converting tabs to tables .................................................................. 26 17 Formatting a Table........................................................................... 27 18 Adding Page Numbers and Autotext ................................................... 30

Word Productivity Doc. 5.126 Ver 1
About this Document
Words in bold Will need to be typed or chosen from a menu or window
Small capitals – e.g. ALT Indicate keys that you press
Press KEY1 + KEY2 Press both keys together
Press KEY1, KEY2 Press each key consecutively
Bulleted lists Are guidelines on how to perform a task
Choose Insert - Picture Show menu commands – in this case, choose the option Picture from the Insert menu at the top of the screen
ii Birkbeck College Central Computing Services

Word - Productivity Doc. 5.126 Ver 1
1 The Format Painter Objectives To copy formatting from one paragraph to another
Method Use the format painter
Activity 1.1 Copying formatting Although you can set up styles to allow you quickly to change the formatting of particular parts of a document, you will often want to apply the formatting from one piece of text to another quickly. The format painter allows you to do so with just a few clicks. • Open the document at q:\samples\word2k\sample1.doc The titles are all formatted differently. We will change them all to look like the first, which is Arial Bold, size 12 • Click into the title at the top of the page
• Click the icon for the format painter Your mouse pointer has now turned into the format painter, and will apply the formatting from the text you last clicked on to wherever you next click • Click and drag over the second title (“What to do with…”) It may take a little practice, but you should be able to make the second title appear exactly the same as the first.
Activity 1.2 Repeated use of the Format Painter The tool, as used above, is a one-off – not so useful if you want to change several separate items of text. Fortunately you may “fix” the format painter in place if needed. • Click into one of the two titles that are Arial size 12 • Double click on the format painter icon • Click and drag over existing headings • Note that while the format painter is in this mode, you can just click on
each word you want to change if you prefer To switch the format painter off, either • Click the icon again • Press the ESC key
Birkbeck College Central Computing Services 1

Doc. 5.126 Ver 1 Word Productivity
2 Show/Hide Objectives
To understand how Word’s formatting affects the appearance of documents
Method Toggle the show/hide button to show non-printing characters
Activity 2.1 Show/Hide All Word documents are full of non-printing characters – that is, elements of the document that affect the layout but are not printed, such as spaces, returns, tabs and so on. If a document appears to be doing something unusual, it is often due to such non-printing characters – a rogue page-break, or extra space. • Click on the show/hide icon on the toolbar Your document will now appear something like that in Figure 2-1. The small dots are spaces. The q marks are paragraph markers – where the RETURN key has been pressed The square by the title shows that that text is a heading
Figure 2-1
Such non-printing characters may be removed by using the delete or backspace keys, but if you cannot see them, doing so is difficult. Toggling the show/hide mode makes it much more simple. • Remove the extra paragraph mark below the first title • Scroll down the document and delete the page break This mode is a toggle. Word should save the status of a document – so if you save it with non-printing characters displayed, they will appear when you next open the document. • Click the icon again to switch off all non-printing characters
2 Birkbeck College Central Computing Services

Word - Productivity Doc. 5.126 Ver 1
3 Using Pictures Objectives To insert and amend pictures in a Word document
Method Use the insert menu and the picture toolbar to insert and manipulate an image
Activity 3.1 Insert a picture Word allows you to include pictures from a variety of sources – clipart and separately-saved files are the most common. To insert a picture previously saved from a different application (whether it be internet explorer, a paint package or some other source), choose the option from the menu • Click into the document under the first paragraph (ending “Pomeranian
dog in the other”) • Choose Insert – Picture – From file • Browse to q:\samples\word2k • Insert the picture pipe_body.png You may see the picture toolbar immediately, as in Figure 3-1
Figure 3-1
If you cannot see the toolbar • Choose View – Toolbars and click on Picture • Click once on the picture to select it The different icons on the picture toolbar allow some rudimentary image editing • Click on the second icon from the left and choose Grayscale • Click again on the same icon and change back to Automatic The next four icons allow you to increase and decrease the contrast and brightness of the picture.
Activity 3.2 Wrapping text round an image • Click on the icon of a dog in a square, as in Figure 3-2 • The top two options allow text to wrap around the picture – select one
of them • Note that these options may also be found by double-clicking the
picture and choosing the Layout tab
Birkbeck College Central Computing Services 3

Doc. 5.126 Ver 1 Word Productivity
4 Birkbeck College Central Computing Services
Figure 3-2
Activity 3.3 Cropping a picture Although a paint programme will give you more options and finer control, you may also crop a picture inserted into Word. • Ensure the picture is still selected (it will have white squares around
the edges) – if not, click on it once to select it • Click on the crop icon • The mouse pointer changes to look like the icon when moved away
from the toolbar This tool is a little misleading – to use it, you click and drag one of the squares around the edge of your picture. However, Word does not leave the picture in view, so it appears that you are resizing it. • Click and drag one of the squares around the picture inwards • Word will chop off the part you drag over • When you let go of the mouse, the crop tool is automatically
deselected – you would need to click on the icon again to select it Note that, whilst it is natural to use this feature to decrease the size of a picture, clicking and dragging outwards adds white space, allowing you to increase the border around a picture.

Word - Productivity Doc. 5.126 Ver 1
4 Changing the default font Objectives To change the font that Word uses automatically on all new documents
Method Use the format style command to change the default font
Activity 4.1 Format – Style There are several ways to change the default font. We will use the menu command first. • Choose Format – Style • Make sure that Normal is selected
on the left hand side, as in Figure 4-1
• Click Modify
Figure 4-1
Styles allow you to set options for font, spacing, indentation and so on. Using styles in a long document allows you to change the look of, for example, your headings just by changing the style settings. The screen that popped up when you clicked Modify gives you several options, allowing you to base one style on another. In this case we can ignore most of the options. • Click Format and choose Font from the
drop-down menu • The screen should look like Figure 4-2.
Change the font as you like – note the preview at the bottom of the dialogue box
• Click OK
Figure 4-2
At the moment, all we have done is change the default font for this document. To make this font our default font for all new documents, we must add it to the template. • Put a tick in the box “add to template”, as in Figure 4-3 • Click OK • Click Apply or Close on the next screen – it does not matter which
Birkbeck College Central Computing Services 5

Doc. 5.126 Ver 1 Word Productivity
6 Birkbeck College Central Computing Services
Figure 4-3
5 Table of contents Objectives To insert an automatic table of contents into a Word document
Method Use Word’s “Index and Tables” command
Activity 5.1 Setting up a document Word can automatically pick out headings in your document and create a table of contents from those. It does so by looking for text formatted using a heading style. The sample document you have open should have formatted headings already – Word will automatically turn text into headings. To check that the style in use on a particular bit of text; • Click into one of the headings on the
document • Look at the toolbar, as in Figure 5-1
– the style is shown to the left of the font
Figure 5-1
If there are any headings not formatted as style “Heading 1”, select them and use the drop-down by the style name to apply the style. If you prefer, the shortcut for Heading 1 is CTRL+ALT+1 (and for Heading 2, CTRL+ALT+2 and so on)

Word - Productivity Doc. 5.126 Ver 1
Activity 5.2 Inserting a table of contents First we should tell Word where to put the table of contents. • Scroll to the top of the
document (CTRL+HOME) • Click before the first heading
(“The Reluctant Gardener”) Now we can add the table • Choose Insert – Index and
Tables • Click on the Table of
Contents tab, as in Figure 5-2 • Click OK
Figure 5-2
The table of contents is inserted. Any problems – missing headings, or too much text – will be due to the heading style not being applied to a particular heading, or to it being applied to too much text. Each heading is now a hyperlink to that heading – click on one to test.
Activity 5.3 Updating a table of contents Word will not automatically update a table of contents on opening a document, though it does when it is printed. If you add a new heading, you may want to see the changes on screen. • Scroll to the end of the document (CTRL+END) • Add the new heading “Controlling Bugs” • Format that heading as Heading 1 by selecting it and using the
dropdown or shortcut (CTRL+ALT+1) • Scroll back to the top of the document (CTRL+HOME) • Right-click on the table of contents and choose Update Field • If prompted, choose to Update Entire Table • Click OK Word recalculates the table of contents
Activity 5.4 Modifying a table of contents It is possible to change the appearance of your contents table. To do so, it does not matter where the cursor is. • Choose Insert – Index and Tables • The drop-down menu by Formats, as in Figure 5-3, gives several pre-
set layouts
Birkbeck College Central Computing Services 7

Doc. 5.126 Ver 1 Word Productivity
• The drop-down menu by Tab leader allows you to change the character between each header and page number - in Figure 5-3 it a dot
• Choose a different layout and click OK
• Word asks if you want to replace the current table of contents – click Yes
Figure 5-3
Note also the “Modify” button. If you choose the format “From template”, you may then modify the font, indentation and so on exactly as you want it.
8 Birkbeck College Central Computing Services
Word - Productivity Doc. 5.126 Ver 1
6 Cross references Objectives To create a clickable link to a heading
Method Use Word’s cross-reference function to link to a pre-formatted heading
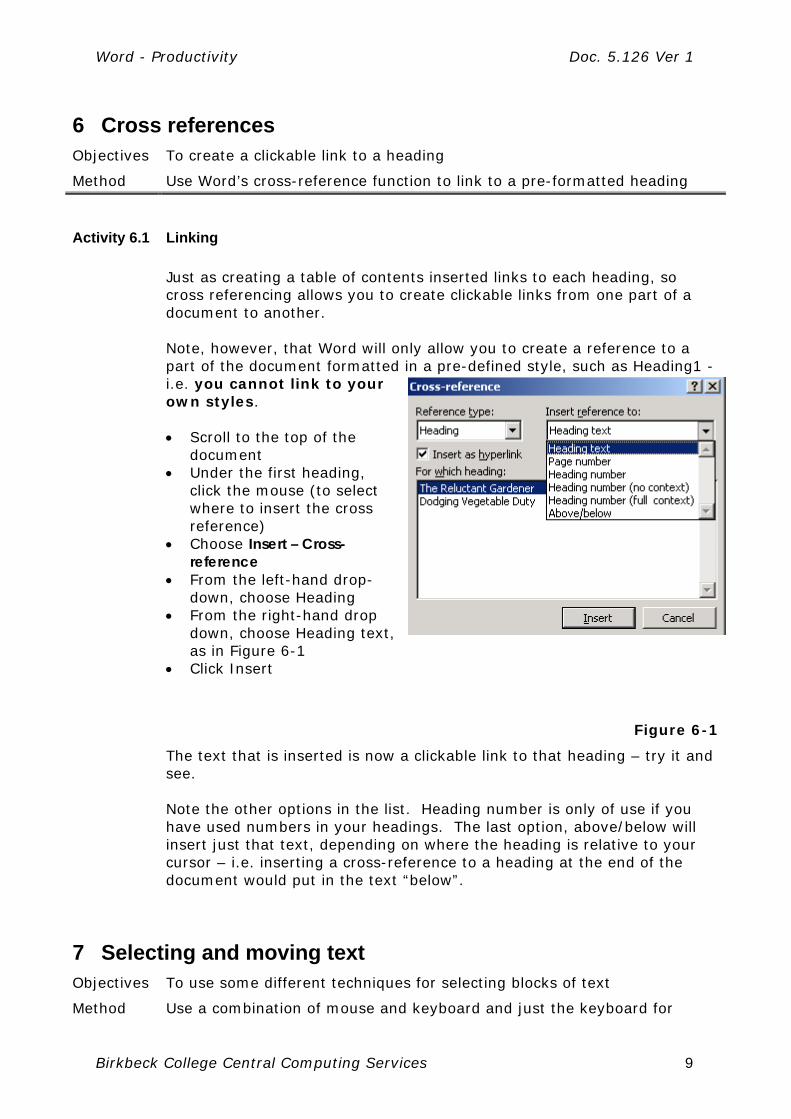
Activity 6.1 Linking Just as creating a table of contents inserted links to each heading, so cross referencing allows you to create clickable links from one part of a document to another. Note, however, that Word will only allow you to create a reference to a part of the document formatted in a pre-defined style, such as Heading1 - i.e. you cannot link to your own styles. • Scroll to the top of the
document • Under the first heading,
click the mouse (to select where to insert the cross reference)
• Choose Insert – Cross-reference
• From the left-hand drop-down, choose Heading
• From the right-hand drop down, choose Heading text, as in Figure 6-1
• Click Insert
Figure 6-1
The text that is inserted is now a clickable link to that heading – try it and see. Note the other options in the list. Heading number is only of use if you have used numbers in your headings. The last option, above/below will insert just that text, depending on where the heading is relative to your cursor – i.e. inserting a cross-reference to a heading at the end of the document would put in the text “below”.
7 Selecting and moving text Objectives To use some different techniques for selecting blocks of text
Method Use a combination of mouse and keyboard and just the keyboard for
Birkbeck College Central Computing Services 9

Doc. 5.126 Ver 1 Word Productivity
easier selecting of blocks of text
Activity 7.1 Selecting large amounts of text You can, of course, easily do this with the mouse. However, if you want to select a large part of an even large document, you may find that the scrolling of the screen is too fast. In this case, you can use the SHIFT-click method • Click once at the very start of the text to be selected • Using the scroll bars (not the page up/down keys, as they move the
cursor), scroll down to the end • Hold down the SHIFT key and click at the end of the text to be
selected All the text between your first and second clicks will be selected
Activity 7.2 Selecting using the keyboard It is also possible to select text using the keyboard, most useful for very small, fiddly areas. • Move the cursor to the start or end of the text to be selected using
mouse or keyboard • Hold down the SHIFT key • Keeping the SHIFT key held down, use the arrow keys to move the
cursor. You may also use Page Up and Page Down to travel larger distances
While on the subject of using the keyboard, it is also useful to know that holding down CTRL and then pressing an arrow key jumps a whole word. So holding down SHIFT, then pressing CTRL and right arrow will select the next word. • Using CTRL+arrow also works for simply moving around the text. You may mix and match these methods – SHIFT-click using the mouse for large areas, then use the keyboard to adjust the area selected.
Activity 7.3 Double and triple clicks • Double click on a word The whole word is selected • Triple click on a word The whole paragraph is selected
10 Birkbeck College Central Computing Services

Word - Productivity Doc. 5.126 Ver 1
Activity 7.4 Moving text Once you have a word or a block of text selected, you may move it using the mouse (instead of cut and paste). • Select some text • Click again into the text and drag it to a different location in the
document
Birkbeck College Central Computing Services 11

Doc. 5.126 Ver 1 Word Productivity
8 Autocorrect Objectives
Learn more about what Autocorrect can do, and what it is already doing, to your documents
Method Use the Autocorrect command on the toolbar
Activity 8.1 Autocorrect The autocorrect options allow for some common errors to be corrected, but also allows you to switch off some of the things it might do that are confusing. • Choose Tools – Autocorrect Note the first option – if you have ever tried to enter two capitals in a row, switching that off will prevent Word changing it for you. The list below the tick boxes shows common spelling mistakes. You may add your own.
Figure 8-1
• Enter the misspelling on the left and the correct spelling on the right, as in Figure 8-1
• Click Add You may add any mistakes you often make, and also shorthand for any long phrases you may type often – e.g. bbk could be replaced by Birkbeck College. • Click OK when finished
Activity 8.2 Autoformat The Autoformat as you type and Autoformat tabs both contain similar options. If you want to switch off or enable any particular behaviour, you should do so in both places to be sure. Most of the effects here are self explanatory. To see them in action; • Type 1 followed by a tab and some text • Hit RETURN • Word turns the text into a numbered list
12 Birkbeck College Central Computing Services

Word - Productivity Doc. 5.126 Ver 1
Birkbeck College Central Computing Services 13
Figure 8-2
• On a new line, type * followed by a tab and some text
• Hit RETURN You may switch off either of these options by unticking the appropriate boxes, as shown at the top right of Figure 8-2
9 Autotext Objectives To enter an entire address without typing it
Method Use the autotext option to define a shortcut
Activity 9.1 Autotext The final option on the autocorrect dialogue box is autotext. It works in a similar way to Autocorrect, but rather than set up a piece of text to be replaced, it tries to match what you are typing. To see how this works; • On a clear part of the document, type an address. E.g.
Birkbeck University of London Malet Street London WC1E 7HX
• Select the address you have just typed • Choose Tools – Autocorrect • Click on the Autotext tab • Click Add The autotext has now been added to the list. • In a clear part of the document, start typing the address again When you are far enough into the autotext, Word will offer to complete it, as in Figure 9-1
Figure 9-1
• Press RETURN to fill in the remainder of the address If the autotext suggestion is not what you want, keep typing and it will

Doc. 5.126 Ver 1 Word Productivity
disappear.
14 Birkbeck College Central Computing Services

Word - Productivity Doc. 5.126 Ver 1
10 Wordart Objectives To explore the features of Wordart
Method Use the Wordart icon on the drawing toolbar
Activity 10.1 Wordart Wordart is accessible from the drawing toolbar, as in Figure 10-1, which should be at the bottom of the screen
Figure 10-1
• If you cannot see the toolbar, click the icon on the main toolbar
• To insert Wordart, use the icon • Choose a style from the menu that pops up – try the curved text, as in
Figure 10-2 • Type some text into the box that pops up – type your name • Click OK The text is inserted. • Note the white squares around the edge
of the object, allowing you to resize it. • Moving or selecting the object requires
you to click in a coloured in area – if you click a white area between two letters, Word will select the page behind the Wordart
Figure 10-2
• Try resizing the Wordart • Double click on the object to change the
text, font and size The final option for Wordart is a little tucked away. When the wordart is selected, you should see a yellow dot, as in Figure 10-3
Figure 10-3
• Click and drag the dot – you will be able to change the aspect of the shape, with different effects depending on the Wordart – in this case, to complete the circle
• The shape may be a little squashed – drag one of the selection squares in the middle of a line outwards to make it more of a circle.
Note that the yellow dot also appears on Word’s Autoshapes.
Birkbeck College Central Computing Services 15

Doc. 5.126 Ver 1 Word Productivity
11 Line Spacing Objectives
Control the spacing of your document, and know how to fix a document which has unwanted line spacing before or after a paragraph.
Activity 11.1 Line Spacing Line spacing in a document is automatically set to single line. If you want extra space between paragraphs, you could just press the ENTER key twice, but this is crude and relies on you remembering to hit the key each time. It is more consistent to use Format – Paragraph. Select all the text in q:\samples\word2k\sample1.doc Choose Format – Paragraph The setting for spacing within a paragraph is
Figure 11-1
If you want to put a space between paragraphs, change the Spacing-After to a different amount - note the text in the preview box changes Clicking on the up and down arrows changes the spacing by a set amount (usually 6pts), but you can change it to any number in between by typing the no. straight into the box This dialogue box is very useful should you receive a document which has some rogue spacing – often there will be a number in the Spacing Before or Spacing After boxes. For an example, see “Dodging Vegetable Duty” on page 2. In that paragraph, there is no line break which may be deleted between the heading and the following paragraph – instead, there is a 6pt gap after the paragraph, which you may remove by using Format – Paragraph.
CT
m(nW
16 Bir
Shortcuts to impressyour friends
RL + PAGE DOWN/PAGE DOWN oves exactly one page b: unless you have used ord’s find command)
kbeck College Central Computing Services

Word - Productivity Doc. 5.126 Ver 1
12 Taking control of tabs Objectives To set, use and remove tabs and explore the different types available.
Activity 12.1 Setting tabs Tabs are a good way quickly to organise information. Tables are more versatile and it is rare that tabs will be more effective than a table, but it is useful to know about tabs in any case. It is also easy to convert information organised with tabs into a table should you want to.
• Open the document q:\samples\word2k\sample1.doc • Scroll down to the text “Useful contacts”
At the moment, the information is higgledy piggledy – nothing quite lines up.
Click on the show/hide icon and you will see why – they have been spaced out by the space bar (the little dots on screen mark where the space bar has been pressed). This is a bad way to try and line things up, partly because it usually doesn’t work, and partly because it makes it difficult to then amend the layout/contents later without them being further displaced. We will use tabs to line things up more neatly – a tab is a marker on your ruler with which your text will line up when the tab key (on the left, with two arrows on). Tab positions are set in the ruler just above your document
Type of tab The default tab style is a left aligned tab, which we will use. To plaonce into the ruler (you should be, vertically, in the middle).
• Select all of the useful contacts information • Click into the ruler to set a tab position – make sure it is to th
the longest name (Annabel) • If you cannot see the dots on screen which show where a spa
the show/hide icon We now need to delete the spaces and insert a tab
• Click next to the first name (John) and delete (using the DELEthe spaces there
• Press the tab key once (it is the key third from top on the leftwo arrows pointing different directions on)
click here to insert tab will not insert tab
Birkbeck College Central Computing Services
ce one, c
e right
ce is, cli
TE key) a
t, and ha
17
lick
of
ck
ll
s

Doc. 5.126 Ver 1 Word Productivity
• The phone number will be lined up with the tab you inserted Repeat for all the other numbers The events in the paragraph below are also not lined up, but in this case they are separated by tabs – marked on screen by arrows between, say “Choral evening” and “23rd June”. In this case, reorganising the text is easier – the tabs are already there, all we have to do is set a marker so the first tab in each line is the same.
• Select all of the events (but not the heading) • Click once to add a tab into the ruler, making sure you click to the right
of the longest text (“Charity Go Karting”) All the dates are now lined up
Activity 12.2 Moving and removing tabs
• Drag a tab along the ruler to move it • Drag a tab away from the ruler to remove it
Note: before inserting a tab, I have each time asked you to select all the text. That is because if you do not, any tab insertions/changes you make will apply to only one line (therefore moving a tab would move one date/number out of line, unless you select the text first and then move it).
• try moving a tab without all the text selected to see the effect (use undo to put it back
Activity 12.3 Different types of tab There are several different types of tab available. Click on the tab marker to the left of the ruler to cycle between them. Tab Behaviour of text
Left-aligned
Centre aligned at mid point of tab
Right-aligned
Aligns the decimal point of numbers to the mid point
Adds a vertical line
18 Birkbeck College Central Computing Services

Word - Productivity Doc. 5.126 Ver 1
13 Reordering tables and lists Objectives To reorder a list without using cut and paste
Activity 13.1 Sort There are several ways of ordering and reordering a table. Word’s sort function allows you to sort information alphabetically. • In q:\samples\word2k\sample1.doc, scroll down to the table of Other
Events • Click into the table – you need not select the whole thing • Choose Table – Sort The dialogue box shown in Figure 13-1 pops up
Figure 13-1
• Click OK Note also the drop-down menu for Type. Try sorting again, this time asking Word to sort by the date column, and using that drop-down menu to tell it that the information in that column is in date form.
Activity 13.2 Using Sort outside Tables Although the command is on the Table menu, you may use it on any part of your document. To sort information outside a table, you should select the text to be sorted first (unless you want to sort the whole document). • Select the text under Events, as in Figure 13-2 • Choose Table – Sort
Figure 13-2
Word knows the top row contains headings – purely because that text is formatted differently to the rest of the table
You may sort in ascending or descending alphabetical order
Birkbeck College Central Computing Services 19

Doc. 5.126 Ver 1 Word Productivity
The sort dialogue box appears again, as in Figure 13-3. Note that Word is now sorting by “Paragraphs”
Figure 13-3
• Click OK to sort the data
Activity 13.3 Shortcut You may have information in a table or list which is not to be sorted alphabetically, but which needs to be reordered. You could cut and paste each row, but that is repetitive and will often leave spare blank rows. Word has a neat, little-known shortcut which allows you to move information up and down inside a table, list or just within a document. We will move the Away day to the top of the table • Click into the row containing “Away day 25/7/04” • Hold down the ALT and SHIFT keys together • Use the UP ARROW key ( ) to move that row up the table This shortcut may be used to reorder any text in a document. Note that Word will move text up to the next paragraph mark – so a whole paragraph may be moved in this way, or one row in a table, or one item in a list. • Click into the first paragraph in the document, “Of course…” • Hold down the ALT and SHIFT keys together • Use the DOWN ARROW key ( ) to move the paragraph further down the
document
20
Shortcuts to impress your friends
CTRL + ENTER inserts a page break
Birkbeck College Central Computing Services

Word - Productivity Doc. 5.126 Ver 1
14 Styles Objectives Create a new style and explore the use of the format-style command
Activity 14.1 Set up a style To preserve text formatting, give your documents structure, and provide an easy way of changing font sizes etc. you may choose to use styles.
On sample1.doc, reformat one of the headings (e.g. change the font size, and make it centred (ctrl+e)). Select the text you have reformatted On the toolbar, click into the text "Normal" on the tool bar (make sure you click into the text, not the drop-down arrow) and type in a new name for this style (e.g. subheading) Press RETURN (otherwise Word will not save your new style) You have now created a style which is accessible from the drop down list Click into a different (unformatted) subheading. Choose your new style from the list This style can now be applied to any other paragraph in the document
Activity 14.2 Change a style Click and select a subheading which has been formatted using the "subheading" style Make the change you want (e.g. increase the point size) Use the drop down arrow next to the current style text to choose the current style again Word will now ask if you want to reformat this text using the original
style, or apply this new formatting to the style ("Update the style to reflect recent changes") – choose the latter
Activity 14.3 Make a style available for other documents The style we have just defined is only available in the current document. To make it available to any future documents
Choose Format – Style Check the List says Styles in use Choose your style from the list Click Modify Put a tick in the Add to template box Note that you can make changes to how a style looks here from the "format" drop down menu on this window. This menu provides a comprehensive set of options, but the effects of changes are not as immediately obvious as the method in 4.5.2.
Birkbeck College Central Computing Services 21

Doc. 5.126 Ver 1 Word Productivity
The above procedure makes changes to what is known as the global template, or normal.dot, and when you quit Word, it may ask if you want to save those changes. Do not worry about the strange terms, just say yes if you want to keep the styles you have defined. Note; You may also set and modify styles from the Format – Style option, though it is much easier to use the method above to set up a new style in the first instance.
Figure 14-1
Figure 14-2
However, choosing Format - Style, then selecting a style and choosing Modify allows you to choose a shortcut key for that style.
22 Birkbeck College Central Computing Services

Word - Productivity Doc. 5.126 Ver 1
15 Adding pictures to Shapes Objectives To add a picture to an autoshape
Activity 15.1 Filling a shape with a picture In addition to filling a shape with a colour or pattern, you may also insert a picture. Word will fit the picture into the shape, trimming it as necessary. • On the Drawing toolbar, choose
Autoshapes – Basic shapes and choose the oval
Figure 15-1
• Click and drag on your document to add the shape – hold down the
SHIFT key to keep the shape circular
• Double-click the shape to bring up
further options (you may choose Format – Autoshape if you prefer)
• Click on the Colors and Lines tab
• Use the drop-down menu next to
Color to select Fill Effects, as in Figure 15-2
Figure 15-2
The Fill Effects window pops up, as in Figure 15-3 • Click on Select Picture • Browse to q:\samples\word2k\ • Insert the picture pipe_body.png • Click OK You are returned to the Format Autoshape window.
Figure 15-3
If you cannot see the drawing toolbar at the bottom of the screen, click
the icon on the toolbar
Birkbeck College Central Computing Services 23

Doc. 5.126 Ver 1 Word Productivity
• Click OK again
Figure 15-4
Activity 15.2 Gradient fills There are other fill effects available – particularly effective can be the gradient fill. • Draw another autoshape onto your document • Double click on the shape to bring up the related options • Click on the drop down next to fill • Click on Fill effects This dialogue allows you to apply a gradient, texture, pattern or picture fill to the object.
Note the OK button is greyed out – although Word is showing us various samples of how the gradient fill might work, we have not yet selected any options on this screen. First, select the "one color" option.
24 Birkbeck College Central Computing Services

Word - Productivity Doc. 5.126 Ver 1
More options appear. You may set "color 1" in the same way as you would have chosen a colour earlier - use the drop down menu and click "More colors" if the one you want is not shown. The second colour is set to either white or black, depending on the position of the dark/light slider. Choose a colour you like for color 1 change the dark/light slider to see how that affects the sample in the
bottom right click OK the Format Autoshape window is still open behind the fill effects one.
Click OK to close it and see how your changes have affected the shape. You may also specify the second colour - rather than accepting the default of white/black. Draw a new, different shape - the choice is yours Bring up the Format – Autoshape window Use the drop-down box by Color on the Fill tab to select Fill Effects Under Colors on the Gradient tab, choose Two colors and select colours
as before. Note also the option, on the gradient tab, to use a Preset fill, which allows for more colourful effects.
Birkbeck College Central Computing Services 25
Doc. 5.126 Ver 1 Word Productivity
16 Converting tabs to tables Objectives To convert information separated by tabs into a table
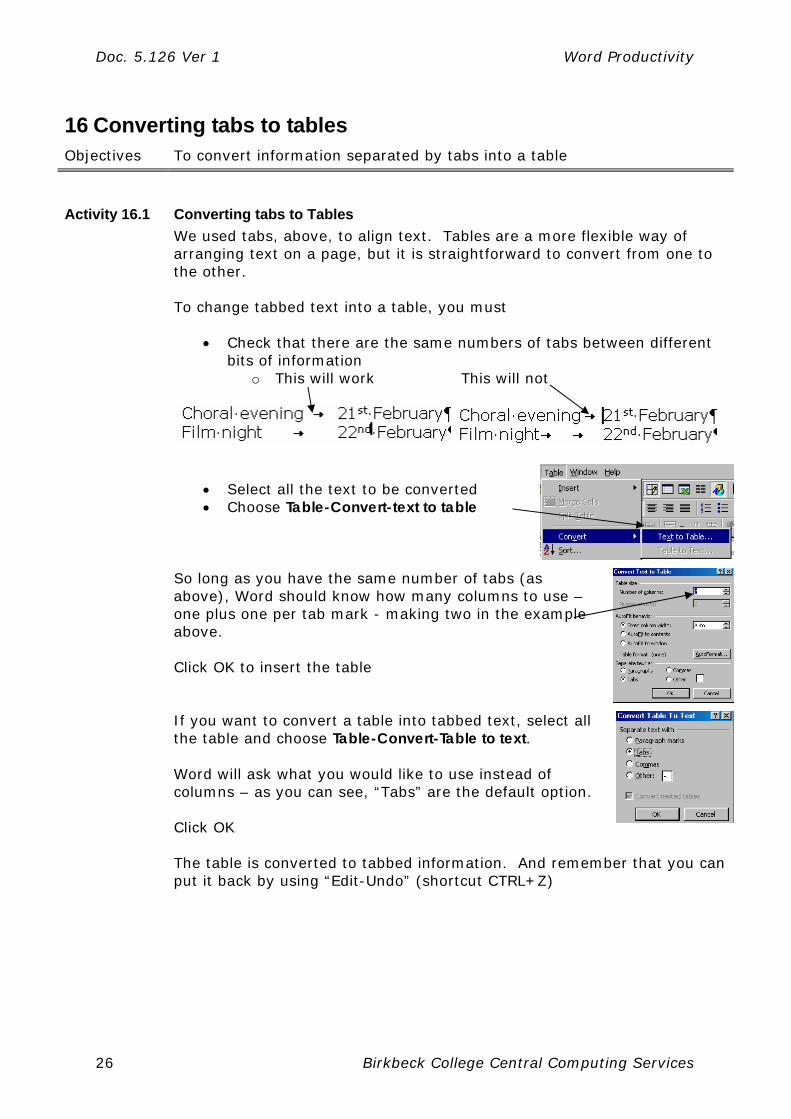
Activity 16.1 Converting tabs to Tables We used tabs, above, to align text. Tables are a more flexible way of arranging text on a page, but it is straightforward to convert from one to the other. To change tabbed text into a table, you must
• Check that there are the same numbers of tabs between different bits of information
o This will work This will not
• Select all the text to be converted • Choose Table-Convert-text to table
So long as you have the same number of tabs (as above), Word should know how many columns to use – one plus one per tab mark - making two in the example above. Click OK to insert the table If you want to convert a table into tabbed text, select all the table and choose Table-Convert-Table to text. Word will ask what you would like to use instead of columns – as you can see, “Tabs” are the default option. Click OK The table is converted to tabbed information. And remember that you can put it back by using “Edit-Undo” (shortcut CTRL+Z)
26 Birkbeck College Central Computing Services

Word - Productivity Doc. 5.126 Ver 1
17 Formatting a Table Objectives To have full control over the layout of a table
Method Use the Table Properties to change a table’s layout
Activity 17.1 Resizing columns and rows You may resize columns and rows within a table by clicking and dragging the borders. The cursor will change when in the correct position To change the width of columns To change the height of rows
Figure 17-1
Figure 17-2
• Increase the height of the rows within sample1.doc’s table
Activity 17.2 Table Properties With the rows made larger, text now sticks to the top border, giving the table an unwieldy look. To centre the text horizontally, use the same icons as you would for text elsewhere in the document
Figure 17-3
To centre text vertically, we need to use the Table Properties dialogue • Click into a cell of your table • Choose Table – Properties • The table tab, shown in Figure 17-4, allows
you to change the alignment of the whole table
• Change the table’s alignment to center
Figure 17-4
• The cell tab, in Figure 17-5, allows you to set the alignment of text
Birkbeck College Central Computing Services 27

Doc. 5.126 Ver 1 Word Productivity
28 Birkbeck College Central Computing Services
within a cell • Change the vertical alignment to center
Note that the latter will only apply to the current cell – we should select the whole table to apply settings to all cells
Figure 17-5
Activity 17.3 Selecting a column As you noticed when resizing parts of the table, the cursor changes function depending on which part of the table it hovers over. To select a whole column, you should position the mouse over the top line of the column, until the cursor becomes a black downward-pointing arrow, as in Figure 17-6
Figure 17-6
• Move the mouse over the event column until the cursor changes to the black arrow
• Click and drag right, over the date column Both columns – and thus the whole table – are now selected. • Choose Table – Properties Any settings you change will now affect the whole table • Use the Cell tab to centre all text vertically
Activity 17.4 Borders and shading You may also change the appearance of any borders on your table, and shade the background of cells. • Click into a cell of the table • Choose Format – Borders and Shading
You may instead choose Table – Properties and select Borders and Shading from there – see Figure 17-4

Word - Productivity Doc. 5.126 Ver 1
Figure 17-7
• Click OK when you have finished
2) Use these icons to quickly apply a border to the selected area
1) Use the drop down to choose where to border settings should be applied
Shortcuts to impress your friends
Quick selection of text; From the end of a line use SHIFT and HOME to select the whole line From the beginning of a line, use SHIFT and END to select the whole line
3) Or choose a border style and click on the diagram
Birkbeck College Central Computing Services 29

Doc. 5.126 Ver 1 Word Productivity
30 Birkbeck College Central Computing Services
18 Adding Page Numbers and Autotext Objectives Add page numbers and autotext to a document’s header and footer
Activity 18.1 Page Numbers You may add page numbers to your document very simply.
• Open sample1.doc • Choose Insert – Page Numbers • The window which pops up has several
options, but all are self explanatory – feel free to change them
• Click OK Word inserts page numbers throughout the document – and updates them as necessary.
Activity 18.2 Using the Footer • Choose View – Header and Footer
Figure 18-1
• The second page numbering icon inserts the total no. of pages in the
document, allowing you to list page numbers as 1 of 5 etc. • Click close to return to the document
Activity 18.3 Autotext The autotext command on the Header and Footer toolbar allows you to add automatically-updated information to your document. Of particular use is the filename and path option, which gives the name and location of a document. • Choose View – Header and Footer • Use the down arrow to move to the footer • Click on Insert Autotext • Choose Filename and path from the list The current filename and path are entered – you may reduce the font size if you wish
Figure 18-2
Page numbers
Date
Page setup
Time

Word - Productivity Doc. 5.126 Ver 1
Activity 18.4 Using a template with autotext already added Setting up a template allows you to add text, page numbers and so on to a document and then use that document as the basis for others – in effect providing an outline for you to fill in details. • Start a new document (CTRL + N) • Choose View – Header and Footer • Use the down arrow ( ) to move to the footer • Click on Autotext and choose Filename and Path • Change the font size as necessary The steps above could be used on any document to add the filename. To turn a document into a template, we need to save it as such. • Choose File – Save As • Give the file a sensible
name • Use the drop down, as
in Figure 18-3, to choose Document Template
Figure 18-3
Word automatically chooses where to save template documents so as to make them accessible – when logged in with a CCS username they go into n:\msoffice • Click Save • Close the document
Activity 18.5 Using a template To reuse a template, you need to open it. Rather than click File – Open and browse for it, you select it from a list of templates • Choose File – New from the menu (you
must use the menu option) Word brings up a list of templates – some are installed by default, others will be those you have created. • Choose your template from the list • Click OK •
Figure 18-4
A new document appears, with the text/autotext you entered already inserted
Birkbeck College Central Computing Services 31