word 2013 unit c formatting text and paragraphswebsites.delta.edu/cstfiles/cst-133/cst133_labpdfs/ms...
TRANSCRIPT

Microsoft® product screenshots used with permission from Microsoft® Corporation. ©Tu
many
an/S
hutte
rstoc
k
CASE You have finished drafting the text for a two-page flyer advertising last minute specials for October tours. Now, you need to format the flyer so it is attractive
and highlights the significant information.
Formatting Text and Paragraphs
WD C-1.docx WD C-2.docxWD C-3.docx
WD C-4.docxWD C-5.docxWD C-6.docx
Files You Will Need
Unit Objectives
Word 2013 Unit C
After completing this unit, you will be able to:
• Format with fonts
• Use the Format Painter
• Change line and paragraph spacing
• Align paragraphs
• Work with tabs
• Work with indents
• Add bullets and numbering
• Add borders and shading
• Insert online pictures
C8395_UnitC_ptg01_hr_049-075.indd 49 3/4/13 12:11 PM
Propert
y of C
enga
ge Le
arning
Formatting Text and Paragraphs Word 50
Word 2013
UNIT C
Learning Outcomes•Changefontandfontsize
•Changefontcolor•Selectanentiredocument
Format with FontsFormattingtextwithfontsisaquickandpowerfulwaytoenhancetheappearanceofadocument.Afontis a complete set of characters with the same typeface or design. Arial, Times New Roman, Courier,Tahoma,andCalibriaresomeofthemorecommonfonts,buttherearehundredsofothers,eachwitha specificdesignandfeel.Anotherwaytochangetheappearanceof text is to increaseordecrease its font size.Fontsizeismeasuredinpoints.Apointis1⁄72ofaninch. CASE You change the font and font size of the body text, title, and headings in the flyer. You select fonts and font sizes that enhance the sales tone of the document and help to structure the flyer visually for readers.
STEPS
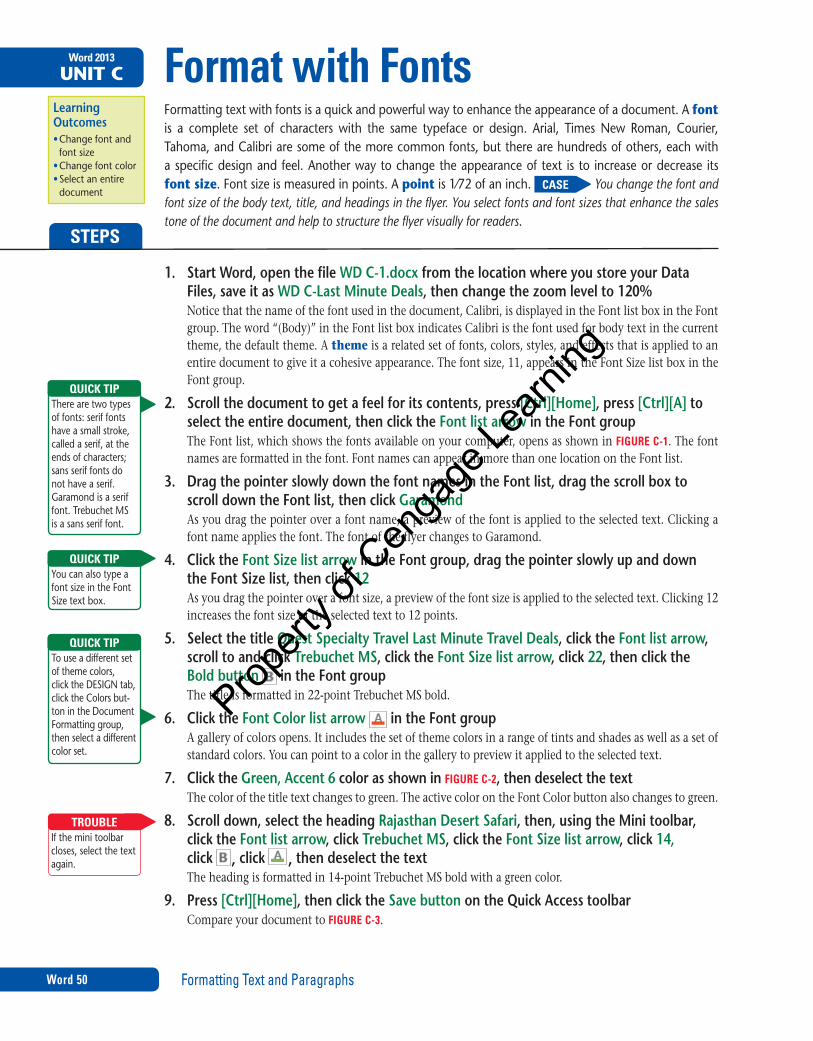
1. Start Word, open the file WD C-1.docx from the location where you store your Data Files, save it as WD C-Last Minute Deals, then change the zoom level to 120%Notice that the name of the font used in the document, Calibri, is displayed in the Font list box in the Font group. The word “(Body)” in the Font list box indicates Calibri is the font used for body text in the current theme, the default theme. A theme is a related set of fonts, colors, styles, and effects that is applied to an entire document to give it a cohesive appearance. The font size, 11, appears in the Font Size list box in the Font group.
2. Scroll the document to get a feel for its contents, press [Ctrl][Home], press [Ctrl][A] to select the entire document, then click the Font list arrow in the Font groupThe Font list, which shows the fonts available on your computer, opens as shown in FIGURE C-1. The font names are formatted in the font. Font names can appear in more than one location on the Font list.
3. Drag the pointer slowly down the font names in the Font list, drag the scroll box to scroll down the Font list, then click Garamond As you drag the pointer over a font name, a preview of the font is applied to the selected text. Clicking a font name applies the font. The font of the flyer changes to Garamond.
4. Click the Font Size list arrow in the Font group, drag the pointer slowly up and down the Font Size list, then click 12As you drag the pointer over a font size, a preview of the font size is applied to the selected text. Clicking 12 increases the font size of the selected text to 12 points.
5. Select the title Quest Specialty Travel Last Minute Travel Deals, click the Font list arrow, scroll to and click Trebuchet MS, click the Font Size list arrow, click 22, then click the Bold button in the Font groupThe title is formatted in 22-point Trebuchet MS bold.
6. Click the Font Color list arrow in the Font groupA gallery of colors opens. It includes the set of theme colors in a range of tints and shades as well as a set of standard colors. You can point to a color in the gallery to preview it applied to the selected text.
7. Click the Green, Accent 6 color as shown in FIGURE C-2, then deselect the textThe color of the title text changes to green. The active color on the Font Color button also changes to green.
8. Scroll down, select the heading Rajasthan Desert Safari, then, using the Mini toolbar, click the Font list arrow, click Trebuchet MS, click the Font Size list arrow, click 14, click , click , then deselect the textThe heading is formatted in 14-point Trebuchet MS bold with a green color.
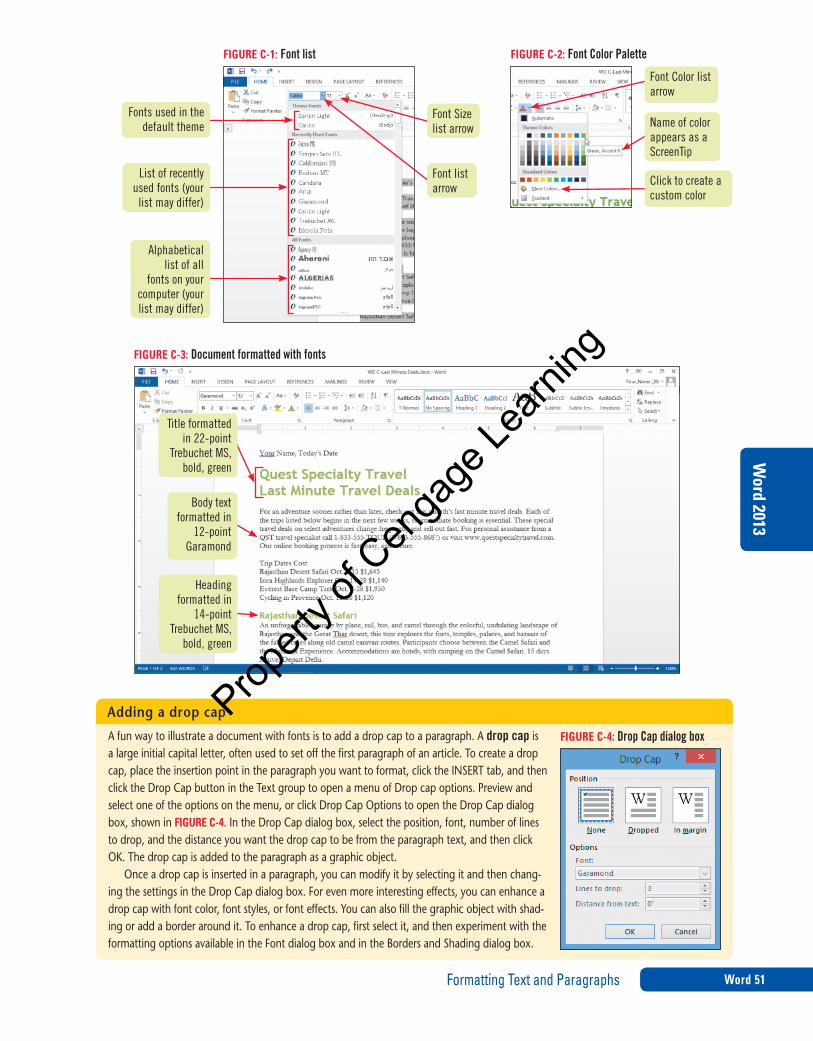
9. Press [Ctrl][Home], then click the Save button on the Quick Access toolbarCompare your document to FIGURE C-3.
Therearetwotypesoffonts:seriffontshaveasmallstroke,calledaserif,attheendsofcharacters;sansseriffontsdonothaveaserif.Garamondisaseriffont.TrebuchetMSisasansseriffont.
QUICK TIP
Iftheminitoolbarcloses,selectthetextagain.
TROUBLE
YoucanalsotypeafontsizeintheFontSizetextbox.
QUICK TIP
Touseadifferentsetofthemecolors,click theDESIGNtab,clicktheColorsbut-tonintheDocumentFormattinggroup,thenselectadifferentcolorset.
QUICK TIP
C8395_UnitC_ptg01_hr_049-075.indd 50 3/4/13 12:11 PM
Propert
y of C
enga
ge Le
arning
Formatting Text and Paragraphs Word 51
Word 2013
FIGURE C-1: Font list
Font list arrow
Font Size list arrow
Fonts used in the default theme
List of recently used fonts (your
list may differ)
Alphabetical list of all
fonts on your computer (your list may differ)
FIGURE C-2: Font Color Palette
Click to create a custom color
Font Color list arrow
Name of color appears as a ScreenTip
Afunwaytoillustrateadocumentwithfontsistoaddadropcaptoaparagraph.Adrop capisa largeinitialcapitalletter,oftenusedtosetoffthefirstparagraphofanarticle.Tocreateadropcap,placetheinsertionpointintheparagraphyouwanttoformat,clicktheINSERTtab,andthenclickthe DropCapbuttonintheTextgrouptoopenamenuofDropcapoptions.Previewandselectoneoftheoptionsonthemenu,orclickDropCapOptionstoopentheDropCapdialogbox,showninFIGURE C-4.IntheDrop Capdialogbox,selecttheposition,font,numberoflinesto drop,andthedistanceyouwantthedropcaptobefromtheparagraphtext,andthenclickOK.Thedropcapisaddedtothe paragraphasagraphicobject.
Onceadropcapisinsertedinaparagraph,youcanmodifyitbyselectingitandthenchang-ingthesettingsintheDropCapdialogbox.Forevenmoreinterestingeffects,youcanenhanceadropcapwithfontcolor,fontstyles,orfonteffects.Youcanalsofillthegraphicobjectwithshad-ingoraddaborderaroundit.Toenhanceadropcap,firstselectit,andthenexperimentwiththeformattingoptionsavailableintheFontdialogboxandintheBordersandShadingdialogbox.
Adding a drop cap
FIGURE C-4: Drop Cap dialog box
FIGURE C-3: Document formatted with fonts
Title formatted in 22-point
Trebuchet MS, bold, green
Body text formatted in
12-point Garamond
Heading formatted in
14-point Trebuchet MS,
bold, green
C8395_UnitC_ptg01_hr_049-075.indd 51 3/4/13 12:11 PM
Propert
y of C
enga
ge Le
arning

Formatting Text and Paragraphs Word 52
Word 2013
UNIT C
Learning Outcomes•Applyfontstylesandeffects
•Addashadowtotext
•Changecharacterspacing
Use the Format PainterYoucandramaticallychangetheappearanceof textbyapplyingdifferent fontstyles, fonteffects,andcharacter-spacingeffects.Forexample,youcanusethebuttonsintheFontgrouptomaketextdarkerbyapplyingboldortomaketextslantedbyapplyingitalic.Whenyouaresatisfiedwiththeformattingofcertaintext,youcanquicklyapplythesameformatstoothertextusingtheFormatPainter.TheFormat PainterisapowerfulWordfeaturethatallowsyoutocopyalltheformatsettingsappliedtoselectedtexttoothertextthatyouwanttoformatthesameway. CASE You spice up the appearance of the text in the document by applying different font styles and text effects.
1. Select immediate booking is essential in the first body paragraph, click the Bold button on the Mini toolbar, select the entire paragraph, then click the Italic button
The phrase “immediate booking is essential” is bold, and the entire paragraph is italic.
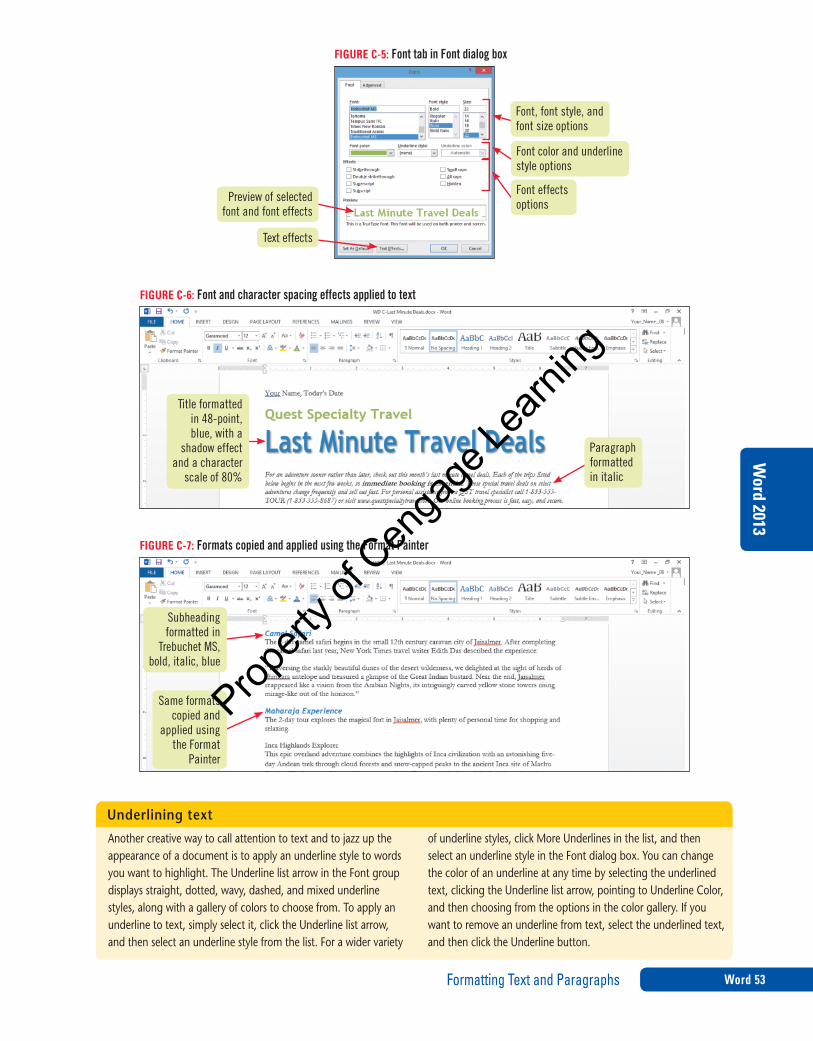
2. Select Last Minute Travel Deals, then click the launcher in the Font groupThe Font dialog box opens, as shown in FIGURE C-5. You can use the options on the Font tab to change the font, font style, size, and color of text, and to add an underline and apply font effects to text.
3. Scroll down the Size list, click 48, click the Font color list arrow, click the Blue, Accent 5 color in the Theme Colors, then click the Text Effects buttonThe Format Text Effects dialog box opens with the Text Fill & Outline options displayed. You can also use this dialog box to apply text effects, such as shadow, reflection, and 3-D effects to selected text.
4. Click the Text Effects icon in the dialog box, click Shadow, click the Presets list arrow, click Offset Diagonal Bottom Right in the Outer section, click OK, click OK, then deselect the textThe text is larger, blue, and has a shadow effect.
5. Select Last Minute Travel Deals, right-click, click Font on the menu that opens, click the Advanced tab, click the Scale list arrow, click 80%, click OK, then deselect the textYou use the Advanced tab in the Font dialog box to change the scale, or width, of the selected characters, to alter the spacing between characters, or to raise or lower the characters. Decreasing the scale of the characters makes them narrower and gives the text a tall, thin appearance, as shown in FIGURE C-6.
6. Scroll down, select the subheading Camel Safari, then, using the Mini toolbar, click the Font list arrow, click Trebuchet MS, click , click , click the Font Color list arrow
, click the Blue, Accent 5 color in the Theme Colors, then deselect the textThe subheading is formatted in Trebuchet MS, bold, italic, and blue.
7. Select Camel Safari, then click the Format Painter button in the Clipboard groupThe pointer changes to .
8. Scroll down, select Maharaja Experience with the pointer, then deselect the text The subheading is formatted in Trebuchet MS, bold, italic, and blue, as shown in FIGURE C-7.
9. Scroll up, select Rajasthan Desert Safari, then double-click the Format Painter buttonDouble-clicking the Format Painter button allows the Format Painter to remain active until you turn it off. By keeping the Format Painter active, you can apply formatting to multiple items.
10. Scroll down, select the headings Inca Highlands Explorer, Everest Base Camp Trek, and Cycling in Provence with the pointer, click the Format Painter button to turn off the Format Painter, then save your changesThe headings are formatted in 14-point Trebuchet MS bold with a green font color.
STEPS
Tochangethecase ofselectedtextfromlowercasetouppercase—andvisaversa—clicktheChangeCasebutton
intheFontgroup,andthenselectthecasestyleyouwanttouse.
QUICK TIP
YoucanalsoapplytexteffectsusingtheTextEffectsandTypographybuttonintheFontgroup.
QUICK TIP
Movethepointeroverthedocumenttexttosee .
TROUBLE
Youcanalsopress[Esc]toturnofftheFormatPainter.
QUICK TIP
C8395_UnitC_ptg01_hr_049-075.indd 52 3/4/13 12:11 PM
Propert
y of C
enga
ge Le
arning
Formatting Text and Paragraphs Word 53
Word 2013
FIGURE C-5: Font tab in Font dialog box
Font, font style, and font size options
Font color and underline style options
Font effects options
Preview of selected font and font effects
FIGURE C-6: Font and character spacing effects applied to text
Title formatted in 48-point, blue, with a
shadow effect and a character
scale of 80%
Paragraph formatted in italic
FIGURE C-7: Formats copied and applied using the Format Painter
Subheading formatted in
Trebuchet MS, bold, italic, blue
Same formats copied and
applied using the Format
Painter
Anothercreativewaytocallattentiontotextandtojazzuptheappearanceofadocumentistoapplyanunderlinestyletowordsyouwanttohighlight.TheUnderlinelistarrowintheFontgroupdisplaysstraight,dotted,wavy,dashed,andmixedunderlinestyles,alongwithagalleryofcolorstochoosefrom.Toapplyanunderlinetotext,simplyselectit,clicktheUnderlinelistarrow,andthenselectanunderlinestylefromthelist.Forawidervariety
ofunderlinestyles,clickMoreUnderlinesinthelist,andthenselectanunderlinestyleintheFontdialogbox.Youcanchangethecolorofanunderlineatanytimebyselectingtheunderlinedtext,clickingtheUnderlinelistarrow,pointingtoUnderlineColor,andthenchoosingfromtheoptionsinthecolorgallery.If youwanttoremoveanunderlinefromtext,selecttheunderlinedtext,andthenclicktheUnderlinebutton.
Underlining text
Text effects
C8395_UnitC_ptg01_hr_049-075.indd 53 3/4/13 12:11 PM
Propert
y of C
enga
ge Le
arning
Formatting Text and Paragraphs Word 54
Word 2013
UNIT C
Learning Outcomes•Addspacingunderparagraphs
•Changelinespac-inginparagraphs
•Applystylestotext
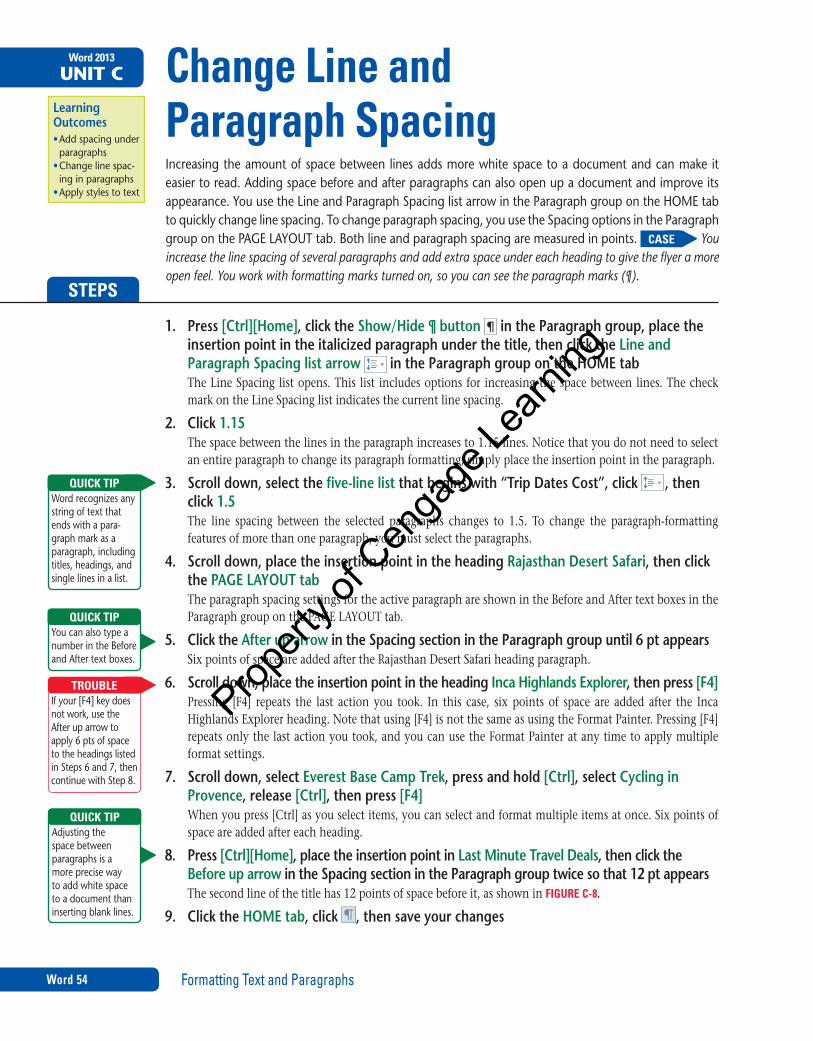
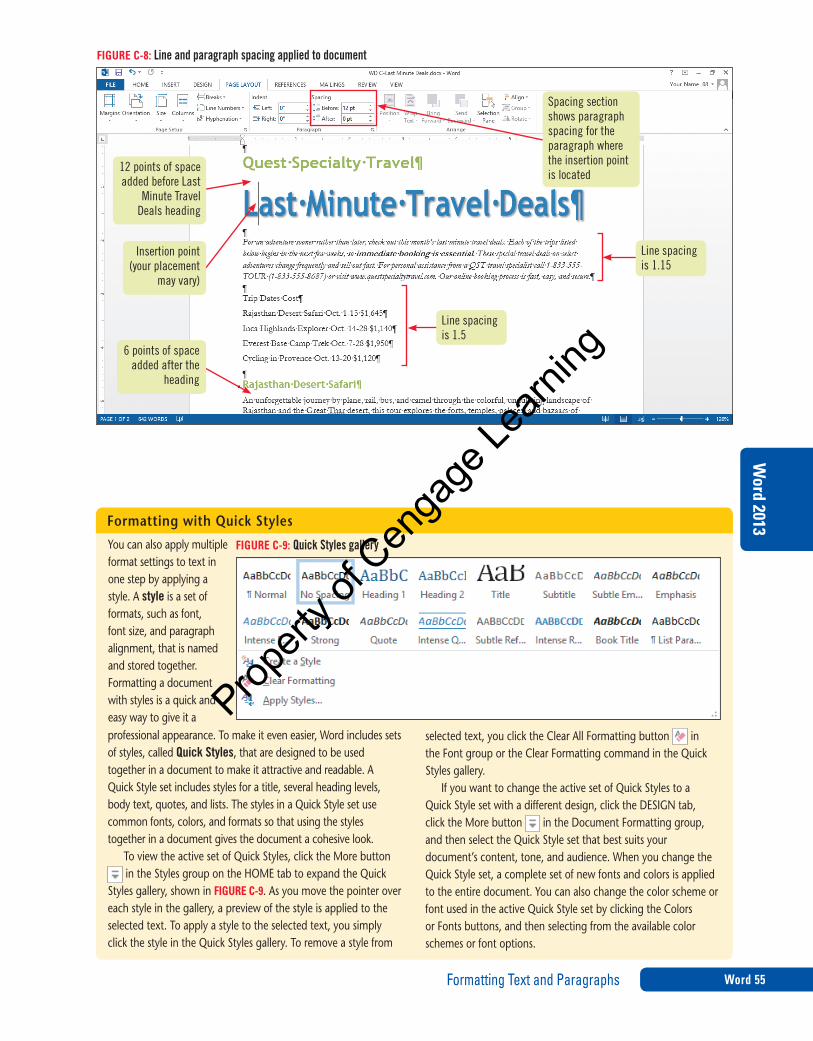
Change Line and Paragraph SpacingIncreasingtheamountofspacebetween linesaddsmorewhitespacetoadocumentandcanmake iteasiertoread.Addingspacebeforeandafterparagraphscanalsoopenupadocumentandimproveitsappearance.YouusetheLineandParagraphSpacinglistarrowintheParagraphgroupontheHOMEtabtoquicklychangelinespacing.Tochangeparagraphspacing,youusetheSpacingoptionsintheParagraphgrouponthePAGELAYOUTtab.Bothlineandparagraphspacingaremeasuredinpoints. CASE You increase the line spacing of several paragraphs and add extra space under each heading to give the flyer a more open feel. You work with formatting marks turned on, so you can see the paragraph marks (¶).
1. Press [Ctrl][Home], click the Show/Hide ¶ button in the Paragraph group, place the insertion point in the italicized paragraph under the title, then click the Line and Paragraph Spacing list arrow in the Paragraph group on the HOME tabThe Line Spacing list opens. This list includes options for increasing the space between lines. The check mark on the Line Spacing list indicates the current line spacing.
2. Click 1.15The space between the lines in the paragraph increases to 1.15 lines. Notice that you do not need to select an entire paragraph to change its paragraph formatting; simply place the insertion point in the paragraph.
3. Scroll down, select the five-line list that begins with “Trip Dates Cost”, click , then click 1.5The line spacing between the selected paragraphs changes to 1.5. To change the paragraph-formatting features of more than one paragraph, you must select the paragraphs.
4. Scroll down, place the insertion point in the heading Rajasthan Desert Safari, then click the PAGE LAYOUT tabThe paragraph spacing settings for the active paragraph are shown in the Before and After text boxes in the Paragraph group on the PAGE LAYOUT tab.
5. Click the After up arrow in the Spacing section in the Paragraph group until 6 pt appearsSix points of space are added after the Rajasthan Desert Safari heading paragraph.
6. Scroll down, place the insertion point in the heading Inca Highlands Explorer, then press [F4]Pressing [F4] repeats the last action you took. In this case, six points of space are added after the Inca Highlands Explorer heading. Note that using [F4] is not the same as using the Format Painter. Pressing [F4] repeats only the last action you took, and you can use the Format Painter at any time to apply multiple format settings.
7. Scroll down, select Everest Base Camp Trek, press and hold [Ctrl], select Cycling in Provence, release [Ctrl], then press [F4] When you press [Ctrl] as you select items, you can select and format multiple items at once. Six points of space are added after each heading.
8. Press [Ctrl][Home], place the insertion point in Last Minute Travel Deals, then click the Before up arrow in the Spacing section in the Paragraph group twice so that 12 pt appears The second line of the title has 12 points of space before it, as shown in FIGURE C-8.
9. Click the HOME tab, click , then save your changes
STEPS
Wordrecognizesanystringoftextthatendswithapara-graphmarkasaparagraph,includingtitles,headings,andsinglelinesinalist.
QUICK TIP
YoucanalsotypeanumberintheBeforeandAftertextboxes.
QUICK TIP
Ifyour[F4]keydoesnotwork,usetheAfteruparrowtoapply6ptsofspacetotheheadingslistedinSteps6and7,thencontinuewithStep8.
TROUBLE
Adjustingthespace betweenparagraphsisamore precisewayto addwhitespacetoadocumentthaninsertingblanklines.
QUICK TIP
C8395_UnitC_ptg01_hr_049-075.indd 54 3/4/13 12:11 PM
Propert
y of C
enga
ge Le
arning
Formatting Text and Paragraphs Word 55
Word 2013
FIGURE C-8: Line and paragraph spacing applied to document
Spacing section shows paragraph spacing for the paragraph where the insertion point is located
12 points of space added before Last
Minute Travel Deals heading
Insertion point (your placement
may vary)
Line spacing is 1.15
Line spacing is 1.5
6 points of space added after the
heading
Youcanalsoapplymultipleformatsettingsto textinonestepby applyingastyle.A styleisasetofformats,suchasfont,font size,and paragraphalignment,thatisnamedandstoredtogether.Formattingadocumentwithstylesisa quickandeasy waytogiveita
Formatting with Quick Styles
FIGURE C-9: Quick Styles gallery
selectedtext,youclicktheClearAllFormattingbutton inthe FontgrouportheClearFormattingcommandintheQuickStylesgallery.
IfyouwanttochangetheactivesetofQuickStylestoaQuick Stylesetwithadifferentdesign,clicktheDESIGNtab,click theMorebutton intheDocumentFormattinggroup,andthenselecttheQuickStylesetthatbestsuitsyourdocument’scontent,tone,andaudience.WhenyouchangetheQuickStyle set,a completesetofnewfontsandcolorsisappliedtothe entiredocument.YoucanalsochangethecolorschemeorfontusedintheactiveQuickStylesetbyclickingtheColorsor Fontsbuttons,andthenselectingfromtheavailablecolorschemesorfontoptions.
professionalappearance.Tomakeiteveneasier,Wordincludessetsofstyles,calledQuick Styles,thatare designedtobeusedtogetherinadocumenttomakeitattractive andreadable.AQuickStylesetincludesstylesforatitle,severalheadinglevels,bodytext,quotes,andlists.ThestylesinaQuickStylesetusecommonfonts,colors,andformatssothatusingthe stylestogetherinadocumentgivesthedocumentacohesive look.
ToviewtheactivesetofQuickStyles,clicktheMorebuttonin theStylesgroupontheHOMEtabtoexpandtheQuick
Stylesgallery,showninFIGURE C-9.Asyoumovethepointerovereachstyleinthegallery,apreviewofthestyleisappliedtotheselectedtext.Toapplya styletotheselectedtext,yousimplyclickthestyleintheQuickStylesgallery.Toremoveastylefrom
C8395_UnitC_ptg01_hr_049-075.indd 55 3/4/13 12:11 PM
Propert
y of C
enga
ge Le
arning
Formatting Text and Paragraphs Word 56
Word 2013
UNIT C
Learning Outcomes•Centertext•Justifytext•Right-aligntext
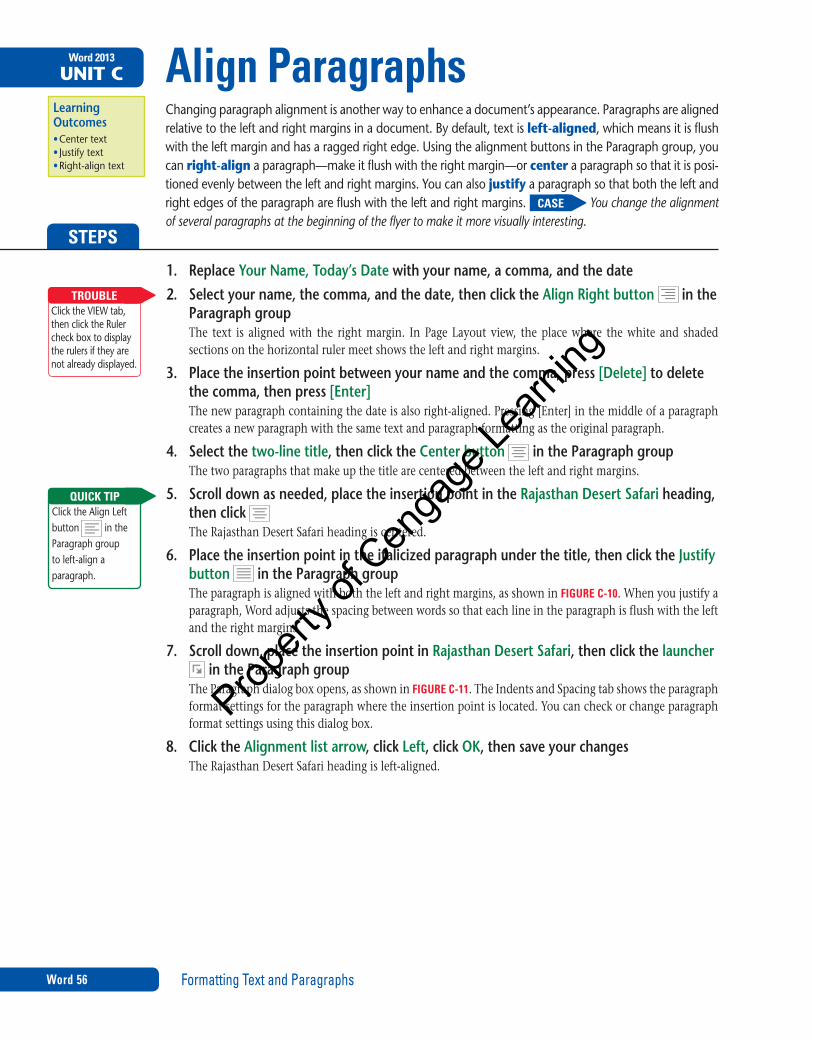
Align ParagraphsChangingparagraphalignmentisanotherwaytoenhanceadocument’sappearance.Paragraphsarealignedrelativetotheleftandrightmarginsinadocument.Bydefault,textisleft-aligned,whichmeansitisflushwiththeleftmarginandhasaraggedrightedge.UsingthealignmentbuttonsintheParagraphgroup,youcanright-alignaparagraph—makeitflushwiththerightmargin—orcenteraparagraphsothatitisposi-tionedevenlybetweentheleftandrightmargins.Youcanalsojustifyaparagraphso that boththeleftandrightedgesoftheparagraphareflushwiththeleftandrightmargins. CASE You change the alignment of several paragraphs at the beginning of the flyer to make it more visually interesting.
STEPS
1. Replace Your Name, Today’s Date with your name, a comma, and the date2. Select your name, the comma, and the date, then click the Align Right button in the
Paragraph groupThe text is aligned with the right margin. In Page Layout view, the place where the white and shaded sections on the horizontal ruler meet shows the left and right margins.
3. Place the insertion point between your name and the comma, press [Delete] to delete the comma, then press [Enter]The new paragraph containing the date is also right-aligned. Pressing [Enter] in the middle of a paragraph creates a new paragraph with the same text and paragraph formatting as the original paragraph.
4. Select the two-line title, then click the Center button in the Paragraph groupThe two paragraphs that make up the title are centered between the left and right margins.
5. Scroll down as needed, place the insertion point in the Rajasthan Desert Safari heading, then click The Rajasthan Desert Safari heading is centered.
6. Place the insertion point in the italicized paragraph under the title, then click the Justify button in the Paragraph groupThe paragraph is aligned with both the left and right margins, as shown in FIGURE C-10. When you justify a paragraph, Word adjusts the spacing between words so that each line in the paragraph is flush with the left and the right margins.
7. Scroll down, place the insertion point in Rajasthan Desert Safari, then click the launcher in the Paragraph group
The Paragraph dialog box opens, as shown in FIGURE C-11. The Indents and Spacing tab shows the paragraph format settings for the paragraph where the insertion point is located. You can check or change paragraph format settings using this dialog box.
8. Click the Alignment list arrow, click Left, click OK, then save your changesThe Rajasthan Desert Safari heading is left-aligned.
ClicktheVIEWtab,thenclicktheRulercheckboxtodisplaytherulersiftheyarenotalreadydisplayed.
TROUBLE
ClicktheAlignLeftbutton intheParagraphgroupto left-alignaparagraph.
QUICK TIP
C8395_UnitC_ptg01_hr_049-075.indd 56 3/4/13 12:12 PM
Propert
y of C
enga
ge Le
arning

Formatting Text and Paragraphs Word 57
Word 2013
FIGURE C-10: Modified paragraph alignment
Center-aligned
Justified
Right-aligned
Left-aligned
Right margin on the ruler
Changingthethemeappliedtoadocumentisanotherpowerfulandefficientwaytotailoradocument’slookandfeel,particularlywhenadocumentisformattedwithaQuickStyleset.Bydefault,alldocumentscreatedinWordareformattedwiththedefaultOfficetheme—whichusesCalibriasthefontforthebodytext—butyoucanchangethethemeatanytimetofitthecontent,tone,andpurposeofadocument.Whenyouchangethethemeforadocument,acompletesetofnewthemecolors,fonts,andeffectsisappliedtothewholedocument.
Topreviewhowvariousthemeslookwhenappliedtothecur-rentdocument,clicktheThemesbuttonintheDocumentFormattinggroupontheDESIGNtab,andthenmovethepointerovereachthemeinthegalleryandnoticehowthedocumentchanges.Whenyouclickthethemeyoulike,alldocumentcon-tentthatusesthemecolors,alltextthatisformattedwithastyle,
includingdefaultbodytext,andalltablestylesandgraphiceffectschangetothecolors,fonts,andeffectsusedbythetheme.Inaddition,thegalleryofcolorschangestodisplaythesetofthemecolors,andtheactiveQuickStylesetchangestoemploythethemecolorsandfonts.Notethatchangingthethemedoesnotchangethenon-theme-basedfontformattingthathasalreadybeenapplied.Forexample,ifyouchangedthefontoftext,appliedboldtotext,orchangedthefontcoloroftexttoastandardorcustomcolor,thatformattingremainsinplace.
Ifyouwanttotweakthedocumentdesignfurther,youcanmodifyitbyapplyingadifferentsetofthemecolors,headingand bodytextfonts,orgraphiceffects.Todothis,simplyclicktheColors,Fonts,orEffectsbuttonintheDocumentFormattinggroup,movethepointerovereachoptioninthegallerytopre-viewitinthedocument,andthenclicktheoptionyoulikebest.
Formatting a document using themes
FIGURE C-11: Indents and Spacing tab in the Paragraph dialog box
Spacing above and below
paragraphs options
Alignment options
Line spacing options
Preview of selected settings
C8395_UnitC_ptg01_hr_049-075.indd 57 3/4/13 12:12 PM
Propert
y of C
enga
ge Le
arning

Formatting Text and Paragraphs Word 58
Word 2013
UNIT C
Learning Outcomes•Settabstopsandtableaders
•Modifytabs•Usetabstoaligntext
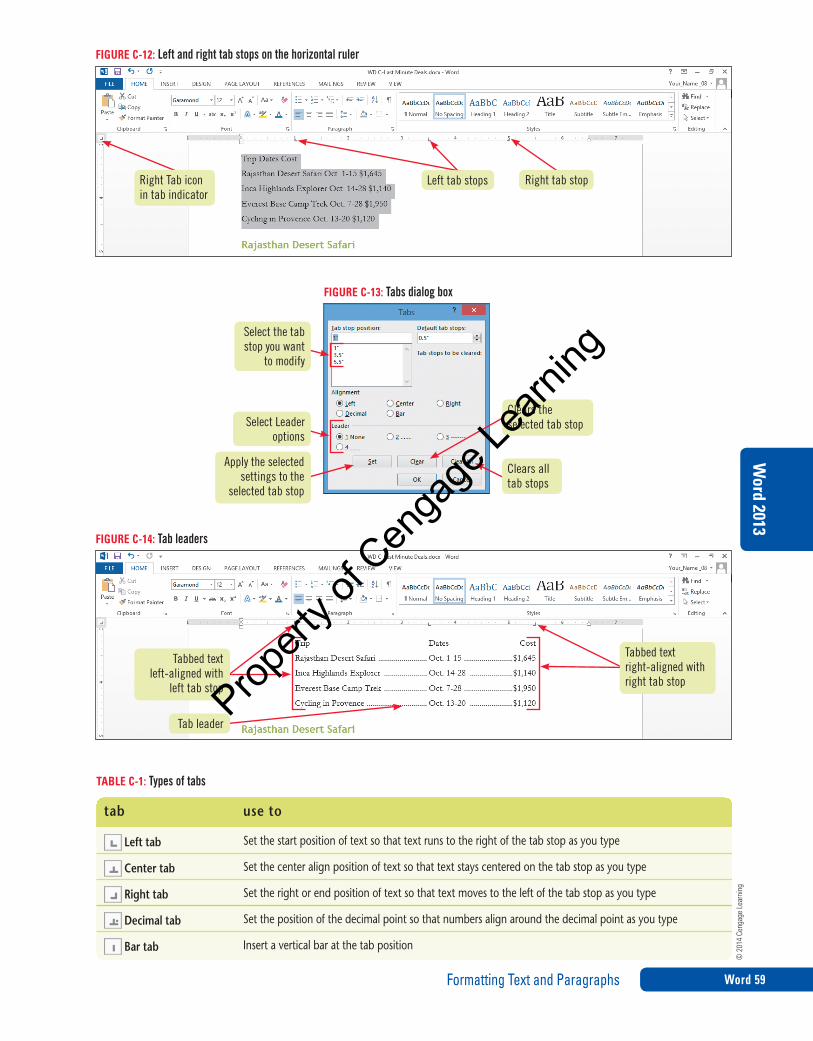
Work with TabsTabsallowyoutoaligntextataspecificlocationinadocument.Atab stopisapointonthehorizontalrulerthatindicatesthelocationatwhichtoaligntext.Bydefault,tabstopsarelocatedevery1⁄2"fromtheleftmargin,butyoucanalsosetcustomtabstops.Usingtabs,youcanaligntexttothe left, right,orcenterofatabstop,oryoucanaligntextatadecimalpointorinsertabarcharacter.TABLE C-1describesthedifferenttypesoftabstops.YousettabsusingthehorizontalrulerortheTabsdialogbox. CASE You use tabs to format the summary information on last minute tour deals so it is easy to read.
STEPS
1. Scroll as needed, then select the five-line list beginning with “Trip Dates Cost”Before you set tab stops for existing text, you must select the paragraphs for which you want to set tabs.
2. Point to the tab indicator at the left end of the horizontal ruler The icon that appears in the tab indicator indicates the active type of tab; pointing to the tab indicator displays a ScreenTip with the name of the active tab type. By default, left tab is the active tab type. Clicking the tab indicator scrolls through the types of tabs and indents.
3. Click the tab indicator to see each of the available tab and indent types, make Left Tab the active tab type, click the 1" mark on the horizontal ruler, then click the 3½" mark
on the horizontal rulerA left tab stop is inserted at the 1" mark and the 3½" mark on the horizontal ruler. Clicking the horizontal ruler inserts a tab stop of the active type for the selected paragraph or paragraphs.
4. Click the tab indicator twice so the Right Tab icon is active, then click the 5" mark on the horizontal rulerA right tab stop is inserted at the 5" mark on the horizontal ruler, as shown in FIGURE C-12.
5. Place the insertion point before Trip in the first line in the list, press [Tab], place the insertion point before Dates, press [Tab], place the insertion point before Cost, then press [Tab]Inserting a tab before “Trip” left-aligns the text at the 1" mark, inserting a tab before “Dates” left-aligns the text at the 3½" mark, and inserting a tab before “Cost” right-aligns “Cost” at the 5" mark.
6. Insert a tab at the beginning of each remaining line in the listThe paragraphs left-align at the 1" mark.
7. Insert a tab before each Oct. in the list, then insert a tab before each $ in the listThe dates left-align at the 3½" mark. The prices right-align at the 5" mark.
8. Select the five lines of tabbed text, drag the right tab stop to the 5½" mark on the horizontal ruler, then deselect the textDragging the tab stop moves it to a new location. The prices right-align at the 5½" mark.
9. Select the last four lines of tabbed text, click the launcher in the Paragraph group, then click the Tabs button at the bottom of the Paragraph dialog boxThe Tabs dialog box opens, as shown in FIGURE C-13. You can use the Tabs dialog box to set tab stops, change the position or alignment of existing tab stops, clear tab stops, and apply tab leaders to tabs. Tab leaders are lines that appear in front of tabbed text.
10. Click 3.5" in the Tab stop position list box, click the 2 option button in the Leader section, click Set, click 5.5" in the Tab stop position list box, click the 2 option button in the Leader section, click Set, click OK, deselect the text, then save your changesA dotted tab leader is added before each 3.5" and 5.5" tab stop in the last four lines of tabbed text, as shown in FIGURE C-14.
Toremoveatabstop,dragitofftheruler.
QUICK TIP
Placetheinsertionpointinaparagraphtoseethetabstopsforthatparagraphonthehorizontalruler.
QUICK TIP
Double-clickatabstopontherulerto opentheTabsdialogbox.
QUICK TIP
C8395_UnitC_ptg01_hr_049-075.indd 58 3/4/13 12:12 PM
Propert
y of C
enga
ge Le
arning
Formatting Text and Paragraphs Word 59
Word 2013
FIGURE C-12: Left and right tab stops on the horizontal ruler
Right Tab icon in tab indicator
Left tab stops Right tab stop
FIGURE C-13: Tabs dialog box
Select the tab stop you want
to modify
Select Leader options
Apply the selected settings to the
selected tab stop
Clears the selected tab stop
Clears all tab stops
FIGURE C-14: Tab leaders
Tabbed text left-aligned with
left tab stop
Tab leader
Tabbed text right-aligned with right tab stop
© 2
014
Ceng
age
Lear
ning
TABLE C-1: Types of tabs
tab use to
Left tab Setthestartpositionoftextsothattextrunstotherightofthetabstopasyoutype
Center tab Setthecenteralignpositionoftextsothattextstayscenteredonthetabstopasyoutype
Right tab Settherightorendpositionoftextsothattextmovestotheleftofthetabstopasyoutype
Decimal tab Setthepositionofthedecimalpointsothatnumbersalignaroundthedecimalpointasyoutype
Bar tab Insertaverticalbaratthetabposition
C8395_UnitC_ptg01_hr_049-075.indd 59 3/4/13 12:12 PM
Propert
y of C
enga
ge Le
arning
Formatting Text and Paragraphs Word 60
Word 2013
UNIT C
Learning Outcomes•Indentaparagraph
•Indentthefirstlineofaparagraph
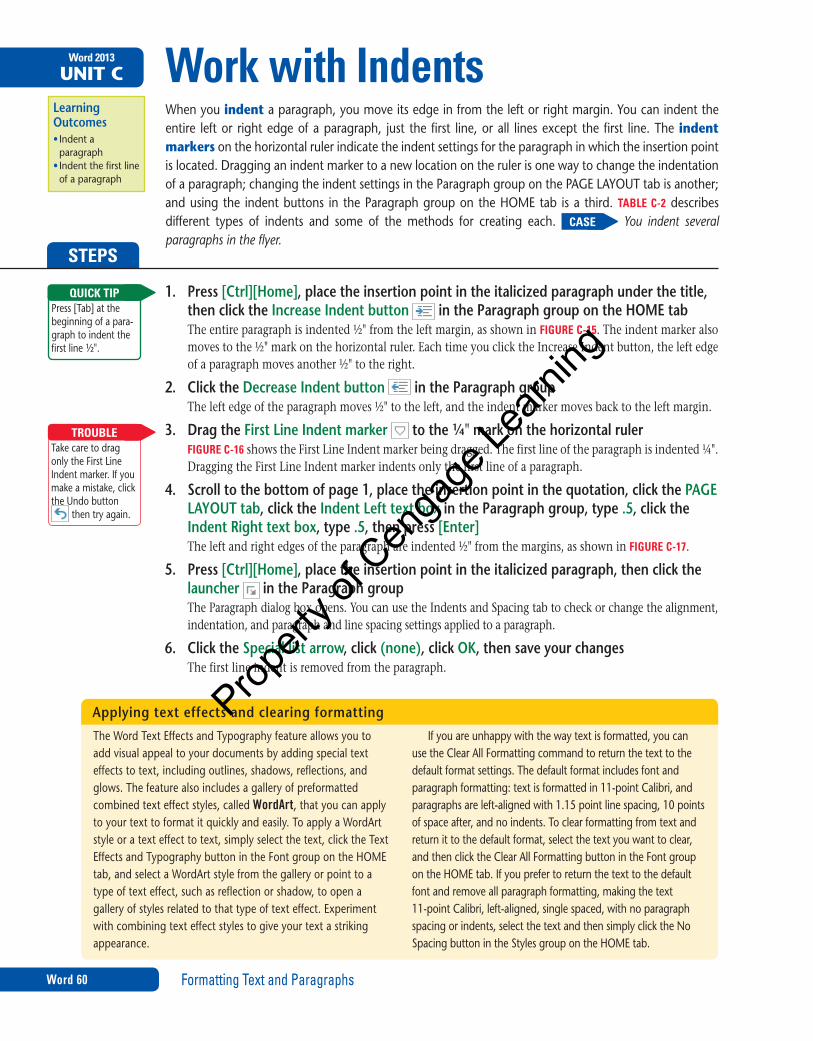
Work with IndentsWhenyouindentaparagraph,youmoveitsedgeinfromtheleftorrightmargin.Youcanindenttheentire leftor rightedgeofaparagraph, just the first line,orall linesexcept the first line.The indent markersonthehorizontalrulerindicatetheindentsettingsfortheparagraphinwhichtheinsertionpointislocated.Dragginganindentmarkertoanewlocationontherulerisonewaytochangetheindentationofaparagraph;changingtheindentsettingsintheParagraphgrouponthePAGELAYOUTtabisanother;andusing the indentbuttons in theParagraphgroupon theHOMEtab isa third.TABLE C-2describesdifferent types of indents and some of the methods for creating each. CASE You indent several paragraphs in the flyer.
STEPS
1. Press [Ctrl][Home], place the insertion point in the italicized paragraph under the title, then click the Increase Indent button in the Paragraph group on the HOME tabThe entire paragraph is indented ½" from the left margin, as shown in FIGURE C-15. The indent marker also moves to the ½" mark on the horizontal ruler. Each time you click the Increase Indent button, the left edge of a paragraph moves another ½" to the right.
2. Click the Decrease Indent button in the Paragraph groupThe left edge of the paragraph moves ½" to the left, and the indent marker moves back to the left margin.
3. Drag the First Line Indent marker to the ¼" mark on the horizontal ruler FIGURE C-16 shows the First Line Indent marker being dragged. The first line of the paragraph is indented ¼". Dragging the First Line Indent marker indents only the first line of a paragraph.
4. Scroll to the bottom of page 1, place the insertion point in the quotation, click the PAGE LAYOUT tab, click the Indent Left text box in the Paragraph group, type .5, click the Indent Right text box, type .5, then press [Enter]The left and right edges of the paragraph are indented ½" from the margins, as shown in FIGURE C-17.
5. Press [Ctrl][Home], place the insertion point in the italicized paragraph, then click thelauncher in the Paragraph groupThe Paragraph dialog box opens. You can use the Indents and Spacing tab to check or change the alignment, indentation, and paragraph and line spacing settings applied to a paragraph.
6. Click the Special list arrow, click (none), click OK, then save your changesThe first line indent is removed from the paragraph.
Press[Tab]atthebeginningofapara-graphtoindentthefirstline½".
QUICK TIP
TakecaretodragonlytheFirstLineIndentmarker.Ifyoumakeamistake,clicktheUndobutton
thentryagain.
TROUBLE
TheWordTextEffectsandTypographyfeatureallowsyoutoaddvisualappealtoyourdocumentsbyaddingspecialtexteffectstotext,includingoutlines,shadows,reflections,andglows.Thefeaturealsoincludesagalleryofpreformattedcombinedtexteffectstyles,calledWordArt,thatyoucanapplytoyourtexttoformatitquicklyandeasily.ToapplyaWordArtstyleoratexteffecttotext,simplyselectthetext,clicktheTextEffectsandTypographybuttonintheFontgroupontheHOMEtab,andselectaWordArtstylefromthegalleryorpointtoatypeoftexteffect,suchasreflectionorshadow,toopenagalleryofstylesrelatedtothattypeoftexteffect.Experimentwithcombiningtexteffectstylestogiveyourtextastrikingappearance.
Ifyouareunhappywiththewaytextisformatted,youcanuse theClearAllFormattingcommandtoreturnthetexttothedefaultformatsettings.Thedefaultformatincludesfontandparagraphformatting:textisformattedin11-pointCalibri,andparagraphsareleft-alignedwith1.15pointlinespacing,10 pointsofspaceafter,andnoindents.Toclearformattingfromtextandreturnittothedefaultformat,selectthetextyouwanttoclear,andthenclicktheClearAllFormattingbuttonintheFontgroupontheHOMEtab.Ifyouprefertoreturnthetexttothedefaultfontandremoveallparagraphformatting,makingthetext11-pointCalibri,left-aligned,singlespaced,withnoparagraphspacingorindents,selectthetextandthensimplyclicktheNoSpacingbuttonintheStylesgroupontheHOMEtab.
Applying text effects and clearing formatting
C8395_UnitC_ptg01_hr_049-075.indd 60 3/4/13 12:12 PM
Propert
y of C
enga
ge Le
arning

Formatting Text and Paragraphs Word 61
Word 2013
FIGURE C-15: Indented paragraph
First Line Indent
marker
Hanging Indent
marker
Left Indent marker
Indented paragraph
Decrease Indent button
Increase Indent button Right Indent
marker
FIGURE C-17: Paragraph indented from the left and right
Paragraph indented ½" from
left margin
Paragraph indented ½" from right margin
FIGURE C-16: Dragging the First Line Indent marker
First Line Indent marker
being dragged to the 1/4" mark
Dotted line shows position of First
Line Indent marker as it is being dragged
TABLE C-2: Types of indents
indent type: description to createLeft indent: The left edge of a paragraph is moved in from the left margin
DragtheLeftIndentmarker ontherulertotherighttothepositionwhereyouwanttheleftedgeoftheparagraphtoalign;whenyoudragtheleftindentmarker,alltheindentmarkersmoveasone
Right indent: The right edge of a para-graph is moved in from the right margin
DragtheRightIndentmarker ontherulertothelefttothepositionwhereyouwanttherightedgeoftheparagraphtoalign
First line indent: The first line of a paragraph is indented more than the subsequent lines
DragtheFirstLineIndentmarker ontherulertotherighttothepositionwhereyouwantthefirstlineoftheparagraphtobegin;oractivatetheFirstLineIndentmarker
inthetabindicator,andthenclicktheruleratthepositionwhereyouwantthefirstlineoftheparagraphtobegin
Hanging indent: The subsequent lines of a paragraph are indented more than the first line
DragtheHangingIndentmarker ontherulertotherighttothepositionwhereyouwantthehangingindenttobegin;oractivatetheHangingIndentmarker inthetabindicator,andthenclicktheruleratthepositionwhereyouwantthesecondandremain-inglinesoftheparagraphtobegin;whenyoudragthehangingindentmarker,theleftindentmarkermoveswithit.
Negative indent (or Outdent): The left edge of a paragraph is moved to the left of the left margin
DragtheLeftIndentmarker ontherulerlefttothepositionwhereyouwantthenegativeindenttobegin;whenyoudragtheleftindentmarker,allmarkersmoveasone
© 2
014
Ceng
age
Lear
ning
C8395_UnitC_ptg01_hr_049-075.indd 61 3/4/13 12:12 PM
Propert
y of C
enga
ge Le
arning

Formatting Text and Paragraphs Word 62
Word 2013
UNIT C
Learning Outcomes•Applybulletsornumberingtolists
•Renumberalist•Changebulletornumberingstyles
Add Bullets and NumberingFormattinga listwithbulletsornumberingcanhelp toorganize the ideas inadocument.Abullet is acharacter,oftenasmallcircle,thatappearsbeforetheitemsinalisttoaddemphasis.Formattingalist as a num-beredlisthelpsillustratesequencesandpriorities.Youcanquicklyformatalistwithbulletsor numberingbyusingtheBulletsandNumberingbuttonsintheParagraphgroupontheHOMEtab. CASE You format the lists in your flyer with numbers and bullets.
Youcancreatelistswithhierarchicalstructuresbyapplyingamultilevelliststyletoalist.Tocreateamultilevel list,alsocalled anoutline,beginbyapplyingamultilevelliststyleusingtheMultilevelListlistarrow intheParagraphgroupontheHOMEtab,thentypeyouroutline,pressing[Enter]aftereachitem.Todemoteitemstoalowerlevelofimportanceintheoutline,placetheinsertionpointintheitem,thenclicktheIncreaseIndentbutton intheParagraphgrouponthe
HOMEtab.Eachtimeyouindentaparagraph,theitemisdemotedtoalowerlevelintheoutline.Similarly,youcanusetheDecreaseIndentbutton topromoteanitemtoahigherlevelintheoutline.Youcanalsocreateahierarchicalstructureinanybulletedornumberedlistbyusing and todemoteandpromoteitemsinthelist.Tochangethemultilevelliststyle appliedtoalist,selectthelist,click andthenselecta newstyle.
Creating multilevel lists
STEPS
1. Scroll until the Everest Base Camp Trek heading is at the top of your screen2. Select the three-line list of 3-day add-ons, click the HOME tab, then click the Numbering
list arrow in the Paragraph group The Numbering Library opens, as shown in FIGURE C-18. You use this list to choose or change the numbering style applied to a list. You can drag the pointer over the numbering styles to preview how the selected text will look if the numbering style is applied.
3. Click the numbering style called out in FIGURE C-18
The paragraphs are formatted as a numbered list.
4. Place the insertion point after Pokhara — Valley of Lakes, press [Enter], then type Temples of Janakpur Pressing [Enter] in the middle of the numbered list creates a new numbered paragraph and automatically renumbers the remainder of the list. Similarly, if you delete a paragraph from a numbered list, Word automatically renumbers the remaining paragraphs.
5. Click 1 in the listClicking a number in a list selects all the numbers, as shown in FIGURE C-19.
6. Click the Bold button in the Font group The numbers are all formatted in bold. Notice that the formatting of the items in the list does not change when you change the formatting of the numbers. You can also use this technique to change the formatting of bullets in a bulleted list.
7. Select the list of items under “Last minute participants in the Everest Base Camp trek...”, then click the Bullets button in the Paragraph groupThe four paragraphs are formatted as a bulleted list using the most recently used bullet style.
8. Click a bullet in the list to select all the bullets, click the Bullets list arrow in the Paragraph group, click the check mark bullet style, click the document to deselect the text, then save your changesThe bullet character changes to a check mark, as shown in FIGURE C-20.
Toremoveabulletornumber,selecttheparagraph(s),thenclick or .
QUICK TIP
Touseasymbolorapictureforabulletcharacter,clicktheBulletslistarrow,clickDefineNewBullet,andthenselectfromtheoptionsintheDefine NewBulletdialogbox.
QUICK TIP
C8395_UnitC_ptg01_hr_049-075.indd 62 3/4/13 12:12 PM
Propert
y of C
enga
ge Le
arning

Formatting Text and Paragraphs Word 63
Word 2013
FIGURE C-18: Numbering Library
Numbering list arrow Choose this numbering
style (the location in your Numbering Library may differ)
Click to change the style, format, and alignment of the numbers in a list
FIGURE C-19: Numbered list
Numbers selected in
numbered list
Bullets button
FIGURE C-20: Check mark bullets applied to list
Numbers are bold
Check mark bullets applied
to list
C8395_UnitC_ptg01_hr_049-075.indd 63 3/4/13 12:12 PM
Propert
y of C
enga
ge Le
arning
Formatting Text and Paragraphs Word 64
Word 2013
UNIT C
Learning Outcomes•Applyshadingtotext
•Applyborderstotext
•Highlighttext
Add Borders and ShadingBordersandshadingcanaddcolorandsplashtoadocument.Bordersarelinesyouaddabove,below,totheside,oraroundwordsorparagraphs.Youcanformatbordersusingdifferentlinestyles,colors,andwidths.Shadingisacolororpatternyouapplybehindwordsorparagraphstomakethemstandoutonapage.YouapplybordersandshadingusingtheBordersbuttonandtheShadingbuttonintheParagraphgroupontheHOMEtab. CASE You enhance the tabbed text of the last minute tours schedule by adding shading to it. You also apply a border around the tabbed text to set it off from the rest of the document.
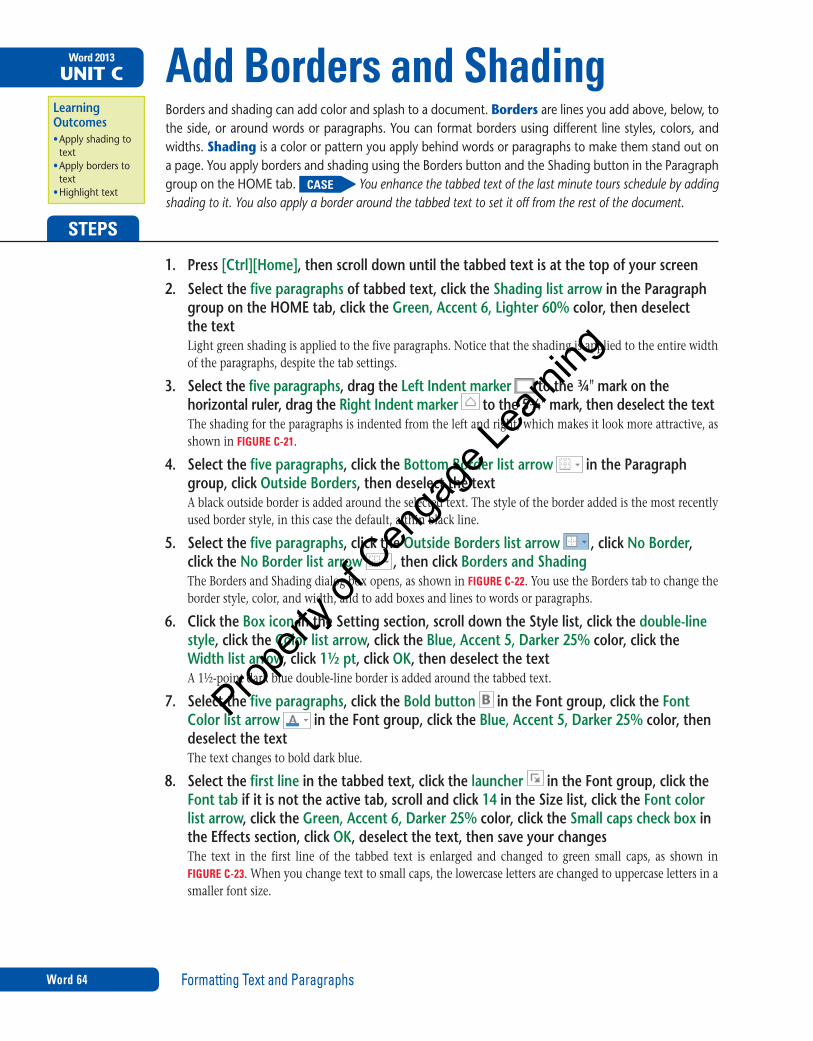
1. Press [Ctrl][Home], then scroll down until the tabbed text is at the top of your screen2. Select the five paragraphs of tabbed text, click the Shading list arrow in the Paragraph
group on the HOME tab, click the Green, Accent 6, Lighter 60% color, then deselect the text Light green shading is applied to the five paragraphs. Notice that the shading is applied to the entire width of the paragraphs, despite the tab settings.
3. Select the five paragraphs, drag the Left Indent marker to the ¾" mark on the horizontal ruler, drag the Right Indent marker to the 5¾" mark, then deselect the textThe shading for the paragraphs is indented from the left and right, which makes it look more attractive, as shown in FIGURE C-21.
4. Select the five paragraphs, click the Bottom Border list arrow in the Paragraph group, click Outside Borders, then deselect the textA black outside border is added around the selected text. The style of the border added is the most recently used border style, in this case the default, a thin black line.
5. Select the five paragraphs, click the Outside Borders list arrow , click No Border, click the No Border list arrow , then click Borders and ShadingThe Borders and Shading dialog box opens, as shown in FIGURE C-22. You use the Borders tab to change the border style, color, and width, and to add boxes and lines to words or paragraphs.
6. Click the Box icon in the Setting section, scroll down the Style list, click the double-line style, click the Color list arrow, click the Blue, Accent 5, Darker 25% color, click the Width list arrow, click 1½ pt, click OK, then deselect the textA 1½-point dark blue double-line border is added around the tabbed text.
7. Select the five paragraphs, click the Bold button in the Font group, click the Font Color list arrow in the Font group, click the Blue, Accent 5, Darker 25% color, then deselect the text The text changes to bold dark blue.
8. Select the first line in the tabbed text, click the launcher in the Font group, click the Font tab if it is not the active tab, scroll and click 14 in the Size list, click the Font color list arrow, click the Green, Accent 6, Darker 25% color, click the Small caps check box in the Effects section, click OK, deselect the text, then save your changesThe text in the first line of the tabbed text is enlarged and changed to green small caps, as shown in FIGURE C-23. When you change text to small caps, the lowercase letters are changed to uppercase letters in a smaller font size.
STEPS
C8395_UnitC_ptg01_hr_049-075.indd 64 3/4/13 12:12 PM
Propert
y of C
enga
ge Le
arning
Formatting Text and Paragraphs Word 65
Word 2013
FIGURE C-21: Shading applied to the tabbed text
Shading applied to
paragraphs
Indent markers show width of the shaded paragraphs
FIGURE C-23: Borders and shading applied to the document
Text formatted in green, small caps
Double-line, 1½-point, blue,
box border
Text formatted in bold, blue
TheHighlighttoolallowsyoutomarkandfindimportanttextinadocument.HighlightingistransparentcolorthatisappliedtotextusingtheHighlightpointer .Tohighlighttext,clicktheTextHighlightColorlistarrow intheFontgroupontheHOMEtab,selectacolor,thenusetheI-beampartofthepointertoselect
thetextyouwanttohighlight.Click toturnofftheHighlightpointer.Toremovehighlighting,selectthehighlightedtext,click
thenclickNo Color. Highlightingprints,butitisusedmosteffectivelywhen adocumentisviewedonscreen.
Highlighting text in a document
FIGURE C-22: Borders tab in Borders and Shading dialog box
Select border formats before
applying them in the
Preview area
Choose a line style
Click buttons or edges of preview to apply borders
Click to change the location of the border relative to
the text
Choose to apply the settings to a paragraph or to selected text
Preview of border settings
C8395_UnitC_ptg01_hr_049-075.indd 65 3/4/13 12:12 PM
Propert
y of C
enga
ge Le
arning

Formatting Text and Paragraphs Word 66
Word 2013
UNIT C
Learning Outcomes•Insertimages•Resizeimages•Wraptextandpositionimages
Insert Online PicturesClip artisacollectionofgraphicimagesthatyoucaninsertintoadocument.Office.comClipartimagesare royalty-free photos and illustrations that you can add to a document using the Online Picturescommandonthe INSERTtab.Onceyou insertaclipart image,youcanwraptextaround it, resize it,enhanceit,andmoveittoadifferentlocation. CASE You illustrate the second page of the document with an online clip art image.
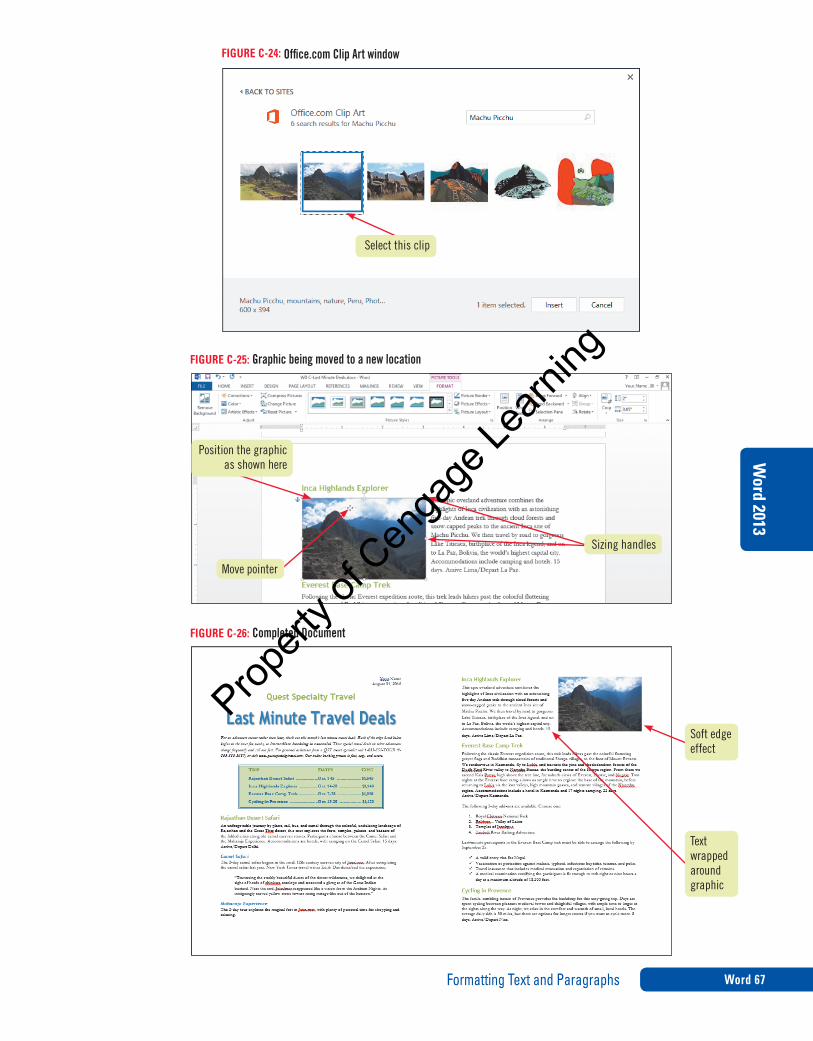
1. Scroll to the top of page 2, place the insertion point before Inca Highlands Explorer, click the INSERT tab, then click the Online Pictures button in the Illustrations groupThe Insert Pictures window opens. You can use this to search Office.com for images related to a keyword.
2. Type Machu Picchu in the Office.com Clip Art search text box, then press [Enter] Images that have the keyword “Machu Picchu” associated with them appear in the Office.com Clip Art window, as shown in FIGURE C-24.
3. Click the clip called out in FIGURE C-24, then click InsertThe clip is inserted at the location of the insertion point. When a graphic is selected, the active tab changes to the PICTURE TOOLS FORMAT tab. This tab contains commands used to adjust, enhance, arrange, and size graphics. The white squares that appear on the square edges of the graphic are the sizing handles.
4. Type 2 in the Shape Height text box in the Size group on the PICTURE TOOLS FORMAT tab, then press [Enter]The size of the graphic is reduced. When you decreased the height of the graphic, the width decreased pro-portionally. You can also resize a graphic proportionally by dragging a corner sizing handle. Until you apply text wrapping to a graphic, it is part of the line of text in which it was inserted (an inline graphic). To move a graphic independently of text, you must make it a floating graphic.
5. Click the Position button in the Arrange group, then click Position in Middle Center with Square Text WrappingThe graphic is moved to the middle of the page and the text wraps around it. Applying text wrapping to the graphic made it a floating graphic. A floating graphic can be moved anywhere on a page. You can also wrap text around a graphic using the Layout Options button.
6. Scroll up until the Inca Highlands Explorer heading is at the top of your screen, position the pointer over the graphic, when the pointer changes to drag the graphic up and to the left so its edges align with the left margin and the top of the paragraph under the Inca Highlands Explorer heading as shown in FIGURE C-25, then release the mouse button The graphic is moved to the upper-left corner of the page. Green alignment guides may appear to help you align the image with the margins.
7. Click the Position button in the Arrange group, then click Position in Top Right with Square Text WrappingThe graphic is moved to the upper-right corner of the page.
8. Click the Picture Effects button in the Picture Styles group, point to Soft Edges, point to each style to see a preview of the style applied to the graphic, then click 2.5 pointA soft edge effect is applied to the graphic.
9. Click the VIEW tab, then click the Multiple Pages button in the Zoom groupThe completed document is shown in FIGURE C-26.
10. Save your changes, submit the document to your instructor, then close the document and exit Word
STEPS
SelectadifferentclipiftheclipshowninFigureC-24isnotavailabletoyou.Youcanalsosearchusingthekeyword“Peru.”
TROUBLE
Topositionagraphicusingprecisemeasurements,clickthePositionbutton,clickMoreLayoutOptions,thenadjustthesettingsonthePositiontabintheLayoutdialogbox.
QUICK TIP
Tocompletethesesteps,yourcomputermustbeconnectedtotheInternet.
QUICK TIP
Ifyourdocumentislongerthantwopages,reducethesizeofthegraphicby draggingthelower-leftcornersizinghandleupand totheright.
TROUBLE
C8395_UnitC_ptg01_hr_049-075.indd 66 3/4/13 12:12 PM
Propert
y of C
enga
ge Le
arning
Formatting Text and Paragraphs Word 67
Word 2013
FIGURE C-25: Graphic being moved to a new location
Position the graphic as shown here
Sizing handles
FIGURE C-24: Office.com Clip Art window
Select this clip
FIGURE C-26: Completed Document
Text wrapped around graphic
Soft edge effect
Move pointer
C8395_UnitC_ptg01_hr_049-075.indd 67 3/4/13 12:12 PM
Propert
y of C
enga
ge Le
arning