wonderware intouch modern application guide · 2016-02-04 · 2 intouch modern application guide...
TRANSCRIPT
1/20/16
WonderwareInTouch® Modern Application Guide

No part of this documentation shall be reproduced, stored in a retrieval system, or transmitted by any means, electronic, mechanical, photocopying, recording, or otherwise, without the prior written permission of Schneider Electric Software, LLC. No liability is assumed with respect to the use of the information contained herein.
Although precaution has been taken in the preparation of this documentation, Schneider Electric Software, LLC assumes no responsibility for errors or omissions. The information in this documentation is subject to change without notice and does not represent a commitment on the part of Schneider Electric Software, LLC. The software described in this documentation is furnished under a license agreement. This software may be used or copied only in accordance with the terms of such license agreement.
© 2015 Schneider Electric Software, LLC. All rights reserved.
Schneider Electric Software, LLC26561 Rancho Parkway SouthLake Forest, CA 92630 U.S.A.(949) 727-3200
http://software.schneider-electric.com
For comments or suggestions about the product documentation, send an e-mail message to [email protected].
ArchestrA, Avantis, DYNSIM, EYESIM, Foxboro, Foxboro Evo, I/A Series, InBatch, InduSoft, IntelaTrac, InTouch, PIPEPHASE, PRO/II, PROVISION, ROMeo, Schneider Electric, SIM4ME, SimCentral, SimSci, Skelta, SmartGlance, Spiral Software, VISUAL FLARE, WindowMaker, WindowViewer, and Wonderware are trademarks of Schneider Electric SE, its subsidiaries, and affiliated companies. An extensive listing of Schneider Electric Software, LLC trademarks can be found at: http://software.schneider-electric.com/legal/trademarks/. All other brands may be trademarks of their respective owners.

3
Contents
Chapter 1 Working with InTouch Modern Applications .....5
Chapter 2 Managing InTouch Modern Applications ..........9Creating an InTouch Modern Application ...................................... 9Editing an InTouch Modern Application ...................................... 11Exporting an InTouch Modern Application .................................. 12Importing an InTouch Modern Application .................................. 13Migrating to an InTouch Modern Application .............................. 17Publishing an InTouch Modern Application ................................. 18Deleting an InTouch Modern Application .................................... 19
Chapter 3 Configuring InTouch Modern Applications ...... 21Configuring Languages for a Modern Application ....................... 21Configuring the Application Style Library for
Modern Applications ................................................................... 22Exporting and Importing the Application Style Library ............. 24Configuring Alarm Priority Mapping for Modern
Applications ................................................................................. 25Exporting ArchestrA Graphics from a Modern Application ........ 26Importing ArchestrA Graphics to a Modern Application ............. 27Exporting Selected Symbols from the ArchestrA Toolbox ........... 28Importing and Embedding Custom Client Controls .................... 30Exporting ArchestrA Symbol Text Strings from a
Modern Application ..................................................................... 31Importing Text Strings of ArchestrA Symbols to a
Modern Application ..................................................................... 32Exporting Localization Strings from a Symbol ............................ 33
InTouch Modern Application Guide

4
Importing Script Function Libraries to an InTouch Modern Application ..................................................................... 35
Configuring NAD Support for Modern Applications .................... 36
InTouch Modern Application Guide

2
Chapter 1
Working with InTouchModern Applications
Modern InTouch applications give you the capability to easily integrate ArchestrA symbols directly into your applications. You simply drag ArchestrA or Situational Awareness Library symbols from WindowMaker’s ArchestrA Graphic Toolbox into Modern application windows. All configuration steps to use ArchestrA Graphics are completed from InTouch WindowMaker.
InTouch Modern Application Guide

3 Chapter 1 Working with InTouch Modern Applications
Modern applications combine the capability inherent in ArchestrA symbols with the familiar workflow of legacy InTouch applications.
The following figure summarizes the workflow of managing and configuring Modern applications. Most management tasks are completed from InTouch Application Manager to:
• Create Modern applications
• Open and edit Modern applications
• Export and import Modern applications
• Migrate earlier versions of InTouch applications to Modern applications
• Publish Modern applications
• Delete Modern applications
InTouch Modern Application Guide

4
Most Modern application configuration tasks are done from WindowMaker, including (but not limited to) those that:
• Configure support for other languages
• Configure the Application Style Library
• Configure Alarm Priority Mapping
• Export and import ArchestrA symbols
• Import client controls
• Configure NAD support
• Import Script Function Libraries
• Export and import Application styles
• Export and import localization strings for symbols
InTouch Modern Application Guide

5 Chapter 1 Working with InTouch Modern Applications
InTouch Modern Application Guide

6
Chapter 2
Managing InTouch ModernApplications
This chapter includes the following topics that explain how to create and manage your InTouch Modern applications from the InTouch Application Manager.
Creating an InTouch Modern ApplicationYou create a Modern InTouch application from InTouch Application Manager. When you create a Modern InTouch application, you must:
• Provide a base folder path to save your Modern applications.
• Specify the name of a folder that stores the Modern application’s files.
• Specify the name of the application.
After creating a Modern application you can access the Modern application’s folder to define it as NAD master folder, share the folder on the network, and copy additional files to the folder.
Important: You cannot use Windows Explorer to move a Modern application's folder after it has been created. Use the Modern application export and import options to move your Modern application to another folder or computer.
To create an InTouch Modern application
1 Open InTouch Application Manager.
2 Select New by one of the following methods:
InTouch Modern Application Guide

7 Chapter 2 Managing InTouch Modern Applications
a Select New from the File menu.
b Right-click within Application Manager and select New from the shortcut menu.
c Select the New icon from the menu bar.
d Press the Ctrl + N keys.
The Create New Application wizard appears with options to create a Modern or legacy application.
3 Select Modern InTouch Application and click Next.
The Create New Application wizard updates to show a field to enter a base directory path to save InTouch applications.
4 Click Browse and select a directory path.
5 Click Next.
The Create New Application wizard updates to show a field to enter the name of the folder for the new Modern application being created.
6 Type the name of the folder and click Next.
The Create New Application wizard updates to show fields to enter a name and a description of a new Modern application.
7 Type the name of the Modern application in the Name field.
Important: Application names must be 32 characters or less.
InTouch Modern Application Guide
Editing an InTouch Modern Application8
8 If you want, enter an optional description of the application in the Description field.
The description appears in the Description column of Application Manager’s list of applications.
9 Click Finish.
A horizontal bar shows the progress of creating a new Modern application. After the application is created, it appears in Application Manager’s list of applications.
Editing an InTouch Modern ApplicationOpening a Modern application is similar to a legacy InTouch application. You open a Modern application from the InTouch Application Manager to edit in WindowMaker or run in WindowViewer.
To open and edit a Modern application
1 Open InTouch Application Manager showing InTouch applications listed by name.
2 Double-click on the name of a listed Modern application to open it in WindowMaker.
You can also open Modern application by other methods:
a Click on the Modern application’s name to select it.
b Do one of the following:
• Select WindowMaker from the File menu.
• Right-click within Application Manager and select WindowMaker from the shortcut menu.
• Select the WindowMaker icon from the menu bar.
• Press the Ctrl + M keys.
3 Save your editing changes to a Modern application.
When you edit an InTouch Modern application, your changes are saved to the application folder.
InTouch Modern Application Guide
9 Chapter 2 Managing InTouch Modern Applications
4 Close the application.
Exporting an InTouch Modern ApplicationTo copy or share a Modern application, you can export an application to an aaPKG file. Then, you can import the application with another name or to another folder or computer.
An exported aaPKG file contains the Modern application’s:
• ArchestrA Graphic Toolbox
• Application Style Library
• Alarm Priority Mapping
• Language strings
• Application folder contents
To export a Modern application
1 Open InTouch Application Manager.
2 Click on a Modern application name to select it from Application Manager’s list of InTouch applications.
3 Select the Export wizard by one of the following methods:
a Select Export from the File menu.
b Right-click within Application Manager and select Export from the shortcut menu.
c Select the Export icon from the menu bar.
d Press the Ctrl + E keys.
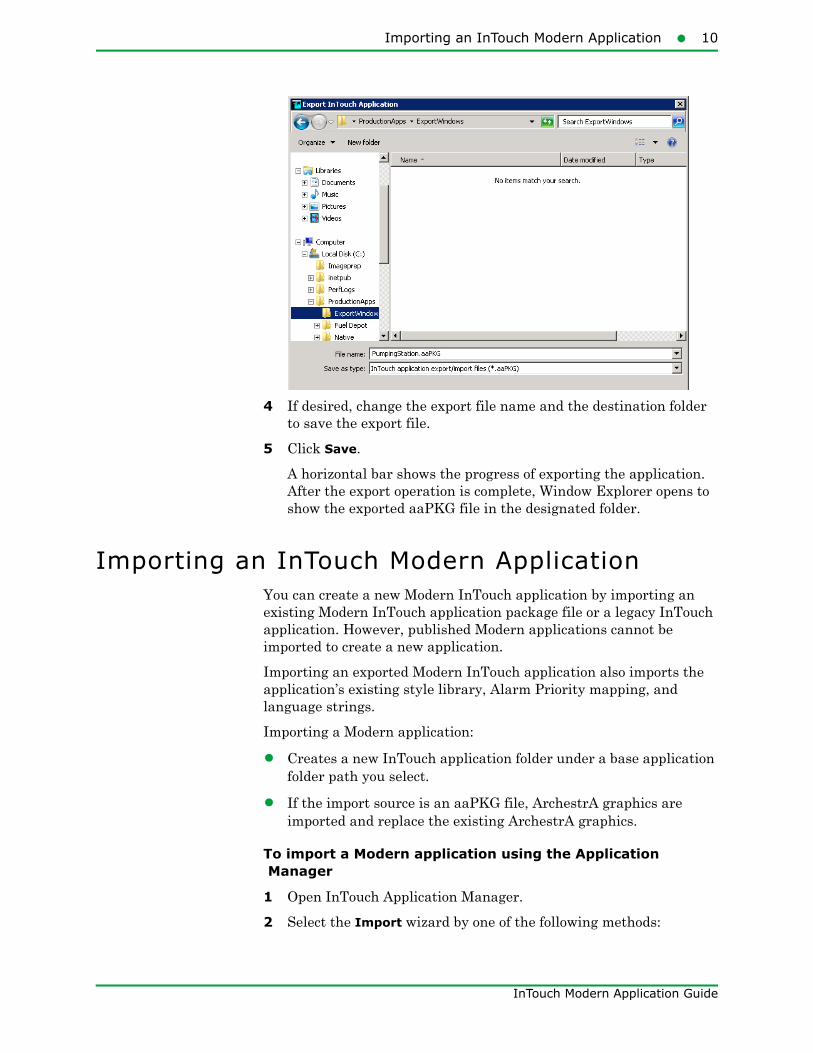
The Export InTouch Application wizard appears with a field to name the export file. The default name of the export aaPKG file is the application name.
InTouch Modern Application Guide
Importing an InTouch Modern Application10
4 If desired, change the export file name and the destination folder to save the export file.
5 Click Save.
A horizontal bar shows the progress of exporting the application. After the export operation is complete, Window Explorer opens to show the exported aaPKG file in the designated folder.
Importing an InTouch Modern ApplicationYou can create a new Modern InTouch application by importing an existing Modern InTouch application package file or a legacy InTouch application. However, published Modern applications cannot be imported to create a new application.
Importing an exported Modern InTouch application also imports the application’s existing style library, Alarm Priority mapping, and language strings.
Importing a Modern application:
• Creates a new InTouch application folder under a base application folder path you select.
• If the import source is an aaPKG file, ArchestrA graphics are imported and replace the existing ArchestrA graphics.
To import a Modern application using the Application Manager
1 Open InTouch Application Manager.
2 Select the Import wizard by one of the following methods:
InTouch Modern Application Guide

11 Chapter 2 Managing InTouch Modern Applications
a Select Import from the File menu.
b Select the Import icon from the menu bar.
c Press the Ctrl + I keys.
The Import InTouch Application wizard appears with buttons and fields to select the root folder of a legacy InTouch application or an exported Modern application package file (aaPKG). You can also select applications by searching a folder for all available InTouch applications.
The Import InTouch Application wizard provides three options to select a file or folder to import a Modern application:
• Search for a file or folder
• Select a file
• Select a folder
3 Search for or select a file or folder for the InTouch application you want to import.
Search for a folder or a file to import
a Select Find Applications.
b Click the ellipsis button (...) and go to a folder to search for an application folder or file.
c Click Find.
InTouch Modern Application Guide
Importing an InTouch Modern Application12
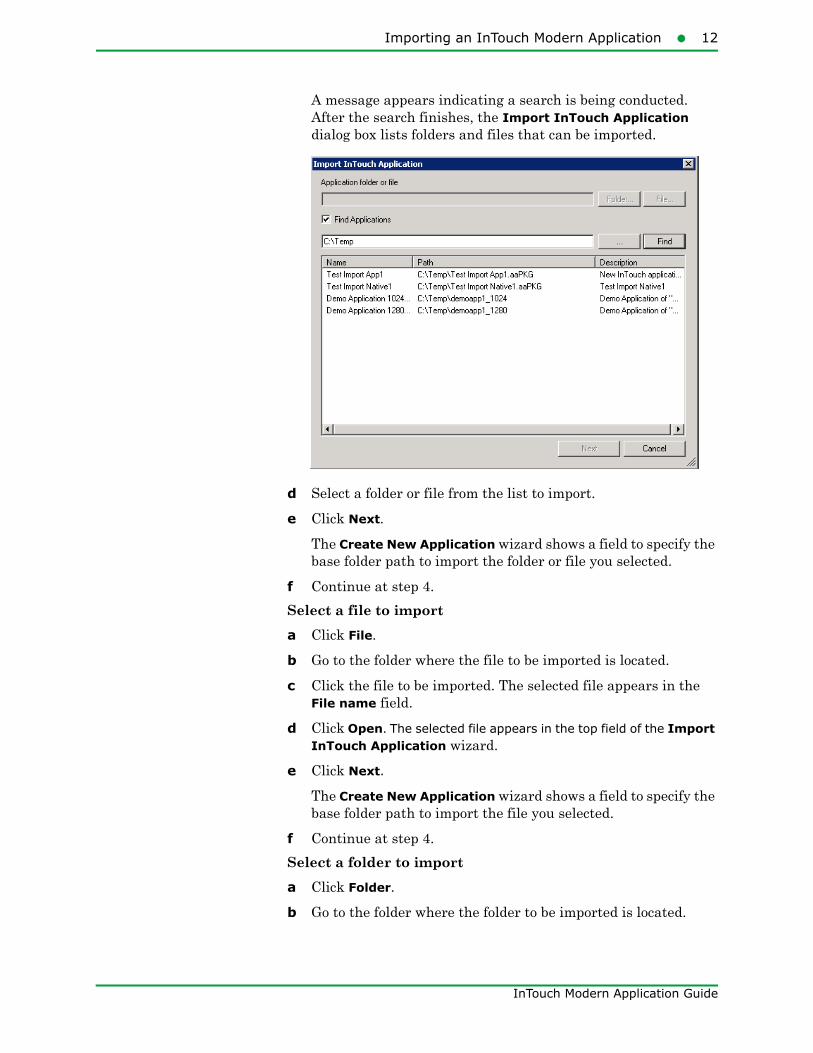
A message appears indicating a search is being conducted. After the search finishes, the Import InTouch Application dialog box lists folders and files that can be imported.
d Select a folder or file from the list to import.
e Click Next.
The Create New Application wizard shows a field to specify the base folder path to import the folder or file you selected.
f Continue at step 4.
Select a file to import
a Click File.
b Go to the folder where the file to be imported is located.
c Click the file to be imported. The selected file appears in the File name field.
d Click Open. The selected file appears in the top field of the Import InTouch Application wizard.
e Click Next.
The Create New Application wizard shows a field to specify the base folder path to import the file you selected.
f Continue at step 4.
Select a folder to import
a Click Folder.
b Go to the folder where the folder to be imported is located.
InTouch Modern Application Guide
13 Chapter 2 Managing InTouch Modern Applications
c Click the folder to be imported and click OK. The selected folder appears in the top field of the Import InTouch Application wizard.
d Click Next.
The Create New Application wizard shows a field to specify the base folder path to import the folder you selected.
e Continue at step 4.
4 Click Browse and go to a folder to import the application.
5 Click Next.
The Create New Application dialog box appears with a field to enter a name of the folder to place the imported application.
6 Type the name of the folder to place the imported application.
7 Click Next.
The Create New Application wizard updates to show fields to enter a name and a description of the imported application. Both fields show the existing file or folder name and any existing description of the application.
8 In the Name field, accept the existing name or type a new name for the application.
9 If you want, enter an optional description of the application in the Description field.
10 Click Finish.
After the application is imported, it appears in Application Manager’s list of applications.
If the aaPKG file you attempt to import includes non-supported components, the import fails and a dialog box with an error is shown.
To import a Modern application using the Command Prompt
To import an InTouch Modern application using the InTouchConsole command-line utility, execute InTouchConsole.exe (located in the InTouch installation folder) as per the example below:
InTouchConsole.exe /import:"c:\test\m1.aaPKG" /param:"c:\test\app1","m2","My modern app"
This command will import m1.aaPKG to create the InTouch Modern application m2 under the path C:\test\app1 with the description My modern app.
At the end of the import operation, you can use the %errorlevel% environment variable to check the return code (1= success, 0 = failure).
InTouch Modern Application Guide

Migrating to an InTouch Modern Application14
Migrating to an InTouch Modern ApplicationYou can migrate a legacy or Modern application to the current version of InTouch. Migration enables you to convert your legacy InTouch applications into Modern applications that support ArchestrA graphics. Migrating an application keeps the migrated files in the original application folder.
To migrate an application
1 Open Application Manager.
2 From the application list, double-click on an application.
A pop-up message asks if you want to migrate your older InTouch application.
3 Click Yes.
A pop-up message asks if you want to migrate the application to be able to use ArchestrA graphics.
• If you click Yes, your application is converted to a Modern InTouch application.
• If you click No, the application is migrated as a legacy InTouch application.
4 Click Yes or No to migrate the application.
If you are migrating a legacy InTouch application to a Modern application, you see a pop-up message asking if you want to create a back up before migrating the application.
No pop-up messages appear if you are migrating an older version of a Modern application. Migration begins immediately.
5 For a legacy InTouch application, click Yes or No to back up the application.
InTouch Modern Application Guide

15 Chapter 2 Managing InTouch Modern Applications
If migration finishes without problems, the migrated application is opened.
Publishing an InTouch Modern ApplicationYou can publish a Modern InTouch application from Application Manager. A published Modern application can be distributed like a legacy InTouch application, but continues to support the functionality provided by ArchestrA symbols.
You cannot edit a published Modern application. You must re-publish an application if any updates are made to the source windows in WindowMaker.
You can use WindowMaker to migrate a published Modern application from a version of InTouch prior to version 2014 R2 Service Pack 1. You can then modify the published application by updating the application source files and re-publishing.
To publish an InTouch Modern application
1 Open Application Manager.
2 Select the Modern application that you want to publish.
3 Select the Publish wizard by one of the following methods:
• Select Publish from the File menu.
• Right-click within Application Manager and select Publish from the shortcut menu.
• Press the Ctrl + P keys.
The Browse for Folder dialog box appears to select a folder to publish the Modern application.
4 Select a folder to publish the Modern application.
If you want to create a folder for the published Modern application, click Make New Folder and assign a name to the folder.
InTouch Modern Application Guide

Deleting an InTouch Modern Application16
5 Click OK.
The Modern application is selected in InTouch Application Manager after it is published.
Deleting an InTouch Modern ApplicationDeleting an InTouch Modern application permanently deletes the application’s folder and associated repository on the local computer. Also, the Modern application no longer appears in the list of applications shown from Application Manager.
Note: If a Modern application’s folder is placed on another computer's shared directory, the delete operation only removes the application from Application Manager. The delete operation does not delete a Modern application folder residing on another computer.
To delete a Modern application
1 Open Application Manager.
2 Select the Modern application that you want to delete from the list.
3 Select the Delete wizard by one of the following methods:
a Select Delete from the File menu.
b Right-click within Application Manager and select Delete from the shortcut menu.
c Click the Delete icon from the menu bar.
d Press the Del key.
The Confirm Application Delete dialogue box appears, requesting confirmation that you want to delete the Modern application you selected.
4 Click Yes to delete the Modern application.
The application you deleted no longer appears in the Application Manager list of InTouch applications.
InTouch Modern Application Guide

17 Chapter 2 Managing InTouch Modern Applications
InTouch Modern Application Guide

18
Chapter 3
Configuring InTouch ModernApplications
This chapter includes the following topics that explain how to configure your InTouch Modern applications from WindowMaker.
Configuring Languages for a Modern Application
You can configure additional languages for a Modern application that can be used in run-time language switching. You can also change the text font while configuring an application’s languages.
To configure languages for a Modern application
1 Open the Modern application in WindowMaker.
2 On the Special menu, click Language, and then click Configure Languages.
The Configure Languages dialog box appears with buttons to add, remove, and set a default language for an application.
To add a language:
a Click Add.
InTouch Modern Application Guide

19 Chapter 3 Configuring InTouch Modern Applications
The Add Language dialog box appears to select another language by name or locale ID.
b Click the By Name or Locale ID drop-down button and select a listed language to add to the application.
c If you want to change the font for the language you are adding to the application, click the Font drop-down button and select the font for the language.
d Click OK to add the language to the application.
To remove a language:
a Select the language you want to remove from the Configure Languages dialog box.
b Click Remove.
The Confirm Delete dialog box appears to verify that you want to remove the language from the application.
c Click Yes.
The Configure Languages dialog box refreshes and shows the language has been deleted.
To set a default language:
a Select the language you want to set as the default for the application on the Configure Languages dialog box.
b Click Set Default.
The Configure Languages dialog box refreshes and shows the default language of the application in the bottom left corner.
Configuring the Application Style Library for Modern Applications
You can configure style libraries for a Modern InTouch application. You can configure application styles for Quality and Status, Element Styles, and numeric Format Styles. Your configuration changes are saved to the Modern application’s repository.
InTouch Modern Application Guide

Configuring the Application Style Library for Modern Applications20
• Quality and Status indicators are graphic icons that represent the current quality of application data and the state of equipment shown by application symbols.
• Element Styles define a set of visual properties that determine the appearance of text, lines, graphic outlines, and interior fill shown in ArchestrA Symbols or graphics.
• Format Styles provide options to individually configure application-wide styles for common types of numbers used in Modern applications.
Important: This section describes the workflow within WindowMaker to access a Modern application’s style libraries. For more information about editing application styles, see WindowMaker online help or the Creating and Managing ArchestrA Graphics User’s Guide.
To configure the Application Style Library for Modern Applications
1 Open a Modern application in WindowMaker.
2 On the Special menu, click Configure, and then click Application Style Library.
The Configure Application Styles dialog box appears with tabs to configure quality and status indicators, graphic Element styles, and number format styles.
InTouch Modern Application Guide
21 Chapter 3 Configuring InTouch Modern Applications
3 Select a tab for the application style you want to edit.
4 Refer to WindowMaker online help or the Creating and Managing ArchestrA Graphics User’s Guide for more information about editing application styles.
Exporting and Importing the Application Style Library
You can export an Application Style Library from a Modern application and then import it to another Modern application. The settings for quality, Element Styles, and numeric formats are exported to an XML file.
To export an Application Style Library from a Modern Application
1 Open WindowMaker.
2 From the File menu, select Export and then Application Style Library.
The Export Application Style Library dialog box appears with fields to specify a file name.
3 Select the folder to place the exported XML file and the name for the file.
4 Click Save.
A dialog box confirms that the Application Style Library was exported successfully.
To import an Application Style Library into a Modern Application
1 Open WindowMaker.
2 From the File menu, select Import and then Application Style Library.
The Import Application Style Library dialog box appears with fields to specify a file name.
3 Select the folder where the exported XML file is located and select it to show the name of the export file in the File Name field.
4 Click Open.
A dialog box confirms that the Application Style Library was imported successfully.
InTouch Modern Application Guide

Configuring Alarm Priority Mapping for Modern Applications22
Configuring Alarm Priority Mapping for Modern Applications
You can configure the alarm priority mapping of a Modern InTouch application to set a priority range for each alarm severity level.
Important: This section describes the workflow within WindowMaker to map alarm priority ranges to alarm severities. While InTouch does not have built-in Alarm Severity management as does Application Server, users can make use of InTouch tags to implement Alarm Border animation. In this case, the priority to severity mapping in the dialog box is used only as a visual aid to associate priorities to alarm border colors and alarm indicator icons. For more information about configuring alarm priority mapping and alarm shelving, see WindowMaker online help or the Creating and Managing ArchestrA Graphics User’s Guide.
To configure Alarm Priority Mappings for Modern Applications
1 Open a Modern application in WindowMaker.
2 On the Special menu, click Configure, and then click Alarm Priority Mapping.
The Alarm Priority Configuration dialog box appears with fields to map a priority range to each alarm severity. The Alarms Priority Configuration dialog box also contains fields to enable alarm shelving based on alarm severity.
3 In the From Priority and To Priority Range fields, click and enter numbers from 1 to 999 to set the lower and upper boundaries of an alarm priority range for each alarm severity.
Each priority range should be contiguous without overlap between priority ranges. Alarm severity 1 starts at priority 1 by default.
InTouch Modern Application Guide

23 Chapter 3 Configuring InTouch Modern Applications
4 In the Shelve column, select or clear the check box to enable alarm shelving for each alarm severity.
5 Click OK to save your changes.
Your changes are saved to the Modern application’s Galaxy Repository and application folder.
Exporting ArchestrA Graphics from a Modern Application
You can export all ArchestrA graphics from a Modern application to an aaPKG file. You can then import the graphics from the file to another Modern application on the same or different computer.
You cannot select which ArchestrA graphics to export from a Modern application. All ArchestrA graphics are exported from a Modern application.
To export ArchestrA graphics from a Modern application
1 Open the Modern application in WindowMaker containing the ArchestrA graphics that you want to export.
2 On the File menu, click Export, and then click All ArchestrA Graphics.
The Export ArchestrA Graphics dialog box appears to specify the destination folder and the name of the export file.
3 Select the destination folder to export the aaPKG file.
InTouch Modern Application Guide

Importing ArchestrA Graphics to a Modern Application24
4 If you want, enter the name of the export file in the File name field.
The default export file name is ArchestrAGraphics.aaPKG.
5 Click Save.
A horizontal bar shows the progress of the ArchestrA graphics being loaded into the export file.
6 Once the export process is finished, navigate to the destination folder in Windows Explorer, and verify that the export file has been created.
Importing ArchestrA Graphics to a Modern Application
You can import ArchestrA graphics created in another Modern application to the active Modern application running in WindowMaker.
Only ArchestrA graphics from the aaPKG file are imported. The imported graphics overwrite any graphics of the Modern application open for editing in WindowMaker. If the aaPKG file contains non-supported components, the import fails and a dialog box with an error is shown.
To import ArchestrA graphics to a Modern application
1 Open the Modern application in WindowMaker that you want to import ArchestrA graphics.
2 On the File menu, click Import, and then click ArchestrA Graphics.
InTouch Modern Application Guide

25 Chapter 3 Configuring InTouch Modern Applications
The Import ArchestrA Graphics dialog box appears to specify the folder containing an export file of ArchestrA graphics.
3 Using Windows Explorer, go to the folder containing an aaPKG file of exported ArchestrA graphics.
4 Select the aaPKG file to import.
The File name field shows the name of the file you selected.
5 Click Open.
A horizontal bar shows the progress of the ArchestrA graphics being imported into the active Modern application. When finished, the progress indicator disappears.
Exporting Selected Symbols from the ArchestrA Toolbox
You can export selected ArchestrA symbols from the ArchestrA Graphic Toolbox of a Modern application to an aaPKG file. You can then import these graphics from the file to another Modern application on the same or different computer.
Note: This procedure explains how to export selected ArchestrA symbols. See "Exporting ArchestrA Graphics from a Modern Application" on page 23 for instructions to export all ArchestrA symbols.
InTouch Modern Application Guide

Exporting Selected Symbols from the ArchestrA Toolbox26
To export selected ArchestrA graphics from a Modern application
1 Open the Modern application in WindowMaker containing the ArchestrA graphics that you want to select to export.
2 Select the symbols you want to export in the ArchestrA Graphic Toolbox.
3 Right-click on a selected symbol to show the shortcut menu.
4 Select Export and then Symbol(s)... from the shortcut menu.
The Export ArchestrA Graphics dialog box appears to specify the destination folder and the name of the export file.
5 Select the destination folder to export the aaPKG file.
6 If you want, enter the name of the export file in the File name field.
The default export file name is the name of the first selected symbol from the ArchestrA Graphic Toolbox.
7 Click Save.
A horizontal bar shows the progress of the ArchestrA graphics being loaded into the export file.
InTouch Modern Application Guide

27 Chapter 3 Configuring InTouch Modern Applications
Importing and Embedding Custom Client Controls
You can create a custom Windows client control and embed it in an ArchestrA symbol in your Modern application. First, you must import the client control to WindowMaker’s ArchestrA Graphic Toolbox. This section describes the steps to import and then embed a custom client control in separate procedures.
To import a custom client control
1 Create a custom client control for your Modern application.
2 Place the client control in a folder accessible to the computer where InTouch WindowMaker is installed.
3 On the File menu, click Import, and then click Client Control.
Important: Only Modern applications can import custom client controls. You cannot import custom client controls to legacy or published InTouch applications.
The Import Client Control(s) dialog box appears with a field to enter the name of a custom client control you created.
4 Using Windows Explorer, go to the folder where you placed the client control .dll file.
5 Select the client control .dll file and click Open.
WindowMaker updates and shows the custom client control you imported in the ArchestrA Graphic Toolbox.
InTouch Modern Application Guide
Exporting ArchestrA Symbol Text Strings from a Modern Application28
You can also remove an imported client control from the ArchestrA Graphic Toolbox. First, select the client control within the ArchestrA Graphic Toolbox. Then, right-click to show the shortcut menu and select Delete.
To embed a custom client control in an ArchestrA symbol
1 Open the Modern application in WindowMaker that you intend to embed a custom client control.
2 Open the window containing the ArchestrA symbol that you intend to embed a custom client control.
3 Select the ArchestrA symbol.
4 From the menu bar, click the Embed ArchestrA Graphic icon.
Important: You cannot drag and drop the custom client control from the ArchestrA Graphic Toolbox onto the ArchestrA symbol. You must always embed the custom client control.
5 Configure your custom client control as needed for the Modern application.
Exporting ArchestrA Symbol Text Strings from a Modern Application
If your Modern application is intended to support run time language switching, you can export the text strings of its ArchestrA symbols to a dictionary file. You can then translate the strings within the dictionary file to other languages using a text editor, an XML editor, or a spreadsheet program like Microsoft Excel or the Wonderware Language Assistant.
When you export the symbol text strings, you must specify an output folder for the dictionary file. A best practice is to create a separate folder for each dictionary file whose strings will be translated into another language.
All exported dictionary files follow a naming convention: <ModernAppFolderName>AA_<LanguageID>.xml. For example, if a Modern application folder name is PumpStation and the language being exported is French (Language ID = 1036), then the file name is PumpStationAA_1036.xml.
If you will be exporting language strings for different objects at different times, use separate target folders to prevent subsequent exports from overwriting the first export.
InTouch Modern Application Guide

29 Chapter 3 Configuring InTouch Modern Applications
To export ArchestrA symbol text strings
1 Open the Modern application in WindowMaker.
2 On the Special menu, click Language, and then select Export ArchestrA Graphics Localization.
The Export Locale Data dialog box appears with fields to select the exported language and a folder to place the exported dictionary file.
3 Configure the symbol text strings to export.
• In the Languages to export list, select the language dictionary to export. The default language is not listed.
• In the Path field, type the folder to which you want to export the dictionary file. Click Browse to select an existing folder or create a new folder.
4 Click Export. A bar shows the progress of the export operation.
Importing Text Strings of ArchestrA Symbols to a Modern Application
For symbol text, you must import the translated dictionary files for each language to enable run-time language switching for those languages. All dictionary files for a given language should be placed in the same folder.
You can import files for only one language at a time. When you import, you select the desired language and specify the dictionary files to import.
InTouch Modern Application Guide

Exporting Localization Strings from a Symbol30
To import a translated dictionary file
1 Open the Modern application in which you want to import symbol text.
2 On the Special menu, click Language, and then select Import ArchestrA Graphics Localization.
3 Configure the import settings.
• In the Language to import list, select the language dictionary to import.
• In the Path box, specify the folder that includes the dictionary file to import.
• In the Select files to Import box, select the .xml files to import. Only files that include the current Modern application folder name and the locale ID for the selected language are shown.
4 Click Import. The import progress is shown.
5 Click Close.
Exporting Localization Strings from a SymbolIf your Modern application is intended to support run time language switching, you can export the text strings of one or more symbols selected from the ArchestrA Graphic Toolbox. You can then translate the exported strings within the file to other languages using a text editor, an XML editor, or a spreadsheet program like Microsoft Excel.
When you export the text strings from a symbol, you must specify an output folder. A best practice is to create a separate folder for each file whose strings will be translated into another language.
InTouch Modern Application Guide

31 Chapter 3 Configuring InTouch Modern Applications
All exported localization files follow a naming convention: <ModernAppFolderName>AA_<LanguageID>.xml. For example, if a Modern application folder name is PumpStation1 and the language of the localization strings being exported is Mexican Spanish (Language ID = 2058), then the file name is PumpStation1AA_2058.xml.
To export localization strings from a symbol
1 Open the Modern application in WindowMaker.
2 Select the symbols from the ArchestrA Graphic Toolbox whose localization strings you want to export.
• Left-click on a symbol name to select a single symbol.
• Press the Ctrl key and left-click on symbol names to select two or more symbols.
• Left-click on a symbol name and then press the Shift key and left-click on another symbol name to select all symbols between the two selected symbols.
3 Right-click on a selected symbol to show the shortcut menu.
4 Select Export, then Localization, and finally Selected Symbols(s)....
The Export Locale Data dialog box appears.
5 Configure the symbol text strings to export.
• In the Languages to export list, select the localization strings to export from the symbols. The default language is not listed.
• In the Path field, type the folder to which you want to export the localization strings. Click Browse to select an existing folder or create a new folder.
6 Click Export. A bar shows the progress of the export operation.
7 Click View Details and verify the localization strings within each selected symbol were exported successfully.
InTouch Modern Application Guide

Importing Script Function Libraries to an InTouch Modern Application32
Importing Script Function Libraries to an InTouch Modern Application
You can import script function libraries to an InTouch Modern Application. Different types of script function libraries can be imported, including .NET (*.dll and other .NET file extensions), script library files (*.aaSLIB), and InTouch script extension files (*.wdf).
The script function library you imported to one Modern application is automatically included when exporting the application to create another Modern Application. The script function library also is available when publishing the Modern application to which it was imported.
To import a script function library to a Modern application
1 Open the InTouch Modern application to which you want to import a script function library.
2 Click File on the WindowMaker main menu, then click Import, then click the Script Function Library option.
The Import Script Function Library dialog opens.
3 Browse to the function library you want to import.
4 Select the file to import and click Open to start importing the script function library.
Note: No progress bar or progress information window appears during the import. An information window opens when the import successfully completes.
InTouch Modern Application Guide

33 Chapter 3 Configuring InTouch Modern Applications
Configuring NAD Support for Modern Applications
Network Application Development (NAD) combines a client server architecture with automatic notification of application changes. Based on user preferences, NAD can automatically distribute updated applications from the master to the client nodes running the application in WindowViewer.
A Modern application supports NAD in the same way as a legacy InTouch application. A Modern InTouch application folder can be shared as the NAD master location. A NAD client is notified when there are changes to the Modern application on the master node.
In addition to the updates to the components of legacy InTouch applications, a Modern application notifies client nodes when there are updates to:
• ArchestrA Graphics
• Application Style Library
• Alarm priority mapping
Modern applications impose some restrictions on NAD:
• Any changes to ArchestrA graphics can be loaded to NAD client nodes only after restarting WindowViewer. Also, the Notify Client command must selected one time in order to generate ArchestrA symbols on disk to be available to the NAD client.
• Any changes to a Modern application’s ArchestrA graphics, style library, and alarm priority mapping are distributed to client nodes only after selecting the Notify Client command from the master node.
• The Notify Client command is always enabled for Modern applications on the master node. As a result, the state of the Notify Client command does not indicate if there are any pending changes that need to be sent to client nodes.
• If the Load changes into WindowViewer or Prompt user to load changes into WindowViewer options are selected from the client node, the user is prompted to restart WindowViewer when any changes to a Modern application are detected.
To configure NAD master support for a Modern application
1 Start Application Manager from the NAD master node.
2 Edit the Modern application in WindowMaker.
3 From the Special menu, click Notify Client to generate ArchestrA symbols on disk to be available to the NAD client.
InTouch Modern Application Guide

Configuring NAD Support for Modern Applications34
To configure NAD client support for a Modern application
1 Start Application Manager from the NAD client node.
2 Select the Modern application to configure for NAD support.
3 From the Tools menu, click Node Properties.
4 Select the Enable Network Application Development check box.
5 In the Local working directory box, type the path to the master folder that contains the application distributed to client nodes.
6 In Polling period (sec), type the interval in seconds at which a client node checks the master node for application updates.
7 In the Change Mode area, select the option that determines the action WindowViewer takes when the master application changes.
• Click Ignore changes to have the WindowViewer node ignore any changes made on the development node.
• Click Restart Window Viewer to have the WindowViewer node copy over the updated master application (if configured to do so) and then restart itself.
• Click Prompt user to Restart to show a message from WindowViewer that the application has changed. The operator can either restart WindowViewer with the application updates or continue using the current application.
InTouch Modern Application Guide

35 Chapter 3 Configuring InTouch Modern Applications
• Click Load Changes into WindowViewer to dynamically load in WindowViewer the changes made in the development node. This may affect performance for large updates.
• Click Prompt user to load changes into WindowViewer to show the operator a message that the application has changed. The message prompts the operator to load the changes.
8 Click OK.
9 From a client node, find the shared application from the master node in Application Manager.
Users can run the shared application in WindowViewer.
InTouch Modern Application Guide