wisenet device manager user guide - hanwha...wisenet device manager user guide getting started 4...
TRANSCRIPT

Wisenet Device Manager User Guide Contents
2
Contents
CONTENTS.................................................................................................................................... 2
GETTING STARTED ........................................................................................................................ 4
INSTALLING WISENET DEVICE MANAGER ...................................................................................... 6
1. SYSTEM REQUIREMENT ............................................................................................................................... 6
2. INSTALLATION ........................................................................................................................................... 6
FUNCTIONS .................................................................................................................................. 7
1. NAME AND FUNCTION OF EACH CONTROL ...................................................................................................... 7
2. NEW PROJECT / SAVE PROJECT / OPEN PROJECT ............................................................................................ 8
3. NETWORK – SHOW AND DELETE ARP ........................................................................................................... 9
4. SEARCH ................................................................................................................................................... 9
5. SELECT SEARCHED DEVICES ........................................................................................................................ 10
6. DEVICE LIST VIEW MODE.......................................................................................................................... 11
7. LIVE VIEWER .......................................................................................................................................... 13
8. EDIT DEVICE NAME ................................................................................................................................. 16
9. DEVICE CREDENTIAL ................................................................................................................................ 16
10. ADD DEVICE ......................................................................................................................................... 18
11. STATUS UPDATE .................................................................................................................................... 19
12. IP ASSIGN ............................................................................................................................................ 20
13. REPORT ............................................................................................................................................... 21
14. FIRMWARE STATUS CHECK ...................................................................................................................... 23
15. FIRMWARE UPDATE ............................................................................................................................... 23
16. CONFIGURATION BACKUP ....................................................................................................................... 26
17. CONFIGURATION RESTORE ...................................................................................................................... 27
18. POPUP MENU ...................................................................................................................................... 29
19. VIDEO PROFILE ...................................................................................................................................... 30
20. DATE & TIME SYNC................................................................................................................................ 32
21. IP & PORT ........................................................................................................................................... 34
22. VIDEO SETUP ........................................................................................................................................ 34
23. CAMERA SETUP ..................................................................................................................................... 35
24. AUDIO SETUP ....................................................................................................................................... 36
25. FOCUS SETUP ....................................................................................................................................... 37
26. HTTPS ................................................................................................................................................. 38
27. 802.1X ............................................................................................................................................... 39
28. SNMP ................................................................................................................................................ 40
29. AUTO IP CONFIGURE ............................................................................................................................. 41

Wisenet Device Manager User Guide Contents
3
30. EVENT SETUP ....................................................................................................................................... 42
31. MULTICAST .......................................................................................................................................... 43
32. PRODUCT INFORMATION ........................................................................................................................ 44
33. RESTART .............................................................................................................................................. 45
34. LOG BACKUP ........................................................................................................................................ 46
35. OPEN PLATFORM................................................................................................................................... 46
36. CGI SENDER ......................................................................................................................................... 47
37. NETWORK DIAGNOSIS ............................................................................................................................ 48
38. STATUS MONITOR ................................................................................................................................. 51
39. WISENET DEVICE MANAGER LANGUAGE SETUP .......................................................................................... 53
40. WEB BROWSER SETTING ......................................................................................................................... 53
41. DEVICE DEFAULT CREDENTIAL SETTING ..................................................................................................... 53
42. WISENET DEVICE MANAGER LOG ............................................................................................................. 54
43. WISENET DEVICE MANAGER HELP............................................................................................................ 54
44. TRAY ICON ............................................................................................................................................ 55
45. ONLINE UPDATER .................................................................................................................................. 55

Wisenet Device Manager User Guide Getting started
4
Getting started
Wisenet Device Manager is PC application that helps easy installation, setup, operation, and diagnosis of
multiple Techwin network devices at a time.
It supports the following features.
To search Techwin network devices in same network
To view the captured image of connected devices
To change language and name of cameras
To assign IP address on multiple devices
To assign and change password on multiple devices
To checkup status of firmware on multiple devices
To download and upgrade firmware on multiple devices
To apply date and time on multiple devices
To backup and restore device configuration
To apply video profile setting on multiple devices
To make system restart / factory default setting / CGI command setting and display each response
To make a schedule for firmware upgrade, backup and restore device configuration
To make/run a script for running multiple jobs
To save device list (encrypted file, password protected)
To reset ARP table of PC
To view live video of a searched network device
To control Pan, Tilt and Zoom of camera
To diagnose network status of searched network devices
To setup multicast
To setup motion detection
To make a report
To setup open SDK
To setup audio settings
To setup SSL
To setup SNMP
To save device’s log file to PC
To setup camera settings
To setup 802.1x settings
To make bookmark
To monitor the status of devices

Wisenet Device Manager User Guide Getting started
5
Auto-upgrade through online updater
To save/search log of Wisenet Device Manager
Wisenet Device Manager User Guide Installing Wisenet Device Manager
6
Installing Wisenet Device Manager
1. System requirement
OS Windows XP, Windows Vista, Windows 7 (Support 64-bit OS)
Platform requirement Microsoft .NET Framework 4 Client Profile
Microsoft Visual C++ 2010 Redistributable Package (x86)
◊ Above two are included in Wisenet Device Manager installation package
CPU Pentium III CPU 1GHz or higher
Graphic card (1024x768) video graphic card
Language English, Korean, Japanese
2. Installation
Step 1. Double click installation file to start.
Step 2. Select a language for installation.
Step 3. Click [Next>] button when the installation wizard starts.
Step 4. Read the license agreement carefully and select “I accept the terms of the License Agreement”. And
click [Next>] to proceed with the next step.
Step 5. Choose the destination folder, and click [Install].
Step 6. The Wizard starts installing the Wisenet Device Manager.
Step 7. When the installation is completed, click [Finish] to complete the installation.

Wisenet Device Manager User Guide Functions
7
Functions
1. Name and function of each control
Wisenet Device Manager consists of 8 areas.
1. Menu – Program related functions
2. Status monitor – To check the connecting status of network cameras and encoders
3. List view – To change the view mode of device list (Icons view / List view / Details view)
4. Toolbar – Techwin network devices setting related functions
5. Filter Button – To show the current selected category from the device list
6. Device list – To show device list according to the selected category
7. Device Setup Menu– To show device setup menu according to the selected devices
8. Searched/Selected status bar – To show the number of searched and selected devices
1
2
6
4
5 3
7
8

Wisenet Device Manager User Guide Functions
8
2. New Project / Save Project / Open Project
You can manage devices by each project.
New Project
Click [Project] > [New Project]. It clears the entire device list.
Save Project
Click [Project] > [Save Project]. You can save device list. You need to enter project password for the next
access.
While saving a project, it will also save devices password. It helps you manage devices
easier with customized password.
A project file format is XML. It is password protected and encrypted. Therefore, it cannot
be decodable from any other application.
Open project
Click [Project] > [Open Project]. It opens a project file that has been saved before. Before loading a
selected file, it asks you to enter the project password. After opening successfully, it displays device list
and automatically updates device status.

Wisenet Device Manager User Guide Functions
9
3. Network – Show and Delete ARP
You can show and reset ARP table of the PC that Wisenet Device Manager is running.
ARP (Address Resolution Protocol) is a protocol used for resolution of IP address into
MAC (physical network) address. PC generally records MAC addresses of destinations to
telecommunicate through network. If the IP address has changed, communication error
could occur until the ARP table matches the MAC address into the new IP address. In
order to avoid the case, Wisenet Device Manager supports to reset ARP table by clicking
[Delete ARP].
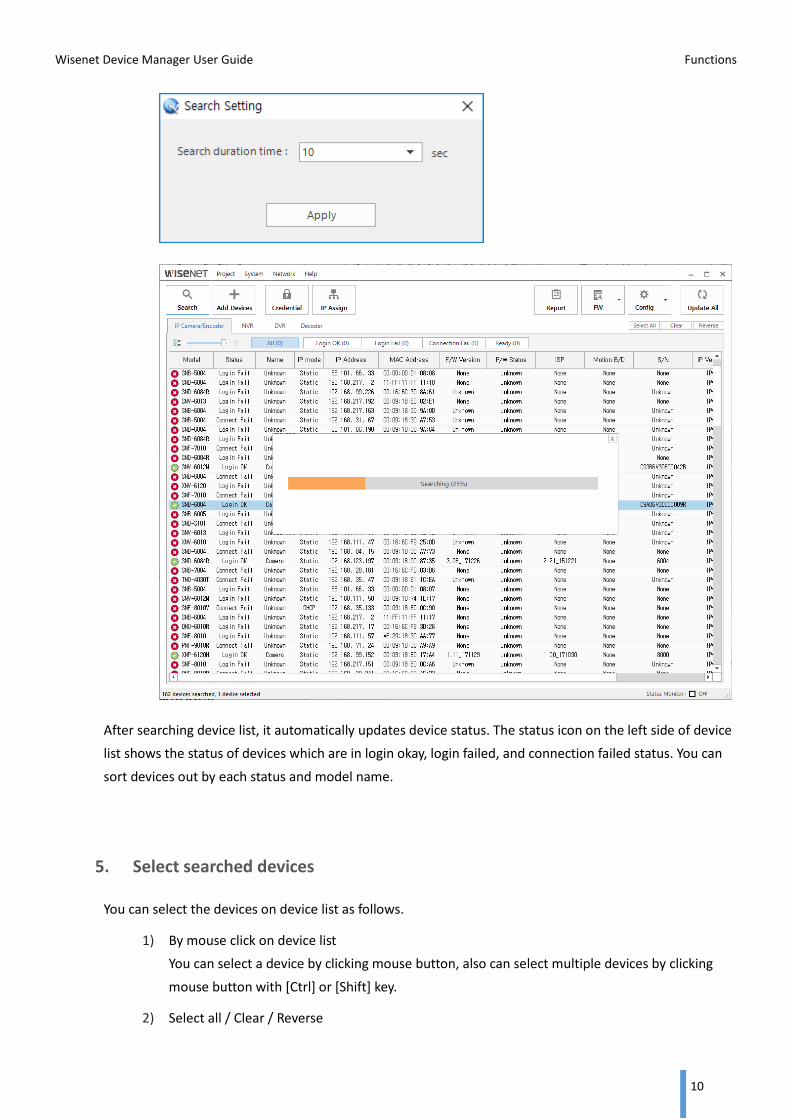
4. Search
Click [Search] button on toolbar. It searches all the Techwin network devices in the same network, and
displays the device list.
For more information about available products, please refer to the last section, ‘Supported model list’.
During the searching devices, the progress bar shows the progress. You can set the duration time for
searching devices by selecting [System] > [Device Search Time Setting] of main menu.
Wisenet Device Manager User Guide Functions
10
After searching device list, it automatically updates device status. The status icon on the left side of device
list shows the status of devices which are in login okay, login failed, and connection failed status. You can
sort devices out by each status and model name.
5. Select searched devices
You can select the devices on device list as follows.
1) By mouse click on device list
You can select a device by clicking mouse button, also can select multiple devices by clicking
mouse button with [Ctrl] or [Shift] key.
2) Select all / Clear / Reverse

Wisenet Device Manager User Guide Functions
11
You can select devices by buttons at the top of the device list or by context menu on the device
list.
A. Select all: Select all devices on device list.
B. Clear: Release any selected device on device list.
C. Reverse: Reverse the selected status on device list.
6. Device List View Mode
Display searched devices on device list according to the view mode.
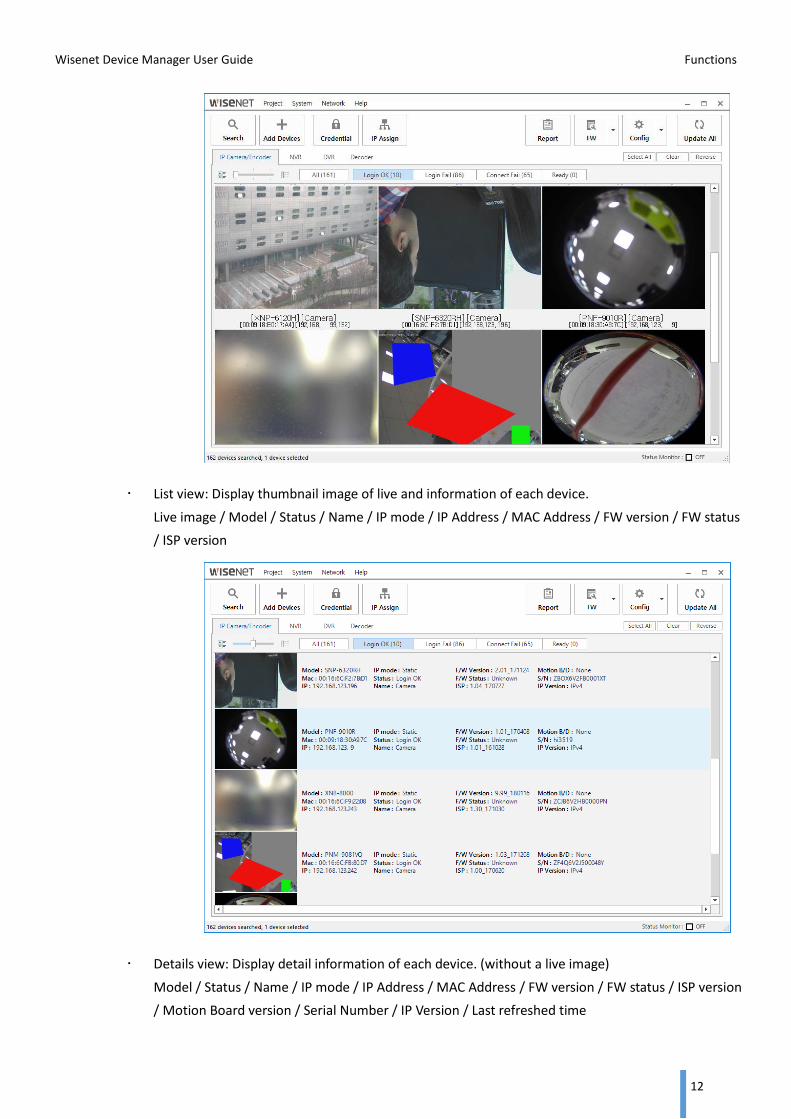
Icons view: Display live image and simple information of each device.
Live image / Status / Model / Name / MAC Address / IP Address
Wisenet Device Manager User Guide Functions
12
List view: Display thumbnail image of live and information of each device.
Live image / Model / Status / Name / IP mode / IP Address / MAC Address / FW version / FW status
/ ISP version
Details view: Display detail information of each device. (without a live image)
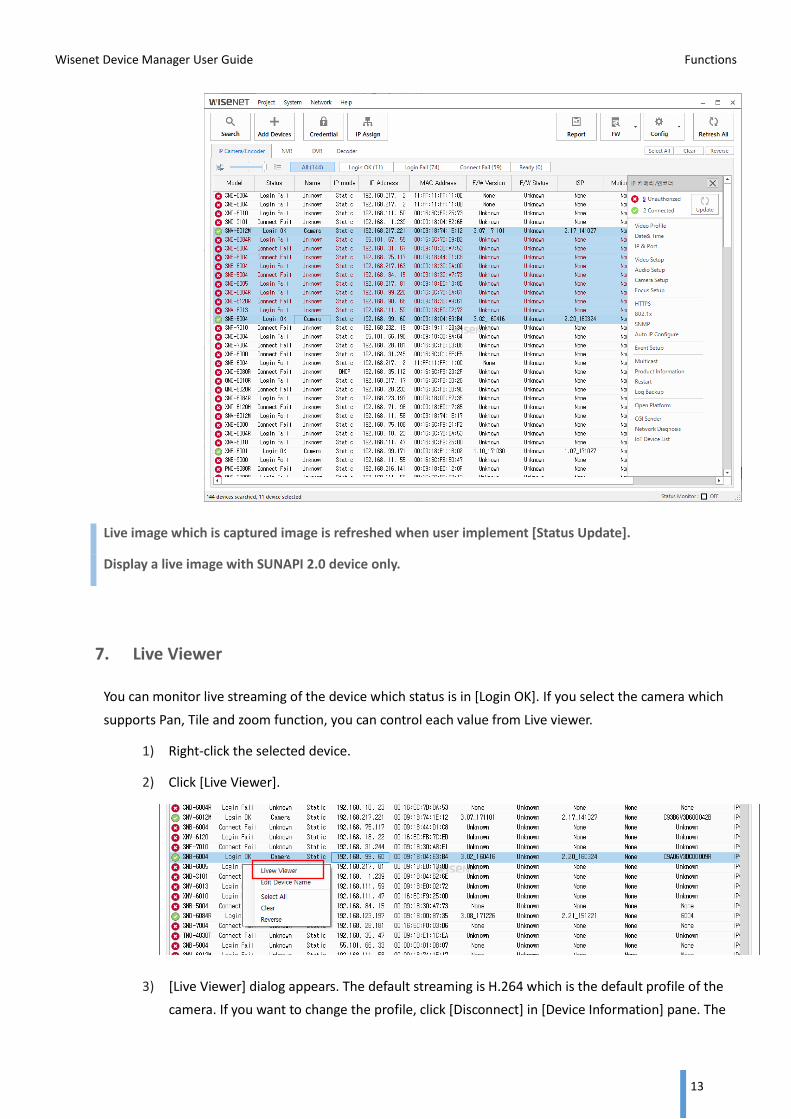
Model / Status / Name / IP mode / IP Address / MAC Address / FW version / FW status / ISP version
/ Motion Board version / Serial Number / IP Version / Last refreshed time
Wisenet Device Manager User Guide Functions
13
Live image which is captured image is refreshed when user implement [Status Update].
Display a live image with SUNAPI 2.0 device only.
7. Live Viewer
You can monitor live streaming of the device which status is in [Login OK]. If you select the camera which
supports Pan, Tile and zoom function, you can control each value from Live viewer.
1) Right-click the selected device.
2) Click [Live Viewer].
3) [Live Viewer] dialog appears. The default streaming is H.264 which is the default profile of the
camera. If you want to change the profile, click [Disconnect] in [Device Information] pane. The

Wisenet Device Manager User Guide Functions
14
streaming will stop transferring, and [Video Profile] drop box will be activated. Select a desired
video profile then click [Connect] to monitor the specified profile.
A. Device Information – Shows detail information of the connected device
– Snapshot: Save the snapshot as an image file in the .jpg format.
– Display original size: Display the video as original resolution size.
– Save graph data: Save the current video data (data, time, frame rate, I-frame, P-
frame, bitrate) as file. You can see/modify file path in [menu] > Project > 1Ch Live
Viewer Setting.
B. PTZ Control
- Pan/Tilt: Adjusting Pan and Tilt through click the arrow.
- Zoom: Change zoom ratio from click [+] and [-] or input number of ratio directly.
- Speed: Change speed of Pan and Tilt movement.
- ABS Move: Get the coordinate and zoom ratio from click [Get] button. Or click [Set]
button to setting your camera’s position after input coordinate and zoom ratio.
- Preset: Add and delete your camera’s Preset information.
- Home: Move your camera to Home position from click [Move] button. Or click [Set]
button to setting camera’s home position
Wisenet Device Manager User Guide Functions
15
C. Profile access – Lists profile information of the connected device
- Update time: Refreshes the time when it gets profile access information
- Profile: Lists codec information of each profile
- Bitrate(kbps): Shows the actual bitrate and the setting value
- Framerate(fps): Shows the actual framerate and the setting value
- ATC(%): Shows the ATC status
- User: Shows how many users are connecting to the device
D. Current users – Shows user information who are receiving the video streaming of the
connected device.
- Update time: Refreshes the time when it gets the user information
- Profile: Lists which codec the users are connecting
- IP address: Lists IP address of each user
- Bitrate(kbps): Shows the bitrate
- Status: Shows whether the network is good or not
E. Framerate – Shows the framerate setting value of the connected profile, and plots a
graph with the actual framerate received from the connected camera.
– I/P frame: Display the value of I-frame and P-frame on [Framerate] chart.
– Reference Line: Display the reference line on [Framerate] chart.
F. Maximum bitrate – Show the target bitrate setting value of the connected profile, and
plots a graph with the actual bitrate received from the connected camera.
– Reference Line: Display the reference line on [Bitrate] chart. Enter the value of
reference line, then click [Set] button.

Wisenet Device Manager User Guide Functions
16
8. Edit Device Name
You can see the camera’s name on device list, and edit the name.
Display name of camera
Show the name of the camera which status is in [Login OK].
Edit name of camera
Edit the name of camera which status is in [Login OK].
1) Right-click the selected camera.
2) Click [Edit Device Name].
3) [Product Information] dialog appears.
4) Change the name and click [OK] button.
9. Device Credential
It saves user name and password of admin account in order to operate device setup.
Set password for device credential
The default passwords of all the devices are saved as 4321. When device does not use the default
password, the actual user name and password of the device should be saved on Wisenet Device
Manager.
It is able to operate devices by user who has menu setup authority only. Be sure to save
the admin user name and password.
Hardware NVR does not allow multiple login of the Admin user. If Admin ID is used in
somewhere else, Wisenet Device Manager will force logging on the NVR.
If you want to modify the default ID and password for device credential, change them by
selecting [Project] > [Search Setting] of main menu.
Wisenet Device Manager User Guide Functions
17
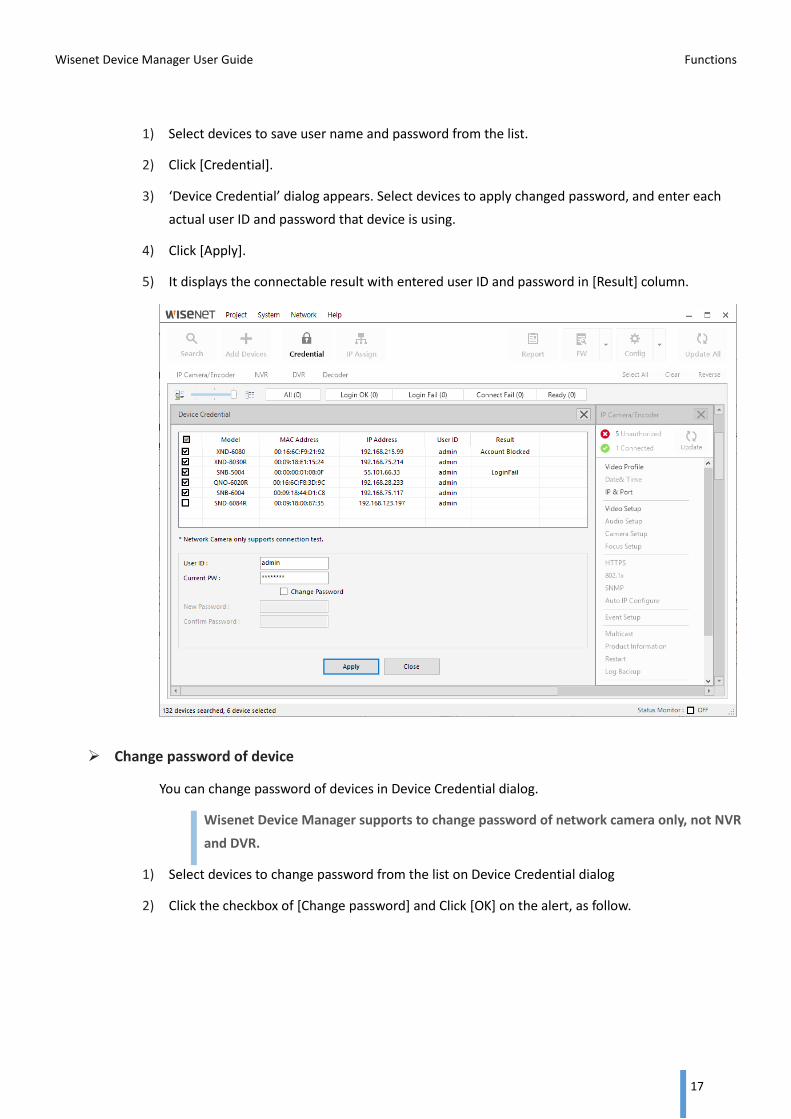
1) Select devices to save user name and password from the list.
2) Click [Credential].
3) ‘Device Credential’ dialog appears. Select devices to apply changed password, and enter each
actual user ID and password that device is using.
4) Click [Apply].
5) It displays the connectable result with entered user ID and password in [Result] column.
Change password of device
You can change password of devices in Device Credential dialog.
Wisenet Device Manager supports to change password of network camera only, not NVR
and DVR.
1) Select devices to change password from the list on Device Credential dialog
2) Click the checkbox of [Change password] and Click [OK] on the alert, as follow.

Wisenet Device Manager User Guide Functions
18
3) Enter same new password on both of <New Password> and <Confirm Password> form.
4) Click [Apply].
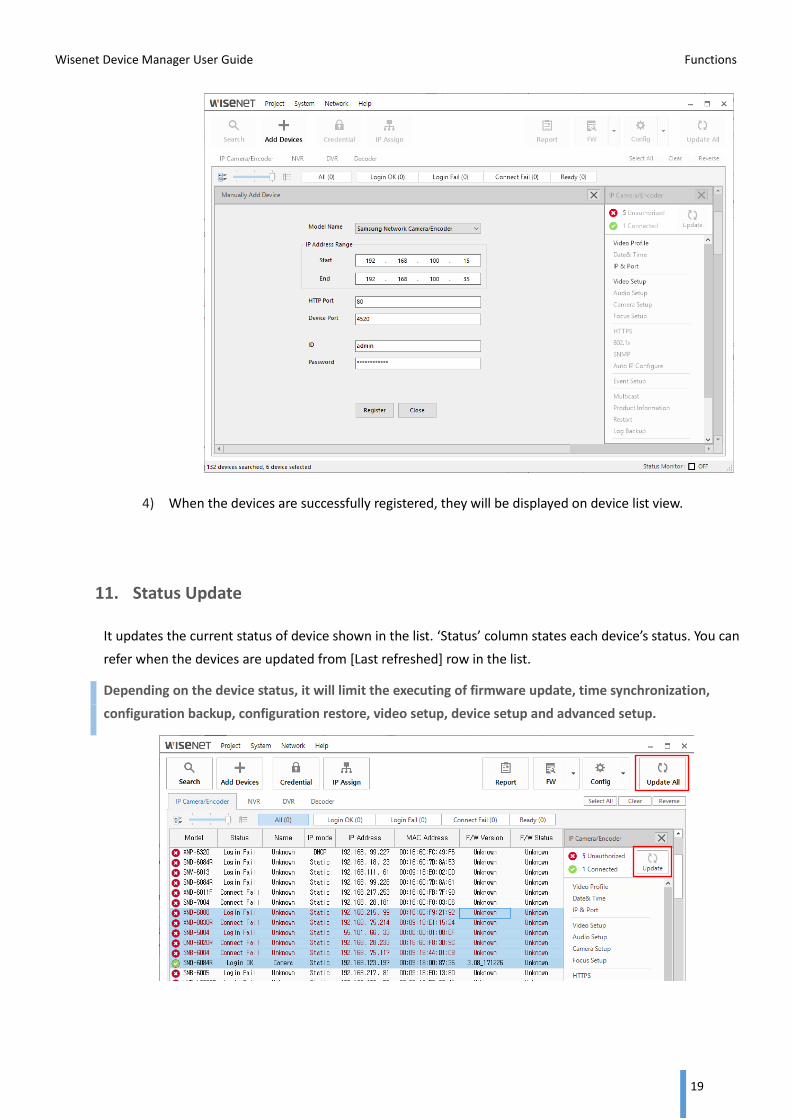
10. Add Device
When the network devices are installed in different network from Wisenet Device Manager installed PC, it
is impossible to search and show the device list from the application. For this case, Wisenet Device Manager
support to add device manually by entering network information of the devices.
1) Click [Add Device].
2) ‘Manually Add Device’ dialog appears.
3) Enter model name, IP address, HTTP port, VNP port, ID and password and click [Register].
It supports to register multiple devices at once by entering start IP address and end IP
address.
Wisenet Device Manager User Guide Functions
19
4) When the devices are successfully registered, they will be displayed on device list view.
11. Status Update
It updates the current status of device shown in the list. ‘Status’ column states each device’s status. You can
refer when the devices are updated from [Last refreshed] row in the list.
Depending on the device status, it will limit the executing of firmware update, time synchronization,
configuration backup, configuration restore, video setup, device setup and advanced setup.

Wisenet Device Manager User Guide Functions
20
12. IP Assign
It assigns IP address on the selected devices.
IP assign on a single device
1) Select a single device to assign IP address from the device list.
2) Click [IP Assign].
3) Select one of IP address assignment type.
A. Obtain an IP address automatically (DHCP) – Automatically obtain IP address from
router/switch.
B. Assign the following IP address –Manually input IP address and port numbers.
4) Enter proper values and click [OK].
IP assign on multiple devices
1) Select two or more devices to assign IP addresses from the list.
2) Select [IP Assign].
3) Select one of IP address assignment type.
A. Obtain an IP address automatically (DHCP) – Automatically obtain IP address from
router/switch.

Wisenet Device Manager User Guide Functions
21
B. Assign the following IP address – Manually input IP address and port numbers.
B-1. Enter IP address range to be assigned
B-2. Enter Subnet mask, Gateway, HTTP Port, and VNP Port
B-3. Click [Simulate] in order to verify which IP address will be assigned to each device
B-4. Double-click IP address, and then you can edit each IP address of device
B-5. Click [Start] to actually assign IP address to each device
B-6. IP assignment result will be shown in [Result] column
13. Report
You can make a report of network devices information.
1) Select desired devices to make a report.
2) Click [Report].
3) [Report] dialog appears. Select desired devices to make a report.
4) Select desired information to be included in a report. Click [Apply].
5) Select a folder to save a report, and specify the file name, and click [Save].

Wisenet Device Manager User Guide Functions
22
6) While proceeding, ‘Status’ column refreshes the progress bar and result of each device. You can
select the saved file format between Excel format (*.xls) and CSV format (*.csv).
When a report is saved as CSV format, image is not included.
[MD/VA Result] and [FD Result] columns state whether the settings are valid. For
example, you made motion detection enabled, but did not define the detection area, it
would be invalid to detect motion. In this case, [MD/VA Result] will be OFF.
Wisenet Device Manager User Guide Functions
23
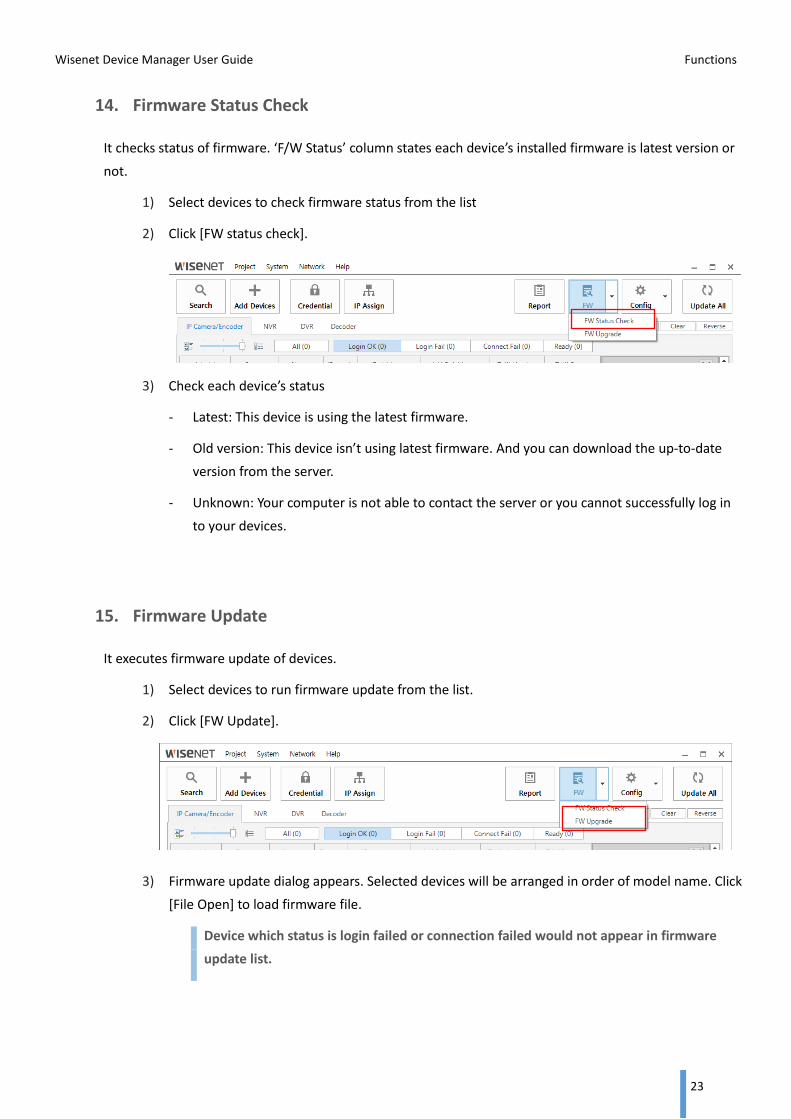
14. Firmware Status Check
It checks status of firmware. ‘F/W Status’ column states each device’s installed firmware is latest version or
not.
1) Select devices to check firmware status from the list
2) Click [FW status check].
3) Check each device’s status
- Latest: This device is using the latest firmware.
- Old version: This device isn’t using latest firmware. And you can download the up-to-date
version from the server.
- Unknown: Your computer is not able to contact the server or you cannot successfully log in
to your devices.
15. Firmware Update
It executes firmware update of devices.
1) Select devices to run firmware update from the list.
2) Click [FW Update].
3) Firmware update dialog appears. Selected devices will be arranged in order of model name. Click
[File Open] to load firmware file.
Device which status is login failed or connection failed would not appear in firmware
update list.

Wisenet Device Manager User Guide Functions
24
4) If the firmware file name is different from general naming convention, it will give you a warning
message in order to verify the correct file again. When you upgrade device with wrong firmware,
the device won’t work. Please be sure to load the correct firmware file.
5) Select one of update type.
A. Parallel – Run simultaneous firmware upgrading of selected devices at a time.
Simultaneously upgrades 16 devices at a time.
B. Sequence – Run firmware upgrading of selected devices one by one, one after another.
6) Select one of upgrading schedule.
A. Relative time – Run after user-selected time interval (selective from ‘now’ to ‘7 days’)
B. Absolute time – Run at user-defined time (from calendar)
The default schedule is ‘now’.
When the dialog closed, firmware update will be aborted. If you need to run schedule
firmware update, the dialog must stay opened.
7) [Download] : You can download up-to-date version of firmware to your computer.
Your computer must be connected to internet to download firmware files.
When you click the column’s head of firmware list, it is aligned by that standard.

Wisenet Device Manager User Guide Functions
25
A. Select model names to download firmware from the list. You can find specific firmware
easily with [Device type] and [Model] option.
B. Confirm path for download firmware to your computer.
– Set/change download path
Click [Project]>[Firmware Setting] to setting and changing firmware download path.
Initial download path is [My Document]>[Samsung]>[Wisenet Device Manager].
C. Click [Start].
8) [Upgrade] : Start firmware update.
9) [Download/Upgrade] : Start firmware update after downloading up-to-date version.
If you want to use [Download/Upgrade], you have to set the update type to <Sequence>.
[Download/Upgrade] is not able to <Parallel>mode.
10) While proceeding firmware updating, ‘Status’ and ‘New ver.’ columns refresh the progress and
result of each device.

Wisenet Device Manager User Guide Functions
26
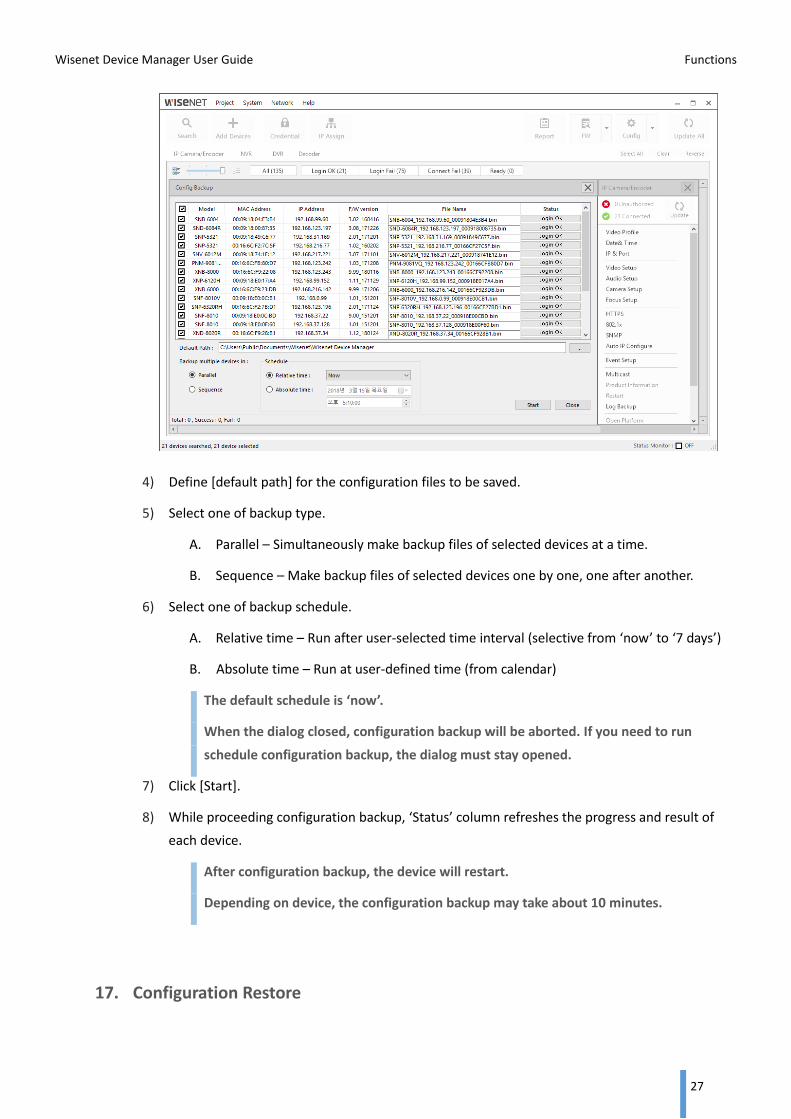
16. Configuration Backup
It saves configuration file of selected device onto local PC.
1) Select devices to make configuration backup from the list.
2) Click [Config Backup].
3) Configuration Backup dialog appears. Selected devices will be listed with default backup file
name.
Wisenet Device Manager User Guide Functions
27
4) Define [default path] for the configuration files to be saved.
5) Select one of backup type.
A. Parallel – Simultaneously make backup files of selected devices at a time.
B. Sequence – Make backup files of selected devices one by one, one after another.
6) Select one of backup schedule.
A. Relative time – Run after user-selected time interval (selective from ‘now’ to ‘7 days’)
B. Absolute time – Run at user-defined time (from calendar)
The default schedule is ‘now’.
When the dialog closed, configuration backup will be aborted. If you need to run
schedule configuration backup, the dialog must stay opened.
7) Click [Start].
8) While proceeding configuration backup, ‘Status’ column refreshes the progress and result of
each device.
After configuration backup, the device will restart.
Depending on device, the configuration backup may take about 10 minutes.
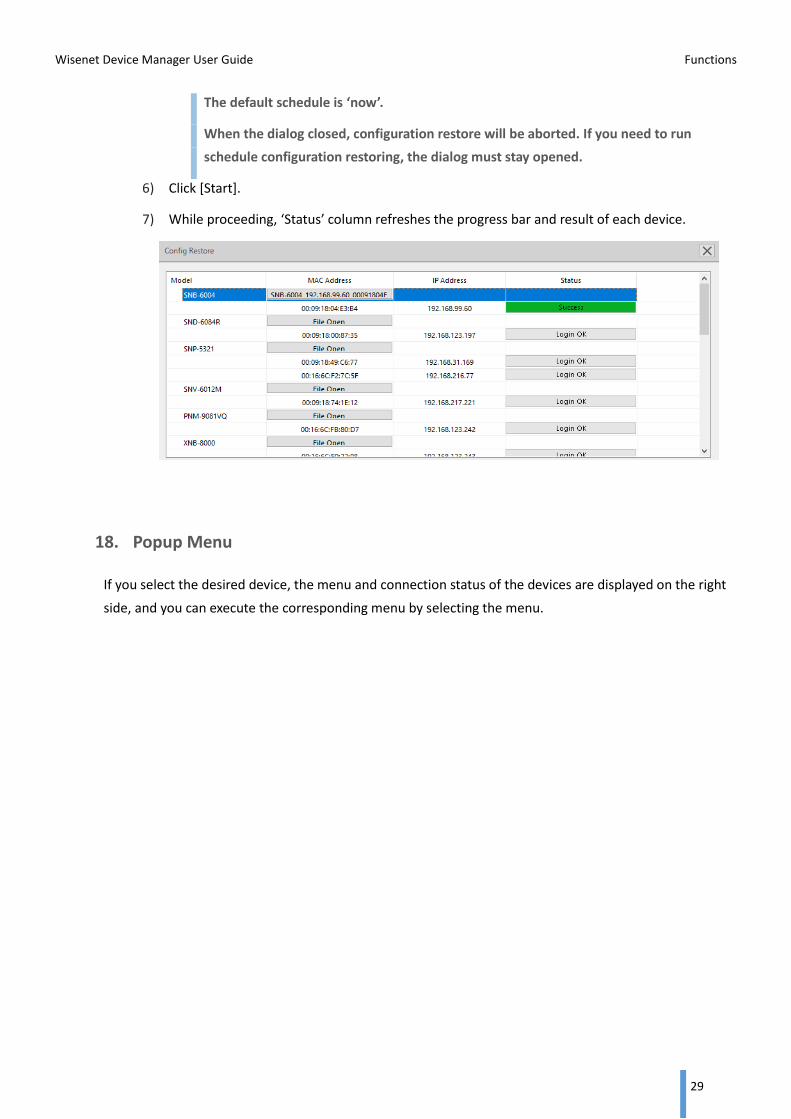
17. Configuration Restore

Wisenet Device Manager User Guide Functions
28
It deploys configuration which has been saved through [Config Backup] on selected devices.
1) Select devices to implement configuration file from the list.
2) Click [Config Restore].
3) Config restore dialog appears. Selected devices will be arranged in order of model name. Click
[File Open] to load configuration file.
Device which status is login failed or connection failed would not appear in firmware
update list.
4) Select one of restoring type.
A. Parallel – Run simultaneous configuration restoring of selected devices. Simultaneously
applied 16 devices at a time.
B. Sequence – Run configuration restoring of selected devices one by one, one after
another.
5) Select one of restoring schedule.
A. Relative time – Run after user-selected time interval (selective from ‘now’ to ‘7 days’)
B. Absolute time – Run at user-defined time (from calendar)
Wisenet Device Manager User Guide Functions
29
The default schedule is ‘now’.
When the dialog closed, configuration restore will be aborted. If you need to run
schedule configuration restoring, the dialog must stay opened.
6) Click [Start].
7) While proceeding, ‘Status’ column refreshes the progress bar and result of each device.
18. Popup Menu
If you select the desired device, the menu and connection status of the devices are displayed on the right
side, and you can execute the corresponding menu by selecting the menu.

Wisenet Device Manager User Guide Functions
30
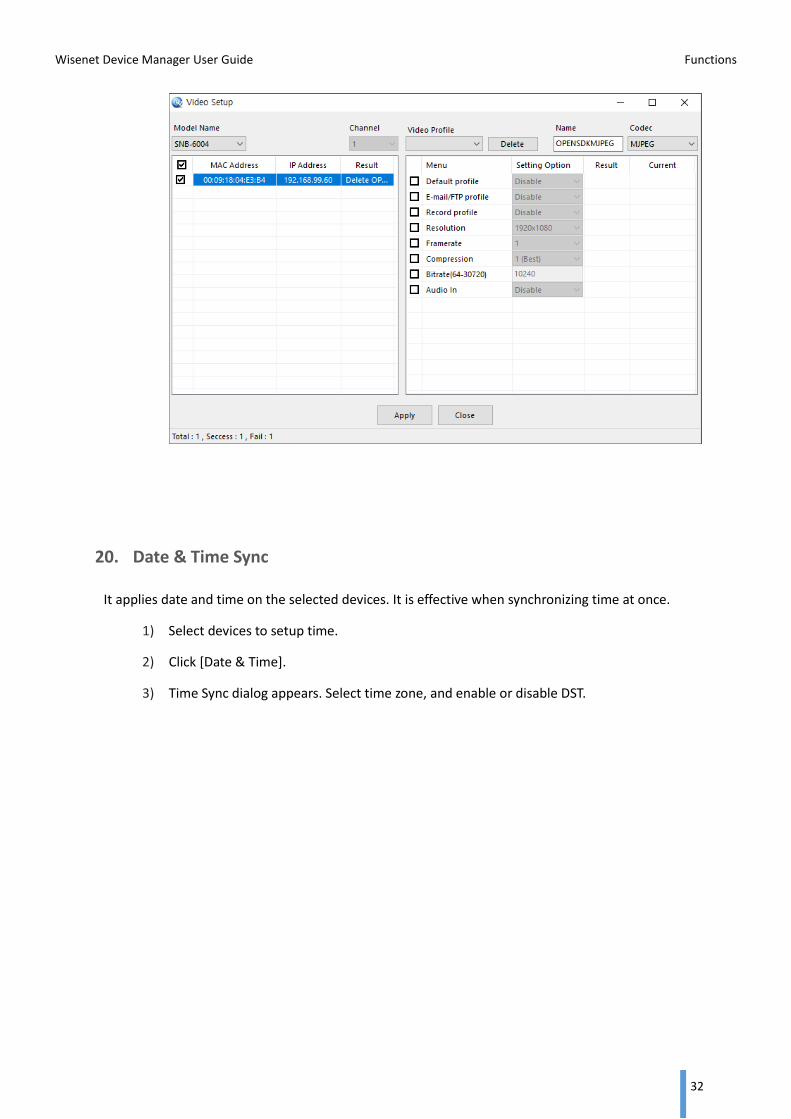
19. Video Profile
It applies to add/modify/delete video profile of network cameras.
1) Select devices to setup video option from the list.
2) Click [Video Profile].
3) Video setup dialog appears. Video profile setup will proceed based on model name. Select
model name first.
4) Devices which correspond to the selected model name will be arranged in the list. Select devices
to setup video profile.
When you double click each device, you can verify the current setting values of the
device from ‘Current’ column.
Add/Modify video profile
When the selected profile already exists, the profile will be modified as user selected setting. When the
selected profile does not exist, the profile will be created as user selected setting.
5) For adding a profile, select <<Add profile..>> from [Select Video Profile]. For modifying a profile,

Wisenet Device Manager User Guide Functions
31
select a profile from [Select Video Profile].
The lists of [Select Video Profile] depend on the selected camera model.
6) Check each setting option and select values from the menu list.
7) Click [Apply] to start deploying selected menu settings.
8) After completed, ‘Result’ column in the left list will be refreshed.
Result has the following three types.
Success: All the selected menu settings are successfully deployed on devices.
Fail: All the selected menu settings failed to deploy.
Partial Success: Some of the menu settings are successfully deployed, while some of
them failed. When double clicking a device which is in partial success status, each setting
result will appear on ‘Result’ column in the right list.
Delete video profile
5) Select model name and devices to delete video profile.
6) Select one of video profile option from [Video Profile], and click [Delete].
7) After completed, ‘Result’ column in the left list will be refreshed.
Wisenet Device Manager User Guide Functions
32
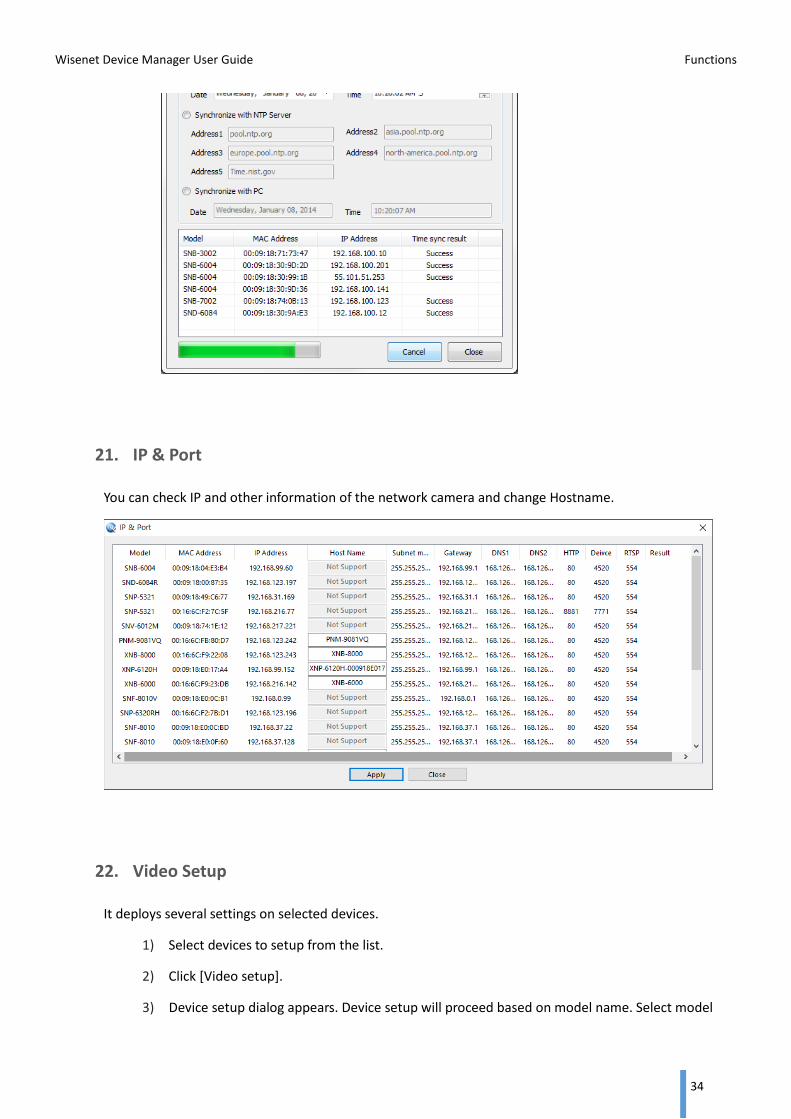
20. Date & Time Sync
It applies date and time on the selected devices. It is effective when synchronizing time at once.
1) Select devices to setup time.
2) Click [Date & Time].
3) Time Sync dialog appears. Select time zone, and enable or disable DST.

Wisenet Device Manager User Guide Functions
33
4) Select one of time setup type.
A. Manual – Manually enter date and time to be implemented on selected devices
B. Synchronize with NTP Server
C. Synchronize with PC – Automatically deploy identical date and time with PC running
Wisenet Device Manager
5) Click [Start].
6) While proceeding time synchronization, ‘Time sync result’ column refreshes the result of each
device.
Wisenet Device Manager User Guide Functions
34
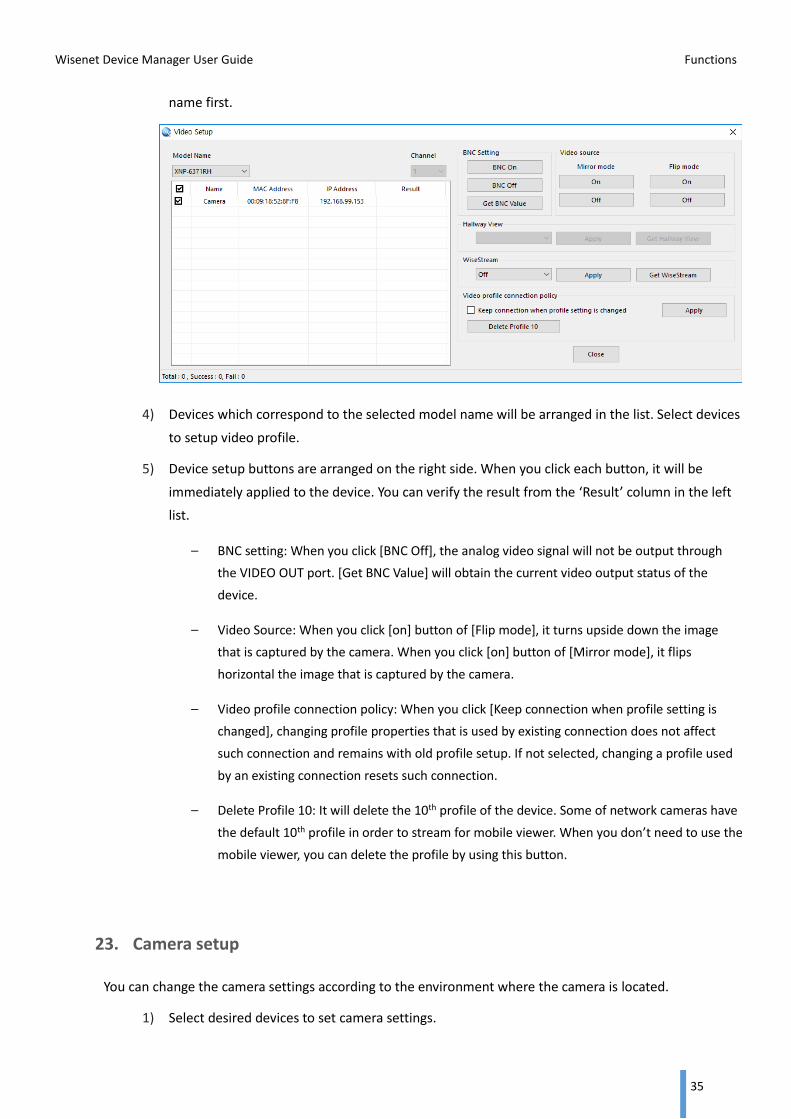
21. IP & Port
You can check IP and other information of the network camera and change Hostname.
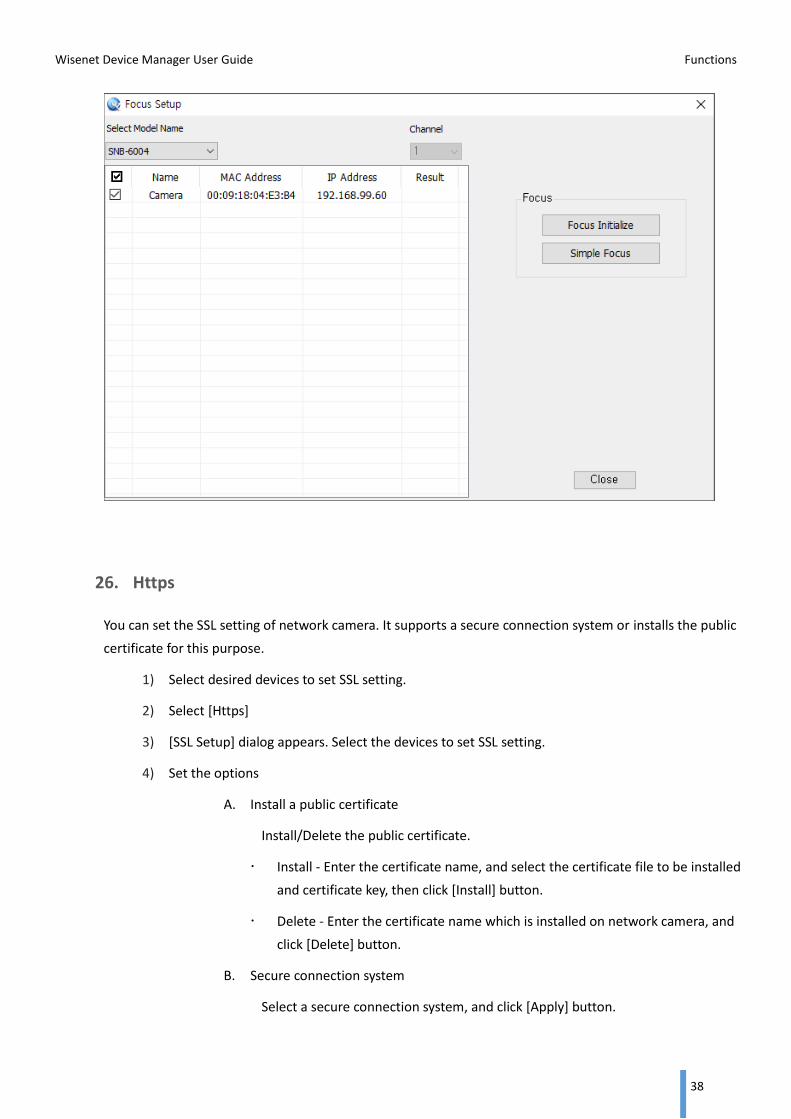
22. Video Setup
It deploys several settings on selected devices.
1) Select devices to setup from the list.
2) Click [Video setup].
3) Device setup dialog appears. Device setup will proceed based on model name. Select model
Wisenet Device Manager User Guide Functions
35
name first.
4) Devices which correspond to the selected model name will be arranged in the list. Select devices
to setup video profile.
5) Device setup buttons are arranged on the right side. When you click each button, it will be
immediately applied to the device. You can verify the result from the ‘Result’ column in the left
list.
– BNC setting: When you click [BNC Off], the analog video signal will not be output through
the VIDEO OUT port. [Get BNC Value] will obtain the current video output status of the
device.
– Video Source: When you click [on] button of [Flip mode], it turns upside down the image
that is captured by the camera. When you click [on] button of [Mirror mode], it flips
horizontal the image that is captured by the camera.
– Video profile connection policy: When you click [Keep connection when profile setting is
changed], changing profile properties that is used by existing connection does not affect
such connection and remains with old profile setup. If not selected, changing a profile used
by an existing connection resets such connection.
– Delete Profile 10: It will delete the 10th profile of the device. Some of network cameras have
the default 10th profile in order to stream for mobile viewer. When you don’t need to use the
mobile viewer, you can delete the profile by using this button.
23. Camera setup
You can change the camera settings according to the environment where the camera is located.
1) Select desired devices to set camera settings.

Wisenet Device Manager User Guide Functions
36
1) Select [Camera Setup]
2) [Camera Setup] dialog appears. Camera setup is able to apply settings based on model name.
Select [Model Name] first.
3) Select a [Display Device] for displaying video on dialog.
4) Select the tab of each camera setting, and then adjust the settings.
Adjusted settings are immediately applied to device. (no need to ‘apply’ button)
For each camera setting, please refer to the user manual of each device.
5) If you want to apply settings to other device (same model), select that device on the right side.
6) Click [Apply Selected Devices] button. You can verify the result from the ‘Result’ column in the
list.
24. Audio Setup
You can set the audio settings.
7) Select desired devices to set audio setting.
8) Select [Audio Setup]
9) [Audio Setup] dialog appears. Audio setup will proceed based on model name. Select model
name first.
10) Devices which correspond to the selected model name will be arranged in the list. Select devices

Wisenet Device Manager User Guide Functions
37
to setup audio.
11) Audio setup buttons are arranged on the right side. You can verify the result from the ‘Result’
column in the left list.
– Audio-In Source: Sets the audio input. [Line] is to connect the cable to the audio device.
[Internal microphone] is for microphone that is built-in in the camera. [External microphone]
is for 3.5mm jack type, powered active external microphone.
– Apply power to Ext. Mic.: If the external microphone connected has no separate power
supply, check this option to set camera to supply power to the connected external
microphone.
– Audio-In Codec: Specify the audio codec.
– Audio-In Bitrate: Set the bit rate to differentiate compression ratio if using G.726 codec.
– Audio-In Gain: Specify the audio input amplification.
– Audio-Out Enable: Sets whether to use audio output.
– Audio-Out Gain: Specify the audio output amplification.
25. Focus Setup
You can set the focus of the network camera.
Wisenet Device Manager User Guide Functions
38
26. Https
You can set the SSL setting of network camera. It supports a secure connection system or installs the public
certificate for this purpose.
1) Select desired devices to set SSL setting.
2) Select [Https]
3) [SSL Setup] dialog appears. Select the devices to set SSL setting.
4) Set the options
A. Install a public certificate
Install/Delete the public certificate.
Install - Enter the certificate name, and select the certificate file to be installed
and certificate key, then click [Install] button.
Delete - Enter the certificate name which is installed on network camera, and
click [Delete] button.
B. Secure connection system
Select a secure connection system, and click [Apply] button.

Wisenet Device Manager User Guide Functions
39
27. 802.1x
You can set the 802.1x setting of network camera. When connecting network, you can choose whether
using 802.1x protocol, and then install the certification.
1) Select desired devices to set 802.1x setting.
2) Select [802.1x]
3) [802.1x] dialog appears. Select the devices to set 802.1x setting.
4) Set the options.
A. IEEE 802.1x setting (EAPOL using EAP-TLS)
IEEE 802.1x Enable: Specify the use of the 802.1x protocol.
EAPOL version: Select version 1 or 2.
ID: Enter the client certificate ID.
Password: Enter the client private key password. If the key file used is not
encrypted, you don’t need to enter it.
B. Certificates
CA certificates: Select a public certificate that contains the public key.
Client certificate: Select a public certificate that contains the client certificate
key.
Client private key: Select a public certificate that contains the client private

Wisenet Device Manager User Guide Functions
40
key.
① Press the [Browse] button for each item and select a certificate to install.
② Press the [Install] button to start installation with a message of
<Installed>.
③ Press the [Delete] button to remove the certificate.
5) Click [Apply] button.
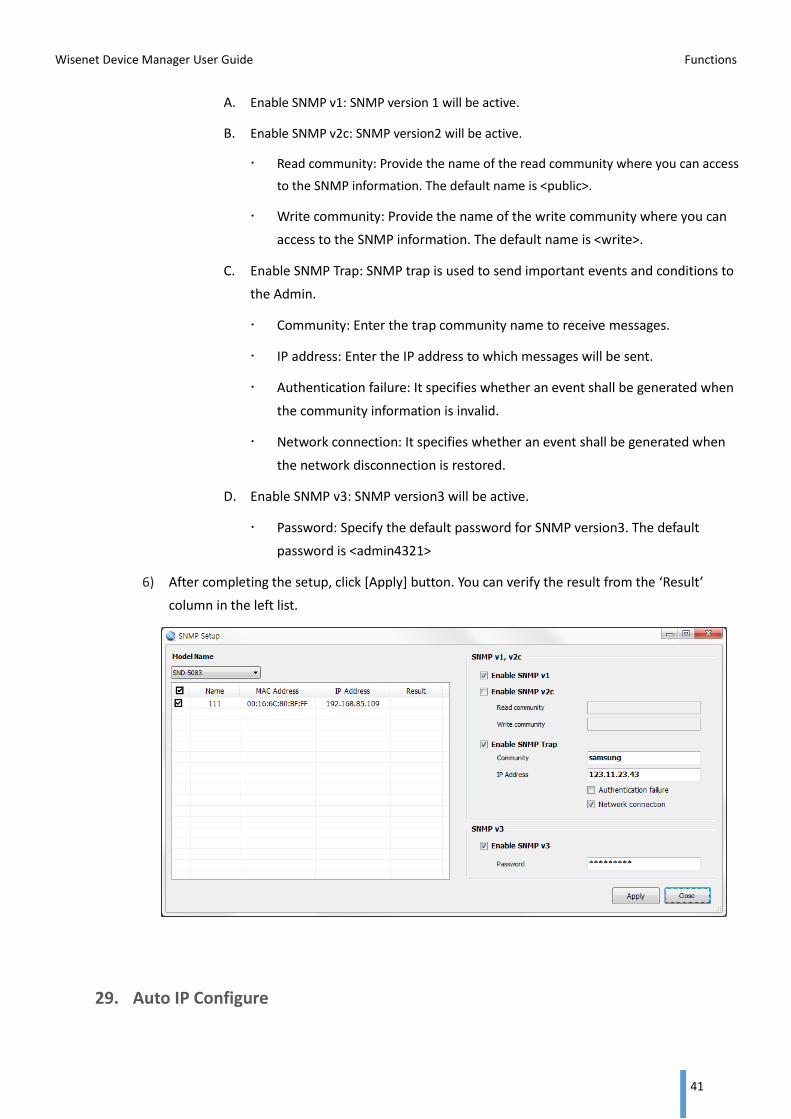
28. SNMP
You can set the SNMP setting of network camera. With the SNMP protocols, the system or network admin
can monitor the network devices on a remote site, and configure the environment settings.
1) Select desired devices to set SNMP setting.
2) Select [SNMP]
3) [SNMP Setup] dialog appears. SNMP setup will proceed based on model name. Select model
name first.
4) Devices which correspond to the selected model name will be arranged in the list. Select devices
to setup SNMP.
5) SNMP setup options are arranged on the right side.
Wisenet Device Manager User Guide Functions
41
A. Enable SNMP v1: SNMP version 1 will be active.
B. Enable SNMP v2c: SNMP version2 will be active.
Read community: Provide the name of the read community where you can access
to the SNMP information. The default name is <public>.
Write community: Provide the name of the write community where you can
access to the SNMP information. The default name is <write>.
C. Enable SNMP Trap: SNMP trap is used to send important events and conditions to
the Admin.
Community: Enter the trap community name to receive messages.
IP address: Enter the IP address to which messages will be sent.
Authentication failure: It specifies whether an event shall be generated when
the community information is invalid.
Network connection: It specifies whether an event shall be generated when
the network disconnection is restored.
D. Enable SNMP v3: SNMP version3 will be active.
Password: Specify the default password for SNMP version3. The default
password is <admin4321>
6) After completing the setup, click [Apply] button. You can verify the result from the ‘Result’
column in the left list.
29. Auto IP Configure

Wisenet Device Manager User Guide Functions
42
You can set up Bonjour, UPnP.
30. Event Setup
You can set motion detection for network cameras.
1) Select desired devices to setup the event.
2) Select [Event Setup].
3) [Event Setup] dialog appears. Motion detection setup will proceed based on model name. Select
model name first.
4) Devices which correspond to the selected model name will be arranged in the list. Select devices
to setup video profile.
5) Motion detection setup buttons are arranged on the right side. You can verify the result from the
‘Result’ column in the left list.
– Sensitivity: You can set the sensor’s sensitivity to detect a motion out of the background
from the monitoring video.
In a situation that definitely distinguishes objects out of backgrounds, set this to a
low sensitivity level. For opposite case that is hard to distinguish objects like low
illuminated situation, set this to a high level.
Wisenet Device Manager User Guide Functions
43
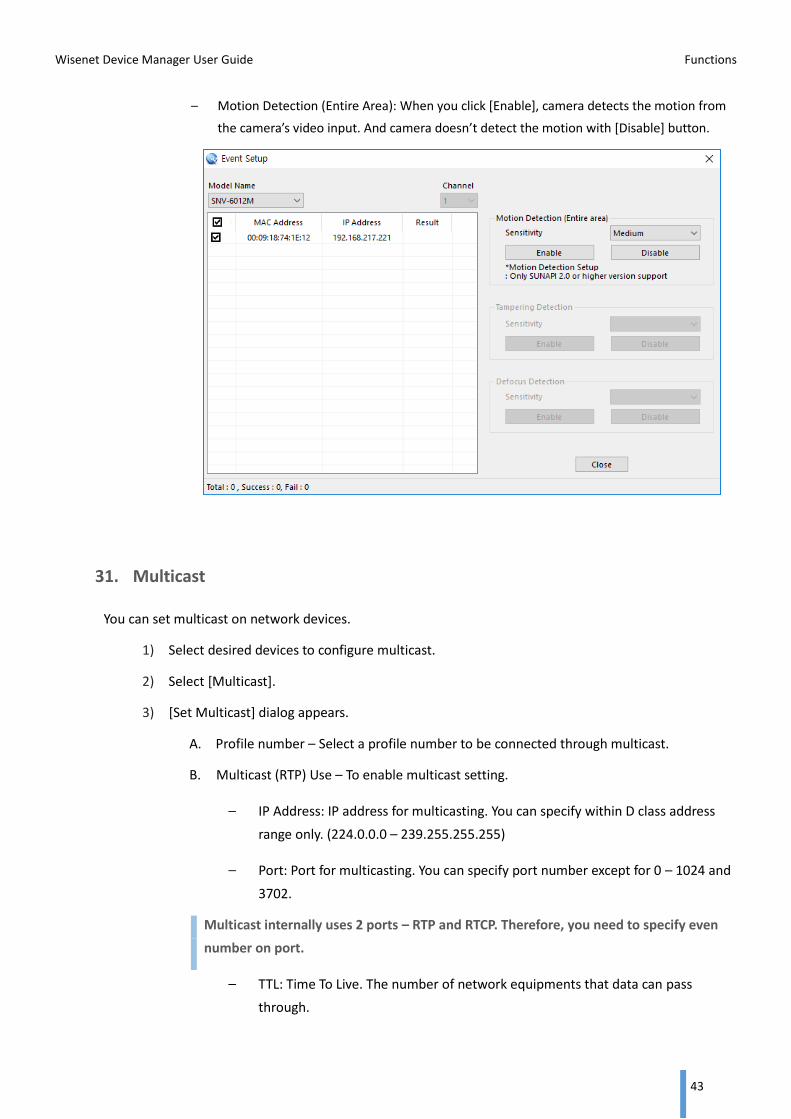
– Motion Detection (Entire Area): When you click [Enable], camera detects the motion from
the camera’s video input. And camera doesn’t detect the motion with [Disable] button.
31. Multicast
You can set multicast on network devices.
1) Select desired devices to configure multicast.
2) Select [Multicast].
3) [Set Multicast] dialog appears.
A. Profile number – Select a profile number to be connected through multicast.
B. Multicast (RTP) Use – To enable multicast setting.
– IP Address: IP address for multicasting. You can specify within D class address
range only. (224.0.0.0 – 239.255.255.255)
– Port: Port for multicasting. You can specify port number except for 0 – 1024 and
3702.
Multicast internally uses 2 ports – RTP and RTCP. Therefore, you need to specify even
number on port.
– TTL: Time To Live. The number of network equipments that data can pass
through.

Wisenet Device Manager User Guide Functions
44
4) Select desired devices to use multicast. Click [Start].
5) While proceeding, ‘Status’ column refreshes the progress bar and result of each device.
32. Product Information
You can set the Web viewer language of the network camera.

Wisenet Device Manager User Guide Functions
45
33. Restart
Restarts or initializes the network camera.
Wisenet Device Manager User Guide Functions
46
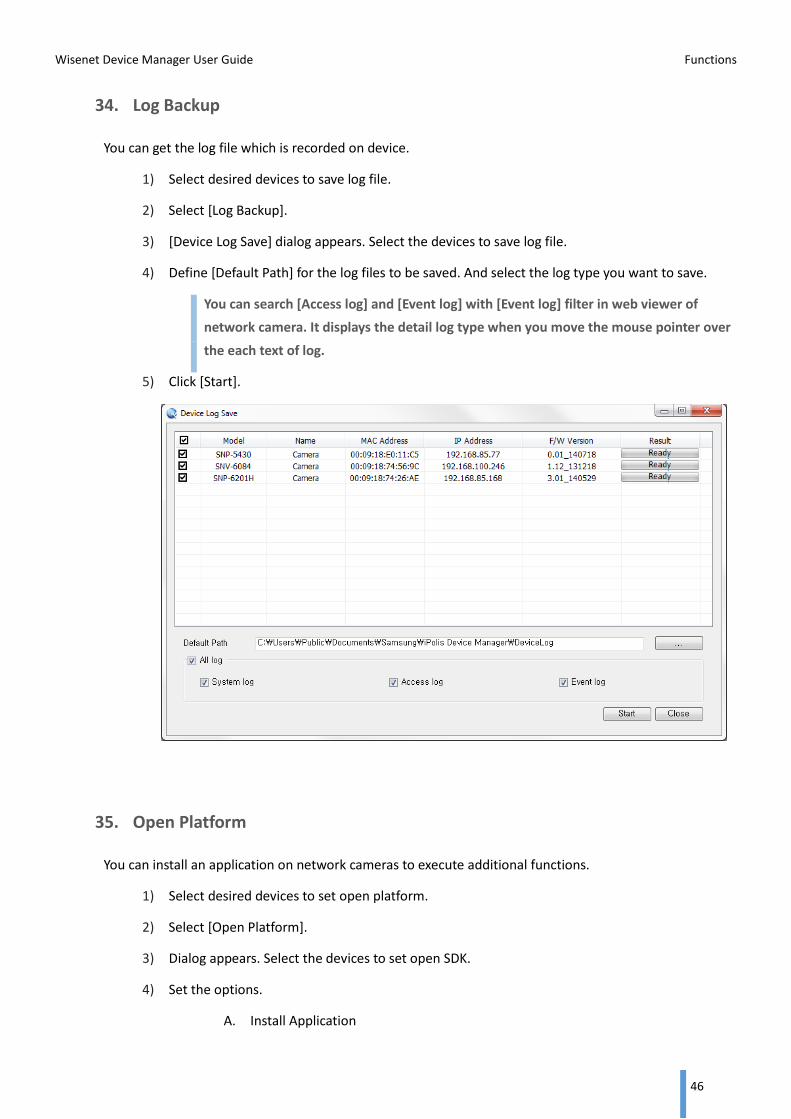
34. Log Backup
You can get the log file which is recorded on device.
1) Select desired devices to save log file.
2) Select [Log Backup].
3) [Device Log Save] dialog appears. Select the devices to save log file.
4) Define [Default Path] for the log files to be saved. And select the log type you want to save.
You can search [Access log] and [Event log] with [Event log] filter in web viewer of
network camera. It displays the detail log type when you move the mouse pointer over
the each text of log.
5) Click [Start].
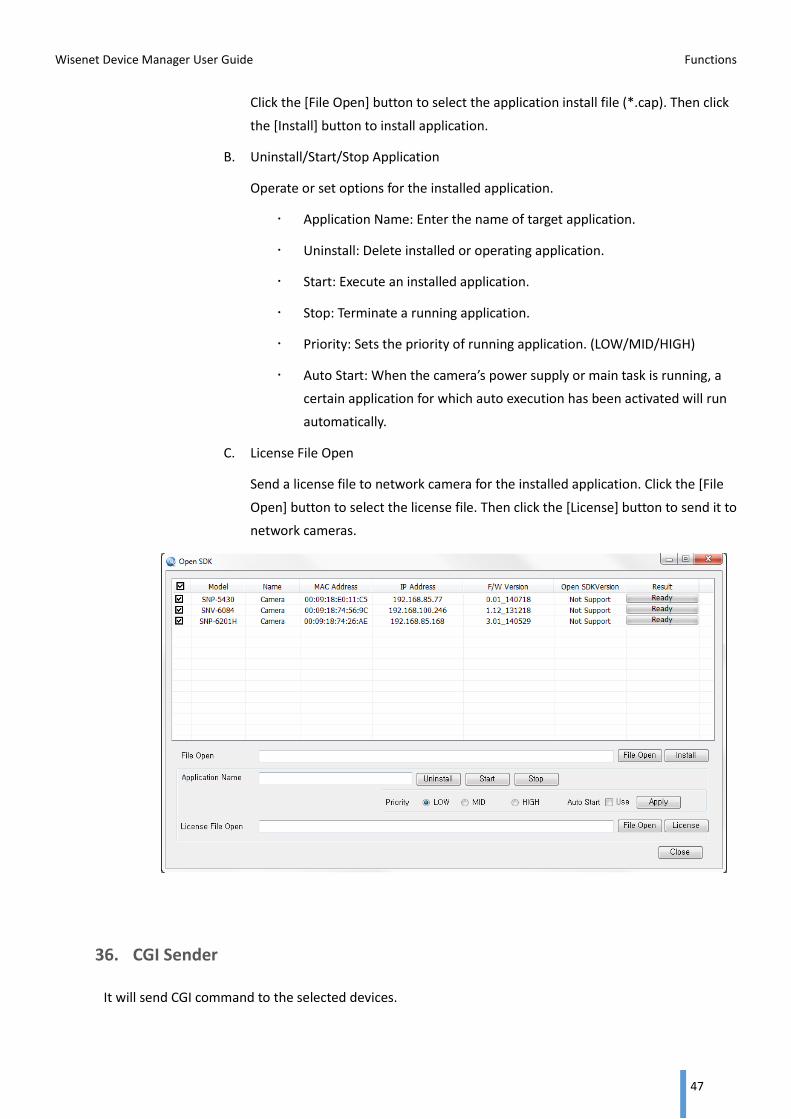
35. Open Platform
You can install an application on network cameras to execute additional functions.
1) Select desired devices to set open platform.
2) Select [Open Platform].
3) Dialog appears. Select the devices to set open SDK.
4) Set the options.
A. Install Application
Wisenet Device Manager User Guide Functions
47
Click the [File Open] button to select the application install file (*.cap). Then click
the [Install] button to install application.
B. Uninstall/Start/Stop Application
Operate or set options for the installed application.
Application Name: Enter the name of target application.
Uninstall: Delete installed or operating application.
Start: Execute an installed application.
Stop: Terminate a running application.
Priority: Sets the priority of running application. (LOW/MID/HIGH)
Auto Start: When the camera’s power supply or main task is running, a
certain application for which auto execution has been activated will run
automatically.
C. License File Open
Send a license file to network camera for the installed application. Click the [File
Open] button to select the license file. Then click the [License] button to send it to
network cameras.
36. CGI Sender
It will send CGI command to the selected devices.

Wisenet Device Manager User Guide Functions
48
1) Select devices to setup from the list.
2) Click [CGI Sender].
3) Advance setup dialog appears. It will proceed based on model name. Select model name first.
4) Devices which correspond to the selected model name will be arranged in the list. Select devices
to send CGI command.
5) Enter CGI code on [SEND CGI code] text box, and click [Apply].
6) You can verify the result from the ‘Result’ column in the left list. When you double click the
device, the respond code will be displayed on [RECEIVE CGI code] box.
You can enter CGI code excluding devices IP address.
For more detail CGI information of each model, please refer to the [CGI Documents] and
[Help] instruction by click each buttons
37. Network diagnosis
You can diagnose network status of devices.
1) Select desired devices to be diagnosed from the list.
2) Click [Network diagnosis].
3) [Network diagnosis] dialog appears.

Wisenet Device Manager User Guide Functions
49
4) The selected devices are shown in the list. Also, you can manually add IP addresses to make a
diagnosis. Specify IP address range on [Input IP Range] and click [Add].
If some of specified IP addresses have already included in the diagnosis list, they will not
be added on the list.
5) You can also manually add port numbers to be checked for the manually added devices. Please
specify port number on [Port] and click [Add].
6) While making diagnosis, you can change ping packet size.
A. Ping packet size – To adjust packet size for running ping test. It could be useful when you
diagnose each in case of big and small packet size. You can specify the packet size from 0
to 65,5000bytes.
B. Packet fragmentation – To split packets in case that the specified ping packet size is too
big to pass through Ethernet. The divided packets will be reassembled when they are
completely transmitted.
When using packet fragmentation, overhead may occur.
- If a divided packet is missing, entire packets should be re-sent.
- The overhead also be occurred in router part.
- Depending on firewall, fragmented packet would be thrown away.
7) Select desired devices from the list, and click [Diagnosis].
Wisenet Device Manager User Guide Functions
50
8) The diagnosis results are shown in the list. When at least one item is NG, the device column is in
yellow.
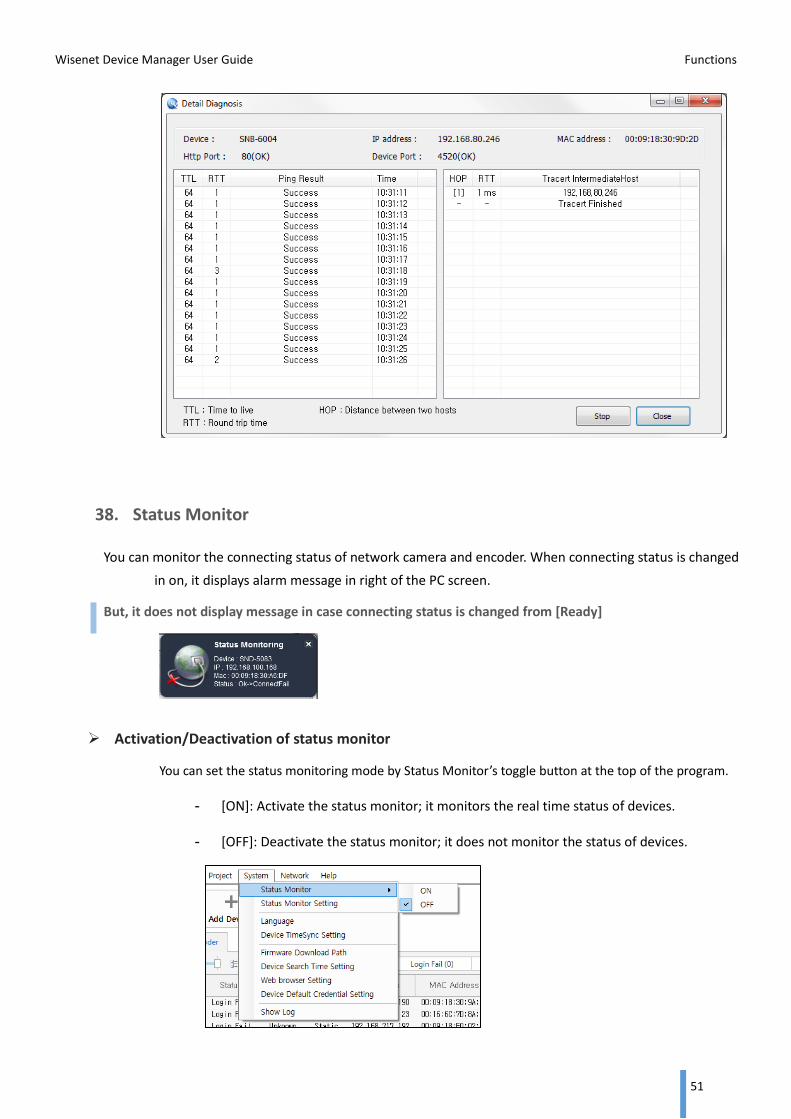
A. Ping: Checks if IP datagram could arrive at the device. You can conclude whether the
device is working from the ping result.
B. RTT: Round Trip Time. The length of time it takes for ping signal to be sent plus the
length of time it takes for an acknowledgment of that signal to be received.
C. HTTP: Show the connection test result to the device’s HTTP port.
D. Device Port: Shows the connection test result to the device’s device port(s).
E. Update Time: Shows the time when the diagnosis executed.
F. Detail: Shows detail information of the network diagnosis. Click [Detail]. [Detail
Diagnosis] dialog appears.
Wisenet Device Manager User Guide Functions
51
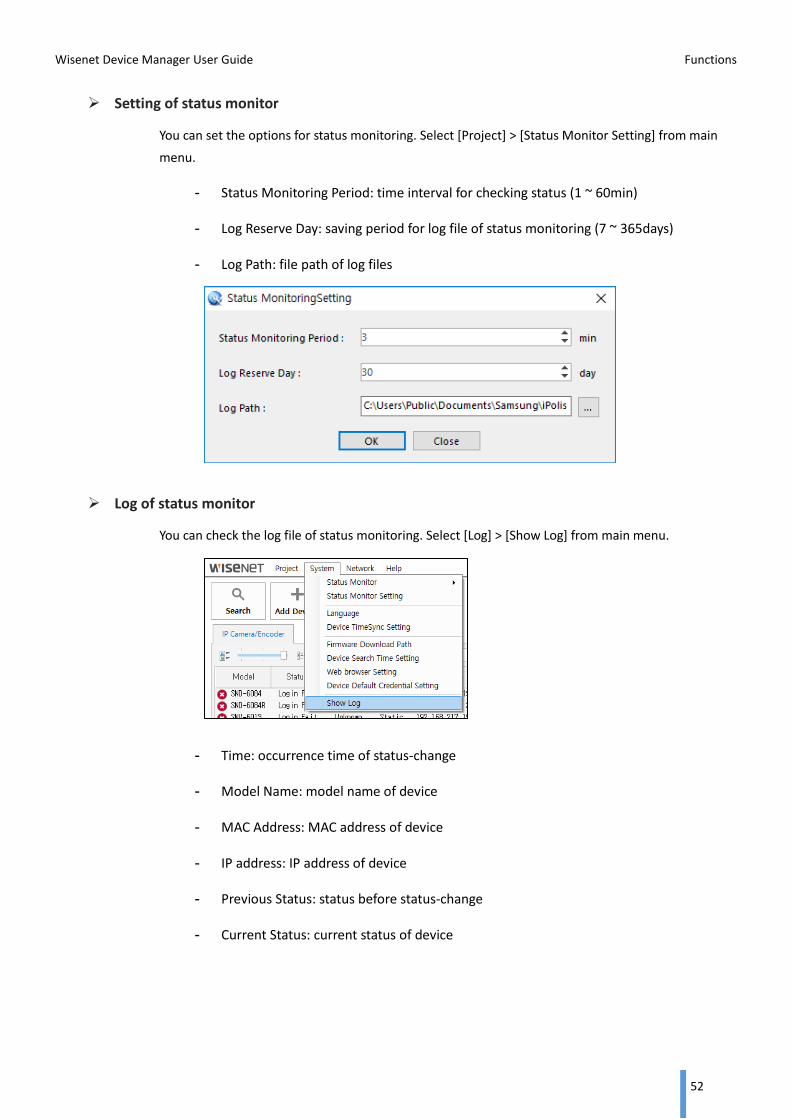
38. Status Monitor
You can monitor the connecting status of network camera and encoder. When connecting status is changed
in on, it displays alarm message in right of the PC screen.
But, it does not display message in case connecting status is changed from [Ready]
Activation/Deactivation of status monitor
You can set the status monitoring mode by Status Monitor’s toggle button at the top of the program.
- [ON]: Activate the status monitor; it monitors the real time status of devices.
- [OFF]: Deactivate the status monitor; it does not monitor the status of devices.
Wisenet Device Manager User Guide Functions
52
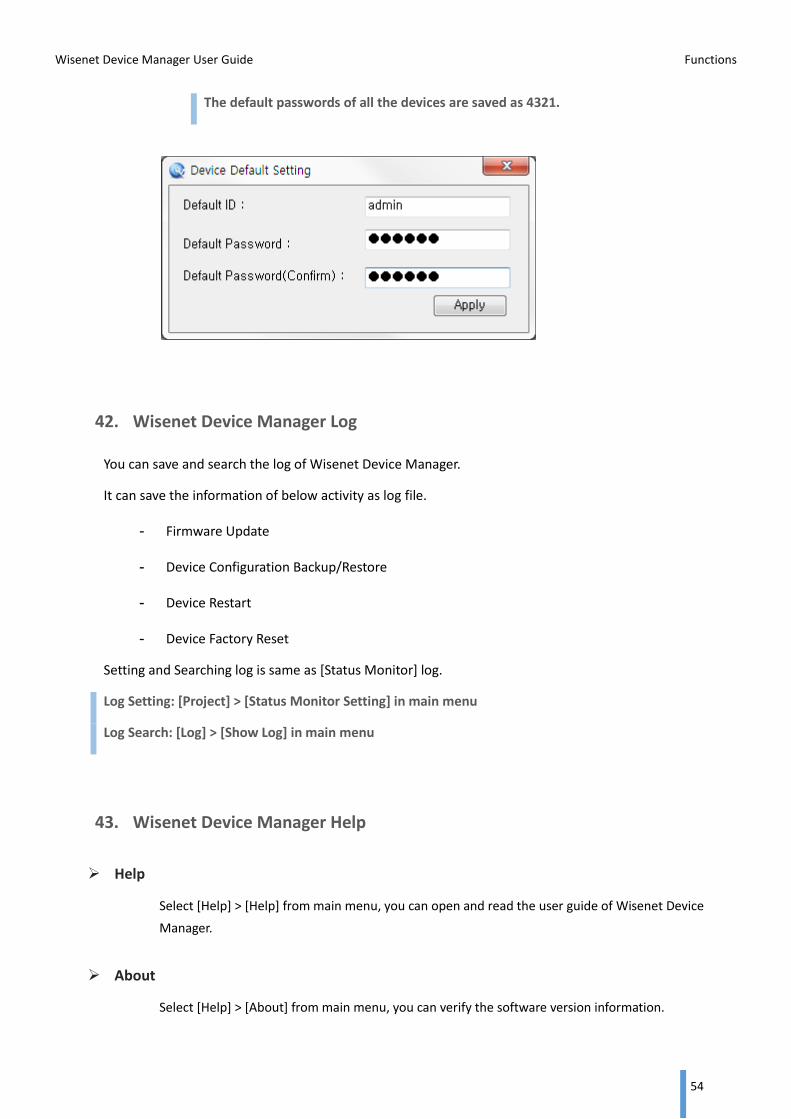
Setting of status monitor
You can set the options for status monitoring. Select [Project] > [Status Monitor Setting] from main
menu.
- Status Monitoring Period: time interval for checking status (1 ~ 60min)
- Log Reserve Day: saving period for log file of status monitoring (7 ~ 365days)
- Log Path: file path of log files
Log of status monitor
You can check the log file of status monitoring. Select [Log] > [Show Log] from main menu.
- Time: occurrence time of status-change
- Model Name: model name of device
- MAC Address: MAC address of device
- IP address: IP address of device
- Previous Status: status before status-change
- Current Status: current status of device

Wisenet Device Manager User Guide Functions
53
39. Wisenet Device Manager Language Setup
You can select language of this application. Select [System] > [Language] from main menu.
1) Select a language.
2) Click [OK]. The language will be immediately applied.
40. Web Browser Setting
When you double-click a device on device list, you can open the web viewer of that. You can set the web
browser for web viewer.
Select [System] > [Web browser Setting] from main menu.
[Web browser] displays web browser list which is installed in PC. Select the web browser and click [Apply]
button.
41. Device Default Credential Setting
You can set the device default setting for device credential.
Select [System] > [Device Default Credential Setting] from main menu.
Enter [Default ID] and [Default Password], then click [Apply] button.
Wisenet Device Manager User Guide Functions
54
The default passwords of all the devices are saved as 4321.
42. Wisenet Device Manager Log
You can save and search the log of Wisenet Device Manager.
It can save the information of below activity as log file.
- Firmware Update
- Device Configuration Backup/Restore
- Device Restart
- Device Factory Reset
Setting and Searching log is same as [Status Monitor] log.
Log Setting: [Project] > [Status Monitor Setting] in main menu
Log Search: [Log] > [Show Log] in main menu
43. Wisenet Device Manager Help
Help
Select [Help] > [Help] from main menu, you can open and read the user guide of Wisenet Device
Manager.
About
Select [Help] > [About] from main menu, you can verify the software version information.

Wisenet Device Manager User Guide Functions
55
44. Tray Icon
While Wisenet Device Manager is running, icon appears in the system tray. Even if you close the program
dialog, it does not quit a program and keeps up the work. To exit the program, use the menu of tray icon.
And, you can indicate the status
Menu of Tray Icon
- Show: Shows Wisenet Device Manager Program.
- Status Monitor On: Sets status monitor to ON.
- Status Monitor Off: Sets status monitor to OFF.
- Exit: Exits Wisenet Device Manager Program.
45. Online Updater
The Online Updater will be installed together when you install Wisenet Device Manager. If there exists the
latest version, you will have a message when you start Wisenet Device Manager. Then you can easily
download and install the program through Online Updater.
46. NVR Setup
NVR Setup is used to configure the NVR device using the Config file.
Factory-set device can also be set.

Wisenet Device Manager User Guide Functions
56
If a device is already added, it can be checked by a list.
You can see the following screen when adding device through [Add Camera] button.
You can also select the desired recording profile and Live profile.
If you press [Save] button, you can transfer the file to NVR. [%] Is displayed on the [Save] button.

Wisenet Device Manager User Guide Functions
57
Add Camera
It displays the logged in camera and can be added to the NVR.
Delete
This button can be selected and deleted from the list.
REC Setting
REC Setting can set the recording schedule for each channel.
Wisenet Device Manager User Guide Functions
58
Layout Setting
Layout Setting can set the layout of the device.
Save will not activate unless you select a layout.