wireless sensor battery replacement instructions shock processor transmitter page 13 glassbreak...
TRANSCRIPT
©2017 ADT Security Services Canada, Inc. All rights reserved. ADT, the ADT logo, 888.ADT.ASAP and the product/service names listed are marks and/or registered marks of ADT. Unauthorized use is strictly prohibited. Third party marks are the property of their respective owners. Licence number: RBQ 3019‐4070‐50
1
Wireless Sensor Battery Replacement Instructions For residential control panels
Your ADT residential security system may be installed with "wireless" sensors, such as door and window contacts, motion detectors, glassbreak detectors, smoke/heat detectors and carbon monoxide detectors that are self‐powered by internal batteries. The batteries inside these wireless sensors must be replaced from time to time due to age and usage. The battery in a wireless sensor needs to be replaced when the keypad displays a "BAT" or "LO BAT" message along with the sensor’s point or zone. In most cases you can replace the battery in these wireless sensors yourself, typically saving you time and money. The process requires that the wireless sensor be identified and the removal and replacement of the battery (or batteries) according the Battery Replacement Instructions shown below. Please read these instructions carefully, including the Battery Safety Warning instructions on page 2.
Battery replacement steps
1 ‐ Determine which wireless sensor is causing the "LO BAT" or "BAT" message on the keypad display by the
description or point/zone number of the sensor that is shown on the keypad’s display.
2 ‐ After you have located the wireless sensor, identify the model number of the sensor by comparing the
sensor with the photographs shown below in the Table of Contents on page 3.
If you cannot identify the model number of the sensor, call 888.ADT.ASAP to schedule a service call.
3 ‐ If after reviewing the specific Battery Replacement Instructions given below for that model of sensor, and the
Battery Safety Warning on page 2, you then choose to replace the battery yourself, contact ADT at
888.ADT.ASAP to have a replacement battery sent to you or you can purchase a CR123A battery at a local
battery supply store.
4 ‐ Upon receipt of the battery you can proceed to replace the battery:
Ensure you have your Personal Identification Code (PIC) and then call the ADT Customer Experience
Department at 888.ADT.ASAP to request that your security system be placed "on test".
With the system "on test" replace the battery, or batteries, following the steps in the specific Battery
Replacement Instructions shown below for that model of sensor. Then proceed to Step 5.
5 ‐ Go to your alarm system keypad to make sure that it no longer displays a "BAT" or "LO BATTERY" message.
If either the "BAT" or "LO BATTERY" message is still displayed please call ADT at 888.ADT.ASAP to
schedule a service call for a service technician to inspect your security system.
6 ‐ Test your security system to make sure it is working properly. Follow the instructions in the control panels
"User’s Guide" in the "Testing the System" section. "User’s Guides" are available for downloading at www.adt.ca
If any issues, please call ADT at 888.ADT.ASAP to schedule a service call.
7 ‐ Call 888.ADT.ASAP and request that the system be removed from test.
8 ‐ Take your old emergency backup power supply to the nearest recycling centre.

©2017 ADT Security Services Canada, Inc. All rights reserved. ADT, the ADT logo, 888.ADT.ASAP and the product/service names listed are marks and/or registered marks of ADT. Unauthorized use is strictly prohibited. Third party marks are the property of their respective owners. Licence number: RBQ 3019‐4070‐50
2
Battery Safety Warning
This section on Battery Safety should be read in its entirety and its contents understood before handling or using
a non rechargeable metallic lithium battery. MSDS (Material Safety Data Sheets) are available upon request.
• Due to the potential energy stored in a non‐rechargeable metallic lithium battery, improper handling
or use of the battery or failure to observe the precautions listed in this document may result in bodily
injury caused by electrolyte leakage, heat generation or explosion.
• USE ELECTRICALLY INSULATED TOOLS. Use of un‐insulated tools may cause a short circuit and the heat
or sparks generated by the short circuit can result in burns, damage to the battery or sensor, or an
explosion. Metallic tools may be insulated using vinyl or electrician’s tape.
• When unpacking the battery, make sure to handle it gently. Check that the battery is free from dents
or leakage. Excessive force should not be used to free a battery lodged inside the sensor and the battery
should not be forced into the sensor housing. These may cause an internal short circuit in the battery.
If at any time you feel uncertain that you can follow these instructions or want to have the battery replaced by an
ADT service technician, contact the ADT Customer Care Department at 888.ADT.ASAP and schedule a service
appointment. In most cases, ADT’s standard service charge will apply.
If you choose to replace the battery yourself, contact ADT at 888.ADT.ASAP to have replacement CR123A
batteries sent to you or you can purchase them at a local battery supply store.
*Please test your system monthly. Place your system on test by calling 888.ADT.ASAP

©2017 ADT Security Services Canada, Inc. All rights reserved. ADT, the ADT logo, 888.ADT.ASAP and the product/service names listed are marks and/or registered marks of ADT. Unauthorized use is strictly prohibited. Third party marks are the property of their respective owners. Licence number: RBQ 3019‐4070‐50
3
Table of contents
LIFE SAFETY DEVICES
5800CO Carbon Monoxide (CO) Detector with Built‐In Wireless Transmitter
Page 6
5808 Photoelectronic Smoke/Heat Detector with Built‐in Wireless Transmitter
Page 7
5808LST Photoelectronic Smoke/Heat Detector with Built‐in Wireless Transmitter
Page 7
5808W3 / W3‐ADT Photoelectronic Smoke/Temperature Detector with Built‐in Wireless Transmitter
Page 8
5809 Rate‐Of‐Rise Heat Detector with Built‐In Wireless Transmitter
Page 9
DOOR, WINDOW AND TEMPERATURE SENSORS
5816 Door/Window Transmitter 5816WMBR Door /Window Transmitter (Brown) 5816WMWH Door /Window Transmitter (White)
Page 10

©2017 ADT Security Services Canada, Inc. All rights reserved. ADT, the ADT logo, 888.ADT.ASAP and the product/service names listed are marks and/or registered marks of ADT. Unauthorized use is strictly prohibited. Third party marks are the property of their respective owners. Licence number: RBQ 3019‐4070‐50
4
Table of contents (cont’d)
5816MN Miniature Door Window Transmitter Page 11
5817 Multi‐Point Universal Transmitter Page 12
5817CB Commercial Burglary Transmitter Page 12
5819 Shock Processor Transmitter 5819BRS/5819WHS Shock Processor Transmitter
Page 13
GLASSBREAK DETECTOR
5853 Glassbreak Detector with Built‐In Wireless Transmitter Page 14

©2017 ADT Security Services Canada, Inc. All rights reserved. ADT, the ADT logo, 888.ADT.ASAP and the product/service names listed are marks and/or registered marks of ADT. Unauthorized use is strictly prohibited. Third party marks are the property of their respective owners. Licence number: RBQ 3019‐4070‐50
5
Table of contents (cont’d)
MOTION DETECTORS 5800PIR Indoor PIR Motion Detector with Built‐In Wireless
Transmitter 5800PIR‐RES Residential PIR Motion Detector with Built‐In Wireless Transmitter
Page 15
5890 PIR Motion Detector with Built‐In Wireless Transmitter 5890PI PIR Motion Detector with Pet Immunity with Built‐In Wireless Transmitter
Page 16
IMAGE SENSOR
TIIMAGE Image sensor 2GIG GE60094IMGKT Image sensor GE QOIMAGE Image sensor Qolsys
Page 17

©2017 ADT Security Services Canada, Inc. All rights reserved. ADT, the ADT logo, 888.ADT.ASAP and the product/service names listed are marks and/or registered marks of ADT. Unauthorized use is strictly prohibited. Third party marks are the property of their respective owners. Licence number: RBQ 3019‐4070‐50
6
Battery Replacement Instructions 5800CO Carbon Monoxide (CO) Detector with Built‐In Wireless TransmitterBattery: CR123A 3‐volt Lithium
1. Put your alarm system into TEST mode (Typically by entering your user code plus the number 5 (TEST)
on the touchpad). The alarm sounder will sound momentarily. While the alarm system is in the TEST
mode, the touchpad will beep about every 30 seconds.
2. Remove the detector from its mounting base by twisting the detector counterclockwise. Remove the
battery and dispose of properly.
3. Wait at least 30 seconds before installing the new battery.
4. Remove the plastic film from the lithium batteries. Install a new CR123A Lithium battery in the battery
compartment. Follow the polarity diagram inside the compartment.
5. Reinstall the detector onto the mounting base by turning the detector clockwise.
6. The green LED should blink about once every 10 seconds to indicate normal operation. If the battery is
not installed correctly, the detector will not operate and the battery may be damaged. If the detector
does not appear to be sending a signal during any of the tests, check for correct battery installation and
for a fully charged battery.
7. Exit the alarm system TEST mode by entering your user code plus the number 1 (OFF). Enter your user
code plus the number 1 (OFF) again. The low battery message should disappear.
BATTERY CAUTION: Risk of fire, explosion and burns. Do not recharge, disassemble, heat above 212F (100C)
or incinerate. Dispose of used batteries promptly. Keep batteries away from children.

©2017 ADT Security Services Canada, Inc. All rights reserved. ADT, the ADT logo, 888.ADT.ASAP and the product/service names listed are marks and/or registered marks of ADT. Unauthorized use is strictly prohibited. Third party marks are the property of their respective owners. Licence number: RBQ 3019‐4070‐50
7
Battery Replacement Instructions 5808 Photoelectronic Smoke/Heat Detector with Built‐in Wireless Transmitter5808LST Photoelectronic Smoke/Heat Detector with Built‐in Wireless Transmitter Battery: CR123A 3‐volt Lithium (two required)
The smoke detector checks for low batteries at least every 60 minutes. If a low battery is detected, the transmitter
sends a low battery message to the control panel, which beeps and displays the detector's ID. This condition will
exist for a minimum of seven days, and then the detector's horn will "chirp" about every 40 seconds. The batteries
should be replaced BEFORE the chirps begin. BE SURE TO REPLACE BOTH BATTERIES WITH FRESH ONES.
1. Put your alarm system into TEST mode (typically by entering your user code plus the number 5 (TEST)
on the touchpad). The alarm sounder will sound momentarily. While the alarm system is in the TEST
mode, the touchpad will beep about every 30 seconds.
2. Remove the smoke detector body from its mounting base by turning the detector body
counterclockwise approximately ½ ‐inch.
3. Remove the battery, and dispose properly. Wait at least 30 seconds before installing a new battery.
4. Install new CR123A Lithium batteries in the battery compartment. Follow the polarity diagram inside the
compartment.
5. Replace the smoke detector by aligning the ridge on the body with the raised arrow on the base and
turning the detector clockwise approximately ½ ‐inch.
6. Press the test button. Hold until touchpad activates (about 30 seconds), then release.
7. Exit the alarm system TEST mode by entering your user code plus the number 1 (OFF). Enter your user
code plus the number 1 (OFF) again. The low battery message should disappear.
BATTERY CAUTION: Risk of fire, explosion and burns. Do not recharge, disassemble, heat above 212F (100C)
or incinerate. Dispose of used batteries promptly. Keep batteries away from children.

©2017 ADT Security Services Canada, Inc. All rights reserved. ADT, the ADT logo, 888.ADT.ASAP and the product/service names listed are marks and/or registered marks of ADT. Unauthorized use is strictly prohibited. Third party marks are the property of their respective owners. Licence number: RBQ 3019‐4070‐50
8
Battery Replacement Instructions 5808W3 / W3‐ADT Photoelectronic Smoke/Temperature Detector with Built‐in Wireless Transmitter Battery: CR123A 3‐volt Lithium
The detector checks for a low battery at least every 65 minutes. If a low battery is detected, the transmitter sends
a low battery message to the control panel, which beeps and displays the detector’s zone number. In addition,
the red LED of the will blink every 45 seconds and the test switch will be disabled. This condition will exist for a
minimum of 7 days, and then the detector’s horn will “chirp” about every 45 seconds. Pressing the test switch
during this time will silence the chirps for 12 hours. The battery should be replaced BEFORE the chirps begin. Be
sure to replace the battery with a fresh one.
1. Put your alarm system into TEST mode (typically by entering your user code plus the number 5 (TEST)
on the touchpad). The alarm sounder will sound momentarily. While the alarm system is in the TEST
mode, the touchpad will beep about every 30 seconds.
2. Remove the smoke detector body from its mounting base by turning the detector body
counterclockwise approximately ½ ‐inch.
3. Remove the battery, and dispose properly. Wait at least 30 seconds before installing a new battery.
4. Install new CR123A Lithium batteries in the battery compartment. Follow the polarity diagram inside the
compartment.
5. Replace the smoke detector by aligning the ridge on the body with the raised arrow on the base and
turning the detector clockwise approximately ½ ‐inch.
6. Press the test button. Hold until touchpad activates (about 30 seconds), then release.
7. Exit the alarm system TEST mode by entering your user code plus the number 1 (OFF). Enter your user
code plus the number 1 (OFF) again. The low battery message should disappear.
BATTERY CAUTION: Risk of fire, explosion and burns. Do not recharge, disassemble, heat above 212F (100C) or
incinerate. Dispose of used batteries promptly. Keep batteries away from children.

©2017 ADT Security Services Canada, Inc. All rights reserved. ADT, the ADT logo, 888.ADT.ASAP and the product/service names listed are marks and/or registered marks of ADT. Unauthorized use is strictly prohibited. Third party marks are the property of their respective owners. Licence number: RBQ 3019‐4070‐50
9
Battery Replacement Instructions 5809 Rate‐Of‐Rise Heat Detector with Built‐In Wireless Transmitter Battery: CR123A 3‐Volt Lithium
1. Put your alarm system into TEST mode (typically by entering your user code plus the number 5 (TEST)
on the touchpad). The alarm sounder will sound momentarily. While the alarm system is in the TEST
mode, the touchpad will beep about every 30 seconds.
2. Remove the heat detector from its base by turning the detector body counterclockwise approximately
3/4 – inch.
3. Remove the battery, and dispose properly. Wait at least 30 seconds before installing a new battery.
4. Observe correct polarity and install a new CR123A Lithium battery in the battery compartment (see
diagram below). Make sure the battery is seated firmly.
5. Replace the heat detector back onto its base by aligning the exposed corner of the C board with the
tamper switch on the base and turning the detector clockwise approximately ¾‐inch.
6. Exit the alarm system TEST mode by entering your user code plus the number 1 (OFF). Enter your user
code plus the number 1 (OFF) again.
7. The low battery message should clear within 90 minutes.
BATTERY CAUTION: Risk of fire, explosion and burns. Do not recharge, disassemble, heat above 212F (100C) or
incinerate. Dispose of used batteries promptly. Keep batteries away from children.

©2017 ADT Security Services Canada, Inc. All rights reserved. ADT, the ADT logo, 888.ADT.ASAP and the product/service names listed are marks and/or registered marks of ADT. Unauthorized use is strictly prohibited. Third party marks are the property of their respective owners. Licence number: RBQ 3019‐4070‐50
10
Battery Replacement Instructions 5816 Door/Window Transmitter5816WMBR Door/Window Transmitter (Brown) 5816WMWH Door/Window Transmitter (White) Battery: CR123A 3‐volt Lithium
1. Put your alarm system into TEST mode (typically by entering your user code plus the number 5 (TEST)
on the touchpad). The alarm sounder will sound momentarily. While the alarm system is in the TEST
mode, the touchpad will beep about every 30 seconds.
2. Remove the transmitter’s cover using the finger latch (some older models may require inserting the flat
blade of a small screwdriver into the pry‐off slot at the bottom end of the unit on the right side closest
to the cover’s decorative ribs and twisting).
3. Remove existing battery from the transmitter, carefully lifting it out with a small screwdriver.
4. Observe correct polarity and install a new CR123A Lithium battery in the battery compartment (see
diagram below). Take care not to bend the antenna.
5. To replace the cover, engage the hooks along one edge and snap shut.
6. Activate the transmitter by opening and shutting the door or window. The touchpad will beep 3 times
confirming reception.
7. Exit the alarm system TEST mode by entering your user code plus the number 1 (OFF). Enter your user
code plus the number 1 (OFF) again. The low battery message should disappear.
BATTERY CAUTION: Risk of fire, explosion and burns. Do not recharge, disassemble, heat above 212F (100C)
or incinerate. Dispose of used batteries promptly. Keep batteries away from children.

©2017 ADT Security Services Canada, Inc. All rights reserved. ADT, the ADT logo, 888.ADT.ASAP and the product/service names listed are marks and/or registered marks of ADT. Unauthorized use is strictly prohibited. Third party marks are the property of their respective owners. Licence number: RBQ 3019‐4070‐50
11
Battery Replacement Instructions 5816MN Miniature Door Window TransmitterBattery: CR123A
1. Put your alarm system into TEST mode (typically by entering your user code plus the number 5 (TEST)
on the touchpad). The alarm sounder will sound momentarily. While the alarm system is in the TEST
mode, the touchpad will beep about every 30 seconds.
2. Remove the transmitter’s cover by inserting the flat blade of a small screwdriver into the pry‐off slot at
the bottom end of the unit on the right side closest to the cover’s decorative ribs and twisting.
3. Remove existing battery from the transmitter, carefully lifting it out with a small screwdriver.
4. Observe correct polarity and install a new CR123A Lithium battery in the battery compartment (see
diagram below). Take care not to bend the antenna.
5. To replace the cover, engage the hooks along one edge and snap shut.
6. Activate the transmitter by opening and shutting the door or window. The touchpad will beep 3 times
confirming reception.
7. Exit the alarm system TEST mode by entering your user code plus the number 1 (OFF). Enter your user
code plus the number 1 (OFF) again. The low battery message should disappear.
BATTERY CAUTION: Risk of fire, explosion and burns. Do not recharge, disassemble, heat above 212F (100C) or
incinerate. Dispose of used batteries promptly. Keep batteries away from children.

©2017 ADT Security Services Canada, Inc. All rights reserved. ADT, the ADT logo, 888.ADT.ASAP and the product/service names listed are marks and/or registered marks of ADT. Unauthorized use is strictly prohibited. Third party marks are the property of their respective owners. Licence number: RBQ 3019‐4070‐50
12
Battery Replacement Instructions 5817 Multi‐Point Universal Transmitter5817CB Commercial Burglary Transmitter Battery: CR123A 3‐Volt Lithium
1. Put your alarm system into TEST mode (typically by entering your user code plus the number 5 (TEST)
on the touchpad). The alarm sounder will sound momentarily. While the alarm system is in the TEST
mode, the touchpad will beep about every 30 seconds.
2. Remove the transmitter’s cover by inserting the flat blade of a small screwdriver into the pry‐off slot at
the bottom end of the unit on the right side closest to the cover’s decorative ribs and twisting.
3. Remove existing battery from the transmitter, carefully lifting it out with a small screwdriver.
4. Observe correct polarity and install a new CR123A Lithium battery in the battery compartment (see
diagram below). Take care not to bend the antenna.
5. To replace the cover, engage the hooks along one edge and snap shut.
6. Activate the transmitter by opening and shutting the door or window. The touchpad will beep 3 times
confirming reception.
7. Exit the alarm system TEST mode by entering your user code plus the number 1 (OFF). Enter your user
code plus the number 1 (OFF) again. The low battery message should disappear.
BATTERY CAUTION: Risk of fire, explosion and burns. Do not recharge, disassemble, heat above 212F (100C) or
incinerate. Dispose of used batteries promptly. Keep batteries away from children.

©2017 ADT Security Services Canada, Inc. All rights reserved. ADT, the ADT logo, 888.ADT.ASAP and the product/service names listed are marks and/or registered marks of ADT. Unauthorized use is strictly prohibited. Third party marks are the property of their respective owners. Licence number: RBQ 3019‐4070‐50
13
Battery Replacement Instructions
5819 Shock Processor Transmitter5819BRS/5819WHS Shock Processor Transmitter Battery: CR123A 3‐Volt Lithium
1. Put your alarm system into TEST mode (typically by entering your user code plus the number 5 (TEST)
on the touchpad). The alarm sounder will sound momentarily. While the alarm system is in the TEST
mode, the touchpad will beep about every 30 seconds.
2. Remove the transmitter’s cover by inserting the flat blade of a small screwdriver into the pry‐off slot at
the bottom end of the unit on the right side closest to the cover’s decorative ribs and twisting.
3. Remove existing battery from the transmitter, carefully lifting it out with a small screwdriver.
4. Observe correct polarity and install a new CR123A Lithium battery in the battery compartment (see
diagram below). Take care not to bend the antenna.
5. To replace the cover, engage the hooks along one edge and snap shut.
6. Activate the transmitter by opening and shutting the door or window. The touchpad will beep 3 times
confirming reception.
7. Exit the alarm system TEST mode by entering your user code plus the number 1 (OFF). Enter your user
code plus the number 1 (OFF) again. The low battery message should disappear.
BATTERY CAUTION: Risk of fire, explosion and burns. Do not recharge, disassemble, heat above 212F (100C) or
incinerate. Dispose of used batteries promptly. Keep batteries away from children.

©2017 ADT Security Services Canada, Inc. All rights reserved. ADT, the ADT logo, 888.ADT.ASAP and the product/service names listed are marks and/or registered marks of ADT. Unauthorized use is strictly prohibited. Third party marks are the property of their respective owners. Licence number: RBQ 3019‐4070‐50
14
Battery Replacement Instructions 5853 Glassbreak Detector with Built‐In Wireless TransmitterBattery: CR123A 3‐volt Lithium (2 required)
NOTE: In some cases a cover screw may have been use. Prior to opening the case, remove this screw is present.
1. Put your alarm system into TEST mode (typically by entering your user code plus the number 5 (TEST)
on the touchpad). The alarm sounder will sound momentarily. While the alarm system is in the TEST
mode, the touchpad will beep about every 30 seconds.
2. Remove the transmitter’s cover by inserting the flat blade of a small screwdriver into the pry‐off slot at
one end of the unit (see Figure for location), and slightly twisting the blade until the cover disengages.
IMPORTANT: DO NOT REMOVE the circuit board from the back case plastic.
3. Observe correct polarity and install a new CR123A Lithium battery in the battery compartment (see
diagram below). Take care not to bend the antenna.
4. To replace the cover, engage the hooks along one edge and snap shut.
5. Exit the alarm system TEST mode by entering your user code plus the number 1 (OFF). Enter your user
code plus the number 1 (OFF) again. The low battery message should disappear.
BATTERY CAUTION: Risk of fire, explosion and burns. Do not recharge, disassemble, heat above 212F (100C) or
incinerate. Dispose of used batteries promptly. Keep batteries away from children.

©2017 ADT Security Services Canada, Inc. All rights reserved. ADT, the ADT logo, 888.ADT.ASAP and the product/service names listed are marks and/or registered marks of ADT. Unauthorized use is strictly prohibited. Third party marks are the property of their respective owners. Licence number: RBQ 3019‐4070‐50
15
Battery Replacement Instructions 5800PIR Indoor PIR Motion Detector with Built‐In Wireless Transmitter 5800PIR‐RES Residential PIR Motion Detector with Built‐In Wireless Transmitter Battery: CR123A 3‐volt Lithium
1. Put your alarm system into TEST mode (typically by entering your user code plus the number 5 (TEST)
on the touchpad). The alarm sounder will sound momentarily. While the alarm system is in the TEST
mode, the touchpad will beep about every 30 seconds.
2. Open the detector by pressing on finger tab as shown in the Figure.
3. Remove existing battery by carefully lifting it out with a small screwdriver.
4. Observe correct polarity and install a new CR123A Lithium battery in the battery compartment (see
diagram below). Take care not to bend the antenna.
5. To replace the cover, engage the hooks along one edge and snap shut.
6. Allow the motion detector to re‐set by leaving the room for at least 4 minutes; then walk past the
detector to activate it. The touchpad will beep 3 times confirming reception.
7. Exit the alarm system TEST mode by entering your user code plus the number 1 (OFF). Enter your user
code plus the number 1 (OFF) again. The low battery message should disappear.
BATTERY CAUTION: Risk of fire, explosion and burns. Do not recharge, disassemble, heat above 212F (100C) or
incinerate. Dispose of used batteries promptly. Keep batteries away from children.

©2017 ADT Security Services Canada, Inc. All rights reserved. ADT, the ADT logo, 888.ADT.ASAP and the product/service names listed are marks and/or registered marks of ADT. Unauthorized use is strictly prohibited. Third party marks are the property of their respective owners. Licence number: RBQ 3019‐4070‐50
16
Battery Replacement Instructions 5890 PIR Motion Detector/Transmitter with Built‐In Wireless Transmitter 5890PI PIR Motion Detector/Transmitter with Pet Immunity with Built‐In Wireless Transmitter Battery: CR123A 3‐volt Lithium (2 required)
1. Put your alarm system into TEST mode (typically by entering your user code plus the number 5 (TEST)
on the touchpad). The alarm sounder will sound momentarily. While the alarm system is in the TEST
mode, the touchpad will beep about every 30 seconds.
2. Remove front cover by inserting a large screwdriver blade (or small coin) in groove between cover and
base at the location shown in Figure 1; rotate blade to override snap fit then lift cover off.
3. Remove existing battery by carefully lifting it out with a small screwdriver.
4. Observe correct polarity and install a new CR123A Lithium battery in the battery compartment (see
diagram below).
5. To replace the cover, engage the hooks along one edge and snap shut.
6. Allow the motion detector to re‐set by leaving the room for at least 4 minutes; then walk past the
detector to activate it. The touchpad will beep 3 times confirming reception.
7. Exit the alarm system TEST mode by entering your user code plus the number 1 (OFF). Enter your user
code plus the number 1 (OFF) again. The low battery message should disappear.
BATTERY CAUTION: Risk of fire, explosion and burns. Do not recharge, disassemble, heat above 212F (100C) or
incinerate. Dispose of used batteries promptly. Keep batteries away from children.
©2017 ADT Security Services Canada, Inc. All rights reserved. ADT, the ADT logo, 888.ADT.ASAP and the product/service names listed are marks and/or registered marks of ADT. Unauthorized use is strictly prohibited. Third party marks are the property of their respective owners. Licence number: RBQ 3019‐4070‐50
17
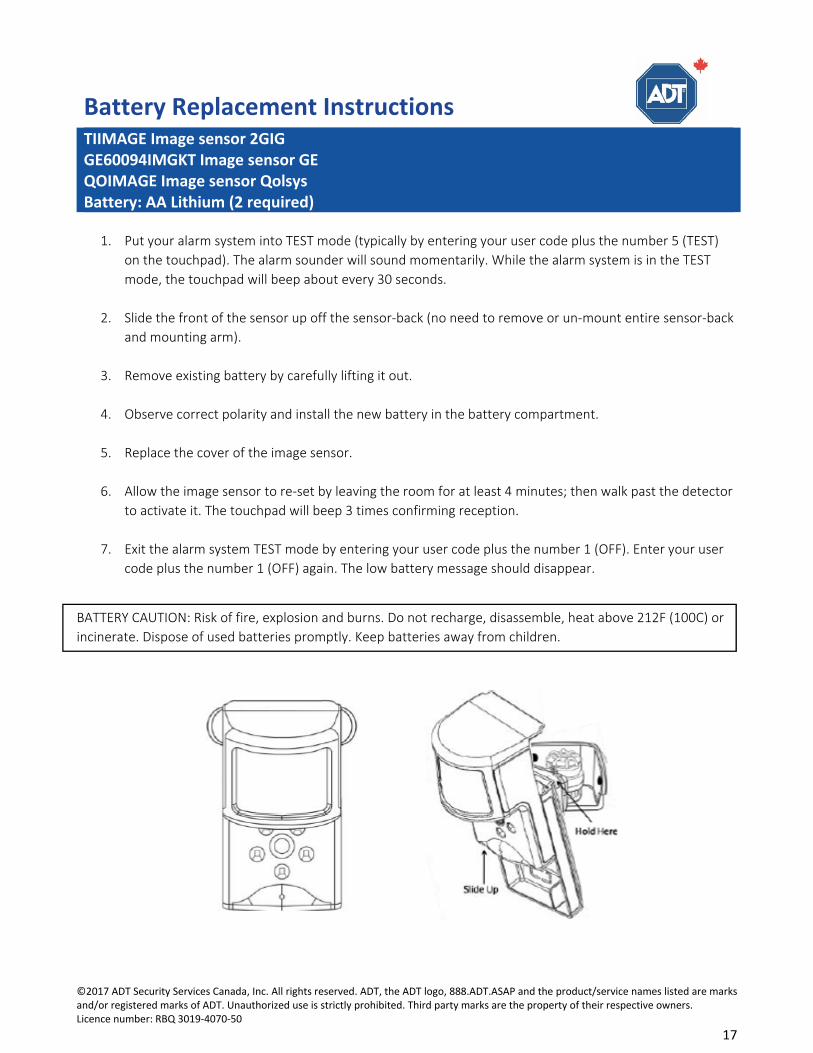
Battery Replacement Instructions TIIMAGE Image sensor 2GIG GE60094IMGKT Image sensor GE QOIMAGE Image sensor Qolsys Battery: AA Lithium (2 required)
1. Put your alarm system into TEST mode (typically by entering your user code plus the number 5 (TEST)
on the touchpad). The alarm sounder will sound momentarily. While the alarm system is in the TEST
mode, the touchpad will beep about every 30 seconds.
2. Slide the front of the sensor up off the sensor‐back (no need to remove or un‐mount entire sensor‐back
and mounting arm).
3. Remove existing battery by carefully lifting it out.
4. Observe correct polarity and install the new battery in the battery compartment.
5. Replace the cover of the image sensor.
6. Allow the image sensor to re‐set by leaving the room for at least 4 minutes; then walk past the detector
to activate it. The touchpad will beep 3 times confirming reception.
7. Exit the alarm system TEST mode by entering your user code plus the number 1 (OFF). Enter your user
code plus the number 1 (OFF) again. The low battery message should disappear.
BATTERY CAUTION: Risk of fire, explosion and burns. Do not recharge, disassemble, heat above 212F (100C) or
incinerate. Dispose of used batteries promptly. Keep batteries away from children.