wireless multi-point gas detection system
TRANSCRIPT

User Manual
Rig Rat III Detector
Wireless Multi-Point Gas Detection System
D2124/2 EnglishiERP: 116448
© 2004 BW Technologies. All rights reserved. Printed in Canada.
All product names are trademarks of their respective companies.

Limited Warranty & Limitation of Liability BW Technologies LP (BW) warrants this product to be free from defects in material and workmanship under normal use and service for a period of two years, beginning on the date of shipment to the buyer. This warranty extends only to the sale of new and unused products to the original buyer. BW’s warranty obligation is limited, at BW’s option, to refund of the purchase price, repair, or replacement of a defective product that is returned to a BW authorized service center within the warranty period. In no event shall BW’s liability hereunder exceed the purchase price actually paid by the buyer for the Product. This warranty does not include:
a) fuses, disposable batteries or the routine replacement of parts due to the normal wear and tear of the product arising from use; b) any product which in BW’s opinion, has been misused, altered, neglected or damaged by accident or abnormal conditions of operation, handling or use; c) any damage or defects attributable to repair of the product by any person other than an authorized dealer, or the installation of unapproved parts on the
product; or The obligations set forth in this warranty are conditional on:
a) proper storage, installation, calibration, use, maintenance and compliance with the product manual instructions and any other applicable recommendations of BW;
b) the buyer promptly notifying BW of any defect and, if required, promptly making the product available for correction. No goods shall be returned to BW until receipt by the buyer of shipping instructions from BW; and
c) the right of BW to require that the buyer provide proof of purchase such as the original invoice, bill of sale or packing slip to establish that the product is within the warranty period.
THE BUYER AGREES THAT THIS WARRANTY IS THE BUYER’S SOLE AND EXCLUSIVE REMEDY AND IS IN LIEU OF ALL OTHER WARRANTIES, EXPRESS OR IMPLIED, INCLUDING BUT NOT LIMITED TO ANY IMPLIED WARRANTY OF MERCHANTABILITY OR FITNESS FOR A PARTICULAR PURPOSE. BW SHALL NOT BE LIABLE FOR ANY SPECIAL, INDIRECT, INCIDENTAL OR CONSEQUENTIAL DAMAGES OR LOSSES, INCLUDING LOSS OF DATA, WHETHER ARISING FROM BREACH OF WARRANTY OR BASED ON CONTRACT, TORT OR RELIANCE OR ANY OTHER THEORY. Since some countries or states do not allow limitation of the term of an implied warranty, or exclusion or limitation of incidental or consequential damages, the limitations and exclusions of this warranty may not apply to every buyer. If any provision of this warranty is held invalid or unenforceable by a court of competent jurisdiction, such holding will not affect the validity or enforceability of any other provision.
Canada USA Europe BW Technologies LP BW America BW Europe
2840 – 2nd Avenue SE 3279 West Pioneer Parkway 5 Canada Close Calgary, AB Arlington, TX Banbury, Oxfordshire Canada T2A 7X9 USA 76013 United Kingdom OX16 2RT

Table of Contents
Title Page
Introduction............................................................................................................................................ 1 Contacting BW Technologies................................................................................................................ 3 Safety Information - Read First ............................................................................................................. 3 Getting Started ...................................................................................................................................... 7 Rig Rat III Detector................................................................................................................................ 8
External Components ............................................................................................................ 8 Operations Bay Panel............................................................................................................ 9 Internal Components ........................................................................................................... 10 Display Elements ................................................................................................................. 11 Main System Components and Option Devices.................................................................. 12 Detector Pushbuttons .......................................................................................................... 13 Detector Mounting Requirements........................................................................................ 14
Installation ........................................................................................................................................... 15 Installation Location ............................................................................................................. 15 The Detector ........................................................................................................................ 15 The Antenna ........................................................................................................................ 16 Mounting the Detector ......................................................................................................... 17 Cable Installation ................................................................................................................. 17 Grounding the Detector ....................................................................................................... 17
Setting the Detector and Transceiver Channels................................................................................. 20 The Sensors........................................................................................................................................ 22
Sensor Locations ................................................................................................................. 22 Sensor Installation ............................................................................................................... 23 Sensor Measuring Ranges .................................................................................................. 25
Installing Optional Devices/Accessories ............................................................................................. 26
iIndependent Power ............................................................................................................................. 26

Rig Rat III Detector User Manual
Battery Life ...........................................................................................................................27 Battery Level ........................................................................................................................28 Line Power ...........................................................................................................................28 Charger Power.....................................................................................................................28 Applying Power ....................................................................................................................28 Sensor Readout Status........................................................................................................29
Calibration and Setting Alarm Setpoints .............................................................................................29 Guidelines ............................................................................................................................30 When to Calibrate ................................................................................................................30 Calibration Features ............................................................................................................30 Setting the Alarm Setpoints .................................................................................................32 Calibrating Stainless Steel Sensors ....................................................................................33 Calibrating Encapsulated Sensors ......................................................................................33 Transmission Interval...........................................................................................................36 End Calibration ....................................................................................................................38
Alarms .............................................................................................................................................39 Viewing the Maximum Gas Level........................................................................................................43 Setting Dipswitches for Alarm Options................................................................................................43
Alarm Option Features and Exceptions...............................................................................45 Maintenance........................................................................................................................................45
Replacing the Fuse (500mA) ...............................................................................................46 Storage and Transport .........................................................................................................46 Prior to Storage or Transport ...............................................................................................46
System Test ........................................................................................................................................48 Test Signal Transmission and Reception............................................................................48 Test Sensor Integrity Alarm .................................................................................................48 Test Low and High Alarm Functions....................................................................................49 System Inspection................................................................................................................49
Troubleshooting...................................................................................................................................50 Replacement Parts and Accessories ..................................................................................................52 Specifications ......................................................................................................................................54 Appendix A Encapsulated Sensors.....................................................................................................57
ii

Sensor Specifications (Encapsulated)................................................................................. 58 Calibration Gas Specifications............................................................................................. 61 Measuring Ranges for Encapsulated Sensors .................................................................... 62 Relative Sensitivity of Combustible Gases/Vapours ........................................................... 63
Appendix B Installation Requirements................................................................................................ 65 Installation of an Unapproved Charger — Detector ............................................................ 66 Installation of an Unapproved External Charger ................................................................. 68 IS Sensor Barrier Installation............................................................................................... 74
Appendix C Stainless Steel Sensors .................................................................................................. 75 Stainless Steel Sensors (Toxic/O2) ..................................................................................... 76 Calibration (Stainless Steel Sensors).................................................................................. 76 Transmission Interval........................................................................................................... 78 End Calibration .................................................................................................................... 80 Maintenance ........................................................................................................................ 80 Specifications (Stainless Steel Sensors)............................................................................. 82 Measuring Ranges for Stainless Steel Sensors.................................................................. 86
iii

Rig Rat III Detector User Manual
iv

List of Tables
Table Title Page 1. The Rig Rat III Detector ......................................................................................................... 2 2. Gases Monitored ................................................................................................................... 2 3. International Symbols ............................................................................................................ 6 4. Rig Rat III External Components ........................................................................................... 8 5. Operations Bay Panel............................................................................................................ 9 6. Detector Internal Components............................................................................................. 10 7. Display Elements ................................................................................................................. 11 8. Main System Components................................................................................................... 12 9. Pushbuttons......................................................................................................................... 13 10. System Cable Connection ................................................................................................... 17 11. Sensor Measuring Range Selection.................................................................................... 26 12. Sensor Types and Battery Life ............................................................................................ 27 13. Sensor Stabilization ............................................................................................................. 29 14. Default Factory Settings ...................................................................................................... 31 15. Alarms.................................................................................................................................. 39 16. Default Alarm Dip Switch Settings....................................................................................... 44 17. Alarm Dip Switch Settings ................................................................................................... 44 18. Troubleshooting Tips ........................................................................................................... 50 19. Replacement Parts and Accessories .................................................................................. 52 20. Operating and Calibration Specifications for Each Encapsulated Sensor .......................... 58 21. Encapsulated Sensor Measuring Ranges ........................................................................... 62 22. Relative Sensitivity of Combustible Gases/Vapours ........................................................... 63 23. Limiting Energy .................................................................................................................... 67 24. I.S. Barrier Example............................................................................................................. 70 25. I.S. Barrier Configurations ................................................................................................... 73
v

Rig Rat III Detector User Manual
26. I.S. Barrier Requirements ....................................................................................................73 27. Toxic/O2 Sensor Replacement Parts ...................................................................................81 28. Operating and Calibration Specifications for Each Stainless Steel Sensor ........................83 29. Stainless Steel Sensor Measuring Ranges .........................................................................86
vi

List of Figures
Figure Title Page 1. Rig Rat III External Components ........................................................................................... 8 2. Operations Bay Panel............................................................................................................ 9 3. Detector Internal Components............................................................................................. 10 4. Display Elements ................................................................................................................. 11 5. Main System Components................................................................................................... 12 6. Mounting Requirements ...................................................................................................... 14 7. Confined Space Installation................................................................................................. 15 8. Bonding the Detector ........................................................................................................... 18 9. Bonding with Bonding Cable ............................................................................................... 19 10. Grounding Rod Installation .................................................................................................. 20 11. RIG RAT III Transceiver ...................................................................................................... 21 12. Channel Rotary Switch ........................................................................................................ 21 13. Transceiver A and B Channels............................................................................................ 21 14. Sensor Ports on Detector .................................................................................................... 23 15. Sensor Dimensions (Encapsulated) .................................................................................... 24 16. Labeling the Sensors on the Detector ................................................................................. 24 17. Sensor Measuring Range Rotary Switches......................................................................... 25 18. Battery Levels ...................................................................................................................... 28 21. Sensor Magnet and Magnetic Pen ...................................................................................... 33 19. Calibrating the Encapsulated Sensor .................................................................................. 34 20. Calibration Connections ...................................................................................................... 35 22. Measuring Range Dip Switches .......................................................................................... 43 23. Pin A and Pin B Option Ports .............................................................................................. 45 24. Gas Detection System Interconnection ............................................................................... 66 25. Division 2 Unapproved External Charger Installation.......................................................... 68 26. Division 1 Unapproved External Charger Installation.......................................................... 69 27. Division 2 Unapproved Accessory Installation .................................................................... 71
vii
Rig Rat III Detector User Manual
28. Division 1 Unapproved Accessory Installation ....................................................................72 29. Approved IS Sensor Barrier Installation ..............................................................................74 30. Sensor Dimensions (Stainless Steel) ..................................................................................76 31. Cylinder Connection for Calibration.....................................................................................77 32. Calibration Cap and Blanking Plugs ....................................................................................80 33. Toxic/O2 Sensor Replacement ............................................................................................81
viii

Rig Rat III Detector
Introduction a Warning
To ensure your personal safety, read the Safety Information before using the detector.
The Rig Rat III Detector (the detector) is a wireless* multi-point gas detection system that emits an alarm when hazardous gas levels exceed the user-selectable alarm setpoints.
*Model RR-3000S is a non-wireless multi-point gas detection system. All reference to wireless transmission, antennas, and transceivers does not apply to this model.
The detector is an area safety device. It is your responsibility to respond properly to the alarm.
Refer to Table 2 for the gases that are monitored by the Rig Rat III detector.
1

Rig Rat III Detector User Manual
CAUTION: FOR SAFETY REASONS, THIS EQUIPMENT MUST BE OPERATED AND SERVICED BY QUALIFIED PERSONNEL ONLY. READ AND UNDERSTAND THE USER MANUAL COMPLETELY BEFORE OPERATING OR SERVICING.
Table 1. The Rig Rat III Detector
Order Number Description
RR-3000 Wireless multi-point gas detection system
RR-3000S Non-wireless multi-point gas detection system
Table 2. Gases Monitored
Gas Detected Unit of Measure
H2S (Hydrogen sulfide) parts per million (ppm)
CO (Carbon monoxide) parts per million (ppm)
O2 (Oxygen) percent by volume (%)
LEL (Combustibles) percent of lower explosive limit (% LEL)
SO2 (Sulfur dioxide) parts per million (ppm)
NH3 (Ammonia) parts per million (ppm)
Cl2 (Chlorine) parts per million (ppm)
H2 (Hydrogen) parts per million (ppm)
HCN (Hydrogen cyanide) parts per million (ppm)
HCL (Hydrogen chloride) parts per million (ppm)
NO2 (Nitrogen dioxide) parts per million (ppm)
CLO2 (Chlorine dioxide) parts per million (ppm)
C2H5OH (Ethanol) parts per million (ppm)
C2H4O (Ethylene oxide) parts per million (ppm)
NO (Nitric oxide) parts per million (ppm)
O3 (Ozone) parts per million (ppm)
PH3 (Phosphine) parts per million (ppm)
2
Rig Rat III Detector Contacting BW Technologies
Contacting BW Technologies To contact BW Technologies call:
USA: 1-888-749-8878 Canada: 1-800-663-4164 Europe: +44 (0) 1295 700300 Anywhere in the world: +1-403-248-9226
Address correspondence to:
BW Technologies LP 2840 – 2 Avenue S.E. Calgary, AB T2A 7X9 CANADA
Email us at: [email protected] Visit BW Technologies’ web site at: www.gasmonitors.com
ISO 9001
Safety Information - Read First Use the detector only as specified in this manual, otherwise the protection provided by the instrument may be impaired.
International symbols used on the detector and in this manual are explained in Table 3.
Read the Warnings and Cautions on the following pages before using the detector.
ec Note
This instrument contains batteries. Do not mix with the solid waste stream. Spent batteries should be disposed of by a qualified recycler or hazardous materials handler.
3

Rig Rat III Detector User Manual
a Cautions
⇒ Warning: Substitution of components may impair Intrinsic Safety.
⇒ Do not use the detector if it or any system components are damaged. Inspect the system on a regular basis and maintain a record log.
⇒ If the detector is damaged or parts are missing, contact BW Technologies immediately.
⇒ To prevent ignition of a flammable or combustible atmosphere, disconnect the power before servicing.
⇒ To prevent damage to fuses and internal components of the detector, disconnect the power before servicing.
⇒ When installing cables, ensure they are protected from possible damage. Secure the cables in place and fasten any excess. Do not exceed a 65o bend allowance when installing the cables.
⇒ Ensure that all plug-in connectors are clean and fully seated when installing.
⇒ Ensure that the weatherproof ring on the connector(s) is fully screwed down.
⇒ Ensure all ports that are not in use are completely screwed down and the port cover caps are installed.
⇒ Ensure the latch on the external hinged door is securely connected and that the handle has been turned the full 180o to complete the weather seal.
⇒ Do not expose the detector to electrical shock and/or severe mechanical shock.
⇒ Do not install the detector in an atmosphere that contains ketones, alcohols, or acids.
⇒ Use only sensors that are specifically designed for the Rig Rat III system. Refer to Encapsulated Sensor Measuring Ranges, Stainless Steel Sensor Measuring Ranges, and/or Replacement Parts and Accessories.
4

Rig Rat III Detector Safety Information - Read First
a Cautions
⇒ Ensure the sensor screen is not blocked.
⇒ Calibrate the detector before first-time use and continue on a regular schedule, depending upon use and sensor exposure to poisons and contaminants. BW recommends calibration minimum once every 90 days (3 months).
⇒ BW recommends that a bump check be performed before each day’s use to verify correct instrument operation. Calibrate if the readings are not within the specified limits.
⇒ Periodically bump check each sensor to confirm accurate response to gas. Expose the detector to a targeted gas concentration that exceeds the high alarm setpoints, and manually verify that the audible and visual alarms are activated.
⇒ BW recommends that the combustible sensor be checked with a known concentration of calibration gas after any known exposure to contaminants/poisons (e.g., sulfur compounds, silicon vapors, halogenated compounds, etc.).
⇒ Protect the combustible sensor from exposure to lead compounds, silicones, butane from a cigarette lighter, and chlorinated hydrocarbons. Although certain organic vapors (such as, leaded gasoline and halogenated hydrocarbons) may temporarily inhibit sensor performance, in most cases the sensor will recover after calibration.
⇒ Any rapid up-scaling reading, followed by a declining or erratic reading, may indicate a gas concentration beyond upper scale limit that may be hazardous.
⇒ The combustible sensor is factory calibrated to 50% LEL methane. If monitoring a different combustible gas in the % LEL range, calibrate the sensor using the appropriate gas. High off-scale % LEL of % v/v methane readings may indicate an explosive concentration.
5

Rig Rat III Detector User Manual
a Cautions
⇒ Extended exposure of the detector’s sensors to specific concentrations of combustible gases and air may stress a detector element that can seriously affect performance. If an alarm occurs due to high concentrations of combustible gases, recalibration should be performed, or if required, replace the sensor.
⇒ Do not allow liquids to condense or use high power sprays on the instruments. Do not attach/connect system components that do not meet specified criteria, such as alarms, relays, cabling, etc.
⇒ Do not attempt to disassemble, adjust, or service the detector unless instructions for that procedure are specified in the user manual and/or that part is listed as a replacement part. Use only BW Technologies Replacement Parts and Accessories.
⇒ The detector warranty is void if customer, personnel, or third parties damage the detector during repair attempts. Non-BW Technologies repair/service attempts void this warranty. Use only sensors that are specifically designed for the Rig Rat III system. Refer to Encapsulated Sensor Measuring Ranges, Stainless Steel Sensor Measuring Ranges, and Replacement Parts and Accessories.
Table 3. International Symbols
Symbol Meaning
n Approved to both U.S. and Canadian Standards by the Canadian Standards Association.
6

Rig Rat III Detector Getting Started
Getting Started The items listed below are included with the detector. If the detector is damaged or parts are missing, contact the place of purchase immediately.
• 5 dBi antenna
• Security key
• Phillips screwdriver
• Slot-regular screwdriver
• Rig Rat III Wireless Multi-Point Gas Detection User Manual
To order replacement parts, refer to Replacement Parts and Accessories.
To become familiar with the features and functions of the detector, refer to the following figures and tables:
• Figure 1 and Table 4 describe the main external components of the detector.
• Figure 2 and Table 5 describe the operation bay panel of the detector.
• Figure 3 and Table 6 describe the internal components of the detector.
• Figure 4 and Table 7 describe the liquid crystal display (LCD) elements of the detector.
• Figure 5 and Table 8 describe the main system components and the option devices of the detector.
• Table 9 describes the detector pushbuttons and functions.
7

Rig Rat III Detector User Manual
Rig Rat III Detector The Rig Rat III detector (“the detector”) is a fixed gas detection unit that can be used independently or operate in conjunction with the Rig Rat III Controller (“the controller”).
External Components
Figure 1. Rig Rat III External Components
Table 4. Rig Rat III External Components
Item Description 1 Carrying handle
2 Mounting bracket
3 TNC antenna
4 Security key
5 External tension latch
6 Audible alarm
7 CHARGER PORT
8 Gas label bars
9 OPTION PORTS (two)
10 Liquid crystal display (LCD)
11 SENSOR PORTS (two)
12 Red LED alarm
13 External hinged door
Note
If the detector is used with a controller, the detector must be equipped with a transceiver.
8

Rig Rat III Detector Rig Rat III Detector
Operations Bay Panel The operations bay panel is designed to provide easy access for activating/deactivating, setting high/low alarm setpoints, enabling/disabling the XMTR, and testing the XMTR.
Figure 2. Operations Bay Panel
Table 5. Operations Bay Panel
Item Description 1 Pushbutton (POWER)
2 Transmitter pushbutton (XMTR DISABLE)
3 Phillips screws (2)
4 Pushbutton (OK)
5 Alarm setpoint/decrement value pushbutton (HIGH / )
6 Alarm setpoint/increment value pushbutton (LOW / )
7 Transmitter pushbutton (XMTR TEST)
8 Service bay hinged door
Calibrations and system tests are also performed from the operations bay panel.
Note
Calibrate the detector every 90 days (3 months).
For calibration guidelines and procedures, refer to Calibration and Setting Alarm Setpoints.
9

Rig Rat III Detector User Manual
Internal Components
Figure 3. Detector Internal Components
Table 6. Detector Internal Components
Item Description 1 Transceiver
2 Power board
3 Main board
4 Operations bay panel door
The internal components are used to set the
• sensor types and measuring ranges,
• detector channels,
• transceiver channels, and
• alarm relays for attached option devices.
10

Rig Rat III Detector Rig Rat III Detector
Display Elements The liquid crystal display (LCD) provides immediate and detailed information about the sensors, alarm setpoints, and battery life levels.
Figure 4. Display Elements
The LCD indicates when it is monitoring, if the XMTR (transmission) is enabled or disabled, and displays information when the detector is in an alarm condition.
Table 7. Display Elements
Item Description
1 Sensor is MONITORING gas
2 XMTR DISABLED icon
3 XMTR enabled icon
4 SENSOR 2 identifier icon bar
5 Sensor OK
6 Sensor FAIL
7 HIGH ALARM condition
8 LOW ALARM condition
9 Numeric value (ppm or %)
10 SENSOR 1 identifier icon bar
11 BATTERY level indicator
12 Battery level bar graph
13 Flashing DANGER alarm icon
11

Rig Rat III Detector User Manual
Main System Components and Option Devices The following figure and table show the exterior connections and available option devices that are used to operate with the detector.
Figure 5. Main System Components
Table 8. Main System Components
Item Description 1 Rig Rat III
2 5 dBi antenna
3 Trickle and bench chargers (solar or line)
4 Optional remote devices: audible/visual alarms, relays, solenoid driver, etc.
5 Shielded sensor cables
6 Sensor screen(s)
7 Remote sensor(s)
8 Weatherproof ring
Refer to Installation for procedures and additional information.
12

Rig Rat III Detector Rig Rat III Detector
Detector Pushbuttons Table 9. Pushbuttons
Pushbutton Description
C POWER • To activate/deactivate the detector, press C POWER.
C XMTR DISABLE • To enable/disable communication between the detector and the controller, press C XMTR DISABLE. Note: If the detector is operating with a controller, it must be equipped with a transceiver.
C HIGH / • To view the high alarm setpoint, press and hold C HIGH / .
• To increment the displayed value (high or low setpoint), press C HIGH / .
• To view the maximum gas level detected by the sensor, press and hold C HIGH / and C OK simultaneously for 1 second.
• To clear the maximum gas level detected, press and hold C HIGH / and C OK simultaneously (5 seconds) until CLr displays on the LCD.
C LOW / • To view the low alarm setpoint, press and hold C LOW / .
• To decrement the displayed value (high or low setpoint), press C LOW / .
• To initiate calibration, press and hold C LOW / and C OK simultaneously for 1 second.
C OK • To accept a selected value, press C OK.
C XMTR TEST • To transmit a countdown sequence to the controller, press C XMTR TEST. Note: If the detector is operating with a controller, it must be equipped with a transceiver.
13

Rig Rat III Detector User Manual
Detector Mounting Requirements
Figure 6. Mounting Requirements
14

Rig Rat III Detector Installation
Installation a Caution
Only qualified personnel should perform installations. Install detectors according to applicable electrical codes, regulations, and safety standards. Ensure that correct cabling and seal fitting practices are implemented.
Installation Location Radio signals transmit well over flat terrain and open water. However, buildings, metal tanks, and other obstructions can interrupt radio transmissions.
When determining a location for the detector, consider
• the terrain,
• obstructions (such as buildings and metal tanks),
• line-of-sight to the controller antenna (if used with a controller),
• radio frequency interference (RFI), and
• if the detector is used for confined space detection.
Read the following sections, The Detector and The Antenna prior to determining the location for installing the detector.
The Detector Before installing the detector,
• ensure that it is located in an area where it is not exposed to electrical or severe mechanical shock, and
• determine if it will be used to monitor a confined space.
Confined Space: For continuous confined space monitoring and pre-entry protection, install the detector approximately 5 to 6 ft. above ground outside the entrance of the building.
Figure 7. Confined Space Installation
Installing the detector at a lower level requires a high gain antenna. Refer to The Antenna for more information.
Drill 1.5 inch (3.8 cm) access holes below the detector for the sensor cables and for the remote option cable.
15

Rig Rat III Detector User Manual
The Antenna As well as determining the optimum location for the detector, the antenna also has specific requirements. BW recommends that the antenna
• not be located near water,
• is positioned well above surrounding objects,
• maintains a clear line-of-sight to the controller (if used with a controller), and
• be placed as far as possible from other antenna systems to avoid possible Radio Frequency Interference (RFI).
For transmission distances, refer to Specifications and any applicable accessory manuals.
Low Gain Antenna: The low gain antenna is used for shorter distances without obstructions and with a clear line of sight to the controller.
High Gain Antenna: The high gain antenna is used for greater transmission distances and is used to extend above obstructions.
Note
Atmospheric conditions may cause signal loss.
a Warning Use extreme caution when working near telephone and electrical power lines. Always mount the antenna two times its length (minimum) away from power lines.
The detector is equipped with a TNC antenna port. Install the antenna and all required extension cables.
Antenna Cable: Antenna cable lengths must be less than 20 ft. (6 m). LMR 240 cable is provided with the detector. For greater transmission distances, use heavier cable such as, the LMR 400.
Refer to Antenna/Cable Assembly/Mounting Brackets in Replacement Parts and Accessories.
Note
The use of mating connectors to extend cable lengths is not recommended.
Connectors cause signal strength loss and shorten transmission distance.
16

Rig Rat III Detector Installation
Mounting the Detector
Note
Install the detector vertically with the antenna pointing upwards only.
The detector is equipped with pre-drilled mounting flanges for permanent installation. The required minimum/maximum clearances are as follows:
• Maintain a minimum clearance of 0.38 in. (0.95 cm) below and from each side of the detector.
• Maintain a maximum 65o bend allowance for all cables connected to the detector.
Refer to Figure 6. Mounting Requirements. Installation bolts are included in the Rig Rat III Detector kit.
Cable Installation Separate cables are required for each detector. All connections must be installed using shielded cable only.
a Warning
In classified areas, use only hazardous location cable. Use shielded cable only.
Table 10. System Cable Connection
Cable Type Identifier # of
Pins
Female Connector Mates with
Male Connector Mates with
Sensor orange ends 6 detector
sensor port sensor head
Solar panel
yellow jacket 5 charger detector
charger port
Option various 6 option device
detector option port
Note
For installation of an unapproved charger or option device in a Class I, Div. 1 area, refer to Appendix B Installation Requirements.
Grounding the Detector
a Warning
The detector must be grounded. Correct grounding practices reduce equipment damage and improve safe working conditions.
It is extremely important that the detector be grounded to ensure Intrinsic Safety and optimum system operation. After determining where to mount the detector, it must be grounded accordingly.
17

Rig Rat III Detector User Manual
To determine the grounding requirements, refer to the following four installation grounding conditions and procedures.
• Condition 1: Mount is Metallic and at Earth Ground Potential
• Condition 2: Mount is Non-Metallic (Non-conducting)
• Condition 3: Mount is Metallic but Not Grounded to Earth Ground (Non-conducting)
• Condition 4: Plant Ground Rod is Not Available and an Earth Ground Must Be Provided
Note All system components and plug-in option devices are bonded to the main system through the connecting cables.
To prevent Radio Frequency Interference (RFI), ensure that all permanent equipment that uses radio signal communication is grounded, such as base stations.
Installation Grounding Conditions Condition 1: Mount is Metallic and At Earth Ground
Potential 1. Examine the bond between the mount and the
earth ground.
Figure 8. Bonding the Detector
18

Rig Rat III Detector Installation
2. Use toothed lock washers to achieve a system bond. Refer to Figure 8. Bonding the Detector.
Condition 2: Mount Is Non-metallic (Non-conducting) 1. Determine a plant ground location.
2. Using a bonding cable (4-12 gauge insulated wire), connect to the existing plant ground network.
Figure 9. Bonding with Bonding Cable
3. Mount the system components in location, and connect the other end of the bonding cable to the mounting bracket. Refer to Figure 9. Bond with Bonding Cable.
Condition 3: Mount is Metallic, but not Grounded to Earth Ground (Non-conducting)
1. If the location is not correctly grounded, a ground must be supplied.
2. Using toothed lock washers, mount the detector in the selected location.
3. If a plant ground is not available, complete the procedures in Condition 2 or establish an earth ground as in Condition 4.
Condition 4: A Plant Ground Rod is Not Available and Earth Ground Must Be Provided
1. Drive a grounding rod into the earth approximately 2 ft. (0.66 m).
2. Secure a bonding cable (4-12 gauge insulated wire) between the detector and the grounding rod as shown in Figure 10. Grounding Rod Installation.
19

Rig Rat III Detector User Manual
Figure 10. Grounding Rod Installation
Setting the Detector and Transceiver Channels Digitally coded information is received via 2.4 GHz radio using Frequency Hopping Spread Spectrum Technology.
The detector and transceiver channels can be set while the detector is activated or deactivated. The channels can be changed on site when
• moving detectors,
• adding detection points, and/or
• replacing equipment.
To set the detector and transceiver channels to enable communication between the detector and the controller, complete the following:
1. Unlatch, unlock, and open the exterior door.
2. If the detector is activated, complete steps #3-5. If the detector is deactivated, complete steps #4-5.
3. On the operations bay door, press C XMTR DISABLE. Refer to Figure 2.
20

Rig Rat III Detector Setting the Detector and Transceiver Channels
4. Remove the two Phillips screws from the operations bay door.
5. Locate the RIG RAT III Transceiver. Refer to Figure 11.
Figure 11. RIG RAT III Transceiver
Detector Channel: Only channels 1-4 are available to select from. If channels 5-9 or A-F are selected, they will be recognized as channel 1.
The detector’s transceiver operates in transmit mode if the channel rotary switch is positioned to any channel except channel 0.
Use a small flathead screwdriver to turn the rotary switch. Position the arrow towards the required channel.
Figure 12. Channel Rotary Switch
Transceiver Channels: To set the transceiver channels, complete the following:
6. Using the rotary switches located above A and B, position the arrows to the required channels. The available channels are 00 to 3F.
Figure 13. Transceiver A and B Channels
21

Rig Rat III Detector User Manual
Important: The transceiver channel(s) on the detector(s) must be set to the same transceiver channel on the controller. There is a maximum of four detectors per controller.
7. Set the transceiver channel on the detector.
8. Set the transceiver channel on the controller. Ensure that it is set to the same channel as the detector.
Refer to the Rig Rat III Controller User Manual for procedures.
9. On the detector, press C XMTR DISABLE.
10. On the detector, press C XMTR TEST. Both the detector and controller LCDs display the count down from 999 999 to 000 000.
11. Deactivate and then reactivate the detector to confirm the channel selection, otherwise the detector will not recognize the selection/change.
The Sensors Sensor Locations There are several factors to consider when selecting a location to install the sensor(s). Refer to the following recommendations to ensure accurate gas detection.
Air Currents: If there are fans, wind, or other sources of air movement, gases may rise or collect in some areas.
Gas Density: To detect gases that are lighter than air, install the sensor approximately 12 in. (30 cm) above the potential gas release. For indoor installations, install the sensor near the ceiling.
To detect gases that are heavier than air, install the sensor approximately 12 in. (30 cm) below the release level. If there are no air currents in the area, install the sensor near the floor or ground.
Gases with a density equal to or slightly greater than air typically rise, especially when there are air currents.
Gas Emission Sources: A minimum of one sensor must be located near each point where a leak is likely to occur, especially when a low volatile liquid is being monitored.
22

Rig Rat III Detector The Sensors
Environmental Factors: Although the sensors are designed for outdoor use, install sensors where they will be protected from
• wind,
• dust,
• snow,
• water,
• vibration, and/or
• electrical/mechanical shock.
Adhere to the temperature operating range of the sensor. Refer to Encapsulated Sensor Specifications in Appendix A and/or Stainless Steel Sensor Specifications in Appendix C.
Sensor Installation The sensor is linked to the detector using RFI/EMI shielded cable that connects directly to both the sensor (male) and the detector (female). Each cable is constructed with a label that lists the cable length.
Cable lengths
• Toxic sensor up to 250 ft. (76.2 m)
• Combustible sensor up to 100 ft. (30.5 m)
When installing the sensors, ensure that
• the cable connectors are clean and not damaged for proper connection,
• each sensor and connecting cable is connected to the correct port (SENSOR PORT 1 or SENSOR PORT 2) that is located on the left side of the detector.
Figure 14. Sensor Ports on Detector
Note
Cable bend allowances must not exceed 65o.
23

Rig Rat III Detector User Manual
To install the sensor(s), complete the following:
1. Connect the sensor cable(s) to the desired sensor port(s).
Figure 15. Sensor Dimensions (Encapsulated)
2. Secure the sensor at the desired location. It can be bolted, screwed, or clamped in place. The optional tripod has predrilled mounts on the legs to attach the sensors.
3. Ensure that the sensor head is directed to the side or downwards to prevent dirt, debris, water, or snow from accumulating on the sensor screen.
4. Connect the sensor cable to the sensor. Hand tighten the crown connector on the cable to the sensor to ensure a weatherproof seal and proper connection.
5. On the external door of the detector, paste labels beside or below the SENSOR 1 and SENSOR 2 markers. Record the gas type and the measuring range. Refer to Figure 16.
Figure 16. Labeling the Sensors on the Detector
Note
A factory gas type label is attached to each sensor.
24
Rig Rat III Detector The Sensors
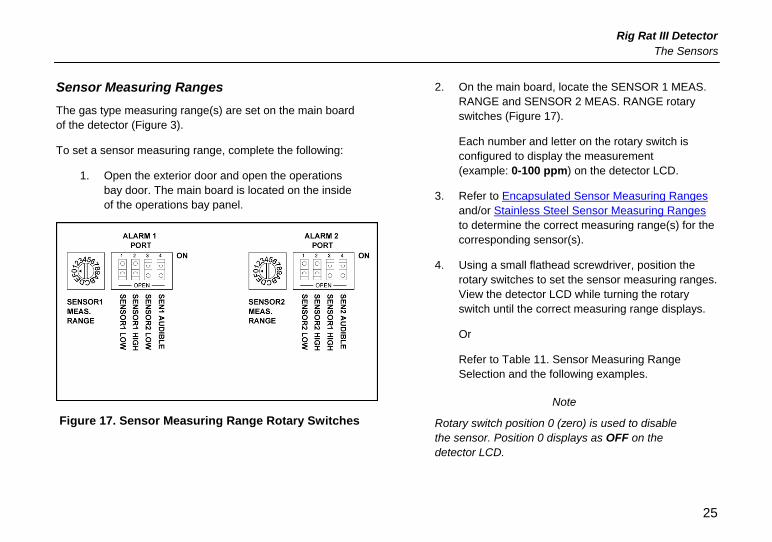
Sensor Measuring Ranges The gas type measuring range(s) are set on the main board of the detector (Figure 3).
To set a sensor measuring range, complete the following:
1. Open the exterior door and open the operations bay door. The main board is located on the inside of the operations bay panel.
Figure 17. Sensor Measuring Range Rotary Switches
2. On the main board, locate the SENSOR 1 MEAS. RANGE and SENSOR 2 MEAS. RANGE rotary switches (Figure 17).
Each number and letter on the rotary switch is configured to display the measurement (example: 0-100 ppm) on the detector LCD.
3. Refer to Encapsulated Sensor Measuring Ranges and/or Stainless Steel Sensor Measuring Ranges to determine the correct measuring range(s) for the corresponding sensor(s).
4. Using a small flathead screwdriver, position the rotary switches to set the sensor measuring ranges. View the detector LCD while turning the rotary switch until the correct measuring range displays.
Or
Refer to Table 11. Sensor Measuring Range Selection and the following examples.
Note
Rotary switch position 0 (zero) is used to disable the sensor. Position 0 displays as OFF on the detector LCD.
25

Rig Rat III Detector User Manual
Table 11. Sensor Measuring Range Selection
Switch Position
LCD Measuring Range
LCD Resolution
0 Sensor Disabled OFF 1 0 – 100 1 2 0 – 10 1 3 0 – 1.00 0.01 4 0 – 9.99 0.01 5 0 – 200 1 6 0 – 20 1 7 0 – 2.00 0.01 8 0 – 20.0 0.1 9 0 – 500 1 A 0 – 50 1 B 0 – 5.00 0.01 C 0 – 50.0 0.1 D 0 – 999 1 E 0 – 30.0 (En./Def.) 0.1
F 0 – 30.0 (Def./Def.) 0.1
Example 1: For 0-100 ppm H2S or 0-100% LEL, set the switch to position 1 (0-100).
Example 2: For 0-500 ppm CO, set the switch to position 9 (0-500).
If the measuring range of the sensor is not listed in Table 11, select the next highest measuring range.
Important: Switch E: low alarm = enrichment, high alarm = deficiency Switch F: low and high alarm = deficiency
Installing Optional Devices/Accessories Refer to all corresponding installation manual(s) for any additional devices/accessories that are installed.
a Warning
To install an Intrinsically Safe system, adhere to all safety regulations. For installation of unapproved accessories in a Class I, Div. 1, Group C, D area, refer to Appendix B Installation Requirements.
26

Rig Rat III Detector Independent Power
Independent Power The detector and rechargeable option devices use the same low maintenance batteries.
The power options that are provided enable the detector to
• operate from the internal battery, or
• trickle charge the system for maintenance-free operation.
Trickle Charge Options
• Solar power 5, 10, 20, or 30 watt panels
• 24 Vdc direct line power
• 110 or 220 Vac line power (using a BW 24V output trickle charger)
A detector that is powered by the internal 12 V, 3 amp hour battery and equipped with the sensor types listed in Table 12, provides the following days of operation:
Table 12. Sensor Types and Battery Life
Number of Sensors
Type of Sensor Days of Operation
2 Toxic or O2 21
1 Toxic or O2 plus combustible 3.5
2 LEL (combustible) 2.0
1 Toxic or O2 28.0
Battery Life Battery life is also dependant upon the following:
• The transmission interval that is set during calibration (frequent transmissions reduce the battery life).
• The power draw of rechargeable option devices and field interfaces can reduce battery life.
• A 10 watt solar panel (minimum) is required to trickle charge a detector that is equipped with one or two combustible sensors.
• In a line or solar powered situation, the battery provides the backup in the event of a power interruption.
27

Rig Rat III Detector User Manual
For additional charger installation information, refer to Appendix B Installation Requirements.
Battery Level Ensure that the battery has obtained a full charge. The battery level displays continuously on the detector LCD.
Low Battery Level: If the battery level is low, the battery level indicator displays below the lowest bar.
Very Low Battery Level: If the battery level is too low (below 10 V), only the battery levels icon displays on the LCD (no other data displays).
Depleted Battery Level: If the battery level drops below 9.5 V, the detector automatically deactivates.
Figure 18. Battery Levels In either situation, use the BW bench charger to charge the detector battery immediately.
Line Power a Caution
Only qualified personnel should perform power installations. Installations must be performed according to applicable electrical codes, regulations, and safety standards.
Installation: 24 Vdc direct and ac line power.
The detector and all BW rechargeable option devices can be trickle charged directly using line power (24 Vdc, 115 and 230 Vac). The detector fuse protects against power fluctuations.
Charger Power Install a charger (if applicable): Solar panels or 110/220 Vac or 24 Vdc direct line chargers. Refer to Appendix B Installation Requirements.
Applying Power Press the XMTR DISABLE button to prevent false alarms at the controller during detector power up and setup.
Once all the equipment is installed and source of power is selected, press C POWER to apply power to the detector.
28

Rig Rat III Detector Independent Power
Sensor Readout Status If an alarm condition occurs while activating the detector, verify that the
• correct sensor measuring range (rotary switch setting) has been selected, and
• sensors are correctly installed.
Note
Even if the transmitter is disabled, during an alarm condition the red LED alarm on the operations bay panel flashes and DANGER displays on the LCD.
Allow the sensors adequate time to stabilize prior to monitoring gases. Refer to Table 13. Sensor Stabilization for required times.
Table 13. Sensor Stabilization
Sensor Condition Time to Stabilize
Common (most sensors)
Normal 2 minutes
Common (most sensors)
Extreme temperatures
2 minutes plus (times will vary)
Biased • Ethanol • Ethylene oxide • Hydrogen chloride • Nitric oxide
All conditions 24 hours
29
Rig Rat III Detector User Manual
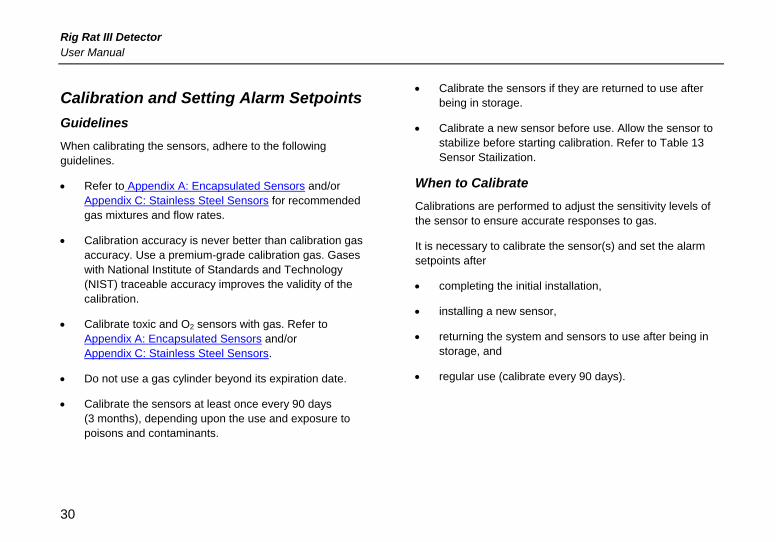
Calibration and Setting Alarm Setpoints Guidelines When calibrating the sensors, adhere to the following guidelines.
• Refer to Appendix A: Encapsulated Sensors and/or Appendix C: Stainless Steel Sensors for recommended gas mixtures and flow rates.
• Calibration accuracy is never better than calibration gas accuracy. Use a premium-grade calibration gas. Gases with National Institute of Standards and Technology (NIST) traceable accuracy improves the validity of the calibration.
• Calibrate toxic and O2 sensors with gas. Refer to Appendix A: Encapsulated Sensors and/or Appendix C: Stainless Steel Sensors.
• Do not use a gas cylinder beyond its expiration date.
• Calibrate the sensors at least once every 90 days (3 months), depending upon the use and exposure to poisons and contaminants.
• Calibrate the sensors if they are returned to use after being in storage.
• Calibrate a new sensor before use. Allow the sensor to stabilize before starting calibration. Refer to Table 13 Sensor Stailization.
When to Calibrate Calibrations are performed to adjust the sensitivity levels of the sensor to ensure accurate responses to gas.
It is necessary to calibrate the sensor(s) and set the alarm setpoints after
• completing the initial installation,
• installing a new sensor,
• returning the system and sensors to use after being in storage, and
• regular use (calibrate every 90 days).
30

Rig Rat III Detector Calibration and Setting Alarm Setpoints
Calibration Features When activating, allow the detector and sensors a minimum of 2 minutes to stabilize before performing calibration.
Note
Some sensor types require a longer period of time to stabilize such as ethanol, ethylene oxide, and nitric oxide. For more information, refer to Appendix A Encapsulated Sensors and/or Appendix C Stainless Steel Sensors.
From the calibration function, modifications can be made to the
• low and high alarm setpoints,
• calibration gas concentration levels,
• transmission intervals, and
• loss of transmission intervals.
Table 14. Default Factory Settings
Description Factory Setting
Sensor1 low alarm 25
Sensor1 high alarm 50
Sensor1 zero adjust 00
Sensor1 span adjust 50
Sensor2 low alarm 25
Sensor2 high alarm 50
Sensor2 zero adjust 00
Sensor2 span adjust 50
Hour time interval 00h
Minute time interval 00.
Second Time interval .05
Hour time expired 00h
Minute time expired 1.
31

Rig Rat III Detector User Manual
Setting the Alarm Setpoints Calibrations are performed to adjust the sensitivity levels of the sensors to ensure accurate responses to gas.
To calibrate the sensor(s) and set the alarm setpoints, complete the following:
Note
If only one setpoint is required, set both the low and high alarm setpoints to the same value.
1. Refer to Encapsulated Sensor Measuring Ranges and/or Stainless Steel Sensor Measuring Ranges to determine the correct ranges.
The alarm setpoints can be set to any value within the designated range limit for the sensor.
2. On the detector operations bay panel, press C LOW/ to display the current low alarm setpoint(s).
3. Press C HIGH/ to display the current high alarm setpoint(s).
To change the low and/or high alarm setpoints, complete the following:
4. Enter calibration mode by pressing C LOW/ and
C OK simultaneously.
The value for the SENSOR 1 LOW ALARM displays.
5. To change this setpoint(s) press C LOW/ or C HIGH/ until the desired value displays.
Or
To retain the current setpoint(s) value, press C OK.
6. If a new value is selected, press C OK to confirm the change. Set the high alarm setpoint if required.
32

Rig Rat III Detector Calibration and Setting Alarm Setpoints
7. If required, repeat steps #1-6 for the remaining sensor.
Note
Oxygen can be set to have both a deficient and an enrichment alarm.
Calibrating Stainless Steel Sensors Refer to Calibration (Stainless Steel Sensors) step #8 in Appendix C.
Calibrating Encapsulated Sensors The encapsulated sensor is factory calibrated (zeroed) and ready for installation; however, after several uses drift can occur. The sensor must then be calibrated.
If the sensor requires calibration, complete Auto Calibration steps #8-9 before proceeding to Auto Span.
a Caution Perform the following calibration procedures in a clean atmosphere that is free of hazardous gas.
Auto Calibration
8. Using the pen magnet, place it in the magnet area as shown in Figure 21.
Figure 21. Sensor Magnet and Magnetic Pen
The sensor LED blinks to indicate that the magnetic pen is being held in the correct location on the sensor. Continue to hold the pen in place.
The sensor continues to blink for approximately 5 seconds.
9. When the sensor has been successfully auto calibrated, the LED stops blinking. Remove the magnetic pen.
Successful Auto Calibration: If the detector displays a 0% LEL reading, proceed to step Auto Span step #10.
Unsuccessful Auto Calibration: If the detector does not display a 0% LEL reading, the detector must then be auto zeroed. Complete the following:
33

Rig Rat III Detector User Manual
From the operations bay panel, press C LOW/ or C HIGH/ until 0 (zero) displays on the detector LCD.
Press C OK to accept the new value.
Note
Zero drift for the O2 sensor is extremely minimal over the life span of the sensor. If zeroing is required, apply 100% Nitrogen (N2).
When the detector is successfully auto zeroed, return to Auto Calibration step #8 and auto calibrate the sensor again before proceeding to Span the Sensor and Detector, step #14.
Auto Span
Refer to Encapsulated Sensor Measuring Ranges for recommended gas mixtures and flow rates before continuing.
Auto span requires approximately 90 seconds to complete.
10. Place the calibration cap onto the sensor head.
To ensure uniform gas flow, the inlet/outlet of the cap must be horizontally aligned with the main outlet of the sensor head exactly as shown in Figure 19.
Figure 19. Calibrating the Encapsulated Sensor
11. When the sensor is ready for calibration gas, the sensor LED blinks once every second.
12. Connect the tubing to the cylinder and to the calibration cap as shown in Figure 20.
34

Rig Rat III Detector Calibration and Setting Alarm Setpoints
Figure 20. Calibration Connections
13. Apply the gas to the sensor. When the auto span is complete the sensor stops blinking.
Successful Auto Span: The detector displays approximately 50% LEL. Proceed to Span the Sensor and Detector, step #14.
Unsuccessful Auto Span: If the detector does not display approximately 50% LEL, auto zero the detector and auto calibrate the sensor again.
Note
If the sensor response from the calibration gas is less than 15% LEL, the calibration has failed. The sensor LED blinks fast for 2 seconds to indicate the fail.
Span the Sensor and Detector
14. Insert the calibration cap and open the valve on the cylinder. Apply a known concentration of gas to the sensor until the detector LCD readout stabilizes (approximately 2 minutes).
The detector must display the same concentration value as the calibration gas being used.
15. To adjust the concentration value on the detector, press C LOW/ or C HIGH/ until the required value displays.
16. Press C OK to accept the new value.
35

Rig Rat III Detector User Manual
17. Remove the gas from the sensor and close the valve of the gas cylinder. Allow the detector time to display a zero reading.
Detector Does Not Return to Zero Reading: If the sensor reading does not return to zero, ensure the sensor measuring range rotary switch is set correctly.
Reset the rotary switch if required and repeat the calibration procedures. Repeat the calibration procedures for SENSOR 2 (if applicable) before setting the Transmission Interval.
Calibration Successful: Proceed to Transmission Interval.
Calibration Unsuccessful: After calibration, if the sensor LED blinks every 2 seconds, the calibration has failed. Re-calibrate the sensor. If calibration fails again, contact BW Technologies.
Transmission Interval
Note
Before proceeding, ensure that both SENSOR 1 and SENSOR 2 (if applicable) have been calibrated.
The transmission interval is used to set the detector to transmit data to the controller on a regularly scheduled basis. The detector can be set to transmit data once a day, hourly, or more frequently.
• Minimum 5 seconds
• Maximum 25 hours
To set/change the transmission time, complete the following:
18. Determine how frequently the transmissions are to be sent to the controller.
Note
Frequent transmissions require that the battery be recharged more frequently.
36

Rig Rat III Detector Calibration and Setting Alarm Setpoints
19. From the detector, press C LOW/ and C OK simultaneously to enter calibration mode (if required).
20. From calibration mode, press C LOW/ and C OK simultaneously again to access the transmission time screen.
The hours 00h interval screen initially displays.
21. Press C LOW/ or C HIGH/ until the required hour(s) value displays (maximum 25 hours).
22. Press C OK to accept the new value.
Or
For more frequent transmissions (less than 1 hour), press C OK to bypass and automatically access the minutes 00. interval screen.
23. Press C LOW/ or C HIGH/ until the required minute(s) value displays.
24. Press C OK to accept the new value.
Or
For more frequent transmissions (less than 1 minute), press C OK to bypass and automatically access the seconds .00 interval screen.
25. Press C LOW/ or C HIGH/ until the required seconds value displays (minimum .05 seconds).
37

Rig Rat III Detector User Manual
26. Press C OK to accept the new value.
The loss of transmission time interval screen 00h t.E displays.
Loss of Transmission Time Interval
In the event that transmissions are interrupted, this function is used to enter a specified time that a controller will wait for transmissions from a detector before entering an alarm state.
• Maximum period of standby: 97 hours
• Minimum period of standby: 1 minute
To enter a loss of transmission time interval, complete the following:
27. The initial loss of transmission time interval (00h t.E) screen displays the hours (00h). Press C LOW/ or C HIGH/ until the desired hour(s) value displays.
28. Press C OK to accept the new value.
Or
For reduced transmission time interval (less than 1 hour), press C OK to bypass and automatically access the minutes (00. t.E) screen.
29. Press C LOW/ or C HIGH/ until the desired minute(s) value displays.
30. Press C OK to accept the new value.
The end calibration screen displays.
End Calibration
After the loss of transmission time interval is set, the LCD displays End CAL to signal the end of the calibration procedure.
38

Rig Rat III Detector Alarms
Alarms The following table describes the system alarms and shows how the LCD displays for each alarm. Alarms automatically reset to normal operation when an alarm condition no longer exists.
Table 15. Alarms
Alarms Display
Low Gas Alarm • Transceiver transmits every 10 seconds
• Red LED flashes
• DANGER displays and flashes
• LOW ALARM displays to indicate the alarm level and displays below the sensor that is affected
• LCD displays the numeric value of the detected gas
• Audible alarm sounds (if enabled)
• Option devices attached to the OPTION PORTS activate (if enabled)
39

Rig Rat III Detector User Manual
Table 15. Alarms
Alarms Display
High Gas Alarm • Transceiver transmits every 10 seconds
• Red LED flashes
• DANGER displays and flashes
• HIGH ALARM displays to indicate the alarm level and displays below the sensor that is affected
• LCD displays the numeric value of the detected gas
• Audible alarm sounds (if enabled) • Option devices attached to the OPTION PORTS activate
(if enabled)
40

Rig Rat III Detector Alarms
Table 15. Alarms
Alarm Display
Low Battery Alarm (1) • Transceiver transmits every 10 seconds • Battery level indicator displays below the lowest bar
Very Low Battery Alarm (2) • If the battery level drops below 10 V, only the flashing
battery level displays.
Depleted Battery Alarm (3) • If the battery level drops below 9.5 V, the detector
automatically deactivates.
41

Rig Rat III Detector User Manual
Table 15. Alarms
Alarm Display
Sensor Integrity Alarm • XMTR alarms activate
• Red LED flashes
• DANGER displays and flashes
• FAIL displays beside the sensor that is affected
• Audible alarm sounds • Option device(s) configured for the sensor(s) activates
Loss of Transmission Alarm • Red LED flashes
• LCD displays rF Out • Audible alarm sounds after several transmission fails • Option devices attached to the OPTION PORTS activate
(if enabled)
42

Rig Rat III Detector Viewing the Maximum Gas Level
Viewing the Maximum Gas Level The maximum gas level feature indicates the maximum gas exposure encountered.
To view the maximum gas level, complete the following:
1. Press and hold C HIGH/ and C OK simultaneously for 1 second.
2. To clear the maximum gas level detected, press and hold C HIGH/ and C OK simultaneously for 5 seconds until CLr displays on the LCD.
Setting Dipswitches for Alarm Options The detector can be set to engage different alarm options devices (sirens, strobe lights, audible alarms, etc.) when the
low and high alarm setpoints are exceeded by setting the option port dipswitches.
Figure 22. Measuring Range Dip Switches
The option port dipswitches are used to enable/disable the OPTION PORTS (ONE and TWO) that are located on the bottom of the detector. Option devices that can be connected are
• audible alarm devices,
• visual alarm devices,
• relay devices, and
• solenoid drivers.
43

Rig Rat III Detector User Manual
The ALARM 1 PORT and ALARM 2 PORT dip switches are positioned on the main board (Figure 22) that is located inside the internal components bay of the detector (Figure 3).
To access the main board, remove the two screws from the operations bay panel to open. The main board is attached to the inside of the operations bay panel.
Table 16. Default Alarm Dip Switch Settings
Description Factory Setting
0 = off 1 = on
Sensor 1 Audible 1
Sensor 2 Low 0
Sensor 1 High 1
Sensor 1 Low 1
Sensor 2 Audible 1
Sensor 1 High 0
Sensor 2 High 1
Sensor 2 Low 1
To set the alarm port dip switches, refer to Table 17. Alarm Dip Switch Settings and the following Examples 1-3.
Example 1: One sensor using two alarm ports ALARM 1 PORT engages when SENSOR 1 is in low alarm. ALARM 2 PORT engages when SENSOR 1 is in high alarm.
Table 17. Alarm Dip Switch Settings
Alarm 1 Port Alarm 2 Port
S1 = sensor one S2 = sensor two Ex = Example 0 = off 1 = on
L = low alarm H = high alarm A = audible alarm
S1L S1H S2L S1A S2L S2H S1H S2A
Ex 1 1 0 0 1 0 0 1 0
Ex 2 1 1 0 1 1 1 0 1
Ex 3 1 0 1 1 0 1 1 1
Example 2: Two sensors using one alarm port ALARM 1 PORT engages when SENSOR 1 is in low or high alarm. ALARM 2 PORT engages when SENSOR 2 is in low or high alarm.
Example 3: Two sensors using two alarm ports ALARM 1 PORT engages when SENSOR 1 and SENSOR 2 are in low alarm. ALARM 2 PORT engages when SENSOR 1 and SENSOR 2 are in high alarm.
44

Rig Rat III Detector Maintenance
The dipswitches activate the connected option devices via the pins in the connector ports. They are as follows:
• ALARM1 PORT dipswitch activates pin A of OPTION PORT ONE and OPTION PORT TWO.
• ALARM2 PORT dipswitch activates pin B of OPTION PORT ONE and OPTION PORT TWO.
Figure 23. Pin A and Pin B Option Ports
Alarm Option Features and Exceptions Features • The audible alarm for sensor 1 (S1A) and sensor 2
(S2A) can be enabled for both low and high alarms.
• The sensor integrity alarm engages all alarms and all connected option devices.
• The alarms automatically reset when alarm conditions no longer exist.
Exceptions The UR-L601 and UR-L602 strobe option devices are
• alarm level specific in a single sensor application, and
• sensor specific in a dual sensor application.
Maintenance System Components: All electronics are sealed in weatherproof enclosures. However, regular maintenance is required for all system components. Visually inspect and test regularly to ensure optimum performance.
Sensors: The sensors are exposed to the environment and must be calibrated minimum every 90 days (3 months) to ensure accurate detection of gas.
Ensure the sensor screen is clean and not damaged. Clean the screen(s) if required. Do not paint the sensor enclosures.
Do not use any type of solvent to clean the sensors.
45

Rig Rat III Detector User Manual
Maintenance Log: Maintain an accurate maintenance log of
• calibration dates,
• sensor replacements, and
• other service/events/occurrences.
Detector: Ensure that the exterior door and the operations bay panel are closed correctly and secured. Ensure that cover caps are securely fastened to all ports not in use. Check the battery level at regular intervals.
To ensure a weatherproof seal, confirm that the exterior door clasp is securely fastened.
Antennas: Replace any bent or damaged antenna extension cables. Periodically test the transmission.
Controllers: Refer to the controller user manual.
Remote Plug-in Cables: Inspect all of the cables regularly. Ensure that all cables are connected correctly. Replace cables that are damaged.
Replacing the Fuse (500mA) If the 500mA fuse on the main board requires replacement, contact BW Technologies.
Storage and Transport BW batteries have a low rate of self discharge. Therefore, the battery powered instruments can be used irregularly or can be stored for long periods of time.
When storing or transporting battery powered equipment, be aware that
• the equipment must be stored in a warm area as freezing the electrolyte damages the battery (as the battery discharges, the battery freezing point rises),
• the rate of discharge varies with storage temperature,
• higher temperatures result in a faster discharge rate, which reduces the time that the equipment can be stored, and
• the battery level should not drain below 50% of the fully charged state.
Prior to Storage or Transport
a Caution Completely discharged batteries must be charged within 30 days.
46

Rig Rat III Detector Maintenance
Adhere to the following:
• If the battery is completely discharged for a long period of time, cycle charge the unit several times to restore function.
• Ensure that the equipment is fully charged before returning to service. Depending upon the conditions, cycle charging may restore up to 75% of full charge.
• Ensure that all instruments are fully charged before storing or transporting.
To prepare equipment for storage or transport, complete the following:
1. Deactivate the required equipment.
2. Create a record of the current connections. This ensures that the equipment is reassembled correctly.
Record the removal date of the sensors, option devices, accessories, and the detector.
3. Disconnect the following from the detector:
• Sensor(s)
• Option devices
• Charger
• Cables
4. Replace all cover caps for the ports located on the side and bottom of the detector.
5. Loosely coil and secure all cables to prevent damage.
6. Insert a calibration cap on each sensor.
Important: Detectors and rechargeable option devices should be recharged at least once every 6 months when in storage.
47

Rig Rat III Detector User Manual
System Test After installing the detector, option devices, and setting the dip and rotary switches, it is essential to complete all of the following tests to ensure that the system responds correctly in the event of an alarm condition.
System tests should also be performed when
• the system or a detector is moved,
• sensors are changed/added,
• sensor measuring range(s) are changed, and
• option devices are added/changed.
Important: Test each detector on the system (system = one to four detectors per controller).
To perform a system test, complete the following:
1. Activate the detector(s) and the controller.
Test Signal Transmission and Reception 2. On the detector, press C XMTR TEST to verify the
transmission and reception signals.
Both the detector and the controller LCDs display a count down from 999 999 to 000 000.
Test Sensor Integrity Alarm If the signal from the sensor is disrupted (sensor or sensor cable is disconnected or damaged), the detector engages the sensor integrity alarm.
48

Rig Rat III Detector System Test
To test the integrity alarm, complete the following:
3. Disconnect the sensor from the detector.
4. Ensure the following actions occur:
• the transmitter alarm engages and sends a signal to the controller,
• the controller receives the signal,
• the red LED lights and flashes on the detector,
• DANGER displays and flashes on the detector LCD,
• FAIL displays on the detector LCD below the sensor that has been disconnected,
• the audible alarm sounds, and
• all additional alarm option devices engage.
5. After confirming the sensor integrity test has passed, reconnect the sensor.
Refer to Alarms for additional information.
Test Low and High Alarm Functions 6. Low Alarm: Apply a test gas concentration to the
sensor. Ensure the gas concentration level is higher than the low alarm setpoint of the sensor.
The red LED flashes, DANGER displays and flashes on the LCD, and the audible alarm sounds (if enabled).
LOW ALARM displays below the sensor on the LCD that is in alarm. Audible, visual and/or relay alarms are engaged (if enabled).
7. High Alarm: Repeat the low alarm test procedures to test the high alarm.
System Inspection Visually inspect the detector, all cables, option devices, and accessories. Ensure that the
• detector doors are securely closed,
• all port connections are securely connected, and
• outer weatherproof ring is fully screwed down.
49

Rig Rat III Detector User Manual
Troubleshooting If a problem occurs, refer to the solutions provided in Table 18. If a problem solution is not listed, calibrate the detector. If the problem cannot be resolved through calibration, contact BW Technologies.
Table 18. Troubleshooting Tips
Problem Possible Cause Solution Controller is deactivated Activate the controller
Antenna is not aligned Move the antenna
If the LCD displays rF Out Radio Frequency (RF) signal from the controller is too weak
Move or replace the antenna Replace the antenna cable with low loss cable LMR 400. Refer to Replacement Parts and Accessories.
The signal is intermittent Outside radio frequency interference (RFI)
Ensure all other radio equipment is grounded (e.g. base station)
Battery is drained Charge the battery
Battery is damaged or defective Contact BW Technologies
Contact BW TechnologiesThe detector does not activate
Main board fuse is blown Replace the main board assembly Contact BW Technologies
The LCD displays OFF Measuring range set to zero Match the gas cylinder measuring range to the measuring range of the encapsulated sensor/stainless sensor
50

Rig Rat III Detector Troubleshooting
Table 18. Troubleshooting Tips (cont.)
Problem Possible Cause Solution Puff of target gas System is functioning normally
There is a false alarm Not calibrated correctly Check test gas and re-calibrate
Sensor is dirty Clean or replace the sensor There is no response to gas
Expired or faulty sensor Replace the sensor
Incorrect bonding and grounding Check grounding and bonding and remove interference
Faulty or damaged sensor cable Replace the cable There is radio frequency interference (RFI)
Snow accumulation Move the detector
Sensor requires calibration Calibrate the sensor The detector does not accurately measure gas Sensor screen is blocked Clean sensor screen
Main board fuse is blown Contact BW TechnologiesThe LCD is blank when the detector is activated Battery low (9.5 V) Charge the battery
The LCD displays dCH ERR Detector channel rotary switch is set to 0 Set the detector channel rotary switch to channel 1,2,3, or 4
51

Rig Rat III Detector User Manual
Replacement Parts and Accessories a Warning
To prevent personal injury or damage to the detector, use only the specified replacement parts.
To order parts or accessories listed in the table below, contact BW Technologies.
Table 19. Replacement Parts and Accessories
Model No Description Qty
Encapsulated Sensors / Caps / Filters SAII-L3H# H2S (hydrogen sulfide) encapsulated sensor 1
SAII-L3M1 CO (carbon monoxide) encapsulated sensor 1
SAII-L3X2 O2 (oxygen) encapsulated sensor 1
SAII-L3W1 % LEL (combustible) encapsulated sensor 1
SAII-L3S# SO2 (sulfur dioxide) encapsulated sensor 1
SAII-L3A# NH3 (ammonia) encapsulated sensor 1
SAII-L3C# Cl2 (chlorine) encapsulated sensor 1
SAII-L3Y1 H2 (hydrogen) encapsulated sensor 1
SAII-L3Z1 HCN (hydrogen cyanide) encapsulated sensor 1
SAII-L3L2 HCl (hydrogen chloride) encapsulated sensor 1
SAII-L3D1 NO2 (nitrogen dioxide) encapsulated sensor 1
SAII-L3V1 ClO2 (chlorine dioxide) encapsulated sensor 1
Model No Description Qty
SAII-L3B2 C2H5OH (ethanol) encapsulated sensor 1
SAII-L3E1 C2H4O (ethylene oxide) encapsulated sensor 1
SAII-L3N2 NO (nitric oxide) encapsulated sensor 1
SAII-L3G1 O3 (ozone) encapsulated sensor 1
SAII-L3P1 PH3 (phosphine) encapsulated sensor 1
RRJ-FIL-K5 Sensor filters (encapsulated sensor) 5
M2493 Calibration cap for encapsulated sensor 1
Stainless Steel Sensors / Filters / Measuring Kits / Plugs PS-RH01 H2S (hydrogen sulfide) sensor 1
PS-RX01 O2 (oxygen) sensor 1
PS-RM01 CO (carbon monoxide) sensor 1
PS-RS01 SO2 (sulfur dioxide) sensor 1
PS-RC01 Cl2 (chlorine) sensor 1
PS-RV01 ClO2 (chlorine dioxide) 1
PS-RA01 NH3 (ammonia) sensor 1
PS-RZ01 HCN (hydrogen cyanide) sensor 1
PS-RD01 NO2 (nitrogen dioxide) sensor 1
PS-RN01 NO (nitric oxide) sensor 1
PS-RL01 HCl (hydrogen chloride) sensor 1
PS-RB01 C2H5OH (ethanol) sensor 1
PS-RE01 C2H4O (ethylene oxide) 1
PS-RY01 H2 (hydrogen) sensor 1
PS-RG01 O3 (ozone) sensor 1
52

Rig Rat III Detector Replacement Parts and Accessories
Model No Description Qty
PLxS-50-#-2K Sensor measuring range change kit for stainless steel sensor units 1
MM-FIL-K2 Sensor filters (for toxic/O2)
E0036 Calibration plug for stainless steel sensor assembly
Cables and Connector Cable Interfaces UC2-S### (010 – 250) Remote sensor cable ft./
m
UC-PWR2-3-10 Dual power cables for solar panels 1
RR-EXT-UCxx (10-100) Cable extension kit 1
RR-EXT-UC10 Cable extension kit (10ft./3m) 1
UC-SCAB2 24 Vdc direct operation connector cable interface (5 ft./1.5 m) 1
UC2-S010 Remote sensor cable with plug-in connectors (10 ft./3 m) 1
Antenna and Cable Assembly and Mounting Brackets RR-AN5 Antenna 5 dBi replacement 1
RR-AN8 Antenna 8 dBi with mounting bracket 1
RR-Acxx (10 or 20) LMR 240 antenna cable assembly (ft./m) 1
RR-Acxxx (50 or 100) LMR 400 antenna cable assembly (ft./m) 1
Chargers and Batteries
UR-C300 Single bench charger 110 Vac with 5 ft./1.5 m cable 1
Model No Description Qty
UR-C404 Quad bench charger 110 Vac with 5 ft./1.5 m cable
UR-S600 Weatherproof line trickle charger 110 Vac with 5 ft./1.5 m plug in cable 1
UR-TC10 Explosion proof link trickle charger 110 Vacwith 5 ft./1.5 m plug in cable 1
Option Devices UR-L600 Strobe light with 60,000 candlepower 1
UR-LR60 Rechargeable strobe light with 160,000 candlepower 1
UR-H700 Siren alarm 101 dB 1
UR-HR70 Rechargeable siren alarm 101 dB 1
UR-HR60 Rechargeable bullhorn 112 dB 1
UR-LHR60 Rechargeable strobe/bullhorn with 160,000 candlepower and 112 dB 1
UR-J950 Multiple option box with 4 ports 1
Relays UD-RWS0 Single relay in weatherproof enclosure 1
UD-RWD0 Dual relay in weatherproof enclosure 1
UD-RES0 Single relay in explosion proof enclosure 1
UD-RED0 Dual relay in explosion proof enclosure 1
UD-RCS0 Single relay card with plug in cable (no enclosure) 1
UD-RCD0 Dual relay card with plug in cable (no enclosure) 1
53

Rig Rat III Detector User Manual
Model No Description Qty
Security Accessories M1524 Security key 1
RR-LAT-1 Security latch (stainless steel) 1
Tripods and Wall Mounts Kits TRIPODx 1 or 2 Folding field tripod 1
TRI-EXT1 Tripod extension 1
TRI-PLATEx Tripod option/accessory plate 1
MK-U600 Wall mounting kit 1
MK-EXT1 Extender sections for MK-U600 1
MK-PLATEx Wall mount option plate 1
Datalogger/Cables/Software RS-DAT7-II Datalogger 1
UA-DATC2 Datalogger RS232 port cable for RS-DAT7-II 1
UAII-DATS2 Software package with manuals and cable for RS-DAT7-II 1
Additional Replacement Parts and Accessories UAII-4-20MA 4-20MA interface for stand alone detectors 1
UA-ST24 Rechargeable solenoid driver 24 Vdc 1
RR-RTD-1 Transceiver assembly with bracket for detector 1
RR-FK-1 Fuse replacement 500 mA (set of 8) 1
E0216K Replacement port cover caps 5-pin & 6-pin with chain, washer, and screws 1
Specifications Instrument dimensions: 21.49 x 28.6 x 11.51 cm (8.46 x 11.26 x 4.53 in.) Weight: 5.15 kg (11 lbs. 6 oz.) Enclosure: 14 gauge stainless steel NEMA/Type 4 Operating temperature: -40°C to +50°C (-40°F to +122ºF) Storage temperature: -40°C to +75°C (-40°F to +167ºF) Operating humidity: 5% to 95% relative humidity (non-condensing)
Battery: 12 V, 3.4 amp hr. rechargeable battery Battery operating time: Charge life: Two toxic/oxygen sensors - 22 days (without active trickle charge) One toxic/oxygen sensor and one combustible sensor - 3 days (without active trickle charge) RF frequency: 2.4 GHz frequency hopping spread spectrum (FHSS) RF transmission distance: 3 km (1.8 miles) Alarm conditions: Low alarm, high alarm, loss of transmission alarm, low battery alarm, and sensor integrity alarm Audible alarm: 85 dB at 1 m (3 ft.) oscillating Visual alarm: Large red light-emitting diode (LED) Security: Key lock access to control panel
54

Rig Rat III Detector Specifications
Sensor heads: Plug-in, interchangeable, gas specific units Sensor: Two 6-pin male ports Supply voltage: Powered by the detector Connector: 6-pin, MIL 5015 (14 S) female plug-in connector Refer to Appendix A Encapsulated Sensors for operating specifications for each gas type Combustible sensors: Poison-resistant catalytic bead Current draw: 35 mA typical at 12 Vdc Output signal: 0 to -500 millivolt signal at option port Enclosure: Encapsulated duraprene Size (l x w x h): 6.90 x 8.20 x 5.79 cm (2.72 x 3.23 x 2.28 in.) Weight: 175 g (6.2 oz.) Approved: Class I, Div. 1, Groups C, D; Class II, Div. 1, Group G Toxic/Oxygen sensors: Electrochemical cells Current draw: 4 mA maximum at 12 Vdc Output signal: 0 to -500 millivolt signal at option port Enclosure: Encapsulated duraprene Size (l x w x h): 6.90 x 8.20 x 5.79 cm (2.72 x 3.23 x 2.28 in.) Weight: 175 g (6.2 oz.) Approved: Class I, Div. 1, Groups C, D; Class II, Div. 1, Group G Display: Alphanumeric liquid crystal display (LCD) Calibration: Automatic zero and automatic span User field options: Maximum gas level, transmission test, sensor disable, loss of transmission time interval, transmitter disable
Connections: Plug-in, mil-style, amphenol connectors with weatherproof covers Sensor: Two 6-pin male ports Charger: One 5-pin female port Options: Two 6-pin female ports Antenna: One port with TNC connector Normal charge: 1 hour per battery Intrinsic Safety: Approved by CSA to both U.S. and Canadian standards Approved: Class I, Division 1, Group C and D, T3C; Class 2, Group G, T3C Standards: CAN/CSA C22.2 No. 157 and C22.2 152 ANSI/UL – 913 and ANSI/ISA – S12.13 Part 1
55

Rig Rat III Detector User Manual
56

Rig Rat III Detector Appendix A Encapsulated Sensors
Appendix A Encapsulated Sensors
Sensor Specifications (Encapsulated) .......................... 57 Calibration Gas Specifications ...................................... 60 Encapsulated Sensor Measuring Ranges..................... 61 Relative Sensitivity of Combustible Gases/Vapors ....... 62
57

Rig Rat III Detector User Manual
Sensor Specifications (Encapsulated) Table 20. Operating and Calibration Specifications for Each Encapsulated Sensor
Specifications Combustibles
%LEL Oxygen
O2% by vol.
Hydrogen Sulfide
H2S ppm
Sulfur Dioxide
SO2 ppm
Carbon Monoxide CO ppm
Ammonia NH3 ppm
Repeatability % of signal 1 0.1 1 1 1 10
Operating temperature range ºC ºF
-40 to +50 -40 to +122
-20 to +50 -4 to +122
-40 to +50 -40 to +122
-20 to +50 -4 to +122
-20 to +50 -4 to +122
-20 to +40 -4 to +104
Operating humidity 5 to 95% non-condensing
Long term drift Zero: % of signal loss/month Span:
Nominal <1 %
Nominal <1 %1
Nominal <2
Nominal <2
Nominal <2
Nominal <2
LCD increments 1% 0.1% 1 ppm 1 ppm 1 ppm 1 ppm
Calibration Flow rate ml/min. at a % or ppm reading of:
250 25%
250 20.9%
250 50 ppm
400 20 ppm
150 200 ppm
250 50 ppm
1 For <1 %1: Oxygen sensor drift is <5% over operating life.
58

Rig Rat III Detector Appendix A Encapsulated Sensors
Table 20. Operating and Calibration Specifications for Each Encapsulated Sensor
Specifications Chlorine Cl2 ppm
Hydrogen H2 ppm
Hydrogen Cyanide
HCN ppm
Hydrogen Chloride HCl ppm
Nitrogen Dioxide
NO2 ppm
Chlorine Dioxide
ClO2 ppm
Repeatability % of signal 2 2 2 2 2 2
Operating temperature range ºC ºF
-20 to +40 -4 to +104
-20 to +50 -4 to +122
-40 to +40 -40 to +104
-20 to +40 -4 to +104
-20 to +50 -4 to +122
-20 to +40 -4 to +104
Operating humidity 5 to 95% non-condensing
Long term drift Zero: % of signal loss/month Span:
Nominal <2
Nominal <2
Nominal <5
Nominal <3
Nominal <2
Nominal <2
LCD increments 0.1 ppm 1 ppm 0.01 ppm 0.1 ppm 0.1 ppm 0.1 ppm
Calibration Flow rate ml/min. at a % or ppm reading of:
1000 2 ppm
150 100 ppm
400 15 ppm
1000 15 ppm
400 10 ppm
1000 5 ppm
59

Rig Rat III Detector User Manual
Table 20. Operating and Calibration Specifications for Each Encapsulated Sensor
Specifications Ethanol
C2H5OH ppm
Ethylene Oxide
C2H4O ppm
Nitric Oxide
NO ppm
Ozone O3 ppm
Phosphine PH3 ppm
Phosgene COCl2 ppm
Repeatability % of signal 1 1 2 5 2 2
Operating temperature range ºC ºF
-20 to +50 -4 to +122
-20 to +50 -4 to +122
-20 to +50 -4 to +122
-20 to +40 -4 to +104
-20 to +50 -4 to +122
-20 to +40 -4 to +104
Operating humidity 15 to 90% non-condensing
Long term drift Zero: % of signal loss/month Span:
Nominal <2
Nominal <2
Nominal <2
Nominal <2
Nominal <2
Nominal <5
LCD increments 1 ppm 1 ppm 1 ppm 0.1 ppm 0.1 ppm 0.1 ppm
Calibration Flow rate ml/min. at a % or ppm reading of:
10002
10 ppm 1000 10 ppm
400 50 ppm
1000 0.8 ppm
1000 1 ppm
1000 0.3 ppm
2 For 1000: To calibrate ethanol use 10 ppm of ethylene oxide.
Note: Performance data is based upon conditions at 20ºC, 50% RH, 1013 mBar.
60

Rig Rat III Detector Appendix A Encapsulated Sensors
Calibration Gas Specifications Toxic and Oxygen: Electrochemical
Combustible: Catalytic
Position sensitivity: None
Operation pressure range: 900 to 1100 mBar (Atmospheric +/- 10%)
Calibration notes: For maximum accuracy, calibrate with a mixture in the range most measurements will be made. For most purposes, a 2 minute exposure is satisfactory.
Remote calibration: Allow a longer period of time when applying gas, dependent upon the length of the hose.
Calibration hose: Use Teflon, Tygon, or stainless steel hose on all sensors.
a Caution Tygon will poison a combustible sensor over time.
Combustible sensor: For the most accurate measurements calibrate using the gas or vapor under investigation. Where this is not possible, refer to Table 22 Relative Sensitivity.
61

Rig Rat III Detector User Manual
Measuring Ranges for Encapsulated Sensors Table 21. Encapsulated Sensor Measuring Ranges
Gas Type Sensor Part #
Units of Measure
Measuring Ranges Available When ordering, substitute # in the part number for the number located at the top of the
column 1 2 3 4 5 6
LEL (Combustibles) SAII-L3W1 % LEL 0 to 100
O2 (Oxygen) SAII-L3X# % by vol. 0 to 25.0 0 to 30.0
H2S (Hydrogen sulfide) SAII-L3H# ppm 0 to 100 0 to 50 0 to 500 0 to 20
SO2 (Sulfur dioxide) SAII-L3S# ppm 0 to 100 0 to 20 0 to 10
CO (Carbon monoxide) SAII-L3M1 ppm 0 to 500
NH3 (Ammonia) SAII-L3A# ppm 0 to 50 0 to 100
Cl2 (Chlorine) SAII-L3C# ppm 0 to 5.0 0 to 10.0
H2 (Hydrogen) SAII-L3Y# ppm 0 to 100 0 to 500
HCl (Hydrogen chloride) SAII-L3L2 ppm 0 to 20.0
HCN (Hydrogen cyanide) SAII-L3Z1 ppm 0 to 20.0
NO2 (Nitrogen dioxide) SAII-L3D1 ppm 0 to 10.0
ClO2 (Chlorine dioxide) SAII-L3V1 ppm 0 to 5.0
C2H5OH (Ethanol) SAII-L3B2 ppm 0 to 1000
C2H4O (Ethylene oxide) SAII-L3E1 ppm 0 to 10.0
NO (Nitric oxide) SAII-L3N2 ppm 0 to 100.0
O3 (Ozone) SAII-L3G1 ppm 0 to 1.0
PH3 (Phosphine) SAII-L3P1 ppm 0 to 10.0
62

Rig Rat III Detector Appendix A Encapsulated Sensors
Relative Sensitivity of Combustible Gases/Vapours The following table shows the variation of the combustible sensor when exposured to a range of gases and vapors at the same % LEL concentration. The figures are expressed relative to the methane signal (=100).
The results are intended for guidance only. For a more accurate measurement, calibrate using the gas or vapor under investigation.
Table 22. Relative Sensitivity of Combustible Gases/Vapours
Gas/Vapor Relative Sensitivity Gas/Vapor Relative Sensitivity
Methane 100 Carbon monoxide 110
Propane 65 Acetone 75
n-Butane 60 Methyl ethyl ketone 60
n-Pentane 50 Toluene 60
n-Hexane 50 Ethyl acetate 65
n-Heptane 50 Hydrogen 100
n-Octane 50 Ammonia 145
Methanol 115 Cyclohexane 65
Ethanol 85 Leaded petrol 60
iso-Propyl Alcohol 70 Unleaded petrol 60
Note: Each sensitivity has been rounded to the nearest 5%.
63

Rig Rat III Detector User Manual
64

Rig Rat III Detector Appendix B Installation Requirements
Appendix B Installation Requirements Installation of an Unapproved Charger – Detector............ 64 Detector System Interconnection ...................................... 64 List 1 .................................................................................. 65 Installation of an Unapproved External Charger ............... 66 Barrier Parameters ............................................................ 68 IS Sensor Barrier ............................................................... 72
65

Rig Rat III Detector User Manual
Installation of an Unapproved Charger — Detector
Detector System Interconnection Note: The diagram below shows the cable limitations and regulations for connecting to detector ports in Class I, Div 1 areas. Violations of these parameters will impair Intrinsic Safety.
Figure 24. Gas Detection System Interconnection
66

Rig Rat III Detector Appendix B Installation Requirements
List 1
Approved Class I, Div. 1, Gr. C, D Alarms
• UR-B600
Approved Class I, Div. 2, Gr. C, D Alarms
• UR-L600
• UR-L601
• UR-L602
Table 23. Limiting Energy
I.S. Barrier Detector Open circuit voltage, VOC ≤ Vmax, maximum voltage allowed Short circuit current, Isc ≤ Imax, maximum current allowed Allowed capacitance, Ca ≥ Ci, internal capacitance +Ccable, cable capacitance Allowed inductance, La ≥ Li, internal inductance +Lcable, cable inductance Ca and La include capacitance and inductance
67

Rig Rat III Detector User Manual
Installation of an Unapproved External Charger Note: When the sensor and detector are in a Class I, Div. 2, Gr. C, D hazardous area and an unapproved external charger is installed in a safe area, barriers are not required.
Figure 25. Division 2 Unapproved External Charger Installation
68

Rig Rat III Detector Appendix B Installation Requirements
Note: When installing an unapproved external charger in a Class I, Div. 1, Gr. C, D hazardous area, install barriers as shown in Figure 26 to ensure Intrinsic Safety.
Figure 26. Division 1 Unapproved External Charger Installation Requirements:
1. This configuration is required for the charger port.
2. I.S. barriers required for Class I, Div. 1 applications only.
3. All intrinsically safe wiring shall be kept separate from non-intrinsically safe wiring.
4. Use Beldon SJTW3 cable or the equivalent.
Note: Any barrier that meets the entity parameter criteria is acceptable.
69

Rig Rat III Detector User Manual
Barrier Parameters
Voc Isc Ca La
19.9 V 150 mA 1.00uF 7.0 mH
Table 24. I.S. Barrier Example
Barrier Example - Dual Qty STAHL P/N
A 1 9002/77-220-296-00
B 1 9001/01-199-150-10
The installation must comply with the Canadian Electrical Code (CEC) and the National Electrical Code (NEC).
70

Rig Rat III Detector Appendix B Installation Requirements
Note: When the sensor and detector are in a Class I, Div. 2, Gr. C, D hazardous area and an unapproved accessory is installed in a safe area, barriers are not required.
Figure 27. Division 2 Unapproved Accessory Installation
71

Rig Rat III Detector User Manual
Note: When installing an unapproved accessory in a Class I, Div. 1, Gr. C, D hazardous area, install barriers as shown in the following figure to ensure Intrinsic Safety.
Figure 28. Division 1 Unapproved Accessory Installation
Requirements:
1. This configuration is required for each option port.
2. I.S. barriers required for Class I, Div. 1 applications only.
3. All intrinsic safe wiring shall be kept separate from non-intrinsically safe wiring.
4. Electrical Parameters of the cable: capacitance = 60pF/ft. and inductance = 0.20 uH/ft. where Ca>Ci+ Ccable and La>Li + Lcable.
72

Rig Rat III Detector Appendix B Installation Requirements
Table 25. I.S. Barrier Configurations
Terminal Voc Isc Ca La
A Reference > to ground 15 V 150 mA 1.2 uF 4.5 mH
B Reference > to ground 15 V 150 mA 1.2 uF 4.5 mH
C Reference > to ground 8.2 V 150 mA 10.8 uF 4.2 mH
D Reference > to ground 8.2 V 150 mA 10.8 uF 4.2 mH
E Reference > to ground 15 V 390 mA 1.2 uF 0.54 mH
Any barrier that meets the entity parameter criteria is acceptable. The following table provides some possible choices.
Table 26. I.S. Barrier Requirements
Barrier Option 1 - Dual Qty STAHL P/N
A 1 9002/77-150-300-00
B 1 9002/22-093-300-00
C 1 9001/01-158-390-10 (Single barrier)
The installation must comply with the Canadian Electrical Code (CEC) and the National Electrical Code (NEC).
73

Rig Rat III Detector User Manual
IS Sensor Barrier Installation Note: The following figure outlines the installation of a sensor in a hazardous area using the IS Sensor Barrier. The IS barrier is approved for installation in Group B or C.
Figure 29. Approved IS Sensor Barrier Installation
For information and requirements about installing option accessories in a hazardous area, refer to Detector System Interconnection and Figure 25 Gas Detection System Interconnection.
74

Rig Rat III Detector Appendix C Stainless Steel Sensors
Appendix C Stainless Steel Sensors Stainless Steel Sensors Toxic/O2...................................... 74 Installation.......................................................................... 74 Calibration (Stainless Steel Sensors)................................ 74 Auto Zero ........................................................................... 74 Cylinder Connection and Sensor Installation .................... 75 Span the Sensors and Detector ........................................ 75 Transmission Interval ........................................................ 77 Loss of Transmission Time Interval................................... 78 End Calibration .................................................................. 79 Maintenance ...................................................................... 79 Replace Toxic/O2 Sensor Cells and Screen..................... 80 Specifications (Stainless Steel Sensors)........................... 81 Sensor Measuring Ranges (Stainless Steel) .................... 85
75

Rig Rat III Detector User Manual
Stainless Steel Sensors (Toxic/O2)
Installation
For proper installation of the toxic/O2 stainless steel sensor, please refer to the following figure.
Figure 30. Sensor Dimensions (Stainless Steel)
Calibration (Stainless Steel Sensors)
Auto Zero a Caution
Perform the following calibration procedures in a clean atmosphere that is free of hazardous gas, otherwise connect a zero gas cylinder.
To set the setpoint to 0 (zero), complete the following:
8. From the operations bay panel, press C LOW/ or C HIGH/ until 0 (zero) displays on the detector LCD.
9. Press C OK to accept the new value.
Note
Zero drift for the O2 sensor is extremely minimal over the life span of the sensor. If zeroing is required, apply 100% Nitrogen (N2).
76

Rig Rat III Detector Appendix C Stainless Steel Sensors
Cylinder Connection and Installation
10. Insert the calibration cap into the stainless steel sensor as shown in Figure 31.
Figure 31. Cylinder Connection for Calibration
11. Connect the hose to the cylinder. Do not attach the hose to the sensor until instructed to apply gas.
Span the Sensors and Detector
Note
Using 50% LEL gas is recommended.
12. Connect the hose to the calibration cap and open the valve on the cylinder. Apply gas to the sensor until the LCD readout stabilizes (approximately 2 minutes).
13. To adjust the current value on the detector, press
C LOW/ or C HIGH/ until the required value displays.
14. Press C OK to accept the new value.
15. Remove the gas from the sensor and close the valve of the gas cylinder. Allow the detector time to display a zero reading.
77

Rig Rat III Detector User Manual
Detector Does Not Return to Zero Reading: If the sensor reading does not return to zero, ensure that the sensor measuring range rotary switch is set correctly.
Reset the rotary switch if required and repeat the calibration procedures. Repeat the calibration procedures for SENSOR 2 (if applicable) before setting the transmission interval in the following section
Transmission Interval
Note
Before proceeding, ensure that both SENSOR 1 and SENSOR 2 (if applicable) have been calibrated.
The transmission interval is used to set the detector to transmit data to the controller on a regularly scheduled basis. The detector can be set to transmit data once a day, hourly, or more frequently.
• Minimum 5 seconds
• Maximum 25 hours
To set/change the transmission time, complete the following:
16. Determine how frequently the transmissions are to be sent to the controller.
Note
Frequent transmissions require that the battery be recharged more frequently.
17. From the detector, press C LOW/ and C OK simultaneously to enter calibration mode (if required).
18. From calibration mode, press C LOW/ and C OK simultaneously again to access the transmission time screen.
The hours 00h interval screen initially displays.
19. Press C LOW/ or C HIGH/ until the required hour(s) value displays (maximum 25 hours).
20. Press C OK to accept the new value.
Or
For more frequent transmissions (less than 1 hour), press C OK to bypass and automatically access the minutes 00. interval screen.
78

Rig Rat III Detector Appendix C Stainless Steel Sensors
21. Press C LOW/ or C HIGH/ until the required minute(s) value displays.
22. Press C OK to accept the new value.
Or
For more frequent transmissions (less than 1 minute), press C OK to bypass and automatically access the seconds .00 interval screen.
23. Press C LOW/ or C HIGH/ until the required seconds value displays (minimum .05 seconds).
24. Press C OK to accept the new value.
The loss of transmission time interval screen 00h t.E displays.
Loss of Transmission Time Interval
In the event that transmissions are interrupted, this function is used to enter a specified time that a controller will wait for transmissions from a detector before entering an alarm state.
• Maximum period of standby: 97 hours
• Minimum period of standby: 1 minute
To enter a loss of transmission time interval, complete the following:
25. The initial loss of transmission time interval (00h t.E) screen displays the hours (00h). Press C LOW/ or C HIGH/ until the desired hour(s) value displays.
26. Press C OK to accept the new value.
Or
For reduced transmission time interval (less than 1 hour), press C OK to bypass and automatically access the minutes (00. t.E) screen.
79
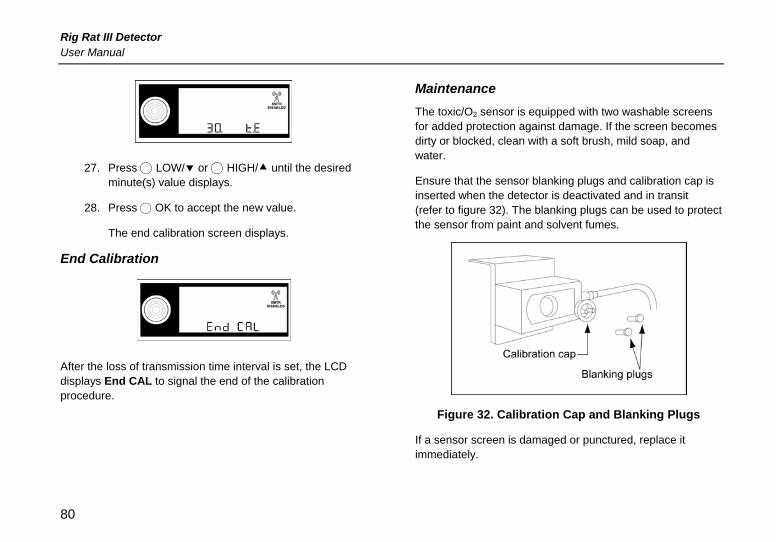
Rig Rat III Detector User Manual
27. Press C LOW/ or C HIGH/ until the desired minute(s) value displays.
28. Press C OK to accept the new value.
The end calibration screen displays.
End Calibration
After the loss of transmission time interval is set, the LCD displays End CAL to signal the end of the calibration procedure.
Maintenance The toxic/O2 sensor is equipped with two washable screens for added protection against damage. If the screen becomes dirty or blocked, clean with a soft brush, mild soap, and water.
Ensure that the sensor blanking plugs and calibration cap is inserted when the detector is deactivated and in transit (refer to figure 32). The blanking plugs can be used to protect the sensor from paint and solvent fumes.
Figure 32. Calibration Cap and Blanking Plugs
If a sensor screen is damaged or punctured, replace it immediately.
80

Rig Rat III Detector Appendix C Stainless Steel Sensors
Replace Toxic/O2 Sensor Cells and Screen
Figure 33. Toxic/O2 Sensor Replacement
1. Using a Phillips screwdriver, remove the four screws on the back cover to open the sensor head.
2. Remove the two screws that hold the measuring range module onto the main board.
Table 27. Toxic/O2 Sensor Replacement Parts
Item Description
1 Philips screws for measuring range module
2 Measuring range module with 8-pin header
3 Hex screws
4 Main board with 8-pin terminal block
5 Sensor
6 O-ring
7 Sensor screen
8 Screws
9 Harness
10 Sensor head
3. Gently remove the module from the 8-pin terminal block.
4. Using a 5/32” hex driver, remove the three hex screws that attach the main board. Unplug the harness and remove the board.
81

Rig Rat III Detector User Manual
5. Screen replacement: Replace the sensor screen. Sensor replacement: Remove the old sensor and insert the new sensor onto the board.
6. Ensure that the sensor screen and O-ring are assembled in the correct order.
7. Replace the main board, the three hex screws, insert in the harness, and replace the measuring range module. Ensure the module gas matches the sensor.
8. Replace the back enclosure, washers, and screws.
9. Calibrate the sensor.
Specifications (Stainless Steel Sensors) Toxic/Oxygen sensor: Electrochemical cells Current draw: 2 mA maximum at 12 V dc Output signal: 0 to -500 millivolt signal at option port Sensor screens: Two washable PTFE (Teflon) mesh Enclosure: 16-gauge stainless steel, NEMA 3R, RFI/EMI shielded Size (l x w x h): 11.5 x 9.1 x 8.0 cm (4.5 x 3.5 x 3.1 in.) Weight: 0.8 kg (1.9 lbs.) Approved: Class I, Div. 1, Groups C, D; Class II, Div. 1, Group G
82
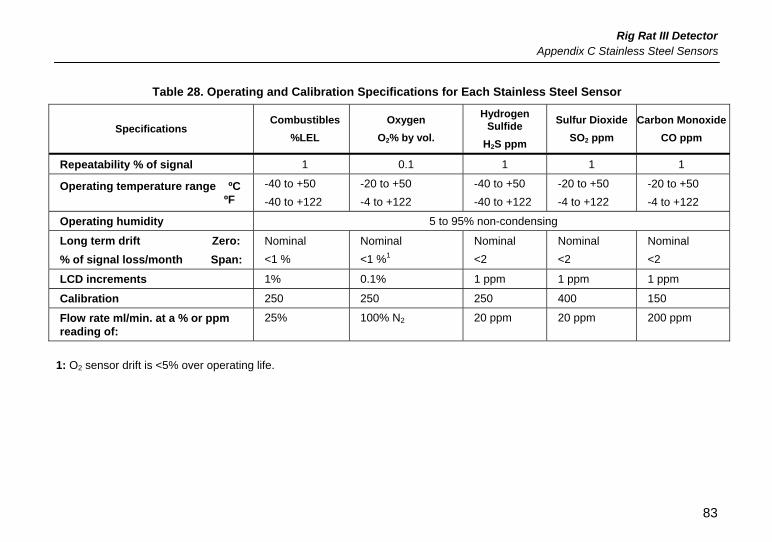
Rig Rat III Detector Appendix C Stainless Steel Sensors
Table 28. Operating and Calibration Specifications for Each Stainless Steel Sensor
Specifications Combustibles
%LEL Oxygen
O2% by vol.
Hydrogen Sulfide
H2S ppm
Sulfur Dioxide SO2 ppm
Carbon MonoxideCO ppm
Repeatability % of signal 1 0.1 1 1 1
Operating temperature range ºC ºF
-40 to +50 -40 to +122
-20 to +50 -4 to +122
-40 to +50 -40 to +122
-20 to +50 -4 to +122
-20 to +50 -4 to +122
Operating humidity 5 to 95% non-condensing
Long term drift Zero: % of signal loss/month Span:
Nominal <1 %
Nominal <1 %1
Nominal <2
Nominal <2
Nominal <2
LCD increments 1% 0.1% 1 ppm 1 ppm 1 ppm
Calibration 250 250 250 400 150
Flow rate ml/min. at a % or ppm reading of:
25% 100% N2 20 ppm 20 ppm 200 ppm
1: O2 sensor drift is <5% over operating life.
83

Rig Rat III Detector User Manual
Table 28. Operating and Calibration Specifications for Each Stainless Steel Sensor (cont.)
Specifications Ammonia NH3 ppm
Chlorine Cl2 ppm
Hydrogen H2 ppm
Hydrogen Cyanide
HCN ppm
Hydrogen Chloride HCl ppm
Nitrogen Dioxide
NO2 ppm
Repeatability % of signal 10 2 2 2 2 2
Operating temperature range ºC ºF
-25 to +35 -13 to +95
-20 to +50 -4 to +122
-20 to +50 -4 to +122
-20 to +50 -4 to +122
-20 to +50 -4 to +122
-20 to +50 -4 to +122
Operating humidity 5 to 95% non-condensing
Long term drift Zero: % of signal loss/month
Span:
Nominal <2
Nominal <2
Nominal <2
Nominal <2
Nominal <2
Nominal <2
LCD increments 1 ppm 0.1 ppm 1 ppm 0.01 ppm 0.1 ppm 0.1 ppm
Calibration Flow rate ml/min. at a % or ppm reading of:
250 25 ppm
1000 10 ppm
150 10 ppm
400 10 ppm
1000 20 ppm
400 10 ppm
84

Rig Rat III Detector Appendix C Stainless Steel Sensors
Table 28. Operating and Calibration Specifications for Each Stainless Steel Sensor (cont.)
Specifications Chlorine Dioxide
ClO2 ppm Ethanol
C2H5OH ppm
Ethylene Oxide
C2H4O ppm
Nitric Oxide NO ppm
Ozone O3 ppm
Repeatability % of signal 2 1 1 2 5
Operating temperature range ºC ºF
-20 to +50 -4 to +122
-20 to +50 -4 to +122
-20 to +50 -4 to +122
-20 to +50 -4 to +122
-20 to +50 -4 to +122
Operating humidity 5 to 95% non-condensing 15 to 90% non-condensing
Long term drift Zero: % of signal loss/month Span:
Nominal <2
Nominal <5
Nominal <5
Nominal <2
Nominal <2
LCD increments 0.1 ppm 1 ppm 1 ppm 1 ppm 0.01 ppm
Calibration Flow rate ml/min. at a % or ppm reading of:
1000 10 ppm
1000 20 ppm
1000 20 ppm
400 10 ppm
1000 1 ppm
Note: Performance data is based on conditions at 20ºC, 50% RH, 1013 mBar.
85

Rig Rat III Detector User Manual
Measuring Ranges for Stainless Steel Sensors Table 29. Stainless Steel Sensor Measuring Ranges
Gas Type Sensor Part #
Units of Measure
Measuring Ranges Available When ordering, substitute # in the part number for the number located at the top of the column
1 2 3 4 5 6 Sensor Cell #
Sensor Range Module Part#
LEL (Combustibles) SA11-L3W1 % LEL 0 - 100 E2333 PLWS-50-#
O2 (Oxygen) SA-L2X1 % by vol. 0 - 25.0 0 - 30.0 PS-RX01 PLXS-50-#
H2S (Hydrogen sulfide) SA-L2H# ppm 0 - 100 0 - 50 0 - 500 0 - 20 0 - 30 PS-RH01 PLHS-50-#
SO2 (Sulfur dioxide) SA-L2S# ppm 0 - 100 0 - 50 0 - 20 0 - 10 PS-RS01 PLSS-50-#
CO (Carbon monoxide) SA-L2M1 ppm 0 - 500 0 - 1000 0 - 100 0 - 50 0 - 200 0 - 600 PS-RM01 PLMS-50-#
NH3 (Ammonia) SA-L2A# ppm 0 - 50 0 - 100 0 - 150 PS-RA01 PLAS-50-#
Cl2 (Chlorine) SA-L2V# ppm 0 - 5.0 0 - 10.0 0 - 250 PS-RV01 PLCS-50-#
H2 (Hydrogen) SA-L2Y# ppm 0 - 100 0 - 200 0 - 800 PS-RY01 PLYS-50-#
HCl (Hydrogen chloride) SA-L2L# ppm 0 - 10.0 0 - 20.0 0 - 100 PS-RL01 PLLS-50-#
HCN (Hydrogen cyanide) SA-L2Z# ppm 0 - 20.0 0 - 50.0 0 - 100 PS-RZ01 PLZS-50-#
NO2 (Nitrogen dioxide) SA-L2D# ppm 0 - 10.0 0 - 20.0 PS-RD01 PLDS-50-#
ClO2 (Chlorine dioxide) SA-L2V ppm 0 - 1.0 PS-RV01 PLVS-50-#
C2H5OH (Ethanol) SA-L2B ppm 0 - 500 PS-RB01 PLBS-50-#
C2H4O (Ethylene oxide) SA-L2E ppm 0 - 10.0 0 - 20.0 PS-RE01 PLES-50-#
NO (Nitric oxide) SA-L2N ppm 0 - 50.0 PS-RN01 PLNS-50-#
O3 (Ozone) SA-L2G ppm 0 - 1.0 0 - 2.0 PS-RG01 PLGS-50-#
86

D2124/3 EnglishiERP: 118434
© 2005 BW Technologies, all rights reserved. Printed in Canada.
All product names are trademarks of their respective companies.