winplus-ip software installation/operation guide
TRANSCRIPT

WinPlus-IP Software
Installation/Operation Guide
S/W Ver 1.6.6.216 8/2019 Issue 1
Page | 1
Contents
WinPlus-IP Installation..................................................................................................................................... 6
To Access WinPlus-IP Software........................................................................................................................... 6
To Install WinPlus-IP ........................................................................................................................................... 6
To Activate Your WinPlus-IP Licence .................................................................................................................. 9
Licence Types ................................................................................................................................................. 11
Licence Warnings ............................................................................................................................................. 11
Firmware Upgrade ......................................................................................................................................... 12
Adding Devices .............................................................................................................................................. 15
Adding An Auto Discovered Device .................................................................................................................. 16
Manually Adding A Device................................................................................................................................ 19
Device Status Light ........................................................................................................................................... 22
Re-ordering Devices .......................................................................................................................................... 22
Configuring CLOCKPLUS-IP ............................................................................................................................. 23
Overview of WinPlus-IP Default Layout ......................................................................................................... 25
Common Icons .................................................................................................................................................. 25
Window Layout ................................................................................................................................................ 25
Moving Panes ................................................................................................................................................... 25
Tabbing Panes .................................................................................................................................................. 26
Story Editor Toolbar.......................................................................................................................................... 27
Story Editor Position Indicators ........................................................................................................................ 30
Story Editor Slider Function .............................................................................................................................. 31
Active Run Order Toolbar ................................................................................................................................. 31
Active Run Order Slider Function ...................................................................................................................... 34
Icon Size ............................................................................................................................................................ 35
Activating Prompting ..................................................................................................................................... 36
To Activate Live Prompting .............................................................................................................................. 36
Page | 2
To De-Activate Live Prompting ......................................................................................................................... 36
Run Orders .................................................................................................................................................... 38
How to Create A Simple Run Order .................................................................................................................. 38
Saving A Run Order .......................................................................................................................................... 39
Recalling A Run Order....................................................................................................................................... 40
Reordering Run Orders ..................................................................................................................................... 41
Dual Rundown Mode ........................................................................................................................................ 41
Automatically Scroll From One Run Down Into the Next .................................................................................. 45
Moving Stories .................................................................................................................................................. 46 Move After Live Story .................................................................................................................................. 46 Move After Story .......................................................................................................................................... 49
Floating/Cloaking Text or Stories ..................................................................................................................... 50 Floating From the Story Editor Window ...................................................................................................... 50 Floating From the Run Order Window ......................................................................................................... 53
Shortcut Keys ................................................................................................................................................. 54
Prompter Preview Preferences ...................................................................................................................... 55
Blanking ............................................................................................................................................................ 55
Cue Marker ....................................................................................................................................................... 58
Clock ................................................................................................................................................................. 60
Sluglines ........................................................................................................................................................ 62
Slugline Configuration ...................................................................................................................................... 62
Removing Sluglines from the Prompt Output ................................................................................................... 63
Prompter Preview Layout Formatting ............................................................................................................ 65
Adjusting the Output Margin ........................................................................................................................... 66
Adjusting the Cue Marker ................................................................................................................................. 67
Adjusting the Interline Spacing......................................................................................................................... 68
Resetting the Prompter Preview Output Formatting ....................................................................................... 69
Presenter Settings.......................................................................................................................................... 70
To Add A Presenter ........................................................................................................................................... 71
To Remove A Presenter .................................................................................................................................... 71
Script Macros ................................................................................................................................................. 73
Adding Script Macros ....................................................................................................................................... 73
Editing Macro Preferences ............................................................................................................................... 74
Bookmarks & Snapshots ................................................................................................................................ 78
Configuring Bookmarks .................................................................................................................................... 79
Page | 3
Selecting Bookmarks .................................................................................................................................... 80
Configuring Snapshots ...................................................................................................................................... 81 Selecting Snapshots ..................................................................................................................................... 82
Find and Replace............................................................................................................................................ 82
To Find Text ...................................................................................................................................................... 82
To Replace Text ................................................................................................................................................ 82
Spell Check .................................................................................................................................................... 83
Font Management ......................................................................................................................................... 84
To Add A Font ................................................................................................................................................... 85
Adding Fonts from a File................................................................................................................................... 87
Removing Fonts ................................................................................................................................................ 87
Printing Options & Configuration ................................................................................................................... 89
Common Settings ............................................................................................................................................. 89
Editing Run Order & Selected Story Settings .................................................................................................... 90
Newsroom Connection & Configuration ........................................................................................................ 92
Connecting To a MOS Newsroom: .................................................................................................................... 92
Adding a Rundown In MOS ............................................................................................................................... 93
Additional MOS Configuration Options ............................................................................................................ 95 Use Backup/Buddy Server ............................................................................................................................ 95 Connection Timeout (MS) ............................................................................................................................ 96 Heartbeat ..................................................................................................................................................... 96 Break Identifier ............................................................................................................................................ 96 Do Not Reinitialise When Reconnecting ...................................................................................................... 96 Preserve Current Run Order If Made Inactive On Server ............................................................................. 97
Connecting To Avid iNews Via FTP ................................................................................................................... 98
Adding a Rundown In iNews ............................................................................................................................. 99
Additional iNews Configuration Options ........................................................................................................ 102 Connection Timeout (MS) .......................................................................................................................... 102 Encoding .................................................................................................................................................... 103 Use Encryption ........................................................................................................................................... 103 Passive Mode ............................................................................................................................................. 103 Limit Connections ...................................................................................................................................... 104 Max Connections ....................................................................................................................................... 104 Backup Servers ........................................................................................................................................... 104
Connecting to a Shared Directory Newsroom ................................................................................................ 105
Adding a Rundown in Shared Directory Newsroom ....................................................................................... 106
Newsroom Preferences ............................................................................................................................... 108
Live Updates ................................................................................................................................................... 109
Auto Story Numbering .................................................................................................................................... 109
Page | 4
Save Run Order Selection ............................................................................................................................... 110
Auto Load MOS-Active Run Orders ................................................................................................................. 110
Exclusion Options ........................................................................................................................................... 110
Bracket Options .............................................................................................................................................. 111
MOS Colour .................................................................................................................................................... 113
Display Run Order Date/Time ......................................................................................................................... 115
Display Story Update/Replacement Count ..................................................................................................... 116
Closed Captioner Configuration ................................................................................................................... 118
General Settings ............................................................................................................................................. 119
Connection Settings ........................................................................................................................................ 121
Advance Settings ............................................................................................................................................ 121
EEG and Link CC Encoders .............................................................................................................................. 123
Legacy WinPlus Settings ................................................................................................................................. 123
Other CC Encoders .......................................................................................................................................... 123
Redundancy ................................................................................................................................................. 125
Overview......................................................................................................................................................... 125
Configuring Redundancy ................................................................................................................................ 125
Swapping Redundant Machines ..................................................................................................................... 128
Additional Redundancy Tools ......................................................................................................................... 128
Newsroom Redundancy .................................................................................................................................. 130
Supported Devices .......................................................................................................................................... 130
Automation ................................................................................................................................................. 131
Overview......................................................................................................................................................... 131
Configuration.................................................................................................................................................. 131
Configuration ............................................................................................................................................... 132
Overview......................................................................................................................................................... 132
Configuration Toolbar .................................................................................................................................... 133
Add A Configuration ....................................................................................................................................... 134 Add Parent or Child Configurations ........................................................................................................... 136
Modify Configurations .................................................................................................................................... 138
Load Configurations ....................................................................................................................................... 139
Reset To Default ............................................................................................................................................. 141
Move & Duplicate Configurations .................................................................................................................. 141
Delete A Configuration ................................................................................................................................... 142
Export/Import Of Settings ........................................................................................................................... 143

Page | 5
Overview......................................................................................................................................................... 143
Exporting Settings .......................................................................................................................................... 143
Importing Settings .......................................................................................................................................... 146
Advanced Display Configuration .................................................................................................................. 148
Power ............................................................................................................................................................. 150
Main Settings ................................................................................................................................................. 151
Colour Temperature ....................................................................................................................................... 151
Image Orientation .......................................................................................................................................... 151
Image Scaling ................................................................................................................................................. 152
Input Source ................................................................................................................................................... 152 DISPLAY ...................................................................................................................................................... 152 TALENT MONITOR ...................................................................................................................................... 153
Noise Reduction .............................................................................................................................................. 153 Dynamic Noise Reduction .......................................................................................................................... 153 MPEG Noise Reduction .............................................................................................................................. 153
Picture-in-Picture (PiP) ................................................................................................................................... 154 DISPLAY ...................................................................................................................................................... 154 TALENT MONITOR ...................................................................................................................................... 155
Controller Devices ....................................................................................................................................... 156
HC-IP Controller (A9009-0002) ....................................................................................................................... 156
FC-IP Controller (A9009-0003) ........................................................................................................................ 157
WHC-PKG (A9009-0005 & A9009-0006) ......................................................................................................... 158
Technical Support & Sales Contact ............................................................................................................... 159
Service Agreements ..................................................................................................................................... 160
How To Videos ............................................................................................................................................. 160
Notes ........................................................................................................................................................... 161
Page | 6
WinPlus-IP Installation
To Access WinPlus-IP Software Go to the following webpage to download the demo WinPlus-IP software:
www.autoscript.tv/support/software-download
You will be required to complete the registration page.
Where applicable Purchase an appropriate WinPlus-IP licence from Vitec Production Solutions and
supply an email address to receive a copy of your delivery note.
You will receive an email from Vitec Production Solutions Sales Support with a delivery note
including your serial id number.
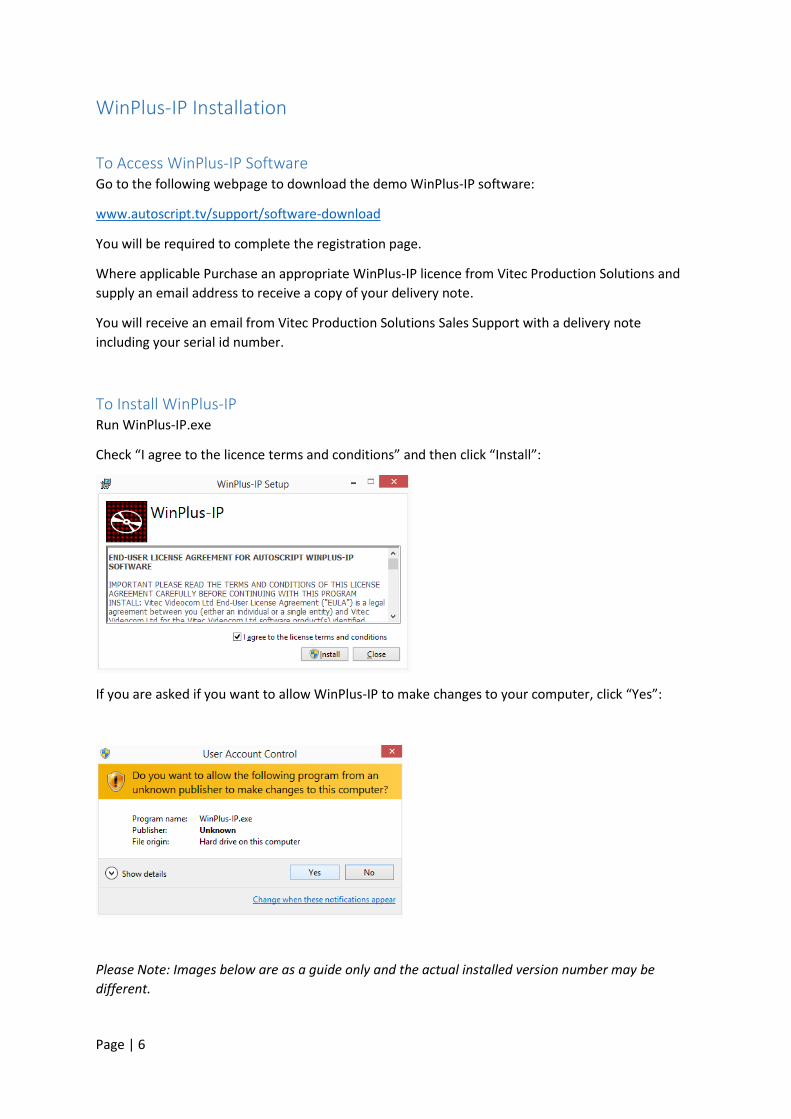
To Install WinPlus-IP Run WinPlus-IP.exe
Check “I agree to the licence terms and conditions” and then click “Install”:
If you are asked if you want to allow WinPlus-IP to make changes to your computer, click “Yes”:
Please Note: Images below are as a guide only and the actual installed version number may be
different.

Page | 7
The setup wizard will then continue. Check “I agree to the licence terms and conditions” and click
“Next”:
The installation will then continue. Click “Next”:
You will then be asked for a location for the destination folder. Enter a new location by clicking
“Change” or click “Next” to use the default location:

Page | 8
You will be given an opportunity to click “Back” to change the location before the installer proceeds.
If you are happy with the installation location, click “Install” to proceed:
Click “Finish” to complete the installation:
If installation is successfully completed, the following window will be displayed:

Page | 9
To Activate Your WinPlus-IP Licence
Open WinPlus-IP on the operating PC by double clicking on the WinPlus-IP icon on the desktop:
Copy the machine id from the Licence Management window:
Register the machine id and serial id(s) at:
http://www.autoscript.tv/support/register-product-software/
You can access that address directly here:
A licence key will be sent to the registered email address.
Copy the licence key into the Key field in the Licence Management window in WinPlus-IP:

Page | 10
WinPlus-IP will unlock the version as per the purchase. You can see the version name in the top
right hand corner Titlebar of the WinPlus-IP GUI, below the Close icon, e.g. IPS/Studio/Newsroom:
Update WinPlus-IP periodically by downloading the latest version from:
www.autoscript.tv/support/software-download
Please Note: An annual licence may be purchased to enable version upgrades [not essential]. Device
firmware upgrades are bundled with the WinPlus-IP installation file where applicable.

Page | 11
Licence Types
WP-IP has various licence types. Please see the below table for an overview of the licences available.
Please Note: Expiration of the IPS, Studio or News licence will not result in the loss of any
functionality. However, if the licence has expired, in order to install any newer software versions the
licence will need to be renewed. An annual licence may be purchased to enable version upgrades
[not essential]. Please contact your reseller or Autoscript directly to discuss licence renewal options.
Licence Warnings If the user attempts to add any features, connections or devices which are not applicable with their licence
type, a message will appear explaining what licence type they need to have.
If a user attempts to install a new version of WP-IP when their licence has expired they will see this message:
Your licence has expired and you are no longer entitled to upgrade to this version for free. Please update your
current licence first by contacting [email protected] or in the Americas please contact
Licence
Type
Titlebar
Text
Newsroom
Connection
Multiple Device
Connection
Licence
Period
After Licence
Expires
Evaluation Yes No Unlimited N/A
Demo Yes Yes Per Invididual Licence Licence will convert to Evaluation
IPS No No 12 Months from activation License renewal and software support/update packages available
Studio No Yes 12 Months from activation License renewal and software support/update packages available
News Yes Yes 12 Months from activation License renewal and software support/update packages available
iPAD N/A Yes Unlimited N/A
E.g. 1: If a user tries to add a NRCS connection but has a
Studio WP-IP licence they will see this message:
E.g. 2: If a user tries to add more than one controller
device to WP-IPS they will see this message:
Where an iPAD licence has been purchased in conjunction with
another licence this will appear in the Titlebar Text E.g.:

Page | 12
Firmware Upgrade
Occasionally there will be a need to update firmware on the devices.
Please Note: To access firmware updates, the latest version of WP-IP must be running
Firmware is bundled with the WP-IP installer. When WP-IP is launched, any device in the Devices
window requiring a firmware upgrade will display a warning sign (yellow triangle) beside the device
Status light:
The message will show as “Device firmware out of date”:
To update the firmware, right click on the device and select Update Firmware:
The application will automatically go to the file location for the updater.
The firmware updater window will open and the update will begin.
Page | 13
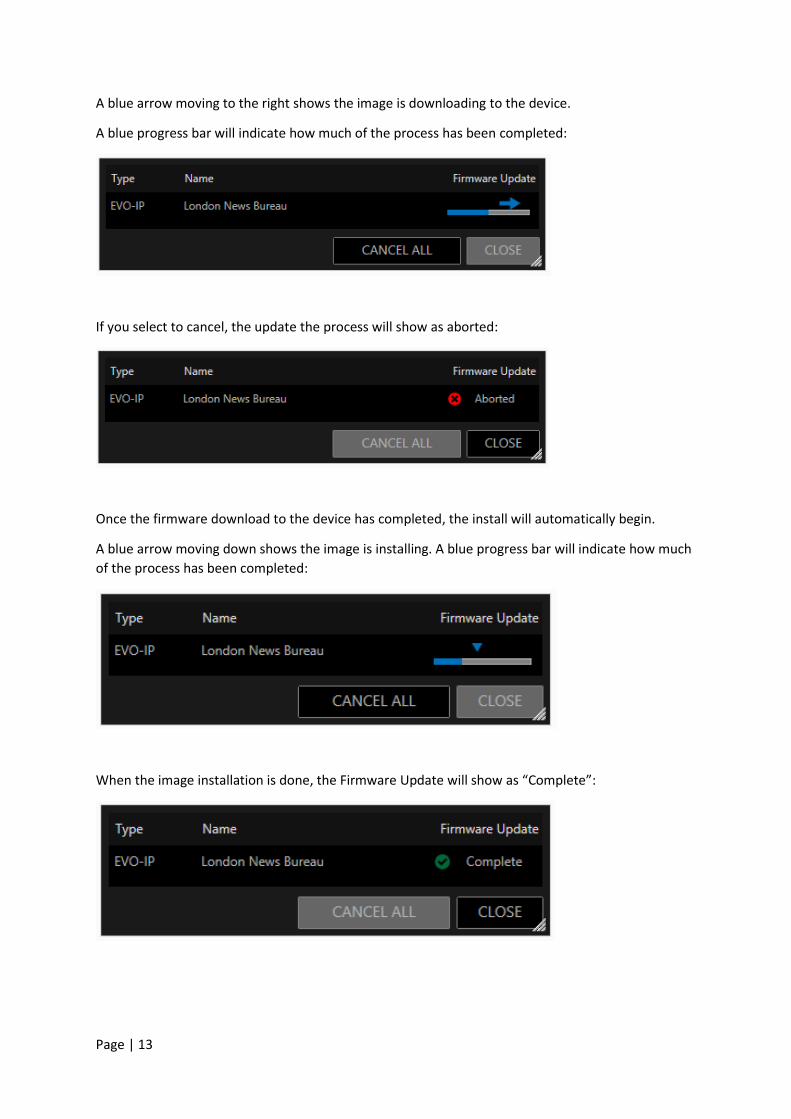
A blue arrow moving to the right shows the image is downloading to the device.
A blue progress bar will indicate how much of the process has been completed:
If you select to cancel, the update the process will show as aborted:
Once the firmware download to the device has completed, the install will automatically begin.
A blue arrow moving down shows the image is installing. A blue progress bar will indicate how much
of the process has been completed:
When the image installation is done, the Firmware Update will show as “Complete”:
Page | 14
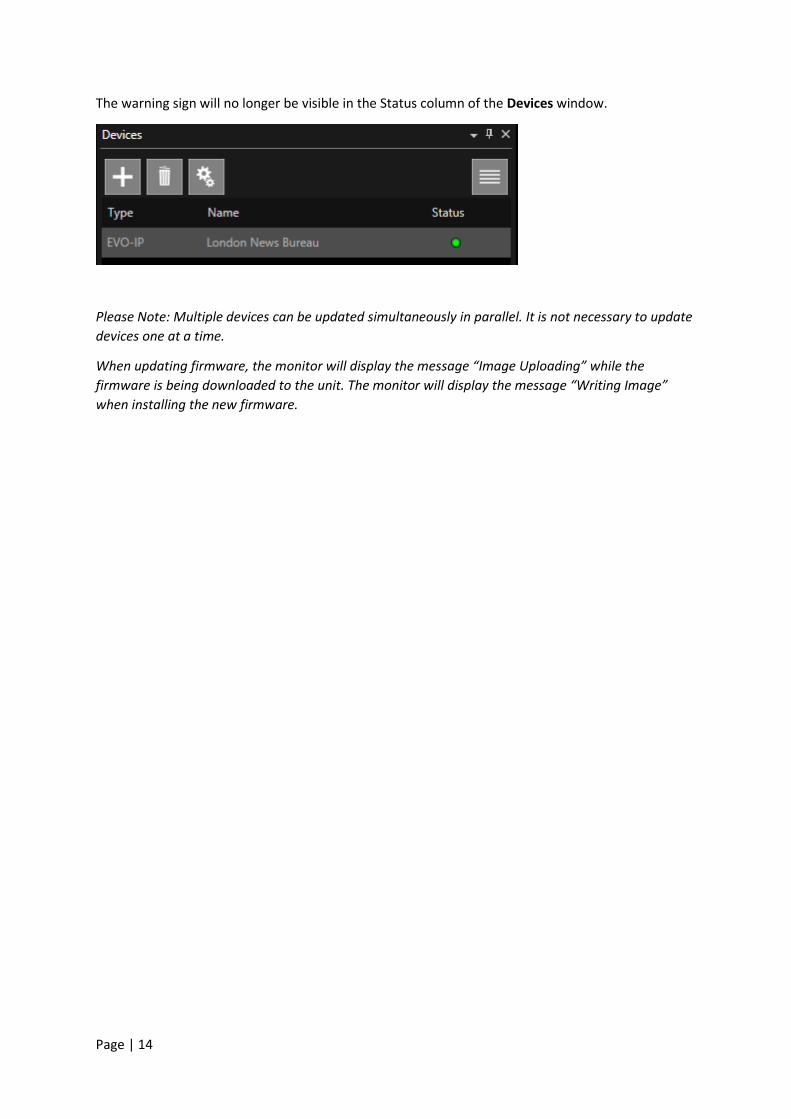
The warning sign will no longer be visible in the Status column of the Devices window.
Please Note: Multiple devices can be updated simultaneously in parallel. It is not necessary to update
devices one at a time.
When updating firmware, the monitor will display the message “Image Uploading” while the
firmware is being downloaded to the unit. The monitor will display the message “Writing Image”
when installing the new firmware.
Page | 15
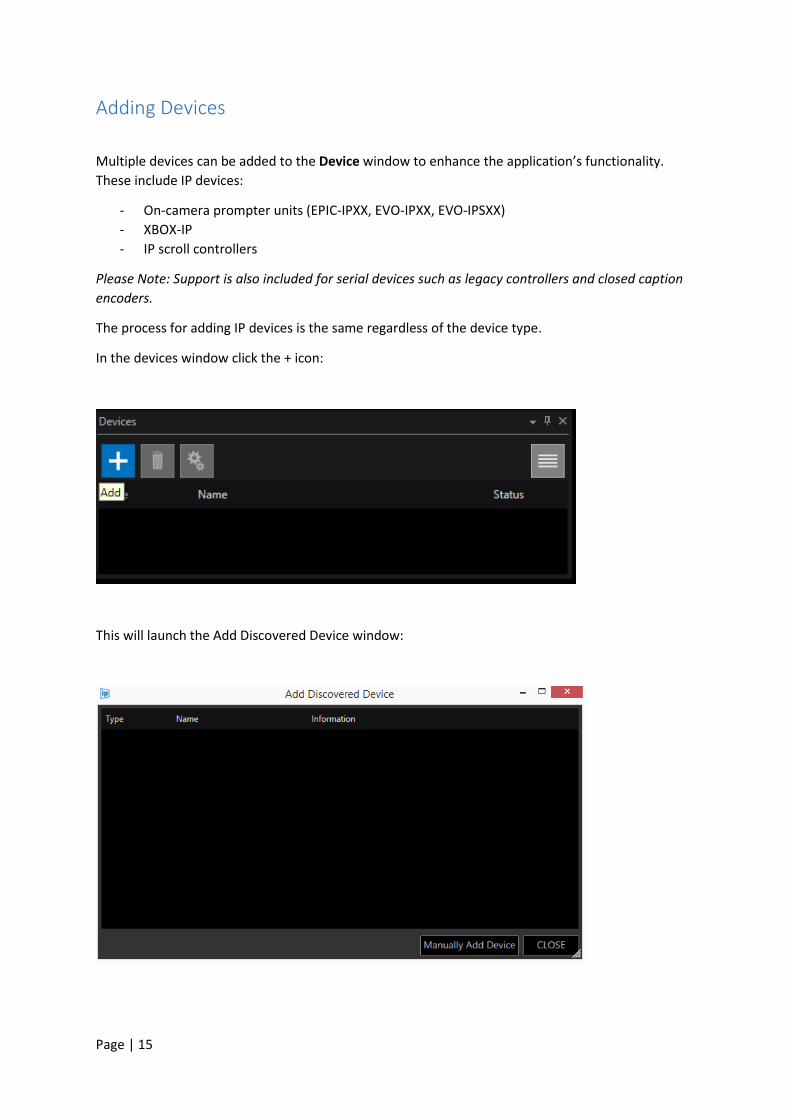
Adding Devices
Multiple devices can be added to the Device window to enhance the application’s functionality.
These include IP devices:
- On-camera prompter units (EPIC-IPXX, EVO-IPXX, EVO-IPSXX)
- XBOX-IP
- IP scroll controllers
Please Note: Support is also included for serial devices such as legacy controllers and closed caption
encoders.
The process for adding IP devices is the same regardless of the device type.
In the devices window click the + icon:
This will launch the Add Discovered Device window:
Page | 16
You now have two options:
Option 1: Add Discovered Device
Option 2: Manually Add Device
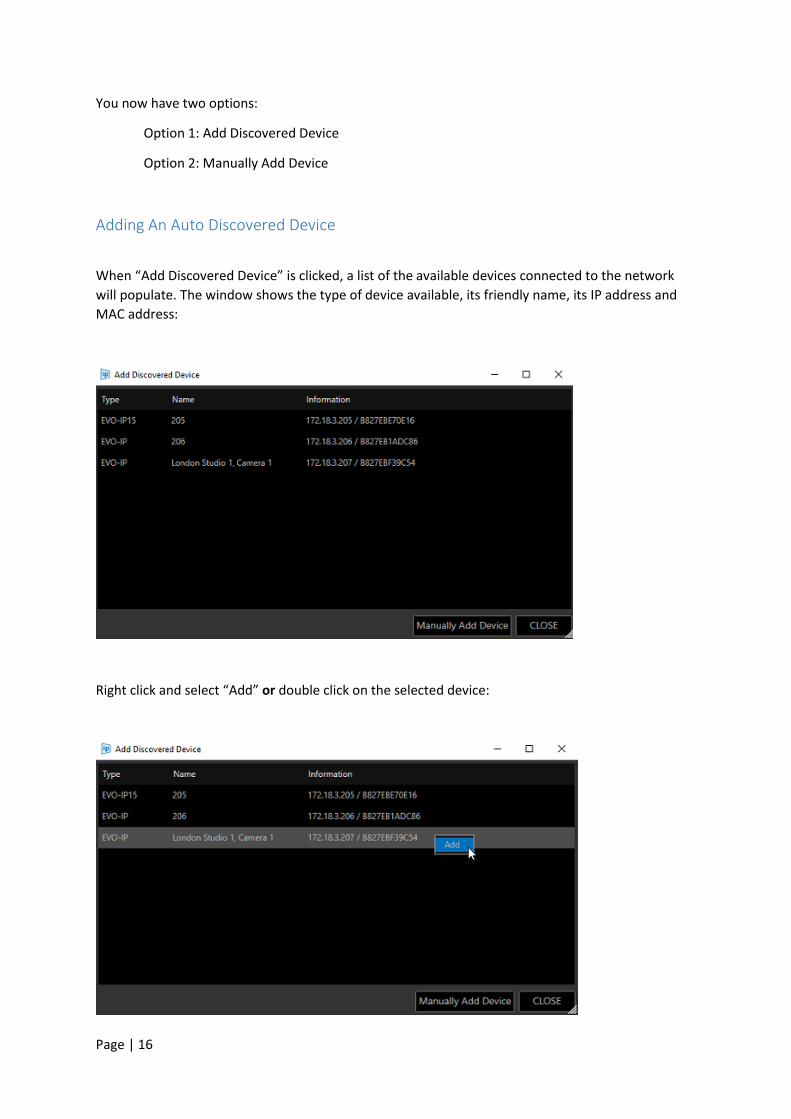
Adding An Auto Discovered Device
When “Add Discovered Device” is clicked, a list of the available devices connected to the network
will populate. The window shows the type of device available, its friendly name, its IP address and
MAC address:
Right click and select “Add” or double click on the selected device:

Page | 17
Devices must be added one at a time.
When the device is added it will disappear from the Add Discovered Device window and appear in
the Devices list:
Repeat these steps to add all remaining devices:
When all available devices are added to the Devices list, the Add Discovered Device window will be
empty:
Any new devices subsequently attached to the network will become visible in the Add Discovered
Device window.
Page | 18
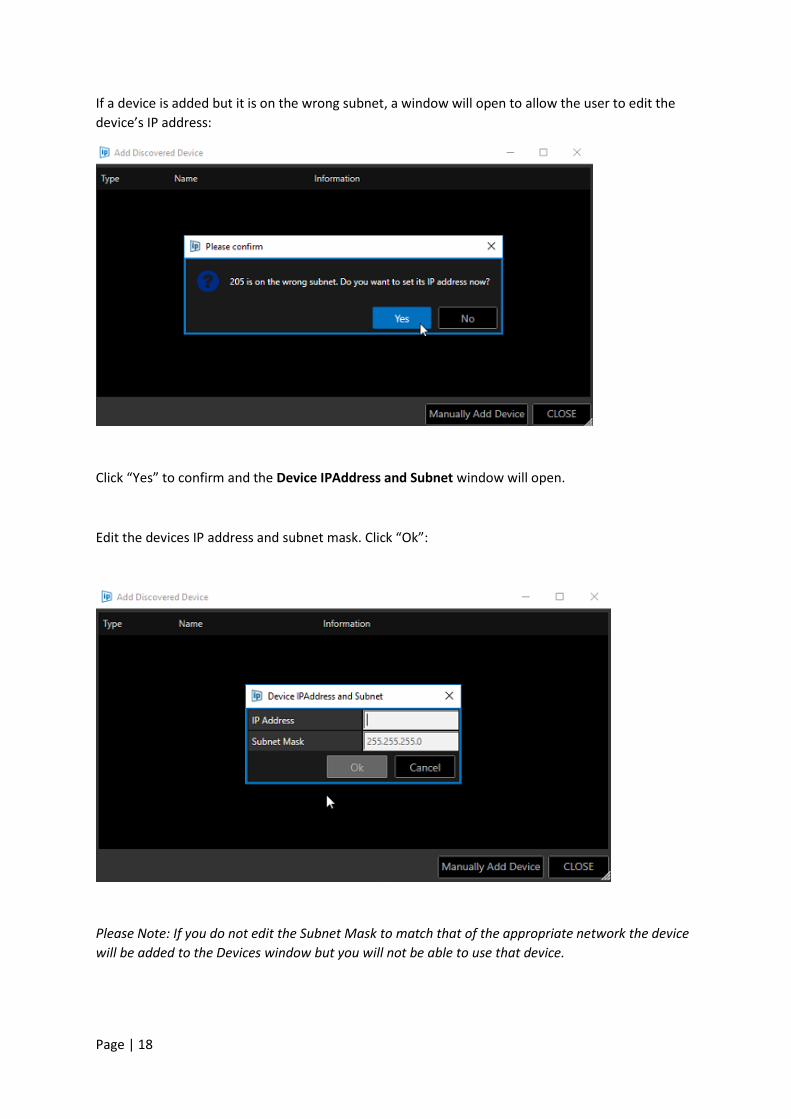
If a device is added but it is on the wrong subnet, a window will open to allow the user to edit the
device’s IP address:
Click “Yes” to confirm and the Device IPAddress and Subnet window will open.
Edit the devices IP address and subnet mask. Click “Ok”:
Please Note: If you do not edit the Subnet Mask to match that of the appropriate network the device
will be added to the Devices window but you will not be able to use that device.
Page | 19
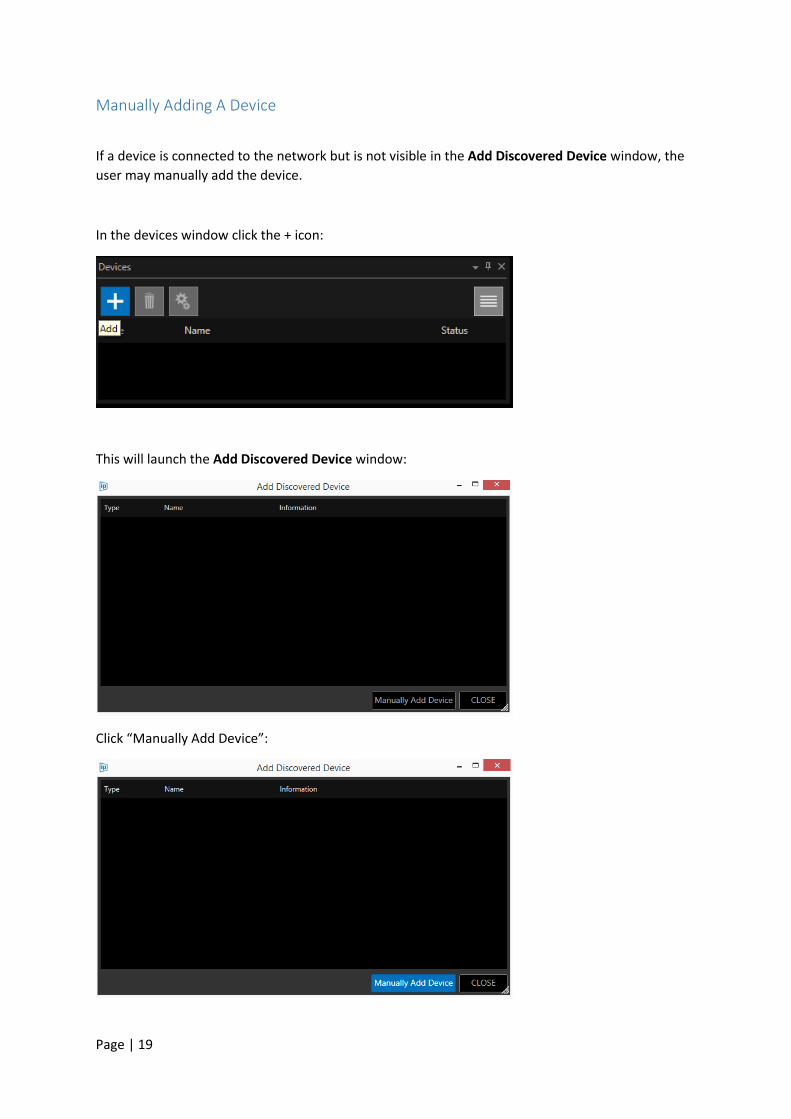
Manually Adding A Device
If a device is connected to the network but is not visible in the Add Discovered Device window, the
user may manually add the device.
In the devices window click the + icon:
This will launch the Add Discovered Device window:
Click “Manually Add Device”:

Page | 20
The Manually Add Device window will open.
Click “Select” to view a pull-down of the available device types:
Choose the device type by clicking on it. In this example, we select an EVO-IP on-camera prompter
device:
Please Note: The available devices list is subject to change as new devices are added and as legacy
support expires. If your desired device does not appear, you may require a software update.
After selecting your device type, the Manually Add Device window will then give you the
opportunity to add a friendly name and the device IP Address:
Page | 21
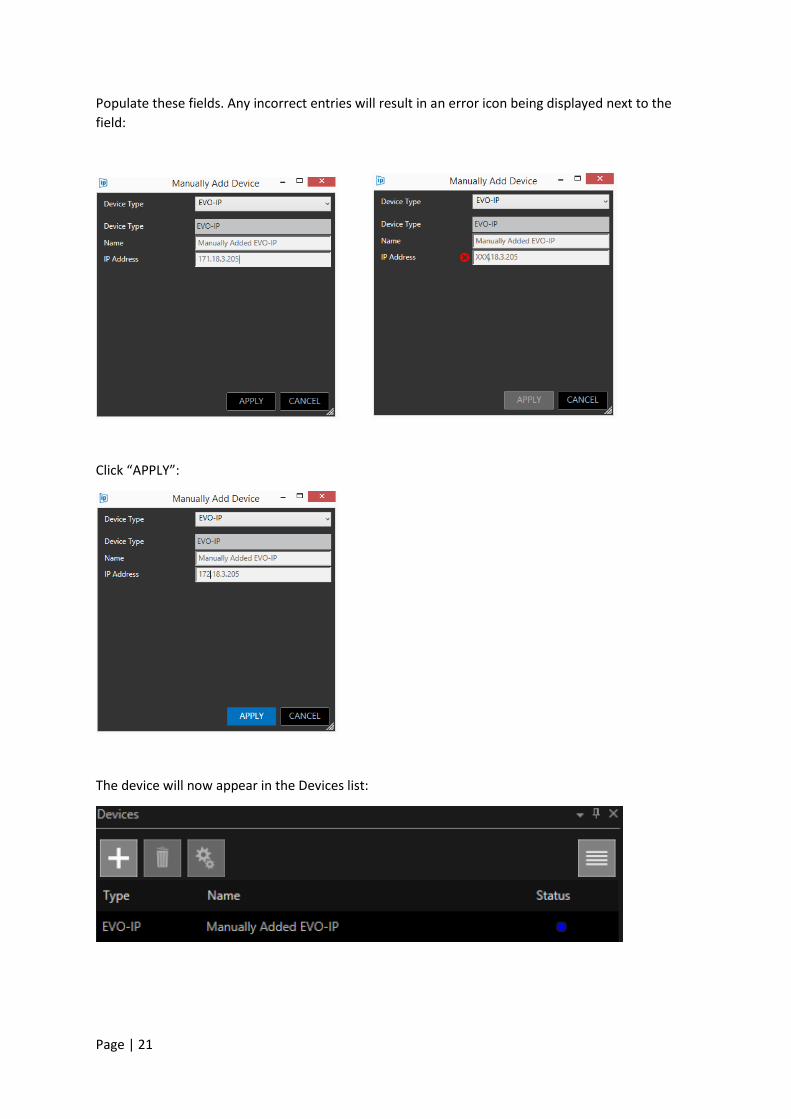
Populate these fields. Any incorrect entries will result in an error icon being displayed next to the
field:
Click “APPLY”:
The device will now appear in the Devices list:
Page | 22
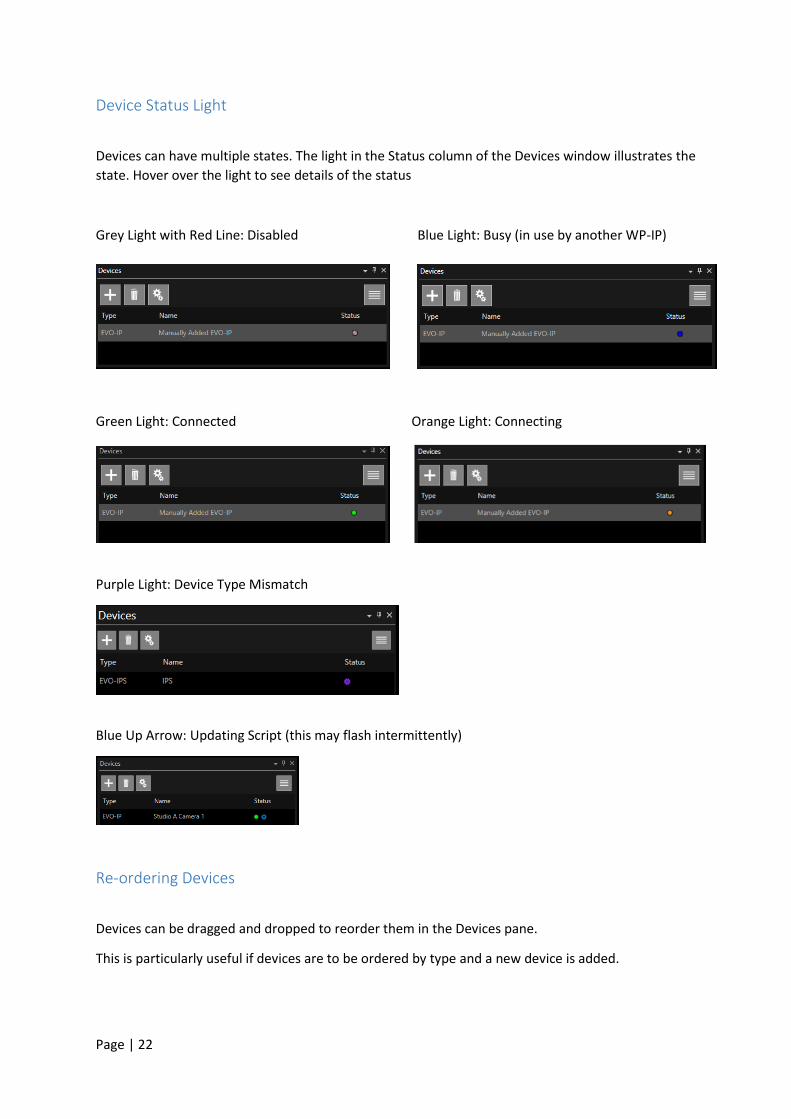
Device Status Light
Devices can have multiple states. The light in the Status column of the Devices window illustrates the
state. Hover over the light to see details of the status
Grey Light with Red Line: Disabled Blue Light: Busy (in use by another WP-IP)
Green Light: Connected Orange Light: Connecting
Purple Light: Device Type Mismatch
Blue Up Arrow: Updating Script (this may flash intermittently)
Re-ordering Devices
Devices can be dragged and dropped to reorder them in the Devices pane.
This is particularly useful if devices are to be ordered by type and a new device is added.

Page | 23
Configuring CLOCKPLUS-IP
The CLOCKPLUS-IP can be configured through the WinPlus-IP Device pane. Highlight the device the
clock is installed in and click the CONFIGURATION button:
In the Device Configuration Window, click CONFIGURATION:
Click the CLOCK MODULE tab:
Make sure the clock is ENABLED:

Page | 24
To get time from the WinPlus-IP NTP synchronized host, select RTC:
Check the TIME ZONE and 12/24 hour preference and click APPLY.
Page | 25
Overview of WinPlus-IP Default Layout
Common Icons
Option (Down arrow): Enables options for the applicable window to be selected (Float, Dock, Auto
Hide, Close)
Auto-Hide (Pin): Pins the applicable window to the sidebar
Close (X): Closes the applicable window
Burger: Enables options for the applicable window to be selected
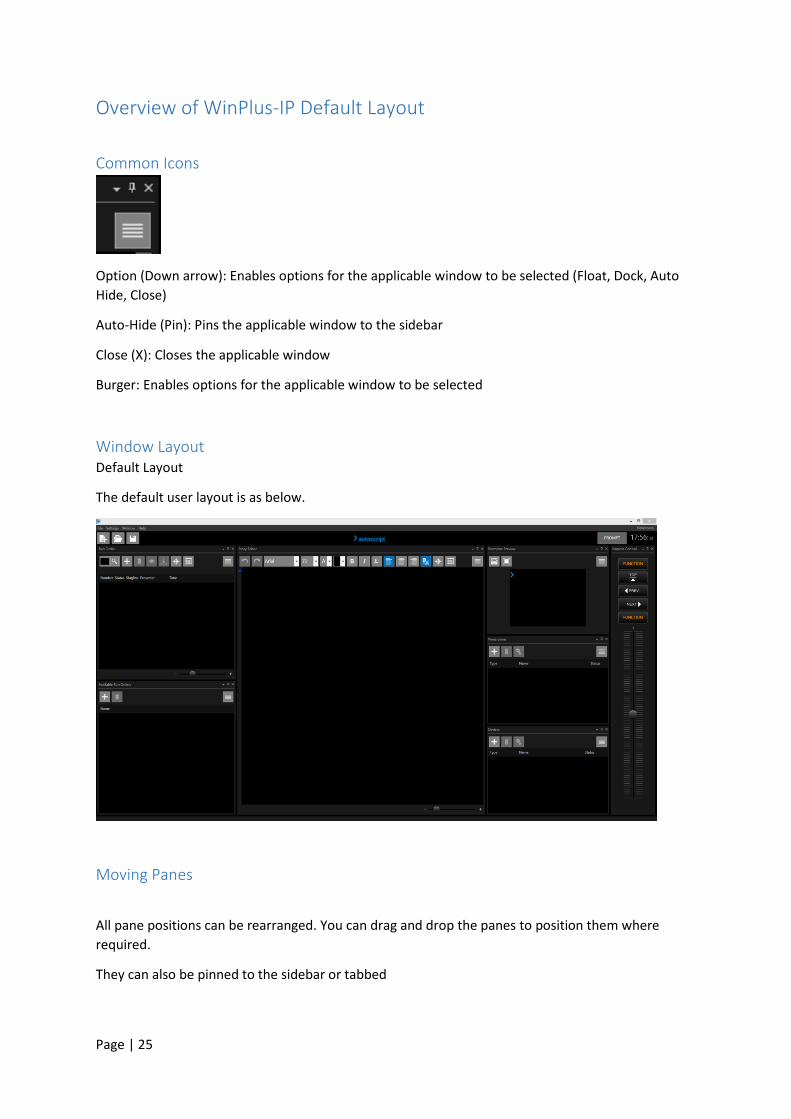
Window Layout Default Layout
The default user layout is as below.
Moving Panes
All pane positions can be rearranged. You can drag and drop the panes to position them where
required.
They can also be pinned to the sidebar or tabbed

Page | 26
Panes can be pinned to the sidebar using Auto-Hide button (see Common Icons)
Panes can be moved to any position within the application either by:
Right clicking in the title bar and selecting Float
Left clicking in the title bar and dragging
When dragging the pane a positioning box will appear. Icons will indicate the position the dragged
pane will be in when dropped relative to the pane they are hovering over
Tabbing Panes
Central Position: When dropped the dragged pane will be tabbed with the pane which it is hovering
over. Multiple panes can be tabbed to the same pane.
1
3
2 4
Pos 1: When dropped the dragged pane will be positioned
above the pane which it is hovering over
Pos 2: When dropped the dragged pane will be positioned to
the right of the pane which it is hovering over
Pos 3: When dropped the dragged pane will be positioned
below the pane which it is hovering over
Pos 4: When dropped the dragged pane will be positioned to
the left the pane which it is hovering over

Page | 27
E.g. Run Orders, Newsrooms and Run Order panes are all tabbed.
Tabb’s can be dragged to reorder if required
Story Editor Toolbar Default functions (icons) are set in the Story Editor toolbar. These functions can be added or
removed by clicking in the burger then selecting Toolbar.
Page | 28
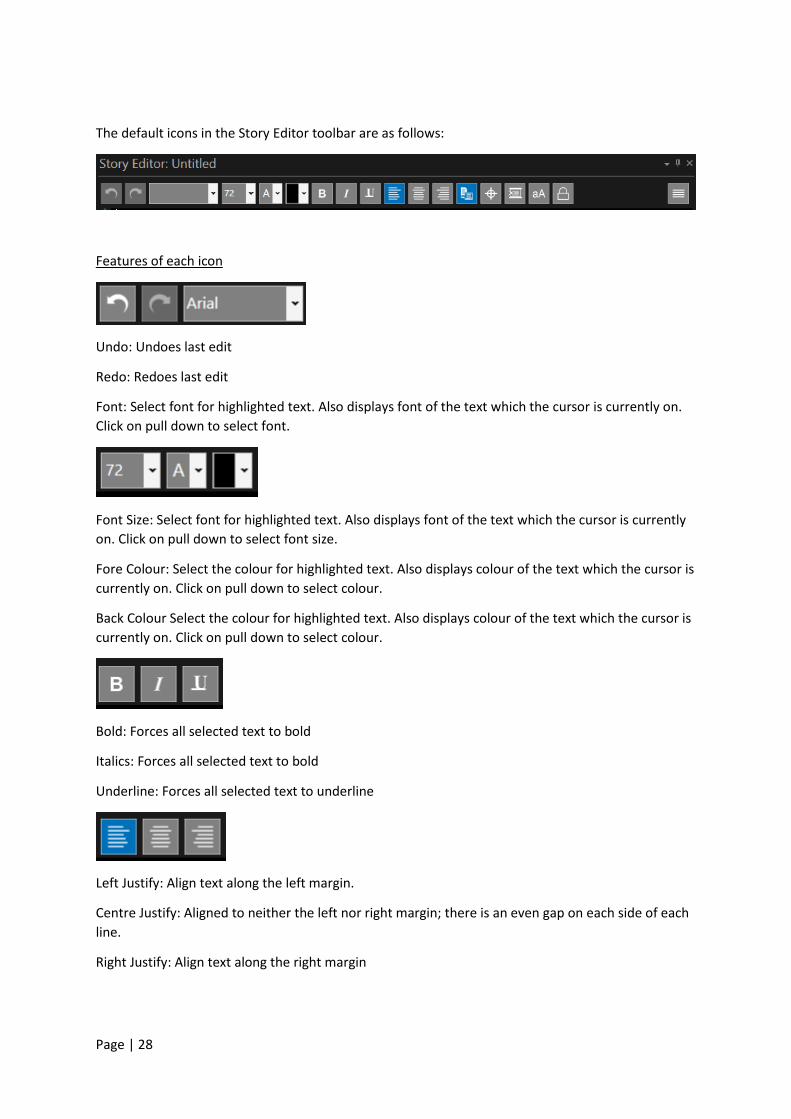
The default icons in the Story Editor toolbar are as follows:
Features of each icon
Undo: Undoes last edit
Redo: Redoes last edit
Font: Select font for highlighted text. Also displays font of the text which the cursor is currently on.
Click on pull down to select font.
Font Size: Select font for highlighted text. Also displays font of the text which the cursor is currently
on. Click on pull down to select font size.
Fore Colour: Select the colour for highlighted text. Also displays colour of the text which the cursor is
currently on. Click on pull down to select colour.
Back Colour Select the colour for highlighted text. Also displays colour of the text which the cursor is
currently on. Click on pull down to select colour.
Bold: Forces all selected text to bold
Italics: Forces all selected text to bold
Underline: Forces all selected text to underline
Left Justify: Align text along the left margin.
Centre Justify: Aligned to neither the left nor right margin; there is an even gap on each side of each
line.
Right Justify: Align text along the right margin

Page | 29
Script Matches Prompt: Checking this option will make the line length of the text in the Story Editor
Window match that of the prompter output displayed in the Prompter Preview. When unchecked
the line length of the text in the Story Editor window will not match that of the Prompter Preview.
Note: When Script Matches Prompt is unchecked the Follow Prompter and Scroll to Prompter
features are disabled
Follow Prompter: When activated, Follow Prompter will automatically position the script in the
Story Editor window to correspond with the part of the script that is currently being prompted and
will follow the prompted output as it scrolls. Uncheck to deactivate Follow Prompter.
Note: When Script Matches Prompt is unchecked the Follow Prompter feature is disabled
Scroll to Prompter: When activated, Scroll to Prompter will automatically position the script in the
Story Editor window to correspond with the part of the script that is currently being prompted.
Note: When Script Matches Prompt is unchecked the Scroll to Prompter feature is disabled
aA: This will force all selected text into uppercase
Lock: When selected this will lock out the ability to make edits in the Story Editor pane. You can still
scroll through the text in the Story Editor pane by dragging the slider up or down but any editing of
the text is inhibited.
When active a padlock icon will appear at the bottom right of the Story Editor window.
Page | 30
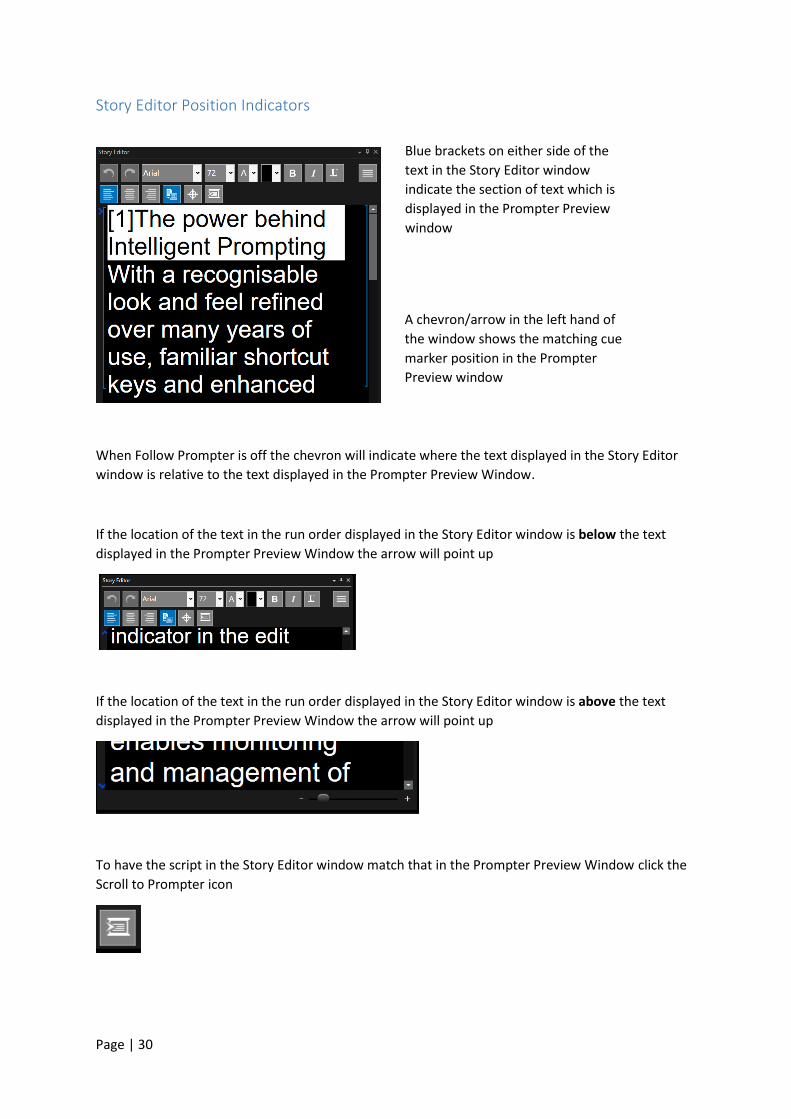
Story Editor Position Indicators
When Follow Prompter is off the chevron will indicate where the text displayed in the Story Editor
window is relative to the text displayed in the Prompter Preview Window.
If the location of the text in the run order displayed in the Story Editor window is below the text
displayed in the Prompter Preview Window the arrow will point up
If the location of the text in the run order displayed in the Story Editor window is above the text
displayed in the Prompter Preview Window the arrow will point up
To have the script in the Story Editor window match that in the Prompter Preview Window click the
Scroll to Prompter icon
Blue brackets on either side of the
text in the Story Editor window
indicate the section of text which is
displayed in the Prompter Preview
window
A chevron/arrow in the left hand of
the window shows the matching cue
marker position in the Prompter
Preview window

Page | 31
Story Editor Slider Function The size of the image in the Story Editor window can be adjusted using the slider at the bottom of
the window.
Drag the slider to the left to decrease the size of the image
Drag the slider to the right to increase the size of the image
Please Note: Adjustment of the slider effects only the size of the image in the Story Editor window. It
has no effect on the output prompter font size.
If the size selected is larger than the available space in the Story Editor window adjust the window
size by dragging the borders.
Active Run Order Toolbar Default functions (icons) are set in the Active Run Order toolbar and Titlebar along with default
columns. These functions and columns can be added or removed by clicking in the burger then
selecting Toolbar, Titlebar or Columns
Page | 32
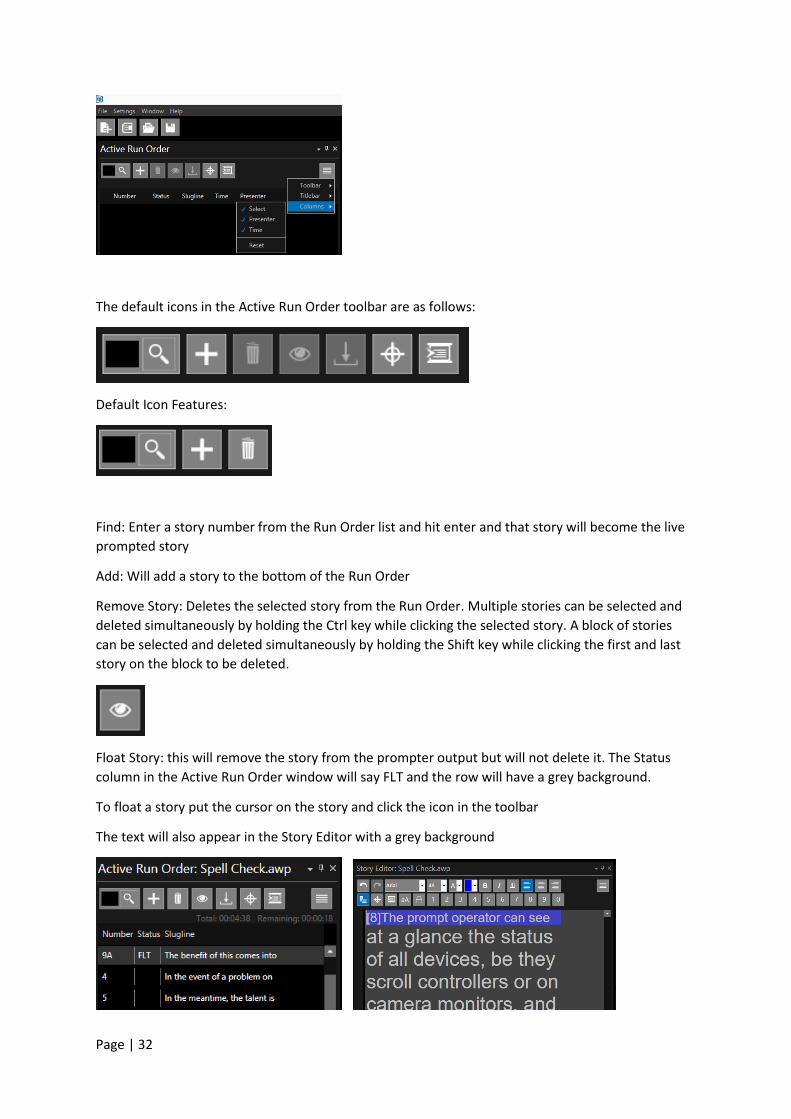
The default icons in the Active Run Order toolbar are as follows:
Default Icon Features:
Find: Enter a story number from the Run Order list and hit enter and that story will become the live
prompted story
Add: Will add a story to the bottom of the Run Order
Remove Story: Deletes the selected story from the Run Order. Multiple stories can be selected and
deleted simultaneously by holding the Ctrl key while clicking the selected story. A block of stories
can be selected and deleted simultaneously by holding the Shift key while clicking the first and last
story on the block to be deleted.
Float Story: this will remove the story from the prompter output but will not delete it. The Status
column in the Active Run Order window will say FLT and the row will have a grey background.
To float a story put the cursor on the story and click the icon in the toolbar
The text will also appear in the Story Editor with a grey background

Page | 33
You can also remove floated stories from the Story Editor by clicking on the burger then Hide Floated
Stories
Please Note: Stories can be floated using a shortcut key. To float put the cursor on the story and click
F2. To un-float put the cursor on the story and click CTRL+F2.
Drop Story: this feature will move the selected story (or stories) from its current position in the run
order to the bottom of the run order.
The Status column in the Active Run Order window will say DRP and the row will have a green
background.
In this example Story 5 is selected. Clicking the icon will drop the story.
Please Note: Stories can be dropped using a shortcut key. To drop the story put the cursor on the
story and click F5.
To return the story to the run order click to select it and drag it up to the desired position in the run
order.

Page | 34
Track Live Story: When activated, Track Live Story will automatically put the current live story at the
top of the Run Order window. As the script is rolled the subsequent stories will move up in the Run
Order window to that top position.
Uncheck will deactivate Track Live Story and the live story will move down in the Run Order window.
Scroll to Prompter: When activated, Scroll to Prompter will automatically position the script in the
Story Editor window to the corresponding position with the story that is currently being prompted.
Note: When Script Matches Prompt is unchecked in the Story Editor window, activating Scroll to
Prompter in the Active Run Order window will activate Script Matches Prompt in the Story Editor
window
Active Run Order Slider Function The font size of the text within the columns of the Active Run Order window can be adjusted using
the slider at the bottom of the window.
To decrease the font size drag the slider to the left
To increase the font size drag the slider to the right

Page | 35
Icon Size The size of the icons in all toolbars can be adjusted to increase visibility or to reduce the space used.
Selection is made by clicking Settings, Icons
Three different sizes are selectable
Small
Medium
Large:

Page | 36
Activating Prompting
To Activate Live Prompting
There are various methods of switching the prompt output on:
Click on the Prompt icon in the top right hand of the application:
The icon will turn red and will say “Prompting”
Double click in the Status column of the Active Run Order window:
The row will show in Red and the Status will show as “Air”.
Click “F9” from anywhere in the GUI: The output will be whatever text is displayed in the
Prompter Preview window.
Please Note: Clicking “F9” when the cursor is on the text in the Story Editor window will
result in the output starting from where the cursor is positioned
If applicable, press “Go Live” as an option on one of the function buttons of the Remote
Controller. Right click on the Function button and select “Function/Go Live”.
To De-Activate Live Prompting
To switch the prompter output off click “Ctrl+F9” or click on the Prompting icon the top right hand of
the application:
Note: when prompting is live a number of indicators will show:
The Prompting button will be red

Page | 37
The live story will be highlighted red and show AIR in the Status column of the Active Run
Order window
The Prompter Preview window will have a red outline.
The current available Run Order will be highlighted red
The Function button will be red and will display “Go Live”
The following are examples of how the default application will be displayed in either Standby or Live
prompting mode.
Standby:
Live:

Page | 38
Run Orders
How to Create A Simple Run Order
Place the cursor in the Story Editor window and begin typing or copy and paste text into the Story
Editor window.
When typing a script from scratch, the text will be highlighted as a Slugline. This will continue until
the first carriage return:
The slugline text will appear in the Active Run Order window and Untitled will appear in the Run
Orders window:
To add another Slugline right click anywhere in the text and select Convert To Slugline or click
Ctrl +F5. You will then be given the option to add an alphanumeric identifier to the Slugline:

Page | 39
Enter the desired identifier and hit Ok. This new slugline will be added to the Run Order. Repeat this
operation for additional stories you would like to appear in the Run Order.
To remove a Slugline, put the cursor on the Slugline text, right click and select “Convert to Story
Text” or click Ctrl+F5.
Saving A Run Order
To save the script, type “Ctrl+S”.
To open an existing script, type “Ctrl+O”.
Please Note: The default file extension is .awp (Autoscript WinPlus).
To add a new Run Order click “File/New” or click + in the main toolbar or in the Run Order window
header
You can add as many Run Orders as you require:
To delete a Run Order right click and select “Delete”

Page | 40
or click on the run order to select it and click the icon
Recalling A Run Order
To recall a Run Order click “File/Open” or type “Ctrl+O”:
Saved Run Orders can also be opened by clicking the Open Run Order form File icon in the main
toolbar or in the Run Orders window header

Page | 41
Up to 4 of the last opened Run Orders can also be accessed directly from the File menu:
Reordering Run Orders Once loaded into the Run Orders pane each run order can be moved by dragging and dropping them
within the pane.
Click to select then hold down left mouse button and drag to reorder.
Please Note: The live Run Order can be moved in this way when active, you do not have to deactivate
it to move it.
Dual Rundown Mode
This enables the user to view, edit and check the status of one Run Order while prompting a
different Run Order.
This is a useful tool for when the operator needs to make changes to one script without stopping the
prompting output of another script.
In the following example I have 3 Run Downs loaded:
Script 1
Script 2
Script 3
I want to prompt and edit Script 1.
I right click on Script 1 and select Prompt and Edit Run Order

Page | 42
This results in the following:
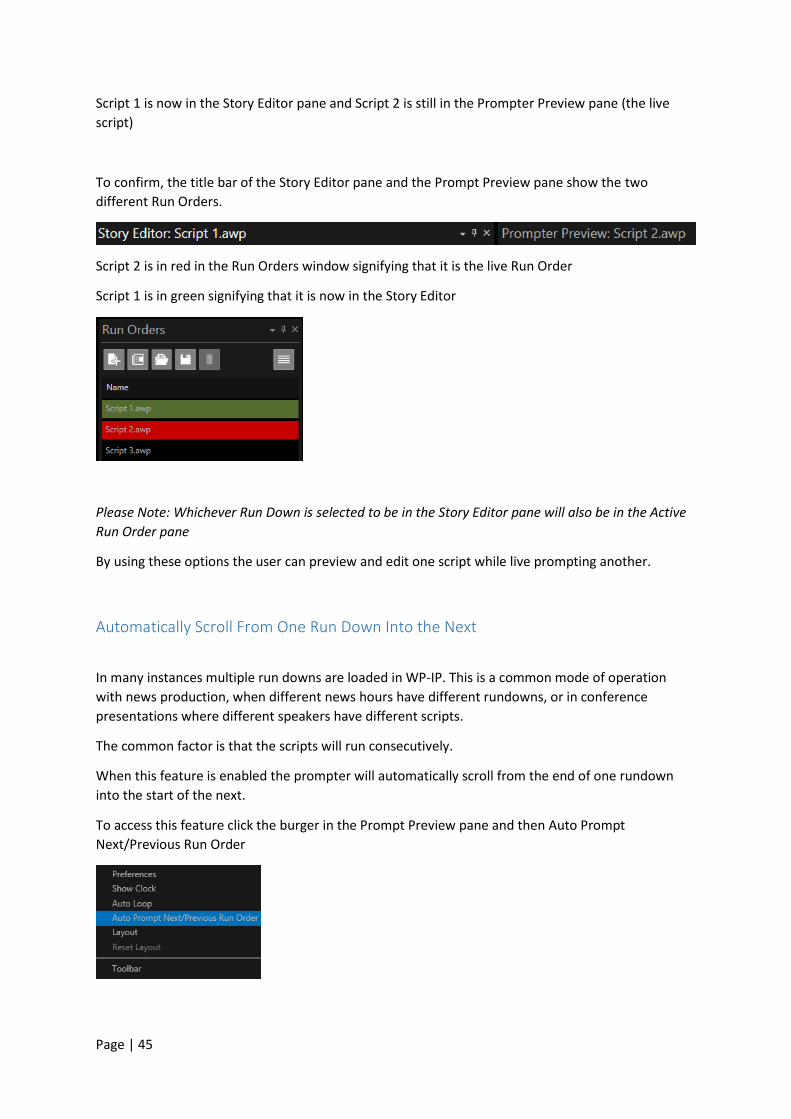
Script 1 is now in the Story Editor pane and the Prompter Preview pane (the live script).
To confirm, they both show the same title.
In addition Script 1 is in red in the Run Orders window signifying that it is the live Run Order
I now want to edit the content of Script 2 but do not want to stop prompting Script 1.
I right click on Script 2 (it goes blue signifying I have selected it) and choose Edit Run Order

Page | 43
This results in the following:
Script 2 is now in the Story Editor pane and Script 1 is still the Prompter Preview pane (the live script)
To confirm, the title bar of the Story Editor pane and the Prompt Preview pane show the two
different Run Orders.
Script 1 is in red in the Run Orders window signifying that it is the live Run Order
Script 2 is in green signifying that it is now in the Story Editor
I now want to prompt the content of Script 2 but want to edit Script 1.
I right click on Script 2 (it has a blue border outlining the green signifying I have selected it) and
choose Prompt Run Order.

Page | 44
Script 2 is now in both the Story Editor pane and the Prompt Preview pane (the live script)
I then right click on Script 1 (it goes blue signifying I have selected it) and choose Edit Run Order.
This results in the following:
Page | 45
Script 1 is now in the Story Editor pane and Script 2 is still in the Prompter Preview pane (the live
script)
To confirm, the title bar of the Story Editor pane and the Prompt Preview pane show the two
different Run Orders.
Script 2 is in red in the Run Orders window signifying that it is the live Run Order
Script 1 is in green signifying that it is now in the Story Editor
Please Note: Whichever Run Down is selected to be in the Story Editor pane will also be in the Active
Run Order pane
By using these options the user can preview and edit one script while live prompting another.
Automatically Scroll From One Run Down Into the Next
In many instances multiple run downs are loaded in WP-IP. This is a common mode of operation
with news production, when different news hours have different rundowns, or in conference
presentations where different speakers have different scripts.
The common factor is that the scripts will run consecutively.
When this feature is enabled the prompter will automatically scroll from the end of one rundown
into the start of the next.
To access this feature click the burger in the Prompt Preview pane and then Auto Prompt
Next/Previous Run Order
Page | 46
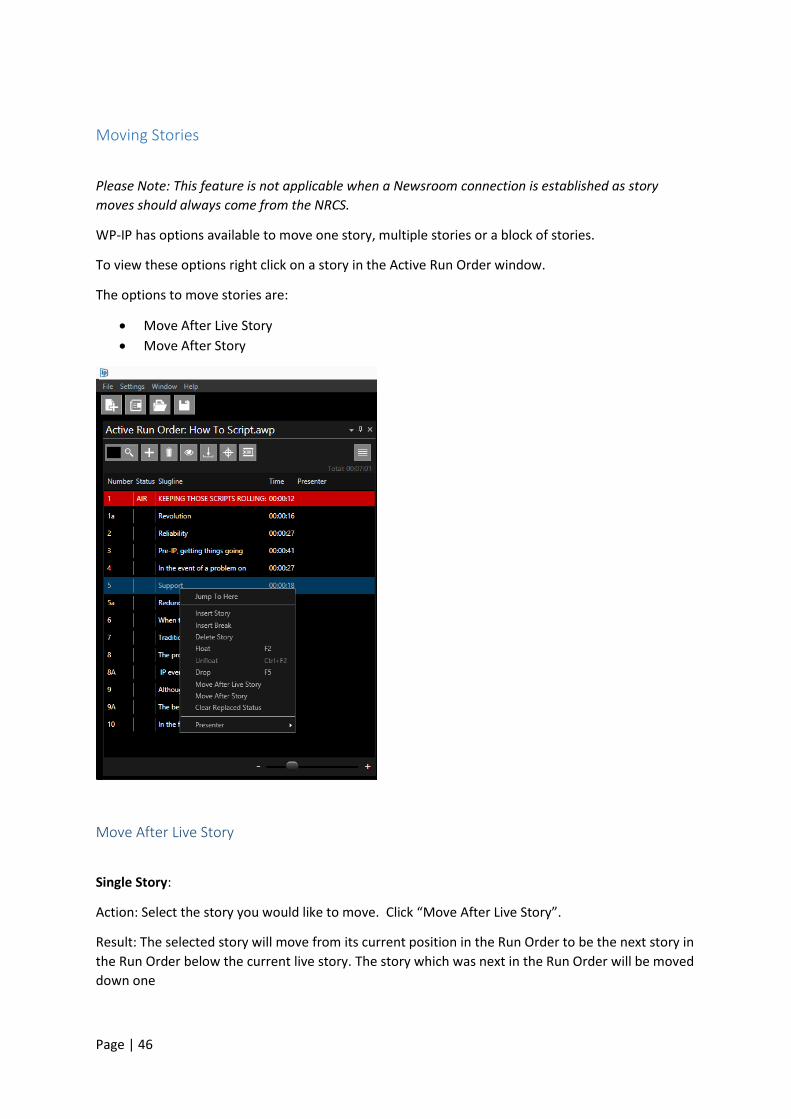
Moving Stories
Please Note: This feature is not applicable when a Newsroom connection is established as story
moves should always come from the NRCS.
WP-IP has options available to move one story, multiple stories or a block of stories.
To view these options right click on a story in the Active Run Order window.
The options to move stories are:
Move After Live Story
Move After Story
Move After Live Story
Single Story:
Action: Select the story you would like to move. Click “Move After Live Story”.
Result: The selected story will move from its current position in the Run Order to be the next story in
the Run Order below the current live story. The story which was next in the Run Order will be moved
down one
Page | 47
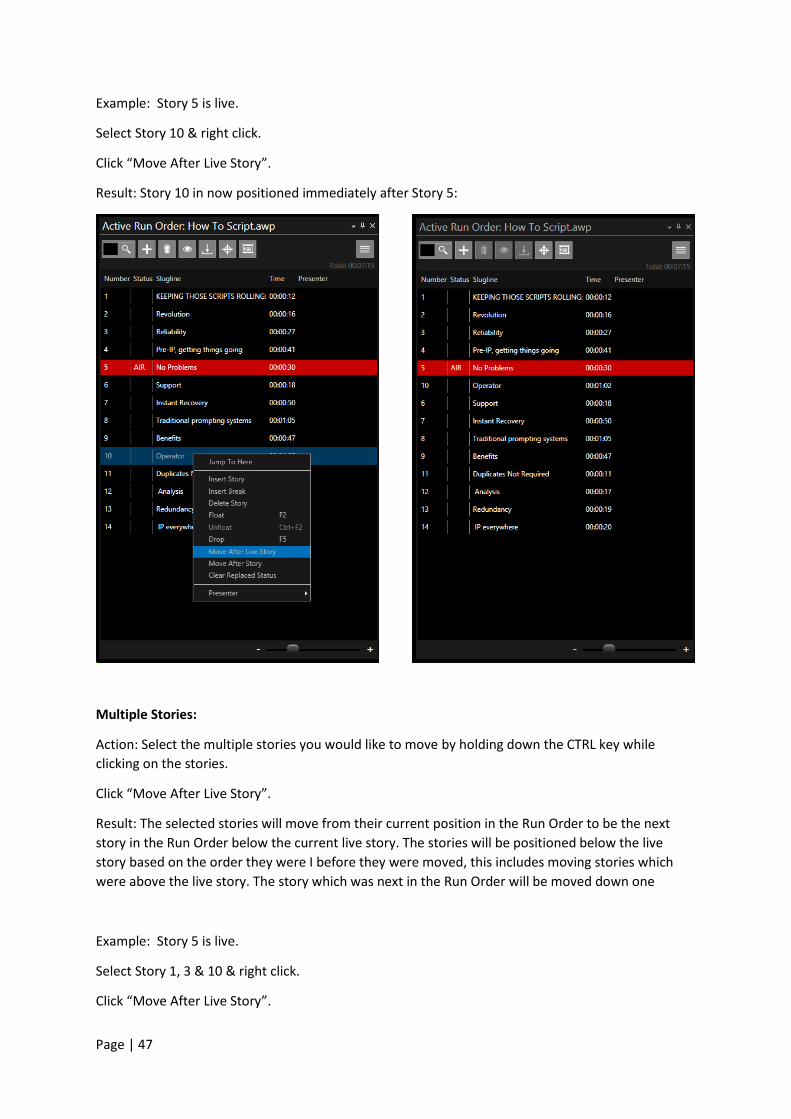
Example: Story 5 is live.
Select Story 10 & right click.
Click “Move After Live Story”.
Result: Story 10 in now positioned immediately after Story 5:
Multiple Stories:
Action: Select the multiple stories you would like to move by holding down the CTRL key while
clicking on the stories.
Click “Move After Live Story”.
Result: The selected stories will move from their current position in the Run Order to be the next
story in the Run Order below the current live story. The stories will be positioned below the live
story based on the order they were I before they were moved, this includes moving stories which
were above the live story. The story which was next in the Run Order will be moved down one
Example: Story 5 is live.
Select Story 1, 3 & 10 & right click.
Click “Move After Live Story”.
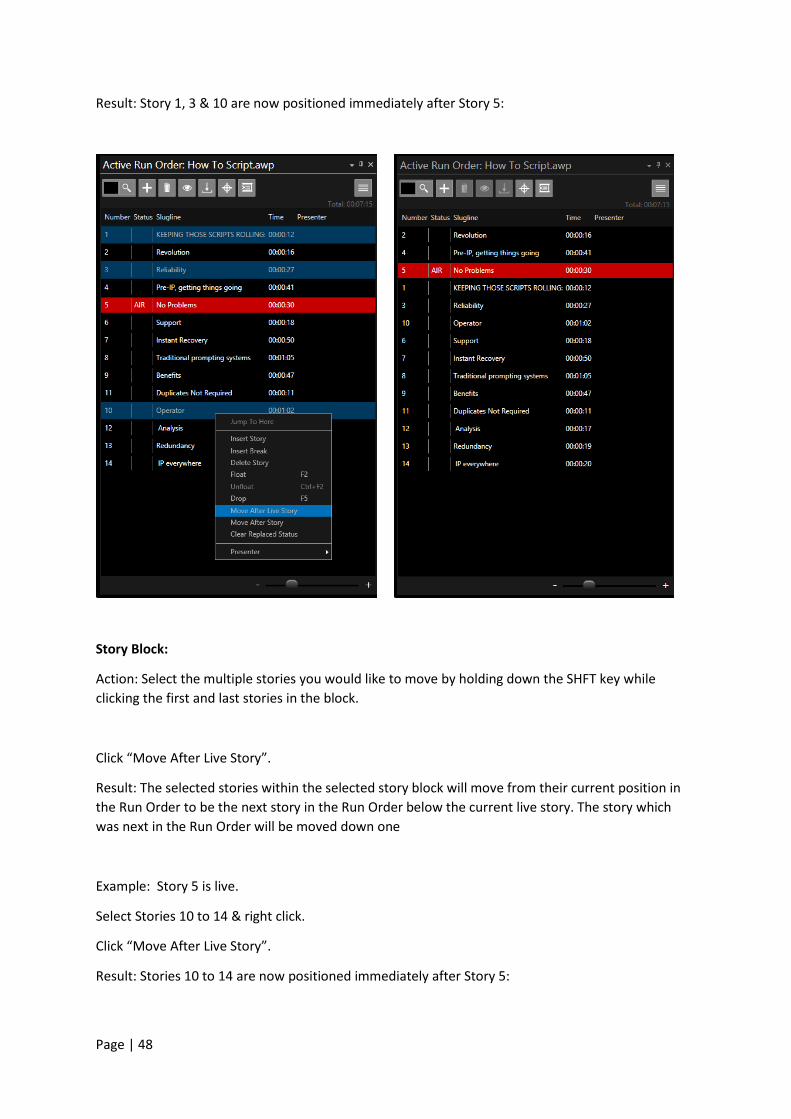
Page | 48
Result: Story 1, 3 & 10 are now positioned immediately after Story 5:
Story Block:
Action: Select the multiple stories you would like to move by holding down the SHFT key while
clicking the first and last stories in the block.
Click “Move After Live Story”.
Result: The selected stories within the selected story block will move from their current position in
the Run Order to be the next story in the Run Order below the current live story. The story which
was next in the Run Order will be moved down one
Example: Story 5 is live.
Select Stories 10 to 14 & right click.
Click “Move After Live Story”.
Result: Stories 10 to 14 are now positioned immediately after Story 5:
Page | 49
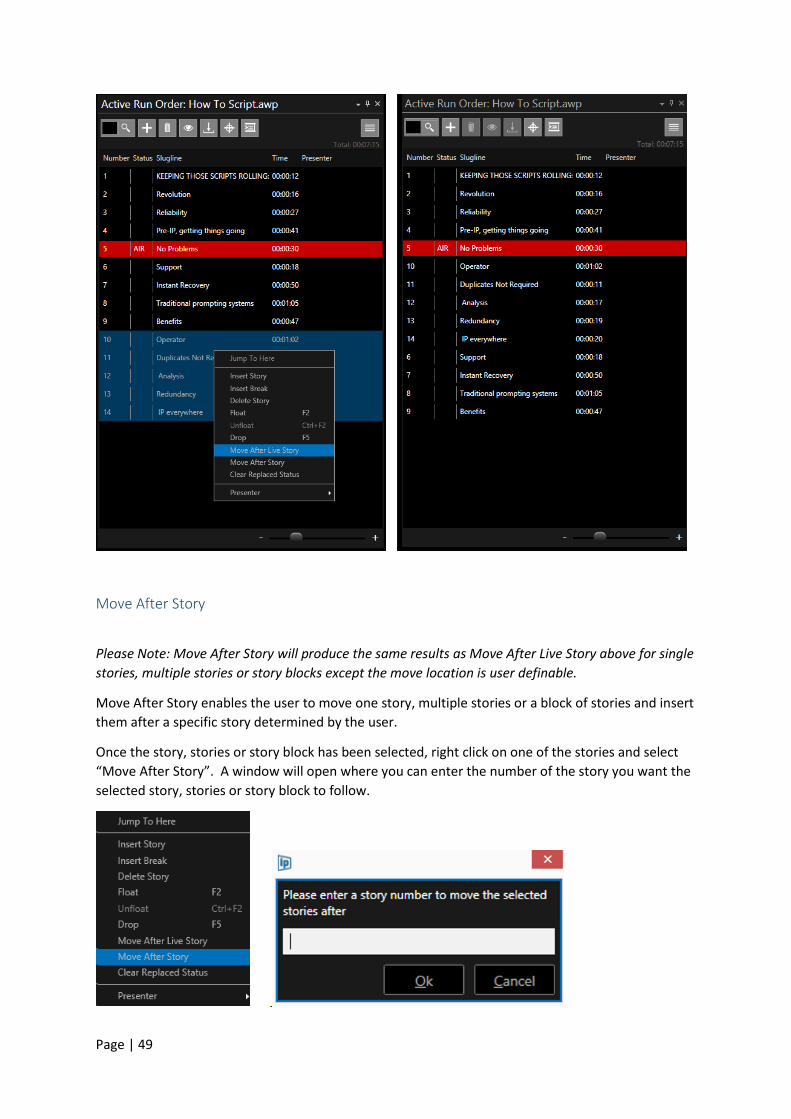
Move After Story
Please Note: Move After Story will produce the same results as Move After Live Story above for single
stories, multiple stories or story blocks except the move location is user definable.
Move After Story enables the user to move one story, multiple stories or a block of stories and insert
them after a specific story determined by the user.
Once the story, stories or story block has been selected, right click on one of the stories and select
“Move After Story”. A window will open where you can enter the number of the story you want the
selected story, stories or story block to follow.

Page | 50
Floating/Cloaking Text or Stories
Please Note: Float/Clock have the same function but the terms differ dependent on the system used.
For the purpose of this manual we will use the term Float.
Text can be removed from the prompted output but remain in the story editor using the Float/Cloak
Function. The Floated text will be highlighted in the Story Editor.
Floating From the Story Editor Window
To view the Float options right click in the Story Editor and then click Float.
Please Note: Float options can be applied using Shortcut keys except “Unfloat Selected Paragraphs”
For the following examples of Floating the original text before any Floating is applied is as below:

Page | 51
To Float Selected Lines: CTRL + F10:
In the Story Editor, put the cursor on one line, or select multiple lines, and click CTRL+ F10.
Example:
To remove Float status click on the Floated text and click CTRL+ F10 again.
To Float A Selection: SHIFT + CTRL + F10:
In the Story Editor, select the text you would like to Float and click SHIFT + CTRL + F10
Example:
To remove Float status right click on the Floated text and click Float/Unfloat Selected Paragraphs

Page | 52
To Float Selected Sentences: SHIFT + F10:
In the Story Editor, select the sentences you would like to Float and click SHIFT + F10
Please Note: The cursor does not have to be placed at the beginning or end of a sentence. A sentence
will be floated as long as any part of it is selected.
Example:
To remove Float status click on the Floated text and click SHIFT + F10 again.
To Float Selected Paragraphs: ALT + F10:
In the Story Editor, put the cursor in the paragraph you would like to Float and click ALT + F10
Example:
To remove Float status click on the Floated text and click CTRL + ALT+ F10.
Page | 53
Floating From the Run Order Window
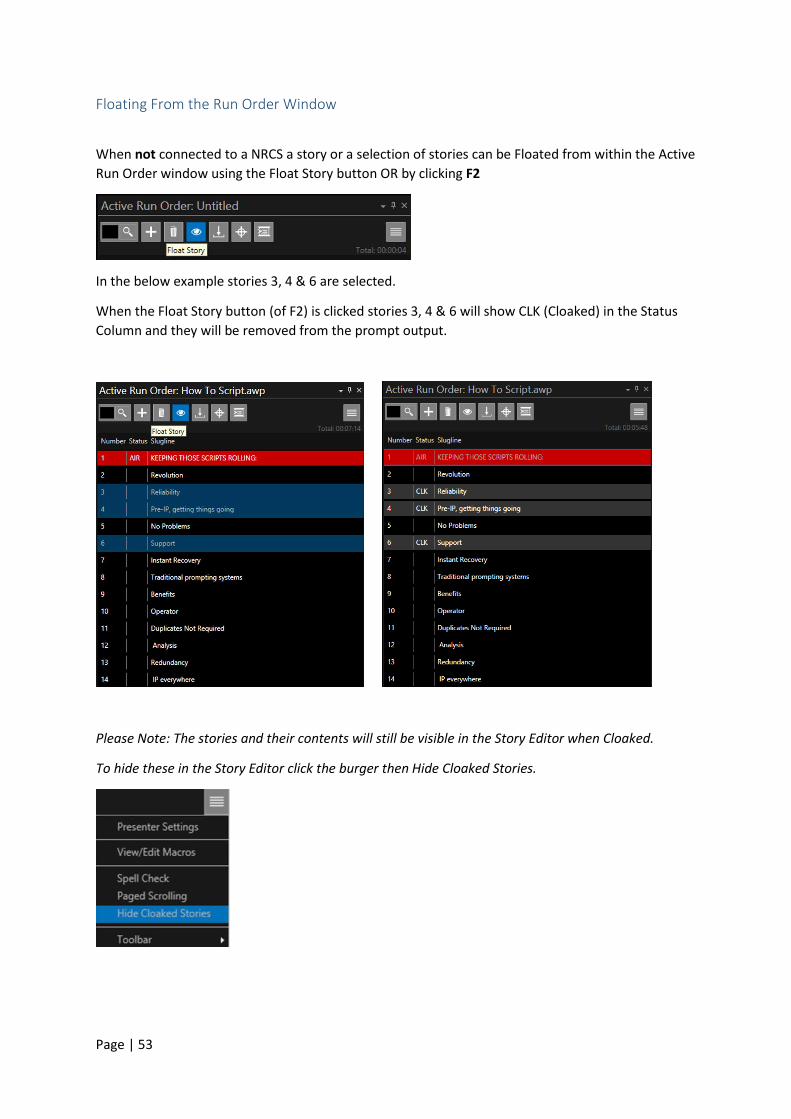
When not connected to a NRCS a story or a selection of stories can be Floated from within the Active
Run Order window using the Float Story button OR by clicking F2
In the below example stories 3, 4 & 6 are selected.
When the Float Story button (of F2) is clicked stories 3, 4 & 6 will show CLK (Cloaked) in the Status
Column and they will be removed from the prompt output.
Please Note: The stories and their contents will still be visible in the Story Editor when Cloaked.
To hide these in the Story Editor click the burger then Hide Cloaked Stories.
Page | 54
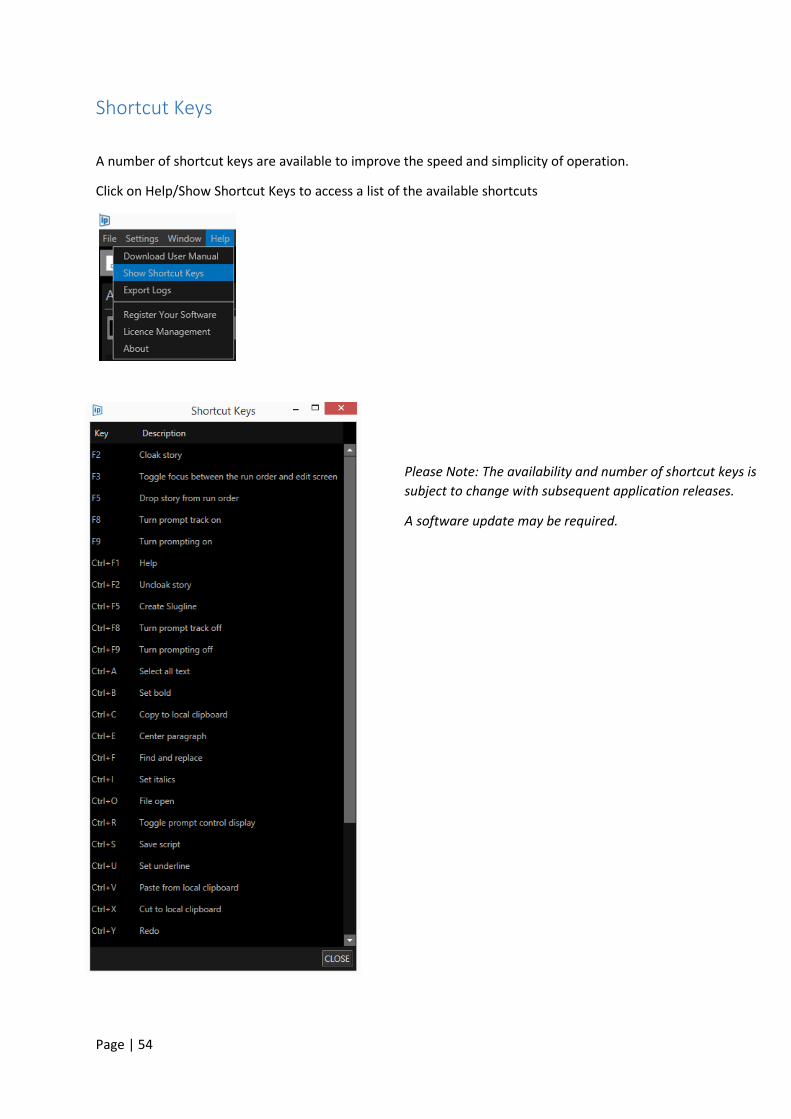
Please Note: The availability and number of shortcut keys is
subject to change with subsequent application releases.
A software update may be required.
Shortcut Keys
A number of shortcut keys are available to improve the speed and simplicity of operation.
Click on Help/Show Shortcut Keys to access a list of the available shortcuts

Page | 55
Prompter Preview Preferences
A number of additional output options can be configured via Prompter Preview preferences. This
can be accessed by clicking the burger and then Preferences
This will then launch the Preferences window.
Blanking
Blanking is a useful tool to remove text from the output in the event that a presenter would like to
look into the camera lens but does not want to be distracted by text on the screen. An example of
this is when an interviewee is not in the same location as the presenter. The presenter will interview
them through the camera. In this example any text on the screen can be a distraction.
The blanking feature will replace the output with whatever is shown in the blanking text box or will
blank the screen completely.
Activating Blanking Function: Blanking status can be toggled on and off in a number of ways:
Click on the Blank icon in the Prompter Preview toolbar
Use the key combinaton SHIFT+F9
Assign one of the Function Buttons on a controller as BLANK SCREEN

Page | 56
Blanking Options
Blanking can be set to switch the output to completely blank or to show a message.
To completely blank the output uncheck the Show Message button:
The following will result
To show a message check the Show Message button.
You can then add the message to be displayed by typing into the message box.
For example “Blanked Screen”:
Prompted Blanked

Page | 57
The following will result:
You can use use up to 3 message lines or use a single character.
The message text will automatically be centre justified.
Please Note: If you edit the message text when blanking is activated you will be able to see the
output update in real time.
Prompted Blanked
Page | 58
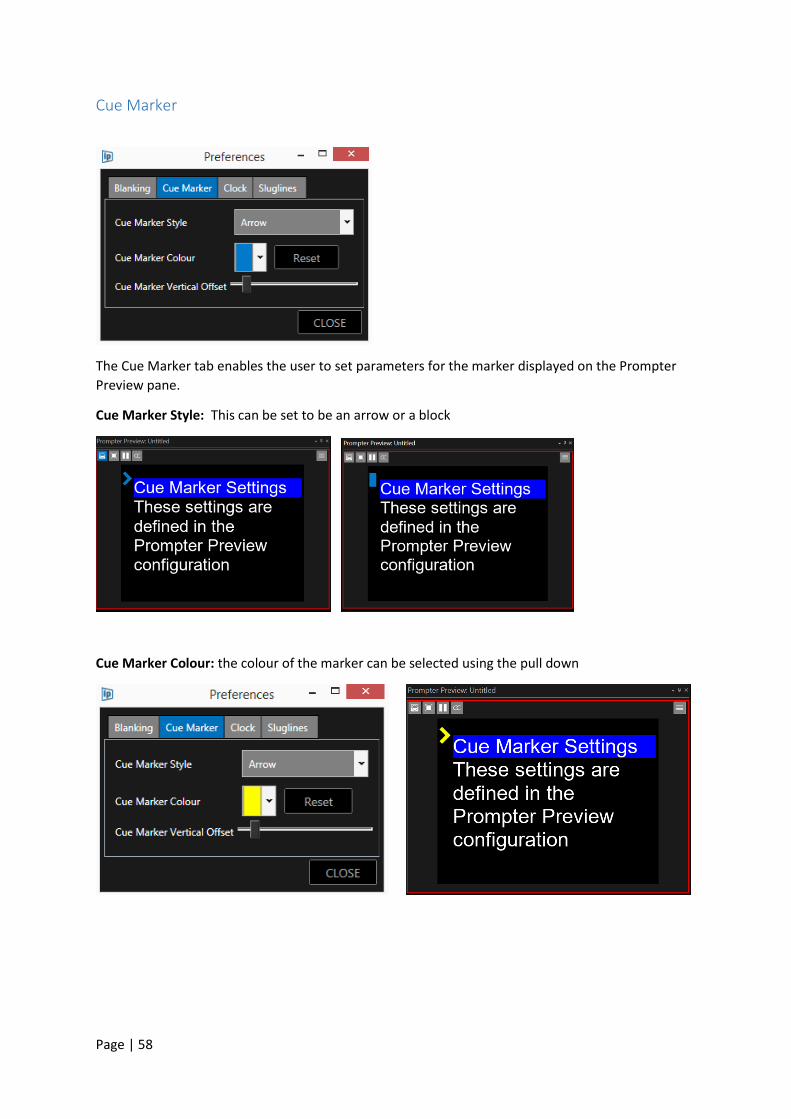
Cue Marker
The Cue Marker tab enables the user to set parameters for the marker displayed on the Prompter
Preview pane.
Cue Marker Style: This can be set to be an arrow or a block
Cue Marker Colour: the colour of the marker can be selected using the pull down
Page | 59
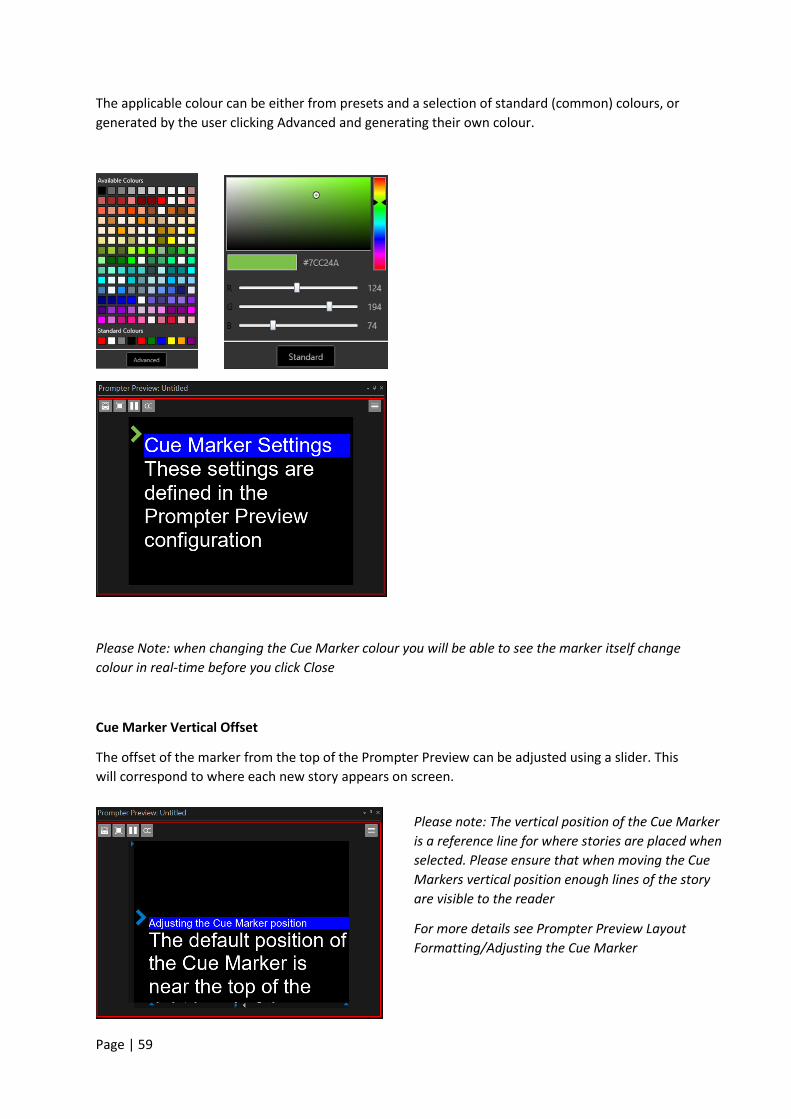
The applicable colour can be either from presets and a selection of standard (common) colours, or
generated by the user clicking Advanced and generating their own colour.
Please Note: when changing the Cue Marker colour you will be able to see the marker itself change
colour in real-time before you click Close
Cue Marker Vertical Offset
The offset of the marker from the top of the Prompter Preview can be adjusted using a slider. This
will correspond to where each new story appears on screen.
Please note: The vertical position of the Cue Marker
is a reference line for where stories are placed when
selected. Please ensure that when moving the Cue
Markers vertical position enough lines of the story
are visible to the reader
For more details see Prompter Preview Layout
Formatting/Adjusting the Cue Marker

Page | 60
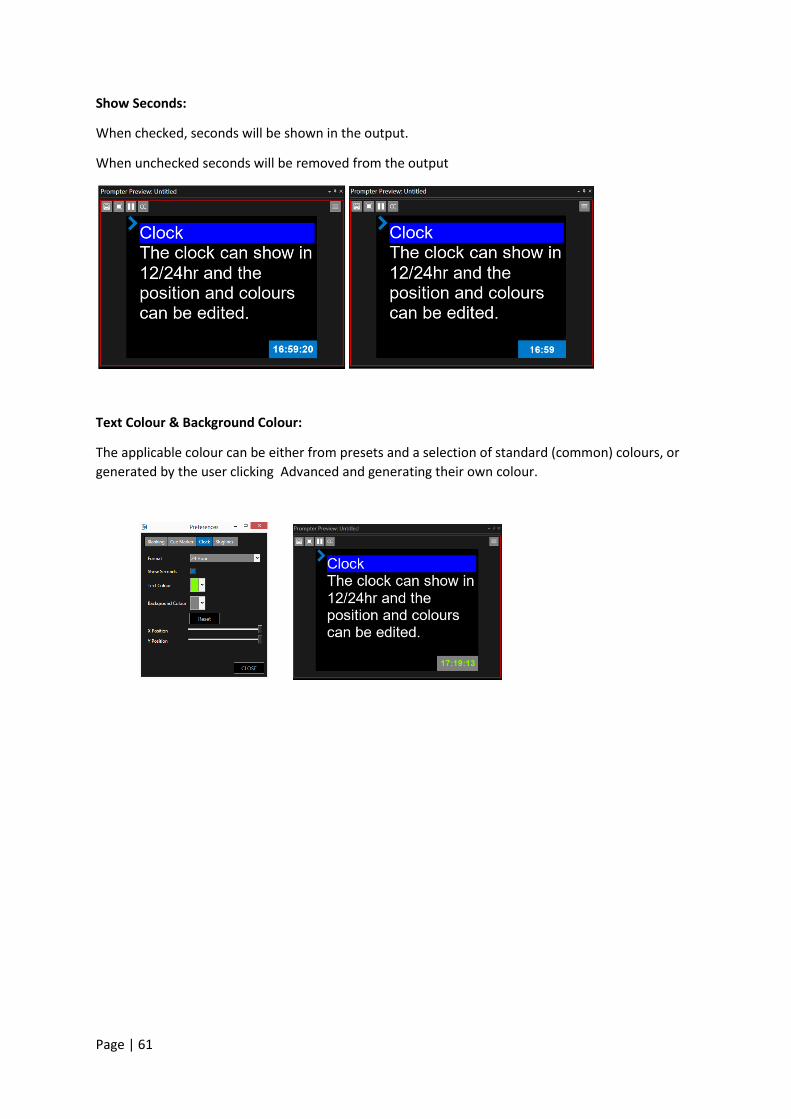
Clock
WP-IP can overly a clock on the Prompter Preview.
The default colours and settings are shown above.
Please Note: the settings within the Preferences are applied to the clock. To activate the clock itself
click on the Prompter Preview burger and select Show Clock
There are a number of adjustable parameters which the user can set.
Format:
This will show the time in 12 or 24hr mode.
Page | 61
Show Seconds:
When checked, seconds will be shown in the output.
When unchecked seconds will be removed from the output
Text Colour & Background Colour:
The applicable colour can be either from presets and a selection of standard (common) colours, or
generated by the user clicking Advanced and generating their own colour.

Page | 62
Sluglines
Slugline is the term used to refer to the text marker at the start of a story.
Slugline Configuration
Slugline configuration can be accessed by clicking Settings/Preferences in the main toolbar:
A pulldown in the Runorder Import tab offers 4 different slugline settings
Unrestricted Length: All text up to the end of a paragraph will be converted to a Slugline
Fit Prompt Output Width: The slugline length will match that of the text in the corresponding line of
text in the Prompt Preview window
Until First “.”, “!” or “?”: Text will be converted to a slugline up to the selected marker. All text after
that marker will be discarded
Specified Number of Characters: Selecting this option will open a field where the user can enter an
integer to determine how many characters they would like to be converted to Slugline

Page | 63
Removing Sluglines from the Prompt Output
To access this click on the burger in the Prompt Preview pane then Preferences /Sluglines
WP-IP enables the option to remove all suglines from the prompter output.
The options are to “Show” or “Hide” sluglines. These can be selected from the pull down.
Please Note: Slugline settings can only be applied when prompting is not live.
When applied the prompt position will be set back to the top of the Run Order.
When “Show” is selected all sluglines will be displayed:

Page | 64
When “Hide” is selected all sluglines will be hidden:
Please Note: Sluglines are only hidden in the prompt output. They are not removed so will appear in
the Story Editor and the Active Run Order window.

Page | 65
Prompter Preview Layout Formatting
A number of options are applicable which enables the user to determine the appearance of the
output. This configuration is done via the Prompter Preview pane
Click the burger in the Prompter Preview pane:
Select “Layout”:
This will show the margin, cuemarker and interline spacing adjustment arrows:

Page | 66
Adjusting the Output Margin
Margin adjustment (determining the width of the output) is done using the left and right upward
pointing arrows:
Drag the margin markers to the desired position.
To increase the width of the right margin drag the right margin marker to the left:
To increase the width of the left margin drag the left margin marker to the right:

Page | 67
Adjusting the Cue Marker
The cue marker position can be configured via the layout option. The default position of the Cue
Marker is near the top left of the Prompter Preview window.
Move the Cue Marker to the right by clicking
the right-hand cuemarker icon at the bottom
of the pane
Depending on which side the Cue Marker is displayed you
can remove it by clicking the right or left cuemarker icon
to toggle it on or off
To change the vertical position of the Cue Marker left
mouse click on it and drag it to the desired position
Please note: The vertical position of the Cue Marker is a reference line for where stories are placed when
selected. Please ensure that when moving the Cue Markers vertical position enough lines of the story are
visible to the reader.
Other Cue Marker parameters can also be set using the Prompt Preview Preferences options. See earlier
section (Prompter Preview Settings/Cue Marker)

Page | 68
Adjusting the Interline Spacing
The size of the gap between the horizontal lines of text is referred to as interline spacing.
This can be adjusted by dragging an arrow in the Prompt Preview window when layout is selected.
Please Note: Changes to interline spacing will not affect the spacing in the Story Editor pane but the
guide brackets will resize automatically
The illustration below shows the default spacing and the position of the adjustment arrow (Marked
with a red dot) and the corresponding text in the Story Editor window.
The illustration below shows the output after the arrow has been dragged down to increase the
interline spacing and how the guide brackets in the Story Editor have correspondingly reduced

Page | 69
To exit layout mode click the burger then Layout again. The adjustment markers will no longer be
visible.
Resetting the Prompter Preview Output Formatting
To reset the formatting click the burger then Layout then Reset Layout

Page | 70
Presenter Settings
Text parameters can be set in the Presenter Settings options
Click Settings/Presenter Settings in the main toolbar or in the Story Editor Window click
Burger/Presenter Settings
This will launch the Presenter Settings window
This window enables you to set parameters of multiple kinds of text including
Story Text
Sluglines (story headers)
Instructions
Sound On Tape
Prompt Name (the presenters name shown in the script)
Break
Read Rate (to calculate the estimated run time of the story based on words per minute)
Click on each of the boxes under these headings to edit the particular parameter for that Presenter.
E.g.
Font
Text Size
Foreground (text) colour
Background colour
Bold/Italics/Underline
Text justification
A Default presenter profile is already loaded.
Page | 71
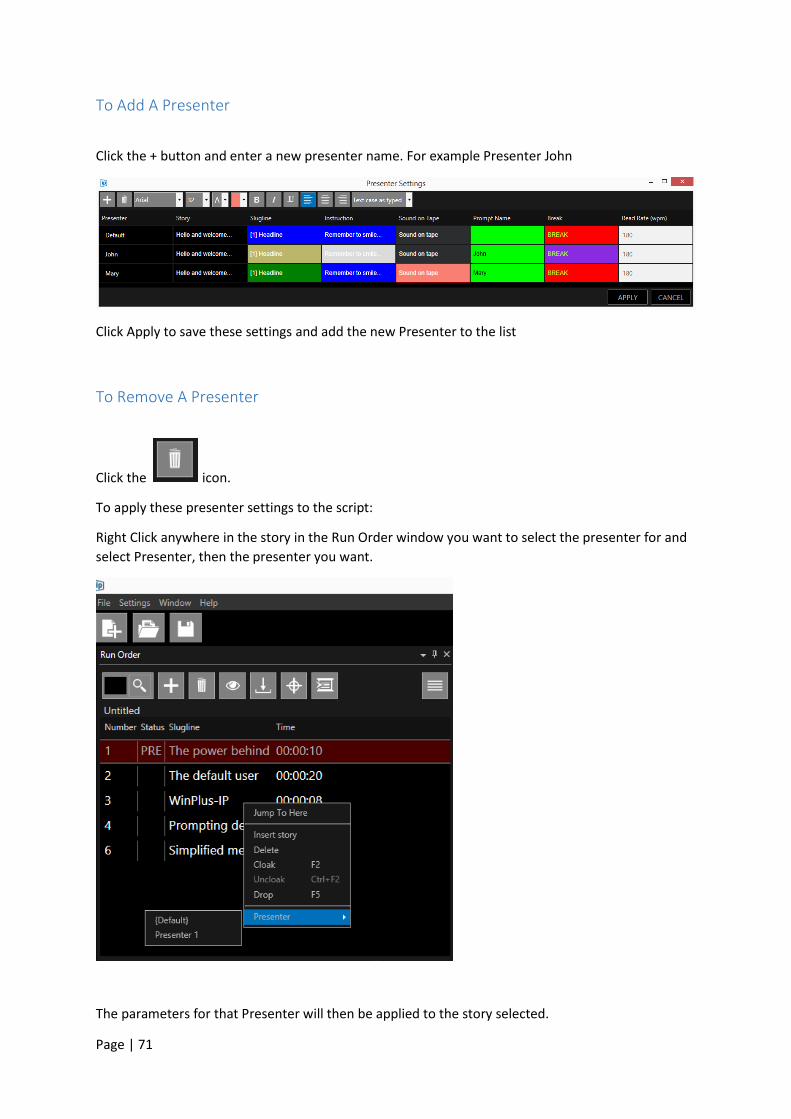
To Add A Presenter
Click the + button and enter a new presenter name. For example Presenter John
Click Apply to save these settings and add the new Presenter to the list
To Remove A Presenter
Click the icon.
To apply these presenter settings to the script:
Right Click anywhere in the story in the Run Order window you want to select the presenter for and
select Presenter, then the presenter you want.
The parameters for that Presenter will then be applied to the story selected.

Page | 72
To see at a glance the Presenter selected for a story or stories you can add a Presenter column to the
Run Order window by clicking the burger then Columns/Presenter
You can now see the Presenters names in the Presenter column
In the absence of a presenter being selected the Default Presenter parameters will be applied to the
story.
If the Default presenter is selected for that story then the Presenter name column will be blank.
Presenter parameters can be changed or over written at any time by opening the Presenter Settings
window, even while prompting is active.

Page | 73
Script Macros
Script Macros enable the user to add pre assigned text to a script for ease of editing.
Adding Script Macros
To Enable Macros in the Story Editor window click the burger/Toolbar/Macros
When this option is selected, a row of 10 buttons will appear at the top of the script display. The colour of the button represents the status of that button
Grey: No Data Stored
Red: Data Stored
To assign text to a macro, highlight the required text and press one of the Macro buttons. When the text has been assigned to a macro the colour of the button will turn from grey to red.
If the button already has data associated with it, the original macro text will be overwritten. If this text is overwritten then the button colour will remain red.
In this example, the words “This text
will be assigned to macro button 1”
was highlighted and then macro
button 1 was clicked.
You can view the contents of the
macro by hovering over it.
Page | 74
To retrieve the stored data and insert into the script, position the caret to the required position in the script and click on the desired Macro button. The script text will be inserted and no data will be overwritten.
You can view the contents of the macro by hovering over it.
To delete data associated with each button, right click on the button and select “Clear”
You can assign data to a macro using shortcut keys.
Editing Macro Preferences
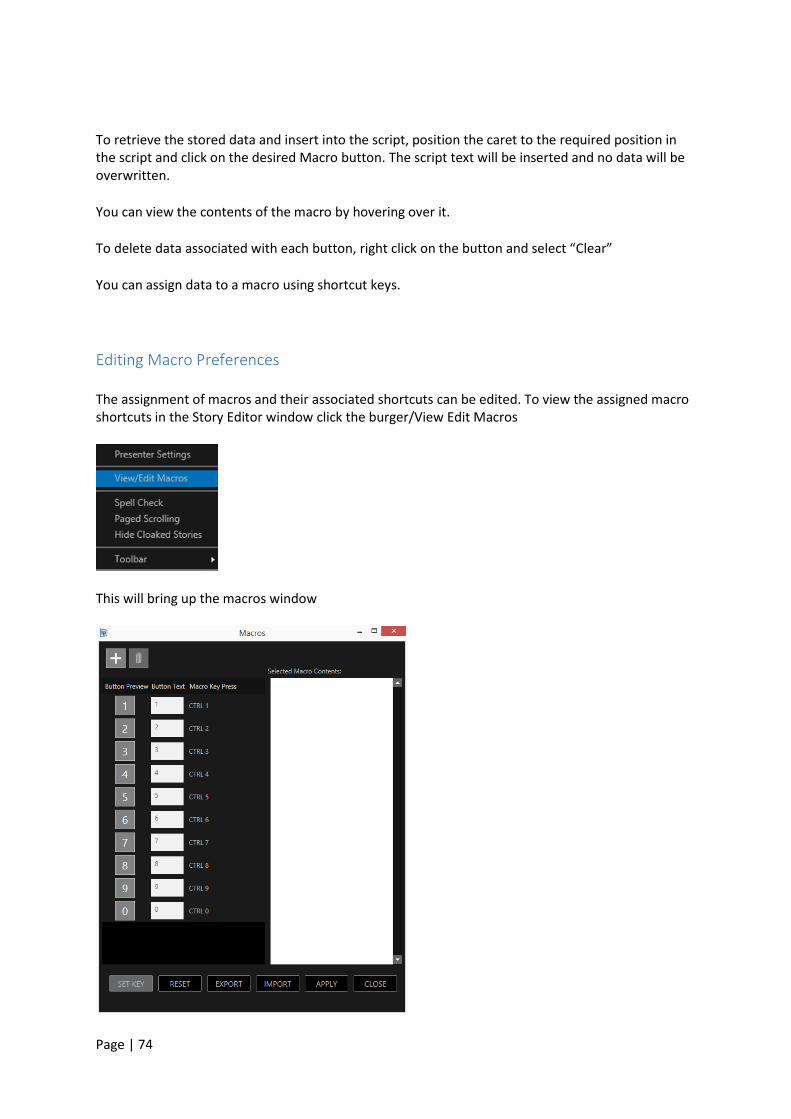
The assignment of macros and their associated shortcuts can be edited. To view the assigned macro shortcuts in the Story Editor window click the burger/View Edit Macros
This will bring up the macros window
Page | 75
This window shows all the parameters and function of each macro.
: This button will add another macro button to the bottom of the macro list and will added to
the end of the macro buttons visible in the Story Editor window.
: This button will delete the currently selected macro and will remove the macro button in the
Story Editor window.
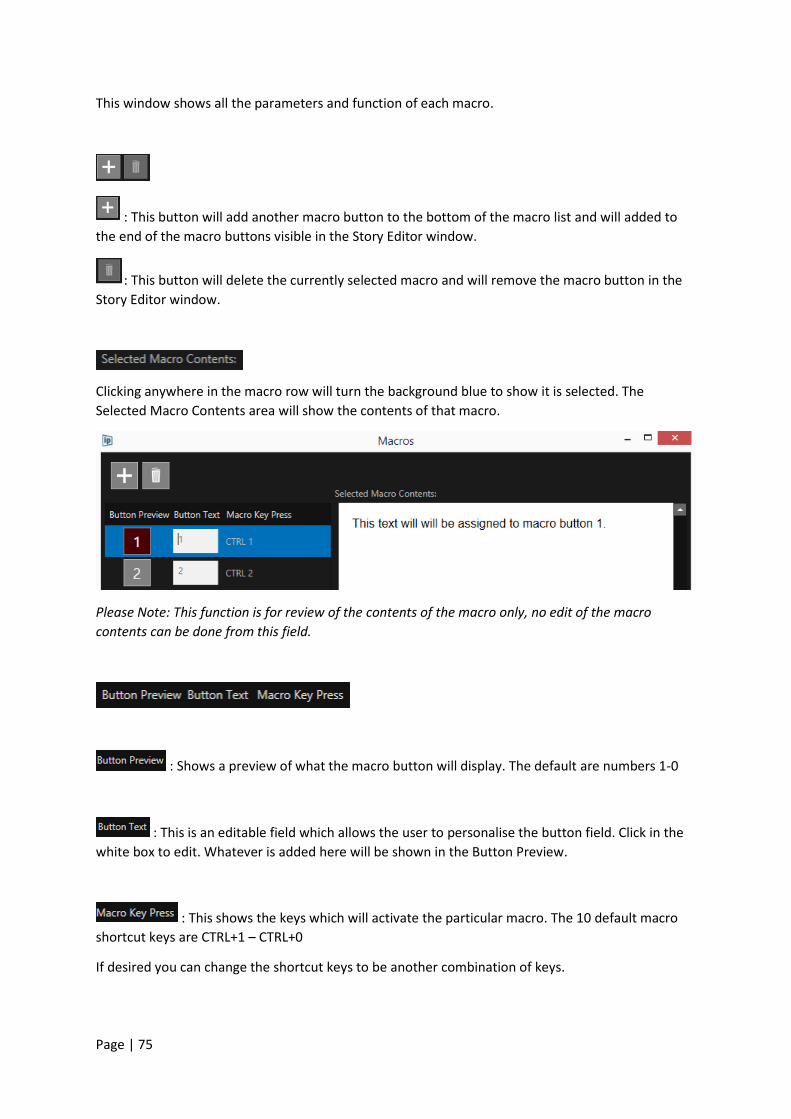
Clicking anywhere in the macro row will turn the background blue to show it is selected. The
Selected Macro Contents area will show the contents of that macro.
Please Note: This function is for review of the contents of the macro only, no edit of the macro
contents can be done from this field.
: Shows a preview of what the macro button will display. The default are numbers 1-0
: This is an editable field which allows the user to personalise the button field. Click in the
white box to edit. Whatever is added here will be shown in the Button Preview.
: This shows the keys which will activate the particular macro. The 10 default macro
shortcut keys are CTRL+1 – CTRL+0
If desired you can change the shortcut keys to be another combination of keys.

Page | 76
: This allows the user to assign a set of keys strokes to be shortcut keys for a macro.
Select the macro you want to edit and click Set Key.
The Set Key text will then turn red and is waiting to record keystrokes to assign to that Macro Key
Press.
As the keys are pressed the entered keystrokes will be shown in the Macro Key Press column.
Once the keystrokes have been entered press Apply.
If a combination of key strokes is not allowed an error message will appear. You must re-enter using
the parameters explained in the error message.
If a combination of key strokes has already been assigned to another macro an error message will
appear. You must re-enter using a unique combination of key strokes.
In the below example an attempt has been made to use the CTRL+1 combination for macro 2:
The error message alerts the user that this shortcut is a duplicate of macro 1 and that a different set
of key strokes is required.
Page | 77
: This will reset all macro settings, will delete all contents, previews and any
additional macros added.
Please Note: this delete cannot be undone. It is recommended that any macro settings be exported
before a reset
: Enables the exporting and saving of all macros data and contents to an XML file
which can then be imported into the same or another instance of WP-IP.
: Enables the import of all macro data and contents and overwrites the macro data
currently installed.
: Applies all changes made to the macro
: Closes the Macros window

Page | 78
Bookmarks & Snapshots
These two features are useful for quickly putting markers in a script for reference and quick access
where another option other than sluglines are appropriate, for example in the middle of a story.
Bookmarks: provide contextual information regarding the marked position and allows the user to
search, this is perhaps more useful for longer term markers.
Snapshot: useful if you need a quick marker that you can jump back to shortly after making it.
Snapshots are a smaller cut down version of bookmarks.
If you have the
Controller pane
open, Bookmarks
and Snapshots will
appear as tabbed in
bottom of this pane
Bookmarks and Snapshot panes
can be launched under the
Windows pull down in the main
WP-IP toolbar:
If you have the
Controller pane
closed, Bookmarks
and Snapshots will
appear as tabbed in
their own pane

Page | 79
Configuring Bookmarks
To inset a Bookmark, in the text in the Story Editor window place the cursor at the position you want
to add as a Bookmark.
Click ALT+M
This will mark the line you clicked on as a Bookmark.
The text in the Story Editor will be highlighted in Pink and the text will appear in the Bookmarks pane
Please Note: You can use CTRL+SHIFT+F3 which will act as a toggle to create and delete a Bookmark
Page | 80
There are a number of columns related to the Bookmark which are selected using the burger in the
Bookmarks pane
ID: allows the user to type up to 8 characters as a reference for that bookmark. 3 seconds after
typing begins the cursor will automatically return to the Story Editor position it was in when the
Bookmark was created
Slugline: Shows the slugline of the story which the Bookmark is contained in. Where there is no
slugline, or it is empty, this field will also be empty
Status: Show the status of the story which that Book mark has been created in. This will be
Dropped/Cloaked/Floated/Blank
Please Note: The status field is linked to the status of the story in the Newsroom and so will only
populate if WP-IP is connected to a Newsroom and if the application has a WP-IPN licence
Text: Shows the text which has been selected as Bookmarked
Selecting Bookmarks
To jump to the Bookmark position in the Story Editor double click anywhere in the Bookmark
To switch prompting on from that Bookmark, in the Bookmark pane, highlight the Bookmark and
click F9
To jump to the next Bookmark, and prompt from there, click ALT+N
To jump to the previous Bookmark, and prompt form there, click ALT+P
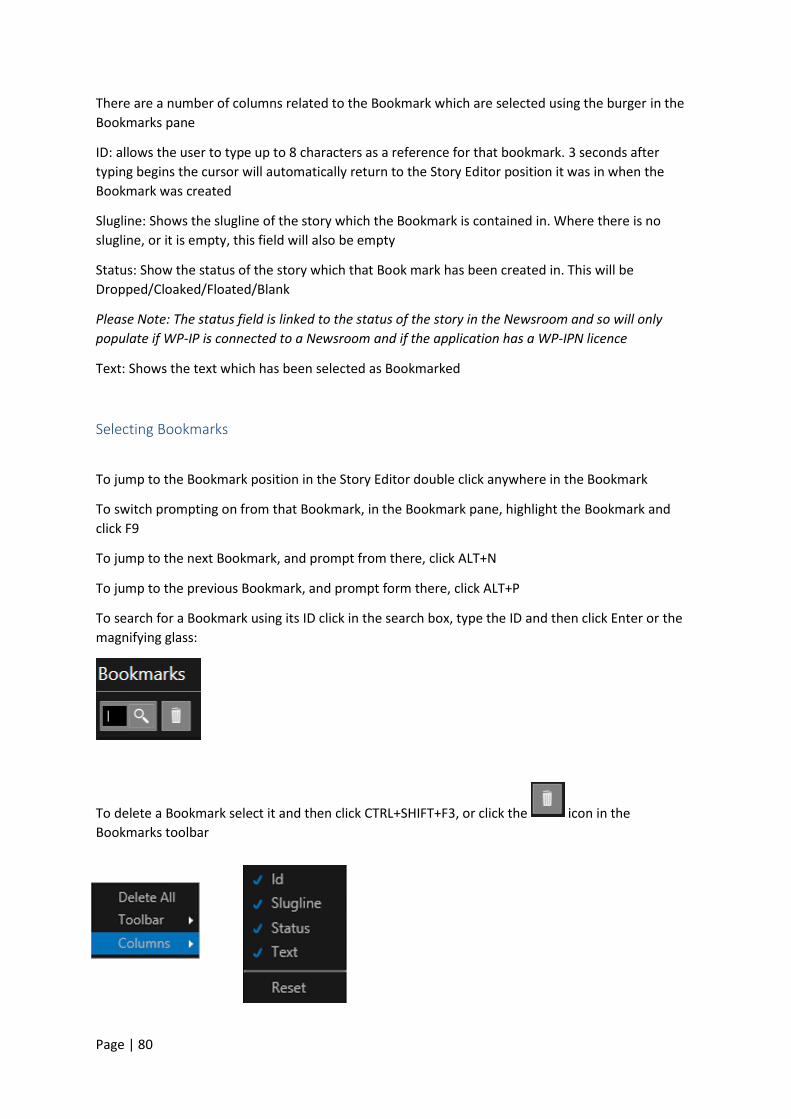
To search for a Bookmark using its ID click in the search box, type the ID and then click Enter or the
magnifying glass:
To delete a Bookmark select it and then click CTRL+SHIFT+F3, or click the icon in the
Bookmarks toolbar
Page | 81
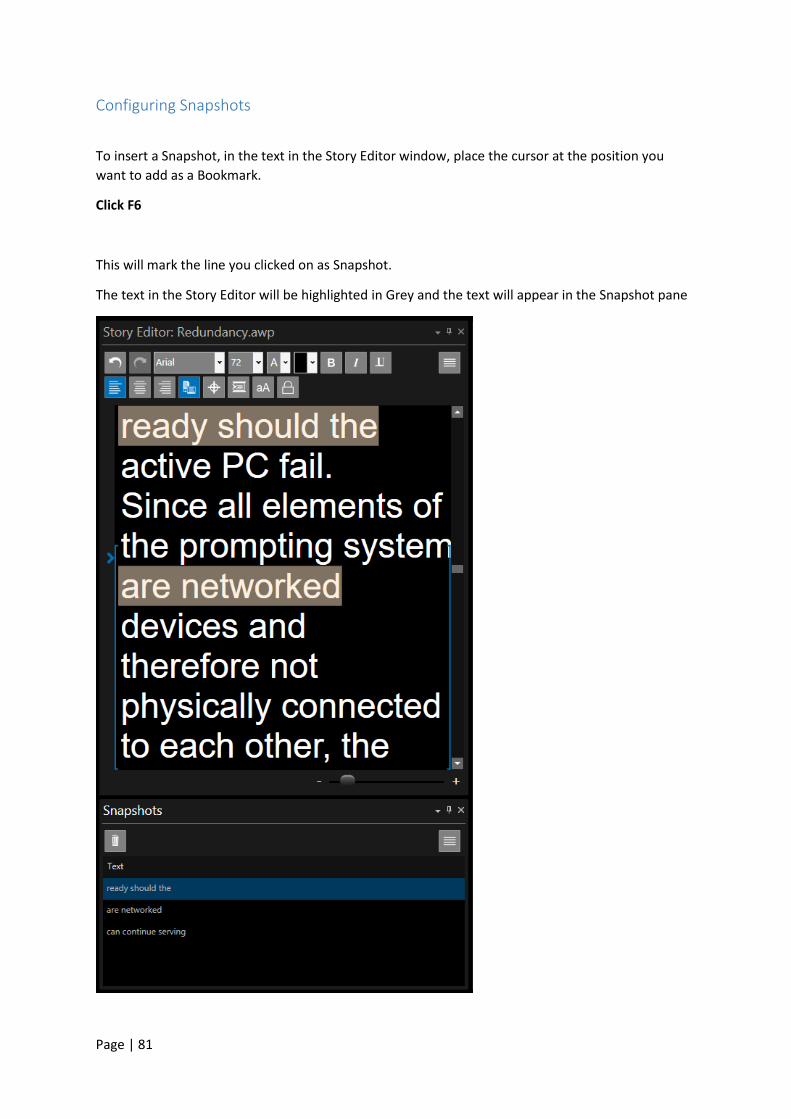
Configuring Snapshots
To insert a Snapshot, in the text in the Story Editor window, place the cursor at the position you
want to add as a Bookmark.
Click F6
This will mark the line you clicked on as Snapshot.
The text in the Story Editor will be highlighted in Grey and the text will appear in the Snapshot pane

Page | 82
Selecting Snapshots
To jump to the Snapshot position in the Story Editor double click anywhere in the Snapshot
To switch prompting on from that Snapshot, in the Snapshots pane, select the Snapshot and click F9
To delete a Snapshot select it and then click F6 or click the icon in the Snapshot toolbar
Find and Replace
WP-IP has a find and replace tool to help speed up the editing and searching of text.
To open the tool click anywhere in the Story Editor then CTRL+F. This will launch the Find and
Replace Text Box
To Find Text Enter the text you want to find in the Find Text field
To search for the text hit enter
To find the next instance of the text click Find Next
To Replace Text To replace text with different text enter the text you want to replace in the Find Text field
Enter the text you want to use to replace this with in the Replace Text field
To replace the next instance of that text click Replace Next
To replace the all instances of that text click Replace All
Please Note: the replacement function will replace the text in the format settings of the Presenter for
that story. Where no presenter is selected it will replace the text in the settings of the Default
Presenter

Page | 83
To filter the results to only select text which matches the case which the text entered in the Find
Text filed check the Match Case box
Spell Check
WP-IP has a spell check function.
To start the spell check feature click the burger in the Story Editor window and the Spell Check
WP-IP will then automatically scan the text for spelling errors and underline them in red.
Edit the text to correct the spelling and the underline will be removed.
Please Note: if the text is imported from a Newsroom, any changes to the spelling made in the Story
Editor will be overwritten, if that story is us updated again.

Page | 84
Font Management
WP-IP has a number of fonts installed. If the user would like to add or remove fonts they can be
done via the Font Management tool. Fonts must be installed on devices as well as in WP-IP. If not
the font displayed on the teleprompter or from the XBOX-IP output will not match that of the script.
Access the Font Management tool via Settings/Preferences
Then selecting Font Management
The Font Management window shows two fields:
Windows Fonts: these are the fonts that are available on the machine that WP-IP is running
Installed Fonts: These are the fonts which have been installed in the application and also to the
devices which require that font (e.g. XBOX-IP: A9009-0001 and EVO-IP: A9011-XXXX)

Page | 85
Please Note: The fonts in the Installed Fonts pane appear in white or grey. Those in white are fonts
which have been added and can be removed, those in grey are default fonts and cannot be removed.
To Add A Font Select the font you would like to add to WP-IP.
Then click Add Selected
In this example Aharoni font is selected:
When Add Selected is clicked the Aharoni font is added to the Installed Fonts at the bottom of the
Installed Fonts list.
Please Note: Double clicking on the font will also add it to the Installed Fonts list

Page | 86
Please Note: The font is initially put at the end of the Installed Fonts so you can see it has been
added. After the Preferences window is closed it will be put into the correct position in the alphabetic
fonts list
To actually install the font click APPLY

Page | 87
The font will be added to WP-IP font list and will be sent to the devices.
An icon (white tray with arrow pointing up) beside the status indicator will flash as the font is
installed on the device
Please Note: If a device is switched off or disabled when the font is applied it will automatically
receive that font when it is powered on and enabled again.
Adding Fonts from a File This option will allow the user to browse to a file where a new font can be added which has not
already been installed on the PC which WP-IP is running on.
Removing Fonts To remove fonts select the font in the Installed Fonts pane and click Remove Selected

Page | 88
The removed font will be moved back to the Windows Fonts pane
Please Note: only fonts which appear in white in the Installed Fonts pane can be removed. Those
which appear in grey are permanently installed both in WP-IP and all devices.
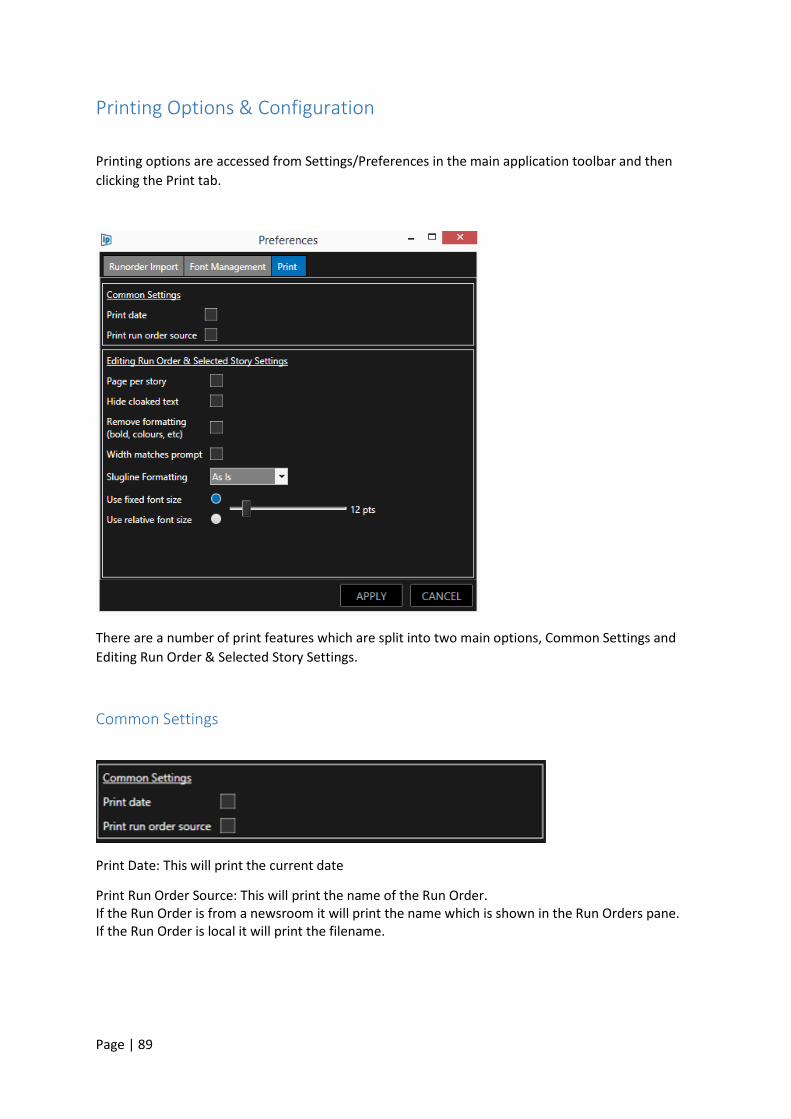
Page | 89
Printing Options & Configuration
Printing options are accessed from Settings/Preferences in the main application toolbar and then
clicking the Print tab.
There are a number of print features which are split into two main options, Common Settings and
Editing Run Order & Selected Story Settings.
Common Settings
Print Date: This will print the current date
Print Run Order Source: This will print the name of the Run Order. If the Run Order is from a newsroom it will print the name which is shown in the Run Orders pane. If the Run Order is local it will print the filename.

Page | 90
Editing Run Order & Selected Story Settings
Page per story: When checked this will start a new print page for each story. When unchecked stories will run continuously. Hide clocked text: When checked this will remove cloaked text from the printed output. When unchecked cloaked text will be printed. Remove formatting: When checked this will remove all test formatting in the print output. The font will be the same as the text is written in but all other formatting will be removed in the print. When unchecked it will print exactly as it is in the Script Editor pane. Please Note: Sluglines can still have formatting applied when Remove Formatting is checked
depending on the slugline handling preference’s set in Slugline Formatting (see below)
Width Matches Prompt: When checked the print output will match the width of the text in the Prompt Preview pane. When unchecked the print output will use the full width of the printed page. Slugline Formatting: When checked sluglines can be set to appear in different way when printed
As Is: This will print the sluglines exactly as they appear in the Script Editor Bold: Sluglines will be printed in bold. Italic: Sluglines will be printed in italics. Underline: Sluglines will be printed underlined.

Page | 91
Use Fixed Font Size: When checked this will apply the same font size to all printed text. The point size can be increased or decreased using a slider.
When unchecked the font size of the printed text will match that of the font in the Edit Pane. Use Relative Font Size: When checked this will open a conversion table and a slider.
The slider will convert the default printed text size to an increased or decreased size dependent on the user’s preference.
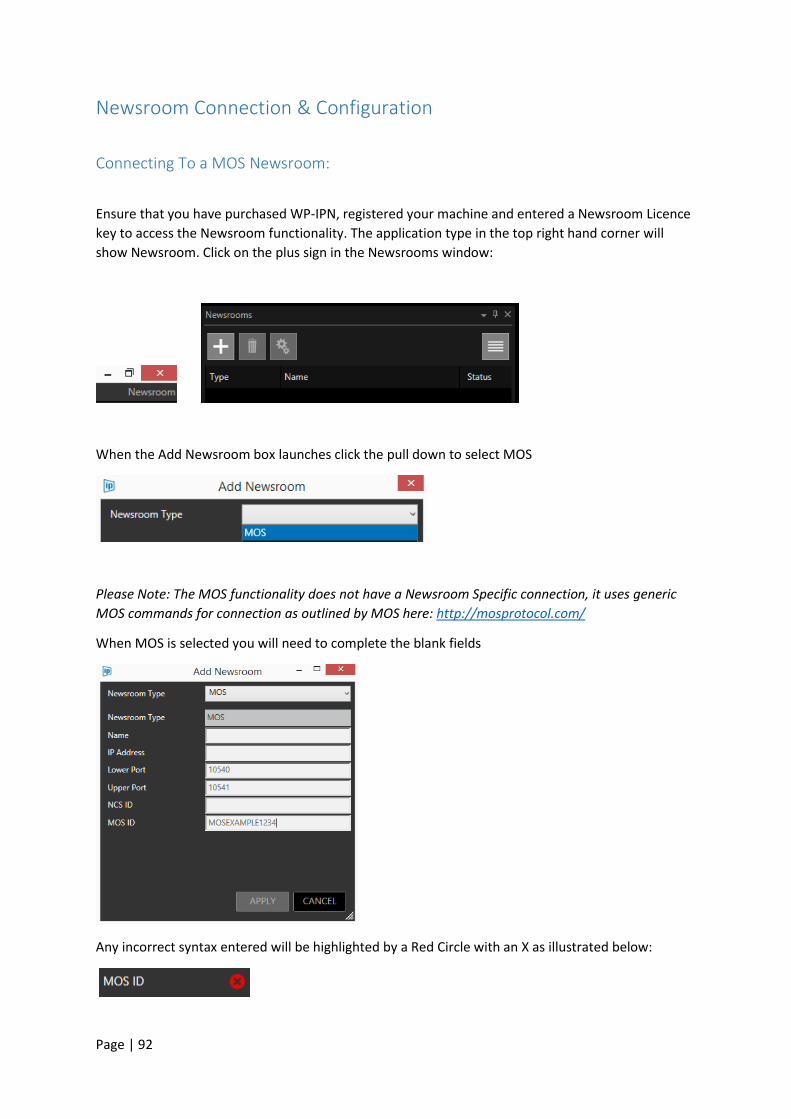
Page | 92
Newsroom Connection & Configuration
Connecting To a MOS Newsroom:
Ensure that you have purchased WP-IPN, registered your machine and entered a Newsroom Licence
key to access the Newsroom functionality. The application type in the top right hand corner will
show Newsroom. Click on the plus sign in the Newsrooms window:
When the Add Newsroom box launches click the pull down to select MOS
Please Note: The MOS functionality does not have a Newsroom Specific connection, it uses generic
MOS commands for connection as outlined by MOS here: http://mosprotocol.com/
When MOS is selected you will need to complete the blank fields
Any incorrect syntax entered will be highlighted by a Red Circle with an X as illustrated below:
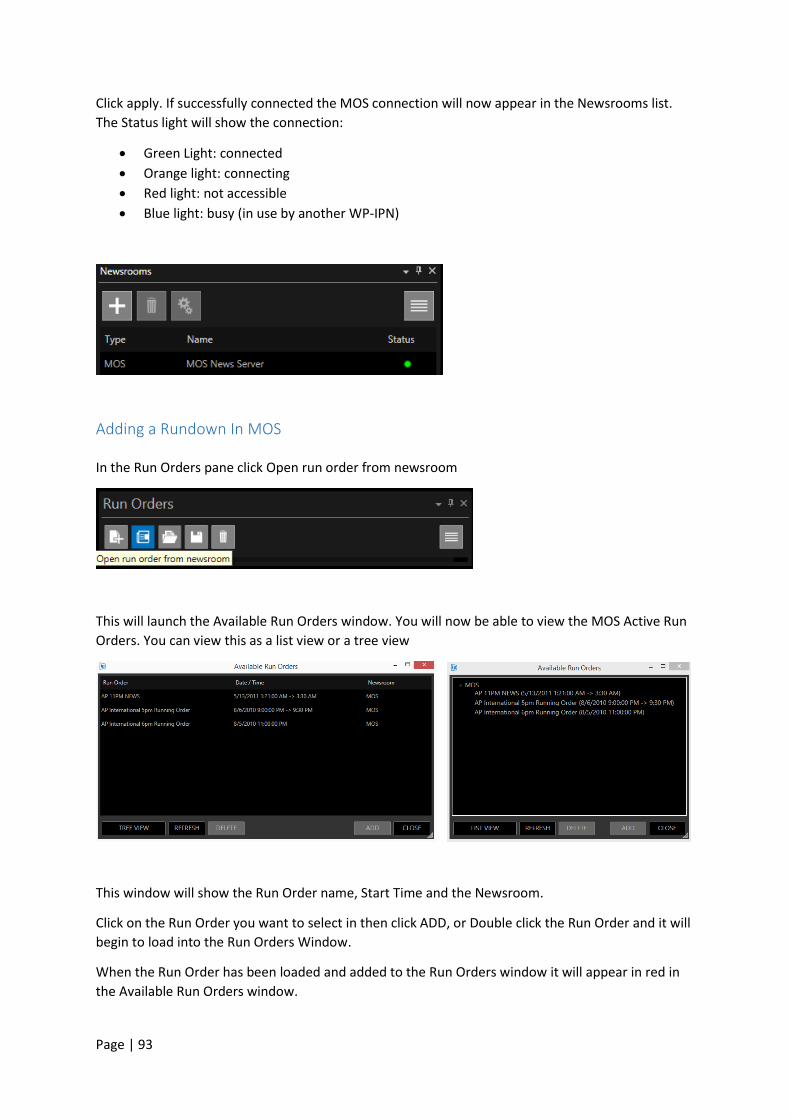
Page | 93
Click apply. If successfully connected the MOS connection will now appear in the Newsrooms list.
The Status light will show the connection:
Green Light: connected
Orange light: connecting
Red light: not accessible
Blue light: busy (in use by another WP-IPN)
Adding a Rundown In MOS In the Run Orders pane click Open run order from newsroom
This will launch the Available Run Orders window. You will now be able to view the MOS Active Run
Orders. You can view this as a list view or a tree view
This window will show the Run Order name, Start Time and the Newsroom.
Click on the Run Order you want to select in then click ADD, or Double click the Run Order and it will
begin to load into the Run Orders Window.
When the Run Order has been loaded and added to the Run Orders window it will appear in red in
the Available Run Orders window.
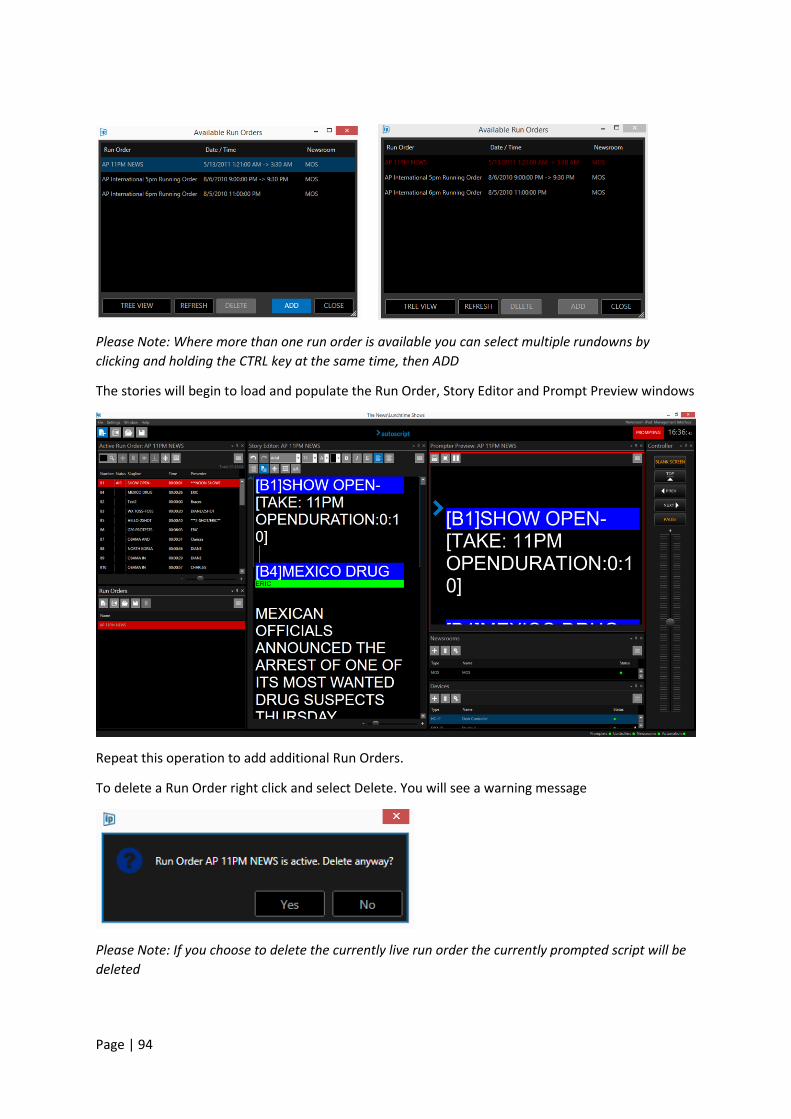
Page | 94
Please Note: Where more than one run order is available you can select multiple rundowns by
clicking and holding the CTRL key at the same time, then ADD
The stories will begin to load and populate the Run Order, Story Editor and Prompt Preview windows
Repeat this operation to add additional Run Orders.
To delete a Run Order right click and select Delete. You will see a warning message
Please Note: If you choose to delete the currently live run order the currently prompted script will be
deleted

Page | 95
Additional MOS Configuration Options
Within the MOS configuration there are a number of options. These may be set when the MOS
Newsroom is first added or they may be changed or edited later.
To access these options select the MOS newsroom within the Newsrooms pane and click the
Configuration button:
The Edit Newsroom Window will open. The additional options are seen below the MOS ID field.
Use Backup/Buddy Server
In the event that a connection is lost to the main MOS server WP-IP will automatically use the
Backup/Buddy Server.
To enable this feature check the Use Backup/Buddy Server button.
You will then see two fields which need to be completed to add the second server
Please Note: Both MOS servers will be connected but typically only one server responds, and sends
WP-IP story updates etc.
Page | 96
Connection Timeout (MS)
Connection timeout is the time the WP-IP machine will wait when trying to establish a connection
before stopping, resting, and then trying again. Usually, during this time the connection status will
display orange (Connecting) in the newsrooms panel. Then while it’s resting (usually for five seconds)
the connection status is red.
Once a connection is established, connection timeout no longer comes into play.
The timeout adjustment is made by a slider. The range is 1000ms to 6000ms
Please Note: increasing this timeout range may help where there are slow network connections
Heartbeat
Once a connection is established the Heartbeat function begins. Heartbeat timeout is how long WP-
IP will wait before deciding there’s a problem and shutting the connection down, and then trying to
re-establish it. A heartbeat is sent every 10 seconds.
Break Identifier
Enter text into the box to determine the text which WP-IP will look for to recognise what the NRCS is
sending as a break. This should match the text which is within the MOS tag sent in the MOS
message.
Please Note: The parameters of the break are then determined by the Break field in the Presenter
settings.
Do Not Reinitialise When Reconnecting
When selected, if a connection has been lost to the MOS NRCS server, when the connection is re-
established the run down will not be deleted from WP-IP and reloaded.
If not selected the run order will be deleted and reloaded when the connection is re-established
again.
Changes made to the run order during the disconnection period will be queued by the NRCS. When
the connection is re-established these changes will be accepted by WP-IP.
Please Note: The handling of queued messages during the disconnected period will be set in the
NRCS. This may differ dependent on the NRCS being used. Please consult your NRCS supplier for
options.

Page | 97
Preserve Current Run Order If Made Inactive On Server
When selected, if a run order is made inactive in the MOS NRCS the run order will not be deleted
from WP-IP. The status will show as INAC (abbrv. Inactive) in the Run Orders window
Active:
Inactive:
A warning triangle will also show in the Status tray at the bottom right of the WP-IP application
window.
Hovering over this warning triangle will display the the details of this warning:
When this run order is made active again only changes which have been made while that run order
was inactive will be received, and the corresponding stories replaced with the new versions.
The complete run order will not deleted and replaced.
The INAC status will be removed in the Run Orders window and the warning triangle in the Status
tray will be removed.

Page | 98
Connecting To Avid iNews Via FTP
Ensure that you have purchased WP-IPN, registered your machine and entered a Newsroom Licence
key to access the Newsroom functionality. The application type in the top right hand corner will
show Newsroom. Click on the plus sign in the Newsrooms window
Click Select Newsroom Type and Select iNews
When iNews is selected you will need to complete the blank fields
Complete the fields and click APPLY

Page | 99
If successfully connected the iNews connection will now appear in the Newsrooms list. The Status
light will show the connection:
Green Light: connected
Orange light: connecting
Red light: not accessible
Blue light: busy (in use by another instance of WP-IPN)
Adding a Rundown In iNews
In the Run Orders pane click Open run order from newsroom
You will then see the available Run Orders. Drill down to the run down you require and double click
or select ADD to add it to the Run Orders list
This run down will now be visible in the Available Run Orders list

Page | 100
The stories will begin to load and populate the Run Orders, Story Editor and Prompt Preview
windows
Repeat this operation to add additional Run Orders.
Please Note: if the Directory field is left blank this will connect to the users default iNews Home
queue. Use the Filter field to only display the items you want to see in the iNews tree

Page | 101
To prompt a different Run Order from the currently prompter Run Order right click on the required
Run Order and click Prompt and Edit Runorder or Prompt Run Order:
To delete a Run Order right click and select Delete. You will see a warning message
Please Note: If you choose to delete the currently live run order the currently prompted script will be
deleted.
As the rundown is loading into a device a blue arrow icon will be displayed beside the status light
(this may flash intermittently).
When the run down is fully loaded the red page icon will no longer be visible.
After any additional script updates the blue arrow icon may be seen to flash again as the run down
on the device is updated.
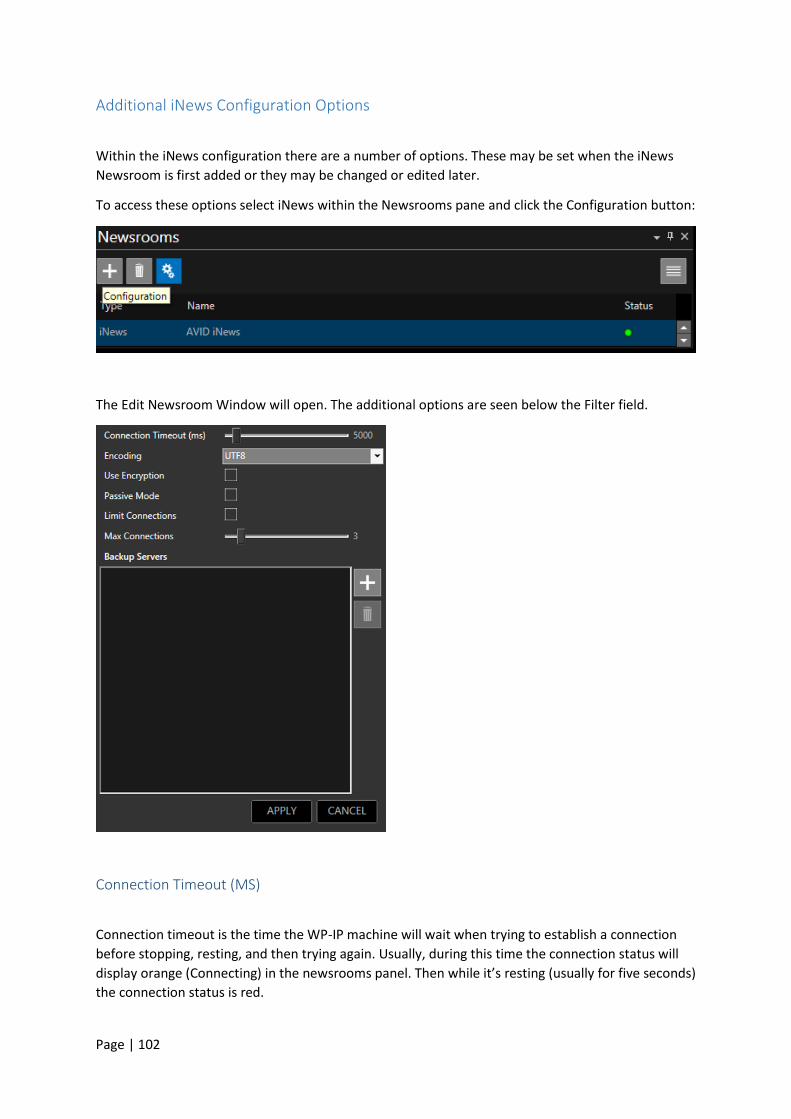
Page | 102
Additional iNews Configuration Options
Within the iNews configuration there are a number of options. These may be set when the iNews
Newsroom is first added or they may be changed or edited later.
To access these options select iNews within the Newsrooms pane and click the Configuration button:
The Edit Newsroom Window will open. The additional options are seen below the Filter field.
Connection Timeout (MS)
Connection timeout is the time the WP-IP machine will wait when trying to establish a connection
before stopping, resting, and then trying again. Usually, during this time the connection status will
display orange (Connecting) in the newsrooms panel. Then while it’s resting (usually for five seconds)
the connection status is red.

Page | 103
Once a connection is established, connection timeout no longer comes into play.
The timeout adjustment is made by a slider. The range is 1000ms to 6000ms
Please Note: increasing this timeout range may help where there are slow network connections
Encoding
To enable compatibility of the encoding used to transfer data from iNews to WP-IP click on the pull
down to select the appropriate encoding
Use Encryption
When enabled WP-IP will only be able to read encrypted messages sent from iNews.
When disabled WP-IP will not be able to read encrypted messages sent from iNews
Passive Mode
When Passive Mode FTP is enabled the connection is only one way, i.e. WP-IP connects to the iNews server so only one direction of firewall needs to be opened. Passive only needs ONE direction of firewall open.
When unchecked (Active Mode FTP) the iNews server connects BACK to WP-IP to send stories. This means connections are made in BOTH directions, requiring firewalls to be opened in both directions.
Please Note: Passive Mode FTP can consume more network connections to the iNews FTP server than Active Mode FTP. When the number of connections are limited it may be better suited to use Active Mode FTP, because then half the time the iNews server connects to WP-IP, which does not consume a connection.
In either case, the iNews FTP server itself may not be configured to support both Passive and Active options. Please consult with your iNews administrator to confirm the best mode of operation.
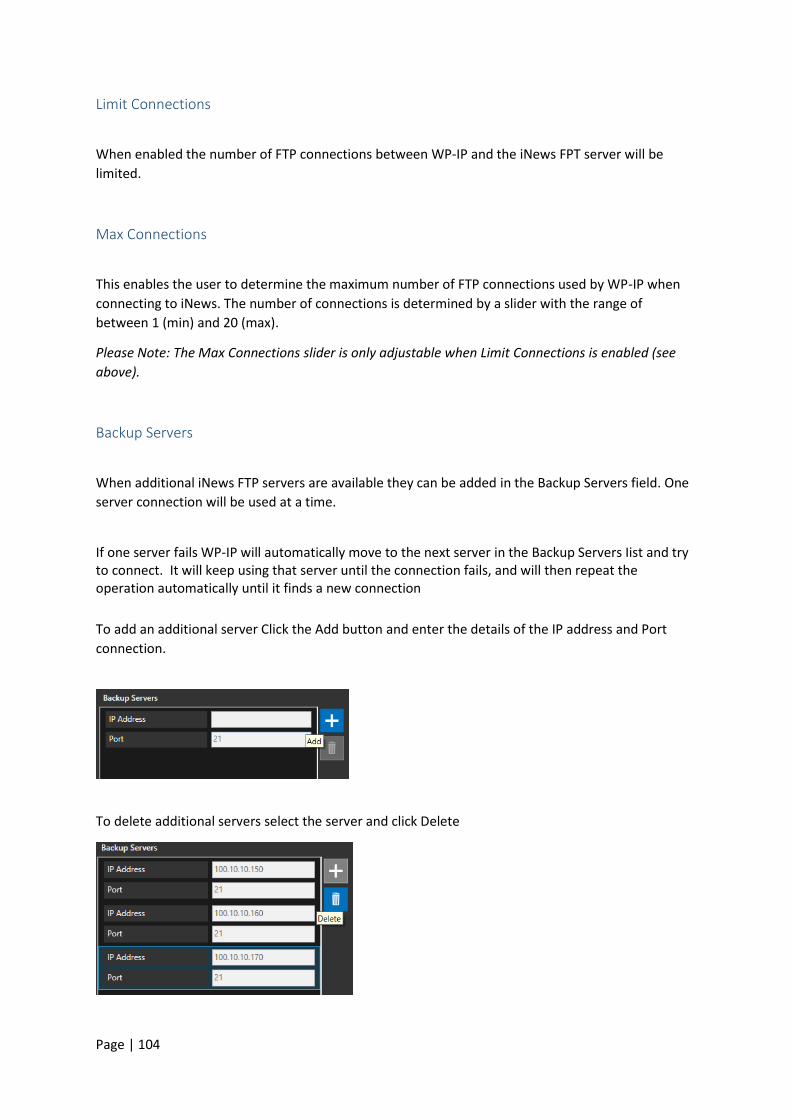
Page | 104
Limit Connections
When enabled the number of FTP connections between WP-IP and the iNews FPT server will be
limited.
Max Connections
This enables the user to determine the maximum number of FTP connections used by WP-IP when
connecting to iNews. The number of connections is determined by a slider with the range of
between 1 (min) and 20 (max).
Please Note: The Max Connections slider is only adjustable when Limit Connections is enabled (see
above).
Backup Servers
When additional iNews FTP servers are available they can be added in the Backup Servers field. One
server connection will be used at a time.
If one server fails WP-IP will automatically move to the next server in the Backup Servers Iist and try to connect. It will keep using that server until the connection fails, and will then repeat the operation automatically until it finds a new connection
To add an additional server Click the Add button and enter the details of the IP address and Port
connection.
To delete additional servers select the server and click Delete
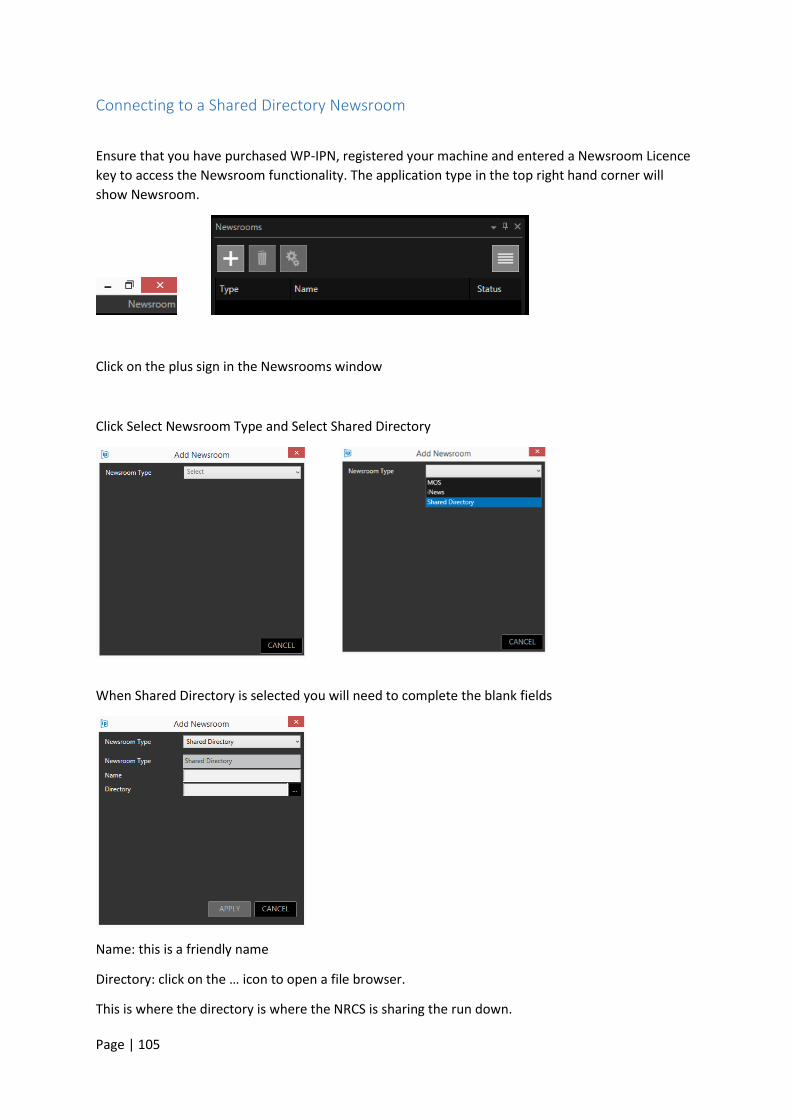
Page | 105
Connecting to a Shared Directory Newsroom
Ensure that you have purchased WP-IPN, registered your machine and entered a Newsroom Licence
key to access the Newsroom functionality. The application type in the top right hand corner will
show Newsroom.
Click on the plus sign in the Newsrooms window
Click Select Newsroom Type and Select Shared Directory
When Shared Directory is selected you will need to complete the blank fields
Name: this is a friendly name
Directory: click on the … icon to open a file browser.
This is where the directory is where the NRCS is sharing the run down.

Page | 106
Click apply. If successfully connected the Shared Directory connection will now appear in the
Newsrooms list. The Status light will show the connection:
Green Light: connected
Orange light: connecting
Red light: not accessible
Blue light: busy (in use by another WP-IPN)
Adding a Rundown in Shared Directory Newsroom
In the Run Orders pane click Open run order from newsroom
You will then see the Available Run Orders. Double click or select ADD to the run down you require
to add it to the Run Orders list

Page | 107
Please Note: Where more than one run order is available you can select multiple rundowns by
clicking and holding the CTRL key at the same time, then ADD
The stories will begin to load and populate the Run Order, Story Editor and Prompt Preview windows
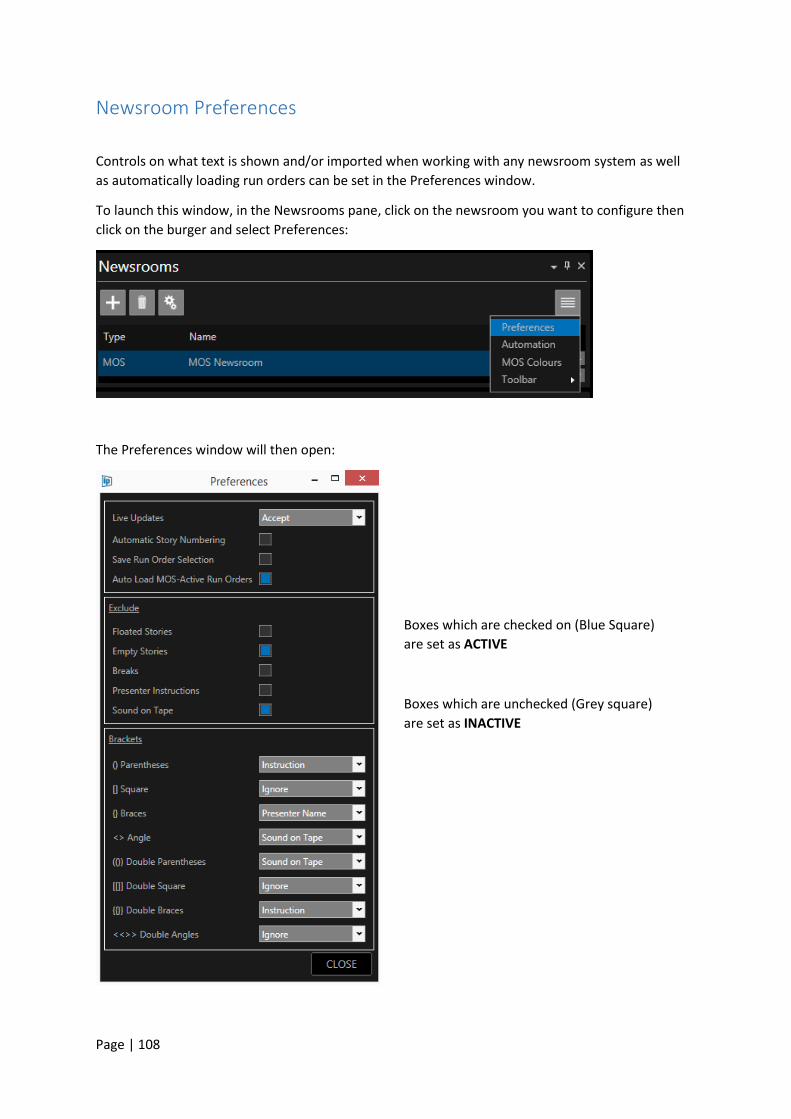
Page | 108
Newsroom Preferences
Controls on what text is shown and/or imported when working with any newsroom system as well
as automatically loading run orders can be set in the Preferences window.
To launch this window, in the Newsrooms pane, click on the newsroom you want to configure then
click on the burger and select Preferences:
The Preferences window will then open:
Boxes which are checked on (Blue Square)
are set as ACTIVE
Boxes which are unchecked (Grey square)
are set as INACTIVE

Page | 109
Live Updates
There are three options available to determine how to deal with changes which are made to the the
story which is currently the live story.
Accept: changes which are made to the current live story will be updated in real time.
Ignore: changes which are made to the current live story in the prompter will be ignored and
discarded.
Defer: changes which are made to the current live story will be cached until that story is no longer
live. Those cached changes will then automatically be applied to that story.
Auto Story Numbering
Automatic Story Numbering on (active): if a rundown does not have story numbers WP-IP will assign
story numbers beginning with 500. If a story number is subsequently added by the Newsroom the
Automatic Story Numbering will be overwritten.
Automatic Story Numbering off (inactive): if a rundown does not have story numbers WP-IP will not
assign story numbers and no story numbers will be visible. If a story number is subsequently added
by the Newsroom the story number will be visible.

Page | 110
Save Run Order Selection
When active, rundowns which have been added to the Run Orders pane will be automatically saved
when WP-IP is closed. When WP-IP is reopened it will automatically launch these Run Orders and
begin loading them. The user will then select which Run Order they want to prompt.
Auto Load MOS-Active Run Orders
Please Note: This option only applies to MOS NRCS connections.
When connected to a MOS NRCS any run orders which are made MOS active in the NRCS will
automatically load into WP-IP.
This negates the need to click the “Open Run Orders from newsroom button” and then select the
required run orders.
When unchecked MOS active run orders will not be automatically loaded. They must be added in the
usual way by clicking the “Open Run Orders from newsroom” button and then selecting the required
run orders.
Exclusion Options
Excluded items will not be displayed in the Active Run Order or the Prompt Preview
Cloaked Stories on (excluded): Any floated stories will not be displayed in the Story Editor or the prompt output Cloaked Stories off (included): Any floated stories will be displayed in the Story Editor but not in the prompt output Please Note: Dependent on the Newsroom the functionality associated with the name “Cloak” can also be applied to systems where this is referred to as “Float” Empty Stories on (excluded): Any empty stories will not be displayed in the Story Editor or the prompt output Empty Stories off (included): Any empty stories will be displayed in the Story Editor & the prompt output Breaks on (excluded): Any story breaks will not be displayed in the Story Editor or the prompt output
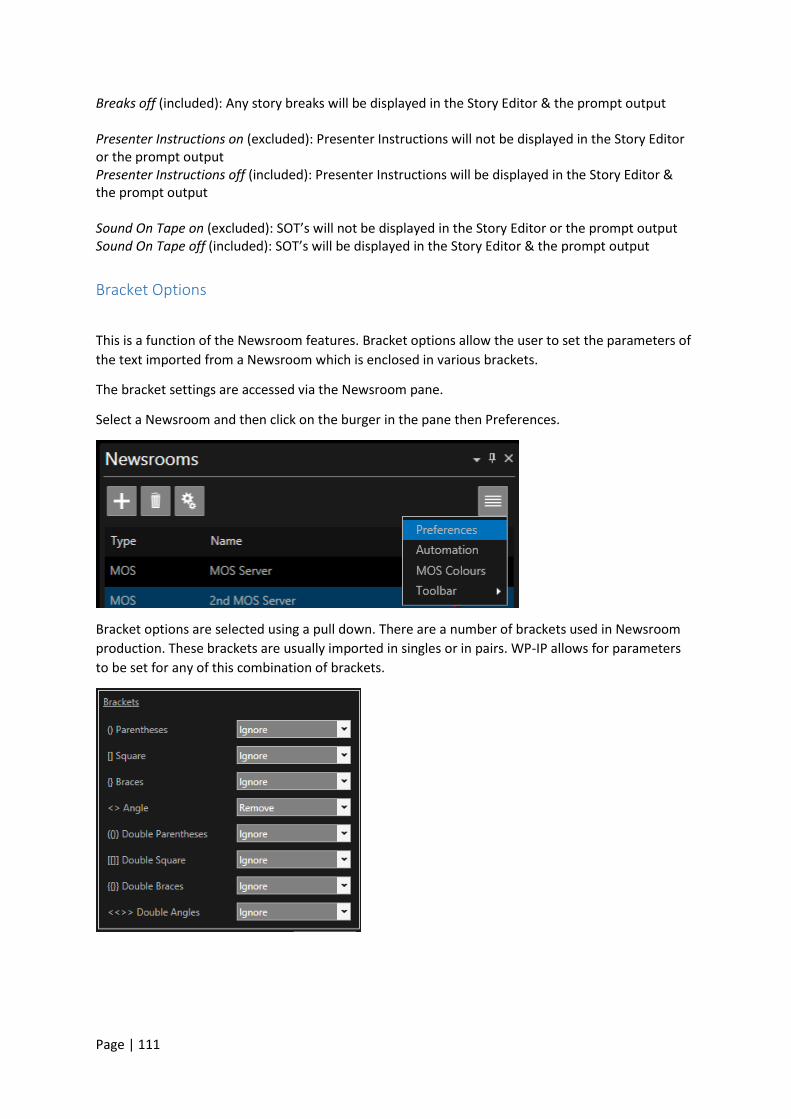
Page | 111
Breaks off (included): Any story breaks will be displayed in the Story Editor & the prompt output Presenter Instructions on (excluded): Presenter Instructions will not be displayed in the Story Editor or the prompt output Presenter Instructions off (included): Presenter Instructions will be displayed in the Story Editor & the prompt output Sound On Tape on (excluded): SOT’s will not be displayed in the Story Editor or the prompt output Sound On Tape off (included): SOT’s will be displayed in the Story Editor & the prompt output
Bracket Options
This is a function of the Newsroom features. Bracket options allow the user to set the parameters of
the text imported from a Newsroom which is enclosed in various brackets.
The bracket settings are accessed via the Newsroom pane.
Select a Newsroom and then click on the burger in the pane then Preferences.
Bracket options are selected using a pull down. There are a number of brackets used in Newsroom
production. These brackets are usually imported in singles or in pairs. WP-IP allows for parameters
to be set for any of this combination of brackets.
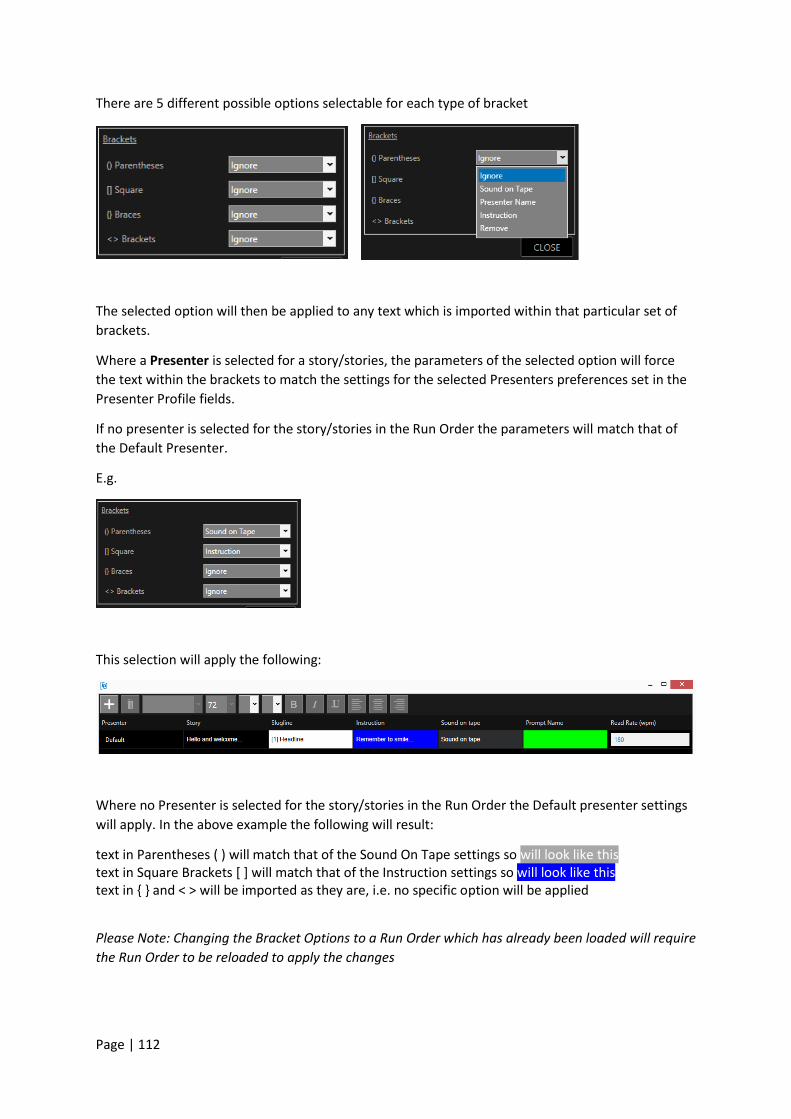
Page | 112
There are 5 different possible options selectable for each type of bracket
The selected option will then be applied to any text which is imported within that particular set of
brackets.
Where a Presenter is selected for a story/stories, the parameters of the selected option will force
the text within the brackets to match the settings for the selected Presenters preferences set in the
Presenter Profile fields.
If no presenter is selected for the story/stories in the Run Order the parameters will match that of
the Default Presenter.
E.g.
This selection will apply the following:
Where no Presenter is selected for the story/stories in the Run Order the Default presenter settings
will apply. In the above example the following will result:
text in Parentheses ( ) will match that of the Sound On Tape settings so will look like this text in Square Brackets [ ] will match that of the Instruction settings so will look like this text in { } and < > will be imported as they are, i.e. no specific option will be applied
Please Note: Changing the Bracket Options to a Run Order which has already been loaded will require
the Run Order to be reloaded to apply the changes

Page | 113
MOS Colour
Where applicable MOS newsrooms assign colours to the script using a numerical command.
WP-IP has a feature which allows the user to set which colours these number reference.
Click on MOS Colours in the Newsroom burger
This will open the MOS Colours tool.
There are 8 pre-set colours.
Click on the pull down arrow in the colour field.
The applicable colour can be either from presets and a selection of standard (common) colours, or
generated by the user clicking Advanced and generating their own colour.
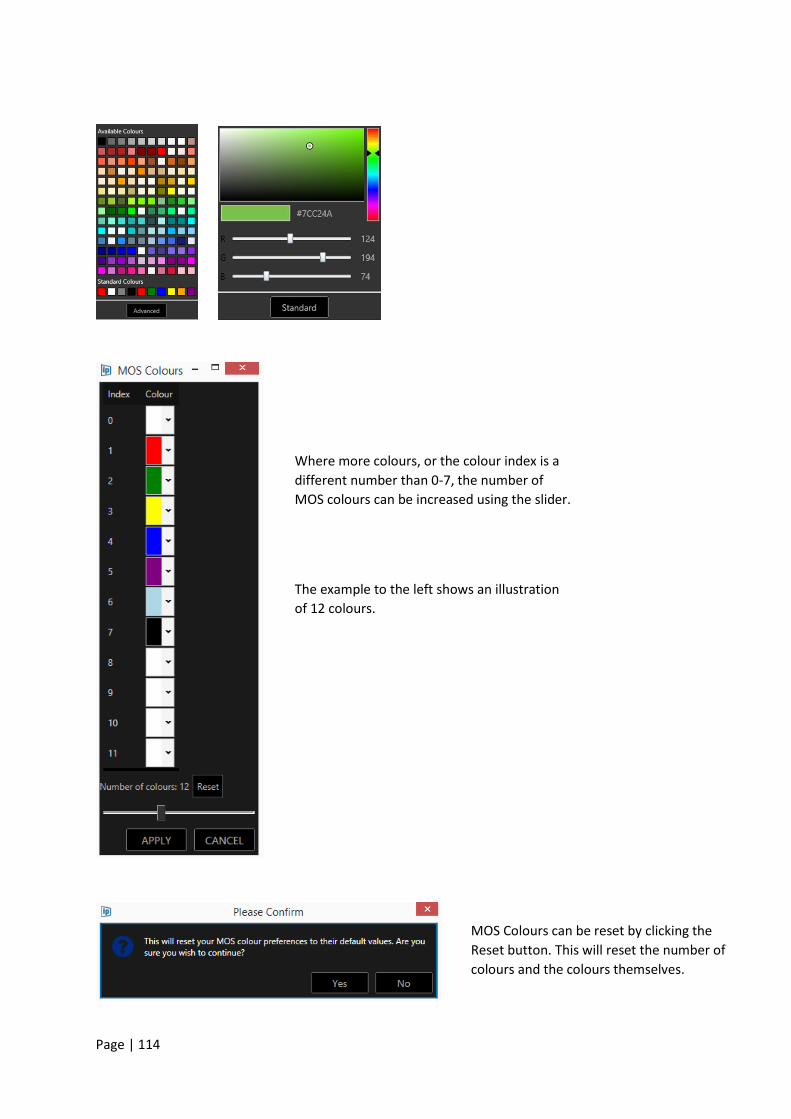
Page | 114
Where more colours, or the colour index is a
different number than 0-7, the number of
MOS colours can be increased using the slider.
The example to the left shows an illustration
of 12 colours.
MOS Colours can be reset by clicking the
Reset button. This will reset the number of
colours and the colours themselves.
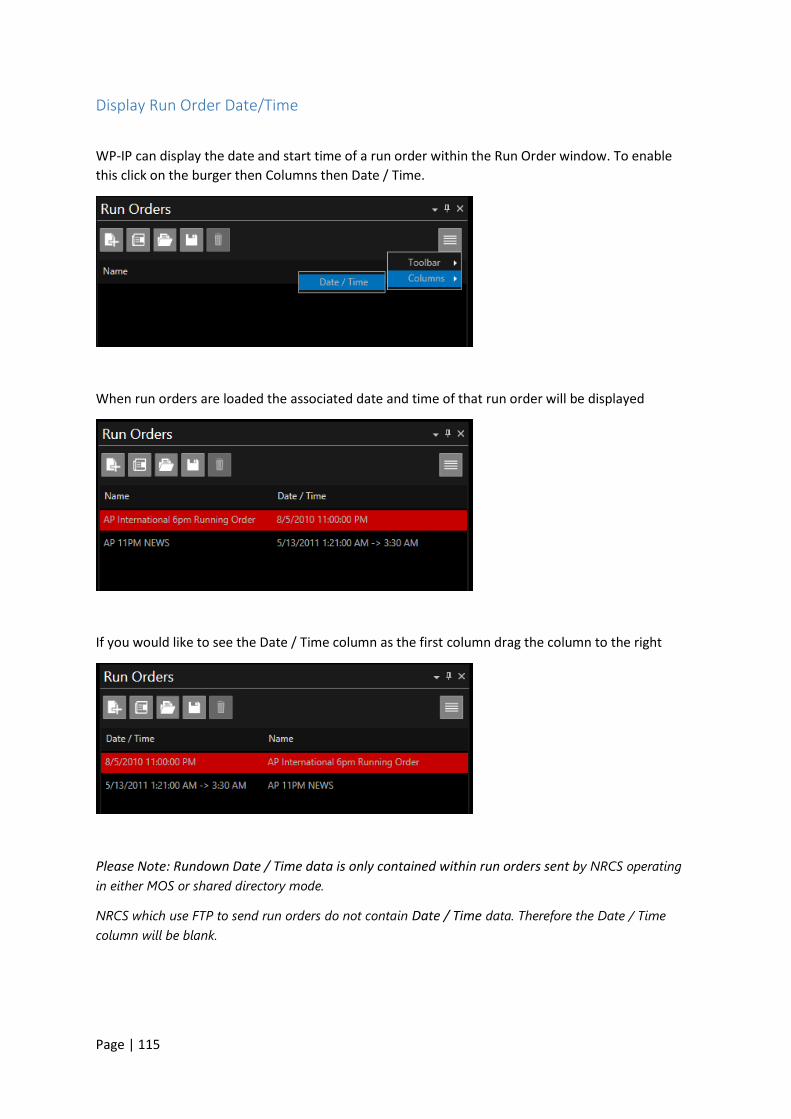
Page | 115
Display Run Order Date/Time
WP-IP can display the date and start time of a run order within the Run Order window. To enable
this click on the burger then Columns then Date / Time.
When run orders are loaded the associated date and time of that run order will be displayed
If you would like to see the Date / Time column as the first column drag the column to the right
Please Note: Rundown Date / Time data is only contained within run orders sent by NRCS operating
in either MOS or shared directory mode.
NRCS which use FTP to send run orders do not contain Date / Time data. Therefore the Date / Time
column will be blank.
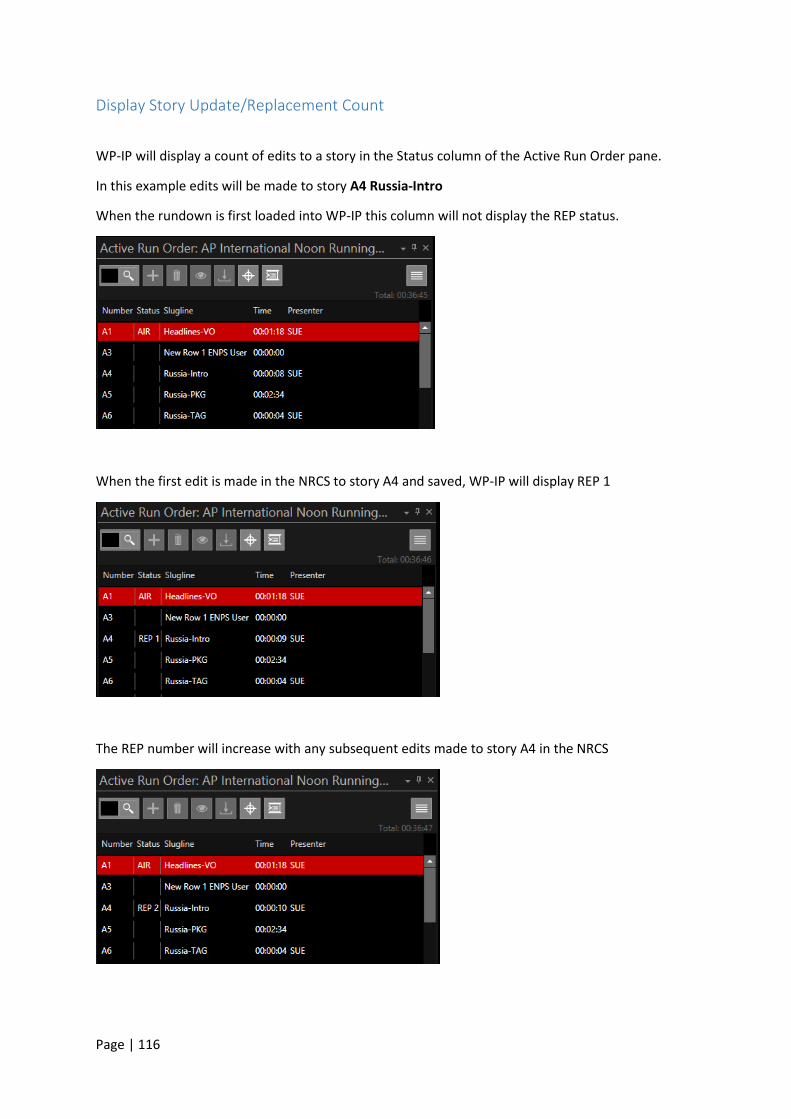
Page | 116
Display Story Update/Replacement Count
WP-IP will display a count of edits to a story in the Status column of the Active Run Order pane.
In this example edits will be made to story A4 Russia-Intro
When the rundown is first loaded into WP-IP this column will not display the REP status.
When the first edit is made in the NRCS to story A4 and saved, WP-IP will display REP 1
The REP number will increase with any subsequent edits made to story A4 in the NRCS

Page | 117
To clear the REP status select the story by clicking anywhere in it, then right click and select “Clear
Replaced Status”. This will then remove the REP text.
Any subsequent edits to story A4 will resume the REP count from the last edit
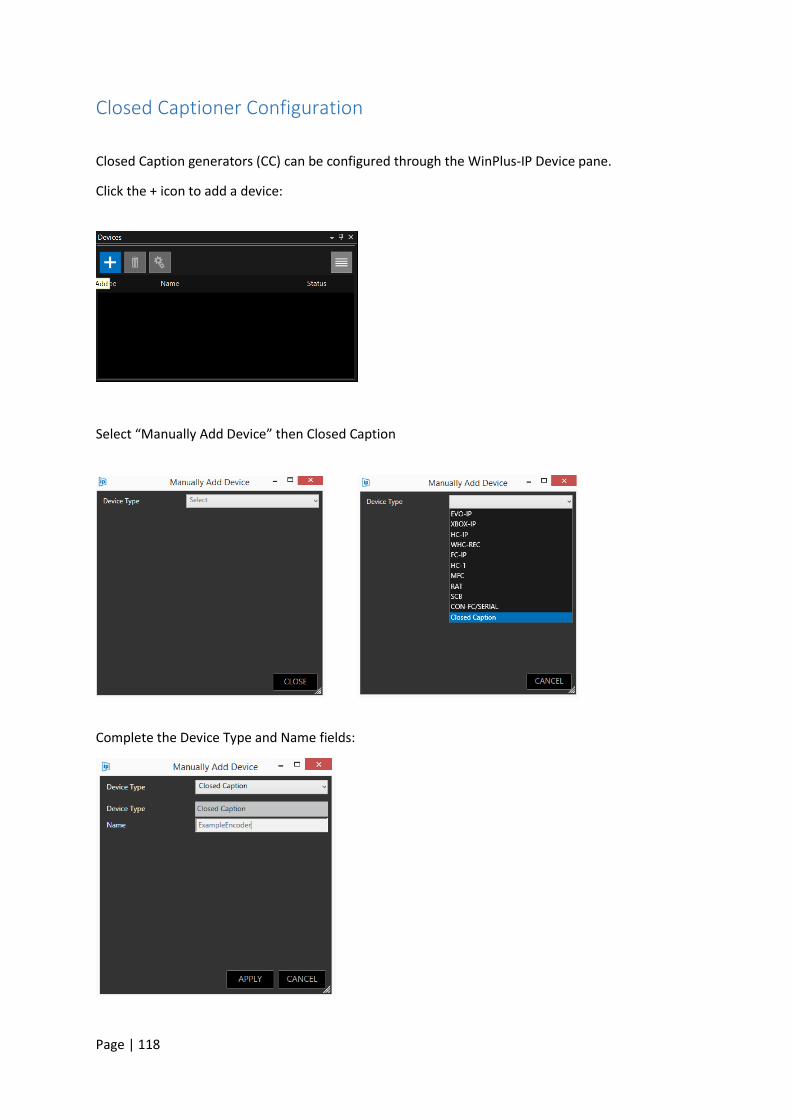
Page | 118
Closed Captioner Configuration
Closed Caption generators (CC) can be configured through the WinPlus-IP Device pane.
Click the + icon to add a device:
Select “Manually Add Device” then Closed Caption
Complete the Device Type and Name fields:
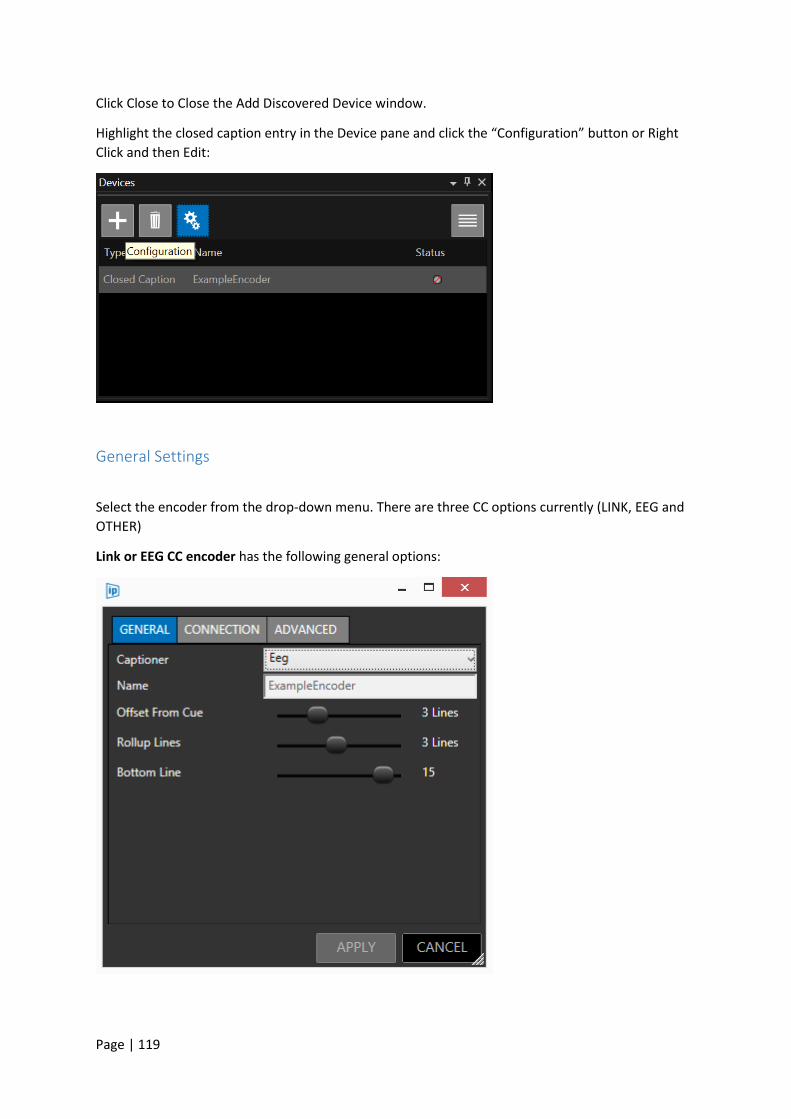
Page | 119
Click Close to Close the Add Discovered Device window.
Highlight the closed caption entry in the Device pane and click the “Configuration” button or Right
Click and then Edit:
General Settings
Select the encoder from the drop-down menu. There are three CC options currently (LINK, EEG and
OTHER)
Link or EEG CC encoder has the following general options:
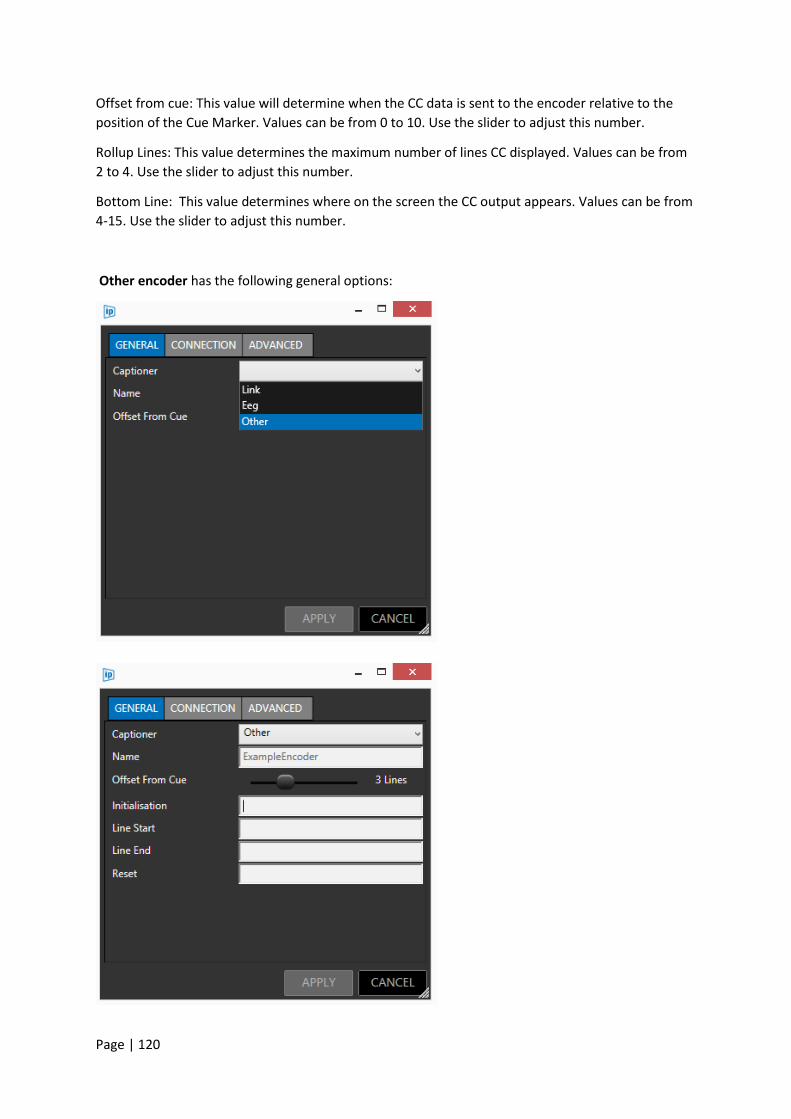
Page | 120
Offset from cue: This value will determine when the CC data is sent to the encoder relative to the
position of the Cue Marker. Values can be from 0 to 10. Use the slider to adjust this number.
Rollup Lines: This value determines the maximum number of lines CC displayed. Values can be from
2 to 4. Use the slider to adjust this number.
Bottom Line: This value determines where on the screen the CC output appears. Values can be from
4-15. Use the slider to adjust this number.
Other encoder has the following general options:

Page | 121
Connection Settings
To set the CC serial output parameters click the “Connection” tab.
There are a number of fields to be completed:
Baud Rate
Parity
Data Bits
Stop Bits
Please refer to your CC generator users guide for recommended settings.
As an example, Serial settings for EEG are 1200 baud, 7 data bits, Odd parity and 1 stop bit.
Advance Settings Advanced settings can be used in conjunction with any applicable CC encoders

Page | 122
The settings in the advanced tab can be used to determine the number of characters output and
therefore determine line length of the display
Extended character enables the display of special characters
Additional output formats can be selected using the Encoding pull down
Line termination options can be selected in the Line Terminator pull down
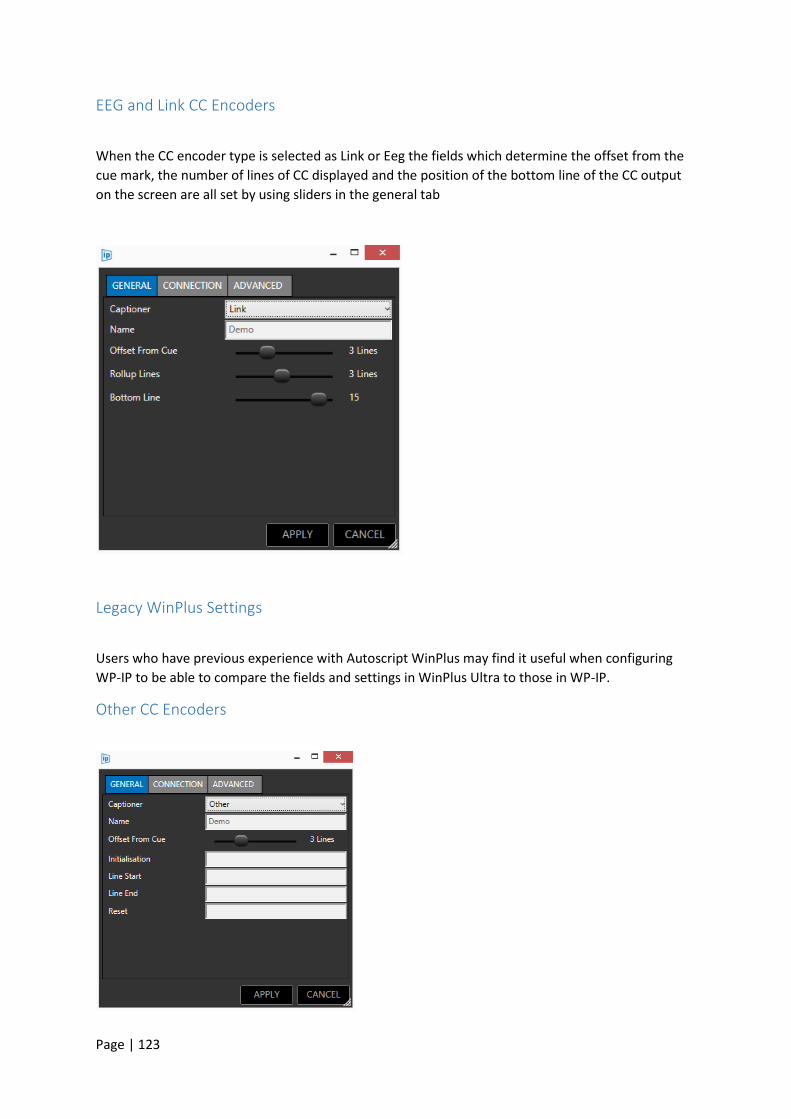
Page | 123
EEG and Link CC Encoders
When the CC encoder type is selected as Link or Eeg the fields which determine the offset from the
cue mark, the number of lines of CC displayed and the position of the bottom line of the CC output
on the screen are all set by using sliders in the general tab
Legacy WinPlus Settings
Users who have previous experience with Autoscript WinPlus may find it useful when configuring
WP-IP to be able to compare the fields and settings in WinPlus Ultra to those in WP-IP.
Other CC Encoders

Page | 124
When the CC encoder type is selected as “Other” the fields in the general tab equate to the
following fields in WinPlus Ultra
WP-IP WinPlus Ultra
Initialisation Closed Caption Access On
Line Start Preline Access
Line End No Equivalent in WinPlus Ultra
Reset Closed Caption Access Off
Please Note: The field Line End has no equivalent in WinPlus Ultra. However, this can be set in the
Advanced tab to match the options in WinPlus Ultra
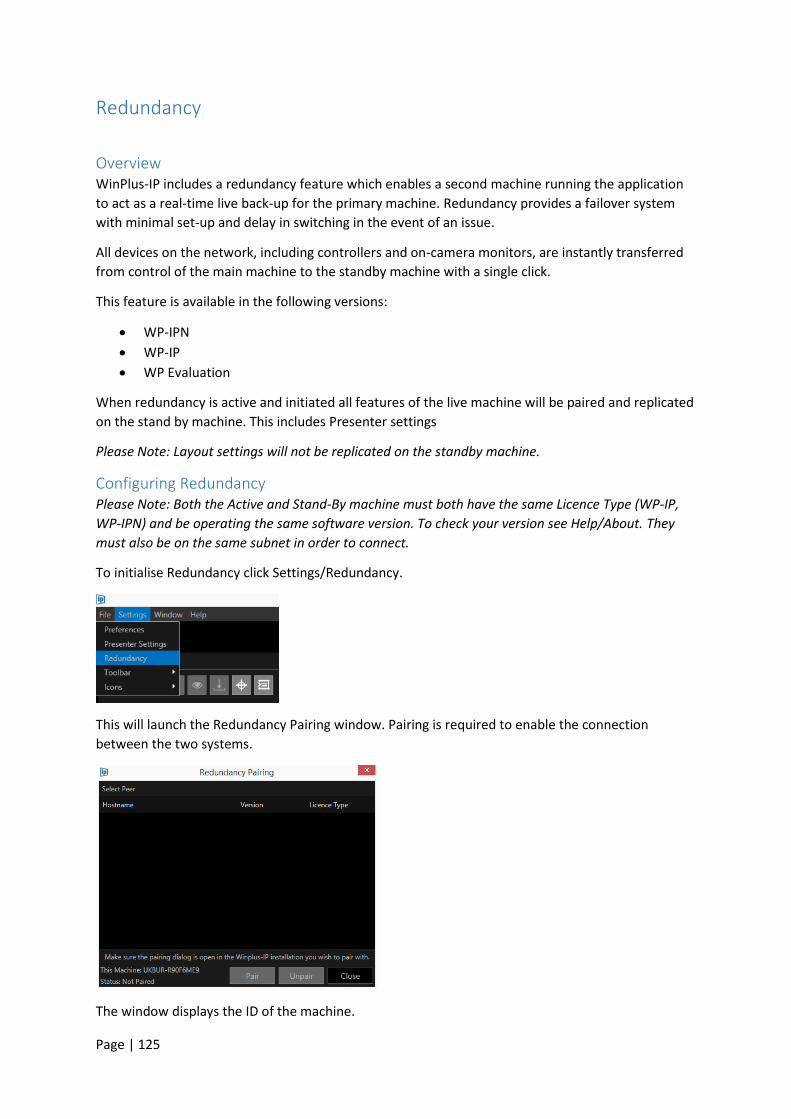
Page | 125
Redundancy
Overview WinPlus-IP includes a redundancy feature which enables a second machine running the application
to act as a real-time live back-up for the primary machine. Redundancy provides a failover system
with minimal set-up and delay in switching in the event of an issue.
All devices on the network, including controllers and on-camera monitors, are instantly transferred
from control of the main machine to the standby machine with a single click.
This feature is available in the following versions:
WP-IPN
WP-IP
WP Evaluation
When redundancy is active and initiated all features of the live machine will be paired and replicated
on the stand by machine. This includes Presenter settings
Please Note: Layout settings will not be replicated on the standby machine.
Configuring Redundancy Please Note: Both the Active and Stand-By machine must both have the same Licence Type (WP-IP,
WP-IPN) and be operating the same software version. To check your version see Help/About. They
must also be on the same subnet in order to connect.
To initialise Redundancy click Settings/Redundancy.
This will launch the Redundancy Pairing window. Pairing is required to enable the connection
between the two systems.
The window displays the ID of the machine.

Page | 126
Any machine on the same subnet running the WP-IP application will automatically appear in the
Redundancy Pairing window in the Hostname column.
Details of the software version and WP-IP licence type will also be displayed
Please Note: To pair two applications this operation must also be performed on a second WP-IP application.
Click on the Hostname you want to connect to and click Pair
While the systems are pairing a window will launch which displays the status
Blinking red to yellow: Pairing
Solid Red: Paired/Standby
The paired hostname will be displayed.
Page | 127
When paired the TAKE CONTROL button will become active.
Clicking TAKE CONTROL will assign that machine to the live machine. The Standby window will close.
The STANDBY window on the second machine will now display in green signifying that it is activey
paired.
When paired the message panel in the bottom right of the WP-IP application will display the status
of the redundancy connection.
The two images below show how the Live machine and the Standby machine:
Live machine:

Page | 128
Standby machine:
When in standby the devices will show a green monitor icon beside the Blue (busy) status light:
This icon denotes the device is paired and is connected to the live machine.
Swapping Redundant Machines
To take control on the standby machine click TAKE CONTROL.
All devices will transfer from the live machine to the standby machine.
The device status light will go from Blue (busy) to Green (connected) on the live machine. The
status icon will disappear.
The live machine will now automatically become the standby machine.
All devices will now be controller by the live machine.
Additional Redundancy Tools
Additional functions are available within the Redundancy status window. Click on the chevron icon in
the bottom right of the Standby window to view:

Page | 129
Unpair: This will disconnect the standby machine from the live machine. The following message
window will pop up:
Export Logs: This will export all logs for troubleshooting and reference purposes. You can select the
location you would like to save these log files. A confirmation message will pop up when the files are
ready to be saved in the location specified.
About: This will display the application details
Page | 130
Minimize: This will minimize the size of the WP-IP application window
Maximize: This will maximize the size of the WP-IP application window
Shutdown: This will close the WP-IP application. A warning message will be displayed before closure.
Newsroom Redundancy Avid iNews FTP: When integrating with iNews the parameters of the iNews connection are
automatically added to the paired machine. After redundancy mode is enabled and the connection is
established, all rundown changes from iNews are synched to the standby machine automatically.
MOS: When integrating using MOS the NRCS must be added separately on the master and standby
machine. After redundancy mode is enabled and the connection is established all rundown changes
from the MOS newsroom are synched to the standby machine automatically.
Supported Devices When added to the main machine all devices including Newsrooms will automatically appear in the
Standby machine. This includes HC-IP, FC-IP, WHC-REC and XBOX-IP.
Please Note: Legacy Autoscript (HC-1, MFC, WSC) equipment are not supported by redundancy
Page | 131
Automation
Overview Automation is the feature which enables actions to be triggered within WP-IP by a third party play
out system
Automation is a MOS based connection.
Automation is a feature included with a WP-IPN licence.
Please note: this is currently only compatible with Sony ELC system. Compatibility with other play out
systems will be added in future releases.
When active the playout system will:
1. Direct WP-IP to load a specific rundown 2. Go to a specific story in that rundown 3. Switch the prompting on at that story
Configuration To configure Automation launch the Automation window under the Newsroom Pane
Complete the MOS ID, NCS ID and Port fields.
These are the Settings which Sony ELC will use to connect to WP-IP so they must be the same in ELC
as they are in WP-IP
Please note: the MOS ID and NCS ID are not related to the settings in your specific NRCS
To enable the Automation connection check the Active box.
When enabled an Automation button will appear in the status bar
Rundowns will then be automatically loaded from the NRCS and prompting activated

Page | 132
Configuration
Please Note: the Configuration feature is available with WP-IP Version 1.6.6.216 or later
Overview
Configuration is a powerful tool that enables the user to quickly and easily create a library of
configurations.
They can then switch between libraries in a single click and Export/Import Configurations libraries
between different Winplus-IP applications.
Configuration examples include:
Create shows with select devices, run orders, presenter settings
Switch NRCS preferences
Create studio groups of devices
Create on-camera unit settings for different look/feel and video input selections To use Configuration, in the main WP-IP toolbar click on Window/Configuration
This will launch the Configuration pane

Page | 133
Configuration Toolbar
Default icons on the main toolbar are:
Add a configuration.
Delete the selected Configuration
Modify selected Configuration
Load and reset missing Configuration items
Load and leave missing Configuration items as currently set
Reset to defaults
Expand all
Collapse all
Clear selection
Please Note: Most of these functions are also available via a right click on a selected Configuration
Page | 134
Burger Options:
Click the burger in the main toolbar for additional options
Use Simplified View: This will collapse all elements to their top level
Toolbar: This will enable addition or deletion of icons to the main
toolbar and reset them to the default
Add A Configuration
Click the Add button in the Configuration window toolbar.
This will then open the Add New Configuration window.
Complete the Name field (in the below example this configuration is named Master Configuration)
Check the boxes of the elements of the configuration you wish to save.
!IMPORTANT! When an element is checked and then saved, the saved parameters will be the
parameters of that element at that moment in time.
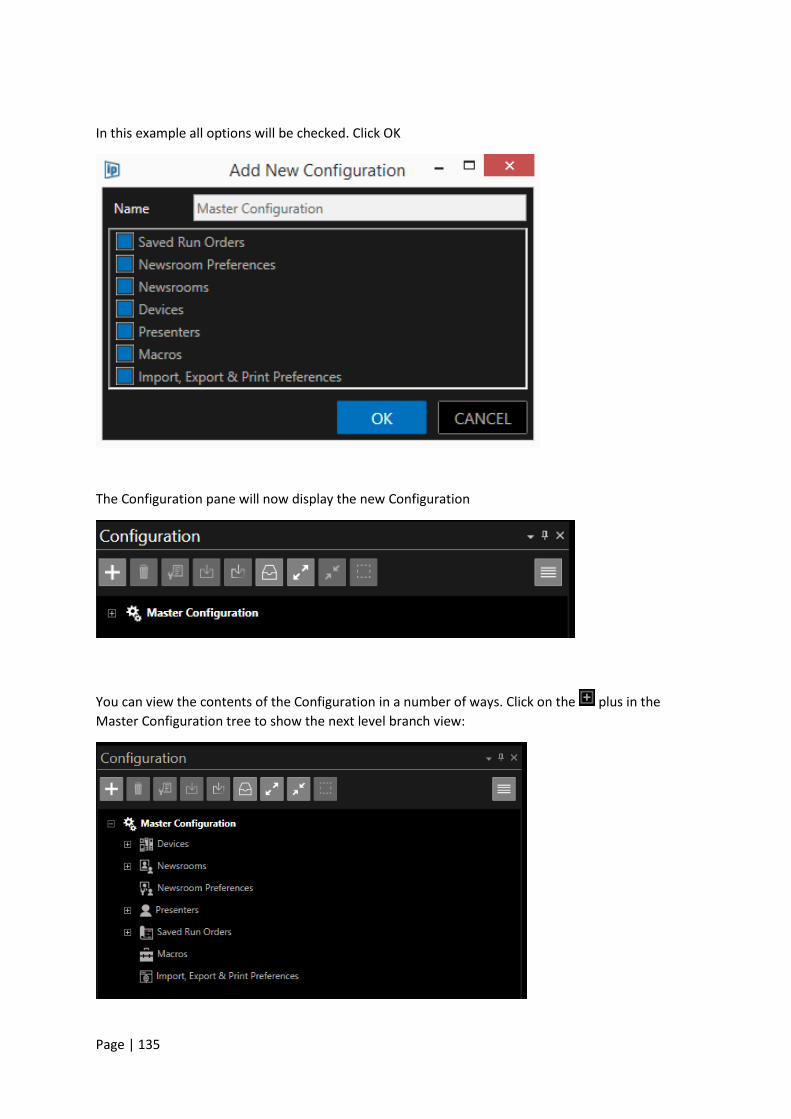
Page | 135
In this example all options will be checked. Click OK
The Configuration pane will now display the new Configuration
You can view the contents of the Configuration in a number of ways. Click on the plus in the
Master Configuration tree to show the next level branch view:

Page | 136
Click on the Expand All button to show the bottom level of the tree
Please note: where no elements are stored the field will not be expanded.
Newsroom Preference, Macros and Import Export & Print Preferences do not expand.
To collapse all items again click the Collapse All button
Add Parent or Child Configurations
Additional Configurations can be added either as a Child of an existing Configuration or as a new
Parent Configuration.
To add as a Child select a Configuration by clicking it and click the Add button.
To add as a Parent click the Clear Selection button then click the Add button
In the below example a Child branch Configuration named 5PM Running Order will be added to the
Parent “Master Configuration”.

Page | 137
The below changes have been made to elements within WP-IP:
Saved Run Orders (added run down International 5PM Running Order)
Newsrooms (removed all NRCS apart from MOS ENPS)
Devices (deleted Studio 1 XBox & Camera 2)
Presenters (deleted presenters John & Jane)
Click the Add button and named the new Configuration “5PM Running Order”.
Select all elements to save.
When OK is clicked the 5PM Running Order is saved as a Child under the Master Configuration
When the tree is expanded the contents of the 5PM Running Order Configuration are visible.
The four changes listed above have been applied to the 5PM Running Order configuration:

Page | 138
Modify Configurations
This function enables a user to make changes to an already existing Configuration.
After you have made edits within WP-IP to the elements you would like you can then apply those
changes.
Select the Configuration you wish to apply those edits to by clicking on the Configuration and then
click the Modify button . This will then open the Modify Current Configuration window:
You can then select the elements you would like to modify with the current settings you have just
edited.
Elements which are selected will be modified with the current settings in WP-IP
Elements which are not selected will remain unchanged.

Page | 139
You can also rename the Configuration in this window.
In the below example, Saved Run Orders and Devices will be modified in the Master Configuration
with the current WP-IP settings, all other elements will be unchanged.
Click OK to apply or CANCEL to close the window without making any modifications.
Please Note: To quickly apply all current settings to a Configuration click on the Configuration you
want to delete to select it then right click and select Save.
When selecting this option a confirmation box will open:
Click Yes or No to save the current settings to the configuration, or close the confirmation box
Load Configurations
To switch between Configurations, I.E. to load a different Configuration from that currently active,
click on the Configuration you want to apply to select it.
In the below example Master Configuration in currently active.
To load the 5PM Running Order click on 5PM Running Order to select it.
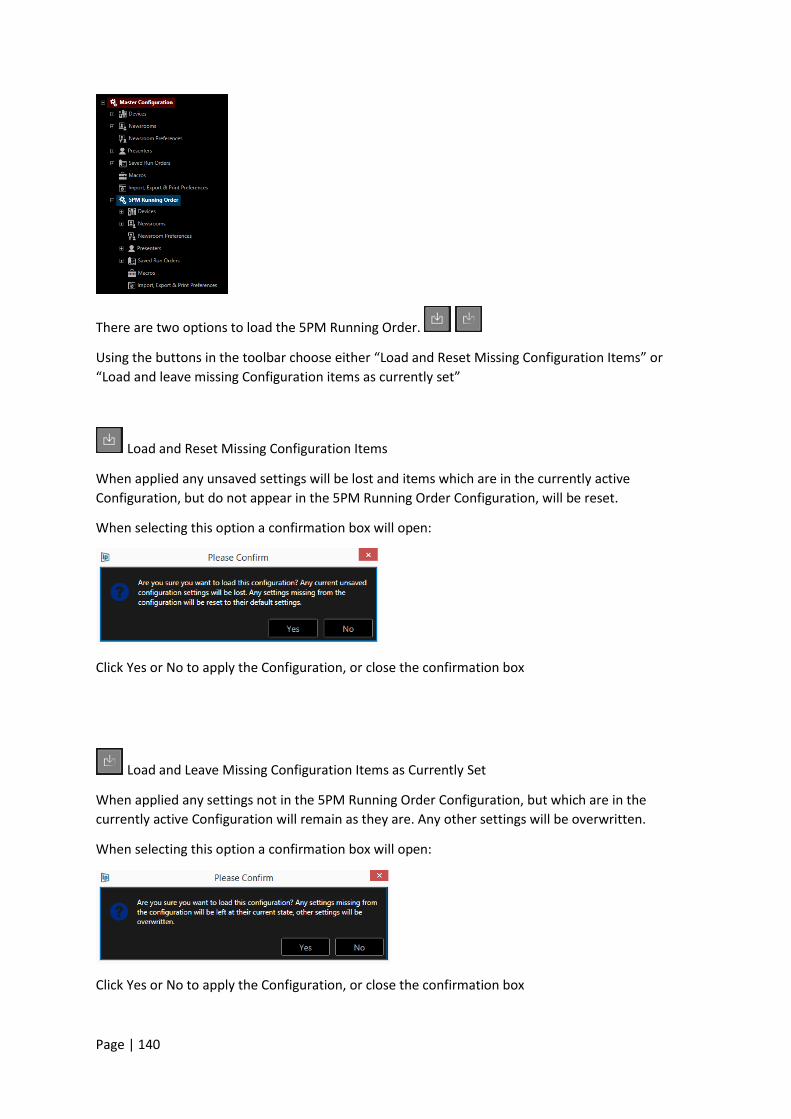
Page | 140
There are two options to load the 5PM Running Order.
Using the buttons in the toolbar choose either “Load and Reset Missing Configuration Items” or
“Load and leave missing Configuration items as currently set”
Load and Reset Missing Configuration Items
When applied any unsaved settings will be lost and items which are in the currently active
Configuration, but do not appear in the 5PM Running Order Configuration, will be reset.
When selecting this option a confirmation box will open:
Click Yes or No to apply the Configuration, or close the confirmation box
Load and Leave Missing Configuration Items as Currently Set
When applied any settings not in the 5PM Running Order Configuration, but which are in the
currently active Configuration will remain as they are. Any other settings will be overwritten.
When selecting this option a confirmation box will open:
Click Yes or No to apply the Configuration, or close the confirmation box

Page | 141
Reset To Default
To “unapply” all settings to a Configuration click on the desired Configuration to select it and then
click the Reset To Defaults button Resetting to defaults will not delete the Configuration but the Configuration will appear as empty in WP-IP, i.e. as if a Configuration was saved as an empty Configuration and then applied.
When selecting this option a confirmation box will open:
Click Yes or No to reset, or close the confirmation box
Move & Duplicate Configurations
If you would like to save time when creating or adding Configurations you can move or duplicate
existing Configurations.
Click on the desired Configuration to select it, then right click and select Cut, Copy or Paste
Please Note: shortcut keys can be applied without the need to right click.
Please Note: When Cut is selected a confirmation box will open:
Click Yes or No to cut the selected Configuration, or close the confirmation box
To add a Child configuration to an existing Parent Configuration:
Put the cursor on the name of the Parent Configuration you would like to add the copied
Configuration to. Right click and Paste or use the shortcut CTRL + V.

Page | 142
To add as new Parent Configuration:
Click any blank area in the Configuration window (i.e. not on an existing Parent or Child
Configuration). Right click and Paste or use the shortcut CTRL + V.
Delete A Configuration
To delete a Configuration click on the configuration you want to delete to select it and then click the
Delete button .
This will delete the Configuration and, where applicable, any Child Configurations also.
Before deletion a confirmation box will open
Click Yes or No to Delete, or close the confirmation box
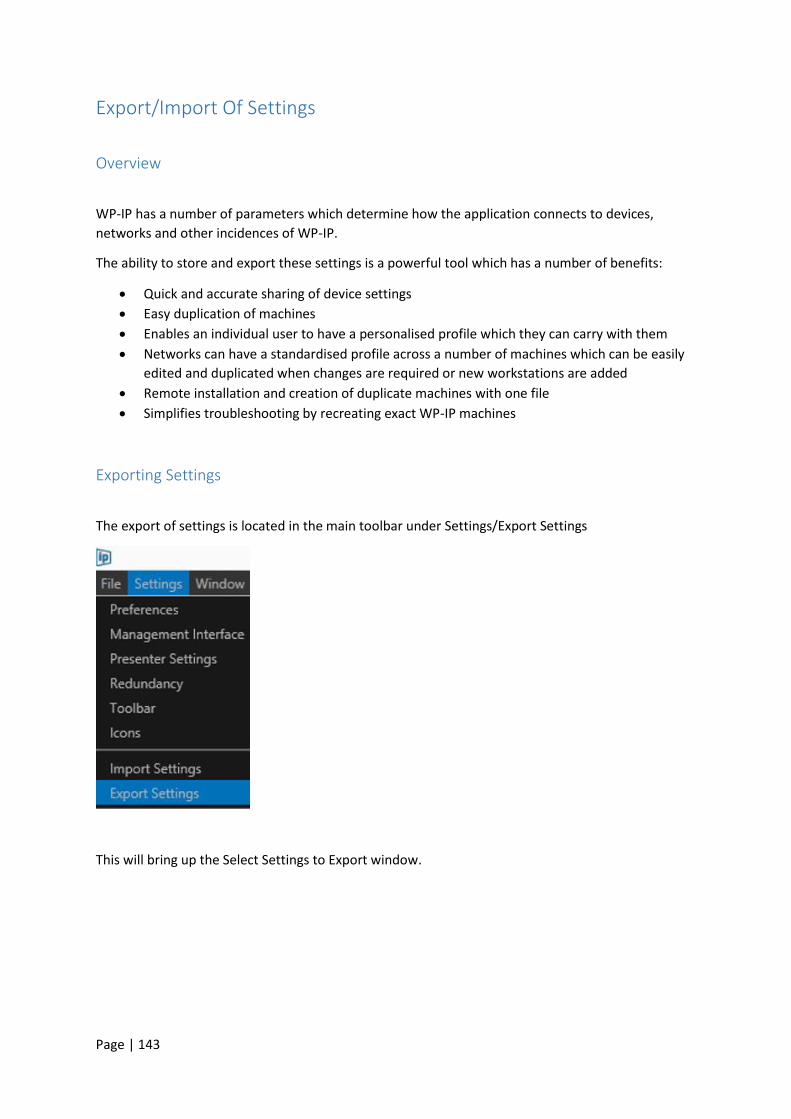
Page | 143
Export/Import Of Settings
Overview
WP-IP has a number of parameters which determine how the application connects to devices,
networks and other incidences of WP-IP.
The ability to store and export these settings is a powerful tool which has a number of benefits:
Quick and accurate sharing of device settings
Easy duplication of machines
Enables an individual user to have a personalised profile which they can carry with them
Networks can have a standardised profile across a number of machines which can be easily
edited and duplicated when changes are required or new workstations are added
Remote installation and creation of duplicate machines with one file
Simplifies troubleshooting by recreating exact WP-IP machines
Exporting Settings
The export of settings is located in the main toolbar under Settings/Export Settings
This will bring up the Select Settings to Export window.

Page | 144
Where the check box is blue that option has been selected to be exported.
Depending on the licence applied the user can choose to export whichever settings are available.
The function of the buttons in the footer of the window are as follows
: This will select all the settings available to be exported
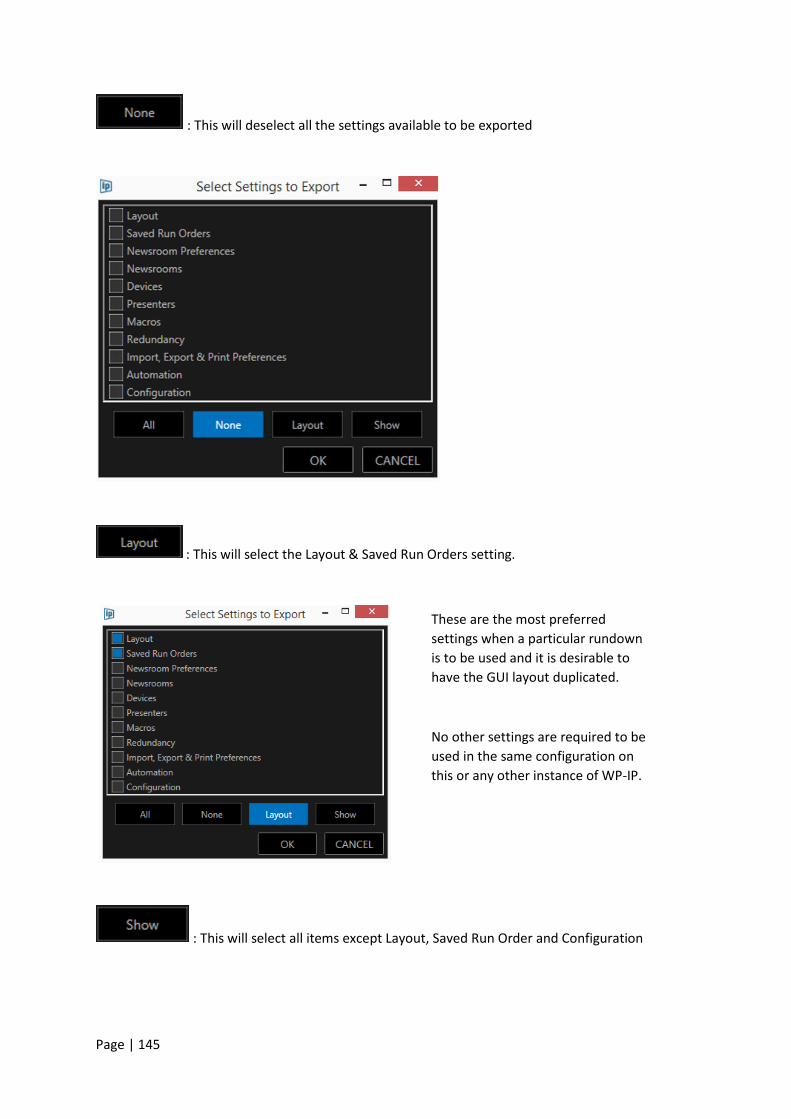
Page | 145
: This will deselect all the settings available to be exported
: This will select the Layout & Saved Run Orders setting.
: This will select all items except Layout, Saved Run Order and Configuration
These are the most preferred
settings when a particular rundown
is to be used and it is desirable to
have the GUI layout duplicated.
No other settings are required to be
used in the same configuration on
this or any other instance of WP-IP.

Page | 146
Please Note: Any combination of individual settings and Show or Layout options can be used.
: This will then enable the user to export the selected settings by saving as an .xml file
: This will cancel the operation and close the Select Settings to Export window
Importing Settings
The import of settings is located in the main toolbar under Settings/Export Settings

Page | 147
When selected an explorer window will open. Browse to the location where you have saved your
.xml file and select it. This will then launch the Select Settings to Import window.
You can then apply the same buttons as for the export depending on what settings you select to
import.
Where you do not select a setting to import the settings which already exist in the incidence of WP-IP which is installed will remain unchanged.
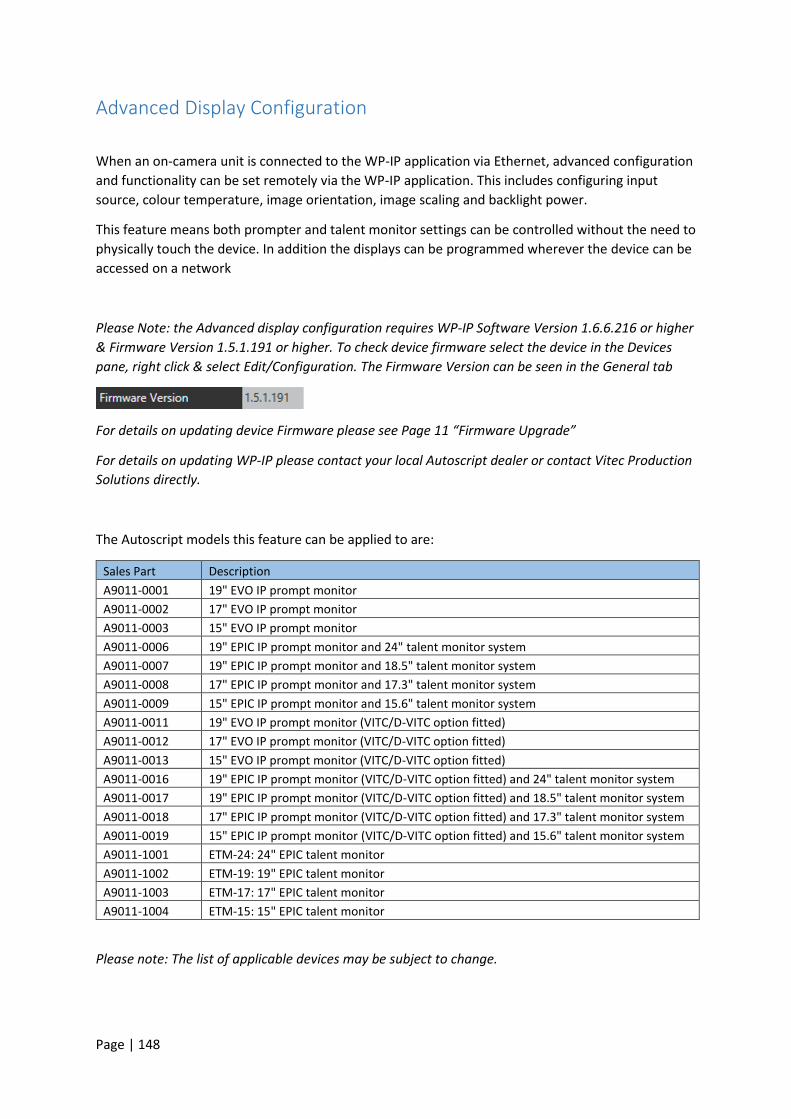
Page | 148
Advanced Display Configuration
When an on-camera unit is connected to the WP-IP application via Ethernet, advanced configuration
and functionality can be set remotely via the WP-IP application. This includes configuring input
source, colour temperature, image orientation, image scaling and backlight power.
This feature means both prompter and talent monitor settings can be controlled without the need to
physically touch the device. In addition the displays can be programmed wherever the device can be
accessed on a network
Please Note: the Advanced display configuration requires WP-IP Software Version 1.6.6.216 or higher
& Firmware Version 1.5.1.191 or higher. To check device firmware select the device in the Devices
pane, right click & select Edit/Configuration. The Firmware Version can be seen in the General tab
For details on updating device Firmware please see Page 11 “Firmware Upgrade”
For details on updating WP-IP please contact your local Autoscript dealer or contact Vitec Production
Solutions directly.
The Autoscript models this feature can be applied to are:
Sales Part Description
A9011-0001 19" EVO IP prompt monitor
A9011-0002 17" EVO IP prompt monitor
A9011-0003 15" EVO IP prompt monitor
A9011-0006 19" EPIC IP prompt monitor and 24" talent monitor system
A9011-0007 19" EPIC IP prompt monitor and 18.5" talent monitor system
A9011-0008 17" EPIC IP prompt monitor and 17.3" talent monitor system
A9011-0009 15" EPIC IP prompt monitor and 15.6" talent monitor system
A9011-0011 19" EVO IP prompt monitor (VITC/D-VITC option fitted)
A9011-0012 17" EVO IP prompt monitor (VITC/D-VITC option fitted)
A9011-0013 15" EVO IP prompt monitor (VITC/D-VITC option fitted)
A9011-0016 19" EPIC IP prompt monitor (VITC/D-VITC option fitted) and 24" talent monitor system
A9011-0017 19" EPIC IP prompt monitor (VITC/D-VITC option fitted) and 18.5" talent monitor system
A9011-0018 17" EPIC IP prompt monitor (VITC/D-VITC option fitted) and 17.3" talent monitor system
A9011-0019 15" EPIC IP prompt monitor (VITC/D-VITC option fitted) and 15.6" talent monitor system
A9011-1001 ETM-24: 24" EPIC talent monitor
A9011-1002 ETM-19: 19" EPIC talent monitor
A9011-1003 ETM-17: 17" EPIC talent monitor
A9011-1004 ETM-15: 15" EPIC talent monitor
Please note: The list of applicable devices may be subject to change.

Page | 149
To access the Advanced Display Configuration:
In the devices pane select the device you would like to configure, right click and select Edit
Then click Configuration
In the General Tab check the box Advanced Configuration.
This will then add the two tabs DISPLAY and TALENT MONITOR
DISPLAY: This refers to the prompter screen (EVO-IPXX)
TALENT MONITOR: This refers to the return video screen (ETM-XX)
Please Note: the Talent Monitor tab will only appear when an EPIC-IP monitor system is addressed.
The Talent Monitor tab will not be visible when an EVO-IP monitor system is addressed.
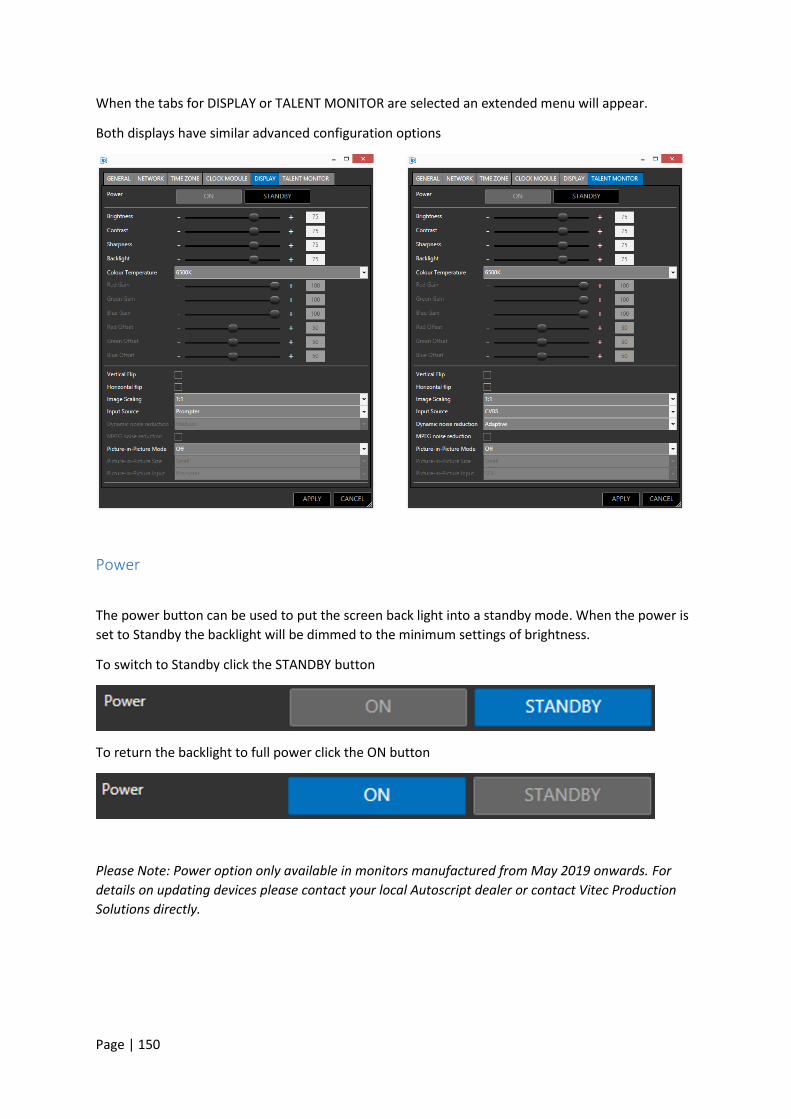
Page | 150
When the tabs for DISPLAY or TALENT MONITOR are selected an extended menu will appear.
Both displays have similar advanced configuration options
Power
The power button can be used to put the screen back light into a standby mode. When the power is
set to Standby the backlight will be dimmed to the minimum settings of brightness.
To switch to Standby click the STANDBY button
To return the backlight to full power click the ON button
Please Note: Power option only available in monitors manufactured from May 2019 onwards. For
details on updating devices please contact your local Autoscript dealer or contact Vitec Production
Solutions directly.

Page | 151
Main Settings
Drag the sliders to adjust levels of Brightness, Contrast, Sharpness and Backlight. Please Note: Slider
range is in % where minimum is 0% and maximum is 100%
Colour Temperature
To select your preferred colour temperature click the pull down in the colour temperature field and
click on the option you would like.
Selecting “User” will enable you to create your own colour temperature by adjusting the RGB
settings using the sliders.
Image Orientation
Both the vertical and horizontal image orientation can be adjusted.
To select the image orientation click in the corresponding check box
Vertical Flip:
Selecting Vertical Flip will result in the following:
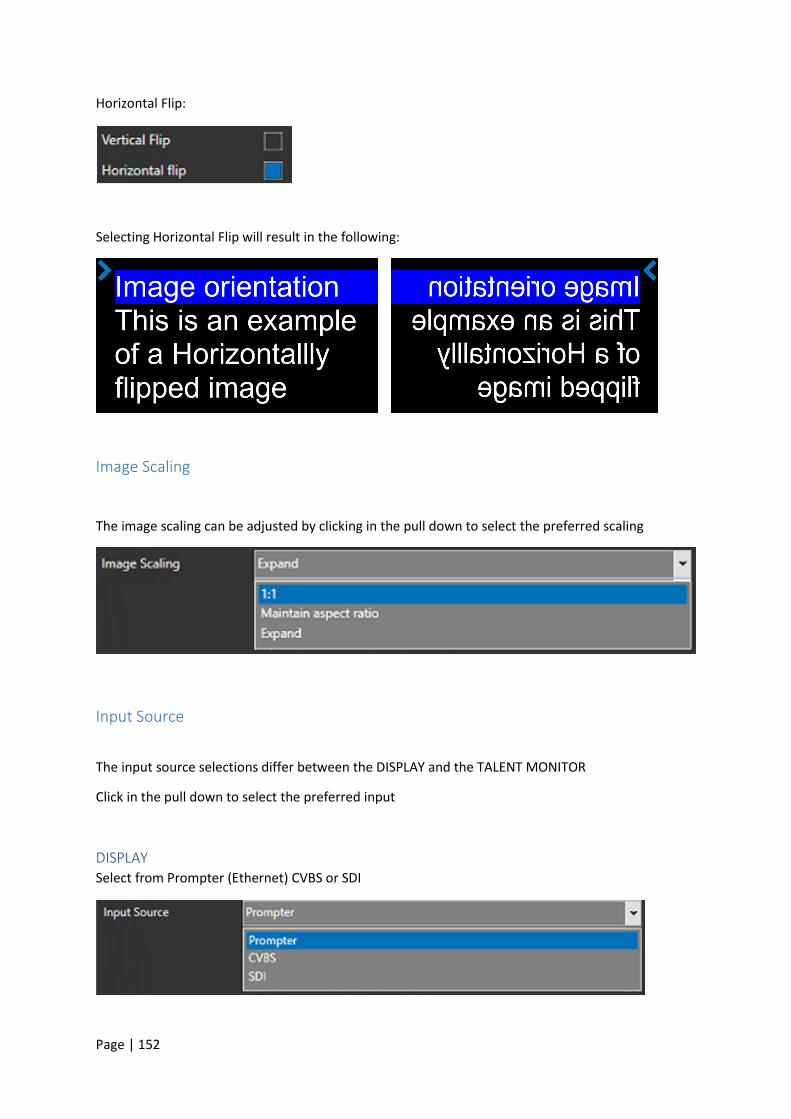
Page | 152
Horizontal Flip:
Selecting Horizontal Flip will result in the following:
Image Scaling
The image scaling can be adjusted by clicking in the pull down to select the preferred scaling
Input Source
The input source selections differ between the DISPLAY and the TALENT MONITOR
Click in the pull down to select the preferred input
DISPLAY Select from Prompter (Ethernet) CVBS or SDI
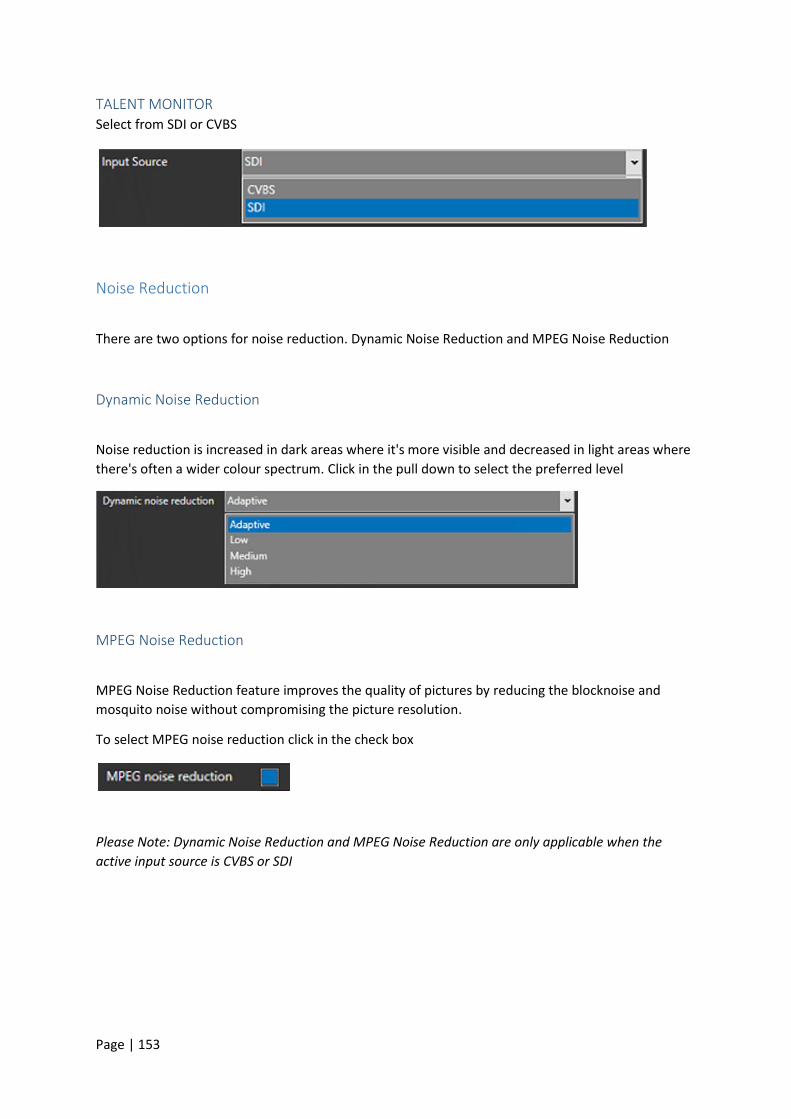
Page | 153
TALENT MONITOR Select from SDI or CVBS
Noise Reduction
There are two options for noise reduction. Dynamic Noise Reduction and MPEG Noise Reduction
Dynamic Noise Reduction
Noise reduction is increased in dark areas where it's more visible and decreased in light areas where
there's often a wider colour spectrum. Click in the pull down to select the preferred level
MPEG Noise Reduction
MPEG Noise Reduction feature improves the quality of pictures by reducing the blocknoise and
mosquito noise without compromising the picture resolution.
To select MPEG noise reduction click in the check box
Please Note: Dynamic Noise Reduction and MPEG Noise Reduction are only applicable when the
active input source is CVBS or SDI

Page | 154
Picture-in-Picture (PiP)
This feature enables two images to be shown in the display or talent monitor. The picture-in-picture
image size and position can be configured using the options below.
Please Note: Not all PiP options are available in all monitors. Please check for compatibility or
contact support for more details.
DISPLAY
Picture-in-Picture Mode: determines where the PiP image will be positioned in the display
For no PiP select Off. To set the position click in the pull down and then the preferred option
Picture-in-Picture Size: determines the size of the PiP image. Select Small or Large
Please Note: When Side-by-Side is selected as Picture-in-Picture Mode, Picture-in-Picture Size is
disabled.
Picture-in-Picture Input: determines the source of the PiP image. For the Display this can be either
Prompter (Ethernet), SDI or CVBS
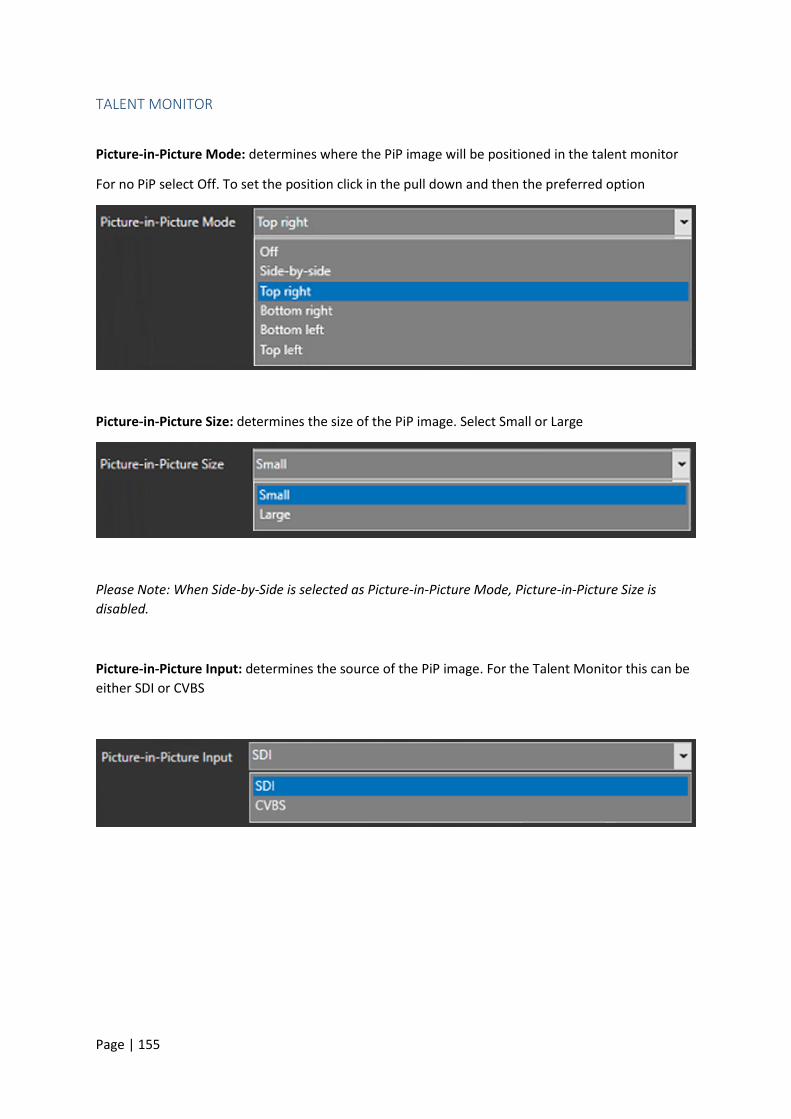
Page | 155
TALENT MONITOR
Picture-in-Picture Mode: determines where the PiP image will be positioned in the talent monitor
For no PiP select Off. To set the position click in the pull down and then the preferred option
Picture-in-Picture Size: determines the size of the PiP image. Select Small or Large
Please Note: When Side-by-Side is selected as Picture-in-Picture Mode, Picture-in-Picture Size is
disabled.
Picture-in-Picture Input: determines the source of the PiP image. For the Talent Monitor this can be
either SDI or CVBS

Page | 156
Controller Devices
HC-IP Controller (A9009-0002)
Standard function buttons
Next (page/bookmark/ snapshot)
Previous (page/bookmark/ snapshot)
Top of script.
Programmable function buttons
2 x illuminated function buttons programmed within WinPlus-IP
Colour options: RGB, White standard (User definable)
Status Display
Illuminated multi-colour window shows device network status and operational mode.
Power
3W Max power consumption
Powered over Ethernet (PoE)
Requires 3rd party PoE injector or XBox-IP (not included)
Weight
500g / 1.1 lb
Size
42mm / 1.65" (Height) x 134mm / 5.28" (Width) x 230mm / 9.06" (Length)
Connector
1 x RJ45

Page | 157
FC-IP Controller (A9009-0003)
Standard function button
Change direction
Back to top of run order
Status Display Illuminated multi-colour window shows device network status and operational mode.
Power
3W Max power consumption
Powered over Ethernet (PoE)
Requires 3rd party PoE injector or XBox-IP (not included)
Weight 610g / 1.3 lb
Size 50mm / 1.9" (Height) x 134mm / 5.28" (Width) x 230mm / 9.06" (Length)
Connector 1 x RJ45
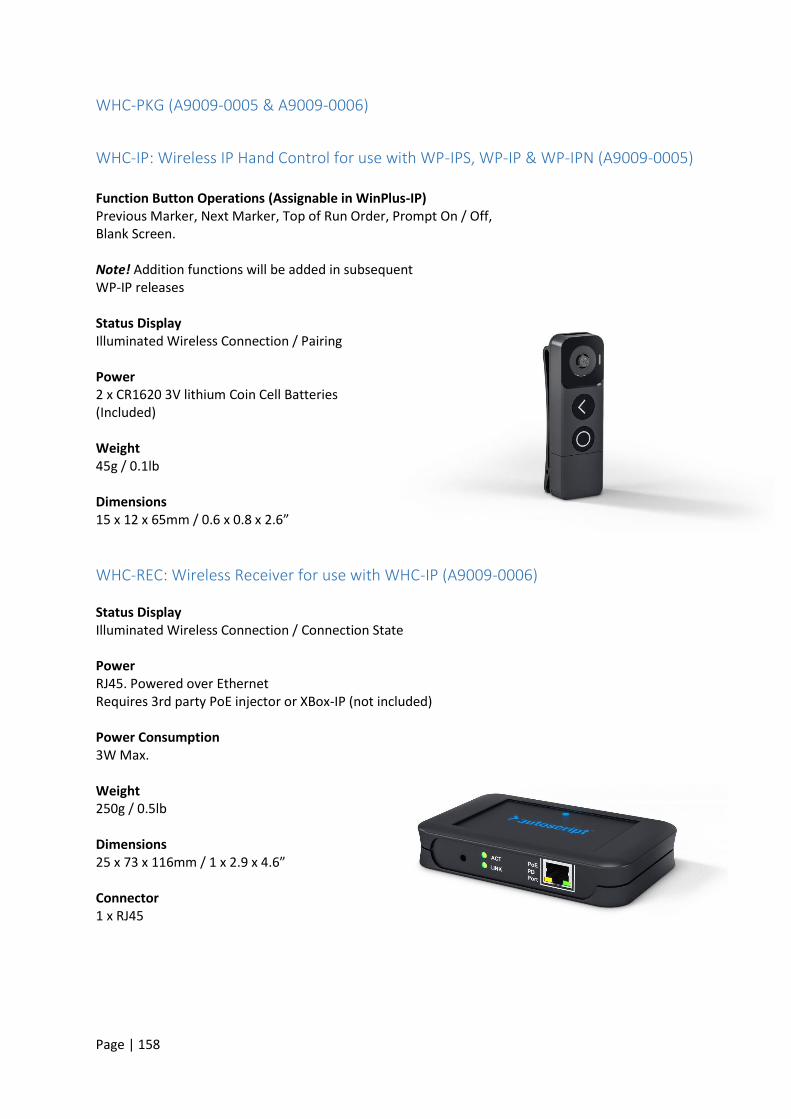
Page | 158
WHC-PKG (A9009-0005 & A9009-0006)
WHC-IP: Wireless IP Hand Control for use with WP-IPS, WP-IP & WP-IPN (A9009-0005) Function Button Operations (Assignable in WinPlus-IP) Previous Marker, Next Marker, Top of Run Order, Prompt On / Off, Blank Screen. Note! Addition functions will be added in subsequent WP-IP releases Status Display Illuminated Wireless Connection / Pairing Power 2 x CR1620 3V lithium Coin Cell Batteries (Included) Weight 45g / 0.1lb Dimensions 15 x 12 x 65mm / 0.6 x 0.8 x 2.6” WHC-
WHC-REC: Wireless Receiver for use with WHC-IP (A9009-0006) Status Display Illuminated Wireless Connection / Connection State Power RJ45. Powered over Ethernet Requires 3rd party PoE injector or XBox-IP (not included) Power Consumption 3W Max. Weight 250g / 0.5lb Dimensions 25 x 73 x 116mm / 1 x 2.9 x 4.6” Connector 1 x RJ45

Page | 159
Technical Support & Sales Contact
For support please contact:
UNITED KINGDOM Vitec Production Solutions Ltd Western Way Bury St.Edmunds Suffolk IP33 3TB Phone: (+44) 1284 757918 Email: [email protected] FRANCE Vitec Production Solutions S.A.R.L 171, Avenue des Grésillons 92635 Gennevilliers Cedex Phone: (+33) 141 323 042 Email: [email protected] ASIA PACIFIC Vitec Production Solutions Pte Ltd 6 New Industrial Road #02-02 New Century Singapore 536199 Phone: (+65) 629 757 76 Email: [email protected] JAPAN Vitec Production Solutions KK Shibakoen 3-chome Bldg. 1F 3-1-38 Shibakoen Minato-ku Tokyo 105-0011 Phone: (+81) 3 5777 8040 Email: [email protected] GERMANY Vitec Production Solutions GmbH Mainzer Straße 139 55545 Bad Kreuznach Phone: (+49) 671 483 43 38 Email: [email protected] USA Vitec Production Solutions Inc. - West Coast 20600 Plummer Street Chatsworth CA 91311 Phone: (+1) 800 541 1667 Email: [email protected] Vitec Production Solutions Inc. - East Coast 14 Progress Drive Shelton CT 06484 Phone: (+1) 800 541 1667 Email: [email protected]
For sales please contact:
EMEA & Asia Vitec Production Solutions GmbH Parkring 29 85748 Garching Germany T +49 (0) 89 32158-200 F +49 (0) 89 32158-227 [email protected] [email protected] Americas Vitec Production Solutions Inc 14 Progress Drive Shelton CT06484 United States T +203-929-1100 F +203-925-2684 [email protected] Japan
Vitec Production Solutions KK Shibakoen 3-chome Bldg. 1F 3-1-38 Shibakoen Minato-ku Tokyo 105-0011 Japan T +81 (0)3 5777 8040 F +81 (0)3 5777 8041 [email protected]

Page | 160
Service Agreements
To ensure on-going performance of your Autoscript products, we can provide a suite of aftersales
services for a fixed price that will provide everything you need. This can include maintenance visits
to your site by an engineer, dedicated spare parts to keep you moving, Operator training and fast
and efficient technical helplines.
Our solutions are very flexible and can be tailored to your specific requirements.
How To Videos How to videos can be viewed on the Autoscript YouTube channel:
https://www.youtube.com/playlist?list=PL0dNC7oaSp0ruJEhBt4FvHt0UGyHhtKF-

Page | 161
Notes