wine cooler - fast · dear customer, thank you for buying a philco brand product. so that your...
TRANSCRIPT

Wine coolerUSER'S MANUAL
PW 96PW 166PW 166 D

Dear customer,Thank you for buying a PHILCO brand product. So that your appliance serves you well, please read all the instructions in this user's manual.
EN - 1
09/2017Copyright © 2017, Fast ČR, a. s.
CONTENTS
PART 1: BEFORE PUTTING INTO OPERATION ................................................................................................. 2
• Safety precautions ..........................................................................................................................................................................2
• Safety instructions for gas R600a ..............................................................................................................................................4
PART 2: DESCRIPTION OF THE APPLIANCE .................................................................................................... 5
• PW 166 (Single Zone Wine Cooler) ...........................................................................................................................................5
• PW 166 (Dual Zone Wine Cooler) ..............................................................................................................................................6
• PW 96 (Single Zone Wine Cooler) .............................................................................................................................................7
PART 3: INSTALLATION .................................................................................................................................... 8
• Transport and unpacking ............................................................................................................................................................8
• Operating conditions ....................................................................................................................................................................8
• Installation location .......................................................................................................................................................................9
• Built-in installation ...................................................................................................................................................................... 10
• Cleaning before use .................................................................................................................................................................... 11
• Electrical connection .................................................................................................................................................................. 11
• Changing the door opening direction ................................................................................................................................. 11
PART 4: CONTROLS ........................................................................................................................................ 14
• Turning on / off ............................................................................................................................................................................. 14
• Locking / unlocking the control panel ................................................................................................................................. 14
• Turning the internal lighting on / off .................................................................................................................................... 14
• Setting the temperature ........................................................................................................................................................... 15
• Storing wine .................................................................................................................................................................................. 16
PART 5: REGULAR MAINTENANCE ................................................................................................................ 17
• Cleaning the appliance .............................................................................................................................................................. 17
• Moving the appliance ................................................................................................................................................................ 18
• Energy saving tips........................................................................................................................................................................ 18
PART 6: WHAT SHOULD I DO WHEN... ........................................................................................................... 19
PART 7: INFORMATION SHEET ...................................................................................................................... 21
EN - 2
09/2017Copyright © 2017, Fast ČR, a. s.
PART 1: BEFORE PUTTING INTO OPERATION
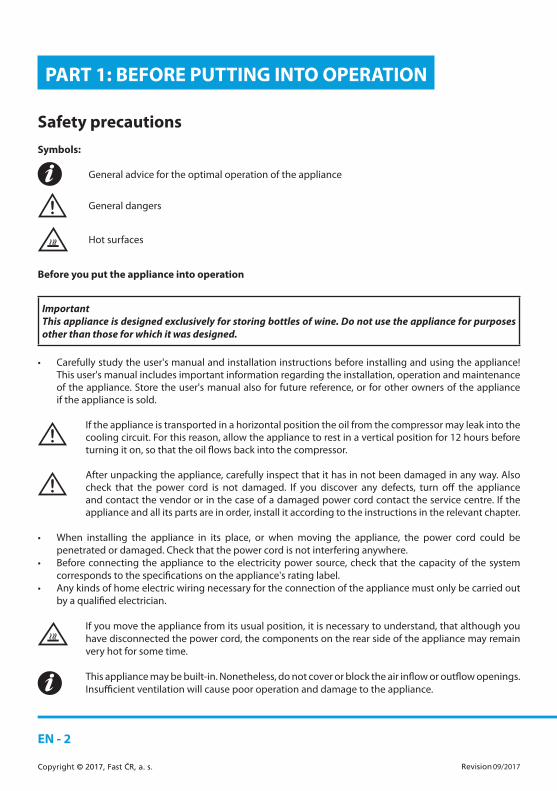
Safety precautionsSymbols:
General advice for the optimal operation of the appliance
General dangers
Hot surfaces
Before you put the appliance into operation
ImportantThis appliance is designed exclusively for storing bottles of wine. Do not use the appliance for purposes other than those for which it was designed.
• Carefully study the user's manual and installation instructions before installing and using the appliance! This user's manual includes important information regarding the installation, operation and maintenance of the appliance. Store the user's manual also for future reference, or for other owners of the appliance if the appliance is sold.
If the appliance is transported in a horizontal position the oil from the compressor may leak into the cooling circuit. For this reason, allow the appliance to rest in a vertical position for 12 hours before turning it on, so that the oil flows back into the compressor.
After unpacking the appliance, carefully inspect that it has in not been damaged in any way. Also check that the power cord is not damaged. If you discover any defects, turn off the appliance and contact the vendor or in the case of a damaged power cord contact the service centre. If the appliance and all its parts are in order, install it according to the instructions in the relevant chapter.
• When installing the appliance in its place, or when moving the appliance, the power cord could be penetrated or damaged. Check that the power cord is not interfering anywhere.
• Before connecting the appliance to the electricity power source, check that the capacity of the system corresponds to the specifications on the appliance's rating label.
• Any kinds of home electric wiring necessary for the connection of the appliance must only be carried out by a qualified electrician.
If you move the appliance from its usual position, it is necessary to understand, that although you have disconnected the power cord, the components on the rear side of the appliance may remain very hot for some time.
This appliance may be built-in. Nonetheless, do not cover or block the air inflow or outflow openings. Insufficient ventilation will cause poor operation and damage to the appliance.
EN - 3
09/2017Copyright © 2017, Fast ČR, a. s.
Operating the appliance• Use the appliance only for the purposes for which it has been designed.• This appliance is designed only for household use, for storing bottles of wine.• The temperature inside the wine cooler may rise or fall slightly and so these appliances are not suitable
for storing products (e.g. medicines), which require a stable temperature.
Do not use any other electric appliances (e.g. heating elements, electric ice cream machines, etc.) inside the appliance. There is a danger of explosion!
Do not place food inside the wine cooler containing flammable propulsion gases (e.g. sprays) and no explosives, contaminants or volatile substances. There is a danger of explosion!
• Do not use the base, racks, door of the appliance, etc. as a step or as a support. There is a danger of injury to persons or damage to the appliance.
• Ensure that the plastic parts of the appliance and the door gasket seals are not soiled with oil or grease. The plastic parts and the gasket seals would then become porous.
Children in the household• Never leave packaging and its parts with children. There is a danger of poisoning or suffocation by the
cardboard boxes and plastic sheets!• This appliance is in no way a toy for children!• For appliances with door locks: do not leave keys within the reach of children!• If you will no longer be using the wine cooler, remove the door, gasket seals and store it in a safe place.
In this way you will prevent the danger of children becoming trapped inside the wine cooler.
Maintenance and cleaning Before you begin with regular or exceptional maintenance, disconnect the appliance's power cord
or turn off the fuse or circuit breaker. Never pull the electric power cord, only pull on the power plug.
Do not clean the appliance using a steam cleaning device! The steam may come into contact with the electric components inside the appliance, where a short circuit could occur. There is a danger of electric shock!
General instructions• This appliance must not be used by persons (including children) with physical, sensory or psychological
impairments or by inexperienced persons, unless properly trained or schooled in the safe use of the appliance, or unless they have been properly supervised by a person who will be responsible for their safety. Children should be supervised so as not to play with the appliance.
• This appliance has been tested in accordance with the directives in force in the European Union.• The tightness of the cooling circuit has been verified.• This appliance conforms to the relevant safety provisions for electrical appliances in force in the European
Union.
Technical safety
The appliance contains a cooling gas, ISOBUTHAN (R600a). Only transport or move the appliance with the utmost care, prevent excessive impacts and shaking to prevent damaging the appliance. If the cooling circuit becomes damaged and the cooling gas may be escaping, there is a risk of an explosion, which may be ignited by a spark or flame. If the appliance shows signs of damage, it must not be put into operation. In such a case contact the service centre, ventilate the room where the appliance is located and prevent the spreading of flames or other interference with the appliance.
EN - 4
09/2017Copyright © 2017, Fast ČR, a. s.
Safety instructions for gas R600aMeasures to be taken in the event of an unexpected releaseIf ventilation is possible, allow the material to evaporate.
Characteristics of the gasThe gas is highly flammable, it is necessary to completely prevent contact with an open flame and hot surfaces. Because the R600a gas is heavier than air, it may become very concentrated at the level of the ground, where ventilation is poor.
First aid
InhalationTake the affected person from the contaminated area to a warm, well ventilated location. Staying in a contaminated location for a long time may cause suffocation, or potentially lead to a loss of consciousness. If necessary, provide mouth-to-mouth resuscitation and in exceptionally serious situations, under expert medical supervision, give oxygen.
Contact with the skinAccidental contact with the skin is not hazardous to health. Thoroughly wash the affected area with water. The liquid spray or dispersed liquid may cause frost bite, wash the affected area with large amounts of water and contact a medical doctor.
Contact with the eyesIf eyes have been affected, wash out with large amounts of water, while trying to keep the eyes open, and call a specialised doctor as soon as possible. If contact or inhalation of the R600a gas occurs, contact your medical doctor.
EN - 5
09/2017Copyright © 2017, Fast ČR, a. s.
PART 2: DESCRIPTION OF THE APPLIANCE
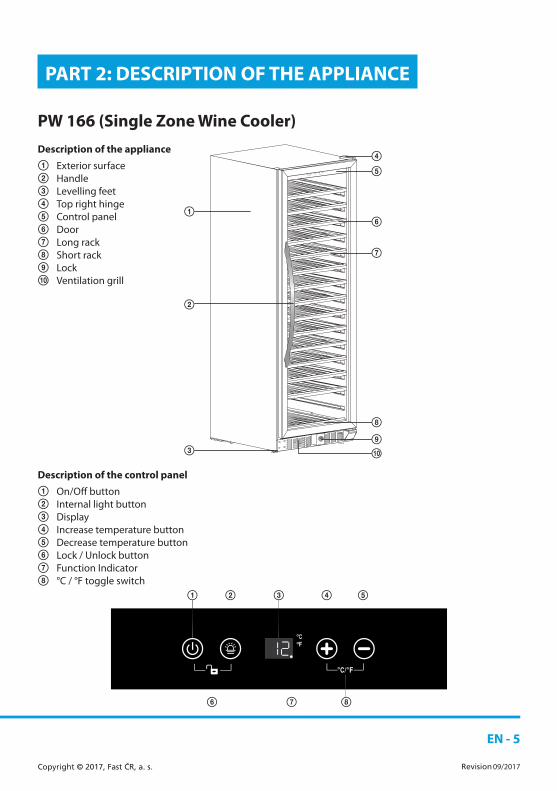
PW 166 (Single Zone Wine Cooler)Description of the appliance
1 Exterior surface2 Handle3 Levelling feet4 Top right hinge5 Control panel6 Door7 Long rack8 Short rack9 Lockq; Ventilation grill
1
2
3
4
7
8
5
6
9
q;
Description of the control panel
1 On/Off button 2 Internal light button3 Display4 Increase temperature button5 Decrease temperature button6 Lock / Unlock button7 Function Indicator8 °C / °F toggle switch
A B DC E
F G H
1 2 3 4 5
6 87
EN - 6
09/2017Copyright © 2017, Fast ČR, a. s.
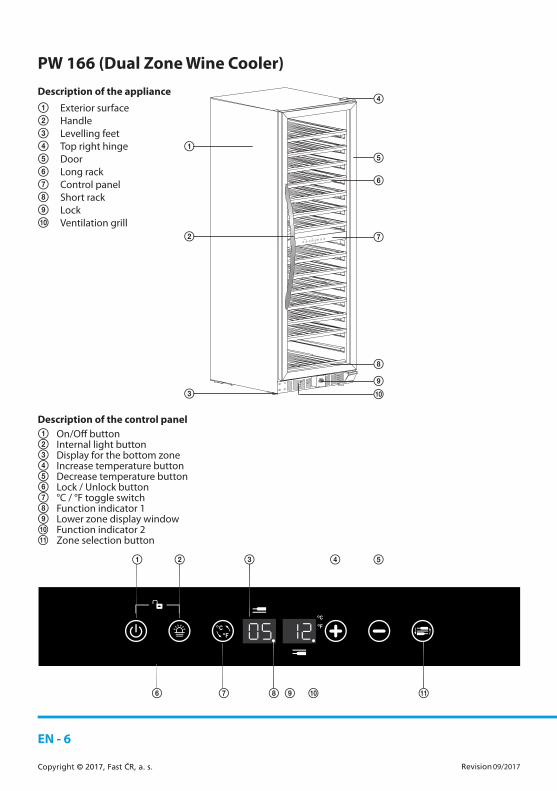
PW 166 (Dual Zone Wine Cooler)Description of the appliance
1 Exterior surface2 Handle3 Levelling feet4 Top right hinge5 Door6 Long rack7 Control panel8 Short rack9 Lockq; Ventilation grill
1
2
3
4
6
9
5
q;
7
8
Description of the control panel1 On/Off button2 Internal light button3 Display for the bottom zone4 Increase temperature button5 Decrease temperature button6 Lock / Unlock button7 °C / °F toggle switch8 Function indicator 19 Lower zone display windowq; Function indicator 2qa Zone selection button
A B DC E
F G H I J K
1 2 3 4
6 97 8 q;
5
qa
EN - 7
09/2017Copyright © 2017, Fast ČR, a. s.
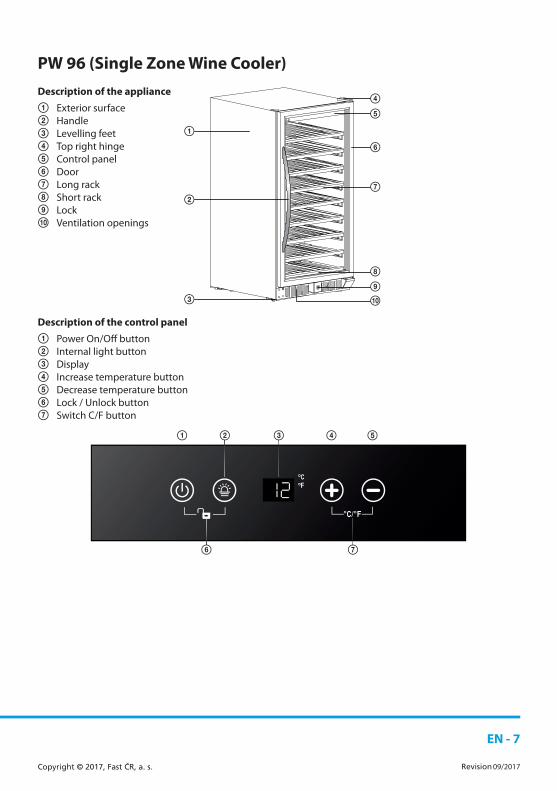
PW 96 (Single Zone Wine Cooler)Description of the appliance
1 Exterior surface2 Handle3 Levelling feet4 Top right hinge5 Control panel6 Door7 Long rack8 Short rack9 Lockq; Ventilation openings
1
2
3
4
7
8
5
6
9
q;
Description of the control panel
1 Power On/Off button2 Internal light button3 Display4 Increase temperature button5 Decrease temperature button6 Lock / Unlock button7 Switch C/F button
1 2 3 4 5
6 7
EN - 8
09/2017Copyright © 2017, Fast ČR, a. s.
PART 3: INSTALLATION
Transport and unpackingIf the appliance is transported in a horizontal position the oil from the compressor may leak into the cooling circuit. For this reason, allow the appliance to rest in a vertical position for 12 hours before turning it on, so that the oil flows back into the compressor.Remove the external packaging, remove the protective plastic film from the surface of the appliance (if used) and clean the external parts of the appliance with an agent designed for this purpose. Do not use steel wool or any coarse agents, which could irreparably damage the surface of the appliance. Carefully remove all papers and adhesive tape from the appliance, the door and other parts packed in polystyrene. Remove documents and accessories from inside the appliance.The packaging material is recyclable and is marked with a recycling symbol. For disposal follow the local regulations. Packaging materials (plastic bags, polystyrene parts, etc.) must be kept out of the reach of children, because they present a possible source of danger.Carefully inspect the appliance. If you discover any defects, stop the installation and contact the vendor.
As a rule the appliance comes with:- user's manual;- 15 slide-out racks (14 with a wheel system) on the PW 166 model; 14 slide-out racks (13 with a wheel
system) on the PW 166D model; 9 pull-out racks (7 with a wheel system) on model PW96.- 2 keys;- accessories for changing the door opening direction.
Operating conditionsProper operation of the appliance is guaranteed only if the following conditions are met:The temperature in the room where the appliance is located conforms to the climate class stated on the appliance's rating label.Maximum ambient relative humidity: 90%.The appliance must be placed at a sufficient distance from heat sources (e.g. baking ovens, central heating, direct sunlight, etc.).The appliance must be located in such a place that it is protected against the effects of weather.Regular maintenance is performed according to the instructions in this user's manual.The ventilation openings in the cover of the appliance must not be covered by anything.Correct installation (e.g. levelling, the capacity of the system corresponds to the specifications on the rating label of the appliance).
Table – Climatic class
Climatic class Ambient temperatureSN +10°C to +32°CN +16°C to +32°CST +16°C to +38°CT +16°C to +43°C
EN - 9
09/2017Copyright © 2017, Fast ČR, a. s.
Installation locationThe installation location of the appliance must meet the requirements in the paragraph "Operating conditions" and must have a stable floor with a load bearing capacity corresponding to the weight of the appliance.The appliance may be built-in. For installation it is necessary to provide for and adhere to the dimensions illustrated below.
Level the appliance using the adjustable feet, ensure there is a gap between the bottom edge of the appliance and the ground, so that there is sufficient circulation of the cooling air; in this way you will ensure the optimal performance of the cooling circuit.
Check whether any cooling circulation pipes have been damaged during the installation.
• Use the appliance only for the purposes for which it has been designed.• The appliance must be located on a rigid and even surface.
In this way you will ensure free circulation of the coolant and effective operation of your appliance.
• If possible, place the appliance into a cool, well ventilated and dry room.• Do not locate the appliance in direct sunlight, or in a room with a high temperature, in the vicinity of any
sources of direct heat, such as heating, an oven, a stove, etc. – this would mean that the compressor would need to work a lot harder resulting in a substantially higher power consumption level.
If it is not possible to prevent the installation in the vicinity of a heat source, we recommend the insertion of an appropriate insulating board (do not use asbestos) between the appliance and the heat source; or at least to maintain the following minimum distances:
• From a gas or electric stove 3 cm;• From a heater or oven, etc. 30 cm;• From another cooling appliance 2 cm.
Do not place any other appliances on the appliance, which release heat on to the appliance, such as microwave ovens, toasters, etc.
Never cover the ventilation grill. Pull out the power plug by pulling on the plug itself, never pull on the cord when disconnecting the appliance.
Before turning on the appliance allow it to stand in its final location for 12 hours, the coolant circuit will stabilise in this way and no operating problems will occur. Before connecting the appliance to the power grid check that it is perfectly dry inside – especially in the corners.
Danger warningThe coolant may be highly flammable, depending on its composition. The coolant circuit was hermetically closed and sealed and was tested many times for possible leaks. Any unqualified tampering with the product may cause a fire hazard. Check that there is no mechanical interruption or effect on the coolant circulation, namely in the accessible parts around the compressor.Only professionally qualified persons may work on the cooling system.

EN - 10
09/2017Copyright © 2017, Fast ČR, a. s.
NOTE:The appliance is made with a zero requirement for the opening of the door, meaning no additional space is needed for the door to open.
Built-inThe appliance may be built-in. In such a case it is necessary to adhere to the built-in space requirements as shown in the provided diagrams. The provided dimensions are the minimum required dimensions.
1770
1770730
635
595
680
Unit: mm
Models:PW 166PW 166 D
PW 96
Unit: mm
EN - 11
09/2017Copyright © 2017, Fast ČR, a. s.
Cleaning before useCheck that you have removed from the appliance all adhesive tape used to hold accessories . Then clean all the inside parts using lukewarm water with a neutral cleaning agent, vinegar or sodium carbonate – in this way you will remove the characteristic odour of new parts – then dry carefully. Do not use detergents or aggressive agents, which could damage the surfaces.
Electrical connectionBefore connecting the power plug to the power socket, check that:• Your hands are completely dry.• The voltage and frequency shown on the rating label of the appliance corresponds to that in the home
power grid (permitted tolerance from -6% to +6% for nominal voltage, for use with different voltages, use a voltage converter with the corresponding parameters).
• The cord and the plug are not damaged or caught under heavy objects.• The power cord is not to be excessively tensioned; it is not permitted to use an extension cord.
Do not connect the appliance to a voltage rectifier (e.g. solar power plant) or use an extension cord.
The appliance must be connected to a working grounding lead.If the power socket of the home system is not grounded in accordance with the current legal regulations, only connect the appliance after consulting with a specialised technician about the grounding lead itself.The manufacturer takes no responsibility for injuries caused as a result of not following these instructions.
If you do not correctly level the appliance during the installation, the door may not close shut and seal properly, which may cause problems with the cooling, ice build up or moisture. Levelling the appliance is very important.
Level the appliance using the levelling feet – turn them clockwise to lift the appliance and turn them anticlockwise to lower the appliance.
Changing the door opening directionThese instructions are for the procedure for changing the opening direction for a door mounted on the right hinges. To change the door opening direction from the right side to the left side, the following spare parts are necessary: top left hinge and bottom left hinge. We recommend that you carefully store all removed parts for the event that the door opening direction may need to be changed.
IMPORTANT INFORMATIONWe recommend that you secure the racks in place using adhesive tape to prevent causing damage when handling the appliance.
EN - 12
09/2017Copyright © 2017, Fast ČR, a. s.
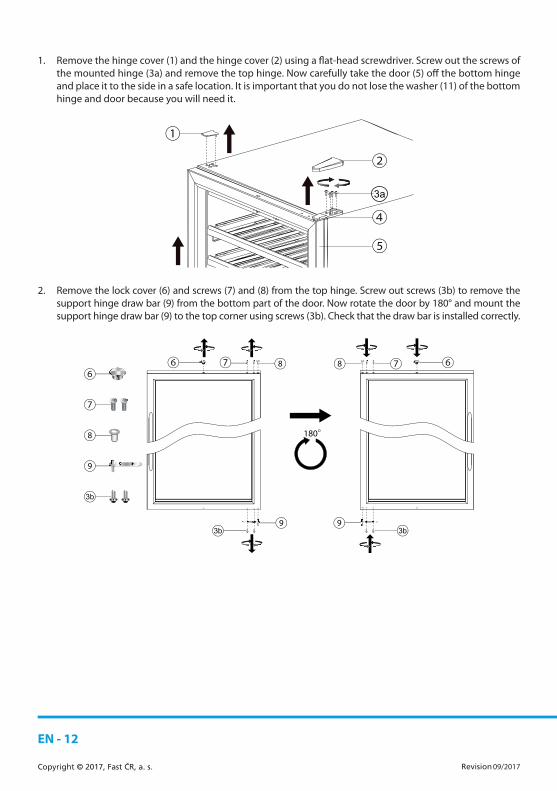
1. Remove the hinge cover (1) and the hinge cover (2) using a flat-head screwdriver. Screw out the screws of the mounted hinge (3a) and remove the top hinge. Now carefully take the door (5) off the bottom hinge and place it to the side in a safe location. It is important that you do not lose the washer (11) of the bottom hinge and door because you will need it.
2. Remove the lock cover (6) and screws (7) and (8) from the top hinge. Screw out screws (3b) to remove the support hinge draw bar (9) from the bottom part of the door. Now rotate the door by 180° and mount the support hinge draw bar (9) to the top corner using screws (3b). Check that the draw bar is installed correctly.
EN - 13
09/2017Copyright © 2017, Fast ČR, a. s.
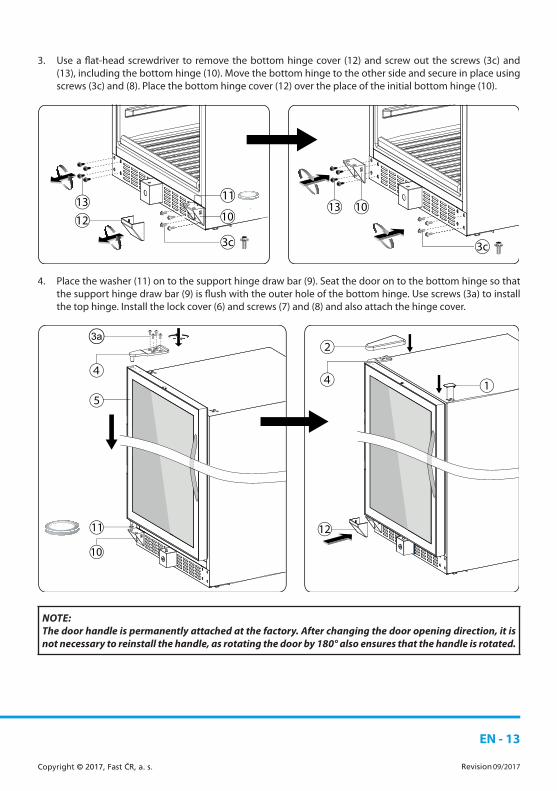
3. Use a flat-head screwdriver to remove the bottom hinge cover (12) and screw out the screws (3c) and (13), including the bottom hinge (10). Move the bottom hinge to the other side and secure in place using screws (3c) and (8). Place the bottom hinge cover (12) over the place of the initial bottom hinge (10).
4. Place the washer (11) on to the support hinge draw bar (9). Seat the door on to the bottom hinge so that the support hinge draw bar (9) is flush with the outer hole of the bottom hinge. Use screws (3a) to install the top hinge. Install the lock cover (6) and screws (7) and (8) and also attach the hinge cover.
NOTE:The door handle is permanently attached at the factory. After changing the door opening direction, it is not necessary to reinstall the handle, as rotating the door by 180° also ensures that the handle is rotated.
EN - 14
09/2017Copyright © 2017, Fast ČR, a. s.
PART 4: CONTROLS
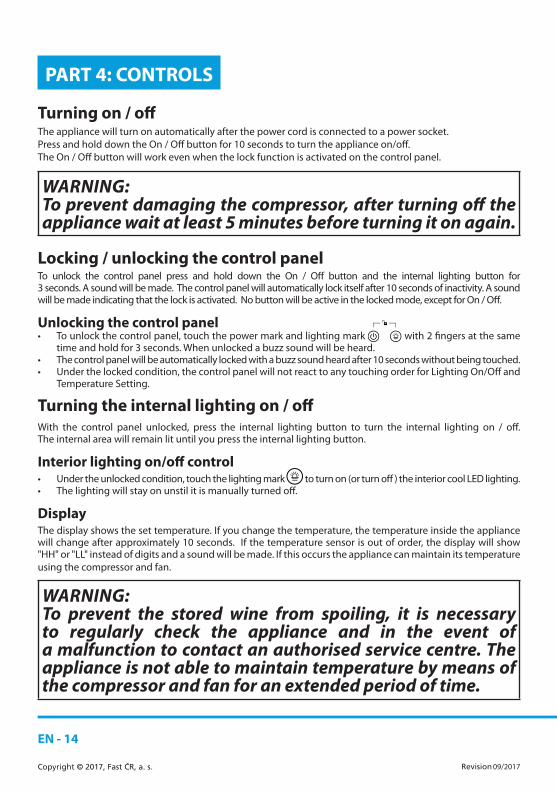
Turning on / off The appliance will turn on automatically after the power cord is connected to a power socket. Press and hold down the On / Off button for 10 seconds to turn the appliance on/off. The On / Off button will work even when the lock function is activated on the control panel.
WARNING:To prevent damaging the compressor, after turning off the appliance wait at least 5 minutes before turning it on again.
Locking / unlocking the control panelTo unlock the control panel press and hold down the On / Off button and the internal lighting button for 3 seconds. A sound will be made. The control panel will automatically lock itself after 10 seconds of inactivity. A sound will be made indicating that the lock is activated. No button will be active in the locked mode, except for On / Off.
Unlocking the control panel• To unlock the control panel, touch the power mark and lighting mark with 2 fingers at the same
time and hold for 3 seconds. When unlocked a buzz sound will be heard. • The control panel will be automatically locked with a buzz sound heard after 10 seconds without being touched. • Under the locked condition, the control panel will not react to any touching order for Lighting On/Off and
Temperature Setting.
Turning the internal lighting on / offWith the control panel unlocked, press the internal lighting button to turn the internal lighting on / off. The internal area will remain lit until you press the internal lighting button.
Interior lighting on/off control• Under the unlocked condition, touch the lighting mark to turn on (or turn off ) the interior cool LED lighting.• The lighting will stay on unstil it is manually turned off.
DisplayThe display shows the set temperature. If you change the temperature, the temperature inside the appliance will change after approximately 10 seconds. If the temperature sensor is out of order, the display will show "HH" or "LL" instead of digits and a sound will be made. If this occurs the appliance can maintain its temperature using the compressor and fan.
WARNING:To prevent the stored wine from spoiling, it is necessary to regularly check the appliance and in the event of a malfunction to contact an authorised service centre. The appliance is not able to maintain temperature by means of the compressor and fan for an extended period of time.
EN - 15
09/2017Copyright © 2017, Fast ČR, a. s.
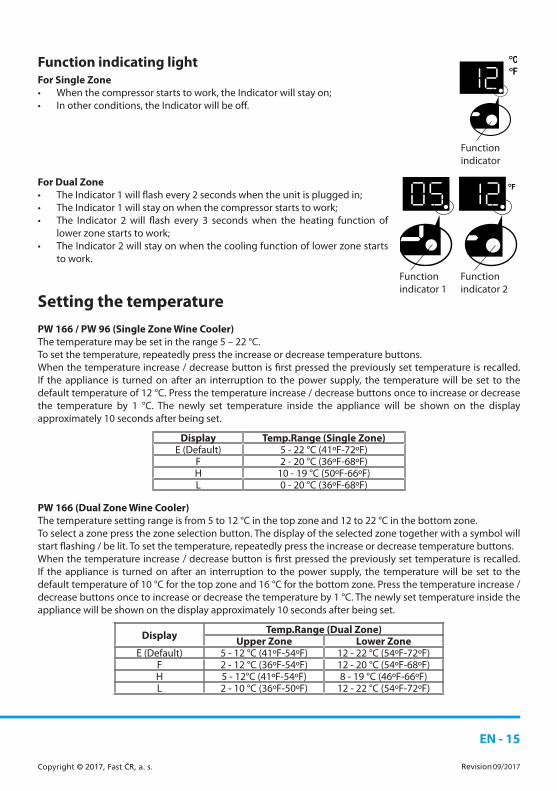
Function indicating lightFor Single Zone• When the compressor starts to work, the Indicator will stay on;• In other conditions, the Indicator will be off.
For Dual Zone• The Indicator 1 will flash every 2 seconds when the unit is plugged in;• The Indicator 1 will stay on when the compressor starts to work;• The Indicator 2 will flash every 3 seconds when the heating function of
lower zone starts to work;• The Indicator 2 will stay on when the cooling function of lower zone starts
to work.
Setting the temperaturePW 166 / PW 96 (Single Zone Wine Cooler)The temperature may be set in the range 5 – 22 °C.To set the temperature, repeatedly press the increase or decrease temperature buttons. When the temperature increase / decrease button is first pressed the previously set temperature is recalled. If the appliance is turned on after an interruption to the power supply, the temperature will be set to the default temperature of 12 °C. Press the temperature increase / decrease buttons once to increase or decrease the temperature by 1 °C. The newly set temperature inside the appliance will be shown on the display approximately 10 seconds after being set.
Display Temp.Range (Single Zone)E (Default) 5 - 22 °C (41ºF-72ºF)
F 2 - 20 °C (36ºF-68ºF)H 10 - 19 °C (50ºF-66ºF)L 0 - 20 °C (36ºF-68ºF)
PW 166 (Dual Zone Wine Cooler)The temperature setting range is from 5 to 12 °C in the top zone and 12 to 22 °C in the bottom zone.To select a zone press the zone selection button. The display of the selected zone together with a symbol will start flashing / be lit. To set the temperature, repeatedly press the increase or decrease temperature buttons. When the temperature increase / decrease button is first pressed the previously set temperature is recalled. If the appliance is turned on after an interruption to the power supply, the temperature will be set to the default temperature of 10 °C for the top zone and 16 °C for the bottom zone. Press the temperature increase / decrease buttons once to increase or decrease the temperature by 1 °C. The newly set temperature inside the appliance will be shown on the display approximately 10 seconds after being set.
Display Temp.Range (Dual Zone)Upper Zone Lower Zone
E (Default) 5 - 12 °C (41ºF-54ºF) 12 - 22 °C (54ºF-72ºF)F 2 - 12 °C (36ºF-54ºF) 12 - 20 °C (54ºF-68ºF)H 5 - 12°C (41ºF-54ºF) 8 - 19 °C (46ºF-66ºF)L 2 - 10 °C (36ºF-50ºF) 12 - 22 °C (54ºF-72ºF)
FunctionIndicatorFunctionindicator
FunctionIndicator 2
Function Indicator 1Functionindicator 1
Functionindicator 2

EN - 16
09/2017Copyright © 2017, Fast ČR, a. s.
NOTE:When it is first turned on, or turned on after being off for a long time, it is possible that there will be a difference between the set temperature and the temperature shown on the display. This is normal and this difference will disappear after several hours.
Switching between °C and °FPW 166 / PW 96 (Single Zone Wine Cooler)Press and hold down the temperature increase and temperature decrease buttons for 5 seconds to change the temperature unit from °C to °F and vice versa. PW 166 (Dual Zone Wine Cooler)Directly press the °C / °F toggle button to change the temperature units from °C to °F and vice versa.
NOTE:The temperature may change depending on whether the internal light is turned on or off, the arrangement of the bottles and other conditions.
Storing wineThe racks are designed for storing wine in Bordeaux type bottles. The maximum number of bottles may differ depending on the size and dimensions of the actual bottles. To prevent damaging the gasket seal, check that the door is fully open before sliding out the rack.Store only originally corked wine bottles. Do not cover the rack with aluminium foil or any other material in any way that could prevent the free circulation of air. Depending on the system, the racks are equipped with a wheel system for easier handling. However, never slide out more than one rack. The load bearing capacity of the racks is approximately 20 kg with each providing space for about 11 to 13 bottles.If you will not be using the appliance for an extended period of time, we recommend that you disconnect the power cord from the power socket, clean it and leave the door slightly open so that air can circulate freely avoiding undesirable odours, moisture, etc.
Table of recommended wine storage temperatures
Type of wine Recommended temperatureRed wine 15 – 18 °C (59 – 64 °F)Dry / White wine 9 – 14 °C (48 – 57 °F)Rosé wine 10 – 11 °C (50 – 52 °F)Sparkling wine 5 – 8 °C (41 – 46 °F)
Door lockThe appliance is supplied with a door lock. As a rule the keys are located in a plastic bag that comes together with the user's manual. To lock / unlock the door it is necessary to use the supplied keys.
EN - 17
09/2017Copyright © 2017, Fast ČR, a. s.
PART 5: REGULAR MAINTENANCE
Cleaning the applianceBefore commencing to clean the refrigerator disconnect it from the power source.
Wipe the internal surface of the appliance with a soft sponge lightly dipped in a table salt solution. Add 2 tablespoons of table salt into 1 litre of warm water. Wash the racks in warm water with a small amount of kitchen dishwashing liquid, rinse and wipe dry. Allow the wooden racks (if the wine cooler has them) to dry completely before returning them to the wine cooler. All parts that you wash with a soft sponge lightly dipped in water must be properly wiped dry. Wipe the outer surface with a soft sponge lightly dipped in water with a small amount of dishwashing liquid. Wipe dry using a clean cloth.
WARNING:Do not use steel wool or sponges with steel wool on stainless steel surfaces. They could damage the surface. Do not use cleaning waxes, concentrated cleaning agents, bleaches or cleaning products containing kerosene to clean the plastic or rubber parts. Never use paper towels or window cleaners on the plastic parts.
The use of steam cleaning appliances is extremely dangerous and so is strictly forbidden.
EN - 18
09/2017Copyright © 2017, Fast ČR, a. s.
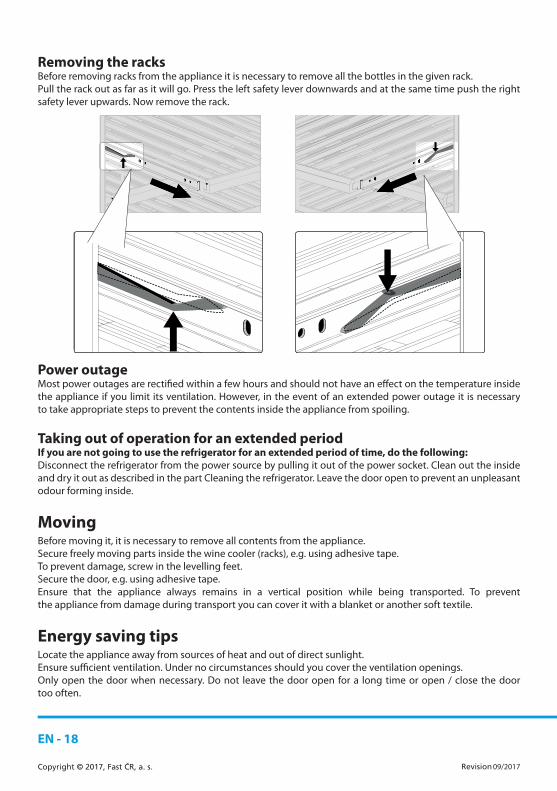
Removing the racks Before removing racks from the appliance it is necessary to remove all the bottles in the given rack. Pull the rack out as far as it will go. Press the left safety lever downwards and at the same time push the right safety lever upwards. Now remove the rack.
Power outageMost power outages are rectified within a few hours and should not have an effect on the temperature inside the appliance if you limit its ventilation. However, in the event of an extended power outage it is necessary to take appropriate steps to prevent the contents inside the appliance from spoiling.
Taking out of operation for an extended periodIf you are not going to use the refrigerator for an extended period of time, do the following:Disconnect the refrigerator from the power source by pulling it out of the power socket. Clean out the inside and dry it out as described in the part Cleaning the refrigerator. Leave the door open to prevent an unpleasant odour forming inside.
MovingBefore moving it, it is necessary to remove all contents from the appliance. Secure freely moving parts inside the wine cooler (racks), e.g. using adhesive tape. To prevent damage, screw in the levelling feet. Secure the door, e.g. using adhesive tape.Ensure that the appliance always remains in a vertical position while being transported. To prevent the appliance from damage during transport you can cover it with a blanket or another soft textile.
Energy saving tipsLocate the appliance away from sources of heat and out of direct sunlight. Ensure sufficient ventilation. Under no circumstances should you cover the ventilation openings. Only open the door when necessary. Do not leave the door open for a long time or open / close the door too often.
EN - 19
09/2017Copyright © 2017, Fast ČR, a. s.
PART 6: WHAT SHOULD I DO WHEN...
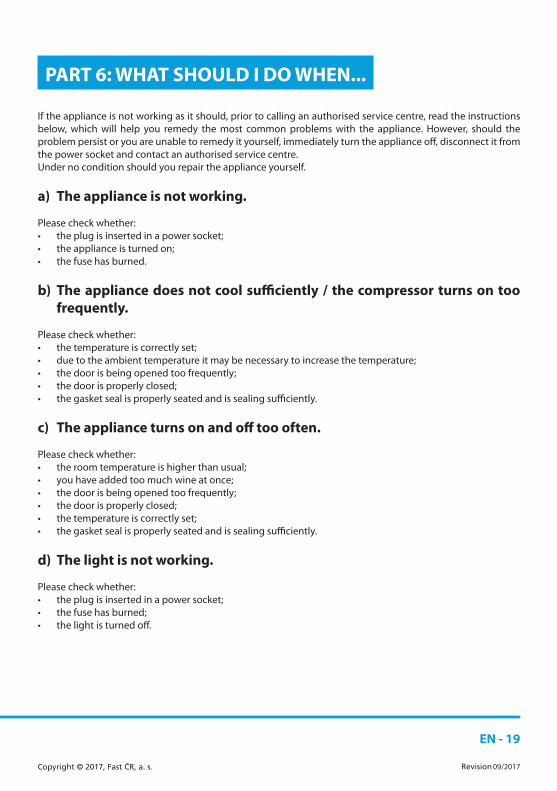
If the appliance is not working as it should, prior to calling an authorised service centre, read the instructions below, which will help you remedy the most common problems with the appliance. However, should the problem persist or you are unable to remedy it yourself, immediately turn the appliance off, disconnect it from the power socket and contact an authorised service centre. Under no condition should you repair the appliance yourself.
a) The appliance is not working.
Please check whether:• the plug is inserted in a power socket;• the appliance is turned on;• the fuse has burned.
b) The appliance does not cool sufficiently / the compressor turns on too frequently.
Please check whether:• the temperature is correctly set;• due to the ambient temperature it may be necessary to increase the temperature;• the door is being opened too frequently;• the door is properly closed;• the gasket seal is properly seated and is sealing sufficiently.
c) The appliance turns on and off too often.
Please check whether:• the room temperature is higher than usual;• you have added too much wine at once;• the door is being opened too frequently;• the door is properly closed;• the temperature is correctly set;• the gasket seal is properly seated and is sealing sufficiently.
d) The light is not working.
Please check whether:• the plug is inserted in a power socket;• the fuse has burned;• the light is turned off.
EN - 20
09/2017Copyright © 2017, Fast ČR, a. s.
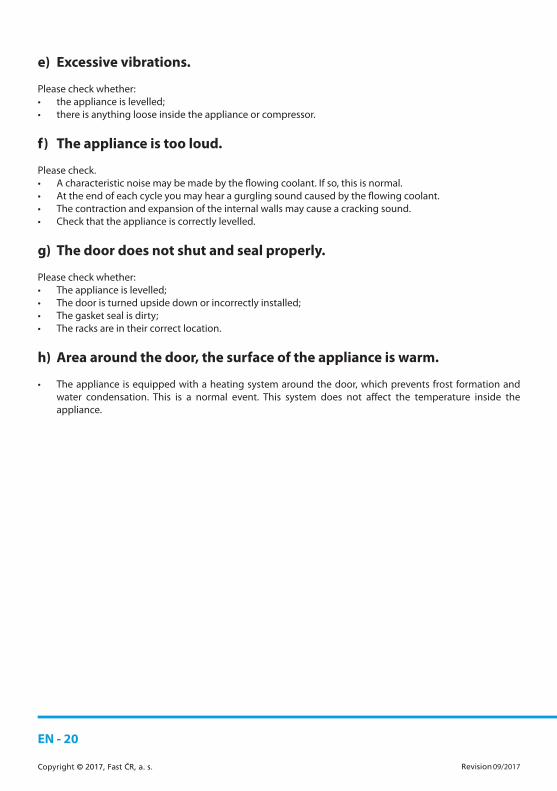
e) Excessive vibrations.
Please check whether:• the appliance is levelled;• there is anything loose inside the appliance or compressor.
f) The appliance is too loud.
Please check.• A characteristic noise may be made by the flowing coolant. If so, this is normal. • At the end of each cycle you may hear a gurgling sound caused by the flowing coolant. • The contraction and expansion of the internal walls may cause a cracking sound. • Check that the appliance is correctly levelled.
g) The door does not shut and seal properly.
Please check whether:• The appliance is levelled;• The door is turned upside down or incorrectly installed;• The gasket seal is dirty;• The racks are in their correct location.
h) Area around the door, the surface of the appliance is warm.
• The appliance is equipped with a heating system around the door, which prevents frost formation and water condensation. This is a normal event. This system does not affect the temperature inside the appliance.
EN - 21
09/2017Copyright © 2017, Fast ČR, a. s.
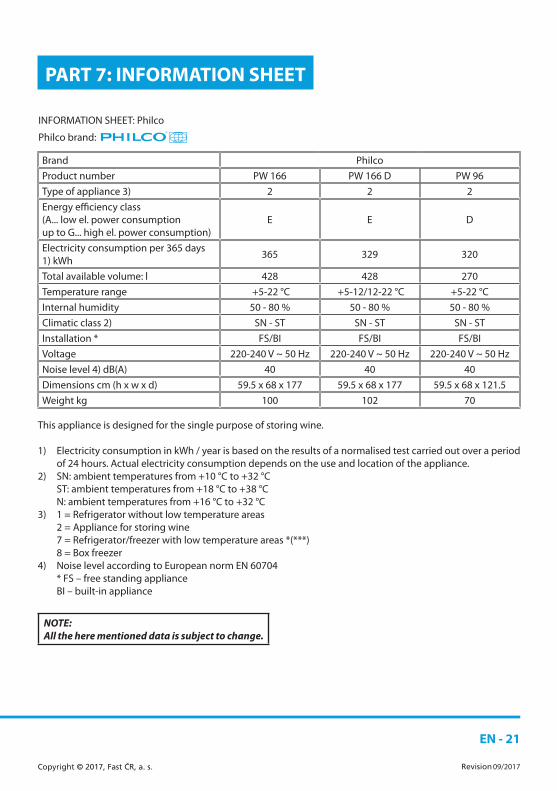
PART 7: INFORMATION SHEET
INFORMATION SHEET: Philco
Philco brand:
Brand PhilcoProduct number PW 166 PW 166 D PW 96Type of appliance 3) 2 2 2Energy efficiency class (A... low el. power consumption up to G... high el. power consumption)
E E D
Electricity consumption per 365 days 1) kWh 365 329 320
Total available volume: l 428 428 270Temperature range +5-22 °C +5-12/12-22 °C +5-22 °CInternal humidity 50 - 80 % 50 - 80 % 50 - 80 %Climatic class 2) SN - ST SN - ST SN - STInstallation * FS/BI FS/BI FS/BIVoltage 220-240 V ~ 50 Hz 220-240 V ~ 50 Hz 220-240 V ~ 50 HzNoise level 4) dB(A) 40 40 40Dimensions cm (h x w x d) 59.5 x 68 x 177 59.5 x 68 x 177 59.5 x 68 x 121.5Weight kg 100 102 70
This appliance is designed for the single purpose of storing wine.
1) Electricity consumption in kWh / year is based on the results of a normalised test carried out over a period of 24 hours. Actual electricity consumption depends on the use and location of the appliance.
2) SN: ambient temperatures from +10 °C to +32 °C ST: ambient temperatures from +18 °C to +38 °C N: ambient temperatures from +16 °C to +32 °C3) 1 = Refrigerator without low temperature areas 2 = Appliance for storing wine 7 = Refrigerator/freezer with low temperature areas *(***) 8 = Box freezer4) Noise level according to European norm EN 60704 * FS – free standing appliance BI – built-in appliance
NOTE:All the here mentioned data is subject to change.

EN - 22
09/2017Copyright © 2017, Fast ČR, a. s.
INSTRUCTIONS AND INFORMATION REGARDING THE DISPOSAL OF USED PACKAGING MATERIALSDispose of packaging material at a public waste disposal site.
DISPOSAL OF USED ELECTRICAL AND ELECTRONIC APPLIANCESThe meaning of the symbol on the product, its accessory or packaging indicates that thisproduct shall not be treated as household waste. Please, dispose of this product at your applicable collection point for the recycling of electrical & electronic equipment waste. Alternatively in some states of the European Union or other European states you may return your products to your local retailer when buying an equivalent new product. The correct disposal of this product will help save valuable natural resources and help in preventing the potential negative impact on the environment and human health, which could be caused as a result of improper liquidation of waste. Please ask your local authorities or the nearest waste collection centre for further details. The improper disposal of this type of waste may fall subject to national regulations for fines.
For business entities in the European UnionIf you wish to dispose of an electrical or electronic device, request the necessary information from your seller or supplier.
Disposal in other countries outside the European UnionIf you wish to dispose of this product, request the necessary information about the correct disposal method from local government departments or from your seller.
This product meets all the basic EU regulation requirements that relate to it.
Changes to the text, design and technical specifications may occur without prior notice and we reserve the right to make these changes.