windows 8.1 update guide
DESCRIPTION
Guide for the Windows 8.1 update.TRANSCRIPT

Your familiar Windows, only better.Your quick guide to Windows 8.1 for business
For Windows 8.1 Update
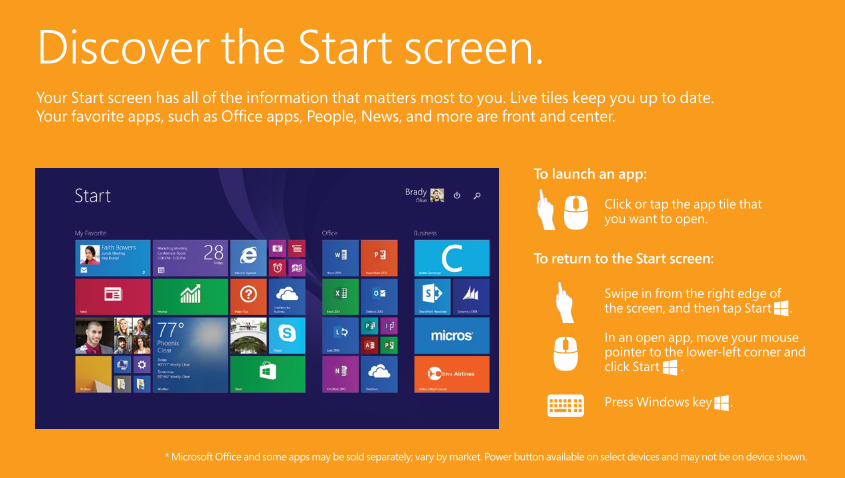
Your Start screen has all of the information that matters most to you. Live tiles keep you up to date. Your favorite apps, such as Office apps, People, News, and more are front and center.
Discover the Start screen.
To launch an app:
Click or tap the app tile that you want to open.
Swipe in from the right edge of the screen, and then tap Start .
In an open app, move your mouse pointer to the lower-left corner and click Start .
Press Windows key .
* Microsoft Office and some apps may be sold separately; vary by market. Power button available on select devices and may not be on device shown.
To return to the Start screen:

The Windows built-in apps like Calendar, Weather, and News power you through essential tasks. Your corporate line-of-business apps increase your productivity and help you stay connected to the tasks that support and enhance your workday. Accessing and sorting your apps take just a few simple clicks or taps.
To access all of your apps on the Start screen: To sort your apps in the Apps view: To pin apps to the Start screen in the Apps view:
Press Ctrl + Tab.
Click the down arrow near the lower-left corner.
Swipe up from the middle of the Start screen.
In the Apps view, click or tap the sort option.
Press and hold the first app to select it. Then tap the other apps you want to pin. Tap Pin to Start.
Press the Ctrl key and then select one or several apps you want to pin. Click Pin to Start.
* Microsoft Office may be sold separately
Access all of your apps.

With Windows, you can find things fast, switch between apps, and get around efficiently on your device by a simple swipe on your touch device.
To see a list of open apps: To reveal app commands: To close an app:
Swipe in from the left edge, and with your finger still on the screen, move it back toward the left edge.
In an open app, swipe up from the bottom or down from the top edge of the screen to reveal app commands.
Get around faster with touch.
Drag the app from the top edge to the bottom of the screen.
To close an app:
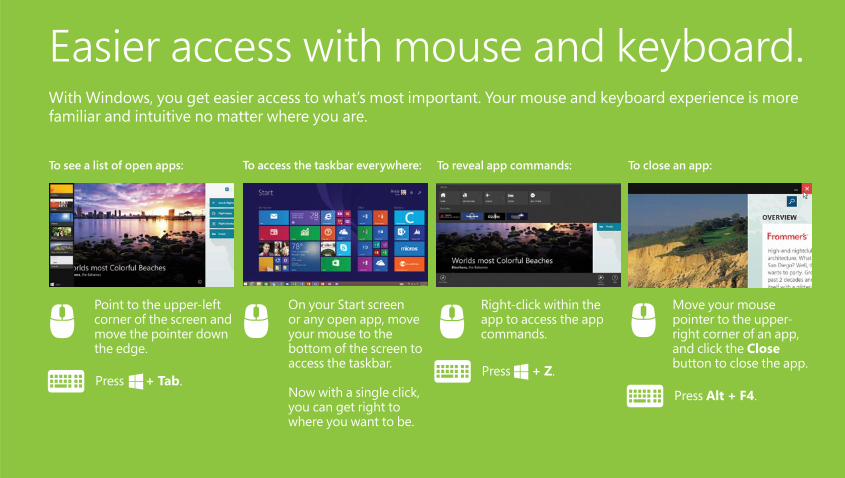
Get around faster with touch.With Windows, you get easier access to what’s most important. Your mouse and keyboard experience is more familiar and intuitive no matter where you are.
To see a list of open apps: To reveal app commands: To close an app:
Press + Tab.
Point to the upper-left corner of the screen and move the pointer down the edge.
Right-click within the app to access the app commands.
Easier access with mouse and keyboard.
Move your mouse pointer to the upper-right corner of an app, and click the Close button to close the app.
To access the taskbar everywhere:
On your Start screen or any open app, move your mouse to the bottom of the screen to access the taskbar.
Now with a single click, you can get right to where you want to be.
Press + Z.
Press Alt + F4.

No matter where you are in Windows, the charms help you execute the tasks you do most often. The five charms—Search, Share, Start, Devices, and Settings—provide access to common tasks and are always available from the right side of your screen.
To reveal the charms:
Press + C.Move your mouse pointer all the way into the upper-right (or lower-right corner). When the charms appear, move down (or up) the edge.
Swipe in from the right edge of the screen.
Search: Get quick results by searching the Internet or by searching your computer for a file, application, or setting.
Share: Share articles, websites, and screen shots with your colleagues via email or social networks.
Start: Return to the most recently used program or to the Start screen with one simple click.
Devices: Manage settings for output devices, such as monitors, projectors, and printers.
Settings: Manage common settings such as power, brightness, Wi-Fi, and notifications.
The charms are always there for you.
* Microsoft Office may be sold separately

Windows helps you stay productive and complete projects as efficiently as possible. You can now open up to four apps on the screen at once* and change the size of each window to give more important apps their space. Windows works the way you do.
To view and use multiple apps: To adjust window sizes:
Multitask and get more done.
With one app open, open the list of current apps. Drag the app you want from the list to the left or right side of the current app.
With multiple apps open, drag the divider to resize the app or move it off the screen.
*The number of apps you can open is dependent on the resolution of your display.
The charms are always there for you.

With the Search button on the Start screen, Bing Smart Search will help find what you’re looking for—on the web or on your PC—in a beautiful app-like experience. Search gives you results like you’ve never seen before.
Find everything you need.
To quick search your PC and the web, just tap or click the Search button on the upper-right corner of your Start screen. Type the search term. Press Enter, or click or tap one of the text suggestions .
Search results include Windows apps and sources from the web. Results are grouped by category and by origin. Results from your PC are listed first, followed by results from the web and from apps. Thumbnails give you an idea of the resource before you tap or click.
Press + S and start typing to open Search.

The desktop you are familiar with is easy to access. You can access apps like Excel, Word, and PowerPoint, as well as the Mail app, Calendar app, and News app. With the Start button, you can seamlessly transition between the Start screen and the desktop whenever you need to.
To access the desktop from the Start screen: To return to the Start screen from the desktop:
Your desktop, better than ever.
Tap or click the Desktop tile. Tap or click the Start button in the lower-left corner.
* Microsoft Office may be sold separatelyPress + D. Press .

Whether you want to boot directly to your desktop or use the desktop wallpaper as the background of the Start screen, you have several options to make your desktop your own. Just press and hold or right-click the taskbar, and select Properties. Then click the Navigation tab.
To display the desktop when you sign in:
To use the desktop wallpaper as the background for the Start screen:
To show all of your apps when you go to Start screen:
Get started in style.
Select When I sign in or close all apps on a screen, go to the desktop instead of Start.
Select Show my desktop background on Start.
Select Show the Apps view automatically when I go to Start.

Windows is all about you and the stuff you love. Resize and group tiles to keep people, sites, and apps in perfect order. Change your Start screen background to fit your personality, or coordinate with a company color scheme. No matter your style, your Start screen is a perfect reflection of you.
To resize Start screen tiles with touch: To change the Start screen background:
Make Windows all about you.
Press and hold the tile. Tap Resize to pick the size you want.
On the Start screen, open the Settings charm, and then tap or click Personalize. Choose the color and background combination you like best.
* Microsoft Office may be sold separately
To resize Start screen tiles with mouse:
Right-click the tile to open the context Menu. Click Resize to pick the size you want.

* Microsoft Office may be sold separately
You can arrange the tiles on your Start screen the way you want them—put the productivity apps together, group all your favorites, or create a group of apps you use for everyday work.
To create a new group of tiles on the Start screen: To name a group of tiles: To move a group of tiles:
Get organized with app groups.
Press and hold the first tile to select it, then tap the other tiles that you want to move. Then, drag the selected tiles to the desired location until a vertical bar appears. Release the tiles.
Above the group, tap and hold an app, or right-click and select New Group, and then enter a new name. After you create a group, you can move the entire group around on your Start screen.
Pinch fingers together to zoom out. Drag the group of tiles to your desired location. Then tap anywhere on the screen to zoom back in.
Select tiles by holding down the Control key and selecting the tiles you want. Then, drag the selected tiles to the desired location until a vertical bar appears. Release the tiles.
Click the zoom icon in the lower-right corner of the screen to zoom out. Click and drag the group of tiles you want to move to your desired location. Then click anywhere on the screen to zoom in again.

Get to know the power of touch.
* Monitor must support a resolution of at least 1366 x 768.
Swipe in from the right edge of your screen, tap Start .
Swipe in from the right edge of your screen.
Swipe in from the left edge of your screen.
In an app, swipe in from the top or bottom edge of the screen.
Swipe in from the left edge, and with your finger still on the screen, move it back toward the left edge.
Swipe from left edge, drag app to the right.*
Swipe from left edge, drag app to the left.*
Drag the app from the top edge of the screen to the bottom of the screen.
Touch the screen with two or more fingers, and then move your fingers toward each other (pinch) to zoom out or away from each other (stretch)to zoom in.
Press and hold an app.
Get back to the Start Screen or previous app (alternating).
See a list of open apps.
Show app commands.
Switch to your last app and other open apps.
Open the charms.
Snap app right.
Snap app left.
Close an app.
Zoom.
Select an item.
Get organized with app groups.

What to do with your mouse.
* Monitor must support a resolution of at least 1366 x 768.
Point to the lower-left corner and click Start .
Move your mouse pointer all the way into the upper-right or lower-right corner. When the charms appear, move up or down the edge and click the one you want.
Point to the upper-left corner. When the previous app appears, click it.
Right-click within the app.
Move your mouse pointer into the upper-left corner, and then move it down the edge.
On the Start screen, right-click on a tile to open the context Menu. From the context Menu, you can resize the app, unpin it from the Start screen, and more.
Move your mouse pointer into the upper-left corner, and then move it down the edge. Click and drag app to right.*
Move your mouse pointer into the upper-left corner, and then move it down the edge. Click and drag app to left.*
Move your mouse pointer to the upper-right corner of an app, and click the Close button to close the app.
Press Ctrl while you rotate the wheel button.
Get back to the Start screen or previous app (alternating).
Open the context Menu to resize the app, unpin the app from the Start screen, and more.
Snap app right.
Close an app.
Zoom.
Snap app left.
Open the charms.
Show app commands.
Switch to your last app.
See a list of open apps.

Use the keyboard to get places fast.+ X
+ comma (,)
+ plus (+) or minus (-)
+ Home
+ Tab
+ Alt + Enter
+ spacebar
+ C
+ H
+ S
+ F
Get to the Start screen.
Open the charms.
Open the Share charm.
Open the Search charm.
Open the Search charm to search for files.
Open the Search charm to search for Settings.
Open the Settings charm.
Open the Devices charm.
Show/Hide the Desktop.
Lock your computer.
Open Quick Link menu.
Peek at Desktop.
Zoom in or out.
Minimize all but the active window.
Cycle through recently used apps (except desktop apps).
Open Windows Media Center.
Switch language and keyboard layout.
Show the commands available in the app.
Open Ease of Access Center.
Choose a presentation display mode.
Get back to the Start screen or previous app (alternating).
+ Z
+ U
+ P
+ I
+ K
+ D
+ L
+ T Cycle through apps on taskbar.
+ R Open the Run dialog.
+W
See a list of open apps.

© 2014 Microsoft Corporation. All rights reserved. This material is provided “as-is”, and for informational purposes only. Microsoft makes no warranties, express or implied, and hereby disclaims any and all such warranties to the maximum extent available by law.