windows 7 appendix windows live photo gallery and movie ... · app 2 windows 7 appendix windows...
TRANSCRIPT

Microsoft Windows 7
Windows 7 Appendix
Windows Live Photo Gallery and Movie Maker UpdatesWindows Live Photo GalleryAs discussed in Chapter 8, once you have acquired digital media files and understand your rights to their usage, you can use Windows Live Photo Gallery to manage them. Periodically, Microsoft updates the Windows Live applications to match developments in the other applications they make. Windows Live Photo Gallery has recently been upgraded to use the Ribbon interface, like the other Windows Live applications, instead of menu and toolbar options. In this portion of the appendix, the Chapter 8 steps have been revised to use the new interface where appropriate.
To Copy Pictures from a Digital Camera to the Computer
The following steps import the pictures from an HP Photosmart 733 digital camera. If you do not have a digital camera to attach to import pictures, you can copy the Digital Camera Pictures folder from the Data Files for this chapter to the Pictures Library on your computer.
Connect the digital camera to an available USB port on the computer. If necessary, turn on the digital camera. After a moment, the AutoPlay dialog box is displayed.
Click the ‘Import pictures and videos using Windows’ option to display the Import Pictures and Videos dialog box.
Type Digital Camera Pictures in the ‘Tag these pictures’ text box.
Click the Import Settings link in the Import Pictures and Videos dialog box to display a complete list of import settings in the Import Settings dialog box.
After viewing the available options, click the Cancel button to close the Import Settings dialog box without making changes.
Click the Import button to import the pictures.
After the images are imported, Windows 7 will display your images in a new window.
Turn off your camera and disconnect it from the computer.
Close the window.
1
2
3
4
5
6
7
8
91. Open Windows Live
Photo Gallery, click Import
Other Ways

APP 2 Windows 7 Appendix Windows Live Photo Gallery and Movie Maker Updates
To Copy the Data Files
Because you may not have a picture of a person displaying the red eye effect in your Gallery, one is provided with the Data Files for this chapter. If you have a picture with red eye, you can use it instead of copying this file. If restrictions prevent you from creating a folder in your user folder on the Local Disk (C:), create the folder elsewhere on the hard disk outside of the Pictures Library.
Create a folder called Data Files on the Local Disk (C:) hard disk in your user folder.
Navigate to the location containing the data files.
Copy the Red Eye Photo picture to the Data Files folder you created.
If necessary, close your user folder window.
To Open Windows Live Photo Gallery
Since you will be using Windows Live Photo Gallery, you need to open the program. When you start Windows Live Photo Gallery, you may be prompted to sign into your Windows Live account. We will not be using the Windows Live account, so signing in is unnecessary.
Display the Start menu and then click All Programs to display the All Programs list.
Click Windows Live Photo Gallery to open Windows Live Photo Gallery. If necessary, maximize the Windows Live Photo Gallery window (Figure A–1).
1
2
3
4
1
2
Figure A–1
File button
Home tab displayed

Windows Live Photo Gallery APP 3
Win
do
ws
7 A
pp
end
ix
To Add a Folder to Windows Live Photo Gallery
When you have pictures in other locations than your Pictures Library, you can add them to Windows Live Photo Gallery by adding the folders that contain them to the Pictures Library. The following steps add the Data Files folder to the Pictures Library.
Click the File button to display the File menu (Figure A–2).
Click the Include folder command to display Pictures Library Locations dialog box.
Click the Add button to display the Include Folder in Pictures dialog box.
Click Data Files to select the folder.
Click the Include folder button to add the folder to the Library locations.
Click the OK button in the Pictures Library Locations dialog box to acknowledge that the folder was added.
1
2
3
4
5
6
Figure A–2
To View a Live Preview of a Picture
When you move your mouse over a picture in the Gallery, a live preview will be displayed. The following step displays a live preview.
Move your mouse over one of the pictures to display a live preview of that picture.1
1. Right-click Pictures in Navigation pane, click Manage Pictures library
Other Ways
Include folder command

APP 4 Windows 7 Appendix Windows Live Photo Gallery and Movie Maker Updates
To View Pictures by Date Taken
You can view pictures and videos taken on a particular date. By default, Windows Live Photo Gallery displays pictures grouped by month and year, but you can expand these categories to view pictures grouped by month and day. The following steps display the pictures taken in April of 2012.
If necessary, click Pictures in the Navigation pane to view only pictures in the Gallery.
If necessary, click the arrow next to April, 2012 in the middle pane to expand it. If 2012 is not an available option, click one of the dates shown.
Move your mouse over the pictures to view live previews.
To Change Views Using the Ribbon
So far, you have changed views using the Navigation pane, and now you will change views using the Ribbon. From the View tab on the Ribbon, you can view arrange your pictures, show details, add flags, zoom in and out, set up a slide show, and work with your tags and captions. The following steps display the pictures arranged using tags.
Click View on the Ribbon to display the View tab (Figure A–3).
Click the Tag button (View tab | Arrange list group) to display the pictures arranged by tags.
1
2
3
1
2
Figure A–3
1. Right-click open area of middle pane to display shortcut menu, point to View, then click ‘Thumbnails with date taken’
Other Ways
To View Pictures as Thumbnails with Date Taken
Windows Live Photo Gallery offers several ways of displaying your pictures and videos, including small versions of the pictures, known as thumbnails, with or without text that includes the date the picture was taken. The following step displays pictures in the Gallery as thumbnails with date taken.
Click the Date taken button (View tab | Show details group) to display the pictures as thumbnails with date taken.
1
View tab
Windows Live Photo Gallery APP 5
Win
do
ws
7 A
pp
end
ix
To View Pictures Using All Details View
You also can view pictures and videos with all details. In tiles view, thumbnails of the pictures and videos are displayed along with their common properties. The following step displays pictures in the Gallery using the All details view.
Click the All details button (View tab | Show details group) to display the pictures with all details.
1 1. Right-click open area in middle pane to display shortcut menu, point to View, then click Details
Other Ways
To View the Table of Contents
You also can view your pictures and videos with the aid of a table of contents. When displayed, the table of contents allows you to peruse your Gallery by year. If you select a different option in the Navigation pane such as tag, rating, or folder, the table of contents will change to reflect the option you selected. The table of contents appears to the left of the pictures, and your pictures and videos will continue to be displayed in their current view. The following steps display the table of contents.
Right-click an open area to display a shortcut menu.
Click the ‘Table of contents’ command to display the table of contents in a new pane.
After viewing the table of contents, right-click an open area in the middle pane to display a shortcut menu.
Click the ‘Table of contents’ command to remove the table of contents.
Click the All details button (View tab | Show details group) to turn off the display of all details.
To Sort Pictures
You also can sort pictures according to the date they were taken. The following steps change the sort order of the pictures.
Click the Date button (View tab | Arrange list group) to arrange the pictures by date.
Click the Reverse sort button (View tab | Arrange list group) to change the sort order of the Gallery to ascending.
Click the Reverse sort button to change the sort order back to descending.
1
2
3
4
5
1
2
3
APP 6 Windows 7 Appendix Windows Live Photo Gallery and Movie Maker Updates
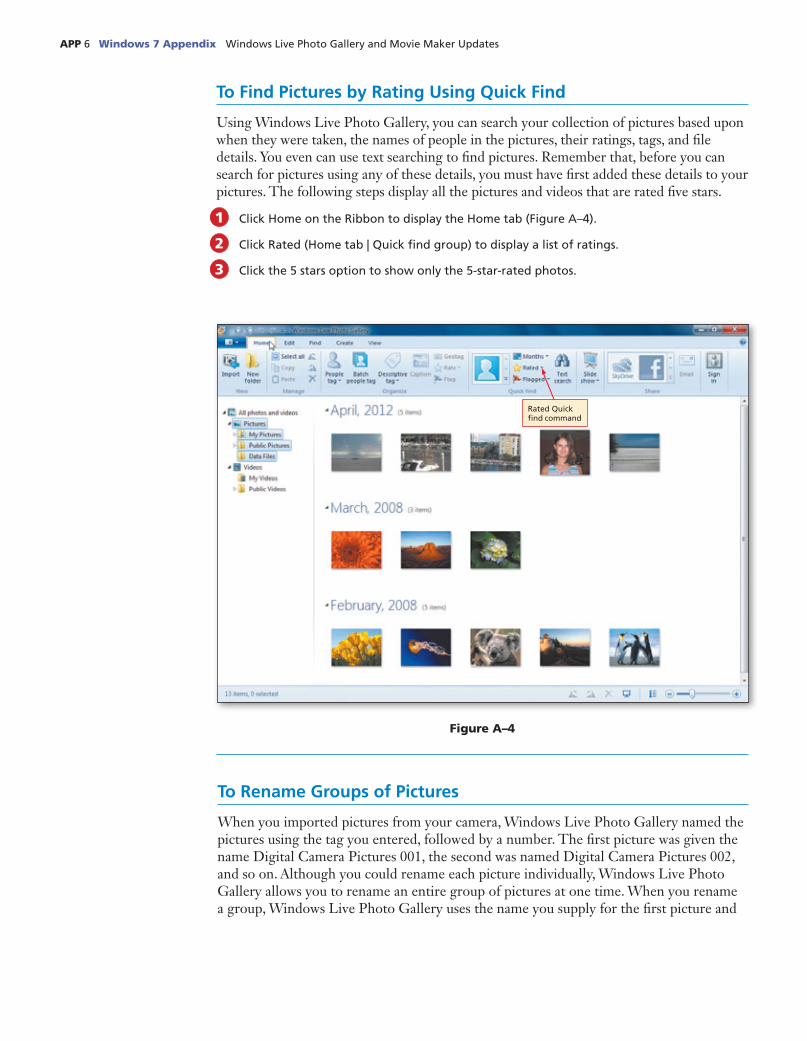
To Find Pictures by Rating Using Quick Find
Using Windows Live Photo Gallery, you can search your collection of pictures based upon when they were taken, the names of people in the pictures, their ratings, tags, and file details. You even can use text searching to find pictures. Remember that, before you can search for pictures using any of these details, you must have first added these details to your pictures. The following steps display all the pictures and videos that are rated five stars.
Click Home on the Ribbon to display the Home tab (Figure A–4).
Click Rated (Home tab | Quick find group) to display a list of ratings.
Click the 5 stars option to show only the 5-star-rated photos.
1
2
3
Figure A–4
To Rename Groups of Pictures
When you imported pictures from your camera, Windows Live Photo Gallery named the pictures using the tag you entered, followed by a number. The first picture was given the name Digital Camera Pictures 001, the second was named Digital Camera Pictures 002, and so on. Although you could rename each picture individually, Windows Live Photo Gallery allows you to rename an entire group of pictures at one time. When you rename a group, Windows Live Photo Gallery uses the name you supply for the first picture and
Rated Quick find command
Windows Live Photo Gallery APP 7
Win
do
ws
7 A
pp
end
ix
then uses the name followed by a number for the remaining pictures. The following steps rename the pictures you imported.
Click the Cancel search button to clear the search.
In the Navigation pane, click the folder that was added when you imported the pictures from your camera.
Click the check box for each picture to select them.
Right-click the last picture to display the shortcut menu.
Click the Rename command to display the Tag and caption pane.
Type Tampa in the Filename text box, and then press the enter key to rename the pictures.
1
2
3
4
5
6 1. Select files, click Tag and caption pane on View Ribbon, click Filename, type new name, press enter
Other Ways
To Create a Tag
The Descriptive tag arrow button on the Home tab of the Ribbon allows you to display a list of tags that have been applied to the pictures and videos in the Gallery. As you recall, you typically apply a tag to a specific file. However, in Windows Live Photo Gallery, you can create a tag independent of a file. In other words, you can create tags for organizing your pictures and videos even before importing them. The following steps create the tag, Vacation.
Click the Descriptive tag arrow button (Home tab | Organize group) to display a list.
Click Manage tags to display the Manage tags dialog box.
Click the ‘Add a new tag’ command to create a new tag.
Type Vacation in the text box.
Press the enter key to add the tag.
Click the Close button to close the Manage tags dialog box.
To Add a Preexisting Tag to Pictures and Videos
Once you have added your tag, you then can assign the tag to pictures. The following steps add the vacation tag to the selected pictures.
Select the pictures you imported.
Click the Descriptive tag button (Edit tab | Organize group) and then click the ‘Tag an item’ command.
Type V in the Descriptive tags text box in the Tag and caption pane to display list of tags beginning with V.
Click the Vacation option to add the vacation tag to the selected pictures.
1
2
3
14
5
6
1
2
3
4

APP 8 Windows 7 Appendix Windows Live Photo Gallery and Movie Maker Updates
To Correct Red Eye in a Picture
The following steps remove the red eye effect from a picture.
Navigate to the redeye.jpg picture using the Navigation pane.
Double-click the redeye.jpg picture to edit the picture (Figure A–5).
Click the Red eye button in the Adjustments group to begin fixing the red eye effect.
Drag the pointer to position a rectangle around the eye on the left, and then release the mouse button to finish fixing the red eye effect.
Drag the pointer to position a rectangle around the eye on the right, and then release the mouse button to finish fixing the eye.
1
2
3
4
5
Figure A–5
To Crop a Picture
The following steps crop the corrected picture to the 4 3 6 standard photo size.
Click the Crop arrow button (Edit tab | Adjustments group) to display cropping options.
Point to the Proportion command to display the list of proportion options.
Click the 4 3 6 list item to select the 4 3 6 cropping rectangle.
Drag the rectangle over the top of the head so that the head is positioned in the rectangle.
Click the Crop arrow button to display cropping options.
Click the Apply crop button to crop the picture.
Click the Close file button on the Ribbon to save the changes and return to the Gallery.
Click OK button to close the dialog box.
1
2
3
4
5
6
7
8
Edit tab
Red eye command
redeye.jpg picture in edit mode

Windows Live Photo Gallery APP 9
Win
do
ws
7 A
pp
end
ix
To Print a Picture
Windows Live Photo Gallery allows you to print pictures directly from the Gallery either to your printer or online. The steps on the following pages print two 4 3 6 prints of the picture you just fixed.
Click the File button to display the File menu.
Point to the Print command to display the print options (Figure A–6).
Click the Print command on the Print submenu to display the Print Pictures dialog box.
Type 2 in the ‘Copies of each picture’ text box.
Click 4 3 6 in. (2) in the Size pane to print two 4 3 6 pictures.
Click the Print button in the Print Pictures dialog box to print the pictures.
1
2
3
4
5
6
Figure A–6
To Create a Black and White Picture
As mentioned in Chapter 8, Windows Live Photo Gallery provides a set of effects you can use to modify pictures. These effects include no filter, orange filter, sepia tone, yellow filter, red filter, and cyan filter. The following steps transform the Tulips sample picture into a black and white picture using an effect.
Click the Public Pictures folder in the Navigation pane to display the public pictures.
Double-click the Tulips.jpg picture to display the Edit tab, and then click the More effects arrow in the Effects group to display all of the available effects in the Effects gallery.
Click the ‘Black and white’ button in the Effects gallery to select it to transform the color picture into a black and white picture.
1
2
3
print options
Print command

APP 10 Windows 7 Appendix Windows Live Photo Gallery and Movie Maker Updates
To Revert to the Original
If you now return to the Gallery, the changes you have made will be saved. If you do not want to save the changes, you will need to revert the picture to its original format. The following steps revert the Tulips sample picture to its original state.
Click the ‘Revert to original’ command on the Ribbon to return the picture to its original state.
Click the Revert button to confirm your selection in the ‘Revert to original’ dialog box.
Click the Close file command on the Ribbon to return to the Gallery.
To View Windows Live Photo Gallery Options
The reason you can revert to the original picture is that a copy is saved by Windows Live Photo Gallery automatically. Although you cannot access this original except by reverting, you can adjust Windows Live Photo Gallery settings so that these originals are deleted to save space. The following steps display the Windows Live Photo Gallery options without making changes.
Click the File button then click the Options command to display the Windows Live Photo Gallery Options dialog box (Figure A–7).
Click the Originals tab and then review the information shown.
Click the ‘Move originals to Recycle Bin after’ list button to display a list of deletion options.
After viewing the options, click the list button again to close the list.
Click the Cancel button to close the dialog box without making changes.
1
2
3
1
2
3
4
5
Figure A–7
Originals tab
Windows Live Photo Gallery Options dialog box

Windows Live Movie Maker APP 11
Win
do
ws
7 A
pp
end
ix
To Delete Tags
If you have no further use for a particular tag, you can delete it from the Gallery. The following steps delete the Digital Camera Pictures and Vacation tags.
Click Descriptive tag arrow button (Home tab | Organize group).
Click Manage tags to display the Manage tags dialog box.
Right-click the Digital Camera Pictures tag.
Click the Delete command to display a confirmation dialog box.
Click the Yes button to delete the tag.
Right-click the Vacation tag, click the Delete command, and then click the Yes button in the confirmation dialog box to delete the tag.
Close the dialog box.
Windows Live Movie MakerIn addition to Windows Live Photo Gallery, Windows Live Movie Maker also has been updated. However, the changes are not as significant as those made to in Windows Live Photo Gallery. The following section displays the major step changes to correspond with Chapter 9 of the Windows 7 book.
To Copy the Data Files
Because you may not have a digital camera, the Birds video is provided the Data Files for this chapter. If you have a digital video camera, you can use the video you imported. These steps appear on page WIN 564 of the text.
Open the Videos Library.
Copy the Birds video to the Videos Library.
If necessary, close the Videos Library.
To Open Windows Live Movie Maker
The following steps open Windows Live Movie Maker.
Display the Start menu and then click the All Programs command to display the All Programs list.
Click the Windows Live Movie Maker command to open Windows Live Movie Maker. If necessary, maximize the Windows Live Movie Maker window (Figure A–8).
1
2
3
4
5
6
7
1
2
3
1
2
Figure A–8
Restore Down button replaces Maximize button

APP 12 Windows 7 Appendix Windows Live Photo Gallery and Movie Maker Updates
To Remove a Title
After adding the videos and photos as you did in Chapter 9 (the steps did not change for this update), there may be an extra title added for the Wildlife video in the Sample Videos folder. The following steps delete the title from the wildlife video. These steps should appear on page WIN 573.
Right-click the title to display a shortcut menu (Figure A–9).
Click the Remove command to remove the title.
1
2
To Change the Aspect Ratio
This version of Windows Live Movie Maker added a new tab to the Ribbon. Using the new Project tab, you can change the audio mix of the movie as well as the aspect ratio. The following steps change the aspect ratio to Standard using the Project tab. These steps update steps found on page WIN 584.
Click the Project on the Ribbon to display the Project tab (Figure A–10).
Click the Standard button (Project tab | Aspect ratio group) to switch the aspect ratio to standard.
1
2
Figure A–9
Figure A–10
Remove command
shortcut menu
Project tab
Standard button
Aspect ratio group

Windows Live Movie Maker APP 13
Win
do
ws
7 A
pp
end
ix
To Modify the Audio Mix
Because you will have a music item playing for the duration of the movie, you need to mute the audio that accompanies the video items. You can use the Audio mix slider to only use the music you have added to the movie. You also could edit each video clip to mute the audio, but that would have to be done separately for each clip. Using the Audio mix slider is fast method for adjusting all of the sound in a movie at once. The following steps make the Kalimba music the only background music for the movie. These steps update steps found on page WIN 589.
Click the Audio mix button to display the Audio mix slider.
Drag the slider all the way to the right to make the Kalimba music the only background music.
Click a blank area of the Ribbon to hide the slider.
To Save a Movie to the Computer
If you are unsure of what you may want to do with your movie, you can save it to your computer. This way you can decide later whether to burn it to CD or DVD using Windows DVD Maker or to attach it to an e-mail message to send to a friend. Saving to the computer also is a good option if you want to post the movie to a Web site other than YouTube. The following steps save the movie to the computer. These steps should appear on page WIN 602.
Click Save movie button (Home tab | Share group) to display a list of saving options (Figure A–11).
Click the For Computer button to display the Save Movie dialog box.
Type HD after Scenes from Nature in the File name text box to indicate the movie is in HD format.
Click the Save button to save the movie. When the saving process is complete, a message that the movie is complete appears.
Click the Play button to complete the publishing process and play the published movie in Windows Media Player. After viewing the movie, close Windows Media Player.
1
2
3
1
2
3
4
5
Figure A–11
menu showing options for saving movie
For computer command
Save movie button
Home tab

APP 14 Windows 7 Appendix Windows Live Photo Gallery and Movie Maker Updates
To Publish a Movie to DVD
You may want to share your movie with friends and family on DVD. When you choose this option, Windows DVD Maker is used to make your DVD. Before Windows DVD Maker is launched, a copy of the video will be saved to the My Videos folder. The following steps publish your movie to DVD. These steps update steps found on page WIN 604.
Click Save movie button (Home tab | Share group) to display a list of saving options.
Click the Burn a DVD command to display the Save Movie dialog box.
Type DVD after Scenes from Nature in the Filename text box to indicate the movie is for DVD.
Click the Save button to save the movie. After the movie has been saved, Windows DVD Maker is opened.
Select the appropriate DVD Maker options and then burn the DVD.
To Apply an AutoMovie Theme
Windows Live Movie Maker can help you make a movie faster now by using an AutoMovie theme. After you add your pictures and photos to a project, you can apply an AutoMovie theme to help you quickly organize your content into a movie based on that theme. The following steps apply the Cinematic AutoMovie theme to a project. These steps should appear on page WIN 605.
Click the Cinematic AutoMovie theme (Home tab | AutoMovie themes group) to change the theme of the project to Cinematic (Figure A–12).
Click the Play button to preview the movie with the theme applied.
1
2
3
4
5
1
2
Figure A–12
Cinematic AutoMovie theme
Home tab
AutoMovie themes group
Cinematic AutoMovie theme applied to movie