wi-fi system components - fx luminaire landscape and ... · with light assignment module and smart...
TRANSCRIPT

The Luxor ZD and ZDC Wi-Fi Control SystemWith Light Assignment Module and Smart Device App
®
LUXOR®
Wi-Fi System ComponentsIC:7693A-24WG0MAMB
FCF:W7OMRF24WG0MAMB
Contains Transmitter Module
Module: FXWIFIMOD
RR

2
Table of Contents
Overview
3 Luxor® Wi-Fi Components
4 Glossay of Terms
Installation
5 Installing Luxor Wi-Fi
Setup
8 Connecting to an Existing Network
8 Wi-Fi Module
11 LAN Module
13 Direct Connect
15 Luxor Linking (Multiple Luxors)
16 Luxor Linking Example
App
17 App Control
17 Getting Started
19 Groups
19 Add a Group
20 Tips on Working with Groups
21 Themes
21 Add a Theme
23 Tips on Working with Themes
24 Color
27 Programming with the LAM
Care and Maintenance
30 Wi-Fi Tips
31 Troubleshooting
Legal Information
32 Regulatory and Legal Information

3
Luxor® Wi-Fi Overview
The Luxor ZD and ZDC systems are capable of communicating with iOS and Android smart devices for on–demand changes to your outdoor lighting system.
Overview
Luxor Wi-Fi Components
Table of ContentsOverview
Luxor® Wi-Fi Components
R
IC:7693A-24WG0MAMB
FCF:W7OMRF24WG0MAMB
Contains Transmitter Module
Module: FXWIFIMOD
LAN Module Wi-Fi Module LAM Module iOS/Android smart device

4
Luxor® Wi-Fi Overview
Glossary of Terms
Group: An addressed set of lights that is designated numerically and controlled as a set by the controller.
Theme: A predetermined set of groups, intensities, and colors (ZDC only) called to action by the program or manual functions.
Fixture/Luminaire: Light unit that contains an FX LED board or device with FX zoning, dimming, or color capabilities.
Intensity: Value indicating measurable amount of brightness, from 1% to 100%.
Event: The initiation, adjustment, or conclusion of a selected theme or group with specific intensity and/or color settings.
Duration: The length of an event.
Hue: The primary attribute of a color represented by values from 0 to 359.
Saturation: The richness of a color mixed with white light, from 0% to 100%.
Color: The visual combination of hue and saturation.
LAM: Light Assignment Module. A device that remotely assigns each FX LED fixture or device to a specific group.
RSSI: Relative Signal Strength Indicator, or a number representing Wi-Fi signal strength.
Direct Connect: A Wi-Fi mode using the FX Wi-Fi Module allowing the Luxor to broadcast its own network for connection with one smart device.
LAN: Local Area Network; Luxor can connect directly into a network through a cat5 cable.
Router: A networking device that allows computers and electronic devices to exchange data.
SSID: Service Set Identifier, or the unique identifying name for a wireless LAN.
Table of ContentsGlossay of Terms
Cross References:

5
Luxor® Wi-Fi Installation
Press bezel lever to the left.
Press facepack through the bezel while holding the tab outward.
Pull bezel outward while holding the lever inward.
Disconnect communication cable. Push tab outward.
Remove cover.
➊
④
②
⑤③
Table of ContentsInstallation
Installing Luxor Wi-Fi

6
Luxor® Wi-Fi Installation
WI-FI MOD ONLY: Remove the antenna plug from the bottom plate.
WI-FI MOD ONLY: Insert the cover threads though the exposed hole.
Insert facepack back into the bezel. WI-FI MOD ONLY: Ensure the facepack locks into place and antenna wire is seeded through the wire slot. DO NOT PINCH THE ANTENNA WIRE.
⑦
⑧ ⑨
Insert Wi-Fi or LAN module.
⑥
NOTE: Outdoor installation requires use of antenna sleeve. Indoor installation of remote mounted facepack requires the wall mount (LUXORFPMNT, sold separately). Once wall mount is installed onto the wall, insert the antenna onto the back plane of the mount before inserting the module and facepack into the mount.

7
Luxor® Wi-Fi Installation
WI-FI MOD ONLY: Insert the antenna into the cover.
WI-FI MOD ONLY: Press cap into antenna wire and tighten over the cover.
LAN MOD ONLY: Connect cat5 cable to LAN Module.
Reconnect commu-nication cable. Close bezel, ensure it locks into place.
⑩ ⑪
⑫ ⑬

8
Luxor® Wi-Fi Setup
Setup
There are two ways to associate a Luxor controller with a Wi-Fi network: through a networked Wi-Fi router, or directly to a wireless iOS or Android device.
Connecting to an Existing Network (Wi-Fi Module)
To connect a Luxor to an existing Wi-Fi network, follow the steps below. Please ensure the Wi-Fi module is already installed per the instructions in the installation section.
1. From the HOME screen, navigate to the SETUP screen using the scroll wheel.
2. Scroll to and select Wi-Fi. NOTE: this menu option changes depending of which module is inserted into the accessory port. “Wi-Fi” displays only when the Wi-Fi module is completely pressed into the accessory port. “LAN” will appear for a LAN module, and “Network” will appear if no card is inserted.
Table of ContentsSetupConnecting to an Existing NetworkWi-Fi Module
Cross References:

9
Luxor® Wi-Fi Setup
3. Select the “network” button to choose a specific network. NOTE: The Luxor defaults to “Direct Connect” mode. See next section for more information on this topic.
4. The Wi-Fi networks page auto-populates with the SSIDs of local wireless networks within range of the Luxor controller. The security column displays “Y” or “N” (yes or no) if a password is required to connect to that network. The RSSI column displays a numeric value to indicate the signal strength of each network.
RSSI is measured between zero and 120, with optimum performance above 70.

10
Luxor® Wi-Fi Setup
5. If a “Y” was displayed for the selected network, a password entry screen will appear. Select each box to scroll for the desired character and press the scroll wheel to finalize that character. Move to the next character space and repeat the process until the full password is entered.
6. Select “OK.”
7. The Luxor will then connect to the network. NOTE: connection can take up to 20 seconds.
8. If the network SSID does not appear in the list of available networks, but the network is close enough that it should be able to connect, select the “Other Network” button from the Wi-Fi networks page.
9. Enter the SSID of the desired network.
10. Select the appropriate password button, and enter the password accordingly as shown previously. HINT: WPA is the most common in modern networks.
NOTE: For best results, ensure an RSSI of 70+

11
Luxor® Wi-Fi Setup
Connecting to an Existing Network (LAN Module)
Installing a LAN module for a direct connection between the Luxor and the network equipment can provide a more reliable connection. Before beginning the steps below, please ensure the LAN module is installed per the instruc-tions in the installation section.
1. From the HOME screen, navigate to the SETUP screen using the scroll wheel.
2. Scroll to and select Wi-Fi. NOTE: this menu option
changes depending of which module is inserted into the accessory port. “Wi-Fi” displays only when the Wi-Fi module is completely pressed into the accessory port. “LAN” will appear for a LAN module, and “Network” will appear if no module is inserted.
Table of ContentsLAN Module

12
Luxor® Wi-Fi Setup
3. The Ethernet status screen will display as “connected” when a cat5 connection is made between the LAN module and the network device.
LED Indicator Lights
The Ethernet port on the LAN module has two status LEDs that provide connection information. Two additional LEDs provide the same information for the service processor network management port.
LED Color Description
Left LED Amber or Green
Speed Indicator:
• Amber on — Operating as a gigabyte connection (1000 Mbps).
• Green on — Operating as a 100-Mbps connection.
• Off — Operating as a 10-Mbps connection.
Right LED Green Link/Activity Indicator:
• Blinking — There is activity on this post.
• Off — No link is established.

13
Luxor® Wi-Fi Setup
Direct Connect
The Luxor can be placed in Direct Connect mode, allowing an iOS or Android device to connect directly over Wi-Fi to a single controller. This removes the need to go through the Wi-Fi router or network in order to communicate directly with the controller.
1. From the HOME screen, navigate to the SETUP screen using the scroll wheel.
2. Scroll to and select Wi-Fi. NOTE: this menu option changes depending of which module is inserted into the accessory port. “Wi-Fi” displays only when the Wi-Fi module is completely pressed into the accessory port. “LAN” will appear for a LAN module, and “Network” will appear if no module is inserted.
Table of ContentsDirect Connect

14
Luxor® Wi-Fi Setup
3. The Luxor defaults to “Direct Connect” mode. The network name is “luxor”. If a controller ID is assigned by the installer, then the ID number is added to the network name (e.g. “luxor-1”). NOTE: the network name is “lxzdc” on ZDC facepacks.
4. If a Luxor is in “network” mode, then select the NET-WORK button on the Wi-Fi setup screen, and select DIRECT CONNECT to switch to direct connect mode.
NOTE: The direct connect feature is available only with the Wi-Fi module, not the LAN module.

15
Luxor® Wi-Fi Setup
Luxor Linking (Multiple Luxors)
When multiple Luxor controllers on a single site are connected to the same network (via LAN or Wi-Fi), the app sees the controllers as a single system with up to 250 groups available across all controllers. Each Luxor will still retain and automate its own programs, but when initiating a manual group event or theme through the Luxor app, the controllers will act as one.
1. To setup multiple Luxor controllers on a single site, start by entering the same Wi-Fi network information on each controller that will be linked. Refer to pages 8 or 11 for detailed instructions.
2. Assign a separate controller ID number for every Luxor on the network. Each Luxor requires a unique controller ID. Enter any number between 1 and 999,999 as the ID number. This feature is also useful when using direct connect to simplify connection to the proper Luxor.
3. When manually initiating a group from the Luxor app, every controller will activate and every fixture assigned to that group will initiate, no matter the
controller to which the fixture is connected.
4. Group/theme names and theme settings are saved across all linked controllers and will remain in sync as long as each Luxor remains connected to the network. NOTE: the facepack displays only the group numbers and theme letters; names assigned by the user are displayed only through the app.
Table of ContentsLuxor Linking (Multiple Luxors)

16
Luxor® Wi-Fi Setup
Luxor Linking Example
LUXOR ZD ➊ controls groups 1-25
LUXOR ZD ➋ controls groups 26-75
GROUP 26
LUXOR ZDs
GROUP 27
GROUP 1
Table of ContentsLuxor Linking Example
Cross References:

17
Luxor® Wi-Fi App
App Control
A Luxor system with a Wi-Fi Module installed can be operated manually and with the themes mode utilizing an iOS or Android device. The FX Luminaire Luxor App can be downloaded from the following application stores. Keyword search: “FX Luxor.”
• Apple iTunes Store
• Google Play Store
Getting Started
• A “connecting” screen will display once the installed app is opened on a smart device. This screen will remain on screen until the app makes a connection with the Luxor.
• The smart device and the Luxor must be connected to the same network to advance past the “connecting” screen using the Wi-Fi or LAN modules. Once the connection is terminated by either the smart device or the Luxor, the “connecting” screen will reappear.
Table of ContentsApp
App ControlGetting Started
18
Luxor® Wi-Fi App
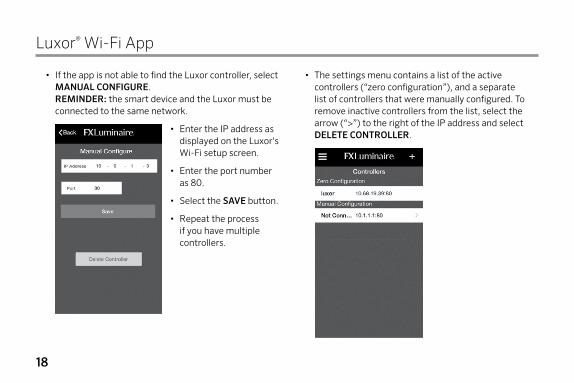
• If the app is not able to find the Luxor controller, select MANUAL CONFIGURE. REMINDER: the smart device and the Luxor must be connected to the same network.
• Enter the IP address as displayed on the Luxor's Wi-Fi setup screen.
• Enter the port number as 80.
• Select the SAVE button.
• Repeat the process if you have multiple controllers.
• The settings menu contains a list of the active controllers (“zero configuration”), and a separate list of controllers that were manually configured. To remove inactive controllers from the list, select the arrow (“>”) to the right of the IP address and select DELETE CONTROLLER.

19
Luxor® Wi-Fi App
Groups
Operating lights in the groups mode is a manual process of turning lights on or off, adjusting the intensity between zero and 100% (ZD only), and changing the colors (ZDC only). Lights will remain as specified in the app without an ending time. Existing programs will override the app selections at the next event time. For example, if all lights are on at 50% and scheduled to dim to 10% at midnight, but the homeowner wants to increase the intensity for a party, the user can change the intensity via the app to 100%, but the lights will still dim to 10% at midnight per the program. If the party is still active after midnight, the homeowner can again increase the intensity if desired.
Add a Group
1. Select the GROUPS tab to show available groups to adjust. The Luxor only displays “named” groups. If no groups are present or only a few, each can be added and named by select-ing the + GROUP button.
Table of ContentsGroups
Add a Group

20
Luxor® Wi-Fi App
2. Enter a name for a group with a description, such as BBQ, Pool, or Patio.
3. Choose the group number. All available (“un-named”) groups will appear on this list even if there has not been a fixture assigned to every group.
4. Click SAVE.
5. This group will now appear as an option under the groups tab and can be adjusted from 0-100%. Repeat these steps to add more groups.
Tips on Working with Groups
• Reorder the groups by selecting EDIT at the top right. Press and hold the “three line” icon next to each group name and drag the group into the desired position. Repeat steps to adjust order of groups.
• Press the all lights off button ( ) to turn off all lights at once. The button is not an “on” switch. To turn on lights, adjust the intensity on specific groups or activate a theme.
• Delete a group by selecting EDIT at the top right. Press the red delete icon ( ) and confirm by press-ing the secondary delete button on the right.
• FX LED devices will only perform to their specific capabilities. For example, ZD boards can zone and dim, but a standard FX LED board will only zone. Thus, when a standard device is activated via the app, the user might set the intensity to 45%, but the light will turn only to 100% for any intensity setting between 1 and 100, and to off at 0%.
Table of ContentsTips on Working with Groups
Cross References:

21
Luxor® Wi-Fi App
Themes
A theme is a planned set of groups at stated colors (ZDC only) and intensities. Using the themes mode on the Luxor app allows you to control preset lighting themes created within the Luxor app or the controller. When a theme is initiated the light levels selected for the groups within it will start. These settings will run until another theme overrides their settings or the next programmed event occurs within the controller. To turn all the lights off, set an off time for all lights within the controller or use the all lights off button ( ) at the top of the app screen.
Add a Theme
1. Select the THEMES tab to show named themes to activate. The Luxor only dis-plays “named” themes. If no themes are present or only a few, each can be added and named by selecting the + THEME button.
Table of ContentsThemes
Add a Theme
Note: If a theme was previously created at the controller, the groups will appear within the theme once the theme is named.

22
Luxor® Wi-Fi App
2. Enter a name for a theme with a description, such as Entertain, Home, or Weekend,etc.
3. Choose the theme letter. All available (“un-named”) themes will appear on this list.
4. Click SAVE.
5. This theme will now appear as an option under the themes tab and can be activated by pressing the icon. Add additional themes and descriptions using the steps outlined above.
6. Select the + Group button to add a group to a theme.
7. Select the desired intensity for that group.
8. Add additional groups with intensities as needed.
9. Select BACK to save the changes and return to the themes screen.

23
Luxor® Wi-Fi App
Tips on Working with Themes
• Themes are initiated by selecting the icon for each theme.
• Activating a new theme does not deactivate the theme currently running. Themes are designed to build on each other in cases where themes are setup by location. If a homeowner wants a theme to turn off specific groups, add a group to the theme with a 0% intensity.
• Themes are commonly created by locations (e.g. BBQ, front yard, back yard, etc.) or by lifestyle (e.g. party, security, romance, etc.).
• Reorder the themes by selecting EDIT at the top right. Press and hold the “three line” icon next to each theme name and drag the theme into the desired position. Repeat previous steps to adjust order of multiple themes.
• Press the all lights off button ( ) to turn off all lights at once. The button is not an “on” switch.
• Delete a theme by selecting EDIT at the top right. Press the red delete icon ( ) and confirm by pressing the secondary delete button appearing on the right.
Table of ContentsTips on Working with Themes

24
Luxor® Wi-Fi App
Color
The Luxor ZDC system adds color to existing zoning and dimming options. A color system requires that a ZDC LED board is installed into each desired FX LED fixture. It also requires replacing the existing Luxor ZD facepack with a Luxor ZDC facepack. Standard and ZD enabled FX fixtures will zone and zone/dim (respectively) on a ZDC facepack, but color is achieved only through the use of specif-ic ZDC LED boards.
1. Access the menu options by pressing the “hamburger” icon ( ) at the top left corner of the screen.
2. Select the COLOR PALETTE.
3. Press the “pencil” icon ( ) to edit a color position.
Table of ContentsColor
Cross References:

25
Luxor® Wi-Fi App
4. Select/confirm a color by dragging the circle selector to the desired color. Make changes in smaller increments by using the “+” and “–” buttons next to hue (horizontal) and saturation (vertical). The color is confirmed by the large color swatch.
5. Test the color in real time by selecting CHANGE and selecting a “test group” number. Press the “test” button to temporarily activate a color on the chosen group.
6. Select BACK to move to the color palette screen.
7. When editing a group, or adding the group to a theme, a LIGHT TYPE is required to define if the group consists of color or non-color fixtures.
a. If “color” is selected, the color palette menu will appear asking for the desired color. Select the new color and press BACK.
b. If “non-color” is selected, the color palette will not appear, and the user can press BACK to return to the groups or themes pages.
NOTE: The Light Type field appears only when the app is connected to a ZDC facepack.

26
Luxor® Wi-Fi App
8. The groups page displays the named groups with intensities and colors dis-played for the groups that are currently running.
a. Color groups display the color code next to the name, as created in the color palette screen.
b. Non-color groups do not have a color code, and a standard yellow color fills the color bar.
9. See groups section on page 18 for more information on groups and themes.
NOTE: Assign color fixtures and non-color fixtures to separate groups for optimum performance.

27
Luxor® Wi-Fi App
Programming with the LAM
The LAM is a device that wirelessly assigns FX LED fixtures with ZD and ZDC Technology™ to groups. To utilize the LAM, open the Luxor app on a device that is associated with the same network as the controller with the fixtures that will be assigned.
1. Insert the LAM into the headphone jack of a smartphone or tablet.
2. Access the menu options by pressing the “hamburger” icon ( ) at the top left corner of the screen.
3. Select SETTINGS.
Table of ContentsProgramming with the LAM

28
Luxor® Wi-Fi App
4. The ASSIGN LIGHTS button will appear at the bottom of the settings screen only when the LAM is inserted into the headphone jack of the smart device.
5. Press ASSIGN LIGHTS.
6. Once the assignment mode is entered, all lights will illuminate at 50% intensity.
7. The first time a device uses the LAM, the operating system typically asks for permission to allow the app to access the microphone. Select OK.
8. Once the assignment mode is entered, all lights will illuminate at 50% intensity.

29
Luxor® Wi-Fi App
9. Select dropdown box and choose the desired group to assign fixture.
10. Press and hold the assign button and point the LAM at the light fixture.
a. This can take a few seconds to initiate. It may help to move the LAM around and point it directly at the light.
11. The device will vibrate and the light will extin-guish when the fixture has been successfully assigned.
12. The remaining lights will continue in assignment mode and can continue to be assigned to the same group.
13. If a new group is desired, select it on the applica-tion and repeat the steps above.
14. Once fixtures have been assigned, exit the as-signment mode by selecting the back button, or entering the group or theme mode on the iPad. Remove the LAM from the device when not in use to conserve its battery.
15. If you experience a problem, please check compat-ible devices at www.fxl.com/LAMDevices.
16. If the LAM suddenly stops functioning, it may need a new CR2032 coin battery.
NOTE: The smart device must have a strong connection to the Luxor through either direct connect or via the network router.

30
Luxor® Wi-Fi Care and Maintenance
Wi-Fi Tips
The Luxor operates optimally at an RSSI of 70 or greater. If the RSSI indicates a value lower than 70, consider the following alternatives:
• Add an extender or access point to the local network, boosting signal closer to the Luxor.
• Move the Luxor into an area with less interference.
• Consider switching to the LAN module for a cat5 connection in areas of poor signal strength.
If the Wi-Fi signal is not as strong as you think it should be, consider possible sources of interference. This can include the following:
• Neighbors' Wi-Fi networks
• Household electronics: cordless phones, baby monitors, microwaves, etc.
• Physical interference: drywall, brick, stucco, etc.
Table of ContentsCare and MaintenanceWi-Fi Tips
Cross References:

31
Luxor® Wi-Fi Care and Maintenance
Troubleshooting
Problem Cause Resolution
Network not listed on available networks
Controller not seeing network Reset network router and verify Wi-Fi signal at transformer's location
App will not connect to Luxor Device, controller, or both are not on the wireless network
Check that device is connected to the correct network
Luxor falls off network Low Wi-Fi signal strength at controller
Elevate the network router for a better signal or add a Wi-Fi booster to increase signal at the controller
LAM will not assign a fixture Low Wi-Fi signal strength near the fixtures
Elevate the network router for a better signal or add a Wi-Fi booster to increase signal at the controller
Fixtures operate correctly from the controller, but not from the app
Low Wi-Fi signal strength at controller
Elevate the network router for a better signal or add a Wi-Fi booster to increase signal at the controller
A fixture will not turn on from app, but will under “All Lights On”
Fixture may be grouped incorrectly Using the LAM device or by returning the fixture to the transformer, group the fixture to the appropriate group
Table of ContentsTroubleshooting

32
Luxor® Wi-Fi Legal Information
Regulatory and Legal Information
This equipment has been tested and found to comply with the limits for a Class B digital device, pursuant to part 15 of the FCC Rules. These limits are designed to provide reasonable protection against harmful interference in a residential installation. This equipment generates, uses and can radiate radio frequency energy, and if not installed and used in accordance with the instructions, may cause harmful interference to radio communications. However, there is no guarantee that interference will not occur in a particular installation. If this equipment does cause harm-ful interference to radio or television reception, which can be determined by turning the equipment off and on, the user is encouraged to try to correct the interference by one or more of the following measures:
• Reorient or relocate the receiving antenna.
• Increase the separation between the equipment and receiver.
• Connect the equipment into an outlet on a circuit differ-ent from that to which the receiver is connected.
• Consult the dealer or an experienced radio/TV techni-cian for help.
The user is cautioned that changes /modifications not approved by the responsible party could void the user’s authority to operate the equipment.
To satisfy FCC RF Exposure requirements for mobile and base station transmission devices, a separation distance of 20 cm or more should be maintained between the antenna of this device and persons during operation. To ensure compliance, operation at a closer distance is not recom-mended. The antenna(s) used for this transmitter must not be co-located or operating in conjunction with any other antenna or transmitter.
Under Industry Canada regulations, this radio transmitter may only operate using an antenna of a type and maximum (or lesser) gain approved for the transmitter by Industry Canada. To reduce potential radio interference to other us-ers, the antenna type and its gain should be chosen so that the equivalent isotropically radiated power (e.i.r.p.) is not more than that necessary for successful communication.
Table of ContentsLegal InformationRegulatory and Legal Information
Cross References:

33
Luxor® Wi-Fi Legal Information
Conformément à la réglementation d’Industrie Canada, le présent émetteur radio peut fonctionner avec une antenne d’un type et d’un gain maximal (ou inférieur) approuvé pour l’émetteur par Industrie Canada. Dans le but de réduire les risques de brouillage radioélectrique à l’inten-tion des autres utilisateurs, il faut choisir le type d’antenne et son gain de sorte que la puissance isotrope rayonnée équivalente (p.i.r.e.) ne dépasse pas l’intensité nécessaire à l’établissement d’une communication satisfaisante.
• This radio transmitter (IC: 7693A-24WG0MAMB) has been approved by Industry Canada to operate with the antenna types listed below with the maximum permis-sible gain and required antenna impedance for each antenna type indicated. Antenna types not included in this list, having a gain greater than the maximum gain indicated for that type, are strictly prohibited for use with this device.
• Conformément à la réglementation d’Industrie Canada, le présent émetteur radio peut fonctionner avec une antenne d’un type et d’un gain maximal (ou inférieur) approuvé pour l’émetteur par Industrie Canada. Dans le but de réduire les risques de brouillage radioélectrique à l’intention des autres utilisateurs, il faut choisir le
type d’antenne et son gain de sorte que la puissance isotrope rayonnée équivalente (p.i.r.e.) ne dépasse pas l’intensité nécessaire à l’établissement d’une communi-cation satisfaisante.
Approved External Antenna Types
Type Manufacturer Part Number Gain
Dipole Aristotle RFA-02-C2M2-D034 2 dBi
PCB Aristotle RFA-02-P33-D034 1 dBi
PCB Aristotle RFA-02-P05-D034 2 dBi
PIFA Aristotle RFA-02-G03-D034 0 dBi
*iOS, iPad, and iPhone are registered trademarks of Apple Inc. Android is a registered trademark of Google Inc.

LANDSCAPE & ARCHITECTURAL LIGHTING | The Intersection of Art & Engineering
1940 Diamond Street, San Marcos, California 92078 USA
www.fxl.com FXLIT-164 3/15