white paper wds
TRANSCRIPT

8/14/2019 White Paper WDS
http://slidepdf.com/reader/full/white-paper-wds 1/15
Zero-Touch OSDeployment Using WDS

8/14/2019 White Paper WDS
http://slidepdf.com/reader/full/white-paper-wds 2/15

8/14/2019 White Paper WDS
http://slidepdf.com/reader/full/white-paper-wds 3/15
2 | P a g e
Zero-Touch OS Deployment Using WDS
Introduction Zero-touch or hands free installation of an Operating System is the first task that needs to be
performed when new computers, workstations or servers are deployed. This task can be carried
out by a combination of technologies: Microsoft Windows Deployment Services and RES
Automation Manager.
Windows 2008 R2 has built-in capabilities of PXE, TFTP imaging and pre-staging that can be
automated using Automation Manager. This is a highly cost-effective solution that does not
need any manual intervention. Workstations and servers can be deployed directly where they
need to be used without a staging process and additional transportation.
Desired Behavior
A new to-be-deployed machine must be enrolled, or pre-staged, in order to determine the
configuration. After being pre-staged, the machine is booted and PXE will pick up the request.
The end user must not be involved in this process by pressing F12 or other buttons. Preferably
the NIC should be the first in the machine boot-sequence.
WDS is configured so the machine is assigned a predefined name and joined to a domain.
After OS deployment, the Automation Manager agent is configured either to join an Automation
Manager team or to execute a predefined Automation Manager module to clean up the
installation or to further configure the machine.
After deployment, the PXE configuration should be set so the end user is not tempted to press
F12. Unknown machines must not be served by PXE to avoid unintentional imaging of those
machines.
WDS Configuration
Windows Deployment Services
WDS works closely with DHCP, PXE, DNS and AD. As all of these functions are part of theWindows server platform, it is cost-effective to use them. DHCP can be offered by a non-
Windows server.
Configure WDS to respond only to “known” computers. To make a new machine known to WDS,
it can be added to AD. The AD attribute “netbootMachineFilePath” determines the response of
PXE to the request.

8/14/2019 White Paper WDS
http://slidepdf.com/reader/full/white-paper-wds 4/15
3 | P a g e
Zero-Touch OS Deployment Using WDS
Some values are:
\boot\x64\PXEBoot.com (requires the F12 button for PXE boot)
\boot\x64\PXEBoot.n12 (no F12 needed)
\boot\x64\abortPXE.com (boots next device, probably hard disk)
There is an equivalent for 32 bit machines.
WDS Install
Make sure DNS, AD and DHCP are working correctly (not necessarily on the same server). Add
WDS with both Deployment Server and Transport Server as server roles. Start the Windows
Deployment Services tool from the administrative tools menu. Select the server and right-click
“configure server”.
DHCP Option 60
Now life gets complicated: if DHCP and PXE (part of WDS) are running on the same server, both
processes must receive the DHCP request packet from the clients. This can be achieved by
setting DHCP option 60. This redirects PXE requests to port 4011. If PXE and DHCP are running
on separate servers, this option must NOT be set.
PXE Server Initial Settings
Set to “Respond only to known client computers” or to “Respond to all client computers”
depending on what you want to achieve. In a tight managed environment, select “Respond only
to known client computers” and let Automation Manager take care of the rest.
Do not select “Require administrative approval”.
Images
WDS makes use of images in 2 stages: a pre-boot operating system and an installed operating
system.
First add a pre-boot OS: in the WDS admin tool, select the server and the folder “Boot Images”
. Right-click to add a boot image. Select the “Sources” folder from the Windows2008R2
installation DVD -> boot.wim.
You can add multiple boot operating systems for different platforms (x86 or x64).
The operating system that is intended to be installed on the target machines must be added
the same way: in the WDS admin tool, select the server and the folder “Install Images”. Right-
click to add an install image. This can be obtained from a Windows 7 or Windows 2008
DVD\sources\install.wim.

8/14/2019 White Paper WDS
http://slidepdf.com/reader/full/white-paper-wds 5/15
4 | P a g e
Zero-Touch OS Deployment Using WDS
You may create different “image groups” for workstation and server operating systems. In this
document we assume two image groups: workstations and servers.
The Automation Manager agent is manually added to the Windows 7 or Windows 2008 image
using the DISM command. Mount the image, add a c:\temp folder and copy the MSI into this
folder. Unmount the image and do not forget to use the /commit option.
Boot Menu Config
Right click the server and select properties. Now select the “Boot” tab. Select “Always
continue the PXE boot” in order to not to be dependent on end-users pressing buttons. If you
allow a user to press the F12 button, the success of the procedure depends on a user reading
the screen and acting accordingly. This rarely happens, so do not rely on it.
Boot Loop
We assume the NIC to be the first in priority in the boot order. This can cause a boot loop: WDS
deploys the image and setup kicks-in. During setup, the machine reboots and everything starts
from the beginning. To avoid this situation, WDS can change the boot program during
deployment if the following registry key is set:
[HKEY_LOCAL_MACHINE\SYSTEM\CurrentControlSet\services\WDSServer\Providers\WDSPXE\Prov
iders\BINLSVC]
"ResetBootProgram"=dword:00000001
Unattend.xmlIn the process, we need two unattend.txt files: one that is used in WinPE phase (winpe.xml)
and one that is associated with the image and is needed after WInPE phase (postpe.xml).
Right click on the imported images and select “Properties” -> Check “Allow to install in
unattended mode”, select the “PostPE.xml” file and finish with “OK”.
Leave the WinPE.xml in the WdsClientUnattend folder in the RemoteInstall install folder

8/14/2019 White Paper WDS
http://slidepdf.com/reader/full/white-paper-wds 6/15
5 | P a g e
Zero-Touch OS Deployment Using WDS
Automation Manager Configuration
Prestaging Computers
The objective is to pre-populate AD with details on the to-be-deployed computer. A significant
detail is the identifier that must be used to differentiate between computers. Such an
identifier can be: hardware GUID or MAC address.
Create a task in Automation Manager “Execute command”, with the following command-line:
C:\windows\system32\wdsutil.exe /add-device /device:$[Workstation name] /id:$[MAC
Address] /wdsclientunattend:wdsclientunattend\WinPE.xml
/bootprogram:boot\x64\pxeboot.n12 /referralserver:<FQDN of your WDS server>
This module requires two parameters:
Workstation name: text; may not be empty
MAC address: text; input mask HH-HH-HH-HH-HH-HH; may not be empty.
Installing the Automation Manager Agent
The Automation Manager agent is installed in the last phase of the setup. You may choose to
either: create an MSI that will put the machine in a preconfigured team, or install the MSI with
an option ADDTOTEAM to make sure the machine will join a specific team. A new member of
this specific team will run a job/module with one parameter [NetBIOSName] and the following
tasks: Delete Local user: Logon name = tempaccount
This line removes the unavoidable useraccount that you need to configure during setup. You
may change the name, but then make sure you change the name in the PostPE.xml file as well.
Auto-Generate Computer Names
In real-life, people tend to not remember the last issued computer name. And they don’t need
to. The task can easily be automated using the following task, which can be combined with the
pre-staging command task.
Prerequisite: create a string type registry key somewhere in the HKLM\software tree on the
WDS server, for example: HKLM\Software\Maverick keyname: Counter, value xxxx where xxxx is
the last issued computername number. So if PC-2345 is your last deployed workstation, the
value of “Counter” is: 2345.

8/14/2019 White Paper WDS
http://slidepdf.com/reader/full/white-paper-wds 7/15

8/14/2019 White Paper WDS
http://slidepdf.com/reader/full/white-paper-wds 8/15
7 | P a g e
Zero-Touch OS Deployment Using WDS
The Unattend Files
WDS has split the unattend config over two files:
WinPE.xml
This file is only used in the Windows PE phase of the setup and determines the connection to
the WDS server, the image to be used and the disk configuration. Changing the disk partitions
may be done in this file. This file uses credentials to connect to the WDS server. These
credentials will not be traceable on the target system as this xml file is destroyed during the
second phase of the installation.
PostPE.xml
This file is used after the reboot of the Windows PE phase. It contains a password of the local
admin account. Please note that this line will be automatically removed; no worries on
security.
The machine name is a parameter %MACHINENAME%, which will automatically be replaced by
WDS. WDS also takes care of the credentials to add the machine to the domain.
The RunSynchronous section of the “Specialize” phase contains the installation of the
Automation Manager client. The MSI is assumed to be in a C:\temp folder. So before deploying
the image, you must stick this MSI into this folder. (Use DISM to modify the image).
8/14/2019 White Paper WDS
http://slidepdf.com/reader/full/white-paper-wds 9/15
8 | P a g e
Zero-Touch OS Deployment Using WDS
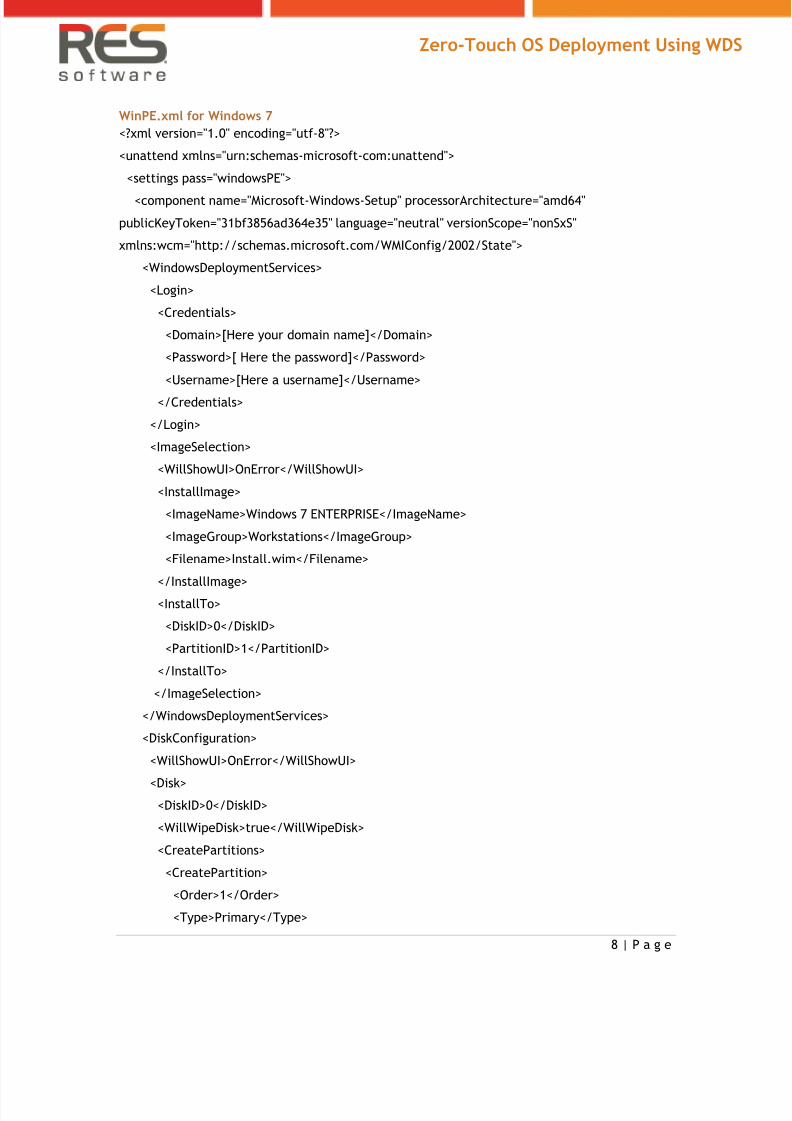
WinPE.xml for Windows 7
<?xml version="1.0" encoding="utf-8"?>
<unattend xmlns="urn:schemas-microsoft-com:unattend">
<settings pass="windowsPE">
<component name="Microsoft-Windows-Setup" processorArchitecture="amd64"
publicKeyToken="31bf3856ad364e35" language="neutral" versionScope="nonSxS"
xmlns:wcm="http://schemas.microsoft.com/WMIConfig/2002/State">
<WindowsDeploymentServices>
<Login>
<Credentials>
<Domain>[Here your domain name]</Domain>
<Password>[ Here the password]</Password>
<Username>[Here a username]</Username>
</Credentials>
</Login>
<ImageSelection>
<WillShowUI>OnError</WillShowUI>
<InstallImage>
<ImageName>Windows 7 ENTERPRISE</ImageName>
<ImageGroup>Workstations</ImageGroup>
<Filename>Install.wim</Filename>
</InstallImage>
<InstallTo>
<DiskID>0</DiskID>
<PartitionID>1</PartitionID>
</InstallTo>
</ImageSelection>
</WindowsDeploymentServices>
<DiskConfiguration>
<WillShowUI>OnError</WillShowUI>
<Disk><DiskID>0</DiskID>
<WillWipeDisk>true</WillWipeDisk>
<CreatePartitions>
<CreatePartition>
<Order>1</Order>
<Type>Primary</Type>
8/14/2019 White Paper WDS
http://slidepdf.com/reader/full/white-paper-wds 10/15
9 | P a g e
Zero-Touch OS Deployment Using WDS
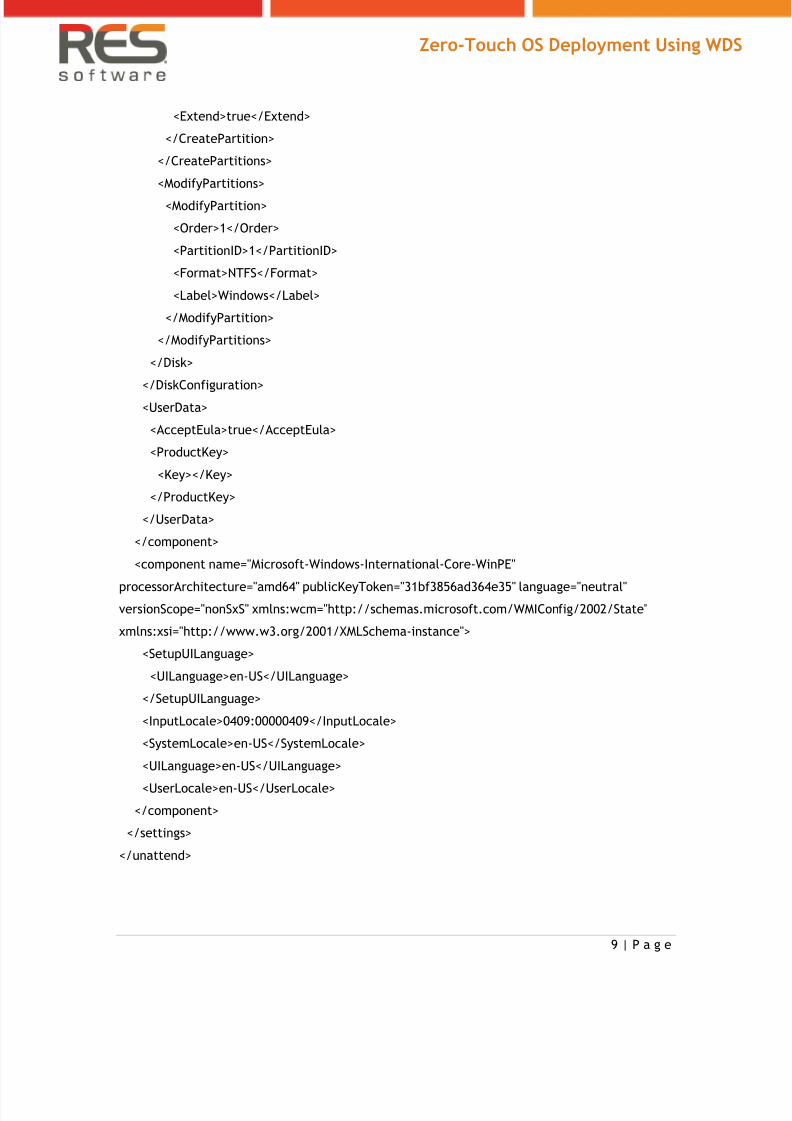
<Extend>true</Extend>
</CreatePartition>
</CreatePartitions>
<ModifyPartitions>
<ModifyPartition>
<Order>1</Order>
<PartitionID>1</PartitionID>
<Format>NTFS</Format>
<Label>Windows</Label>
</ModifyPartition>
</ModifyPartitions>
</Disk>
</DiskConfiguration>
<UserData>
<AcceptEula>true</AcceptEula>
<ProductKey>
<Key></Key>
</ProductKey>
</UserData>
</component>
<component name="Microsoft-Windows-International-Core-WinPE"
processorArchitecture="amd64" publicKeyToken="31bf3856ad364e35" language="neutral"versionScope="nonSxS" xmlns:wcm="http://schemas.microsoft.com/WMIConfig/2002/State"
xmlns:xsi="http://www.w3.org/2001/XMLSchema-instance">
<SetupUILanguage>
<UILanguage>en-US</UILanguage>
</SetupUILanguage>
<InputLocale>0409:00000409</InputLocale>
<SystemLocale>en-US</SystemLocale>
<UILanguage>en-US</UILanguage>
<UserLocale>en-US</UserLocale>
</component>
</settings>
</unattend>

8/14/2019 White Paper WDS
http://slidepdf.com/reader/full/white-paper-wds 11/15

8/14/2019 White Paper WDS
http://slidepdf.com/reader/full/white-paper-wds 12/15
11 | P a g e
Zero-Touch OS Deployment Using WDS
<Extend>true</Extend>
</CreatePartition>
</CreatePartitions>
<ModifyPartitions>
<ModifyPartition>
<Order>1</Order>
<PartitionID>1</PartitionID>
<Format>NTFS</Format>
<Label>Windows</Label>
</ModifyPartition>
</ModifyPartitions>
</Disk>
</DiskConfiguration>
<UserData>
<AcceptEula>true</AcceptEula>
<ProductKey>
<Key></Key>
</ProductKey>
</UserData>
</component>
<component name="Microsoft-Windows-International-Core-WinPE"
processorArchitecture="amd64" publicKeyToken="31bf3856ad364e35" language="neutral"versionScope="nonSxS"
xmlns:wcm="http://schemas.microsoft.com/WMIConfig/2002/State"
xmlns:xsi="http://www.w3.org/2001/XMLSchema-instance">
<SetupUILanguage>
<UILanguage>en-US</UILanguage>
</SetupUILanguage>
<InputLocale>0409:00000409</InputLocale>
<SystemLocale>en-US</SystemLocale>
<UILanguage>en-US</UILanguage>
<UserLocale>en-US</UserLocale>
</component>
</settings>
</unattend>

8/14/2019 White Paper WDS
http://slidepdf.com/reader/full/white-paper-wds 13/15
12 | P a g e
Zero-Touch OS Deployment Using WDS
PostPE.xml
<?xml version="1.0" encoding="utf-8"?>
<unattend xmlns="urn:schemas-microsoft-com:unattend">
<settings pass="specialize">
<component name="Microsoft-Windows-Shell-Setup"
processorArchitecture="amd64" publicKeyToken="31bf3856ad364e35" language="neutral"
versionScope="nonSxS"
xmlns:wcm="http://schemas.microsoft.com/WMIConfig/2002/State"
xmlns:xsi="http://www.w3.org/2001/XMLSchema-instance">
<ComputerName>%MACHINENAME%</ComputerName>
<TimeZone>W. Europe Standard Time</TimeZone>
</component>
<component name="Microsoft-Windows-UnattendedJoin"
processorArchitecture="amd64" publicKeyToken="31bf3856ad364e35" language="neutral"
versionScope="nonSxS"
xmlns:wcm="http://schemas.microsoft.com/WMIConfig/2002/State"
xmlns:xsi="http://www.w3.org/2001/XMLSchema-instance">
<Identification>
<UnsecureJoin>TRUE</UnsecureJoin>
<JoinDomain>[Here your domain]l</JoinDomain>
</Identification>
</component>
<component name="Microsoft-Windows-Deployment" processorArchitecture="amd64"
publicKeyToken="31bf3856ad364e35" language="neutral" versionScope="nonSxS"
xmlns:wcm="http://schemas.microsoft.com/WMIConfig/2002/State"
xmlns:xsi="http://www.w3.org/2001/XMLSchema-instance">
<RunSynchronous>
<RunSynchronousCommand wcm:action="add">
<Description>EnableAdmin</Description>
<Order>1</Order>
<Path>cmd /c net user Administrator /active:yes</Path></RunSynchronousCommand>
<RunSynchronousCommand wcm:action="add">
<Description>Install RES-AM</Description>
<Order>2</Order>
<Path>msiexec /i "c:\temp\RES-AM-Agent-6.0.1.1.msi" /qn</Path>
</RunSynchronousCommand>

8/14/2019 White Paper WDS
http://slidepdf.com/reader/full/white-paper-wds 14/15
13 | P a g e
Zero-Touch OS Deployment Using WDS
</RunSynchronous>
</component>
<component name="Microsoft-Windows-International-Core"
processorArchitecture="amd64" publicKeyToken="31bf3856ad364e35" language="neutral"
versionScope="nonSxS"
xmlns:wcm="http://schemas.microsoft.com/WMIConfig/2002/State"
xmlns:xsi="http://www.w3.org/2001/XMLSchema-instance">
<InputLocale>0409:00000409</InputLocale>
<SystemLocale>en-US</SystemLocale>
<UILanguage>en-US</UILanguage>
<UserLocale>en-US</UserLocale>
</component>
<component name="Microsoft-Windows-SystemRestore-Main"
processorArchitecture="amd64" publicKeyToken="31bf3856ad364e35" language="neutral"
versionScope="nonSxS"
xmlns:wcm="http://schemas.microsoft.com/WMIConfig/2002/State"
xmlns:xsi="http://www.w3.org/2001/XMLSchema-instance">
<DisableSR>1</DisableSR>
</component>
</settings>
<settings pass="oobeSystem">
<component name="Microsoft-Windows-Shell-Setup" processorArchitecture="amd64"publicKeyToken="31bf3856ad364e35" language="neutral" versionScope="nonSxS"
xmlns:wcm="http://schemas.microsoft.com/WMIConfig/2002/State">
<UserAccounts>
<AdministratorPassword>
<Value>[Here the admin password]</Value>
<PlainText>true</PlainText>
</AdministratorPassword>
<LocalAccounts>
<LocalAccount wcm:action="add">
<Description>Temp account</Description>
<DisplayName>Temp account</DisplayName>
<Group>Users</Group>
<Name>TempAccount</Name>
</LocalAccount>

8/14/2019 White Paper WDS
http://slidepdf.com/reader/full/white-paper-wds 15/15
14 | P a g e
Zero-Touch OS Deployment Using WDS
</LocalAccounts>
</UserAccounts>
<OOBE>
<HideEULAPage>true</HideEULAPage>
<NetworkLocation>Work</NetworkLocation>
<ProtectYourPC>1</ProtectYourPC>
<SkipUserOOBE>true</SkipUserOOBE>
</OOBE>
</component>
<component name="Microsoft-Windows-International-Core"
processorArchitecture="amd64" publicKeyToken="31bf3856ad364e35" language="neutral"
versionScope="nonSxS"
xmlns:wcm="http://schemas.microsoft.com/WMIConfig/2002/State"
xmlns:xsi="http://www.w3.org/2001/XMLSchema-instance">
<InputLocale>0409:00000409</InputLocale>
<SystemLocale>en-US</SystemLocale>
<UILanguage>en-US</UILanguage>
<UserLocale>en-US</UserLocale>
</component>
</settings>
</unattend>
RES Software would like to extend special thanks to Kees Baggerman of Inter Access and Arie Joosse fortheir research. They were key contributors to this document, and we appreciate their continued support.