what is warpath? - mantic blog · pdf filewhat is warpath? warpath is a mass-battle wargame...
TRANSCRIPT

1
What is Warpath?
Warpath is a mass-battle wargame set in Mantic’s science-fiction universe. The players assume the role of a battlefield commander, overseeing the firefights and long-ranged engagements fought out by their futuristic armies. These armies – human, alien, robot or something in between – are represented by Mantic’s range of 30mm scale miniatures, and all of the action takes place on a tabletop battlefield. It is up to the players to use all of their wits to make the tactical decisions required to win the game, with the help of the dice to represent the random element of war.
Warpath is designed to represent the large-scale conflict of the future – defending a city against a rampaging horde of alien creatures, battling to take a well-fortified strategic objective, or simply killing as many of the enemy as possible before they can overwhelm the planet! The game is usually played with upwards of 30 figures per side; sometimes many more.
These two rulebooks, Warpath and Warpath: Firefight, contain everything you need to know to play out Warpath’s dramatic battles. The core rules of both games are very simple to learn, but it will take some time and experimentation to master the art of winning a futuristic war.
Warpath
This book, Warpath, is for the upper end of the scale, and really comes into its own in games of over 100 figures per side. Warpath focuses on teams, units, and combined arms; it does not concern itself with the detail of minor flesh wounds and individual soldiers. This game is about the major casualties, the psychological effects of warfare, and the strategies required to win the war. The nature of the battles is purposefully kept fairly abstract to allow you to play out extensive campaigns, but still in a refreshingly short amount of time.
Warpath is designed for epic battles of strategy, where the key to victory is to use the right troops at the right time. Huge battles can be played out, where no one model can win you the fight, but a cunning plan can.
The game retains enough character to feel like the science-fiction war game it should, but some of the
detail is filtered to speed up play and focus the players’ attention on the tactics.
Warpath: Firefight
For those who want to get deeper into the action, Warpath: Firefight zooms in and allows you to play out the fates of each individual soldier in smaller conflicts of 30-100 figures per side. It is a game for hobbyists who want every one of their lovingly-painted miniatures to impact the outcome of the battle. You can find out more in the Firefight Rulebook [insert pic].
Both Warpath and Firefight use the same miniatures range, but take common mechanics and apply them to two different gaming styles to give you the perfect sci-fi gaming fix no matter your preference.
Insert photos of a typical sized army for each version.
Even smaller-scale skirmishes in the Warpath universe are played out in Deadzone, Warpath’s sister game in Mantic’s sci-fi range. The miniatures are again interchangeable, but Deadzone zooms in to capture the intricate detail of the more delicate reconnaissance missions, with just 5-30 figures per side, and a campaign system where your troopers will gain experience and improve their skills between missions.
The Universe
Warpath recreates battles fought out across the breadth of corporate space, from the towering cities of Corporation Central to the unexplored planets of the outer spheres. You can learn more about the Warpath universe and all of its inhabitant races in the accompanying sourcebook [insert pic].
The Hobby
Warpath is not just a game, it’s a hobby. The miniatures that make up your army are supplied unassembled and unpainted, giving you the chance to make something truly unique. Some of the most exciting parts of Warpath are customising your force, collecting and painting the models, and bringing everything together on the tabletop.
Checkout the sourcebook for more information on the painting and modelling aspect of the game.

2
What You Need to Play
Double-page spread. Insert photo of a board set up for a game, with captions pointing to each of the following things.
An Opponent
Warpath is a two-player game – you’ll need someone to command the other army! If you’re just starting out why not share the Two-Player Battle Set with a friend – you’ll have a small force each and you can learn the rules together. If you’re already a veteran wargamer then try introducing Warpath to your local club – it’s quick and easy to get involved. The Mantic website is also a great place to find like-minded people – check it out at www.manticgames.com.
Armies
Each player will need a collection of miniatures to represent their troops on the battlefield. For your first few games we recommend using the miniatures in the Two-Player Battle Set. Once you know what you’re doing, check out the force lists starting on page XXX. Each one lists the characteristics and abilities of a different race or faction – pick your favourite and start collecting an army.
Battlefield
You will need something to represent the surface of the planet that your battle is taking place on. This can be as simple as using your dining table at home, or you can unleash your hobby potential and have a go at making a board yourself if you want a more realistic looking game. The standard size for a Warpath table is 6 feet by 4 feet.
Terrain
It is rare for a battle to take place on an open field. With the level of firepower available in the distant future it would be foolish to make yourself such an easy target. Therefore you will need some pieces of scenery to place on the battlefield. In the game these can be used for cover and be occupied by your troops, adding another tactical angle to the game. Mantic makes a range of modular buildings that you can use to populate your table – find out more at www.manticgames.com.
Dice
War is not an exact science. The bullet fired at the right moment, the perfect timing of an infantry charge, the random nature of an explosion; all of these things have to be represented in the game to keep you on your toes. Warpath uses six-sided dice to do this and you will find some in the Two-Player Battle Set, but as you play bigger battles you may want to pick up some more.
Command Dice
After you’ve played your first few games, you’ll want to develop your skills with an extra level of strategy. Warpath’s Command system will give you extra tactical options, and you’ll need some special dice to keep track of your army’s abilities.
Counters
Sometimes it can be hard to keep track of what your units have and haven’t done in the rush of a battle. Counters are used as reminders so that the players can keep their heads clear to plan the next move.
Insert images of the following
Activation tokens (double sided, with different colours/icons per side to show if a unit has been set to overwatch/refreshed)
Suppression Tokens
Objective markers
Tape Measure
With bizarre technology and myriad alien races, Warpath has a lot of variety in the types of troops that you can field. All of these can move and shoot different distances, so you will need a ruler or tape measure to check these distances during the game.

3
Units
Warpath is played with groups of miniatures and vehicles that come together to form an army or force. Each of these groups or vehicles is referred to in the rules as a unit.
Teams
Infantry units can vary in size – small units can be more manoeuvrable, but large units can bring a lot more firepower to bear. To keep things simple in the game, units are broken down into smaller groups of miniatures called teams. Some units may consist of just a single team; some are much larger.
Each team is made up of a certain number of miniatures depending on its Class – either Infantry, Large Infantry or Massive Infantry. These units all follow exactly the same rules in the game and are affected by any rule referring to “Infantry”. The main difference between them is the number of models in each team:
Infantry units have 5 models per team.
Large Infantry units have 2 models per team.
Massive Infantry models fight on their own, so any reference to a team in the rules refers to a single Massive Infantry model.
Teams in a unit move and fight as a single entity. However, as units take casualties during a game, teams can be removed to represent the damage that the unit has taken.
Vehicles also work differently, and usually act as a unit on their own. For more on Vehicles, see page XXX.
Some armies will have different options and exceptions which will be explained in the relevant force list.
Insert labelled pictures of various unit types as examples, showing single team units and multi-team units, as well as different sizes of infantry and a vehicle. Captions

4
Hubs
Note: This section may change. If there is enough merit in always using unit stands for Warpath (because people that prefer not to now have Firefight), then the hub and coherency rules become largely obsolete – the stands will remove any ambiguity in model placement, and will have knock-on effects in simplifying line of sight and assault. This is very much up for discussion.
In Warpath, although you may have hordes of troops at your disposal, somebody needs to tell them what to do. In game this is represented by nominating a leader for each team within a unit – these are the people who will pass on your commands to the troops. At the beginning of each game you will need to nominate a clearly marked point in each of your teams that represents this leader – it could be a sergeant model, a figure painted in a different colour, a decorative banner, or a turret in the case of a tank. This is called the hub of the team. Whatever and wherever it is, it must be clearly marked so that both players can use it for reference during the game.
Insert picture of team, highlighting the hub.
Positioning
There are certain rules that define where the models in your unit can be positioned as they move across the battlefield. They are as follows:
All models in each team must remain within 2” of their hub at all times.
In units consisting of multiple teams, all hubs must be within 4” of another hub in the same unit.
No model may enter within 1” of any other unit, friend or foe, unless it is engaging an enemy in Assault (see page XXX).
No model may enter within 1” of a defensible terrain piece (see page XXX) unless the unit is occupying the terrain or Assaulting the unit within.
Insert diagram of a multi-team unit showing these distances, and showing that bases must be partially
within the coherency range, not completely within. Caption
If a unit has a specialist trooper (such as a sergeant, heavy weapon, communications officer or melee specialist) it is best to designate this figure as the hub – it will be the most visually obvious when playing.

5
Dice
Warpath uses dice to decide many aspects of the game, from who gets to deploy their units first to whether a unit is able to hit its target. Warpath uses six-sided dice to do this, referred to in the rules as D6 for short. If you need to roll multiple dice for any reason, this will be written with a number before the term D6, for example 3D6. Sometimes you will need to add or subtract a number to or from the result of a dice roll. In these cases it will be written in the form D6+2, or 2D6-1.
You may also see the term D3.
D3 simply means that when you roll the dice you divide the result in half, rounding up, so:
o 1-2 = 1. o 3-4 = 2. o 5-6 = 3.
Some of the game values used to determine whether a unit is successful in its endeavours will be written as a number followed by a plus sign, for example Acc 4+. This means that in a test against this value on the dice, results of 4 or higher are successful, and all others are not.
Modifiers
Some rules will allow you to modify a dice roll, which means that you can add or subtract from the result rolled. For example, a -1 modifier incurred by your unit being suppressed would mean that all 4s rolled would become 3s instead, and would therefore be unsuccessful if trying to make a 4+ test.
Many gamers think of this the other way around, and instead of making the result lower, the modifier makes the test harder. So, using the above example the dice results would remain as they are, but only results of a 5 or more would be successful instead of a 4 or more.
Both ways of thinking have the same end result, it just depends on your preference.
Re-Rolls
Some rules require or allow you to re-roll one or more dice. This means that you ignore the original result, take the dice and roll them again. The second result always stands, even if it’s worse than the first. Dice cannot be re-rolled more than once.
In Play
The term in play refers to any unit that is considered to be involved in the battle at a given time. Generally this will apply to all units that are still alive and on the board, with units that have left the board or been destroyed no longer counting as in play. There can be exceptions to this rule, such as units within a transport vehicle that are not physically on the table. These exceptions will be explored in the relevant sections.
Measuring
Warpath requires you to measure distances during the game to determine how far your troops can move and shoot. All distances are given in inches, so you will need a ruler or tape measure to do this during the game.
You can measure any distance at any time.
When measuring distances in Warpath, your team leaders can only give commands based on what they can see. Therefore all distances are measured from the hubs – all other parts of the unit being measured from are not important. To determine whether something is in range of an attack or ability, you measure to the closest point of the target unit.
Due to the imprecise nature of wargaming in general, in cases where you cannot be sure if something is within a certain distance or not, and might well be in or out by a tiny fraction of an inch, roll a die. On a 4+ it is in; on a lower result it is out.

6
Line of Sight
There are often times in Warpath where you will need to check whether one of your units can see another unit or objective. This is called line of sight.
Line of sight is very important in Warpath – it determines the targets that your units can shoot at. Other units, intervening terrain and your units’ chosen positions will all have a big impact, and securing the right vantage point will be a key part of your army’s tactics.
Height
All units and terrain areas in the game have a height, as shown in the chart below:
Height 0 The gaming surface Height 1 Small creatures, low scrub, low walls
and barricades Height 2 Man-sized creatures, most Infantry
units, perimeter walls Height 3 Most Vehicle units, large humanoids,
trees, one-storey buildings Height 4+ Two-storey buildings, some hills, some
large vehicles or alien beasts
In general, most unit types have a standard height depending on their Class:
Infantry and Large Infantry are height 2.
Massive Infantry and Vehicles are height 3.
Some units may have a different height specified in their unit entry, but otherwise you should use the heights listed above.
Players should always agree before deployment on the height of each terrain area on the table, noting this down if necessary. If the players agree that a terrain area (or a part of the battlefield) is higher than the ground, then a unit that is occupying that part of the battlefield adds its height to their own. For example, if a height 2 unit is standing on a height 3 hill, it will count as a height 5 unit.
A good rule of thumb is that every 1.5” of physical height of a building or other terrain piece is equivalent to one level of height.
Designer’s Notes: Line of Sight
How to approach line of sight was one of the most challenging decisions to be made while developing Warpath, and the right answer is a very subjective issue.
On one hand we have abstract line of sight, where the calculation to determine if your unit can see a target is based on a series of almost mathematical steps. This has the benefit of being very clear-cut. However, without getting into trigonometry, which has no place in a game, abstract line of sight rules have their failings, and will throw up situations that just don’t feel right.
Wargaming is about storytelling after all, and a rule known as true line of sight can be far more cinematic. This rule invites the player to get down to the table to see the world from their models’ perspective. If the player can see the target, the model can see the target – simple! Of course, true line of sight has its own problems – it has to set out lots of qualifying criteria when it comes to partially blocked lines of sight and extravagantly posed miniatures.
At Mantic we prefer more clear-cut rules, and don’t people to refrain from fulfilling their modelling and hobby ambitions for the sake of gameplay, so Warpath uses an abstract method, described on the next page.
However, we are well aware that experienced gamers will be used to true line of sight and find it intuitive to bend down to the table and immerse themselves in the action, regardless of the rules. Luckily, dynamically posed models aside, you will find that if you use true line of sight for Warpath then the vast majority of the time you will reach the same conclusion anyway. The step-by-step rules on the next page will just help you out for those tricky situations where you can only see a model’s outstretched arm, or when a model is smaller or larger than it should be.

7
Determining Line of Sight
Line of sight is determined separately for each team within a unit, and is a two-step process.
1. Blocking Units and Terrain
Firstly you will need to establish if any other unit or terrain piece on the board blocks line of sight. Draw a straight line from your hub’s base to any part of the target unit’s base. If there is nothing blocking that line (other models in the shooting unit are ignored), proceed to step 2. If another unit or piece of terrain blocks this line, determine if line of sight can still be established with the following criteria:
All units and terrain areas block line of sight to some degree. The entire area of a unit blocks that line up to the unit’s height, regardless of the position of the models within it. Consider the outermost figures in the unit to be the edges, and consider all gaps between the models to also block line of sight. This represents the fact that in real life the troops would be moving rather than being in the static positions portrayed by the miniatures.
Terrain or units of a lower height than either the shooter or the target unit are completely ignored for determining line of sight. It is assumed that you can just see through or over them. An example would be a height 1 barricade in front of a height 2 Infantry unit. Note that terrain bonuses such as cover still apply.
Units and terrain always block line of sight to units behind them of the same height or lower, regardless of the actual models, unless the shooter is higher than the blocking unit or terrain piece, as detailed above.
Defensible terrain (see page XXX) can always be seen into and out of, but not through.
If there is anything blocking your view, then you cannot draw line of sight and must select a new target. If you determine that there is nothing blocking your view, proceed to step 2.
2. Cover
Sometimes you will be able to see part of a unit, either because the unit is behind a wall or barricade, or because some of the models in the target unit are completely hidden from view behind a larger piece of terrain. This is called cover.
See note on hubs – this section may change accordingly.
If at least half of the target unit’s hubs are partially or completely obscured by another unit or piece of terrain, the unit is in cover and anyone targeting the unit will suffer penalties when shooting.
If direct line of sign can be drawn to more than half of the hubs in the unit, then it is not in cover.
Any obstructions that are in base contact with the shooting unit are not counted as cover for the target unit.
Units inside defensible terrain are always in cover.
Due to the imprecise nature of wargaming in general, in cases where you cannot be sure if something is within line of sight or cover, and might well be in or out by a tiny fraction of an inch, roll a die. On a 4+ it can be seen; on a 3 or less it cannot.
Insert photo showing one target fully in view, one visible to the eye, but not visible based on the height conditions (seen through a piece of terrain, or between the gaps in a unit for example), and one partially visible (in cover). The shooting unit in the example should be behind a wall itself (in base contact). Caption

8
Unit Statistics
Each unit in Warpath has a series of game values that determine its effectiveness on the battlefield. These are called statistics (or stats for short) and together form the unit’s statline or profile. These are listed below. Teams within a unit move, shoot and fight together, using the same Speed, Accuracy, Defence, Resilience and Nerve stats, but may have different weaponry.
Double-page spread - Insert image of Enforcer Unit Profile in centre of page, with each of the following in a caption with an arrow pointing to the appropriate stat.
Enforcers (1-2 Teams) Infantry
Spd Acc Def Res Ner
6 3+ 5+ 4 3
Enforcer Strike Team Points: 90 Special Rules: Anti-Grav, Communications
Weaponry
Weapon Range Power AP Special Genling 45 Laser Assault Rifles
24” 6 1
Assault Weaponry A 4 -
Enforcer Ranged Support Team Points: 15 Upgrade any Enforcer Strike team to a Ranged Support Team, granting: Additional Weaponry
Weapon Range Power AP Special Burst Laser 36” 4 1
Enforcer Heavy Support Team Points: 125 Special Rules: Anti-Grav, Communications
Weaponry
Weapon Range Power AP Special >Missile Launchers (AT) 6-48” 4 4 Anti-Tank, Heavy Firepower >Missile Launchers 6-48” 4 1 Blast (D3+1), Heavy Firepower >Pistols 12” 6 1 Assault Weaponry A 4 -
Enforcer Unit Leader Points: 30 Upgrade any 1 team to a Unit Leader, granting:
+1 Nerve
Command ❶
Unit
The stat values at the top apply to the entire unit, no matter which teams it includes, or how many of them there are.
Unit Name
The name given to the unit. When you write out your own army list you can always come up with your own unit names.
Unit Size
The minimum and maximum number of teams that can be taken in this unit, selected from those below.
Speed (Spd)
This determines how far the unit can move in inches with a Move action.
Accuracy (Acc)
This is the dice roll required for the unit to hit the enemy with a Shoot action.

9
Defence (Def)
This value represents both the toughness and armour of the unit, and is the dice roll that the enemy requires to damage it in both Shooting and Assault.
Resilience (Res)
This value represents how much damage a unit can withstand before a team is destroyed.
Nerve (Ner)
This represents the unit’s morale, and is used to determine the point at which a unit can no longer fight at full effectiveness, or even flee the battle completely.
Class
This states whether the unit is Infantry, Large Infantry, Massive Infantry or a Vehicle.
Teams
Each unit entry will list a number of teams for each unit. These can be selected in various combinations depending on the battlefield role that the player wants them to fulfil.
Points
This determines each team’s value within the army, and is used when calculating the size of your force. See Building a Force on page XXX.
Restrictions
The number of each type of team than can be taken within a unit. This may list minimums and/or maximums. If there is no number listed, any number of that team type can be taken.
Special Rules
This section will list any equipment or ability possessed by the team that bestow special rules upon the unit. These rules will be in effect for the entire unit while the team remains in play. Definitions for these special rules can be found on pages XXX.
Weaponry
Most teams will have multiple types of weapon and will have more than one value in this section.
Range
The distance in inches that each weapon can fire.
Sometimes this will be a single number, indicating the maximum range of the weapon.
Sometimes this will be a pair of numbers separated by a hyphen – the lower number indicates a minimum range at which the weapon can shoot.
Sometimes this will be written as the letter A, indicating that this weapon is used in Assault, or R, indicating that this weapon is used by a Vehicle when it rams another unit.
Power
The number of dice rolled when the team attacks with this weapon.
AP (Armour Penetration)
How easily the weapon can pass through enemy armour. This will modify an opponent’s Defence roll in an attack.
Special
Some weapons will also have special rules. These rules apply only to the weapon they are listed for, not to
Alternative Weapons
Some weapons will have this symbol: [insert symbol, written as > in the Forces Section], and are classed as alternative. This means that the unit carries multiple weapons or ammunition types but can only fire one at a time. Each time the unit shoots it must choose only one weapon with the > symbol to use.
Command (Cmd)
Some units will have an additional value listed under their special rules or upgrades sections called Command, allowing them to issue Orders to other troops on the battlefield. This is covered in full on page XXX.

10
any other weapons carried by the unit unless explicitly stated.
Unit Upgrades
Some units will allow certain teams to be upgraded with additional personnel that grant the unit additional rules or improved stats. As with the team special rules, these rules will be in effect for the entire unit while the team containing the upgrade remains in play.

11
Setting up a Game
Before you play a game there are certain steps you must follow. The Warpath universe is huge and diverse and the set-up process will carry this through into your games – no two will play out the same!
You will need to select which soldiers are going to be fighting for you, who you’re going to be fighting against, why you’re going to be fighting them, and where you’re going to be fighting. Many players like to build a narrative around their army – where each unit commander has a name and a history, and each battle is a part of a long campaign with a goal wider than occupying a single objective. For more on building a story around your games, see the Campaigns section on page XXX.
Of course, many players prefer to play one-off games, at home or at a local gaming club with friends, or competitively in tournaments. Whichever type of game you prefer, the process is as follows.
1: Build your Force
As the commander-in-chief, you decide which troops will fight for you in each battle. You can take the same force every time, or you can try out different combinations to see what works best. For full details on how to select a Warpath force, see page XXX.
2: Select Mission
With such a wide range of unusual species, there’s an equally wide range of motives for warfare. Some battles are fought over seemingly trivial political matters, some to claim a valuable asset, and some just because the troops are hungry!
Warpath has a set of missions that represent the varying objectives that a force may be given by their commander, and each one has a different way to win, forcing you to use all manner of different tactics. For more information on Missions, see page XXX.
3: Place Terrain
Terrain is integral to Warpath. With such advanced weaponry and equipment, battles across open ground would be over in seconds – the victor would be the one quickest to the draw. Instead, the terrain on the table is as important as your opponent – you’ll often find you need to go through the terrain to get to your
enemy, or go through your enemy to hold a key piece of terrain!
The battlefields of the future will tend to be fairly dense – it would be foolish for a general to bring the fight to the enemy on open ground. Sometimes you will want to build specific pieces of terrain; to represent a base that your army fights from, or a particular objective, such as a comms tower. In most games more generic pieces will be useful – medium-sized buildings, small forests, watchtowers etc. Here are some examples:
Insert photos of terrain pieces.
For the full rules on how each piece of terrain works in the game, see page XXX.
Some missions will have specific terrain requirements, and this will be listed in their briefing. Otherwise there is a standard method that can be used to set up your table in as fair a way as possible.
As a general rule, you should have one piece of terrain for every 2 square feet of table area. For a 6’ x 4’ table that means you should have around 12 pieces of terrain, although a couple more or less will work just fine.
Split the terrain pieces equally between the two players. You should then take it in turns to each place a piece of terrain onto the board.
Remember that you haven’t yet determined where you will deploy your forces, so try not to favour any one area of the table.
It is best to keep the pieces fairly evenly spaced.
Try to keep the arrangement of the terrain as realistic as possible to get a more cinematic looking table – don’t put a grassy hill between a pair of skycrapers for example.
Alternatively, ask a third, impartial person to set the terrain up for you before the game.
Insert two photos of boards – one grassy with hills, trees and individual buildings, and one city table.
4. Roll for Initiative
With the battlefield in place, it’s time to see who has arrived first and chosen their position.

12
Each player should roll a D6. The player with the highest result wins the Initiative, and may choose which of the deployment zones he deploys in. Some missions may instead have an Attacker and Defender, in which case the player with Initiative may choose which he is. In the case of a draw, both players must re-roll their dice.
5. Deploy
During this phase the players will take it in turns to place their units onto the battlefield one at a time, starting with the player who has Initiative, and continuing until all units are deployed. If one player has more units than the other, once one player has no units left to deploy his opponent may then deploy all remaining units at once.
All units must be placed fully within the deployment zones shown on the map for the mission (see page XXX), unless a special rule states otherwise.
Important: Units following the normal deployment rules may not be placed in terrain pieces that are even partially outside the deployment zone.
Diagram
Some players may choose to place units in reserve using the Orders rules on page XXX, should the mission allow it. This counts as deploying a unit, but it is placed off of the table and the player must tell his opponent that the unit is starting the game in reserve.
6. Play!

13
Missions
Warpath is a game that tells a story; a game that recreates the outcome of a fierce battle. When you read these tales of war, how many of them are about two groups of soldiers simply lining up to fight? Warpath is about more than that, and missions are a chance to give your army a purpose – a reason to fight and a strategy for how they will do it. There are six core missions detailed over the next few pages that represent some of the most common battle scenarios, and if you visit www.manticgames.com you will find more mission briefings to test out your force.
Sometimes you may want to play a specific mission, maybe because it’s part of a storyline that you are working through. Sometimes however, you may just want to obliterate your enemies without worrying about any other objectives! If you aren’t planning to play any particular mission, roll a D6 before the game. The result will tell you which of the six missions you will be playing. Each mission briefing will have the following headings:
Forces
Some missions will impose certain restrictions on the forces chosen for the game, such as not allowing certain troop types, or selecting a larger force for one player than the other.
Terrain
Some missions will have specific requirements for placing terrain onto the board, and these should be taken into account before you use the terrain placement rules on page XXX.
Deployment
Each mission briefing will incorporate a map of the battlefield. As well as showing the placement of any terrain pieces, this will also highlight the areas in which the forces should be deployed at the start of the game.
First Activation
Some missions will specify which player takes the first Activation. Otherwise, the player with the Initiative may choose who goes first.
Game Length
Each mission will specify a number of Turns that the game will last. This is the amount of time that the players have to determine the victor.
Victory
Each mission will have different victory conditions. This section will outline what the players have to do to win.
Victory Points
Most missions will define the victor as the player who has accumulated the most points by the end of the game, and each mission will list the different ways that these points can be obtained.
Special Rules
Some missions will specify additional special rules that apply to the troops on the battlefield during the game.

14
1. Violent Encounter
Basic Pitched Battle.
Forces
There are no restrictions for this mission.
Terrain
There is no specific terrain requirement for this mission.
Deployment
Insert map – deployment zones are within 12” of the two long edges of the board.
First Activation
The player with the Initiative may choose who goes first.
Game Length
The game will last for 4 Turns.
Victory
This mission uses Victory Points. At the end of the game, if one player has a 2 or more point lead over the other then that player is the winner. Any other result is a draw.
1 victory point is awarded for every 10% of the enemy’s force destroyed, based on the size of the starting forces.
For example, in a 2000 point game, players will obtain a victory point for every 200 points’ worth of the enemy’s force that they destroy.
5 more core missions to be added

15
Sequence of Play
The game is broken down into a series of Turns, during which each unit on the table has the opportunity to activate. Each Turn is further broken down into a number of Activations, one for each unit.
Each mission briefing will tell you how to determine which player takes the first Activation in the first Turn. In the second and subsequent Turns, the player who finished first in the previous Turn will take the first Activation.
During each Turn the players will alternate activating their units. During each Activation a player must activate a single unit that is not marked as activated.
After a player has activated their chosen unit, play then passes to the opponent who may take his Activation in the same way. This continues back and forth until all units are marked as activated.
If a player has no units left to activate, he passes, and his opponent may activate all remaining units, one at a time as usual.
Activations
A unit’s Activation is its opportunity to move, shoot and fight, and each unit may only be activated once in a Turn unless a special rule says otherwise. Each Activation allows a unit to make up to two different Short Actions, or a single Long Action.
Before you choose which actions to take with a unit, you should always check the number of Suppression Tokens assigned to it, as they may affect what it is able to do. For more on Suppression, see page XXX.
You should declare to your opponent which action you are taking before you move the miniatures, so that they are aware of what you are doing and can react if necessary.
Short Actions
Move
Shoot
Assault
Regroup
Long Actions
Enter/Leave Terrain
Double Move
Disengage
Rally
In addition, a unit can choose to do nothing. This still marks the unit as activated.
All stages of an Activation must be completed before play passes to the opponent. When the player has finished with each unit he must place an activation token [insert picture of activation token] next to it to show that it cannot act again this Turn.
Important: A unit that starts its Activation engaged with an enemy unit (see page XXX) may only Assault or Disengage.
A unit that starts its Activation grounded (see page XXX) must first make a Recovery roll, and can then only Rally.
If units consisting of multiple teams ever get separated by more than the distances listed on page XXX (by taking casualties from the middle of a unit for example), they cannot make any actions other than Regrouping or Rallying until they have made a Move or Double Move action that will bring them back into coherency.

16
End of the Turn
When all units have been marked as activated then the Turn is over. Remove all of the activation tokens from the table, remove 1 suppression token (see page XXX) from each unit, and start the next Turn with the player who finished first in the previous one.
Overwatch
It is not always the right time to act, and you may want to hold your units back to react to your opponent’s movements.
When it is your Activation, instead of activating a unit in the normal way you can choose to put it on Overwatch instead. You may place an Overwatch counter [insert pic of counter] next to the unit, and play passes to your opponent without you making any actions.
You can then activate this unit later in the Turn as a separate Activation. A unit on Overwatch may only make a single short action during their Activation. Once the unit has completed its Activation, turn the Overwatch counter over to mark the unit as activated.
In addition, units on Overwatch may make a Shoot action as a charge reaction (see page XXX).
If the only units left to activate in your force are on Overwatch and your opponent has regular Activations left to make, you may choose to pass your Activation without doing anything. Once only Overwatching units remain available to activate on both sides, both players must resume alternately activating their Overwatching units until everything has been activated.
Units that are grounded or engaged may not be put on Overwatch.
Designer’s Notes: Sequence of Play
Gone are the days of “I Go, You Go”. Alternate activation is the in-thing now – it creates a more dynamic game by allowing players to react to opponents’ moves, and adds an additional level of decision-making in choosing the order to move your units – act early and shoot first, or risk being attacked for a potentially better opportunity without retaliation later in the turn.
For Warpath, alternate activation at a basic level was a no-brainer – to give the game its sci-fi feel it had to be dynamic and reactive. Originally we also toyed with a few more original ways of doing it – activating multiple units at once depending on the skill of the commander, tests to activate subsequent units, and so on.
However, in the end we went back to basics and stuck with activating a single unit at a time – no passing, nothing special. Mantic’s design philosophy is about keeping the core rules as simple as possible, with the focus instead on accessibility and tactical choice. The extra complexity didn’t add anything to the gameplay other than additional steps to work through. Instead, this extra choice has been added back in through the Orders system, adding a resource-management element to the game without complicating it for the players who don’t want or need that option.
Another expectation of a sci-fi game is overwatch, where a unit is on standby to react to the action of another. Of course with an alternate activation game this is inherent in the system, but we wanted to include it anyway. By not providing an option to pass on an Activation, we were again able to streamline the core rules, but added the ability back in under the guise of an “Overwatch” rule.
Overwatch is a valuable tactic for small, elite armies who may otherwise be overwhelmed by forces with more units acting unimpeded at the end of each Turn. Putting units on Overwatch allows the smaller forces to wait for the right moment to strike and react to the oncoming horde.

17
Actions
The following section describes the common actions available to most units. Some units may have other actions available to them, and these will be listed in their unit entry in the forces section.
Important: Each unit may only perform each type of action once during its Activation, unless a special rule states otherwise.
Move – Short Action
This action allows the unit to move up to its Speed value in inches. Each team in the unit is moved independently, providing it ends its move within coherency of the rest of the unit (see page XXX).
To move a team, measure from the hub in your chosen direction, and move it to the new position. Place the rest of its team members (if applicable) within 2” of it as usual.
Repeat this step for any other teams within the unit, ensuring that the hubs end up within 4” of each other as normal.
The positioning of the models within each team can change freely as the unit moves, and some of them may end up moving further than their Speed value – this doesn’t matter – only the hub does.
Friendly Infantry models can be freely moved through during a move action, but the moving unit must complete its move at least 1” away.
A unit may not move within 1” of an enemy unless it is engaging it in assault. It may not end its move within 1” of any defensible terrain piece unless it is occupying the terrain or assaulting a unit inside. If there is not enough space to place the unit in the desired position then it cannot move to that location.
Vehicles, terrain, or enemy Infantry units within a team’s movement distance do not affect the distance it can move, but, there must be a clear path between the team’s start and end positions at least wide enough that each model in the unit can follow without the hub ever moving further than its Speed from its start point or any model entering within 1” of an enemy.
As you can see, there is space on the other side of the Forge Father units for the Marine unit to fit, within its
Speed value.
However, the gap between is not wide enough for a model to pass through without entering within 1” of
the enemy, and the Marines cannot move around the outside of the enemy units as this path would take the
hub further than its Speed from its start point.
You may not move into or out of an area of terrain with a Move action – this may only be done with the Enter/Leave Terrain action (see page XXX).
Moving when Suppressed
Units that are Suppressed halve their Speed value. See page XXX for more information on suppression.

18
Engaging the Enemy
If a unit wants to engage another in melee, it may enter within 1” of one or more enemy units provided that it has sufficient Speed for one of its hubs to be placed in base contact with that enemy.
This is called a charge, and all units in contact are now engaged. The charging unit will instantly make an Assault action against the enemy and gain the charging bonus when doing so (see page XXX).
This Assault action can be made even if the assaulting unit has used its allowance of actions for that Activation (if it has already made a Double Move for example).
If the charging unit does not have sufficient movement for any one of its hubs to be placed in base contact with the enemy, it may not charge and must stop 1” away from the enemy as usual.
In units with multiple teams, some teams may be able to reach base contact and some may not. However, in the ensuing assault phase, all teams in the unit may attack.
Note that it is possible to engage multiple units at once. See the Assault section for details.
Charge Reactions
If you declare a Move action that will result in charging an enemy unit, they have a chance to react, provided that they are not marked as activated, grounded, or already engaged. Before your unit is moved, any enemy unit due to be engaged may make any of the following actions:
Move
Blaze Away (with the charging unit as the target – see page XXX)
Regroup (see page XXX)
Remove activation token (only when in defensible terrain)
Shoot (only when on Overwatch or in fortified terrain)
Moving or Blazing Away will mark the reacting unit as activated, and therefore unable to fight at full strength in the coming assault, should one still occur. Regrouping can be done for free and will not mark the unit as activated.
The unit does not have to react if it doesn’t want to.
If the enemy has multiple units being charged, he may choose the order in which they react, and each reaction must be dealt with in full before proceeding to the next.
If the reaction is a Move, the move reaction cannot end with the unit engaged with any enemy.
Note that the Shoot and Blaze Away actions do not need to be within line of sight or range at the point of reaction – they will fire as the charging unit gets closer.
If any reaction results in the charging unit being unable to reach its original target(s), the charging unit may make only a single Move action instead of the action that would have resulted in the charge, and may not charge any other units. Its Activation is over.
Any enemy units due to react that had not yet done so no longer react to the charge.
Charging into Defensible Terrain
Units inside defensible terrain of any kind (see page XXX) have readied themselves for attack and may always make a charge reaction unless they are already engaged, even if they have already been activated in this Turn. This reaction will not mark them as activated unless they already were.
If they choose none of the other options, their reaction may be to remove their activation token if they have one.
Units inside fortified terrain have taken advantage of the safety provided by their surroundings to set up fire lanes and aim. Units inside fortified terrain also have the option of a Shoot action as their charge reaction, with the charging unit as the target. Otherwise they react just like any other unit in defensible terrain.

19
Moving On and Off the Board
Unless a special rule or mission briefing says otherwise, units may not move onto or off of the board – consider the edge of the board to be an impassable wall.
Let’s say a unit of Plague 2nd Gens wants to charge a unit of Enforcers 7½” away and in the open. The Enforcer unit has not yet been activated this Turn, and can therefore react to the charge. The Enforcers have three options, they can Move, Regroup, or Blaze Away. Moving is a great way of getting out of danger, and will be the most common reaction to a charge. However, the reacting player needs to consider whether moving will force his unit into an awkward position. A cunning charging player may have been expecting his target to move away, and intentionally chased the target unit into a position out of range and line of sight. In this case with the 2nd Gens just 7½” away, the Enforcers would not be able to move far enough to escape them and so moving may not be the best option. If the reacting unit had previously been suppressed by enemy fire, a Regroup action can potentially clear this effect and prevent any penalties to the reacting unit in the ensuing assault. Our Enforcer unit has a Nerve of 3, and has only 2 suppression tokens, so it is not currently suppressed. Therefore Regrouping will not have a direct benefit at this stage. However, if Moving or Blazing Away are not useful options for a unit, it might as well Regroup – the reduced suppression will be useful later, and the action costs nothing. Our Enforcer unit has decided to Blaze Away. They can’t escape the 2nd Gens, but they may be able to stop the charge altogether if they can suppress the charging enemy – 4 suppression tokens will be enough to reduce the 2nd Gens to half Speed, and therefore they won’t have enough movement to reach the Enforcers. Even if the 2nd Gens had been closer, a Blaze Away action may still be the most viable option – you may not be able to stop them reaching you, but at the very least you can lessen the impact when they do.
Designer’s Notes: Melee in a Sci-fi Game
Lightsabres and big-boss showdowns aside, how often do you see a sword-fight or a punch-up in a science-fiction battle? Technology is such that even 100 years ago the firearm had become the weapon of choice, and so close-quarters combat doesn’t really have a place in contemporary battles, let alone sci-fi – it’s all about the guns!
Warpath has taken this to heart, and so the game is heavily focused on positioning and shooting, as opposed to the combat focus of Kings of War. Of course, the nature of the weird and wonderful alien armies in the Warpath universe means that we can’t ignore melee altogether, but we can take a different angle on it.
As you play your first few games, you will find that melee is difficult to get into. With technology as it is, combat will be excessively brutal and over very quickly, and this has been reflected in the Assault rules on page XXX. As such, committing to an assault is and should be a tough decision, and the ability to react to a charge in Warpath is a step we’ve taken to add more realism to the game, and to open up further tactical options for both players.
A lot of the time, the reactions will prevent a charging unit from reaching combat at all, but they may in the process force the target unit to waste its Activation on an undesirable action, so don’t think it’s not worth attempting a charge when the time is right, even if you won’t reach the enemy.
For melee-focused armies such as the Plague, the solution to success is to have a cohesive plan and a varied force. Plague units will invariably win most of their assaults, but to count on that happening they will need to make the most of the suppression rules to hold their targets in place with some shooting, and use the activation system to strike at the right time. Gamers accustomed to a pure close-combat playstyle may have to change their way of thinking, but we think that’s a refreshing thing to do!

20
Shoot – Short Action
Provided that your unit is not engaged with an enemy unit, it may use any ranged weapons that it has to attack from a distance. To do so, take the following steps:
1: Pick Your Target
This is a tactical decision to be made by the player – do you try to cut down the combat unit that’s getting a little too close, or do you try to take out the opponent’s long range support before he takes out yours? You cannot pick a target that is engaged with one of your own units. All teams within a unit must shoot at the same target.
2: Line of Sight
As detailed on page XXX, you will need to determine if your unit can see their target before you are able to shoot at them. If you can’t see them, you must pick a different target, or a different action (which can include changing a previous Move action into a Double Move).
3: Range
Different teams will have different ranges depending on the weaponry they are armed with, and this will be detailed in the unit’s weapon statlines.
Note: Weapons with a range of A or R are for use in Assault and cannot be used to shoot.
Distances can be measured at any time during the game. Measure the distance from each team’s hub to any point on the target unit and compare to this value. Unless specified otherwise, a unit may fire all of its weapons that are in range. Don’t forget that some teams in a unit may be in range while others are not. Note that some weapons have a minimum range.
Insert diagram measuring range from one unit to another, showing that you measure from the hub to any part of the target.
4: Fire!
Once you’ve established that you can hit your target, it’s time to find out if you actually do! Take the number of dice equal to your weapons’ Power value. For units consisting of multiple teams, roll dice for the combined weaponry of all teams in the unit that are within range and line of sight of the enemy.
If a unit has weapons with differing AP values or special rules, roll these separately or with different coloured dice.
Once you have determined the number of dice, roll them and compare to the Accuracy stat found on the unit’s statline. Some things make it easier or harder to hit and will affect the dice that you’ve rolled. These are called modifiers and are listed below.
+1 Short Range The target is within 6” -1 Cover The target is in cover (see page
XXX) -1 Fortified Terrain
The target is in fortified terrain (see page XXX)
-1 Suppression The Shooting unit is Suppressed (see page XXX)
Remember that units in defensible terrain are always in cover, and units shooting into fortified terrain will suffer both the fortified terrain and cover modifiers unless either are negated by their weapons.
These numbers are added or subtracted to the number rolled on the dice, so you will find that more or less of them will succeed when you compare to your Accuracy stat.
Important: When rolling to hit, any dice that roll a 1 always fail, and any dice that roll a 6 always succeed, even if modifiers would otherwise make a shot impossible.
If any hits are scored on the target, place one suppression token next to it (see page XXX).

21
5: Roll to Damage
Once you have rolled your dice to hit and applied all appropriate modifiers, take all of the dice that were successful and roll again.
This time you will be rolling against the Defence value of the target unit, with all successes dealing a point of damage.
Important: When rolling to damage, any dice that roll a 1 always fail, regardless of modifiers. Some units will have a Defence value of higher than 6+. In these cases it will be impossible to damage them without modifiers.
There is only one common modifier on rolls to damage:
+X Armour Piercing This value will be listed in the statline for your weaponry.
6: Remove Casualties
Compare the damage dealt to the unit’s Resilience. For every amount of damage equal to the Resilience:
Remove one team of the owning player’s choice.
Add 1 suppression token to the unit.
When a team is removed, as well as suffering a reduction in firepower the unit will lose any benefits that were provided by that team, such as special rules or stat increases. A unit can only be affected by teams that remain in play.
After casualties have been removed you no longer need to keep a note of the damage on the unit – only suppression tokens will remain in place.
7: Suppression Check
After resolving any casualties, compare any leftover damage to the unit’s Nerve value. If the amount of damage equals or beats the Nerve value, add an additional suppression token to the unit.
Note: This means that units with a Nerve equal to or higher than their Resilience will never take additional suppression from this check.
After all suppression checks have been completed you no longer need to keep a note of the damage on the unit – only suppression tokens added from the attack will remain in place.
A unit of Corporation Marines is shooting at a unit of Steel Warriors. The Corporation player checks line of sight to ensure that the Marines can see the Forge Fathers advancing toward them, and they can.
The Corporation unit has three teams of Marines, and one Ranged Support team. The closest point of their target is 19” away, and so all of their weaponry is in range. This gives a total Power of 24. However, as the Autocannon has a different AP value, the dice for this weapon should be rolled separately.
Corporation Marines usually require 4s or more to hit their target. They are not suppressed, but there is a barricade partially blocking their view so the Cover modifier will apply. 1 will be subtracted from each roll, and so the Marines will now need 5s or more to hit.
The dice are rolled – the Marines have scored 7 hits with their rifles and 2 hits with the Autocannon. These 9 dice can then be rolled again to see if they damage the Forge Fathers.
As a hit has been scored, a suppression token is added to the Forge Father unit.

22
Blaze Away
Blaze Away is an alternate type of Shoot action that represents a unit spraying an area with bullets in order to keep their enemies’ heads down. This is done by making a shooting attack as normal, but using an Accuracy value of 6+ to represent most of the shots going astray. No modifiers of any kind are applied to the roll.
No dice are rolled to damage. Instead, all hits rolled are applied to the target unit as suppression tokens (see page XXX). This is cumulative with any added by the Suppressive Fire special rule.
Our Corporation Marines from before scored 9 hits on their target. The Steel Warriors have a Defence value of 5+, which means that these dice will need a 5 or more to cause damage. However, the 2 hits from the Autocannon have an AP value of 2, which will reduce this down to a 3 or more. Again, the dice should be rolled separately to keep the results clear.
The dice are rolled. The Autocannon succeeds with both of its dice, and the hits from the rifles deal a further 4 points of damage.
This is a total of 6 points of damage, which is compared to the Resilience value on the Forge Fathers’ statline. The Resilience value has been reached once, and so one team is removed from the Steel Warrior unit, and another suppression token added.
Note: Had the damage been 8 or more, the Resilience value would have been reached twice and a second team would have been destroyed, with a third destroyed at 12 damage, and so on.
After the casualties are removed, the 2 leftover damage is compared to the Steel Warriors’ Nerve value of 3. The damage has not reached the Nerve value, so no further suppression tokens are added.

23
Assault – Short Action
Assaulting is an action that can only be taken by a unit in base contact with an enemy.
Units at such close range are assumed to hit each other very easily, and therefore the process for assaulting an enemy works like shooting, but starts at the damage phase. As such, combat can be brutal, and entering into it can be a costly decision.
To make an Assault action, follow these steps:
1: Roll to Damage
Take a number of dice equal to the Power of the unit’s Assault weapons (those with a Range of A). For units consisting of multiple teams, roll dice for the combined Assault weaponry of all teams in the unit.
Unlike shooting attacks, at close quarters the enemy can hit you back! Your opponent must simultaneously take his Assault Power dice and prepare to make an Assault roll for all of his units engaged with your unit as well. This will mark the opponent’s unit(s) as activated if they weren’t already.
Units that have already been activated will also retaliate, but with half the number of dice (rounding up). Grounded units will not retaliate.
If the defending side has multiple units in base contact with the attacking unit, the attacking player chooses how to split the attacks between the defenders, and both defenders will retaliate if they can.
If any unit has weapons with differing Armour Piercing values or special rules, roll these separately or with different coloured dice.
Once both players have determined the number of dice, each must roll them and compare to the Defence stat found on the opposing unit’s statline. Some things make it easier or harder to cause damage and will affect the dice that you’ve rolled. These are called modifiers and are listed below:
+1 Charging The unit charged in this Activation
+X Armour Piercing This value will be listed in the statline for your weaponry
-1 Suppression The unit is suppressed (see page XXX)
The numbers listed above are added or subtracted to the number rolled on the dice, so you will find that more or less of them will succeed when you compare to the opposing unit’s Defence stat. Any dice that roll a 1 always fail. Some units will have a Defence value of higher than 6+. In these cases it will be impossible to damage them without modifiers.
2: Remove Casualties
Compare the damage taken on each side to each units’ Resilience. For every amount of damage equal to the Resilience:
Remove one team of the owning player’s choice.
Add 1 suppression token to the unit.
3: Determine Winner
Once casualties have been removed you will need to determine the winner of the assault – this is the unit that has taken the least damage. In a draw, both units count as the loser.
4: Suppression Check
After resolving any casualties, compare any leftover damage to the losing unit’s Nerve value. If the amount of damage equals or beats the Nerve value, add an additional suppression token to the unit. If at this point the loser has accumulated enough suppression to be grounded, they will be overrun and the unit is destroyed and removed from the table.
The winner of an Assault never takes additional suppression from this check and is not removed even if they are grounded.
Note: This means that with a Nerve equal to or higher than their Resilience will never take additional suppression from this check.
After all suppression checks have been completed you no longer need to keep a note of the damage on the unit – only suppression tokens added from the attack will remain in place.
5: Follow Up
If the loser of an Assault is completely removed, the winner may make a free Move action, provided they were not grounded during the Assault. This free action cannot be used to engage another enemy unit. If the

24
losing unit was occupying a terrain piece, the winner of the Assault may instead make a free follow-up Enter Terrain action into the terrain and occupy it in the loser’s place.
If there was no winner, or if neither unit was destroyed, no unit may move. The surviving units remain in place and the action is over. All surviving teams in the units involved in the Assault must be moved as close to the enemy as possible if not already in base contact.
A unit of 2 teams of Plague 2nd Gens has charged a unit of Corporation Marines, 3 teams strong. The Marines have 1 suppression token, but are not yet marked as activated, and can therefore retaliate in the Assault.
The 2nd Gens have a total Power of 16, and the Marines a Power of 12. Both players roll their dice.
The 2nd Gens are rolling against the Marines’ Defence value of 4+, with an AP of 1. They have also charged in this Activation, and so have a total modifier of +2. This means that all results of a 2 or more will cause damage!
The Marines are rolling against the 2nd Gens’ Defence value of 5+, with no modifiers.
The 2nd Gens score a total of 12 points of damage, and the Marines score 5. Comparing to the respective Resilience values, the 2nd Gens have entirely wiped out the Marines, but have lost a team in return, and will accrue a suppression token because of it. A ferocious attack!
As the winners of the Assault, the leftover damage on the 2nd Gens won’t have any effect, and they can make a follow up Move action if they wish.

25
Other Actions
Regroup – Short Action
This removes 1 suppression token from the unit. See Suppression on page XXX.
Enter/Leave Terrain – Long Action
This action works exactly like a Move action, but the unit must start and/or end its Move occupying an area of terrain. All teams must be able to reach the terrain – if any cannot, the unit must remain outside the terrain piece. See page XXX for more information on terrain.
Double Move – Long Action
This action works exactly like a Move action, but the unit can move a distance of up to double its Speed value.
Disengage – Long Action
This action is only available to units that are currently engaged. It works just like a Double Move or Enter/Leave Terrain action, except that the unit cannot end its movement engaged with any enemy. Suppression will affect this action as normal.
Rally – Long Action
This removes D6+1 suppression tokens from the unit. The unit may then make a Move action as part of the Rally, although it may not engage the enemy with this Move.

26
Suppression
Suppression is a state that can be as debilitating as being damaged by the enemy, a combination of fear and self-preservation. In the game, this is represented by imposing penalties on any unit under suppressing conditions, such as heavy fire, shots out of nowhere, and injuries to squad-mates. Heavily suppressed units will go to ground, which puts them out of the action and leaves them sitting ducks to be slaughtered in close quarters. Some may even turn tail and flee the battlefield.
The following things will add suppression tokens [insert picture of counter] to a unit – place the tokens on the board next to the unit as a reminder.
1 token for taking any number of hits from a Shoot or Blaze Away action.
1 token for each successful hit scored by a Blaze Away action.
X tokens for being bit by a weapon with the Suppressive Fire (X) rule.
1 token for each team removed following a Shooting or Assault action against the unit.
1 token for leftover damage reaching or exceeding the unit’s Nerve value in a Suppression Check.
Suppression tokens will affect a unit’s ability to perform, as they will be distracted from the task at hand by their efforts to duck for cover and hide.
A unit is suppressed if ever has more suppression tokens than its Nerve value. A suppressed unit suffers the following penalties:
The unit moves at half Speed
The unit suffers a -1 penalty in both Shooting and Assault
Removing Suppression
The effects of suppression will naturally erode as troops recover. When activation tokens are removed from each unit at the end of the Turn, each unit also removes one suppression token.
Going to Ground
Sometimes a unit can take so much fire that they will dive to the floor, unable to play any further part in the battle until they can gather their wits. This is called being grounded, and can happen by accumulating a large number of suppression tokens.
A unit is grounded if it has more suppression tokens than double its Nerve value.
Grounded units are affected by the following rules:
They may not make any action during their Activation except Rally.
They may not be placed on Overwatch.
They may not make charge reactions.
They may not retaliate in Assault.
They may not issue Orders.

27
Recovery
Grounded units are at risk – the troops may turn and flee the battlefield or succumb to their wounds. When a grounded unit is activated it must try to recover before it takes any actions.
To do this it must roll one die for each team in the unit and compare the result to the unit’s Nerve value.
For every roll greater than the unit’s Nerve, a team has died of its injuries or fled the battle – one team of the owner’s choice is removed. No further suppression is added for the teams removed. Any remaining teams have recovered, and the unit must carry on with its Activation and make a Rally action as normal.
Designer’s Notes: Suppression
Suppression was one of the key concepts that we wanted to include in Warpath from the beginning. It promotes the idea that there is more to warfare than just death. Fear can be just as limiting, and the ability to fight the war on two fronts opens up a wealth of tactical choice.
The suppression system allows those forces whose shooting is not so skilled or powerful to still gain control of the battlefield. Whether or not they inflict damage, by focusing their fire on the strongest threats they can hold them back to deal with at a more opportune time.
Intelligent use of the Blaze Away action and Suppressive Fire weapons will allow a player to pin opposing units in place, even with small units of cheap, weak troops. This will delay the opponent’s advance, and leave them unable to avoid a charge from your stronger warriors. Even if you don’t have an Assault ready to go, enough suppression can force an enemy to turn tail and run.
Don’t forget that suppression will erode with time – you need to keep up the pressure!
It is vital for the opposing player to keep an eye on the suppression levels of his troops, and choose the right moments to make Regroup and Rally actions to clear it off. For situations where there’s no time for such things, the Orders system will come into play – it’s always worth saving a few Command dice for a Call to Arms or Courage Under Fire Order in the final Turns of the game – using it on the right unit at the right time can allow you to snatch victory from the jaws of defeat.

28
Terrain
We refer to the (relatively) flat and featureless gaming surface which normally constitutes the majority of the battlefield as open ground. No extra rules or exceptions apply to open ground.
Any terrain feature on the gaming surface should have a clearly defined area that shows the space it takes up on the table. This can either be the edges of the piece itself in the case of a building, or the edge of a larger base around the terrain pieces in the case of a forest – the entire base area is considered to be the terrain. These terrain areas can block line of sight and can affect movement. Players should agree on the details of each terrain piece before each game.
Impassable Terrain
Examples of impassable terrain could be cliff faces, lakes or large rocks. These are the simplest to handle – no unit can enter or move through these areas, and moving units must move around them in the same way as enemy units, except that they can approach these areas up to literally being in base contact with them as they move – there is no need to keep a 1” gap between units and these areas. The primary purpose of these pieces in the game is to limit movement and block line of sight.
Decorative Terrain
Any small terrain piece that does not have a defined area is decorative terrain and has little effect on the game, other than making your table look more realistic. Example of this can be: raised platforms, tiny buildings, crop fields, lampposts, isolated pylons, individual trees, power generators, etc. Units can move and attack over and around these without penalty, although they may partially block line of sight.
Height
All terrain that is higher than ground level must be assigned a height at the beginning of the game. See page XXX.
If the piece of terrain is a building with multiple floors, you will also need to define the height of the highest floor that figures can be placed on (the same height as the building if figures can be placed on the roof, or a
level or two lower if not). This will determine what a unit occupying the building can see.

29
Defensible Terrain
Defensible terrain is anything considered large and sturdy enough for troops to take cover in – buildings, woods, low rocky outcrops, etc. These terrain pieces are impassable to Tanks (see page XXX), but can be occupied by other units using the Enter/Leave Terrain action. The entire unit will enter the terrain piece; it is not possible to have a unit half in terrain and half not.
It is not necessary to physically place the unit on or into the terrain piece if it will be awkward to fit – units within an area of terrain are still considered to be in play, even though the models may be off of the table.
It is assumed that the troops will adapt a defensive formation around the perimeter, and effectively the edges of the terrain piece become the edges of the unit. A unit can leave terrain by measuring its movement from any point on the edge of the terrain area as if it were each occupying team’s hub. All ranges and line of sight can be drawn from any point at the edge of the terrain in the same way.
Units in defensible terrain are always in cover.
A terrain area that is already occupied cannot be entered. If it is occupied by a friendly unit you will need to move the occupiers out before any other unit can move in. If it is occupied by an enemy unit then moving into contact with the terrain will result in an Assault action against that unit.
Suppressing Units in Terrain
The protection offered by defensible terrain confers the Unflinching special rule to any unit occupying it. This means that while the unit is in terrain, at the beginning of its Activation, before any Recovery rolls, it may remove 1 suppression token.
Furthermore, this rule means that the unit does not suffer the single suppression tokens added by regular shooting, but will still suffer suppression from all other sources, such as Blaze Away, the Suppressive Fire (X) rule and taking casualties.
Sometimes it will not be obvious as to how terrain should be designated. In these situations you will need to agree with your opponent before the game using the most sensible option. Note that sometimes, a combination of terrain types may be the answer.
Take a Landing Pad for example [insert picture]. The landing pad is fairly open, so it seems odd to class it as defensible terrain. This is exacerbated when using particularly large pads – it would look and feel wrong to break them down into multiple terrain areas. The suggested solution here would be to treat the landing pad like a hill (i.e. raised yet open ground) surrounded by a barricade (providing cover). This simplifies the rules and prevents you having to define which part of the pad a unit is in during the game.

30
Terrain Capacity
At the beginning of the game you will need to agree with your opponent how many units can occupy each piece of terrain, and divide it into that number of similarly sized segments. A general rule is that a terrain area can hold one unit for every 6-12” square space it occupies, but there may sometimes be a more obvious way to split a terrain piece, such as different wings or floors of a building. This will ultimately depend on the designs available in your terrain collection.
You may also wish to define terrain sizes in more detail, by agreeing a number of teams that can fit into a specified terrain piece, so that only units of a certain size can enter it. Mantic’s Battlezones™ Scenery range is made up of modular 3” cubes – if using it, a good guideline would be to say that each 3” cube can hold a single team.
These segments are regarded as separate pieces of terrain for the purposes of gameplay. A unit occupying one such area can make a Move action to cross from one terrain area to any adjacent unoccupied terrain area (or a Double Move to cross into two adjacent terrain areas).
Units in adjacent terrain areas may also make Shoot and Blaze Away actions against each other (with the cover modifier as normal), and can also make Assault actions against each other.
No charge reactions can be made against units assaulting from an adjacent terrain piece.
Insert photo examples of different sized terrain pieces, broken down into areas. Caption
Fortified Terrain
Some terrain pieces such as bunkers are so thick and impregnable that they are classed as fortified terrain. Fortified terrain is a type of defensible terrain and will benefit from all the same rules and bonuses. It also grants extra protection to its occupants from shooting in the form of an additional modifier, and through a greater range of reactions to being charged (see page XXX).
Sometimes these pieces will be defined by the mission you are playing, but otherwise they should be agreed with your opponent before the game.

31
Special Rules and Equipment Aerial Deployment
This unit is able to enter the battlefield from above. If brought onto the table using the Reserves Order this unit may choose any point on the board to arrive, not just the board edge, provided that the unit can fit in that position without going too close to terrain or enemies. This point must be declared before the dice are rolled for the Order. The first model in the unit will be placed at that point, with the rest placed around it following the normal coherency rules.
As with the Reserves Order, if the unit has a Commander within it, this entry point can be anywhere on the board. Otherwise, the entry point must be within range of a Commander that is already on the table. Once it has been placed on the board, it may only make one short action in its first Activation, and it may not engage the enemy.
Unlike other Orders, if the roll is failed this Reserves Order is still successful – the troops will have already started their descent! However, on a failed Order roll, the opposing player may instead choose the entry position by selecting any other valid point within 12” of the original one.
Anti-Grav
This unit has jump packs, thrusters, wings or mystical powers that allow it to move off of the ground. It may move over terrain, vehicles and enemy units without following the normal rules for having a clear path. It must still have enough space to end its move in the chosen position.
Anti-Tank
This weapon is designed for destroying vehicles and penetrating bunkers. It may make additional rolls to damage Vehicles on results of 5 and 6 rather than just 6. Note that even though they grant an additional dice, the 5s still need to reach the vehicle’s Defence to actually damage it, as normal.
In addition, it ignores the fortified terrain modifier (but not the cover modifier) when shooting.
Area Effect
This weapon sprays its ammunition over a wide area. After it has made a Shoot or Blaze Away action against
an enemy unit, it may immediately make a second action of the same type against any other enemy unit within 6” of the first.
Both of these attacks are part of the same action, and will only count as a single use on a Limited (X) weapon.
Blast (X)
If this unit hits with a shooting attack, any hits are multiplied by X before rolling to damage. In Assault, the power of the weapon is simply multiplied by X. If X is a dice roll (e.g. Blast (D3)), roll one die per hit. Blast weapons also ignore cover penalties (but not fortified terrain penalties) for shooting.
Bulky
This unit cannot enter a Transport Vehicle (see page XXX).
Camouflage
This unit has a distortion field or patterned markings that make it hard to see. The unit counts as being in cover even when in the open. This rule has no further benefit when the unit is in cover.
In addition, enemies targeting this unit have trouble drawing a bead on it. Any Shoot action against this unit is a long action rather than a short action. Weapons with the Heavy Firepower rule may fire as normal.
Communications
This unit has an off-planet communications device, allowing it to benefit from the effects of the Orbital Command rule.
Experimental
When this weapon rolls to hit with a Shoot action, any dice that roll a 1 count as hitting the shooting unit itself (these hits do not add suppression tokens). However, any dice that roll a 6 to hit have their AP increased by one against the target unit, and will benefit from the Shredder rule.

32
Fire in the Hole!
When this unit charges, no charge reactions of any kind may be made, even by units in terrain, as the target unit’s vision is obscured or it is pinned in place.
Headstrong
At the beginning of its Activation, before any Recovery rolls, this unit may remove 1 suppression token.
Heavy Firepower
Shooting at full power is a long action for this weapon. The weapon may be fired as a regular short action, but it will roll half the number of dice (rounding up). The weapon may not be used to Blaze Away.
Indirect
This weapon may be used to fire at any target within range, regardless of line of sight, but will suffer a further -1 penalty to hit when targeting a unit that it cannot see.
Limited (X)
This weapon may only be used X times in a game.
Medic
After an enemy has rolled to damage against the Medic’s unit with a shooting attack, remove D3 damage points from the unit before determining casualties.
Mobile Defences
This unit counts as being in cover even when in the open. The ability has no further benefit when the unit is in cover.
Orbital Command
This unit is not placed on the board and does not need to be deployed – it represents a general or other high-ranking officer directing the battle from orbit. It is still considered to be in play and must be activated once each Turn like every other unit (although in most cases will not make an action as part of its activation). All units on the board count as being within 12” of this unit, provided they have the Communications special rule. This unit can always draw range and line of sight
to everything on the board, and is not affected by any modifiers when shooting.
The unit cannot be targeted, and for victory purposes is not considered to be a part of the force. For example, in a 2000pt game with a 100pt Orbital Commander, the force will count as 1900pts for determining the victor. Therefore killing 10% of the force would only require the opponent to destroy 190pts’ worth of units rather than 200.
Although not strictly necessary, it is a good idea to have a model to represent Orbital Commanders in the game. These models can be placed in a corner of the board as a reminder of their presence and can have activation markers placed next to them when appropriate.
Insert pic of Orbital Commander model
Recon
This unit may start the game inside any terrain piece outside the opponent’s deployment zone.
Reckless Advance
This unit has no use for clearing protocols and no need for caution as it charges into the unknown. This unit may Enter and Leave Terrain as a short action. Remember that a unit cannot make the same action twice in an Activation.
Shield (X)
Every time you Shoot or Blaze Away at this unit, you must discard the first X hits to overcome the shield’s defences (starting with those with the lowest AP value and working up). Only the hits remaining afterwards will cause any suppression and can be rolled to damage.
If a single attack inflicts twice as many hits as X (before discarding any dice), the shield has been overloaded and will not work for the rest of the battle. It will affect the Shoot action that overloaded it as normal.
Weapons with an AP of X or more ignore the effects of the shield, and will still count towards overloading it.
33
Shredder
When rolling to damage with this weapon, for any dice that roll a 6 to damage you may take an additional die and roll to damage again, with any subsequent damage added to the original total. Any 6s rolled on this second roll (or indeed any further rolls) also grant additional dice – this continues until no 6s are rolled.
There is no additional effect against vehicles.
Stun
Any damage caused by this weapon marks its target as activated.
Suppressive Fire (X)
This unit deals X suppression tokens on top of any regular suppression caused when making a Shoot or Blaze Away action. This applies even if no damage is caused, but the weapon must hit at least once. If firing multiple weapons with this rule, the totals are cumulative.
Tag
This weapon’s ammunition is fitted with geo-trackers that will alert friendly troops to the location of their enemies. Whenever this unit inflicts a point of damage on an enemy unit, place a tag token [insert pic] next to the targeted unit. Any further shooting in that Turn against the tagged unit is at +1 to hit. The tag token is removed at the end of the Turn with the activation tokens. A target unit can only be tagged once – further tag tokens will have no effect.
Tenacious
This unit is able to hold enemies in position, whether by surrounding their prey, gripping them with tentacles, or using some kind of alien weaponry. Enemy units may not make a Disengage action while in contact with a unit with this rule.
Unflinching
At the beginning of its Activation, before any Recovery rolls, this unit may remove 1 Suppression Token.
Furthermore, this unit does not suffer the single suppression Tokens added by regular shooting, but
will still suffer Suppression from all other sources, such as Blaze Away, the Suppressive Fire (X) rule and taking casualties.

34
Vehicles
In Warpath, Vehicles work in the same way as Infantry units in most cases, but you’ll find that they tend to have more firepower and heavier armour. There are some other minor changes to their rules as detailed below.
Vehicle Units
Vehicles always form a unit on their own. Even when in a formation, each vehicle is targeted and takes damage independently of any others.
Suppression
Although Vehicles do not suffer pain or duck for cover, they can still be suppressed like every other unit. In the case of a Vehicle, the suppression tokens represent the crew being shaken up, the vehicle being knocked off course, temporary damage to computer systems and so on.
However, all Vehicles have the Unflinching special rule, and cannot be grounded.
In addition, due to the protection their armour provides, they can only suffer suppression tokens from weapons capable of damaging them in the first place – they can comfortably ignore small-arms fire. For example, a Vehicle with Defence 8+ could only be suppressed by weapons with AP 2 or higher.
Damaging and Destroying Vehicles
Sometimes, a well-placed shot can spell the end for a vehicle, detonating its fuel reserves, frying its electrics, or killing its crew. To represent this, all attacks have the Shredder rule against Vehicles – for any dice that roll a 6 to damage against a Vehicle you may take an additional die and roll to damage again, with any subsequent damage added to the original total before determining if the Vehicle is destroyed. Any 6s rolled on this second roll (or indeed any further rolls) also grant additional dice – this continues until no 6s are rolled.
Unlike Infantry units, when a Vehicle is destroyed it is not always removed from the table. If the damage inflicted met but did not exceed the Vehicle’s Resilience, the model is left on the table as impassable terrain.
Of course, when a Vehicle is under heavy fire it can throw shrapnel into the surrounding area or even suffer a catastrophic explosion. If the amount of damage inflicted on a Vehicle exceeds its Resilience, the Vehicle will explode.
When this happens, all other units within 6”, friend or foe, suffer a number of hits equal to the Vehicle’s Resilience value plus D6. These will roll to damage with AP X, where X is the amount that the Resilience was exceeded by. X cannot be more than the Vehicle’s Resilience. Roll separately for each unit.
These units will take suppression tokens from the hit as if it were a shooting attack. The destroyed Vehicle is removed from the table.
If a vehicle is destroyed while inside a piece of terrain, the explosion will be confined to the terrain and will not affect any other units.
Tanks
Some vehicles such as Striders are effectively large mechanical infantry, and the only difference between them and regular Infantry is how they take damage. However, some vehicles are classified as Tanks, and they have a few additional rules.
Tank Movement
Tanks cannot enter defensible terrain, nor can they engage enemy units in defensible terrain. They can however move into and through enemy Infantry units. This is a charge and the Vehicle will make an Assault action against the unit moved through (see below), even if it ends its move out of contact. This represents the tank ramming and running over the enemy.
Tanks can charge other vehicles as well, but may not move through them.
Tanks are never considered engaged – they may move freely out of base contact with an enemy, and the enemy may do the same to them.
Tanks in an Assault
Some Tanks have a ramming value to represent the damage they do when running over enemy Infantry or ramming an enemy vehicle – this is shown in their statline as a weapon with a range of R. If a Tank with such a value charges an enemy unit (not the other way around) it will make an Assault action as normal.

35
When being charged by the enemy, Tanks may make charge reactions as if they were inside fortified terrain, i.e. they can always react, and can shoot as a reaction.
Tanks cannot retaliate in Assault unless the attacking unit is also using a ramming value, to represent the damage caused to the engaging vehicle by the collision. This retaliation roll may be made with the full number of dice regardless of whether or not the Tank has been activated this Turn, and it not be marked as activated after the Assault if it wasn’t already.
Vehicle Special Rules
Flyer
This Vehicle flies high above the battlefield. It is not deployed with other units at the start of a game. Instead, it can use its Activation to arrive on the board from any edge using a Move or Double Move action, and the Flyer and any troops on-board are not in play until it has moved onto the table.
All terrain is ignored by Flyers – if you want to position them above terrain just put the base on top of the terrain piece – the unit is not occupying it.
Flyers must always perform either a Move, Double Move or Strafing Run as part of their activation, and must end their move at least their Speed value in inches away from their starting point – they cannot stay still. Suppression has no effect on the Speed value of a Flyer.
When Shooting at Flyers they are always considered to be 12” further away than their base actually is, unless targeted by another Flyer, and shooting at them will suffer a -1 penalty due to their height and speed.
They can always be seen and can always see all enemy units. They only suffer the cover modifier when shooting into defensible terrain.
They do not have a height.
They cannot engage or be engaged in Assault.
Destroyed Flyers are never left on the table, and do not damage nearby units.
Flyers have access to a new action in addition to the standard ones:
Strafing Run – Long Action
Make a Double Move action as normal, but draw an imaginary straight line across the battlefield from the Flyer’s starting position to its end position (which can be off of the board). All units that fall underneath this line, friend or foe, and any units engaged with them, must have a shooting attack made against them (using the same weapons each time). Any Limited weapons will stop firing once they have used up their limit. Once the unit’s Activation is finished, the Flyer is removed from the table. It may return in a later Turn using a Move or Double Move as above.
Transport (X)
Some Vehicles are able to carry Infantry into battle. The Vehicle is able to carry up to X teams (these teams do not have to be from the same unit). Transported infantry units can enter and exit a Vehicle exactly as if it were a defensible terrain piece (albeit one that moves), with the exception that they cannot exit if the Vehicle has performed a Double Move action that Turn. Units can also choose to start a game inside a Transport, and placing the Vehicle containing the unit only counts as placing one unit during deployment.
While a unit is inside a Vehicle, it cannot be targeted by enemy fire (unless the Vehicle is Open-Topped – see below), and it may only make Leave Terrain (to exit the vehicle) or Regroup and Rally actions. It may not make any kind of attack, and if the vehicle becomes engaged with an enemy unit the occupants of the vehicle do not participate in the Assault. They may however choose to exit the vehicle as a charge reaction if the Transport is charged.
If they choose to exit the vehicle while it is engaged, they are placed in contact with the engaged enemy unit, as close to the Transport as possible. They become instantly engaged with the same enemy unit, and do not count as charging. Units inside a Vehicle are still in play.
Flyers that also have the Transport rule cannot safely land on the battlefield to deliver their troops – units inside a flying Transport can only exit the vehicle if they have the Anti-Grav rule.
If a Vehicle with the Transport rule is destroyed while there is a unit inside it, they suffer a number of hits equal to the Vehicle’s Resilience value plus D6. These will roll to damage with AP X (where X is the amount

36
that the Resilience was exceeded by), and are marked as activated if they weren’t already. Survivors are placed as close to the Vehicle as possible if it remains on the table, or will take its place on the table if it has been removed. Passengers in a flying Transport are destroyed with the Vehicle.
Open-Topped
Units being Transported inside an Open-Topped vehicle can attack as normal – they can choose to make a shooting attack from the back of the vehicle, and will be engaged in Assault with any enemy unit that the vehicle is engaged with (the enemy can split their attacks between the Vehicle and the occupying unit as normal, and the occupying unit can make charge reactions as if from a fortified position, just like the Vehicle itself).
The occupying unit can be targeted by enemy shooting as if they were in terrain.

37
Command
Commanders of a force are able to influence their troops to go above and beyond, and to do this you will find that some units in the game have an additional stat in their unit entry: Command.
Command Pool
All Commanders contribute to the force’s Command Pool. This is a pool of special dice that represent strategic planning and tactical communication within the force, and allow Commanders to direct their troops in ways over and above those granted by the standard rules. These abilities can turn the tide of a battle, so use them wisely!
At the beginning of a game, add together all of the Command values in your force, and take that number of Command dice and place them at the side of the board.
Insert image of Command dice (custom D8s).
Note: The number of Command dice in the pool is set at the start of the game, and is never reduced by anything other than rolling the dice to issue an Order. Losing a Commander in battle does not reduce the pool.
Orders
During the game, you may use these dice to give Orders. Orders are special abilities that will allow units to do things that they otherwise couldn’t have done, such as activating multiple times in a turn, activating simultaneously with another unit, or making special actions. The list of standard Orders can be found on
page XXX. Most armies and some individual units will also have their own unique Orders, and these will be listed in their force list. There is no limit to how many Orders you can give in a Turn, as long as you have enough dice, but each unit can only be issued 1 Order per Turn.
Giving Orders
Unless stated otherwise, Orders are always used when it is your turn to activate a unit, and only before or after the Activation, not during. The Order itself does not count as your Activation, although any units activated as part of the Orders will.
Each Order must be centred on the hub of one of your Commanders when declared – this determines who can be affected by it. Every Commander has a range of influence of 12” unless listed otherwise, and all units within that radius can be affected by their Orders. Grounded Commanders cannot issue Orders.
To give an Order, declare which Order you are giving, which Commander is giving it, and to which unit, and decide how many Command dice you want to roll for the Order. Roll the dice, and check your result.
Every O [to be replaced with a symbol] icon that you roll counts as a single success.
Every blank face rolled is a failure – the Order has been misunderstood or didn’t get through to your troops.
Every + [to be replaced with a symbol] icon means that the die can be returned to your pool after determining the result of the roll, even if the Order was unsuccessful.
A Level 1 Order will require 1 O to be carried out, a Level 2 Order will take 2 Os, and a Level 3 Order will take 3.
If you roll enough O icons to succeed, follow the instructions detailed for the Order. If you do not roll enough Os, the Order is unsuccessful.
Either way, return any dice that rolled a + to your pool, and discard the rest.
Note: If you ever roll multiple blank faces in a single roll this gives the opponent a chance to take advantage of an opportunity you’ve left open for
Command (Cmd)
The Command stat indicates a unit’s ability to control the troops around it, and contributes to the army Command Pool, granting special abilities during the battle. Teams with a Command stat are referred to as Commanders in the rules. Command can vary between teams in a unit.
Command will be listed under the special rules section of a unit/team’s entry, and can also be granted by certain unit upgrades.
[insert pic showing where to find the stat]

38
them. They may immediately add an additional Command die to their pool.
As you will see, it is possible to give any Order on a single die with the right roll, but it is often wise to roll multiple dice when attempting a higher level order.
The Command rules interrupt the usual sequence of play detailed on page XXX. Even after a player has finished activating all of his units, both players will continue to take alternating Activations until the end of the Turn.
Players with no units available to activate can still use Orders during their Activation; otherwise they may simply do nothing and pass to their opponent. If they use an Order that makes a unit available to activate, they may act with this unit as part of their Activation as normal.
The Turn will only end when both players have no units left to activate, and both choose to pass.
Symbols to be created and etched on the dice. The number below is the result on a standard D8. For reference, the dice will have these results:
1: Blank
2: O
3: O
4: O
5: O+
6: OO
7: OO+
8: OOO

39
Level 1 Orders
Bounding Overwatch
Choose two friendly units within range. One unit may make a single Move action and then be placed on Overwatch. The other may then make its Activation as normal.
Counter Attack
This Order may be given to any unit about to make a charge reaction. That unit may instead charge the unit that was charging it (provided that it can reach the target with a Double Move or Leave Terrain action), and will gain the charging bonus in the ensuing Assault.
Courage Under Fire
One unit within range removes all suppression tokens and cannot be given any more of any kind from shooting attacks for the remainder of the Turn. They can still receive them in Assault as normal.
This does not count as the unit’s Activation.
Firestorm
One unit within range that is not marked as activated may immediately make a Shoot action, re-rolling any misses. The unit is then marked as activated.
Move, Move, Move!
One unit within range that is not marked as activated may either:
Perform a Double Move action that starts or ends in a piece of terrain, or
Perform a Triple Move action (a Move at triple the unit’s Speed).
The move cannot be used to engage a unit in an Assault, and is unaffected by suppression. The unit is then marked as activated.
Level 2 Orders
Call to Arms
Your Commander regroups nearby units en-masse. Choose a Commander. All friendly units within range instantly remove suppression tokens equal to the Commander’s Command stat.
This Order is not affected by the 1 order per unit per Turn restriction, and can therefore be issued in addition to one other Order to each affected unit.
This Order may not be used by an Orbital Commander.
Flanking Manoeuvre
This Order may be given whenever you are about to make a charge reaction with a unit within range. Any other unit within range may choose to make a charge reaction instead. Like the Counter Attack order, this reaction may be used to charge the original charging unit (provided that it can reach the target with a Double Move or Leave Terrain action), and will gain the charging bonus in the ensuing Assault.
Combined Attack
Two of your units may be activated simultaneously. Both target units must be within range of the same Commander. This ability counts as a single Activation, and marks both units as activated. The units must, as part of their Activation, either:
i. Both Shoot or Blaze Away at the same target. Roll to hit and damage for both units at the same time, before determining casualties. The target unit will take a suppression token for being hit by each unit. or
ii. Both charge the same target. Engage both units with the enemy unit, one at a time, before rolling any dice, and roll to damage with both units before determining casualties. If the target unit reacts to the charge and prevents either unit from reaching Assault, they may each make a Move action as normal.
Any other part of the units’ Activations such as a Move or Regroup can be performed separately.
Refresh
Remove an activation token from a unit, granting it an additional activation in this Turn.
You may also use this Order during your opponent’s Activation when an enemy declares a charge against your unit. This will either allow your unit to make a charge reaction, or will allow them to fight in the

40
ensuing Assault. This action must be declared before the enemy unit has moved.
Reserves
You may choose not to deploy some of your units at the start of a game, unless the mission you are playing states otherwise. You may use an Order to bring these units on from any board edge during your Activation. They must arrive on the board with either a Move or Double Move from a chosen entry point. If the unit has a Commander within it, this entry point can be anywhere. Otherwise, the entry point must be within range of a Commander that is already on the table. They may not engage with the enemy as part of this Activation.
This counts as your Activation.
Level 3 Orders
Last Stand
This Order may only be given in the last Turn of the game (listed in the mission briefing). It is not played on a particular unit. Instead, it will extend the length of the game for an additional Turn. It cannot be used in the newly created Turn to extend the game even further.
Request Orbital Assistance
An Orbital Commander that has used up a Limited (X) attack and is not marked as activated for this Turn may use the attack an additional time. This counts as your Activation.
Comms Interference
Each opposing Commander’s range of influence is reduced to zero until the end of the Turn. Your opponent’s units may only have Orders used on them by Commanders within the units themselves. The Orbital Command rule has no effect for your opponent while Comms Interference is in play.

41
Specialised Orders
Some specialists within a force provide unique abilities when purchased as unit upgrades, and can be directed to use them with an Order. Only the unit containing the upgrade may be Ordered to use these abilities – they are not available to other units within the force.
Level 1 – Repair
A friendly vehicle within range may immediately remove D3+1 Suppression Tokens. This does not count as the vehicle’s Activation.
Level 1 – Precision Fire
If any enemy teams are removed from a unit directly following a Shoot action by a unit with this ability, the Shooting player may use this Order to choose one of teams that is removed instead of the owning player.

42
Picking a Force
So, now you know how to play, you’ll surely want to build up your own army. People like to play the game in many different ways so the forces are fully customisable. You can choose whether to overwhelm your opponent with hordes of basic troops, or destroy them piece by piece with a smaller elite force.
Which Force?
Certain armies are suited to certain playstyles. There is flexibility in every army, but a Veer-myn force will be at its best in large numbers, whereas an Enforcer force will be smaller but more adaptable, focusing its power in just the right places.
Of course, the way an army plays isn’t the only reason to take it into battle. Have a read through this section and see which force takes your fancy – it may be a particular backstory that you can best identify with, or you may want to pick your favourite miniature range.
Building a Force
You can play Warpath with just a few units per side, without worrying about the two sides being equally matched. This is great for learning the game, but after you’ve become familiar with the rules and have amassed a large collection of models, you might want to try a game where the forces facing one another across the battlefield are balanced, so that both players have an equal chance of winning the game.
In order to achieve this, you and your opponent must pick a force from your chosen army list before the game. First agree a total of points, say for example 1,000 points. Then start picking units from the force lists provided in this book.
Selecting Units
Each force will be made up of a number of units, each with its own entry in the force list. There are no restrictions on which units may or may not be taken –
it’s up to you to decide which units will work best for you in the game, or simply which units you like the look of! Pick your units one at a time, making a note of the amount of points that you’ve spent as you go along. Keep adding these costs together until you reach your chosen limit for the game. You cannot spend more, but you can of course spend less than the agreed total, which is a very brave thing to do!
Once you’ve decided on a unit to include in your army, you will then need to look at the different teams available to select as part of that unit. As detailed on page XXX, each unit profile may have restrictions on the number of each type of team that can be taken within a unit, as well as minimums and maximums for the number of teams taken overall.
Once a unit composition is decided, it cannot change – teams cannot leave or join for any reason other than death.
Unit Upgrades
Each force list will have a set of available upgrades to your units. The majority of these will be the unit leaders, listed under each unit entry, and there is no restriction on how many of these can be taken across the army. In addition there will be further upgrades listed separately. These can be distributed across your force as you wish, although they will be a limited resource.
Note: Building a force of your own will require a little knowledge of how the game works in practice, and which units are best in which situations. For your first few games, we recommend you use the pre-designed starter forces in the Two-Player Battle Set. Once you know what you’re doing, read on!
For example, a unit of Plague 3rd Gen Troopers must have a minimum of two teams and a maximum of five. At least one team in each unit must be regular 3rd Gens, but you are free to pick the rest. No more than two teams in the unit can carry HMGs, and no more than one can carry grenade launchers or mortars. Any number can have Beasts to support them in Assault.
Note that these restrictions will have implications on your chosen playstyle. If you want to maximise the suppressive fire that you can lay down, you’ll want to take multiple HMG and Mortar teams. However, with the limits on each unit, you’ll have to take multiple smaller units rather than fewer larger ones. Smaller units are more flexible during the game and will inflict more suppression, but will struggle to put out enough firepower to effectively destroy their enemies. You’ll need to take this into account, and allocate some of the points in your force to units that can compensate for this weakness.
If your strategy is to heavily suppress your enemy with HMGs, consider taking some fast melee units like 2nd Gens to quickly dispatch the enemies in Assault as they recover.

43
Any benefits conferred by the upgrade are over and above any possessed by the basic team.
Note that unit upgrades are written inconsistently at the moment, with regard to whether they add models, replace models, upgrade equipment, etc. This will be tidied up once the rules are more solid so that people know how to model their units.
Force Limits
To be written after playtesting. I would like to restrict the forces as little, with the points values doing their job, but if there is something that can be spammed and break the game, we’ll limit it here.
No requirement to take any Commanders, but note that you won’t be able to use any Orders if you don’t.
In addition, if a unit has the [* - symbol to be created] symbol after its name in the list, it is a unique unit. Only one such unit exists and can therefore only be taken once in the force.
Formations
Vehicles and Massive Infantry do not always fight alone. Some can be grouped into formations consisting of multiple units, and this will be detailed in their unit entry, where X is the number of Vehicles or Massive Infantry models that can be grouped together. If you choose to do this, all units in a formation will be activated together as a single Activation. They must remain within 6” of each other at all times. The units are still separate for the purposes of being targeted and taking damage. If one unit in a formation is destroyed, any others accrue a suppression token.

44
Enforcers NOTE – ALL POINTS VALUES ARE ROUGH ESTIMATES AND WILL NOT BE FULLY BALANCED UNTIL EXTENSIVE BETA TESTING HAS TAKEN PLACE.
Orders
Enforcers have access to the following Orders in addition to the standard ones.
Level 2 – Coordinated Offensive
Two of your units may be activated in the same Activation. Both target units must be within 12” of the same Commander. This ability counts as your single Activation, but marks both units as activated. The units may perform any action(s) as part of their activation. If both units Shoot or Assault the same
enemy, this must be declared before any dice are rolled, and you must roll to damage with both units before determining casualties. If both units shoot the same target, it will take a suppression token for being hit by each unit.
Level 3 - Fusillade
Choose a target. Any unactivated units with line of sight to that target may immediately perform a Blaze Away action at that target. In addition, any hits may be rolled to damage as if a Shoot action were being performed. Roll to hit and damage with all units before determining casualties. None of the participating units are marked as activated, although giving this order does count as your Activation.

45
Enforcers (1-2 Teams) Infantry
Spd Acc Def Res Ner
6 3+ 5+ 4 3
Enforcer Strike Team Points: 90 Special Rules: Anti-Grav, Communications
Weaponry
Weapon Range Power AP Special Genling 45 Laser Assault Rifles
24” 6 1
Assault Weaponry A 4 -
Enforcer Ranged Support Team Points: 15 Upgrade any Enforcer Strike team to a Ranged Support Team, granting: Additional Weaponry
Weapon Range Power AP Special Burst Laser 36” 4 1
Enforcer Heavy Support Team Points: 125 Special Rules: Anti-Grav, Communications
Weaponry
Weapon Range Power AP Special >Missile Launchers (AT) 6-48” 4 4 Anti-Tank, Heavy Firepower >Missile Launchers 6-48” 4 1 Blast (D3+1), Heavy Firepower >Pistols 12” 6 1 Assault Weaponry A 4 -
Enforcer Unit Leader Points: 30 Upgrade any 1 team to a Unit Leader, granting:
+1 Nerve
Command ❶

46
Assault Enforcers (1-2 Teams) Infantry
Spd Acc Def Res Ner
6 3+ 5+ 4 3
Enforcer Assault Team Points: 90 Special Rules: Anti-Grav, Communications
Weaponry Weapon Range Power AP Special Pistols 12” 6 1 Wristblades A 8 1
Enforcer Incinerator Support Team Points: 25 Upgrade any Enforcer Assault team to an Incinerator Support Team, granting:
Special Rule: Fire in the Hole!
Additional Weaponry
Weapon Range Power AP Special Incinerator 12” 2 1 Blast (2D3)
Enforcer Defender Team Points: 100 Special Rules: Anti-Grav, Communications, Mobile Defences
Weaponry Weapon Range Power AP Special Shotguns 12” 6 1 Assault Weaponry A 8 -
Enforcer Breach and Eradicate Team Points: 110 Special Rules: Anti-Grav, Communications
Weaponry
Weapon Range Power AP Special Pistols 12” 6 1 Thermal Rifle 18” 4 5 Anti-Tank Wristblades & Mines A 8 5 Anti-Tank
Assault Enforcer Unit Leader Points: 30 Upgrade any 1 team to a Unit Leader, granting:
+1 Nerve
Command ❶
STILL TO COME – ENFORCER BREACH AND ERADICATE TEAM

47
Enforcer Pathfinders (1-2 Teams) Infantry
Spd Acc Def Res Ner
6 3+ 4+ 4 3
Pathfinder Team Points: 95 Special Rules: Recon
Weaponry
Weapon Range Power AP Special >LSX Sniper Rifles 6-60” 4 2 Suppressive Fire (1), Tag >Pistols 12” 6 1 Assault Weaponry A 6 -
Enforcer Pathfinder D.O.G. Drone Points: 30 Upgrade any 1 team with a D.O.G. Drone, granting:
Special Rules: Communications, RDL Transmission
Additional Weaponry
Weapon Range Power AP Special Burst Laser 36” 4 1
Enforcer Pathfinder Unit Leader Points: 40 Upgrade any 1 team to a Unit Leader, granting:
+1 Nerve
Command ❶
Precision Fire Order
[BOXOUT]Special Rule: RDL Transmission
The D.O.G. Drone is primarily a support tool for isolated Pathfinder units – it carries their equipment and provides automated fire support when necessary. However, it also logs every piece of information encountered by the Pathfinders and their survey drones, building a highly-detailed map of the area, its inhabitants and any areas of military strength. This reconnaissance-data-log, or RDL, is uploaded periodically to High Command, but the drone is also equipped to perform an emergency upload during intense conflict, giving the Enforcers off-world an up-to-the-minute log of a battle’s progression and troop movements.
While a D.O.G. Drone is in play, the controlling player may re-roll a single Command die in each Turn of the game.
In addition, if the drone is destroyed during a battle, the Enforcer player may use an Order to access its final upload and give the Enforcers a unique advantage. This is a Level 1 Order, and the dice for it are rolled as soon as the drone is removed from the table. If successful, at the end of a mission when calculating victory points, roll a D6 and multiply the result by 10. Add this to the controlling player’s score.[/BOXOUT]

48
Enforcer Jetbikes (1-5 Teams) Large Infantry
Spd Acc Def Res Ner
12 3+ 6+ 3 3
Jetbike Team Points: 110 Special Rules: Anti-Grav, Communications
Weaponry
Weapon Range Power AP Special Twin Genling 45 Laser Assault Rifles
24” 6 1
Assault Weaponry A 4 -
Jetbike Ranged Support Team Points: 140 Special Rules: Anti-Grav, Communications
Weaponry
Weapon Range Power AP Special Twin Genling 45 Laser Assault Rifles
24” 4 1
Heavy Burst Laser 36” 6 2 Suppressive Fire (1) Assault Weaponry A 4 -
Jetbike Heavy Support Team Points: 150 Special Rules: Anti-Grav, Communications
Weaponry
Weapon Range Power AP Special Twin Genling 45 Laser Assault Rifles
24” 4 1
>Missile Launcher (AT) 6-48” 4 4 Anti-Tank >Missile Launcher 6-48” 4 1 Blast (D3+1) Assault Weaponry A 4 -
Jetbike Unit Leader Points: 30 Upgrade any 1 team to a Unit Leader, granting:
+1 Nerve
Command ❶

49
Enforcer Peacekeepers (1-2 Teams) Infantry
Spd Acc Def Res Ner
6 3+ 6+ 5 3
Peacekeeper Team Points: 130 Special Rules: Anti-Grav, Communications
Weaponry
Weapon Range Power AP Special Twin Genling 45 Laser Assault Rifles
24” 8 1
Energy Gauntlets A 6 3
Peacekeeper Ranged Support Team Points: 15 Upgrade any Peacekeeper team to a Ranged Support Team, granting: Additional Weaponry
Weapon Range Power AP Special Burst Laser 36” 4 1
Peacekeeper Incinerator Support Team Points: 25 Upgrade any Peacekeeper team to an Incinerator Support Team, granting:
Special Rule: Fire in the Hole!
Additional Weaponry
Weapon Range Power AP Special Incinerator 12” 2 1 Blast (2D3)
Peacekeeper Defender Support Team Points: 150 Special Rules: Anti-Grav, Communications, Mobile Defences
Weaponry
Weapon Range Power AP Special Twin Genling 45 Laser Assault Rifles
24” 8 1
Assault Weaponry A 6 -
Peacekeeper Unit Leader Points: 30 Upgrade any 1 team to a Unit Leader, granting:
+1 Nerve
Command ❶

50
Enforcer Strider (Formation: 2-3) Vehicle
Spd Acc Def Res Ner
6 3+ 7+ 4 4
Strider Points: 135 Special Rules: Communications
Weaponry Weapon Range Power AP Special Heavy Burst Laser 36” 6 2 Suppressive Fire (1) Assault Weaponry A 4 3
Strider Unit Leader Points: 20 Upgrade any 1 Strider in a Formation to a Unit Leader, granting:
Command ❶
STILL TO COME – ‘AJAX’ SIEGE STRIDER
Enforcer Accuser Interceptors (Formation: 2-3) Vehicle (Tank)
Spd Acc Def Res Ner
16 3+ 8+ 3 3
Accuser Interceptor Points: 150 Special Rules: Communications, Flyer, Transport (1)
Weaponry
Weapon Range Power AP Special >Twin Heavy Burst Lasers
36” 12 2 Suppressive Fire (1)
>Missile Pods 72” 4 5 Anti-Tank
STILL TO COME – ENFORCER PERSECUTOR BOMBER
Enforcer Orbital Commander -
Spd Acc Def Res Ner
- 3+ - - -
Orbital Commander Points: 100 Special Rules: Command ❸, Orbital Command
Weaponry Weapon Range Power AP Special
Orbital Bombardment N/A 2 5 Area Effect, Blast (4D3), Limited (1), Suppressive Fire (3)
Enforcer Unit Upgrades Enforcer Captain Points: 25 Upgrade any Unit Leader to a Captain, granting:
Command ❷
STILL TO COME – MORE COMMAND UPGRADES

51
Forge Fathers
NOTE – ALL POINTS VALUES ARE ROUGH ESTIMATES AND WILL NOT BE FULLY BALANCED UNTIL EXTENSIVE BETA TESTING HAS TAKEN PLACE.
Orders
Forge Fathers have access to the following Orders in addition to the standard ones.
Level 1 – Masters of Engineering
Forge Fathers are masters of both geology and construction, and can target the weak points in a terrain piece to bring it crumbling down around its occupants. This Order must be targeted at a friendly unit. That unit ignores all modifiers for cover and fortified terrain when shooting in that Activation.
Level 2 – ‘Tis but a Scratch!
Choose a Commander. All friendly units within range at that point are granted the Unflinching ability until the end of the Turn.

52
Forge Father Steel Warriors (1-4 Teams) Infantry
Spd Acc Def Res Ner
4 4+ 5+ 4 3
Steel Warrior Team Points: 75 Special Rules: Headstrong
Weaponry Weapon Range Power AP Special Hailstorm Rifles 24” 4 2 Assault Weaponry A 4 -
Steel Warrior Ranged Support Team Points: 15 Upgrade any Steel Warrior team to a Ranged Support Team, granting: Additional Weaponry
Weapon Range Power AP Special Hailstorm Autocannon 36” 4 2 Suppressive Fire (1)
Rekkhyrr Team Points: 110 Special Rules: Fire in the Hole!, Headstrong
Weaponry Weapon Range Power AP Special Dragonbreath Flamers 12” 8 1 Blast (2D3) Assault Weaponry A 6 -
Stormrage Veteran Team Points: 110 Special Rules: Command ❶, Headstrong
Weaponry
Weapon Range Power AP Special >Magma Cannons 36” 4 7 Anti-Tank, Heavy Firepower >Mjolnir Missile Launchers
6-48” 4 2 Blast (D3+2), Heavy Firepower
>Hailstorm Pistols 12” 4 2 Assault Weaponry A 4 -
Steel Warrior Unit Leader Points: 10 Upgrade any 1 team to a Unit Leader, granting:
+1 Nerve
Forge Father Militia (2-4 Teams) Infantry
Spd Acc Def Res Ner
4 5+ 4+ 4 2
Militia Team Points: 55 Special Rules: Headstrong
Weaponry Weapon Range Power AP Special Hailstorm Rifles 24” 4 2 Assault Weaponry A 4 -
Militia Unit Leader Points: 10 Upgrade any 1 team to a Unit Leader, granting:
+1 Nerve

53
Forge Father Brokkrs (1-4 Teams) Infantry
Spd Acc Def Res Ner
4 4+ 4+ 4 3
Brokkr Team Points: 70 Special Rules: Headstrong
Weaponry Weapon Range Power AP Special Burst Pistols 12” 4 1 Assault Weaponry A 8 1
Brokkr Bunker Assault Team Points: 20 Upgrade any Brokkr team to a Bunker Assault Team, granting:
Special Rule: Fire in the Hole!
Additional Weaponry
Weapon Range Power AP Special Magma Rifle 12” 2 7 Anti-Tank
Brokkr Unit Leader Points: 10 Upgrade any 1 team to a Unit Leader, granting:
+1 Nerve
Brokkr Engineer Points: 30 Upgrade any 1 team with an Engineer, granting:
Command ❶
Repair Order
Forge Father Valkyrs (1-5 Teams) Large Infantry
Spd Acc Def Res Ner
8 4+ 4+ 3 3
Valkyr Team Points: 85 Special Rules: Headstrong
Weaponry Weapon Range Power AP Special Twin Hailstorm Rifles 24” 8 2 Assault Weaponry A 6 -
Valkyr Unit Leader Points: 10 Upgrade any 1 team to a Unit Leader, granting:
+1 Nerve

54
Forge Father Forge Guard (1-2 Teams) Infantry
Spd Acc Def Res Ner
4 3+ 6+ 5 4
Forge Guard Team Points: 135 Special Rules: Headstrong
Weaponry Weapon Range Power AP Special Hailstorm Rifles 24” 4 2 Forge Hammers A 4 4 Blast (D3)
Forge Guard Ranged Support Team Points: 15 Upgrade any Forge Guard team to a Ranged Support Team, granting: Additional Weaponry
Weapon Range Power AP Special Hailstorm Autocannon 36” 4 2 Suppressive Fire (1)
Forge Guard Anti-Tank Support Team Points: 10 Upgrade any Forge Guard team to an Anti-Tank Support Team, granting: Additional Weaponry
Weapon Range Power AP Special Magma Cannon 36” 2 7 Anti-Tank
Forge Guard Unit Leader Points: 10 Upgrade any 1 team to a Unit Leader, granting:
+1 Nerve
STILL TO COME – HAMMERFIST DROP SQUAD
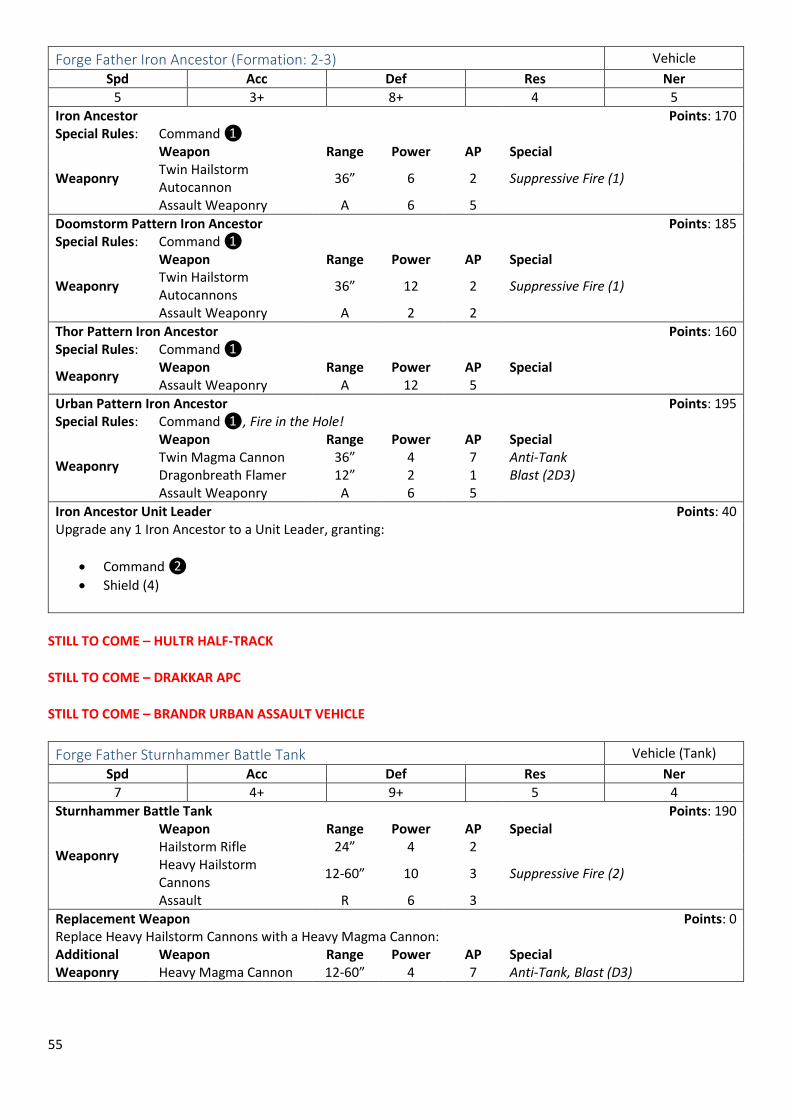
55
Forge Father Iron Ancestor (Formation: 2-3) Vehicle
Spd Acc Def Res Ner
5 3+ 8+ 4 5
Iron Ancestor Points: 170 Special Rules: Command ❶
Weaponry
Weapon Range Power AP Special Twin Hailstorm Autocannon
36” 6 2 Suppressive Fire (1)
Assault Weaponry A 6 5
Doomstorm Pattern Iron Ancestor Points: 185 Special Rules: Command ❶
Weaponry
Weapon Range Power AP Special Twin Hailstorm Autocannons
36” 12 2 Suppressive Fire (1)
Assault Weaponry A 2 2
Thor Pattern Iron Ancestor Points: 160 Special Rules: Command ❶
Weaponry Weapon Range Power AP Special Assault Weaponry A 12 5
Urban Pattern Iron Ancestor Points: 195 Special Rules: Command ❶, Fire in the Hole!
Weaponry
Weapon Range Power AP Special Twin Magma Cannon 36” 4 7 Anti-Tank Dragonbreath Flamer 12” 2 1 Blast (2D3) Assault Weaponry A 6 5
Iron Ancestor Unit Leader Points: 40 Upgrade any 1 Iron Ancestor to a Unit Leader, granting:
Command ❷
Shield (4)
STILL TO COME – HULTR HALF-TRACK
STILL TO COME – DRAKKAR APC
STILL TO COME – BRANDR URBAN ASSAULT VEHICLE
Forge Father Sturnhammer Battle Tank Vehicle (Tank)
Spd Acc Def Res Ner
7 4+ 9+ 5 4
Sturnhammer Battle Tank Points: 190
Weaponry
Weapon Range Power AP Special Hailstorm Rifle 24” 4 2 Heavy Hailstorm Cannons
12-60” 10 3 Suppressive Fire (2)
Assault R 6 3
Replacement Weapon Points: 0 Replace Heavy Hailstorm Cannons with a Heavy Magma Cannon: Additional Weaponry
Weapon Range Power AP Special Heavy Magma Cannon 12-60” 4 7 Anti-Tank, Blast (D3)

56
Forge Father Weapons Platform (Formation: 3) Vehicle (Tank)
Spd Acc Def Res Ner
3 4+ 6+ 2 3
Jotunn Weapons Platform Points: 80
Weaponry Weapon Range Power AP Special Heavy Hailstorm Cannons
60” 10 3 Suppressive Fire (2)
Assault R 4 -
Surtr Weapons Platform Points: 80
Weaponry Weapon Range Power AP Special Heavy Magma Cannon 60” 4 7 Anti-Tank, Blast (D3)
Assault R 4 -
Forge Father Unit Upgrades Forge Father Forge Lord Points: 75 Upgrade any Unit Leader to a Forge Lord, granting:
Command ❸
Special Rule: Shield (4)
Forge Father Huscarl Points: 50 Upgrade any Unit Leader to a Huscarl, granting:
Command ❷
Special Rule: Shield (4)
STILL TO COME – MORE COMMAND UPGRADES

57
The Plague
NOTE – ALL POINTS VALUES ARE ROUGH ESTIMATES AND WILL NOT BE FULLY BALANCED UNTIL EXTENSIVE BETA TESTING HAS TAKEN PLACE.
Orders
The Plague have access to the following Orders in addition to the standard ones.
Level 1 – Transfixed by Fear
Use this Order when you Assault an enemy unit. Add D3 suppression tokens to that unit before any dice are rolled for the Assault. Unflinching units are not affected by this Order.
Level 2 – Thirst for Blood
Once the victims of the Plague have tasted flesh, their hunger only grows. If a Plague unit completely destroys an enemy unit in Assault, you may use an Order to allow the follow-up Move action to end by Assaulting a second enemy unit.

58
Plague 3rd Gens (2-5 Teams) Infantry
Spd Acc Def Res Ner
5 5+ 4+ 4 2
1+ 3rd Gen Team Points: 50
Weaponry Weapon Range Power AP Special Rifles 24” 6 - Assault Weaponry A 8 -
0-2 3rd Gen Ranged Support Team Points: 10 Upgrade up to two 3rd Gen teams to Ranged Support Teams, granting: Additional Weaponry
Weapon Range Power AP Special HMG 36” 4 - Suppressive Fire (1)
0-1 3rd Gen Mortar Support Team Points: 30 Upgrade any 3rd Gen team to a Mortar Support Team, granting:
Additional Weaponry
Weapon Range Power AP Special
Mortar 12-48” 4 - Blast (D6), Heavy Firepower, Indirect, Suppressive Fire (2)
0-2 3rd Gen Grenade Support Team Points: 20 Upgrade up to two 3rd Gen teams to Grenade Support Teams, granting:
Special Rule: Fire in the Hole!
Additional Weaponry
Weapon Range Power AP Special Grenade Launcher 18” 2 - Blast (2D3)
3rd Gen Beast Support Team Points: 10 Upgrade any 3rd Gen team to a Beast Support Team, granting: Additional Weaponry
Weapon Range Power AP Special Dogs/Swarm A 6 1
3rd Gen Unit Leader Points: 10 Upgrade any 1 team to a Unit Leader, granting:
+1 Nerve
Plague Zombies (4-8 Teams) Infantry
Spd Acc Def Res Ner
5 - 3+ 3 3
Zombie Team Points: 35 Special Rules: Unflinching
Weaponry Weapon Range Power AP Special Teeth and Claws A 6 -

59
Plague 2nd Gens (1-3 Teams) Large Infantry
Spd Acc Def Res Ner
7 - 5+ 4 4
2nd Gen Team Points: 85 Special Rules: Reckless Advance, Unflinching
Weaponry Weapon Range Power AP Special Teeth and Claws A 8 1
STILL TO COME – PLAGUE ‘MURDERBIRDS’
Plague Aberration Massive Infantry
Spd Acc Def Res Ner
6 - 6+ 4 5
Aberration Points: 145 Special Rules: Bulky, Reckless Advance, Unflinching
Weaponry Weapon Range Power AP Special Teeth and Claws A 12 4
Plague Striders (Formation: 2-3) Vehicle
Spd Acc Def Res Ner
6 5+ 7+ 4 4
Plague Strider Points: 125 Special Rules: Fire in the Hole!
Weaponry Weapon Range Power AP Special Flamer 12” 4 1 Blast (2D3) Assault Weaponry A 6 3 Anti-Tank
STILL TO COME – PLAGUE TAD-65 HORNET DROPSHIP
STILL TO COME – PLAGUE VEHICLES

60
Plague Teratons (Formation: 2-3) Massive Infantry
Spd Acc Def Res Ner
5 - 7+ 2 4
Plague Teraton Points: 120 Special Rules: Command ❷, Bulky, Unflinching
Weaponry Weapon Range Power AP Special Teeth and Claws A 4 3
Plague 1st Gen Mutant Massive Infantry
Spd Acc Def Res Ner
5 - 7+ 3 5
1st Gen Mutant Points: 190 Special Rules: Command ❹, Unflinching
Weaponry Weapon Range Power AP Special
Teeth and Claws A 8 3
Plague Unit Upgrades Plague Lieutenant Points: 20 Upgrade any Unit Leader to a Lieutenant, granting:
Command ❶
STILL TO COME – MORE COMMAND UPGRADES

61
The Veer-myn
NOTE – ALL POINTS VALUES ARE ROUGH ESTIMATES AND WILL NOT BE FULLY BALANCED UNTIL EXTENSIVE BETA TESTING HAS TAKEN PLACE.
Orders
The Veer-myn have access to the following Orders in addition to the standard ones.
Level 1 – Swarm
All Nightcrawler units, regardless of armament, within range of a single Commander may be activated simultaneously. This ability counts as a single Activation, and marks all units as activated. The units may only perform a single action each (either long or short). If any units Shoot or Assault the same enemy, this must be declared before any dice are rolled, and you must roll to damage with all units before
determining casualties. Targets shot by multiple units will take a suppression token for being hit by each unit.
Level 2 – Premonition
This Order may only be given by a Tangle. The Tangle imparts one of its visions into the minds of an opponent’s unit, distracting it from the task at hand.
If the Order is successful, choose an unengaged, unactivated enemy Infantry unit within range. Roll a single die and compare it to the unit’s Nerve stat. If the result on the die is greater than the unit’s Nerve, the Veer-myn player may make a single Move action with the unit (which may not end in contact with an enemy), add a suppression token to it, and then mark it as activated.
This counts as the Veer-myn player’s activation.

62
Veer-myn Nightcrawlers (1 Team) Infantry
Spd Acc Def Res Ner
6 5+ 4+ 3 1
Nightcrawler Team Points: 40
Weaponry Weapon Range Power AP Special Ray Guns 18” 10 - Teeth and Claws A 6 -
Malignus with Chem-Laser Points: 10 Upgrade any Nightcrawler team with a Malignus with Chem-Laser, granting: Additional Weaponry
Weapon Range Power AP Special Chem-Laser 36” 4 4 Experimental
Malignus with Chem-Thrower Points: 20 Upgrade any Nightcrawler team with a Malignus with Chem-Thrower, granting:
Special Rule: Fire in the Hole!
Additional Weaponry
Weapon Range Power AP Special Chem-Thrower 12” 2 2 Blast (2D3), Experimental
Nightcrawler Stalker Team Points: 40
Weaponry Weapon Range Power AP Special Ray Pistols 8” 10 - Knives, Teeth and Claws A 10 -
STILL TO COME – VEER-MYN CREEPERS
STILL TO COME – VEER-MYN MALIGNI HEAVY WEAPON TEAMS

63
Veer-myn Nightmares (1-3 Teams) Large Infantry
Spd Acc Def Res Ner
5 5+ 5+ 4 2
Nightmare Team Points: 65
Weaponry Weapon Range Power AP Special Chem-Burners 18” 4 2 Combat Drills A 8 3 Shredder
Nightmare XXX Team Points: 65
Weaponry Weapon Range Power AP Special Twin Combat Drills A 12 3 Shredder
Nightmare XXX Team Points: 90
Weaponry
Weapon Range Power AP Special Chem-Burners 18” 2 2 Combat Drills A 4 3 Shredder Heavy Chem-Thrower 18” 4 3 Blast (3D3), Experimental
Nightmare XXX Team Points: 70
Weaponry
Weapon Range Power AP Special Chem-Burners 18” 2 2 Combat Drill A 4 3 Shredder Heavy Combat Drill A 4 4 Anti-Tank, Shredder
Veer-myn Weapons Platform (Formation: 2-3) Vehicle (Tank)
Spd Acc Def Res Ner
5 4+ 6+ 2 2
Thrower Weapons Platform Points: 80
Weaponry Weapon Range Power AP Special Super-Heavy Chem-Thrower
24” 4 3 Area Effect, Blast (3D3), Experimental
Assault R 4 -
Laser Weapons Platform Points: 80
Weaponry Weapon Range Power AP Special Super-Heavy Chem-Laser
48” 6 5 Experimental
Assault R 4 -

64
Veer-myn Night Terrors (1 Team) Infantry
Spd Acc Def Res Ner
7 5+ 5+ 4 4
Terror with Reaper Harness Points: 90 Special Rules: Unseen Terror, Unflinching
Weaponry Weapon Range Power AP Special Scythes A 10 2
Terror with Acid-Sprayer Points: 110 Special Rules: Unseen Terror, Unflinching
Weaponry Weapon Range Power AP Special Acid-Sprayer 12” 4 3 Area Effect, Blast (2D3), Experimental Teeth and Claws A 8 1
[BOXOUT]Special Rule: Unseen Terror
Night Terrors are barely controllable, especially when they see something representing a threat, or a meal! The Veer-myn do their best to keep the Terror out of sight of the enemy until the last minute, when it is unleashed.
Night Terrors are classed as regular Infantry, although the team is actually made up of the beast itself and two Nightcrawler handlers. The unit is not deployed at the start of the game – the Veer-myn player should deploy a standard Nightcrawler team in its place, and secretly make a note of which Nightcrawler team represents the Terror.
While the unit representing the Terror is within 6” of at least three other Nightcrawler teams (of any type) it can remain concealed, and will act as a Nightcrawler team except that it may not Shoot or Blaze Away.
The unit can be revealed by choice at the start of its Activation, and the models swapped out for a Terror and its handlers. It may then act as normal for that Activation onwards.
The Terror will also be revealed automatically in the following situations:
If there are no longer three other Nightcrawler units within 6” (swap the models out as soon as the last Nightcrawler unit is removed from the table).
If any Shoot or Blaze Away action scores a hit on the unit (swap the models out after the roll to hit).
If the unit is charged (swap the models out once the enemy is in contact).
If the unit begins its activation within 6” of an enemy (swap the models out before the unit takes an action).
In addition, once a Terror has been released, the Veer-myn player will no longer be in full control of the unit. At the beginning of each of the Terror’s Activations after it has been revealed, roll a die. On a 1-2 the Terror will be uncontrollable. It must move as directly as possible towards the nearest other unit, friend or foe, and engage it in Assault.[/BOXOUT]

65
Veer-myn Unit Upgrades Veer-myn Brood Mother Points: XXX Upgrade any Infantry team with a Brood Mother, granting:
+1 Nerve
Command ❸
Special Rule: Agitator
Veer-myn Progenitor Points: XXX Upgrade any Infantry team with a Progenitor, granting:
Command ❶
[BOXOUT]Special Rule: Agitator
The presence of a Brood Mother or Tangle whips the nearby Veer-myn up into a protective frenzy, which has two effects.
Firstly, it increases the Nerve value of all Nightcrawlers within 12” by 1, and they cannot be grounded while they are within this area.
Secondly, the Nightcrawlers will leap to the defence of any unit with this rule. If an Agitator is charged by an enemy unit, any other Nightcrawler unit of the owning player’s choice that is not activated, engaged or grounded within 12” may make a charge reaction on the Agitator’s behalf. In addition, if the Agitator takes enough damage from a shooting attack to be destroyed, the owning player may select any other Nightcrawler unit within 6” to be destroyed instead, as if it were a team in the same unit. The Precision Fire Order will still allow the Agitator to be selected for destruction, and the unit will also be destroyed as usual in Assault.[/BOXOUT]
STILL TO COME – VEER-MYN TUNNELLER
STILL TO COME – VEER-MYN TANGLE
STILL TO COME – MORE COMMAND UPGRADES