what is scanning and why is it useful? acid-free photo ... · copies of photos and documents, but...
TRANSCRIPT

What is scanning and why is it useful?
A scanner is like a photocopy machine. It makes copies of photos and documents, but instead of creating another piece of paper, it creates a digital image which is viewed on a computer screen. Copying original photographs into a digital format is important because photos deteriorate over time, particularly the early colour photos from the 1970s that many of us put into sticky photo albums. By scanning photographs, we can capture what they look like now before they deteriorate further. We can even digitally enhance them so that they reveal more detail than the fading original photo does. It is recommended to display copies of original photos and store your originals in a safe and dry environment. Photos and paper should not be stored in cardboard boxes or acidic paper as they will cause photos to become more acidic and deteriorate faster. It is best to store photos in an
14.1 Scanning photographs
acid-free photo album with photo corners or store them in mylar or acid-free envelopes in acid-free boxes. See our ‘Products and supplies’ information sheet on where to buy these archival products.
Digital images have many purposes and can be:
• usedfordisplayandaccess,insteadofusingoriginal photos which can be safely stored away in an acid-free environment
• displayedontheweb,givingpotentiallyworldwide access to your collection
• sentinanemail• usedinaPowerPointpresentation• reproducedontopaperorphotographicpaper• usedtoenhanceanoriginalphotobycropping,
enlarging or manipulating the image to reveal more details.
What to look for in a scanner?
Scanners have come down in price in the last few years and it is possible to pick up a very good one for about $300. If possible, avoid the 3-in-1s (printer, scanner, copier) as they have more components, each with the potential to break down. They also have less scanning tools in them.
The scanner used in the Powerhouse Museum Conservation department.

2
Before scanning
Take off bracelets and rings as these might get in the way when you are scanning and can scratch the glass plate of the scanner. This glass can’t be replaced, so you need to take care of it. It is good to keep the glass clean of dust and sticky particles that may come off the back of a photo. Use surgical wipes to clean the glass plate after every few scans.
Cleaning the screen.
Placing your photo or document for scanning
Turn on your scanner, then place a photo facedown on the scanning bed, near the centre rather than the top edge (it is easier to manipulate the crop later). Handle older photographs with great care as they can sometimes be bowed and the emulsion may crack if you put weight on top of it too quickly. Gently place a piece of grey neutral card over the photo, then slowly close the lid. The grey card reduces the glare from the white surface under the lid. It will give a cleaner scan and can help you colour match the grey with the histogram option in the scanning program.
Place the photo straight on the scanner bed.Place a grey card on top of the photo.
3
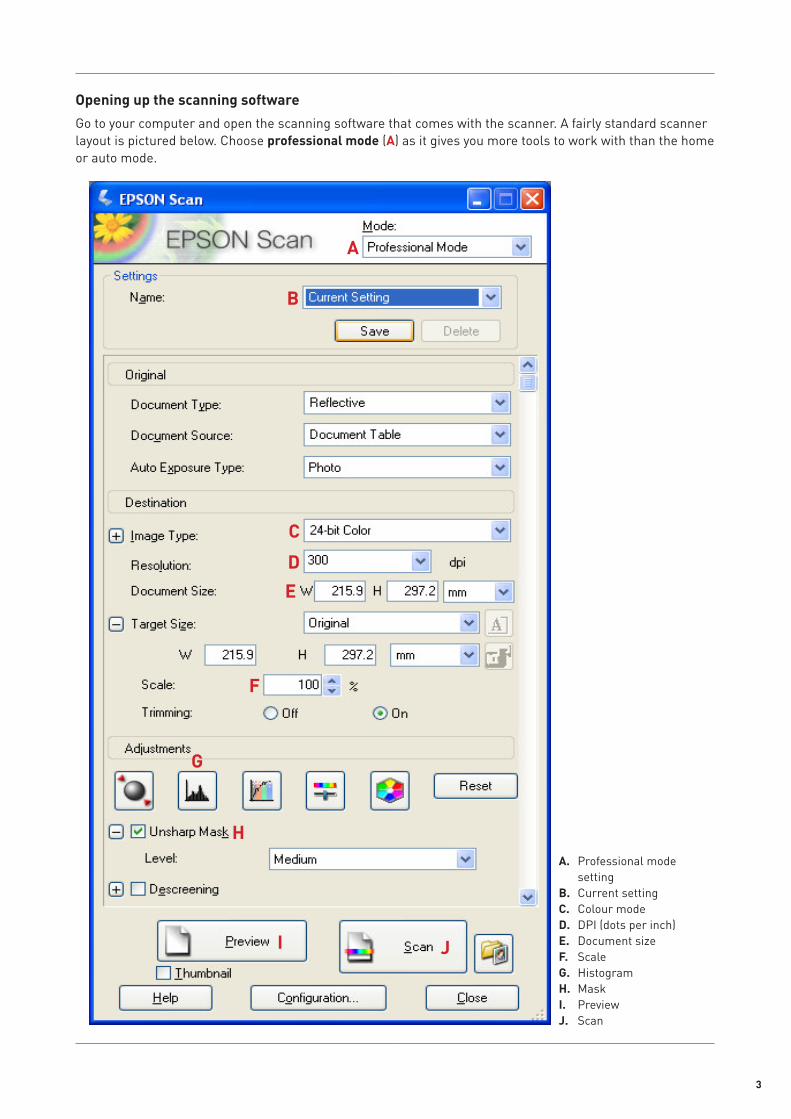
Opening up the scanning software
Go to your computer and open the scanning software that comes with the scanner. A fairly standard scanner layout is pictured below. Choose professional mode (A) as it gives you more tools to work with than the home or auto mode.
A. Professional mode setting
B. Current settingC. Colour modeD. DPI (dots per inch)E. Document sizeF. ScaleG. HistogramH. MaskI. PreviewJ. Scan
A
B
C
D
E
F
G
H
I J
4
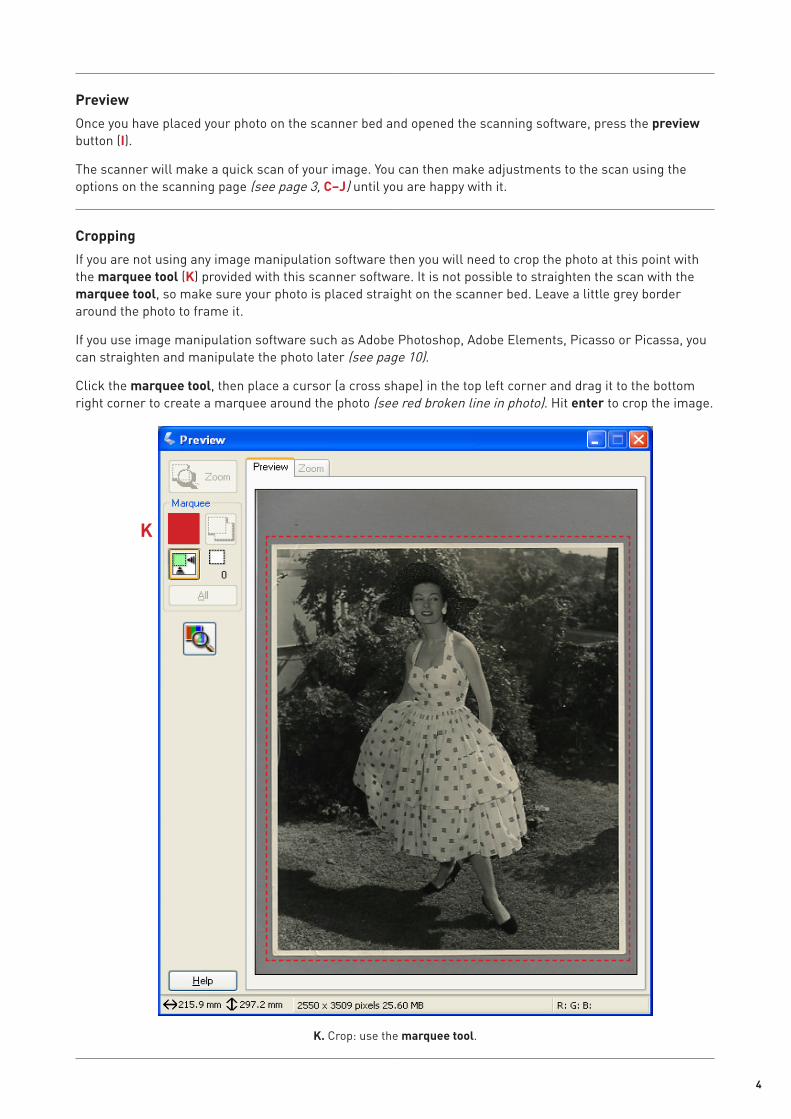
Preview
Once you have placed your photo on the scanner bed and opened the scanning software, press the preview button (I).
The scanner will make a quick scan of your image. You can then make adjustments to the scan using the options on the scanning page (see page 3, C–J) until you are happy with it.
Cropping
If you are not using any image manipulation software then you will need to crop the photo at this point with the marquee tool (K) provided with this scanner software. It is not possible to straighten the scan with the marquee tool, so make sure your photo is placed straight on the scanner bed. Leave a little grey border around the photo to frame it.
If you use image manipulation software such as Adobe Photoshop, Adobe Elements, Picasso or Picassa, you can straighten and manipulate the photo later (see page 10).
Click the marquee tool, then place a cursor (a cross shape) in the top left corner and drag it to the bottom right corner to create a marquee around the photo (see red broken line in photo). Hit enter to crop the image.
K
K. Crop: use the marquee tool.

5
Image type — set the colour mode
Always set the mode to colour (C), even if you are scanning black and white photos. This is because black and white images have many grey tones that are picked up better with the colour mode setting.
Resolution — know your needs
Digital images are made up of pixels. Resolution is measured in dots per inch (dpi) or pixels per inch (ppi). To produce a scan, set the resolution to 300 dpi (D). This will give you a sharp master image that can be used for multiple purposes. You will be able to make high quality prints at this resolution. Save this as a master image (TIFF), and then make another compressed copy as a (JPEG) which can be used for emails, web and general use. High resolution images can be converted to low resolution images but low resolution images can never be converted to high resolution images.
Illustrations/diagrams. Set the resolution to 1200 dpi and it must be saved as a TIFF file. This is because JPEGs are not suitable with text, large blocks of colour or simple shapes because crisp lines will blur and colours can shift.
Document size (also known as output size or target size)
It is important to scan photos at a large enough size (E). Many scanning hours can be wasted if scans are inadvertently made too small.
The standard size for museum archives is: 10 x 8" TIFF at 300 dpi, Adobe RGB, which should take up about 25 MB (megabytes) of storage. Note: 25 MB also reads as 25 000 KB (kilobytes).
For very clear information on how to change your images and files size to suit your needs, go to: http://www.jiscdigitalmedia.ac.uk/stillimages/advice/print-size-and-file-size-calculator.
For another option on file sizing, go to: http://graphicssoft.about.com/od/photoshop/l/bllps502d.htm and http://graphicssoft.about.com/od/photoshop/l/bllps502x5.htm
Scale
Each photo should be scaled at 100% (F). The smaller the scale, the smaller the image will be. It is best to go as large as is practical.
If you scan four photos at once, set the scale at 400%. This will take a few minutes to scan. If you did one scan of four small photos at 100%, you would end up with very small images (each image would be less than 25%). Scan the images at 400% and then crop them individually so that each image will be about 100%. Any photo that is smaller than a postcard should be scanned at 200–300% (at 300 dpi).
6
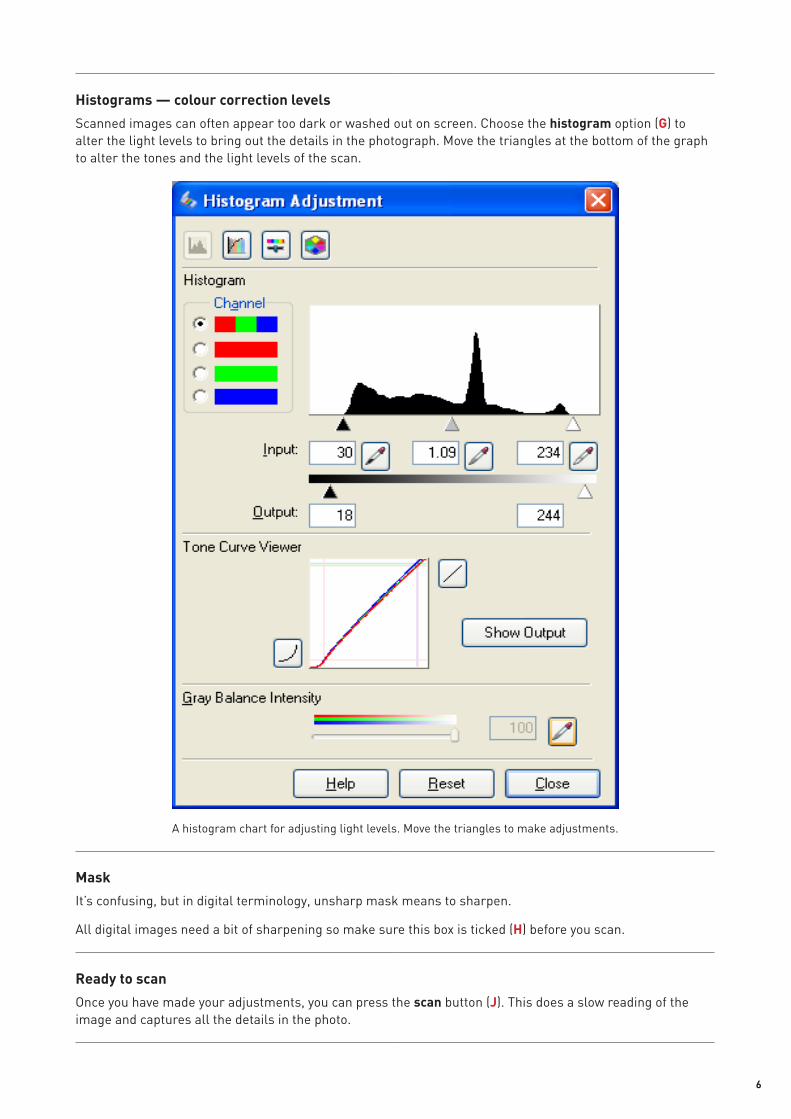
Histograms — colour correction levels
Scanned images can often appear too dark or washed out on screen. Choose the histogram option (G) to alter the light levels to bring out the details in the photograph. Move the triangles at the bottom of the graph to alter the tones and the light levels of the scan.
A histogram chart for adjusting light levels. Move the triangles to make adjustments.
Mask
It’s confusing, but in digital terminology, unsharp mask means to sharpen.
All digital images need a bit of sharpening so make sure this box is ticked (H) before you scan.
Ready to scan
Once you have made your adjustments, you can press the scan button (J). This does a slow reading of the image and captures all the details in the photo.

7
Saving your image
Once an image is scanned, it needs to be saved. Go to file, save as on your computer to save it and specify what mode you want. It is recommended to always save a scanned image as a TIFF file as they are large, incorruptible image files that are very good for archiving. TIFFs take up a lot of storage space, so it is wise to store them on an external hard drive. You can buy 1-2 terabyte hard drives for about $100 and you can store approximately 5000 TIFF images on them. Storing the TIFFs on an external drive will free up the hard drive in your computer and provide a separate back-up for your photos.
DVDs and CDs are not recommended for photo storage. They can be used to move digital files from one computer to another but they won’t last in the long term. As technology changes so quickly, the images stored on DVDs and CDs are unlikely to be able to be opened and viewed in ten years time. Hard drives are a much safer option.
After you have saved your scanned image as a TIFF file you can then hit save as and save it as a JPEG for email, web and general use.
TIFF file saving
Go to save in your menu bar. Name the scan in the prefix box (L). Then choose TIFF from the drop down menu in the image format/type box (M). Make sure the start number is on 001 (N) when you begin your scans.
Next, go to browse (O) and then select where you will place the scan, eg desktop, internal or external drive etc.
L
M
O
N
Make the scan a TIFF, name and number it.
Save the file to a folder or the desktop.
8
Check the size of the TIFF file under the image size menu to see that it is the right size.
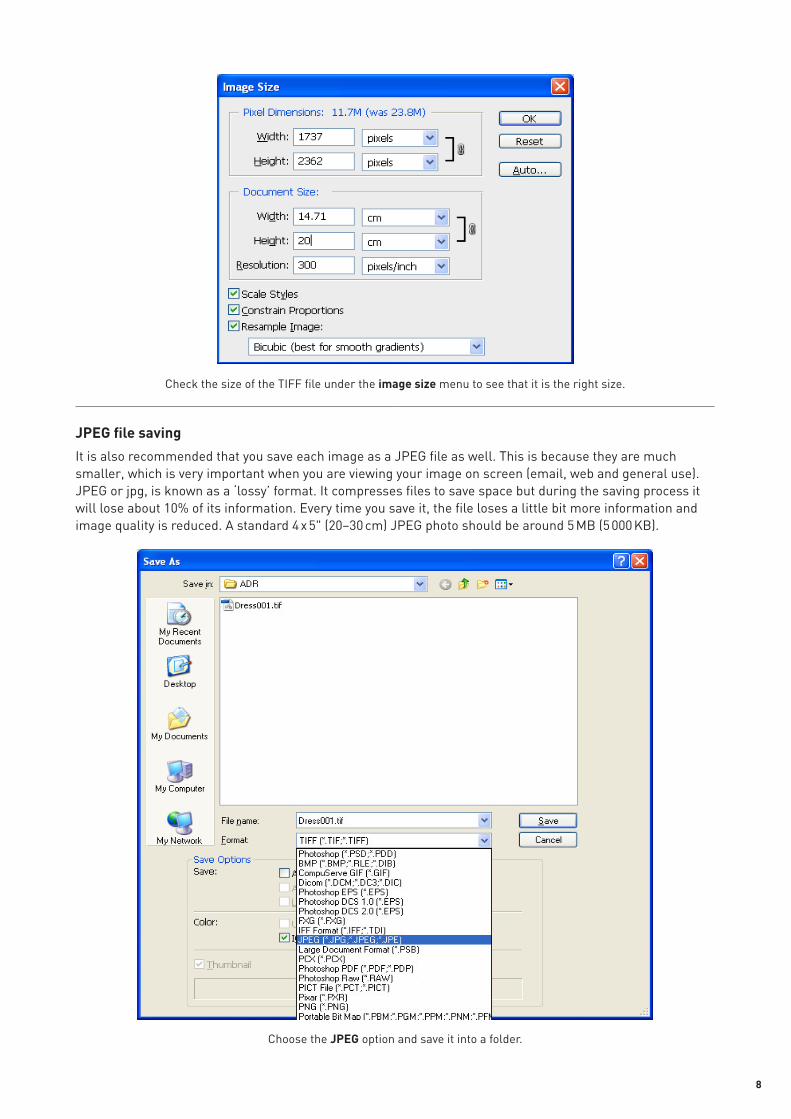
JPEG file saving
It is also recommended that you save each image as a JPEG file as well. This is because they are much smaller, which is very important when you are viewing your image on screen (email, web and general use). JPEG or jpg, is known as a ‘lossy’ format. It compresses files to save space but during the saving process it will lose about 10% of its information. Every time you save it, the file loses a little bit more information and image quality is reduced. A standard 4 x 5" (20–30 cm) JPEG photo should be around 5 MB (5 000 KB).
Choose the JPEG option and save it into a folder.
9
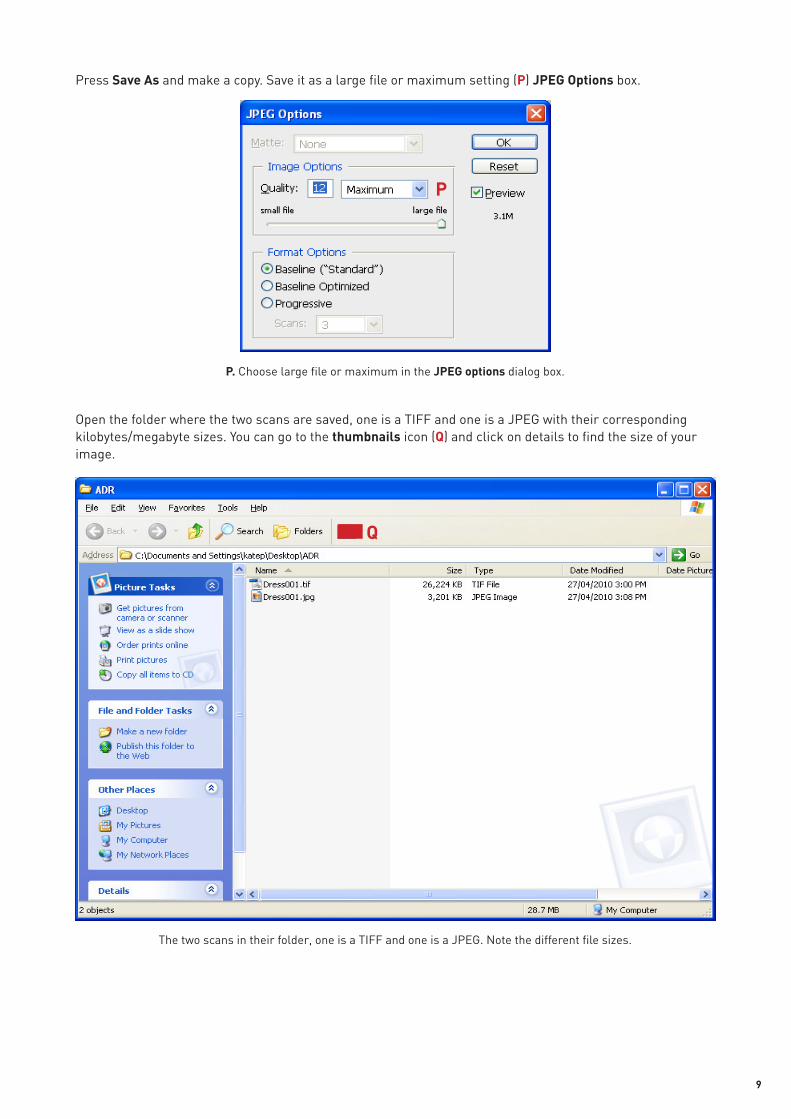
Press Save As and make a copy. Save it as a large file or maximum setting (P) JPEG Options box.
P
P. Choose large file or maximum in the JPEG options dialog box.
Open the folder where the two scans are saved, one is a TIFF and one is a JPEG with their corresponding kilobytes/megabyte sizes. You can go to the thumbnails icon (Q) and click on details to find the size of your image.
Q
The two scans in their folder, one is a TIFF and one is a JPEG. Note the different file sizes.
10
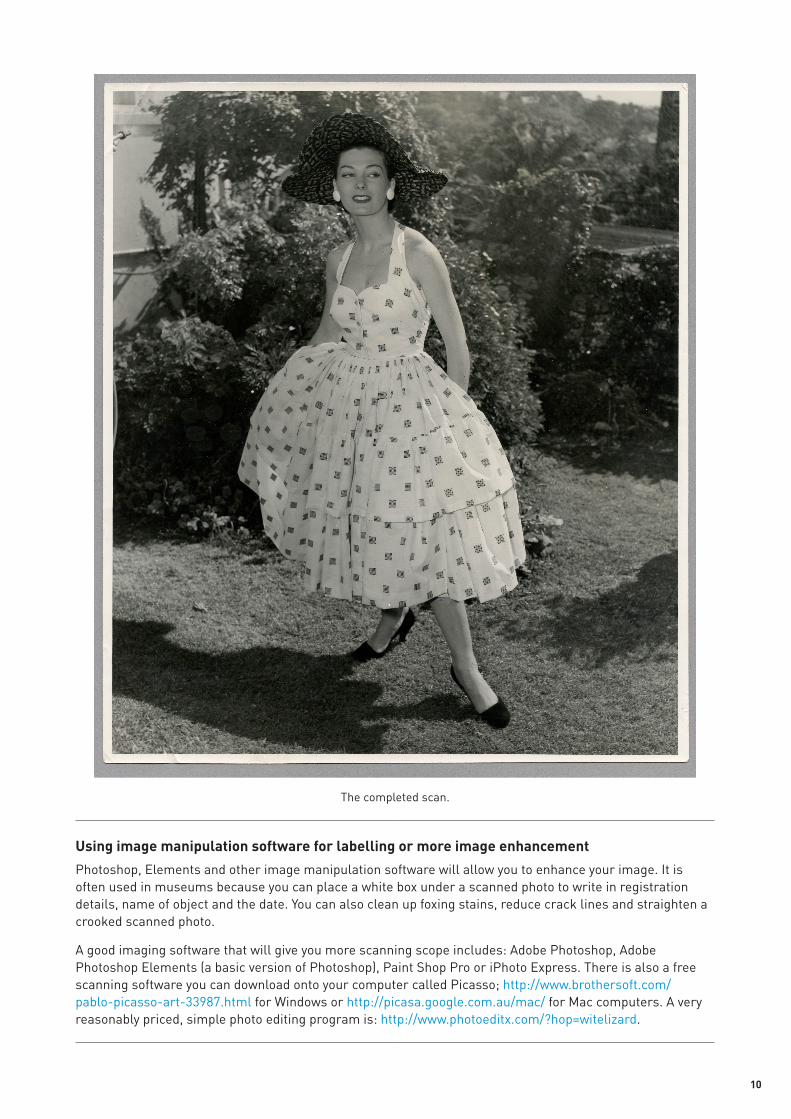
The completed scan.
Using image manipulation software for labelling or more image enhancement
Photoshop, Elements and other image manipulation software will allow you to enhance your image. It is often used in museums because you can place a white box under a scanned photo to write in registration details, name of object and the date. You can also clean up foxing stains, reduce crack lines and straighten a crooked scanned photo.
A good imaging software that will give you more scanning scope includes: Adobe Photoshop, Adobe Photoshop Elements (a basic version of Photoshop), Paint Shop Pro or iPhoto Express. There is also a free scanning software you can download onto your computer called Picasso; http://www.brothersoft.com/pablo-picasso-art-33987.html for Windows or http://picasa.google.com.au/mac/ for Mac computers. A very reasonably priced, simple photo editing program is: http://www.photoeditx.com/?hop=witelizard.

11
Cropping in Photoshop or other image manipulation software
Once you have saved a scan, open up your image manipulation software. To crop, use the crop tool and draw a marquee (broken line) around the image (R), leaving a little border around the image to frame it. You can straighten the image with the crop tool.
For numbering purposes, you can make a text box underneath the image. To do this, drag the middle point at the bottom of the marquee a little further down the screen. Use the text tool (S) to write the registration number, date etc.
Once you have finished, press save and override your existing (un-manipulated) file.
R
S
R. Crop tool. S. Text tool: use this tool to write the image number and date here in black font.
12
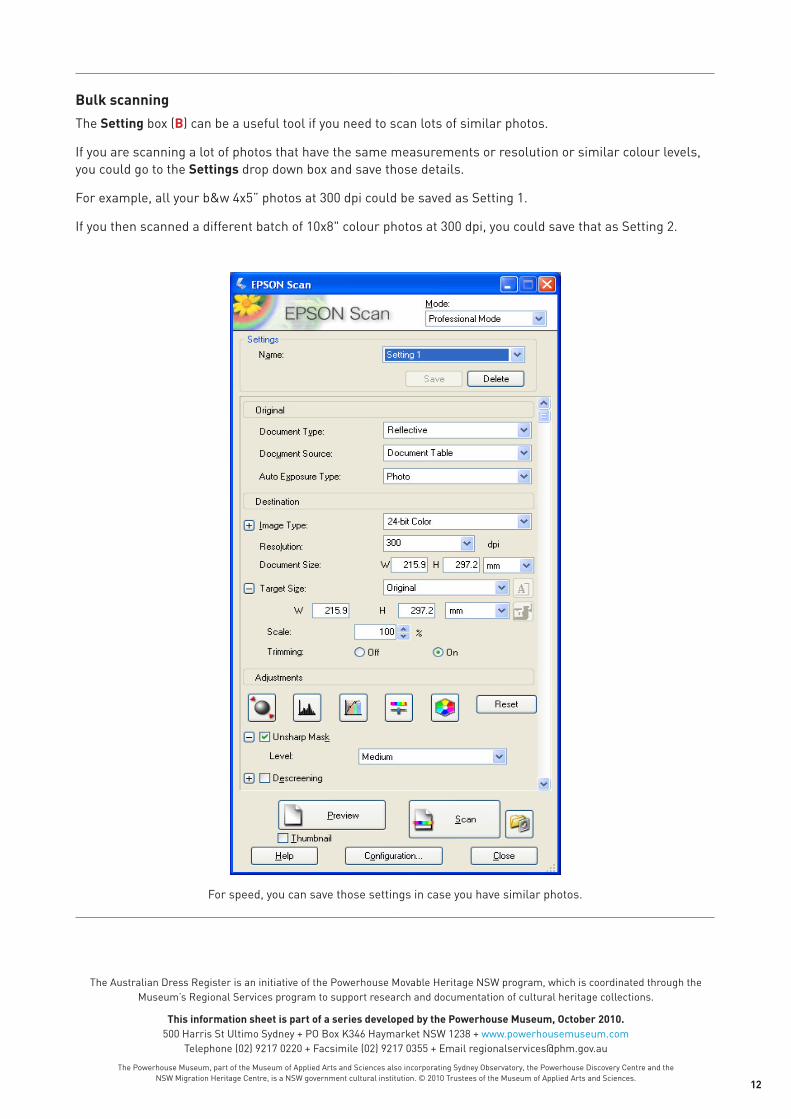
Bulk scanning
The Setting box (B) can be a useful tool if you need to scan lots of similar photos.
If you are scanning a lot of photos that have the same measurements or resolution or similar colour levels, you could go to the Settings drop down box and save those details.
For example, all your b&w 4x5” photos at 300 dpi could be saved as Setting 1.
If you then scanned a different batch of 10x8" colour photos at 300 dpi, you could save that as Setting 2.
For speed, you can save those settings in case you have similar photos.
The Australian Dress Register is an initiative of the Powerhouse Movable Heritage NSW program, which is coordinated through the Museum’s Regional Services program to support research and documentation of cultural heritage collections.
This information sheet is part of a series developed by the Powerhouse Museum, October 2010.500 Harris St Ultimo Sydney + PO Box K346 Haymarket NSW 1238 + www.powerhousemuseum.com
Telephone (02) 9217 0220 + Facsimile (02) 9217 0355 + Email [email protected]
The Powerhouse Museum, part of the Museum of Applied Arts and Sciences also incorporating Sydney Observatory, the Powerhouse Discovery Centre and the NSW Migration Heritage Centre, is a NSW government cultural institution. © 2010 Trustees of the Museum of Applied Arts and Sciences.