welcometothe loseit!userguidecdn-s3.loseit.com/static/img/gettingstarted/loseituserguidepdf3.pdf ·...
TRANSCRIPT

1
Welcome to the Lose It! User Guide!
Table of Contents:
How to Create Your Account (pg. 2-3)
How to Log a Food (pg. 3-4)
How to Log an Exercise (pg. 5-‐6)
How to Log Previous Meals (pg. 6-‐8)
How to Build a Recipe (pg. 8-‐10)
How to Create a Challenge (pg. 11-‐14)
Additional: How to Connect a Fitbit to Lose It! (pg. 15-‐16)

2
How to Create Your Account 1.) Visit the App store or Google Play to download the Lose It! app.
2.) Open the Lose It! app on your phone screen. The Lose It! app icon will appear as an orange scale:
3.) You will see the user agreement. After reading through the user agreement, select “I agree” at the bottom. 4.) Select that you are a new user.
How to Set Your Goal – and Get Your Plan
1. Enter your current weight then your goal weight. Choose your gender. Selectyour height then date of birth; scroll the wheels to set these. (After making eachof these selections, tap next.)
2. Select your weight loss plan and then tap next:• Maintain current weight• Lose ½ pound per week (*Leaves you with the most calories in your
budget)• Lose 1 pound per week• Lose 1 ½ pounds per week• Lose 2 pounds per week (*Leaves you with the least calories in your
budget)3. When you select your plan, you’ll see your calorie budget and the estimated date
for you to reach your goal. If you find you need to change your plan after a fewdays, just click on modify program on the goals screen.
4. Enter your email address and set your password. Tap next. You’re ready to start!
3
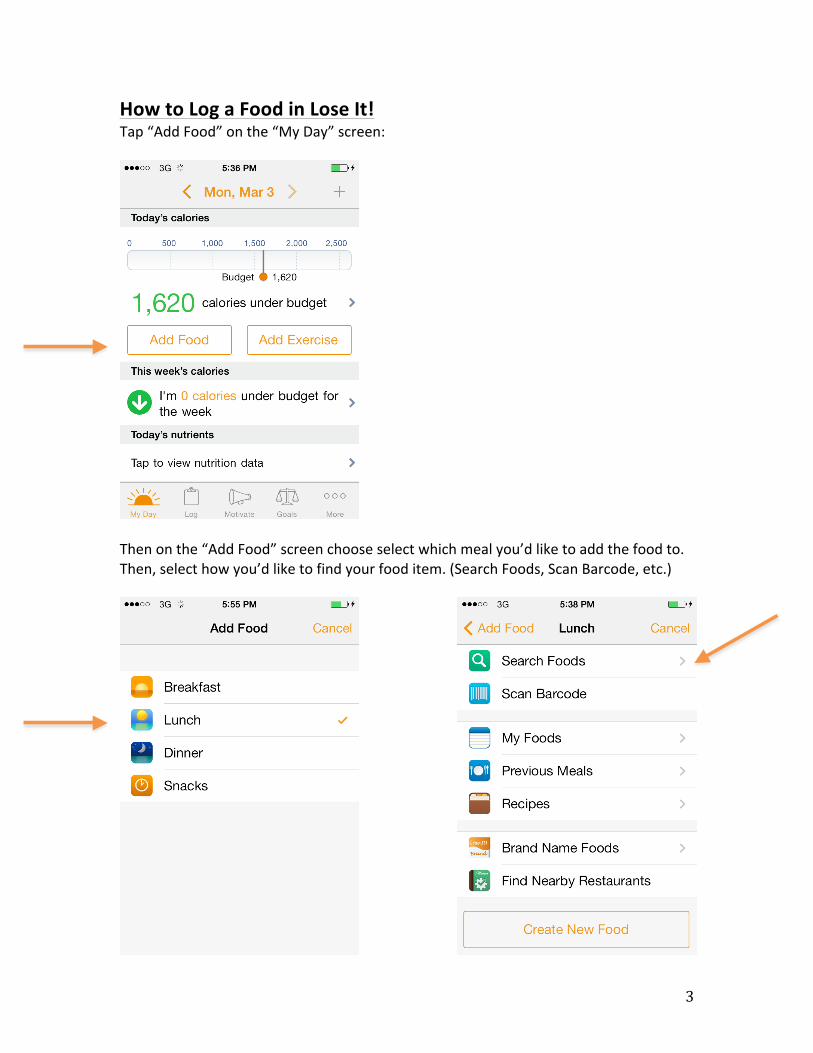
How to Log a Food in Lose It! Tap “Add Food” on the “My Day” screen:
Then on the “Add Food” screen choose select which meal you’d like to add the food to. Then, select how you’d like to find your food item. (Search Foods, Scan Barcode, etc.)

4
“Search Foods” produces the most results, including generic versions of a food (listed at the top). Next, select the food you’d like to log. On the “Add Food” screen, scroll the wheels to change your serving size. Click “Add” to add that item to log:
Once you’ve logged your food, you can click “Done” in the top right-‐hand corner to return to the “Log” screen below. You’ll see that the food has been added to your log:

5
How to Add Exercise Tap “Add Exercise” on the “My Day” screen:
Now you’ll add your activity. On the “Add Exercise” screen you can choose “Browse Exercises” to choose an activity. Then search for your activity on the “Exercises” screen:

6
This example below shows running. You can set your speed and length of your workout. To add the exercise, click “Add”. Once you tap “Add” you’ll return to the “Log” screen:
How to Log Previous Meals Tap the “+” button to add food:

7
On the “Add to Log” screen, tap the meal you are logging. Now that you have chosen breakfast, tap “Previous Meals”:
Once you selected “Previous Meals” you will see the meals you’ve logged for the last 30 days. Choose any of them to log to your current meal selection:

8
If you only had a few of the items you can tap the icon on the left to unselect unwanted items and then just tap “Add” in the top right to add those selected foods to your log!
How to Build a Recipe: To build a recipe just tap “More” on the bottom right-‐hand side of app:

9
Select “Edit Foods & Exercises”. Then on the next screen, tap “Recipes”:
Tap “+” in upper right hand corner. This will bring you to the “New Recipe” screen. Here you will give your recipe a name, then tap “Save”:

10
Then add your ingredients by clicking “Add Food”. Then you can search the database, scan a barcode, or add something from My Foods or Previous Meals:
This example shows how to add items from a previous meal and unselect the ones that are not part of the recipe. Then tap “Add”. After you’ve added the items tap “Done”:

11
Now you have successfully added a recipe to your Recipe database in Lose It!. When you decide to log a recipe in the future you can just tap “Recipes” and call it up! How to Create a Challenge! You can organize your very own health or fitness challenge on Lose It!. Challenges can be competitive or supportive and public or private! To get started, click “Motivate” at the bottom of the app:

12
At the top right of the screen, tap “Create”. Select the type of challenge you want to create: individual goal or competition, or team goals and competition. As an example, select team competition:
Now that you have selected “Team Competition”, you can select the type of challenge you want to create such as exercise:

13
Then you can select what you want the challenge to be measured by. You can either select calories, minutes exercised, the number of workouts logged, or steps logged:
Select the “Minutes” challenge to create an exciting competition based on the minutes of exercise logged by each participant. Once you tap “Minutes”, you can fill out the details of the challenge and personalize it.

14
Lastly, tap “Create” in the top right-‐hand corner and you’ve made your challenge! Once your challenge is created, you can invite friends! You can now invite friends by tapping “Invite Friends”, assign teams by tapping on “Join Team”, view who’s in the lead by tapping on “Rankings”, and create conversation within the team by tapping on “Comments”! You’ve now successfully created a challenge!

15
How to Sync Your Fitbit to Lose It! To connect via the Lose It! app, select More > Apps & Devices:
After you choose Fitbit from the list of “Apps & Devices” you'll be prompted to connect your Fitbit by logging in with your Fitbit credentials:

16
More on using Fitbit with Lose It!: Lose It! automatically assumes that you'll be burning a certain number of calories each day just by living your normal life. Here are the activities we automatically assume you'll burn: Sleeping -‐ 8 hours Personal care (dressing, showering) -‐ 1 hour Eating -‐ 1 hour Cooking -‐ 1 hour Sitting (office work, selling produce, tending shop) -‐ 8 hours Driving car to/from work -‐ 1 hour General household work -‐ 1 hour Light leisure activities (watching TV, chatting) -‐ 3 hours To view the number of additional calories you need to burn get an adjustment, view the Fitbit section on the “My Day” screen. It will say “X more calories to earn bonus.” (X will be a specific number.) Once you’ve hit the adjustment it will say “X calorie bonus earned!” You can also view this information on the “Log” page, under “Exercise”. It will say “Burn X more calories to earn bonus”. Once you’ve earned an adjustment, these screens will say “Calorie bonus achieved! X calories”. (Again X will be a specific number.)