welcome to · welcome to. table of contents ... low house battery radio not set on usa radio...
TRANSCRIPT

53’ ADVENTURER
HOUSEBOAT MANUAL
W E L C O M E T O


TABLE OF CONTENTS
Marine Radio .....................................................................................................1
Engines/Helm .................................................................................................. 3
Houseboat Batteries .......................................................................................6
Generator ..........................................................................................................8
Water Pressure .............................................................................................. 10
Hot Water ....................................................................................................... 12
Holding Tanks ..................................................................................................13
Gas/Propane .................................................................................................. 15
Refrigerator ..................................................................................................... 17
Range ................................................................................................................ 19
Grill ................................................................................................................... 20
Heater ............................................................................................................... 21
Cooling .............................................................................................................22
Accessories .....................................................................................................23

Your houseboat has come equipped with a VHF Marine Band Radio. It is located at the helm, to the left of the steering wheel.
ON/OFFTurn on DC MAIN BreakerTurn on VHF RADIO Breaker on theDC PanelTurn the volume Knob in a clockwisedirection to turn on the radio.Make sure the H/L (high/low frequency) button is on the Hi position which can be seen on the display.
CHANNEL 16Use Channel 16 for hailing and emergencies only. Never use Channel 16 for routine conversations.
In case of an emergency, hail the National Park Service on channel 16. They monitor this channel 24 hours a day.
To hail Boat Rentals, turn radio ON and to Channel 16, depress button on side of handheld microphone to talk, and release the button when you are finished talking. The Boat Rentals Office monitors this channel during regular business hours.
Say “_________ (the name of the marina you are calling) BOAT RENTALS this is houseboat # _____” (number of your houseboat). For example: “Bullfrog Boat Rentals, this is houseboat # S11.”
When communication is established, we will direct you to another channel. Commonly used channels are 10, 12, 68 and 72. Be sure to acknowledge that channel, before you change to the channel. Then turn to that channel, and we will continue the conversation.
Information you will need when you call us:
1. Your boat number.2. Your exact location, if known.3. Description of the problem.4. Any details on the trouble-shooting you have already tried.
If you need assistance we will attempt to help you troubleshoot a problem over the radio. If we are not successful, we will dispatch a technician out to help you.
For safety, our technicians can only be dispatched if they can fix the problem and return to our docks before dark. If we receive your call late in the day, we will gladly respond first thing the next morning.
MARINE RADIO
1

WEATHERW/X button or Channel 1 on your marine radio is the weather channel.
This channel is updated periodically by the National Weather Service.
Be sure to check this channel regularly during your trip to keep apprised of the changing weather conditions here at Lake Powell.
REQUEST FOR ASSISTANCE CARDIf for some reason you cannot reach us by Marine Radio, fill out your Request for Assistance Card located in your manual.
Flag down a boat passing by and ask them to take it to the nearest marina for assistance.
We will dispatch a technician out to your boat as soon as we can safely do so.
OTHER INFODo NOT use VHF antenna as a flag pole or hang anything on the antenna.
Channel 26 is the Marine Operator.
Marine Radios transmit line-of-sight. So if you are back in a canyon, you may have to ask assistance from another boater with a radio to help contact us if you cannot get through directly.
Profanity over the public airways is a federal crime.
Reminder: Your Marine Radio is not a toy and should be operated only by a responsible adult.
A VHF marine radio is not the same as a Citizen’s Band Radio. CB lingo and 10-codes are not used.
COMMON TROUBLESHOOTING
PROBLEM POSSIBLE CAUSES REMEDIES
Not transmitting or receiving
Low house battery
Radio not set on USA
Radio blocked by canyon walls
Set on 1 watt mode
Antenna has fallen down
Charge house battery
Push USA/Int button
Move the houseboat to open water
Push 1/25or Hi/Lo button to change to 25 watt
Raise antenna
2

YOUR HOUSEBOAT HAS TWO ENGINES…
• For greater maneuverability and power.
• To provide you with a spare in case of engine failure.
Your engines are well maintained, but occasional breakdowns can occur. The spare is to ensure your safety and save you inconvenience. Don’t let the loss of one engine delay your vacation. Proceed on your planned itinerary with the good engine and we will catch up to you as soon as possible and make necessary repairs.
GAUGESTachometer • Monitors the engine revolutions. • Wide-Open Throttle (WOT) should be 4800-5200 RPM’s. • The most efficient cruising RPM will be 3800-4200 RPM
Horn• Turn on the breaker for Horn located
on your DC panel.• Push in the HORN button
at the helm.Fuel Gauge (Voyager XL Model Only)
• Key must be on for fuel level to register.
NAUTICAL NOTE: When leaving a dock, signal with 1 long blast (4 seconds) and 3 short blasts (1 second each).
THROTTLESetting Neutral Throttle for Starting
• With the throttle controls in neutral turn the key to start.
• If the motor does not start push in the button at the base of the control throttle (side). Move the throttle forward 1/3 and turn key to start.
• Once started bring throttle control back to neutral and let warm up for three minutes.
THROTTLE (Voyager XL Model Only)Setting Neutral Throttle for StartingNeutral Throttle.• With the throttle controls in the
neutral position turn the key to first click – beeper will sound.
• Push and hold “Black” command button the red light will be solid to indicate that the shift control is activated, and lever movement will engage prop.
• Turn key to engage starter. If the engine fails to start in 10 seconds, return key to on position wait 30 second and try again.
• If the motor still will not start try directions bellow:
• Confirm that the throttle is in neutral
position.Engines/Helm• Turn the key to first click- Beeper
will sound.• Push and hold “black” command
button while pushing throttle forward to the first detent
ENGINES/HELM
3

• Red light will flash to indicate throttle only control.
• Turn key to engage starter. If the engine fails to start in 10 seconds, return key to ON position, wait 30 seconds and try again.
• Once it starts, advance the throttles till the tachometer reads 2000 rpm’s and allow engine to warm up for 3 minutes.
• Return throttle lever to center position after warm-up. Red light will be solid to indicate that the shift control is activated, and lever movement will engage prop.
• If engine is still difficult to start, squeeze primer bulb, located on the fuel line near the engine, until firm.
Cold Start• Same as regular start, but warm up
time needs to be extended.
GETTING UNDER WAYFrom Neutral Throttle
• Return throttle to neutral position.• Button will automatically pop out.• Push throttle lever forward to go
forward or pull back for reverse.• Advance throttle to increase speed.• Always pause in neutral before
changing gears.Shut Down
• Return throttles to neutral position.• Turn key to off.
HYDRO-LOCKHydro-locking of an engine occurs when water enters the engine cylinders. The starter will click, but the engine won’t turn over.
Caused by• Overloading the back deck.• Large waves behind boat.• Dropping lake level which increases
the angle of a beached boat.If you suspect your engine has become hydro-locked, get word to the nearest marina and a technician will be sent out help you.
RAISING ENGINEElectric tilt toggle is located on the left side of the engine, below the cowling (cover).
Changing the Prop• Remove keys from ignition
(to avoid someone else accidentally starting the engine).
• Raise engine.• Unscrew lock nut.• Remove spacer washer.
4

• Remove Prop.• Reverse procedure to install the new
propeller.
ENGINES/HELM
COMMON TROUBLESHOOTING
PROBLEM POSSIBLE CAUSES REMEDIES
Engine doesn’t turn over
Engine turns over slowly
Engine turns over but won’t start
Engine won’t turn off
No light on control (Voyager XL Model Only)
Is the throttle in neutralLow battery
Hydrolock
Low battery
Flooded
Short in the ignition l line switch
Stuck in Neutral Throttle (All models except Voyager XL)
Button didn’t pop out Jiggle the throttle until button pops out.
Put throttle in neutralCharge battery from the GeneratorCall the marina for help
Charge battery from the Generator
See starting procedures for Flooded engine
Fuel line disconnected Unplug the fuel line from the engine or reconnect the harness
switch harness has t Engine become unplugged a the engine. (VoyagerXL Model Only)
Unplug the fuel from the engine
Reset the MMC breaker located in the Generator compartment on the rear deckTurn off key Reset the engine control breaker located underneath the rear stateroom bed.
5

The 12-volt house system includes cabin lights and navigational lights, water pumps, the horn and the VHF Radio.Battery Condition Gauge
• A dash-mounted Battery gauge is located left of the steering wheel. The toggle switch selects battery 1 (houseboa battery) or battery 2 (engine crank battery).
• When a battery reaches the YELLOW area, you must start the generator or engines to charge the low batteries. On the Voyager XL models the battery gauge is located to the right of the steering column.
Charging• Start the Generator.• Turn on the AC main breaker.• The batteries will also charge
directly from the engines. Operate the engines 2-3 hours at 1000-2000 RPM to fully charge without the generator.
DC Breaker Panel• DC Main• Refrigerator• Heater• Salon Lights
• Cabin Lights- Port• Instrument panel• Radio• Deck Lights• Cabin Lights• Water heater• 12-volt DC Outlet• Navigational Lights• Horn• Bilge Pump• Shower Pump
Please Note:• Turn off the LAKE WATER PUMP
breaker while underway, beaching, or unbeaching. Once you are beached, leave this breaker off for an additional 15 minutes to let sand and sediment in the water settle.
Remember: Each light or appliance will need to be turned on individually once the breaker is on.DC Breaker
• If you should lose DC power and your batteries are fully charged, reset the DC breaker located on the electrical panel. See picture to the left.
A/V.05 ELECT 1 HOUSEBOAT BATTERIESBilge Pumps
• Located in the lower stateroom (if applicable) and in the below deck generator compartment. Use only when water is presentTurn on DC MAIN breaker.
• Turn on BILGE PUMP breaker.• On helm, push Bilge 1 or Bilge 2
switches ON to activate.
HOUSEBOAT BATTERIES
6

Tips for Getting the Most from your Houseboat Batteries
• When generator is running ALWAYS have the AC MAIN and BATTERY CHARGER breakers on.
• Charge daily.• The lake water pump draws a lot
from the houseboat batteries. When using the shower or washing dishes, run the generator with the BATTERY CHARGER on.
• Don’t use unnecessary lights such as running lights and anchor lights.
• The INST, RADIO and HORN breakers should be ON when under way but may be turned OFF when beached.
NOTE: Deep Cycle batteries are used to extend the time between charging. However, they also require more time to recharge when they are discharged for too long. When the lights dim and the pumps slow, a recharge is overdue.
HOUSEBOAT BATTERIES
7
COMMON TROUBLESHOOTING
PROBLEM POSSIBLE CAUSES REMEDIES
No DC Power DC Breaker off
Cabin Light Dim
No Cabin Lights
No Lake Water Pressure
No Fresh Water Pressure
House batteries low or dead
Low house battery
CABIN LIGHTS DC breakers not on
LAKE WATER PUMP not on Air lock
Fresh Water Empty
Turn on DC Breaker
Start generator and Turn on BATTERY CHARGER Breaker Start generator and Turn on BATTERY CHARGER Breaker
House batteries low or dead Check Breaker
Start generator and Turn on BATTERY CHARGER Breaker
Check LAKE WATER BREAKER on DC panel
HOLD down the toilet valve for 15-20 seconds
Refill with Potable Water at any marina

The Generator is located on the rear deck of your houseboat.
Note: On the Voyager XL model only, the generator should not be running when underway in choppy water as it is water cooled and could over heat if unable to draw enough water to cool the Gen.
Starting/ Warm UpThe remote start is located on the wall of the cabin just inside the rear door. (Voyager XL Models only: There is also a remote start located to the left of the steering wheel at the helm.
• Confirm that the AC MAIN breaker and all other breakers are OFF.
• Press start button until generator starts or for 20 seconds – no longer.
If the engine fails to start, wait 20 seconds and repeat.
NOTE: The engine won’t start with a load on the circuit. By continually holding the starter switch, you can run down the battery or damage the starter.
• Allow the engine to warm up for 5 minutes.
• Switch the AC MAIN breaker ON.• You may now turn on individual
breakers to provide power to your houseboat.
NOTE: Your generator also has an ON/OFF rocker switch on the generator itself. If your remote starter does not work, you can try this one. Remember to replace the panel cover, on above deck models after starting to avoid overheating.
AC Breaker Panel
• AC Main• Battery Charger• Refrigerator• Cooler• Galley Outlets• Microwave• Heat Outlets• Outlets Port
GENERATOR
8

Fuel Tank Switch-Over Valve, On the Voyager XL model only
• The fuel tank switch-over valve is to help balance fuel usage between port and starboard tanks.
• Valve is located in the rear deck compartment.
• Point handle left or right to change tanks.
GFI Outlets Some electrical outlets have a GFI breaker. Push in the reset button to reset.
• To Shut Down Generator Turn off all circuit breakers
• Turn off AC MAIN breaker Generator
• Push and hold STOP button until engine stops completely or approximately 15 seconds.
1. Turn off the generator.2. Remove the brass top off thecooling
system strainer.3. Empty the strainer and replace top.4. Be certain top is on straight and
hand tightened all the way.Special Notes Your battery Charger is located in the back stateroom closet. It is plugged into an electric outlet. DO NOT unplug the charger.
5. Restart generator.For Voyager XL models only: The generator is equipped with coolant (lake water) strainers. Do not open this unit unless no water is pumping from the side of the houseboat during generator operation, or you hear excessively loud operation:
GENERATOR
COMMON TROUBLESHOOTINGPROBLEM POSSIBLE CAUSES REMEDIES
No generator power
Outlet doesn’t work
Generator Shut downGenerator cranks but won’t startCO Alarm beeps
4 beeps every 5 seconds
CO Alarm beeps 1 beeps every minute
AC MAIN breaker off
Is the generator on?AC MAIN breaker off?Is that area’s breaker on?Is GFI tripped?Out of FuelOut of Fuel
Engines/Generator running
System Error
Check breaker on panel
Start generatorCheck breaker on panelCheck breaker on panelReset GFI OutletdeckCheck gaugesRefuel
Turn off Engines/GeneratorEvacuate crew out of cabinOpen doors and windowsPress the RESET/SILENCE
Press the REST/SILENCE button for more than 15 seconds to shut off.
9

YOUR HOUSEBOAT IS SUPPLIED WITH 40 GALLONS OF FRESH WATER.Holding Tank
• Located on the top deck inside of abench box and on the Voyager XL Model only it is located in the front stateroom under the bed.
• A chrome cap marked WATER is located under the bench cushion and on the Voyager XL model only this cap is located along the port side outside the cabin.
• Open only when refilling tank from a POTABLE water hose located at any Marina. The fresh water is a gravity-fed system.
• Voyager XL model only: The fresh water is an on demand pump that operates only when a faucet is turned ON.
• A pressure valve is located at the base of the tank, inside the bench.
Lake Water Pressure• Turn on the DC MAIN breaker
located on the DC panel.
• Turn on the WATER PUMP breaker on the DC panel.
• Turn on the LAKE WATER switch on the wall above the dinette. (Note: Not all boats will have a LAKE WATER SWITCH. If your boat does not have one, disregard this last instruction.)
Faucets • The Large Faucet is lake water. • Small Faucet is fresh water.
• The sinks and showers empty directly into the grey-water tank.
Head/Toilet• LAKE WATER breaker must be on.• To fill toilet bowl with water, lift up
on the foot pedal.• To flush, push down on the foot
pedal slowly.NOTE: Make sure the pedal returns to the up position or flooding can occur.
WATER PRESSURE
10
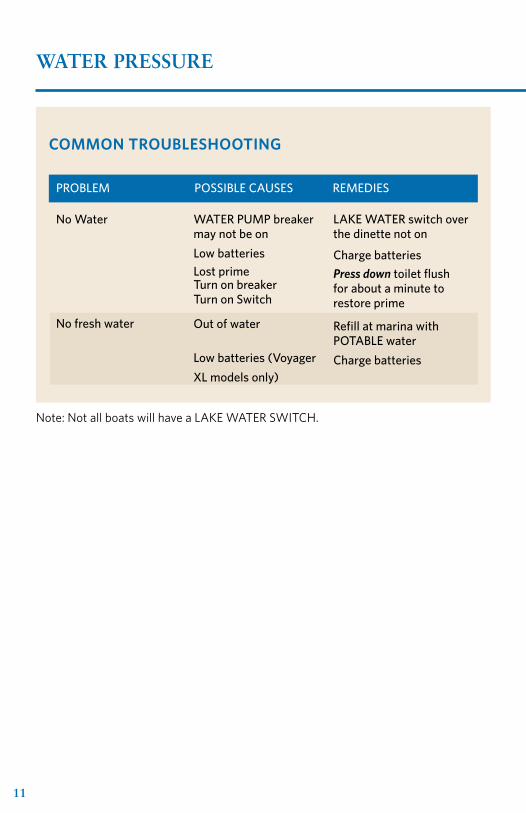
COMMON TROUBLESHOOTING
PROBLEM POSSIBLE CAUSES REMEDIES
No Water
No fresh water
WATER PUMP breaker may not be onLow batteriesLost prime Turn on breaker Turn on Switch
Out of water
Low batteries (VoyagerXL models only)
LAKE WATER switch over the dinette not on Charge batteries Press down toilet flush for about a minute to restore prime
Refill at marina with POTABLE waterCharge batteries
WATER PRESSURE
11
Note: Not all boats will have a LAKE WATER SWITCH.

HOT WATER
YOUR BOAT IS EQUIPPED WITH A 6-GALLON CAPACITY WATER HEATER.To Start
• Turn ON the DC MAIN.• Turn ON the valve for your propane
tank.• Turn ON the WATER HEATER
breaker located on the DC panel.• Turn ON the SHOWER PUMP
breaker located on the DC panel.• Turn ON the WATER HEATER
switch located in the hall above the Thermostat.
• The red light will be on until the water heater ignites.
• Allow approximately 30 minutes for the water to heat.
NOTE: If water is already hot, water heater will not come on nor will the water heater light.
COMMON TROUBLESHOOTING
PROBLEM POSSIBLE CAUSES REMEDIES
Water Hear does not light
The red light on the master switch does not come on
Ran out of hot water
Propane may not be on
Propane might not be full
DC MAIN might not be onWATER HEATER breaker may not be onWater may already be hot
You only have 6 -gallons of hot water
Check your propane to be sure it is onCheck your propane to be sure it is full.
Turn on DC MAIN
TURN on WATER HEATER breaker on DC panel
Allow 30 minutes to heat more water
12

HOLDING TANKS
YOUR HOUSEBOAT HAS BEEN EQUIPPED WITH A A COM-BINED BLACKWATER TANK AND A GREYWATER TANK WITH A TOTAL CAPACITY OF 500-GALLON.Full Service Pumpout
• Radio into any of the Rental Docks.• Give us an estimated time for
arrival.• We will direct you where to park and
will pump out your houseboat for you.
Self Service Pumpout• Located in any marina.• The silver tank openings are located
on the port side of the boat. There along the side rub rails of your houseboat and are marked WASTE.
• Unscrew the cap.• Screw the correct sized fitting
into the pumpout port on your houseboat. (Fittings are available at the dock on the pumps)
• Attach the pumpout hose to the fitting
• Open valve and follow the direction on the pump.
• When finished, close the valve before removing the hose.
• Remove the fitting from your houseboat and replace on dock.
• Place the end of the lake water hose inside the pump out portal.
• Fill the tank with approximately 2 to 3 gallons of water.
• Empty one packet of provided chemical into the head/toilet inside and flush.
• Put all the hoses back and replace the cap on the WASTE opening. DONE!
13

Remote Station Pumpout• See HELP PRESERVE in your
Nautical Notes for locations of Remote Pumpouts.
• Unscrew WASTE cap.• Place end of hose into opening.• Work the hand lever to pump.
COMMON TROUBLESHOOTING
PROBLEM POSSIBLE CAUSES REMEDIES
Odor Holding tanks are full Pumpout at the nearest marina or remote stationAfter pumping out, add a packet of chemical and two gallons of water in the headLeave some water in the bowl to trap any odor
14

GAS/PROPANE
Location of Fuel TanksThere are Port and Starboard tanks.• Fuel fittings are located on the rear
deck, directly in front of engine covers.
• Remove cap to check fuel level for refueling.
• Voyager XL has Fuel gauges to check fuel level.
Checking Fuel Level• Fuel level stick is located in the
broom closet.• The ignition switch needs to be on
for the fuel gauges to operate.
Refueling• Turn off grill and cabin heater.• Turn off all propane tanks 10
minutes prior to to entering the marina..
• Turn OFF pilot light switches at refrigerator and hot water heater.
• Turn OFF all electrical breakers.• Turn OFF the generator.• Close all doors and windows.Caution: NEVER siphon gas from your
houseboat fuel tanks.NOTE: Captain and Crew must remain on board your houseboat. Wait for Fuel Dock personnel to assist you.
Location of Propane TankThere are 2 tanks located in a metal box outside the rear cabin wall.
On/Off• A valve is located on the top of each
tank. Turn counterclockwise to open.• Turn clockwise to close.• Only use one tank at a time. After
turning ON propane re-light pilots and /or reset refrigerator. Use master switch to turn on hot water heater.
15

COMMON TROUBLESHOOTING
PROBLEM POSSIBLE CAUSES REMEDIES
Propane Smell The grill is not turned off all the wayOne of the propane appliances is not turned off all the way.
Only use one bottle at a timeTurn off any propane appliances unless they are in use.
16

REFRIGERATOR
How to Start• Confirm that the propane is ON or
that the generator is running. (See below.)
• Push the master switch on the refrigerator panel ON.
• Choose between propane or 110V power to operate the refrigerator or push AUTO.
If using the generator, you musthave the DC MAIN ON as well as theBATTERY CHARGER breaker ON.Refer to the instructions locatedinside the refrigerator/freezer formore details.
Getting the most out of your Refrigerator
• Put cold or frozen food into the refrigerator.
• Open door only when necessary.• Use ice chest for beverages.• Don’t pack the refrigerator full, leave
space for air to circulate freely.
• Cover foods with strong odor.• Cover foods that easily absorb odor.• The coldest areas in the refrigerator
are under the cooling fins and at the bottom.
• Warmest areas are on the upper door shelves.
• The refrigerator will operate more efficiently if houseboat is level.
• Beach your houseboat so refrigerator side will be in the shade in the afternoon.
• The refrigerator will not cool as efficiently as your household refrigerator.
Getting the most out of your freezer• The freezer on your houseboat is not
designed for deep or quick freezing.• Coldest part of your freezer is at the
bottom of the aluminum liner.• Ice cubes can be made in the freezer
if placed in direct contact with bottom of freezer.
• Cool items in fridge before placing in freezer.
• Condensation from warm items being placed in the freezer will adversely affect the operation of the freezer.
17

COMMON TROUBLESHOOTING
PROBLEM POSSIBLE CAUSES REMEDIES
18
Not cooling properly
Check Light Comes On
There is a clicking sound and a blinking orange light coming on from my refrigerator
Is the refrigerator on?Is there too much in your refrigerator?
Was everything cooled down before you put it in the refrigerator?How hot is the outside air temperature?
You need to reset theigniter
You are out of propane
Turn ON the refrigerator.Check the bottles of propane to be sure they are ON and full.Leave plenty of room around items for air circulation.Put items on ice to cool down and then put them back in the refrigerator.Check your temperature setting. If it is the coldest setting, it is as cool as possible. Be sure to put perishables on the ice in the cooler.
Turn OFF the master switch, then turn back ON at the master switch to reset
Switch bottles of propane and go through restart.

RANGE
To Light the Burners• Confirm that the propane is on.• Light match.• Turn control knob counter clockwise
to the LITE position.• Apply match immediately to the
burner to light.• Adjust heat, with knob, to the
desired flame size.
To Light the Oven• Confirm that the propane is on.• Open oven door and and find pilot
light area under the bottom shelf Light match.
• Push and turn oven control knob counter clockwise to the desired temperature.
• Apply match to light. It may take 30-60 seconds for the oven to light after the pilot is lit.
To Shut Down• Turn all knobs to OFF.
COMMON TROUBLESHOOTING
PROBLEM POSSIBLE CAUSES REMEDIES
Burners or oven won’t light
Propane is not ON or is empty
Check propane at bottle and be sure it is ON and is full.
19

COMMON TROUBLESHOOTING
PROBLEM POSSIBLE CAUSES REMEDIES
Grill won’t light Propane is offPropane is empty
Turn on propaneBe sure propane is full
GRILL
To Light • Confirm that the propane is on.• Open lid of grill.• Visually check to be certain where
you will light the grill.• Turn knob to HIGH to allow propane
to flow into the tube.• Use the igniter to light the grill.• Adjust flame to desired setting.
Caution: NEVER stand over the grill when lighting.
To Shut Down• After cooking, turn setting to HIGH
for a few minutes to burn any excess food or grease from the grate.
• Turn knob clockwise to shut off.• Close lid.• DO NOT remove lava rocks.
NEVER put wood into the grill. Doing so could cause severe damage or injury.
20

HEATER
On• Turn ON DC MAIN breaker on the
DC panel.• Turn ON the HEATER breaker on the
DC panel.• Be certain that the propane is on.
On the thermostat, move the white switch on the bottom to the right for ON.
• Set thermostat to desired temperature.
• The fan will come on and run for 2-5 minutes before you feel heat come out of the vents.
• Generator should be running with battery charger on as the heater draws a lot power from the battery.
Off• At thermostat, move white switch at
button to OFF.
• Turn OFF HEATER breaker at DC panel.
• The fan will continue to run for 2-3 minutes after you have shut down the heating system.
NOTE: The fan draws a lot of DC power. You must run the generator whenever you run the heater. Be sure to have the Battery Charger breaker ON.
COMMON TROUBLESHOOTING
PROBLEM POSSIBLE CAUSES REMEDIES
Heater won’t light
Heat pump won’t work
DC main is OffHeater breaker is off
Thermostat is offLow battery
Thermostat not set to heat.Breaker not turned on.
Turn on DC MAINTurn on the HEATER breaker
Turn on the thermostatCharge the battery
Set control to heat setting.
Turn breaker on.
21

COOLING
On/Off• Generator must be running.• Turn on the AC Main.• Turn on AIR CONDITIONER
breakeron the AC panel.• Choose “cooling setting” on the air
handler control panel.• Choose “cooling” setting for air
circulation.• Open the louvers to direct the flow
of air.
COMMON TROUBLESHOOTING
PROBLEM POSSIBLE CAUSES REMEDIES
Air Conditioner blowing warm air
Compressor motor is frozen
Turn OFF Air Conditioner for 1 hour
22

ACCESSORIES
Microwave• Generator must be running.• Turn on AC MAIN.• Turn on MICROWAVE breaker on
the AC panel.• Use microwave as you would at
home.
Coffee Maker • Generator must be running.• Turn AC main.• Turn on GALLEY OUTLETS breaker
on the AC panel.• Use the coffee maker as you would
at home.
Blender, Toaster and Can Opener• Generator must be running.• Turn AC main.• Turn on GALLEY OUTLETS breaker
on the AC panel.• Use these appliances as you would
at home.
Stereo• Turn on DC MAIN on the DC panel• Turn on the RADIO breaker on the
DC panel• Turn on the knob for the stereo for
power.• Don’t forget to turn off when not in
use so that the battery isn’t drained. The radio stations on the lake are limited and varied by location.
.
SpeakersSwitches are located near the stereo for:• Front Deck• Salon Area• Aft Stateroom• Rear Deck• Upper Deck
Back Up Monitor (Voyager XL model only)
• Turn on the DC MAIN on the DC breaker panel.
• Turn on the BACK-UP MONITOR breaker.
• Turn on POWER button on the monitor.
GPS/Sonar (Voyager XL model only)
• Turn on the DC MAIN on the DC breaker panel
• Turn on the GPS breaker.• Press POWER button on the GPS/
SONAR
23

Boat Repair: 928-645-1149Rental Office: 928-645-1078NPS Emergency: 928-608-6300NPS Office: 928-608-6301Dangling Rope: 928-691-0206Bullfrog Marina: 435-684-3010

24