welcome to the university of south florida’s curriculog
TRANSCRIPT

1
USF Curriculog – Undergraduate Program New Under Existing CIP
(Major, Concentration, Minor, or Certificate)
Welcome to the University of South Florida’s Curriculog “Undergraduate Program New Under Existing
CIP for a Major, Concentration, Minor, or Certificate” tutorial. This tutorial will provide information on
how to set up a New Program under an existing CIP for a Major, Concentration, Minor or Certificate.
There is one Proposal used for either a new major, concentration, minor or certificate. This Proposal
will also be used to set up a new 4 Year and 2 Year Plan of Study for a Major or Concentration.
To learn more about Curriculog and the proposal system, visit the USF Undergraduate Studies
Curriculum website at https://www.usf.edu/ugs-curriculum-training. Tutorials on Curriculog
Navigation, Course Proposals and the approval workflow process, as well as resources for the
proposal system can be found here.
For more assistance, please contact the Undergraduate Studies Curriculum team at UGS-
Program templates for a Major, Concentration, Minor, or Certificate can be found at the USF
Undergraduate Studies Curriculum website under the “Resources” link. You can also find the
templates for the 4 Year and 2 Year Plan of Study there.
It is recommended that you download the template prior to submitting a Curriculog Proposal. Filling
out the template prior to starting the proposal will make it easier to complete the Proposal in
Curriculog.

2
Logging into Curriculog
Please open your browser and go to the USF Curriculog website at https://usf.curriculog.com/. You
will want to bookmark this address. To optimize the Curriculog experience, it is best to use Firefox or
Chrome as your browser.
Once you access the site, you will need to login. Click the “Login” at the top, right of the screen. USF
has a single signer login.

3
Opening the Program New Proposal
The Curriculog dashboard will be displayed after logging into the site. For more information on how
to navigate, please view the Curriculog Navigation tutorial at https://usf.edu/ugs-curriculum-training on
the Undergraduate Studies Curriculum website.
On your dashboard, you will click the “New Proposal” button. It is the blue button under the second
set of large tabs.
Graduate and Undergraduate proposal Proposals will be displayed. Graduate Proposals are
displayed first, followed by Undergraduate proposal Proposals. Ten Proposals are displayed at a
time. Click the “Next 10” button to view the set of proposals on the next screen.
If you are not sure which form fits your desired Curriculum Proposal, email the Undergraduate
Studies Curriculum team at [email protected]. We will be happy to assist you.

4
Program New Proposal
The Program New Under Existing CIP (Major, Concentration, Minor or Certificate) is the proposal you
will use to set up a new program under an existing CIP code. It is also used for a new 4 Year and 2
Year Plan of Study for a Major or Concentration. Your college or department liaison can also assist
you in determining if this is the correct proposal to use.
For this tutorial, we will shorten the title of this proposal to “Program New Proposal.”
When you find the Program New Proposal, there are two icons to the right of the name of the
proposal. The first icon allows you to preview the proposal.
Clicking the “Preview Proposal” icon brings up a new screen which allows you to preview the
proposal. You cannot enter information on this proposal, however you can review the proposal prior
to starting it. To close the preview, click the X in the top toolbar on the preview screen.

5
Opening the Program New Proposal
The second icon to the right of each proposal is the “Checkmark,” which will start the proposal in
Curriculog. This is what you will click to start the Program New Proposal.
Clicking the “Start Proposal” or “Checkmark” icon opens the proposal. This may take some time
depending on how many users are in the system or the length of the Proposal.
The Program New Proposal will open on the left side of the dashboard. The right side of the
dashboard shows the approval workflow process for the proposal.
To maximize the Program New Proposal, click the X above the “Steps to Approval” on the right side
of your dashboard. You can view this side of your dashboard at any time by clicking the “Steps to
Approval.”

6
Starting the Program New Proposal
Before starting the Program New Proposal, please read the items under “Read before you begin.”
Item 1 is related to the heading “Type of Program.” If you are proposing a new Major, Concentration,
Minor, or Certificate, you will select “Program” under “Type of Program.” If your proposal is for a new
4-Year Plan of Study or new 2-year Plan of Study, you will select “Shared Core” under “Type of
Program.” Each curriculum program is stored in the catalog software as a “Program” or as a “Shared
Core.”
There are two things to remember. First, a new Major or a new Concentration will also require a new
4-Year Plan of Study and a 2-Year Plan of Study. The Program New Proposal will need to be
submitted for each Plan of Study to accompany a new Major or a new Concentration. In other words,
if you are submitting a Program New Proposal for a Major, you will also need to submit two additional
Program New Proposals for each Plan of Study – 4 Year and 2 Year. At this time, Curriculog does
not support including all items on one proposal.
If you are submitting a new Concentration, and the current Major’s 4 Year and 2 Year Plan of Study
will apply to the new Concentration, you do not need to submit separate Plans of Study for the
Concentration. However, if the new Concentration requires a different Plan of Study than the one
used in the current Major, you will submit two additional Program New Proposals for each Plan of
Study – 4 Year and 2 Year.
Please visit the UGS website at https://www.usf.edu/undergrad/curriculum/curriculog/index.aspx to
view the tutorial for using the Program New Proposal for a new Plan of Study.
The second thing to remember is to download the template for your program prior to starting the
Program New Proposal. Program templates for a Major, Concentration, Minor, Certificate, 4 Year
Plan of Study, and 2 Year Plan of Study can be found at the USF Undergraduate Studies Curriculum
website under the “Resources” link. It is recommended that you download the template prior to
submitting a Curriculog Proposal, and convert the .pdf file to a Word document. Filling out the
template will make it easier to complete the Program New Proposal in Curriculog.

7
Please also note the other instruction items under “Read before you begin.” We will cover these
items in this tutorial.
These represent the next steps for the Program New Proposal after you complete “Step 1.”
“Step 2” tells you to select the “Import” option in the top, dark blue toolbar to load the template for
your proposed new program into the Proposal. Instructions are given on which template to import.
“Step 3” tells you to fill in all fields marked with an asterisk prior to submitting or launching the
proposal. If you do not complete these required fields before you launch, the Proposal will prompt you
by marking these fields in red.
The last item, “Step 4,” explains that you launch the Proposal by clicking the “Rocketship” icon in the
dark blue toolbar at the top of the Proposal. “Launch” is Curriculog-speak for submit.
You will want to save the proposal frequently so you do not lose any of your changes. There is a
“Save All Changes” option at the top of the Proposal, as well as, an option that floats or moves with
the Proposal. Be sure to click this to save the changes you have made.

8
Importing Information into the Program New Proposal
For this tutorial on the Program New Proposal, we will use an example of a New Certificate under
Existing CIP called “Leadership Studies for Professionals Certificate.”
For the “Type of Program” field we will select “Program,” as indicated in the instructions for our
proposed Certificate.
Next, we will go to the “Import” option in the dark blue toolbar at the top of the Proposal.
Click “Import” to open the import window. You will click the name of the catalog from which to pull the
program. In our example, it will be the “Acalog: 2021-2022 Undergraduate Catalog.”
Course and program data is stored in Acalog which is the companion software system to Curriculog.
Acalog is the catalog, while Curriculog is the way to update the catalog for courses and programs.
9
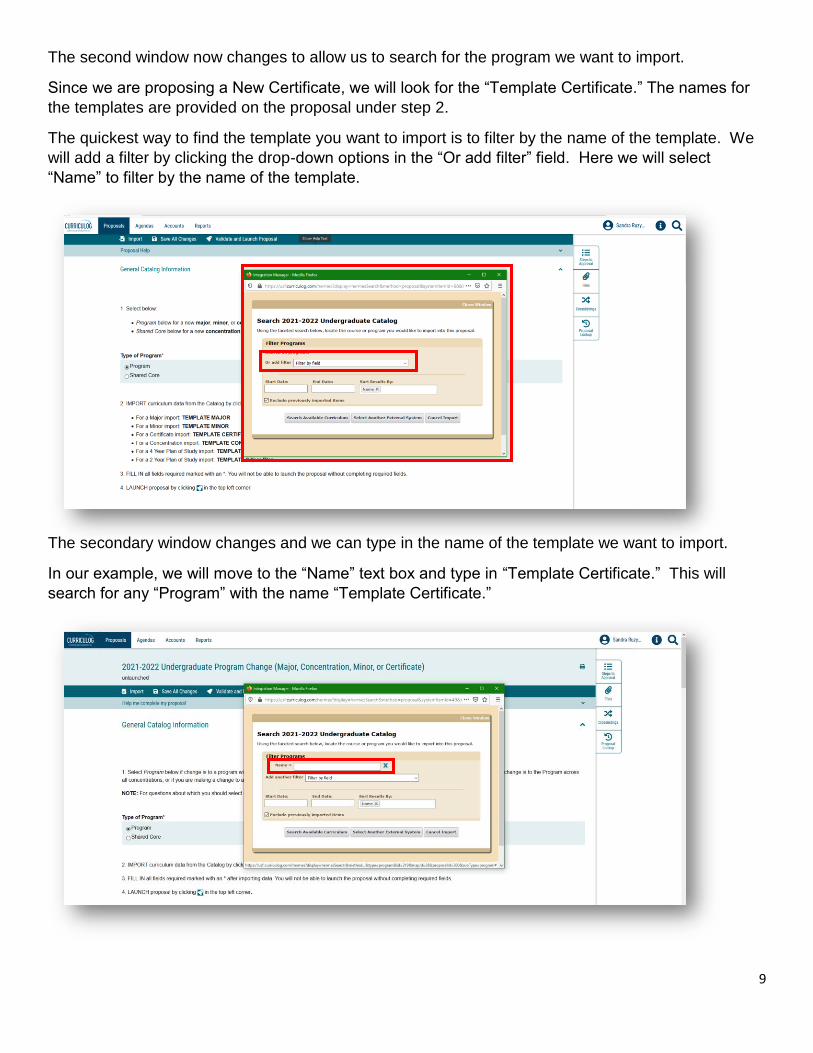
The second window now changes to allow us to search for the program we want to import.
Since we are proposing a New Certificate, we will look for the “Template Certificate.” The names for
the templates are provided on the proposal under step 2.
The quickest way to find the template you want to import is to filter by the name of the template. We
will add a filter by clicking the drop-down options in the “Or add filter” field. Here we will select
“Name” to filter by the name of the template.
The secondary window changes and we can type in the name of the template we want to import.
In our example, we will move to the “Name” text box and type in “Template Certificate.” This will
search for any “Program” with the name “Template Certificate.”

10
Next, we uncheck the box that says “Exclude previously imported items.” Then, we click the first
option at the bottom of this window which is “Search available curriculum.”
The secondary window will now display the “Search Results.” Under “Search Results,” we will click on
the title “Template Certificate.” This will load the certificate template into the Program New Proposal.

11
Once you click on the title of the program under “Search Results,” the window changes to the various
catalog fields for this Template.
Scroll to the bottom of this window and click the “Import This Item” option to import the Template
Certificate information into the Program New Proposal.
The screen will gray out as the template for the certificate is loaded into the Program New Proposal.
In our example, the certificate template is loaded, and ready for us to input the program information.

12
As a quick reminder, you will want to save changes frequently as you work on any proposal in
Curriculog. Save your changes frequently by either clicking the “Save All Changes” in the top dark
blue toolbar or clicking the “Save All Changes” in the lower left of the display screen. This feature
floats with the display so that you do not have to scroll to the top.
After saving changes in the Proposal, you can exit Curriculog by going to your name in the upper right
of the dashboard. Click on your name to open the drop-down menu. Then click “Log out.” Since you
saved the Proposal it will be available for you to continue your work on it.
When you log back into Curriculog, click the “My Proposals” tab.
Click the proposal to open it up and scroll to the place you were previously.
13
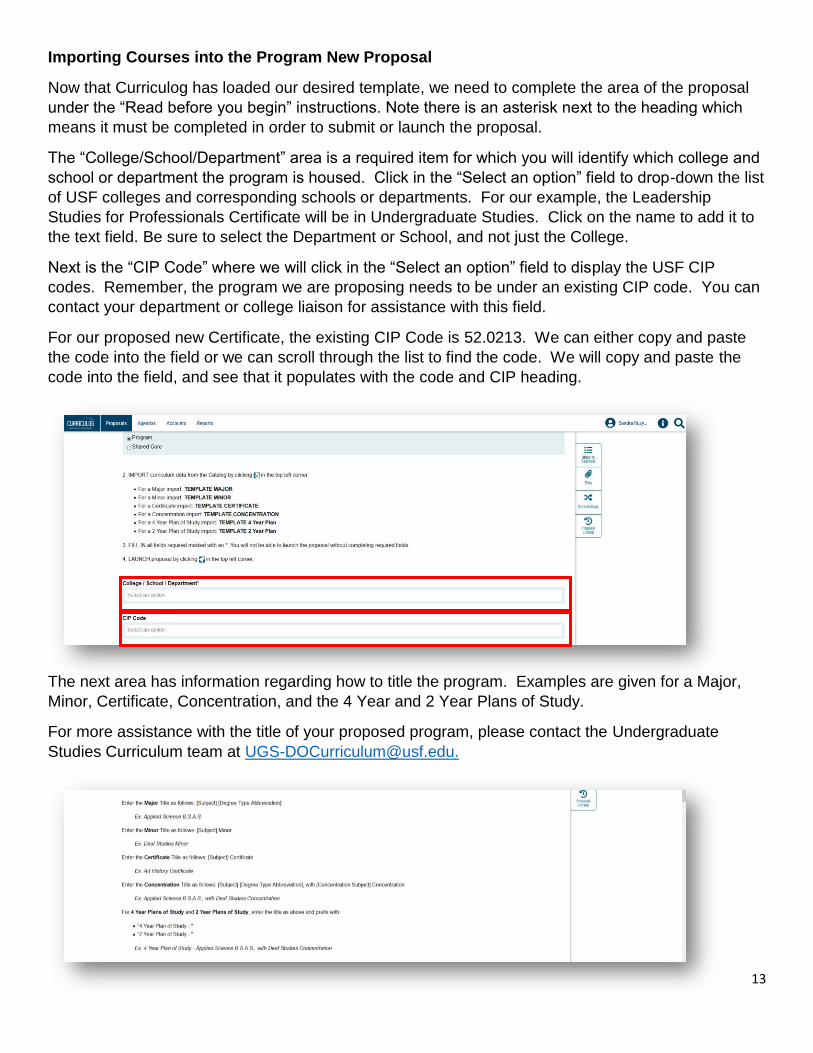
Importing Courses into the Program New Proposal
Now that Curriculog has loaded our desired template, we need to complete the area of the proposal
under the “Read before you begin” instructions. Note there is an asterisk next to the heading which
means it must be completed in order to submit or launch the proposal.
The “College/School/Department” area is a required item for which you will identify which college and
school or department the program is housed. Click in the “Select an option” field to drop-down the list
of USF colleges and corresponding schools or departments. For our example, the Leadership
Studies for Professionals Certificate will be in Undergraduate Studies. Click on the name to add it to
the text field. Be sure to select the Department or School, and not just the College.
Next is the “CIP Code” where we will click in the “Select an option” field to display the USF CIP
codes. Remember, the program we are proposing needs to be under an existing CIP code. You can
contact your department or college liaison for assistance with this field.
For our proposed new Certificate, the existing CIP Code is 52.0213. We can either copy and paste
the code into the field or we can scroll through the list to find the code. We will copy and paste the
code into the field, and see that it populates with the code and CIP heading.
The next area has information regarding how to title the program. Examples are given for a Major,
Minor, Certificate, Concentration, and the 4 Year and 2 Year Plans of Study.
For more assistance with the title of your proposed program, please contact the Undergraduate
Studies Curriculum team at [email protected].

14
In the “Program Title” area we will type in “Leadership Studies for Professionals Certificate.”
Now move to the curriculum areas of the Program New Proposal. Prior to starting the proposal, we
downloaded the Certificate Template from the UGS Curriculum website, converted it to a Word
document, and filled in the information for our proposed New Certificate. We will now open the
document to assist us in completing the Curriculog New Program Proposal. We will copy and paste
the information from our Word document into the Curriculog proposal for each area.

15
“Program Description” is the next area. We will copy and paste our Program Description from our
Word document into the Proposal text field for the “Program Description.”
The next area of the Program New Proposal provides information on how to edit the Program
Curriculum. When using the Program New Proposal for the 4 Year and 2 Year Plan of Study, the
steps will be different. Please review the tutorial on the using the Program New Proposal for new
Plans of Study associated with a new Major or Concentration.
Let’s do a quick overview before we start the process. For our new program, we will need to first
import existing courses into the program using the “View Curriculum Courses” tab. This is under the
heading “Program Curriculum.” You will import all courses, including supporting, core, and electives
into this area. However, you do not add State Mandated Common Course Prerequisites here. These
will get added to that specific heading under “View Curriculum Schema” for a Major.
Once you have brought in all the courses, you will then move to the “View Curriculum Schema” tab,
and place the courses into their headings or cores, such as Core Courses or Elective Courses.

16
We are now reading to use the Certificate Template we completed as a Word document to import the
courses into the “View Curriculum Courses” tab. There are two buttons in the area for the “View
Curriculum Courses.” We will click the “Import Course” button for courses that are currently in the
Catalog system’s Course Inventory.
The “Add Course” button is used for New Courses that are proposed and pending in Curriculog.
Please do not use the “Add Course” button for new courses that are not pending in Curriculog.
For our Leadership Studies for Professionals Certificate, we will click on “Import Course” and add all
of the courses associated with the program. There are eight total courses (both core and electives)
which we will import.
This will open a second window for the “Import Course” process. First, we will select the catalog for
the next cycle. In our example, it will be the 2021-2022 Undergraduate catalog.

17
The import screen changes to display a “Search” feature. All of the courses we want to add to the
New Certificate have the “LDR” prefix. So, we will search by the course “Prefix.” We will go to “Or
add filter” area, and in the text field, click to bring up the drop-down display. Here we will find “Prefix”
and click to add to our Search options. If there are multiple courses with the same “Prefix,” you will
search and add the courses with the same “Prefix.” Once you have imported those courses, you
would change the “Prefix” field for the next set of same prefix courses.
At any time, you can go to the “Add another filter” area and click in the field to bring up the drop-down
display to add another search option. For example, you can “Add another filter” to search by “Code”
or the course number, in addition to the “Prefix.”
Once you have entered the search options you want to use, scroll down and uncheck the box next to
“Exclude previously imported items.” Then click the gray “Search Available Curriculum” button to
start the search. Curriculog will then pull into the “Search Results” area all the courses with the
search options you have specified. In our example, we are given all USF LDR courses. Next to
“Search Results” we are told there are 23 USF courses with the LDR prefix.

18
We can scroll through the list of courses under “Search Results” and click on the courses we want to
add to the new program. You may need to go to the “Next” screen in the Search window to see the
next set of courses.
As you click on each course for the new program, it will get added to the “Selected Courses” area
under the “Search Results.” Check to ensure the courses you want to add to the new program, with
that search option, are in the “Selected Courses.”
The eight courses we want to add to our New Certificate are in the “Selected Courses” listing. We will
now click the gray “Add Courses to Proposal” button.
19
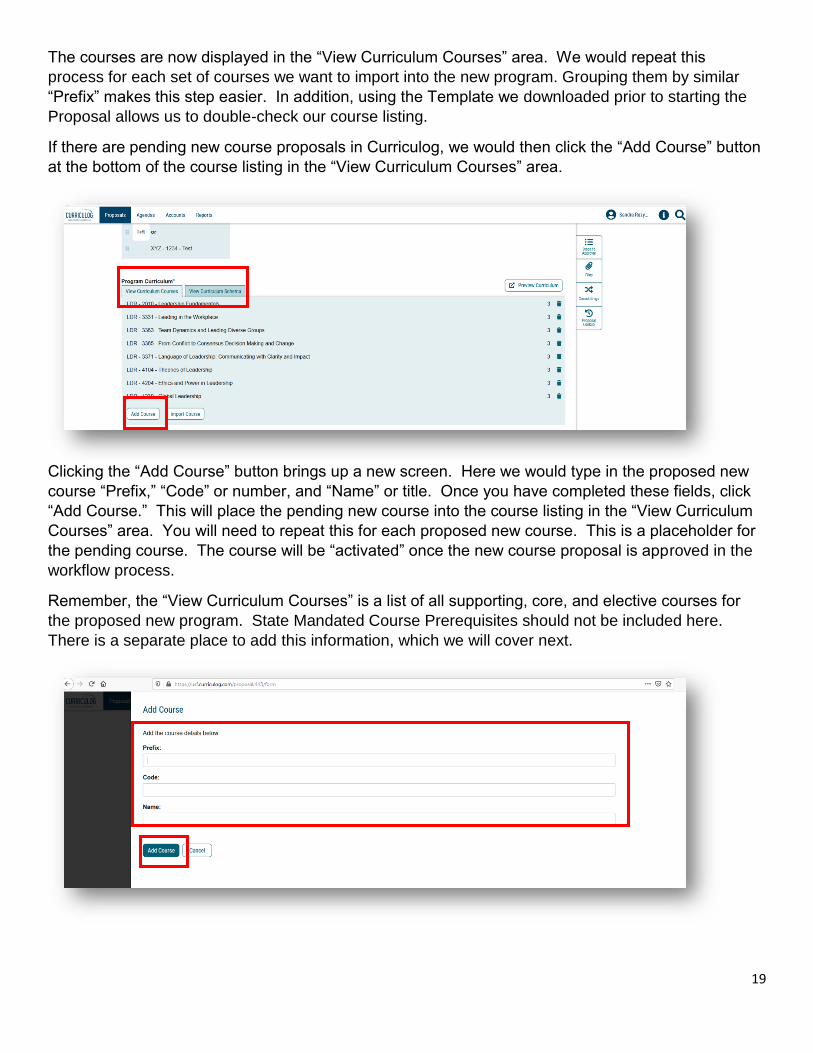
The courses are now displayed in the “View Curriculum Courses” area. We would repeat this
process for each set of courses we want to import into the new program. Grouping them by similar
“Prefix” makes this step easier. In addition, using the Template we downloaded prior to starting the
Proposal allows us to double-check our course listing.
If there are pending new course proposals in Curriculog, we would then click the “Add Course” button
at the bottom of the course listing in the “View Curriculum Courses” area.
Clicking the “Add Course” button brings up a new screen. Here we would type in the proposed new
course “Prefix,” “Code” or number, and “Name” or title. Once you have completed these fields, click
“Add Course.” This will place the pending new course into the course listing in the “View Curriculum
Courses” area. You will need to repeat this for each proposed new course. This is a placeholder for
the pending course. The course will be “activated” once the new course proposal is approved in the
workflow process.
Remember, the “View Curriculum Courses” is a list of all supporting, core, and elective courses for
the proposed new program. State Mandated Course Prerequisites should not be included here.
There is a separate place to add this information, which we will cover next.

20
Placing the Program Information into the Catalog Headings in the Program New Proposal
Once the program courses have been added to the “View Curriculum Courses” tab, we are ready to
place those courses into the program. Click on the “View Curriculum Schema” tab. These headings
will look familiar if you completed the template document for your new program prior to starting the
proposal.
The headings displayed are the standard catalog program headings. They will vary based on the
type of program (Major, Concentration, Minor, or Certificate). In the catalog, these are called “Cores.”
You will see two buttons at the bottom of the display for “Add Core” and “Import Core.” The “Add
Core” is used when a heading unique to your program needs to be added. For example, some
Majors have separate admission requirements for their program. If the heading is not displayed, use
the “Add Core” button.
For a Major, you will see the State Mandated Common Course Prerequisites heading or core. This is
where you would update these prerequisites. For more information on State Mandated Common
Course Prerequisites, visit their website at https://www.floridashines.org/succeed-in-college/plan-
your-path/common-prerequisites.
21
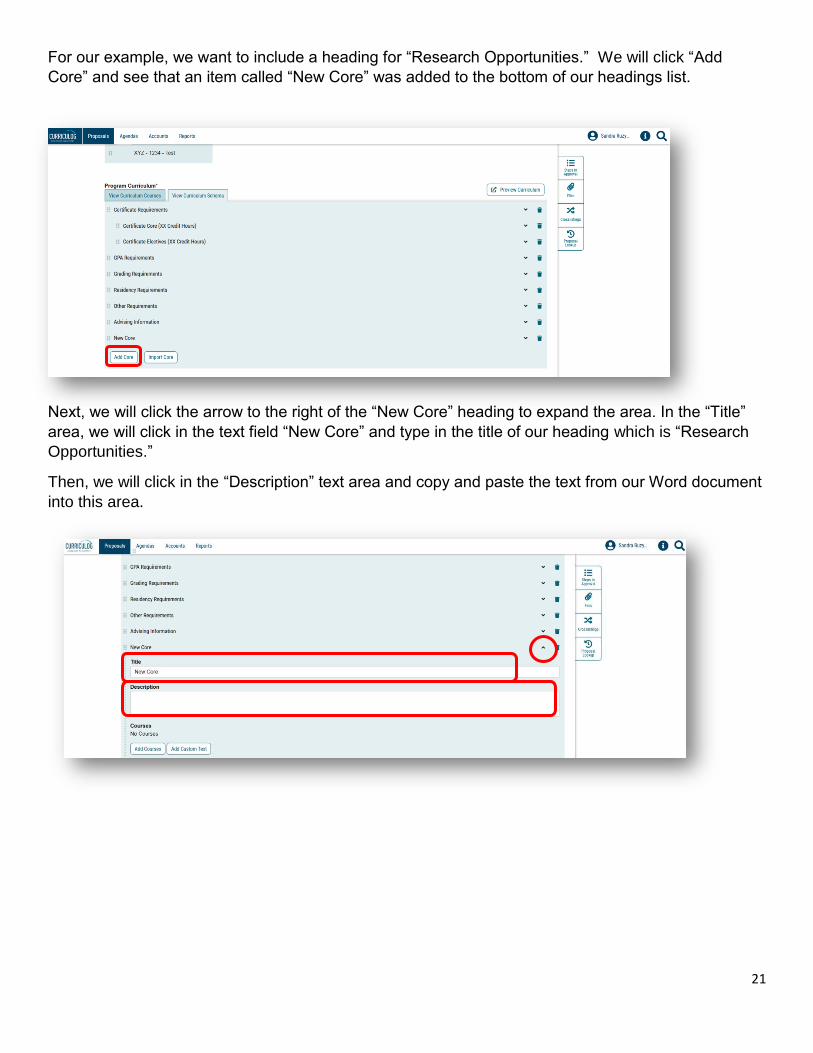
For our example, we want to include a heading for “Research Opportunities.” We will click “Add
Core” and see that an item called “New Core” was added to the bottom of our headings list.
Next, we will click the arrow to the right of the “New Core” heading to expand the area. In the “Title”
area, we will click in the text field “New Core” and type in the title of our heading which is “Research
Opportunities.”
Then, we will click in the “Description” text area and copy and paste the text from our Word document
into this area.

22
There are two buttons at the bottom of this heading area - “Add Courses” and “Add Custom Text.” If
your new heading area had courses associated with it, you would click the “Add Courses” button.
Remember, these courses must be in the listing under the “View Curriculum Courses” tab.
The “Add Custom Text” button refers to text that could be added to any course selection. For
example, if you added a course for which you want to indicate it must be taken in a specific semester,
you would use the “Add Custom Text” button to include that information with that course.
We do not need to add courses or custom text to our “New Core.” We will save our changes, and
then collapse this area by click the arrow to the right of the heading.
The title of the new core that we added is now saved, along with the description information.
However, it is not displayed in the order that we want. We will click the small squares icon to the left
of the title in order to drop-and-drag the heading and associated information. We will place this new
area under the “Residency Requirements” heading.
We can also remove any headings that are not needed for our program. Looking at our Word
document, we want to remove the “Other Requirements” area. To the right of the title is a “Garbage
Can” icon. We will click the icon to delete the heading.

23
In doing so, we get a “Confirm Delete” screen. We will click “Delete Core” and the Proposal will
return us to “View Curriculum Schema” area.
We now see that the core we added has moved in the place we wanted in the display. And the “Other
Requirements” area was removed. If you want sub-headings for any of the areas listed, you can place
the heading by moving your mouse over the squares to the left of the title. Then drag-and-drop that
heading so that it highlights the heading it needs to be under.
We will now open both the Curriculog Proposal and our Word document and place them side-by-side
so we can edit the headings under the “View Curriculum Schema” tab.
We use our template to copy and paste the information into the corresponding heading area. Click
the arrow to the right of the heading to open up or collapse that area. You will want to save your
updates frequently.

24
Let’s take a look at how to add courses to the “Certificate Core” area. We open the “Certificate Core”
area by clicking the arrow to the right of the title. Then we update the “Title” by replacing “(XX Credit
Hours)” with (9 Credit Hours).
If there are any instructions or additional information associated with the core courses, we would copy
and paste it into the “Description” text field. Since we do not need to add this information, we move to
the “Add Courses” button. We will click this button to identify those courses we have pre-loaded into
the “View Curriculum Courses” as being part of the “Core” courses.
Once we click the “Add Courses” button, a “Choose courses to add” screen appears, with the listing
of courses from the “View Curriculum Courses” tab.
We refer to our Word template, and identify the courses we need to add to the core. We can click on
the courses in the “Choose courses to add” screen, and then click the “Add Course” button to add the
highlighted courses.
25
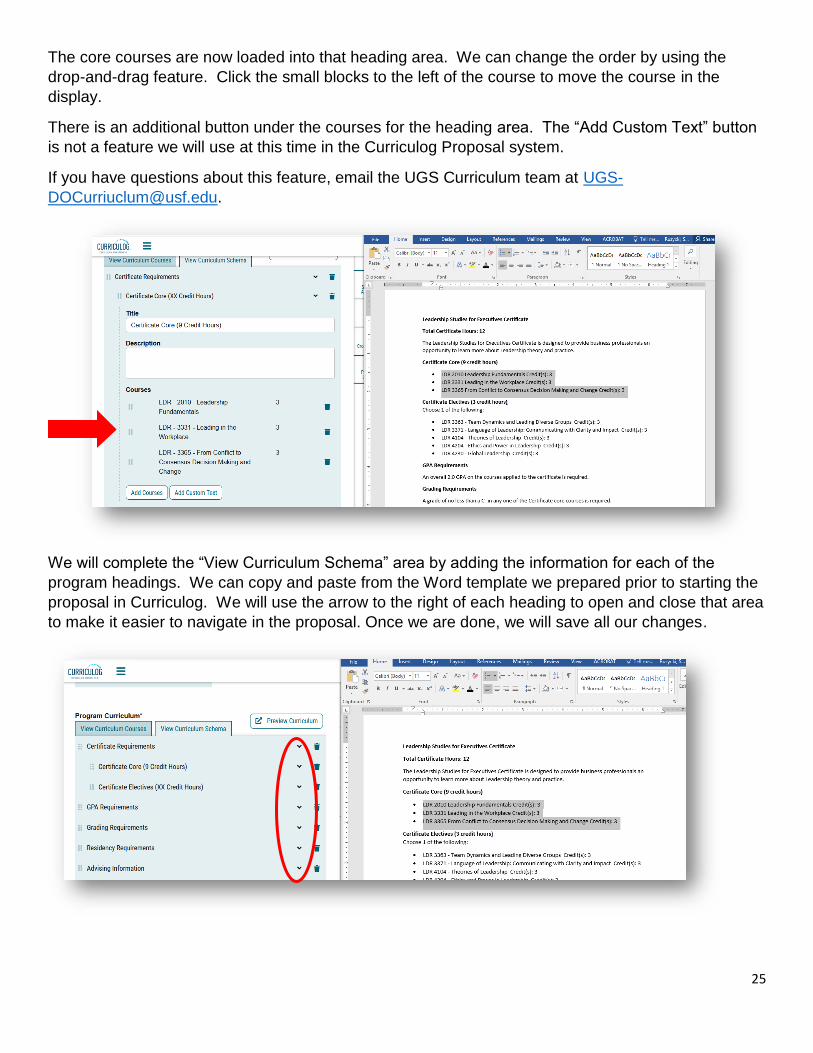
The core courses are now loaded into that heading area. We can change the order by using the
drop-and-drag feature. Click the small blocks to the left of the course to move the course in the
display.
There is an additional button under the courses for the heading area. The “Add Custom Text” button
is not a feature we will use at this time in the Curriculog Proposal system.
If you have questions about this feature, email the UGS Curriculum team at UGS-
We will complete the “View Curriculum Schema” area by adding the information for each of the
program headings. We can copy and paste from the Word template we prepared prior to starting the
proposal in Curriculog. We will use the arrow to the right of each heading to open and close that area
to make it easier to navigate in the proposal. Once we are done, we will save all our changes.

26
At any time, we can preview the program information by click the “Preview Curriculum” button that is
to the right of the “Program Curriculum” heading. This will bring up a new screen that displays the
Program New information.
Please sure to review the way the information is displayed, as this is the way it will appear in the
Undergraduate Catalog. To close this screen, click the X in the green toolbar of the preview
curriculum window.
For changes, go back to the “View Curriculum Schema” tab and make the needed updates.
The last two sections on the Program New Proposal are for the College Review and the
Undergraduate Studies review. These areas will be completed by each area in their review of the
proposal. You can collapse these areas of the Proposal by clicking the arrow to the right of the
headings. Save the Proposal one last time by clicking the “Save All Changes” button.
Remember, if submitting a Program New Proposal for a Major or Concentration, the corresponding 4
Year and 2 Year Plan of Study must be submitted using a separate Program New Proposal for each.
Since the directions for these are different, it will be useful to view the tutorial on using the Program
New Proposal for a Plan of Study on the UGS Curriculum website.

27
Launching the Proposal
After you have reviewed the updates you made for the Program New Proposal, it is time to submit or
launch the proposal. At the top of the Proposal, in the dark blue bar, is the “Rocketship” icon or
“Validate and Launch” the proposal. Click the “Rocketship” icon to submit the proposal to the
approval workflow process.
If there are required areas which were not completed, you will get the “Could Not Launch Proposal”
screen. To view the areas which need completion, click the “Show Me” option.
The areas which require completion will show in red. You can update the information, save all
changes, and then relaunch the Proposal.

28
Once the proposal is validated, or requires no further information, you will see a “Launch Proposal”
screen. Click the “Launch Proposal” button to send the proposal to the approval workflow process.
Remember, you will need to complete the Program New Proposal for each Plan of Study to be
associated with the Major or Concentration. Two separate Program New Proposals need to be
submitted for the 4 Year Plan of Study and the 2 Year Plan of Study.
Please review the tutorial on the Program New Proposal for Plan of Study on the Undergraduate
Studies Curriculum Team website at https://www.usf.edu/ugs-curriculum-training. You can download
the template for each Plan of Study from the “Resources” page in order to complete the information
on the word document prior to starting the Program New Proposal.
If you have questions, please contact the Undergraduate Studies Curriculum team at UGS-

29
ORIGINATOR APPROVAL
The final step is for you to approve the New Course proposal in the approval workflow.
Open the right side of the screen. You will see the “Approval Steps.” We chose not to launch the
proposal which is why it states “Incomplete” under the Proposal Toolbox. Once the proposal is
launched, this text will state “Launched.”
Under the Approval Steps heading, you will see the various steps in the process for Program New
Proposal.
As the course proposer, you are identified as the Originator in the Curriculog approval work flow
process. You will need to “Approve” the proposal. Once approved, the circle next to Originator will
have a green “Thumbs up” icon. The proposal will then move to the College step.
This concludes the USF Curriculog “Undergraduate Program New Under Existing CIP for a Major,
Concentration, Minor, or Certificate” tutorial.
Remember, for a New Major or Concentration under and existing CIP code, the Program New
Proposal must be completed for the 4 Year and 2 Year Plan of Study. To view the tutorial for this
topic, visit the USF Undergraduate Studies Curriculum website at https://usf.edu/ugs-curriculum-
training. Additional Curriculog tutorials are located here, as well as important dates and deadlines,
FAQs, and other resources.
You can email the UGS Curriculum Team at [email protected] for any additional
assistance.