webex recording editor - meetingconnect.net of webex recording editor the webex recording editor...
TRANSCRIPT
WebEx Recording Editor
User Guide
3.26
Copyright
© 1997–2011 Cisco and/or its affiliates. All rights reserved. WEBEX, CISCO, Cisco WebEx, the CISCO logo, and the Cisco WebEx logo are trademarks or registered trademarks of Cisco and/or its affiliated entities in the United States and other countries. Third-party trademarks are the property of their respective owners.
U.S. Government End User Purchasers. The Documentation and related Services qualify as "commercial items," as that term is defined at Federal Acquisition Regulation ("FAR") (48 C.F.R.) 2.101. Consistent with FAR 12.212 and DoD FAR Supp. 227.7202-1 through 227.7202-4, and notwithstanding any other FAR or other contractual clause to the contrary in any agreement into which the Agreement may be incorporated, Customer may provide to Government end user or, if the Agreement is direct, Government end user will acquire, the Services and Documentation with only those rights set forth in the Agreement. Use of either the Services or Documentation or both constitutes agreement by the Government that the Services and Documentation are commercial items and constitutes acceptance of the rights and restrictions herein.
0051911
www.webex.com
i
Table of Contents
Chapter 1 WebEx Recording Editor User's Guide ................................................................. 5
About WebEx Recording Editor ................................................................................................................ 5
System Requirements ................................................................................................................................... 6
Installing WebEx Recording Editor ........................................................................................................... 6
Starting WebEx Recording Editor ............................................................................................................. 7
Components of WebEx Recording Editor .............................................................................................. 7
Chapter 2 How to Use WebEx Recording Editor ................................................................. 11
Chapter 3 Opening a Recording .......................................................................................... 13
Chapter 4 Playing a Recording ............................................................................................ 15
Starting Playback ........................................................................................................................................ 15
Controlling Playback .................................................................................................................................. 16
Chapter 5 Navigating a Recording ...................................................................................... 19
Viewing Snapshots of a Recording ....................................................................................................... 19
Going to a Specific Segment ................................................................................................................... 20
Going to the Beginning or End of Recording .................................................................................... 20
Going to the Current Location................................................................................................................ 21
ii
Chapter 6 Setting the Current Location .............................................................................. 23
Chapter 7 Selecting Recorded Data ..................................................................................... 25
Selecting Video or Audio .......................................................................................................................... 25
Selecting a Snapshot ................................................................................................................................. 28
Selecting a Range of Time ........................................................................................................................ 28
Selecting a Segment .................................................................................................................................. 29
Chapter 8 Working with Markers ......................................................................................... 31
Inserting a Marker ....................................................................................................................................... 31
Moving a Marker ......................................................................................................................................... 33
Undefining a Marker .................................................................................................................................. 33
Editing Cue Point Marker Properties .................................................................................................... 33
About the Marker Define/Marker Properties Dialog Box ............................................................... 34
Chapter 9 Working with Segments ...................................................................................... 37
Defining a Segment ................................................................................................................................... 37
Editing a Segment's Properties .............................................................................................................. 38
Undefining a Segment .............................................................................................................................. 40
About the Define Segment/Segment Properties Dialog box ...................................................... 40
Chapter 10 Cutting, Copying, and Pasting Recorded Data ............................................... 43
Cutting Recorded Data ............................................................................................................................. 43
Copying Recorded Data ............................................................................................................................ 44
Pasting Recorded Data .............................................................................................................................. 45

iii
Inserting Another Recording................................................................................................................... 47
Chapter 11 Dubbing Audio in a Recording ......................................................................... 49
Choosing an Audio Input Device for Dubbing Audio ..................................................................... 49
Controlling Audio Dubbing ..................................................................................................................... 50
Adjusting the Audio Input Volume During Dubbing ..................................................................... 52
Chapter 12 Saving an Edited Recording ............................................................................. 55
Chapter 13 Exporting a Recording to a Windows Media File ............................................ 57
About the WMV Options Dialog Box .................................................................................................... 58
Chapter 14 Uninstalling WebEx Recording Editor ............................................................. 61
Index ....................................................................................................................................... 63

1
5
Chapter 1
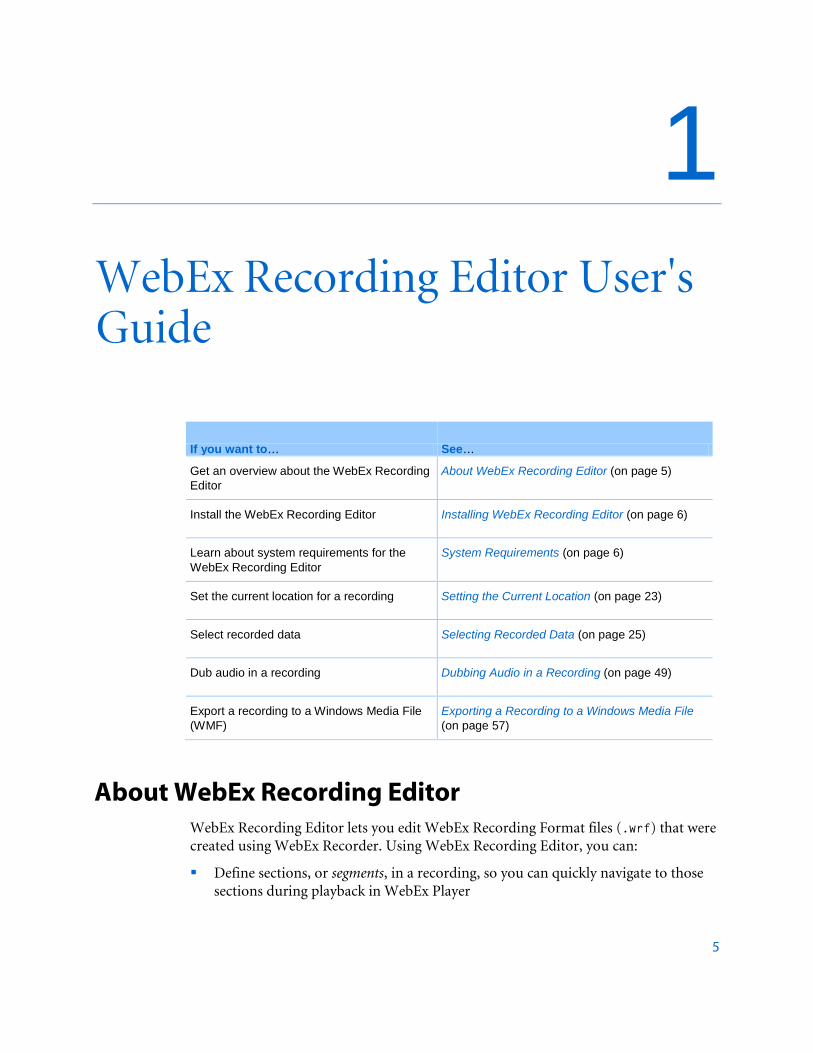
If you want to… See…
Get an overview about the WebEx Recording Editor
About WebEx Recording Editor (on page 5)
Install the WebEx Recording Editor Installing WebEx Recording Editor (on page 6)
Learn about system requirements for the WebEx Recording Editor
System Requirements (on page 6)
Set the current location for a recording Setting the Current Location (on page 23)
Select recorded data Selecting Recorded Data (on page 25)
Dub audio in a recording Dubbing Audio in a Recording (on page 49)
Export a recording to a Windows Media File (WMF)
Exporting a Recording to a Windows Media File (on page 57)
About WebEx Recording Editor WebEx Recording Editor lets you edit WebEx Recording Format files (.wrf) that were created using WebEx Recorder. Using WebEx Recording Editor, you can:
Define sections, or segments, in a recording, so you can quickly navigate to those sections during playback in WebEx Player
WebEx Recording Editor User's Guide

Chapter 1: WebEx Recording Editor User's Guide
6
Delete recorded data from a recording
Insert all or part of a recording into another recording
Dub audio in a recording—that is, record audio over existing audio, or add new audio to a recording
Convert any WebEx Recording Format file (.wrf) to a Windows Media Video file (.wmv)
System Requirements The following are the recommended system requirements for WebEx Recording Editor.
Refer to the WebEx cross-platform release notes for supported operating systems, browsers, and other minimum system requirements for Windows.
Sound card, for playing audio or dubbing audio
Speakers, or a headphone jack and headphones, for playing or dubbing audio
Audio input device for dubbing audio
Windows Media Player 9.0 or later, for converting .wrf files to .wmv files
For more information about audio input devices, see Choosing an Audio Input Device for Dubbing Audio (on page 49).
Note: For maximum performance of WebEx Recording Editor, delete any temporary files on your
computer and defragment your hard disk using Windows Disk Defragmenter before editing a recording.
If you want to dub audio, ensure that your computer's sound card is set up to record audio. For details, refer to the WebEx Recorder and Player User's Guide, which is available on the Recording and Playback page on your WebEx service Web site.
Installing WebEx Recording Editor You can download WebEx Recording Editor from the Recording and Playback page on your WebEx service Web site.
To download and install WebEx Recording Editor:
1 On the navigation bar of your WebEx service Web site, click Support.

Chapter 1: WebEx Recording Editor User's Guide
7
2 Under Downloads, click the Recording and Playback page link.
3 Click Download WebEx Recording Editor.
4 Follow the on-screen instructions.
Starting WebEx Recording Editor To start WebEx Recording Editor, do one of the following on your computer's desktop:
On the Start menu, choose Programs > WebEx > WebEx Recorder and Player > WebEx Recording Editor.
Double-click the WebEx Recording Editor shortcut.
Components of WebEx Recording Editor The WebEx Recording Editor window is your workspace for editing recordings. In the window, you can play, listen to audio in, and navigate a recording, so you can locate the points at which you want to edit recorded data, including recorded audio.
The following figure shows the WebEx Recording Editor window and indicates its primary components.

Chapter 1: WebEx Recording Editor User's Guide
8
Toolbar
Menu bar
Preview area
Elapsed Time and Duration indicator
Timeline
Video
Audio
Playback toolbar
Current Location indicator
The following table describes the components of WebEx Recording Editor.

Chapter 1: WebEx Recording Editor User's Guide
9
Component Description
Menu bar Includes commands for using WebEx Recording Editor. Many of the commands are also available on the toolbar.
Toolbar Contains tools that you can use to edit a recording. All of the tools are also available as commands on the menus.
Elapsed Time and Duration indicator
The Elapsed Time and Duration indicator shows the elapsed time during playback or editing, and the total duration of a recording, in hours, minutes, seconds, and tenths of a second.
Preview area Displays playback of a recording.
Playback toolbar Contains tools that you can use to play back a recording. Most of the tools are also available as commands on the Control menu.
Recording timeline Displays a series of snapshots that represent 10 seconds of recorded data, which includes screen images and any audio that was recorded. The timeline includes both a video portion and an audio portion.
Current Location indicator
Shows the current location on the timeline during playback. You can move this indicator to indicate the point at which you want to edit recorded data or begin playback. This Elapsed Time and Duration indicator tracks the movement of the Current Location indicator.

2
11
Chapter 2
To edit a recording, you can simply select data on its timeline, and then cut or copy the data and paste it at another location. Or, you can define segments—that is, specific ranges of recorded data that you can label, delete, copy, paste at another location on the timeline, or insert into another recording's timeline.
When you define a segment, you are defining starting point and ending point markers for that segment of recorded data. You can also define cue point markers that let you return to precise locations on the timeline.
The following are some examples of how you can use WebEx Recording Editor:
Define segments of recorded data to which you can quickly navigate during playback: Define a segment of recorded data on the timeline and indicate the start and end of the segment with starting point and ending point markers. For details, see Defining a Segment (on page 37).
Delete part of a recording: Select recorded data on the timeline, and then cut or delete it from the timeline. For details, see Cutting Recorded Data (on page 43). Or, for more precise editing, define a segment, and then delete the segment from the timeline. For details, see About the Define Segment/Segment Properties Dialog box (on page 40).
Insert recorded data from one recording into another recording: Open the two recordings. In one recording, define a segment that includes the data that you want to insert into the other recording. Then copy the segment, and insert into the timeline of the other recording. For details, see Pasting Recorded Data (on page 45).
Dub audio in a recording: Define just the starting point at which to begin dubbing audio, or a specific section of a recording in which to dub audio. Then, using the Audio Dubbing panel and an audio input device, such as a microphone, record
How to Use WebEx Recording Editor
Chapter 2: How to Use WebEx Recording Editor
12
new audio to correct mistakes, update information, and so on. For details, see Dubbing Audio in a Recording (on page 49).
Convert a WRF file to a Windows Media Video (WMV) file: In the Recording Editor, open a recording (.wrf) that was made with WebEx Recorder. Export the file to the WMV format (.wmv), which you can play in Windows Media Player or other third-party media players. For details, see Exporting a Recording to a Windows Media File (on page 57).
3
13
Chapter 3
You can open any recording that was made using WebEx Recorder. WebEx Recording Format files have a .wrf extension.
To open a recording:
1 On the toolbar, click the Open File button.
The Open dialog box appears.
2 Select the recording file that you want to open.
3 Click Open.
Opening a Recording


4
15
Chapter 4
You can play back a WebEx Recording Format file (.wrf) in the WebEx Recording Editor viewer, to determine the points at which you want to edit the recording.
Starting Playback You can start playback at the beginning of a recording or at any point on the recording's timeline. Or you can play back a specific segment of a recording that you have defined. For information about defining segments, see Defining a Segment (on page 37).
To start playback at the beginning of a recording:
On the Playback toolbar, click the Play button.
To start playback at a specific point on a recording's timeline:
1 Move the Current Location indicator to the point on the timeline at which you want to start playback.
For details, see Setting the Current Location (on page 23).
2 On the Playback toolbar, click the Play button.
To play back a specific segment of a recording:
1 On the Playback toolbar, click the Play button.
2 Click the Next Segment or Previous Segment button to move to the desired segment.
Playing a Recording

Chapter 4: Playing a Recording
16
Controlling Playback When playing a recording, you can
Pause and resume playback
Fast forward or rewind the recording
Stop playback
Set the playback volume
Mute and unmute audio
To pause and resume playback:
On the Playback toolbar, click the Pause button.
To resume recording:
On the Playback toolbar, click the Resume button.
To rewind a recording:
1 On the Playback toolbar, click the Rewind button.
The Current Location indicator moves quickly backward on the timeline, one snapshot at a time.
2 To stop rewinding a recording, click the Rewind button again.
To rewind a recording to its beginning:
On the Control menu, choose Rewind to Beginning.
To fast forward a recording:
1 On the Playback toolbar, click the Fast Forward button.
Chapter 4: Playing a Recording
17
The Current Location indicator moves quickly forward on the timeline, one snapshot at a time.
2 To stop fast forwarding a recording, click the Fast Forward button again.
To fast forward a recording to its end:
On the Control menu, choose Fast Forward to End.
To set playback volume:
Do either of the following:
On the Playback toolbar, adjust the volume control by dragging the slider to the right or left.
To increase the volume, press Ctrl+Up Arrow on your keyboard; to reduce the volume, press Ctrl+Down Arrow.
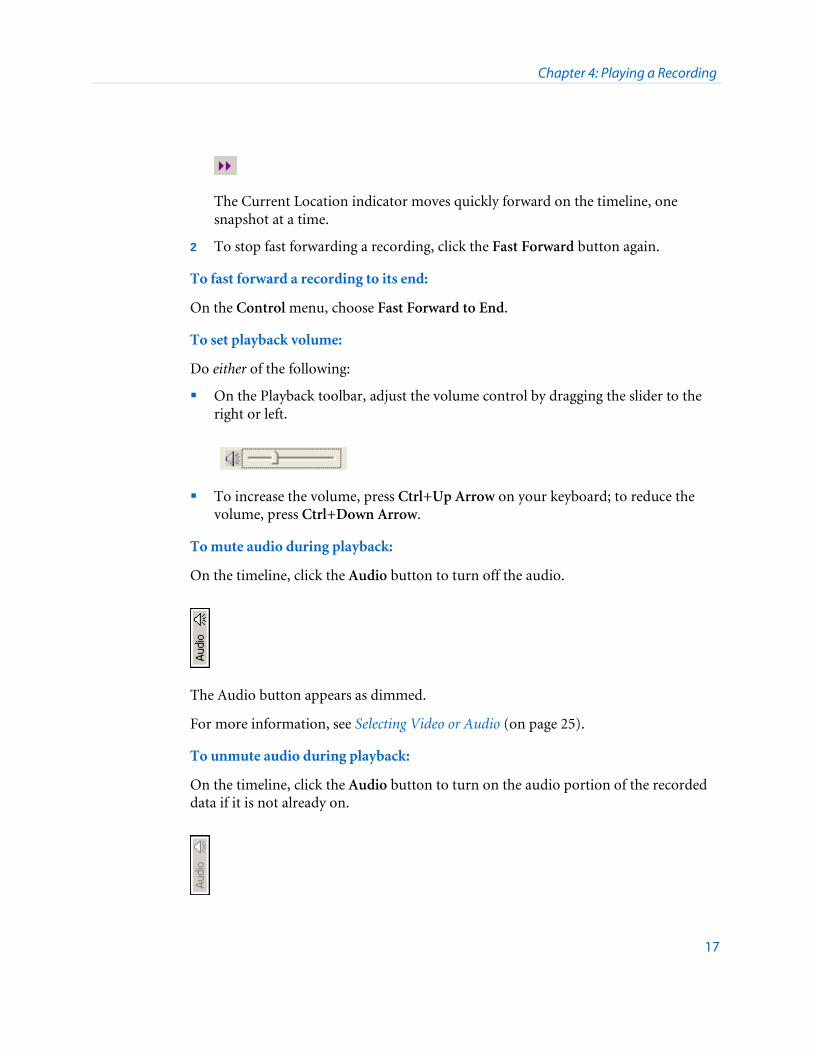
To mute audio during playback:
On the timeline, click the Audio button to turn off the audio.
The Audio button appears as dimmed.
For more information, see Selecting Video or Audio (on page 25).
To unmute audio during playback:
On the timeline, click the Audio button to turn on the audio portion of the recorded data if it is not already on.

Chapter 4: Playing a Recording
18
For more information, see Selecting Video or Audio (on page 25).
To stop playback:
On the Playback toolbar, click the Stop button.
5
19
Chapter 5
To locate the specific point at which you want to edit a recording, you can navigate the recording, using any of several methods, including going to
A snapshot of that represents 10 seconds of recorded data
A specific segment of recorded data that you have defined
A specific marker that you have inserted on a recording's timeline
The beginning or end of a recording's timeline
The current location on a recording's timeline—that is, the point on a timeline at which the Current Location indicator resides
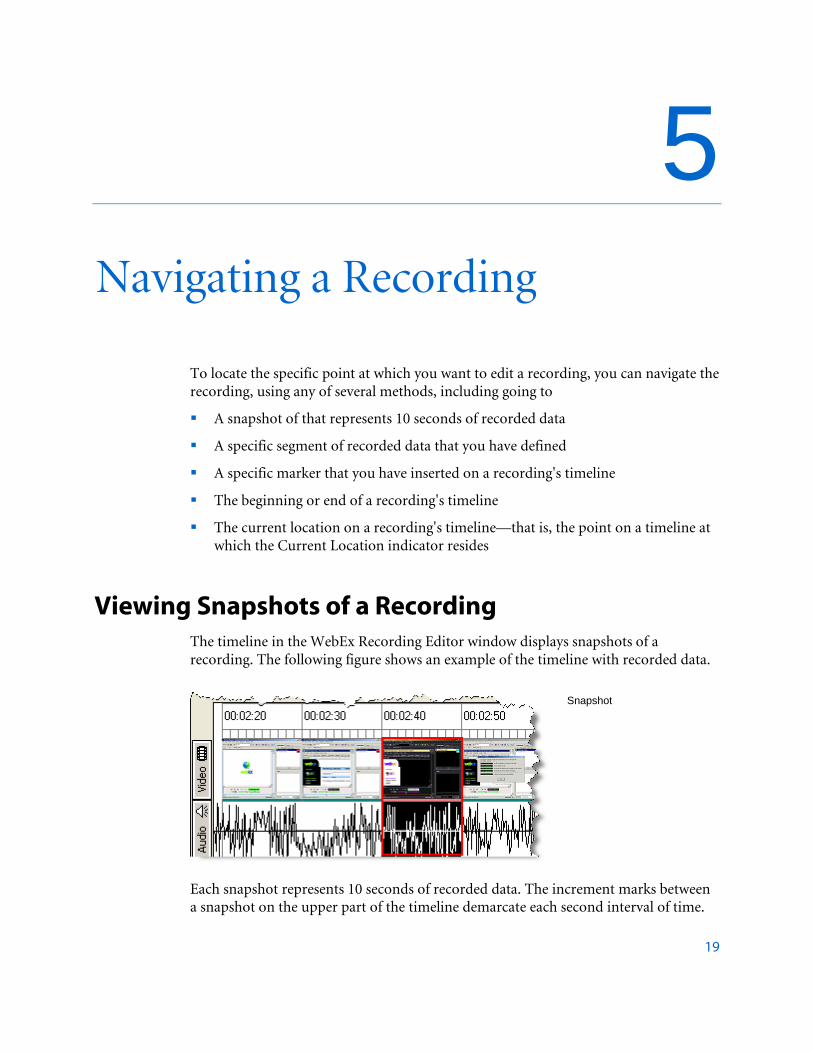
Viewing Snapshots of a Recording The timeline in the WebEx Recording Editor window displays snapshots of a recording. The following figure shows an example of the timeline with recorded data.
Snapshot
Each snapshot represents 10 seconds of recorded data. The increment marks between a snapshot on the upper part of the timeline demarcate each second interval of time.
Navigating a Recording

Chapter 5: Navigating a Recording
20
Going to a Specific Segment If you have defined a segment in a recording, you can go directly to a segment's starting point marker on the timeline, without starting playback. When you go to a segment, the Current Location indicator moves directly to the starting point marker for that segment.
For information about defining segments, see Defining a Segment (on page 37).
To go to the next or previous segment:
On the toolbar, do one of the following:
Click the Next Segment button.
Click the Previous Segment button.
Going to the Beginning or End of Recording You can quickly navigate to the beginning or end or a recording's timeline. If you go to the beginning or end of a timeline, the Current Location indicator moves to that location.
To go to the beginning of a timeline:
Do either of the following:
Press the Home key on your keyboard.
Right-click the timeline. On the menu that appears, choose Go To > Beginning.
To go to the end of the timeline
Do either of the following:
Press the End key on your keyboard.
Right-click the timeline. On the menu that appears, choose Go To > End.
Chapter 5: Navigating a Recording
21
Going to the Current Location If you are viewing a recording's timeline, you can quickly navigate to the point on the timeline at which the Current Location indicator resides.
To go to the Current Location indicator:
On the Control menu, choose Go To Current Location.

6
23
Chapter 6
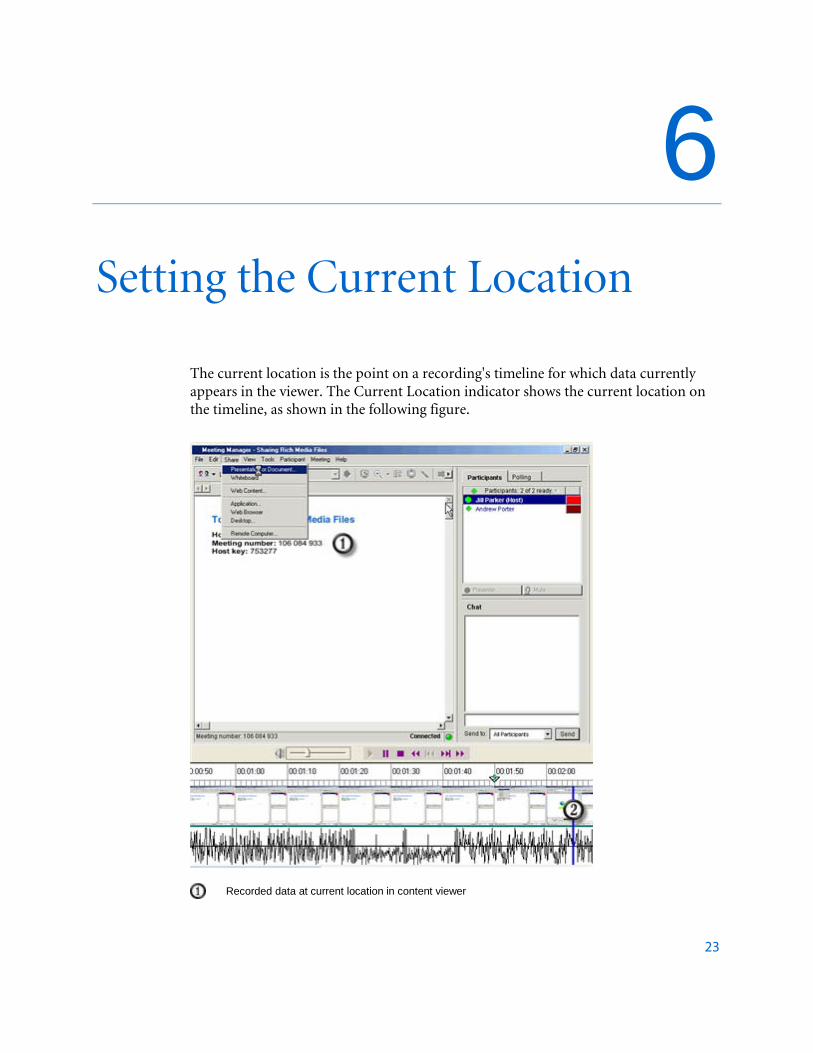
The current location is the point on a recording's timeline for which data currently appears in the viewer. The Current Location indicator shows the current location on the timeline, as shown in the following figure.
Recorded data at current location in content viewer
Setting the Current Location

Chapter 6: Setting the Current Location
24
Current Location indicator
You must set the current location on the timeline to perform editing activities, such as inserting markers or recorded data.
To move the current location to a specific snapshot or range of recording data:
1 Ensure that playback is stopped. If playback is paused, you must first resume playback, and then stop playback.
2 Scroll to a location on the timeline.
3 Select a snapshot or range of time on the timeline.
For details, see Selecting Recorded Data (on page 25).
4 On the Control menu, choose Set Current Location.
The Current Location indicator automatically moves to the left boundary of the selected snapshot or range of time.
To move the current location to a specific marker:
1 Ensure that playback is stopped. If playback is paused, you must first resume playback, and then stop playback.
2 Go to a marker on the timeline.
3 Select a marker.
4 On the Control menu, choose Set Current Location.
The Current Location indicator automatically moves to the location of the selected marker.
To move the current location incrementally, or to finely adjust the current location:
1 Ensure that playback is stopped. If playback is paused, you must first resume playback, and then stop playback.
2 Do one of the following:
On the timeline, drag the Current Location indicator forward or backward.
Press the Right Arrow or Left Arrow key on your keyboard to move the Current Location indicator continuously along the timeline, one snapshot at a time.
Hold down the Ctrl key while pressing the Right Arrow or Left Arrow key on your keyboard to move the Current Location indicator by a distance that is equivalent to the width of the Recording Editor window.
7
25
Chapter 7
To perform many editing tasks, you must first select recorded data on the timeline.
You can select both video and audio portions of the recorded data, or select only video or only audio data.
You can also select one of the following portions of recorded data:
Snapshot
Range of time
Segment
Selecting Video or Audio You can determine whether the recorded data that you edit and playback includes both video and audio, only video, or only audio.
To select both video and audio recorded data:
1 Make sure the Video and the Audio buttons at the left of the timeline are already turned on.
2 Select recorded data.
Both the video and audio recorded data is highlighted in the timeline.
Selecting Recorded Data
Chapter 7: Selecting Recorded Data
26
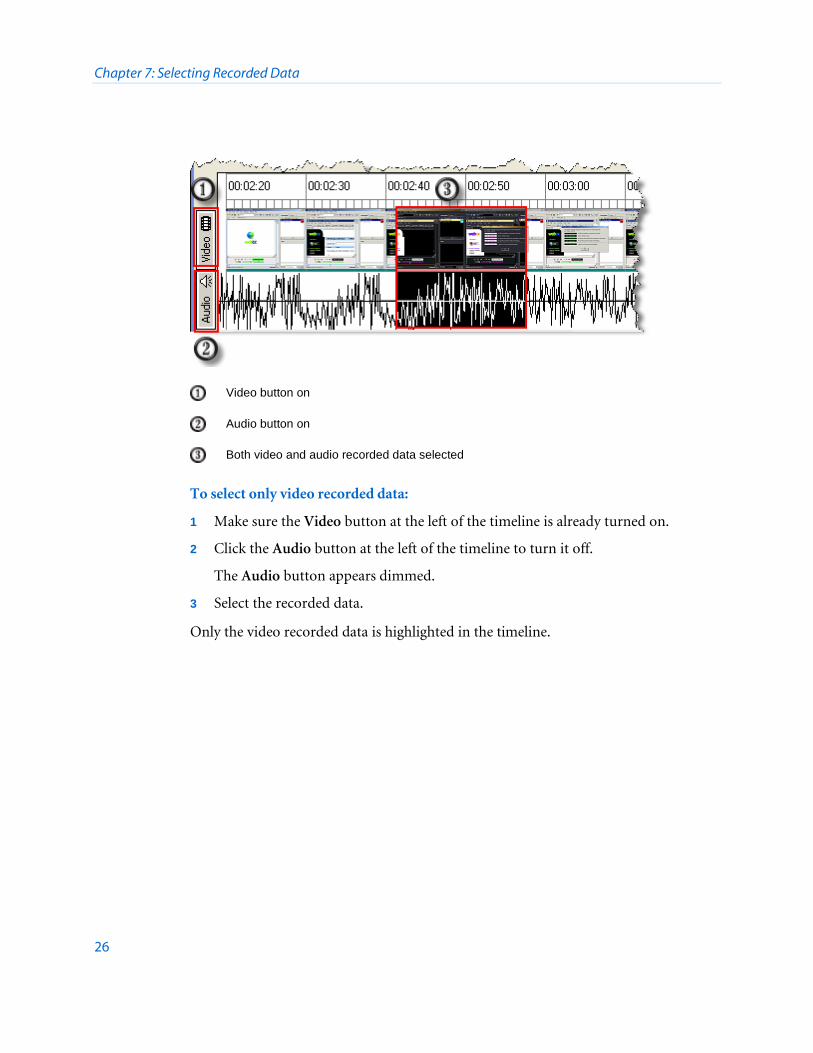
Video button on
Audio button on
Both video and audio recorded data selected
To select only video recorded data:
1 Make sure the Video button at the left of the timeline is already turned on.
2 Click the Audio button at the left of the timeline to turn it off.
The Audio button appears dimmed.
3 Select the recorded data.
Only the video recorded data is highlighted in the timeline.
Chapter 7: Selecting Recorded Data
27
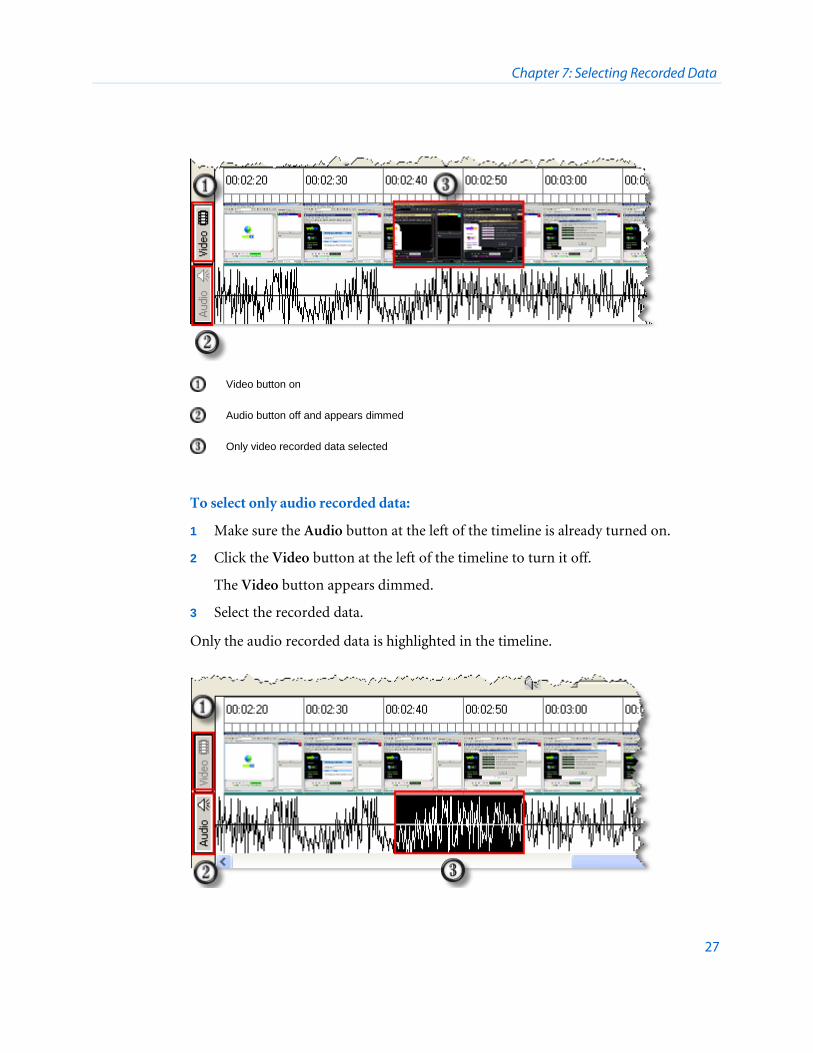
Video button on
Audio button off and appears dimmed
Only video recorded data selected
To select only audio recorded data:
1 Make sure the Audio button at the left of the timeline is already turned on.
2 Click the Video button at the left of the timeline to turn it off.
The Video button appears dimmed.
3 Select the recorded data.
Only the audio recorded data is highlighted in the timeline.

Chapter 7: Selecting Recorded Data
28
Video button off and appears dimmed
Audio button on
Only audio recorded data is selected
Selecting a Snapshot You can select a snapshot of recorded data.
To select a snapshot:
On the timeline, click the snapshot. The snapshot is highlighted.
Snapshot
Selecting a Range of Time You can select a range of time on the timeline. A selected range appears highlighted on the lower part of the timeline.
You can select a range of time between any two points, frames, snapshots, cue point markers, or starting and ending point markers. Once you select a range of time, you can also extend the range in either direction on the timeline.
To select a range of time between any two points on a timeline:
1 On the timeline, press your mouse button to set an anchor point.
2 Drag your mouse forward and backward over the timeline.
3 Release your mouse button.
The range is highlighted.

Chapter 7: Selecting Recorded Data
29
Range
To select a range of time between two snapshots or markers on a timeline:
1 Select a snapshot or marker.
2 Scroll to another snapshot or marker at the end of the range that you want to select.
3 Hold down the Shift key and click the snapshot or marker.
Selecting a Segment You can select a segment to edit its properties or to cut or copy it to the Clipboard palette. You can select a segment on the timeline.
To select a segment on the timeline:
Click the portion of the upper part of the timeline that demarcates a segment. For example:
Click here to select segment.
The segment is highlighted on the timeline.
Chapter 7: Selecting Recorded Data
30
Tip: Once you select a segment, you can view or edit its properties. For details, see Editing a Segment's Properties (on page 38).

8
31
Chapter 8
A marker is a flag that you insert to indicate a point on the timeline at which an action is to occur or to which you can jump. When you define a segment, pair of markers indicate the starting and ending points of the segment. You can also insert cue point markers, which are useful for marking any location to which you want to return.
Once you insert a marker, you can
Move the marker to another location on a timeline
Edit the marker's properties
Undefine a marker
Inserting a Marker You can insert the following types of markers on a recording's timeline:
Cue point marker
Starting point marker
Ending point marker
You can insert a marker at a snapshot, the beginning of a range of time, or a precise location on a timeline.
To insert a cue point marker on the timeline:
1 Do one of the following:
Select a snapshot or a range of time on the timeline.
For details, see Selecting Recorded Data (on page 25).
Move the Current Location indicator to a location on the timeline.
Working with Markers
Chapter 8: Working with Markers
32
For details, see Setting the Current Location (on page 23).
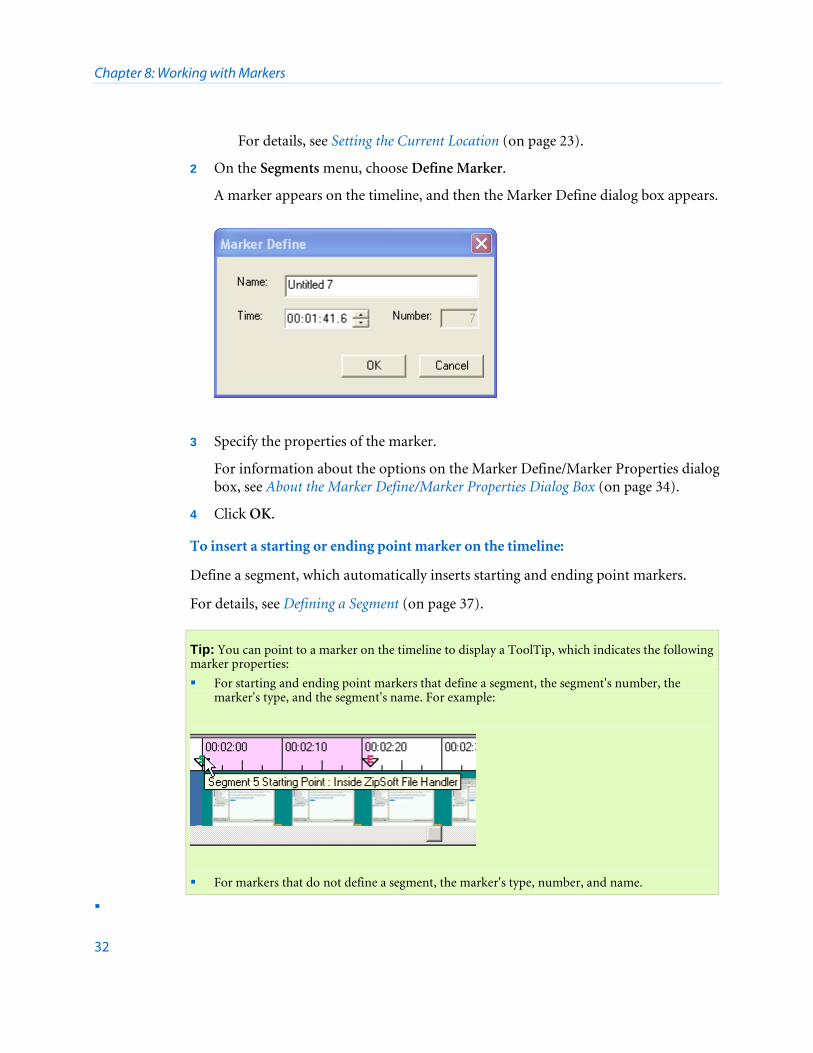
2 On the Segments menu, choose Define Marker.
A marker appears on the timeline, and then the Marker Define dialog box appears.
3 Specify the properties of the marker.
For information about the options on the Marker Define/Marker Properties dialog box, see About the Marker Define/Marker Properties Dialog Box (on page 34).
4 Click OK.
To insert a starting or ending point marker on the timeline:
Define a segment, which automatically inserts starting and ending point markers.
For details, see Defining a Segment (on page 37).
Tip: You can point to a marker on the timeline to display a ToolTip, which indicates the following marker properties:
For starting and ending point markers that define a segment, the segment's number, the marker's type, and the segment's name. For example:
For markers that do not define a segment, the marker's type, number, and name.
Chapter 8: Working with Markers
33
Moving a Marker Once you insert a cue point, starting point, or ending point marker on the timeline, you can adjust the marker's position.
To move a marker:
Do any of the following:
Drag the marker on the timeline.
To move the marker in 10-second increments, select a marker, and then press the Right Arrow or Left Arrow key on your keyboard.
To move the marker to the end of the timeline, hold down the Ctrl key while pressing the Right Arrow or Left Arrow key on your keyboard.
If you moved a starting or ending point marker that defines a segment, a message appears, asking you whether you want to redefine the segment.
Tip: You can also move a marker by editing the marker's properties to change the precise time at which it appears on the timeline. For details, see Editing Cue Point Marker Properties (on page 33).
Undefining a Marker You can undefine any marker that you have inserted on a recording's timeline.
To delete a marker:
1 On the timeline, select a marker to delete.
2 Click the right mouse button. A shortcut menu appears.
3 Choose Undefine.
Editing Cue Point Marker Properties You initially define the properties of a cue point when inserting it. However, you can edit the following properties for a marker at any time:
The marker's name
The marker's location on the timeline

Chapter 8: Working with Markers
34
To specify the properties of an existing cue point marker:
1 If necessary, locate the marker for which you want to specify new properties.
For details, see Going to the Beginning or End of Recording (on page 20).
2 Select the marker.
3 Click the right mouse button. A shortcut menu appears.
4 Choose Properties.
The Marker Properties dialog box appears.
5 Specify new properties for the marker.
For information about the options on the Define Marker/Marker Properties dialog box, see About the Marker Define/Marker Properties Dialog Box (on page 34).
6 Click OK.
Tip: You can point to a cue point marker on the timeline to display a ToolTip that indicates the the marker's type, number, and name.
About the Marker Define/Marker Properties Dialog Box
The Marker Define/Marker Properties dialog box lets you define or edit information about a cue point marker. For instructions on accessing the Marker Properties dialog box, see Inserting a Marker (on page 31) or Editing Cue Point Marker Properties (on page 33).
Chapter 8: Working with Markers
35
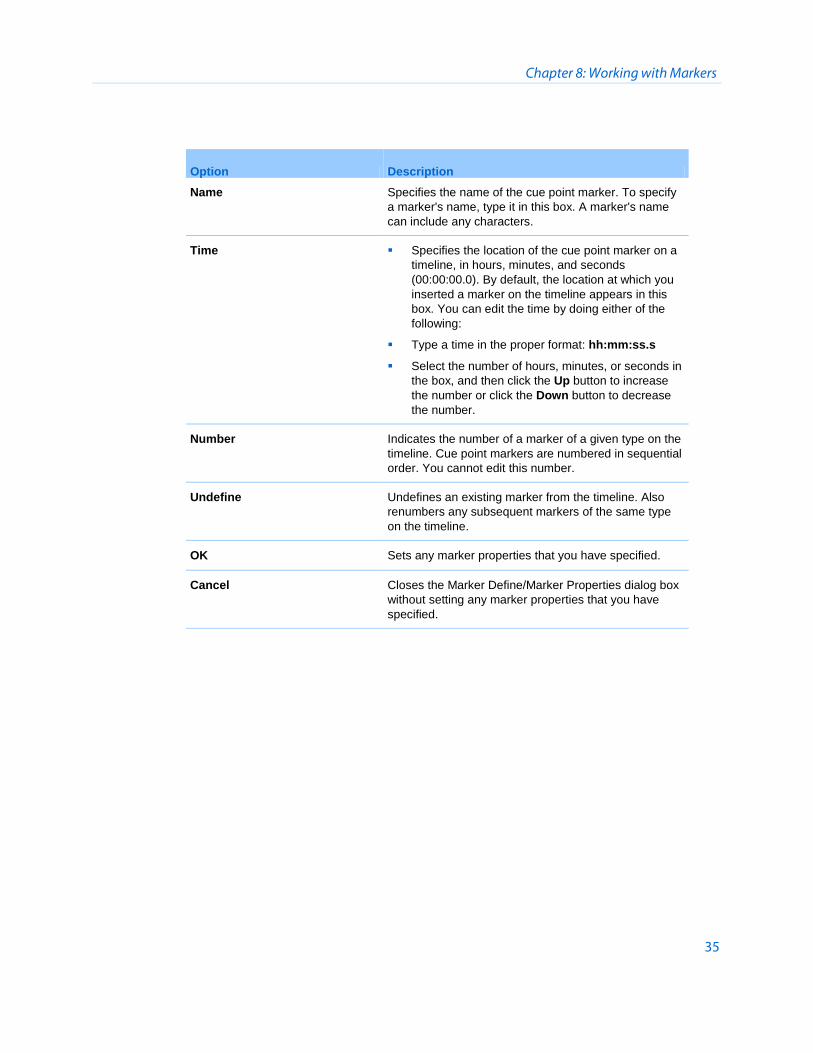
Option Description
Name Specifies the name of the cue point marker. To specify a marker's name, type it in this box. A marker's name can include any characters.
Time Specifies the location of the cue point marker on a timeline, in hours, minutes, and seconds (00:00:00.0). By default, the location at which you inserted a marker on the timeline appears in this box. You can edit the time by doing either of the following:
Type a time in the proper format: hh:mm:ss.s
Select the number of hours, minutes, or seconds in the box, and then click the Up button to increase the number or click the Down button to decrease the number.
Number Indicates the number of a marker of a given type on the timeline. Cue point markers are numbered in sequential order. You cannot edit this number.
Undefine Undefines an existing marker from the timeline. Also renumbers any subsequent markers of the same type on the timeline.
OK Sets any marker properties that you have specified.
Cancel Closes the Marker Define/Marker Properties dialog box without setting any marker properties that you have specified.

9
37
Chapter 9
A segment is a range, of recorded data for which you specify starting and ending points and a name. Once you define a segment, you can:
Move it to another location on a timeline
Edit its properties, such as its name and starting and ending points on a timeline
Undefine it, without deleting the data that it contains
Delete it from a timeline
Note: The names, or titles, of segments that you define are available in WebEx Player, allowing you to jump directly to a segment during playback.
Defining a Segment You can define a segment of recorded data on a timeline, using one of several methods. A segment includes a starting point marker and an ending point marker, which together indicate the range of recorded data for the segment.
To define a segment:
1 Select the portion of the timeline you would like to define as a segment. The portion that is highlighted will become the segment.
2 On the Segments menu, choose Define Segment.
The Define Segment dialog box appears. Under Starting point, the location of the selected starting point marker appears in the Time box. Under Ending point, the location of the selected ending point marker appears in the Time box.
Working with Segments
Chapter 9: Working with Segments
38
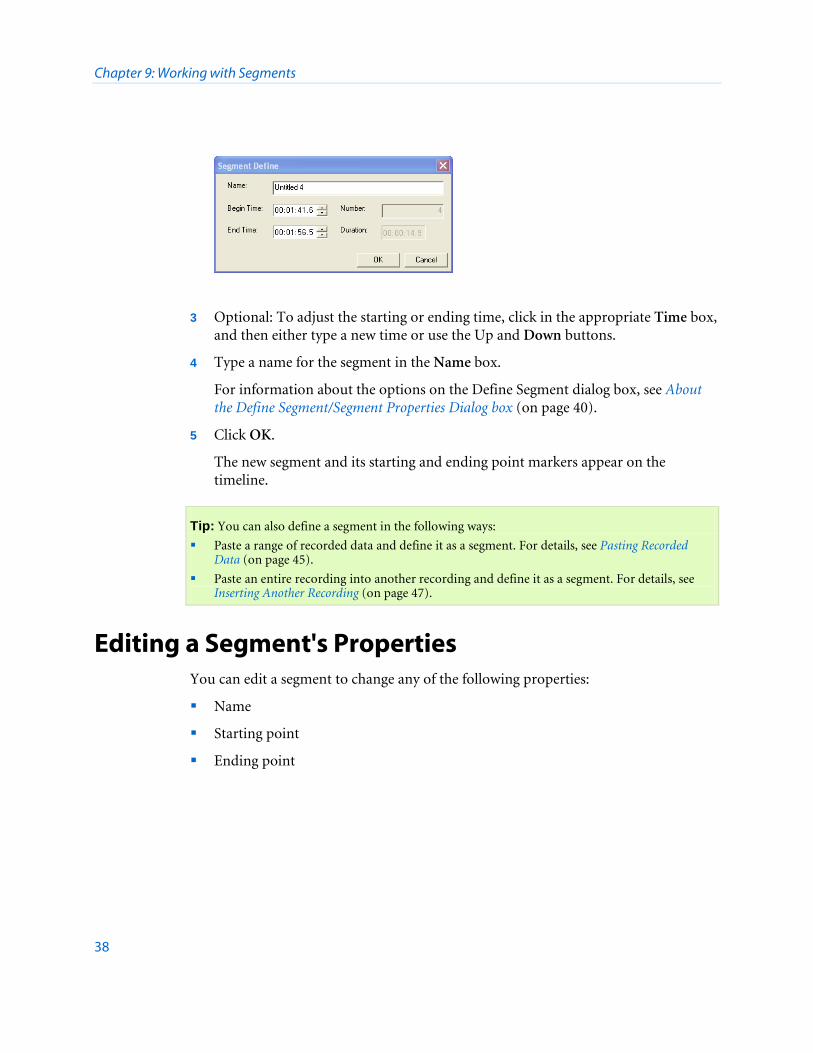
3 Optional: To adjust the starting or ending time, click in the appropriate Time box, and then either type a new time or use the Up and Down buttons.
4 Type a name for the segment in the Name box.
For information about the options on the Define Segment dialog box, see About the Define Segment/Segment Properties Dialog box (on page 40).
5 Click OK.
The new segment and its starting and ending point markers appear on the timeline.
Tip: You can also define a segment in the following ways:
Paste a range of recorded data and define it as a segment. For details, see Pasting Recorded Data (on page 45).
Paste an entire recording into another recording and define it as a segment. For details, see Inserting Another Recording (on page 47).
Editing a Segment's Properties You can edit a segment to change any of the following properties:
Name
Starting point
Ending point

Chapter 9: Working with Segments
39
Tip: You can point to a segment on the timeline to display a ToolTip, which indicates the segment's number and name. For example:
To edit a segment:
1 Select a segment.
For details, see Selecting a Segment (on page 29).
2 On the toolbar, click the Properties button.
The Segment Properties dialog box for that segment appears.
3 Specify new information about the segment.
For information about the options on the Segment Properties dialog box, see About the Define Segment/Segment Properties Dialog box (on page 40).
Tip: You can also edit a segment by moving its starting point or ending point marker on the timeline. For details, see Moving a Marker (on page 33).

Chapter 9: Working with Segments
40
Undefining a Segment If you have defined a segment on a recording's timeline, you can undefine it. Undefining a segment removes its starting and ending point markers but does not remove the recorded data from the timeline.
To undefine an existing segment of a recording:
1 On the timeline, select either a starting point marker or an ending point marker of the segment.
2 Click the right mouse button. A shortcut menu appears.
3 Click Undefine.
The starting and ending point markers are removed and the segment is undefined.
About the Define Segment/Segment Properties Dialog box
The Define Segment/Segment Properties dialog box lets you specify properties about a new segment that you want to insert on a timeline or an existing segment on a timeline.
For instructions on accessing the Define Segment dialog box, see Defining a Segment (on page 37). For instructions on accessing the Segment Properties dialog box, see Editing a Segment's Properties (on page 38).
Option Description
Name Specifies the segment's name. A segment name can consist of up to 64 characters and include any characters. To specify a segment's name, type it in the box.
Begin Time
Time: Specifies the location of the segment's starting point on the timeline, in hours, minutes, and seconds (00:00:00.0). To edit the time value, click the number of hours, minutes, or seconds in the box, and then do either of the following:
Type a new number. You can type a number of hours between 00 and 99, a number of minutes between 00 and 60, and a number of seconds between 00.0 and 60.0.
Click the Up button to increase the number or click the Down button to decrease the number.
End Time Time: Specifies the location of the segment's ending point on the timeline, in hours, minutes, and seconds (00:00:00.0). To edit the

Chapter 9: Working with Segments
41
Option Description time value, click the number of hours, minutes, or seconds in the box, and then do either of the following:
Type a new number. You can type a number of hours between 00 and 99, a number of minutes between 00 and 60, and a number of seconds between 00.0 and 60.0.
Click the Up button to increase the number or click the Down button to decrease the number.
Marker name: Specifies the marker's name. A marker name is an alphanumeric string that can consist of up to 64 characters and include any characters. To specify a marker's name, type it in the box.
Number Indicates the number of the segment on the timeline. Segments are automatically numbered in sequential order. You cannot edit this number.
Duration Indicates the duration of the segment, in hours, minutes, and seconds (00:00:00.0). You cannot edit this value.
Undefine
Makes the segment an unnamed range of recorded data, and renumbers any subsequent segments on the timeline. The segment's starting and ending point markers are removed. Clicking this button does not delete the data that the segment contains.
OK Sets any segment properties that you have specified.
Cancel Closes the Define Segment/Segment Properties dialog box without setting any segment properties that you have specified.

10
43
Chapter 10
When editing a recording, you can:
Cut or copy recorded data, and then paste it at another location on the timeline
Insert another recording—that is, an entire .wrf file on the timeline
Cutting Recorded Data On a recording's timeline, you can cut:
Any range of recorded data
A segment that you have defined
A snapshot of recorded data
Cutting recorded data places it on the Clipboard palette. You can then paste the recorded data at another location on a recording's timeline.
To cut recorded data:
1 Ensure that playback is stopped. If playback is paused, you must first resume playback, and then stop playback.
2 On the timeline, select the recorded data.
For details, see Selecting Recorded Data (on page 25).
3 On the toolbar, click the Cut button.
Cutting, Copying, and Pasting Recorded Data

Chapter 10: Cutting, Copying, and Pasting Recorded Data
44
A message box appears, allowing you to confirm the deletion.
4 Click Yes.
The Marker Properties dialog box appears, allowing you to insert a cue point or another type of marker at the location at which you cut recorded data.
5 If you want to insert a marker, specify a name for it, and then click OK. Otherwise, click Cancel.
WebEx Recording Editor places the recorded data on the Clipboard palette.
Note: The Clipboard palette lets you view information about its contents and paste it at another location. For details, see Pasting Recorded Data (on page 45).
Copying Recorded Data On a recording's timeline, you can copy:
Any range of recorded data
A segment that you have defined
A snapshot of recorded data
Copying recorded data places it on the Clipboard palette. You can then paste the recorded data at another location on a recording's timeline.
To copy recorded data:
1 On the timeline, select the recorded data.
For details, see Selecting Recorded Data (on page 25).
2 On the toolbar, click the Copy button.
WebEx Recording Editor places the recorded data on the Clipboard palette.
Note: The Clipboard palette lets you view information about its contents and paste it at another location. For details, see Pasting Recorded Data (on page 45).

Chapter 10: Cutting, Copying, and Pasting Recorded Data
45
Pasting Recorded Data Once you cut or copy data in a recording to the Clipboard palette, you can paste it to:
Another location in the same recording
A location in another recording
On the recording's timeline, you can paste recorded data:
Before a selected snapshot
At a specific location
Before a specific segment that you defined
To paste recorded data to the left of a selected snapshot on the timeline:
1 Ensure that playback is stopped. If playback is paused, you must first resume playback, and then stop playback.
2 Select a snapshot on the timeline.
3 On the toolbar, click the Paste button.
If the recorded data that you are pasting is not already a defined segment, a message appears, asking whether you want to define a new segment.
4 In the message box, click Yes or No, as appropriate.
5 If you chose to define the inserted recording as segment, in the Segment Properties dialog box that appears, specify the segment's properties, and then click OK.
For information about the options on the Segment Properties dialog box, see the topic About the Define Segment/Segment Properties Dialog box.
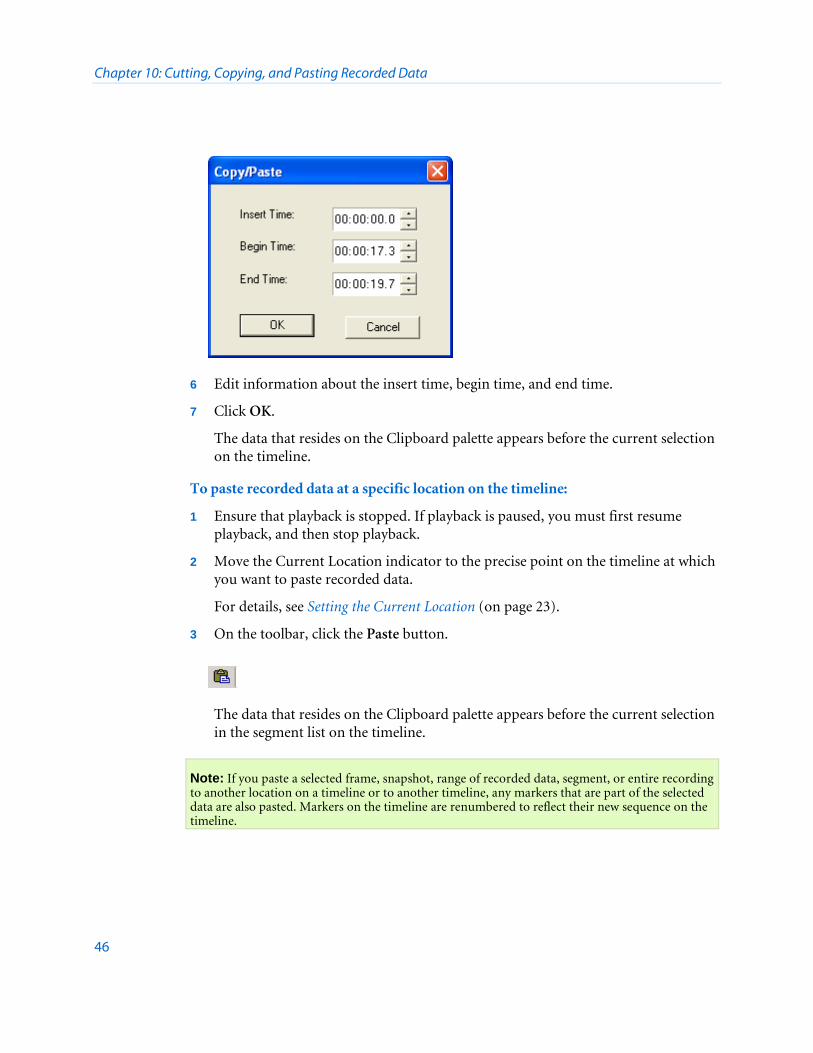
The Copy/Paste dialog box appears.
Chapter 10: Cutting, Copying, and Pasting Recorded Data
46
6 Edit information about the insert time, begin time, and end time.
7 Click OK.
The data that resides on the Clipboard palette appears before the current selection on the timeline.
To paste recorded data at a specific location on the timeline:
1 Ensure that playback is stopped. If playback is paused, you must first resume playback, and then stop playback.
2 Move the Current Location indicator to the precise point on the timeline at which you want to paste recorded data.
For details, see Setting the Current Location (on page 23).
3 On the toolbar, click the Paste button.
The data that resides on the Clipboard palette appears before the current selection in the segment list on the timeline.
Note: If you paste a selected frame, snapshot, range of recorded data, segment, or entire recording to another location on a timeline or to another timeline, any markers that are part of the selected data are also pasted. Markers on the timeline are renumbered to reflect their new sequence on the timeline.

Chapter 10: Cutting, Copying, and Pasting Recorded Data
47
Inserting Another Recording You can insert another existing recording—that is, an entire .wrf file—on the timeline, either:
After a selected snapshot of recorded data
At a specific location on the timeline.
A recording that you insert constitutes a new segment on the timeline, for which you can define properties.
To insert a recording on the timeline:
1 Do one of the following:
If you want to insert a recording to the right of a specific snapshot, select a snapshot on the timeline.
If you want to insert a recording at a precise location on the timeline, move the Current Location indicator to that point.
For details, see Setting the Current Location (on page 23).
2 Optional: If you are inserting a recording at a precise location, insert a cue point marker to mark the location on the timeline, as follows: On the Tools menu, choose Segment > Define Marker.
3 On the Edit menu, choose Insert Recording.
The Insert Recording dialog box appears.
4 Select a recording, and then click Insert.
The inserted recording appears to the right of the selected snapshot or location. If the recording that you inserted does not include any segments, a message appears, asking whether you want to define the inserted recording as a new segment.
5 If the message box appears, select Yes or No, as appropriate.
6 If you chose to define the inserted recording as segment, in the Segment Properties dialog box that appears, specify the segment's properties, and then click OK.
For information about the options on the Segment Properties dialog box, see the topic About the Define Segment/Segment Properties Dialog box.


11
49
Chapter 11
Using WebEx Recording Editor, you can dub audio in a recording. Dubbing audio lets you record new audio over existing audio or add new audio to a silent recording. For example, you can re-record audio to correct mistakes or update information in a recording.
Because you can dub audio after you make a recording, you can make a "silent" recording first, and then dub audio later. That way, you can avoid having to synchronize, or time, your audio and video together when you make the original recording.
When dubbing audio, you can do either of the following:
Define a starting point in a recording at which you want to dub audio, and then stop dubbing audio at any time.
Define both a starting and ending point for dubbing audio. WebEx Recording Editor automatically stops dubbing audio at the ending point that you specify.
Once you define the starting point or section at which you want to dub audio in a recording, an Audio Dubbing Panel appears. This panel lets you start, stop, pause, and resume audio dubbing, and lets you adjust the audio input volume while dubbing audio.
Important: Before dubbing audio, ensure that your computer meets the minimum system requirements. For details, see System Requirements (on page 6).
Choosing an Audio Input Device for Dubbing Audio To dub audio, you must use an audio input device that connects to your computer. You can use the following types of audio input devices:
Microphone: Connects to the audio input line for your computer's sound card.
Dubbing Audio in a Recording

Chapter 11: Dubbing Audio in a Recording
50
Computer headset: Connects to the audio input line for your computer's sound card, and includes a microphone and earphones.
Universal multimedia amplifier: Connects your telephone to a headset and to your computer's sound card.
You can use a universal multimedia amplifier as a phone recording adapter to capture all audio in a teleconference. Using a universal multimedia amplifier is ideal if you often record audio in both teleconferences and standalone recording sessions, because it lets you switch between a phone headset and a computer headset. The following universal amplifier is known to be compatible with WebEx Recorder and WebEx Recording Editor:
Plantronics MX10 Universal Amplifier
To purchase a Plantronics universal multimedia amplifier, please visit the following Web address: www.plantronics.com
Tip: The quality of the audio input device that you use can affect the quality of audio recording.
Controlling Audio Dubbing Before dubbing audio in a recording, ensure that your computer meets the minimum system requirements and that you have connected an audio input device to your computer.
To start dubbing audio:
1 Optional. Move the Current Location indicator to the point at which you want to begin dubbing audio.
For details, see Setting the Current Location (on page 23).
2 On the Edit menu, choose Dub Audio.
The Dub Audio dialog box appears.

Chapter 11: Dubbing Audio in a Recording
51
3 Optional. If you did not set the Current Location indicator to the point at which you want to begin dubbing audio, define the starting point in the Start box.
4 Do one of the following:
Select the End check box, and then define the point in the recording at which you want to WebEx Recording Editor to automatically stop audio dubbing.
Clear the End check box. WebEx Recording Editor does not stop audio dubbing automatically.
5 Select one of the following options under Audio Source:
Microphone, if the audio dubbing is coming from a microphone
External audio file (WAV), if the audio dubbing is coming from a prerecorded audio file. Click Browse to locate the audio file.
6 Click OK.
The Audio Dubbing Panel appears.

Chapter 11: Dubbing Audio in a Recording
52
7 On the Audio Dubbing Panel, click the Record button.
The Audio Dubbing Panel indicates the elapsed time of audio dubbing, followed by the total time of the recording.
To pause and then resume dubbing audio:
1 On the Audio Dubbing Panel, click the Pause button.
2 Then, to resume dubbing audio, on the Audio Dubbing Panel, click the Resume button again.
To stop dubbing audio:
On the Audio Dubbing Panel, click the Stop button.
Tip: Play back the part of the recording for which you dubbed audio to check the audio quality and volume. If the volume is too low or too high, you can adjust the audio input volume during audio dubbing. For details, see Adjusting the Audio Input Volume During Dubbing (on page 52).
Adjusting the Audio Input Volume During Dubbing When dubbing audio, you can adjust the audio input volume for your microphone, which specifies the sensitivity of WebEx Recording Editor when capturing audio.

Chapter 11: Dubbing Audio in a Recording
53
To adjust the audio input volume during dubbing:
1 If you have not done so already, start dubbing audio.
For details, see Controlling Audio Dubbing (on page 50).
2 On the Audio Dubbing Panel, ensure that the Record Audio check box is selected.
3 While speaking into your microphone, use the Microphone Volume slider to adjust your microphone level.
Microphone Volume slider
4 When speaking, ensure that the microphone level remains below the topmost level of the Microphone Volume indicator.
Tip: It is recommended that you adjust the audio input volume for your microphone before you begin dubbing audio, and adjust the volume during dubbing only to make minor adjustments, if necessary. For details about adjusting the audio input volume before recording audio, refer to the WebEx Recorder and Player User's Guide, which is available on the Recording and Playback page on your WebEx service Web site.


12
55
Chapter 12
You can save a recording that you have edited. If you have previously saved an edited recording, you can save a copy of the recording to another file.
To save an edited recording:
1 On the toolbar, click the Save button.
2 Choose a location at which to save the file.
3 Type a name for the file in the File name box.
4 Click Save.
To save a copy of an edited recording:
1 On the File menu, choose Save As.
2 Optional. Choose a new location at which to save the file.
3 Optional. Type a new name for the file in the File name box.
4 Click Save.
Saving an Edited Recording

13
57
Chapter 13
You can convert any recording that was made with WebEx Recorder to a Windows Media Video (WMV) file. A WMV file has a .wmv extension, and plays in Windows Media Player and other third-party media players. A file that you convert to WMV format includes any audio that was present in the original recording.
When you convert a recording to WMV format, Recording Editor exports the recorded data to a new file, so your original WRF file is not lost.
Important: To export a recording to WMV format, your computer must have Windows Media Player 9.0 or later.
To export a recording to WMV format:
1 Ensure that the recording is stopped in the Recording Editor window. You cannot export the file if it is playing.
2 On the File menu, choose Export to.
The Export To dialog box appears.
3 Choose a location at which to save the file.
4 Type a name for the file in the File name box.
5 Click Save.
The WMV Options dialog box appears.
Exporting a Recording to a Windows Media File
Chapter 13: Exporting a Recording to a Windows Media File
58
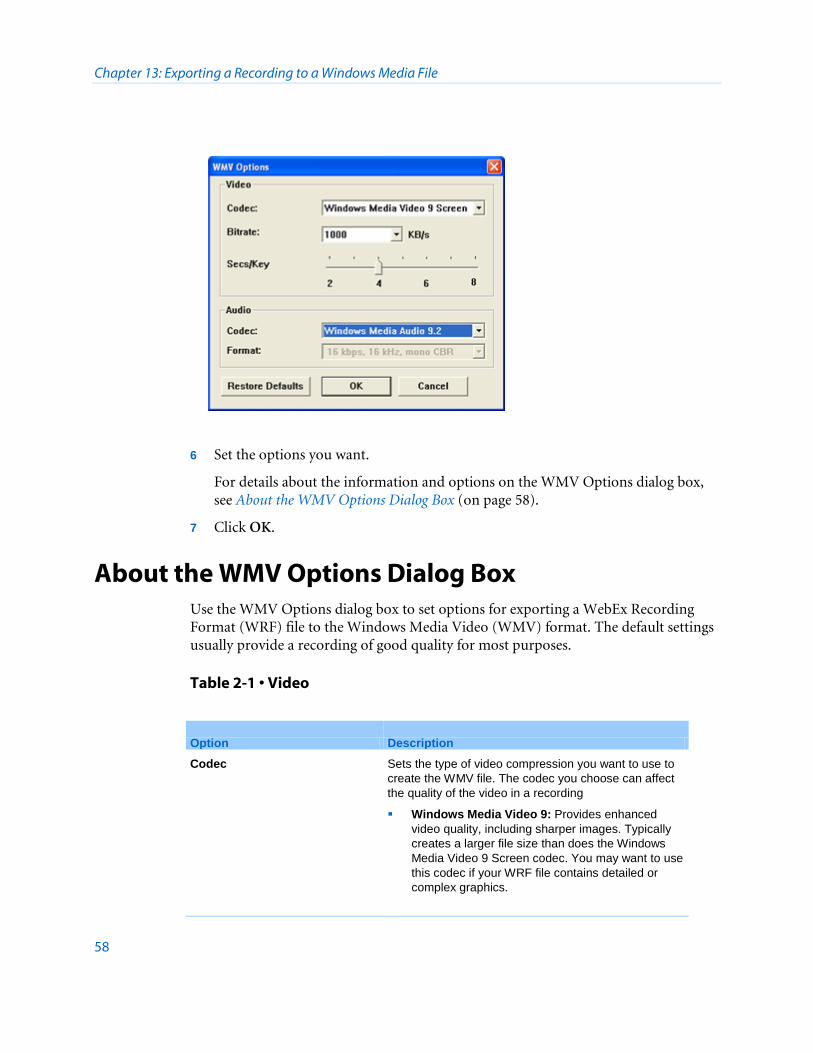
6 Set the options you want.
For details about the information and options on the WMV Options dialog box, see About the WMV Options Dialog Box (on page 58).
7 Click OK.
About the WMV Options Dialog Box Use the WMV Options dialog box to set options for exporting a WebEx Recording Format (WRF) file to the Windows Media Video (WMV) format. The default settings usually provide a recording of good quality for most purposes.
Table 2-1 • Video
Option Description
Codec Sets the type of video compression you want to use to create the WMV file. The codec you choose can affect the quality of the video in a recording
Windows Media Video 9: Provides enhanced video quality, including sharper images. Typically creates a larger file size than does the Windows Media Video 9 Screen codec. You may want to use this codec if your WRF file contains detailed or complex graphics.
Chapter 13: Exporting a Recording to a Windows Media File
59
Option Description Windows Media Video 9 Screen: Ideal for most recordings that contain images of a computer screen and typical mouse movements.
Bitrate The maximum number of kilobits per second of video data that WMV file will contain. The bitrate determines the size and quality of the resulting WMV file. A higher bitrate can provide better quality video images, but the file size will be larger. You may want to increase the bitrate if your WRF file includes detailed or complex images.
Second/Slide The number of frames per second that the recording displays. A higher number can provide smoother video motion in the recording, but also creates a larger file size. You may want to increase the frames per second if your WRF file includes extensive mouse movements or other screen motion.
Table 2-2 • Audio
Option Description
Codec Sets the type of audio compression you want to use to create the WMV file. The codec you choose can affect the quality of the audio in a recording.
ACELP.net: Provides enhanced audio quality, including less static and greater dynamic range. Typically creates a larger file size than does the Windows Media Audio 9 Voice codec. You may want to use this codec if your WRF file contains dynamic audio, such as music or sound effects, and your original WRF file was recorded using the PCM compression scheme at 22 KHz or higher.
Windows Media Audio 9 Voice: Ideal for most recordings that contain speech audio captured through a telephone or computer microphone. Choose this codec if your WRF file was recorded using the G.723 compression scheme.
Format For the selected audio codec, indicates the bitrate (in kilobits per second), the audio sampling rate (in kilohertz per second), and whether it records audio in mono or stereo.
Restore Defaults Resets all WMV options to their default settings.
Chapter 13: Exporting a Recording to a Windows Media File
60
14
61
Chapter 14
You can remove WebEx Recording Editor from your computer, using your computer's Add/Remove Programs utility.
Important: Uninstalling WebEx Recording Editor also uninstalls WebEx Recorder, Player, and the WebEx meeting software on your computer. Once you uninstall Recording Editor, you must reinstall the WebEx meeting software to start or join a meeting on your WebEx service Web site.
To uninstall Recording Editor:
1 Open the Windows Control Panel.
2 Open the Add/Remove Programs utility.
3 Select WebEx Recording Editor.
4 Click Remove, depending on your computer's operating system.
5 Click Yes.
6 Follow the instructions on your screen.
Uninstalling WebEx Recording Editor

63
A audio dubbing • 49, 50, 52
adjusting input volume • 52 controlling • 50 input device • 49
audio input device • 49 audio, selecting • 25
B beginning, going to • 20
C components of Recording Editor • 7 controlling playback of a recording • 16 copying recorded data • 44 current location • 21, 23
going to • 21 setting • 23
Current Location indicator • 7, 21 cutting recorded data • 43
D defining a segment • 37 dubbing audio • 49, 50, 52
adjusting input volume • 52 choosing an audio input device • 49 controlling • 50
E editing a segment's properties • 38 Elapsed Time and Duration indicator • 7 end, going to • 20
G going to a specific segment • 20 going to the beginning or end of a recording • 20 going to the current location • 21
I inserting another recording • 47
M Marker Define dialog box • 34 Marker Properties dialog box • 34 markers • 31, 33
editing marker properties • 33 moving • 33 undefining • 33
menu bar • 7
Index
64
N navigating a recording • 19
O opening a recording • 13
P pasting recorded data • 45 playback • 7, 15, 16
controlling • 16 Playback toolbar • 7 starting • 15
Playback toolbar • 7 playing a recording • 15 Preview area • 7
R range of time, selecting • 28 recorded data • 43, 44, 45
copying • 44 cutting • 43 pasting • 45
Recording Editor • 5, 6, 7, 11, 61 about • 5 components • 7 starting • 7 system requirements • 6 uninstalling • 61 using • 11
recordings • 13, 15, 16, 19, 20, 21, 23, 47, 49, 55 controlling playback • 16 dubbing audio • 49 going to beginning or end • 20 going to specific segment • 20 going to the current location • 21
inserting another • 47 navigating • 19 opening • 13 playing • 15 saving • 55 setting the current location • 23 starting playback • 15 viewing snapshots • 19
S saving recording • 55 segments • 20, 29, 37, 38, 40
Define Segment dialog box • 40 defining • 37 editing properties • 38 going to • 20 Segment Properties dialog box • 40 selecting • 29 undefining • 40
selecting a range of time • 28 selecting a snapshot • 28 selecting recorded data • 25 selecting segment • 29 selecting video or audio • 25 setting the current location on timeline • 23 snapshots • 19, 28
selecting • 28 viewing • 19
starting playback of a recording • 15 stating Recording Editor • 7 system requirements • 6
T timeline • 7, 23
in Recording Editor window • 7 setting the current location • 23
toolbar • 7
65
U undefining segments • 40 uninstalling Recording Editor • 61 using Recording Editor • 11
V video, selecting • 25 viewing snapshots of a recording • 19 volume, adjusting for audio dubbing • 52
W window components • 7 Windows Media Video (WMV) • 58 WMV Options dialog box • 58 working with markers • 31