images.acswebnetworks.comimages.acswebnetworks.com/1010/1726/masemailsmail… · web viewmass...
TRANSCRIPT

Mass Emails, Mail Merges, and Labels – Oh My!
Mass Emails – page 1Mail Merges – page 5Labels – page 9

Mass Email
1. Once you have your results, click on the “Search Information” tab and select “Mass E-mail” or from your search results tab right click and select “Mass E-mail”
2. A new window will pop-up that provides you with three choices:a. Constant Contact (must have an account with
them) – go to #3b. Use local SMTP (this runs an email program
via ACS) – go to #7c. Copy to local client (this will copy the
emails into whatever email program is your default on your computer – like Outlook) – go to #14
3. If you select Constant Contact you must already have an account with Constant Contact and have via “mange accounts” linked your Constant Contact with ACS.
4. Once selected, the new window will show you all of your current Constant Contact groups and ask if those indiviudals in your search will be joining an existing group, or if you will be creating a new group. So either select an existing group, or type in the name of this new group. Click “OK” when ready to move on.
5. Now everyone in your search who has an email address will be imported into Constant Contact. You will be asked if you wish to open Constant Contact now. Suggestion and best practice is “No” because you are now trying to run a web based program through a web based program and it will cause Constant Contact to run really slow and at times not do what you want. It is best once you have
1

imported your individuals, to open Constant Contact via your normal web browser. Now, you click “Yes” but do know that you may experience more difficults.
6. Once in Constant Contact, you will follow the steps in Constant Contact in creating your email with then selecting the send to group that you either added to, or newly created.
7. If you select use local SMTP the following window will appear. In order to use this function, you will first have to configure the SMTP to connect with your local server. You may need to speak with your IT person to learn the correct information you need to supply in order to make this work.
8. Before going any further, click on the “options button” (looks like the gears – located right next to “close editor”). It is best to only change the check boxes in order to have the emails sent as you want them. If you change the bottom three counter options, you run the risk of your email being considered spam and your recipients not receiving them. Once you have decided on the setting that work best for this email (it will remember you choices so you should look at this every time you send out an email), click on “OK”.
9. Back to the email, enter the email address you want this email to come from – maybe you, maybe the generic church email address, or maybe from the senior pastor. Enter you subject and then proceed to treat this like an ordinary email – write the body of your letter and add any attachments.
2
Best to not change
Body of email
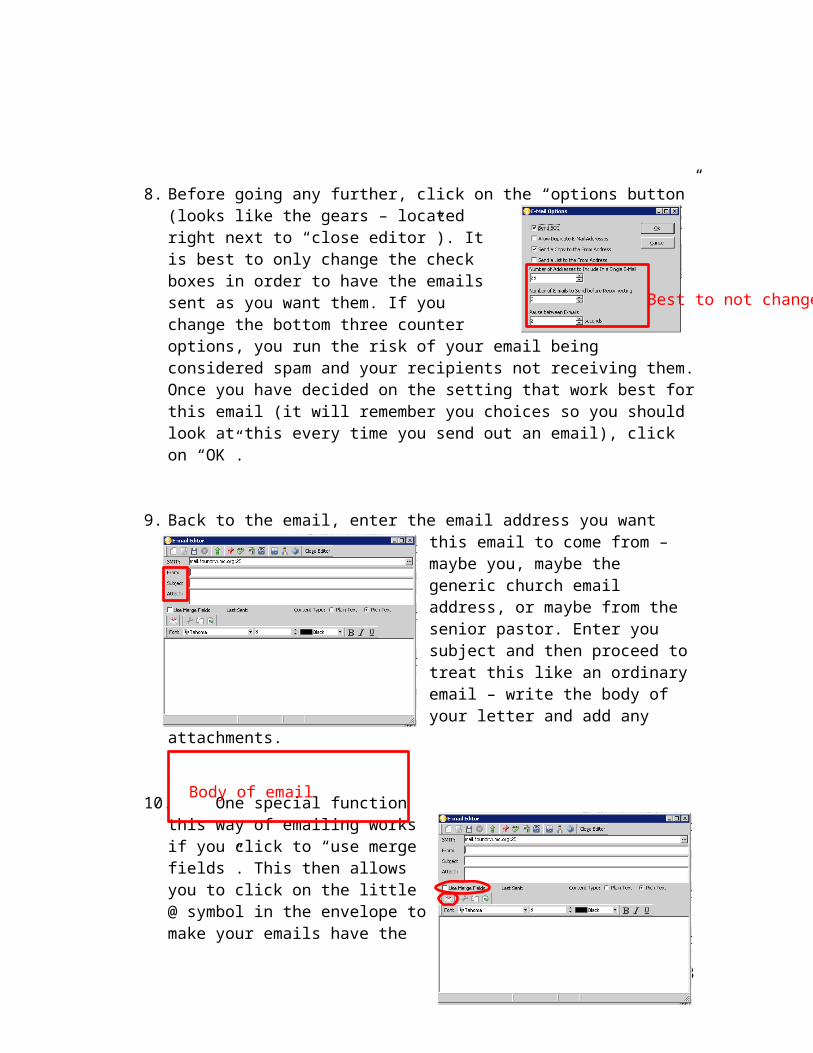
10. One special function this way of emailing works if you click to “use merge fields”. This then allows you to click on the little @ symbol in the envelope to make your emails have the ability to be personalized – meaning your emails can read Dear John Smith instead of Dear Church Member. There are limited merge fields right now (enhancement request) so you cannot get too fancy.
11. Once you have completed your email, you hit the green arrow (item 5 in the top toolbar) to send the email.
12. The email will proceed to send and you will end up with one of two messages:a. A completed message – juck click on “close”b. An error message – the error message will let you know of any emails that
did not get sent because it was an invalid email in some way. You will want to note these individuals in case you need to ensure they get the message in some other form.
13. Once done, click on the “ok” or “close” buttons to shut down the SMTP email program until you are back to your search window.
3
Body of email
A. B.

14. If you select copy to local client your default email program (like outlook) will automatically open. Now this is best to do if you are only emailing less than 50 people, because emails containing more 50 emails or more are typically considered spam and will very likely get caught in your recipients spam filters.
15. Complete the email like you would any other email and hit send.
Notes on Mass Emailing:
1. If individuals in your search result do not have an email address you will naturally not be sending this email to them. However, when you import into Constant Contact, use the SMTP or your local client, you will not get a list of who you did not import so it is very important to first review your search results to ensure everyone has an email address.
2.
4
Mail Merges
1. Once you have your results, click on the “Search Information” tab and select “Mail Merge” or from your search results tab right click and select “Mail Merge”
2. A new window will pop up that will show all of the documents you have loaded and saved in ACS and it will allow you to load new ones and/or create new
documents from scratch. Note: unless you are well versed and feel comfortable using OpenOffice, do not create a new main document since ACS uses OpenOffice and not Microsoft Word. It is best to use a loaded document, or upload a new document to use for your mail merge.
3. Before selecting to upload a new document or to use an existing one, click on the “mail merge setup” button. This will bring up a new window with many options you should consider before moving forward.
5

4. The mail merge options open on the “name settings” tab but it is best to look over all of the tabs: “special fields”, “contributions”, and “merge options” especially depending on the nature of your letter. Once you have confirmed all of your options, click on “close”.
6
Here you will select if you are merging a letter, envelopes, labels… (I would highly discourage doing labels via this means) and other options like if you want a return address. Most times you will not change anything on this tab
Here you will select any funds that you have collected money for that you want reported in your letter (example: pledge status or memorial gift).
Here you will select the basic name functions for your letter, like if the label name on the letter will be formal, while the greeting/salutation name will be informal. Do you want everyone in your search to receive a letter, or just one letter per household/family?

5. If you are loading a new document to use, click on “Load Document” to bring up a browse window that will let you go through your personal files and find/select the document you wish you use. Note: the desktop button here is not actually your desktop – this is your ACS desktop so you will never find any documents on your personal desktop here so do not save the document you want to load here. Make sure it is in another location.
6. Once selected, it will ask you to confirm the name of the document you are loading. Make sure it is a title everyone who uses ACS will understand. Change the name if necessary.
7. It will now appear on your list and you can select it to use. At the same time if the document you wanted to use was already loaded, you can proceed to load it. Highlight the document you want, and click “merge document”.
7

8. It will ask you to refresh your mail merge data – click “ok”
9. It will now confirm with you that it is opening a Microsoft Office product – click “yes”. Another pop-up will confirm that all of the records have been processed.
10. Now Word will open and you can edit the document as necessary. You can enter in your merge fields, change the text around, and then run the merge completion like you would in any Word document.
Notes on Mail Merging:
1. The fields you select to merge will transfer over as they are in ACS so if someone does not have a complete address, their merged letter will show this incomplete address. It is best in advance to review your search data to ensure all of the fields you plan to merge into the letter are present.
2. If you have a loaded document and you need to make a permanent change to it, highlight the document, and then click “view/edit main document”. Make the changes, and then hit save like you would any other document other than the only place these changes are saving is to the ACS document.
3.
8

Labels
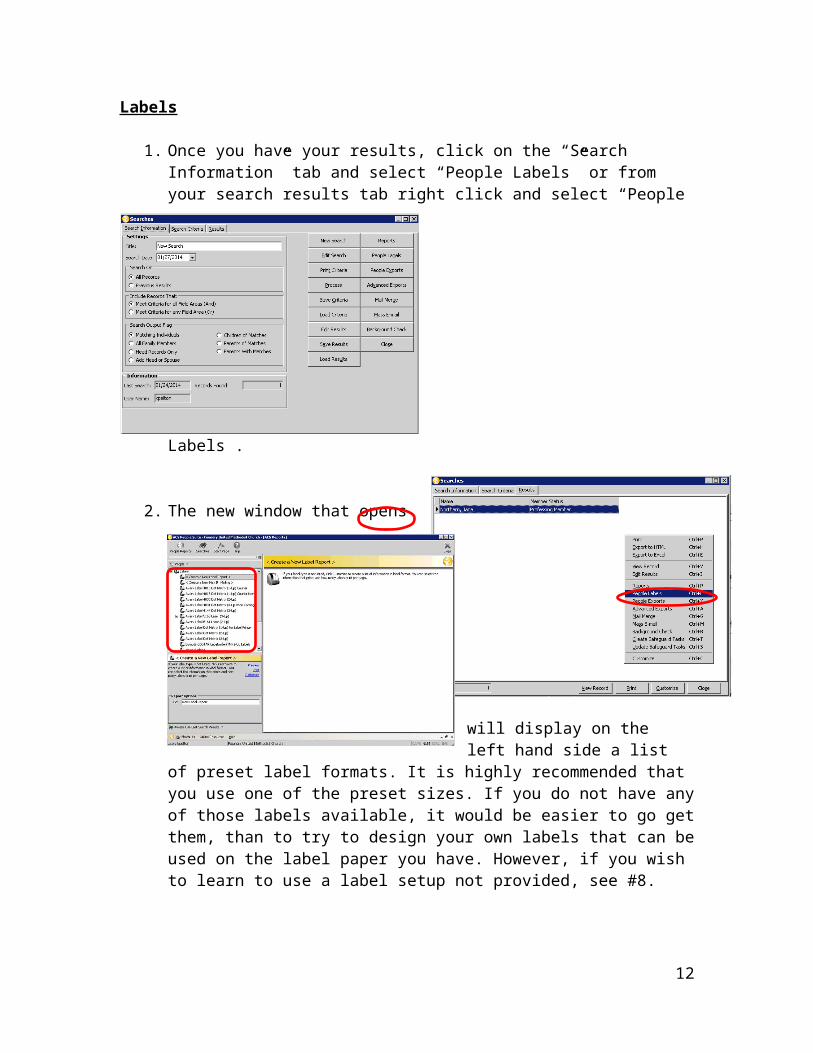
1. Once you have your results, click on the “Search Information” tab and select “People Labels” or from your search results tab right click and select “People Labels”.
2. The new window that opens will display on the left hand side a list of preset label formats. It is highly recommended that you use one of the preset sizes. If you do not have any of those labels available, it would be easier to go get them, than to try to design your own labels that can be used on the label paper you have. However, if you wish to learn to use a label setup not provided, see #8.
3. If using one of the preset labels, highlight your selection and you will see a sample of how it will print on the right.
9

4. Now that you see the preview, you need to customize your labels so they display what information you need them to display. Clicking on the customize button will bring up a new window with a series of options.
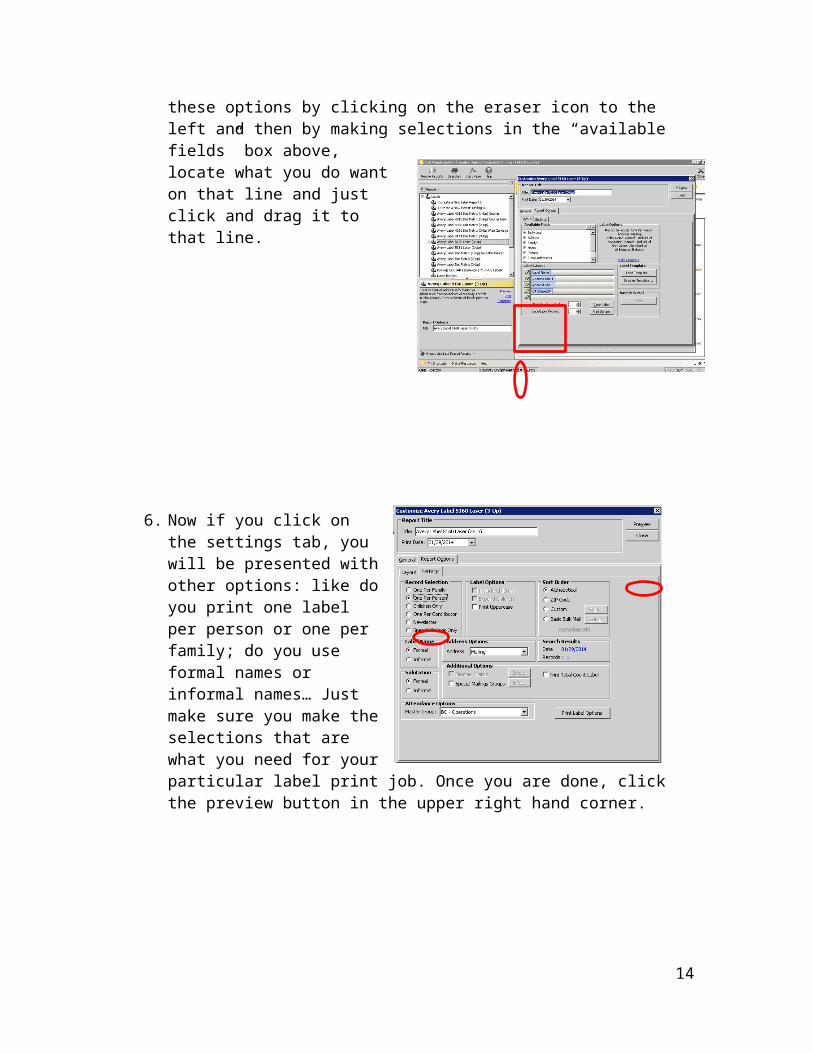
5. Note that you can do more than just make traditional labels. You will see in the blue the items that are currently listed to print on your label. You can delete these options by clicking on the eraser icon to the left and then by making selections in the “available fields” box above, locate what you do want on that line and just click and drag it to that line.
6. Now if you click on the settings tab, you will be presented with other options: like do you print one label per person or one per family; do you use formal names or informal names… Just make sure you make the selections that are what you need for your particular label print job. Once you are done, click the preview button in the upper right hand corner.
10
7. You will be taken back to the preview screen, but now instead of sample ACS data, you will see your own actual data in the label format you selected. Once you determine it looks the way you want it, you can print or email the labels.
8. If you are using label paper that is not a standard preset in ACS, highlight and select customize to the first listing – “create a new label report”. This will open up a window just like before except that you will see no label setup. Click on “edit layout.”
9. A new window will open that will take you to a design program. Now I am not sure that if you have not purchased ACS’ report designer that it will be available to you – but I cannot say since we do own it.
11
Click here to emailClick here to print
10. Clicking “ok” to “custom label template” will bring up a new window with several other label options. Find that label setup you are working with and select “ok”.
11. It will now take you back to the design screen where you get to design what goes on each label line.
12

12. You click on the items listed on the left and then in your design box, click to draw out where you want this information to be. For each item you will be given many more customizable options.
13. Once you have everything setup the way you want, click on “file” – “close designer”
13
Click and drag over
Other options
Making a selection here will change the options listed below.
14. You will now be back at the original pop-up window but now you will see a label layout displayed. Complete the instructions listed in #6 (Now if you click on the settings tab, you will be presented with other options: like do you print one label per person or one per family; do you use formal names or informal names… Just make sure you make the selections that are what you need for your particular label print job. Once you are done, click the preview button in the upper right hand corner.).
15. You will be taken back to the preview screen, but now instead of sample ACS data, you will see your own actual data in the label format you selected. Once you determine it looks the way you want it, you can print or email the labels.
14
Click here to printClick here to email

Notes on Labels:
1. As stated earlier, it is best to use the preset labels provided by ACS. Make sure your office stocks those specific labels in order to make your life easier.
2. Custom labels do have the tendency to require you to go back and forth several times between printing and designing as the margins are typically not perfect so you will have to adjust you placement of label lines to compensate for this.
3. When printing through ACS, you will print to your printer’s default settings. You will not have the option to go and change setting like printing to the bypass try. So it is important to either email the document to yourself to print it outside of ACS or to temporarily change your default print settings to be able to print the labels and then change it back once you have printed.
15