web gis user guide -...
TRANSCRIPT

Web GIS User Guide
http://gis.tazewellcounty.org/tazewellcountygis/
Page 2 of 15
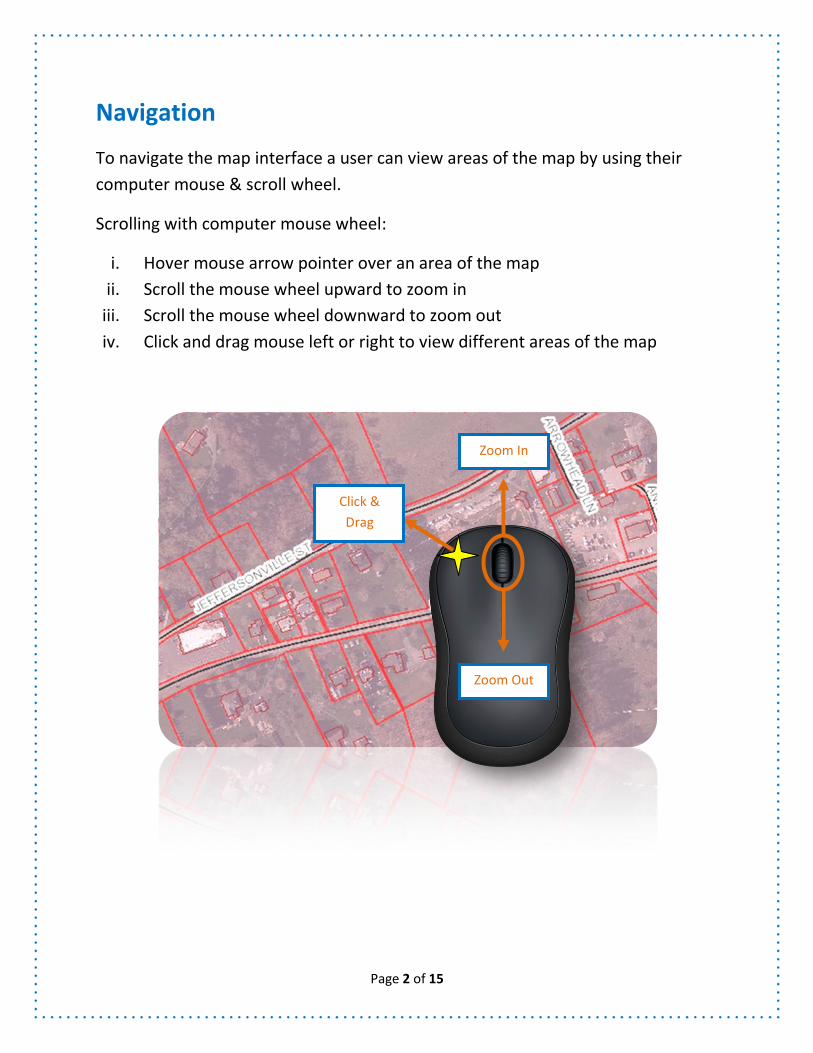
Navigation
To navigate the map interface a user can view areas of the map by using their
computer mouse & scroll wheel.
Scrolling with computer mouse wheel:
i. Hover mouse arrow pointer over an area of the map
ii. Scroll the mouse wheel upward to zoom in
iii. Scroll the mouse wheel downward to zoom out
iv. Click and drag mouse left or right to view different areas of the map
Zoom In
Zoom Out
Click &
Drag

Page 3 of 15
Map Tools
Zoom In/Out Tool – While map is active click tool to zoom in or zoom out.
Home Tool – This tool is located at the bottom right corner of your screen, click
this tool to return the map to the full extent or start position.
Search Tool – Includes a drop down menu that allows you to search addresses,
roads, account numbers, tax map numbers and owner’s names.
Enhanced Basemap Gallery Tool – Includes the option to view map in basic form or
with satellite images from 2011 & 2015
Layer List Tool – Includes drop down menus that allow you to check on and off
which layers you would like to interact with on the screen. For example: roads,
railroads, ATV trails, parcels, EMS stations, etc.
Measurement Tool – Measurers area, distance and location
Print Tool – Click to generate a map layout that you can send to your printer.
Draw Tool – Includes a various selection of lines and shapes that allow you to
draw on the map which can be used to determine the distance between points
Share Tool – Click to share map as a link through email, Facebook, Twitter,
Google+ or as an embedded link for webpage use.

Page 4 of 15
Map Layers
To turn on or off map layers, click on the Layer List Tool Icon to show the available
layers for the map. Then click on one of the checkboxes to turn a layer on or off
(you can click on the arrow next to the layer choices to show a drop down menu
of more layer choices).
NOTE: If layer name is grayed out you are zoomed to far out to see the layer.
Page 5 of 15
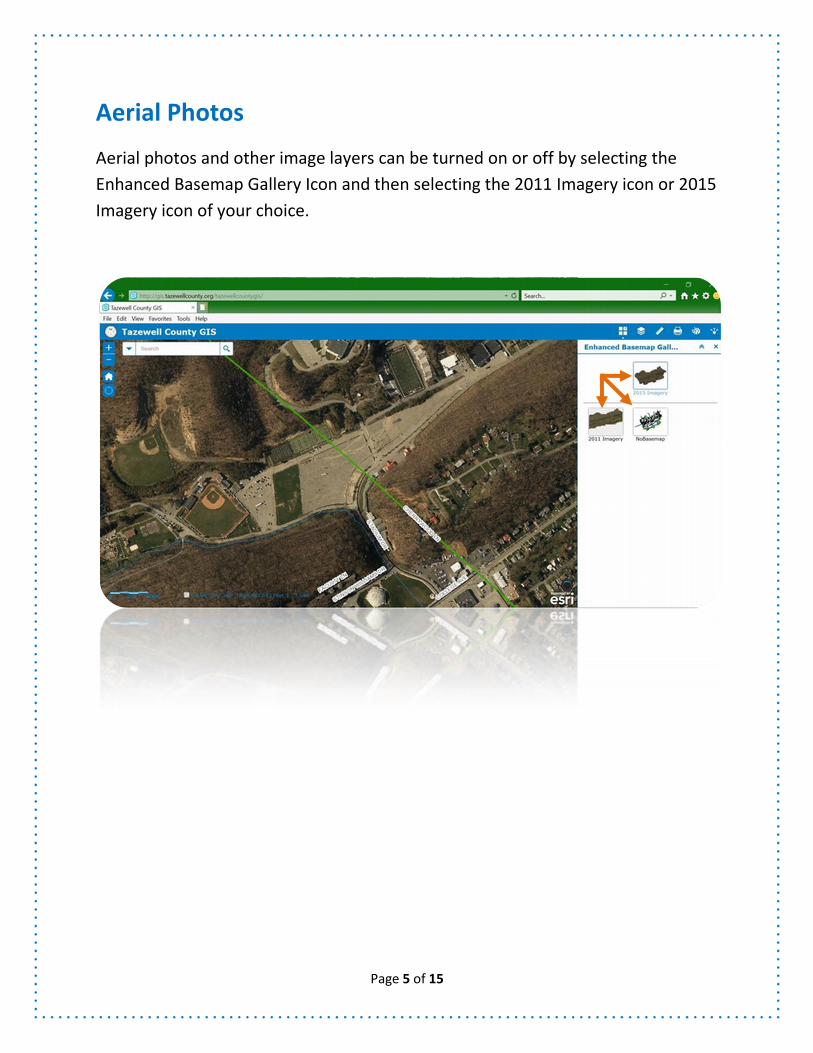
Aerial Photos
Aerial photos and other image layers can be turned on or off by selecting the
Enhanced Basemap Gallery Icon and then selecting the 2011 Imagery icon or 2015
Imagery icon of your choice.
Page 6 of 15
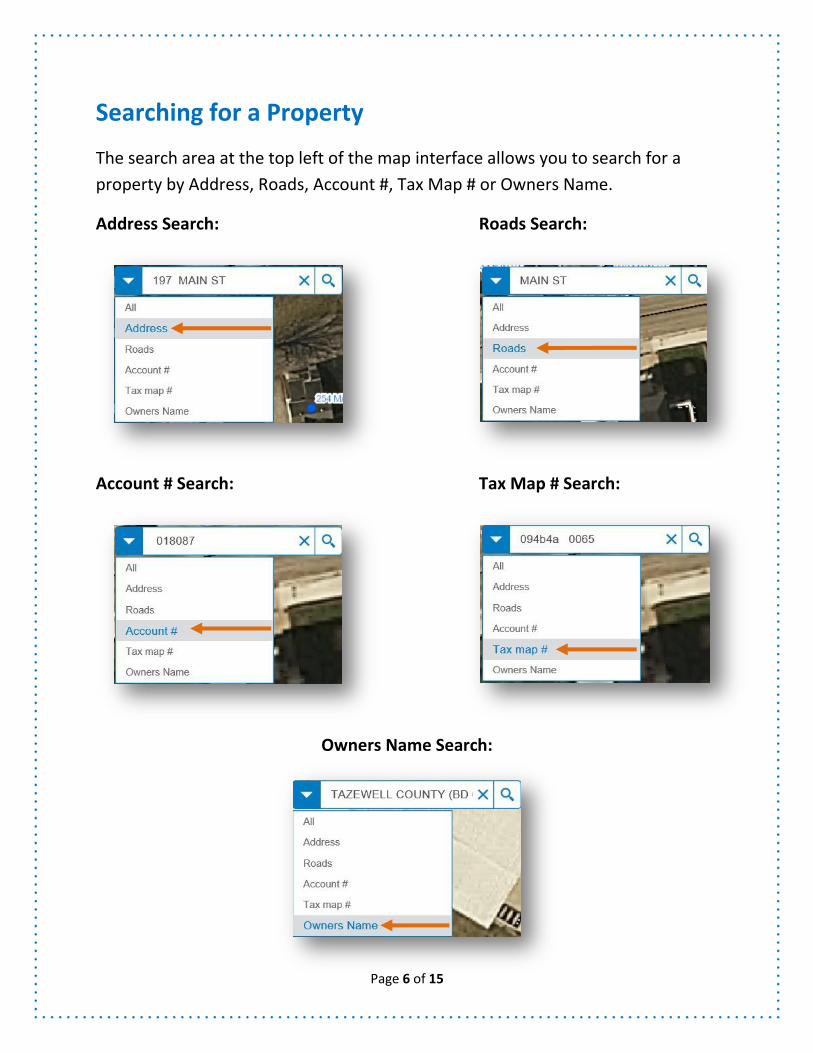
Searching for a Property
The search area at the top left of the map interface allows you to search for a
property by Address, Roads, Account #, Tax Map # or Owners Name.
Address Search: Roads Search:
Account # Search: Tax Map # Search:
Owners Name Search:

Page 7 of 15
Tax Map# Search Examples
Searching with Tax Map Numbers can
be tricky. Here is a guide that will assist
you when searching with them.
Note: ‘Space’ indicates how many times
you need to use the spacebar on your
keyboard to accurately find what you
are searching for.
Tax Map# 094B4A 0065
094 B4 A Space Space Space 0065
Map Insert Double Circle
Double Circle
Block Block Lot
Tax Map# 134 A 0002
134 Space Space A Space Space Space 0002
Map Insert Insert Double Circle
Double Circle
Block Block Lot
Tax Map# 024A324410002-0005
024 A3 24 41 0002 -0005
Map Insert Double Circle
Block Lot Sub Lot
Tax Map# 004A 01010001-0002
004 A Space 01 01 0001 -0002
Map Insert Insert Double Circle
Block Lot Sub Lot
Map 3 spaces
Insert 2 spaces
Double Circle 2 spaces
Block 2 spaces
Lot 4 spaces
Sub Lot 7 spaces

Page 8 of 15
Search Results/ Property Information
Once you have searched for a property using one of the search methods to find a
property you will have access to detailed information about the property.
Page 9 of 15
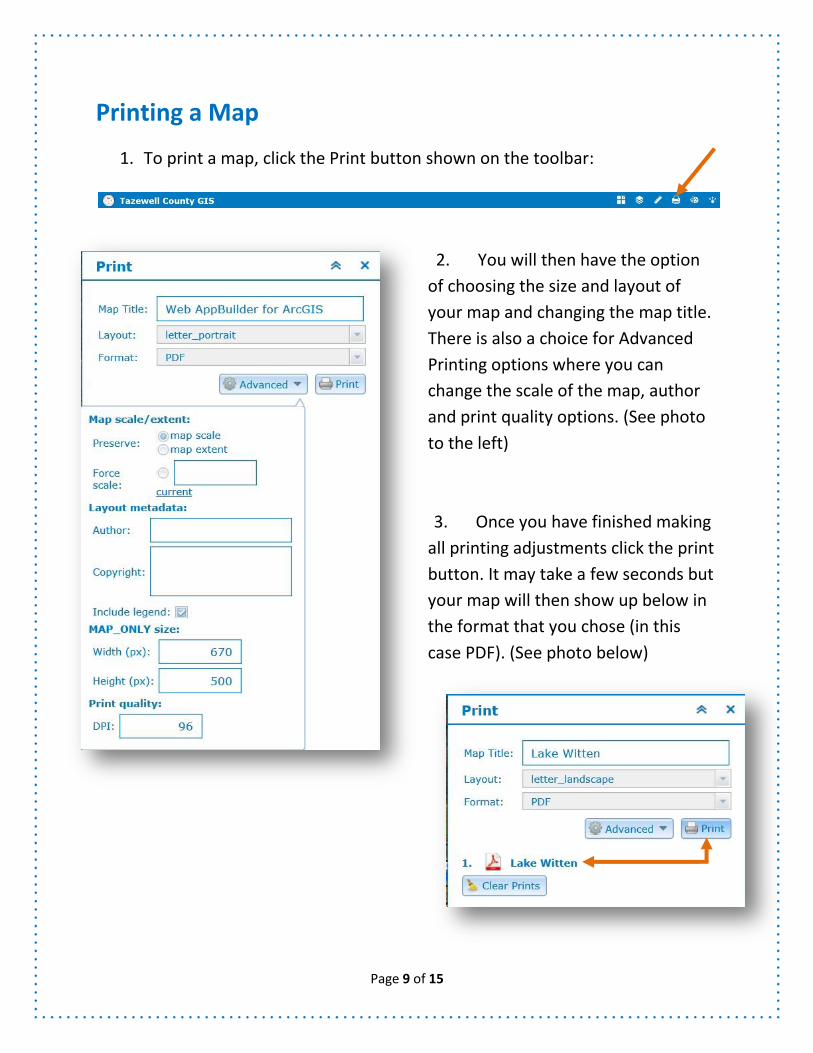
Printing a Map
1. To print a map, click the Print button shown on the toolbar:
2. You will then have the option
of choosing the size and layout of
your map and changing the map title.
There is also a choice for Advanced
Printing options where you can
change the scale of the map, author
and print quality options. (See photo
to the left)
3. Once you have finished making
all printing adjustments click the print
button. It may take a few seconds but
your map will then show up below in
the format that you chose (in this
case PDF). (See photo below)

Page 10 of 15
Printing a Map (Continued)
4. After the PDF of your map appears click on it. A new window with your map
will appear (as below).
5. Once the map layout is shown you may print it from your web browser by
choosing File->Print or File->Print Preview because you can then adjust the
printer setting such as margins and scaling while viewing a preview.
6. You may also save your map from the web browser by choosing File->Save
As and then saving it to a location on your computer.
NOTE: Depending on the internet browser you are using the steps may vary for
printing & saving. Also when printing a map in landscape format, you will
probably need to set your print preview or printer page setup to Landscape rather
than Portrait.

Page 11 of 15
Sharing a Map
Click the Share Tool to share a map through email, Facebook, Twitter, Google+ or
as an embedded link for webpage use.
NOTE: Please note that sharing maps may not be supported in Internet Explorer
versions 6 and 7, it’s recommended to upgrade to the latest Internet Explorer,
Google Chrome, or Firefox versions. You also want to make sure that if you are
using Internet Explorer 8 or later, that you turn off “Compatibility View”.

Page 12 of 15
The Measure Tool (Area)
To measure the area of a location click the Area Icon and then select what form of
measurement you would like to use (example: acres, sq. yards, sq. miles, etc.)
then click a point on the map. This will create a point on the map that you will
then drag your mouse and click other areas of the map to include in your
measurement. To stop using this tool double click on the last point you created on
the map. Your measurement results will be located in the right panel.
Page 13 of 15
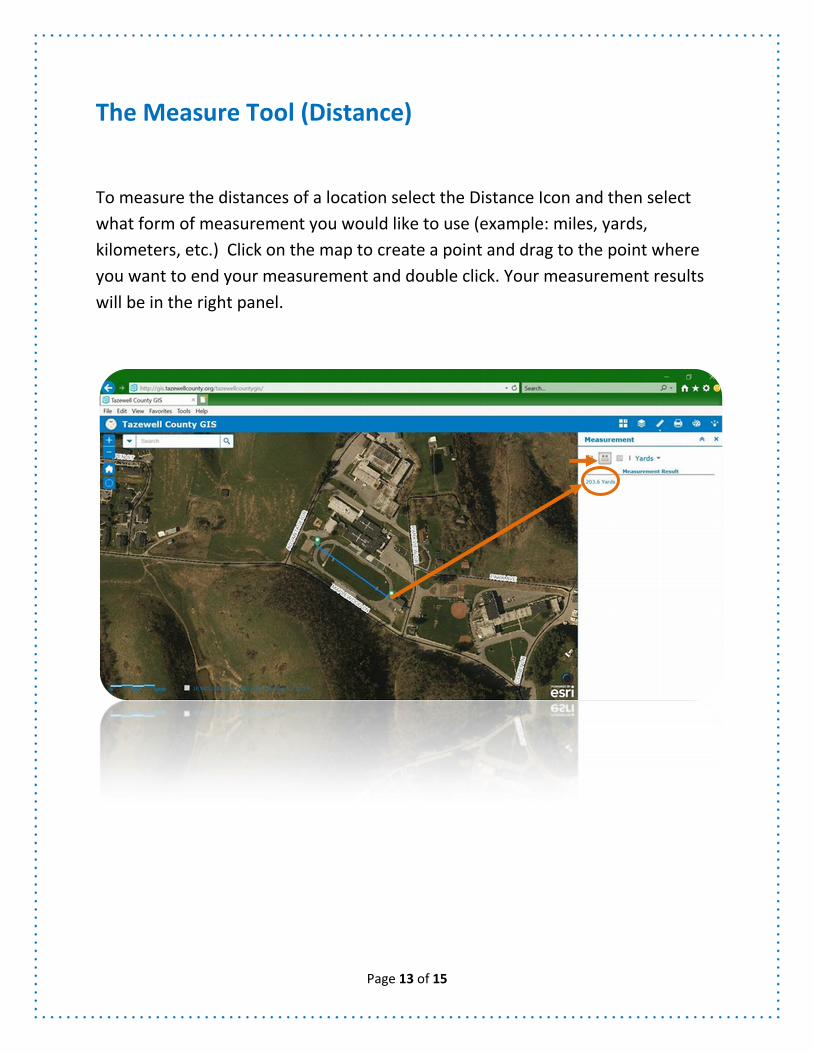
The Measure Tool (Distance)
To measure the distances of a location select the Distance Icon and then select
what form of measurement you would like to use (example: miles, yards,
kilometers, etc.) Click on the map to create a point and drag to the point where
you want to end your measurement and double click. Your measurement results
will be in the right panel.

Page 14 of 15
The Measure Tool (Location)
To get the longitude and latitude of a location select the Location Icon and then
select what form of measurement you would like to use (example: degrees or
DMS). Next click on the map where you would like to get coordinates of. Your
results will be in the right panel.

Page 15 of 15
Troubleshooting
Our Web GIS interface requires the latest version of your web browser and also
requires that JavaScript be enabled.
In most cases, if you experience a problem with the interface, upgrading to the
latest version of your web browser will solve the problem. In addition making sure
that your web browser is not zoomed in too far will be helpful in viewing the
interface and being able to accurately utilize the tools available.
Also trying a different web browser may be helpful.
If you continue to experience problems or have any questions, please feel free to
contact us by phone or email at:
Kenneth Dunford, Jr.
Assistant County Engineer
Office: (276) 385-1254
Email: [email protected]