web customer service module - iis7downloads.dolphind.com/training/traininglibrarybmm/we… · ·...
TRANSCRIPT
Copyright © 2016 Dolphin Dynamics Ltd.
The information contained herein is the property of Dolphin Dynamics Ltd. No part of this publication may be reproduced, stored in a retrieval system, or transmitted in anyform or any means electronic or mechanical, including photocopying and recording foof Dolphin Dynamics Ltd.
Dolphin Dynamics Ltd.162-164 Upper Richmond RoadLondon, SW15 2SLwww.dolphind.com
Web Customer Service Module
Dolphin Dynamics Ltd Confidential 2
Table of ContentsIntroduction ..............................................................................................................................................3
Dolphin Dynamics Ltd Confidential 3
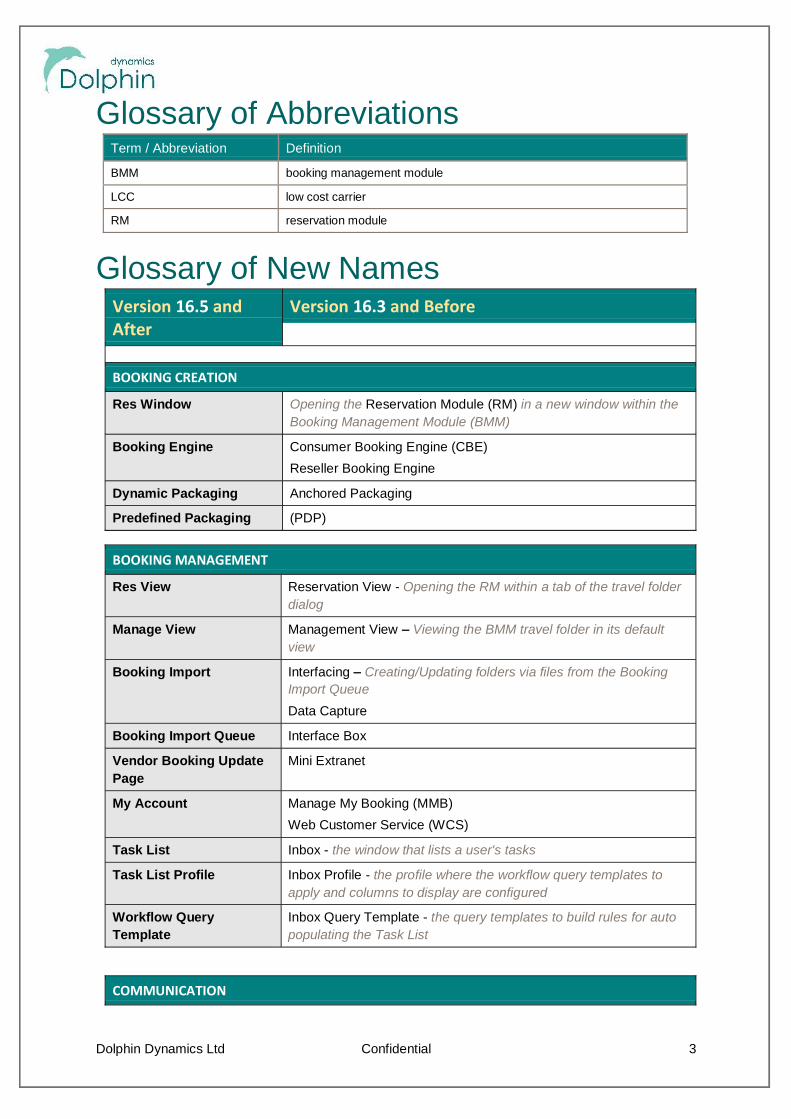
Glossary of AbbreviationsTerm / Abbreviation Definition
BMM booking management module
LCC low cost carrier
RM reservation module
Glossary of New NamesVersion 16.5 andAfter
Version 16.3 and Before
BOOKING CREATION
Res Window Opening the Reservation Module (RM) in a new window within theBooking Management Module (BMM)
Booking Engine Consumer Booking Engine (CBE)Reseller Booking Engine
Dynamic Packaging Anchored Packaging
Predefined Packaging (PDP)
BOOKING MANAGEMENT
Res View Reservation View - Opening the RM within a tab of the travel folderdialog
Manage View Management View Viewing the BMM travel folder in its defaultview
Booking Import Interfacing Creating/Updating folders via files from the BookingImport QueueData Capture
Booking Import Queue Interface Box
Vendor Booking UpdatePage
Mini Extranet
My Account Manage My Booking (MMB)Web Customer Service (WCS)
Task List Inbox - the window that lists a user's tasks
Task List Profile Inbox Profile - the profile where the workflow query templates toapply and columns to display are configured
Workflow QueryTemplate
Inbox Query Template - the query templates to build rules for autopopulating the Task List
COMMUNICATION
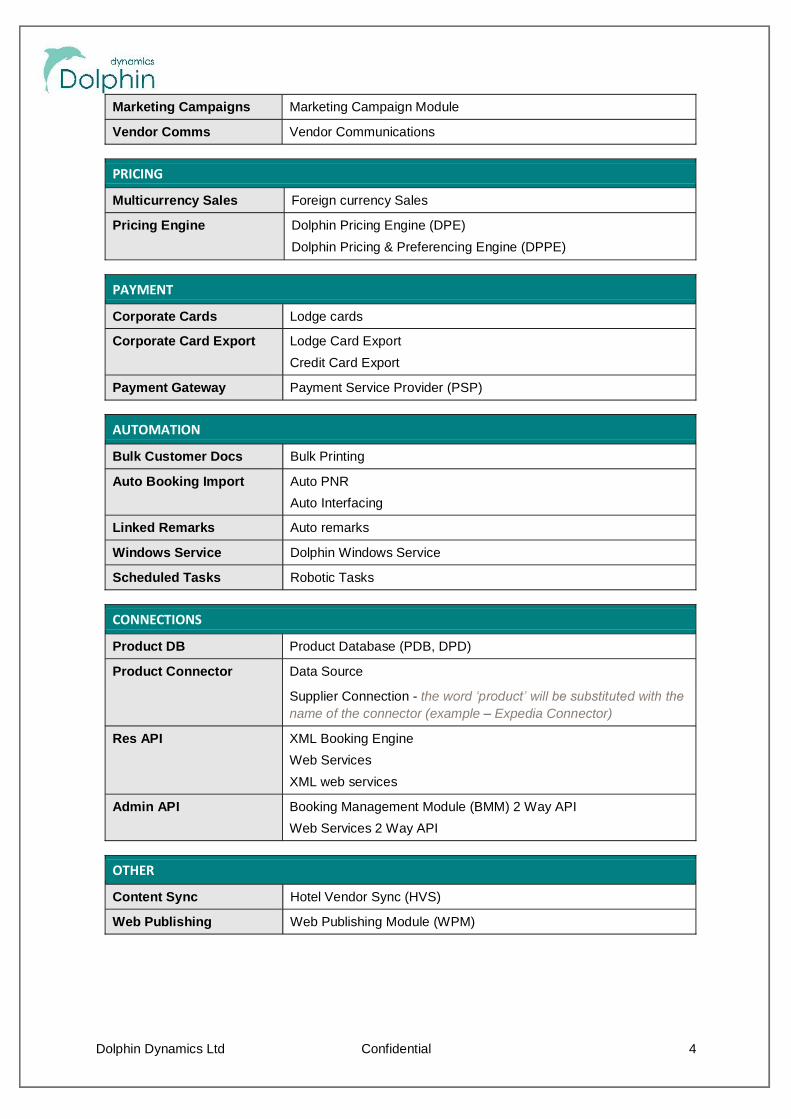
Dolphin Dynamics Ltd Confidential 4
Marketing Campaigns Marketing Campaign Module
Vendor Comms Vendor Communications
PRICING
Multicurrency Sales Foreign currency Sales
Pricing Engine Dolphin Pricing Engine (DPE)Dolphin Pricing & Preferencing Engine (DPPE)
PAYMENT
Corporate Cards Lodge cards
Corporate Card Export Lodge Card ExportCredit Card Export
Payment Gateway Payment Service Provider (PSP)
AUTOMATION
Bulk Customer Docs Bulk Printing
Auto Booking Import Auto PNRAuto Interfacing
Linked Remarks Auto remarks
Windows Service Dolphin Windows Service
Scheduled Tasks Robotic Tasks
CONNECTIONS
Product DB Product Database (PDB, DPD)
Product Connector Data Source
Supplier Connection - the wname of the connector (example Expedia Connector)
Res API XML Booking EngineWeb ServicesXML web services
Admin API Booking Management Module (BMM) 2 Way APIWeb Services 2 Way API
OTHER
Content Sync Hotel Vendor Sync (HVS)
Web Publishing Web Publishing Module (WPM)
Dolphin Dynamics Ltd Confidential 5
IntroductionThis module allows your customers to self-service. This means you can provide a differentiated serviceand one that many travellers now expect, as well as reducing the management overhead for manyadministrative enquiries.
The module allows you to give your customers usernames and passwords. Alternatively, the customerscan set up their own usernames and passwords which will automatically be recorded in their profiles inDolphin. Once they have a username and password customers can view their booking details online,view and print off itineraries and booking confirmations and update their personal profile details andsend messages to the agent who made the original booking.
module in a hosted environment. This is because it runs on a web-server which must be able to connectto your database.
Key FeaturesInsert a link to a PDF itinerary from any email sent directly to a client directly from a folder inDolphinItinerary is generated in real time from Dolphin, so the information shown is always up-to-date.Dolphin Dynamics controls security, manages the web servers and hosts the databases.Web Customer Service screens will look generic (later they may be able to be customised touse the travel agent branding).The Web Customer Service screen includes a customisable area (using frames) where thetravel agent can promote their own offers/news/information to travellers
Corporate customers can access Web Reporting via Web Customer Service
BenefitsSaves you time and resource costs travellers can answer many simple questions themselvesusing self-service, including getting copies of the itineraries or confirmation.Enables you to provide a superior service to your customers offering web customer serviceis a great selling point for the travel agents. It enables you to offer a differentiated level ofservice and improves customer satisfaction. This could help you to close a sale or gain acustomer they might not otherwise have been able to.Creates a professional image being able to offer self-service functionality portrays a qualityimage. By integrating web customer service into your website they will be seen to offer a strongservice based on use of the latest technology.Provides an additional revenue stream corporate agencies may have the option to charge foraccess to web customer service.
ActivationTo activate this functionality, you need to contact Dolphin Dynamics and you might incur in additionalfees.
ConfigurationWe will undertake the necessary configuration so that you have access to a web customer servicewebsite with a URL which is unique to your agency and which will have the following format:https://wcs.dolphinanywhere.com/travelagencyname
You will need to ensure the following is set up to use web customer service:
Dolphin Dynamics Ltd Confidential 6
Office ITAdobe AcrobatVersion 7 (or higher) is required to be able to produce documents.
Site DetailsWelcome MessageWhen users initially log in to the site, they will see a welcome screen where it is possible for you toconfigure your own text if desired.
In the booking management module, select menu: Options > Site Details > select the required branch> Web Config tab.
In the WCS Welcome Message section, enter the text you wish to appear on the Welcome screen. It ispossible to use HTML formatting here (if required) and add hyperlinks to your own or other websites.
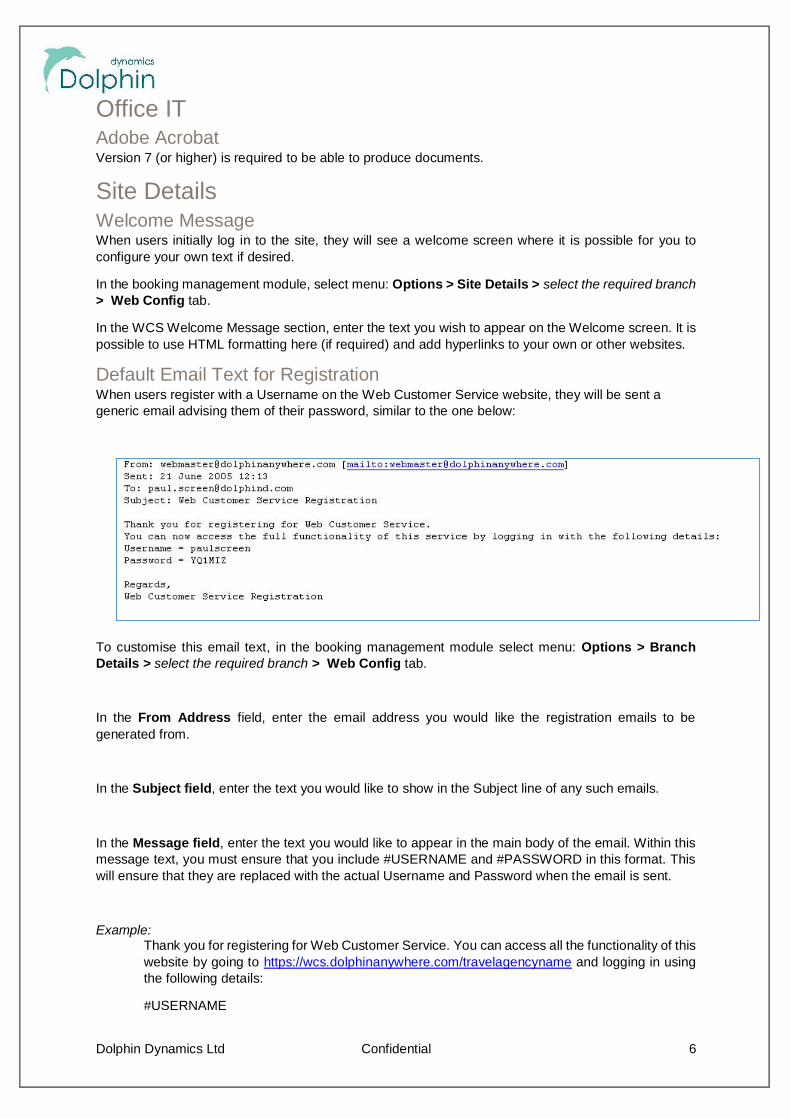
Default Email Text for RegistrationWhen users register with a Username on the Web Customer Service website, they will be sent ageneric email advising them of their password, similar to the one below:
To customise this email text, in the booking management module select menu: Options > BranchDetails > select the required branch > Web Config tab.
In the From Address field, enter the email address you would like the registration emails to begenerated from.
In the Subject field, enter the text you would like to show in the Subject line of any such emails.
In the Message field, enter the text you would like to appear in the main body of the email. Within thismessage text, you must ensure that you include #USERNAME and #PASSWORD in this format. Thiswill ensure that they are replaced with the actual Username and Password when the email is sent.
Example:Thank you for registering for Web Customer Service. You can access all the functionality of thiswebsite by going to https://wcs.dolphinanywhere.com/travelagencyname and logging in usingthe following details:
#USERNAME
Dolphin Dynamics Ltd Confidential 7
#PASSWORD
Financial TransactionsWhen users view their folder details on the Web Customer Service website, it is possible for them tohave the option to view and print off any financial transactions (receipts, invoices, refunds, credit notes)issued within that folder.
If you would like all financial transactions to be accessible to your clients by default, select menu:Options > Branch Details > select the required branch > Financial 1 tab. Select the
check box. This will ensure that every time you issue a new receipt,invoice, refund or credit note, the Publish to Web checkbox in the bottom right hand corner of the windowwill be ticked by default. It is of course possible for you to clear the check box it if you do not want aparticular financial transaction to be accessible to your client.
Assigning Usernames and PasswordsIf you wish to assign Usernames and Passwords to your clients in advance you can do so within theClient, Company or Agency profiles.
To set this up, select menu: Options > Security > select the user you require and retrieve >Access/Updates tab. Select the check box.
Open the relevant Client, Company or Agency profiles and select the Web Access tab. In the LoginDetails section, enter a User ID and Password. You will need to give these to your clients in order forthem to access their booking details via the Web Customer Service website.
Alternatively, if you do not wish to assign usernames and passwords in advance, clients can registeron the Web Customer Service website, create their own usernames and have passwords generatedautomatically, once they have made an initial booking or quote.
Dolphin Dynamics Ltd Confidential 8
Booking Management ModuleDocumentsEnsure that documents are set up so that they can be viewed over the internet. For example: itineraryand booking confirmation.
In the booking management module, select menu: Options > Documents. Choose each document
type in turn from the dropdown Document list and select the check box for eachdocument.
Note: If you have more than one type of each document set up you can only choose one type topublish to web.
Email TemplateIf you wish to configure your own default email text for any emails generated from Dolphin, select menu:Options > Documents. Choose each document type in turn from the drop down menu. Enter theinformation you would like to appear in the Subject, Default Email and Default Attachment Namefields so that this information appears every time you send a client an email of that particular documenttype.
In the Subject and Default Email area you can use the following tags as shown Dolphin will populatethese fields with the appropriate information from the travel folder.
[BRANCH_CODE]
[FOLDER_NUMBER]
[CUSTOMER_TITLE]
[CUSTOMER_FIRST_NAME]
[CUSTOMER_NAME] //This will be the last name for a client or the company name for acompany and the agency name for an agent
[COMPANY_NAME]
[LEAD_PAX_TITLE]
[LEAD_PAX_FIRST_NAME]
[LEAD_PAX_LAST_NAME]
[DESTINATION]
Note: You do not need a file extension in the Default Attachment Name.
Auto Insert HyperlinkWhen emailing documents to a customer you can automatically insert a hyperlink into each email whichwill direct the customer to the information via Web Customer Services. This is possible for all documenttypes, i.e.: receipt, invoice, refund, credit note, itinerary, booking confirmation, quotation and voucher.The hyperlink will always direct the customer to the itinerary document of the travel folder that thedocument is being emailed from.
Dolphin Dynamics Ltd Confidential 9
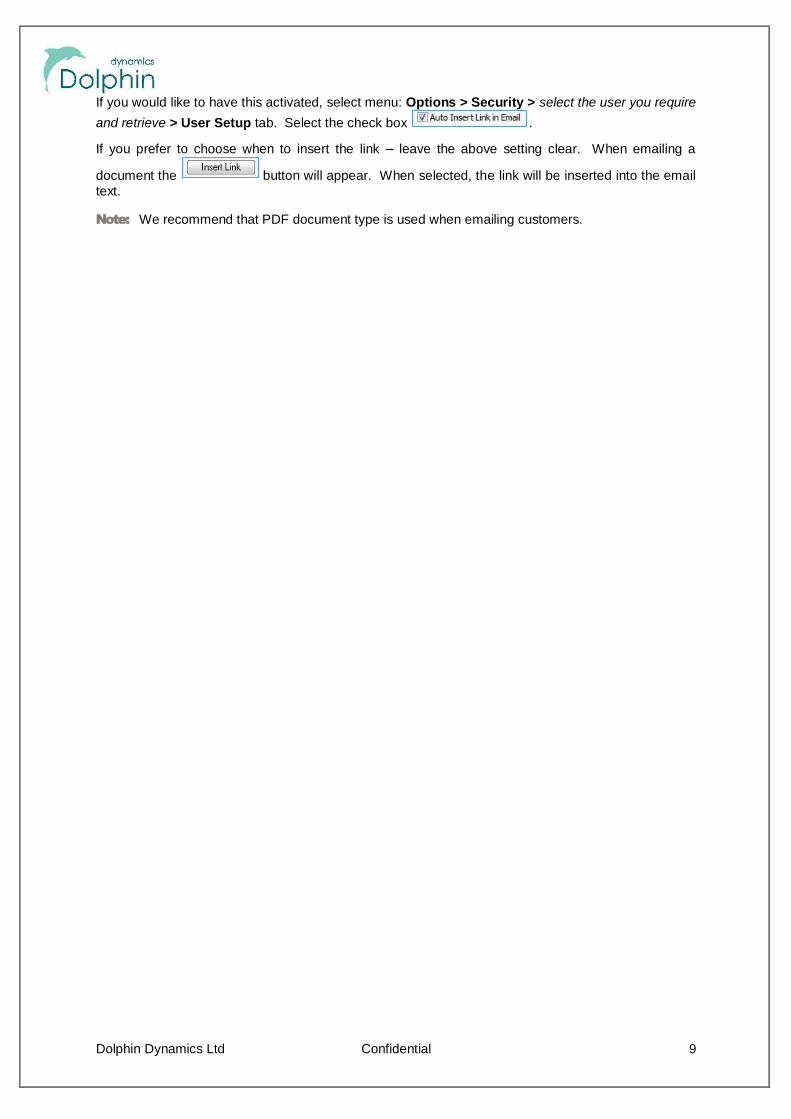
If you would like to have this activated, select menu: Options > Security > select the user you requireand retrieve > User Setup tab. Select the check box .
If you prefer to choose when to insert the link leave the above setting clear. When emailing a
document the button will appear. When selected, the link will be inserted into the emailtext.
Note: We recommend that PDF document type is used when emailing customers.
Dolphin Dynamics Ltd Confidential 10
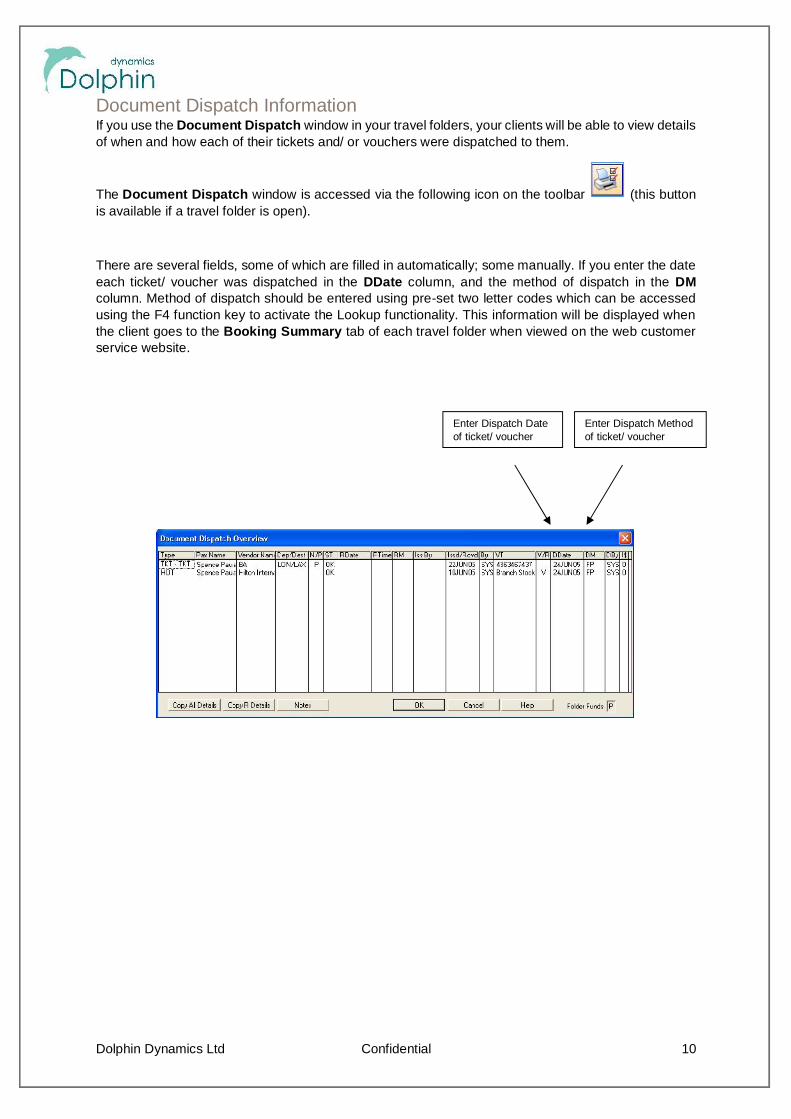
Document Dispatch InformationIf you use the Document Dispatch window in your travel folders, your clients will be able to view detailsof when and how each of their tickets and/ or vouchers were dispatched to them.
The Document Dispatch window is accessed via the following icon on the toolbar (this buttonis available if a travel folder is open).
There are several fields, some of which are filled in automatically; some manually. If you enter the dateeach ticket/ voucher was dispatched in the DDate column, and the method of dispatch in the DMcolumn. Method of dispatch should be entered using pre-set two letter codes which can be accessedusing the F4 function key to activate the Lookup functionality. This information will be displayed whenthe client goes to the Booking Summary tab of each travel folder when viewed on the web customerservice website.
Enter Dispatch Methodof ticket/ voucher
Enter Dispatch Dateof ticket/ voucher
Dolphin Dynamics Ltd Confidential 11
Web ReportingOnce the functionality has been activated, please go through the following steps to configure and useit.
User SecuritySelect menu: Options > Security > select the user you require and retrieve > Access/Updates tab.Select the check box.
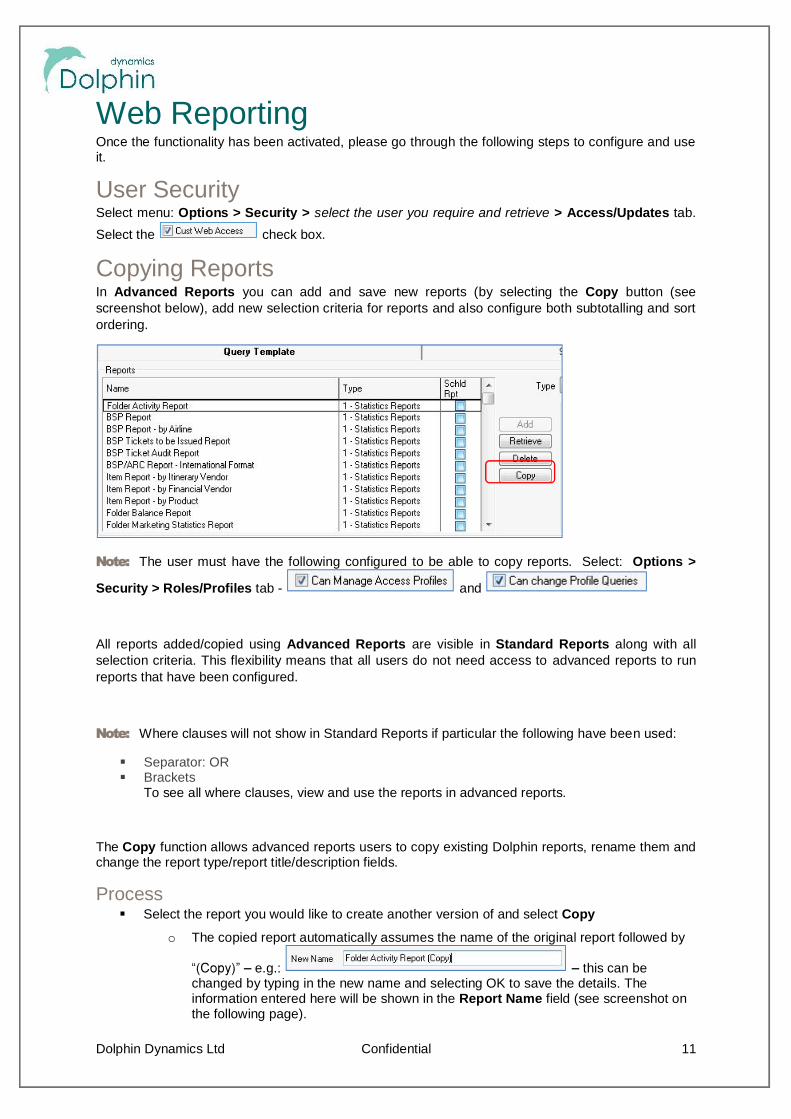
Copying ReportsIn Advanced Reports you can add and save new reports (by selecting the Copy button (seescreenshot below), add new selection criteria for reports and also configure both subtotalling and sortordering.
Note: The user must have the following configured to be able to copy reports. Select: Options >
Security > Roles/Profiles tab - and
All reports added/copied using Advanced Reports are visible in Standard Reports along with allselection criteria. This flexibility means that all users do not need access to advanced reports to runreports that have been configured.
Note: Where clauses will not show in Standard Reports if particular the following have been used:
Separator: ORBracketsTo see all where clauses, view and use the reports in advanced reports.
The Copy function allows advanced reports users to copy existing Dolphin reports, rename them andchange the report type/report title/description fields.
ProcessSelect the report you would like to create another version of and select Copyo The copied report automatically assumes the name of the original report followed by
e.g.: this can bechanged by typing in the new name and selecting OK to save the details. Theinformation entered here will be shown in the Report Name field (see screenshot onthe following page).
Dolphin Dynamics Ltd Confidential 12
o Once you have copied a report you will find it at the end of the specified report type list.
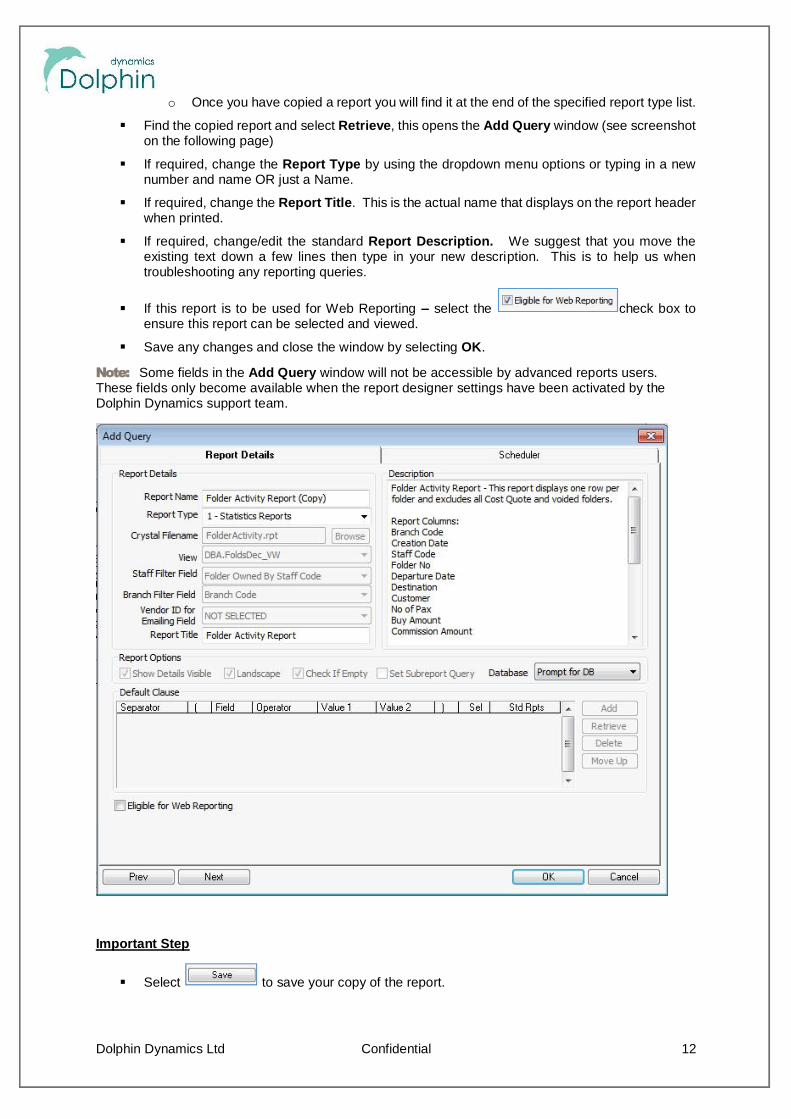
Find the copied report and select Retrieve, this opens the Add Query window (see screenshoton the following page)
If required, change the Report Type by using the dropdown menu options or typing in a newnumber and name OR just a Name.
If required, change the Report Title. This is the actual name that displays on the report headerwhen printed.
If required, change/edit the standard Report Description. We suggest that you move theexisting text down a few lines then type in your new description. This is to help us whentroubleshooting any reporting queries.
If this report is to be used for Web Reporting select the check box toensure this report can be selected and viewed.
Save any changes and close the window by selecting OK.
Note: Some fields in the Add Query window will not be accessible by advanced reports users.These fields only become available when the report designer settings have been activated by theDolphin Dynamics support team.
Important Step
Select to save your copy of the report.
Dolphin Dynamics Ltd Confidential 13
Changing the Report DescriptionSee Copying Reports above.
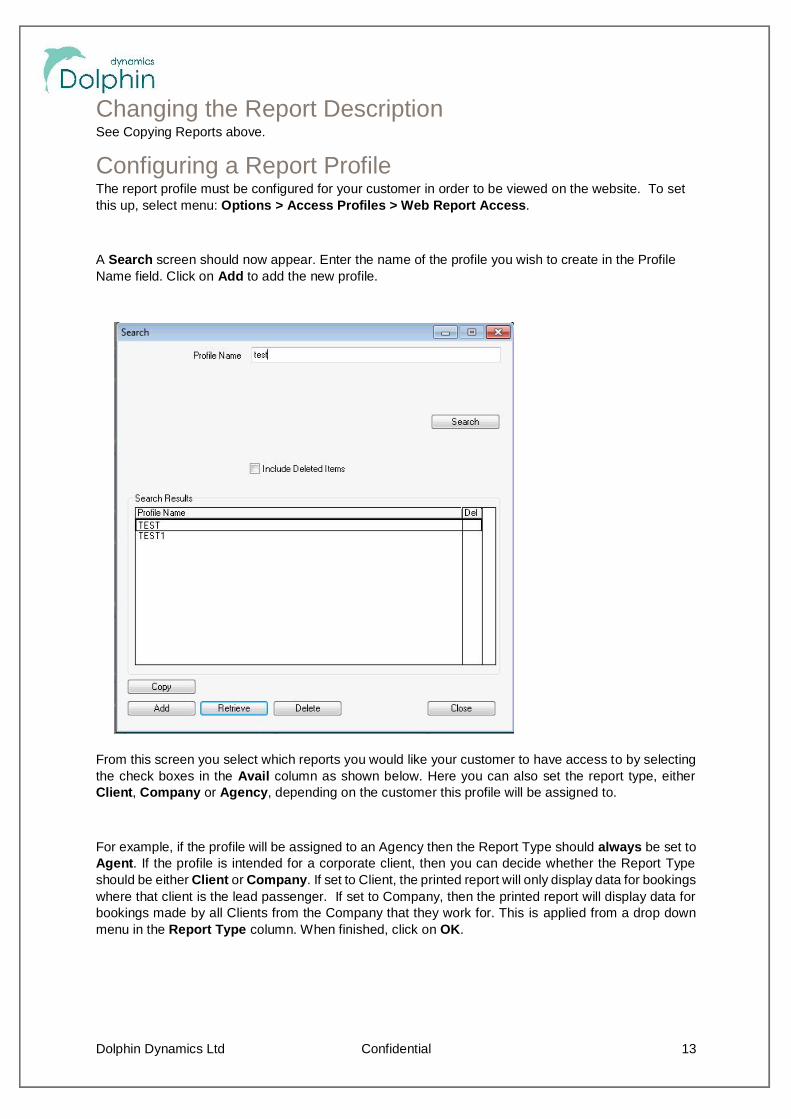
Configuring a Report ProfileThe report profile must be configured for your customer in order to be viewed on the website. To setthis up, select menu: Options > Access Profiles > Web Report Access.
A Search screen should now appear. Enter the name of the profile you wish to create in the ProfileName field. Click on Add to add the new profile.
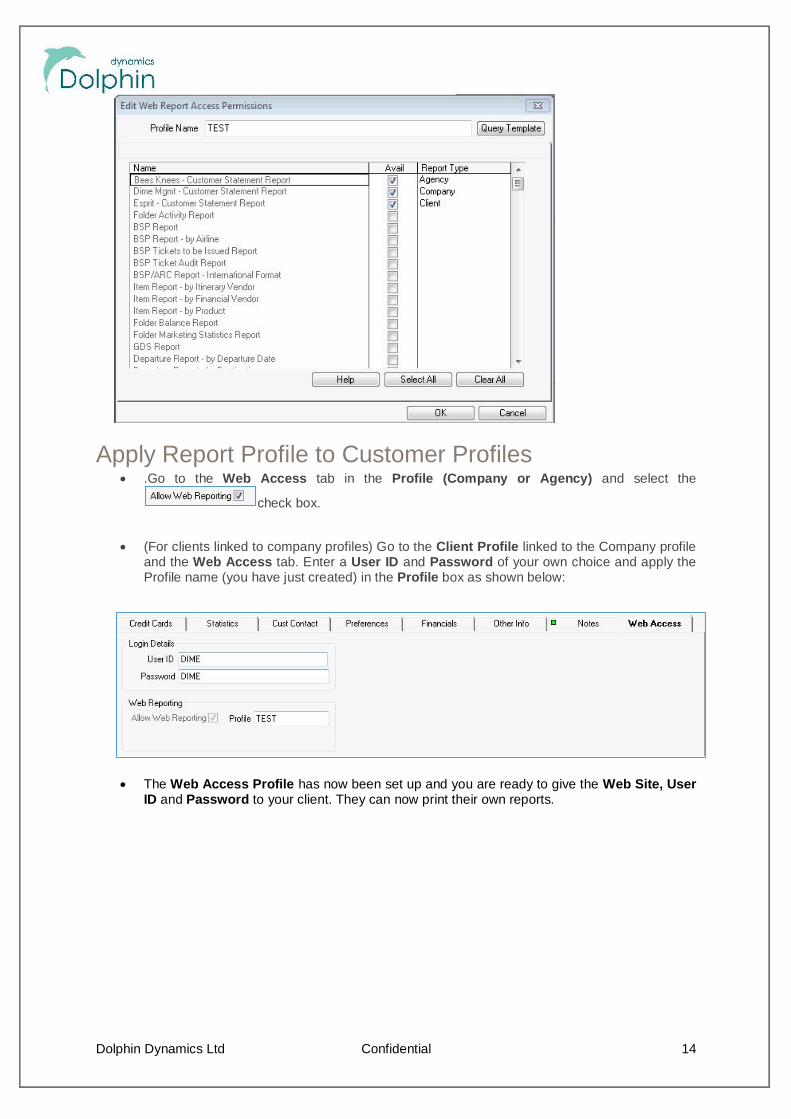
From this screen you select which reports you would like your customer to have access to by selectingthe check boxes in the Avail column as shown below. Here you can also set the report type, eitherClient, Company or Agency, depending on the customer this profile will be assigned to.
For example, if the profile will be assigned to an Agency then the Report Type should always be set toAgent. If the profile is intended for a corporate client, then you can decide whether the Report Typeshould be either Client or Company. If set to Client, the printed report will only display data for bookingswhere that client is the lead passenger. If set to Company, then the printed report will display data forbookings made by all Clients from the Company that they work for. This is applied from a drop downmenu in the Report Type column. When finished, click on OK.
Dolphin Dynamics Ltd Confidential 14
Apply Report Profile to Customer Profiles.Go to the Web Access tab in the Profile (Company or Agency) and select the
check box.
(For clients linked to company profiles) Go to the Client Profile linked to the Company profileand the Web Access tab. Enter a User ID and Password of your own choice and apply theProfile name (you have just created) in the Profile box as shown below:
The Web Access Profile has now been set up and you are ready to give the Web Site, UserID and Password to your client. They can now print their own reports.
Dolphin Dynamics Ltd Confidential 15
Dolphin Dynamics Ltd Confidential 16
Web Customer Service WebsiteThe following section of this document describes the functionality of the Web Customer Servicecustomer facing website.
There are two versions of the same section.
Travel Agent Use is intended for you to use Web Customer Service internally (to familiariseyourself with the layout and options available).
Client Use is intended to be given to your clients who will be the end users of the site. You canamend or customise the text and screen shots before passing on to clients.
Travel Agent UseFrom the website customers have the ability to:
View and print documentation relating to any bookings made with youView any details held in the profiles Client, Company and AgencySend messages relating to a particular booking directly to user who created the travel folder.
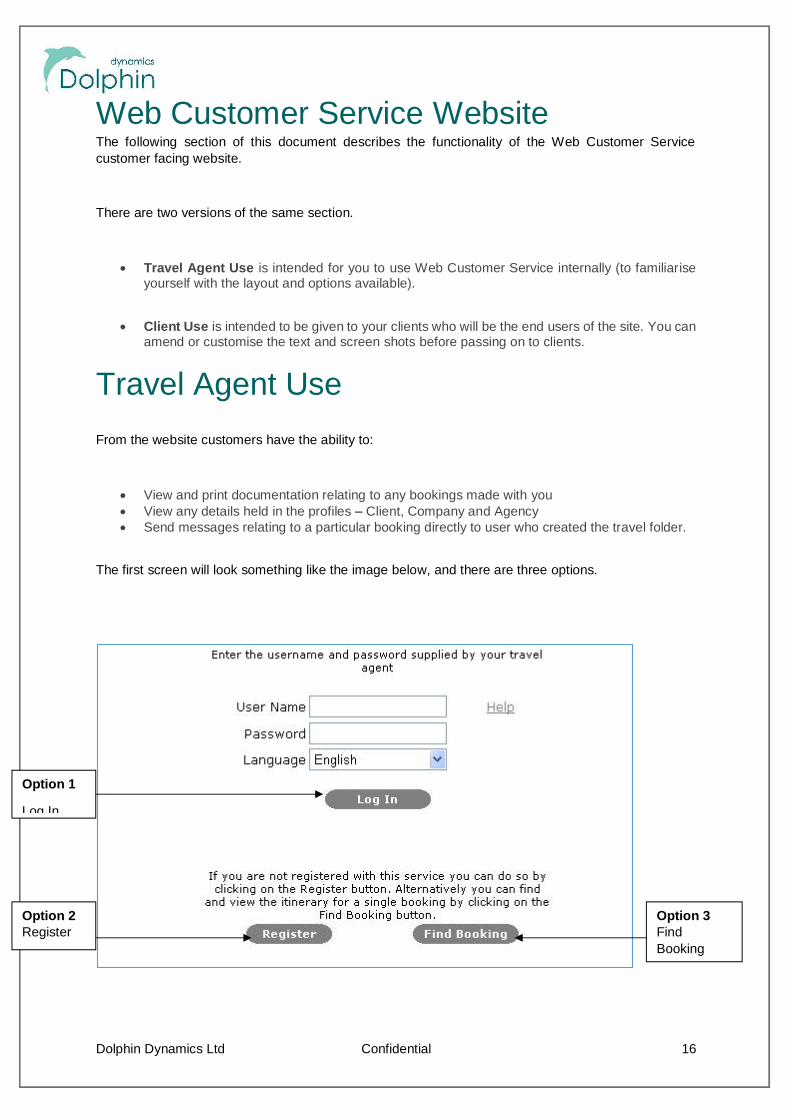
The first screen will look something like the image below, and there are three options.
Option 1
Log In
Option 2Register
Option 3FindBooking

Dolphin Dynamics Ltd Confidential 17
Option 1 Log InIf you have set up user names and passwords for your clients in advance in their client, company andagency profiles. The client should enter the information into the relevant boxes and click on Log In.
This will take them to an initial Welcome screen. Please see the Configuration area of this documentfor further information.
Example:
Three or four tabs will be available:
Most Recent Booking tabAll Bookings tabYour Profile tabReports tab (optional)
Each of the tabs is explained in further detail below.
Most Recent Booking tab
Print aConfirmationdocument
Print anItinerarydocument
Send a messageto travel agent

Dolphin Dynamics Ltd Confidential 18
At the top of the screen is shown the Booking Number, Departure Date, Destination, Deposit Due date
An Itinerary can be printed using the button shown above. This is a document showing all travelarrangements booked but with no costings, identical to the Itinerary generated in Dolphin.
A Confirmation can be printed using the button shown above. This is a document showing all travelarrangements including ticket information and costings, identical to the Booking Confirmation generatedin Dolphin.
If the booking is a Cost Quote, this will be indicated by the word Quote directly underneath the BookingNumber. The Deposit and Balance details will state N/A. In place of the Confirmation button will be aQuote button, which will print a document showing all provisional travel arrangements including ticketinformation and costings, identical to the Cost Quote generated in Dolphin.
If clients wish to contact you with a query or comment relating to this booking, they can use the ContactAgent button, shown above. A window will be displayed wherein they can enter a message, then clickon Send. The folder will appear in the Dolphin Inbox of the person who created the travel folder with amessage type Inbox Message and the message attached.
Booking Summary tab
The Booking Summary tab shows an overview of all your booking details, as illustrated in the screenshot on the previous page.
Financials tab

Dolphin Dynamics Ltd Confidential 19
The Financials tab will display all financial transactions relating to the folder booking i.e. receipts orinvoices which you have indicated you wish to be accessible to the client by selecting the Publish ToWeb check box in the bottom right hand corner of the financial transaction window.
Clicking on an invoice or receipt number will display a PDF version of the document, which can thenbe printed or saved by the client if you wish.
The Financials tab is not applicable if the booking is a Cost Quote.
Dolphin Dynamics Ltd Confidential 20
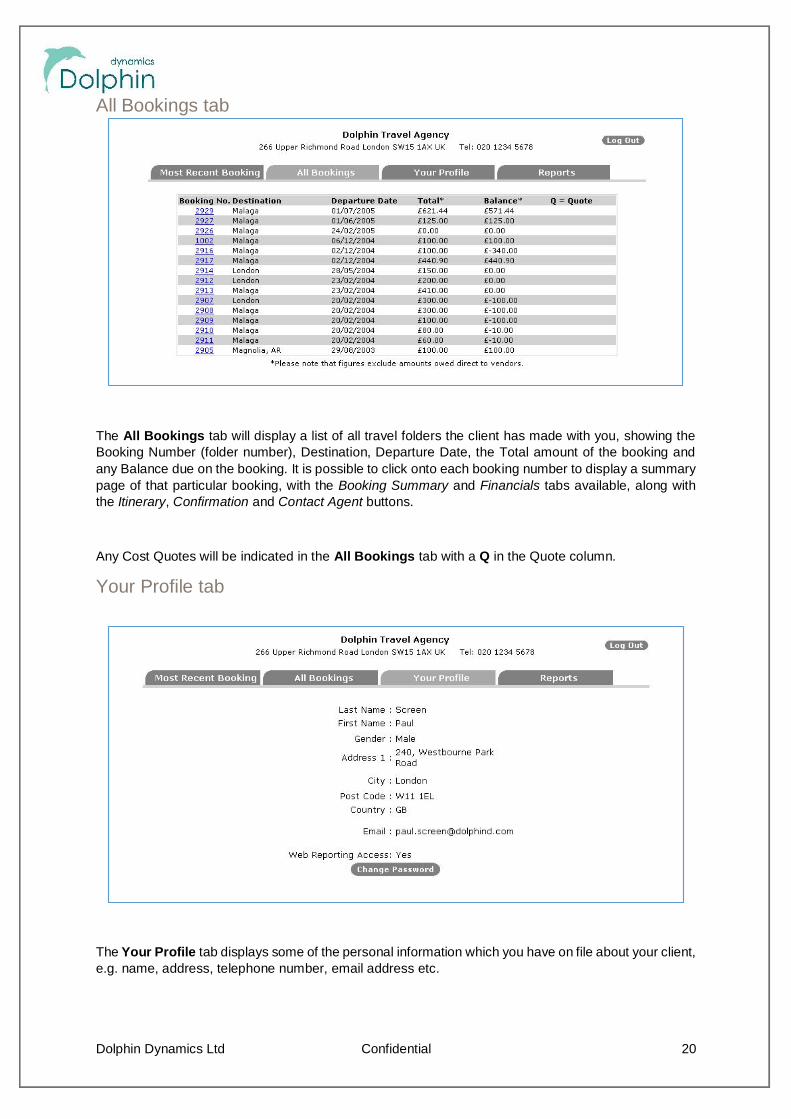
All Bookings tab
The All Bookings tab will display a list of all travel folders the client has made with you, showing theBooking Number (folder number), Destination, Departure Date, the Total amount of the booking andany Balance due on the booking. It is possible to click onto each booking number to display a summarypage of that particular booking, with the Booking Summary and Financials tabs available, along withthe Itinerary, Confirmation and Contact Agent buttons.
Any Cost Quotes will be indicated in the All Bookings tab with a Q in the Quote column.
Your Profile tab
The Your Profile tab displays some of the personal information which you have on file about your client,e.g. name, address, telephone number, email address etc.
Dolphin Dynamics Ltd Confidential 21
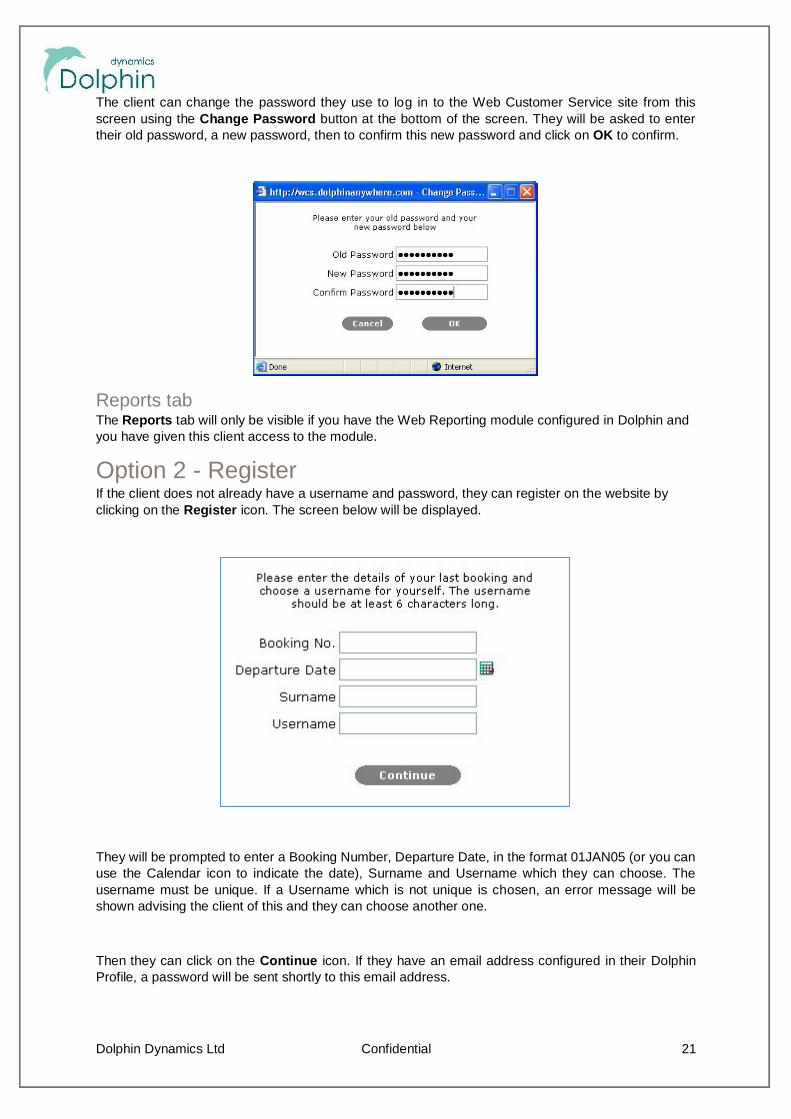
The client can change the password they use to log in to the Web Customer Service site from thisscreen using the Change Password button at the bottom of the screen. They will be asked to entertheir old password, a new password, then to confirm this new password and click on OK to confirm.
Reports tabThe Reports tab will only be visible if you have the Web Reporting module configured in Dolphin andyou have given this client access to the module.
Option 2 - RegisterIf the client does not already have a username and password, they can register on the website byclicking on the Register icon. The screen below will be displayed.
They will be prompted to enter a Booking Number, Departure Date, in the format 01JAN05 (or you canuse the Calendar icon to indicate the date), Surname and Username which they can choose. Theusername must be unique. If a Username which is not unique is chosen, an error message will beshown advising the client of this and they can choose another one.
Then they can click on the Continue icon. If they have an email address configured in their DolphinProfile, a password will be sent shortly to this email address.
Dolphin Dynamics Ltd Confidential 22
If there is not a valid email address in the Profile, the client will be advised to contact you directly.
When they have received a password, the client can use their Username and password to log in tothe website.
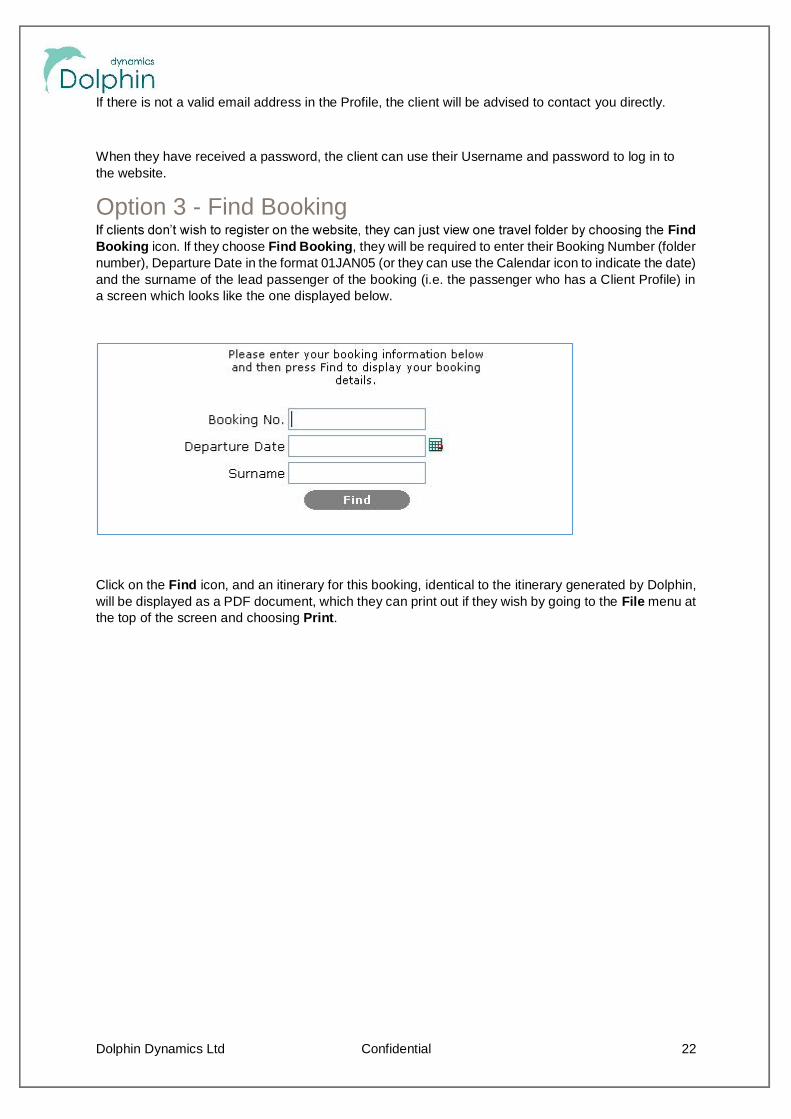
Option 3 - Find BookingFind
Booking icon. If they choose Find Booking, they will be required to enter their Booking Number (foldernumber), Departure Date in the format 01JAN05 (or they can use the Calendar icon to indicate the date)and the surname of the lead passenger of the booking (i.e. the passenger who has a Client Profile) ina screen which looks like the one displayed below.
Click on the Find icon, and an itinerary for this booking, identical to the itinerary generated by Dolphin,will be displayed as a PDF document, which they can print out if they wish by going to the File menu atthe top of the screen and choosing Print.
Dolphin Dynamics Ltd Confidential 23
Client UseFrom the website you can do the following:
View and print documentation relating to any bookings made with your travel agencyView any details the travel agency has on file about youSend messages relating to a particular booking directly to agent who originally made thebooking for you.
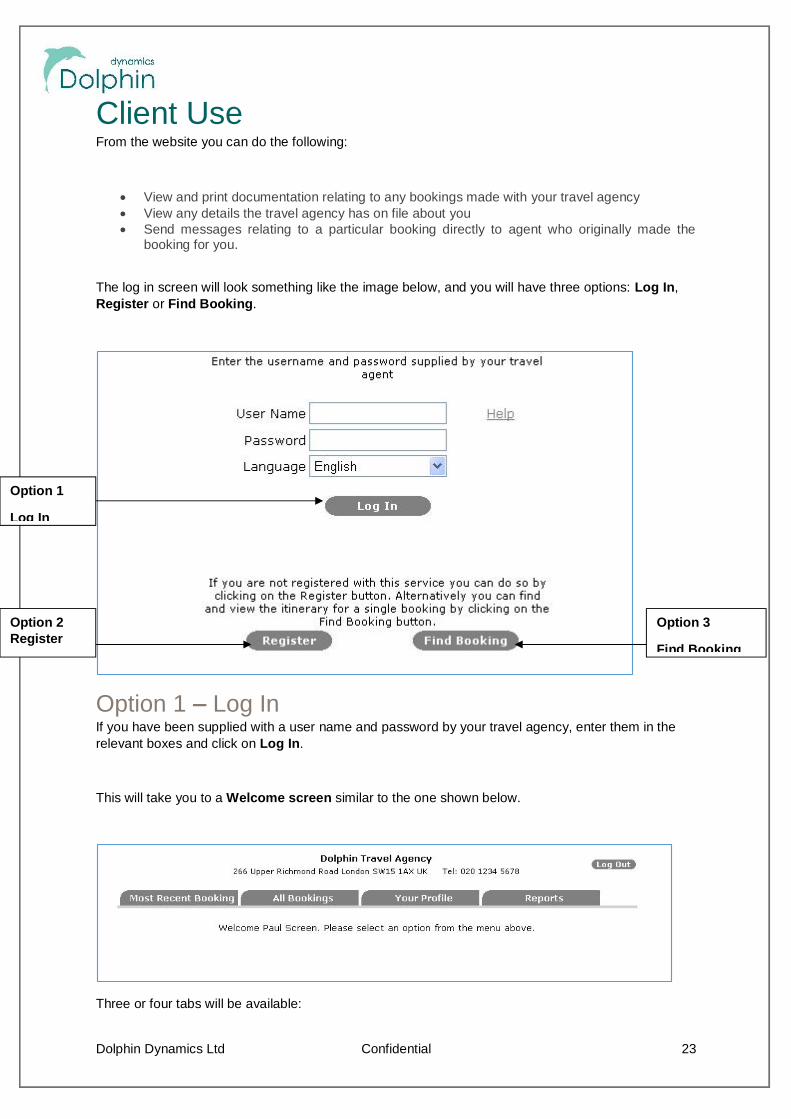
The log in screen will look something like the image below, and you will have three options: Log In,Register or Find Booking.
Option 1 Log InIf you have been supplied with a user name and password by your travel agency, enter them in therelevant boxes and click on Log In.
This will take you to a Welcome screen similar to the one shown below.
Three or four tabs will be available:
Option 1
Log In
Option 2Register
Option 3
Find Booking
Dolphin Dynamics Ltd Confidential 24
Most Recent Booking tabAll Bookings tabYour Profile tabReports tab (optional)
Each of the tabs is explained in further detail below.
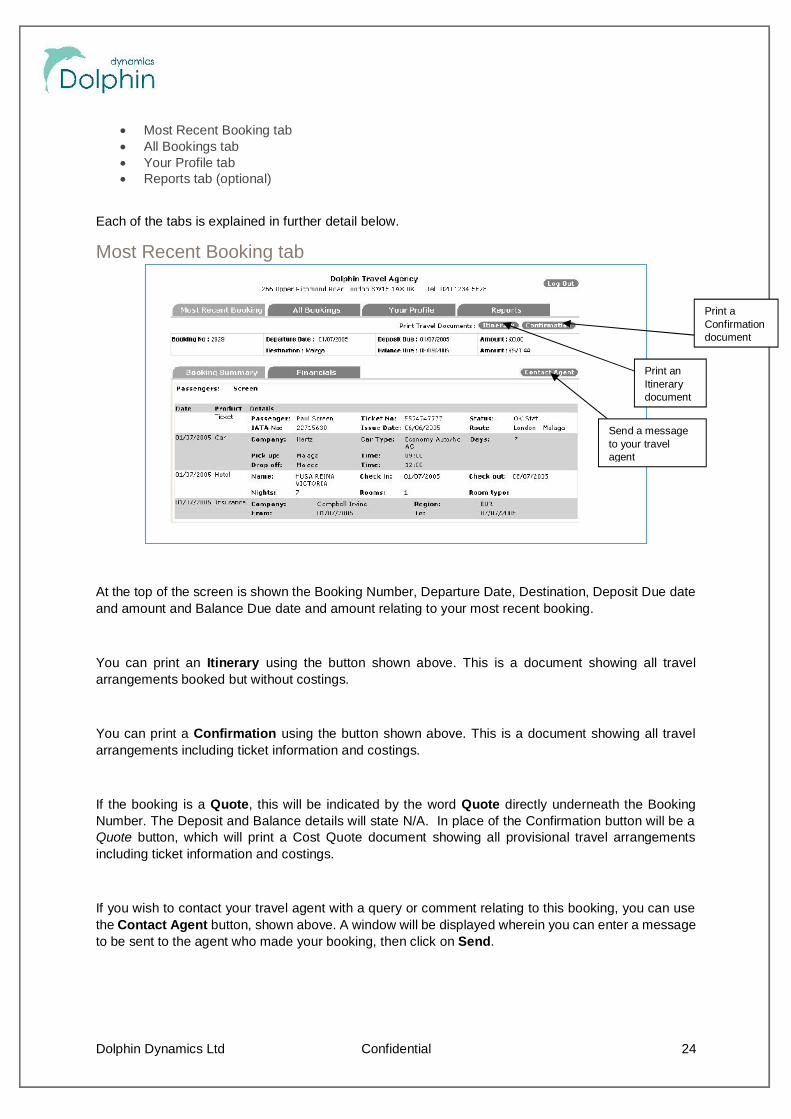
Most Recent Booking tab
At the top of the screen is shown the Booking Number, Departure Date, Destination, Deposit Due dateand amount and Balance Due date and amount relating to your most recent booking.
You can print an Itinerary using the button shown above. This is a document showing all travelarrangements booked but without costings.
You can print a Confirmation using the button shown above. This is a document showing all travelarrangements including ticket information and costings.
If the booking is a Quote, this will be indicated by the word Quote directly underneath the BookingNumber. The Deposit and Balance details will state N/A. In place of the Confirmation button will be aQuote button, which will print a Cost Quote document showing all provisional travel arrangementsincluding ticket information and costings.
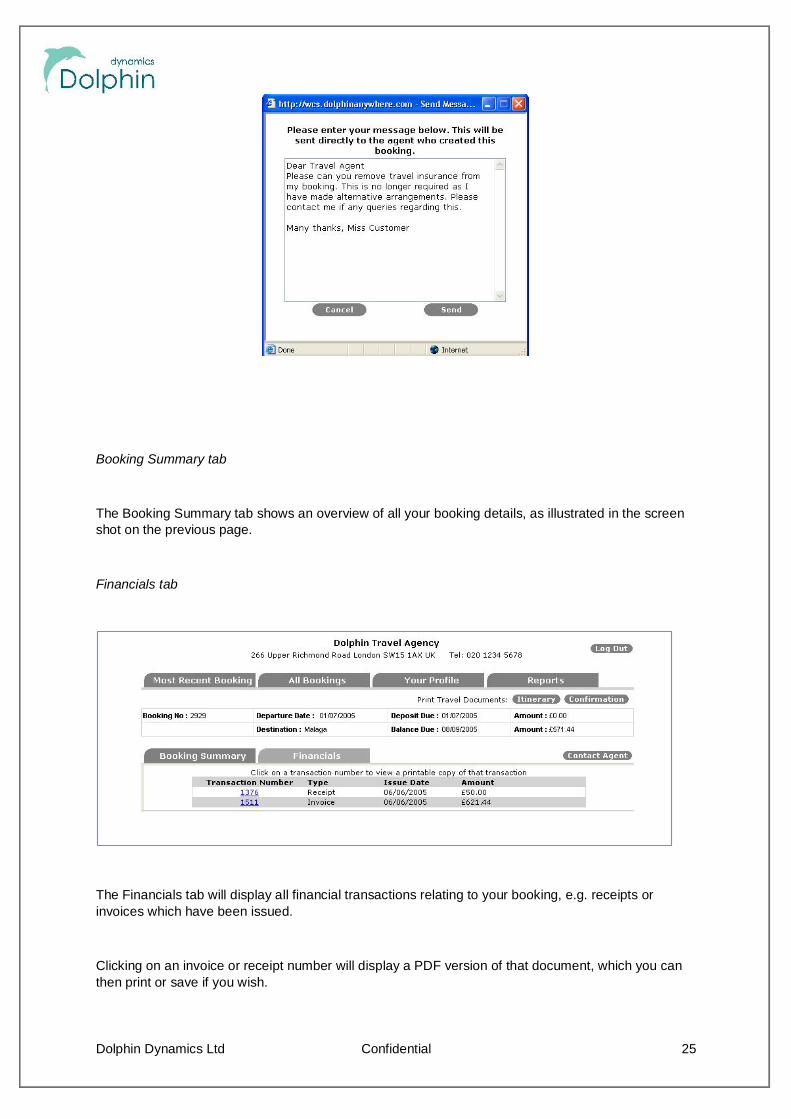
If you wish to contact your travel agent with a query or comment relating to this booking, you can usethe Contact Agent button, shown above. A window will be displayed wherein you can enter a messageto be sent to the agent who made your booking, then click on Send.
Print aConfirmationdocument
Print anItinerarydocument
Send a messageto your travelagent
Dolphin Dynamics Ltd Confidential 25
Booking Summary tab
The Booking Summary tab shows an overview of all your booking details, as illustrated in the screenshot on the previous page.
Financials tab
The Financials tab will display all financial transactions relating to your booking, e.g. receipts orinvoices which have been issued.
Clicking on an invoice or receipt number will display a PDF version of that document, which you canthen print or save if you wish.
Dolphin Dynamics Ltd Confidential 26
The Financials tab is not applicable if the booking is a quote.
Dolphin Dynamics Ltd Confidential 27
All Bookings tab
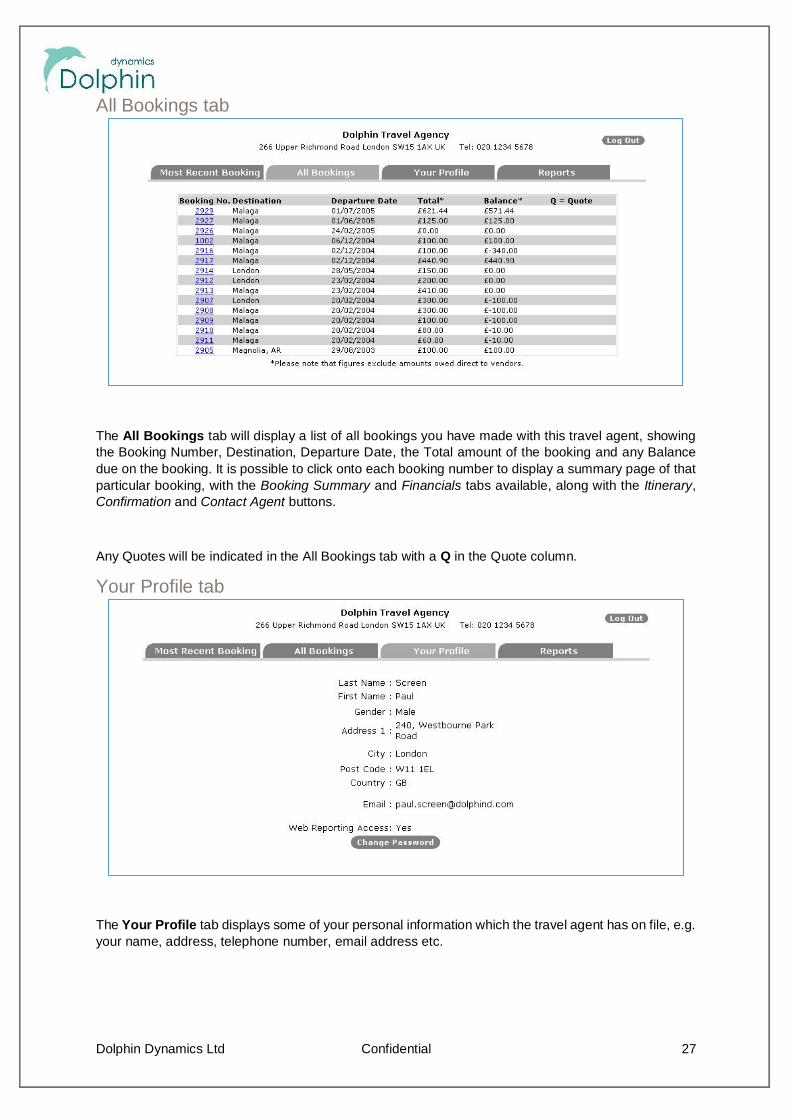
The All Bookings tab will display a list of all bookings you have made with this travel agent, showingthe Booking Number, Destination, Departure Date, the Total amount of the booking and any Balancedue on the booking. It is possible to click onto each booking number to display a summary page of thatparticular booking, with the Booking Summary and Financials tabs available, along with the Itinerary,Confirmation and Contact Agent buttons.
Any Quotes will be indicated in the All Bookings tab with a Q in the Quote column.
Your Profile tab
The Your Profile tab displays some of your personal information which the travel agent has on file, e.g.your name, address, telephone number, email address etc.
Dolphin Dynamics Ltd Confidential 28
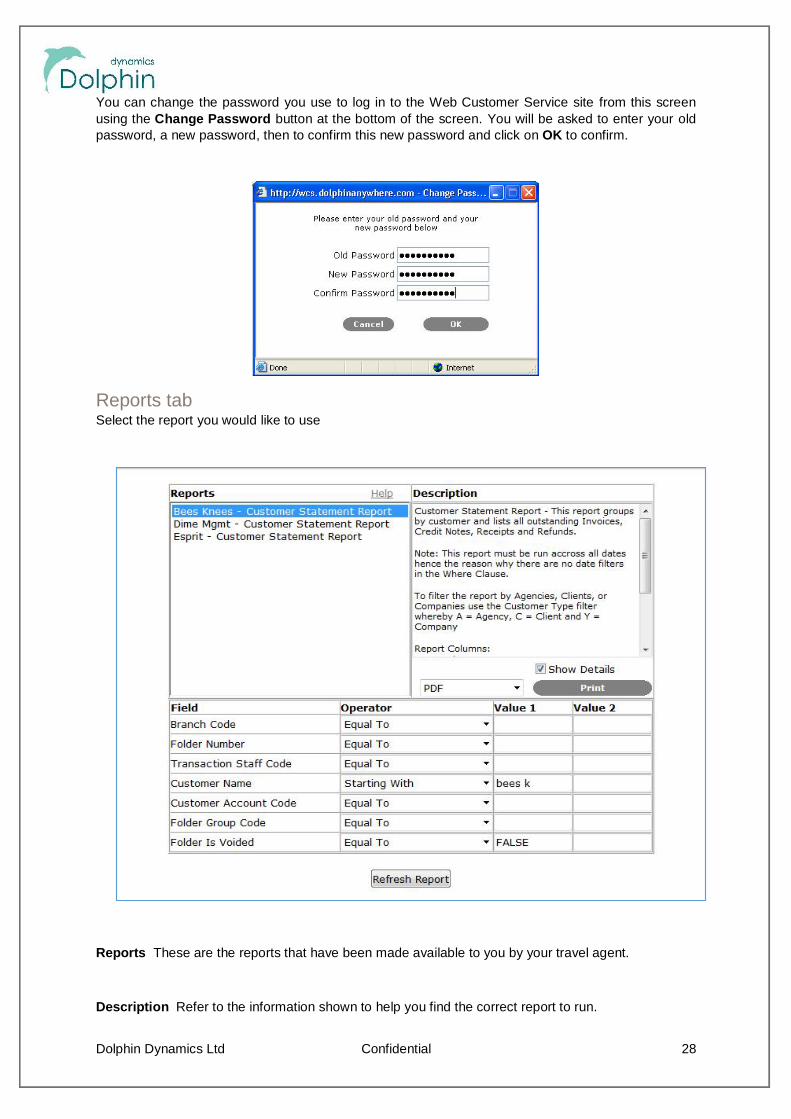
You can change the password you use to log in to the Web Customer Service site from this screenusing the Change Password button at the bottom of the screen. You will be asked to enter your oldpassword, a new password, then to confirm this new password and click on OK to confirm.
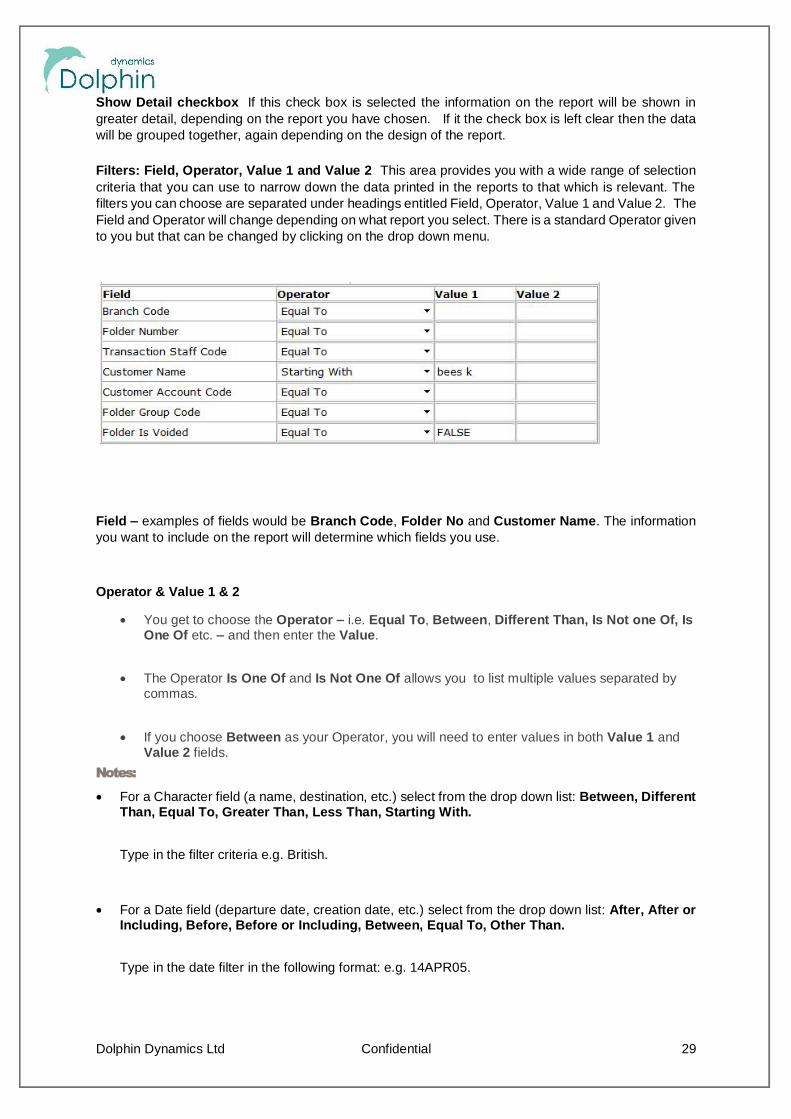
Reports tabSelect the report you would like to use
Reports These are the reports that have been made available to you by your travel agent.
Description Refer to the information shown to help you find the correct report to run.
Dolphin Dynamics Ltd Confidential 29
Show Detail checkbox If this check box is selected the information on the report will be shown ingreater detail, depending on the report you have chosen. If it the check box is left clear then the datawill be grouped together, again depending on the design of the report.
Filters: Field, Operator, Value 1 and Value 2 This area provides you with a wide range of selectioncriteria that you can use to narrow down the data printed in the reports to that which is relevant. Thefilters you can choose are separated under headings entitled Field, Operator, Value 1 and Value 2. TheField and Operator will change depending on what report you select. There is a standard Operator givento you but that can be changed by clicking on the drop down menu.
Field examples of fields would be Branch Code, Folder No and Customer Name. The informationyou want to include on the report will determine which fields you use.
Operator & Value 1 & 2
You get to choose the Operator i.e. Equal To, Between, Different Than, Is Not one Of, IsOne Of etc. and then enter the Value.
The Operator Is One Of and Is Not One Of allows you to list multiple values separated bycommas.
If you choose Between as your Operator, you will need to enter values in both Value 1 andValue 2 fields.
Notes:
For a Character field (a name, destination, etc.) select from the drop down list: Between, DifferentThan, Equal To, Greater Than, Less Than, Starting With.
Type in the filter criteria e.g. British.
For a Date field (departure date, creation date, etc.) select from the drop down list: After, After orIncluding, Before, Before or Including, Between, Equal To, Other Than.
Type in the date filter in the following format: e.g. 14APR05.
Dolphin Dynamics Ltd Confidential 30
For an Amount field (folder balance, invoice amount, etc.) or a Number field (folder number, invoicenumber, etc.) select from the drop down list: Between, Different Than, Equal To, Greater Than,Less Than.
Type in an amount e.g. 100.00 or a number e.g. 1500.
Note: - For amounts you do not need to enter the currency symbol e.g. $, £ or
For a Yes/No field (e.g. Folder is Cost Quote, Client has mainly Business Travel, etc.): DifferentThan, Equal To.
Type in either: FALSE (No), TRUE (Yes), or leave blank (either No or Yes).
Printing the Report
To print the Report you select the Report by clicking on it. Then add the filters accordingly and choosewhat format you want the report to print in. The Report can be printed in Active X Viewer or HTMLformat. The Active X viewer is only compatible with Internet Explorer but provides you with more options,such as exporting and printing to various printers.
Finally click on the Print button. This will print the report to a new window. If you have displayed thereport using the Active X Viewer, it can also be exported to a format such as Excel or Word if youclick on the Envelope icon (top left hand corner) or printed to paper by clicking on the Printer icon inthe top left hand corner.
Note: - Web Reporting uses pop-up windows to display the printed reports. If you have downloadedWindows XP service pack 2, Google Tool Bar, or any other applications that blocks pop-up windows,please configure them to allow pop-ups. For Windows XP users who have upgraded to service pack2, this can be located in the "Internet Options" dialog accessed from the "Tools" menu in InternetExplorer. For other applications, please refer to the supplied documentation.
Click on the X on the top right had corner to close the screen down. That will then take you back to thereports screen to print further reports.
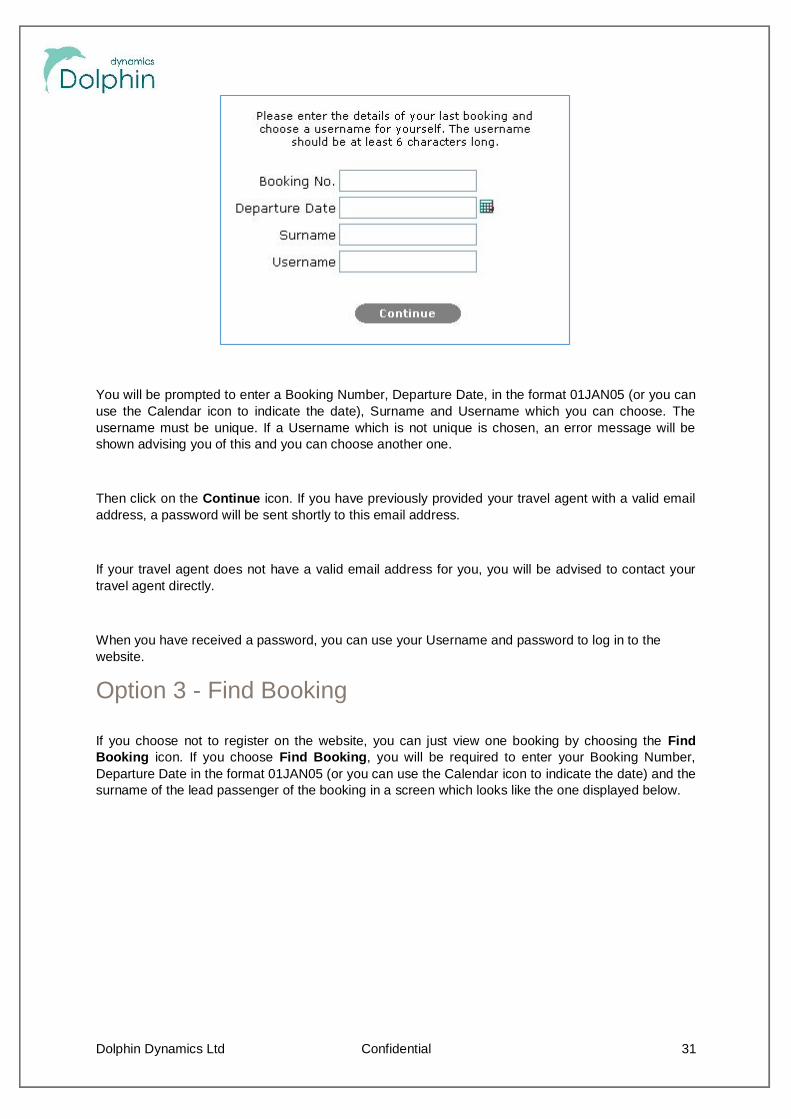
Option 2 RegisterIf you do not already have a username and password, you can register on the website by clicking onthe Register icon. The screen below will be displayed.
Dolphin Dynamics Ltd Confidential 31
You will be prompted to enter a Booking Number, Departure Date, in the format 01JAN05 (or you canuse the Calendar icon to indicate the date), Surname and Username which you can choose. Theusername must be unique. If a Username which is not unique is chosen, an error message will beshown advising you of this and you can choose another one.
Then click on the Continue icon. If you have previously provided your travel agent with a valid emailaddress, a password will be sent shortly to this email address.
If your travel agent does not have a valid email address for you, you will be advised to contact yourtravel agent directly.
When you have received a password, you can use your Username and password to log in to thewebsite.
Option 3 - Find Booking
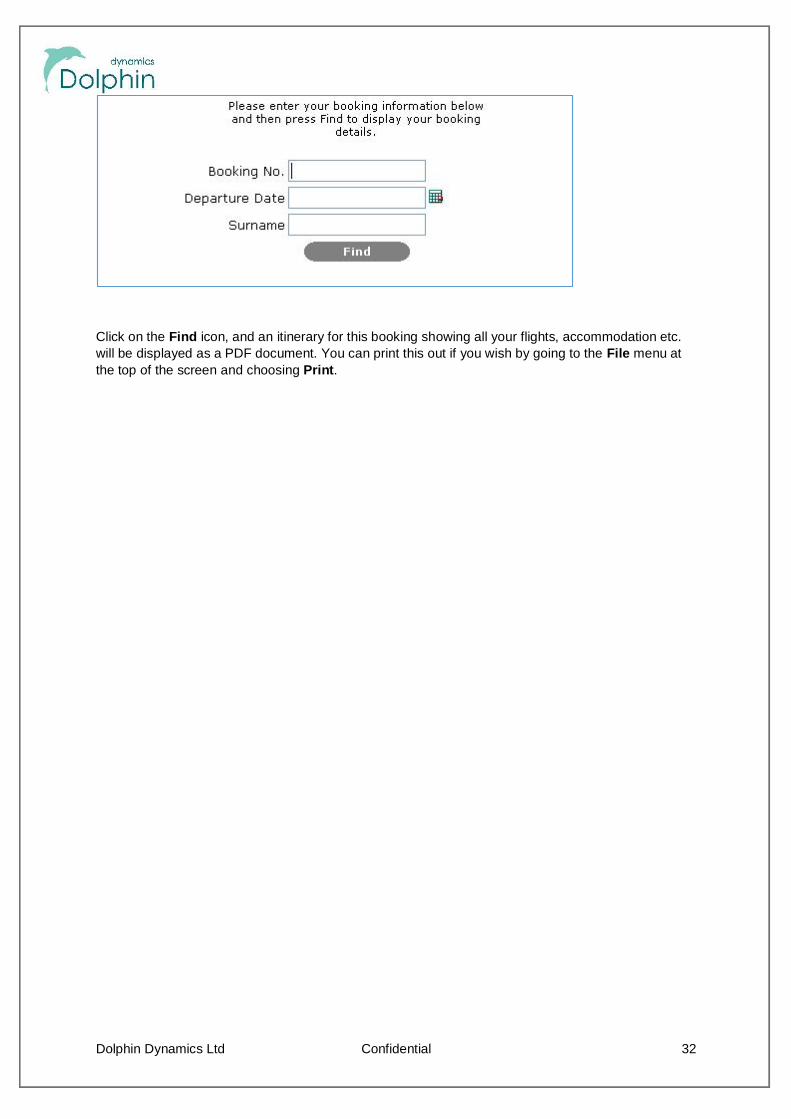
If you choose not to register on the website, you can just view one booking by choosing the FindBooking icon. If you choose Find Booking, you will be required to enter your Booking Number,Departure Date in the format 01JAN05 (or you can use the Calendar icon to indicate the date) and thesurname of the lead passenger of the booking in a screen which looks like the one displayed below.
Dolphin Dynamics Ltd Confidential 32
Click on the Find icon, and an itinerary for this booking showing all your flights, accommodation etc.will be displayed as a PDF document. You can print this out if you wish by going to the File menu atthe top of the screen and choosing Print.