web authentication for mobile users
TRANSCRIPT
5
Web Authentication for Mobile Users
Contents
Overview . . . . . . . . . . . . . . . . . . . . . . . . . . . . . . . . . . . . . . . . . . . . . . . . . . . . . . 5-2
The Web-Auth Process . . . . . . . . . . . . . . . . . . . . . . . . . . . . . . . . . . . . . . . 5-3
Authentication Through a RADIUS Server . . . . . . . . . . . . . . . . . . . . . . 5-5
Web Pages for the Login Process . . . . . . . . . . . . . . . . . . . . . . . . . . . . . . 5-6
Allow List . . . . . . . . . . . . . . . . . . . . . . . . . . . . . . . . . . . . . . . . . . . . . . . . . . 5-8
Creating a VLAN Interface for the Web-Auth VLAN . . . . . . . . . . . . . . . 5-9
Configuring Web-Auth . . . . . . . . . . . . . . . . . . . . . . . . . . . . . . . . . . . . . . . . . . 5-10
Configuring Basic Options and Accessing the Web-Auth Screen . . . 5-11
Configuring Internal Web-Auth Pages . . . . . . . . . . . . . . . . . . . . . . . . . 5-16
Configuring Web-Auth to an External Web Server . . . . . . . . . . . . . . . 5-24
Loading Custom Pages onto the Wireless Edge Services xl Module’s Internal Server (Advanced) . . . . . . . . . . . . . . . . . . . . . . . . 5-26
Configuring the Allow List . . . . . . . . . . . . . . . . . . . . . . . . . . . . . . . . . . . 5-28
Configuring Encryption for a Web-Auth WLAN . . . . . . . . . . . . . . . . . 5-29
Copying Logo Files to the Module’s Flash . . . . . . . . . . . . . . . . . . . . . . . . . 5-32
Configuring Custom Web-Auth Pages . . . . . . . . . . . . . . . . . . . . . . . . . . . . . 5-35
Configuring the CGI Commands for the Login Page . . . . . . . . . . . . . 5-35
Configuring the CGI Commands for the Welcome Page . . . . . . . . . . 5-37
5-1
Web Authentication for Mobile UsersOverview
Overview
With the ProCurve Wireless Edge Services xl Module, you can require mobile users to authenticate by entering their login credentials on a Web page. Like other authentication methods, Web authentication (Web-Auth) is verified through a Remote Access Dial In User Service (RADIUS) server.
You can use Web-Auth to provide limited network services for mobile users who visit your company’s office. For example, you might want to provide Internet access so that these users can browse the World Wide Web or establish a virtual private network (VPN) to their company’s network. Through the security provided over a VPN, users can access the applications (such as email) and the data that they need to do their jobs.
In addition to using Web-Auth to provide network services for visitors, you can use Web-Auth to provide authenticated access for employees who are using stations that do not support 802.1X. Because Web-Auth is easy to configure and provides an easy access method for users, you may also want to use this authentication method for employees who need limited network services.
N o t e With Web-Auth, mobile users roam seamlessly between RPs adopted by the same Wireless Edges Services xl Module. To have stations roam at Layer 2 between RPs adopted by different modules, you must place the modules in a redundancy group. (See Chapter 10: Redundancy Groups.) To have stations roam between modules at Layer 3, you must place the modules in a Layer 3 mobility domain. (See Chapter 9: Fast Layer 2 Roaming and Layer 3
Mobility.)
However, the redundancy group, like the module, is limited to adopting 48 RPs. Consider having a single module adopt all RPs. (You can install RPs in a different subnetwork than the Wireless Edge Services xl Module that adopts them. See “Network Requirements for Layer 3 Adoption” on page 2-61 of Chapter 2: Configuring the ProCurve Wireless Edge Services xl Module.)
5-2
Web Authentication for Mobile UsersOverview
The Web-Auth Process
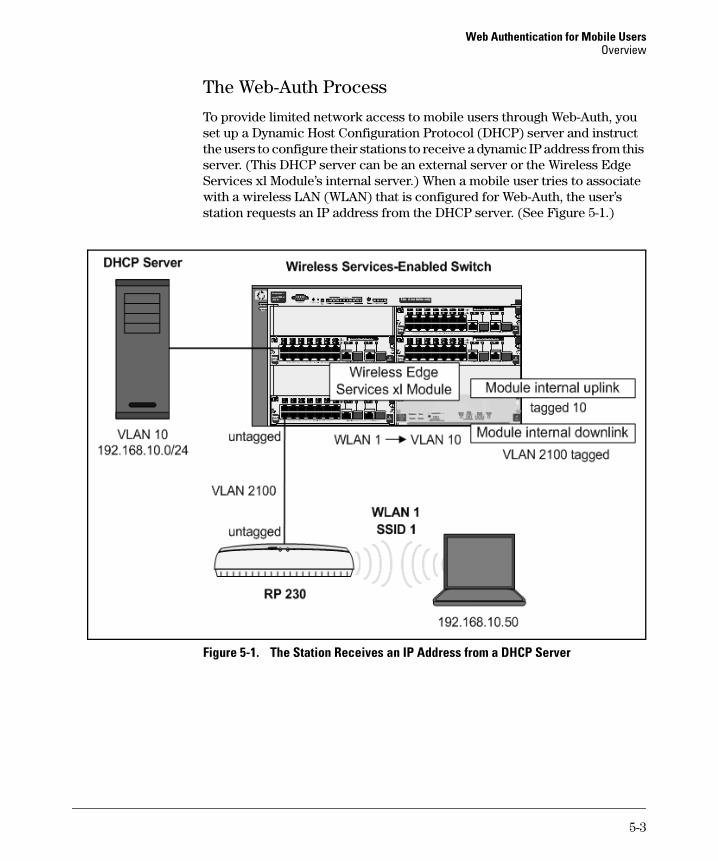
To provide limited network access to mobile users through Web-Auth, you set up a Dynamic Host Configuration Protocol (DHCP) server and instruct the users to configure their stations to receive a dynamic IP address from this server. (This DHCP server can be an external server or the Wireless Edge Services xl Module’s internal server.) When a mobile user tries to associate with a wireless LAN (WLAN) that is configured for Web-Auth, the user’s station requests an IP address from the DHCP server. (See Figure 5-1.)
Figure 5-1. The Station Receives an IP Address from a DHCP Server
5-3

Web Authentication for Mobile UsersOverview
After a station successfully receives an IP address and associates with the WLAN, the station enters the Web-Auth state. (See Figure 5-2.) In this state, the station can access only the network devices that you have added to the Web-Auth Allow list. This list includes the IP address of any device that you want unauthenticated users to be able to access. (When you add the IP address of a device to the Allow list, that device is publicly available: it can be accessed by any user. For more information, see “Allow List” on page 5-8.)
Associating with the WLAN is the first step. A mobile user must then open a Web browser and attempt to access a valid URL that can be reached through your company’s network. The Wireless Edge Services xl Module intercepts this request and redirects the user’s Web browser to the Web-Auth login page, which prompts the user to enter a username and password.
When the user enters a username and password, the Wireless Edge Services xl Module submits these login credentials to the RADIUS server. If the RADIUS server verifies the user’s login credentials, the login attempt is successful, and the module displays the Web-Auth welcome page. At this point, the user’s station enters the authentication state, and the mobile user can access the network resources to which he or she has rights. (You can control access to network resources through the RADIUS server or through ProCurve Identity Driven Management [IDM]. For information about ProCurve IDM, visit the ProCurve Networking Web site at http://www.procurve.com.)
In addition to reporting that the login was successful, the Web-Auth welcome page includes a Disconnect link. When the user no longer needs to access your company’s network services, he or she can click this link to end the session. (The Disconnect link is provided for the user’s convenience. The user does not need to keep the Web-Auth welcome page open or use this link to disconnect from your network services.)
If the user enters an invalid username and password, the RADIUS server denies access, and the Wireless Edge Services xl Module displays the Web-Auth failed page. In this case, the user’s station remains in the unauthen-ticated state, and the user can access only the devices that you have added to the Allow list.
5-4

Web Authentication for Mobile UsersOverview
Figure 5-2. The Web-Auth Process
Authentication Through a RADIUS Server
To allow mobile users to access the Internet and selected services on your company’s network, you configure Web-Auth as the authentication method for a WLAN and define a RADIUS server that verifies each user’s login credentials. You can specify both a primary RADIUS server and a secondary RADIUS server, ensuring high availability. If the primary RADIUS server is unavailable, the Wireless Edge Services xl Module contacts the secondary RADIUS server.
The Wireless Edge Services xl Module provides an internal RADIUS server, which you can use for Web-Auth. See Chapter 11: RADIUS Server for more information.
5-5
Web Authentication for Mobile UsersOverview
Web Pages for the Login Process
To enable authentication through the Web, the Wireless Edge Services xl Module provides three default Web pages that guide users through the login process:
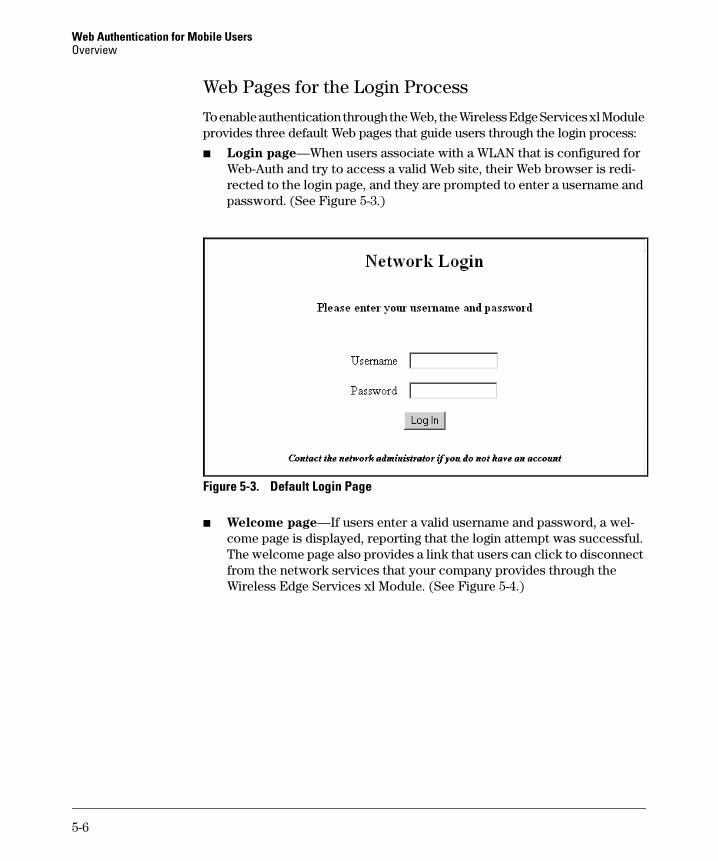
■ Login page—When users associate with a WLAN that is configured for Web-Auth and try to access a valid Web site, their Web browser is redi-rected to the login page, and they are prompted to enter a username and password. (See Figure 5-3.)
Figure 5-3. Default Login Page
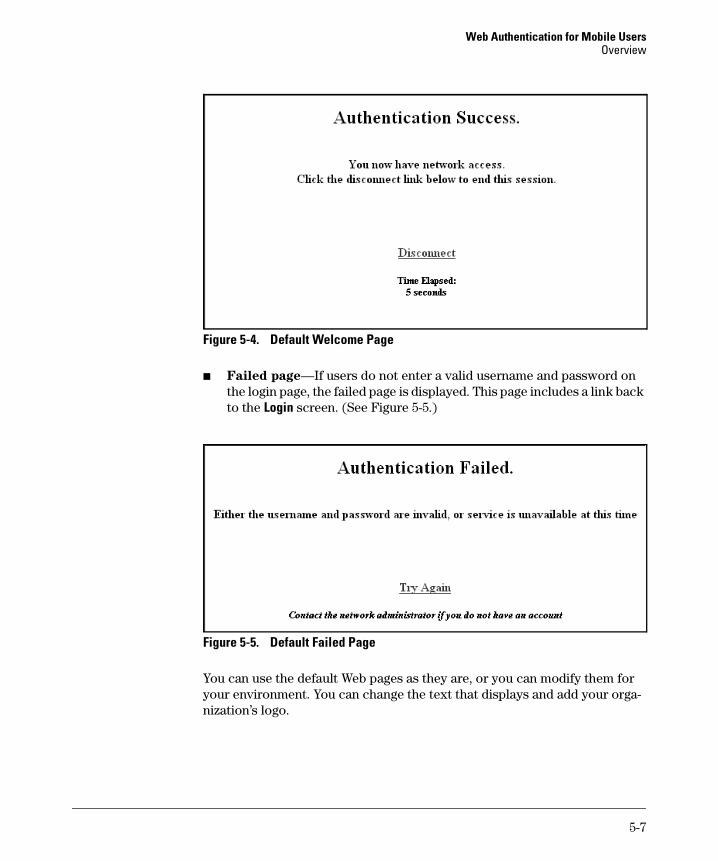
■ Welcome page—If users enter a valid username and password, a wel-come page is displayed, reporting that the login attempt was successful. The welcome page also provides a link that users can click to disconnect from the network services that your company provides through the Wireless Edge Services xl Module. (See Figure 5-4.)
5-6
Web Authentication for Mobile UsersOverview
Figure 5-4. Default Welcome Page
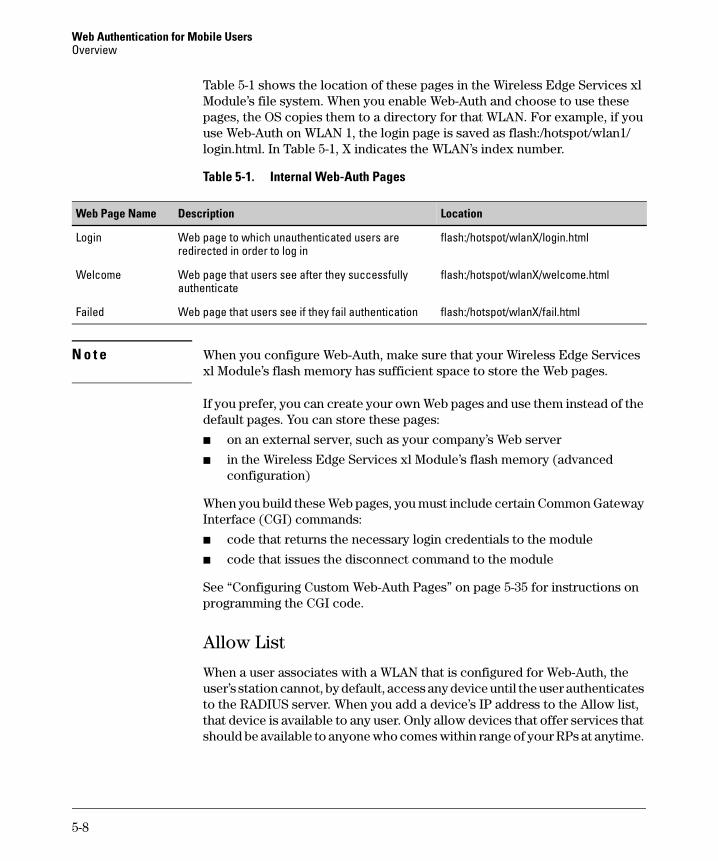
■ Failed page—If users do not enter a valid username and password on the login page, the failed page is displayed. This page includes a link back to the Login screen. (See Figure 5-5.)
Figure 5-5. Default Failed Page
You can use the default Web pages as they are, or you can modify them for your environment. You can change the text that displays and add your orga-nization’s logo.
5-7
Web Authentication for Mobile UsersOverview
Table 5-1 shows the location of these pages in the Wireless Edge Services xl Module’s file system. When you enable Web-Auth and choose to use these pages, the OS copies them to a directory for that WLAN. For example, if you use Web-Auth on WLAN 1, the login page is saved as flash:/hotspot/wlan1/login.html. In Table 5-1, X indicates the WLAN’s index number.
Table 5-1. Internal Web-Auth Pages
N o t e When you configure Web-Auth, make sure that your Wireless Edge Services xl Module’s flash memory has sufficient space to store the Web pages.
If you prefer, you can create your own Web pages and use them instead of the default pages. You can store these pages:
■ on an external server, such as your company’s Web server
■ in the Wireless Edge Services xl Module’s flash memory (advanced configuration)
When you build these Web pages, you must include certain Common Gateway Interface (CGI) commands:
■ code that returns the necessary login credentials to the module
■ code that issues the disconnect command to the module
See “Configuring Custom Web-Auth Pages” on page 5-35 for instructions on programming the CGI code.
Allow List
When a user associates with a WLAN that is configured for Web-Auth, the user’s station cannot, by default, access any device until the user authenticates to the RADIUS server. When you add a device’s IP address to the Allow list, that device is available to any user. Only allow devices that offer services that should be available to anyone who comes within range of your RPs at anytime.
Web Page Name Description Location
Login Web page to which unauthenticated users are redirected in order to log in
flash:/hotspot/wlanX/login.html
Welcome Web page that users see after they successfully authenticate
flash:/hotspot/wlanX/welcome.html
Failed Web page that users see if they fail authentication flash:/hotspot/wlanX/fail.html
5-8
Web Authentication for Mobile UsersOverview
The Wireless Edge Services xl Module automatically permits certain station traffic, even when the destination is not on the Allow list:
■ DHCP requests—The station must receive an IP address before it can access the Web login page and authenticate.
■ Domain Name System (DNS) requests—The station must attempt to reach a valid IP address in order for the Wireless Edge Services xl Module to redirect the browser to the login page. The DNS requests allows the station’s Web browser to resolve a Web site URL to a valid IP address.
So you do not need to add the IP addresses of your DHCP and DNS servers to the allow list.
The only necessary IP address on the Allow list is that of the Web server—when you store the Web-Auth login, welcome, and failed pages on an external Web server. On the other hand, if these pages are stored on the Wireless Edge Services xl Module, you do not have to add the module’s IP address to the Allow list. In fact, to protect management access to the module, you should not.
You can add a maximum of 10 IP addresses to the Allow list.
Creating a VLAN Interface for the Web-Auth VLAN
The Wireless Edge Services xl Module requires an IP address on the static VLAN to which the Web-Auth WLAN maps. See “IP Settings” on page 6-3 of Chapter 6: IP Services—IP Settings, DHCP, and DNS for information on creating the VLAN interface and assigning it an IP address.
You can apply access control lists (ACLs) to the VLAN interface in order to continue to control traffic from the wireless stations, even after they authen-ticate. You can also apply dynamic Network Address Translation (NAT) to traffic from wireless users, protecting the IP addresses used in your private network. (See Chapter 7: Access Control Lists (ACLs) and Chapter 8: Con-
figuring Network Address Translation (NAT).)
You can also, if you so desire, have the module place users in dynamic VLANs after they authenticate. With Web-Auth, however, stations initially receive IP addresses in the static VLAN. To allow stations to receive IP addresses in the dynamic VLAN after users authenticate, set the lease time in the DHCP configuration for the static VLAN very low.
5-9
Web Authentication for Mobile UsersConfiguring Web-Auth
N o t e The Wireless Edge Services xl Module automatically allows unauthenticated stations access to the IP address on the static VLAN for the Web-Auth WLAN. (Such access is necessary for the stations to complete Web-Auth.) Even though management access to the module is protected by a password, you might want to protect such access further. Make sure to assign the Web-Auth WLAN to a different VLAN than the module’s management VLAN. Then activate secure management. See “Viewing VLAN Interfaces and Enabling Secure Management” on page 6-3 of Chapter 6: IP Services—IP Settings,
DHCP, and DNS.
Configuring Web-Auth
To configure a WLAN, you must set the service set identifier (SSID) and the VLAN in which traffic will be forwarded. Typically, you will want the SSID for the Web-Auth WLAN to be broadcast (beaconed), so you must configure WLAN 1, 2, 3, or 4 to use Web-Auth. For more information about SSIDs and WLANs, including which SSIDs are broadcast by the Wireless Edge Services xl Module, see “Configuration Options: Normal Versus Advanced Mode” on page 4-4 of Chapter 4: Wireless Local Area Networks (WLANs).
N o t e By default, the Wireless Edge Services xl Module places all wireless traffic in VLAN 1. If your network has only one subnetwork, this configuration may be adequate. Often, however, you will want to use a separate VLAN for the Web-Auth WLAN. If so, you must assign this VLAN an IP address. See Chapter 6: IP Services—IP Settings, DHCP, and DNS.
You must also set the security options, which specify the authentication method and the encryption standard for the WLAN. In this case, you will select Web-Auth as the authentication method. See “Configuring Encryption for a Web-Auth WLAN” on page 5-29 to learn about encryption options.
In addition to configuring these settings, you can configure advanced settings for individual WLANs, which include inter-station blocking, closed system operations, and inactivity timeouts. You can also configure settings for all WLANs. For more information about configuring these additional settings, see Chapter 4: Wireless Local Area Networks (WLANs).
5-10
Web Authentication for Mobile UsersConfiguring Web-Auth
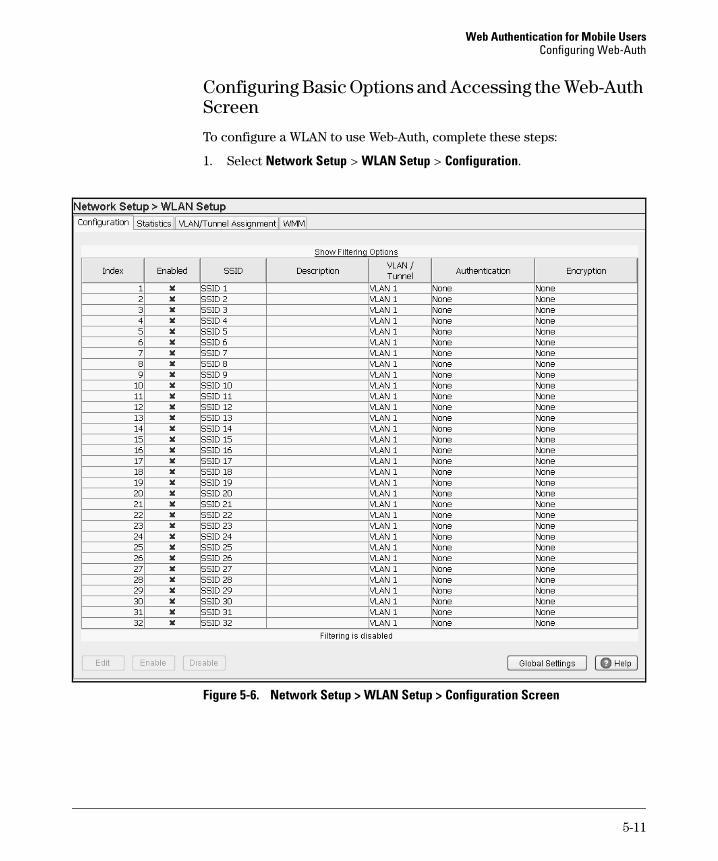
Configuring Basic Options and Accessing the Web-Auth Screen
To configure a WLAN to use Web-Auth, complete these steps:
1. Select Network Setup > WLAN Setup > Configuration.
Figure 5-6. Network Setup > WLAN Setup > Configuration Screen
5-11
Web Authentication for Mobile UsersConfiguring Web-Auth
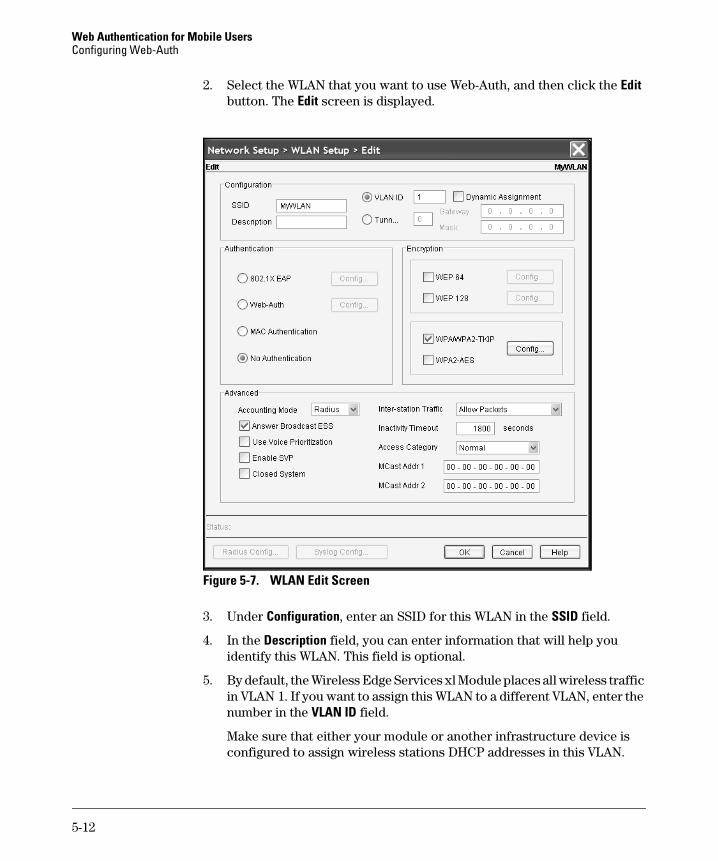
2. Select the WLAN that you want to use Web-Auth, and then click the Edit button. The Edit screen is displayed.
Figure 5-7. WLAN Edit Screen
3. Under Configuration, enter an SSID for this WLAN in the SSID field.
4. In the Description field, you can enter information that will help you identify this WLAN. This field is optional.
5. By default, the Wireless Edge Services xl Module places all wireless traffic in VLAN 1. If you want to assign this WLAN to a different VLAN, enter the number in the VLAN ID field.
Make sure that either your module or another infrastructure device is configured to assign wireless stations DHCP addresses in this VLAN.
5-12

Web Authentication for Mobile UsersConfiguring Web-Auth
N o t e For more information about configuring SSIDs, VLANs, and advanced config-uration options, such as interstation blocking and voice prioritization, see Chapter 4: Wireless Local Area Networks (WLANs).
6. Under Authentication, select Web-Auth.
7. Click the Radius Config button at the bottom of the screen. The Radius Configuration screen is displayed.
Figure 5-8. Radius Configuration Screen
5-13
Web Authentication for Mobile UsersConfiguring Web-Auth
8. In the fields in the Server area, define the primary RADIUS server under the Primary heading.
a. In the RADIUS Server Address field, enter the IP address of the RADIUS server that authenticates users.
Enter 127.0.0.1 if you are using the Wireless Edge Services xl Module’s internal RADIUS server.
b. In the RADIUS Port field, leave the port number at the default value (1812) unless your RADIUS server uses a different port.
c. In the RADIUS Shared Secret field, enter the shared secret that the RADIUS server uses to identify the Wireless Edge Services xl Module as a valid RADIUS client (or network access server [NAS]).
You do not need to set the secret if you are using the module’s internal RADIUS server. (If you have previously set the secret, clear the field.)
9. If you have a backup RADIUS server, repeat step 8 in the fields under the Secondary heading.
10. In the Server Timeout field, enter a timeout value in seconds.
This setting determines how long the module waits for a reply from the RADIUS server. The default setting is 5 seconds.
11. In the Server Retries field, enter the number of times that the Wireless Edge Services xl Module should re-attempt to contact the RADIUS server.
The default setting is 3, which means that the module attempts to contact the server up to four times.
12. In the Advanced section, choose the authentication protocol that the Wireless Edge Services xl Module uses to forward the username and password to the RADIUS server.
You can choose PAP or CHAP. Match the setting allowed in the RADIUS server’s policy. The module’s internal RADIUS server supports both pro-tocols. However, if you choose PAP, users’ passwords display in plaintext in logs. Generally, you should choose CHAP for higher security.
13. Click the OK button to apply the settings and close the screen.
14. On the WLAN Edit screen, under Authentication, click the Config button next to Web-Auth. The Web-Auth screen is displayed.
5-14
Web Authentication for Mobile UsersConfiguring Web-Auth
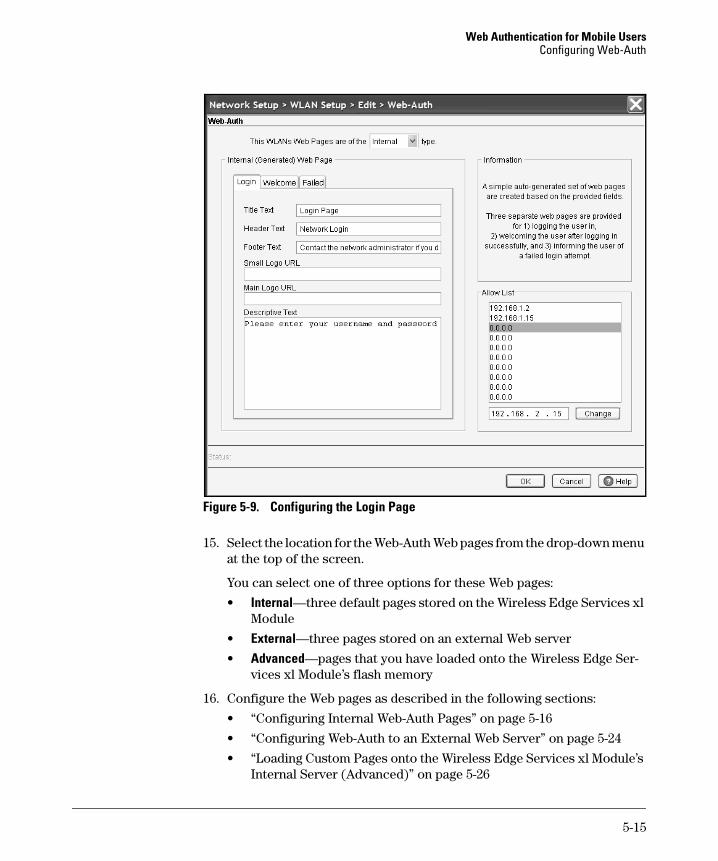
Figure 5-9. Configuring the Login Page
15. Select the location for the Web-Auth Web pages from the drop-down menu at the top of the screen.
You can select one of three options for these Web pages:
• Internal—three default pages stored on the Wireless Edge Services xl Module
• External—three pages stored on an external Web server
• Advanced—pages that you have loaded onto the Wireless Edge Ser-vices xl Module’s flash memory
16. Configure the Web pages as described in the following sections:
• “Configuring Internal Web-Auth Pages” on page 5-16
• “Configuring Web-Auth to an External Web Server” on page 5-24
• “Loading Custom Pages onto the Wireless Edge Services xl Module’s Internal Server (Advanced)” on page 5-26
5-15
Web Authentication for Mobile UsersConfiguring Web-Auth
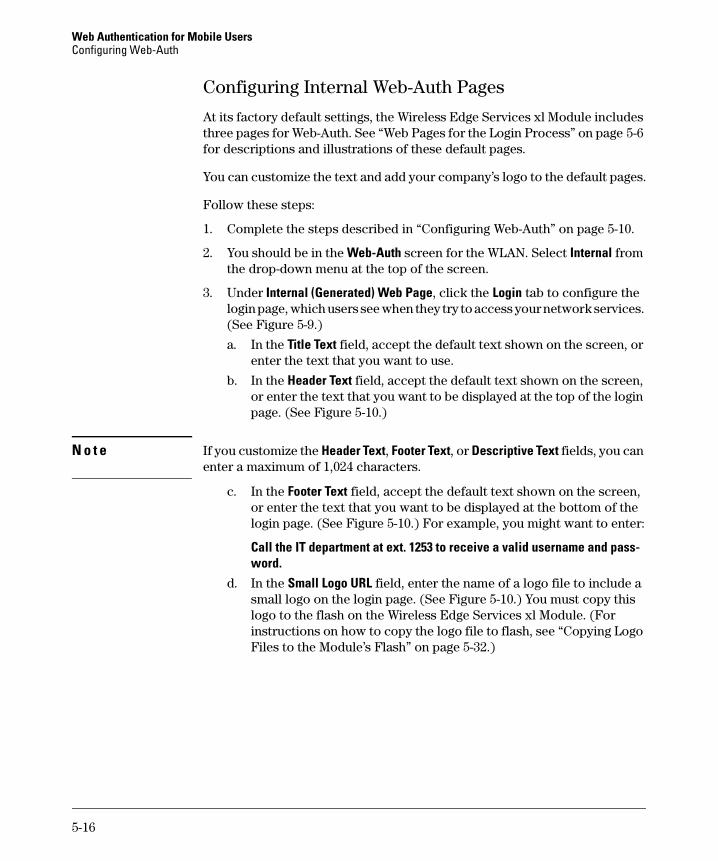
Configuring Internal Web-Auth Pages
At its factory default settings, the Wireless Edge Services xl Module includes three pages for Web-Auth. See “Web Pages for the Login Process” on page 5-6 for descriptions and illustrations of these default pages.
You can customize the text and add your company’s logo to the default pages.
Follow these steps:
1. Complete the steps described in “Configuring Web-Auth” on page 5-10.
2. You should be in the Web-Auth screen for the WLAN. Select Internal from the drop-down menu at the top of the screen.
3. Under Internal (Generated) Web Page, click the Login tab to configure the login page, which users see when they try to access your network services. (See Figure 5-9.)
a. In the Title Text field, accept the default text shown on the screen, or enter the text that you want to use.
b. In the Header Text field, accept the default text shown on the screen, or enter the text that you want to be displayed at the top of the login page. (See Figure 5-10.)
N o t e If you customize the Header Text, Footer Text, or Descriptive Text fields, you can enter a maximum of 1,024 characters.
c. In the Footer Text field, accept the default text shown on the screen, or enter the text that you want to be displayed at the bottom of the login page. (See Figure 5-10.) For example, you might want to enter:
Call the IT department at ext. 1253 to receive a valid username and pass-word.
d. In the Small Logo URL field, enter the name of a logo file to include a small logo on the login page. (See Figure 5-10.) You must copy this logo to the flash on the Wireless Edge Services xl Module. (For instructions on how to copy the logo file to flash, see “Copying Logo Files to the Module’s Flash” on page 5-32.)
5-16
Web Authentication for Mobile UsersConfiguring Web-Auth
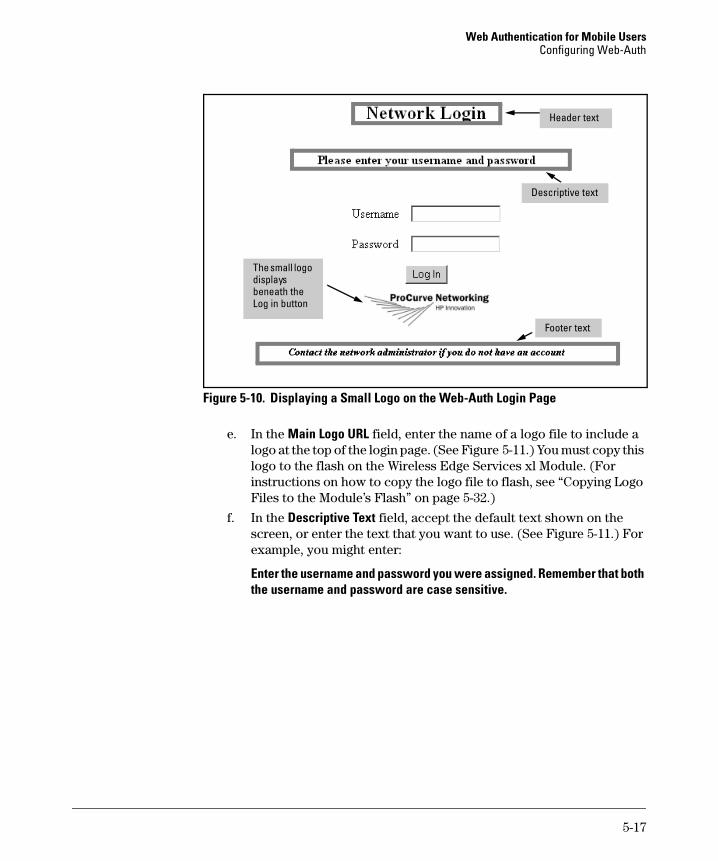
Figure 5-10. Displaying a Small Logo on the Web-Auth Login Page
e. In the Main Logo URL field, enter the name of a logo file to include a logo at the top of the login page. (See Figure 5-11.) You must copy this logo to the flash on the Wireless Edge Services xl Module. (For instructions on how to copy the logo file to flash, see “Copying Logo Files to the Module’s Flash” on page 5-32.)
f. In the Descriptive Text field, accept the default text shown on the screen, or enter the text that you want to use. (See Figure 5-11.) For example, you might enter:
Enter the username and password you were assigned. Remember that both the username and password are case sensitive.
Header text
Descriptive text
Footer text
The small logo displays beneath the Log in button
5-17
Web Authentication for Mobile UsersConfiguring Web-Auth
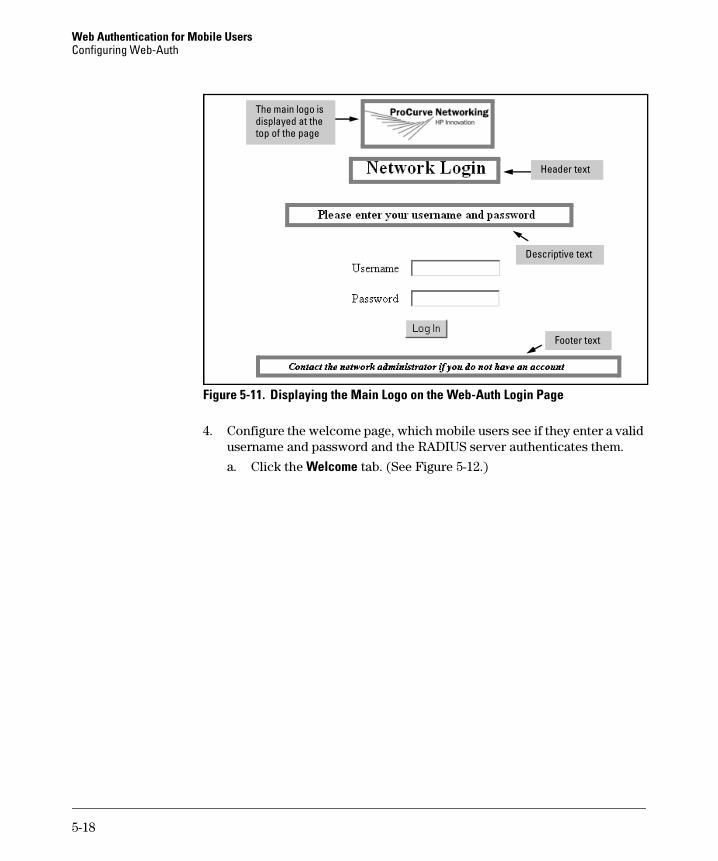
Figure 5-11. Displaying the Main Logo on the Web-Auth Login Page
4. Configure the welcome page, which mobile users see if they enter a valid username and password and the RADIUS server authenticates them.
a. Click the Welcome tab. (See Figure 5-12.)
Descriptive text
The main logo is displayed at the top of the page
Footer text
Header text
5-18
Web Authentication for Mobile UsersConfiguring Web-Auth
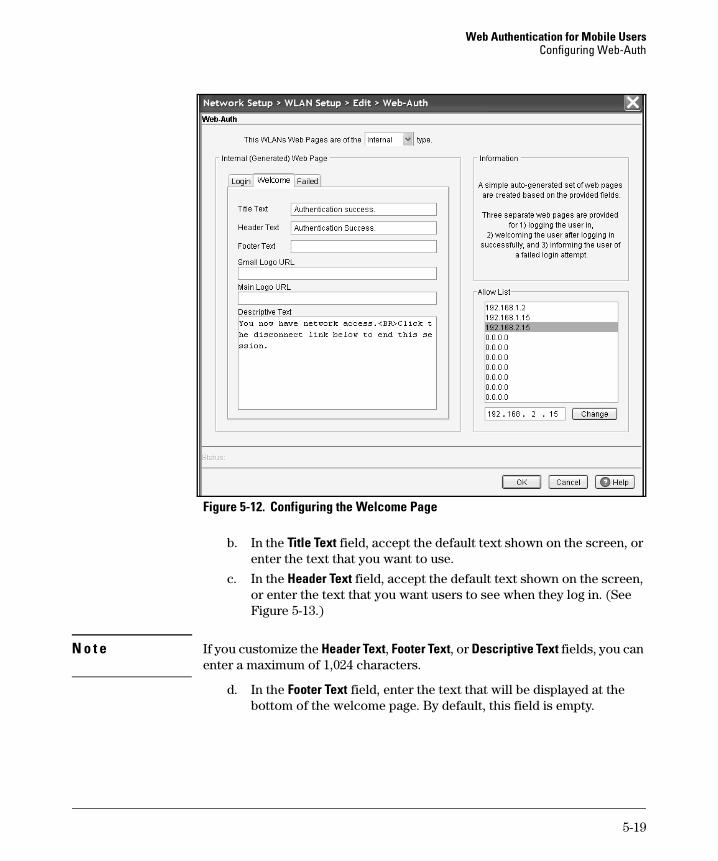
Figure 5-12. Configuring the Welcome Page
b. In the Title Text field, accept the default text shown on the screen, or enter the text that you want to use.
c. In the Header Text field, accept the default text shown on the screen, or enter the text that you want users to see when they log in. (See Figure 5-13.)
N o t e If you customize the Header Text, Footer Text, or Descriptive Text fields, you can enter a maximum of 1,024 characters.
d. In the Footer Text field, enter the text that will be displayed at the bottom of the welcome page. By default, this field is empty.
5-19
Web Authentication for Mobile UsersConfiguring Web-Auth
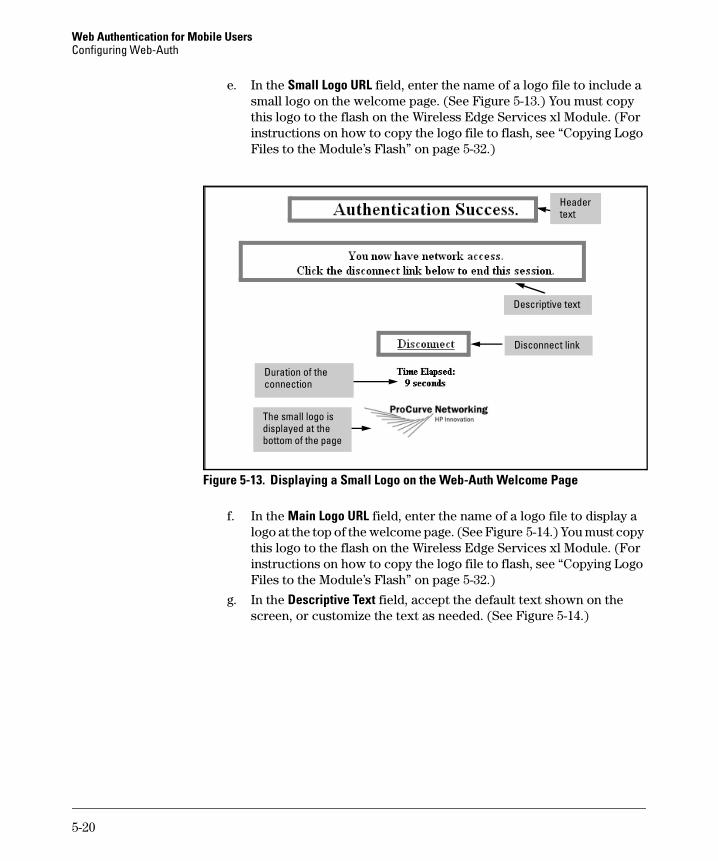
e. In the Small Logo URL field, enter the name of a logo file to include a small logo on the welcome page. (See Figure 5-13.) You must copy this logo to the flash on the Wireless Edge Services xl Module. (For instructions on how to copy the logo file to flash, see “Copying Logo Files to the Module’s Flash” on page 5-32.)
Figure 5-13. Displaying a Small Logo on the Web-Auth Welcome Page
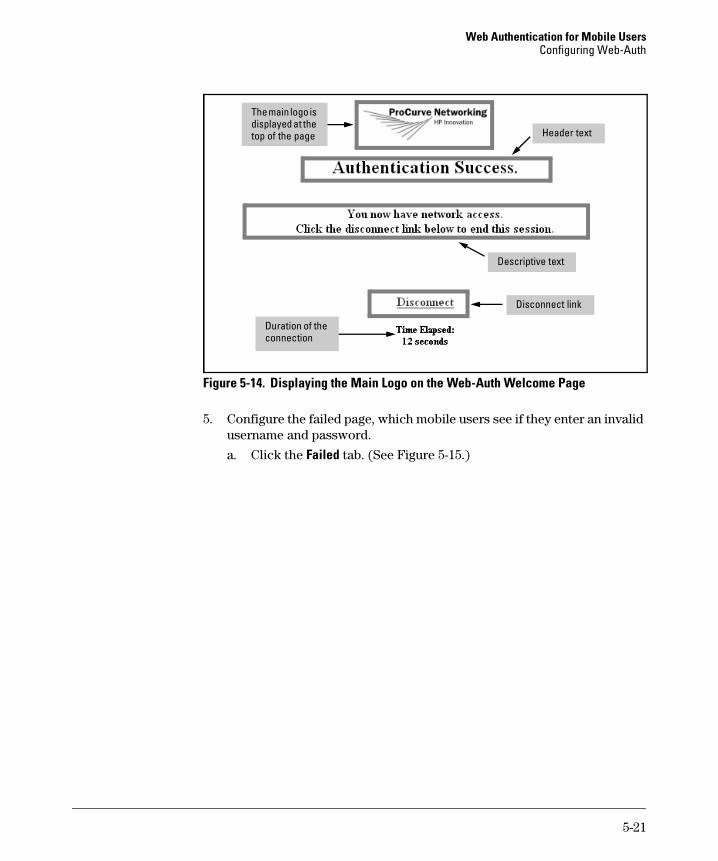
f. In the Main Logo URL field, enter the name of a logo file to display a logo at the top of the welcome page. (See Figure 5-14.) You must copy this logo to the flash on the Wireless Edge Services xl Module. (For instructions on how to copy the logo file to flash, see “Copying Logo Files to the Module’s Flash” on page 5-32.)
g. In the Descriptive Text field, accept the default text shown on the screen, or customize the text as needed. (See Figure 5-14.)
Descriptive text
The small logo is displayed at the bottom of the page
Header text
Disconnect link
Duration of the connection
5-20
Web Authentication for Mobile UsersConfiguring Web-Auth
Figure 5-14. Displaying the Main Logo on the Web-Auth Welcome Page
5. Configure the failed page, which mobile users see if they enter an invalid username and password.
a. Click the Failed tab. (See Figure 5-15.)
Descriptive text
The main logo is displayed at the top of the page Header text
Disconnect link
Duration of the connection
5-21

Web Authentication for Mobile UsersConfiguring Web-Auth
Figure 5-15. Configuring the Failed Page
b. In the Title Text field, accept the default text shown on the screen, or change the text as needed.
c. In the Header Text field, accept the default text shown on the screen, or enter the text that you want users to see if they fail to log in. (See Figure 5-16.)
N o t e If you customize the Header Text, Footer Text, or Descriptive Text fields, you can enter a maximum of 1,024 characters.
d. In the Footer Text field, accept the default text shown on the screen, or enter the text that you want to be displayed at the bottom of the failed page. (See Figure 5-16.) For example, you may want to add the extension that users should call if they cannot log in.
5-22
Web Authentication for Mobile UsersConfiguring Web-Auth
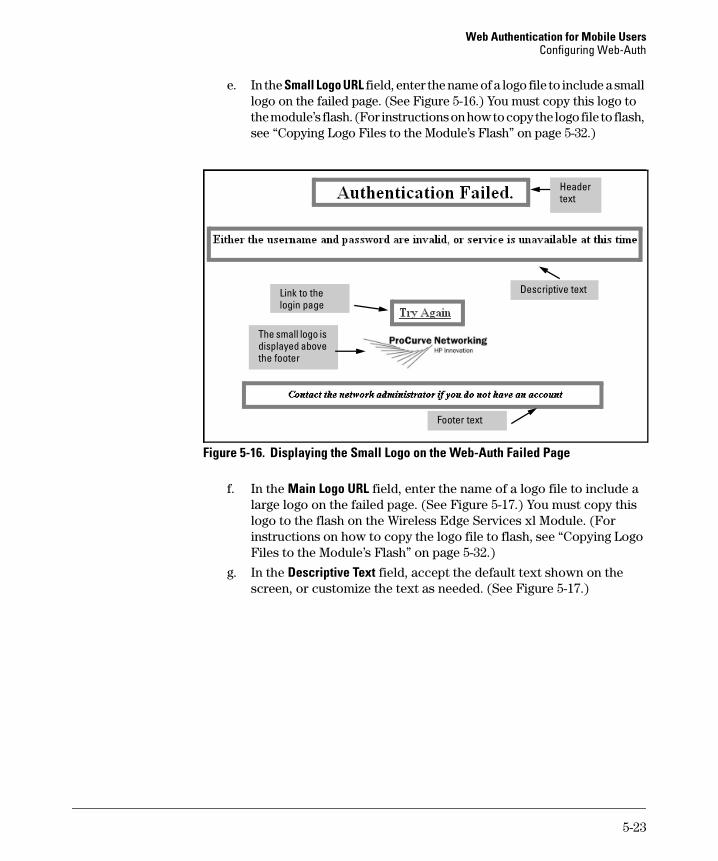
e. In the Small Logo URL field, enter the name of a logo file to include a small logo on the failed page. (See Figure 5-16.) You must copy this logo to the module’s flash. (For instructions on how to copy the logo file to flash, see “Copying Logo Files to the Module’s Flash” on page 5-32.)
Figure 5-16. Displaying the Small Logo on the Web-Auth Failed Page
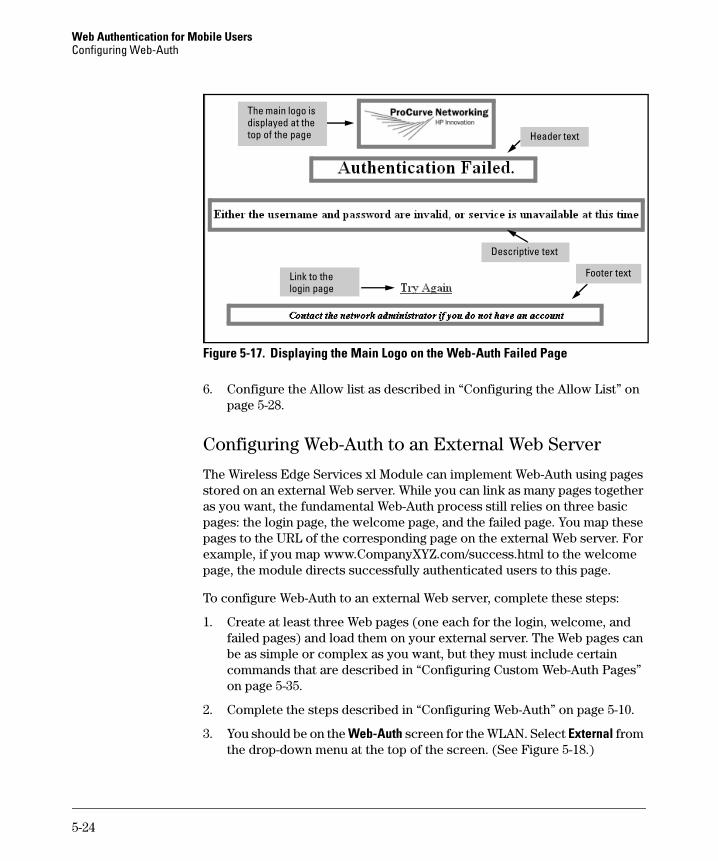
f. In the Main Logo URL field, enter the name of a logo file to include a large logo on the failed page. (See Figure 5-17.) You must copy this logo to the flash on the Wireless Edge Services xl Module. (For instructions on how to copy the logo file to flash, see “Copying Logo Files to the Module’s Flash” on page 5-32.)
g. In the Descriptive Text field, accept the default text shown on the screen, or customize the text as needed. (See Figure 5-17.)
Header text
Descriptive text
The small logo is displayed above the footer
Footer text
Link to the login page
5-23
Web Authentication for Mobile UsersConfiguring Web-Auth
Figure 5-17. Displaying the Main Logo on the Web-Auth Failed Page
6. Configure the Allow list as described in “Configuring the Allow List” on page 5-28.
Configuring Web-Auth to an External Web Server
The Wireless Edge Services xl Module can implement Web-Auth using pages stored on an external Web server. While you can link as many pages together as you want, the fundamental Web-Auth process still relies on three basic pages: the login page, the welcome page, and the failed page. You map these pages to the URL of the corresponding page on the external Web server. For example, if you map www.CompanyXYZ.com/success.html to the welcome page, the module directs successfully authenticated users to this page.
To configure Web-Auth to an external Web server, complete these steps:
1. Create at least three Web pages (one each for the login, welcome, and failed pages) and load them on your external server. The Web pages can be as simple or complex as you want, but they must include certain commands that are described in “Configuring Custom Web-Auth Pages” on page 5-35.
2. Complete the steps described in “Configuring Web-Auth” on page 5-10.
3. You should be on the Web-Auth screen for the WLAN. Select External from the drop-down menu at the top of the screen. (See Figure 5-18.)
Header text
Descriptive text
Footer textLink to the login page
The main logo is displayed at the top of the page
5-24
Web Authentication for Mobile UsersConfiguring Web-Auth
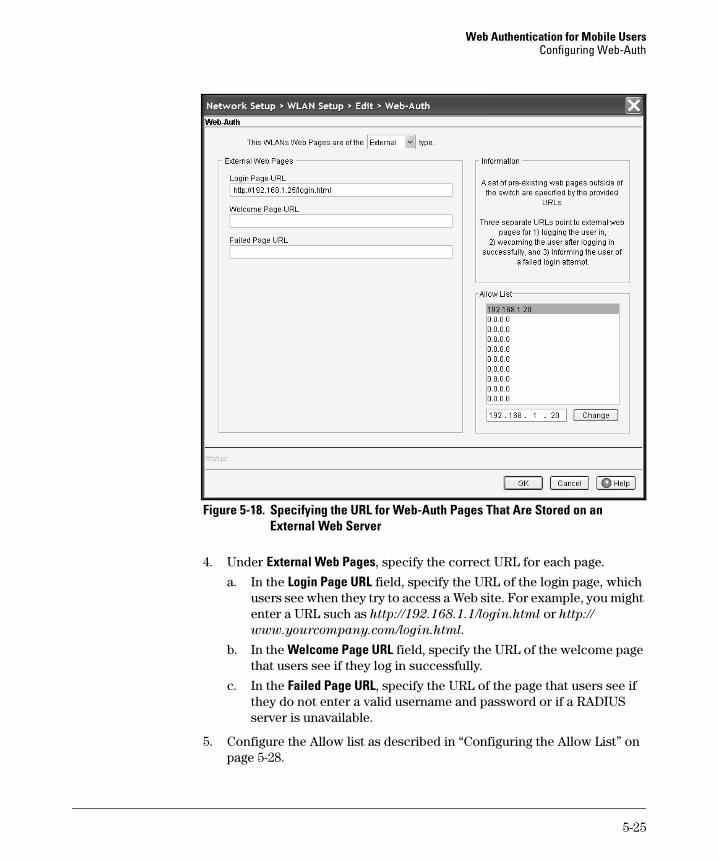
Figure 5-18. Specifying the URL for Web-Auth Pages That Are Stored on an External Web Server
4. Under External Web Pages, specify the correct URL for each page.
a. In the Login Page URL field, specify the URL of the login page, which users see when they try to access a Web site. For example, you might enter a URL such as http://192.168.1.1/login.html or http://
www.yourcompany.com/login.html.
b. In the Welcome Page URL field, specify the URL of the welcome page that users see if they log in successfully.
c. In the Failed Page URL, specify the URL of the page that users see if they do not enter a valid username and password or if a RADIUS server is unavailable.
5. Configure the Allow list as described in “Configuring the Allow List” on page 5-28.
5-25
Web Authentication for Mobile UsersConfiguring Web-Auth
Loading Custom Pages onto the Wireless Edge Services xl Module’s Internal Server (Advanced)
As discussed earlier, the Wireless Edge Services xl Module can act as the Web server for Web-Auth. As an alternative to using the module’s default (pre-configured) Web-Auth pages, you can load your own pages onto the module. This advanced option gives you greater freedom in designing your Web pages than simply customizing the text on the default pages.
For advanced Web-Auth configuration, you install an entire directory (.tar) on the module. The directory holds the Web-Auth pages and can include subdi-rectories as well. The Web pages can be as simple or complex as you like, but must include at least these three pages:
■ login.html
■ welcome.html
■ fail.html
These pages must contain certain commands which are described in “Config-uring Custom Web-Auth Pages” on page 5-35.
When you install the directory, the Wireless Edge Services xl Module copies the pages in that directory to this location: flash:/hotspot/wlanX. X is replaced by the index number of the WLAN that you are configuring.
1. Create custom Web-Auth pages and group them in a tar file.
2. Load the directory that you have created onto a File Transfer Protocol (FTP) or Trivial FTP (TFTP) server.
3. Complete the steps described in “Configuring Basic Options and Access-ing the Web-Auth Screen” on page 5-11.
4. You should be on the Web-Auth screen for the WLAN. Select Advanced from the drop-down menu at the top of the screen. (See Figure 5-19.)
5-26
Web Authentication for Mobile UsersConfiguring Web-Auth
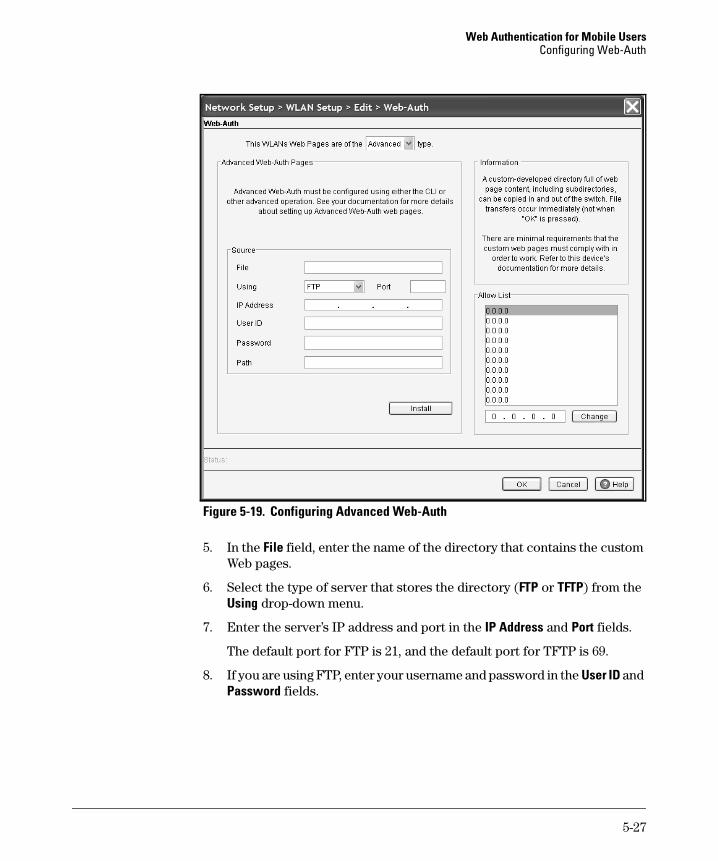
Figure 5-19. Configuring Advanced Web-Auth
5. In the File field, enter the name of the directory that contains the custom Web pages.
6. Select the type of server that stores the directory (FTP or TFTP) from the Using drop-down menu.
7. Enter the server’s IP address and port in the IP Address and Port fields.
The default port for FTP is 21, and the default port for TFTP is 69.
8. If you are using FTP, enter your username and password in the User ID and Password fields.
5-27
Web Authentication for Mobile UsersConfiguring Web-Auth
9. In the Path field, specify the name of the server directory in which the file that you are loading is stored.
If the file is stored in the server’s base directory, leave the field empty. For some FTP servers, you might need to enter /.
To specify a directory within the base directory, include (/)—for example, /MyDirectory.
10. Click the Install button.
The file immediately copies to the module’s flash.
11. Configure the Allow list as described below.
Configuring the Allow List
The Allow list determines the devices that stations can access before they are authenticated by the RADIUS server. The Allow list can contain up to 10 IP addresses. (For more information about which devices should be included on the Allow list, see “Allow List” on page 5-8.)
Follow these steps to configure the Allow list:
1. Complete the steps in “Configuring Basic Options and Accessing the Web-Auth Screen” on page 5-11.
2. You should be on the Web-Auth screen for the WLAN. In the Allow List section on the right side of the screen, add up to 10 IP addresses.
a. If you have specified External for the Web-Auth page type, enter the IP address of the external Web server:i. Under the Allow List heading, select one of the 0.0.0.0 addresses.ii. In the Change field, enter the address for the Web server.iii. Click the Change button.
b. Follow the same process to enable access to any other devices providing services to unauthenticated users.
You do not need to allow the IP addresses of your DHCP and DNS servers. Access to these services is automatically permitted.
N o t e When you add a device’s IP address to the Allow list, that device is publicly available; no network authentication is required to access the device. Any user can access the device—unless that device (like the Wireless Edge Services xl Module) has its own authentication requirements.
3. Verify that you have configured the Web pages as described in earlier sections of this chapter.
5-28
Web Authentication for Mobile UsersConfiguring Web-Auth
4. Click the OK button to apply your settings and close the Web-Auth screen.
5. If you want, configure encryption for the WLAN. See “Configuring Encryp-tion for a Web-Auth WLAN” on page 5-29.
6. Otherwise, click the OK button on the Edit screen and the Save link at the top of the screen.
Configuring Encryption for a Web-Auth WLAN
By itself, Web-Auth ensures that only the proper wireless users can access your private network. However, it does not protect data transmitted over the wireless network. For data privacy, you must enable encryption on the WLAN.
You can configure one of the following encryption options:
■ Wired Equivalent Privacy (WEP) with 64-bit keys
■ WEP with 128-bit keys
■ Wi-Fi Protected Access (WPA)/WPA2-Temporal Key Integrity Protocol (TKIP)
■ WPA2-Advanced Encryption Standard (AES)
■ both WPA/WPA2-TKIP and WPA2-AES
If you select a WEP option, the WLAN enforces static WEP. If you select a WPA option, the WLAN enforces WPA with preshared keys (WPA-PSK). This secu-rity takes effect before users connect to the wireless network and complete Web-Auth.
Follow these steps:
1. Access the Web-Auth WLAN’s Edit screen:
a. Select Network Setup > WLAN Setup > Configuration.
b. Select the WLAN that uses Web-Auth and click the Edit button.
5-29
Web Authentication for Mobile UsersConfiguring Web-Auth
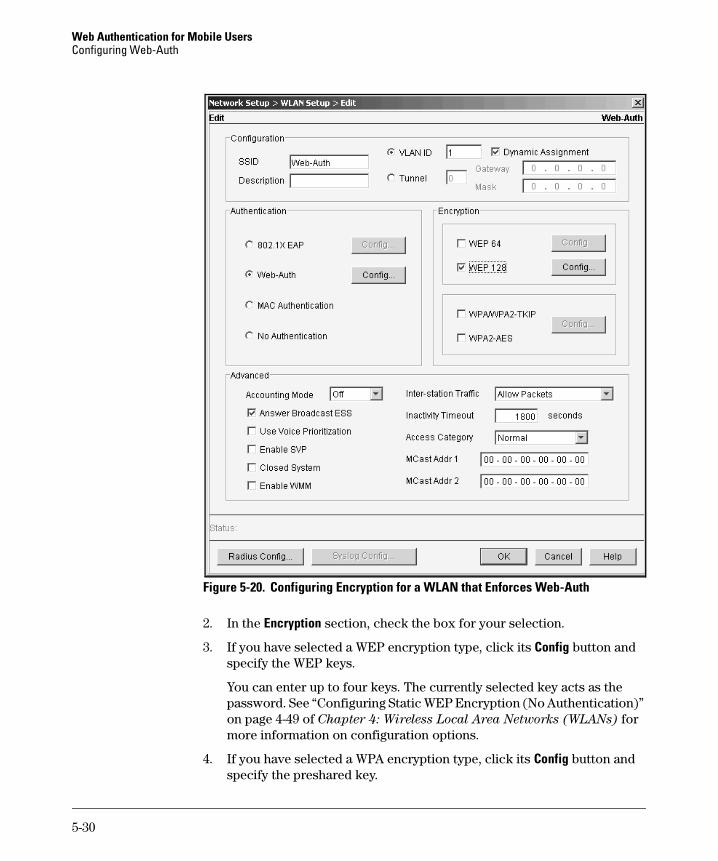
Figure 5-20. Configuring Encryption for a WLAN that Enforces Web-Auth
2. In the Encryption section, check the box for your selection.
3. If you have selected a WEP encryption type, click its Config button and specify the WEP keys.
You can enter up to four keys. The currently selected key acts as the password. See “Configuring Static WEP Encryption (No Authentication)” on page 4-49 of Chapter 4: Wireless Local Area Networks (WLANs) for more information on configuration options.
4. If you have selected a WPA encryption type, click its Config button and specify the preshared key.
5-30
Web Authentication for Mobile UsersConfiguring Web-Auth
See “Wireless Local Area Networks (WLANs)” on page 4-1 of Chapter 4:
Wireless Local Area Networks (WLANs) for more information on config-uring the preshared key.
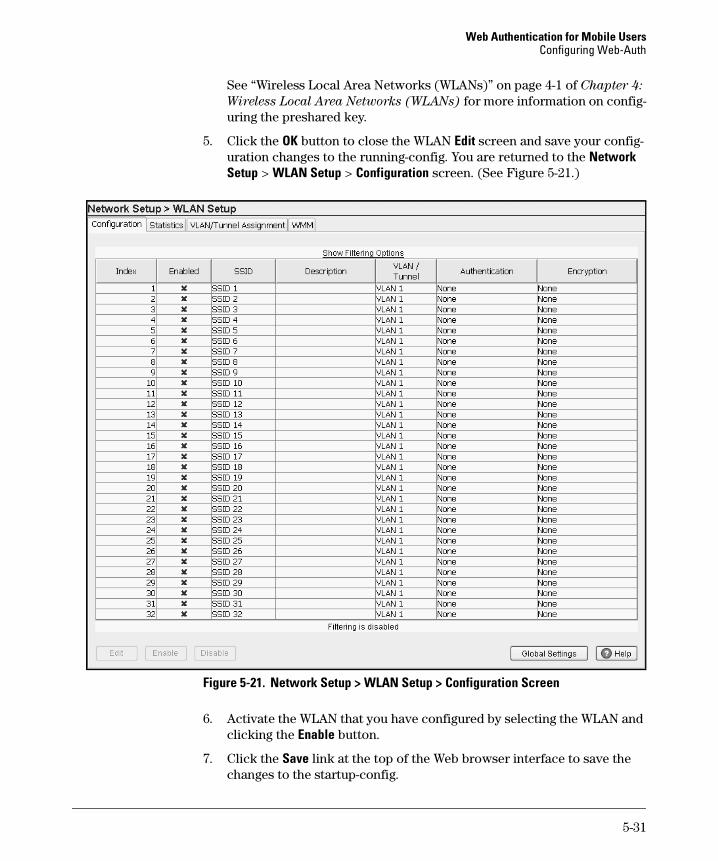
5. Click the OK button to close the WLAN Edit screen and save your config-uration changes to the running-config. You are returned to the Network Setup > WLAN Setup > Configuration screen. (See Figure 5-21.)
Figure 5-21. Network Setup > WLAN Setup > Configuration Screen
6. Activate the WLAN that you have configured by selecting the WLAN and clicking the Enable button.
7. Click the Save link at the top of the Web browser interface to save the changes to the startup-config.
5-31
Web Authentication for Mobile UsersCopying Logo Files to the Module’s Flash
Copying Logo Files to the Module’s Flash
If you want to display your company’s logo on the Web-Auth login, welcome, or failed page, you must copy the logo file to the appropriate directory on the Wireless Edge Services xl Module’s flash.
The module’s flash contains a hotspot directory that, in turn, contains a subdirectory for each WLAN on the module. To display a logo on one of the Web-Auth pages, you must copy the logo file to the hotspot subdirectory for the WLAN that you are configuring. For example, if you are configuring Web-Auth as the authentication method for WLAN 2, you must copy your company’s logo file to the /hotspot/wlan2 directory in the module’s flash. If you are configuring Web-Auth for WLAN 1, you must copy your company’s logo file to the /hotspot/wlan1 directory.
To copy the logo file to the appropriate directory for the WLAN that you are configuring, you can use either an FTP or TFTP server. Copy the logo file to the FTP or TFTP server, and then complete these steps:
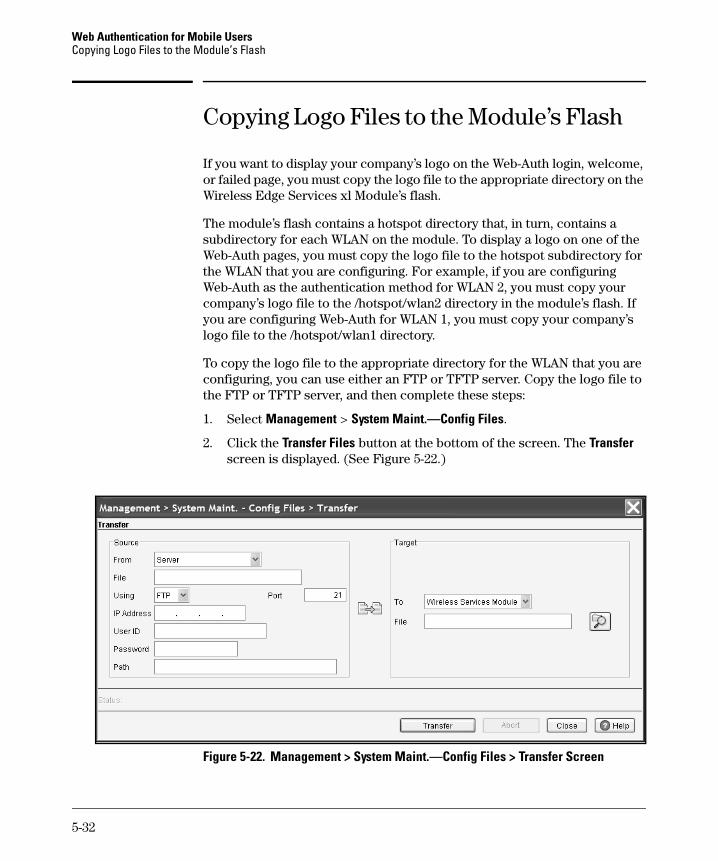
1. Select Management > System Maint.—Config Files.
2. Click the Transfer Files button at the bottom of the screen. The Transfer screen is displayed. (See Figure 5-22.)
Figure 5-22. Management > System Maint.—Config Files > Transfer Screen
5-32
Web Authentication for Mobile UsersCopying Logo Files to the Module’s Flash
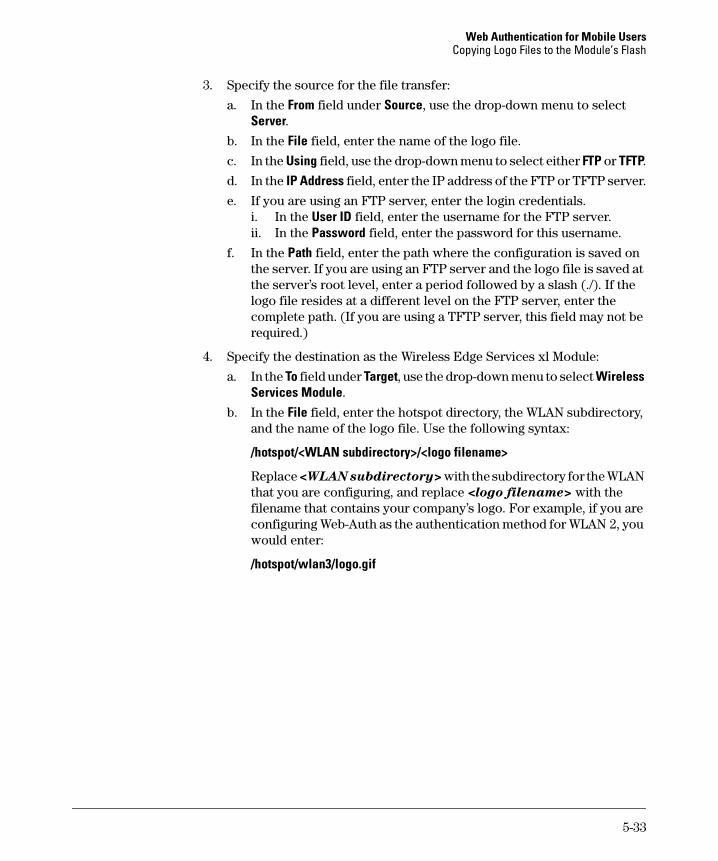
3. Specify the source for the file transfer:
a. In the From field under Source, use the drop-down menu to select Server.
b. In the File field, enter the name of the logo file.
c. In the Using field, use the drop-down menu to select either FTP or TFTP.
d. In the IP Address field, enter the IP address of the FTP or TFTP server.
e. If you are using an FTP server, enter the login credentials.i. In the User ID field, enter the username for the FTP server.ii. In the Password field, enter the password for this username.
f. In the Path field, enter the path where the configuration is saved on the server. If you are using an FTP server and the logo file is saved at the server’s root level, enter a period followed by a slash (./). If the logo file resides at a different level on the FTP server, enter the complete path. (If you are using a TFTP server, this field may not be required.)
4. Specify the destination as the Wireless Edge Services xl Module:
a. In the To field under Target, use the drop-down menu to select Wireless Services Module.
b. In the File field, enter the hotspot directory, the WLAN subdirectory, and the name of the logo file. Use the following syntax:
/hotspot/<WLAN subdirectory>/<logo filename>
Replace <WLAN subdirectory> with the subdirectory for the WLAN that you are configuring, and replace <logo filename> with the filename that contains your company’s logo. For example, if you are configuring Web-Auth as the authentication method for WLAN 2, you would enter:
/hotspot/wlan3/logo.gif
5-33
Web Authentication for Mobile UsersCopying Logo Files to the Module’s Flash
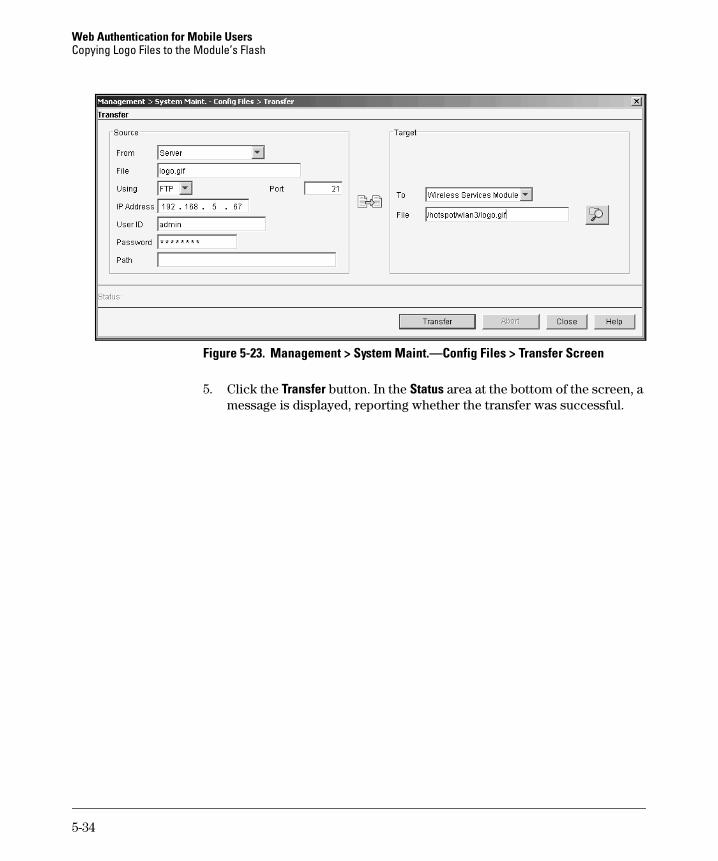
Figure 5-23. Management > System Maint.—Config Files > Transfer Screen
5. Click the Transfer button. In the Status area at the bottom of the screen, a message is displayed, reporting whether the transfer was successful.
5-34
Web Authentication for Mobile UsersConfiguring Custom Web-Auth Pages
Configuring Custom Web-Auth Pages
You can design your own Web-Auth pages and either store them on an external server or upload them to the Wireless Edge Services xl Module’s flash memory (advanced configuration). The custom Web-Auth pages must include a login page, a welcome page, and a failed page. However, in addition to those pages, you can configure links to as many other pages as you desire.
To enable Web-Auth support, you must incorporate specific CGI code on both the login page and the welcome page:
■ Login page—You must include CGI code that allows users to enter their login credentials and then send these credentials to the Wireless Edge Services xl Module. The module, in turn, submits this information to the RADIUS server.
■ Welcome page—You must include CGI code that disconnects the user’s station from your company’s network services and displays the login page again.
You do not need to include any specific CGI commands on the failed page; however, you might want to include a link back to the login page, as the default failed page does.
Configuring the CGI Commands for the Login Page
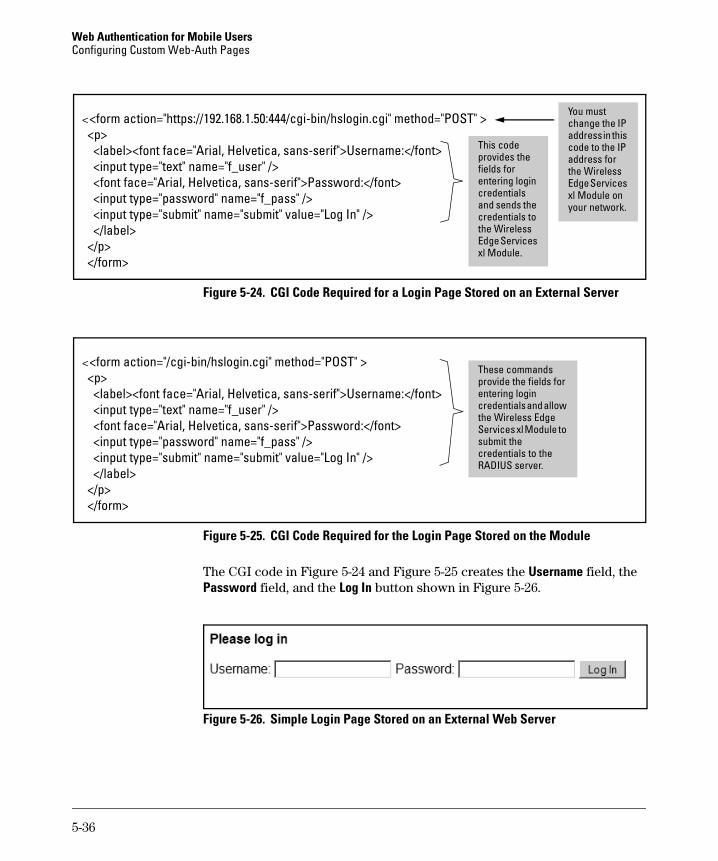
When you create the login page, you can include any text and graphical elements that you want as long as you include the CGI code shown in Figure 5-24 (for an external page) or Figure 5-25 (for a custom page stored on the module). The required code includes the commands that submit the user’s login credentials to the Wireless Edge Services xl Module. When the page is stored on an external server, you must specify the IP address of the module before the reference to the CGI commands. When you are using pages that you have loaded to the module’s flash memory with advanced configuration, the IP address is unnecessary.
In addition, the CGI code shown in Figure 5-24 and Figure 5-25 configures a small form that includes a username field and a password field. You can customize the font and the appearance of the form as needed to fit the other design elements on your company’s login page.
5-35
Web Authentication for Mobile UsersConfiguring Custom Web-Auth Pages
Figure 5-24. CGI Code Required for a Login Page Stored on an External Server
Figure 5-25. CGI Code Required for the Login Page Stored on the Module
The CGI code in Figure 5-24 and Figure 5-25 creates the Username field, the Password field, and the Log In button shown in Figure 5-26.
Figure 5-26. Simple Login Page Stored on an External Web Server
<<form action="https://192.168.1.50:444/cgi-bin/hslogin.cgi" method="POST" > <p> <label><font face="Arial, Helvetica, sans-serif">Username:</font> <input type="text" name="f_user" /> <font face="Arial, Helvetica, sans-serif">Password:</font> <input type="password" name="f_pass" /> <input type="submit" name="submit" value="Log In" /> </label> </p> </form>
You must change the IP address in this code to the IP address for the Wireless Edge Services xl Module on your network.
This code provides the fields for entering login credentials and sends the credentials to the Wireless Edge Services xl Module.
<<form action="/cgi-bin/hslogin.cgi" method="POST" > <p> <label><font face="Arial, Helvetica, sans-serif">Username:</font> <input type="text" name="f_user" /> <font face="Arial, Helvetica, sans-serif">Password:</font> <input type="password" name="f_pass" /> <input type="submit" name="submit" value="Log In" /> </label> </p> </form>
These commands provide the fields for entering login credentials and allow the Wireless Edge Services xl Module to submit the credentials to the RADIUS server.
5-36
Web Authentication for Mobile UsersConfiguring Custom Web-Auth Pages
Configuring the CGI Commands for the Welcome Page
Like the login page, the welcome page can include any text and graphical elements that you want as long as you include the CGI code that the Wireless Edge Services xl Module needs to handle Web-Auth properly. The welcome page requires just one line of CGI code, which provides a Disconnect link:
■ for an external Web page—<a href=”https://192.168.1.50:444/cgi-bin/hslogout.cgi”>Disconnect</a>
■ for a custom page loaded on the module—<a href=”/cgi-bin/hslogout.cgi”>Disconnect</a>
Again, for the external page, you must replace the IP address shown in this CGI code with the IP address of the Wireless Edge Services xl Module on your network.
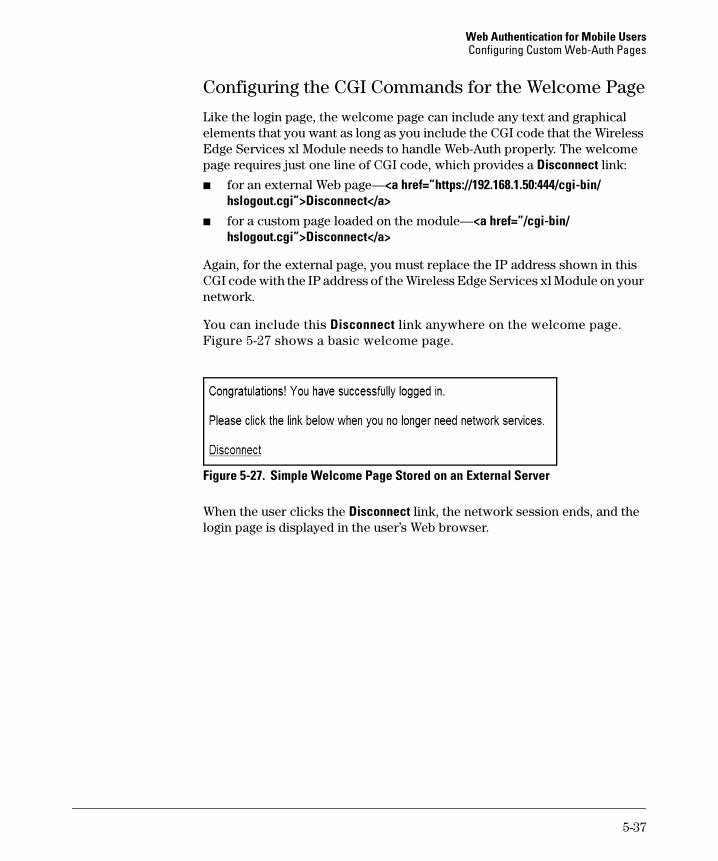
You can include this Disconnect link anywhere on the welcome page. Figure 5-27 shows a basic welcome page.
Figure 5-27. Simple Welcome Page Stored on an External Server
When the user clicks the Disconnect link, the network session ends, and the login page is displayed in the user’s Web browser.
5-37
Web Authentication for Mobile UsersConfiguring Custom Web-Auth Pages
5-38